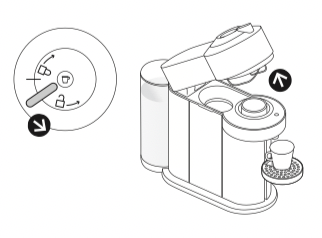
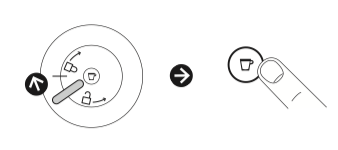
You may use the following procedure to toggle Bluetooth ® / Wi-Fi on / off:
1. Unplug the machine and wait for at least 10 s.
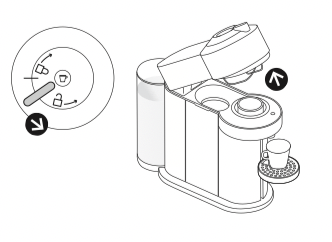
2. Place handle in unlocked position.
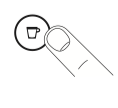
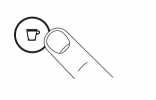
3. Press and hold the button.
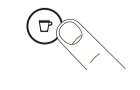
4. Plug-in the machine while keeping the button pressed.
When the Bluetooth ® / Wi-Fi is switched ON, the machine will blink once for 1 s WHITE. When the Bluetooth ® / Wi-Fi is turned OFF the machine will blink in orange in the same way.
By default, the Bluetooth ® / Wi-Fi is switched on. Factory reset will also switch the Bluetooth ® / Wi-Fi on.
How to update your Nespresso machine’s software:
Get the App
1. Download the Nespresso App. If you have it already, we recommend to update the App to the latest version.
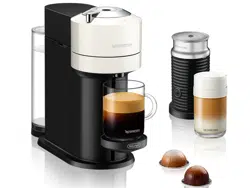
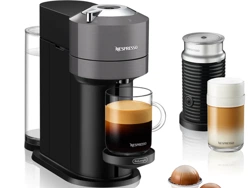
Nespresso Vertuo Next is compatible with: IOS (iPhone + iPad), Android.
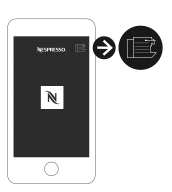
2. Launch the App on your smartphone or tablet.
3. From the Nespresso app homepage, click on the Machine icon.
Pairing
Please remember that the Bluetooth ® mode must be activated beforehand on your smartphone or tablet. To benefit from all features, pair your machine with your smartphone or tablet and connect it to Wi-Fi, following the instructions via the App.
First use or after a long period of non-use
NOTE: for the best experience, please pair your machine and accept automatic software updates.
CAUTION: first read the important safeguards to avoid risks of fatal electrical shock and fire.
CAUTION: please ensure ground continuity when plugging the machine in the power outlet.
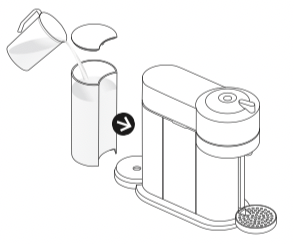
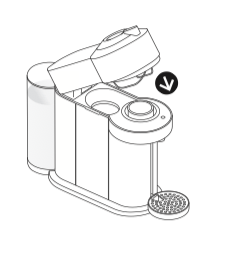
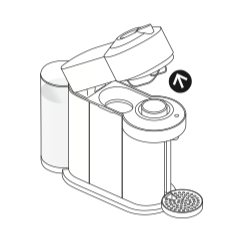
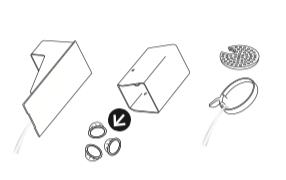
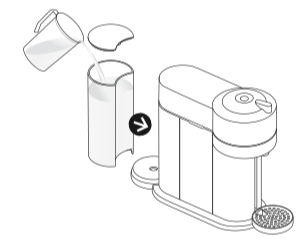
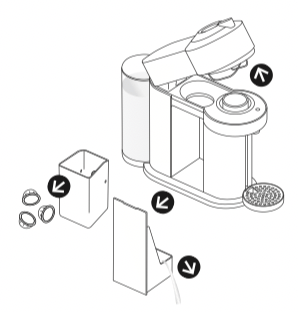
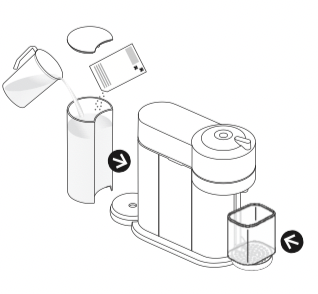
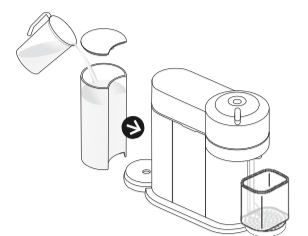
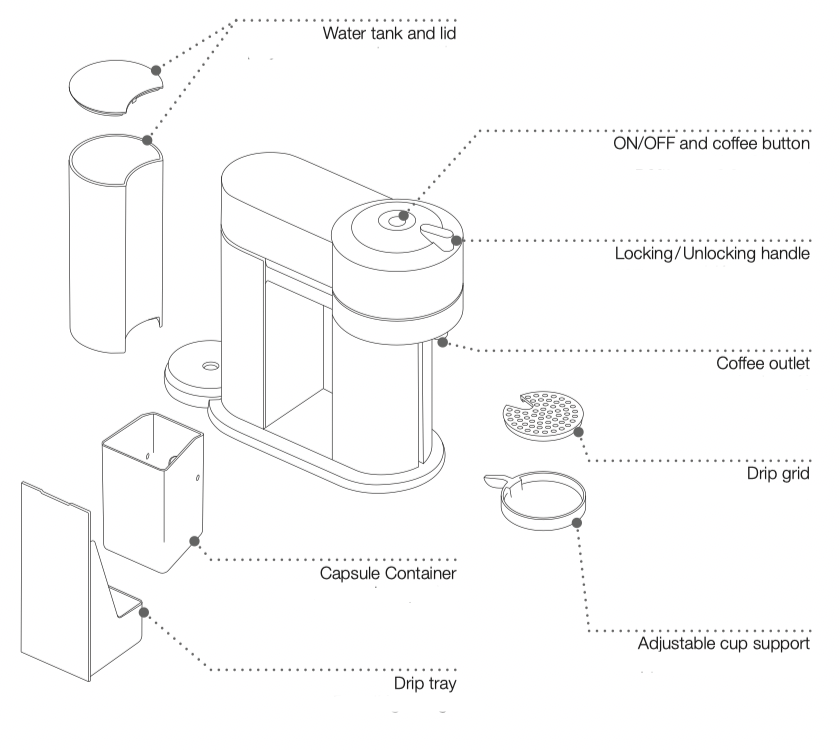
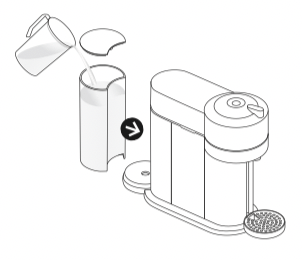
1. Rinse and clean the water tank and the lid before filling it only with fresh drinking water. Put the water tank in place and make sure it’s properly attached.
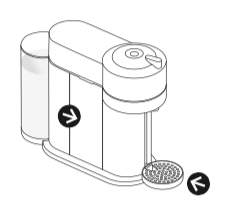
2. Ensure the capsule container and the cup support (if necessary for the selected cup size) are in place. For your safety, operate the machine only with cup and capsule container in position.
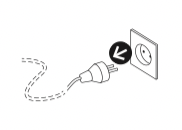
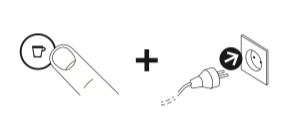
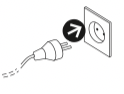
3. Plug in the power cord.
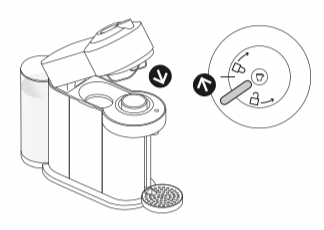
4. - For an optimized heating time, close and lock the machine to turn the machine ON.
- If the machine is already closed and locked, turn the machine ON by pressing the button.
NOTE: to close the machine, push down the machine's head and turn the handle left to the lock symbol while maintaining pressure.
5. Light will blink while the machine is heating up. Steady light indicates the machine is ready.
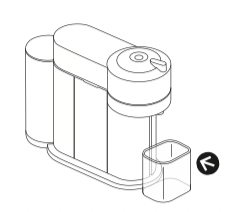
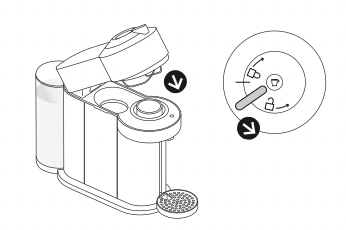
6. Place a container of at least 34 fl oz. / 1 L under the coffee outlet.
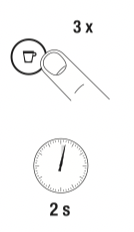
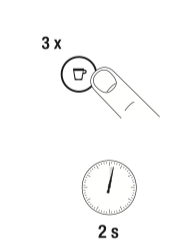
Make sure no capsule is inserted during the cleaning process.
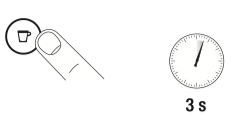
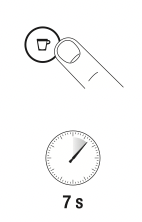
7. Make sure that the machine is still locked. Press the button 3 times within 2 seconds to start cleaning and let the cleaning procedure complete automatically. It will take less than 2 minutes before start of the flow.
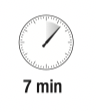
8. This operation may take up to 7 minutes. The procedure can be stopped at any time by pushing the button. Once the cleaning is finished, a steady light will appear on the machine. In case you want to resume the cleaning process, push the button again.
When interrupting the cleaning procedure, the machine may not stop immediately. Never open the machine during the cleaning procedure.
Coffee preparation
1. Fill the water tank with fresh drinking water and place it into its position.
2 .- For an optimized heating time, close and lock the machine to turn the machine ON.
- If the machine is already closed and locked, turn the machine ON by pressing the button.
3. Light will blink while the machine is heating up. Steady light indicates the machine is ready.
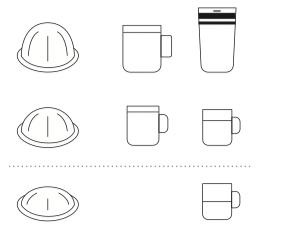
4. The factory settings for the coffee sizes are the following. Please make sure your recipient is big enough to prevent overflow.
Alto: 14 fl oz. / 414 ml
Mug: 7.77 fl oz. / 230 ml
Gran Lungo: 5.07 fl oz. / 150 ml
Double Espresso: 2.7 fl oz. / 80 ml
Espresso: 1.35 fl oz. / 40 ml
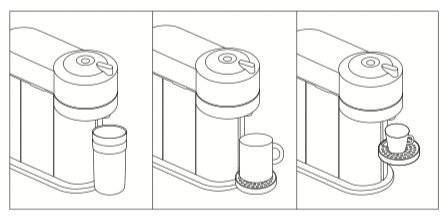
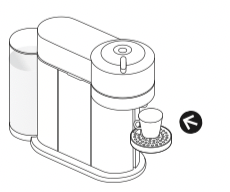
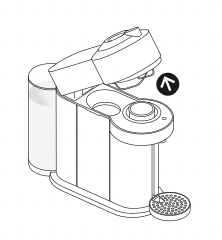
5. Adjust position in height of the cup support. The cup support has 3 positions and can be temporarily removed to accommodate various cup sizes. Make sure the cup support is properly secured.
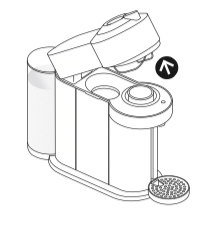
6. Unlock and open the machine head completely.
7. This machine operates with Nespresso Vertuo capsules. Nespresso classic capsules cannot be used in this machine.
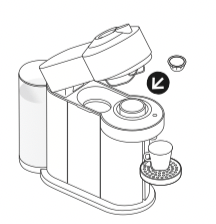
8. Insert a capsule with the dome shape at the bottom. Be careful not to injure yourself on sharp points or trap your fingers when reaching inside the machine.
NOTE: to avoid damaging the machine, use only fresh, unused capsules. Ensure previous capsule has been ejected before inserting a fresh one.
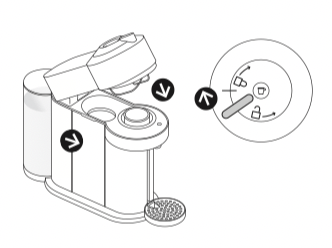
9. Close the head and lock the machine by turning the handle left to the lock symbol on the machine head.
NOTE: ensure that no capsules are lying on the machine top before closing the head. If capsules are lying they should be removed and the capsule container should be emptied.
10. Place a cup of sufficient capacity under the coffee outlet. Risk of scalding may occur due to overflowing.
11. Push the button to start the coffee preparation. It will take some time before the coffee flow comes out (due to barcode reading, coffee pre-wetting and infusion time).
NOTE: the machine will automatically recognize the inserted capsule and select the coffee preparation parameters and cup length defined by Nespresso coffee experts to extract the coffee blend at its best.
NOTE: you can do this even when the machine is still heating up. The coffee will then flow automatically when the machine is ready.
12. To stop the coffee flow early, push the button.
NOTE: when interrupting the coffee flow, the machine will not stop immediately.
13. To manually top up your coffee, push the button and push again to stop when desired volume is reached.
NOTE: top up can be activated only during 45 seconds after the end of the extraction.
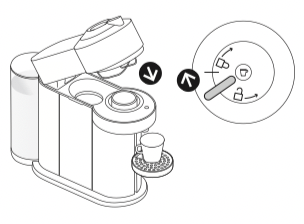
14. Please wait until coffee preparation is done to unlock the handle and / or switch off the machine. Turn the handle to the right and open the head to automatically eject the capsule.
A steady light will appear once the brewing is finished.
For hygienic matters, do not let the machine open when not in use.
NOTE: handle can warm up after several brewings in a row.
Energy saving concept
The machine can be turned “OFF” at any time (when not operating) by holding the button for 3 seconds. Automatic “OFF” Mode: the machine will turn off automatically after 2 minutes of non-use.
NOTE: in special cases, the machine can take up to 5 minutes to automatically turn off.
Programming the water volume
1. The programming is specific to each capsule type, Alto, Mug, Gran Lungo, Double Espresso or Espresso. Cup sizes may be programmed from 0.7 fl oz. / 20 ml to 17 fl oz. / 500 ml.
2. Open the machine head; insert the capsule you want to program; close the head; lock the machine.
3. Light will blink while the machine is heating up. Steady light indicates the machine is ready.
4. Push and hold the button until desired volume is reached.
5. Water volume level is now stored for the capsule type used for the programming.
NOTE: once a customer-specific volume is programmed by the user, every time that capsule type is inserted in the machine, the preparation will stop at the user-programmed cup size.
Reset to factory settings
Resetting to factory settings will reset all reprogrammed volumes.
1. Open the machine head and let the used capsule be ejected.
2. Close the head. Leave the handle in “UNLOCKED” position.
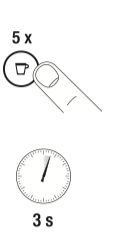
3. Push the button 5 times within 3 seconds. The button blinks 5 x orange and changes than to steady white.
Emptying the system
before a period of non-use, for frost protection or before a repair
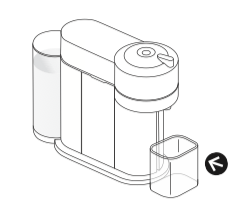
1. Empty the water tank and put it in place.
2. Place a container under the coffee outlet.
3. Unplug the power cord.
4. Open the machine head and let the used capsule be ejected.
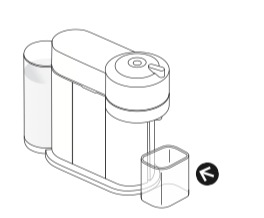
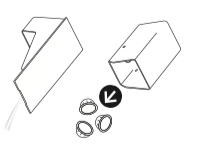
5. Empty capsule container, the drip tray and the cup support.
6. Close the head and turn handle left until “LOCKED” position.
7. Push and hold the button while plugging the power cord. Release the button when the machine starts the emptying procedure.
8. It will take approximately 30 seconds for the machine to complete the emptying. Machine turns “OFF” automatically when machine is empty.
CAUTION: caution should be exercised when plugging in the coffee machine with the button pressed. Small quantities of steam may emit from the machine as it evacuates the remaining liquids.
Cleaning
The machine has a predefined cleaning procedure that can be launched at user discretion. Office use: Daily cleaning.
1. Rinse and clean the water tank and the lid before filling it with fresh drinking water. Put the water tank in place.
2. Rinse the cup support. Place a container of at least 34 fl oz. / 1 L under coffee outlet.
3. Open the machine head and let the used capsule be ejected. Empty and rinse the capsule container and the drip tray.
4. Close the head and turn handle left until “LOCKED” position.
Please make sure no capsule is present in the machine before doing the cleaning.
5. Light will blink while the machine is heating up. Steady light indicates the machine is ready.
6. Wait for the machine to complete heating up. The light will be steady white. Push the button 3 times within 2 seconds. The button will blink quickly during the procedure. It will take less than 2 minutes before a flow comes out. The cleaning procedure will run automatically for 7 minutes.
7. The procedure can be stopped at any time by pushing the button. The button will go to a steady light. In case you want to resume the cleaning process, push the button again. To brew a coffee, open the head and insert a capsule, then close, lock the machine by turning the handle left and push the button.
CAUTION: do not use any strong or abrasive cleaning agent or solvent cleaner. Do not put in a dishwasher. Never immerse the appliance or part of it in water. Clean the coffee outlet regularly with a clean damp cloth. Please use only clean cloths for cleaning the machine.
NOTE: water may accumulate inside the machine's head during cleaning. If this happens please dry visible parts with a clean dry cloth.
Descaling
NOTE: duration: approximately 20 minutes.
NOTE: descale mode cannot be interrupted or exited. If the machine is unplugged during the descale procedure the machine will enter the Descale Mode upon start. Both cycles, descaling and rinsing, must be repeated after this.
CAUTION: read the Safety Precautions on the descaling package. The descaling solution can be harmful. Avoid contact with eyes, skin and surfaces. Never use any product other than the Nespresso descaling kit available through Nespresso to avoid damage to your machine. For any additional questions you may have regarding descaling, please contact Nespresso.
1. Empty the drip tray and the capsule container.
2. Fill the water tank with 1 unit of Nespresso descaling liquid and add 17 fl oz. / 0.5 L of water.
3. - For an optimized heating time, close and lock the machine to turn the machine ON.
- If the machine is already closed and locked, turn the machine ON by pressing the button.
4. Blinking light indicates the machine is heating up. When the light is steady, the machine is ready.
5. Open the machine head and let the capsule be ejected.
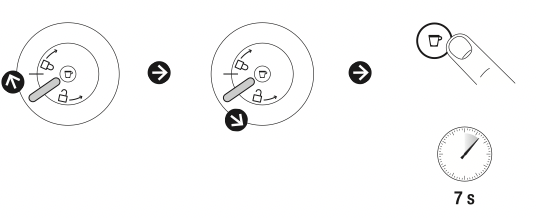
6. Reclose the machine and leave the lever in "UNLOCKED" position, towards the front of the machine.
7. To enter the descaling mode, hold the button for at least 7 seconds.
8. The button will start blinking rapidly. You now have 45 seconds to enter descaling mode by following the next steps, otherwise the machine will return to the ready for brewing coffee mode.
9. Lock the machine by turning the lever left to the lock symbol and unlock by turning right. Hold the button for at least 7 seconds in "UNLOCKED" position.
10. Place a container (minimum 34 fl oz. / 1 L) under the coffee outlet.
11. To start descaling, lock the machine by turning the lever left to locked symbol and push on the button. The machine will stop automatically when the first phase of descaling is completed.
12. Empty and rinse water tank, drip tray and cup support thoroughly.
13. Fill the water tank with fresh drinking water.
14. When ready, push the button to rinse the machine. Machine will stop automatically when complete.
15. The button will stop blinking rapidly and become steady. Descaling is completed. Allow the machine to dry for 10 minutes before using it.
NOTE: water may accumulate inside the machine's head during rinsing. If this happens please dry visible parts with a clean dry cloth.
16. The machine is now ready for use.
Blinking summary
Description
Indication ➔ troubleshooting
0 1". 2"
No light on the button
Machine OFF ➔ see points 1 & 10*
Steady white illuminated button
Ready mode
White regular blinking: once/second
Coffee preparation ➔ see point 6
Orange light blinking quickly: twice/second
Cleaning mode ➔ see point 6*
Orange light blinking rapidly: three times/second
Descaling/Emptying ➔ see point 6*
White light pulsing up: lighting up to steady ON, then OFF…
Heating up ➔ see point 7*
Orange light pulsing down: fading to OFF, then ON…
Cooling down after overheating ➔ see point 7*
Orange light blinking rapidly twice, then long OFF…
Error ➔ see points 7 & 8*
Orange button ON for 1.5 second, then OFF for 0.5 second…
Water tank is empty ➔ see point 5*
Orange light blinking 5 times in 10 seconds
Reset to factory settings
Orange and white light alternately blinking 3 times and then steady on
Descaling alert ➔ see point 11*
White light blinking twice/second
Software update
Troubleshooting
1. No light on the button.
- The machine has turned “OFF” automatically; push the button or “UNLOCK” the machine.
- Check the mains, plug, voltage, and fuse.
2. No coffee, no water.
- Check that the water tank is filled.
- Check that a fresh capsule is inserted in correct position, that the handle is properly locked and push the button to start.
- Descale if necessary.
- Open the machine head and let the capsule be ejected. Then perform a cleaning as per cleaning section.
3. Coffee is not hot enough.
- Preheat cup with hot drinking water from the tap.
- Descale if necessary.
4. The machine doesn’t start and has light steady on. If blinking, see next points.
- Check that handle is properly locked.
- If you want to brew a Coffee or Espresso, check that a fresh capsule is inserted in correct position, that the handle is properly locked and push the button to start.
- If you are cleaning, descaling or emptying the system, check that no capsule is inserted then close, lock the machine and push the button to start one of these operations.
5. The machine doesn’t start and light blinks alternately; 1 blink and 1 pause.
- Fill the water tank and push button to start.
- Check that handle is properly locked.
6. Light blinks while machine is running.
- If coffee is flowing normally, this indicates the machine is working properly.
- If only water is flowing, the machine is executing a user request for either cleaning, descaling or emptying the system. Refer to the corresponding paragraph in this user manual.
- If there is no intention to clean, descale, or empty the system, then push the button to stop the machine. If the machine is still blinking, exit descaling mode by holding the button for at least 7 seconds or refer to next section. If problem persists, call Nespresso.
7. Light blinks and machine is not running.
- It will take some time before the coffee flow comes out (due to barcode reading and prewetting the coffee).
- Check that a fresh capsule is inserted in correct position, that the handle is properly locked and push the button to start.
- Fill the water tank and push button to start.
- Turn the machine to “OFF mode” by pushing the button for 3 seconds and then push it again to turn the machine “ON”. Now wait approximately 20 minutes to allow the machine to cool down after extensive use.
- If the machine doesn’t turn “OFF” then exit descaling mode by pushing the button for at least 7 seconds.
8. Light blinks alternately 2 blinks and 1 pause continuously. Machine is not running.
- During regular Coffee/Espresso preparation: 1) Unlock the handle and open the machine head to check that a fresh undamaged capsule is inserted in the correct position. 2) Check that the handle is in “LOCKED” position. 3) Check that the water tank is filled.
- During Descaling, Emptying and Cleaning: 1) Check that capsule is ejected. 2) Check that the handle is in “LOCKED” position.
- During Programming Volume: 1) Check if a capsule has been well inserted. 2) Please refer to the corresponding chapter.
- If problem persists:
1. Unlock the handle and open machine head.
2. Replace capsule (if needed).
3. Disconnect powercord from the outlet and plug the machine back into outlet after 10 seconds.
4. Close the head and press the button to turn “ON” and press again to start brewing. If problem persists, call Nespresso.
9. Leakage or unusual coffee flow.
- Check that the water tank is well positioned.
10. Machine turns to “OFF” mode.
- To save energy the machine will turn off after 2 minutes of non-use.
- See paragraph on “Energy Saving Concept”.
11. Light alternately blinking 3 times and then steady on.
- Descaling needed: machine can be operated when alert appears only a few times after this alert before descaling becomes necessary.

 Please remember that the Bluetooth ® mode must be activated beforehand on your smartphone or tablet. To benefit from all features, pair your machine with your smartphone or tablet and connect it to Wi-Fi, following the instructions via the App.
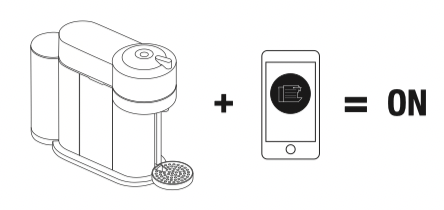

 Make sure no capsule is inserted during the cleaning process.