Documents: Go to download!
User Manual
- User Manual - (English)
- Quick Start Guide - (English)
- Quick Start Guide - (French)
- Installation Instructions - (English)
- Product spec sheet - (English)
User manual Gas Range
SETTING SURFACE CONTROLS
Setting surface controls
The ability to heat food quickly and in large volumes increases as the burner size increases. Your gas appliance may be equipped with many different sized surface burners.
It is important to select cookware that is suitable for the amount and type of food being prepared. Select a burner and flame size appropriate for the cookware size.
- The standard size burner or burners may be used for most surface cooking needs.
- Small burners are best used for low-flame heating of small amounts of food.
- Large burners are best for bringing large quantities of liquid to temperature or heating larger quantities of food.
Setting a surface burner:
- Place cooking utensil on center of surface burner grate. Be sure the cooking utensil rests stable on the burner grate.
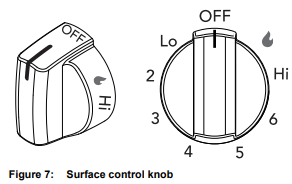
- Push the burner’s surface control knob in and turn counterclockwise out of the OFF position (Figure 7).
- Release the surface control knob and rotate to the LITE position (
 ). Visually check that the burner has a steady gas flame.
 - Once the surface burner has a flame, push the surface control knob in and turn counterclockwise to the desired flame size setting. Adjust the flame as needed using the knob markings.
Set proper burner flame size
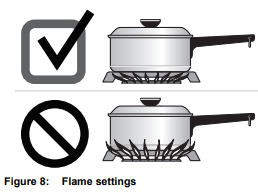
The color of the flame is the key to proper burner adjustment. A good flame is clear, blue and hardly visible in a well-lighted room. Each cone of flame should be steady and sharp. Adjust or clean the burner if flame is yellow-orange.
For most cooking: start on the highest setting and then turn to a lower setting to complete the process. Use the recommendations below as a guide for determining proper flame size for various types of cooking (Figure 9).
For deep fat frying: use a thermometer and adjust the surface knob accordingly. If the fat is too cool, the food will absorb the fat and be greasy. If the fat is too hot, the food will brown so quickly that the center will be under-cooked. Do not attempt to deep fat fry too much food at once as the food will neither brown nor cook properly
Flame size: High flame
Type of cooking: Start most foods; bring water to a boil; pan broiling
Flame size: Medium flame
Type of cooking: Maintain a slow boil; thicken sauces, gravies; steaming
Flame size: Low flame
Type of cooking: Keep foods cooking; poaching; stewing
These settings are based on medium-weight metal or aluminum pans with lids. Settings may vary when using other types of pans.
Cooking with a griddle (some models)
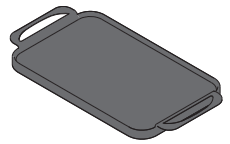
Figure 10: Griddle
The griddle is a versatile accessory that is perfect for cooking foods that require large flat surfaces such as pancakes, French toast, grilled sandwiches, bacon, and also for cooking different foods at the same time.
After use, let the griddle cool before washing. Hand wash with hot soapy water. Do not soak. Dry thoroughly. Do not put a griddle in a dishwasher.
If you would like to purchase a griddle, you can order one from Frigidaire.com.
Using the griddle:
Place the griddle securely on top of the burner grates. Preheat the griddle for 5 minutes on medium to medium low setting. Slow preheat ensures even heat distribution during the cooking process. DO NOT preheat the griddle on HI setting. Preheating on HI may warp the griddle and prevent even heat distribution.
Home Canning
Be sure to read and observe all the following points when home canning with your appliance. Check with the USDA (United States Department of Agriculture) Web site and be sure to read all the information they have available as well as follow their recommendations for home canning procedures.
- Use only a completely flat bottom canner with no ridges that radiate from the bottom center when home canning. Heat is spread more evenly when the bottom surface is flat. Use a straight-edge to check canner bottom.
- Make sure the diameter of the canner does not exceed 1 inch beyond the surface element markings or burner.
- It is recommended to use smaller diameter canners on electric coil and ceramic glass cooktops and to center canners on the burner grates.
- Start with hot tap water to bring water to boil more quickly.
- Use the highest heat seating when first bringing the water to a boil. Once boiling is achieved, reduce heat to lowest possible setting to maintain that boil.
- Use tested recipes and follow instructions carefully. Check with your local Cooperative Agricultural Extension Service or a manufacturer of glass jars for the latest canning information.
- It is best to can small amounts and light loads.
- Do not leave water bath or pressure canners on high heat for an extended amount of time.
SETTING OVEN CONTROLS
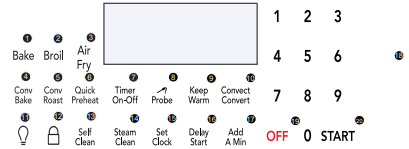
Oven Control Features
1. Bake - Use to select Bake feature.
2. Broil - Use to set Broil feature.
3. Air Fry - Uses super hot air circulating around food to produce crispy golden results.
4. Conv Bake - Circulates the oven heat evenly and continuously for faster cooking of some foods.
5. Conv Roast - Uses a convection fan to gently brown meats and poultry and seal in the juices.
6. Quick Preheat - Best used for single rack baking with packaged and convenience foods.
See other models: FFHT1713LZ GHSC239DW FFET2725PW LFHT2131QP FFRE103WAE
7. Timer Off-On - Use to set or cancel the minute timer. The minute timer does not start or stop any cooking function.
8. Probe - Use to set and adjust temperatures when using probe.
9. Keep Warm - Use to keep cooked foods at serving temperature.
10. Convect Convert - Use to change standard bake recipe to a convection bake recipe.
11. Oven Light - Use to turn on internal light when checking on food. Also will turn on when the oven door is open.
12. Oven Lock - Use to lock out oven controls.
13. Self Clean - Use with number keys to set a self clean cycle between 2 and 4hrs.
14. Steam Clean - Use for cleaning light soils.
15. Set Clock - Use set the time of day
16. Delay Start - Add to any cooking feature or Self Clean to program a delay start time.
17. Add A Min -Use to add additional minutes to the timer.
18. 0 through 9 keys - Use to set temperature and time.
19. OFF - Use to clear any feature except the time of day and minute timer.
20. START - Use to start most oven features.
Table 1: Minimum/Maximum time and temperatures
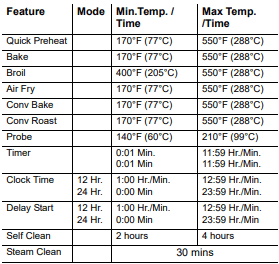
Note: An entry acceptance tone (1beep) will sound each time a key is touched (the oven lock key is delayed 3 seconds). An entry error tone (3 short beeps) will sound if the entry of the temperature or time is below the minimum or above the maximum settings for the feature.
Setting the Clock
When the appliance is first powered up, 12:00 will flash in the display (Figure 13). The time of day must first be set before operating the oven.

Figure 13: 12:00 in display before setting the clock.
To set clock to 1:30:
1. Press Set Clock.
2. Enter 1 3 0 using numeric keys.
3. Press START.
Important note:
The clock cannot be changed when a Self Clean, Delay Start, or cooking feature is active.
Setting 12 Hour or 24 Hour display mode
The clock display mode allows you to select 12 hr or 24 hr modes. The factory pre-set clock display mode is 12 hours.
To set 12 hr or 24 hr display mode:
1. Press and hold Set Clock for 3 seconds.
2. Press self clean to toggle between 12 Hr day or 24 Hr day display modes (Figure 14).
3. Press START to accept the choice.

Figure 14: 12 Hr dAy and 24 Hr dAy settings
Setting Timer
The minute timer allows you to track your cooking times without interfering with the cooking process. The timer may be set from a minimum time of 1 minute to a maximum of 11 hours and 59 minutes.
To set timer for 5 minutes:
1. Press Timer Off-On.
2. Enter 5 using numeric keypad.
3. Press Timer Off-On to start the timer. When set time ends, END will show in the display and the control will sound a beep three times every 30 seconds until Timer Off-On key is pressed.
To cancel the timer when active, press Timer Off-On again.
Important note:
- The timer does not start or stop the cooking process. It serves as an extra minute timer that will beep when the set time has run out. The timer may be used alone or while using any of the other oven functions.
- When timer is set for more than 1 hour it will display hours and minutes until 1 hour remains. When less than 1 hour remains, the display counts down in minutes and seconds. With less than 1 minute remaining, only seconds will display.
- If the timer is active during a cooking process, the timer will show in the display. To view the status of any other active oven function, press the key of the cooking function once and it will appear in the display for a few seconds.
Add a Min
Use the add a min feature to set additional minutes to the timer. Each press of the key will add 1 additional minute. If add a min is pressed when the timer is not active, the timer will activate and begin counting down from 1 minute.
To add 2 minutes to the timer:
Press add a min twice
Changing between continuous bake setting or 12 hour energy saving
The oven control has a factory preset built-in 12 hour Energy Saving feature that will turn off the oven if the oven is left on for more than 12 hours. The control may be programmed to override this feature to bake continuously.
To change between continuous bake or 12 hour energy saving feature:
1. Press and hold Timer Off-On for 3 seconds.
2. Press self clean to toggle between 12 hour OFF or Stay On feature (Figure 15).
3. Press START to accept choice.

Figure 15: 12Hr energy saving (L) and continuous setting (R)
The electronic oven control is set to display °F when shipped from the factory. The display may be changed to show either °F or ºC oven temperatures.
To change temperature display mode from °F to °C or from °C to °F:
1. Press and hold broil for 3 seconds.
2. Once F (or C) appears in the display, press self clean to toggle between Fahrenheit and Celsius temperature display modes (Figure 16).
3. Press START to accept the choice.
Important note: The oven temperature display cannot be changed during the cooking process or if a delay start has been set or self clean is active.


Figure 16: Display showing Fahrenheit and Celsius
Setting Silent or Audible Control mode
Silent mode allows the oven control to operate without audible tones. The control may be programmed for silent operation and later reset to operate with all the normal audible tones.
To set for silent or audible mode:
1. Press and hold Delay Start for 3 seconds.
2. Press the self clean key to toggle between bEEP On or bEEP OFF (Figure 17).
3. Press START to accept the choice.

Figure 17: Display showing audible and silent operation
Setting Oven Lockout
The oven lockout feature is used to lock the controls and the oven door.
To activate the oven lockout features:
1. Be sure oven door is completely closed.
2. Press and hold the lock key for 3 seconds. The motor driven door latch mechanism will begin locking the oven door automatically. Do not open the oven door. Allow about 15 seconds for the oven door to completely lock. Once door is locked, the word DOOR with a lock icon will appear in the display.
To cancel the oven lockout feature:
1. Press and hold the lock key for 3 seconds. The motor door latch will begin unlocking the oven door automatically. Do not open the oven door. Allow about 15 seconds for the oven door to completely unlock.
2. When the word DOOR with a lock icon no longer displays, the oven door may be opened, and the oven control keypad will be available for use.
Important note: If a control key is pressed when oven lockout is active, the control will triple beep indicating the key action is not available when the oven lockout feature is active.
Operating Oven Lights
The interior oven lights will automatically turn on when the oven door is opened. Oven lights will not operate during a self clean cycle. For best baking results, do not leave oven light on while cooking.
Press  to turn the interior oven lights on and off whenever the oven door is closed.
The interior oven lights are located on the side wall of the oven interior and are covered with a glass shield. The glass shield protects the bulb from high temperatures and should always be in place whenever the oven is in use.
To replace the interior oven light, see “Replacing the Oven Light” on page 44.
Quick Preheat
Quick Preheat is available for single rack baking with packaged and convenience foods and can be programmed for temperatures between 170°F and 550°F. Follow the recipe or package directions for food preparation time and temperature.
When Quick Preheat is complete, a reminder tone will sound and food should be placed in the oven.
During the Quick Preheat function, the bake burner will cycle on and off. The convection fan will turn on after 6 minutes and stay on until baking is canceled. Depending on your preference for doneness cooking times may vary. Watch food closely.
Important:
- Always place food in center of the oven on rack position 4 (Figure 19). Place the food as shown in Figure 18.
- For best results when baking batter and dough-based items such as cookies and pastries, use convection bake function and place food in oven when the reminder tone sounds signaling the oven is fully preheated.
To set the preheat temperature for 350°F:
1. Arrange the interior oven racks.
2. Press Quick Preheat. 350 will appear in the display.
3. Press START.
4. 350 and PREHEAT will be displayed while the oven is preheating.
5. Press OFF when baking is complete or to cancel the preheat feature.
To change preheat temperature while oven is preheating (ex: changing from 350°F to 425°F):
1. Press Quick Preheat. 350 will appear in the display.
2. Enter the new preheat temperature. Press 4 2 5.
3. Press START. 425 will show in the display.
4. When baking is complete, press OFF.
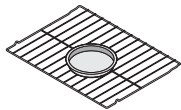
Figure 18: Single rack baking for convenience foods
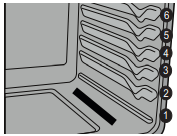
Figure 19: Oven rack position (4) best for cooking convenience foods
Setting Bake
Bake cooks with heat that rises from the oven bottom. The heat and air circulate naturally in the oven. A reminder tone will sound indicating when the set bake temperature is reached and to place the food in the oven. The convection fans will turn on in preheat and then cycle on and off as needed during baking. Bake may be set for any oven temperature between 170°F (77°C) to 550°F (288°C).
Baking tips
- Fully preheat the oven before baking items like cookies, cakes, biscuits and breads. Cookies and biscuits should be baked on pans with no sides or very low sides.
- Use the convection bake function for best results when baking cookies on multiple racks.
- Bake is the best function to use for baking cakes.
- For best results when baking layer cakes using two oven racks, place racks in positions 3 and 6 and place pans as shown in Figure 20.
- When using any single rack for baking cookies, cakes, biscuits, or muffins use rack position 3.
- Allow at least 2 inches (5 cm) of space between bakeware for proper air circulation.
- Dark or dull bakeware absorbs more heat than shiny bakeware, resulting in dark or overbrowned foods. It may be necessary to reduce oven temperature or cook time to prevent overbrowning of some foods.
- Dark pans are recommended for pies; shiny pans are recommended for cakes, cookies, and muffins.
- Do not open oven door often. Opening the door will reduce the temperature in the oven and may increase cook time.
- For best results leave oven light off while baking.
To set Bake for (default) oven temperature of 350°F:
1. Press Bake.
2. 350° will appear in the display.
3. Press START.
To cancel Bake at any time, press OFF.
To change the oven temperature to 425°F when the oven is baking:
1. Press Bake.
2. Enter 4 2 5 using numeric keys.
3. Press START.
4. To cancel Bake at any time, press OFF.
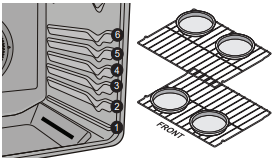
Figure 20: Rack positions and pan placement
Important: The oven will bake no longer than 12 hours. If you wish to bake for a longer period, see “Changing between continuous bake setting or 12 hour energy saving” on page 22 for detailed information.
Convection Bake
Convection Bake uses a fan to circulate the oven's heat uniformly around the oven. This improved heat distribution allows for even cooking and browning results. Heated air flows around the food from all sides.
Convection bake may be set for any oven temperature between 170°F (77°C) and 550°F (288°C).
Benefits of convection cooking include:
- Multiple rack baking.
- Foods may cook faster, saving time and energy.
Baking tips
- Fully preheat the oven before baking items like cookies, cakes, biscuits and breads. Cookies and biscuits should be baked on pans with no sides or very low sides to allow heated air to circulate around the food.
- When baking cakes using two oven racks place bakeware in positions 3 and 6 and place bakeware as shown in Figure 21.
- When using any single rack for baking cookies, cakes, biscuits or muffins, use rack position 3.
- Allow at least 2 inches (5 cm) of space between bakeware for proper air circulation.
- Unless the recipe is written for convection cooking, use Conv Convert to reduce oven temperature from the recipe’s recommended oven temperature.
- Dark or dull bakeware absorbs more heat than shiny bakeware, resulting in dark or overbrowned foods. It may be necessary to reduce oven temperature or cook time to prevent overbrowning of some foods.
- Dark pans are recommended for pies; shiny pans are recommended for cakes, cookies, and muffins.
- Do not open oven door often. Opening the door will reduce the temperature in the oven and may increase cook time.
- For best results leave oven light off while baking.
To set convection bake with a default oven set temperature of 350°F:
1. Press Conv Bake.
2. Conv Bake and 350° will appear in the display.
3. Press START.
Important: The convection fan will turn on after a few minutes and stay on during the cooking process.
4. To cancel convection bake at any time, press OFF.
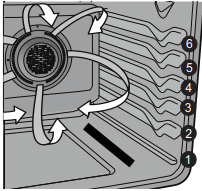
Figure 21: Rack positions
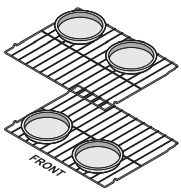
Figure 22: Pan positions
Setting Convection Convert
Pressing the Convect Convert key automatically converts the cooking temperature entered for any standard baking recipe to the lower temperature required for convection baking.
To set the oven for convection bake with a standard baking recipe temperature of 400°F:
1. Arrange interior oven racks.
2. Press Conv Bake.
3. Press 4 0 0.
4. Press Conv Convert.
5. Press START.
6. Place food in the oven.
Important note:
- Convection convert may only be used with Convection Bake.
- When using convection convert, bake time reductions may vary depending on the oven set temperature.
- If the oven door is opened when any convection function is active, the convection fan will stop rotating until the oven door is closed.
- Do not open the oven door often. Opening the door will reduce the temperature in the oven and may increase the cooking time necessary for best results.
Setting Delay Start
Delay Start sets a delayed starting time to oven cooking or cleaning functions. Prior to setting a delay start, be sure the time of day is set correctly. Delay Start must be set before starting the cooking function. If the oven door is opened after Delay Start is set the program will be canceled and must be reset.
To program oven for a delay start beginning at 5:30, and for baking at 375°F:
1. Press Bake. Enter 3 7 5 using numeric keypad.
2. Press Delay Start.
3. Enter 5 3 0 using numeric keypad.
4. Press START to accept.
5. The oven will turn on when the delay start time (5:30) is reached.
Important note: Delay Start may be set using a 24 hr clock. To set clock for 24 Hr operation, See “Setting 12 Hour or 24 Hour display mode” on page 21 for more information. The Delay Start feature may be used with Convection Bake, Convection Roast, Convection Convert, Bake, Broil and Self Clean functions.
Convection Roast
Convection roast combines a cook cycle with the convection fan and element to rapidly roast meats and poultry. Heated air circulates around the meat from all sides, sealing in juices and flavors. Meats cooked with this feature are crispy and brown on the outside while staying moist inside.
Benefits of Convection Roasting:
- Some foods cook up 25 to 30% faster, saving time and energy.
- No special pans or bakeware required.
- Preheating is not necessary for most meats and poultry.
- Be sure to carefully follow your recipe’s temperature and time recommendations or refer to the convection roast chart for additional information.
To set Convection Roast:
1. Place the insert on broiler pan. Place meat (fat side up) on insert.
2. Make sure the insert is securely seated on top of the broiler pan. Do not use the broiler pan without the insert.
3. Place prepared food on oven rack and slide into oven.
4. Close the oven door.
5. Press Conv Roast.
6. Enter desired temperature using numeric keys.
7. Press START.
8. When cooking is completed or to cancel convection roast press OFF.
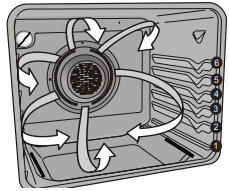
Figure 24: Convection roasting on lower oven racks
Air Fry
The Air Fry feature works best for single rack baking with packaged and convenience foods and can be programmed for temperatures between 170°F and 550°F.
Follow the recipe or package directions for food preparation quantity, time, and temperature.
Important:
- Air Fry is designed for baking on a single oven rack. Food should be arranged in single layers on a pan.
- When using Air Fry, use dark bakeware with low or no sides and place food on rack position 3 for best results.
- Leave oven light off when baking.
- Food may need to be removed early and should be checked at minimum recommended bake time. However, frozen dense foods and items with cook times less than 15 minutes may require additional time.
To set the Air Fry function:
1. Arrange food on rack as suggested.
2. Press Air Fry. Enter the suggested temperature for particular food.
3. Press START.
4. When preheat tone sounds place the tray on rack position 3.
Note: Set the minute timer for the minimum suggested cook time listed in the table below and check food for desired doneness when timer ends.
5. When cooking is complete press OFF.
Note: Frigidaire offers an optional Air Fry Tray specifically designed to deliver superior performance.
Some Benefits of the Optional Air Fry Tray:
- Tray optimized for oven space.
- Fits in the dishwasher for easy clean up.
- Higher yield than countertop models.
- Frees up countertop space.
- Compatible with convection ovens.
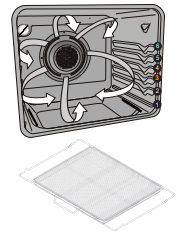
Figure 25: Optional Frigidaire Air Fry Tray. Use rack position 3 with tray or dark pan with low or no sides for best results.
Table 3: Suggested Air Fry Settings

Cooking with Meat Probe
Use the probe feature for best results when cooking foods such as roasts, hams, or poultry.
The probe feature, when set correctly, will signal an alert when the internal food temperature reaches the desired set target temperature.
When active, the probe displays the internal food temperature which is visible in the display during the cooking process. This eliminates any guesswork or the need to open the oven door to check the thermometer.
For meats like poultry and roasts, using a probe to check internal temperature is the safest method to ensure properly cooked food.
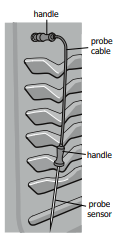
Figure 26: Using the probe
Proper placement of probe in food.
Insert the probe so that the probe tip rests inside the center of the thickest part of meat or food (See Figure 27). For best results, do not allow the probe temperature sensor to contact bone, fat, gristle, or the cookware.
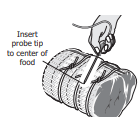
Figure 27: Probe in thickest area of food
- For bone-in ham or lamb, insert the probe into the center of lowest large muscle or joint.
- For meat loaf or casseroles, insert the probe into center of food.
- When cooking fish, insert meat probe just above the gill.
- For whole poultry or turkey, fully insert the probe sensor into the thickest part of the breast (See Figure 28).
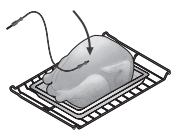
Figure 28: Probe in thickest part breast
To set probe:
1. Insert the meat probe into the food. Place prepared food on the desired oven rack position and slide into the oven.
2. Plug the connector end of the probe all the way into the probe receptacle while the oven is still cool. The receptacle is located on the upper left front oven cavity wall. Close oven door.
3. Set oven for Quick Preheat, Bake, Convection Bake, or Convection Roast and set oven temperature.
4. Press START.
5. Press Probe. The Probe default temperature of 170°F appears. Using the numeric keys set the desired internal food temperature for food type.
Note: The minimum setting is 140ºF (60ºC); the maximum is 210ºF (99ºC). Default is 170ºF (77ºC).
6. Press START to accept the target temperature.
7. The control will provide three beeps when the internal target temperature is reached.
8. When the internal target temperature is reached, the oven will automatically change to Hld setting and will maintain the oven temperature at 170°F (77°C) until canceled. The temperature of the food will appear in the display alternating with the Hld setting of 170°F (77°C).
9. To stop cooking at any time, press OFF.
Table 4: USDA recommended minimum internal cooking temperatures
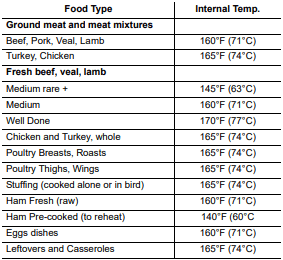
The U.S. Department of Agriculture states, “Rare fresh beef is popular, but you should know that cooking it to only 140°F (60°C) means some food poisoning organisms may survive.” (Source: Safe Food Book, Your Kitchen Guide, USDA) Visit the USDA Food Safety and Inspection website at www.fsis.usda.gov
To set how the oven will operate once the probe reaches the target temperature:
The oven is preset to automatically stop cooking and start the warm feature when probe sensor reaches the target temperature. This probe may be set to continue cooking if desired. Setting the options must be done when the oven is inactive. The probe is not required to be connected to the probe receptacle when setting this option.
To set the oven to continue cooking after reaching the target temperature:
1. Press probe key and hold for 3 seconds.
2. Press self clean key and toggle until Continu: appears, as shown in Figure 29, then press START to accept.

Figure 29: Probe set to continue cooking
To set the oven to automatically stop cooking and start warm once reaching target temperature:
1. Press probe key and hold for 3 seconds.
2. Press the self clean key and toggle until CAnCEL appears, as shown in Figure 30, then press START to accept.

Figure 30: Probe set to cancel cooking
Probe too hot message:
When the message Prob... Too... Hot... flashes in the display, the probe temperature has exceeded 250°F (121°C). If the probe is not removed, this message may continue until the sensor reaches 300°F (149°C) or higher, and oven will automatically turn off. Be sure the probe sensor is fully covered by the food.
Keep Warm
Keep Warm should only be used with foods that are already at serving temperatures. Keep Warm will keep cooked foods warm and ready for serving for up to 3 hours after cooking has finished. After 3 hours the Keep Warm will shut-off automatically. Keep Warm will keep the oven temperature at 170° F (77°C).
To set Keep Warm:
1. If needed, arrange oven racks and place cooked food in oven.
2. Press Keep Warm: KEEP WARM will appear in the display. (If no other keys are touched within 25 seconds the request for keep warm will clear.)
3. Press START. Keep Warm will automatically turn on and then turn off after 3 hours unless cancelled.
To turn Keep Warm off at any time, press OFF.
Important note: When using the Probe for cooking, the Keep Warm function will turn on automatically once the probe reaches the target temperature of the food.
Keep Warm will remain on at a serving temperature of 170°F until canceled.
Setting the Sabbath Feature (for use on the Jewish Sabbath and Holidays)

- This appliance provides special settings for use when observing the Jewish Sabbath/Holidays. Sabbath mode disables all audible tones or visual display changes on the oven control. Bake heating is the only cooking feature available while in the Sabbath mode. Oven controls are locked during Sabbath mode.
- You must first set the Bake feature and temperature(s) needed for the oven and Delay Start option (if needed). Any settings made prior to setting the Sabbath mode will be visible in the displays.
- The Sabbath mode will override the factory preset 12 hour energy saving mode, and the appliance will stay on until the cooking features are cancelled. If any of the cooking features are cancelled when the appliance is in the Sabbath mode, no audible or visual indicators will be available to verify the cancellation.
- If the oven interior lights are needed, be sure to activate them prior to setting the Sabbath mode. Once the oven light is turned on and the Sabbath mode is active, the oven light will remain on until the Sabbath mode is turned off and the oven lights are turned off. The oven door will not activate the interior oven lights when the oven door is opened or closed.
- It is recommended that any oven temperature modification made within an active Sabbath mode be followed with two presses of the START key. This will insure the oven remains on even if an attempt is made to set the oven temperature outside of its temperature range.
- If the oven temperature is set outside of the temperature range, the oven will default to the nearest available temperature. Try to set the desired oven temperature again.
Important:
- Do not attempt to activate any other oven function except Bake while the Sabbath feature is active. The following keys will function correctly when the Sabbath feature is active: 0-9 number keypad, Bake, START, and OFF. All other keys should not be used once the Sabbath feature is active.
- You may change the oven temperature once baking has started. Press Bake, use the numeric keypad to enter the oven temperature change (170°F to 550F°), and press START (for Jewish Holidays only).
- Remember that the oven control will no longer provide audible tones or display any further changes when the Sabbath feature is active.
- The oven will shut-off automatically after completing a keep warm and therefore may only be used once during the Sabbath/Jewish Holidays.
- If a delay start time longer than 11 hours and 59 minutes is desired, set the oven control for the 24 hour day display mode setting. See “Setting 12 Hour or 24 Hour display mode” on page 21 for more information.
To program oven to Bake with default oven temperature of 350°F and activate the Sabbath feature:
- Be sure the clock is set with the correct time of day.
- Arrange oven racks, place bakeware in oven, and close oven door. Press Bake.
- Press START.
- Note: If a Delay Start is desired enter the time at this point. See “Setting Delay Start” on page 26 for detailed instructions.
- Press and hold Self Clean and Steam Clean simultaneously for about 3 seconds to set the Sabbath feature. Once the feature is set, SAb will appear in the display indicating the oven is properly set for the Sabbath feature (Figure 31).

Figure 31: Oven set for Sabbath baking
To turn the oven off and keep the Sabbath feature active:
1. Press OFF.
To turn off the Sabbath feature:
Press and hold both Self Clean and Steam Clean simultaneously for at least 3 seconds to turn the Sabbath feature off. The control will provide an acceptance tone, and SAb will disappear from the display. The oven is no longer programmed for the Sabbath feature.
What to do during a power failure or power interruption after the Sabbath feature was activated:
Should you experience a power failure or interruption, the oven will shut-off. When power is restored the oven will not turn back on automatically. The oven will remember that it is set for the Sabbath, and the oven display will show the message SF for Sabbath failure (Figure 32).

Figure 32: Display showing Sabbath failure
The food may be safely removed from the oven while still in the Sabbath feature, however the oven cannot be turned back on until after the Sabbath/Holidays. After the Sabbath observance turn off the Sabbath feature.
Press and hold both Self Clean and Steam Clean keys for at least 3 seconds simultaneously to turn the Sabbath feature off. SF will disappear from the display, and the oven may be used with all normal functions.
Adjusting Oven Temperatures
Your appliance has been factory calibrated and tested to ensure accurate baking temperatures. For the first few uses, follow your recipe times and temperature recommendations carefully. If you think the oven is cooking too hot or too cool for your recipe times, you may adjust the control so the oven cooks hotter or cooler than the oven temperature displayed.
Important: Do not use oven thermometers such as those found in grocery stores to check the temperature settings inside your oven. These oven thermometers may vary as much as 20 to 40°F degrees from actual temperatures.
The oven temperature may be increased as much as +35°F (+19°C) or decreased -35°F (-19°C) from the factory calibrated settings.
To increase or decrease the oven temperature by 20°F:
1. Press and hold Bake until the control produces an audible tone (about 3 seconds). The factory offset temperature of 0 (zero) should appear in the display.
2. Enter 2 0 using numeric keypad.
3. To offset the oven by -20°F, press Self Clean to toggle between + and -.
4. Press START to accept change.
Important note:
- Oven temperature adjustments will not change the Broil, Self Clean, or Keep Warm temperatures.
- The oven temperature adjustment may be made if your oven control is set to display temperatures in °C (Celsius). Minimum and maximum settings for Celsius range from plus (+)19°C to minus (-) 19°C.
Self Clean
A self cleaning oven cleans itself with high temperatures (well above normal cooking temperatures), which eliminate soils completely or reduces them to a fine powdered ash you can wipe away afterwards with a damp cloth. This function can be programmed for clean times between 2 and 4 hours.
Important: Before starting self clean read all following caution and important statements before starting a self clean cycle.
Important notes:
- Completely remove all oven racks and any accessories from oven cavity to avoid damage to oven racks. If the oven racks are not removed they may discolor.
- Remove all items from the oven and cooktop including cookware, utensils, and any aluminum foil. Aluminum foil will not withstand high temperatures from a self clean cycle and will melt.
- Do not spray oven cleaners or oven protective coatings in or around any part of the oven interior. Clean any soil from the oven frame, the door liner outside the oven door gasket, and the small area at the front center of the oven bottom (Figure 33). These areas heat sufficiently to burn soil on. Clean using soap and water prior to starting Self Clean.
- Remove any excessive spills. Any spills on the oven bottom should be wiped up and removed before starting a self clean cycle. To clean use hot, soapy water and a cloth. Large spills can cause heavy smoke or fire when subjected to high temperatures.
- Do not allow food spills with high sugar or acid content (such as milk, tomatoes, sauerkraut, fruit juices, or pie fillings) to remain on the surface as they may leave a dull spot even after cleaning.
- Do not clean the oven door gasket. The woven material in the gasket is essential for a good seal. Care should be taken not to rub, damage, or remove the oven door gasket. Doing so could cause damage to the door gasket and compromise the performance of the oven.
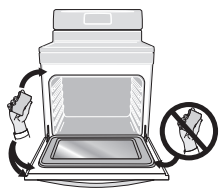
Fig. 33 Areas to clean and areas to avoid (gasket)
- The kitchen area should be well ventilated using an open window, ventilation fan, or exhaust hood during the first self clean cycle. This will help eliminate the normal odors.
- Do not attempt to open the oven door when the OVEN LOCK indicator light is flashing. Allow about 15 seconds for the motorized door latch mechanism to completely lock or unlock the oven door.
- When the clean time finishes, the oven door will remain locked until the range has cooled sufficiently. In addition to the clean time that was programmed, you must allow about 1 additional hour for the oven to cool before you will be able to open the oven door.
Setting Self Clean
To set self clean:
- Be sure the oven is empty and all oven racks are removed. Remove all items from the oven. Be sure oven door is completely closed.
- Press self clean and the default 3 hour clean time will appear in the display. You may accept the default 3 hour clean time or choose a different clean time by using the numeric keys to enter any time between 2 and 4 hours clean time.
- Press START to activate self clean. The REMOVE RACKS warning will flash in the display. Press START again to activate the self clean.
When the oven is set to run a self clean cycle, the motor door lock will begin locking the oven door. Do not open the oven door while the lock motor is running or when any locking indicators or displays are showing. The oven door is completely locked in about 15 seconds. Once the oven door has locked, CLEAN will appear in the display indicating self clean has started.
Important: Do not force the oven door open when self clean is active. This can damage the automatic door-locking system. Use caution when opening the door after self clean cycle is complete; the oven may still be very hot.
When self clean is finished:
1. CLEAN message will turn off, and Hot will appear in display window.
2. Once the oven has cooled down (about 1 hour) and Hot is no longer displayed, the oven door may be opened.
3. When the oven interior has completely cooled, wipe away any residue or powdered ash with a damp cloth or paper towel.
Setting Delay Start Self Clean
To start a delay self clean with default clean time of 3 hours and a start time of 9:00 o’clock:
- Be sure the clock is set with the correct time of day, the oven is empty, and all oven racks are removed. Be sure oven door is completely closed.
- Press Delay Start.
- Using numeric keypad, enter 9 0 0.
- Press START to accept
- Press self clean.
- Press START.
If it becomes necessary to stop self clean when active:
1. Press OFF.
2. If self clean has heated the oven to a high temperature, allow enough time for the oven to cool.
3. Before restarting self clean, be sure to read important notes below.
Important note:
- If your clock is set with the (default) 12 hr display mode, the delay start for a self clean can only be programmed to start up to 11 hours and 59 minutes after the time showing in the display (be sure to set the clock to current time before programming a Delay Start). To set a Delay Start self clean to begin 12 or more hours (maximum is 23 hours and 59 minutes) after the time of setting, be sure to first set the control in the 24 Hr display mode.
- If self clean was active and then interrupted by a power failure or cancelled before the oven was thoroughly cleaned, it may be necessary to run another self clean cycle.
- If the oven temperature was high enough when self clean was interrupted the oven control may not allow another self clean cycle to be set for up to 4 hours.
Steam Clean
The Steam Clean feature offers a chemical free and time saving method to assist in the routine cleaning of small and light soils. For heavier baked on soils use the Self Clean feature..
Be sure the oven is level and cool before starting Steam Clean. If the oven temperature is above room temperature a triple beep will be heard and the function will not start. Steam Clean produces best results when started with a cool oven.
To set a Steam Clean cycle:
1. Remove all racks and oven accessories.
2. Scrape or wipe loose debris and grease from the oven bottom.
3. Pour 1 cup of tap water onto the oven bottom.(Figure 34) Close oven door.
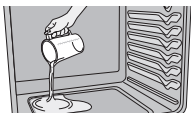
Figure 34: Add 1 cup of tap water
4. Press Steam Clean.
5. Press START. St Cn will appear in the display.
6. The time remaining in the Steam Clean cycle is shown in the display. Do not open the door during this time. If the oven door remains open for more than 4 minutes, an alarm sounds.
7. When the steam clean cycle is complete an alert will sound and the END message will show in the display. Press off to return to the clock.
8. Take care opening the door when the steam clean is finished. Stand to the side of the oven out of the way of escaping vapor.
9. Wipe oven cavity and bottom. Do not clean oven door gasket (Figure 35). Avoid leaning or resting on the oven door glass while cleaning cavity.
10. To stop Steam Clean at any time press OFF..
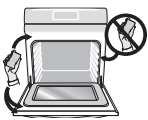
Figure 35: Clean around the oven door gasket
Notes:
- Opening oven door during Steam Clean cycle prevents the water from reaching the temperature needed to clean.
- For best results, clean oven immediately after the cycle is complete. Steam Clean works best for soils on the oven bottom.
- Place a paper towel or cloth in front of the oven to capture any water that may spill while wiping out.
- A non abrasive scouring pad, stainless steel sponge, plastic scraper, or eraser style cleaning pad (without cleaner) can be used for difficult soils. Moisten pads with water before use.
- Do not leave the residual water in the oven for any length of time.
- Some condensation or water vapor may appear close to the oven vent. This is normal. The oven gasket may become damp; do not wipe dry.
- Local water sources often contain minerals (hard water). If hard water deposits occur, wipe cavity with a 50/50 solution of water and vinegar or 50/50 solution of lemon juice and water.
- Steam Clean cannot be programmed with a Delay Start.
- If Steam Clean results are not satisfactory, run a self clean. See “Self Clean” on page 38.
CARE AND CLEANING
Remove spills and any heavy soiling as soon as possible. Regular cleaning will reduce the difficulty of major cleaning later.
CAUTION
- Before cleaning any part of the appliance, be sure all controls are turned off and the appliance is cool
- If ammonia or appliance cleaners are used, they must be removed and the appliance must be thoroughly rinsed before operating. Follow manufacturer's instructions and provide adequate ventilation.
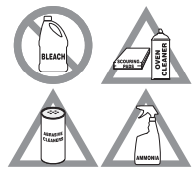
Figure 37: Use cleaners with caution
Aluminum and vinyl
Using a soft cloth, clean with mild dish detergent and water. Rinse with clean water, dry and polish with a soft, clean cloth.
Painted and plastic control knobs, Painted body parts, Painted decorative trims
Using a soft cloth, clean with mild dish detergent and water or a 50/50 solution of vinegar and water. Rinse with clean water, dry and polish with a soft, clean cloth. Glass cleaners may be used, but do not apply directly to surface; spray onto cloth and wipe.
Control panel
Using a soft cloth, clean with mild dish detergent and water or a 50/50 solution of vinegar and water. Do not spray liquids directly on the oven control and display area. Do not use large amounts of water on the control panel - excess water on the control area may cause damage to the appliance. Do not use other liquid cleaners, abrasive cleaners, scouring pads, or paper towels - they will damage the finish.
Control knobs
Using a soft cloth, clean with mild dish detergent and water or a 50/50 solution of vinegar and water. To remove control knobs: turn to the OFF position, grasp firmly, and pull off the shaft. To replace knobs after cleaning, line up the OFF markings and push the knobs into place.
Stainless Steel
Using a soft cloth, clean with mild dish detergent and water or a 50/50 solution of vinegar and water. Rinse with clean water, dry with a soft clean cloth. Do not use cleaners containing abrasives, chlorides, chlorine, or ammonia.
Smudge Proof™ Stainless Steel, Black Stainless Steel
Using a soft cloth, clean with mild dish detergent and water or a 50/50 solution of vinegar and water. Rinse with clean water, dry with a soft clean cloth. Do not use appliance cleaner, stainless steel cleaner, or cleaner containing abrasives, chlorides, chlorine, or ammonia. These cleaners may damage the finish.
Porcelain-enameled broiler pan and insert, Porcelain door liner, Porcelain body parts
Rinse with clean water and a damp cloth. Scrub gently with a soapy, non-abrasive scouring pad to remove most spots. Rinse with a 50/50 solution of clean water and ammonia. If necessary, cover difficult spots with an ammonia-soaked paper towel for 30 to 40 minutes. Rinse and wipe dry with a clean cloth. Remove all cleaners or future heating could damage the porcelain. Do not allow food spills with a high sugar or acid content (milk, tomatoes, sauerkraut, fruit juices or pie filling) to remain on porcelain surfaces. These spills may cause a dull spot even after cleaning.
Self-cleaning oven interior
Before setting a self-clean cycle, clean soils from the oven frame, areas outside the oven door gasket, and the small area at the front center of the oven bottom. See “Self Clean” on page 38.
Oven door
Use mild dish detergent and water or a 50/50 solution of vinegar and water to clean the top, sides, and front of the oven door. Rinse well. Glass cleaner may be used on the outside glass of the door. Ceramic smoothtop cleaner or polish may be used on the interior door glass. Do not immerse the door in water. Do not spray or allow water or cleaners to enter the door vents. Do not use oven cleaners, cleaning powders, or any harsh abrasive cleaning materials on the outside of the oven door.
Do not clean the oven door gasket. The oven door gasket is made of a woven material which is essential for a good seal. Do not rub, damage, or remove this gasket.
Gas cooktop surface burners
See “Cleaning the sealed burners” on page 43.
Gas cooktop surface grates, Gas cooktop burner caps
Use a non-abrasive plastic scrubbing pad and mild abrasive cleanser. Do not allow food spills with a high sugar or acid content (milk, tomatoes, sauerkraut, fruit juices or pie filling) to remain on the burner grates or burner caps. These spills may cause a dull spot even after cleaning. Clean these spills as soon as surfaces are cool. Thoroughly dry immediately following cleaning.
Cleaning the sealed burners
To avoid possible burns, do not attempt cleaning before turning off all surface burners and allowing them to cool.
Any additions, changes, or conversions required in order for this appliance to satisfactorily meet the application needs must be made by an authorized qualified Agency. Routinely clean the cooktop. Wipe with a clean, damp cloth and wipe dry to avoid scratches. Keeping the surface burner head ports and slots clean will prevent improper ignition and an uneven flame.
To clean recessed and contoured areas of cooktop:
- If a spill occurs on or in the recessed or contoured areas, blot up spill with an absorbent cloth.
- Rinse with a clean, damp cloth and wipe dry.
To clean burner heads:
1. Remove the burner cap from the burner head (see Figure 38). Clean the cap with hot soapy water and dry thoroughly.

Figure 38: Burner Cap
2. For burned-on and dried spills, apply hot soapy water to the burner head. Allow time for the soils to soften.
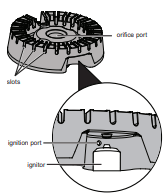
Figure 39: Sealed burner components
3. Use a toothbrush to clean all over the burner head (see Figure 39).
4. Use the toothbrush to clean the slots and holes in the burner (see Figure 39).
5. Use a needle or fine wire to clean out the ignition port (see Figure 39).
6. Wipe the burner head clean with a soft, clean cloth, sponge, or scratch-free cleaning pad.
7. Before using the cooktop again, make sure the burner caps are properly placed and seated on the burner heads. When placed correctly, the burner cap is centered on the burner head and will click into place on the burner head. You can wiggle the cap to test placement, it should not move off the burner head (see “Assembly of the burner caps” on page 13).
Replacing the oven interior light bulb:
The interior oven light is located at the rear of the oven cavity and covered with a glass shield. The glass shield must be in place whenever the oven is in use (Figure 40).
1. Turn electrical power off at the main source or unplug the appliance.
2. Remove the interior oven light shield after removing the wire holder by carefully moving the wire to the side of the glass shield. The tension from the wire holds the glass shield in place.
3. Pull the shield straight out. Do not twist or turn.
4. Replace the bulb with a new appliance bulb.
5. Replace the glass oven light shield. Replace wire holder.
6. Turn the power back on again at the main source (or plug the appliance back in).
7. Be sure to reset the time of day on the clock.

Figure 40: Oven light protected by glass shield
To remove and replace storage drawer (some models)
Use the storage drawer for storing cooking utensils. The drawer can be removed to facilitate cleaning under the range. Use care when handling the drawer.
Removing and Replacing the Oven Door
To remove the oven door:
1. Open oven door completely, horizontal with floor.
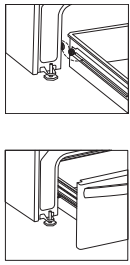
2. Pull up the lock located on each hinge support toward front of the oven until the lock stops. You may have to apply a little upward pressure on the lock to pull it up (Figure 42 and Figure 43).
3. Grasp the door by the sides, and close the door until the door frame makes contact with the unlocked hinges.
4. Pull the bottom of the door toward you while rotating the top of the door toward the appliance to completely disengage the hinge levers (Figure 44).
To Replace Oven Door:
1. Firmly grasp both sides of oven door along the door sides. Do not use the oven door handle (Figure 44).
2. Hold the oven door at the same angle as the removal position. Carefully insert the hinge levers into the oven frame until you feel the hinge levers are seated into the hinge notches. The hinge arms must be fully seated into the hinge notches before the oven door can be fully opened. (Figure 44).
3. Fully open the oven door, horizontal with floor (Figure 41).
4. Push the door hinge locks up toward and into the oven frame on both left and right oven door hinges to the locked position (Figure 43 and 42). 5. Close the oven door.
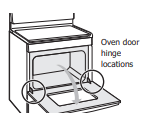
Figure 41: Door hinge location
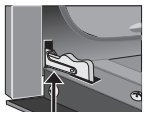
Figure 42: Door hinge locks
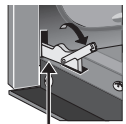
Figure 43: Unlocking door hinge
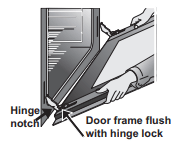
Figure 44: Replacement and location of hinge arm and roller pin
BEFORE YOU CALL
Oven Baking
For best cooking results, preheat the oven before baking cookies, breads, cakes, pies, pastries, etc. There is no need to preheat the oven for roasting meat or baking casseroles. The cooking times and temperatures needed to bake a product may vary slightly from your previously owned appliance.
Cookies and biscuits burn on the bottom.

Causes
- Cookies and biscuits put into oven before oven is preheated.
- Oven rack is overcrowded.
- Dark pan absorbs heat too fast.
Corrections
- Allow oven to preheat to desired temperature before placing food in oven.
- Choose pan sizes that will permit at least 2” of air space (5.1 cm) on all sides when placed in the oven.
- Use a medium weight shiny baking sheet.
Cakes too dark on top or bottom

Causes
- Cakes put in oven before oven is preheated.
- Rack position too high or too low.
- Oven too hot.
Corrections
- Allow oven to preheat to the selected temperature before placing food in the oven.
- Use proper rack position for baking needs.
- Set oven temperature 25°F (13°C) lower than recommended.
Cakes not done in center

Causes
- Oven too hot.
- Incorrect pan size.
- Pan not centered in oven.
- Glass cookware slow heat conductor.
Corrections
- Set oven temperature 25°F (13°C) lower than recommended.
- Use pan size suggested in recipe.
- Use proper rack position and place pan so there are at least 2” (5.1 cm) of space on all sides of pan.
- Reduce temperature and increase cook time or use shiny bakeware.
Cakes not leve

Causes
- Oven not level.
- Pan too close to oven wall or rack overcrowded.
- Pan warped.
- Oven light left on while baking.
Corrections
- Place a marked glass measuring cup filled with water on the center of the oven rack. If the water level is uneven, refer to the installation instructions for leveling the oven.
- Use proper rack position and place pan so there are at least 2” (5.1 cm) of space on all sides of pan.
- Do not use pans that are dented or warped.
- Do not leave the oven light on while baking.
Foods not done when cooking time is over.

Causes
- Oven too cool.
- Oven overcrowded.
- Oven door opened too frequently
Corrections
- Set oven temperature 25°F (13°C) higher than suggested and bake for the recommended time.
- Be sure to remove all pans from the oven except the ones to be used for baking.
- Open oven door only after the shortest recommended baking time.
Solutions to Common Problems:
Before you call for service, review the following list. It may save you time and expense. Possible solutions are provided with the problem listed.
Entire appliance does not operate.
- Appliance not connected. Make sure power cord is plugged properly into outlet. Check your fuse box or breaker box to make sure the circuit is active.
- Electrical power outage. Check house lights to be sure. Call your local electric company for service outage information.
Poor baking results.
- Many factors affect baking results. Use proper oven rack position. Center food in the oven and space pans to allow air to circulate. Preheat the oven to the set temperature before placing food in the oven. Try adjusting the recipe's recommended temperature or baking time. See “Adjusting Oven Temperatures” on page 37 if you feel the oven is too hot or too cool.
Flames inside oven or smoking from oven vent.
Excessive spills in oven. Grease or food spilled onto the oven bottom or oven cavity. Wipe up excessive spills before starting the oven. If flames or excessive smoke are present when using broil, see “Setting Broil” on page 27.
Oven smokes excessively when broiling.
Incorrect setting. Follow the “Setting Broil” instructions on page 27.
Meat too close to the broil element or burner. Reposition the broil pan to provide proper clearance between the meat and broil element or burner. Remove excess fat from meat. Cut remaining fatty edges to prevent curling, but do not cut into lean.
Grease build up on oven surfaces. Regular cleaning is necessary when broiling frequently. Grease or food splatters will cause excessive smoking.
Oven control panel beeps and displays any F or E code error.
Oven control has detected a fault or error condition. To clear the error, press the OFF key on the control panel. Once the error code is cleared, try the bake or broil function. If the F or E code error repeats, turn off the power to appliance, wait 5 minutes, and then repower the appliance. Set the clock with correct time of day. Try the bake or broil function again. If the fault recurs, press the OFF key to clear.
Oven portion of appliance does not operate.
Be sure the regulator gas valve is turned to ON. See installation instructions.
The time of day is not set. The clock must be set in order to operate the oven. See “Setting the Clock” on page 21.
Be sure the oven controls are set properly for the desired function. See “Setting Oven Controls” starting on page 20 and review instructions for the desired cooking function in this manual or see “Entire appliance does not operate.” in this checklist.
Convection fan does not rotate.
Oven door is open. The convection fan will turn off if the oven door is opened when convection is active. Close the oven door.
On gas models, the convection fan will begin to rotate about 6 minutes into the preheating process.
Surface burners do not ignite.
Surface control knob was not completely turned to LITE ( ). Push in and turn the surface control knob to LITE until the burner ignites and then turn the control knob to the desired flame size.
Burner ports are clogged. With the burner OFF and cool, use a small-gauge wire or needle to clean the burner head slots and ignition ports. See“Cleaning the sealed burners” in the Care & Cleaning section on page 43 for additional cleaning instructions.
Range power cord is disconnected from outlet (electric ignition models only). Be sure the power cord is securely plugged into the power outlet.
Circuit is broken. Check breaker box or fuse box.
Electrical power outage. Burners may be lit manually. See “Setting surface controls” on page 16.
Surface burner flame uneven or only part way around burner cap
Burner slots or ports are clogged. With the surface burner OFF and cool, clean ports with a small-gauge wire or needle. If moisture is present after cleaning, lightly fan the flame and allow the burner to operate until flame is full.
Burner caps are not seated properly. Check that all burner caps are level and seated correctly on the burner heads. See“Cleaning the sealed burners” in the Care & Cleaning section on page 43 for additional cleaning instructions.
Surface burner flame is too high.
Surface control knob is set too high. Adjust to a lower flame setting.
Burner caps are not seated properly. Check that all surface burner caps are level and seated correctly on the surface burner heads. See“Cleaning the sealed burners” in the Care & Cleaning section on page 43 for additional cleaning instructions.
Incorrect L.P. conversion. Refer to L.P. conversion kit instructions to correct.
Surface burner flame is orange.
Dust particles in main gas line. Allow the burner to operate a few minutes until flame turns blue. In coastal areas, a slightly orange flame is unavoidable due to salt content in the air.
Incorrect L.P. conversion. Refer to L.P. conversion kit instructions to correct.
Self clean does not work.
Oven control not set properly. See “Setting Self Clean” on page 39.
Oven racks discolored or do not slide easily
Oven racks left in oven cavity during self clean. Remove oven racks from oven cavity before starting a self-clean cycle. Clean by using a mild abrasive cleaner following manufacturer's instructions. Rinse with clean water, dry, and replace in oven.
Soil not completely removed after self clean.
Self clean. Self clean was interrupted. Review instructions on “Self Clean” on page 38.
Excessive spills on oven bottom. Remove excessive spills before starting self clean.
Failure to clean soil from the oven frame, the door liner outside the oven door gasket, and the small area at the front center of the oven bottom. These areas are not in the self-cleaning area, but get hot enough to burn on residue. Clean these areas before starting the self-cleaning cycle. Burned-on residue can be cleaned with a stiff nylon brush and water or a nylon scrubber. Be careful not to damage the oven gasket.
The oven control display shows "SPr" and self-clean is not working.
The cooktop should not be used during a self-clean cycle. On some models, turning on any cooktop surface burner will cause the clean cycle to cancel. If the clean cycle is canceled, the oven control display will show “SPr" for 5 seconds. The oven door will remain locked until the oven has cooled down below cleaning temperature. If the oven is below cleaning temperature, the user can start another clean cycle immediately. If the oven is in cleaning temperature range, another self-clean cycle can be set once the door unlocks (up to 4 hours).
Appliance is not level.
Be sure the floor is level, strong, and stable enough to adequately support the range.
If the floor is sagging or sloping, contact a carpenter to correct the situation.
Poor installation. Place the oven rack in the center of the oven. Place a level on the oven rack. Adjust the leveling legs at the base of the appliance until the rack is level.
Kitchen cabinet alignment may make range appear not level. Be sure cabinets are square and have sufficient room for appliance clearance.
Cannot move appliance easily. Appliance must be accessible for service.
Cabinets not square or are built in too tightly. Contact the builder or installer to make the appliance accessible.
Carpet interferes with appliance. Provide sufficient space so the appliance can be lifted over carpet. Installation over carpet is not advised. See the installation instructions for guidelines specific to your appliance.
Oven light does not work.
Be sure the oven light is secure in the socket. See “Replacing the Oven Light” on page 44.
