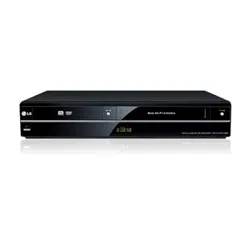
OWNER’S MANUAL Digital & Analog DVD recorder/VCR player
Getting Started
Remote control
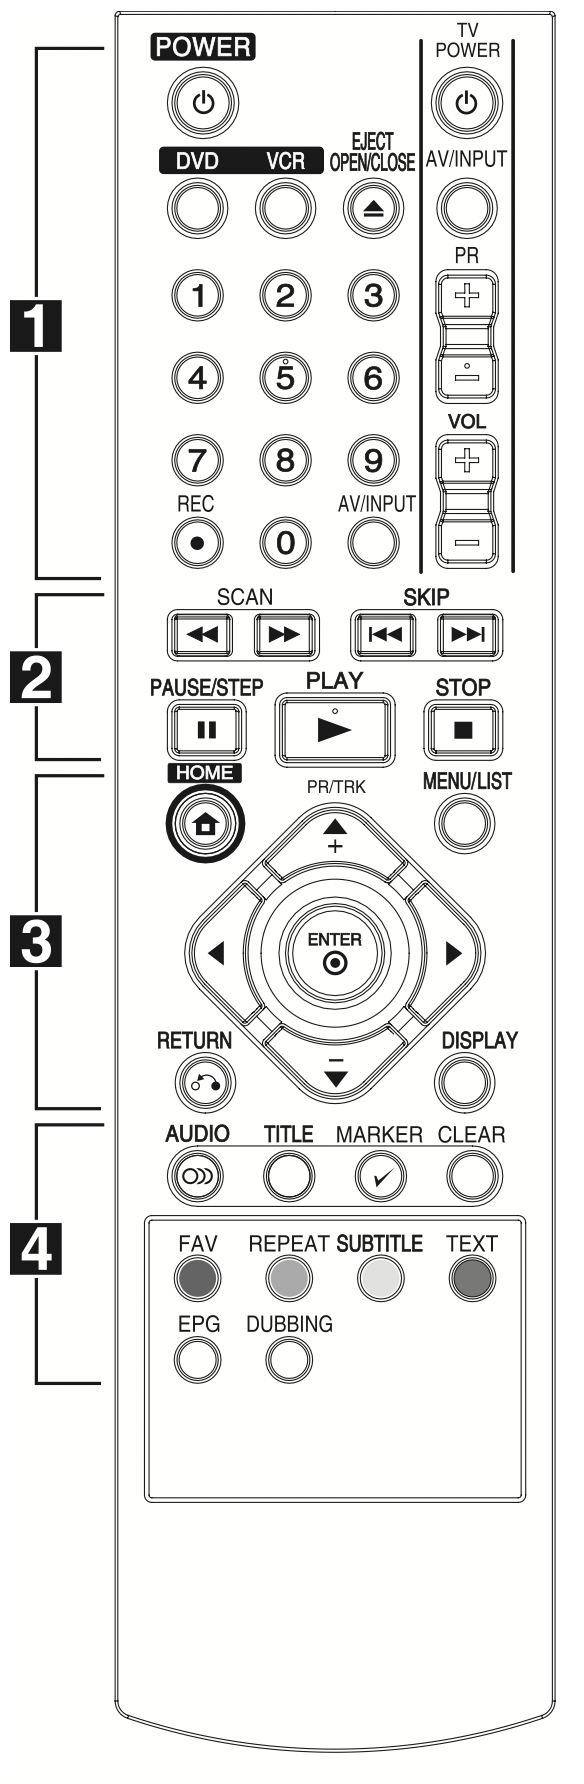
 (POWER): Switches the unit ON or OFF.
DVD: Selects the unit’s mode to DVD.
VCR: Selects the unit’s mode to VCR.
EJECT, OPEN/CLOSE: Opens and closes the disc tray and ejects the tape in the VCR deck.
0-9 numerical buttons: Selects numbered options in a menu.
REC ( ): Starts recording. Press repeatedly to set the recording time.
AV/INPUT: Changes the input to use for recording (Tuner, AV1-2, or DV IN).
TV Control Buttons: See page 65.
SCAN ( /
/  ):
):
- DVD: Search backward or forward.
- VCR: Rewinds/Advances the tape during the stop/play mode for fast reverse/forward picture search.
SKIP ( /
/  ): Go to next or previous chapter/track or file.
PAUSE/STEP ( ): Pause playback or recording temporarily.
PLAY ( ): Starts playback.
STOP ( ): Stops playback or recording.
HOME ( ): Accesses or removes the HOME menu.
MENU/LIST: Accesses menu on a DVD disc, Title List or Playlist menu.
 (left/right/up/down): Navigates on-screen displays.
PR/CH TRK (+/-): Select channel programme of the recorder. To adjust tracking. To control vertical tremble during picture still.
ENTER ( ): Acknowledges menu selection or displays the TV info.
DISPLAY: Accesses On-Screen Display.
RETURN ( ): Exits the menu or back to previous step.
AUDIO ( ): Selects an audio language or audio channel.
TITLE: Displays the disc’s Title menu, if available.
MARKER ( ): Marks any point during playback.
CLEAR:
- Removes a mark on the Marker Search menu.
- Reset tape counter to zero.
EPG: Displays the EPG menu. Colored buttons: Use when tuned to a teletext program of a digital broadcast. The function of each button will be described on-screen, and changes depending on the screen being displayed.
FAV: Displays the favorite programme list.
REPEAT: Repeats a desired section or sequence.
SUBTITLE: Selects a subtitle language.
TEXT: Switches between teletext mode and normal TV viewing.
EPG: Displays the EPG menu. DUBBING: Press to copy VCR to DVD)
Front panel
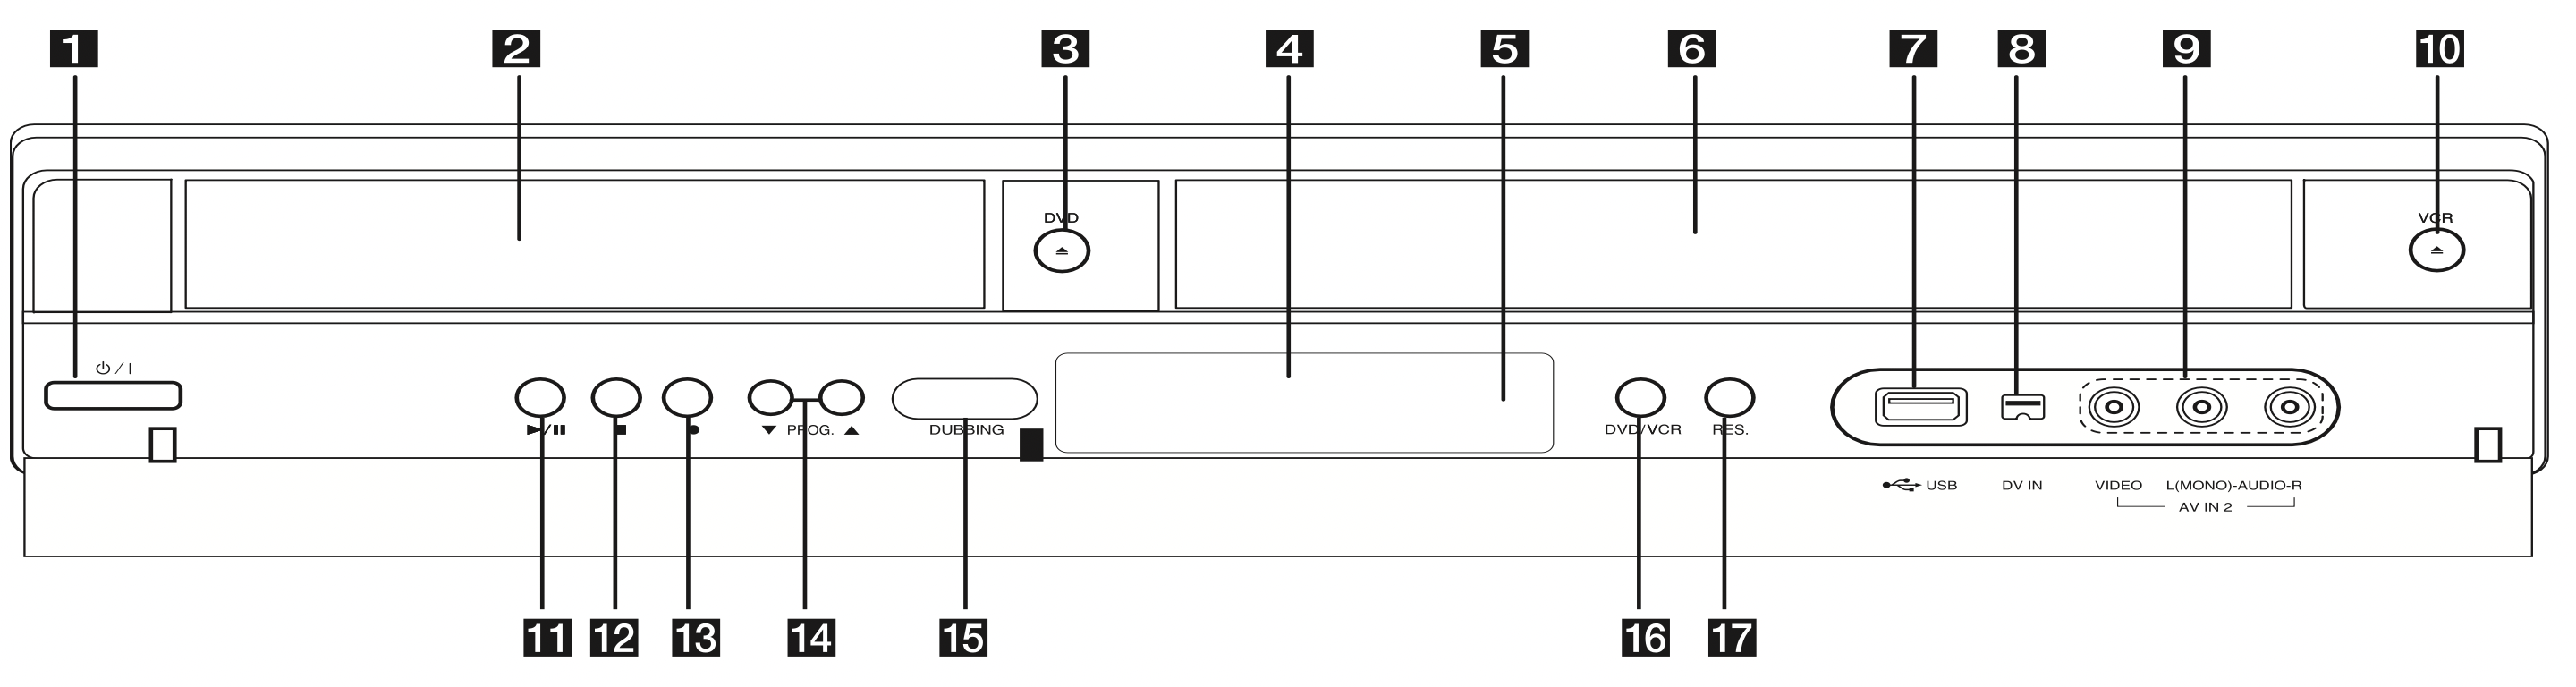
 /I (Power)
- Disc Tray
- DVD/

- Display window
- Remote Sensor
- Cassette Compartment (VCR deck)
- USB Port
- DV IN
- AV IN 2 (VIDEO/AUDIO (Left/Right)
- VCR/

 (PLAY/PAUSE)
  (STOP)
  (Recording)
 - PROG. (
 )
)
- DUBBING
- DVD/VCR
- RES.
Rear panel
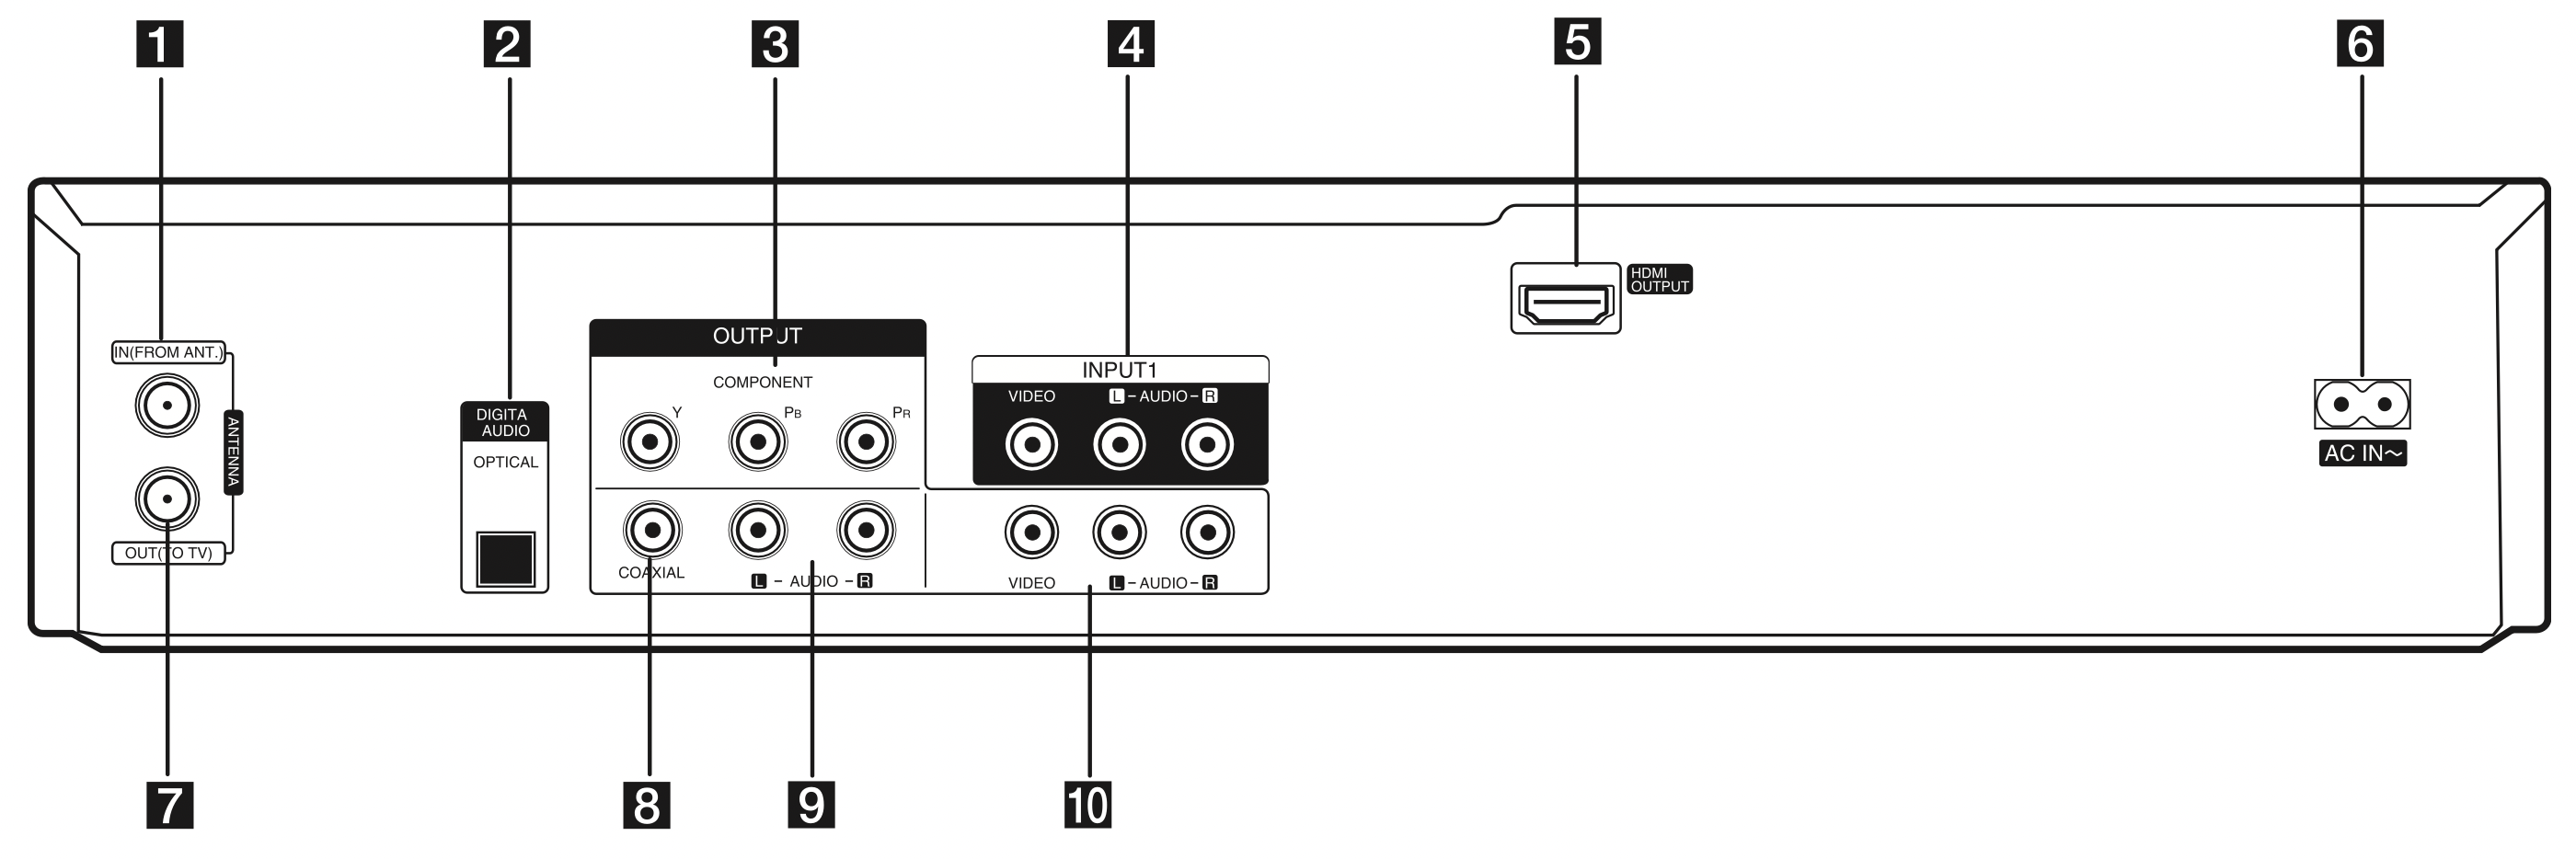
- ANTENNA IN (FROM ANT.)
- OPTICAL (DIGITAL AUDIO OUTPUT)
- COMPONENT OUTPUT (Y Pb Pr)
- VIDEO/AUDIO INPUT (Left/Right)
- HDMI OUTPUT
- AC Power Cord
- ANTENNA OUT (TO TV)
- COAXIAL OUTPUT A
- UDIO OUTPUT (Left/Right)
- VIDEO/AUDIO OUTPUT (Left/Right)
Connecting
Connecting to Your TV
Make one of the following connections, depending on the capabilities of your existing equipment.
- Antenna connection to your TV and this unit (page 14)
- HDMI connection (page 15)
- Component Video connection (page 16)
Note
- Depending on your TV and other equipment you wish to connect, there are various ways you could connect the unit. Use only one of the connections described in this manual.
- Please refer to the manuals of your TV, Stereo System or other devices as necessary to make the best connections.
- Make sure the player is connected directly to the TV. Tune the TV to the correct video input channel.
- Do not connect the player’s AUDIO OUT jack to the phono in jack (record player) of your audio system.
- Do not connect your player via your VCR.
The image could be distorted by the copy protection system.
Antenna connection to your TV and this unit
Remove the antenna cable plug from your TV set and insert it into the antenna socket at the back of the recorder. Plug one end of the antenna cable into the TV socket on the recorder and the other end into the antenna input socket on your TV set.
Connect one end of the RF cable to ANTENNA OUT(TO TV) jack on the unit and other end to ANTENNA IN jack on your TV. Passes the signal from the ANTENNA IN jack to your TV/monitor.
Connect the ANTENNA IN jack on the unit. If you want to use an indoor antenna, use one with a signal amplifier rated at 5V, 100mA and set [Antenna Feed 5V] to [ON] in the setup menu (See page 25).
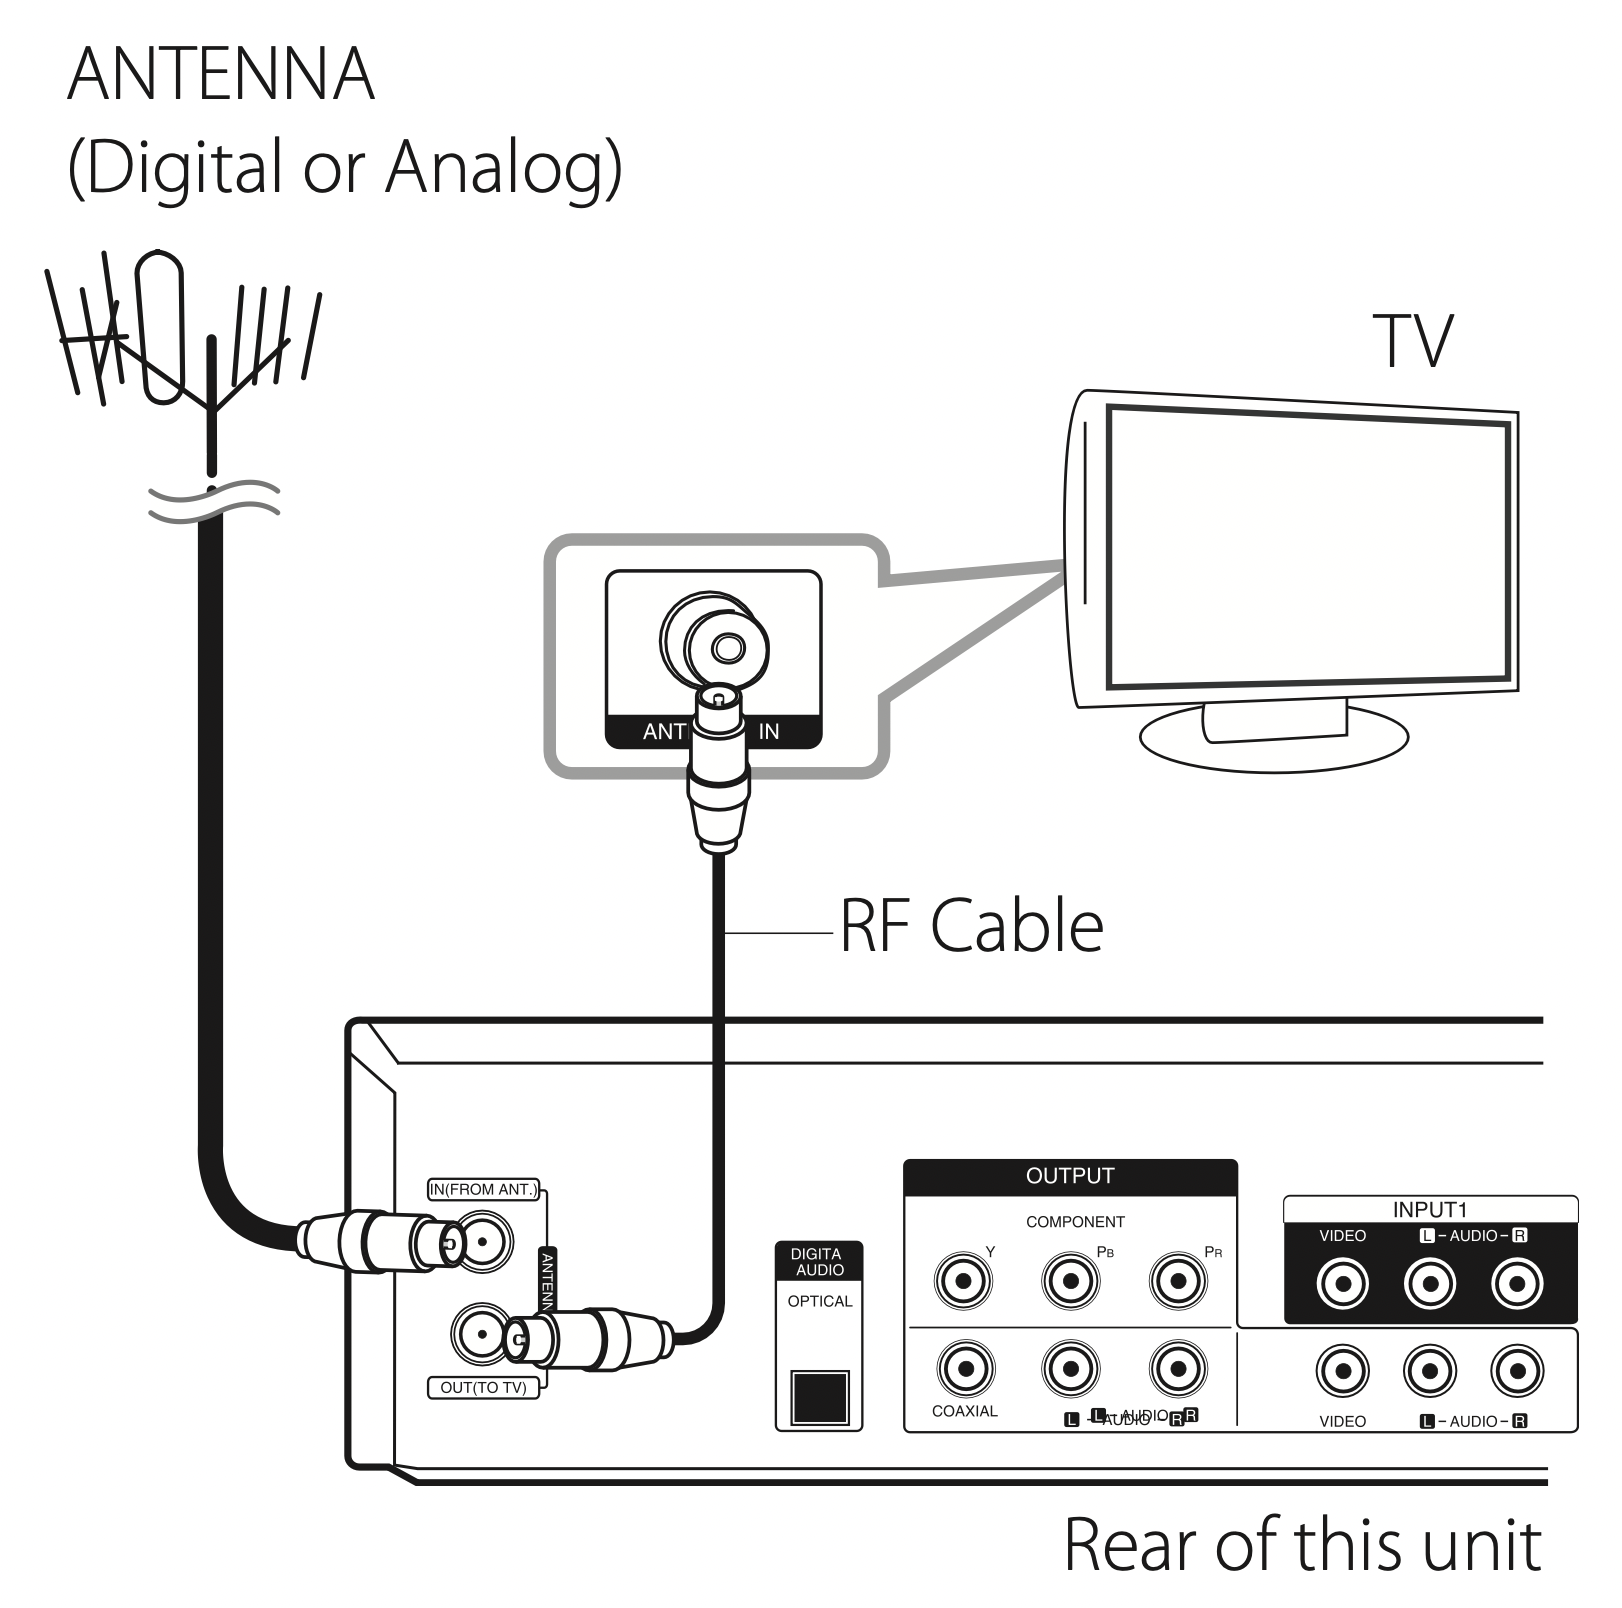
Note: Please observe that this recorder is not designed for the reception of regular digital cable-TV signals (QAMsignal). Despite this, operators of smaller cable networks may have chosen to distribute the digital terrestrial signals (COFDM-signal) in the network. In this case this recorder may well be used. Check with your landlord if you are insecure about what type of TV-signal that is provided in the wall antenna outlet.
HDMI Connection
If you have a HDMI TV or monitor, you can connect it to this player using a HDMI cable (Type A). Connect the HDMI jack on the unit to the HDMI jack on a HDMI compatible TV or monitor.
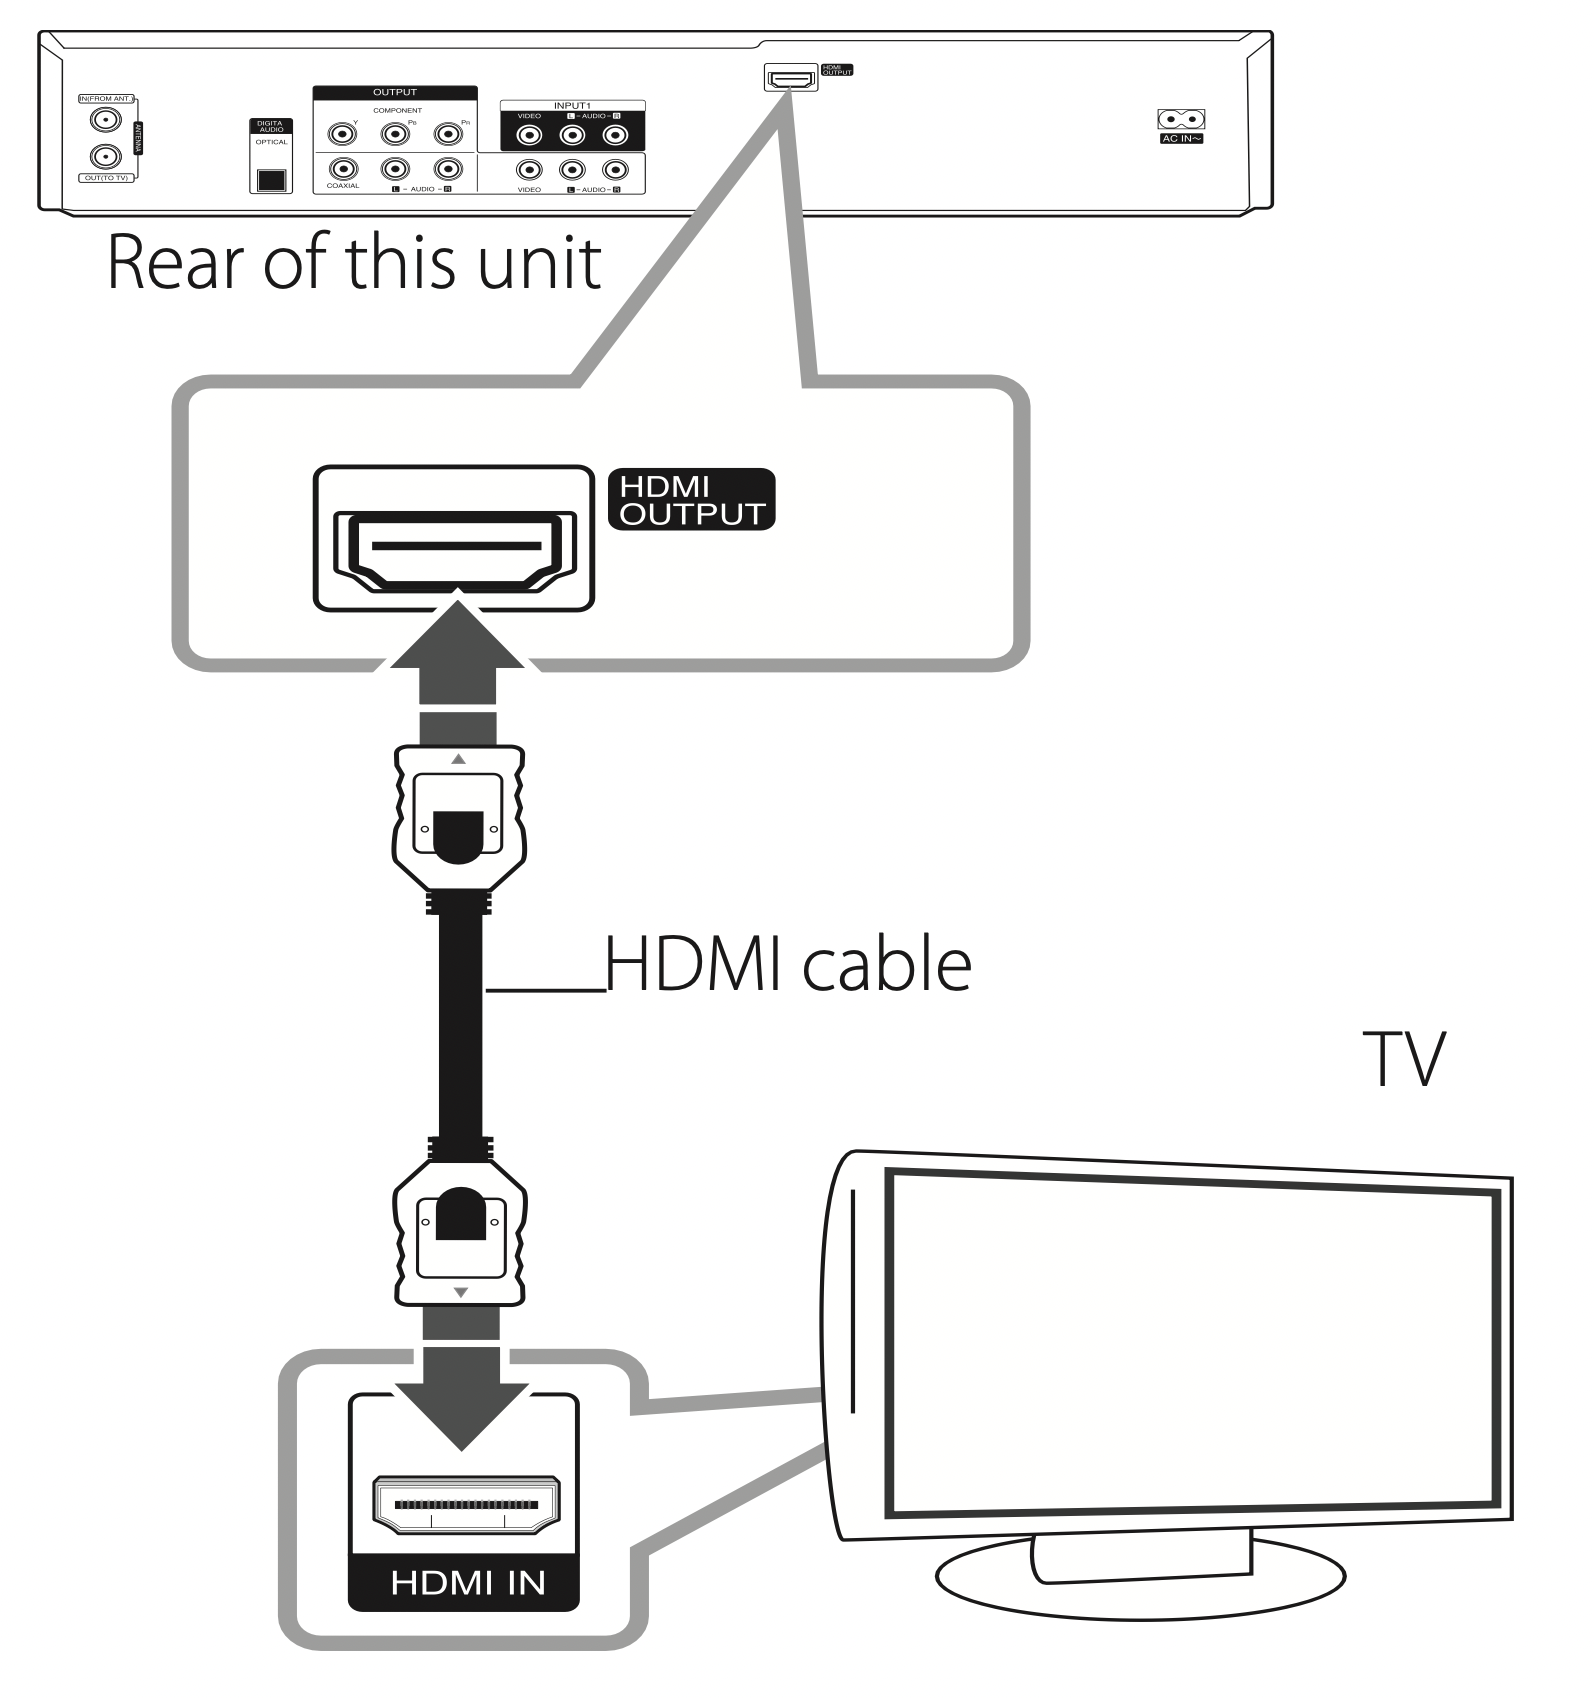
Set the TV’s source to HDMI (refer to TV’s Owner’s manual).
Additional Information for HDMI
- When you connect a HDMI or DVI compatible device make sure of the following:
- Try switching off the HDMI/DVI device and this player. Next, switch on the HDMI/DVI device and leave it for around 30 seconds, then switch on this player.
- The connected device’s video input is set correctly for this unit.
- The connected device is compatible with 720x480p, 1280x720p, 1920x1080i or 1920x1080p video input.
- Not all HDCP-compatible HDMI or DVI devices will work with this player.
- The picture will not be displayed properly with non-HDCP device.
- This player does not playback and TV screen is changed to black screen.
Note
- When you use the HDMI connection, you can change the resolution (576i, 576p, 720p, or 1080i) for the HDMI output using RES. button on the front panel.
- If your TV is NOT capable of handling 96kHz sampling frequency, set the [Sampling Freq.] option to [48 kHz] on the setup menu (See page 27).
- When this choice is made, this unit will automatically convert any 96 kHz signals to 48 kHz so your system can decode them.
- If your TV is not equipped with Dolby Digital and MPEG decoder, set the [Dolby Digital] and [MPEG] options to [PCM] on the setup menu (See page 27).
- If your TV is not equipped with DTS decoder, set the [DTS] options to [OFF] on the setup menu (See page 27). To enjoy DTS multi channel surround, you must connect this recorder to a DTS compatible receiver via one of this recorder’s digital audio outputs.
- The arrow on the cable connector body should face up for correct alignment with the connector on the recorder. If your TV is NOT capable of handling 96 kHz sampling frequency, set the [Sampling Freq.] option to [48 kHz] on the setup menu (See page 27).
About HDMI
HDMI (High Definition Multimedia Interface) supports both video and audio on a single digital connection for use with DVD Players, Set-Top Boxes, and other AV devices.
HDMI was developed to provide the technologies of HDCP (High Definition Contents Protection). HDCP is used to protect digital content transmitted and received.
HDMI has the capability to support standard, enhanced, or high-definition video plus standard to multi-channel surround-sound audio, HDMI features include uncompressed digital video, a bandwidth of up to 5 gigabytes per second, one connector (instead of several cables and connectors), and communication between the AV source and AV devices such as DTVs.
Component Video Connection
Connect the COMPONENT VIDEO OUT jacks on the player to the corresponding input jacks on the TV using component video cable. Connect the left and right AUDIO OUT jacks of the player to the audio left and right IN jacks on the TV using the audio cables.
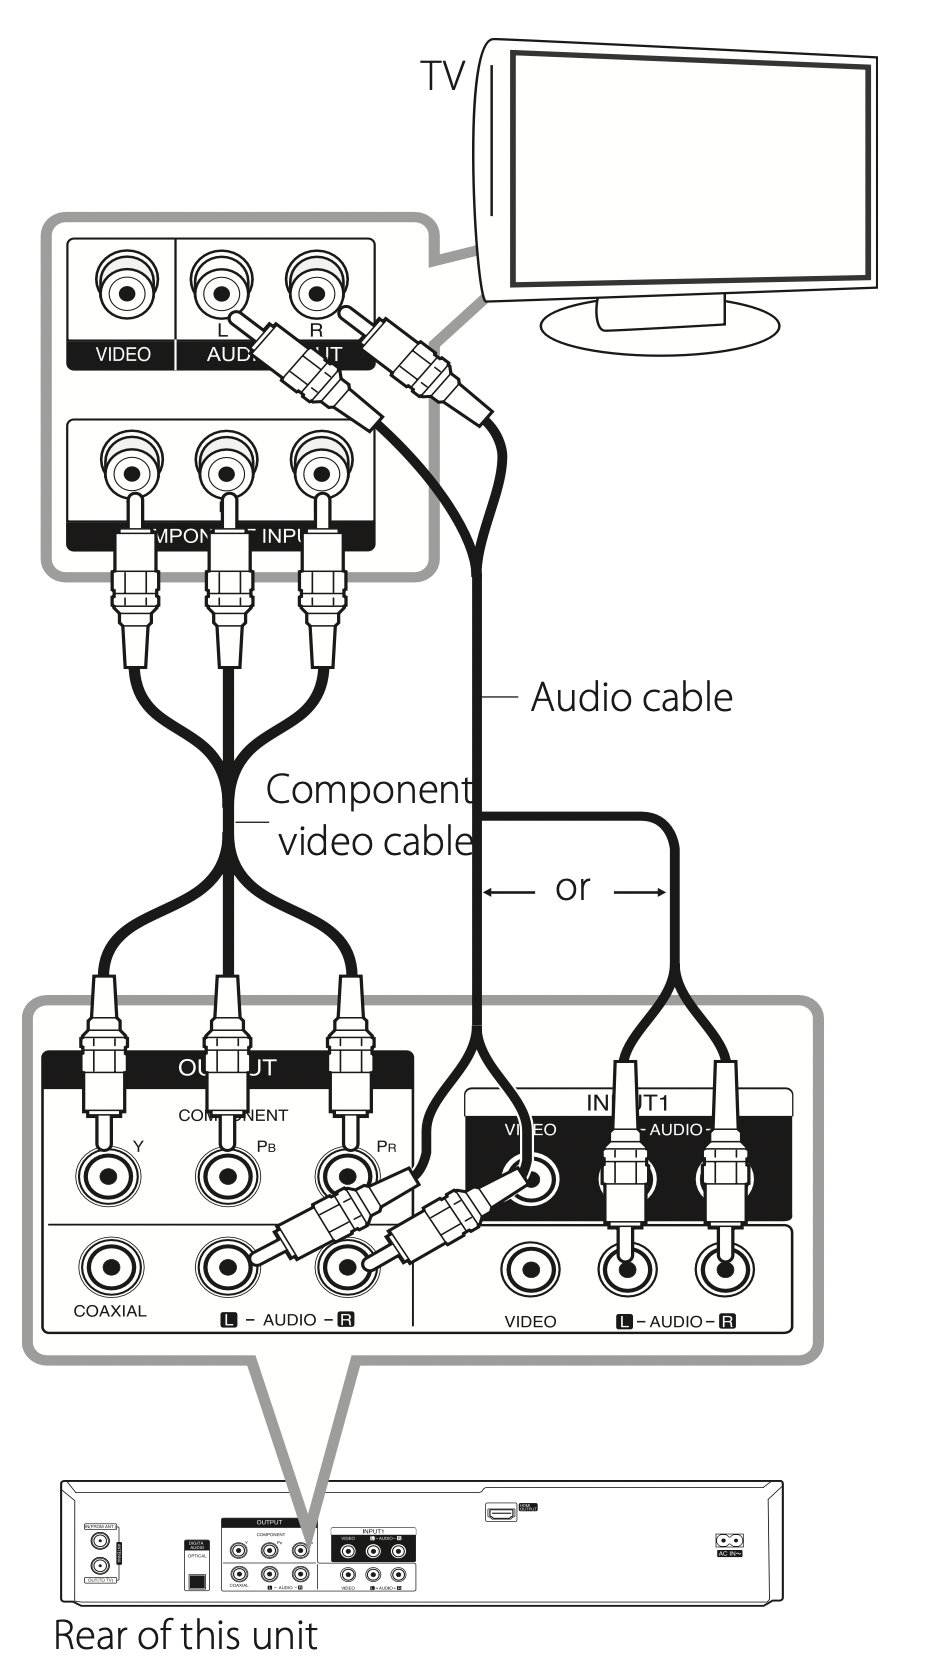
Note: Set the resolution to 576p for progressive signal using RES. button on the front panel.
Connecting to an Amplifier
Connecting to an Amplifier via Digital Audio Output
Connecting to an amplifier equipped with two channel analog stereo
Connecting to an amplifier equipped with two channel digital stereo (PCM) or to an Audio/Video receiver equipped with a multi-channel decoder (Dolby Digital™, MPEG 2, or DTS)
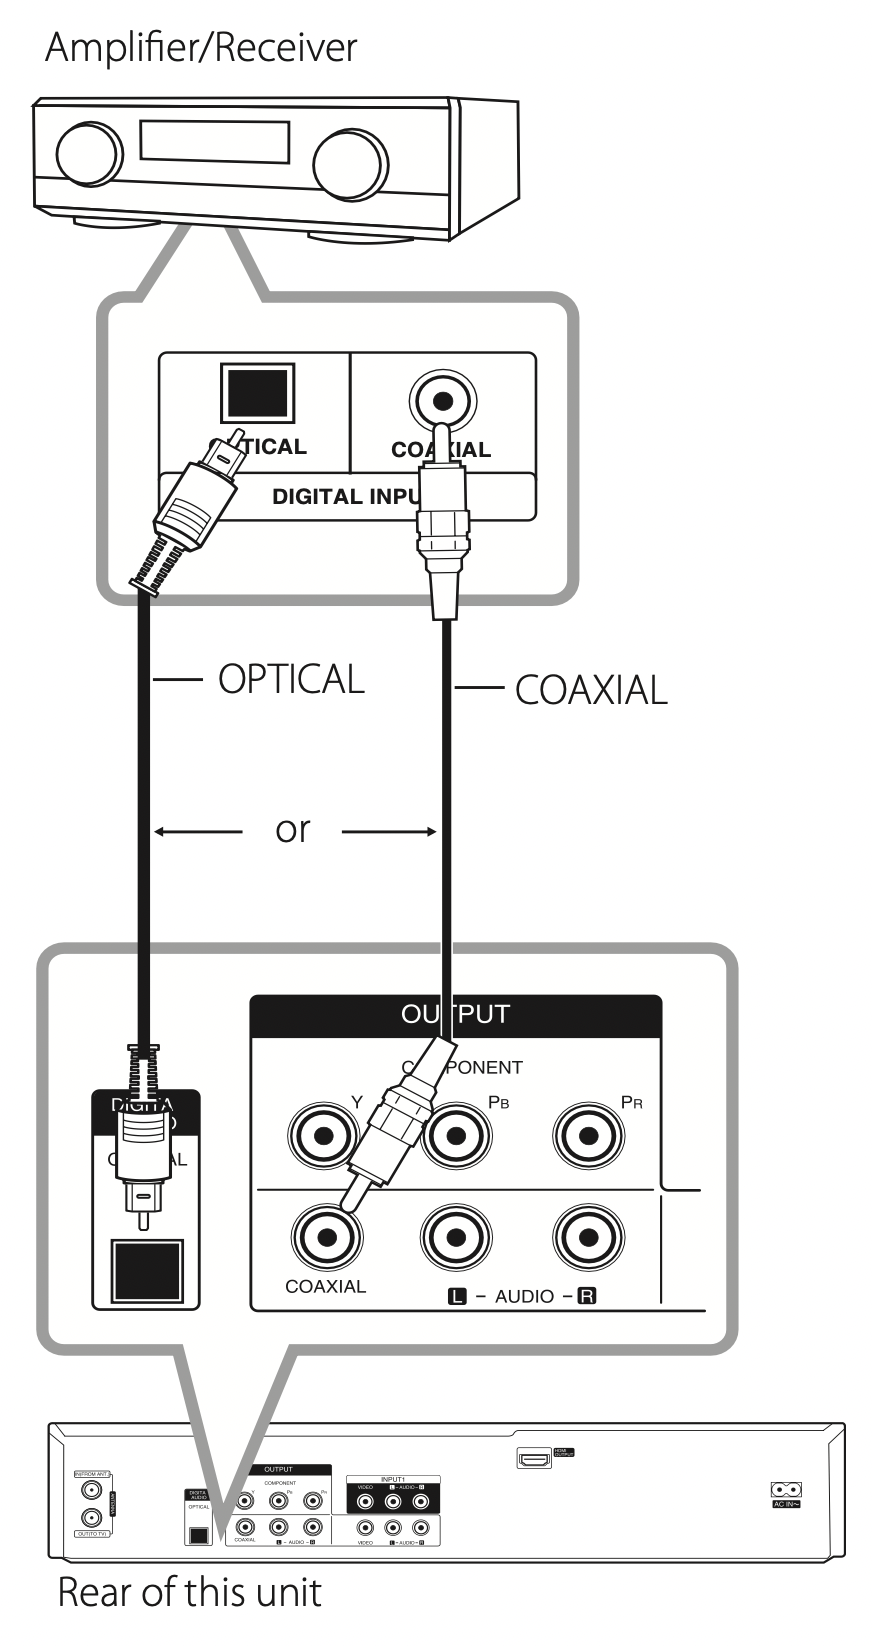
- Connect one of the Recorder’s DIGITAL AUDIO OUTPUT jacks (OPTICAL or COAXIAL) to the corresponding in jack on your amplifier. Use an optional digital (Optical or Coaxial) audio cable.
- You will need to activate the Recorder ’s digital output. (See [Audio Settings] on page 27).
Note
- If the audio format of the digital output does not match the capabilities of your receiver, the receiver will produce a strong, distorted sound or no sound at all.
- Six Channel Digital Surround Sound via digital connection can only be obtained if your receiver is equipped with a Digital Multi-channel decoder.
- To see the audio format of the current DVD in the on-screen display, press AUDIO.
- This Recorder does not perform internal (2 channel) decoding of a DTS sound track. To enjoy DTS multi channel surround, you must connect this Recorder to a DTS compatible receiver via one of this Recorder’s digital audio outputs.
- While viewing a digital channel, the 2 channel stereo audio is only output through the audio output jacks.
- A digital multi-channel connection provides the best sound quality. For this you need a multi-channel Audio/Video receiver that supports one or more of the audio formats supported by your Recorder (MPEG 2, Dolby Digital and DTS). Check the receiver manual and the logos on the front of the receiver.
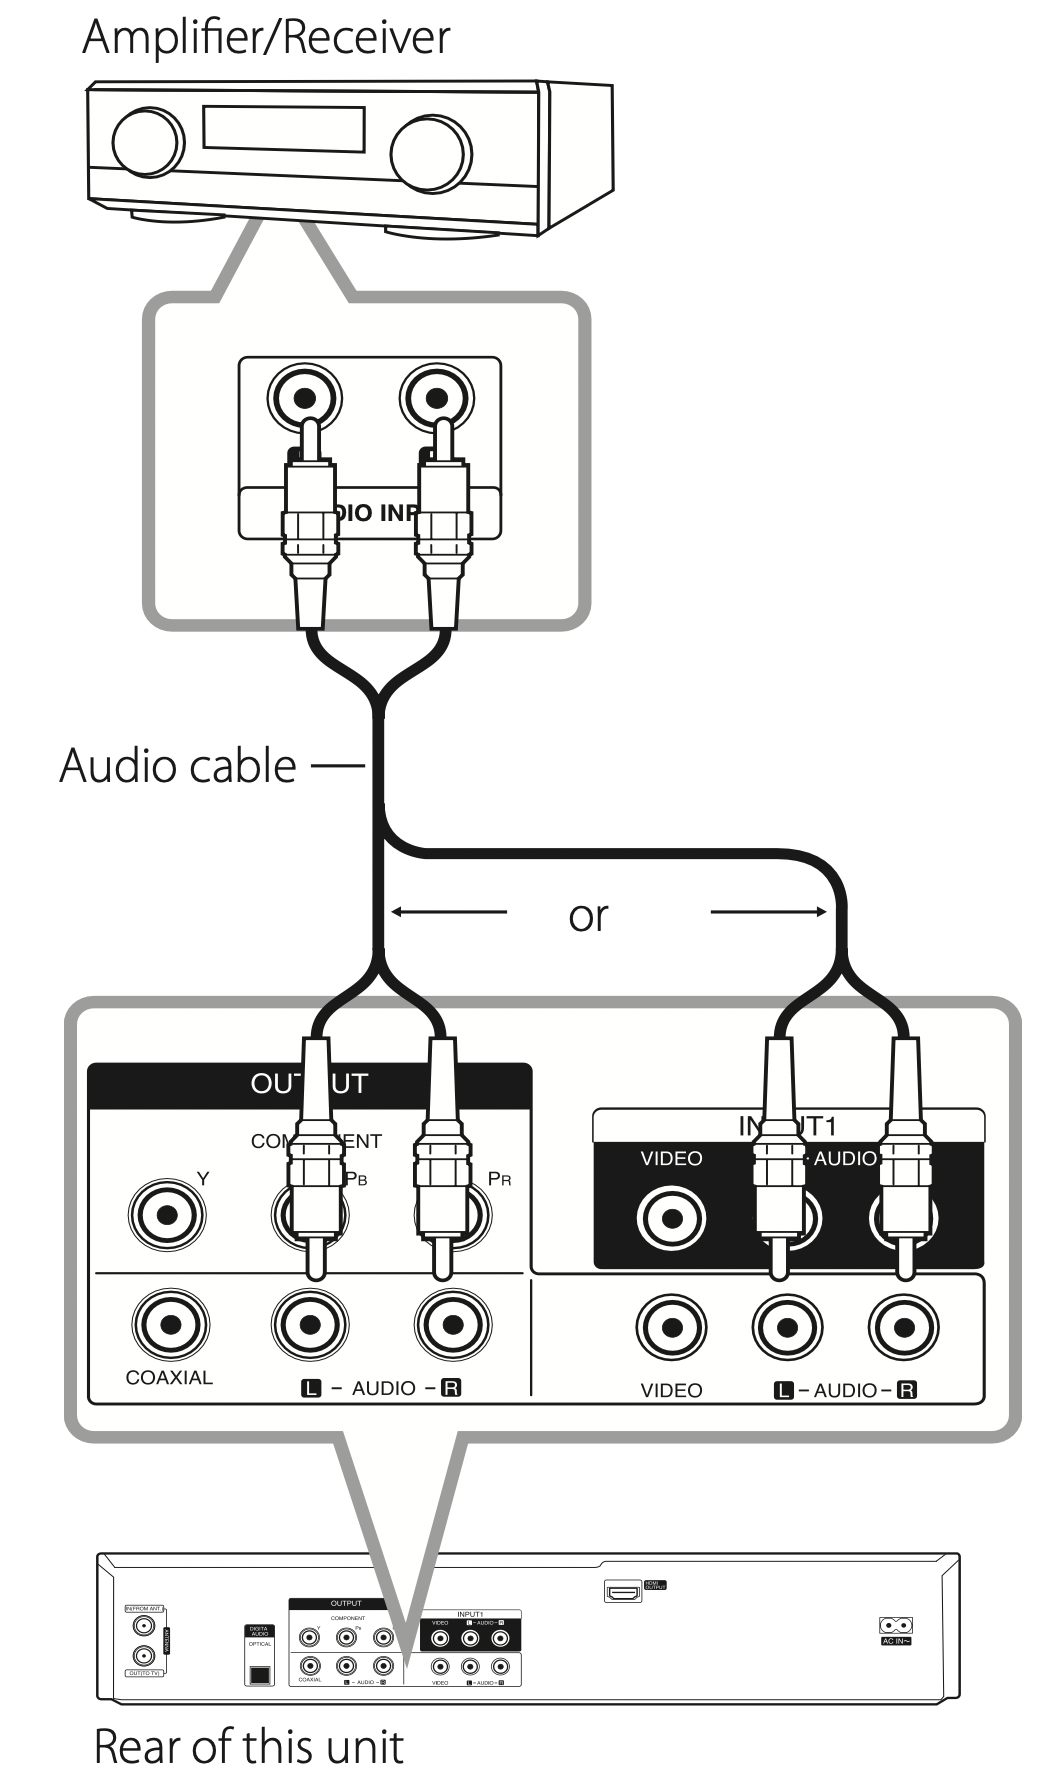
Connecting to an Amplifier via 2 Channel Audio Output
Connect the Left and Right 2CH AUDIO OUT jacks on the player to the audio left and right in jacks on your amplifier, receiver, or stereo system using audio cables.
Connection to Another device
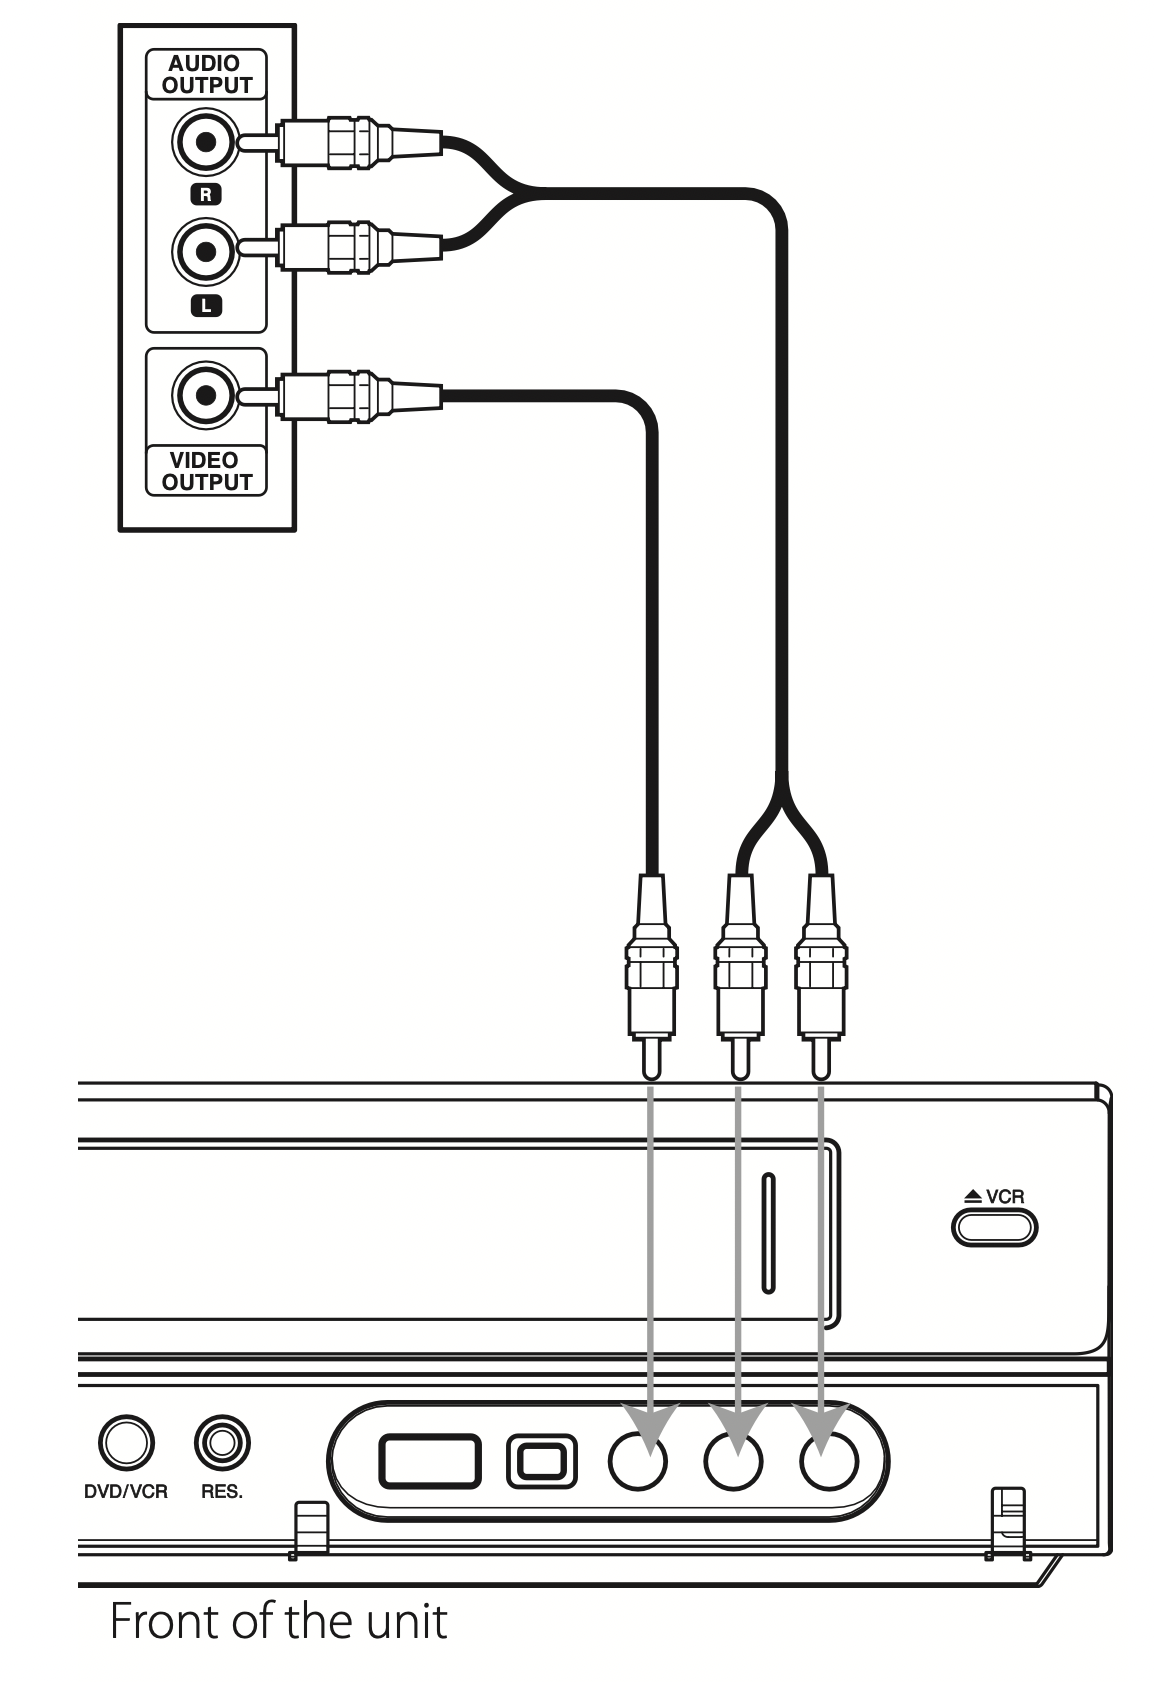
Accessory Audio/Video (A/V) Connections to Recorder
Connect the input jacks (AV IN 2) on the recorder to the audio/video out jacks on your accessory component, using audio/video cables.
Connecting a Digital Camcorder
Using the front panel DV IN jack, it is possible to connect a DV digital camcorder or video deck or DVD-R/RW recorder and digitally transfer DV tapes or DVD-R/RW discs to DVD-R/RW.
Use a DV cable (not supplied) to connect the DV in/ out jack of your DV camcorder/video deck to the front panel DV IN jack of this recorder.
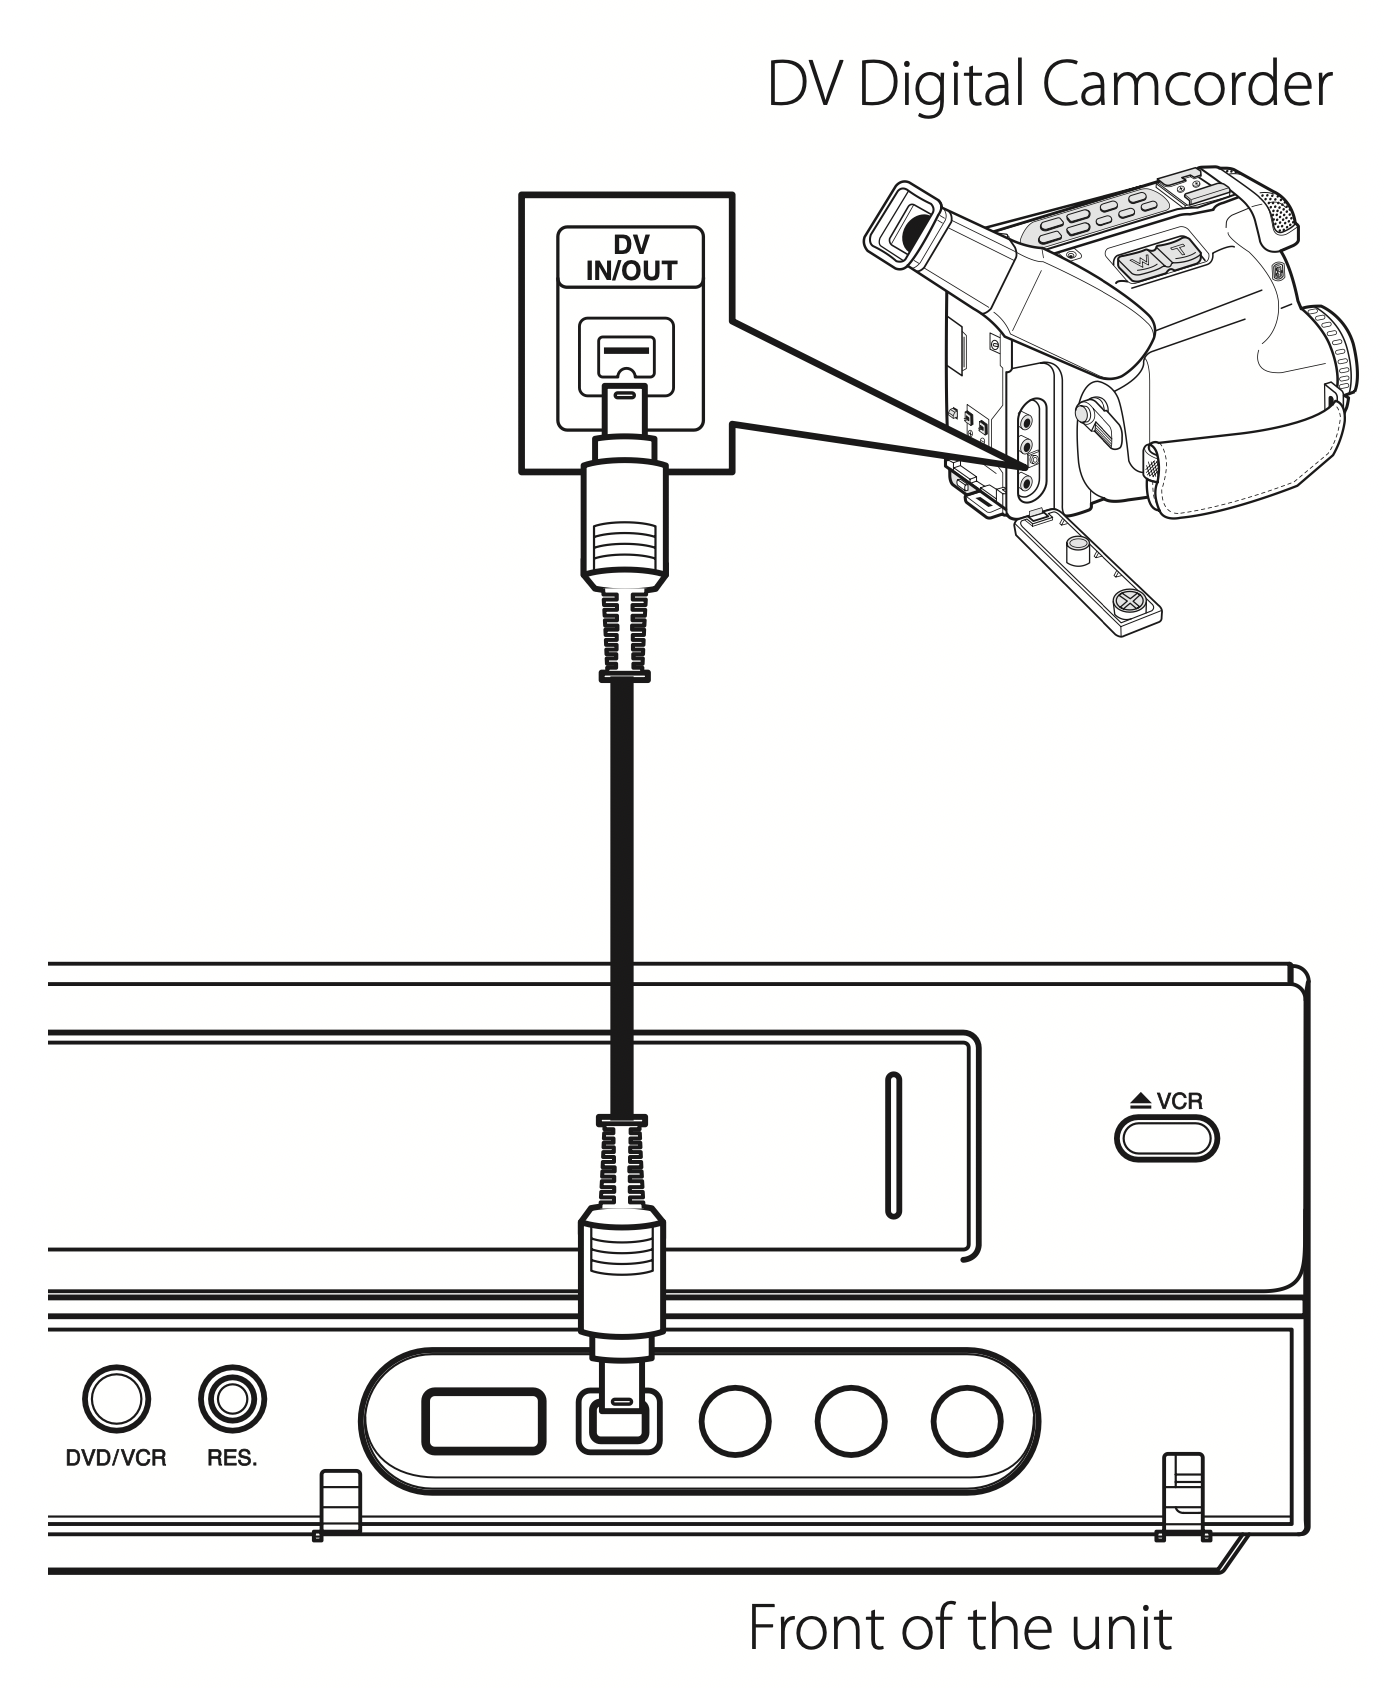
Note
- This jack is for connection to DV equipment only. It is not compatible with digital satellite tuners or D-VIDEO video decks.
- Disconnecting the DV cable while recording a contents of the connected digital camcorder may result in malfunction.
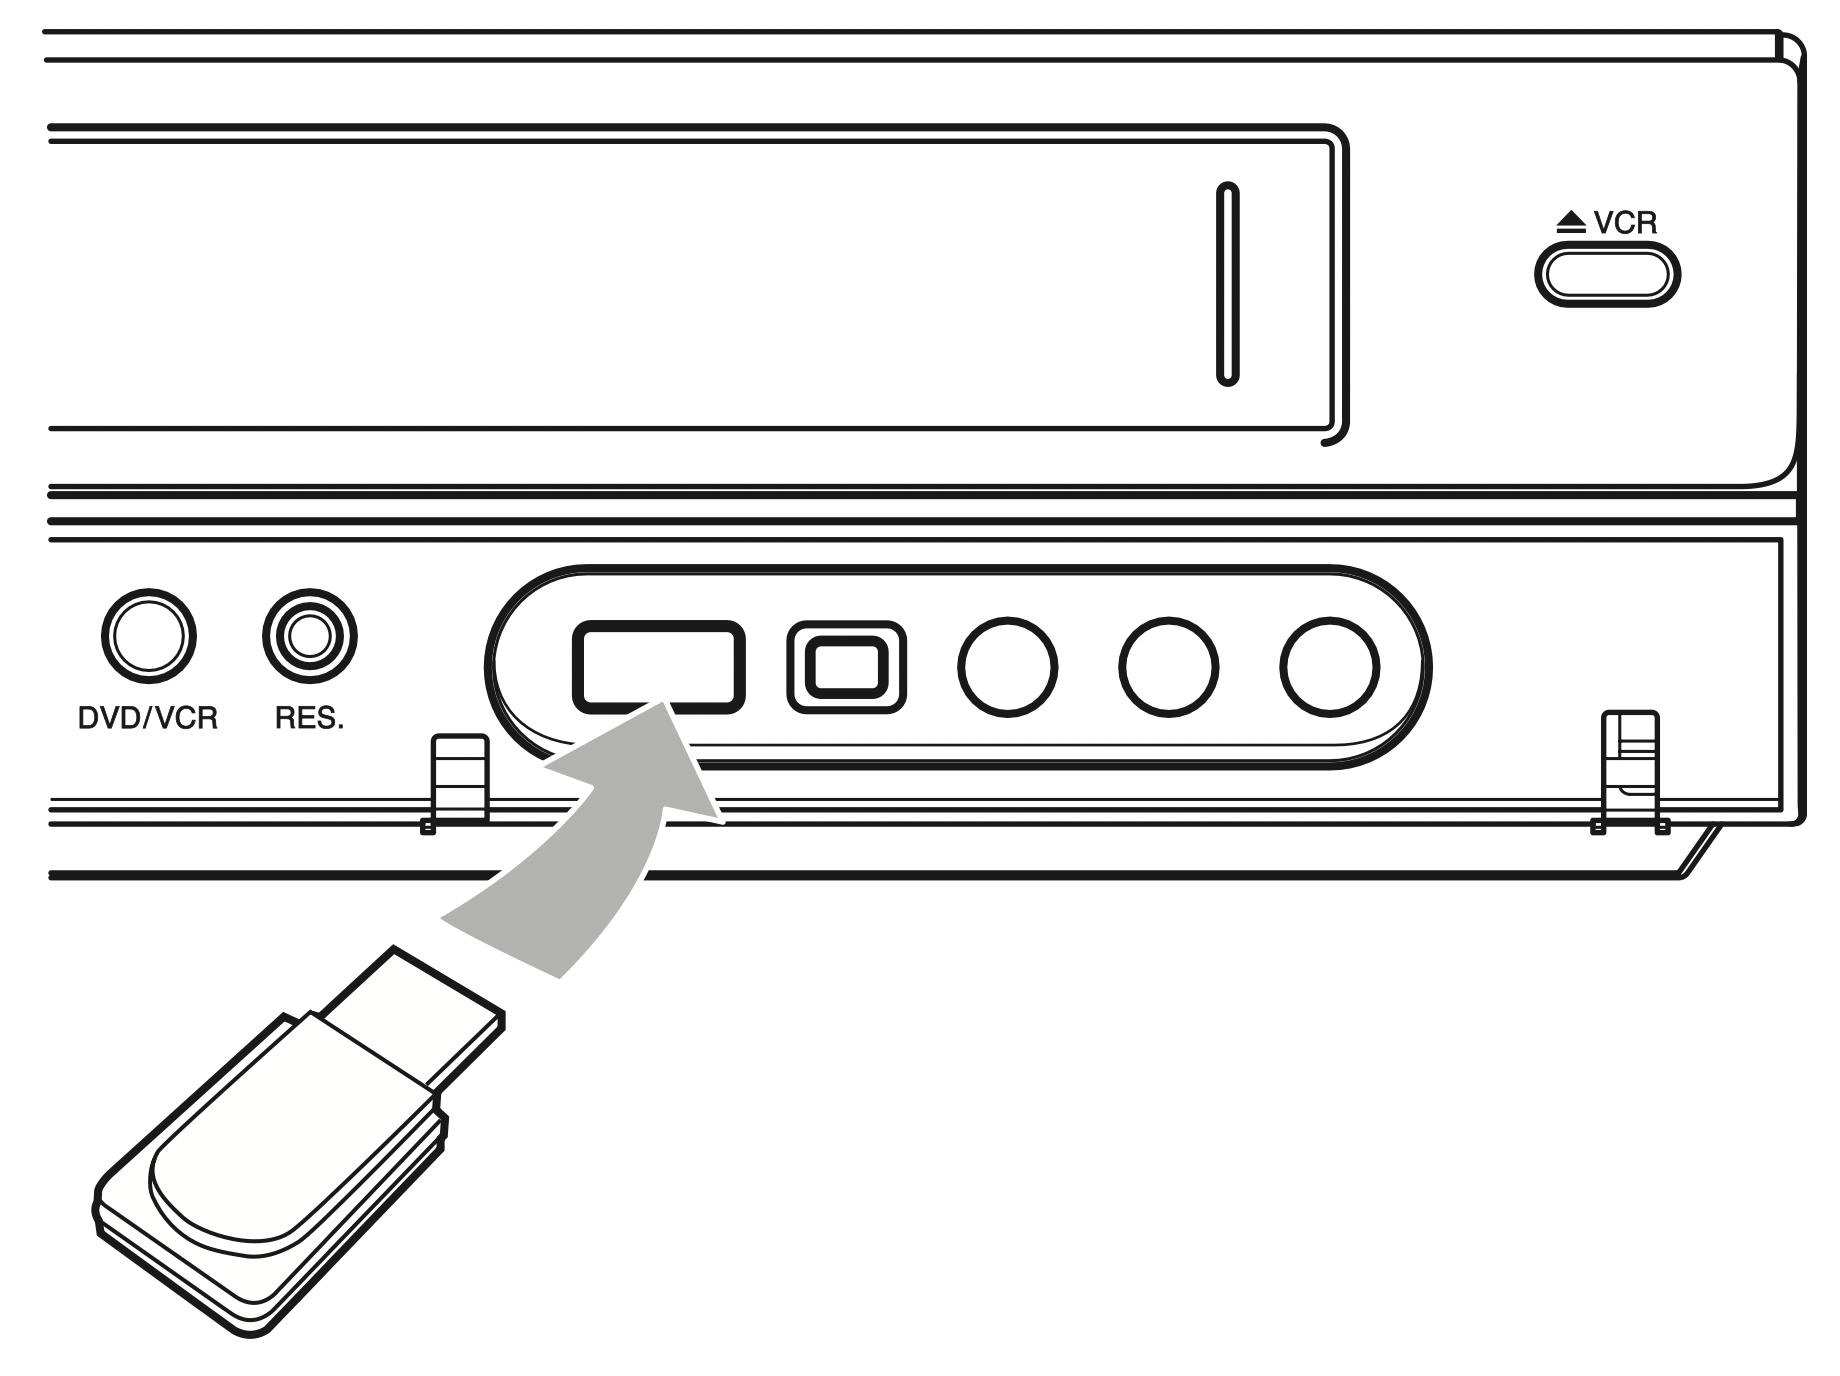
USB device connection
This unit can play movie, music and photo files contained on a USB device.
Playback content in the USB device
- Insert a USB device into the USB port until it fits into place.
- Press HOME ().
- Select [Movie], [Photo] or [Music] using
 and press ENTER ().
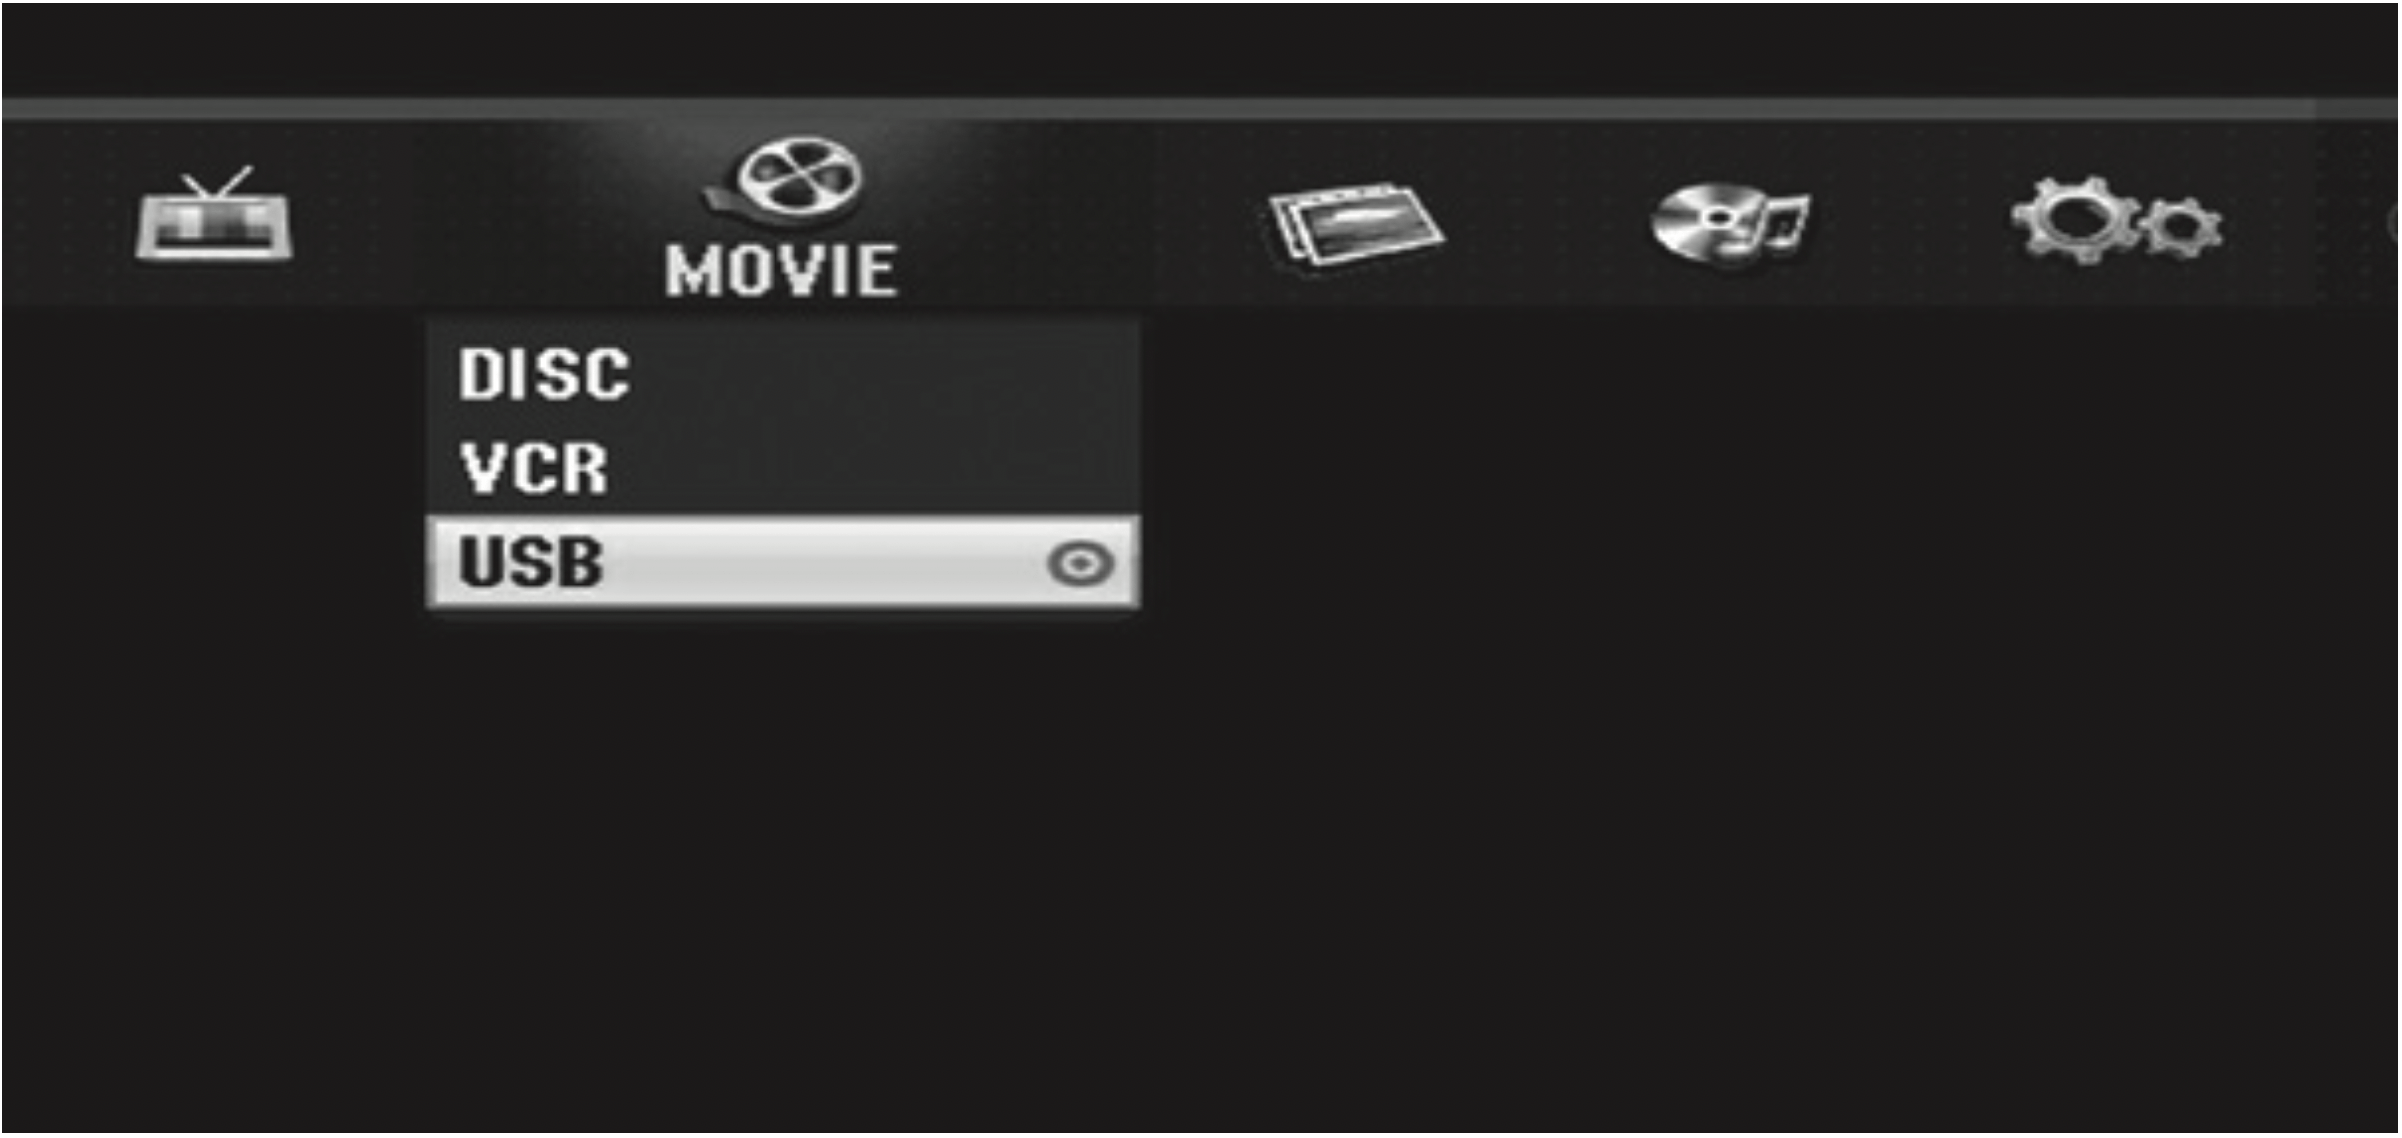
- Select the [USB] option using and press ENTER ().
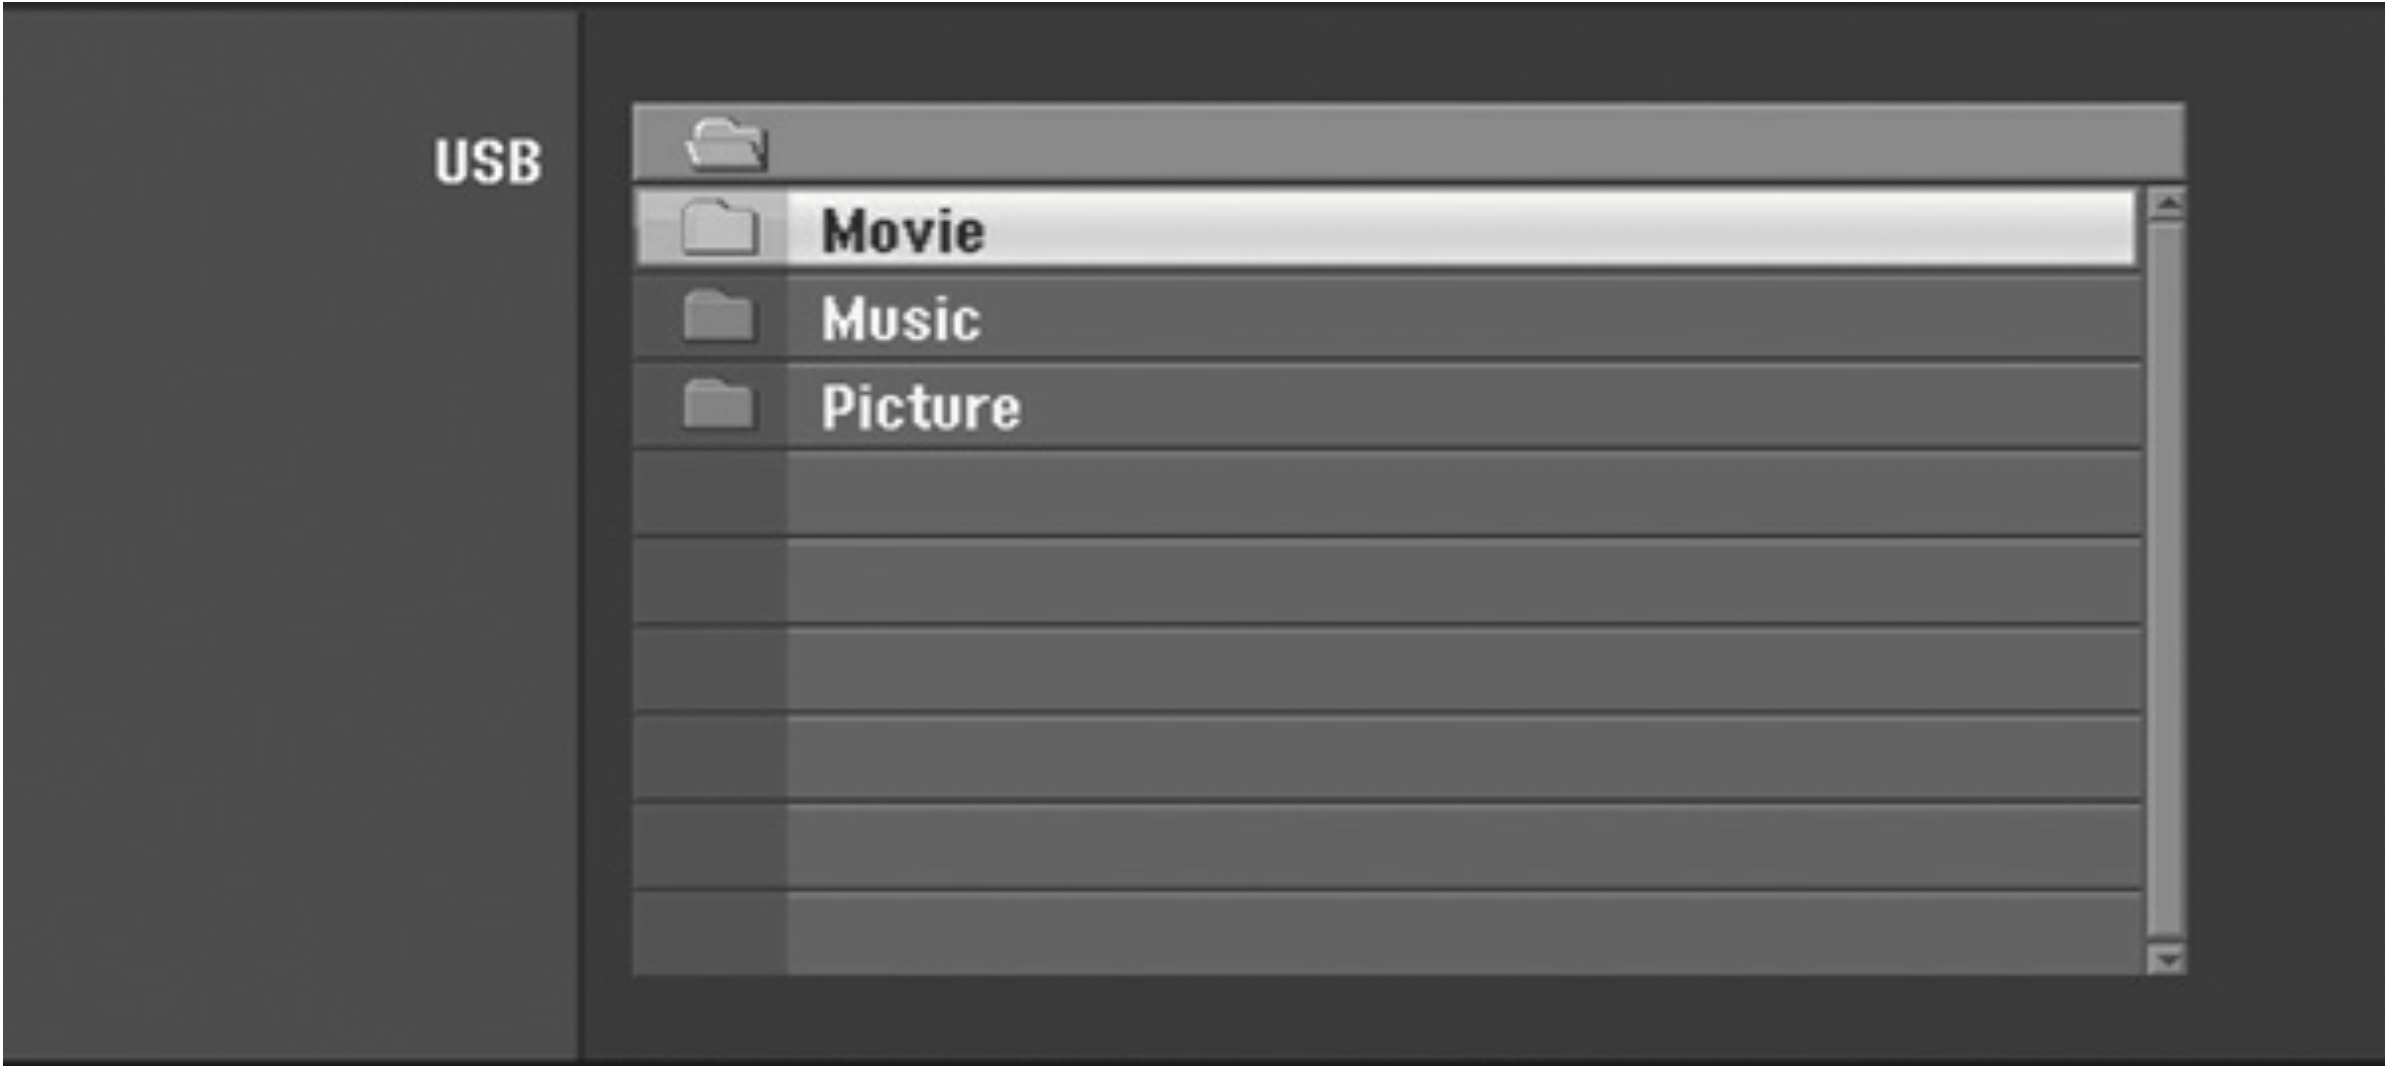
- Select a file using , and ENTER () to play the file.
- Withdraw the USB device carefully.
Compatible USB Flash Drive
- USB Flash Drive which require additional program installation when you have connected it to a computer, is not supported.
- USB Flash Drive: USB Flash Drive that support USB1.1.
Note
- The contents on the disc cannot be moved or copied to USB Flash Drive.
- Keep the USB Flash Drive out of reach of children. If swallowed, seek medical advice immediately.
- This unit supports only USB Flash Drive with FAT16 or FAT32 format.
- The USB Flash Drives which require additional program installation when you have connected it to a computer are not supported.
- This unit is compatible with the Flash type USB device that supports USB 1.1.
- This unit may not support some USB Flash Drives.
- Do not extract the USB Flash Drive during operation (play, etc.). It may cause a malfunction on this unit.
Operating
TV Viewing
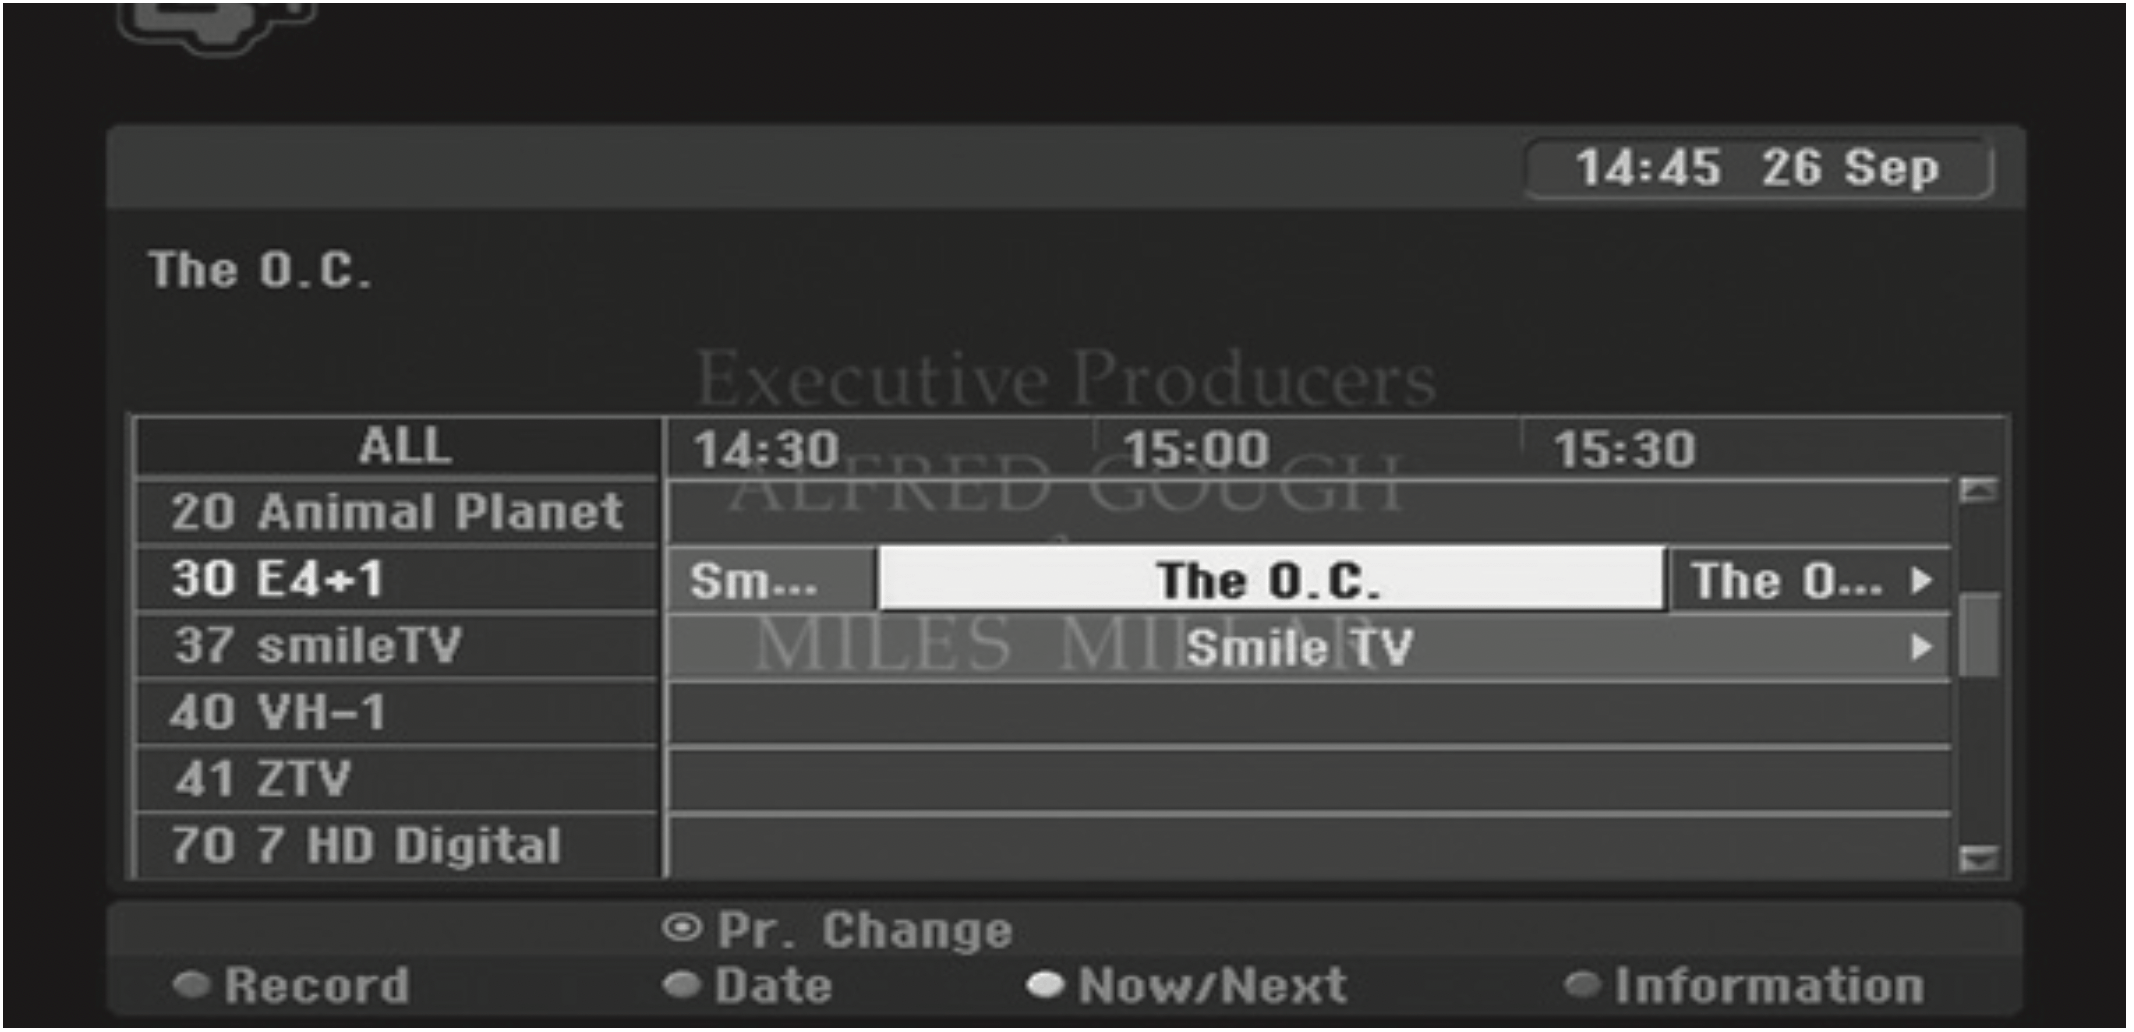
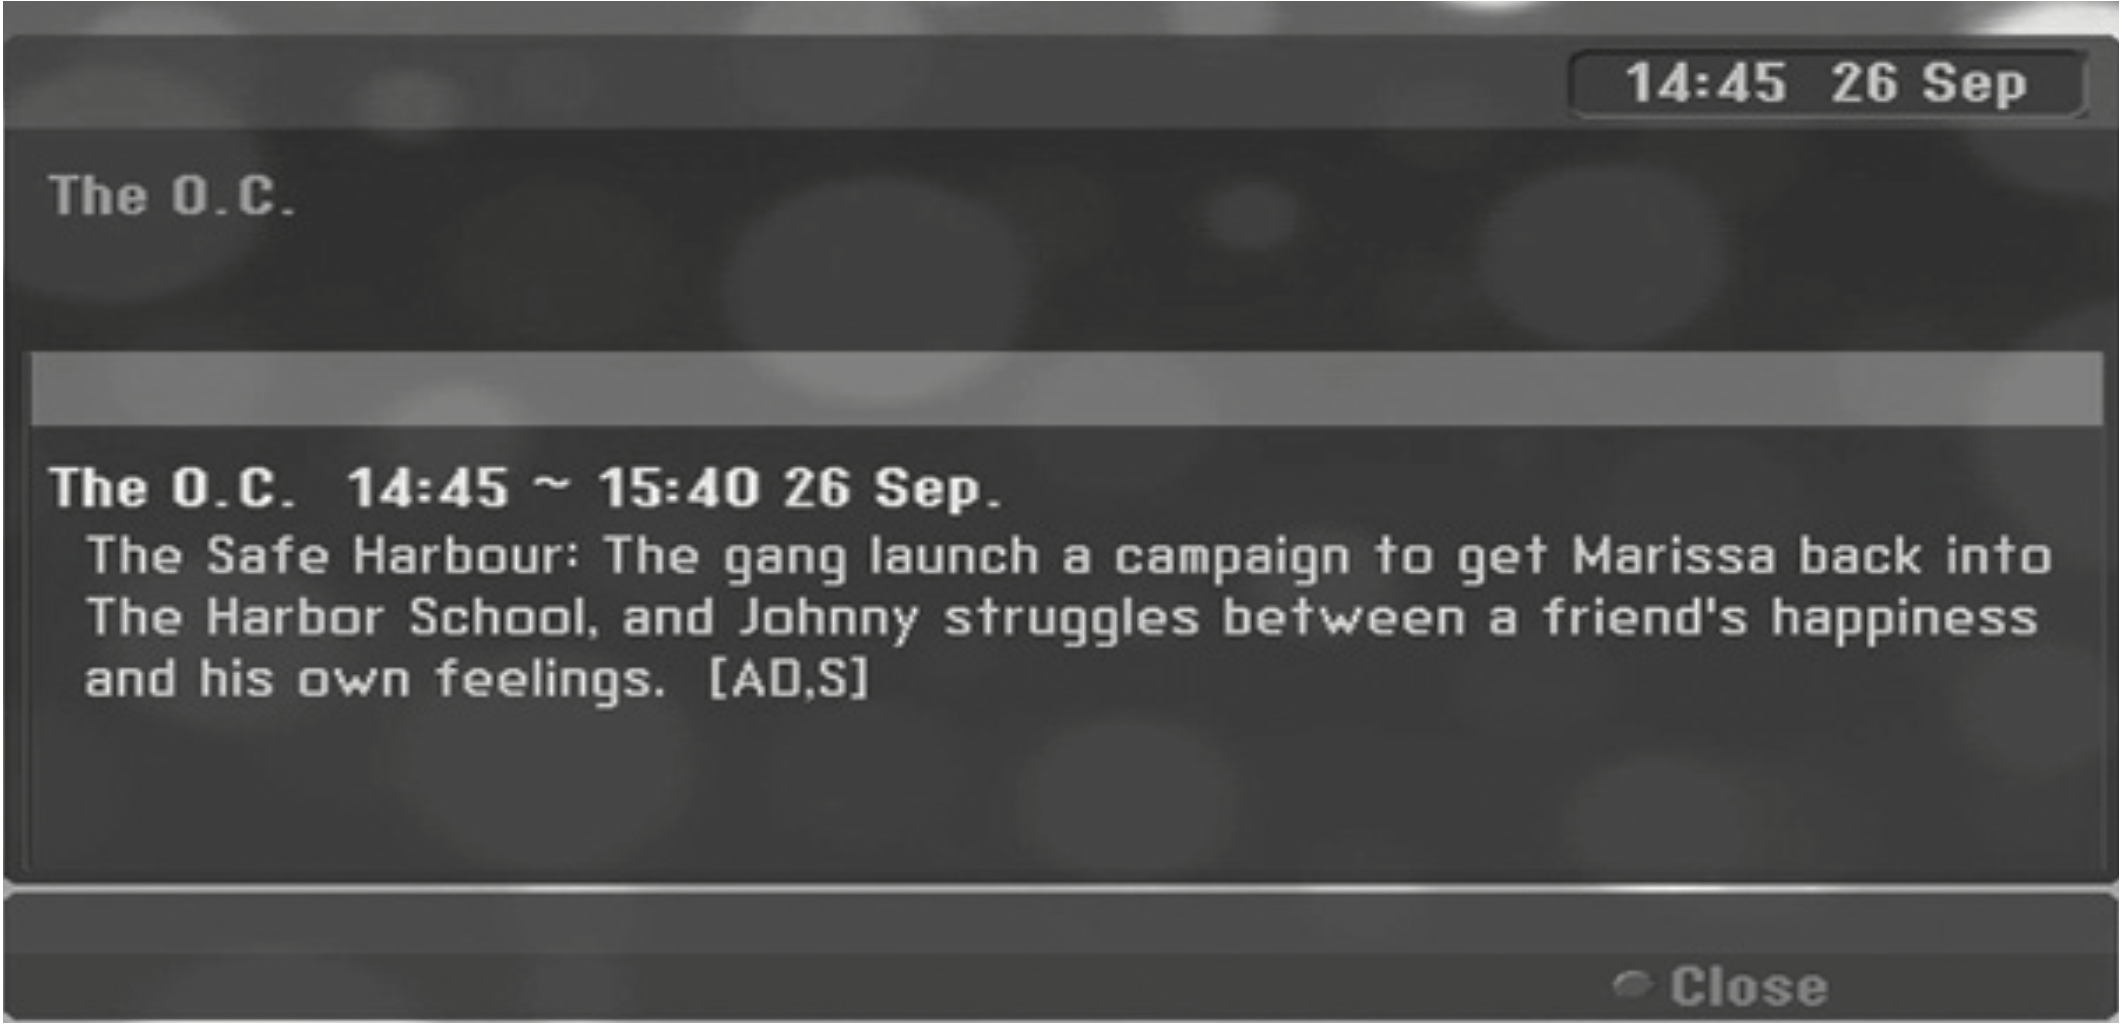
Viewing the EPG (Electronic Programme Guide)
The Electronic Programme Guide schedule and program information for digital programs. They also provide local over-the-air programs information including conventional digital programs. Use the Electronic Programme Guide to find programs easily and conveniently and to view schedule and descriptive program information for the programs.
To Display the Program Guide
Press the EPG button on your remote control.
To Exit the Program Guide
Press the RETURN () button to return to the last program you tuned to.
To change guide menu
The guide screen provides two search menus.
Press yellow color button when the Program Guide is displayed.
- Now/Next: The screen shows now and next programs.
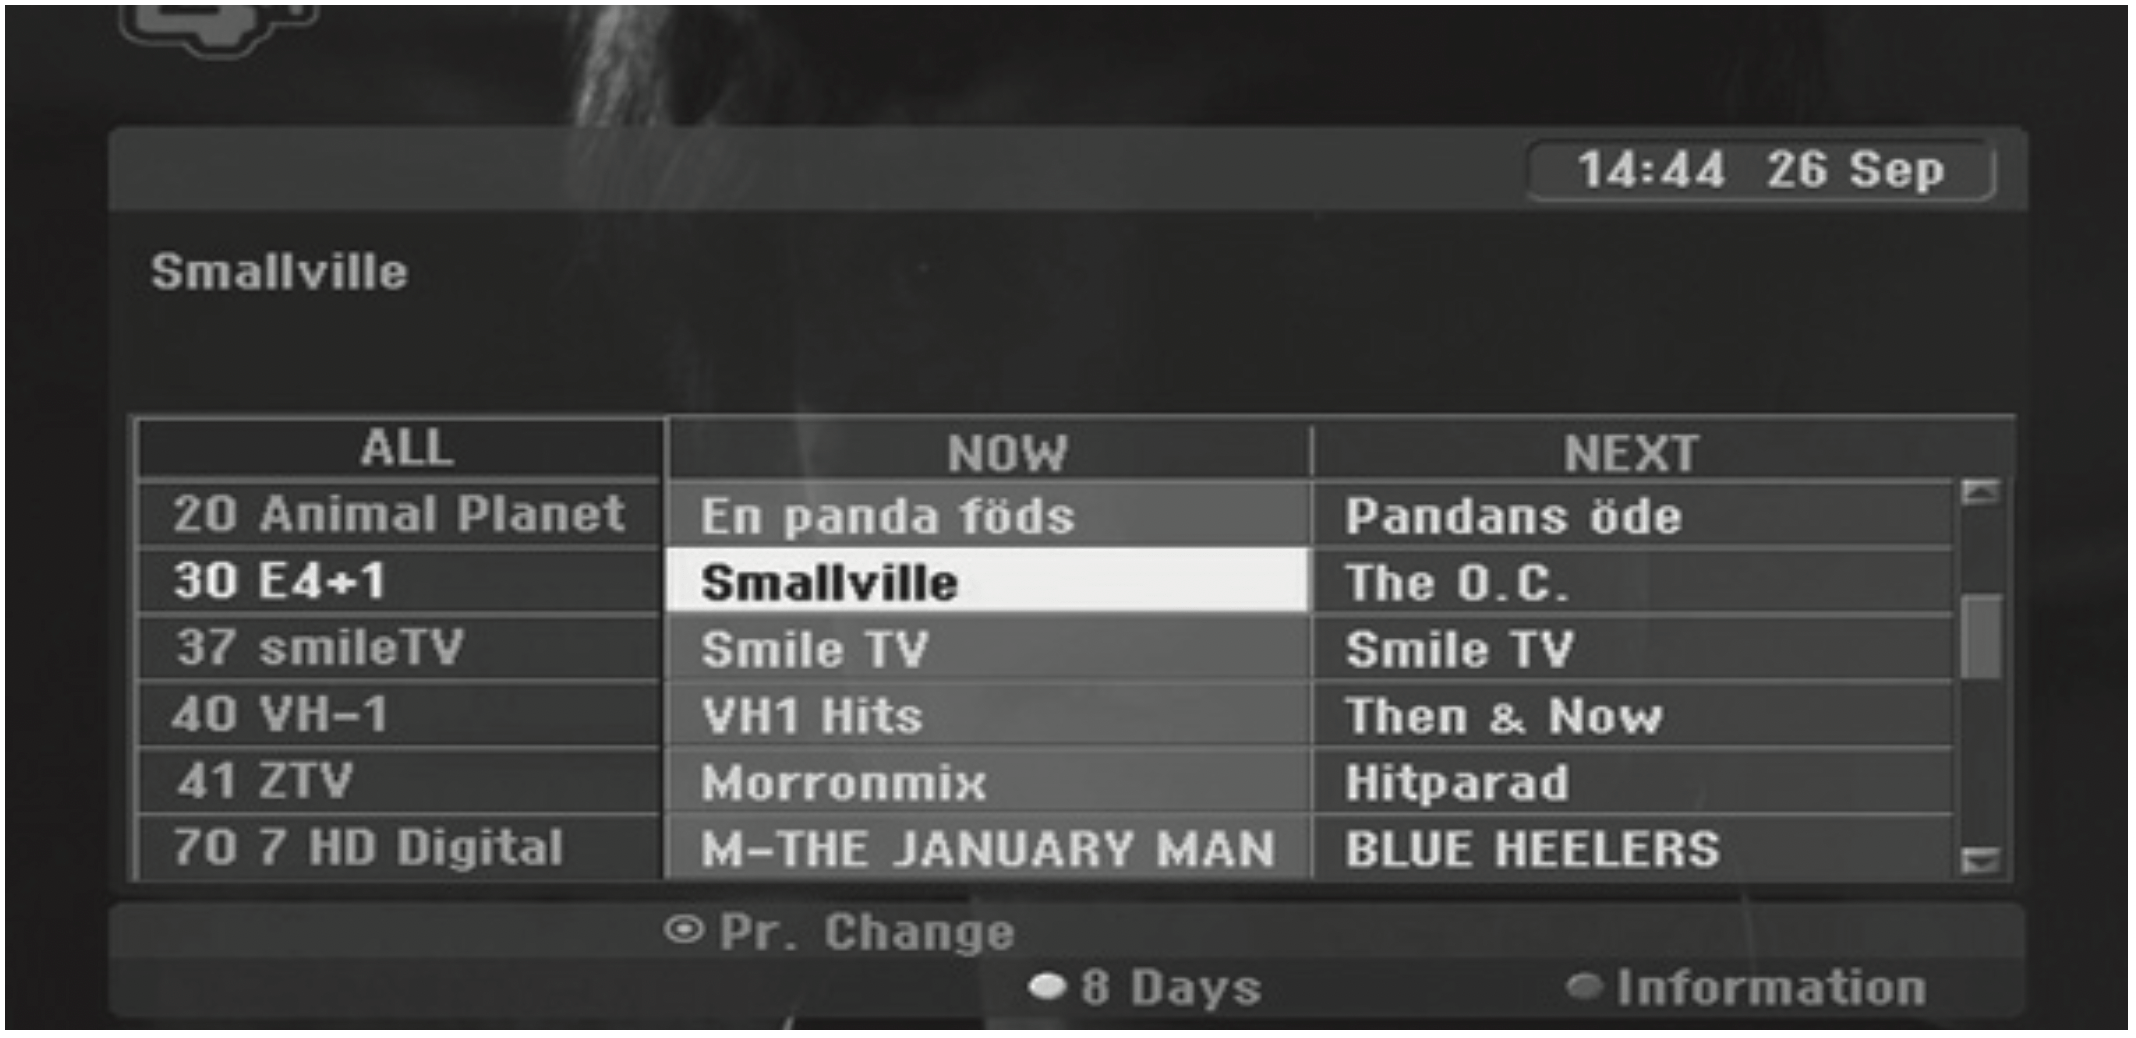
- 8 Days: The screen shows programs within 8 days.
To navigate through programs on the Guides
Use on your remote control to navigate the guide screen.
You can move faster through programs by scrolling page-by-page with the or buttons on the remote control. Each button stroke scrolls one page up or down.
To tune to another current channel
Use to select a current channel then press ENTER (). You can watch the channel.
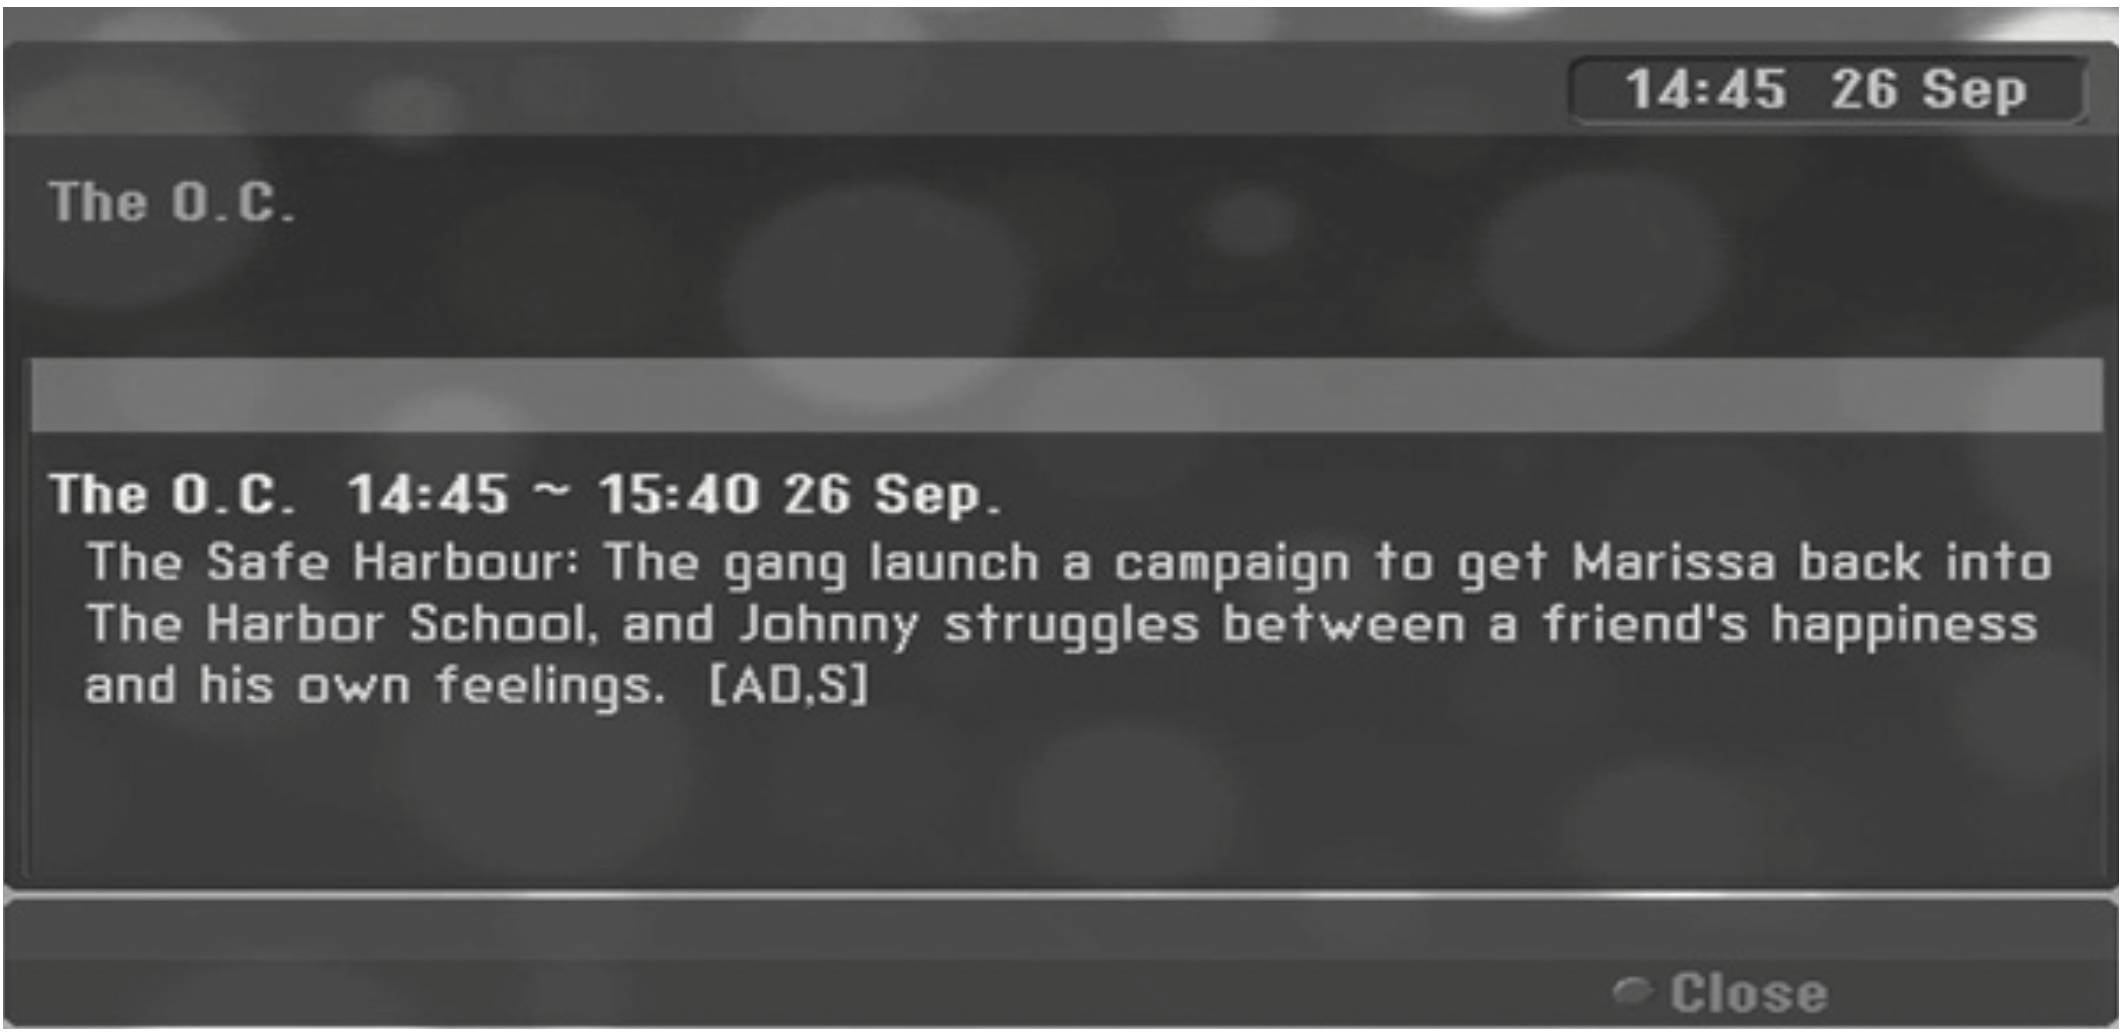
To display the Full Information window
You can view detail informations for the highlighted program. Press blue color button to display detail information window. To exit the detail information window, press blue color button again.
To change date
When the Program Guide with 8 days is displayed, you can also change the date of the Program Guide by pressing the green color button then use to select a date then press ENTER ().
Timer Recording with Program Guide
You can set a timer record using program guide with 8 days.
- Display Program Guide with 8 days.
- Select a program then press red color button.
The red timer icon will be displayed and the program will be memorized by the recorder. You can check the programming on the Timer Record List menu (see page 50).
- To release the timer recording, select the program then press red color button. The red timer icon disappears.

Program Selection
You can select a program as shown below.
Number buttons
Use Number (0-9) buttons to select a program directly.
FAV button
Press to scroll through your favorite programs.
PR +/– buttons
Use PR +/– on the remote control or PROG on the front panel to cycle the recorder through the programs in memory.
Program List
Three types of program lists are provided for easy and quick program searching.
ANALOG TV: The list of all analog TV programs.
DIGITAL TV: The list of all digital TV programs.
RADIO: The list of all Radio programs.
Displaying Channel List and Changing Channel
You can display channel list using the ENTER () button and switch into other channel on the channel list.
- Press ENTER () while watching a program to display the channel list.
- Select your desired channel using the and press ENTER () to change the channel.

Switching Program List
You can switch the program list to DIGITAL TV, ANALOG TV, or RADIO.
- Press
 to move the highlight position to top of the program list.
- Press to select a [DIGITAL TV], [ANALOG TV], or [RADIO]. Selected program list appears.

Displaying the Favorite Program List
You can display favorite channel list: The list of the favorite channels with several-groups that you can organise channels by your private taste.
Note
To set a favorite program, use [Program Edit] option in the Setup menu. (See page 22-23.)
- Press ENTER () while watching a program to display the program list.
- Press Red button. The favorite options appears.
- Press to select a favorite option then press ENTER ().
Playing a DVD
Playback Setup
Before using the remote control, press the DVD button to select the device to be operated.
Turn the TV on and select the video input source connected to the Recorder.
Audio system: Turn the audio system on and select the input source connected to the Recorder.
- Press OPEN/CLOSE () to open the disc tray.
- Load your chosen disc in the tray, with the playback side down.
- Press OPEN/CLOSE () to close the tray.
REAd appears on the display window, and playback starts automatically. If playback does not start, press (PLAY).
In some cases, the disc menu might appear instead.
Note
If a menu screen is displayed
- The menu screen may be displayed first after loading a DVD which contains a menu.
- Use the buttons to select the title/chapter you want to view, then press ENTER () to start playback.
- Press TITLE or MENU/LIST to return to the menu screen.
- If Parental Control is set and the disc is not within the Rating settings (not authorized), the 4-digit code must be entered and/ or the disc must be authorized (see “DVD Rating”, on page 28).
- DVDs may have a Region Code. Your recorder will not play discs that have a region code different from your recorder. The region code for this recorder is 2 (two). channels for cable subscribers.
General Features
Note: Unless stated otherwise, all operations described use the remote control. Some features may also be available on the Setup menu.
Moving to another TITLE
When a disc has more than one title, you can move to another title as follows:
Press DISPLAY twice then use to select the title icon. Then, press the appropriate numbered button (0-9) or to select a title number.
Moving to another CHAPTER/ TRACK
When a title on a disc has more than one chapter/ track, you can move to another chapter/track as follows:
Press SKIP ( / ) briefly during playback to select the next chapter/track or to return to the beginning of the current chapter/track.
Press SKIP () twice briefly to step back to the previous chapter/track.
To go directly to any chapter/track during playback, press DISPLAY twice. Then, use to select chapter icon (or select track icon). Then, enter the chapter/track number using the numbered buttons (0-9) or press .
Search
- Press SCAN ( or ) during playback.
The recorder will now go into SEARCH mode.
- Press SCAN ( or ) to select the required speed:
 (Reverse play), ,
  ,
,  ,
,  ,
,  (backward) or ,
  ,
,  ,
,  ,
,  (forward).
With a DivX disc the Search speed changes: , , , (backward) or , , , (forward).
- To exit SEARCH mode, press (PLAY).
Still Picture and Frame-by-Frame Playback
- Press PAUSE/STEP () during playback.
The recorder will now go into PAUSE mode.
- You can advance or back up the picture frameby frame by pressing repeatedly during PAUSE mode.
- To exit PAUSE mode, press (PLAY).
Note
- The picture frame-by-frame in reverse is not available for Video CD.
- You can advance the picture frameby-frame by pressing PAUSE/STEP () repeatedly on the remote control.
Slow Motion
- Press PAUSE/STEP () during playback.
The recorder will now go into PAUSE mode.
- Press SCAN ( or ) during PAUSE mode.
The Recorder will enter SLOW mode.
- Use the SCAN ( or ) to select the required speed:
 1/16, 1/8, 1/4, or 1/2 (backward), or
  1/16, 1/8, 1/4, or 1/2 (forward).
- To exit Slow Motion mode, press (PLAY).
Time Search
The Time Search function allows you to start playing at any chosen time on the disc.
- Press DISPLAY twice during playback.
The on-screen display appears on the TV screen. The Time Search box shows the elapsed playing time of the current disc.
- Within 7 seconds, use to select the Time Search icon in the on-screen display.
The “-:--:--” appears in the Time Search box.
- Within 7 seconds, use the number buttons to enter the required start time. Enter hours, minutes, and seconds from left to right in the box.
You can not enter an invalid time.
If you enter the wrong numbers, press to move the under bar (_) to the wrong number. Then enter the correct numbers.
- Within 7 seconds, press ENTER () to confirm the start time.
Playback starts from the selected time on the disc.
Checking the Contents of DVD Video Discs:
Menus DVDs may contain menus that allow you to access special features. To open the disc menu, press MENU/LIST. Then, press the appropriate number button to select an option. Or, use the buttons to highlight your selection, then press ENTER ().
Title Menu
- Press TITLE.
If the current title has a menu, the menu will appear on the TV screen. Otherwise, the disc menu may appear.
The recorder will now go into PAUSE mode.
- The menu may contain camera angles, spoken language and subtitle options, and chapters for the title.
Disc Menu
- Press MENU/LIST
The disc menu is displayed.
- To remove the disc menu, press MENU/LIST again.
Camera Angle
If the disc contains scenes recorded at different camera angles, you can change to a different camera angle during playback.
- Press DISPLAY twice during playback.
- Use to select the ANGLE icon.
- Press repeatedly to select a desired angle.
Note: The Camera Angle icon is displayed on the TV screen when alternate angles are available.
Changing the Audio Soundtrack
Press AUDIO then press repeatedly during playback to hear a different audio language or audio soundtrack if available.
Note: Some discs feature both Dolby Digital and DTS soundtracks. There is no analog audio output when DTS is selected. To listen to the DTS soundtrack, connect this recorder to a DTS decoder via one of the digital outputs. See page 16-18 for connection details.
Changing the Audio Channel
With DVD-RW discs recorded in VR mode that have both a main and a Bilingual audio channel, you can switch between Main (L), Bilingual (R), or a mix of both (Main + Bilingual) by pressing AUDIO.
3D Surround
This unit can produce a 3D Surround effect, which simulates multi-channel audio playback from two conventional stereo speakers, instead of the five or more speakers normally required to listen to multichannel audio from a home theater system.
- Press DISPLAY twice during playback. The OnScreen Display appears on the TV screen.
- Use to select the Sound icon in the OnScreen Display.
- Use to select “3D SUR”.
To turn off the 3D Surround effect, select “NORMAL”.
Subtitles
Press SUBTITLE then press repeatedly during playback to see the different subtitle languages.
Last Condition Memory
This Recorder memorizes last scene from the last disc that is viewed. The last scene remains in memory even if you remove the disc from the Recorder or switch off the Recorder. If you load a disc that has the scene memorized, the scene is automatically recalled.
Note
- Settings are stored in memory for use any time.
- This recorder does not memorize settings of a disc if you switch off the recorder before commencing to play it.
Playing a VCR
Preparation
- Before using the remote control, press the VCR button to select the device to be operated.
- Turn the TV on and select the video input source connected to the Recorder.
- Audio system: Turn the audio system on and select the input source connected to the Recorder.
Normal Playback
- Insert a prerecorded video cassette.
The indicator will light and the Recorder will powerup automatically.
Make sure that the TIMER indicator in the display window is not lighted.
If it is, press POWER once. y If a tape without a safety tab is inserted, the Recorder will start playback automatically.
- Press (PLAY) once.
PLAY icon appears on the TV screen.
It is not necessary to select the tape speed for playback. It will be automatically selected by the Recorder.
- Press STOP () to stop playback.
STOP icon appears on the TV screen.
If the tape reaches the end before STOP () is pressed, the Recorder will automatically stop, rewind and eject the tape, and turn itself off.
Note
- If you wish to watch the DVD playback during the VCR playback, press DVD (or DVD/VCR) to change to DVD mode and perform the DVD playback.
- You cannot playback for the both DVD and VCR at the same time.
Tracking Control
Auto Tracking
The automatic tracking function adjusts the picture to remove snow or streaks.
The AUTO TRACKING function works in the following cases:
- A tape is played back for the first time.
- Tape speed (SP, LP) changes.
- Streaks or snow appear because of scratches on the tape.
Manual Tracking
If noise appears on the screen during playback, press either PR/TRK () on the remote control or PROG. () on the front panel until the noise on the screen is reduced.
- In case of vertical jitter, adjust these controls very carefully.
- Tracking is automatically reset to normal when the tape is ejected or the power cord is unplugged for more than 3 seconds.
Special Effect Playback
Special effects playback notes
- Horizontal lines (noise bars) will appear on the TV screen. This is normal.
- The audio is automatically muted during special effect modes, so there is no sound during search.
- During the high-speed picture search modes, a short time is needed to stabilize tape speed when re-entering the PLAY mode. Slight interference may be observed during this time.
Search
This function lets you visually search forward and backward for a desired scene on your tape.
- Press SCAN ( or ) during playback.
The Recorder will be activated in the SEARCH mode.
If the Recorder is left in the SEARCH mode for more than 3 minutes, the Recorder will automatically enter the PLAY mode, to protect the tape and video heads.
- To return to playback, press (PLAY).
Still Picture and Frame-by-Frame Playback
- Press (PAUSE/STEP) during playback.
A still picture appears on the TV screen.
If a still picture vibrates vertically, stabilize it by using PR/TRK () on the remote control.
If the Recorder is left in the STILL mode for more than 5 minutes, the Recorder will automatically enter the STOP mode to protect the tape and video heads.
- Press (PAUSE/STEP) repeatedly to advance the video picture one frame at a time while viewing a still picture.
- To return to playback, press (PLAY).
Slow Motion
- While in still mode, press SCAN ().
The tape will be played back at a speed 1/19 times slower than the normal speed.
During slow playback, use PR/TRK () on the Remote Control to minimize noise bands.
If slow motion mode continues for more than 3 minutes, the Recorder will automatically change to normal play mode.
- To return to playback, press (PLAY).
Counter Memory Function
This is useful if there is a section of tape you want to view immediately after recording or if you want to return to the same point several times.
- Begin recording or playing a tape.
- Press DISPLAY repeatedly to display the realtime counter on the TV screen.
- At the point you want to locate later, reset the realtime counter to 0:00:00 by pressing CLEAR. Continue to play or record.
- Press STOP () when recording or playback finishes.
- Press (RETURN).
The tape automatically stops when the tape counter returns to about “0:00:00”.
DVD Recording
DVD Recording
Notes for DVD recording
- This Recorder cannot record CD-R or CD-RW discs.
- Fingerprints and small scratches on a disc can affect playback and/or recording performance. Please take proper care of your discs.
- The company does not hold any responsibility to compensate the contents which should have been recorded, and any losses or damages (e.g. losses of business profit, or business intermission) that may arise from malfunction of this recorder (not recording/editing as intended).
- The recording times shown are not exact because the recorder uses variable bit-rate video compression. This means that the exact recording time will depend on the material being recorded.
- When recording a TV broadcast, if the reception is poor or the picture contains interference, the recording times may be shorter.
- The unit cannot record the DTV caption on the recordable DVD disc.
- If you record still pictures or audio only, the recording time may be longer.
- The displayed times for recording and time remaining may not always add up to exactly the length of the disc.
- The recording time available may decrease if you heavily edit a disc.
- If using a DVD-RW disc, make sure you change the recording format (Video mode or VR mode) before you record anything on the disc. See page 25 (Initialize) for how to do this.
- When using a DVD-R or DVD+R disc, you can keep recording until the disc is full, or until you finalize the disc. Before you start a recording session, check the amount of recording time left on the disc.
- When using a DVD-RW disc in Video mode, recording time available will only increase if you erase the last title recorded on the disc.
- The Delete Title option in the Title List (Original) menu only hides the title, it does not actually erase the title from the disc and increase the recording time available (except for the last recorded title on a DVD-RW disc in Video mode).
- Overwrite recording is available using DVD+RW discs.
- When using a DVD+R/RW, the recorder will execute the Menu-making operation to update the new title and editing when removing the disc from the recorder.
- The recordable time is limited to 12 hours for a title.
- If the unit detects the copy-protected signal while recording, the recording will be paused temporarily until the signal switchs to recordable signal.
Recording time and picture quality
There are five preset recording quality modes:
[XP] – Highest quality setting, gives about 1 hour of recording time on a DVD (4.7GB).
[SP] – Default quality, sufficient for most applications, gives about 2 hours of recording time on a DVD (4.7GB).
[LP] – Slightly lower video quality, gives about 4 hour of recording time on a DVD disc (4.7GB).
[EP] – Low video quality, gives about 6 hours of recording time on a DVD (4.7GB).
[MLP] – The longest recording time with the lowest video quality, gives you about 14 hours of recording time on a DVD (4.7GB).
Note: You may see a fragmented picture during playing back the contents recorded in EP or MLP mode.
Restrictions on video recording
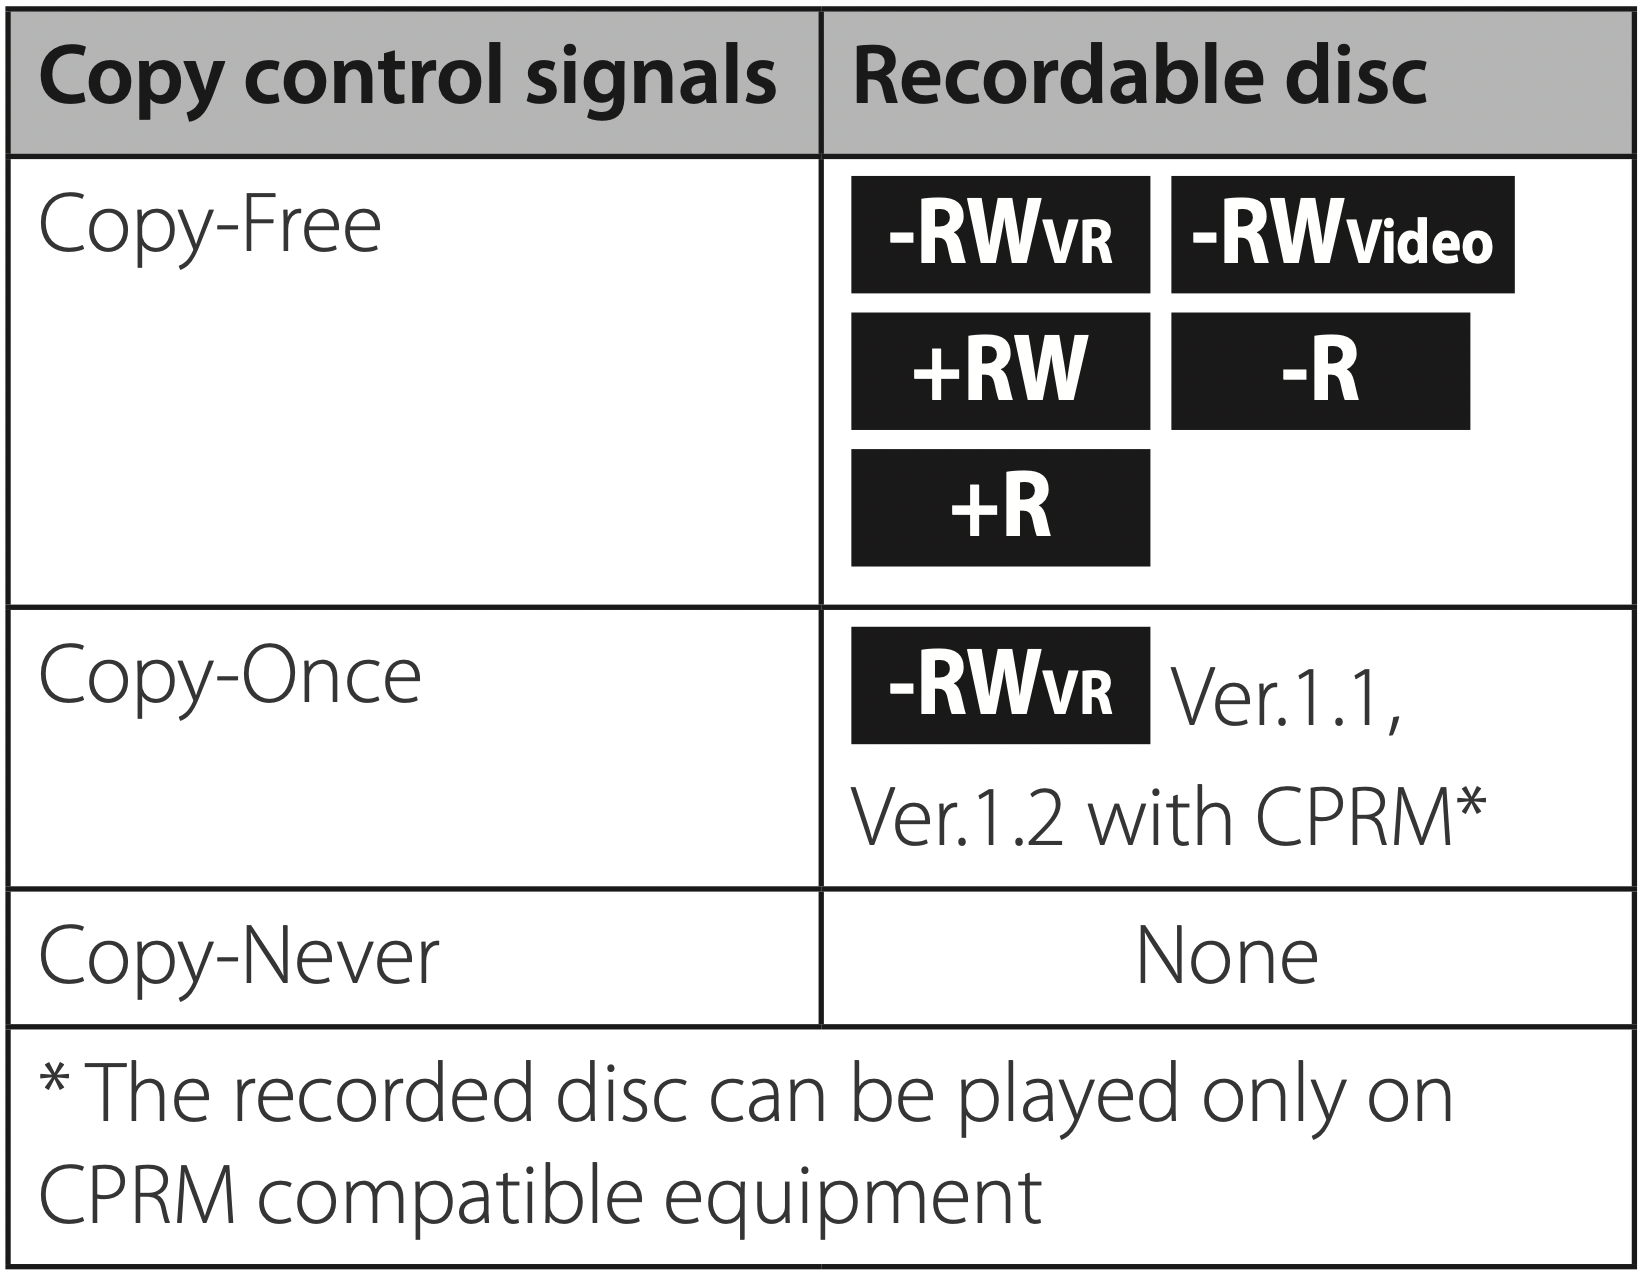
- You cannot record copy-protected video using this recorder. Copy-protected video includes DVD-Video discs and some satellite broadcasts. If copy-protected material is encountered during a recording, recording will pause or stop automatically and an error message will be displayed on-screen.
- Video that is ‘copy-once only’ can only be recorded using a DVD-RW disc in VR mode.
Troubleshooting
General
|
Symptom
|
Cause & Solution |
| The Power does not turned on. |
- Plug the power cord into the wall outlet securely.
|
| The unit does not start playback. |
- Insert a playable disc. (Check the disc type, color system, and regional code.)
- Place the disc with the playback side down.
- Place the disc on the disc tray correctly inside the guide.
- Clean the disc.
- Cancel the Rating function or change the rating level.
|
| The angle cannot be changed. |
- Multi-angles are not recorded on the DVD Video being played.
- The angle cannot be changed for the titles recorded on this unit.
|
| Cannot play movie, photo or audio files. |
- The files are not recorded in a format that the unit can play.
- The unit does not support the codec of the movie file.
|
| The channel is not found or stored. |
- Check your antenna connection.
|
| The remote control does not work properly. |
- The remote control is not pointed at the remote sensor of the unit.
- The remote control is too far from the unit.
- There is an obstacle in the path between the remote control and the unit.
- The batteries in the remote control are exhausted.
- The remote’s manufacturer code returned to the default setting when you replaced the batteries. Reset the code (page 65).
|
Resetting the unit
|
Symptom
|
Cause & Solution |
|
If you observe any of the following symptoms.
|
- The unit is plugged in, but the power will not turn on or off.
- The front panel display is not working.
- The unit is not operating normally.
|
|
You can reset the unit as follows.
|
- Press and hold the POWER () button for at least five seconds. This will force the unit to power off then turn the unit back on.
- Unplug the power cord, wait at least five seconds, and then plug it in again.
|
Playback
|
Symptom
|
Cause & Solution |
|
Cannot play a disc recorded using this unit on other player.
|
- Finalize the disc (see page 31).
- Check the disc compatibility of the player.
- Place the disc on the disc tray correctly inside the guide.
- Discs recorded with copy-once material cannot be played on other players.
|
|
The subtitle language can not be changed or turned off.
|
- Subtitles are not recorded on the DVD Video being played.
- The subtitle cannot be changed for the titles recorded on this unit.
|
|
Can not play MP3/WMA/JPEG/ MPEG4 files.
|
- The files are not recorded in a format that the unit can play.
- The unit does not support the codec of the MPEG4 movie file.
- The resolution is higher than the unit can support.
|
Recording
| Symptom |
Cause & Solution |
|
Can not record or does not record successfully.
|
- Check the remaining space on the disc.
- If your source is copy-protected, you cannot record it using this unit.
- Use a VR mode formatted disc for copy-once material. Video that is ‘copy-once only’ can only be recorded using a DVD-RW disc in VR mode disc with CPRM.
- The power may have failed during recording.
- In DVD mode, you can not record the rated digital program, no signal, audio only, scrambled program, etc. If the unit detects an unrecordable signal asdescribed above during recording, the recording will be paused. The recording will be continued when recordable signal is detected in pause mode. If the paused recording is continued for an hour, the recording will be stopped automatically with the message.
- If you set a DTV rating for the unit and higher rated digital programs are received, the program can not be recorded. Change the DTV rating level in order to record it.
|
|
Timer record does not record successfully.
|
- Clock is not set to correct time.
- The start time of the timer recording is past.
- Two timer recordings may have overlapped, in which case only the earlier one will record completely.
- When setting the recording programme, make sure you set the recorder’s built-in tuner, not the TV’s built-in tuner.
- If the inserted disc is damaged, the recording may not complete successfully.
|
| Stereo Audio Record and/ Playback is not present. |
- TV is not Stereo-compatible.
- Broadcast programme is not in stereo format.
- The A/V Output jacks on the unit are not connected to TV A/V In jacks.
|
| Even though the timer is set, the recorder will not record when. |
- There is no disc loaded.
- A non-recordable disc is loaded.
- Disc Protect is set to [ON] in the Disc menu (see page 32).
- There are already 99 titles (DVD-RW, DVD-R), 49 titles (DVD+RW, DVD+R(DL)) recorded on the disc.
|
| You cannot enter a timer programme when. |
- recording is already underway.
- The time you’re trying to set has already passed.
- There are already 16 timer programs set.
|
| If two or more timer programs overlap. |
- The earlier programme takes priority.
- When the earlier program finishes, the later program starts.
- If two programs are set to start at exactly the same time, the program entered first takes priority. If the disc is damaged, the recording may not complete successfully. In this case even though the Check field shows [Rec. OK], it may not be
|
HDMI
| Symptom |
Cause & Solution |
| The connected HDMI device does not display any picture. |
- Try disconnecting then reconnecting the HDMI cable.
- Try switching the power of the HDMI device off then back on.
- The video input of the connected device is set correctly for this unit.
- The HDMI cable you are using is fully HDMI-compliant. Using a nonstandard cable may result in no picture being output.
- Not all HDCP-compatible DVI devices will work with this unit.
|
| The connected HDMI device does not output sound. |
- Some HDMI-compatible devices do not output sounds (check the manual that came with the connected device).
- If your TV is not capable of handling 96 kHz sampling frequency, set the [Sampling Freq.] option to [48 kHz] on the setup menu. When this choice is made, this unit will automatically convert any 96 kHz signals to 48 kHz so your system can decode them.
- If your TV is not equipped with Dolby Digital and MPEG decoder, set the [Dolby Digital] and [MPEG] options to [PCM] on the setup menu.
- If your TV is not equipped with DTS decoder, set the [DTS] options to [OFF] on the setup menu.
To enjoy DTS multi channel surround, you must connect this unit to a DTS compatible receiver via one of this unit’s digital audio outputs.
|