When using electrical appliances, basic safety precautions should always be followed to reduce the risk of fire, electric shock, and/pr injury to persons including the following:
Read all instructions carefully before using the coffee-grinder.
To protect against risk of fire, electrical shock and injury to persons, do not immerse cord, plug or appliance in water or other liquids.
The appliance is not intended for use by persons (including children) with reduced physical, sensory or mental capacities, or lack of experience and knowledge, unless they have been given supervision or instruction concerning use of the appliance by a person responsible for their safety. Children should be supervised to ensure that they do not play with the appliance.
Close supervision is necessary when any appliance is used by or near children.
Do not remove the lid until the grinders have stopped completely. After releasing the push button the grinders will come to a stop within 2 to 3 seconds.
Unplug from the outlet when not in use, before putting on or taking off parts, and before cleaning. Allow to cool down before putting on or taking off parts, before cleaning the appliance, and before storing.
Do not operate any appliance with a damaged cord or plug or after the appliance malfunctions, or has been dropped or damaged in any manner. Return the appliance to the nearest authorized De’Longhi service center for examination, repair or adjustment.
To reduce the risk of injury do not drape cord over the counter top or table top where it can be pulled on by children or tripped over unintentionally.
Do not let the cord hang over the edge of the table or counter, or touch hot surfaces. A short power cord is provided to reduce risks resulting from becoming entangled in or tripping over a longer cord. Longer, detachable power supply cords or extension cords are available and may be used if care is exercised in their use. If an extension cord is used, the marked electrical rating should be at least as great as the electrical rating of the appliance. The longer cord should be arranged so that it will not drape over the counter-top or table top where it can be pulled on by children or tripped over.
Do not use outdoors.
Do not place on or near a hot gas or electric burner, or in a heated oven.
To disconnect, remove plug from wall outlet. Do not yank cord, instead grasp plug and pull to disconnect.
Do not use the appliance for other than intended use. Never chop ice or use the coffee mill other than as described in the instructions.
Check grinding chamber for presence of foreign obects before using.
Make certain the voltage of the appliance is in accordance with your domestic supply.
This appliance is for household use only. Any servicing other than cleaning and user maintenance should be performed by the nearest authorized De’Longhi Service Center. Do not immerse the appliance in water. To reduce the risk of fire or electric shock, do not dismantle the appliance. Repair should be done by an authorized De’Longhi Service Center only.
The use of attachments not recommended or sold by the manufacturer may cause fire, electric shock or injury.
Avoid contacting moving parts.
SHORT CORD INSTRUCTIONS
A short power cord is provided to reduce risks resulting from becoming entangled in or tripping over a longer cord.
Longer, detachable power supply cords or extension cords are available and may be used if care is exercised in their use.
If an extension cord is used, the marked electrical rating should be at least as great as the electrical rating of the appliance. If the appliance is provided with 3- wire, grounding type cord, the extension should be a GROUNDING TYPE 3
WIRE CORD. The longer cord should be arranged so that it will not drape over the counter-top or table top where it can be pulled on by children or tripped over.
INSTRUCTION FOR USE
Read this Instruction for Use carefully before using the appliance. Failure to follow this Instruction for Use may result in burns or damage to the appliance.
The manufacturer is not liable for damage deriving from failure to respect this Instruction for Use.
Please note: Keep this Instruction for Use. If the appliance is passed to other persons, they must also be provided with this Instruction for Use.
DESCRIPTION
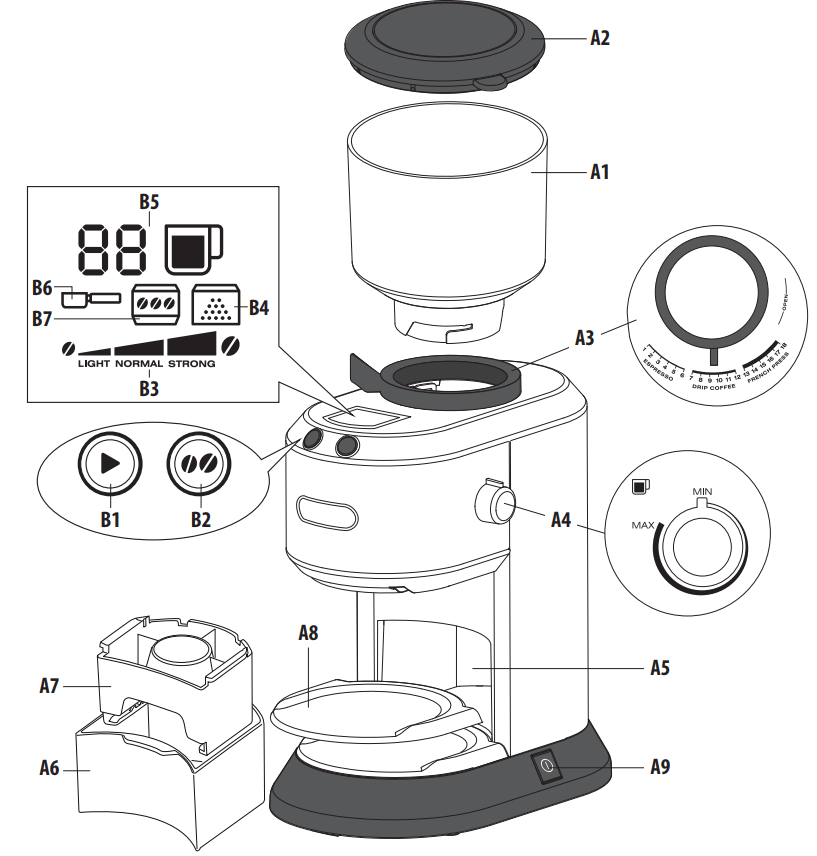
Description of the appliance
A1. Coffee beans container
A2. Coffee beans container lid
A3. Grinding selection regulator
A4. Selection dial for number of cups (MIN=1; MAX=14)
A5. Accessories holder housing
A6. Box for filter holder’s accessory
A7. Filter holder’s accessory
A8. Ground coffee container’s tray
A9. ON/OFF button
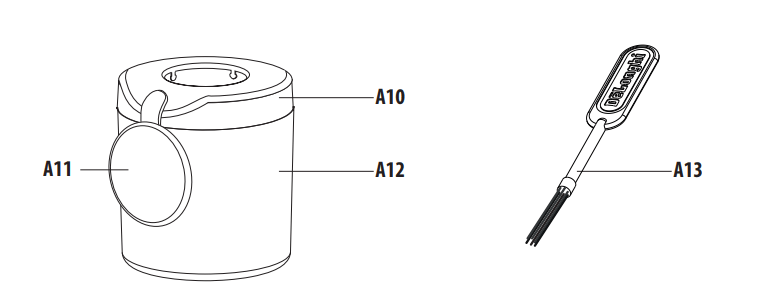
A10. Ground coffee container’s lid
A11. Ground coffee container’s cap
A12. Ground coffee container
A13.Cleaning brush
Description of the control panel
B1. Start grinding button
B2. Strength selection button
B3. Selected strength (LIGHT; NORMAL; STRONG)
B4. Ground coffee container’s light
B5. Selected number of cups
B6. Filter holder’s accessory light
B7. Coffee beans container light
CHECKING THE APPLIANCE
After removing the packaging, make sure the product is complete and undamaged and that all accessories are present. Do not use the appliance if it is visibly damaged. Contact De’Longhi Customer Services.
CONNECTING THE APPLIANCE
Danger! Check that the mains power supply voltage corresponds to the value indicated on the rating plate on the bottom of the appliance.
Connect the appliance to an efficiently earthed and correctly installed socket with a minimum current rating of 10A only. If the power socket does not match the plug on the appliance, have the socket replaced with a suitable type by a qualified professional.
BEFORE USE
Before using the coffee grinder, clean the outer housing and the container for loading coffee beans with a clean damp cloth. Wash all the accessories in hot soapy water, then rinse and dry.
Important: The grinder should not be washed and must always be kept dry. Clean the grinder with a stiff bristle brush.
USING THE APPLIANCE
Using the ground coffee container
Place the appliance on a flat surface.
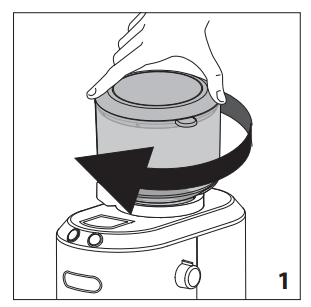
2. Screw the coffee beans container turning it clockwise (fig. 1);
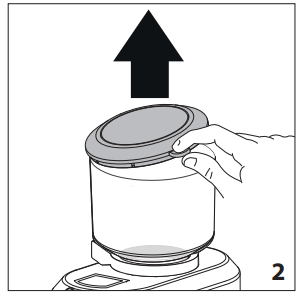
3. Remove the coffee beans container lid (fig. 2);
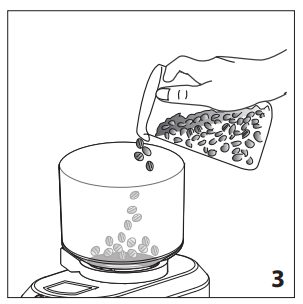
4. Pour the desired coffee beans quantity in the container (fig. 3);
5. Close the lid pushing it firmly; Important: Never remove the container if there are coffee beans inside.
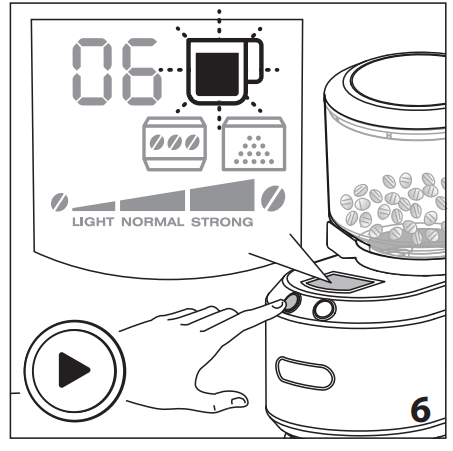
6. Plug the appliance into the mains socket;
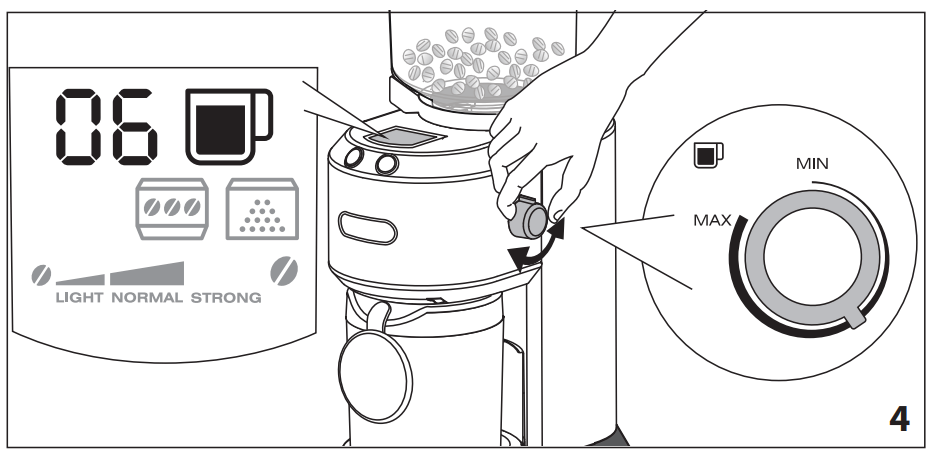
7. Set the dial (A4) to the quantity of coffee corresponding to the number of cups for which you want to grind the beans: the relative number appears on the display (fig. 4). Use this ratio as a rough guide only, since the amount will vary according to the taste, type and roasting of coffee beans as well as the fineness of grinding selected;
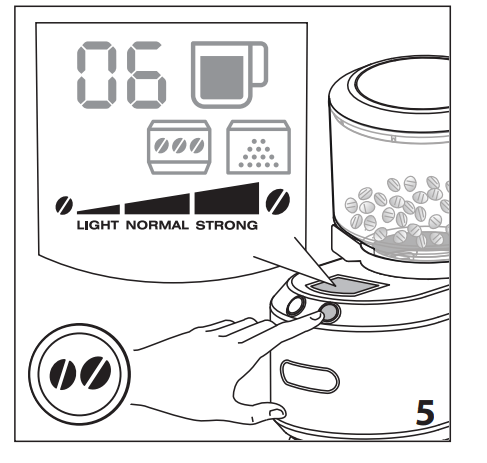
8. Press the strength selection button (B2) until the desired aroma appears on the display (fig. 5);
Important:
The quantity of ground coffee varies upon the different coffee grind.
Adjust the coffee grind and strength according the personal taste.
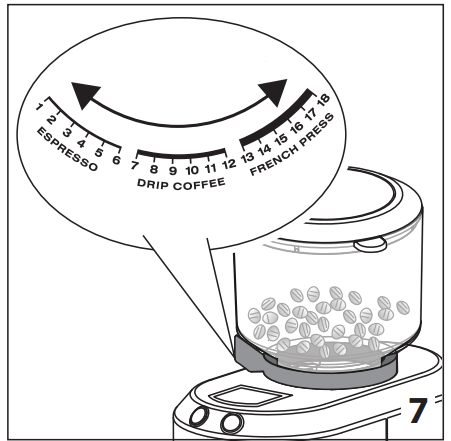
FRENCH PRESS: when preparing ground coffee for this kind of coffee machine, it is recommended to set max 8 cups.
9. Push the start grinding button (B1) (fig. 6);
10. Select the grind of coffee by adjusting the regulator (A3) to the type of coffee desired (fig. 7): adjust the regulator when the appliance is working;
11. Once the previously selected amount of coffee is reached, the appliance will stop automatically;
12. If you want to stop the appliance before grinding is finished, press the start grinding button again;
Please note: Stop grinding if the ground coffee reaches the max level
13. Remove the pre-ground coffee container, gently tap the container, remove the lid and pour the pre-ground coffee into the filter of the coffee machine. If you don’t use all the ground coffee, it can be stored in the container, closing the cap (A11) to avoid loosing aroma.
Always empty the ground coffee container before using the appliance again.
Grinding directly in the filter holder
1. Prepare the coffee beans container as illustrated in steps 1 to 6 of the previous paragraph;
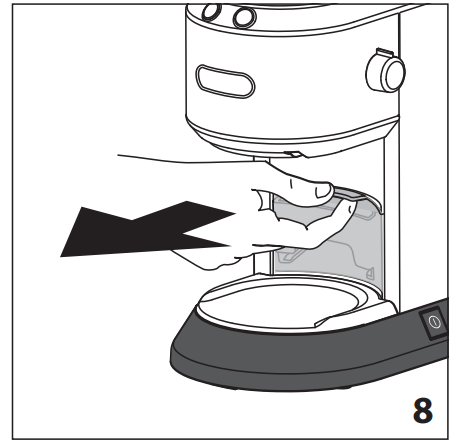
2. Extract the filter holder accessory’s box (A6) from its housing (fig. 8);
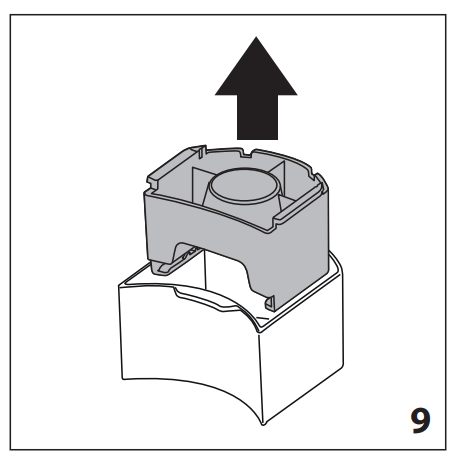
3. Extract the filter holder accessory (A7) (fig. 9);
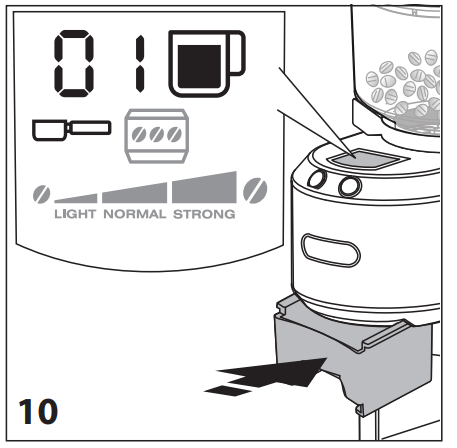
4. Insert the accessory to the appliance, pushing it as far as it goes: the corresponding light comes steady on the display (fig. 10);
Please note:
When using the filter holder accessory, you can not choose the number of the cups: you can only grind coffee for 1 or 2 cups of espresso;
When using the filter holder accessory, turn the grinding selection regulator (A3) to number 1 or 6 of the “ESPRESSO” section. Note: do not grind beyond number 6 to avoid to overfill the filter holder.
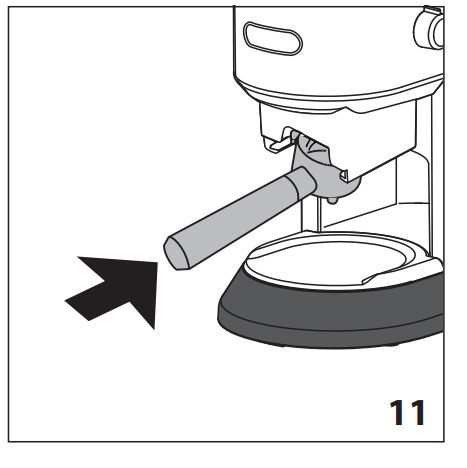
5. Insert the filter holder to the accessory (fig. 11). It is recommended to hold in place the filter holder, as the accessory is suitable for standard dimensions and do not cover all the models;
6. Push the start button (B1) (fig. 6): to grind the 2-cups quantity, push two times the start button within 1 second after the grinding starts;
7. Grinding automatically stops: if you want to stop it earlier, press the start button once again;
8. Extract the filter holder and proceed preparing espresso coffee.
TIPS
Always close the beans coffee container to maintain the taste and aroma of the coffee beans.
Only grind the coffee quantity for the single preparation.
Never overfill the coffee beans container. As a rough guide, use a tablespoon of beans per cup (e.g. 4 tablespoons of beans for 4 cups of coffee). As you use the grind- er, you will of course discover the optimum quantities for your own personal taste. • After 2 preparations consequently, wait 15 minutes before next use.
To ensure good quality in terms of coffee freshness, always clean the appliance after each use. It is not advisable to grind oil beans.
PROGRAMMABLE SETTINGS
Programming grinding time with the filter holder accessory (A7)
Insert the filter holder accessory;
Insert the filter holder of your coffee machine;
Push the start grinding button (A1) and keep it pushed: the grinding starts and the cup symbol flashes fast to indicate that the appliance is in programming mode;
Once reached the coffee quantity, release the button: the appliance stops grinding and the time for 1 espresso cup is programmed.
Please note:
To avoid excessive quantities, the max programmable grinding time is about 7 seconds.
It is possible to program the 1-cup quantity: when preparing the quantity for 2 cups, the appliance grinds a double quantity
Display contrast
The display can be set on 5 different levels of contrast:
Switch the appliance on by pressing the ON/OFF button (A9);
Extract the ground coffee container (A12) or the filter holder accessory (A7) (if inserted);
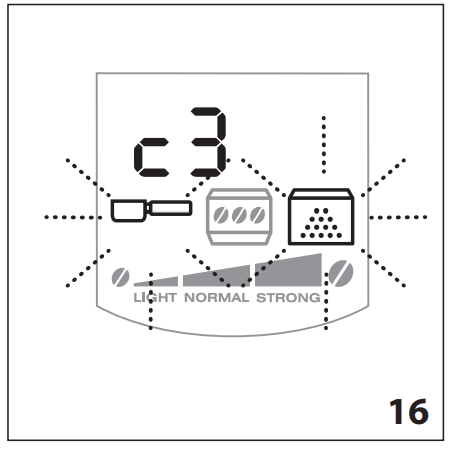
Press one button: on the display appears the current number of the contrast level (fig. 16);
4. Press the buttons to increase or decrease the contrast;
5. Onceselected the desired contrast, insert the ground coffee container of the filter holder accessory: the appliance is ready to use.
Reset to default values
Switch the appliance on by pushing the ON/OFF button (A9);
Extract the ground coffee container (A12) or the filter holder accessory (A7) (if inserted);
Press both buttons simultaneously: the appliance reset to the default values of display contrast and grinding time when using the filter holder accessory;
Insert the ground coffee container or the filter holder accessory: the appliance is ready to use.
CLEANING
Danger! Before performing any cleaning operations, the machine must be turned off and disconnected from the mains power supply. Never immerse the coffee machine in water.
Unplug from the mains.
Unhook the coffee beans container (A1) rotating it counterclockwise and extract it.
Extract the ground coffee container (A12);
Extract the filter holder accessory’s box (A6);
Lift the ground coffee container’s tray (A8);
Wash all the accessories with soapy mild water: do not wash in dishwasher! Dry thoroughly the accessories before use.
Please note: Regularly clean the grinders, proceeding as follows:
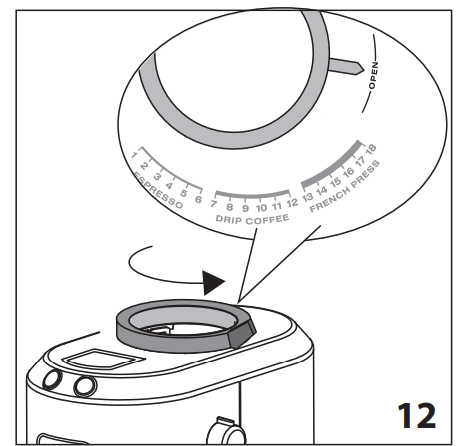
Turn counterclockwise the regulator, to “OPEN” position (fig. 12);
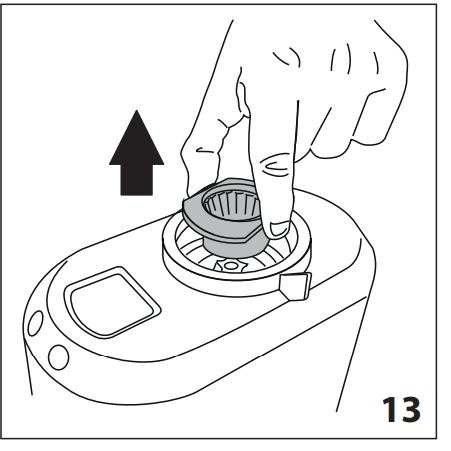
2. Extract by lifting the upper grinder (fig. 13);
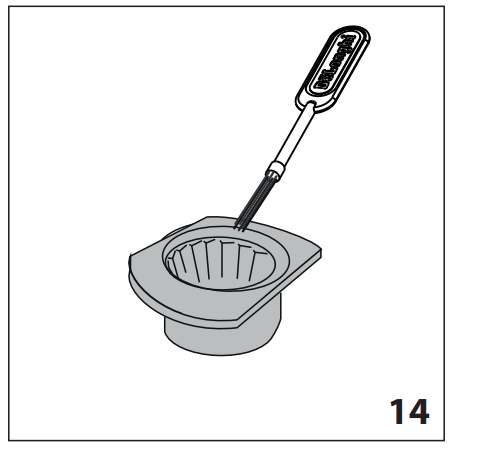
3. Clean the extracted grinder with the stiff bristle brush (fig. 14);
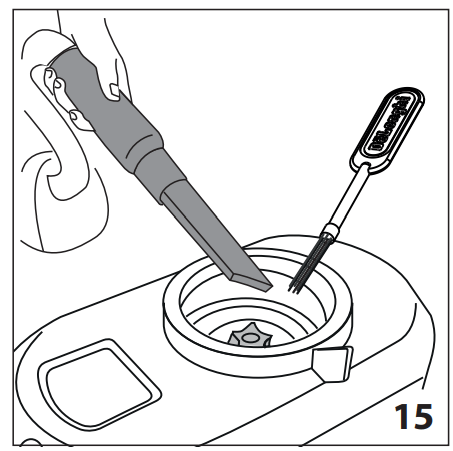
4. Clean the inner grinder with a brush and vacuum up the residues of coffee with a vacuum cleaner (fig. 15);
5. Re-insert the upper grinder and turn the regulator by choosing the desired grinding level.
TROUBLESHOOTING
The appliance does not work.
Make sure the plug is properly inserted in the socket and that the socket is working properly.
Nor the ground coffee container (A12) nor the filter holder’s accessory (A7) are inserted. Insert the accessory.
The accessory is not correctly inserted. Extract it and repeat inserting.
The coffee beans container (A1) is not inserted. Insert the coffee bean container.
The coffee beans container (A1) is not correctly inserted. Extract it and repeat inserting.
The appliance stops during operation.
The appliance is overheating.
The motor thermal fuse has intervened.
Contact the authorised Customer Services.
Poor ground coffee quantity
By the time the grinders are subject to wear and the quantity of ground coffee is reduced. In this case, contact an authorized service center to buy the new grinders and replace them ( see section “10. Cleaning”)