Owner 's Manual for Dryer
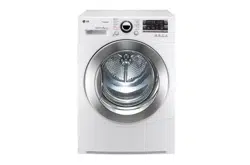
Appearance & Design
Product Layout

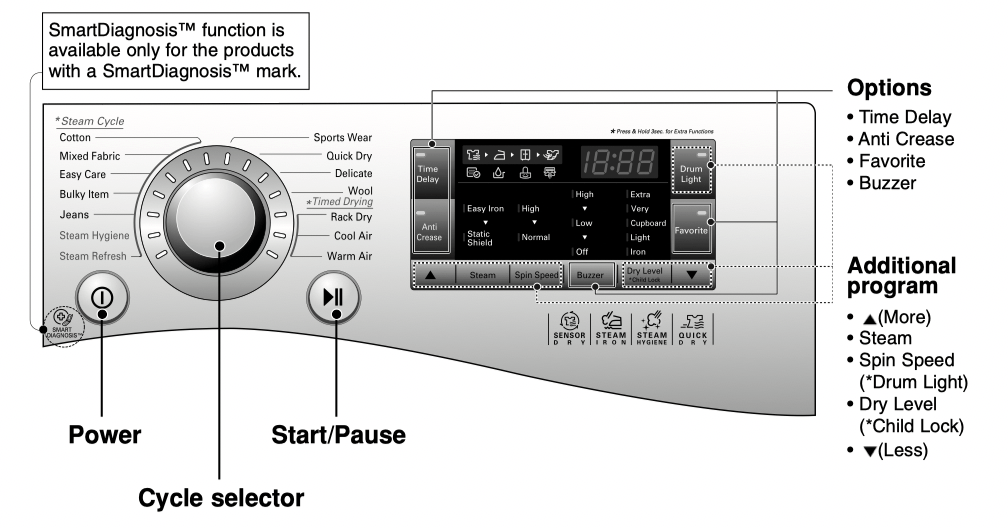
Control Panel
Operating Your Dryer
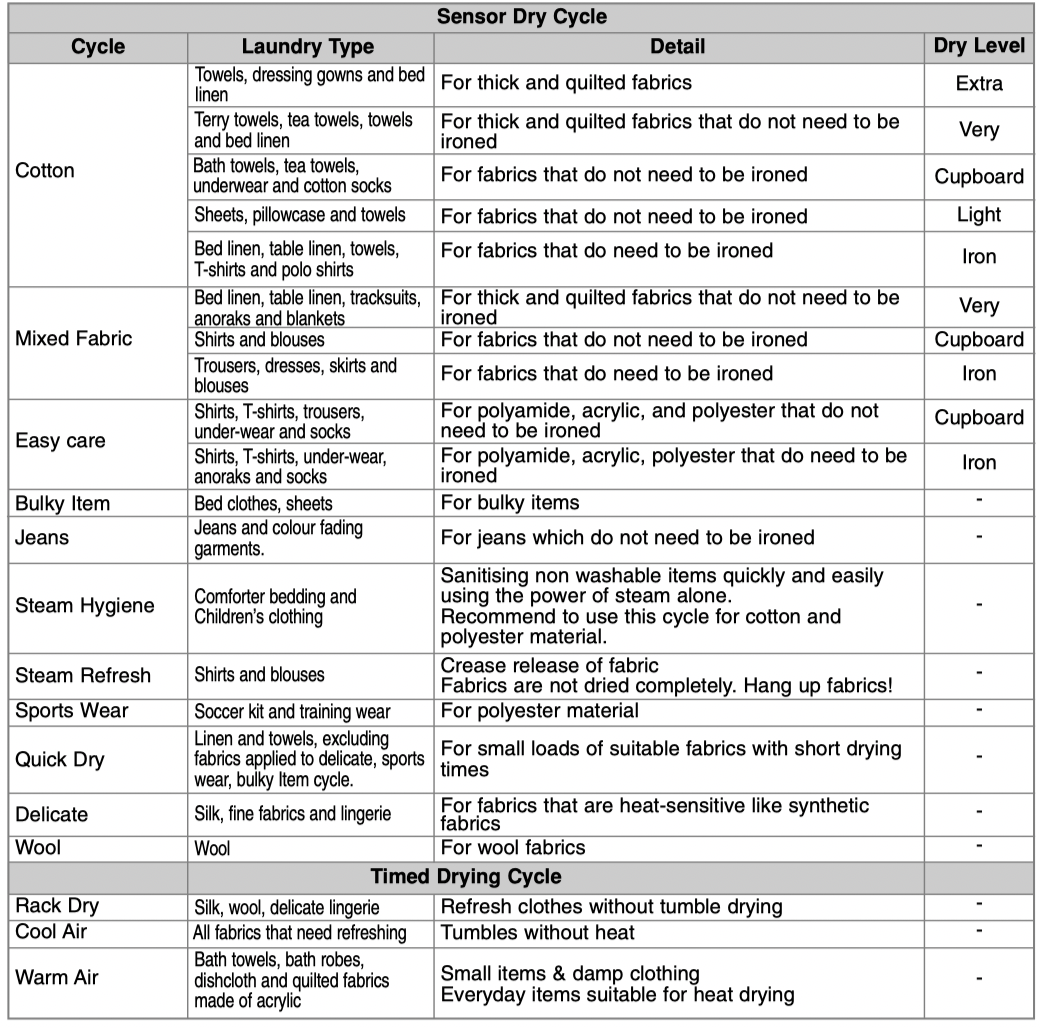
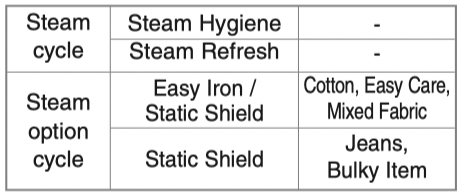
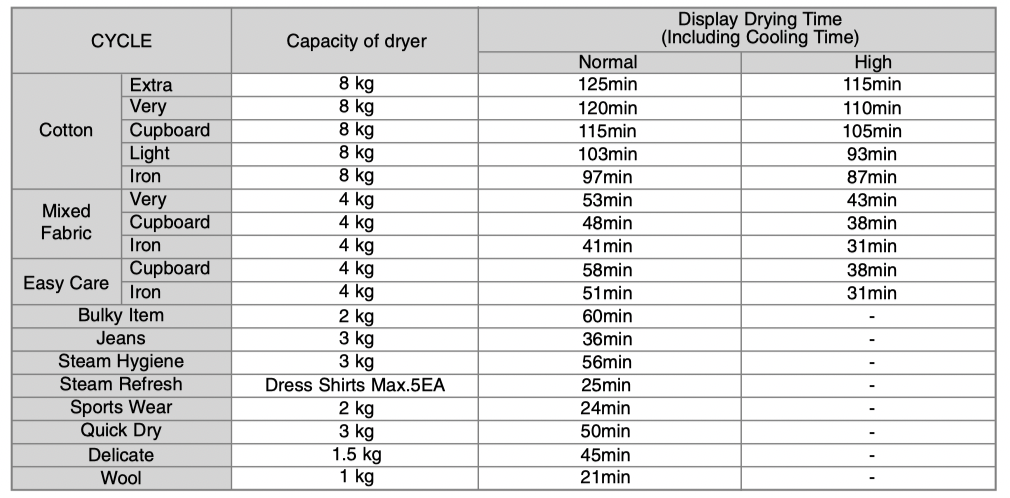
Cycle Selection Table
CAUTION
If the load is less than 1kg, please use the “Warm Air” Cycle in timed Drying Cycle. Wool items should be dried using the “Wool” Cycle and heat-sensitive fabrics including silk, underwear and lingerie should be dried using the “Delicate” Cycle. Please comply with the recommended laundry load when you select your desired cycle found on page 23, otherwise your clothes may be damaged.
Please read before using your LG dryer for the first time
After removing the packaging, please carry out the following checks to ensure the LG dryer is correctly installed and ready for use. (See installation instructions)
1. Check the dryer is well balanced by using a spirit level. If not, adjust the feet of the LG dryer until the machine is balanced.
2. Check the water container, filter, control panel and drum to make sure everything is in place.
3. Set the machine to dry for 5 minutes to warm up the drum.
4. Open the door between loads the first few times you use the machine to allow any odours from the interior of the LG dryer to disperse.
Note
The final part of a tumble dryer cycle occurs without heat (cool down cycle) so that the items are left at a temperature to ensure that they will not be damaged.
1. Turn the power on.
First, press the ‘‘Power’’ button. The indicator light above the button will become illuminated indicating that the machine is all set to run.
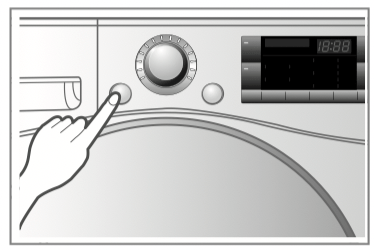
Turn the power on.
2. Open the door.
Open the Door.
3. Check the filter and water container are clean.
The filter is inside the door rim or in the back of the door. It needs to be cleaned before and after drying.
Open the door and check the filter is clean. If not, please clean it referring to page 19.
Also check if the water container needs to be emptied for better drying results.
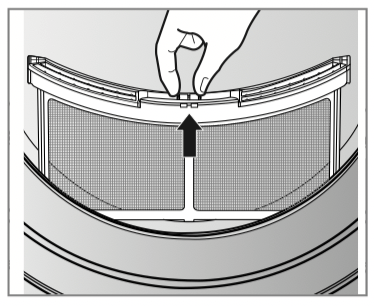
Check the filter.
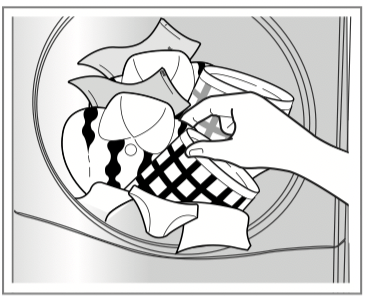
4. Place laundry into the drum after sorting.
The clothes should be sorted by fabric type and dryness level and all the strings and belts of clothes should be well tied and fixed before being put into the drum.
Push the laundry to the back to keep it away from the door seal.
If not, the door seal and clothes may be damaged.
CAUTION
Do not dry unwashed items in the tumble dryer.
5. Close the door.
Before you close the door, make sure fabrics are well placed inside and that foreign objects, especially flammable ones, are not caught around the door.
Select the desired cycle.
CAUTION
Be careful not to trap laundry between the loading door and rubber seal.
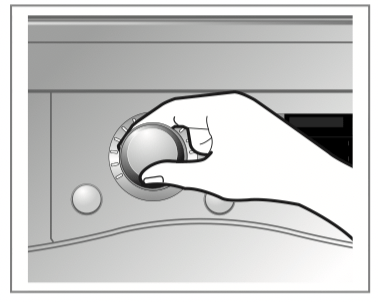
6. Select the drying cycle you want.
You can choose a cycle by turning the cycle selector knob until the required cycle is indicated. If you press Start/Pause button without choosing a cycle, the dryer will proceed with the Cupboard cycle. Please refer to Cycle Selection table (page 13) for the detailed information.
7. Press the start button.
You will hear the drum rotating.
8. After the cycle has finished, open the door and remove the laundry.
Take out the laundry.
CAUTION
Be careful! The drum inside could still be hot.
(Operation time varies depending on your cycle selection or options.)
Note
The final part of a tumble dryer cycle occurs without heat (cool down cycle) to ensure that the items are left at a temperature that will not damage them.
9. Clean the filter and empty the water container.
The filter should be cleaned after each load.
Clean the filter. (Replace the filter if it is damaged.)
10. Turn off the dryer.
Press the ‘‘Power’’ button.
CAUTION
- Take care if using a vacuum cleaner to clean the filter, as it is easily damaged and torn. If there is a residue build up on the filter, scrub the filter with a brush to remove.
- If you want to open the door while the dryer is operating, please press the Start/Pause button first, wait until the drum completely stops and then open the door.
WARNING
Never stop a tumble dryer before the end of the drying cycle unless all items are quickly removed and spread out so that the heat is dissipated.
CAUTION
This dryer must not be used for purposes other than those for which it was designed.
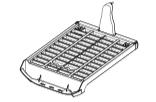
Rack Dry
The drying rack is placed inside the dryer as seen in the picture below. Remove and discard packing material before use.
The Rack Dry is designed for use with items that you do not want to tumble dry including sweaters and delicate fabrics.
To use the Drying rack :
1.Open the door.
2.Do not remove the filter.
3.Place drying rack over the bottom of the dryer door opening.
Reset the rack on the dryer back lodge.
Push down on the frame front to secure over filter.
4.Place wet items on top of the rack.
Allow space around items for air to circulate.
The rack does not move, but the drum will rotate.
5.Close the door.
6.Turn power on and select Rack Dry.
Note
Check the lint filter and remove any lint accumulated from items dried on the rack.
1. Insert wire edge to the drum centre.

2. Place delicate fabrics or sportshoes.

Additional Functions
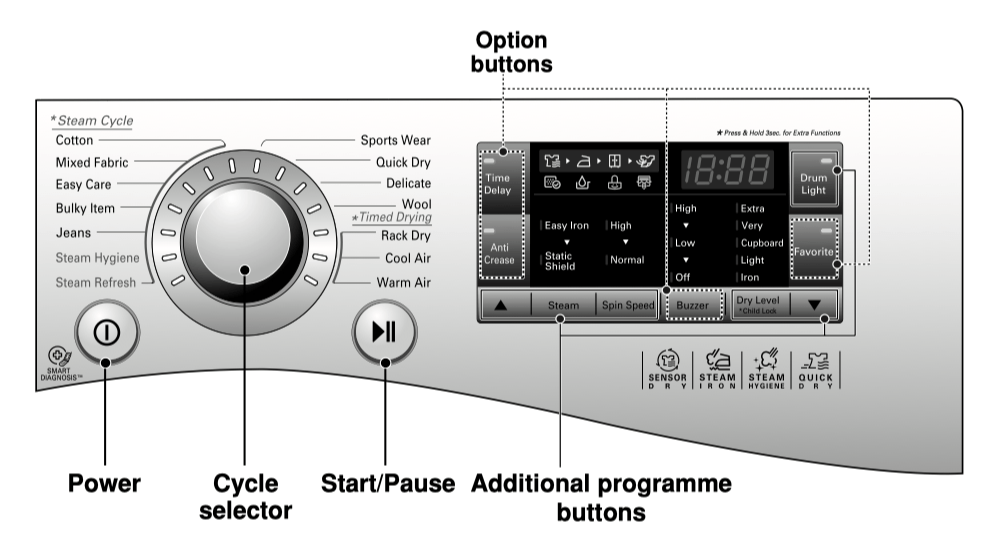
Power
• Press the Power button to turn power on and off.
• To cancel the Time Delay function, the power button should be pressed.
Cycle selector
• Cycles are available according to the laundry type.
• The lamp will light up to indicate selected cycle.
Start/Pause
• This Start/Pause button is used to start the dry cycle or pause the dry cycle.
• Press The Start/Pause button to stop the cycle temporarily.
• When in Pause, the power is turned off automatically after 4 minutes.
Additional programme
• Use these buttons to select the desired options for the selected cycle.
Options
• This allows you to select additional options and will light up when selected.
Time Delay
You can use the Time Delay option to delay the finishing time of the drying cycle. Maximum Time Delay is 19 hours. Minimum Time Delay is 3 hours.
1. Turn the dryer on.
2. Select a cycle.
3. Set time delay hour by pressing the “ ”, “
”, “  ” button.
4. Press Start/Pause button.
Anti Crease
The Anti Crease option prevents creases that are formed when the laundry is not unloaded promptly at the end of the drying cycle. When Anti Crease is selected, the dryer repeatedly runs and pauses, giving you 2 hours to unload the laundry. If the door is opened during the Anti Crease option, the option is cancelled.
Favorite
Favorite option allows you to store a customised dry cycle for future use.
1. Turn the dryer on.
2. Select a cycle.
3. Select the option or additional program. (Anti Crease, Spin Speed etc.)
4. Press and hold the Favorite option button for 3 seconds.
The Favorite option is now stored for future use. To reuse the stored cycle, select the Favorite option and press Start/Pause.
Drum Light
Whilst the dryer is running it is possible to see inside the drum if you select the Drum Light function.
- Light on : Door is opened.
- Light off : Door is closed. Off automatically.
Spin speed
This additional programme is able to control drying time and you can select high or normal. (Default option is normal)
- High : When washing dehydration proceeds from more than 1,200 rpm.
- Normal : When washing dehydration proceeds from less than 1,000 rpm.
Spin RPM is based on the LG Washing Machine.
Steam
WARNING
Do not open the dryer door during Steam cycles. Do not touch the steam nozzle in the drum during or after the steam cycle.
Using the Steam cycle The Steam Refresh cycle uses the power of steam to quickly reduce wrinkles in fabrics.
1. Turn the dryer on.
2. Select steam cycle.
3. Press the “ ”, “ ” button.
4. Press the Start/Pause button.
For these settings, the dryer tumbles while the water in the steam generator is heated.
Note
Do not use Steam cycle for delicates such as wool, silk, and easily discoloured clothes.
Child Lock ( )
)
For the safety of children, press Dry Level button for about 3 seconds.
You will see “ ” indication on the LED. You can see “
 ” sign on LED window.
- All controls except Child Lock and Power buttons will be disabled.
- Child Lock continues after the end of cycle.
Note
To turn the Child Lock off, press Dry Level button for about 3 seconds.
Buzzer
This is an option to enable you to adjust the volume of beeper sound.
Caring for Your Dryer
Care and Cleaning is Very Important
It’s not difficult to care for your dryer but it is important that you do care for it. Follow the instructions below.
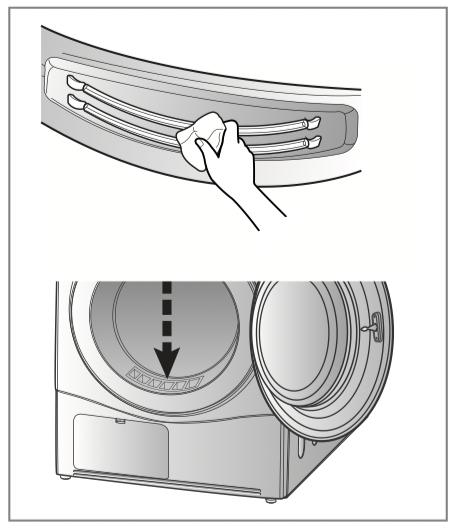
Clean Filter
Clean the filter after each use and check it before each use. It should also be cleaned if the ‘‘Clean Filter’’ light becomes illuminated and the buzzer sounds whilst the dryer is in operation.
Cleaning or emptying the filter will reduce drying times and energy consumption and lengthen the dryer life.
CAUTION
- The lint trap has to be cleaned frequently, if applicable.
- Lint must not to be allowed to accumulate around the tumble dryer.
- The filter must be cleaned after every cycle is finished.
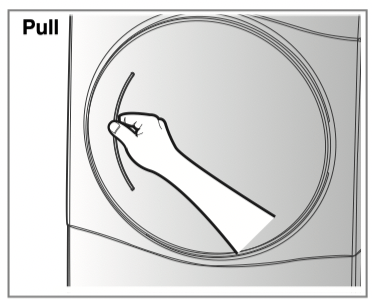
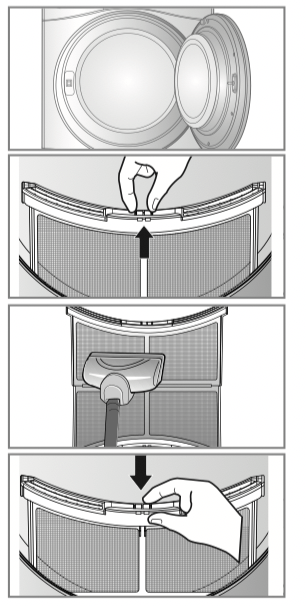
1. Open the door.
2. Pull the filter out.
3. Clean the filter by using a vacuum cleaner or rinsing under the tap.
4. Replace the filter.
- Push the filter all the way down to avoid interference with the door.
5. Close the door.
CAUTION
- After washing the filter please dry thoroughly.
- Lint must not be left to accumulate in the dryer.
Note
If “Clean Filter” symbol is displayed during the operation, clean the filter promptly.
1.Cool the dryer down and follow the above steps.
2.Press the Start/Pause button.
Empty Water Container
Condensed water is collected in the water container. Empty the water container after every use.
Not doing so will affect the drying performance.
If the water container is full, the “Empty Water” lamp glows and the buzzer sounds while the dryer is operating. If this should occur, the water container needs to be emptied within the next hour.
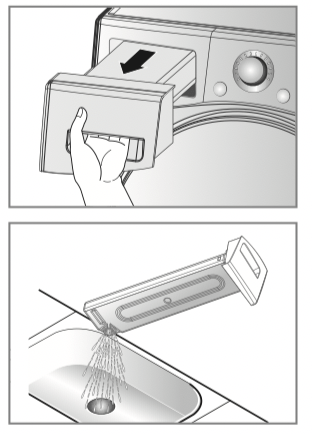
1. Pull out the water container.
2. Empty water container in the sink.
3. Push it back.
4. Press the Start/Pause button.
Note
A high atmospheric temperature and a small room may both increase drying time as well as energy consumption.
WARNING
Do not drink the condensed water.
CAUTION
If the laundry is not spun at a high speed during washing, energy consumption and drying time will increase.
In some instances, the LED window may display “ ” (Empty water symbol) and the dryer may stop because the water container is full.
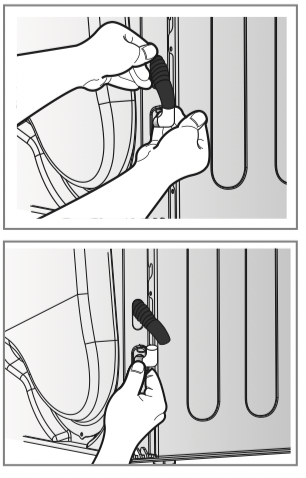
Condenser
The condenser is also a very important part for efficient drying performance results so it needs special care from you. It is recommended that the condenser be cleaned three or four times a year or when the condenser clean lamp blinks.
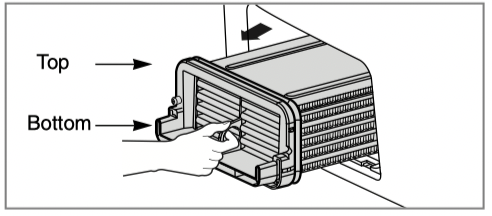
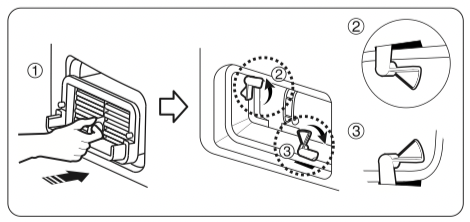
1. Push the cap and open the condensing cover.
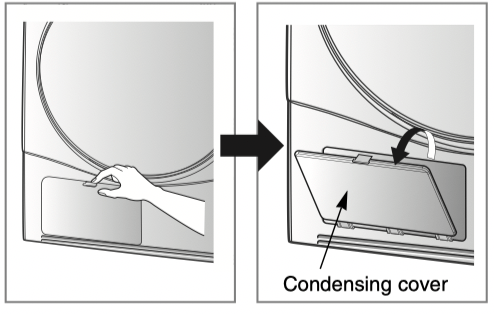
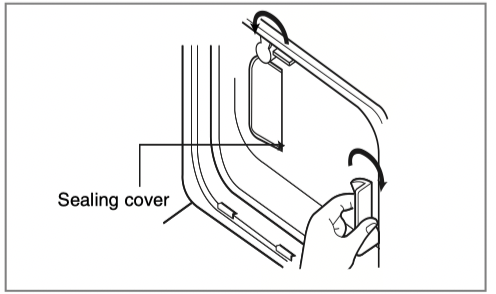
2. Open seal by turning the locking lever
3. Pull the condenser out by inserting a finger into the tab at the front of the condenser. (Don’t force the condenser)
Note
If “Clean Condenser” symbol is displayed, clean the condenser promptly.
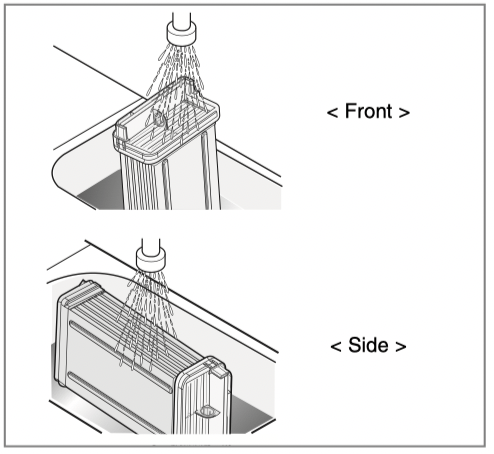
4. Clean the condenser thoroughly under a tap, letting the water flow through
5. Put everything back together by following the instructions in reverse order
CAUTION
The locking lever must be closed after cleaning the condenser as below.
CAUTION
- Operating when the condenser is clogged with lint can damage the dryer. This also increases energy consumption.
- Do not use sharp objects to clean the heat exchanger. This could cause damage and leaking.
- Never operate the dryer without the heat exchanger.
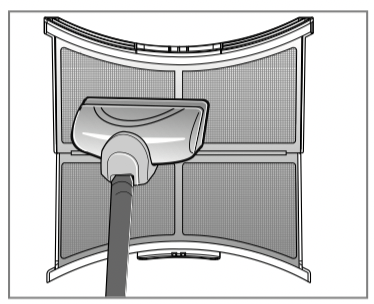
Ventilation Grill and Cool Air Inlet Grill
Vacuum the front ventilation grill 3-4 times a year to make sure there is no build up of lint or dirt that could cause improper air flow.
Note
- Warm air is exhausted through the ventilation grill
- Adequate ventilation has to be provided to avoid the back flow of gases into the room from appliances burning other fuels, including open fires.
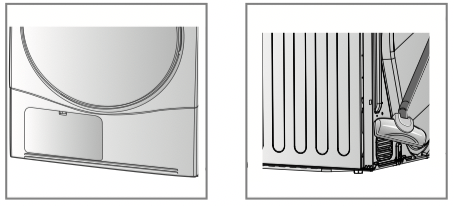
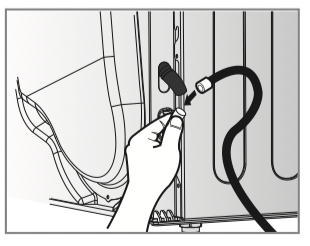
Condensed Water Drain-out
Normally, condensed water is pumped up to the water container where water is collected until manually emptied. Water can also be drained out directly to a mains drain, especially when the dryer is stacked on top of a washing machine. With a connecting kit for a mains drain hose, simply change the water path and reroute to the drainage facility as below:
1. Take connecting kit out.
2. Separate water container hose from the kit.
3. Connect drain hose to the kit.
Moisture Sensor
The device senses the moisture level of the laundry during operation, which means it must be cleaned regularly to remove any build up of lime scale on the surface of the sensor. Wipe the sensors inside drum (as illustrated)
Before cleaning the dryer's interior, unplug the power cord to avoid electric shock hazards.
• Turn off the stopcock if the machine is to be left for any length of time (e.g. holiday), especially if there is no floor drain (gully) in the immediate vicinity.
The water inlet filter
• " " icon will be displayed on the control panel when water does not enter the dryer.
• If water is very hard or contains traces of lime deposit, the water inlet filter may become clogged. It is therefore a good idea to clean it from time to time.
1. Turn off the water tap.
2. Unscrew the water inlet hose.
3. Carefully remove the filter from inlet valve and clean the filter using a bristle brush.
4. Replace the filter and tighten up the inlet hose.

Additional Tips for Smart Use
Drying Guide
Woollens
Dry woollens on “wool’’ cycle. Be sure to follow fabric care label symbols first. Wool may not be completely dried from the cycle, so don't repeat drying. Pull woollens to their original shape and dry them flat.
Woven and Loopknit Materials
Some woven and loopknit materials may shrink, depending on quality.
Permanent Press and Synthetics
Do not overload your dryer. Take out permanent press items as soon as the dryer stops to reduce creases.
Baby Clothes and Night Gowns
Always check the manufacturer’s instructions.
Rubber and Plastics
Do not dry any items made from or containing rubber or plastics such as:
a) Aprons, Bibs and Chair Covers
b) Curtains and Table Clothes
c) Bathmats
Fibreglass
Do not dry fibreglass articles in your dryer.
Glass particles left in the dryer could be picked up by your clothes the next time you use the dryer and irritate your skin.
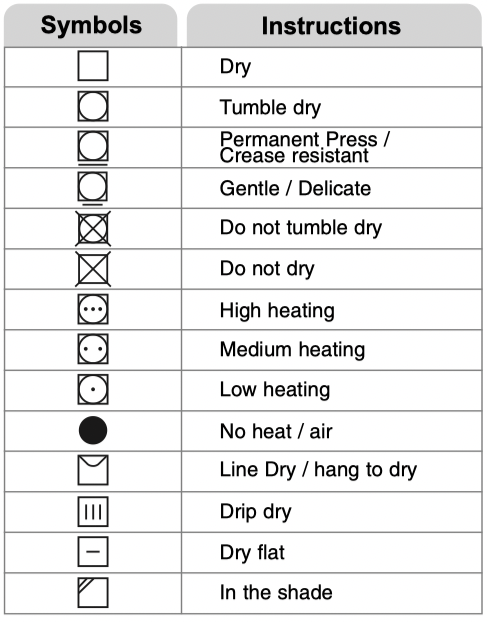
Fabric Care Labels
Clothes have their own wash care labels, so drying according to the wash care label is recommended.
Not only that, the laundry must be sorted according to size and type of fabric.
For the best drying performance and most efficient energy usage, do not overload the dryer.
Below are fabric care label Symbols.
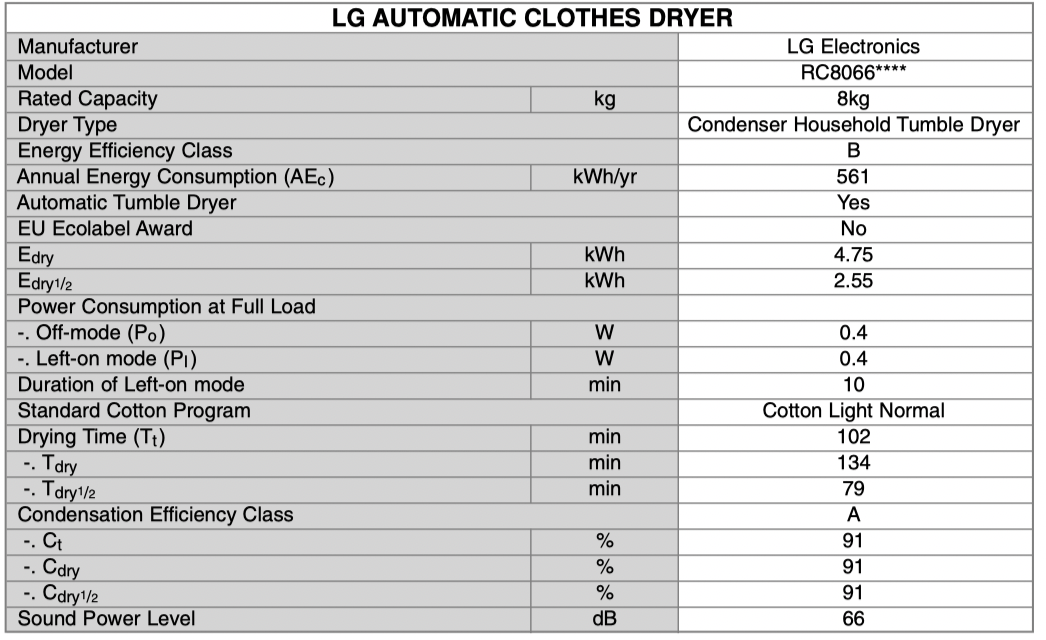
Product Specification

Note
• Tested in accordance with EN61121 and Directive 932/2012
• Set programme at "Cotton Light Normal (Full & Half Load)" for test in accordance in conformity with EN61121 and Directive 932/2012
- Standard Cotton programme : Cotton Light + Normal (Default) (This is the most efficient programme in terms of the test conditions proposed by EN61121 and Directive 932/2012)
• Information about the ‘standard cotton programme’ specifies that it is suitable to dry normal wet cotton laundry and that it is the most efficient programme in terms of energy consumption for drying wet cotton laundry.
• The test results depend on room temperature, type and amount of load, water hardness and water inlet temperature.
• If the product is installed as built under, it may cause performance degradation.
Spare Parts
Spare parts that are required under the terms of warranty are provided free of charge. If the warranty has expired then spare parts must be purchased from the service centre.
Disposal of the Dryer
It is requested that you dispose of your dryer safely to protect your children and others from possible injury.
The door, lid and other protruding parts must be removed and the power cord should be cut off before safe disposal.
Service Contact
If there is a problem with your dryer, first consult the Trouble Shooting Guide. If you cannot find the error and you are unable to resolve the problem, please contact the Service centre.
A Customer Service representative will ask you the following questions:
1. Name, address and postcode
2. Phone number
3. Description of problem
4. Model number and serial number of your dryer
5. Date of Purchase
Accessory Parts
• Accessories available:
1. Dryer Rack (Included)
2. Y connector and hose (Included)
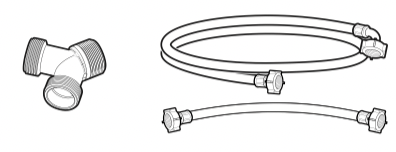
3. Condensing Drain Hose and Hose Holder (Purchased Separately)

Stacking Kit

• The stacking kit can be used for washer top plate size 550mm and 600mm for both.
If stacking is needed, you must stack the dryer upon an LG washing machine.
A stacking kit is sold separately.
Troubleshooting Guide
Troubleshooting Tips
To save you time and money, the following page will help answer your questions before the service call.
| Issue |
What to do |
| Dryer won’t run |
1. Check dryer is plugged in.
2. Check "Start" button is pressed.
3. Check door is properly closed.
4. Check Room temperature is not below 5°C.
5. Check a fuse is not blown or the circuit breaker is tripped and replace them.
(Caution : electric dryers generally use two fuses or breakers) After emptying the water container and Cleaning filter during operation, you must press the Start button, then the dryer operates again.
|
| It takes a long time to dry |
1. The filter should be cleaned after each load.
2. Check water container is emptied.
3. Check cleanness of condenser.
4. Select correct programme setting for fabric type
5. Check air ventilation grill or rear vents of dryer are not obstructed
6. Check clothes are not excessively wet
7. Check the dryer is not overloaded
|
 |
1. Check filter is clean
2. Check condenser unit is not clogged
|
| Clothes are covered in Fluff |
1. Check lint filter is empty.
2. Check all the items in the dryer are clean
3. Check all the laundry has been correctly sorted by fabric type
4. Check dryer is not overloaded
5. Check if there is any paper, tissues or other degradable items amongst the laundry and remove.
|
| The drying time is not consistent |
The drying time for a load will vary depending on the heat setting, the size of the load, the type of fabrics, the wetness of the clothes and the condition of the lint filter. |
| Water is leaking |
Check if the door or seal cover is dirty or damaged. |
| The clothes are creased |
Check the laundry is not overloaded. Try a shorter drying time and remove items whilst they still retain a slight amount of moisture. Use the anti-crease function. |
| The garments have shrunk |
To avoid shrinkage, please follow the care and use instructions for your garment, as some fabrics shrink naturally when washed and other fabrics should not be placed in a dryer. |
Error Mode
- dE : The door must be closed and Start/Pause button must be pressed for re-operation.If error message continues to occur, unplug the power cord and call the service centre for advice.
- tE1, tE3, Add : If error message continues to occur, unplug the power cord and call the service centre for advice.
Drum light does not work
• Contact the customer service centre.
Note
The SmartDiagnosis™ function is available only for the products with a SmartDiagnosis™ mark. In case of a mobile phone with static option, the smart diagnosis function may not operate.
Using SmartDiagnosis™
• Only use this feature when instructed to do so by the call centre. The transmission sounds similar to a fax machine, and so has no meaning except to the call centre.
• SmartDiagnosis™ cannot be activated if the dryer does not power up. If this happens, then troubleshooting must be done without SmartDiagnosis™.
If you experience problems with your dryer, call LG’s customer information centre. Follow the call centre agent's instructions, and do the following steps when requested:
1. Press the Power button to turn on the dryer. Do not press any other buttons or turn the cycle selector knob.

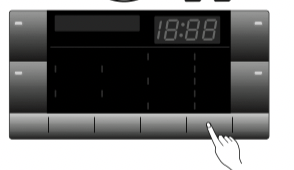
2. When instructed to do so by the call centre, place the mouthpiece of your phone close to the "SmartDiagnosis™" icon and Power button.
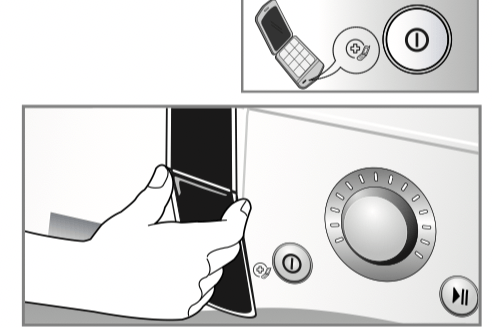
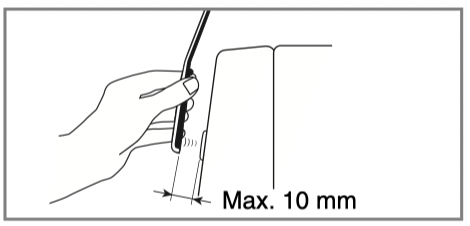
3. Press and hold the “ (More)” button for three seconds, while holding the mouthpiece of your phone close to the "SmartDiagnosis™" icon and Power button.
4. Keep the phone in place until the tone transmission has finished.
This takes about 6 seconds, and the display will count down the time.
• For best results, do not move the phone while the tones are being transmitted.
• If the call centre agent is not able to get an accurate recording of the data, you may be asked to try again.
• Pressing the Power button during the transmission will shut off the SmartDiagnosis™.
5. Once the countdown is over and the tones have stopped, resume your conversation with the call centre agent, who will then be able to assist you using the information transmitted for analysis during your call to the customer information centre.
Note
“Smart Diagnosis is a troubleshooting feature designed to assist, not replace, the traditional method of troubleshooting through service calls. The effectiveness of this feature depends upon various factors, including, but not limited to, the reception of the cellular phone being used for transmission, any external noise that may be present during the transmission, and the acoustics of the room where the machine is located. Accordingly, LG does not guarantee that Smart Diagnosis would accurately troubleshoot any given issue.”