
Safety Instructions ......................... 2, 3
Operating Instructions
About the Controls
on the Dehumidifier .................................... 4
Automatic Defrost ......................................... 5
Choosing a Location .................................... 5
How the Dehumidifier Operates ............ 5
Removing Collected Water .................... 6
Water Level ...................................................... 6
Care and Cleaning
Air Filter ............................................................. 7
Grille and Case ................................................ 7
Water Bucket ................................................... 7
Troubleshooting Tips ......................... 8
Consumer Support
Consumer Support ...................Back Cover
Ownership Registration for
Customers in Canada only ................9, 10
Warranty for Customers
in Canada ........................................................13
Warranty for Customers
in the U.S.A. .....................................................12
GEAppliances.com
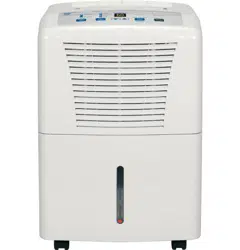
Dehumidifiers
49-7703 09-12 GE
ADER30
ADER40
ADER65
Owner’s Manual
Write the model and serial numbers here:
Model # _________________________
Serial # _________________________
You can find them on a label on the back
of the dehumidifier.
Déhumidificateur
Deshumedificador
Manuel d’utilisation
Manual del propietario
La section française commence à la page 14
La sección en español empieza en la página 26
In Canada, contact us at:
www.GEAppliances.ca
IMPORTANT SAFETY INFORMATION.
READ ALL INSTRUCTIONS BEFORE USING.
When using this dehumidifier, always follow basic safety precautions, including the following:
Ŷ Use this appliance only for its intended
purpose as described in this Owner’s Manual.
Ŷ This dehumidifier must be properly installed
and grounded as described
in this manual before it is used.
Ŷ Never operate this dehumidifier in an area
that is likely to accumulate standing water.
If this condition develops, for your safety
disconnect the power supply before stepping
into the water.
Ŷ Never unplug your dehumidifier by pulling on
the power cord. Always grip plug firmly and
pull straight out from the receptacle.
Ŷ Replace immediately all electric service
cords that have become frayed or otherwise
damaged. A damaged power supply cord
must be replaced with a new power supply
cord obtained from the manufacturer and not
repaired. Do not use a cord that shows cracks
or abrasion damage along its length or at
either the plug or connector end.
Ŷ If the receptacle does not match the plug,
the receptacle must be changed out by a
qualified electrician
Ŷ Turn the dehumidifier OFF and unplug it
before cleaning.
Ŷ GE does not support any servicing of
the dehumidifier. We strongly recommend
that you do not attempt to service the
dehumidifier yourself.
Ŷ For your safety, do not store or use
combustible materials, gasoline or other
flammable vapors or liquids in the vicinity
of this or any other appliance.
Ŷ All dehumidifiers contain refrigerants, which
under federal law must be removed prior to
product disposal. If you are getting rid of an
old product with refrigerants, check with the
company handling disposal about what to
do.
Ŷ Do not use outdoors.
Ŷ This dehumidifier is intended for
indoor residential applications only.
This dehumidifier should not be used
for commercial or industrial applications.
Ŷ These R410A Dehumidifier Systems require
contractors and technicians to use tools,
equipment and safety standards approved
for use with this refrigerant. DO NOT use
equipment certified for R22 refrigerant only.
SAFETY PRECAUTIONS
Do not, under any circumstances, cut or remove
the third (ground) prong from the power cord.
For personal safety, this appliance must be properly
grounded.
DO NOT use an adapter plug with this appliance.
The power cord of this appliance is equipped
with a 3-prong (grounding) plug which mates
with a standard 3-prong (grounding) wall outlet
to minimize the possibility of electric
shock hazard from this appliance.
Have the wall outlet and circuit checked by a
qualified electrician to make sure the outlet is
properly grounded.
Where a 2-prong wall outlet is encountered,
it is your personal responsibility and obligation to
have it replaced with a properly grounded
3-prong wall outlet.
The dehumidifier should always be
plugged into its own individual electrical
outlet, which has a voltage rating matching
the rating plate.
This provides the best performance and also
prevents overloading house wiring circuits, which
could cause a fire hazard from overheated wires.
HOW TO CONNECT ELECTRICITY
2
Consumer Support Troubleshooting Tips Operating Instructions Safety InstructionsTroubleshooting Tips Care and Cleaning Safety InstructionsOperating Instructions
WARNING!
For your safety, the information in this manual must be followed to minimize the risk of fire, electric shock
or personal injury.
3
Consumer SupportTroubleshooting TipsOperating InstructionsSafety Instructions Care and Cleaning
READ AND FOLLOW THIS SAFETY INFORMATION CAREFULLY.
SAVE THESE INSTRUCTIONS
GEAppliances.com
WARNING!
RISK OF FIRE. Could cause serious injury or
death.
DO NOT use an extension cord with this
Dehumidifier.
DO NOT use surge protectors or multi-outlet
adaptors with this Dehumidifier.
USE OF EXTENSION CORDS
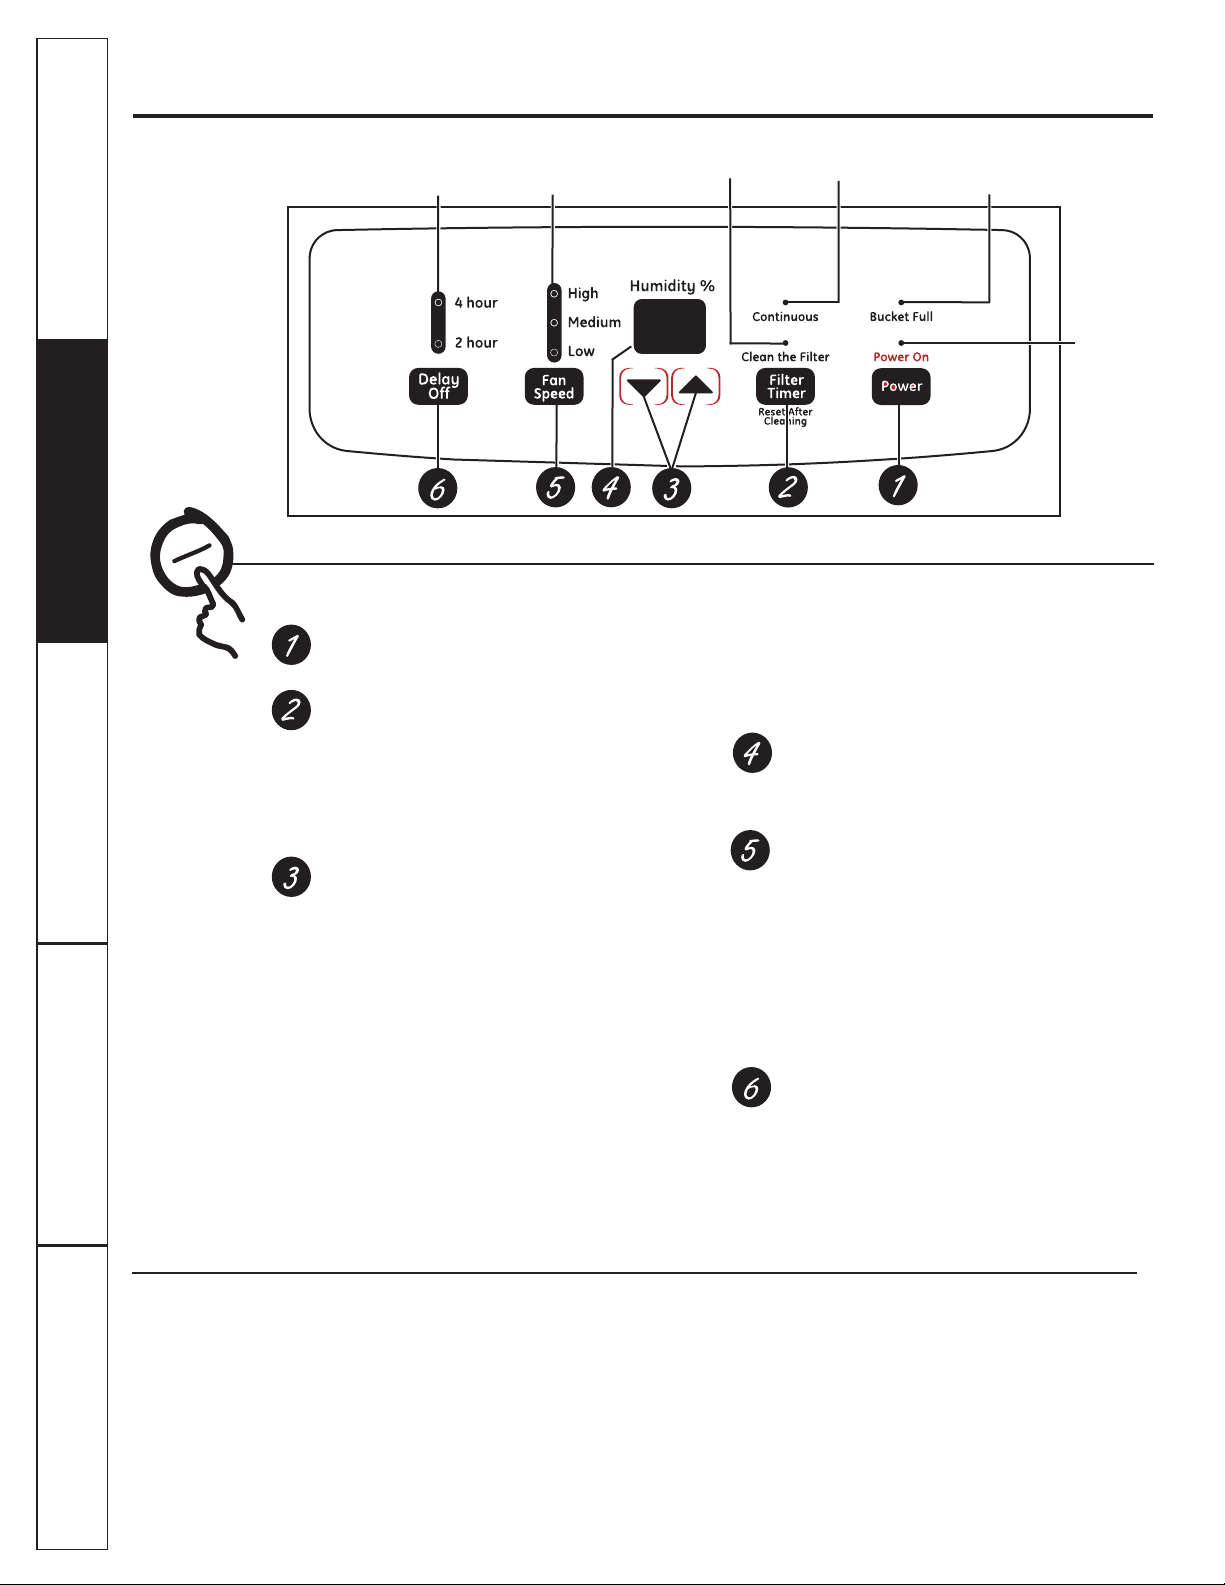
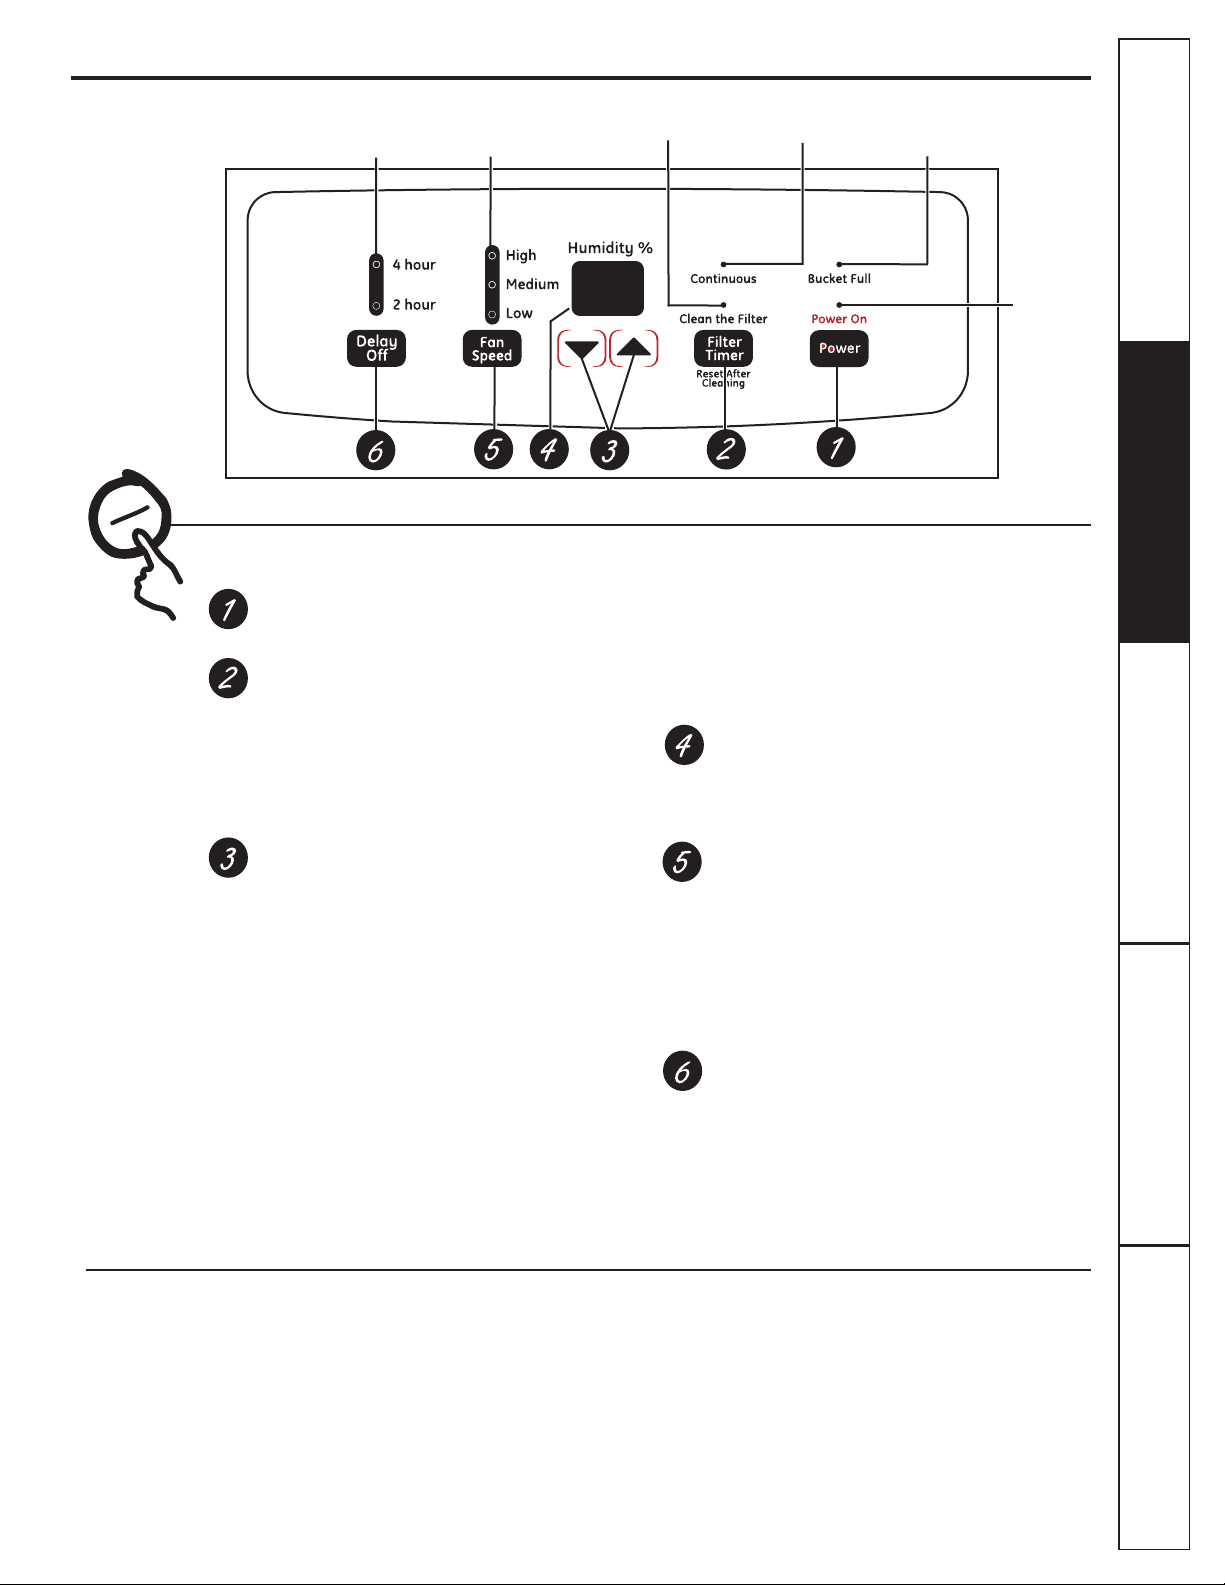
NOTE: When the bucket is full or removed, the
controls cannot be set.
Power Pad
Press to turn the dehumidifier on and off.
Filter Timer
After 250 hours of operation, the Clean the Filter
indicator light will glow to remind you to clean
the filter. Remove the filter and clean it.
Press to turn off the Clean the Filter light. See
the Care and Cleaning section.
Humidity Set Control Pads
The humidity level can be set within a range of
35% RH (Relative Humidity) to 80% RH (Relative
Humidity) in 5% increments or at CO for
continuous operation. To set the unit for
continuous operation, press the ź pad until
the screen reads CO.
NOTE: If CO (Continuous) is selected, the
dehumidifier will operate continuously at
its maximum dehumidification settings if
attached to a hose to drain or until the bucket
is full.
For drier air, press the ź pad and set to
a lower percent value (%).
For damper air, press the Ÿ pad and set
to a higher percent value (%).
When you first use the dehumidifier, set
the humidity control to 45% or 50%. Allow at
least 24 hours for the dehumidifier to achieve
the humidity level. If you still have damper air
than desired, set the humidity level to a lower
setting or select Continuous for maximum
dehumidification.
Display
Shows the set % humidity level while setting,
then shows the actual (+/– 5% accuracy)
room % humidity level.
Fan Speed Pad
Controls the fan speed.
Press to select either High, Medium or Low fan
speed.
Set the fan control to High for maximum
moisture removal. When the humidity
has been reduced and quiet operation is
preferred, set the fan control to Medium
or Low.
Delay Off
While the dehumidifier is in operation, press
this pad to set it to automatically turn off in 2
hours or 4 hours.
4
Consumer Support Troubleshooting Tips Operating Instructions Safety InstructionsTroubleshooting Tips Care and Cleaning Safety InstructionsOperating Instructions
Clean the Filter
indicator light
About the controls on the dehumidifier.
Controls
Other Features
BUCKET FULL Light
Glows when the bucket is ready to be emptied, or
when the bucket is removed or not replaced in the
proper position.
Alarm
If the bucket is full or missing for more than 3
minutes, an alarm will sound for about 10 seconds
to remind you to empty and replace the bucket.
Auto Shut Off
The Water Level Control Switch shuts off the
dehumidifier when the bucket is full, or when
the bucket is removed or not replaced in the
proper position. NOTE: Fan will continue to run
approximately 3 minutes after bucket is removed.
Auto Defrost
When frost builds up on the evaporator coils, the
compressor will cycle off and the fan will continue
to run until the frost disappears.
Power Outage
In the case of a power outage or interruption, the
unit will automatically restart, in the settings last
used, after the power is restored.
Continuous operation on
indicator light
Bucket Full light indicates
bucket needs to be emptied
or is not in place in the unit
4 hour or 2 hour
delay off
indicator lights
High, Medium
and Low fan
indicator lights
Power On
indicator light

Consumer SupportTroubleshooting TipsOperating InstructionsSafety Instructions Care and Cleaning
Using the dehumidifier. GEAppliances.com
When first using the dehumidifier, operate the unit continuously for 24 hours.
Choosing a Location
A dehumidifier operating in a basement will have little
or no effect in drying an adjacent enclosed storage
area, such as a closet, unless there is adequate
circulation of air in and out of the area.
Ŷ Do not use outdoors.
Ŷ This dehumidifier is intended for indoor residential
applications only. This dehumidifier should not be
used for commercial or industrial applications.
Ŷ Place the dehumidifier on a smooth, level floor strong
enough to support the unit with a full bucket of water.
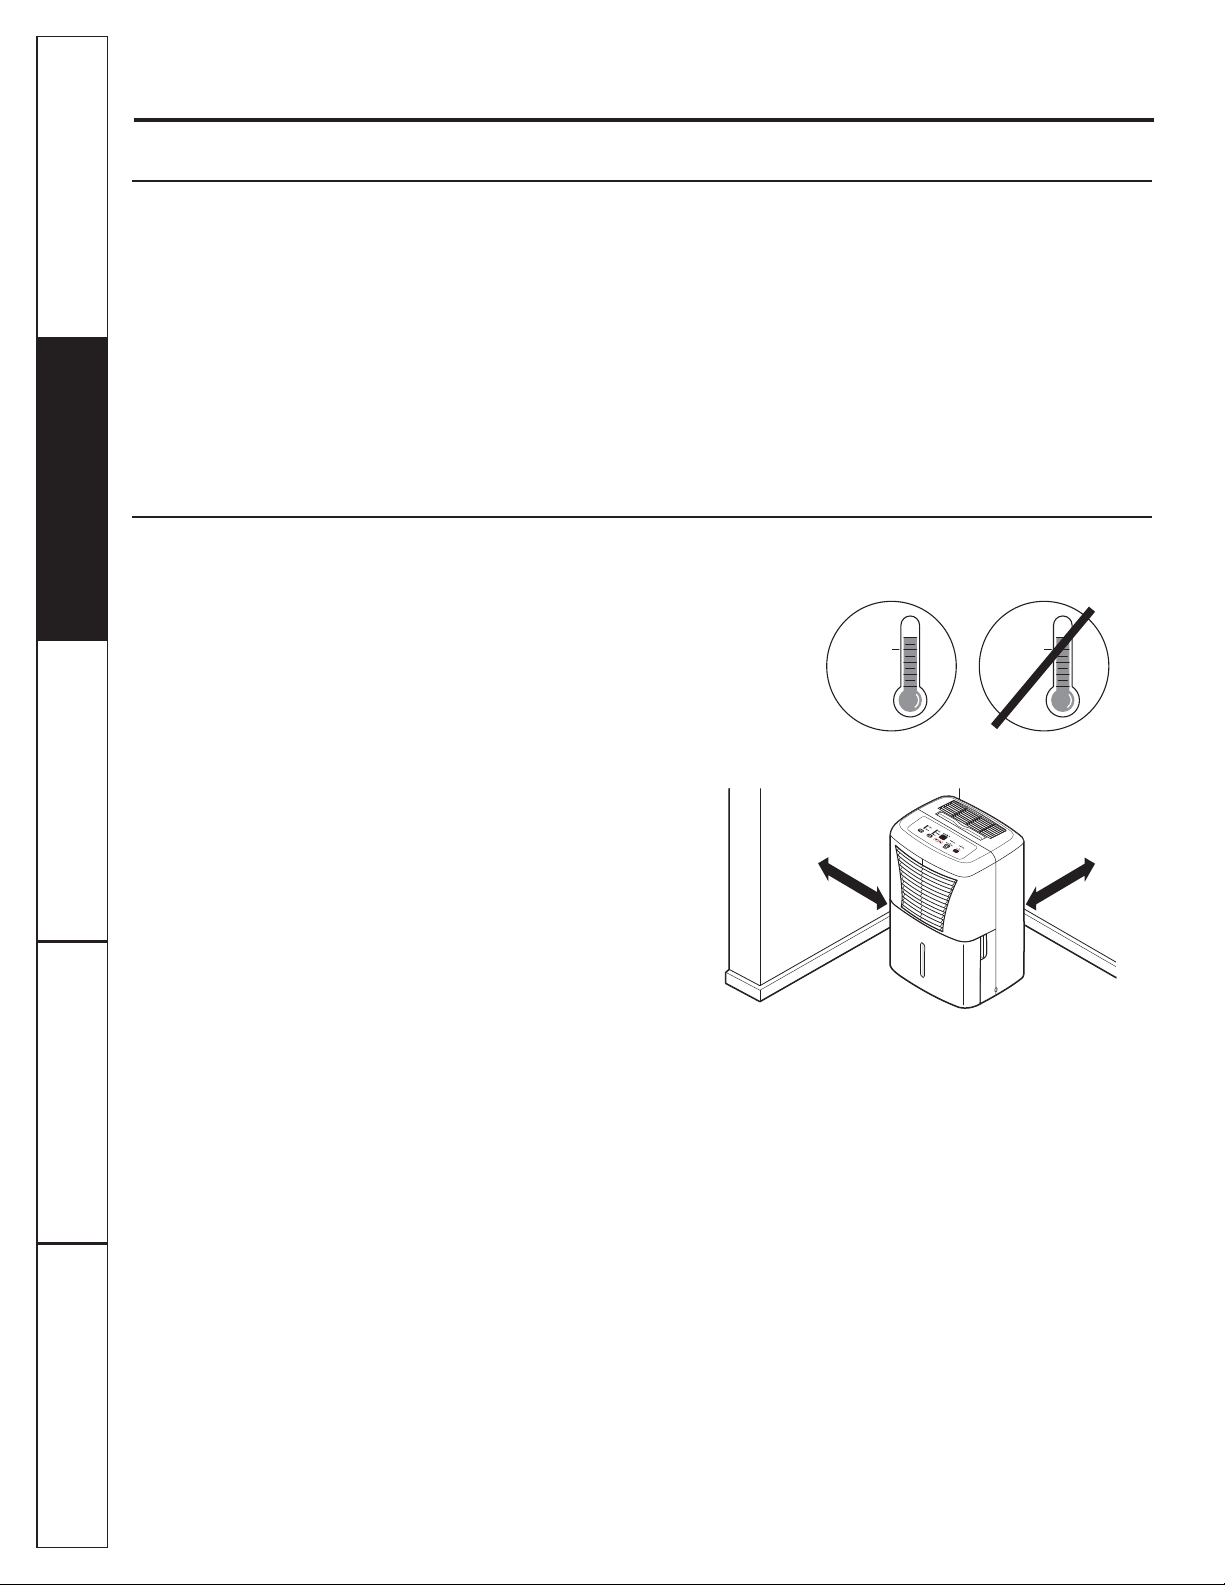
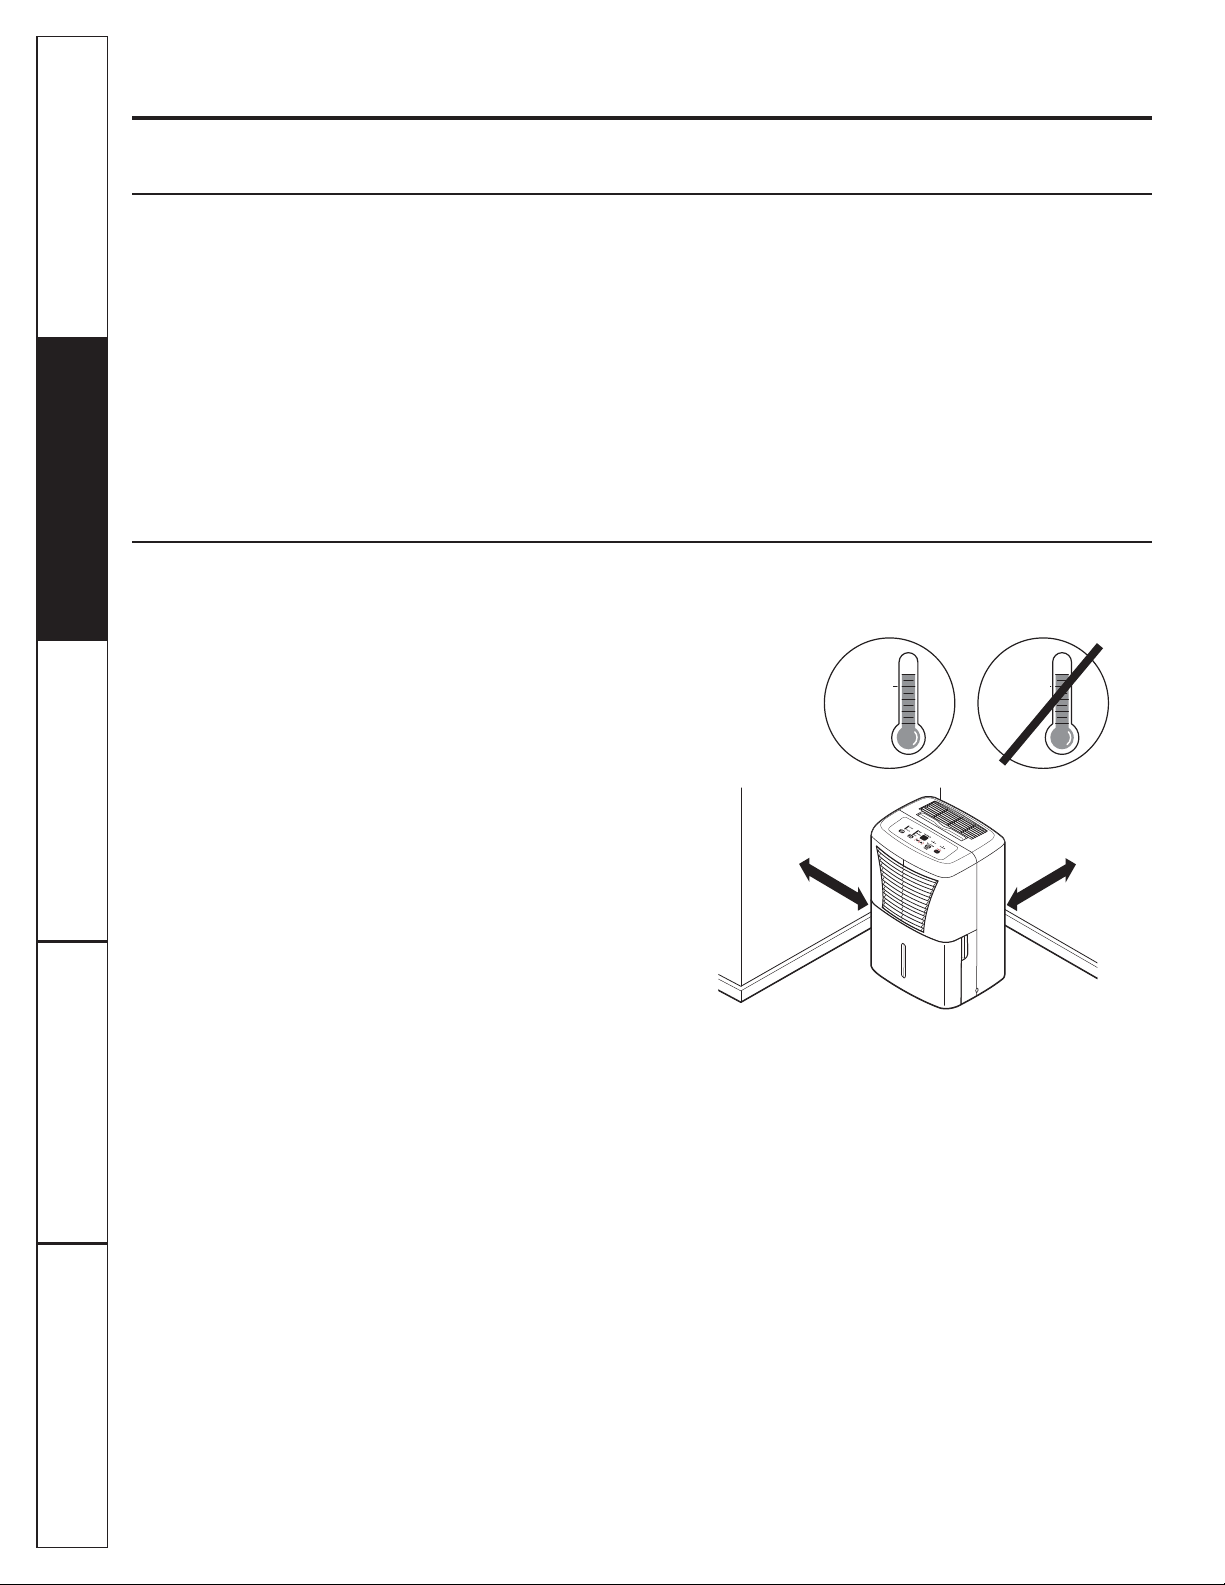
Ŷ Allow at least 12–18 inches of air space on all sides of
the unit for good air circulation.
Ŷ Place the dehumidifier in an area where the
temperature will not fall below 41°F (5°C). The coils
can become covered with frost at temperatures
below 41°F, which may reduce performance.
Ŷ Use the dehumidifier in cooking, laundry, bathing
and dishwashing areas that have excessive moisture.
NOTE: Place the dehumidifier away
from the clothes dryer.
Ŷ Use the dehumidifier to prevent moisture damage
anywhere books or valuables are stored.
Ŷ Use the dehumidifier in a basement to help prevent
moisture damage.
Ŷ The dehumidifier must be operated in an enclosed
area to be most effective.
Ŷ Close all doors, windows and other outside openings
to the room.
YES NO
NOTE: The dehumidifier has rollers to aid placement,
but it should only be rolled on smooth, flat surfaces.
Do not attempt to roll the dehumidifier on carpet or
over objects.
How the Dehumidifier Operates
Moist, humid air is drawn over a cold refrigerated
dehumidifying coil. Moisture in the air condenses on
this coil and drains into a bucket (or through
a hose and drain).
Dry, clean air is drawn through the condenser where
it is heated and discharged out the top grille into the
room.
It is normal for the surrounding air to become slightly
warmer as the dehumidifier operates.
When frost builds up on the evaporator coils, the
compressor will cycle off and the fan will continue to
run until the frost disappears.
When the coil is defrosted, the compressor or fan will
automatically restart and dehumidifying will resume.
5
Automatic Defrost
12s–18s min. 12s–18s min.
Consumer Support Troubleshooting Tips Operating Instructions Safety InstructionsTroubleshooting Tips Care and Cleaning Safety InstructionsOperating Instructions
6
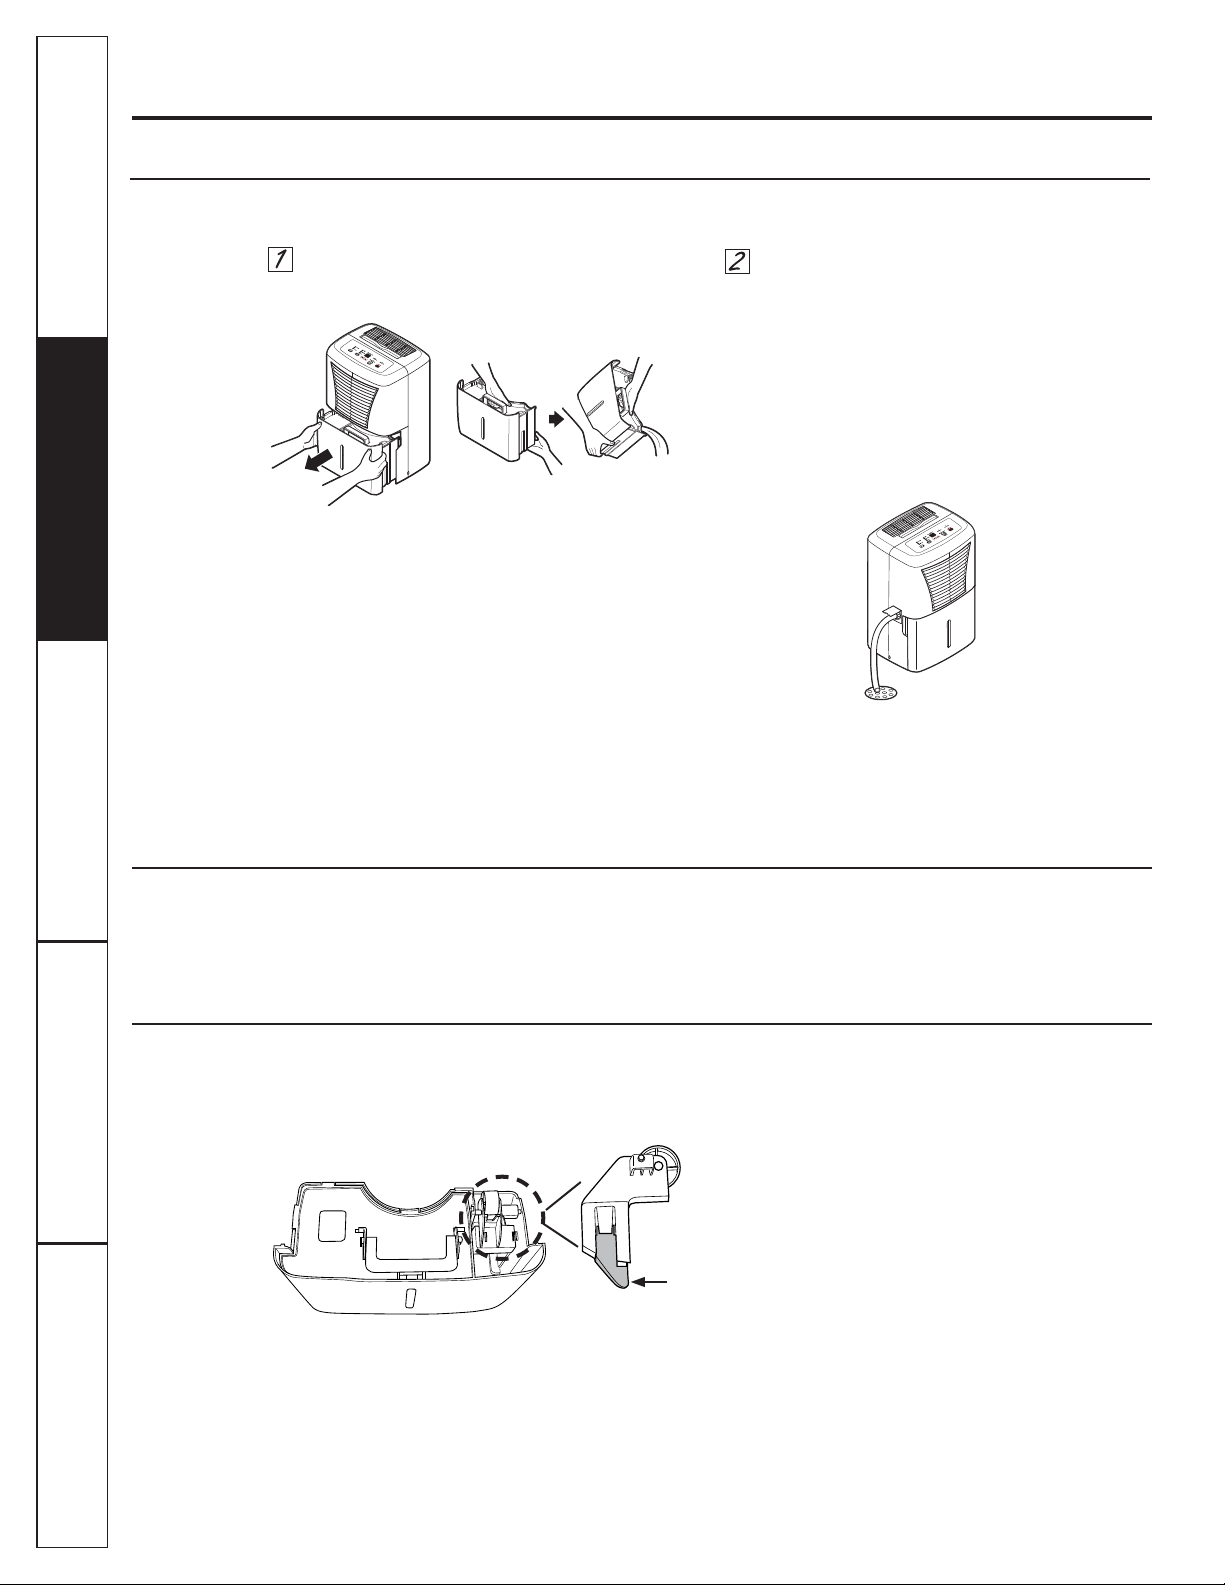
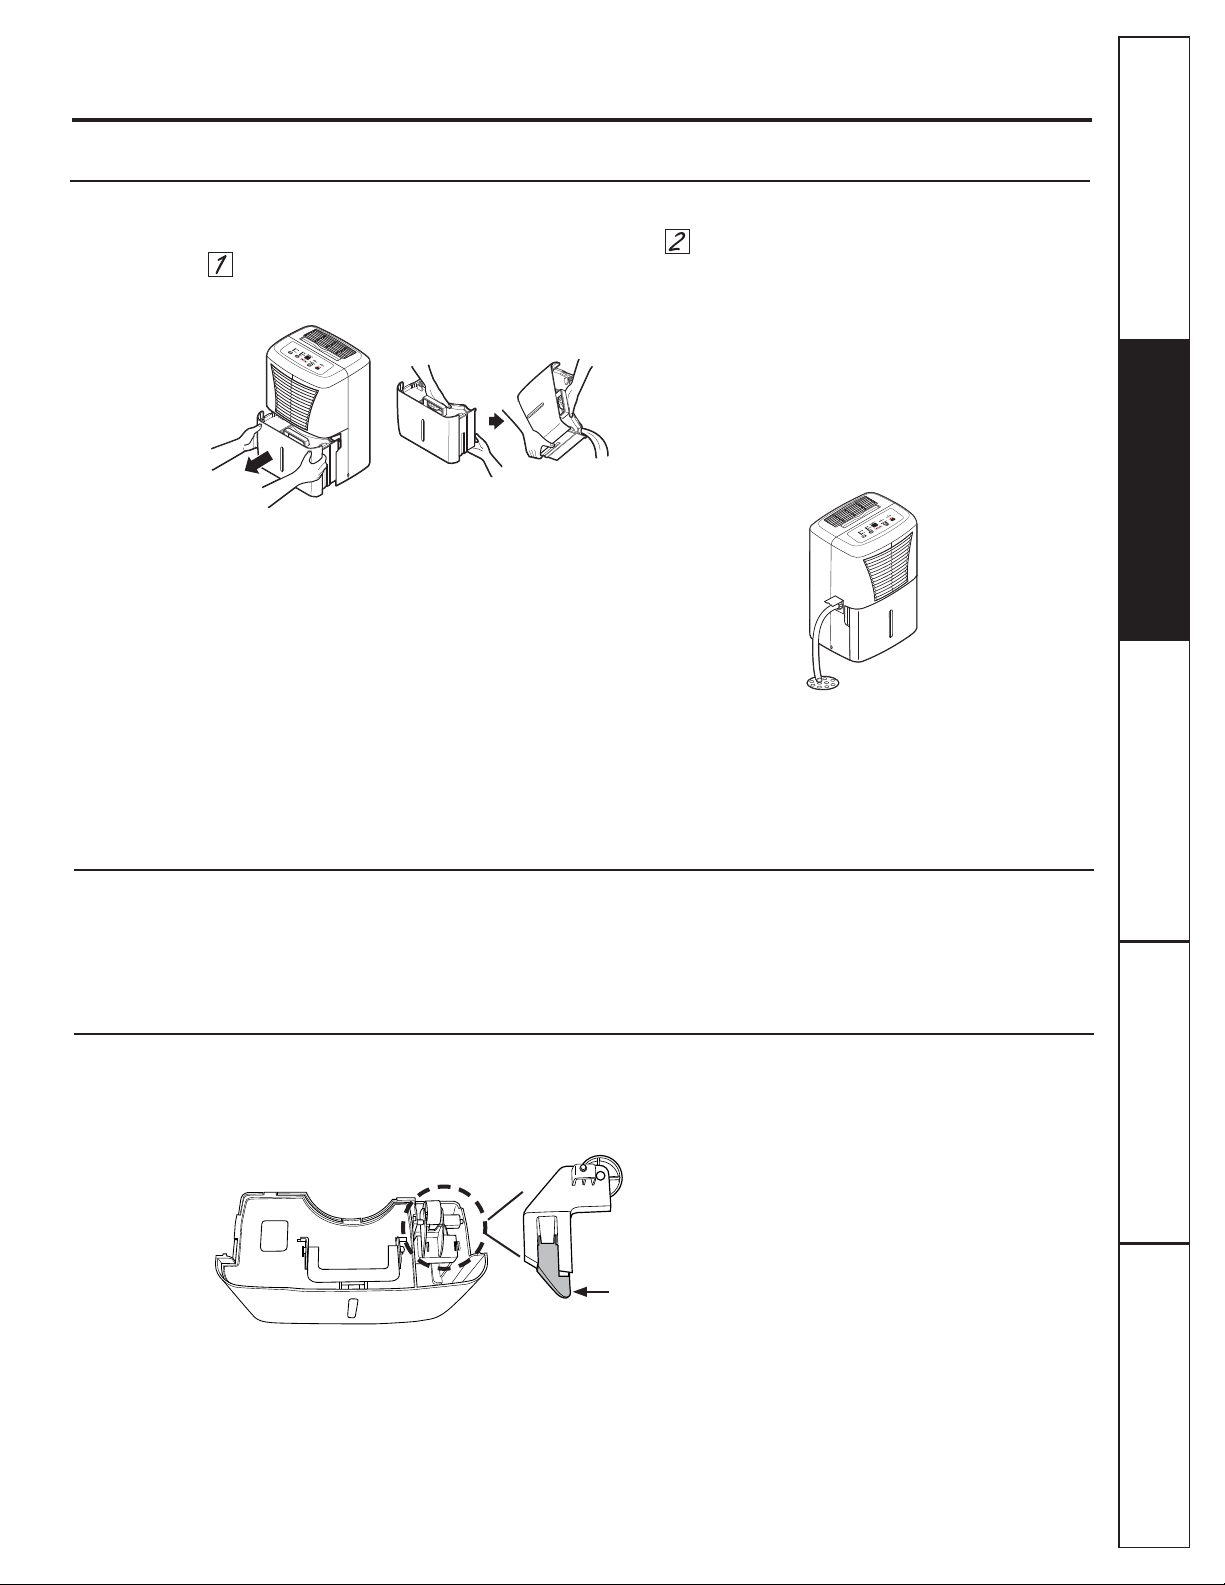
There are 2 ways to remove collected water:
Use the bucket. When the bucket is removed,
the unit will shut off. Empty and replace
the bucket.
IMPORTANT: Do not use the hose if using
the bucket to collect water. When the hose
is connected, water will flow through it onto
the floor instead of into the bucket.
NOTES:
Ŷ Do not remove the bucket while the
dehumidifier is operating or if it has just stopped
operating. This might cause some water to drip
from the drain pan.
Ŷ The bucket must be in place and securely
seated for the dehumidifier to operate.
Use a hose. Water can be automatically
emptied into a floor drain by attaching
a garden water hose (not included).
1. Remove the bucket from the front of
the unit.
2. Open the drain cover on the side of
the unit.
3. Thread a garden hose (not supplied)
onto the nozzle, cut to length, and lead it
to the floor drain.
4. Replace the bucket in the unit.
NOTE: The bucket must be in place and securely
seated for the dehumidifier to operate.
Always make sure the water bucket is locked into place on the dehumidifier.
Water Level
The dehumidifier will turn off automatically
when the bucket is full, or when the bucket is
removed or not replaced in the proper position.
The bucket must be replaced in the proper position
for the dehumidifier to work. The light will be on
and the dehumidifier will not run if the bucket is not
in the proper position.
Using the dehumidifier.
Removing Collected Water
NOTE: Support bucket with
both hands when emptying.
Side of unit
Bucket Operation
DO NOT remove the foam piece in the bucket
assembly. If removed the Dehumidifier will not work
properly.
Foam
7
Consumer SupportTroubleshooting TipsOperating InstructionsSafety Instructions Care and Cleaning
Care and cleaning of the dehumidifier. GEAppliances.com
Turn off the dehumidifier and remove the plug from the wall outlet before cleaning.
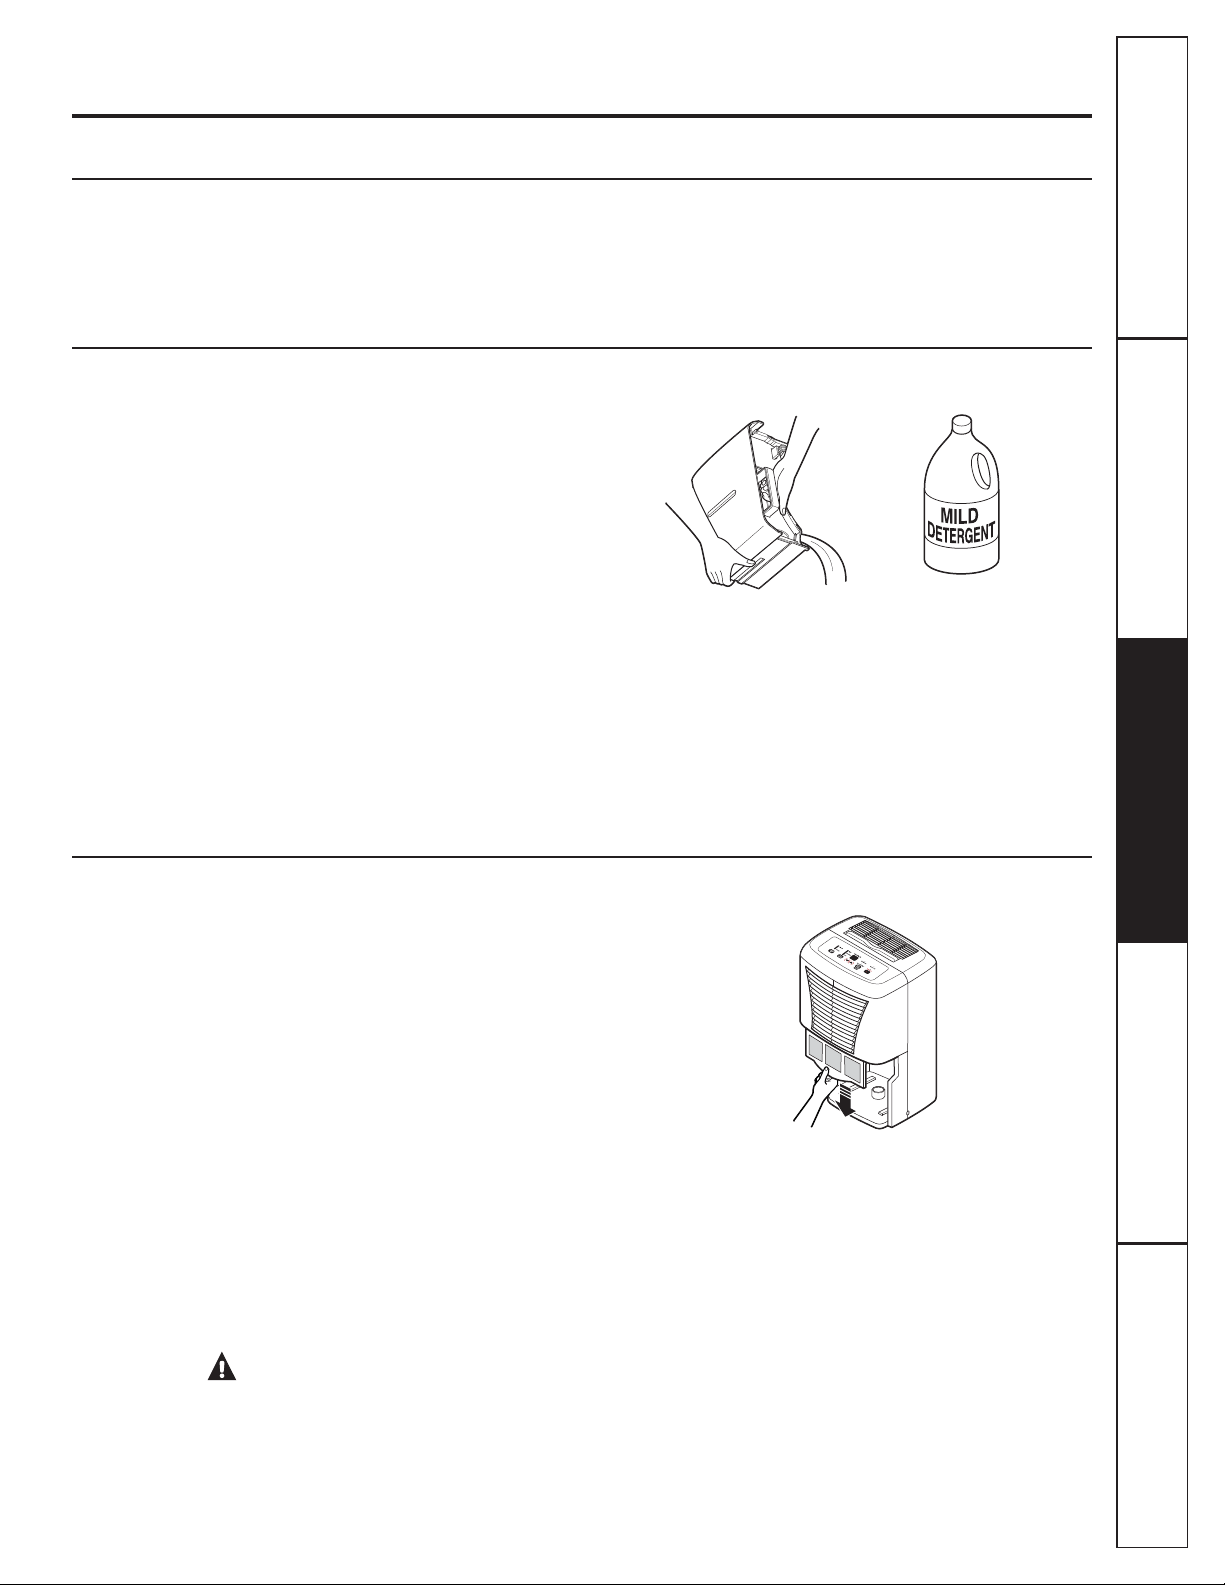
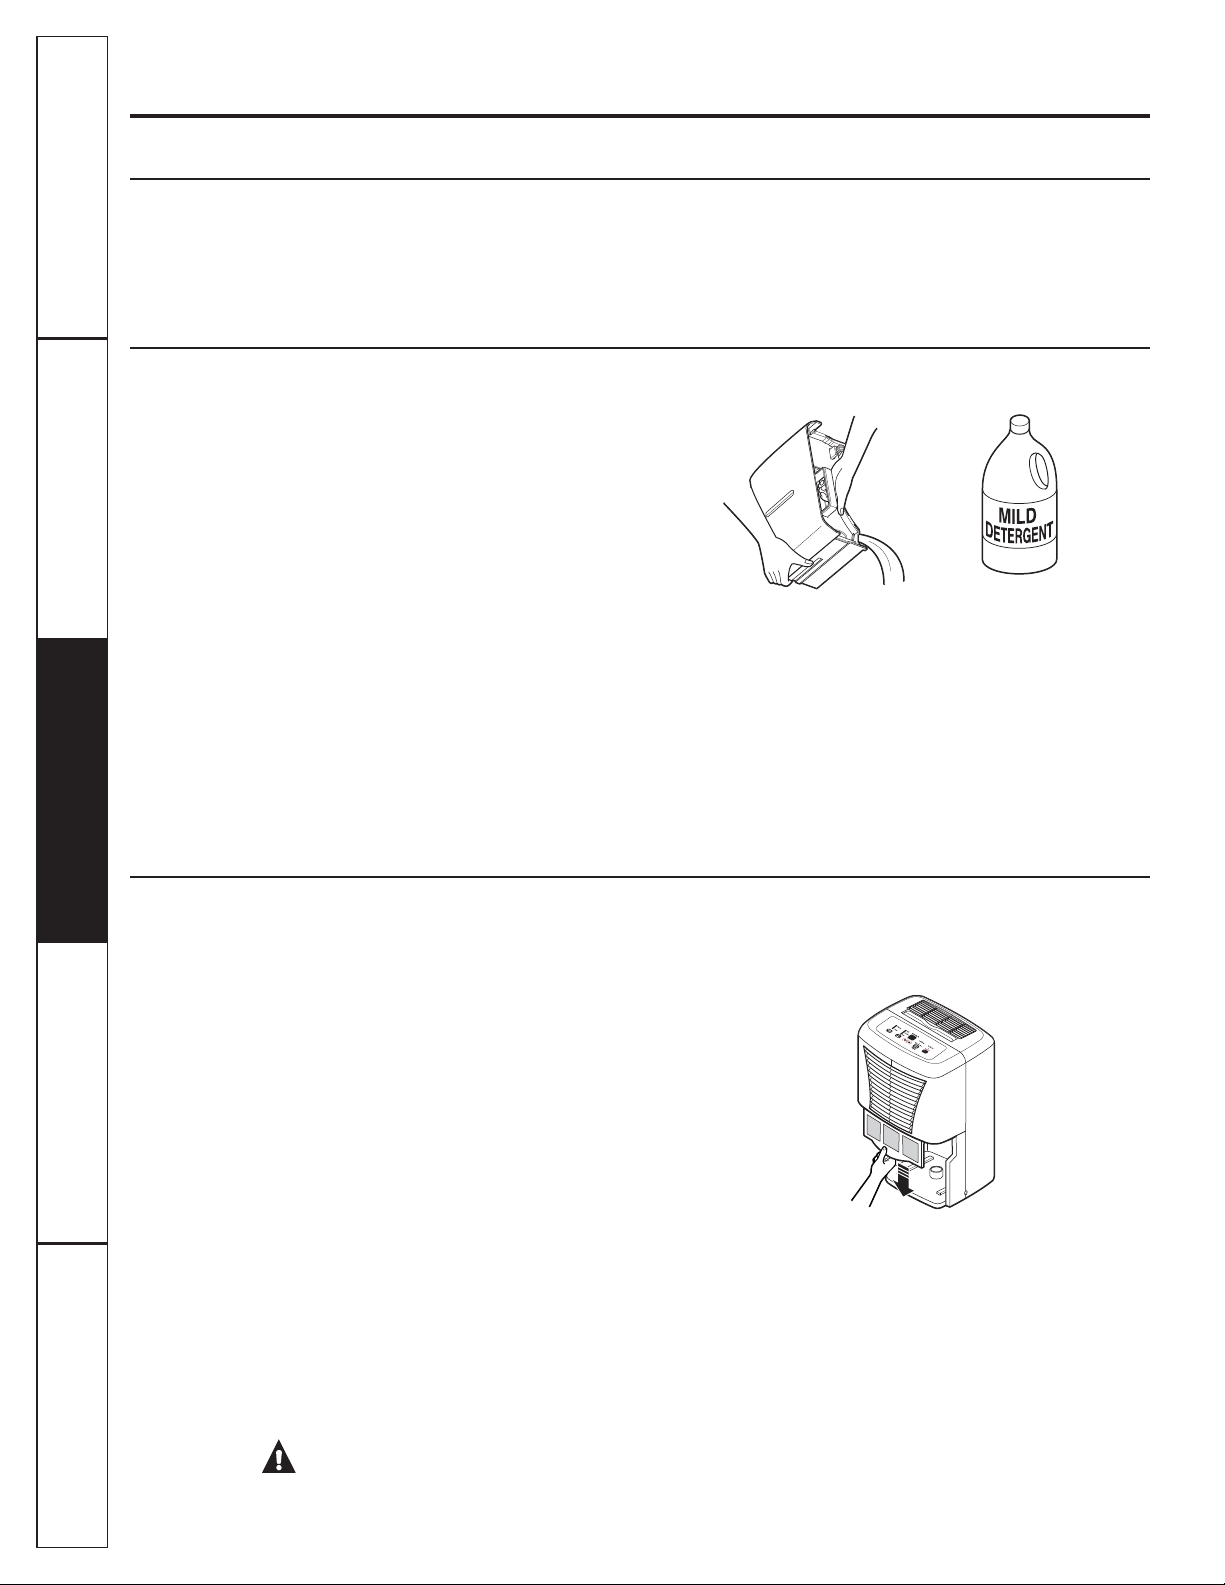
Grille and Case
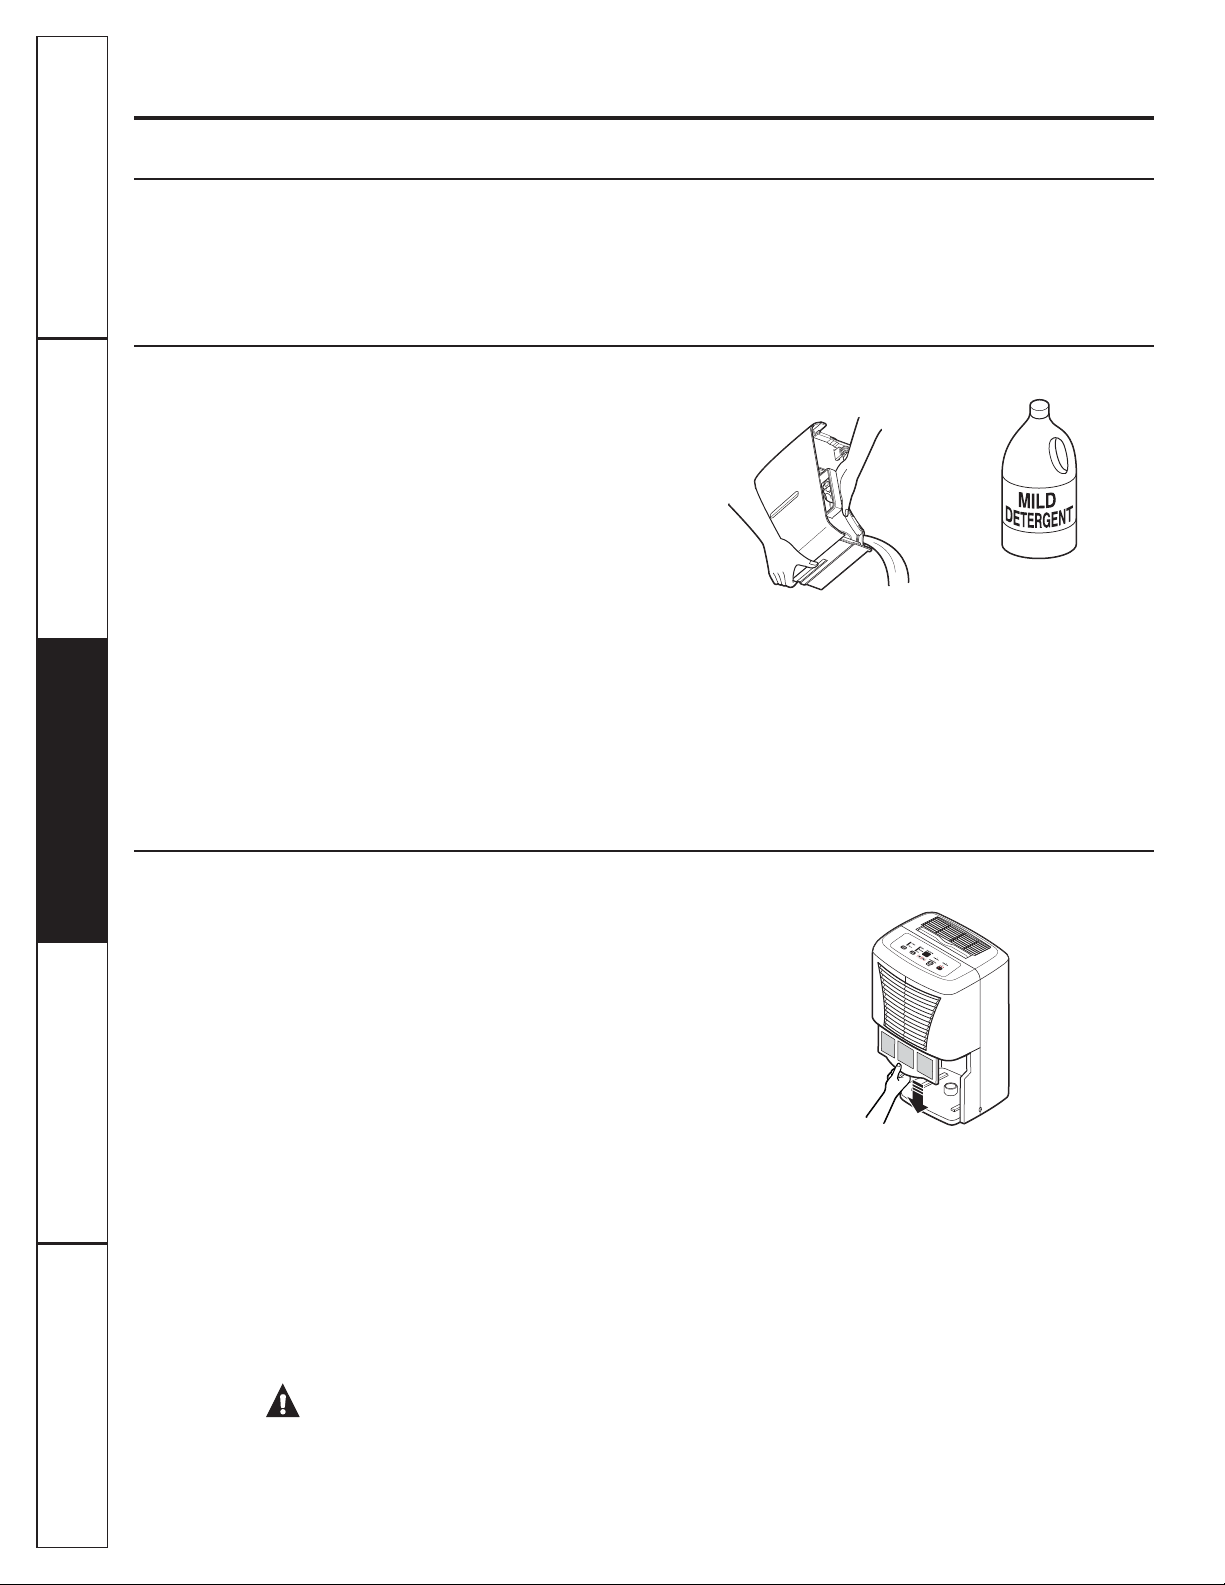
To clean the case:
Use water and a mild detergent. Do not use
bleach or abrasives.
To clean the front grille:
Use a vacuum attachment or brush.
Water Bucket
To clean:
Every few weeks, clean the bucket to prevent growth
of mold, mildew and bacteria. Partially fill the bucket
with clean water and add a little mild detergent.
Swish it around in the bucket, empty and rinse.
NOTE: Do not use a dishwasher to clean the
water bucket.
To remove:
Remove the bucket and pour out any water.
To replace:
Slide the bucket into the dehumidifier.
NOTE: The bucket must be in place and securely seated
for the dehumidifier to operate.
Air Filter
The air filter behind the front grille should
be checked and cleaned at least every 250 hours
of operation or more often if necessary.
After 250 hours of operation, the Clean the Filter
indicator light will glow to remind you to clean the
filter. Remove the filter and clean it. Replace the filter
and press the Filter Timer pad to turn off the Clean the
Filter light.
To remove:
Remove the bucket. Grasp the filter edge, and pull it
straight down and out.
To clean:
Clean the filter with warm, soapy water. Rinse
and let the filter dry before replacing it.
NOTE: DO NOT rinse or put the filter in an automatic
dishwasher.
CAUTION:
NOTE: Avoid using a dishwasher to clean the filter.
DO NOT operate the dehumidifier without a filter because
dirt and lint will clog it and reduce performance.

8
Troubleshooting tips…
Save time and money! Review the chart below first and you may not need to call for service.
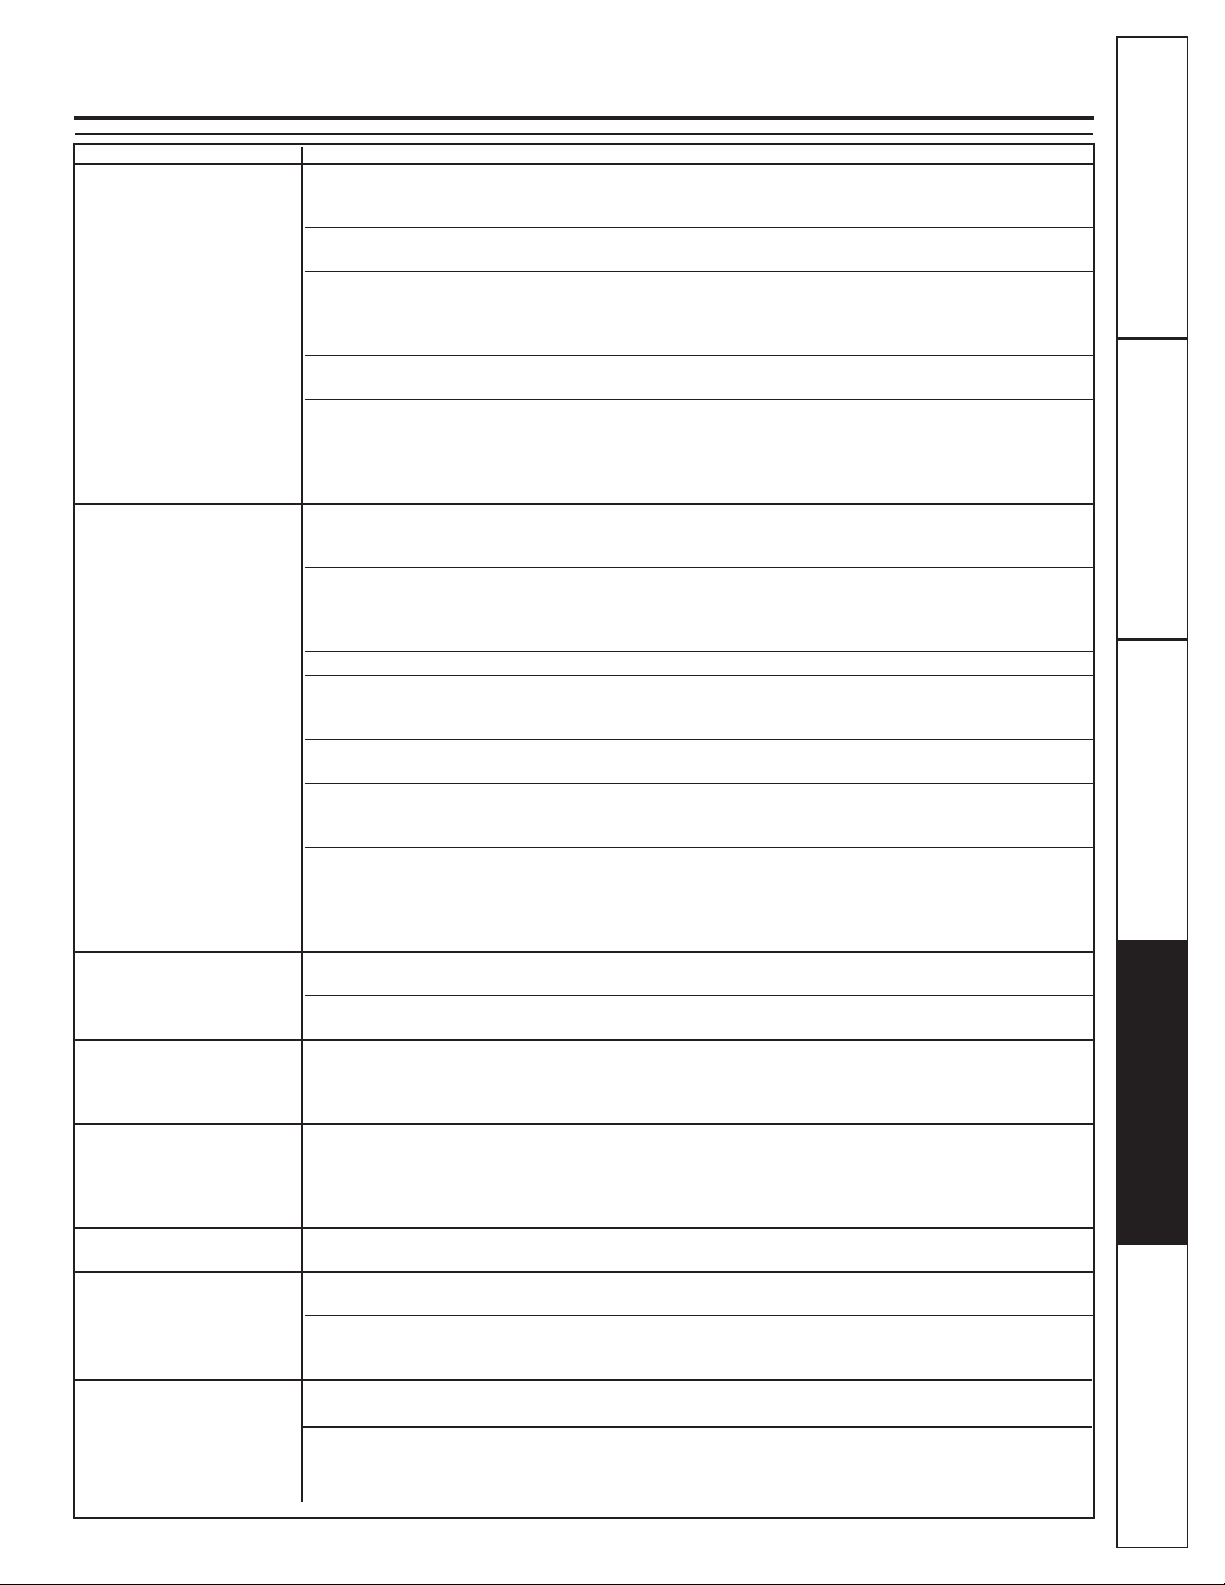
Problem Possible Causes What To Do
Dehumidifier The dehumidifier tMake sure the dehumidifier’s plug is pushed completely
does not start is unplugged. into the outlet.
The fuse is blown/circuit t Check the house fuse/circuit breaker box and replace
breaker is tripped. the fuse or reset the breaker.
Dehumidifier has reached its t The dehumidifier automatically turns off when either
preset level or bucket is full. condition occurs. Change to a lower setting or empty
the bucket and replace properly.
Bucket is not in the t The bucket must be in place and securely seated for the
proper position. dehumidifier to operate.
Power failure. t There is a protective time delay (up to 3 minutes) to
prevent tripping of the compressor overload. For this
reason, the unit may not start normal dehumidifying
for 3 minutes after it is turned back on.
Dehumidifier does not Did not allow enough time t When first installed, allow at least 24 hours to maintain
dry the air as it should to remove the moisture. the desired dryness.
Airflow is restricted. t Make sure there are no curtains, blinds or furniture
blocking the front or back of the dehumidifier. See the
Choosing a Location section.
Dirty filter. t See the Care and Cleaning section.
The Humidity Control may t For drier air, press the ź pad and set to a lower percent
not be set low enough. value (%) or at CO (continuous) for maximum
dehumidification.
Doors and windows may not t Check that all doors, windows and other openings
be closed tightly. are securely closed.
Clothes dryer may be t Install the dehumidifier away from the dryer.
blowing moisture-laden The dryer should be vented to the outside.
air into the room.
Room temperature t Moisture removal is best at higher room temperatures.
is too low. Lower room temperatures will reduce the moisture
removal rate. Models are designed to be operated at
temperatures above 41°F (5°C).
Dehumidifier runs Area to be dehumidified t The capacity of your dehumidifier may not be adequate.
too much is too large.
Doors and windows are open. t Close all doors and windows to the outside.
Frost appears on Dehumidifier has been turned t This is normal. Frost will usually disappear
the coils on recently, or room temperature within 60 minutes. See the Automatic Defrost section.
is below 41°F (5°C).
Controls cannot be set The compressor will turn off t This is normal. Wait approximately 3 minutes and set the
and the fan will automatically fan as desired.
continue to run for
approximately 3 minutes at a
fixed setting.
Fan noise Air is moving through t This is normal.
the dehumidifier.
Water on floor Hose connection may be loose. t Check the hose connection. See the Removing Collected
Water section.
Intended to use the bucket to t Disconnect the hose if using the bucket to collect water.
collect water, but a hose See the Removing Collected Water section
as attached.
Bucket Full LED light Drain hose not tight on fitting t Check drain hose connection.
flashing and alarm
sounds while drain hose Drain hose is kinked t Ensure the drain hose is pointed straight down to the floor
is connected and is not kinked in anyway.
Consumer Support Troubleshooting Tips Operating Instructions Safety InstructionsTroubleshooting Tips Care and Cleaning Safety InstructionsOperating Instructions

9
$VTUPNFS4FSWJDF5SPVCMFTIPPUJOH5JQT0QFSBUJOH*OTUSVDUJPOT4BGFUZ*OTUSVDUJPOT *OTUBMMBUJPO*OTUSVDUJPOT
Notes. GEAppliances.com

10
Consumer Support Troubleshooting Tips Operating Instructions Safety InstructionsTroubleshooting Tips Care and Cleaning Safety InstructionsOperating Instructions
Notes.

11
$VTUPNFS4FSWJDF5SPVCMFTIPPUJOH5JQT0QFSBUJOH*OTUSVDUJPOT4BGFUZ*OTUSVDUJPOT *OTUBMMBUJPO*OTUSVDUJPOT
Notes. GEAppliances.com
12
Consumer Support Troubleshooting Tips Operating Instructions Safety InstructionsTroubleshooting Tips Care and Cleaning Safety InstructionsOperating Instructions
For The Period Of: We Will Replace:
One Year Replacement unit for any product which fails due to a defect in materials or workmanship.
From the date of the The replacement unit is warranted for the remainder of your product’s original one-year
original purchase warranty period.
*('HKXPLGLILHU³2QH<HDU/LPLWHG:DUUDQW\(For customers in the U.S.A.)
Ŷ Customer instruction. This owner’s manual provides
information regarding operating instructions and
user controls.
Ŷ Improper installation, delivery or maintenance. If you
have an installation problem, or if the dehumidifier is
of improper dehumidification capacity, contact your
GHDOHURULQVWDOOHU<RXDUHUHVSRQVLEOHIRUSURYLGLQJ
adequate electrical, plumbing and other connecting
facilities.
Ŷ Failure of the product resulting from modifications to
the product or due to unreasonable use, including failure
to provide reasonable and necessary maintenance.
Ŷ Replacement of house fuses or resetting of circuit
breakers.
Ŷ Failure due to corrosion on models not corrosion-
protected.
Ŷ Damage to the product caused by improper power
supply voltage, accident, fire, floods or acts of God.
Ŷ Incidental or consequential damage caused by possible
defects with this dehumidifier.
Ŷ Damage caused after delivery.
What Is Not Covered:
This warranty is extended to the original purchaser and any succeeding owner for products purchased for home
use within the USA.
Some states do not allow the exclusion or limitation of incidental or consequential damages. This warranty gives
you specific legal rights, and you may also have other rights which vary from state to state. To know what your
legal rights are, consult your local or state consumer affairs office or your state’s Attorney General.
Exclusion of implied warranties: Except where prohibited or restricted by law, there are no warranties, whether
express, oral or statutory which extend beyond the description on the face hereof, including specifically the
implied warranties of merchantability or fitness for a particular purpose.
Warrantor: General Electric Company. Louisville, KY 40225
Staple your receipt here.
Proof of the original purchase date
is needed to make a warranty claim.
Ŷ 3URSHUO\SDFN\RXUXQLW:HUHFRPPHQGXVLQJWKH
original carton and packing materials.
Ŷ Return the product to the retail location where it
was purchased.
Ŷ Include in the package a copy of the sales receipt or
other evidence of date of original purchase. Also print
your name and address and a description of the defect.
EXCLUSION OF IMPLIED WARRANTIES—Your sole and exclusive remedy is product replacement as provided
in this Limited Warranty. Any implied warranties, including the implied warranties of merchantability or fitness
for a particular purpose, are limited to one year or the shortest period allowed by law.
In Order to Make a Warranty Claim:
13
For The Period Of: We Will Replace:
One Year Replacement unit for any product which fails due to a defect in materials or workmanship.
From the date of the The replacement unit is warranted for the remainder of your product’s original one-year
original purchase warranty period.
*('HKXPLGLILHU³2QH<HDU/LPLWHG:DUUDQW\(For customers in Canada)
Ŷ Customer instruction. This owner’s manual provides
information regarding operating instructions and
user controls.
Ŷ Improper installation, delivery or maintenance. If you
have an installation problem, or if the dehumidifier is
of improper dehumidification capacity, contact your
GHDOHURULQVWDOOHU<RXDUHUHVSRQVLEOHIRUSURYLGLQJ
adequate electrical, plumbing and other connecting
facilities.
Ŷ Failure of the product resulting from modifications to
the product or due to unreasonable use, including failure
to provide reasonable and necessary maintenance.
Ŷ Replacement of house fuses or resetting of circuit
breakers.
Ŷ Failure due to corrosion on models not corrosion-
protected.
Ŷ Damage to the product caused by improper power
supply voltage, accident, fire, floods or acts of God.
Ŷ Incidental or consequential damage caused by possible
defects with this dehumidifier.
Ŷ Damage caused after delivery.
What Is Not Covered:
This warranty is extended to the original purchaser and any succeeding owner for products purchased in
Canada for home use within Canada.
Some provinces do not allow the exclusion or limitation of incidental or consequential damages, so the above
exclusion may not apply to you. This warranty gives you specific legal rights, and you may also have other
rights which vary from province to province. To know what your legal rights are in your province, consult your
local or provincial consumer affairs office.
Exclusion of implied warranties: Except where prohibited or restricted by law, there are no warranties, whether
express, oral or statutory which extend beyond the description on the face hereof, including specifically the
implied warranties of merchantability or fitness for a particular purpose.
:DUUDQWRU0DEH&DQDGD,QF
Burlington, Ontario
Staple your receipt here.
Proof of the original purchase date
is needed to make a warranty claim.
Ŷ 3URSHUO\SDFN\RXUXQLW:HUHFRPPHQGXVLQJWKH
original carton and packing materials.
Ŷ Return the product to the retail location where it
was purchased.
Ŷ Include in the package a copy of the sales receipt or
other evidence of date of original purchase. Also print
your name and address and a description of the defect.
EXCLUSION OF IMPLIED WARRANTIES—Your sole and exclusive remedy is product replacement as provided
in this Limited Warranty. Any implied warranties, including the implied warranties of merchantability or fitness
for a particular purpose, are limited to one year or the shortest period allowed by law.
In Order to Make a Warranty Claim:
Consumer SupportTroubleshooting TipsOperating InstructionsSafety Instructions Care and Cleaning

&RQVLJQHVGHVpFXULWp
&RQVLJQHVG·XWLOLVDWLRQ
$SURSRVGHVFRPPDQGHVGX
GpVKXPLGLILFDWHXU
&KRL[G·XQHPSODFHPHQW
'pJLYUDJHDXWRPDWLTXH
)RQFWLRQQHPHQWGX
GpVKXPLGLILFDWHXU
1LYHDXG·HDX
5HWUDLWGHO·HDXFROOHFWpH
(QWUHWLHQHWQHWWR\DJH
)LOWUHjDLU
*ULOOHHWERÌWLHU
6HDXFROOHFWHXU
&RQVHLOVGHGpSDQQDJH
$VVLVWDQFHjODFOLHQWqOH
$VVLVWDQFHjODFOLHQWqOH
*DUDQWLH
(QUHJLVWUHPHQWGXWLWUH
GHSURSULpWp
Inscrivez ici les numéros de modèle et de
série :
Numéro de modèle : _______________
Numéro de Série : ________________
9RXVOHVWURXYHUH]VXUXQHpWLTXHWWHSODFpHj
O·DUULqUHGXGpVKXPLGLILFDWHXU
Assistance à la Clientèle Conseils de Dépannage Fonctionnement Safety Instructions Entretien et Nettoyage Consignes de Sécurité
$X&DQDGDYLVLWH]QRXVDX
ZZZHOHFWURPHQDJHUVJHFD
IMPORTANTES CONSIGNES DE S CURIT .
VEUILLEZ LIRE TOUTES LES CONSIGNES AVANT UTILISATION.
Lorsque vous utilisez le déshumidificateur, suivez toujours les consignes de sécurité de base suivantes :
1·XWLOLVH]FHWDSSDUHLOTX·DX[ILQV
SUpYXHVGpFULWHVGDQVOHPDQXHO
G·XWLOLVDWLRQ
&HGpVKXPLGLILFDWHXUGRLWrWUH
FRUUHFWHPHQWLQVWDOOpHWPLVjODWHUUH
DYDQWWRXWHXWLOLVDWLRQFRPPHLQGLTXp
GDQVFHPDQXHO
1HIDLWHVMDPDLVIRQFWLRQQHUOH
GpVKXPLGLILFDWHXUGDQVXQH]RQHRGH
O·HDXVWDJQDQWHSRXUUDLWV·DFFXPXOHU
3RXUYRWUHVpFXULWpHQFDVG·HDX
VWDJQDQWHGpEUDQFKH]O·DSSDUHLODYDQW
GHPDUFKHUGDQVO·HDX
1HGpEUDQFKH]MDPDLVO·KXPLGLILFDWHXU
HQWLUDQWVXUOHFRUGRQG·DOLPHQWDWLRQ
3UHQH]WRXMRXUVIHUPHPHQWODILFKHHQ
PDLQHWWLUH]SRXUODVRUWLUGHODSULVH
5HPSODFH]LPPpGLDWHPHQWWRXWFRUGRQ
pOHFWULTXHXVpRXHQGRPPDJp8Q
FRUGRQG·DOLPHQWDWLRQHQGRPPDJpGRLW
rWUHUHPSODFpSDUXQQRXYHDXFRUGRQ
G·DOLPHQWDWLRQREWHQXGXIDEULFDQW1H
UpSDUH]SDVOHFRUGRQHQGRPPDJp
1·XWLOLVH]SDVXQFRUGRQILVVXUpRX
SUpVHQWDQWGHVGRPPDJHVGXVDX[
IURWWHPHQWVVRLWVXUVDORQJXHXURXDX[
H[WUpPLWpVGXFÔWpGHODILFKHRXGX
UDFFRUG
6LODSULVHGHFRXUDQWHVWG·XQIRUPDW
GLIIpUHQWGHODILFKHFHWWHSULVHGRLWrWUH
FKDQJpHSDUXQpOHFWULFLHQTXDOLILp
(WHLJQH]HWGpEUDQFKH]OH
GpVKXPLGLILFDWHXUDYDQWGHOHQHWWR\HU
*(Q·RIIUHSDVGHVHUYLFHG·HQWUHWLHQ
SRXUOHVGpVKXPLGLILFDWHXUV1RXVYRXV
UHFRPPDQGRQVGHQHSDVHVVD\HU
G·HIIHFWXHUYRXVPrPHO·HQWUHWLHQGX
GpVKXPLGLILFDWHXU
3RXUYRWUHVpFXULWpQHVWRFNH]SDVHW
Q·XWLOLVH]SDVG·HVVHQFHRXG·DXWUHV
YDSHXUVHWOLTXLGHVLQIODPPDEOHVGDQV
OHVSDUDJHVGHFHWDSSDUHLORXGHWRXW
DXWUHDSSDUHLO
7RXVOHVGpVKXPLGLILFDWHXUV
FRQWLHQQHQWGHVIOXLGHVIULJRULJqQHVTXL
FRQIRUPpPHQWjODOpJLVODWLRQIpGpUDOH
GRLYHQWrWUHUHWLUpVDYDQWODPLVHDX
UHEXWGHO·DSSDUHLO6LYRXVPHWWH]DX
UHEXVXQDQFLHQDSSDUHLOFRQWHQDQWGHV
IOXLGHVIULJRULJqQHVYpULILH]ODSURFpGXUH
jVXLYUHDXSUqVGHODFRPSDJQLH
UHVSRQVDEOHGHO·pOLPLQDWLRQ
1·XWLOLVH]SDVOHGpVKXPLGLILFDWHXUj
O·H[WpULHXU
&HGpVKXPLGLILFDWHXUHVWVHXOHPHQW
FRQÈXSRXUXQHXWLOLVDWLRQjO·LQWpULHXU
SRXUXQHDSSOLFDWLRQUpVLGHQWLHOOH&H
GpVKXPLGLILFDWHXUQHGRLWSDVrWUHXWLOLVp
SRXUGHVDSSOLFDWLRQVFRPPHUFLDOHVRX
LQGXVWULHOOHV
&HVV\VWqPHVGpVKXPLGLILFDWHXUV
5$H[LJHQWTXHOHVHQWUHSUHQHXUV
HWWHFKQLFLHQVDGRSWHQWOHVRXWLOVOH
PDWpULHOHWGHVQRUPHVGHVpFXULWp
DSSURXYpVSRXUXWLOLVDWLRQDYHF
FHUpIULJpUDQW1·XWLOLVH]SDVGH
PDWpULHOFHUWLILpSRXUOHUpIULJpUDQW
5XQLTXHPHQW1·XWLOLVH]3$6GH
PDWpULHOFHUWLILpSRXUOHUpIULJpUDQW5
XQLTXHPHQW
CONSIGNES DE SÉCURITÉ
Ne coupez pas ou n’enlevez pas, sous aucun
prétexte, la troisième broche de mise à la terre
du cordon d’alimentation. Pour des raisons de
sécurité, cet appareil doit être correctement mis à
la terre.
N’utilisez PAS d’adaptateurs avec cet appareil.
/HFRUGRQG·DOLPHQWDWLRQGHFHWDSSDUHLOHVW
pTXLSpG·XQHILFKHjWURLVEURFKHVPLVHjOD
WHUUHTXLV·DGDSWHjODSULVHGHFRXUDQWVWDQGDUG
jEURFKHVPLVHjODWHUUHSRXUPLQLPLVHUOHV
ULVTXHVGHFKRFVpOHFWULTXHVSDUFHWDSSDUHLO
)DLWHVYpULILHUOHVSULVHVGHFRXUDQWHWOHVFLUFXLWV
SDUXQpOHFWULFLHQTXDOLILpSRXUV·DVVXUHUTXHOH
V\VWqPHHVWFRUUHFWHPHQWPLVjODWHUUH
4XDQGODSULVHGHFRXUDQWQ·HVWpTXLSpHTXH
GHEURFKHVO·LQVWDOODWHXUDODUHVSRQVDELOLWpHW
O·REOLJDWLRQGHODUHPSODFHUSDUXQHSULVHjWURLV
EURFKHVFRUUHFWHPHQWPLVHjODWHUUH
/·KXPLGLILFDWHXUGRLWWRXMRXUVrWUHEUDQFKpjVD
SURSUHSULVHpOHFWULTXHG·XQHWHQVLRQQRPLQDOH
FRUUHVSRQGDQWjVDSODTXHVLJQDOpWLTXH
&HFLSHUPHWG·REWHQLUXQPHLOOHXUUHQGHPHQW
GXGpVKXPLGLILFDWHXUHWpYLWHGHVXUFKDUJHU
OHVFLUFXLWVpOHFWULTXHVGXGRPLFLOHTXLHQ
VXUFKDXIIDQWSRVHQWXQULVTXHG·LQFHQGLH
BRANCHEMENTS ÉLECTRIQUES
AVERTISSEMENT !
Pour votre sécurité, les informations contenues dans ce manuel doivent être suivies afin de minimiser les
risques d’incendie, de chocs électriques ou de blessures corporelles.
Assistance à la ClientèleConseils de Dépannage FonctionnementConsignes de Sécurité Entretien et Nettoyage
LISEZ ET SUIVEZ SOIGNEUSEMENT
CES CONSIGNES DE S CURIT .
CONSERVEZ CES INSTRUCTIONS
Assistance à la Clientèle Conseils de Dépannage Fonctionnement Safety Instructions Entretien et Nettoyage Consignes de Sécurité
IMPORTANTES CONSIGNES DE SÉCURITÉ .
VEUILLEZ LIRE TOUTES LES CONSIGNES AVANT UTILISATION.
$9(57,66(0(17
5,648('·,1&(1',(3HXWRFFDVLRQQHUGHV
EOHVVXUHVJUDYHVRXODPRUW
1(3$6XWLOLVHUGHUDOORQJHDYHFFH
GpVKXPLGLILFDWHXU
1(3$6XWLOLVHUGHSDUDVXUWHQVHXUVRX
G·DGDSWDWHXUVjVRUWLHVPXOWLSOHVDYHFFH
GpVKXPLGLILFDWHXU
87,/,6$7,21'(5$//21*(6
REMARQUE : /RUVTXHOHVHDXFROOHFWHXUHVWSOHLQRXDEVHQW
OHVFRPPDQGHVQHSHXYHQWrWUHUpJOpHV
Touche d’alimentation
$SSX\H]VXUFHWWHWRXFKHSRXUDOOXPHURXpWHLQGUH
OHGpVKXPLGLILFDWHXU
Compteur horaire du filtre
$SUqVKHXUHVGHIRQFWLRQQHPHQWOHYR\DQW
&OHDQWKH)LOWHUQHWWR\HUOHILOWUHV·DOOXPHUDSRXU
YRXVUDSSHOHUGHQHWWR\HUYRWUHILOWUH5HWLUH]OHILOWUH
HWQHWWR\H]OH
$SSX\H]VXUODWRXFKHSRXUpWHLQGUHOHYR\DQW
&OHDQWKH)LOWHUQHWWR\HUOHILOWUH&RQVXOWH]OD
VHFWLRQEntretien et Nettoyage.
Touches de réglage de l’humidité
/HQLYHDXG·KXPLGLWpSHXWrWUHUpJOpGDQVXQH
JDPPHYDULDQWGHG·+5KXPLGLWpUHODWLYHj
G·+5SDULQFUpPHQWVGHRXVXU&2SRXU
XQHXWLOLVDWLRQHQFRQWLQXH3RXUUpJOHUO·DSSDUHLO
SRXUO·RSpUDWLRQFRQWLQXHODSSX\HUODIOqFKH
GHVFHQGDQWHMXVTX·jFHTXHO·pFUDQUHYHOH&2
REMARQUE :6LCOHQFRQWLQXHVWVpOHFWLRQQp
OHGpVKXPLGLILFDWHXUIRQFWLRQQHUDHQFRQWLQXDX
UpJODJHGHGpVKXPLGLILFDWLRQOHSOXVpOHYpVLLOHVW
UHOLpjO·pYDFXDWLRQSDUXQWX\DXRXMXVTX·jFHTXH
OHFROOHFWHXUVRLWSOHLQGDQVOHFDVFRQWUDLUH
3RXUXQDLUSOXVVHFDSSX\H]VXUODWRXFKHd
HWUpJOH]OHGpVKXPLGLILFDWHXUjXQSRXUFHQWDJH
G·+5SOXVIDLEOH
3RXUXQDLUSOXVKXPLGHDSSX\H]VXUODWRXFKHcHW
UpJOH]OHGpVKXPLGLILFDWHXUjXQSRXUFHQWDJHG·+5
SOXVpOHYp
/RUVTXHYRXVXWLOLVH]OHGpVKXPLGLILFDWHXUSRXUOD
SUHPLqUHIRLVUpJOH]OHVFRPPDQGHVG·KXPLGLWpVXU
RX$WWHQGH]DXPRLQVKHXUHVSRXUTXH
OHGpVKXPLGLILFDWHXUDUULYHjFHQLYHDXG·KXPLGLWp
6LO·DLUHVWHQFRUHWURSKXPLGHUpJOH]O·KXPLGLWpVXU
XQHYDOHXUSOXVEDVVHRXFKRLVLVVH]ODIRQFWLRQ(Q
&RQWLQXSRXUXQHGpVKXPLGLILFDWLRQPD[LPDOH
Affichage
$IILFKHOHSRXUFHQWDJHG·KXPLGLWpVpOHFWLRQQp
SHQGDQWOHUpJODJHSXLVDIILFKHOHQLYHDX
G·KXPLGLWpUpHOGDQVODSLqFHSUpFLVLRQGH
Touche de vitesse du ventilateur
&RQWUÔOHODYLWHVVHGXYHQWLODWHXU
$SSX\H]VXUFHWWHWRXFKHSRXUFKRLVLUXQHYLWHVVH
GHYHQWLODWLRQOHYpH0R\HQQHRX%DVVH
5pJOH]ODYLWHVVHGXYHQWLODWHXUVXUOHYpHSRXUXQH
pOLPLQDWLRQPD[LPDOHGHO·KXPLGLWp8QHIRLVTXH
O·KXPLGLWpDpWpUpGXLWHHWTX·XQIRQFWLRQQHPHQW
VLOHQFLHX[HVWSUpIpUpUpJOH]OHYHQWLODWHXUVXUXQH
YLWHVVH0R\HQQHRX%DVVH
Délai avant arrêt
/RUVTXHOHGpVKXPLGLILFDWHXUHVWHQ
IRQFWLRQQHPHQWDSSX\H]VXUFHWWHWRXFKHSRXU
UpJOHUDXWRPDWLTXHPHQWXQGpODLGHKHXUHVRX
GHKHXUHVDYDQWO·DUUrWGHO·DSSDUHLO
Voyant indiquant que le
filtre doit être nettoyé
A propos des commandes du déshumidificateur. www.electromenagersge.ca
Commandes
Autres fonctions
Voyant BUCKET FULL (Seau plein)
&HYR\DQWV·DOOXPHORUVTXHOHVHDXFROOHFWHXUHVWSUrWjrWUH
YLGpRXVLFHOXLFLDpWpUHWLUpGHO·DSSDUHLORXQ·DSDVpWp
UHPLVHQSODFH
Alarme
6LOHVHDXFROOHFWHXUHVWSOHLQRXDEVHQWSHQGDQWSOXVGH
PLQXWHVXQHDODUPHVHGpFOHQFKHSHQGDQWVHFRQGHV
SRXUYRXVUDSSHOHUGHYLGHUOHVHDXHWGHOHUHPHWWUHHQ
SODFH
Arrêt Automatique
/H&RPPXWDWHXUGHFRQWUÔOHGXQLYHDXG·HDXpWHLQWOH
GpVKXPLGLILFDWHXUORUVTXHOHVHDXFROOHFWHXUHVWSOHLQRXVL
FHOXLFLDpWpUHWLUpGHO·DSSDUHLORXQ·DSDVpWpUHPLVHQSODFH
5HPDUTXH/HYHQWLODWHXUFRQWLQXHUDGHIRQFWLRQQHUSHQGDQW
HQYLURQPLQXWHVXQHIRLVOHVHDXUHWLUp
Dégivrage Automatique
/RUVTXHOHJLYUHV·DFFXPXOHVXUOHVVHUSHQWLQVG·pYDSRUDWLRQ
OHFRPSUHVVHXUV·DUUrWHHWOHYHQWLODWHXUFRQWLQXHj
IRQFWLRQQHUMXVTX·jGLVSDULWLRQGXJLYUH
Panne de courant
(QFDVGHSDQQHRXG·LQWHUUXSWLRQGHFRXUDQWO·DSSDUHLO
UHGpPDUUHDXWRPDWLTXHPHQWDSUqVUpWDEOLVVHPHQWGH
O·DOLPHQWDWLRQpOHFWULTXHHWFRQVHUYHOHVGHUQLHUVUpJODJHV
Voyant de fonctionnement
en continu
Voyant ´ Bucket Full ª (Seau Plein)
indique que le seau doit être vidé
ou qu’il n’est pas dans l’appareil
Voyants indiquant le délai de
2 heures ou de 4 heures avant
l’arrêt du déshumidificateur
Voyants indiquant la
vitesse élevée, moyenne
ou basse du ventilateur
Voyant
d’alimentation
Assistance à la ClientèleConseils de Dépannage FonctionnementConsignes de Sécurité Entretien et Nettoyage
Assistance à la Clientèle Conseils de Dépannage Fonctionnement Safety Instructions Entretien et Nettoyage Consignes de Sécurité
Lorsque vous utilisez le déshumidificateur pour la première fois, faites le fonctionner en continu pendant 24 heures.
Choix d’un Emplacement
8QGpVKXPLGLILFDWHXUHQIRQFWLRQQHPHQWGDQVXQ
VRXVVRODXUDSHXRXSDVG·HIIHWVXUOHVpFKDJHG·XQ
HQGURLWGHVWRFNDJHIHUPpFRPPHXQSODFDUGSDU
H[HPSOHjPRLQVTX·XQHFLUFXODWLRQDGpTXDWHGHO·DLU
GDQVOHSODFDUGVRLWSHUPLVH
N’utilisez pas le déshumidificateur à l’extérieur.
Ce déshumidificateur est seulement conÁu pour
une utilisation à l’intérieur pour une application
résidentielle. Ce déshumidificateur ne doit pas
être utilisé pour des applications commerciales ou
industrielles.
Placez le déshumidificateur sur une surface plane et
de niveau, suffisamment robuste pour supporter le
poids de l’appareil contenant un seau rempli d’eau.
Laissez un espace de 12 à 18 pouces autour de
l’appareil pour une bonne circulation de l’air.
Placez le déshumidificateur dans une pièce où la
température ne descend pas en dessous de 5 °C
(41 °F). Les serpentins peuvent se couvrir de givre
à des températures inférieures 5 °C (41 °F), ce qui
réduit considérablement l’efficacité de l’appareil.
Utilisez le déshumidificateur dans des pièces utilisées
pour la cuisine, la lessive, le bain et la vaisselle et
ayant une humidité excessive. REMARQUE : Eloignez
le déshumidificateur de la sécheuse.
Utilisez le déshumidificateur pour éviter les
dommages dus à l’humidité dans toutes les pièces où
des livres ou des objets de valeurs sont rangés.
Utilisez le déshumidificateur dans un sous-sol pour
éviter les dommages par l’humidité.
Le déshumidificateur doit fonctionner dans une pièce
fermée pour une meilleure efficacité.
Fermez toutes les portes, fenêtres et autres
ouvertures de la pièce.
OUI NON
REMARQUE : Le déshumidificateur est équipé de
roulettes pour aider à son positionnement. Ces roulettes
ne doivent être utilisées que sur des surfaces planes
et lisses. N’essayez pas de faire rouler le
déshumidificateur sur une moquette ou sur des objets.
Fonctionnement du Déshumidificateur
/·DLUKXPLGHHVWHQWUDÌQpYHUVOHVVHUSHQWLQVUpIULJpUpV
GHGpVKXPLGLILFDWLRQ/·KXPLGLWpGHO·DLUVHFRQGHQVH
VXUFHVHUSHQWLQHWV·pFRXOHGDQVOHVHDXFROOHFWHXU
RXSDUXQWX\DXG·pYDFXDWLRQ
/·DLUSURSUHHWVHFHVWHQWUDvQpjWUDYHUVOH
FRQGHQVHXURLOHVWFKDXIIpSXLVUHQYR\pGDQVOD
SLqFHSDUODJULOOHVXSpULHXUH
Il est normal que l’air autour du déshumidificateur soit
légèrement plus chaud que dans le reste de la pièce.
/RUVTXHOHJLYUHV·DFFXPXOHVXUOHVVHUSHQWLQV
G·pYDSRUDWLRQOHFRPSUHVVHXUV·DUUrWHHWOH
YHQWLODWHXUFRQWLQXHjIRQFWLRQQHUMXVTX·jGLVSDULWLRQ
GXJLYUH
/RUVTXHOHVHUSHQWLQHVWGpJLYUpOHFRPSUHVVHXU
RXOHYHQWLODWHXUUHGpPDUUHDXWRPDWLTXHPHQWHWOD
GpVKXPLGLILFDWLRQUHSUHQG
Dégivrage Automatique
12–18po min. 12–18po min.
Au
dessus
de 5°C
(41°F)
Utilisation du déshumidificateur.
En
dessous
de 5°C
(41°F)
Il y a deux faÁons de retirer l’eau collectée :
Utilisez le seau collecteur. /RUVTXHOHVHDXHVW
UHWLUpO·DSSDUHLOV·DUUrWHGHIRQFWLRQQHU9LGH]OH
VHDXHWUHPHWWH]OHHQSODFH
IMPORTANT : N’utilisez pas le tuyau d’évacuation
si vous utilisez le seau pour récupérer l’eau.
Lorsque le tuyau est branché, l’eau passe par ce
dernier vers le sol au lieu d’être collectée dans le
seau.
REMARQUES :
Ne retirez pas le seau pendant que le
déshumidificateur est en fonctionnement ou
si ce dernier vient juste de s’arrêter. De l’eau
pourrait goutter dans le bac d’évacuation.
Le seau doit être en place et solidement
positionné pour que le déshumidificateur
fonctionne.
Utilisez le tuyau. /·HDXSHXWV·pYDFXHU
DXWRPDWLTXHPHQWYHUVOHVLSKRQGHVROSDU
O·LQWHUPpGLDLUHG·XQWX\DXG·DUURVDJHQRQ
IRXUQL
5HWLUH]OHVHDXGHO·DYDQWGHO·DSSDUHLO
2XYUH]OHFRXYHUFOHG·pYDFXDWLRQVXUOHFÔWp
GHO·DSSDUHLO
)L[H]OHWX\DXG·DUURVDJHQRQIRXUQLFRXSpj
ODORQJXHXUDGpTXDWHjODEXVHHWSODFH]VRQ
H[WUpPLWpDXQLYHDXGXVLSKRQGHVRO
5HPHWWH]OHVHDXHQSODFHGDQVO·DSSDUHLO
REMARQUE : Le seau doit être en place
et solidement positionné pour que le
déshumidificateur fonctionne.
Assurez-vous toujours que le seau collecteur est verrouillé en place dans le déshumidificateur.
Niveau d’Eau
/HGpVKXPLGLILFDWHXUV·pWHLQWDXWRPDWLTXHPHQW
ORUVTXHOHVHDXHVWSOHLQRXVLFHOXLFLDpWpUHWLUpGH
O·DSSDUHLORXQ·DSDVpWpUHPLVHQSODFH
Le seau doit être repositionné correctement dans le
déshumidificateur pour que ce dernier fonctionne.
Le voyant sera allumé et le déshumidificateur ne
fonctionnera pas si le seau est mal positionné.
www.electromenagersge.ca
Retrait de l’Eau Collectée
REMARQUE : Maintenez le seau avec
les deux mains lorsque vous le videz.
CÙté de l’appareil
Assistance à la ClientèleConseils de Dépannage FonctionnementConsignes de Sécurité Entretien et Nettoyage
Fonctionnement du seau
1(3$6HQOHYHUODSLqFHHQPRXVVHjO·LQWpULHXUGX
VHDX/HGpVKXPLGLILFDWHXUQHIRQFWLRQQHUDSDV
FRUUHFWHPHQWVDQVFHWWHSLqFH
0RXVVH
Entretien et nettoyage du déshumidificateur
Eteignez et débranchez le déshumidificateur avant tout nettoyage.
Grille et Boîtier
Pour nettoyer le boîtier :
8WLOLVH]GHO·HDXHWXQGpWHUJHQWGRX[1·XWLOLVH]SDV
G·HDXGH-DYHORXGHQHWWR\DQWVDEUDVLIV
Pour nettoyer la grille avant :
8WLOLVH]XQDVSLUDWHXURXXQHEURVVH
Seau Collecteur
Pour nettoyer le seau collecteur :
$TXHOTXHVVHPDLQHVG·LQWHUYDOOHVQHWWR\H]OHVHDX
FROOHFWHXUSRXUpYLWHUODSUROLIpUDWLRQGHODPRLVLVVXUH
HWGHVEDFWpULHV5HPSOLVVH]SDUWLHOOHPHQWOHVHDX
DYHFGHO·HDXSURSUHHWDMRXWH]XQHSHWLWHTXDQWLWpGH
GpWHUJHQWGRX[)DLWHVWRXUQHUO·HDXHWOHGpWHUJHQW
GDQVOHVHDXSXLVYLGH]FHOXLFLHWULQFH]OH
REMARQUE : Ne nettoyez pas le seau dans un
lave-vaisselle.
Pour retirer le seau :
5HWLUH]OHVHDXHWYLGH]O·HDX
Pour remettre le seau en place :
)DLWHVJOLVVH]OHVHDXGDQVOHGpVKXPLGLILFDWHXU
REMARQUE : Le seau doit être en place et solidement
positionné pour que le déshumidificateur fonctionne.
Filtre à Air
/HILOWUHjDLUGHUULqUHODJULOOHDYDQWGRLWrWUHYpULILpHW
QHWWR\pDXERXWGHKHXUHVGHIRQFWLRQQHPHQWRX
SOXVVRXYHQWVLQpFHVVDLUH
$SUqVKHXUHVGHIRQFWLRQQHPHQWOHYR\DQW Clean
the Filter1HWWR\HUOHILOWUHV·DOOXPHUDSRXUYRXV
UDSSHOHUGHQHWWR\HUYRWUHILOWUH5HWLUH]OHILOWUHHW
QHWWR\H]OH5HPHWWH]OHILOWUHHQSODFHSXLVDSSX\H]
VXUODWRXFKHFilter timer&RPSWHXUKRUDLUHGXILOWUH
SRXUpWHLQGUHOHYR\DQWClean the Filter1HWWR\HUOH
ILOWUH
Pour retirer le filtre
5HWLUH]OHVHDXFROOHFWHXU$WWUDSH]OHERUGGXILOWUHHW
WLUH]OHYHUVOHEDVSRXUOHVRUWLU
Pour nettoyer le filtre :
1HWWR\H]OHILOWUHDYHFGHO·HDXVDYRQQHXVHWLqGH
5LQFH]OHILOWUHHWODLVVH]OHVpFKHUDYDQWGHOHUHPHWWUH
GDQVOHGpVKXPLGLILFDWHXU
REMARQUE : NE rincez PAS et NE lavez PAS le filtre
dans le lave-vaisselle.
MISE EN GARDE : NE faites PAS
fonctionner le déshumidificateur sans le filtre sous peine de le
boucher avec de la poussière et de la charpie et de réduire son
efficacité.
REMARQUE : Evitez de nettoyer le filtre au
ave-vaisselle.
Assistance à la Clientèle Conseils de Dépannage Fonctionnement Safety Instructions Entretien et Nettoyage Consignes de Sécurité

Note www.electromenagersge.ca
Assistance à la ClientèleConseils de Dépannage FonctionnementConsignes de Sécurité Entretien et Nettoyage

Note
Assistance à la Clientèle Conseils de Dépannage Fonctionnement Safety Instructions Entretien et Nettoyage Consignes de Sécurité

Conseils de dépannage… www.electromenagersge.ca
Economisez du temps et de l’argent ! Consultez d’abord le tableau ci-dessous pour peut être éviter de faire appel à un technicien.
Problème Causes Possibles Que faire
Le déshumidificateur /HGpVKXPLGLILFDWHXU • $VVXUH]YRXVTXHODILFKHGXGpVKXPLGLILFDWHXUHVW
ne démarre pas HVWGpEUDQFKp FRPSOqWHPHQWHQIRQFpHGDQVODSULVHGHFRXUDQW
/HIXVLEOHHVWJULOOp •9pULILH]ODERvWHGHIXVLEOHVGXGRPLFLOHOHGLVMRQFWHXUHW
OHGLVMRQFWHXUHVWGpFOHQFKp UHPSODFH]OHVIXVLEOHVJULOOpVHQFOHQFKH]OHGLVMRQFWHXU
/HGpVKXPLGLILFDWHXUDDWWHLQW •/HGpVKXPLGLILFDWHXUV·pWHLQWDXWRPDWLTXHPHQWVLXQH
VRQQLYHDXSURJUDPPpRXOH GHFHVFRQGLWLRQVVHSUpVHQWH3DVVH]jXQUpJODJH
VHDXFROOHFWHXUHVWSOHLQ G·KXPLGLWpSOXVIDLEOHRXYLGH]OHVHDXHW
UHSRVLWLRQQH]OHFRUUHFWHPHQW
/HVHDXQ·HVWSDV •/HVHDXGRLWrWUHHQSODFHHWVROLGHPHQWSRVLWLRQQpSRXU
SODFpFRUUHFWHPHQW TXHOHGpVKXPLGLILFDWHXUIRQFWLRQQH
3DQQHGHFRXUDQW •
,O\DXQGpODLGHSURWHFWLRQMXVTX·jPLQXWHVSRXU
pYLWHUGHGpFOHQFKHUXQHVXUFKDUJHGXFRPSUHVVHXU3RXU
FHWWHUDLVRQO·DSSDUHLOQHUHSUHQGUDSDVVRQIRQFWLRQQHPHQW
SHQGDQWOHVPLQXWHVVXLYDQWOHUHWRXUGHO·DOLPHQWDWLRQ
Le déshumidificateur 9RXVQ·DYH]SDVODLVVpDVVH]GH •$SUqVXQHSUHPLqUHLQVWDOODWLRQDWWHQGH]DXPRLQV
n’assèche pas l’air WHPSVDXGpVKXPLGLILFDWHXU KHXUHVSRXUREWHQLUOHWDX[G·KXPLGLWpUHTXLV
comme il le devrait SRXUpOLPLQHUO·KXPLGLWp
/HIOX[G·DLUHVWUHVWUHLQW •
$VVXUH]YRXVTXHGHVULGHDX[GHVVWRUHVRXGHVPHXEOHV
QHEORTXHQWSDVOHGHYDQWRXO·DUULqUHGXGpVKXPLGLILFDWHXU
&RQVXOWH]ODVHFWLRQChoix d’un l’emplacement.
/HILOWUHHVWVDOH •&RQVXOWH]ODVHFWLRQEntretien et nettoyage.
/H&RQWUÔOHGHO·+XPLGLWpQ·HVW •3RXUXQDLUSOXVVHFDSSX\H]VXUODWRXFKHdHWUpJOH]
SHXWrWUHSDVUpJOpDVVH]EDV OHGpVKXPLGLILFDWHXUjXQSRXUFHQWDJHG·+5SOXV
IDLEOHRXVXUCOHQFRQWLQXSRXUXQH
GpVKXPLGLILFDWLRQPD[LPDOH
/HVIHQrWUHVHWOHVSRUWHVQH •9pULILH]TXHWRXWHVOHVSRUWHVIHQrWUHVHWDXWUHV
VRQWSHXWrWUHSDVIHUPpHV RXYHUWXUHVVRQWFRUUHFWHPHQWIHUPpHV
FRUUHFWHPHQW
/DVpFKHXVHHQYRLHSHXWrWUH •(ORLJQH]OHGpVKXPLGLILFDWHXUGHODVpFKHXVH/·DLU
XQDLUFKDUJpG·KXPLGLWp SURGXLWSDUODVpFKHXVHGRLWrWUHpYDFXpYHUVO·H[WpULHXU
GDQVODSLqFH
/DWHPSpUDWXUHGHODSLqFH •
/·pOLPLQDWLRQGHO·KXPLGLWpHVWSOXVHIILFDFHjGHV
HVWWURSEDVVH WHPSpUDWXUHVSOXVpOHYpHV'HVWHPSpUDWXUHVSOXVEDVVHV
GDQVODSLqFHUpGXLURQWO·HIILFDFLWpG·pOLPLQDWLRQGH
O·KXPLGLWp/HVPRGqOHVVRQWFRQÈXVSRXUIRQFWLRQQHUj
GHVWHPSpUDWXUHVVXSpULHXUHVj&)
Le déshumidificateur se /DSLqFHjGpVKXPLGLILHU •/DFDSDFLWpGHYRWUHGpVKXPLGLILFDWHXUQ·HVWSHXWrWUHSDV
déclenche trop souvent HVWWURSJUDQGH DSSURSULpH
/HVSRUWHVHWOHVIHQrWUHV •)HUPH]WRXWHVOHVSRUWHVHWIHQrWUHVGRQQDQWVXU
VRQWRXYHUWHV O·H[WpULHXU
Du givre apparaît sur /HGpVKXPLGLILFDWHXUYLHQW •
&·HVWQRUPDO/HJLYUHGLVSDUDvWHQJpQpUDODXERXWGH
les serpentins
G·rWUH
PLVHQPDUFKHRXOD PLQXWHV&RQVXOWH]ODVHFWLRQVXUOHDégivrageautomatique.
WHPSpUDWXUH
GHODSLqFHHVW
LQIpULHXUHj&)
Les commandes ne /HFRPSUHVVHXUV·DUUrWHHWOH •&·HVWQRUPDO$WWHQGH]HQYLURQPLQXWHVHWUpJOH]OH
peuvent pas être réglées YHQWLODWHXUFRQWLQXHj YHQWLODWHXUFRPPHYRXVOHVRXKDLWH]
IRQFWLRQQHUSHQGDQWHQYLURQ
PLQXWHVjXQUpJODJHIL[H
Bruit de ventilateur /·DLUSDVVHDXWUDYHUVGX •&·HVWQRUPDO
GpVKXPLGLILFDWHXU
Présence d’eau sur /HEUDQFKHPHQWGXWX\DX •9pULILHUOHEUDQFKHPHQWGXWX\DX&RQVXOWH]ODVHFWLRQ
le sol. HVWSHXWrWUHOkFKH VXUOHRetrait de l’eau collectée.
9RXVDYH]HXO·LQWHQWLRQG·XWLOLVHU •'pEUDQFKH]OHWX\DXG·pYDFXDWLRQVLYRXVXWLOLVH]OHVHDX
OHVHDXPDLVOHWX\DXHVWUHVWp SRXUUpFXSpUHUO·HDX&RQVXOWH]ODVHFWLRQVXUOHRetrait
IL[pDXGpVKXPLGLILFDWHXUde l’eau collectée.
Le voyant à DEL de seau 7X\DXGHYLGDQJHSDVVHUUp ÷9pULILHUODFRQQH[LRQGXWX\DXGHYLGDQJH
plein clignote et l’alarme VXUOHUDFFRUGGHWX\DX
retentit.
/HWX\DXGHYLGDQJHHVWSOLp ÷$VVXUH]YRXVTXHOHWX\DXGHYLGDQJHHVWRULHQWpYHUVOHVROHW
Q·HVWSDVGXWRXWSOLp
Assistance à la ClientèleConseils de Dépannage FonctionnementConsignes de Sécurité Entretien et Nettoyage
Pour faire une réclamation :
Pour la période d’ : Nous remplacerons :
Un An Un appareil de remplacementSRXUWRXWSURGXLWTXLV·DYqUHGpIHFWXHX[HQUDLVRQG·XQGpIDXW
A partir de la date GHPDWpULDXRXGHIDEULFDWLRQ/·DSSDUHLOGHUHPSODFHPHQWHVWJDUDQWLSRXUOHUHVWHGHOD
d’achat initial GXUpHGHODJDUDQWLHG·RULJLQHG·XQDQ
Déshumidificateur GE—Garantie Limitée D’un An.
/DIRUPDWLRQGXFOLHQW&HPDQXHOG·XWLOLVDWLRQGRQQHOHV
LQIRUPDWLRQVQpFHVVDLUHVVXUOHIRQFWLRQQHPHQWHWOHV
FRPPDQGHV
8QHLQVWDOODWLRQOLYUDLVRQRXPDLQWHQDQFHGpIHFWXHXVH
(QFDVGHSUREOqPHG·LQVWDOODWLRQRXVLYRWUH
GpVKXPLGLILFDWHXUQ·DSDVODERQQHFDSDFLWpFRQWDFWH]
YRWUHUHYHQGHXURXYRWUHLQVWDOODWHXU9RXVrWHV
UHVSRQVDEOHGHODSURYLVLRQG·XQV\VWqPHpOHFWULTXH
G·XQHSORPEHULHHWG·DXWUHVFRQQH[LRQVDSSURSULpV
8QHSDQQHGXSURGXLWUpVXOWDQWGHPRGLILFDWLRQV
DSSRUWpHVDXSURGXLWRXGXHjXQHXWLOLVDWLRQ
GpUDLVRQQDEOH\FRPSULVWRXWPDQTXHPHQWjXQ
HQWUHWLHQUpJXOLHUHWQpFHVVDLUH
/HUHPSODFHPHQWGHVIXVLEOHVRXOHUpHQFOHQFKHPHQWGX
GLVMRQFWHXUGXGRPLFLOH
/HVSDQQHVSURYRTXpHVSDUODFRUURVLRQVXUOHVPRGqOHV
Q·pWDQWSDVSURWpJpVFRQWUHODFRUURVLRQ
/HVGRPPDJHVDXSURGXLWFDXVpVSDUXQHPDXYDLVH
WHQVLRQG·DOLPHQWDWLRQXQDFFLGHQWXQLQFHQGLHXQH
LQRQGDWLRQRXXQHFDWDVWURSKHQDWXUHOOH
7RXWGRPPDJHIRUWXLWRXLQGLUHFWFDXVpSDUG·pYHQWXHOV
GpIDXWVGXGpVKXPLGLILFDWHXU
/HVGRPPDJHVFDXVpVDSUqVODOLYUDLVRQ
Ce qui n’est pas couvert :
&HWWHJDUDQWLHHVWYDODEOHSRXUOHSUHPLHUSURSULpWDLUHHWWRXWDXWUHSURSULpWDLUHGXSURGXLWV·LODFKHWpDX&DQDGDSRXU
XWLOLVDWLRQGRPHVWLTXHGDQV&DQDGD
'DQVFHUWDLQHVSURYLQFHVLOHVWLQWHUGLWG·H[FOXUHRXGHOLPLWHUOHVGRPPDJHVGLUHFWVRXLQGLUHFWV,OHVWDORUVSRVVLEOH
TXHOHVOLPLWDWLRQVRXH[FOXVLRQVFLGHVVXVQHV·DSSOLTXHQWSDVGDQVYRWUHFDV/DSUpVHQWHJDUDQWLHYRXVFRQIqUH
GHVGURLWVMXULGLTXHVVSpFLILTXHV9RXVSRXYH]EpQpILFLHUG·DXWUHVGURLWVTXLYDULHQWG·XQHSURYLQFHjO·DXWUH3RXU
FRQQDvWUHOHVGURLWVGRQWYRXVEpQpILFLH]GDQVYRWUHSURYLQFHFRPPXQLTXH]DYHFOHEXUHDXGHVUHODWLRQVDYHFOHV
FRQVRPPDWHXUVGHYRWUHUpJLRQ
Exclusion des garanties tacites : Sauf si elles sont interdites ou restreintes par la loi, il n’y a pas de garantie
qu’elle soit expresse, verbale ou statutaire, qui s’étende au-delà de la présente description, en particulier aucune
garantie implicite de qualité marchande ou de convenance à un besoin particulier.
*DUDQW0DEH&DQDGD,QF
%XUOLQJWRQ2QWDULR
Agrafez votre facture ici.
Une preuve de la date d’achat initial est nécessaire
pour faire une réclamation sous garantie.
(PEDOOH]FRUUHFWHPHQWYRWUHDSSDUHLO1RXVYRXV
UHFRPPDQGRQVG·XWLOLVHUOHFDUWRQHWOHPDWpULHO
G·HPEDOODJHG·RULJLQH
5DPHQH]OHSURGXLWDXPDJDVLQRYRXVO·DYH]DFKHWp
$MRXWH]XQHFRSLHGHYRWUHIDFWXUHRXWRXWHDXWUHSUHXYH
GHODGDWHG·DFKDWG·RULJLQHjYRWUHHPEDOODJH,QVFULYH]
pJDOHPHQWYRWUHQRPHWYRWUHDGUHVVHDLQVLTX·XQH
GHVFULSWLRQGXGpIDXW
EXCLUSION DES GARANTIES TACITES—Votre recours exclusif est l’échange du produit suivant les
modalités de la Garantie Limitée. Toutes garanties tacites, y compris les garanties de valeurs marchandes ou
d’adéquation à des fins particulières, sont limitées à une durée d’un an ou à la durée la plus courte autorisée
par la loi.
Assistance à la Clientèle Conseils de Dépannage Fonctionnement Safety Instructions Entretien et Nettoyage Consignes de Sécurité

Service à la clientèle. www.electromenagersge.ca
Site Internet GE www.electromenagersge.ca
3RXUWRXWHTXHVWLRQRXSRXUXQEHVRLQG·DVVLVWDQFHDXVXMHWGHYRWUHDSSDUHLOPpQDJHUFRQVXOWH]OHVLWH
,QWHUQHWFLGHVVXVDFFHVVLEOHKHXUHVSDUMRXUFKDTXHMRXUGHO·DQQpH¢SDUWLUGXVLWHYRXVSRXYH]
WpOpFKDUJHUOHVPDQXHOVG·XWLOLVDWLRQ
Studio de conception réaliste www.electromenagersge.ca
6XUGHPDQGH*(SHXWIRXUQLUXQHEURFKXUHVXUO·DPpQDJHPHQWG·XQHFXLVLQHSRXUOHVSHUVRQQHV
jPRELOLWpUpGXLWH
FULYH] 'LUHFWHXU5HODWLRQVDYHFOHVFRQVRPPDWHXUV0DEH&DQDGD,QF
%XUHDX)DFWRU\/DQH
0RQFWRQ1%(&0
Pièces et accessoires www.electromenagersge.ca
&HX[TXLGpVLUHQWUpSDUHUHX[PrPHVOHXUVpOHFWURPpQDJHUVSHXYHQWUHFHYRLUSLqFHVHWDFFHVVRLUHV
GLUHFWHPHQWjODPDLVRQFDUWHV9,6$0DVWHU&DUGHW'LVFRYHUDFFHSWpHV
Les procédures expliquées dans le présent manuel peuvent être exécutées par n’importe quel utilisateur.
GE n’offre pas de services de réparation pour ce produit. Nous vous recommandons fortement de ne pas tenter de
réparer vous-même le produit.
Contactez-nous www.electromenagersge.ca
6LYRXVQ·rWHVSDVVDWLVIDLWGXVHUYLFHDSUqVYHQWHGRQWYRXVDYH]EpQpILFLp
3UHPLqUHPHQWFRPPXQLTXH]DYHFOHVJHQVTXLRQWUpSDUpYRWUHDSSDUHLO
(QVXLWHVLYRXVQ·rWHVWRXMRXUVSDVVDWLVIDLWHQYR\H]WRXVOHVGpWDLOV³QXPpURGHWpOpSKRQHFRPSULV³DX
'LUHFWHXU5HODWLRQVDYHFOHVFRQVRPPDWHXUV0DEH&DQDGD,QF
%XUHDX)DFWRU\/DQH
0RQFWRQ1%(&0

,QVWUXFFLRQHVGHVHJXULGDG
,QVWUXFFLRQHVGHRSHUDFLyQ
$FHUFDGHORVFRQWUROHV
&yPRGHVHFKDU
HODJXDDFXPXODGD
&yPRIXQFLRQD
HOGHVKXPHGLILFDGRU
'HVFRQJHODGRDXWRPiWLFR
1LYHOGHDJXD
6HOHFFLyQGHOOXJDUDGHFXDGR
&XLGDGR\OLPSLH]D
)LOWUHGHDLUH
5HMLOOD\JDELQHWH
7DQTXHGHDJXD
6ROXFLyQGHSUREOHPDV
$\XGDDOFOLHQWH
$\XGDDOFOLHQWH
*DUDQWtD
Escriba los números de modelo
y serie aquí:
# de Modelo _____________________
# de Serie _______________________
3XHGHHQFRQWUDUHVWRVQ~PHURVHQ
XQDHWLTXHWDHQODSDUWHDWUiVGHO
GHVKXPHGLILFDGRU
Ayuda al cliente Solución de problemas Operación SeguridadCuidado y limpieza
INFORMACIÓN IMPORTANTE DE SEGURIDAD.
LEA TODAS LAS INSTRUCCIONES ANTES DE USAR. GEAppliances.com
8VHHVWHHOHFWURGRPpVWLFRVRODPHQWH
SDUD
HOSURSyVLWRGHWHUPLQDGRVHJ~QVH
GHVFULEHHQHVWH0DQXDOGHOSURSLHWDULR
(VWHGHVKXPHGLILFDGRUGHEHLQVWDODUVH
FRUUHFWDPHQWH\FRQHFWDGRDWLHUUDGH
DFXHUGRFRQODVLQVWUXFFLRQHVGHHVWH
PDQXDODQWHVGHVXXVR
1XQFDRSHUHHVWHGHVKXPHGLILFDGRU
HQXQiUHDHQODTXHHVSRVLEOHTXH
VHDFXPXOHDJXD'HHQFRQWUDUVHHQ
HVWDVFRQGLFLRQHVSRUVXVHJXULGDG
GHVFRQHFWHHOVXPLQLVWURGHFRUULHQWH
HOpFWULFDDQWHVGHSLVDUVREUH
HODJXD
1XQFDGHVHQFKXIHVXGHVKXPHGLILFDGRU
WLUDQGRGHOFDEOHHOpFWULFR6LHPSUH
DJDUUHILUPHPHQWHHOHQFKXIH\WLUHGH
pOGLUHFWDPHQWHKDFLDDIXHUD
5HHPSODFHLQPHGLDWDPHQWHWRGRVORV
FDEOHVHOpFWULFRVTXHVHKD\DQSHODGR
RTXHVHKD\DQGDxDGRGHDOJXQDRWUD
PDQHUD
8QFDEOHGHFRUULHQWHGDxDGRQRGHEH
UHSDUDUVHVLQRTXHGHEHVHUVXVWLWXLGR
SRUXQRQXHYRTXHVHDGTXLHUDGHO
IDEULFDQWH1RXVHXQFDEOHHOpFWULFRTXH
PXHVWUHHYLGHQFLDVGHGHWHULRURRGDxRV
GHDEUDVLyQHQVXVXSHUILFLHHQDOJXQR
GHVXVH[WUHPRV
6LHOUHFHSWiFXORQRFRLQFLGHFRQHO
HQFKXIHXQHOHFWULFLVWDFDOLILFDGRGHEH
UHHPSOD]DUHOUHFHSWiFXOR
$SDJXHHOFRQWURO\GHVHQFKXIHVX
GHVKXPHGLILFDGRUDQWHVGHKDFHU
FXDOTXLHUUHSDUDFLyQROLPSLDU
*(QRHVWiQRDSR\DTXHVHOH
SURSRUFLRQHQLQJ~QVHUYLFLRDO
GHVKXPHGLILFDGRU9HKHPHQWHPHQWH
UHFRPHQGDPRVTXH
XVWHGQRLQWHQWHSURSRUFLRQDUVHUYLFLR
DOGHVKXPHGLILFDGRUXVWHGPLVPR
3RUVXVHJXULGDGQRDOPDFHQHQLXVH
PDWHULDOHVFRPEXVWLEOHVJDVROLQDX
RWURVYDSRUHVROtTXLGRVLQIODPDEOHV
HQODSUR[LPLGDGGHpVWHRDOJ~QRWUR
HOHFWURGRPpVWLFR
7RGRVORVGHVKXPHGLILFDGRUHVFRQWLHQHQ
UHIULJHUDQWHVORVFXDOHVVHGHEHQ
HYDFXDUDQWHVGHGHVHFKDUHOSURGXFWR
GHDFXHUGRFRQODOH\IHGHUDO6LYDD
GHVHFKDUDOJ~QDSDUDWRDQWLJXRFRQ
UHIULJHUDQWHFRQVXOWHDODFRPSDxtDD
FDUJRGHHYDFXDUHODSDUDWRDVHJ~UHVH
GHKDFHUORDGHFXDGDPHQWH
1RXVHHOGHVKXPHGLILFDGRUHQ
H[WHULRUHV
(VWHGHVKXPHGLILFDGRUHVWiGLVHxDGR
H[FOXVLYDPHQWHSDUDDSOLFDFLRQHV
UHVLGHQFLDOHVGHLQWHULRU1RGHEH
XVDUVHSDUDDSOLFDFLRQHVFRPHUFLDOHVQL
LQGXVWULDOHV
(VWRV6LVWHPDV'HVKXPHGLILFDGRUHV
5$UHTXLHUHQTXHORVFRQWUDWLVWDV
\WpFQLFRVXWLOLFHQKHUUDPLHQWDV
HTXLSDPLHQWR\QRUPDVGHVHJXULGDG
DSUREDGDVSDUDVXXVRFRQHVWH
UHIULJHUDQWH12XWLOLFHHTXLSDPLHQWR
FHUWLILFDGRVyORSDUDUHIULJHUDQWH5
Al usar este deshumedificador, se deben seguir precauciones básicas de seguridad, incluyendo
las siguientes:
PRECAUCIONES DE SEGURIDAD
¡ADVERTENCIA!
Por su seguridad, se debe seguir la información en este manual para minimizar el riesgo de incendios,
descargas eléctricas o lesiones personales.
Ayuda al clienteSolución de problemasOperaciónSeguridad Cuidado y limpieza
Ayuda al cliente Solución de problemas Operación SeguridadCuidado y limpieza
Bajo ninguna circunstancia, corte o remueva la
tercera púa (tierra) del cable eléctrico. En pos
de la seguridad personal, este electrodoméstico
debe siempre conectarse a tierra.
NO USE un enchufe adaptador con este aparato.
(OFDEOHHOpFWULFRGHHVWHHOHFWURGRPpVWLFRHVWi
HTXLSDGRFRQXQHQFKXIHGHWUHVS~DVWLHUUD
TXHFRPELQDFRQXQWRPDFRUULHQWHHVWiQGDU
GHWUHVWRPDVGHSDUHGSDUDPLQLPL]DUOD
SRVLELOLGDGGHXQDGHVFDUJDHOpFWULFD
3LGDDXQWpFQLFRTXHLQVSHFFLRQHHO
WRPDFRUULHQWH\HOFLUFXLWRSDUDFHUFLRUDUVH
GHTXHHOWRPDFRUULHQWHHVWiFRQHFWDGRD
WLHUUDGHODPDQHUDDSURSLDGD
'RQGHH[LVWDXQWRPDFRUULHQWHGHGRVWRPDVHV
VXUHVSRQVDELOLGDG\REOLJDFLyQSHUVRQDOKDFHU
TXHGLFKRWRPDFRUULHQWHVHDUHHPSOD]DGRSRU
XQRGHWUHVWRPDVFRQFRQH[LyQDWLHUUD
(OGHVKXPHGLILFDGRUGHEHUtDVLHPSUHHVWDU
FRQHFWDGRDXQWRPDFRUULHQWHLQGLYLGXDOFRQVX
FLUFXLWRGHYROWDMHFRUUHVSRQGLHQWH
(VWRSURSRUFLRQDHOPD\RUUHQGLPLHQWR\
DGHPiVHYLWDTXHORVFLUFXLWRVGHOUHVWRGH
ODFDVDVHVREUHFDUJXHQORFXDOSRGUtDFDXVDU
LQFHQGLRVSRUHOVREUHFDOHQWDPLHQWR
GHOFDEOHDGR
COMO CONECTAR LA ELECTRICIDAD
LEA Y SIGA ESTAS INSTRUCCIONES DE SEGURIDAD CUIDADOSAMENTE.
GUARDE ESTAS INSTRUCCIONES
INFORMACIÓN IMPORTANTE DE SEGURIDAD.
LEA TODAS LAS INSTRUCCIONES ANTES DE USAR.
£$'9(57(1&,$
5,(6*2'(,1&(1',23RGUtDRFDVLRQDU
OHVLRQHVJUDYHVRODPXHUWH
12XVHSURORQJDGRUHVFRQHVWH
'HVKXPLGLILFDGRU
12XVHSURWHFWRUHVFRQWUDSLFRVGHFRUULHQWHQL
DGDSWDGRUHVSDUDP~OWLSOHVWRPDFRUULHQWHVFRQ
HVWH'HVKXPLGLILFDGRU
862'(352/21*$'25(6

Acerca de los controles del deshumedificador. GEAppliances.com
Controles
Botón de Encendido/Apagado (Power)
3UHVLRQHSDUDHQFHQGHURDSDJDUHO
GHVKXPHGLILFDGRU
Temporizador del filtro (Filter Timer)
'HVSXpVGHKRUDVGHRSHUDFLyQVH
HQFHQGHUiODOX]LQGLFDGRUDGHClean the Filter
(Limpieza de filtro) SDUDUHFRUGDUOHTXHGHEH
OLPSLDUHOILOWUR4XLWHHOILOWUR\OtPSLHOR
3UHVLRQHSDUDDSDJDUODOX]GH
Clean the Filter
(Limpieza de filtro)
OLJKW9HUODVHFFLyQCuidado y
limpieza
Botones para el Control de humedad
(Humidity Set Control)
/DKXPHGDGVHSXHGHFRQWURODUDQLYHOHVGHHQWUH
+5KXPHGDGUHODWLYD²+5KXPHGDG
UHODWLYDHQLQFUHPHQWRVGHO
RFRQCOSDUD
XQIXQFLRQDPLHQWRFRQWLQXR
3DUDFRQILJXUDUOD
XQLGDGHQRSHUDFLyQFRQWLQXDSUHVLRQHODIOHFKD
KDFLDDEDMRKDVWDTXHVHREVHUYH&2HQODSDQWDOOD
NOTE:
6LVHVHOHFFLRQDCOFRQWLQXRXV
HOGHVKXPHGLILFDGRUIXQFLRQDUiHQIRUPD
FRQWLQXDHQODFRQILJXUDFLyQPi[LPDGH
GHVKXPHGLILFDFLyQKDVWDTXHVHOOHQHHOWDQTXH
6LGHVHDDLUHPiVVHFRSUHVLRQHHOERWyQd
\VHOHFFLRQHXQYDORUSRUFHQWXDOPiVEDMR
6LGHVHDDLUHPiVK~PHGRSUHVLRQHHOERWyQc
\VHOHFFLRQHXQYDORUSRUFHQWXDOPiVDOWR
&XDQGRXVHSRUSULPHUDYH]HOGHVKXPHGLILFDGRU
FRORTXHHOFRQWUROGHOGHVKXPHGLILFDGRUD
y3HUPLWDTXHWUDQVFXUUDQSRUORPHQRV
KRUDVSDUDTXHHOGHVKXPHGLILFDGRUDOFDQFH
HOQLYHOGHKXPHGDG6LHODLUHD~QHVWiPiV
K~PHGRGHORGHVHDGRDMXVWHHOQLYHOGHKXPHGDG
DXQQLYHOPHQRURVHOHFFLRQHHOERWyQGH
IXQFLRQDPLHQWRFRQWLQXRFRQWLQXRXVSDUDREWHQHU
XQDPi[LPDGHVKXPLGLILFDFLyQ
Pantalla
0XHVWUDHOGHOQLYHOGHKXPHGDGSURJUDPDGR
GXUDQWHODFRQILJXUDFLyQOXHJRPXHVWUDHOGHO
QLYHOGHKXPHGDGUHDOGHODKDELWDFLyQFRQXQD
SUHFLVLyQGH²
Boton de velocidad del ventilador
(Fan Speed)
&RQWURODODYHORFLGDGGHFLUFXODFLyQGHODLUH
3UHVLRQHSDUDVHOHFFLRQDUODYHORFLGDGGHOYHQWLODGRU
HQDOWD(High),PHGLR(Medium) R
EDMR(Low)
&RORTXHHOFRQWUROGHOYHQWLODGRUDDOWD(High)
YHORFLGDGSDUDORJUDUUHPRYHUODPD\RUFDQWLGDG
GHKXPHGDG&XDQGRODKXPHGDGKD\DVLGR
UHGXFLGD\XVWHGSUHILHUDXQDRSHUDFLyQPiV
WUDQTXLODFRORTXHHOFRQWUROGHOYHQWLODGRU
DPHGLR(Medium) REDMR(Low) YHORFLGDG
Retardo en apagado (Delay Off)
0LHQWUDVHOGHVKXPHGLILFDGRUVHHQFXHQWUD
HQIXQFLRQDPLHQWRSUHVLRQHHVWHERWyQSDUD
TXHVHDSDJXHDXWRPiWLFDPHQWHDODV
KRUDVRDODVKRUDV
Otras funciones
Indicador del tanque de agua (BUCKET FULL)
(VWHLQGLFDGRUVHLOXPLQDFXDQGRHOWDQTXHHVWpOOHQR\
GHEHUDYDFLDUVHRFXDQGRHOUHFLSLHQWHVHUHPXHYDR
QRHVWpFRORFDGRHQODSRVLFLyQFRUUHFWD
Alarma (Alarm)
6LHOWDQTXHVHHQFXHQWUDOOHQRRQRHVWiHQVX
OXJDUSRUPiVGHWUHVPLQXWRVVRQDUiXQDDODUPD
GXUDQWHVHJXQGRVSDUDUHFRUGDUOHGHYDFLDU\
YROYHUDFRORFDUHOWDQTXH
Apagado automático (AUTO SHUT OFF)
(O,QWHUUXSWRUGHFRQWUROGHQLYHOGHDJXDDSDJD
HOGHVKXPHGLILFDGRUFXDQGRHOWDQTXHHVWpOOHQRR
FXDQGRHOWDQTXHQRHVWpSUHVHQWHRQRHVWpFRORFDGR
HQXQDSRVLFLyQDSURSLDGD127$(OYHQWLODGRUVHJXLUi
IXQFLRQDQGRGXUDQWHDSUR[LPDGDPHQWHPLQXWRV
GHVSXpVGHTXLWDUHOWDQTXH
Descongelado automático (AUTO DEFROST)
&XDQGRVHDFXPXOHHVFDUFKDHQORVVHUSHQWLQHV
HYDSRUDGRUHVHOFRPSUHVRUVHDSDJDUi\HOYHQWLODGRU
FRQWLQXDUiIXQFLRQDQGRKDVWDTXHODHVFDUFKD
GHVDSDUH]FD
Pérdida de energía (POWER OUTAGE)
(QFDVRGHODSpUGLGDGHODHQHUJtDRLQWHUUXSFLyQ
ODXQLGDGUHLQLFLDUiDXWRPiWLFDPHQWHHQODV
FRQILJXUDFLRQHVXVDGDVSRU~OWLPDYH]XQDYH]
ODHQHUJtDVHDUHVWDEOHFLGD
Luz indicadora de
limpieza de filtro
Luz indicadora de
funcionamiento de
operación continua
La luz de tanque lleno indica que
el tanque debe vaciarse o que no
se encuentra en la unidad
Luces indicadoras de
retardo en apagado de
4 horas o 2 horas
Luces indicadoras de
velocidad de ventilador
alta, media y baja
Luz
indicadora de
encendido
Ayuda al clienteSolución de problemasOperaciónSeguridad Cuidado y limpieza
Ayuda al cliente Solución de problemas Operación SeguridadCuidado y limpieza
Cómo usar el deshumedificador.
Cuando se disponga a usar el deshumedificador por primera vez, permita que la unidad opere de manera continua
por 24 horas.
Selección del lugar adecuado
Descongelado automático
(OGHVKXPHGLILFDGRUXELFDGRHQXQVyWDQRWHQGUi
SRFRRQLQJ~QHIHFWRHQVHFDUHODLUHGHQWURDUHDV
DGMDFHQWHVGHDOPDFHQDPLHQWRFRPRXQDUPDULR
SRUHMHPSORDOPHQRVTXHH[LVWDXQDFLUFXODFLyQ
DGHFXDGDGHDLUHKDFLDHQLQWHULRU\KDFLDHOH[WHULRU
GHGLFKDiUHD
No use el deshumedificador en exteriores.
Este deshumedificador está diseñado exclusivamente
para aplicaciones residenciales
de interior. No debe usarse para aplicaciones
comerciales ni industriales.
Coloque el deshumedificador en un piso firme y
nivelado que sea lo suficientemente fuerte para
soportar la unidad cuando la cubeta esté llena
de agua.
Deje por lo menos 12–18 pulgadas de espacio libre
alrededor de la unidad para que exista una buena
circulación de aire.
Coloque el deshumedificador en un área en la
que la temperatura no sea inferior a 41 °F (5 °C). Los
serpentines pueden escarcharse en ambientes con
temperaturas inferiores a 41 °F (5 °C), lo cual puede
reducir su rendimiento.
Use el deshumedificador en áreas como
la cocina, cuartos de lavado, baños, y en áreas
donde exista humedad excesiva. NOTA: Coloque
el deshumedificador lejos la secadora de ropa.
Use el deshumedificador para evitar daños causados
por la humedad en lugares donde
guarde libros o artículos de valor.
Use el deshumedificador en el sótano para ayudar a
prevenir los daños causados por la humedad.
El deshumedificador debe usarse en áreas cerradas
para mayor efectividad.
Cierre todas las puertas, ventanas y otras aberturas
hacia el exterior de la habitación en donde esté el
deshumedificador.
NOTA: El deshumedificador tiene ruedas para ayudarle
a colocarlo en distintos lugares, pero debe rodarse en
superficies firmes y plantas. No intente rodarlo sobre
objetos o sobre una alfombra.
Cómo funciona el deshumedificador
/DKXPHGDGHQHODLUHSDVDSRUXQVHUSHQWLQ
GHVKXPHGLILFDGRU/DKXPHGDGHQHODLUHVH
FRQGHQVDHQHVWHVHUSHQWLQ\VHGUHQDKDFLDHO
WDQTXHRDWUDYpVGHODPDQJXHUD\OXHJRWUDYpV
GHOGUHQDMH
(ODLUHOLPSLR\VHFRSDVDOXHJRSRUHOFRQGHQVDGRU
GRQGHHVFDOHQWDGR\GHVHFKDGRGHUHJUHVRDOPHGLR
DPELHQWHDWUDYpVGHODSDUULOOD
Es normal que el aire en los alrededores se caliente un
poco conforme el deshumedificador funciona.
&XDQGRVHDFXPXOHHVFDUFKDHQORVVHUSHQWLQHV
HYDSRUDGRUHVHOFRPSUHVRUVHDSDJDUi\HO
YHQWLODGRUFRQWLQXDUiIXQFLRQDQGRKDVWDTXH
ODHVFDUFKDGHVDSDUH]FD
&XDQGRHOHYDSRUDGRUVHGHVFRQJHOHHOFRPSUHVRU
RHOYHQWLODGRUVHHQFHQGHUiDXWRPiWLFDPHQWH\HO
SURFHVRGHGHVKXPHGLILFDFLyQFRQWLQXDUi
30–46 cm
(12–18 pulgadas) mín.
Por debajo
de 5 °C
(41 °F)
SI
NO
Por encima
de 5 °C
(41 °F)
30–46 cm
(12–18 pulgadas) mín.

Siempre cerciórese de que la tanque de agua esté asegurada en su lugar dentro del deshumedificador.
Nivel de agua
(OGHVKXPHGLILFDGRUVHDSDJDUiDXWRPiWLFDPHQWH
FXDQGRHOWDQTXHVHOOHQHRFXDQGRHOWDQTXH
VHDUHPRYLGRRQRVHDFRORFDGRHQODSRVLFLyQ
DSURSLDGD
El tanque debe colocarse en la posición apropiada para
que el deshumedificador funcione. La luz se encenderá
y el deshumedificador no funcionará a no ser que el
tanque esté colocado en la posición apropiada.
Cómo usar el deshumedificador. GEAppliances.com
Cómo desechar el agua acumulada
Hay 2 formas de desechar el agua acumulada:
Use el tanque.&XDQGRXVWHGVDTXHHOWDQTXHGH
VXOXJDUODXQLGDGVHDSDJDUi9DFtH\
UHLQVWDOHOR
IMPORTANTE: No use el manguera si usa el
tanque para recoger agua. Si el manguera está
conectada, el agua caerá al piso en lugar de caer
dentro del tanque.
NOTAS:
No retire el balde con el deshumedificador
en funcionamiento o si recién se apagó. Esto
puede hacer que el agua gotee del recipiente
de drenaje.
El tanque debe estar en su lugar y bien sujeto
para que el deshumedificador funcione.
Use una manguera. (ODJXDSXHGHGHVHFKDUVH
DXWRPiWLFDPHQWHKDFLDXQGUHQDMHHQHOSLVRVL
XVWHGFRQHFWDHOWXERGHGUHQDMHFRQERTXLOOD
GHODXQLGDGDXQDPDQJXHUDSDUDDJXDGH
MDUGtQQRLQFOXLGD
6DTXHHOWDQTXHGHOIUHQWHGHODXQLGDG
$EUDODWDSDGHGUHQDMHVREUHHOODGRGH
ODXQLGDG
(QURVTXHXQDPDQJXHUDSDUDMDUGtQQR
SURYLVWDHQODERTXLOODFXWWROHQJWK\GLUtMDOD
DOGUHQDMHGHSLVR
9XHOYDDFRORFDUHOWDQTXHHQODXQLGDG
NOTA: El tanque debe estar en su lugar y bien
sujeto para que el deshumedificador funcione.
NOTA: Para vaciarlo, tome
el tanque con ambas manos.
Parte lado
de la unidad
Ayuda al clienteSolución de problemasOperaciónSeguridad Cuidado y limpieza
Funcionamiento del Balde
12UHWLUHODSLH]DGHHVSXPDHQODMXQWDGHOEDOGH
6LVHUHWLUDHO'HVKXPLGLILFDGRUQRIXQFLRQDUi
FRUUHFWDPHQWH
(VSXPD
Cuidado y limpieza del deshumedificador.
Apague el deshumedificador y desconecte el enchufe del tomacorriente en la pared antes de limpiarlo.
Rejilla y gabinete
Para limpiar el gabinete:
8VHDJXD\XQGHWHUJHQWHGHEDMDFRQFHQWUDFLyQ1R
XVHEODQTXHDGRUQLOLPSLDGRUHVDEUDVLYRV
Para limpiar la rejilla:
8VHXQDDVSLUDGRUDFRQDFFHVRULRGHFHSLOORVXDYH
RXQFHSLOORGHPDQR
Tanque de agua
Para limpiar:
'HVSXpVGHDOJXQDVVHPDQDVOLPSLHHOWDQTXHSDUD
HYLWDUODIRUPDFLyQGHPRKRPLOGL~\EDFWHULDV/OHQH
SDUFLDOPHQWHHOWDQTXHFRQDJXDOLPSLD\DJUHJXHXQ
SRFRGHGHWHUJHQWHVXDYH$JLWHHOFRQWHQLGRGHQWUR
GHOWDQTXHOXHJRYDFtHOR\HQMXiJXHOR
NOTA: 1RXVHXQDPiTXLQDODYDYDMLOODVSDUDOLPSLDU
HOWDQTXHGHDJXD
Para retirar:
5HWLUHHOWDQTXH\GHVHFKHWRGRUHVWRGHDJXD
Para volver a colocar:
&RORTXHHOWDQTXHHQHOGHVKXPHGLILFDGRU
GHVOL]iQGROR
NOTA: El tanque debe estar en su lugar y bien sujeto
para que el deshumedificador funcione.
Filtro de aire
(OILOWURGHDLUHGHWUiVGHODUHMLOODIURQWDOGHEH
LQVSHFFLRQDUVH\OLPSLDUVHSRUORPHQRVFDGD
KRUDVRPiVDPHQXGRVLIXHVHQHFHVDULR
'HVSXpVGHKRUDVGHRSHUDFLyQVHHQFHQGHUi
ODOX]LQGLFDGRUDGHClean the Filter OLPSLH]DGHILOWUR
SDUDUHFRUGDUOHTXHGHEHOLPSLDUHOILOWUR4XLWHHOILOWUR
\OtPSLHOR9XHOYDDFRORFDUHOILOWUR\SUHVLRQHHOERWyQ
Filter TimerWHPSRUL]DGRUGHOILOWURSDUDDSDJDUODOX]
Clean the FilterOLPSLH]DGHOILOWUR
Para retirarlo:
4XLWHHOWDQTXHWRPHHOH[WUHPRGHOILOWUR\MDOHKDFLD
DEDMR\DIXHUD
Para limpiar:
/LPSLHHOILOWURFRQDJXDWLELD\MDEyQ(QMXiJXHOR\
SHUPLWDTXHVHVHTXHDQWHVGHFRORFDUORRWUDYH]HQ
VXOXJDU
NOTA: NO enjuague o lave el filtro usando una máquina
lavavajillas automática.
PRECAUCIÓN: NO OPERE el
deshumedificador sin el filtro debido a que la suciedad
y las pelusas lo obstruirán y reducirán su rendimiento.
NOTA: (YLWHXVDUXQDPiTXLQDODYDYDMLOODVSDUD
OLPSLDUHOILOWUR
Ayuda al cliente Solución de problemas Operación SeguridadCuidado y limpieza
Ideas para la identificación y solución de problemas…
°Ahorre dinero y tiempo! Revise la siguiente tabla primero y quizás no tenga que llamar para solicitar servicio.
Problema Causas posibles Qué hacer
El deshumedificador (OFDEOHHOpFWULFRGHO • &HUFLyUHVHGHTXHODFODYLMDGHOGHVKXPHGLILFDGRUHVWp
no enciende GHVKXPHGLILFDGRUHVWi FRQHFWDGDHQODSDUHG
GHVHQFKXIDGR
(OIXVLEOHHVWiTXHPDGRRHO •5HYLVHODFDMDGHOGLV\XQWRUGHOFLUFXLWRyHOIXVLEOH
GLV\XQWRUGHOFLUFXLWRHVWiDELHUWR FDPELHHOIXVLEOHRYXHOYDDFWLYDUHOGLV\XQWRU
(OGHVKXPHGLILFDGRUKDDOFDQ]DGR•(OGHVKXPHGLILFDGRUVHDSDJDDXWRPiWLFDPHQWHFXDQGR
VXQLYHOSUHVHOHFFLRQDGRR RFXUUHDOJXQDGHODVGRVFRQGLFLRQHV&DPELHDXQD
HOWDQTXHGHDJXDHVWiOOHQR FRQILJXUDFLyQPiVEDMDRYDFtHHOWDQTXHGHDJXD\
UHLQVWDOHDSURSLDGDPHQWH
(OWDQTXHQRHVWiHQVXOXJDU •(OWDQTXHGHEHHVWDUHQVXOXJDU\ELHQVXMHWRSDUDTXH
HOGHVKXPHGLILFDGRUIXQFLRQH
&RUWHGHHQHUJtD •+D\XQDGHPRUDSURWHFWRUDGHKDVWDPLQXWRV
SDUDSUHYHQLUODLQWHUUXSFLyQGHODVREUHFDUJD
GHOFRPSUHVRU3RUHVDUD]yQODXQLGDGQRUHLQLFLDUi
ODGHVKXPHGLILFDFLyQDORVPLQXWRVGHKDEHU
VLGRHQFHQGLGDGHQXHYR
Deshumedificador no seca 1RKDSDVDGRVXILFLHQWHWLHPSR •&XDQGRVHLQVWDODSRUSULPHUDYH]GHMHTXHSDVHQ
el aire como debiera SDUDTXHVHTXHHODLUH KRUDVSDUDTXHVHPDQWHQJDHOQLYHOGHKXPHGDG
GHVHDGD
+D\HVFDVDFLUFXODFLyQGHDLUH •&HUFLyUHVHGHTXHQRKD\DFRUWLQDVSHUVLDQDVR
PXHEOHVTXHEORTXHHQODSDUWHSRVWHULRUyDOIUHQWH
GHOGHVKXPHGLILFDGRU9HDODVHFFLyQSeleccione del lugar
adecuado.
)LOWURVXFLR •9HDODVHFFLyQGHCuidado y limpieza
(O&RQWUROGHKXPHGDG •3DUDDLUHPiVVHFRSUHVLRQHHOERWyQ\VHOHFFLRQHXQ
QRHVWiDMXVWDGROR YDORUSRUFHQWXDOPiVEDMRRHQCOFRQWLQXR
VXILFLHQWHPHQWHEDMR SDUDREWHQHUXQDPi[LPDGHVKXPLGLILFDFLyQ
/DVSXHUWDV\YHQWDQDVQR •5HYLVHTXHWRGDVODVSXHUWDVYHQWDQDV\RWUDVDEHUWXUDV
HVWiQFHUUDGDVFRPSOHWDPHQWH HVWiQFHUUDGDVFRPSOHWDPHQWH
(OVHFDGRUGHURSDSRGUtDHVWDU •,QVWDOHHOGHVKXPHGLILFDGRUOHMRVGHODVHFDGRUDGHURSD
JHQHUDQGRDLUHK~PHGRHQ (OVHFDGRUGHEHGHVHFKDUHODLUHKDFLDHOH[WHULRU
HOUHFLQWR
/DWHPSHUDWXUDGHOUHFLQWR •/DGHVKXPHGLILFDFLyQHVPHMRUDWHPSHUDWXUDV
HVWiGHPDVLDGREDMD DPELHQWHDOWDV7HPSHUDWXUDVEDMDVFDXVDQEDMR
UHQGLPLHQWRGHGHVKXPHGLILFDFLyQ0RGHORVHVWiQ
GLVHxDGDSDUDIXQFLRQDUDWHPSHUDWXUDV
SRUHQFLPDGH)&
El deshumedificador (OYROXPHQGHDLUHD •/DFDSDFLGDGGHVXGHVKXPHGLILFDGRUQRHVWiQDGHFXDGD
trabaja demasiado GHVKXPHGLILFDUHVH[FHVLYR
/DVSXHUWDV\YHQWDQDVHVWiQ •&LHUUHWRGDVODVSXHUWDV\YHQWDQDVTXHGHQDOH[WHULRU
DELHUWDV
Se forma escarcha en (OGHVKXPHGLILFDGRUKDVLGR •(VWRHVQRUPDO/DHVFDUFKDQRUPDOPHQWHGHVDSDUHFHUi
el serpentín HQFHQGLGRKDFHSRFRROD HQPLQXWRV9HDODVHFFLyQGHDescongelado automático
WHPSHUDWXUDGHOUHFLQWRHV (Automatic defrost).
LQIHULRUD)&
Los controles no se (OFRPSUHVRUVHDSDJD\HO •(VWRHVQRUPDO(VSHUHDSUR[LPDGDPHQWHPLQXWRV\
pueden configurar YHQWLODGRUVLJXHIXQFLRQDQGR FRORTXHHOYHQWLODGRUORGHVHH
DXWRPiWLFDPHQWHGXUDQWH
DSUR[LPDGDPHQWHPLQXWRV
DXQDFRQILJXUDFLyQILMD
El ventilador (ODLUHVHPXHYHDWUDYpV •(VWRHVQRUPDO
hace ruido GHOGHVKXPHGLILFDGRU
Hay agua en el piso /DFRQH[LRQHDODPDQJXHUD •,QVSHFFLRQHODFRQH[LRQHDODPDQJXHUD&RQVXOWHOD
HVWiIORMD VHFFLyQCómo desechar el agua acumulada
,QWHQWDXVDUHOWDQTXHSDUD •'HVFRQHFWHHOPDQJXHUDVLXVDHOWDQTXHSDUDUHFRJHU
UHFRJHUDJXDSHURHOPDQJXHUD DJXD&RQVXOWHODVHFFLyQCómo desechar el agua
HVWiFRORFDGD acumulada
La luz LED de Tanque /DPDQJXHUDGHGUHQDMHQRHVWi 9HULILTXHODFRQH[LyQGHODPDQJXHUDGHGUHQDMH
Lleno destella y suena la ELHQDMXVWDGDHQHODFFHVRULR
alarma /DPDQJXHUDGHGUHQDMHHVWi 9HULILTXHTXHODPDQJXHUDGHGUHQDMHDSXQWHHQIRUPD
WRUFLGD UHFWDKDFLDHOSLVR\TXHQRVHHQFXHQWUHWRUFLGD
Ayuda al clienteSolución de problemasOperaciónSeguridad Cuidado y limpieza
Ayuda al cliente Solución de problemas Operación SeguridadCuidado y limpieza
*DUDQWtDGHVXdeshumedificador³JDUDQWtDOLPLWDGDGHXQDxR
3RUHOSHUtRGRGH 1RVRWURVUHHPSOD]DUHPRV
8QDxR 8QLGDGGHUHHPSOD]RSDUDFXDOTXLHUSURGXFWRTXHIDOOHGHELGRDGHIHFWRVHQORVPDWHULDOHVRHQ
$SDUWLUGHODIHFKD HOSURFHVRGHIDEULFDFLyQ/DXQLGDGGHLQWHUFDPELRHVWiJDUDQWL]DGDSDUDHOUHVWRGHOSHUtRGR
GHODFRPSUDRULJLQDO GHXQDxRGHJDUDQWtDRULJLQDOGHOSURGXFWR
,QVWUXFFLRQHVDOFOLHQWH(O0DQXDOGHOSURSLHWDULR
SURSRUFLRQDLQIRUPDFLyQDFHUFDGHODVLQVWUXFFLRQHVGH
RSHUDFLyQ\GHORVFRQWUROHVGHOXVXDULR
,QVWDODFLyQRHQWUHJDLQDSURSLDGDRPDQWHQLPLHQWR
LPSURSLR6LXVWHGWLHQHXQSUREOHPDGXUDQWHOD
LQVWDODFLyQRVLVXGHVKXPHGLILFDGRUQRWLHQHOD
FDSDFLGDGTXHXVWHGQHFHVLWDSyQJDVHHQFRQWDFWR
FRQQXHVWURGLVWULEXLGRU8VWHGHVUHVSRQVDEOHGH
SURSRUFLRQDUODVLQVWDODFLRQHVHOpFWULFDV\GHSORPHULD
QHFHVDULDV
)DOORGHOSURGXFWRUHVXOWDQWHGHPRGLILFDFLRQHVDO
SURGXFWRRGHELGRDXVRLUUD]RQDEOHLQFOX\HQGRQR
SURSRUFLRQDUPDQWHQLPLHQWRUD]RQDEOH\QHFHVDULR
5HHPSOD]RGHIXVLEOHVGHODFDVDRUHDMXVWHGHOVLVWHPD
GHFLUFXLWRV
)DOORGHELGRDODFRUURVLyQHQPRGHORVTXHQRHVWiQ
SURWHJLGRVFRQWUDODFRUURVLyQ
'DxRDOSURGXFWRFDXVDGRSRUYROWDMHLQDSURSLDGRKDFLD
HOHTXLSRDFFLGHQWHVLQFHQGLRVLQXQGDFLRQHVRDFWRV
GHODQDWXUDOH]DGHIXHU]DPD\RU
'DxRLQFLGHQWDORFRQVHFXHQFLDOFDXVDGRSRUSRVLEOHV
GHIHFWRVFRQHOGHVKXPHGLILFDGRU
&DXVDUGDxRVGHVSXpVGHODHQWUHJD
/RTXHQRHVWiFXELHUWR
(VWDJDUDQWtDVHH[WLHQGHDOFRPSUDGRURULJLQDO\FXDOTXLHUFRPSUDGRUSRVWHULRUGHSURGXFWRVFRPSUDGRVSDUDXVR
UHVLGHQFLDOGHQWURGH(VWDGRV8QLGRV
$OJXQRVHVWDGRVQRSHUPLWHQODH[FOXVLyQRODVOLPLWDFLRQHVGHGDxRVLQFLGHQWDOHVRFRQVHFXHQFLDOHV(VWDJDUDQWtD
GDGHUHFKRVOHJDOHVHVSHFtILFRV\XVWHGSRGUtDWHQHURWURVGHUHFKRVTXHYDULDUiQGHHVWDGRDHVWDGR3DUDVDEHU
FXiOHVVRQVXVGHUHFKRVOHJDOHVFRQVXOWHDODRILFLQDGHDVXQWRVGHOFRQVXPLGRUORFDORODRILFLQDGHO$WWRUQH\
*HQHUDOHQ
VXORFDOLGDG
([FOXVLyQGHJDUDQWtDVLPSOLFDGDV([FHSWRGRQGHHVWiSURKLELGRRUHVWULQJLGRSRUODOH\QRKD\
JDUDQWtDVH[SUHVDVRUDOHVRHVWDWXWDULDVTXHH[WLHQGDQPiVDOOiGHODGHVFULSFLyQHVSHFtILFDLQFOX\HQGR
HVSHFtILFDPHQWHODVJDUDQWtDVLPSOLFDGDVGHPHUFDQWLELOLGDGRSURSLHGDGSDUDXQSURSyVLWRSDUWLFXODU
*DUDQWH*HQHUDO(OHFWULF&RPSDQ\/RXLVYLOOH.<
*UDSHDTXtVXUHFLER6HUHTXLHUHIDFLOLWDU
SUXHEDGHODIHFKDGHFRPSUDRULJLQDOSDUD
KDFHUXQUHFODPRGHJDUDQWtD
(PSDTXHVXXQLGDGDSURSLDGDPHQWH5HFRPHQGDPRV
XVDUHOFDUWyQRULJLQDO\ORVPDWHULDOHVGHHPSDTXHWDGR
5HJUHVHHOSURGXFWRDOORFDOGHYHQWDVGRQGHXVWHG
ORFRPSUy
,QFOX\DHQHOSDTXHWHXQDFRSLDGHOUHFLERGHYHQWD
XRWUDHYLGHQFLDGHODIHFKDRULJLQDOGHODFRPSUD
$GHPiVLPSULPDVXQRPEUH\GLUHFFLyQ\XQD
GHVFULSFLyQGHOGHIHFWR
3DUDKDFHUXQUHFODPRGHJDUDQWtD
(;&/86,Ï1'(*$5$17¯$6,03/¯&,7$6³6X~QLFR\H[FOXVLYRGHUHFKRHVHOFDPELRGHOSURGXFWRWDO\
FRPRVHLQGLFDHQHVWD*DUDQWtDOLPLWDGD&XDOTXLHUJDUDQWtDLPSOtFLWDLQFOX\HQGRODVJDUDQWtDV
LPSOtFLWDVGHFRPHUFLDELOLGDGRDGHFXDFLyQSDUDXQILQGHWHUPLQDGRHVWiQOLPLWDGDVDXQDxRRHO
SHUtRGRGHWLHPSRPiVEUHYHSHUPLWLGRSRUODOH\
Ayuda al cliente. GEAppliances.com
3iJLQD:HEGH*($SSOLDQFHV
*($SSOLDQFHVFRP
¡7LHQHDOJXQDSUHJXQWDVREUHVXHOHFWURGRPpVWLFR"3UXHEHODSiJLQD:HEGH*($SSOLDQFHVFXDOTXLHU
GtDGHODxR3DUDPD\RUFRQYHQLHQFLD\VHUYLFLRPiVUiSLGR\DSXHGHGHVFDUJDUORV0DQXDOHVGHORV
3URSLHWDULRVSHGLUSLH]DVRLQFOXVRKDFHUXQDFLWDHQOtQHDSDUDTXHYHQJDQDUHDOL]DUXQDUHSDUDFLyQ
5HDO/LIH'HVLJQ6WXGLR(VWXGLRGHGLVHxRSDUDODYLGDUHDO
*($SSOLDQFHVFRP
*(DSR\DHOFRQFHSWRGH'LVHxR8QLYHUVDO³SURGXFWRVVHUYLFLRV\DPELHQWHVTXHSXHGHQXVDUJHQWHGHWRGDV
ODVHGDGHVWDPDxRV\FDSDFLGDGHV5HFRQRFHPRVODQHFHVLGDGGHGLVHxDUSDUDXQDJUDQJDPDGHKDELOLGDGHV
\GLILFXOWDGHVItVLFDV\PHQWDOHV3DUDPiVGHWDOOHVFREUHODVDSOLFDFLRQHVGH*('LVHxR8QLYHUVDOLQFOX\HQGR
LGHDVGHGLVHxRSDUDODFRFLQDSDUDSHUVRQDVFRQGLVFDSDFLGDGHVPLUHQXHVWUDSiJLQD:HEKR\PLVPR3DUD
SHUVRQDVFRQGLILFXOWDGHVDXGLWLYDVIDYRUGHOODPDUDO7''*($&
3LH]DV\DFFHVRULRV
*($SSOLDQFHVFRP
$TXHOORVLQGLYLGXRVFRQODFDOLILFDFLyQQHFHVDULDSDUDUHSDUDUVXVSURSLRVHOHFWURGRPpVWLFRVSXHGHQ
SHGLUTXHVHOHVPDQGHQODVSLH]DVRDFFHVRULRVGLUHFWDPHQWHDVXVKRJDUHVDFHSWDPRVODVWDUMHWDV
9,6$0DVWHU&DUG\'LVFRYHU+DJDVXSHGLGRHQOtQHDKR\KRUDVFDGDGtDROODPDUSRUWHOpIRQR
DOGXUDQWHKRUDVQRUPDOHVGHRILFLQD
/DVLQVWUXFFLRQHVGHVFULWDVHQHVWHPDQXDOFXEUHQORVSURFHGLPLHQWRVDVHJXLUSRUFXDOTXLHUXVXDULR
*(QRHVWiQRDSR\DTXHVHOHSURSRUFLRQHQLQJ~QVHUYLFLRDODFRQGLFLRQDGRUGHDLUH9HKHPHQWHPHQWH
UHFRPHQGDPRVTXHXVWHGQRLQWHQWHSURSRUFLRQDUVHUYLFLRDODFRQGLFLRQDGRUGHDLUHXVWHGPLVPR
3yQJDVHHQFRQWDFWRFRQQRVRWURV
*($SSOLDQFHVFRP
6LQRHVWiVDWLVIHFKRFRQHOVHUYLFLRTXHUHFLEHGH*(SyQJDVHHQFRQWDFWRFRQQRVRWURVHQQXHVWUDSiJLQD
:HELQGLFDQGRWRGRVORVGHWDOOHVDVtFRPRVXQ~PHURGHWHOpIRQRRHVFUtEDQRVD
*HQHUDO0DQDJHU&XVWRPHU5HODWLRQV
*($SSOLDQFHV$SSOLDQFH3DUN
/RXLVYLOOH.<
Printed in China
Consumer Support.
GE Appliances Website
In the U.S.A. GEAppliances.com
+DYHDTXHVWLRQRUQHHGDVVLVWDQFHZLWK\RXUDSSOLDQFH"7U\WKH*($SSOLDQFHV:HEVLWHKRXUVDGD\
DQ\GD\RIWKH\HDU)RUJUHDWHUFRQYHQLHQFHDQGIDVWHUVHUYLFH\RXFDQQRZGRZQORDG2ZQHU·V0DQXDOV
RUHYHQRUGHUSDUWVRQOLQH,Q&DQDGDZZZ*($SSOLDQFHVFD
Real Life Design Studio In the U.S.A. GEAppliances.com
*(VXSSRUWVWKH8QLYHUVDO'HVLJQFRQFHSW³SURGXFWVVHUYLFHVDQGHQYLURQPHQWVWKDWFDQEHXVHGE\
SHRSOHRIDOODJHVVL]HVDQGFDSDELOLWLHV:HUHFRJQL]HWKHQHHGWRGHVLJQIRUDZLGHUDQJHRISK\VLFDO
DQGPHQWDODELOLWLHVDQGLPSDLUPHQWV)RUGHWDLOVRI*(·V8QLYHUVDO'HVLJQDSSOLFDWLRQVLQFOXGLQJNLWFKHQGHVLJQ
LGHDVIRUSHRSOHZLWKGLVDELOLWLHVFKHFNRXWRXU:HEVLWHWRGD\)RUWKHKHDULQJLPSDLUHGSOHDVHFDOO7''
*($&
,Q&DQDGDFRQWDFW 0DQDJHU&RQVXPHU5HODWLRQV0DEH&DQDGD,QF
6XLWH)DFWRU\/DQH
0RQFWRQ1%(&0
Parts and Accessories In the U.S.A. GEAppliances.com
,QGLYLGXDOVTXDOLILHGWRVHUYLFHWKHLURZQDSSOLDQFHVFDQKDYHSDUWVRUDFFHVVRULHVVHQWGLUHFWO\WRWKHLUKRPHV
9,6$0DVWHU&DUGDQG'LVFRYHUFDUGVDUHDFFHSWHG2UGHURQOLQHWRGD\KRXUVHYHU\GD\RU
E\SKRQHDWGXULQJQRUPDOEXVLQHVVKRXUV
Instructions contained in this manual cover procedures to be performed by any user. GE does not support any
servicing of the air conditioner. We strongly recommend that you do not attempt to service the air conditioner
yourself.
&XVWRPHUVLQ&DQDGDVKRXOGFRQVXOWWKH\HOORZSDJHVIRUWKHQHDUHVW0DEHVHUYLFHFHQWHU
RUFDOO
Contact Us In the U.S.A. GEAppliances.com
,I\RXDUHQRWVDWLVILHGZLWKWKHVHUYLFH\RXUHFHLYHIURP*(FRQWDFWXVRQRXU:HEVLWHZLWKDOOWKHGHWDLOV
LQFOXGLQJ\RXUSKRQHQXPEHURUZULWHWR *HQHUDO0DQDJHU&XVWRPHU5HODWLRQV
*($SSOLDQFHV$SSOLDQFH3DUN
/RXLVYLOOH.<
,Q&DQDGDZZZ*($SSOLDQFHVFDRUZULWHWR 'LUHFWRU&RQVXPHU5HODWLRQV0DEH&DQDGD,QF
6XLWH)DFWRU\/DQH
0RQFWRQ1%(&0

