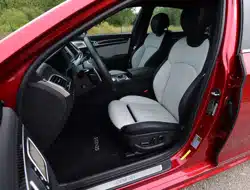
Seat sliding forward or rearward /Seatback angle adjustment (for front passenger seat) * : if equipped Rear seat
Seat sliding forward or rearward /Seat cushion tilt adjustment*
Seat sliding or shoulder adjustment*
Lumbar support adjustment*
Head restraint adjustment*
Seat sliding forward or rearward/ Seatback angle adjustment* (for front passenger seat)
Seat mode switches*
Seat warmer
Seat cooler (by air)*
RSE LOCKED indicator
Rear curtain control (details in Chapter 3)
Armrest
Ski through
Seat position memory system* (details in Chapter 3)
* : if equipped
ACCESSING YOUR VEHICLE
Smart Key
Your G90 uses a Smart Key, which you can use to lock or unlock a door (and trunk) and even start the engine.
Door Lock
Door Unlock
Trunk Unlock
Panic
Locking
Using the door handle button
Close all doors, engine hood and trunk.
Press the outside door handle button.
The hazard warning lights will blink and the chime will sound once. Also, the outer side view mirror will fold, if the side view mirror folding switch is in the AUTO position.
Make sure the doors are locked by checking the position of the door lock button inside the vehicle.
Information
The door handle button will only operate when the smart key is within 28~40 inches (0.7~1 m) from the outside door handle.
Pressing the door handle button does not unlock the doors. To unlock the doors, refer to the following page.
Even though you press the outside door handle button, the doors will not lock and the chime will sound for three seconds if any of the following occur:
The Smart Key is in the vehicle.
The Engine Start/Stop button is in ACC or ON position.
Any door except the trunk is open.
Using the button on the Smart Key
Close all doors, engine hood and trunk.
Press the Door Lock button (1).
The hazard warning lights will blink and the chime will sound once. Also, the outer side view mirror will fold, if the side view mirror folding switch is in the AUTO position.
Make sure the doors are locked by checking the position of the Door Lock button inside the vehicle.
Unlocking
Using the door handle
Carry the Smart Key.
Put your hand in the outside door handle.
The driver's door will unlock. If you put your hand in the outside door handle again within 4 seconds, then all doors will unlock.
The hazard warning lights will blink two times. Also, the outer side view mirror will unfold, if the side view mirror folding switch is in the AUTO position.
Using the button on the Smart Key
Carry the Smart Key.
Press the Door Unlock button (2).
The driver's door will unlock. If you press the Door Unlock button (2) on the Smart Key again within 4 seconds, then all doors will unlock.
The hazard warning lights will blink two times. Also, the outer side view mirror will unfold, if the side view mirror folding switch is in the AUTO position.
Information
The door handle unlocking will only operate when the smart key is within 28~40 inches (0.7~1 m) from the outside door handle and other people can also open the doors.
You can change the system to the central door unlock mode in the User Settings menu of the LCD display to unlock all the doors when you press the unlock button one time.
After unlocking the doors, the doors will lock automatically after 30 seconds unless a door is opened.
Information
The doors may unlock if the inner sensor of the outer door handle is recognized while washing your car or due to heavy rain. However, the doors are automatically locked in 30 seconds unless a door is opened after they are unlocked.
The doors may not unlock if you put your hands in the inside of the outer door handle with gloves on.
The doors may not unlock if suddenly approach the door and put your hands in the inside of the outer door handle.
Trunk Unlocking
To open:
Carry the smart key.
Either press the trunk handle button or press and hold the Trunk Unlock button (3) on the smart key for more than one second.
The hazard warning lights will blink two times.
Once the trunk is opened and then closed, the trunk will lock automatically.
Information The trunk handle button will only operate when the smart key is within 28 inches (0.7 m) from the trunk handle.
Information The power trunk (if equipped) can be operated when the engine is not running. However, the power trunk consumes large amounts of vehicle electric power. To prevent the battery from being discharged, do not operate consecutively (more than approximately 10 times).
Panic button
Press and hold the Panic button (4) for more than one second. The horn sounds and hazard warning lights blink for about 30 seconds. To cancel the panic mode, press any button on the Smart Key.
Start-up
You can start the engine without inserting the key.
For more information, refer to the "Engine Start/Stop Button" section in chapter 5.
Mechanical key
If the Smart Key does not operate normally, you can lock or unlock the door by using the mechanical key.
Press and hold the release button (1) and remove the mechanical key (2). Insert the mechanical key into the key hole on the door.
To reinstall the mechanical key, put the key into the hole and push it until a click sound is heard.
Loss of a smart key
A maximum of two Smart Keys can be registered to a single vehicle. If you happen to lose your smart key, you should immediately take the vehicle and remaining keys to your authorized retailer of Genesis Branded products or tow the vehicle, if necessary.
Smart key precautions
The smart key will not work if any of the following occur:
The smart key is close to a radio transmitter such as a radio station or an airport which can interfere with normal operation of the transmitter.
The smart key is near a mobile two way radio system or a cellular phone.
Another vehicle's smart key is being operated close to your vehicle.
If the smart key is in close proximity to your mobile phone, the signal could be blocked by your mobile phones normal operational signals. This is especially important when the phone is active such as making and receiving calls, text messaging, and/or sending/receiving emails. Avoid placing the smart key and your mobile phone in the same pants or jacket pocket and always try to maintain an adequate distance between the two devices.
When the smart key does not work correctly, open and close the door with the mechanical key. If you have a problem with the smart key, contact an authorized retailer of Genesis Branded products.
Restrictionsin handling keys
When leaving keys with parking lot and valet attendants, the following procedures will ensure your vehicle's trunk and glove box compartment can only be opened with the mechanical key.
To lock:
Remove the mechanical key from the Smart Key.
Unlock the glove box by using the mechanical key, then open it.
Set the Trunk Lid Control button to the LOCK position (button pressed).
Close and lock the glove box using the mechanical key.
Leave the Smart Key with the attendant and keep the mechanical key with you.
The Smart Key can only be used to start the engine and operate door locks.
To unlock:
Open the glove box with the mechanical key.
Set the Trunk Lid Control button to the UNLOCK position (button not pressed).
In this position the trunk lid will open with the Trunk Lid button or the SmartKey.
Battery replacement
If the Smart Key is not working properly, try replacing the battery with a new one.
Battery Type : CR2032
To replace the battery:
Using a flat-blade screwdriver, gently pry open the rear cover of the smart key.
Remove the old battery and insert the new battery.
Reinstall the rear cover of the smart key.
If you suspect your smart key might have sustained some damage, or you feel your smart key is not working correctly, contact an authorized retailer of Genesis Branded products.
DOOR LOCKS
Operating Door Locks from Outside the Vehicle
Mechanical key
First, remove the cover (1~2), and then turn the key toward the rear of the vehicle to unlock and toward the front of the vehicle to lock (3).
If you lock the driver's door with a mechanical key, all vehicle doors will lock. If you unlock the driver's door with a mechanical key, the driver's door will unlock.
Once the doors are unlocked, they may be opened by pulling the door handle.
When closing the door, push the door by hand. Make sure that doors are closed securely.
Smart key
To lock:
Press the button on the outside door handle while carrying the Smart Key with you or press the Door Lock button on the Smart Key.
To unlock:
Put your hand in the driver's outside door handle while carrying the Smart Key with you, the driver's door will unlock.
Put your hand in the outside door handle again within 4 seconds, then all doors will unlock.
Put your hand in the passenger’s out side door handle, all door will unlock.
Press the Door Unlock button on the Smart Key, the driver's door will unlock.
Press the Door Unlock button on the Smart Key again within 4 seconds, then all doors will unlock.
Once the doors are unlocked, they may be opened by pulling the door handle.
When closing the door, push the door by hand. Make sure that doors are closed securely.
Information You can change the system to the central door unlock mode in the User Settings menu of the LCD display to unlock all the doors when you press the unlock button one time.
Information
In cold and wet climates, door lock and door mechanisms may not work properly due to freezing conditions.
If the door is locked/unlocked multiple times in rapid succession with either the vehicle key or door lock switch, the system may stop operating temporarily in order to protect the circuit and prevent damage to system components.
What to do in an emergency
HAZARD WARNING FLASHER
The hazard warning flasher serves as a warning to other drivers to exercise extreme caution when approaching, overtaking, or passing your vehicle.
It should be used whenever emergency repairs are being made or when the vehicle is stopped near the edge of a roadway.
To turn the hazard warning flasher on or off, press the hazard warning flasher button. The button is located in the center fascia panel. Both the left and right turn signal lights will flash simultaneously.
The hazard warning flasher operates whether your vehicle is running or not.
The turn signals do not work when the hazard flasher is on.
IN CASE OF AN EMERGENCY WHILE DRIVING
If the Engine Stalls While Driving
Reduce your speed gradually, keeping a straight line. Move cautiously off the road to a safe place.
Turn on your hazard warning flasher.
Try to start the engine again. If your vehicle will not start, contact an authorized retailer of Genesis Branded products or seek other qualified assistance.
If the Engine Stalls at a Crossroad or Crossing
If the engine stalls at a crossroad or crossing, if safe to do so, move the shift lever to the N (Neutral) position and then push the vehicle to a safe location.
If you Have a Flat Tire While Driving
If a tire goes flat while you are driving:
Take your foot off the accelerator pedal and let the vehicle slow down while driving straight ahead. Do not apply the brakes immediately or attempt to pull off the road as this may cause loss of vehicle control resulting in an accident. When the vehicle has slowed to such a speed that it is safe to do so, brake carefully and pull off the road. Drive off the road as far as possible and park on firm, level ground. If you are on a divided highway, do not park in the median area between the two traffic lanes.
When the vehicle is stopped, press the hazard warning flasher button, move the shift lever into P(Park), and apply the parking brake, and place the Engine Start/Stop button in the OFF position.
Have all passengers get out of the vehicle. Be sure they all get out on the side of the vehicle that is away from traffic.
When changing a flat tire, follow the instructions provided later in this chapter.
IF THE ENGINE WILL NOT START
If the Engine Doesn't Turn Over or Turns Over Slowly
Be sure the shift lever is in N (Neutral) or P (Park). The engine starts only when the shift lever is in N (Neutral) or P (Park).
Turn on the interior light. If the light dims or goes out when you operate the starter, the battery is drained.
Do not push or pull the vehicle to start it. This could cause damage to your vehicle. See instructions for "Jump Starting" provided in this chapter.
If the Engine Turns Over Normally but Doesn't Start
Check the fuel level and add fuel if necessary.
If the engine still does not start, have your vehicle checked by an authorized retailer of Genesis Branded products.
JUMP STARTING
Jump starting can be dangerous if done incorrectly. Follow the jump starting procedure in this section to avoid serious injury or damage to your vehicle. If in doubt about how to properly jump start your vehicle, we strongly recommend that you have a service technician or towing service do it for you.
To prevent damage to your vehicle:
Only use a 12-volt power supply (battery or jumper system) to jump start your vehicle.
Do not attempt to jump start your vehicle by push-starting.
Jump starting procedure
Information Your vehicle has a battery in the trunk compartment, but when you jump start your vehicle, use the jumper terminal in the engine compartment.
Position the vehicles close enough that the jumper cables will reach, but do not allow the vehicles to touch.
Avoid fans or any moving parts in the engine compartment at all times, even when the vehicles are turned off.
Turn off all electrical devices such as radios, lights, air conditioning, etc. Put the vehicles in P (Park) and set the parking brakes. Turn both vehicles OFF.
Open the engine hood.
Open the small service cover with a screwdriver.
Remove the engine room fuse box cover.
Connect the jumper cables in the exact sequence shown in the illustration. First connect one jumper cable to the red, positive (+) jumper terminal of your vehicle (1).
Connect the other end of the jumper cable to the red, positive (+) battery/jumper terminal of the assisting vehicle (2).
Connect the second jumper cable to the black, negative (-) battery/ chassis ground of the assisting vehicle (3).
Connect the other end of the second jumper cable to the black, negative (-) chassis ground of your vehicle (4). Do not allow the jumper cables to contact anything except the correct battery or jumper terminals or the correct ground. Do not lean over the battery when making connections.
Start the engine of the assisting vehicle and let it run at approximately 2,000 rpm for a few minutes. Then start your vehicle.
Keep your vehicle operating for at least 30 minutes at idle or driving to assure your battery receives enough charge to be able to start on its own after the vehicle is shut off. A complete dead battery may require as long as 60 minutes runtime to fully recharge it. If vehicle is run for less, the battery may not restart. If you continue to have problem, have your authorized retailer of Genesis Branded products test the battery.
If your vehicle will not start after a few attempts, it probably requires servicing. In this event please seek qualified assistance. If the cause of your battery discharging is not apparent, have your vehicle checked by an authorized retailer of Genesis Branded products.
Disconnect the jumper cables in the exact reverse order you connected them:
Disconnect the jumper cable from the black, negative (-) chassis ground of your vehicle (4).
Disconnect the other end of the jumper cable from the black, negative (-) battery/chassis ground of the assisting vehicle (3).
Disconnect the second jumper cable from the red, positive (+) battery/jumper terminal of the assisting vehicle (2).
Disconnect the other end of the jumper cable from the red, positive (+) jumper terminal of your vehicle (1).
Push-Starting
Vehicles equipped with automatic transmission cannot be push-started.
Follow the directions in this chapter for jump-starting.
IF THE ENGINE OVERHEATS
If your temperature gauge indicates overheating, you experience a loss of power, or hear loud pinging or knocking, the engine may be overheating. If this happens, you should:
Pull off the road and stop as soon as it is safe to do so.
Place the shift lever in P (Park) and set the parking brake. If the air conditioning is ON, turn it OFF.
If engine coolant is running out under the vehicle or steam is coming out from the hood, stop the engine. Do not open the hood until the coolant has stopped running or the steaming has stopped. If there is no visible loss of engine coolant and no steam, leave the engine running and check to be sure the engine cooling fan is operating. If the fan is not running, turn the engine off.
Check for coolant leaking from the radiator, hoses or under the vehicle. (If the air conditioning had been in use, it is normal for cold water to be draining from it when you stop.)
If engine coolant is leaking out, stop the engine immediately and call the nearest authorized retailer of Genesis Branded products for assistance.
Heater hose connector cap (for Tau 5.0 GDI engine)
If you cannot find the cause of the overheating, wait until the engine temperature has returned to normal. Then, if coolant has been lost, carefully add coolant to the reservoir to bring the fluid level in the reservoir up to the halfway mark.
Proceed with caution, keeping alert for further signs of overheating. If overheating happens again, call an authorized retailer of Genesis Branded products for assistance.
Low Tire Pressure / Tire Pressure Monitor / TPMS Malfunction Display (shown on the cluster LCD display)
Check Tire Pressure
You can check the tire pressure in the Assist mode on the cluster. Refer to the "LCD Modes” in chapter 3.
Tire pressure is displayed after a few minutes of driving after initial engine start up.
If tire pressure is not displayed when the vehicle is stopped, "Drive to display" message will appear. After driving, check the tire pressure.
The displayed tire pressure values may differ from those measured with a tire pressure gauge.
You can change the tire pressure unit in the User Settings mode on the cluster.
psi, kpa, bar (Refer to the "LCD Modes" in chapter 3).
Tire Pressure Monitoring System
Each tire, including the spare (if provided), should be checked monthly when cold and inflated to the inflation pressure recommended by the vehicle manufacturer on the vehicle placard or tire inflation pressure label. (If your vehicle has tires of a different size than the size indicated on the vehicle placard or tire inflation pressure label, you should determine the proper tire inflation pressure for those tires.)
As an added safety feature, your vehicle has been equipped with a tire pressure monitoring system (TPMS) that illuminates a low tire pressure telltale when one or more of your tires is significantly under-inflated. Accordingly, when the low tire pressure telltale illuminates, you should stop and check your tires as soon as possible, and inflate them to the proper pressure. Driving on a significantly under-inflated tire causes the tire to overheat and can lead to tire failure.
Under-inflation also reduces fuel efficiency and tire tread life, and may affect the vehicle’s handling and stopping ability.
Please note that the TPMS is not a substitute for proper tire maintenance, and it is the driver’s responsibility to maintain correct tire pressure, even if under-inflation has not reached the level to trigger illumination of the TPMS low tire pressure telltale.
Your vehicle has also been equipped with a TPMS malfunction indicator to indicate when the system is not operating properly. The TPMS malfunction indicator is combined with the low tire pressure telltale. When the system detects a malfunction, the telltale will flash for approximately one minute and then remain continuously illuminated. This sequence will continue upon subsequent vehicle start-ups as long as the malfunction exists.
When the malfunction indicator is illuminated, the system may not be able to detect or signal low tire pressure as intended. TPMS malfunctions may occur for a variety of reasons, including the installation of replacement or alternate tires or wheels on the vehicle that prevent the TPMS from functioning properly.
Always check the TPMS malfunction telltale after replacing one or more tires or wheels on your vehicle to ensure that the replacement or alternate tires and wheels allow the TPMS to continue to function properly.
Changing a Tire with TPMS
If you have a flat tire, the Low Tire Pressure and LCD position indicator will come on. Have the flat tire repaired by an authorized retailer of Genesis Branded products as soon as possible or replace the flat tire with the spare tire.
The spare tire does not come with a tire pressure monitoring sensor. When the low pressure tire or the flat tire is replaced with the spare tire, the Low Tire Pressure LCD position indicator will remain on. Also, the TPMS Malfunction Indicator will illuminate after blinking for one minute if the vehicle is driven at speed above 15.5 mph (25 km/h) for approximately 20 minutes.
Once the original tire equipped with a tire pressure monitoring sensor is reinflated to the recommended pressure and reinstalled on the vehicle, the Low Tire Pressure LCD position indicator and TPMS Malfunction Indicator will go off within a few minutes of driving.
If the indicators do not disappear after a few minutes, please visit an authorized retailer of Genesis Branded products.
Each wheel is equipped with a tire pressure sensor mounted inside the tire behind the valve stem (except for the spare tire). You must use TPMS specific wheels. It is recommended that you always have your tires serviced by an authorized retailer of Genesis Branded products.
A cold tire means the vehicle has been sitting for 3 hours and driven for less than 1 mile (1.6 km) in that 3 hour period.
Allow the tire to cool before measuring the inflation pressure. Always be sure the tire is cold before inflating to the recommended pressure.
IF YOU HAVE A FLAT TIRE
Jack and tools
The jack, jack handle, and wheel lug nut wrench are stored in the luggage compartment under the luggage box cover.
The jack is provided for emergency tire changing only.
Turn the winged hold down bolt counterclockwise to remove the spare tire.
Store the spare tire in the same compartment by turning the winged hold down bolt clockwise.
To prevent the spare tire and tools from "rattling", store them in their proper location.
If it is hard to loosen the tire holddown wing bolt by hand, you can loosen it easily using the jack handle.
Put the jack handle (1) inside of the tire hold-down wing bolt.
Turn the tire hold-down wing bolt counterclockwise with the jack handle.
Changing tires
Follow these steps to change your vehicle's tire:
Park on a level, firm surface.
Move the shift lever into P(Park), apply the parking brake, and place the Engine Start/Stop button in the OFF position.
Press the hazard warning flasher button.
Remove the wheel lug nut wrench, jack, jack handle, and spare tire from the vehicle.
Block both the front and rear of the tire diagonally opposite of the tire you are changing.
Loosen the wheel lug nuts counterclockwise one turn each in the order shown above, but do not remove any lug nuts until the tire has been raised off of the ground.
Place the jack at the designated jacking position under the frame closest to the tire you are changing. The jacking positions are plates welded to the frame with two notches and two dimples. Never jack any other position or part of the vehicle. Doing so may damage the side seal molding or other parts of the vehicle.
Insert the jack handle into the jack and turn it clockwise, raising the vehicle until the tire clears the ground. Make sure the vehicle is stable on the jack.
Loosen the lug nuts with the wheel lug nut wrench and remove them with your fingers. Remove the wheel from the studs and lay it flat on the ground out of the way. Remove any dirt or debris from the studs, mounting surfaces, and wheel.
Install the spare tire onto the studs of the hub.
Tighten the lug nuts with your fingers onto the studs with the smaller end of the lug nuts closest to the wheel.
Lower the vehicle to the ground by turning the jack handle counterclockwise.
Use the wheel lug nut wrench to tighten the lug nuts in the order shown. Double-check each lug nut until they are tight. After changing tires, have an authorized retailer of Genesis Branded products tighten the lug nuts to their proper torque as soon as possible. The wheel lug nut should be tightened to 79~94 Ibf ft (11~13 kgf m).
If you have a tire gauge, check the tire pressure (see "Tires and Wheels" in chapter 8 for tire pressure instructions.). If the pressure is lower or higher than recommended, drive slowly to the nearest service station and adjust it to the recommended pressure. Always reinstall the valve cap after checking or adjusting tire pressure. If the cap is not replaced, air may leak from the tire. If you lose a valve cap, buy another and install it as soon as possible. After changing tires, secure the flat tire and return the jack and tools to their proper storage locations.
If any of the equipment such as the jack, lug nuts, studs, or other equipment is damaged or in poor condition, do not attempt to change the tire and call for assistance.
Jack Label
The actual Jack label in the vehicle may differ from the illustration.
For more detailed specifications, refer to the label attached to the jack.
Model Name
Maximum allowable load
When using the jack, set your parking brake.
When using the jack, stop the engine.
Do not get under a vehicle that is supported by a jack.
The designated locations under the frame
When supporting the vehicle, the base plate of jack must be vertical under the lifting point.
Shift into Reverse gear on vehicles with manual transmission or move the shift lever to the P (Park) position on vehicles with automatic transmission.
The jack should be used on firm level ground.
Jack manufacture
Production date
Representative company and address
TOWING
Towing Service
If emergency towing is necessary, we recommend having it done by an authorized retailer of Genesis Branded products or a commercial tow-truck service. Proper lifting and towing procedures are necessary to prevent damage to the vehicle. The use of wheel dollies or flatbed is recommended.
On 2WD vehicles, it is acceptable to tow the vehicle with the front wheels on the ground (without dollies) and the rear wheels off the ground. If any of the loaded wheels or suspension components are damaged or the vehicle is being towed with the rear wheels on the ground, use a towing dolly under the rear wheels. When being towed by a commercial tow truck and wheel dollies are not used, the rear of the vehicle should always be lifted, not the front.
When towing the vehicle by flatbed equipment, secure wheels by using chocks and tie-down straps (or soft belts).
When towing your vehicle in an emergency without wheel dollies:
Set the Engine Start/Stop button in the ACC position.
Place the shift lever in N (Neutral).
Release the parking brake.
Emergency Towing
If towing is necessary, we recommend you have it done by an authorized retailer of Genesis Branded products or a commercial tow truck service.
If towing service is not available in an emergency, your vehicle may be temporarily towed using a cable or chain secured to the emergency towing hook at the front (or rear) of the vehicle.
Use extreme caution when towing the vehicle with a cable or chain. A driver must be in the vehicle to steer it and operate the brakes.
Towing in this manner may be done only on hard-surfaced roads for a short distance and at low speeds. Also, the wheels, axles, power train, steering and brakes must all be in good condition.
Maintenance
ENGINE COMPARTMENT
Engine coolant reservoir
Radiator cap
Brake fluid reservoir
Air cleaner
Engine oil dipstick
Engine oil filler cap
Windshield washer fluid reservoir
Fuse box
Jumper terminal
Engine coolant reservoir
Radiator cap
Brake fluid reservoir
Air cleaner
Engine oil dipstick
Engine oil filler cap
Windshield washer fluid reservoir
Fuse box
Jumper terminal
MAinTEnAnCE SERVICES
You should exercise the utmost care to prevent damage to your vehicle and injury to yourself whenever performing any maintenance or inspection procedures.
We recommend you have your vehicle maintained and repaired by an authorized retailer of Genesis Branded products. An authorized retailer of Genesis Branded products meets Genesis Branded Vehicle's high service quality standards and receives technical support from Genesis Branded Vehicle in order to provide you with a high level of service satisfaction.
Owner's Responsibility
Maintenance service and record retention are the owner's responsibility.
You should retain documents that show proper maintenance has been performed on your vehicle in accordance with the scheduled maintenance service charts shown on the following pages. You need this information to establish your compliance with the servicing and maintenance requirements of your vehicle warranties.
Detailed warranty information is provided in your Owner's Handbook & Warranty Information booklet.
Repairs and adjustments required as a result of improper maintenance or a lack of required maintenance are not covered.
Owner Maintenance Precautions
Inadequate, incomplete or insufficient servicing may result in operational problems with your vehicle that could lead to vehicle damage, an accident, or personal injury. This chapter provides instructions only for the maintenance items that are easy to perform. Several procedures can be done only by an authorized retailer of Genesis Branded products with special tools.
Your vehicle should not be modified in any way. Such modifications may adversely affect the performance, safety or durability of your vehicle and may, in addition, violate conditions of the limited warranties covering the vehicle.
Certain modifications may also be in violation of regulations established by the U.S. Department of Transportation and other federal or state agencies.
OWNER MAINTENANCE
The following lists are vehicle checks and inspections that should be performed by the owner or an authorized retailer of Genesis Branded products at the frequencies indicated to help ensure safe, dependable operation of your vehicle.
Any adverse conditions should be brought to the attention of your dealer as soon as possible.
These Owner Maintenance vehicle checks are generally not covered by warranties and you may be charged for labor, parts and lubricants used.
Owner Maintenance Schedule
When you stop for fuel:
Check the engine oil level.
Check coolant level in the engine coolant reservoir.
Check the windshield washer fluid level.
Check for low or under-inflated tires.
While operating your vehicle:
Note any changes in the sound of the exhaust or any smell of exhaust fumes in the vehicle.
Check for vibrations in the steering wheel. Notice if there is any increased steering effort or looseness in the steering wheel, or change in its straight-ahead position.
Notice if your vehicle constantly turns slightly or "pulls" to one side when traveling on smooth, level road.
When stopping, listen and check for unusual sounds, pulling to one side, increased brake pedal travel or "hard-to-push" brake pedal.
If any slipping or changes in the operation of your transmission occurs, check the transmission fluid level.
Check the automatic transmission P (Park) function.
Check the parking brake.
Check for fluid leaks under your vehicle (water dripping from the air conditioning system during or after use is normal).
At least monthly:
Check coolant level in the engine coolant reservoir.
Check the operation of all exterior lights, including the brake lights, turn signals and hazard warning flashers.
Check the inflation pressures of all tires including the spare for tires that are worn, show uneven wear, or are damaged.
Check for loose wheel lug nuts.
At least twice a year:( i.e., every Spring and Fall)
Check radiator, heater and air conditioning hoses for leaks or damage.
Check windshield washer spray and wiper operation. Clean wiper blades with clean cloth dampened with washer fluid.
Check headlamp alignment.
Check muffler, exhaust pipes, shields and clamps.
Check the seat belts for wear and function.
At least once a year:
Clean body and door drain holes.
Lubricate door hinges and hood hinges.
Lubricate door and hood locks and latches.
Lubricate door rubber weather strips.
Lubricate door checker.
Check the air conditioning system.
Inspect and lubricate automatic transmission linkage and controls.
Clean the battery and terminals.
Check the brake fluid level.
SCHEDULED MAINTENANCE SERVICE
Follow Normal Maintenance Schedule if the vehicle is usually operated where none of the following conditions apply. If any of the following conditions apply, you must follow the Maintenance Under Severe Usage Conditions.
Repeated driving short distance of less than 5 miles (8 km) in normal temperature or less than 10miles (16 km) in freezing temperature
Extensive engine idling or low speed driving for long distances
Driving on rough, dusty, muddy, unpaved, graveled or salt-spread roads
Driving in areas using salt or other corrosive materials or in very cold weather
Driving in heavy dust condition
Driving in heavy traffic area
Driving on uphill, downhill, or mountain road repeatedly
Towing a trailer or using a camper, or roof rack
Driving as a patrol car, taxi, other commercial use of vehicle towing
Frequently driving in stop-and-go condition
For additional information or assistance see an authorized retailer of Genesis Branded products.
SEVERE DRIVING CONDITIONS
A-Repeatedly driving short distance of less than 5 miles (8 km) in normal temperature or less than 10 miles (16 km) in freezing temperature
B -Extensive engine idling or low speed driving for long distances
C-Driving on rough, dusty, muddy, unpaved, graveled or salt- spread roads
D-Driving in areas using salt or other corrosive materials or in very cold weather
E -Driving in heavy dust condition
F -Driving in heavy traffic area
G-Driving on uphill, downhill, or mountain road repeatedly H-Towing a Trailer, or using a camper, or roof rack I -Driving as a patrol car, taxi, other commercial use or vehicle towing J -Driving over 106 mph (170 km/h)
K-Frequently driving in stop-and-go conditions
EXPLANATION OF SCHEDULED MAINTENANCE ITEMS
Engine Oil and Filter
The engine oil and filter should be changed at the intervals specified in the maintenance schedule. If the car is being driven in severe conditions, more frequent oil and filter changes are required.
Drive Belts
Inspect all drive belts for evidence of cuts, cracks, excessive wear or oil saturation and replace if necessary. Drive belts should be checked periodically for proper tension and adjusted as necessary.
Fuel Filter
A clogged-up fuel filter may limit the vehicle driving speed, damage the emission system, and cause the hard starting. When a considerable amount of foreign substances are accumulated in the fuel tank, the fuel filter should be replaced.
Upon installing a new fuel filter, operate the engine for several minutes, and check the connections for any leakages. Fuel filters should be installed by an authorized retailer of Genesis Branded products.
Fuel Lines, Fuel Hoses and Connections
Check the fuel lines, fuel hoses and connections for leakage and damage. Have an authorized retailer of Genesis Branded products replace any damaged or leaking parts immediately.
Vapor Hose and Fuel Filler Cap
The vapor hose and fuel filler cap should be inspected at those intervals specified in the maintenance schedule. Make sure a new vapor hose or fuel filler cap is correctly replaced.
Air Cleaner Filter
A Genesis/Hyundai air cleaner filter is recommended when the filter is replaced.
Spark Plugs
Make sure to install new spark plugs of the correct heat range.
Valve Clearance (Lambda engine)
Inspect for excessive valve noise and/or engine vibration and adjust if necessary. Have an authorized retailer of Genesis Branded products perform the operation.
Cooling System
Check cooling system components, such as radiator, coolant reservoir, hoses and connections for leakage and damage. Replace any damaged parts.
Engine Coolant
The coolant should be changed at the intervals specified in the maintenance schedule.
Automatic Transmission Fluid
Automatic transmission fluid should not be checked under normal usage conditions. But in severe conditions, the fluid should be changed at an authorized retailer of Genesis Branded products in accordance to the scheduled maintenance at the beginning of this chapter.
Brake Hoses and Lines
Visually check for proper installation, chafing, cracks, deterioration and any leakage. Replace any deteriorated or damaged parts immediately.
Brake Fluid
Check brake fluid level in the brake fluid reservoir. The level should be between the MIN and the MAX marks on the side of the reservoir. Use only hydraulic brake fluid conforming to DOT 3 or DOT 4 specification.
Brake Transmission Fluid
Check the pads for excessive wear, discs for run out and wear, and calipers for fluid leakage.
Exhaust Pipe and Muffler
Visually inspect the exhaust pipes, muffler and hangers for cracks, deterioration, or damage. Start the engine and listen carefully for any exhaust gas leakage. Tighten connections or replace parts as necessary.
Suspension Mounting Bolts
Check the suspension connections for looseness or damage. Retighten to the specified torque.
Steering Gear Box, Linkage & Boots/Lower Arm Ball Joint
With the vehicle stopped and the engine off, check for excessive free-play in the steering wheel. Check the linkage for bends or damage. Check the dust boots and ball joints for deterioration, cracks, or damage. Replace any damaged parts.
Drive Shafts and Boots
Check the drive shafts, boots and clamps for cracks, deterioration, or damage. Replace any damaged parts and, if necessary, repack the grease.
Air Conditioning Refrigerant
Check the air conditioning lines and connections for leakage and damage.
ENGINE OIL
Checking the Engine Oil Level
Follow all of the oil manufacturer’s precautions.
Be sure the vehicle is on the level ground in P (Park) with the parking brake set. If possible, block the wheels.
Turn the engine on and allow the engine to reach normal operating temperature.
Turn the engine off and wait about five minutes for the oil to return to the oil pan.
Pull the dipstick out, wipe it clean, and re-insert it fully.
Pull the dipstick out again and check the level. The level should be between F and L.
If it is near or at L, add enough oil to bring the level to F.
Checking the Engine Oil and Filter
Have engine oil and filter changed by an authorized retailer of Genesis Branded products according to the Maintenance Schedule at the beginning of this chapter.
Recommended engine coolant
When adding coolant, use only deionized water, distilled water or soft water for your vehicle and never mix hard water in the coolant filled at the factory.
An improper coolant mixture can result in severe malfunction or engine damage.
The engine in your vehicle has aluminum engine parts and must be protected by an ethylene-glycol with phosphate based coolant to prevent corrosion and freezing.
Do not use alcohol or methanol coolant or mix them with the specified coolant.
Do not use a solution that contains more than 60% antifreeze or less than 35% antifreeze, which would reduce the effectiveness of the solution.
For mixing percentage, refer to the following table:
Ambient
Temperature
Mixture Percentage (volume)
Antifreeze
Water
5°F (-15°C)
35
65
-13°F (-25°C)
40
60
-31°F (-35°C)
50
50
-49°F (-45°C)
60
40
The electric motor for the cooling fan is controlled by engine coolant temperature, refrigerant pressure and vehicle speed. As the engine coolant temperature decreases, the electric motor will automatically shut off. This is a normal condition. If your vehicle is equipped with GDI, the electric motor for the cooling fan may begin to operate at any time and continue to operate until you disconnect the negative battery cable.
Changing Engine Coolant
Have coolant changed by an authorized retailer of Genesis Branded products according to the Maintenance Schedule at the beginning of this chapter.
AIR CLEANER
Filter Replacement
The air cleaner filter can be cleaned for inspection using compressed air. Do not attempt to wash or to rinse it, as water will damage the filter.
If soiled, the air cleaner filter must be replaced.
Visit an authorized retailer of Genesis Branded products to replace the air cleaner filter.
Replace the filter according to the Maintenance Schedule
LIGHT BULBS
Consult an authorized HYUNDAI dealer to replace most vehicle light bulbs. It is difficult to replace vehicle light bulbs because other parts of the vehicle must be removed before you can get to the bulb. This is especially true for removing the headlamp assembly to get to the bulb(s).
Removing/installing the headlamp assembly can result in damage to the vehicle.
Information After heavy driving, rain or washing, headlamp and trunk lenses could appear frosty. This condition is caused by the temperature difference between the lamp inside and the outside temperature. This is similar to the condensation on your windows inside your vehicle during the rain and doesn't indicate a problem with your vehicle. If the water leaks into the lamp bulb circuitry, have your vehicle checked by an authorized retailer of Genesis Branded products.
Type A - HID headlamp
Headlamp (Low/High)
Parking lamp
Turn signal lamp/ Daytime running light
Side marker
Headlamp (Low, High)
If the light bulb does not operate, have the vehicle checked by an authorized retailer of Genesis Branded products.
Type B – LED headlamp
Headlamp (Low)
Headlamp (High)
Parking lamp
Turn signal/Daytime running light
Side marker
Your vehicle is equipped with LED lamps. LED lamps do not have replaceable bulbs. If the LED lamp does not operate, have the vehicle checked by an authorized retailer of Genesis Branded products.
Side Repeater Lamp Replacement
If the light bulb does not operate, have the vehicle checked by an authorized retailer of Genesis Branded products.
Rear Combination Light Bulb Replacement
Stop/Tail lamp
Turn signal/Backup lamp
Side marker
Your vehicle is equipped with LED lamps. LED lamps do not have replaceable bulbs. If the LED lamp does not operate, have the vehicle checked by an authorized retailer of Genesis Branded products.
High Mounted Stop Light Replacement
Your vehicle is equipped with LED lamps. LED lamps do not have replaceable bulbs. If the LED lamp does not operate, have the vehicle checked by an authorized retailer of Genesis Branded products.
License Plate Light Replacement replacement
If the light bulb does not operate, have the vehicle checked by an authorized retailer of Genesis Branded products.
APPEARANCE CARE
Exterior Care
Exterior general caution
It is very important to follow the label directions when using any chemical cleaner or polish. Read all warning and caution statements that appear on the label.
High-pressure washing
When using high-pressure washers, make sure to maintain sufficient distance from the vehicle. Insufficient clearance or excessive pressure can lead to component damage or water penetration.
Do not spray the camera, sensors or its surrounding area directly with a high pressure washer. Shock applied from high pressure water may cause the device to not operate normally.
Do not bring the nozzle tip close to boots (rubber or plastic covers)or connectors as they may be damaged if they come into contact with high pressure water.
Do not use any high-pressure nozzles, which induce either one-direct water stream or water swirling.
Finish maintenance
Washing
To help protect your vehicle’s finish from rust and deterioration, wash it thoroughly and frequently at least once a month with lukewarm or cold water.
If you use your vehicle for off-road driving, you should wash it after each off-road trip. Pay special attention to the removal of any accumulation of salt, dirt, mud, and other foreign materials. Make sure the drain holes in the lower edges of the doors and rocker panels are kept clear and clean.
Insects, tar, tree sap, bird droppings, industrial pollution and similar deposits can damage your vehicle’s finish if not removed immediately. Even prompt washing with plain water may not completely remove all these deposits. A mild soap, safe for use on painted surfaces, should be used.
After washing, rinse the vehicle thoroughly with lukewarm or cold water. Do not allow soap to dry on the finish.
Waxing
A good coat of wax provides a barrier between your paint and environmental contamination.
Keeping a good coat of wax on your vehicle will help protect it.
Wax the vehicle when water will no longer bead on the paint.
Always wash and dry the vehicle before waxing. Use a good quality liquid or paste wax, and follow the manufacturer’s instructions. Wax all metal trim to protect it and to maintain its luster.
Removing oil, tar, and similar materials with a spot remover will usually strip the wax from the finish. Be sure to re-wax these areas even if the rest of the vehicle does not yet need waxing.
Finish damage repair
Deep scratches or stone chips in the painted surface must be repaired promptly. Exposed metal will quickly rust and may develop into a major repair expense.
Bright-metal maintenance
To remove road tar and insects, use a tar remover, not a scraper or other sharp object.
To protect the surfaces of bright-metal parts from corrosion, apply a coating of wax or chrome preservative and rub to a high luster.
During winter weather or in coastal areas, cover the bright metal parts with a heavier coating of wax or preservative. If necessary, coat the parts with non-corrosive petroleum jelly or other protective compound.
Underbody maintenance
Corrosive materials used for ice and snow removal and dust control may collect on the underbody. If these materials are not removed, accelerated rusting can occur on underbody parts such as the fuel lines, frame, floor pan and exhaust system, even though they have been treated with rust protection.
Thoroughly flush the vehicle underbody and wheel openings with lukewarm or cold water once a month, after off-road driving and at the end of each winter. Pay special attention to these areas because it is difficult to see all the mud and dirt. It will do more harm than good to wet down the road grime without removing it. The lower edges of doors, rocker panels, and frame members have drain holes that should not be allowed to clog with dirt; trapped water in these areas can cause rusting.
Aluminum wheel maintenance
The aluminum wheels are coated with a clear protective finish.
Corrosion protection
Protecting your vehicle from corrosion
By using the most advanced design and construction practices to combat corrosion, Genesis Branded Vehicle produces cars of the highest quality. However, this is only part of the job. To achieve the long-term corrosion resistance your vehicle can deliver, the owner’s cooperation and assistance is also required.
Common causes of corrosion
The most common causes of corrosion on your vehicle are:
Road salt, dirt and moisture that is allowed to accumulate underneath the vehicle.
Removal of paint or protective coatings by stones, gravel, abrasion or minor scrapes and dents which leave unprotected metal exposed to corrosion.
High-corrosion areas
If you live in an area where your vehicle is regularly exposed to corrosive materials, corrosion protection is particularly important. Some of the common causes of accelerated corrosion are road salts, dust control chemicals, ocean air and industrial pollution.
Moisture breeds corrosion
Moisture creates the conditions in which corrosion is most likely to occur. For example, corrosion is accelerated by high humidity, particularly when temperatures are just above freezing. In such conditions, the corrosive material is kept in contact with the car surfaces by moisture that is slow to evaporate.
Mud is particularly corrosive because it is slow to dry and holds moisture in contact with the vehicle. Although the mud appears to be dry, it can still retain the moisture and promote corrosion.
High temperatures can also accelerate corrosion of parts that are not properly ventilated so the moisture can be dispersed. For all these reasons, it is particularly important to keep your vehicle clean and free of mud or accumulations of other materials. This applies not only to the visible surfaces but particularly to the underside of the vehicle.
To help prevent corrosion
Keep your car clean The best way to prevent corrosion is to keep your vehicle clean and free of corrosive materials. Attention to the underside of the vehicle is particularly important.
If you live in a high-corrosion area — where road salts are used, near the ocean, areas with industrial pollution, acid rain, etc.—, you should take extra care to prevent corrosion. In winter, hose off the underside of your vehicle at least once a month and be sure to clean the underside thoroughly when winter is over.
When cleaning underneath the vehicle, pay particular attention to the components under the fenders and other areas that are hidden from view. Do a thorough job; just dampening the accumulated mud rather than washing it away will accelerate corrosion rather than prevent it. Water under high pressure and steam are particularly effective in removing accumulated mud and corrosive materials.
When cleaning lower door panels, rocker panels and frame members, be sure that drain holes are kept open so that moisture can escape and not be trapped inside to accelerate corrosion.
Keep your garage dry Don’t park your car in a damp, poorly ventilated garage. This creates a favorable environment for corrosion. This is particularly true if you wash your vehicle in the garage or drive it into the garage when it is still wet or covered with snow, ice or mud. Even a heated garage can contribute to corrosion unless it is well ventilated so moisture is dispersed.
Keep paint and trim in good condition Scratches or chips in the finish should be covered with "touch-up" paint as soon as possible to reduce the possibility of corrosion. If bare metal is showing through, the attention of a qualified body and paint shop is recommended.
Bird droppings are highly corrosive and may damage painted surfaces in just a few hours. Always remove bird droppings as soon as possible.
Interior Care
Interior general precautions
Prevent caustic solutions such as perfume and cosmetic oil, from contacting the interior parts because they may cause damage or discoloration. If they do contact the interior parts, wipe them off immediately. See the instructions for the proper way to clean vinyl.
Cleaning the upholstery and interior trim Vinyl (if equipped)
Remove dust and loose dirt from vinyl with a whisk broom or vacuum cleaner. Clean vinyl surfaces with a vinyl cleaner.
Fabric (if equipped)
Remove dust and loose dirt from fabric with a whisk broom or vacuum cleaner. Clean with a mild soap solution recommended for upholstery or carpets. Remove fresh spots immediately with a fabric spot cleaner. If fresh spots do not receive immediate attention, the fabric can be stained and its color can be affected.
Also, its fire-resistant properties can be reduced if the material is not properly maintained.
Yes, the 2018 Genesis G90 is a good luxury large car. A relative newcomer onto a competitive scene, it goes toe to toe with well-established rivals. The G90 is fun to drive, its interior quality hits the luxury target, and it boasts a long list of standard infotainment and active safety features. The 2018 G90 has numerous strengths: - Two powerful engine options - Pampering ride and poised handling - Posh interior - Ample passenger room - Tons of standard driver assistance technology - User-friendly infotainment features - Excellent crash-test results It has a couple notable weaknesses: - Below-average fuel economy - High five-year ownership costs for class
We’ve researched 23 Genesis G90 reviews, as well as hard data points like reliability ratings and cost of ownership estimates, to help you make the best car-buying decision possible. U.S. News & World Report has been ranking cars since 2007, and our Best Cars team has decades of combined automotive industry experience. While we’re passionate about cars, we’re even more committed to providing helpful consumer advice. To ensure our reviews remain impartial, we refuse expensive gifts and trips from car companies, and an outside team handles the advertising on our site.
The 2019 Genesis G90 carries over with no major changes from 2018. Therefore, you may be better served by purchasing the nearly identical 2018 model. Doing so could save you lots of money. Prices for the 2018 G90 range from around $51,500 to $75,300, while the 2019 G90 starts at $69,350.The Genesis G90 was introduced as an all-new model for 2017, when Hyundai spun off its luxury car division into a standalone brand. Changes made for the 2018 G90 include standard adaptive headlights and a newly available rear-seat DVD entertainment system. If these enhancements aren’t that important to you, consider a very similar inaugural 2017 G90, which will likely cost you less.


 Rear seat