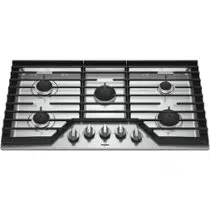
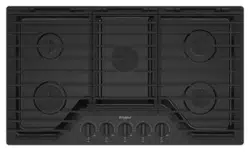
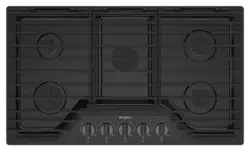
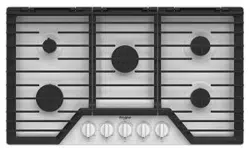
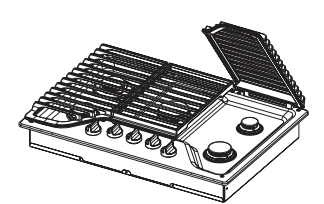
User Manual for Gas Cooktop
KEY USAGE TIPS
Propane Gas Conversion
IMPORTANT: This cooktop is factory set for use with Natural gas.
If you wish to use Liquid Propane, call a licensed professional to install the Propane gas conversion kit (included).
Placement of Burner Heads and Caps
All burner caps and burner bases should be properly installed BEFORE operating the cooktop. Check that each burner has the right size head and cap.
Refer to the “Assembling Your Cooktop” section for proper burner head placement details.
Lighting the Burners
IMPORTANT: All burners will click/spark when a knob is pushed in. A burner will light only if the knob is pushed in then turned counterclockwise to IGNITE.
To light the burners:
- Push in the knob.
- Turn the knob counterclockwise to IGNITE. Wait until you see a flame.
- Turn the knob anywhere between Hi and Lo to the desired setting.
Power failure: In case of a power failure, burners can be lit manually. Hold a lit match near the burner and turn the knob counterclockwise to IGNITE.
Cleaning the Burner: Tips
The burners should be kept clean. Spillovers should be cleaned immediately since they can clog the openings in the burners.
IMPORTANT: Before cleaning, make sure all controls are off and the cooktop is cool. For more information, see the “Care and Cleaning” section.
- Remove the burner cap from the base. Clean the burner cap with hot soapy water and then rinse it.
- Remove the burner base and clean the gas tube opening under the base.
- Clean clogged burner ports with a straight pin, needle or small-gauge wire as shown. Do not use a wooden toothpick or clean in the dishwasher.
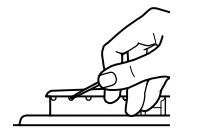
- Gently clean the igniter with a damp cloth.
ASSEMBLING YOUR COOKTOP
Assembling the Burners
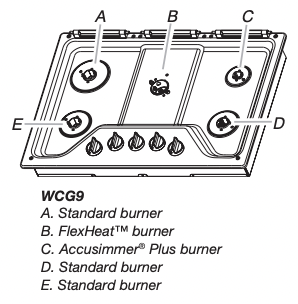
Check your model number. Then refer to the following for information specific to your burners.
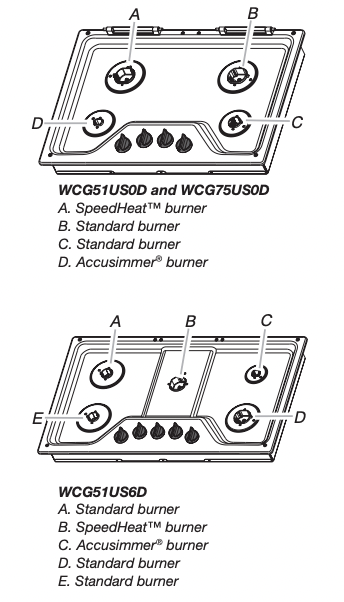
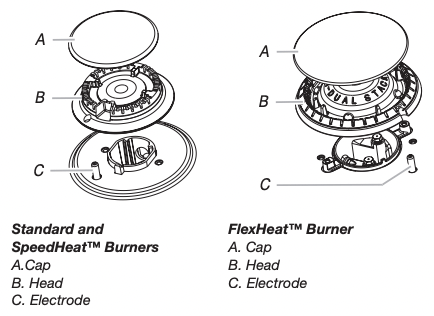
Burner Head Placement
- Burner caps and heads are included with your cooktop.
- Always match the burner head size to the cap size.
- Always line up the hole in the burner head to the electrode.
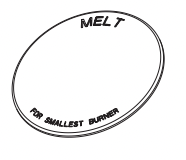
- The cooktop comes with an extra Melt cap on WCG9 series models. This is a large cap with “MELT” and “FOR SMALLEST BURNER” printed on it. Use this cap over the smallest burner only.
- Standard, SpeedHeat™ and FlexHeat™ burners are similar in assembly. Note that there is no hole in the FlexHeat™ dual flame burner head to insert the electrode. The FlexHeat™ burner electrode (C) aligns with the semicircle notch in the head (B).
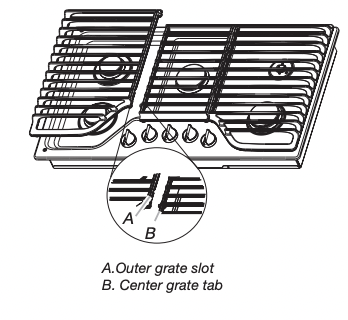
Grate Placement
To install the grates, align the feet on the center grate with the indents on the cooktop. Then install the 2 outer grates by aligning the tabs on the center grate with the slots in the outer grates. Be sure to line up the slots and tabs for proper grate alignment.
COOKTOP FEATURES
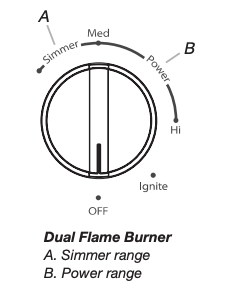
FlexHeat™ Burner
This burner has the flexibility of two burners in one, providing heat ranges from fast boiling to precise simmering.
- Power: Select Hi for preparing large quantities of food or to boil liquids quickly. For best results, rotate the knob to Hi in the Power range.
- Simmer: Use Simmer to slowly cook foods or to hold a simmer. For best results, rotate the knob to the end of the Simmer range. Only the small flame will light, making this the best burner for simmering or slow cooking.
Accusimmer® and Accusimmer® Plus Burners
The Even-Heat™ Simmer burner is for simmering sauces. Position the knob closer to Melt for a more delicate simmer level.
Accusimmer® Plus
NOTE: The melt cap is available on WCG9 series models only.
Melt: For melting chocolate or butter or an even more delicate simmer, the melt cap can be used in place of the standard burner cap on the smallest burner. Set the knob to the “Melt” position.
Remove the small burner cap and replace it with the larger Melt cap for delicate simmering. For less delicate simmering, use the small cap.
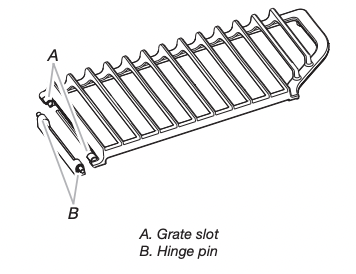
EZ-2-Lift™ Hinged Cast Iron Grates
Your cooktop comes with hinged grates for easier cleaning. The grates pivot upward and toward the back of the cooktop for easy access under the grates.
The grates will stop once they are moved to their vertical (fully open) position. A 20” (50.8 cm) minimum clearance from the countertop to the bottom of the upper cabinets/appliances is needed to fully open the grates.
Be sure to return the grates to their normal (down) position once cleaning is complete.
The grates are removable for cleaning.
To attach the grates to their hinges, insert the grate slot over the hinge pin on the back of the cooktop. Be sure to keep the grate angled above the cooktop to avoid scratching the cooktop until the grate is seated on the hinge pin. Then position the grate down onto the cooktop.
SpeedHeat™ Burner
Use the SpeedHeat™ burner for rapid boiling, searing and frying. The SpeedHeat™ burner is the left rear burner on 30” (76.2 cm) models and the center burner on 36” (91.4 cm) models.
CARE AND CLEANING
IMPORTANT: Before cleaning, make sure all controls are off and the cooktop is cool. Soap, water and a soft cloth or sponge are suggested first unless otherwise noted. Food spills containing acids, such as vinegar and tomato, should be cleaned as soon the cooktop is cool. These spills may affect the finish.
| Surface Type |
Burner Grates |
| Control Knobs (Plastic) |
The knobs should be cleaned with soap and water or in the dishwasher.
To remove the knobs, be sure the knobs are in the OFF position.
Do not remove the seals under the knobs.
|
| Burner Grates |
Soap and Water: Use a nonabrasive plastic scrubbing pad and mildly abrasive cleanser, soap and water.
Dishwasher: The grates may be cleaned in the dishwasher. Remove any burnt on food prior to placing the grates in the lowest rack in the dishwasher.
To avoid chipping, do not bang grates against each other or hard surfaces, such as cast iron cookware. Although the grates are durable, they will gradually lose their shine due to exposure to high temperatures.
|
| Burner Caps |
Use a nonabrasive plastic scrubbing pad and mildly abrasive cleanser, soap and water.
Do not place caps in the dishwasher or reassemble caps on burners when wet.
|
| Burner Base |
The holes in the burner bases must be kept clean for proper ignition and a complete, even flame.
Refer to “Cleaning the Burners: Tips” in the “Key Usage” section.
|
| Porcelain Enamel Cooktop Surface |
Use a nonabrasive scrubbing pad and glass cleanser or a mild liquid cleaner, such as affresh® Kitchen and Appliance Cleaner, Part Number W10355010. |
| Stainless Steel Cooktop Surface |
For best results, use a soft cloth or non-scratch sponge.
Rub in direction of the grain to avoid damaging the surface.
Use all-purpose cleaner, such as affresh® Kitchen and Appliance Cleaner, Part Number W10355010.
For stainless steel finishes, order affresh® Stainless Steel Cleaner, Part Number W10355016.
Do not use scouring pads, abrasive cleaners, cooktop cleaner, steel wool pads, gritty washcloths or abrasive paper towels.
|
COOKING WITH YOUR COOKTOP
WARNING Fire Hazard Do not let the burner flame extend beyond the edge of the pan. Turn off all controls when not cooking. Failure to follow these instructions can result in death or fire.
Selecting the proper flame size
The flame size should match the cookware you are using. When you adjust the heat, watch the flame, not the knob. A flame larger than the bottom of the cookware wastes energy and will heat the handle.
- High flame - Start food cooking, bring water to a boil, or pan broiling.
- Medium flame - Maintain a slow boil, fry or sauté, thicken sauces, steam, or stew.
- Low flame - Keep food cooking, simmer, or keep food warm.
REMEMBER: When cooktop is in use, the entire cooktop area may become hot.
Cookware
Ideal cookware should have a flat bottom, straight sides and a well-fitting lid. The material should be medium to heavy thickness.
Rough finishes may scratch the cooktop. Aluminum and copper cookware may be used but may leave permanent marks on the grates or cooktop. Use the chart below as a guide for cookware material.
IMPORTANT: Do not leave empty cookware on a hot surface cooking area or burner.
Canning
When canning for long periods, alternate the use of burners between batches to allow time for the most recently used area to cool.
- Center the canner on the gate.
- Do not place the canner on 2 burners at the same time.
For more information, contact your local agricultural department or a company that manufactures home canning products.
| Cookware |
Characteristics |
| Aluminum |
Heats quickly and evenly.
Medium or heavy thickness is best for most cooking tasks.
|
| Cast iron |
Heats slowly and evenly.
Good for browning and frying.
Maintains heat for slow cooking.
|
| Ceramic or ceramic glass |
Follow manufacturer’s instructions.
Heats slowly and evenly.
Ideal results on low to medium heat.
|
| Copper |
Heats very quickly and evenly. |
| Earthenware |
Follow manufacturer’s instructions.
Use on low heat.
|
| Porcelain enamel-on-steel or cast iron |
Refer to stainless steel or cast iron. |
| Stainless steel |
Heats quickly but unevenly.
A core or base of aluminum or copper on stainless provides even heating.
|
TROUBLESHOOTING
First try the solutions suggested here. If you need further assistance or more recommendations that may help you avoid a service call, refer to the warranty page in this manual or visit www.whirlpool.com/product_help for recommendations that may help you avoid a service call.
WARNING Electrical Shock Hazard Plug into a grounded 3 prong outlet. Do not remove ground prong. Do not use an adapter. Do not use an extension cord. Failure to follow these instructions can result in death, fire, or electrical shock.
| PROBLEM |
POSSIBLE CAUSES AND/OR SOLUTIONS |
| Nothing will operate |
Check the following:
■ Make sure the power supply cord is plugged into a grounded 3 prong outlet.
■ Replace the fuse or reset the circuit breaker. If the problem continues, call an electrician.
■ Make sure the cooktop is properly connected to the gas supply. Contact a service technician or refer to the installation instructions.
|
| Burners will not operate |
If this is the first time the cooktop is being used, turn on any one of the burner knobs to release air from the gas lines. Be sure the control knob is pushed in before turning to a setting.
A burner port (hole) may be clogged or the igniter may need cleaning. Refer to “Cleaning the Burner: Tips” in the “Key
Usage Tips” section.
Check that the burner base and caps are positioned correctly. Refer to “Placement of Burner Heads and Caps” in the “Key Usage Tips” section.
|
| Burner flames are uneven, yellow and/or noisy |
Compare the flame to the illustrations below. If the flames look like A, call or service. Normal flames look like B or C. If Propane gas is being used, the cooktop may have been converted improperly. Contact a service technician or refer to the “Assistance or Service” section in the Use and Care Guide.

A burner port (hole) may be clogged. Refer to “Cleaning the Burner: Tips” in the “Key Usage Tips” section. Check that the burner caps are positioned correctly. Refer to “Placement of Burner Heads and Caps” in the “Key Usage Tips” section.
|
| When a knob is pushed, all burners spark |
Sparking/clicking of all the burners is normal operation. A burner will light only if the knob is pushed in and turned to the  position. position. |
| Burner is making a popping noise |
If the burner is wet or dirty, clean and/or let the burner dry |
| Excessive heat around the cookware on cooktop |
Be sure the cookware is approximately the same size as the cooking area and surface burner. Cookware should not extend more than ½” (13 mm) outside the cooking area. Adjust the flame so that it does not wrap around the cookware. |
| Cooking results are not what expected |
Check the following:
■ Be sure the proper cookware is being used. Refer to the “Cooking with Your Cooktop” section.
■ Check the heat level. Refer to “Excessive heat around the cookware on cooktop.”
■ Check the level of the cooktop. Refer to the Installation Instructions.
|
| Flame too High or too Low |
Ensure the cooktop gas supply is correct (Propane or Natural gas). These cooktops come from the factory set for Natural gas.
Refer to the Installation Instructions to verify that the pressure regulator is installed correctly and the line pressure and the gas line pressure are correct.
|