! Disconnect the dryer when not in use or during cleaning and maintenance operations.
Cleaning the filter after each cycle
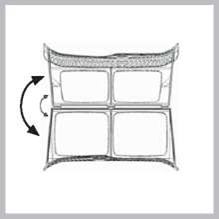
The filter is a fundamental component of the dryer: its function is to collect lint and fluff that form during drying.
Clean the filter once drying is completed, by rinsing it under running water or cleaning it with a vacuum cleaner. Should the filter become clogged, the flow of air inside the dryer will be seriously hampered: drying times becomes longer and more energy is consumed.
Moreover, the dryer may become damaged. The filter is located in front of the dryer seal (see Picture).
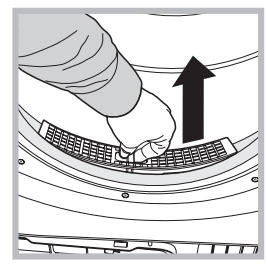
Removing the filter:
1. Pull the filter’s plastic handle upwards (see Picture).
2. Clean the fluff off the filter and replace it correctly. Ensure that the filter is pushed fully home.
! Do not use the dryer unless the filter has been replaced in its holder.
Checking the drum after each cycle
Rotate the drum manually to remove smaller items (handkerchiefs) that could have been left inside the dryer.
Cleaning the drum
! Avoid using abrasives, steel wool or stainless steel cleaning agents to clean the drum. A coloured film may appear on the stainless steel drum surface: it may be caused by a combination of water and/or cleaning agents such as wash-softeners. This coloured film does not affect the dryer’s performance.
Emptying the water container after each cycle
Remove the water container and empty it into a sink or other suitable drain outlet, then replace it correctly.
Always check the water container and empty it before starting a new drying cycle.
Failure to empty the water container may cause the following:
The dryer stops heating (thus the load may still be damp at the end of the drying cycle).
Priming the Water Collection System
When your dryer is new, the Water Container will not collect Water until the system is primed, this will take 1 or 2 drying cycles. Once primed it will collect Water during every cycle.
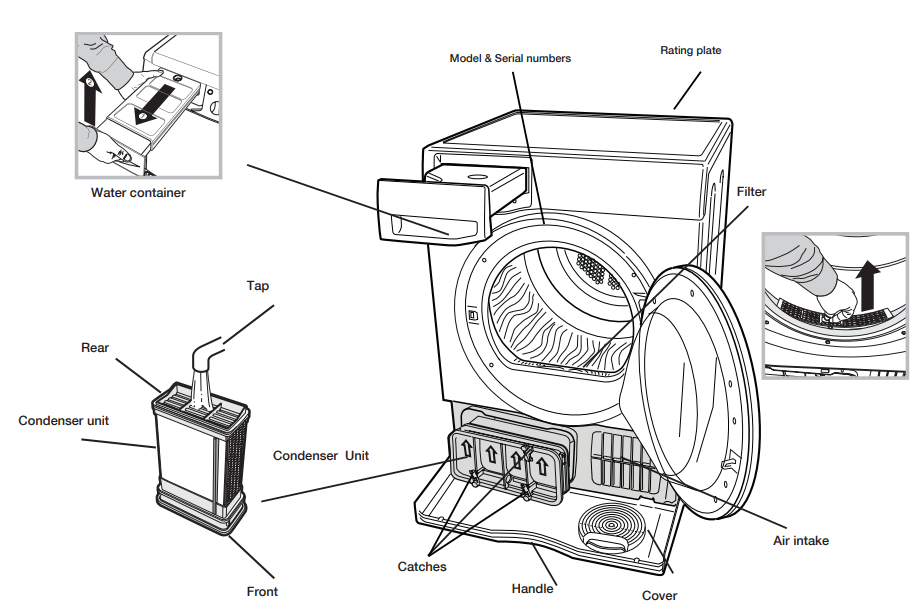
Cleaning the condenser unit.
Remove the condenser (see Picture below) unit regularly (monthly) and clean off any fluff deposits from the plates by rinsing it with cold water running on the rear end of the condenser.
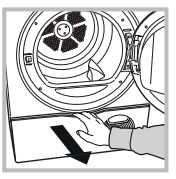
Removing the condenser:
1. Disconnect the dryer from the power supply and open the door.
2. Open the condenser cover (see Picture below), unlock the three catches by turning them 90° anti-clockwise, then pull on the grip to remove the condenser.
3. Clean the surface of the seals and replace the unit with the arrows pointing upwards, while making sure that the catches are securely fixed.
Cleaning the tumble dryer
The external metal, plastic and rubber parts can be cleaned with a damp cloth.
Clean the front air intake grille regularly (every 6 months) with a vacuum cleaner to remove any lint, fluff or dust deposits. Furthermore, remove any lint deposits from the front part of the condenser and from the filter area, using a vacuum cleaner every so often.
! Do not use solvents or abrasives.
! Have the dryer checked regularly by authorised technical personnel in order to ensure that the electrical and mechanical parts work safely (see Assistance).
Quick Tips
!Remember to clean your filter and Condenser unit after each load.
! Remember to empty your water container after each load.
! Doing this will keep your machine working at its BEST!
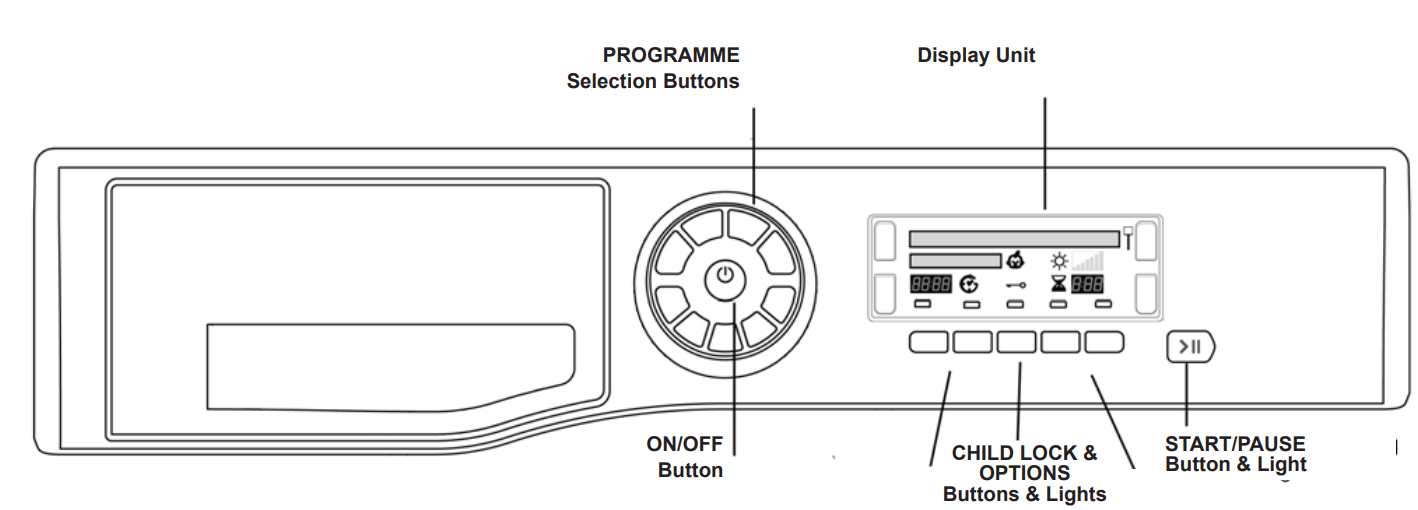
Control panel
The ON/OFF button: - if pressed when the dryer is running: If the display shows the dryer stops. If the display shows . hold the botton and the display counts down 3. 2. 1 and then stops. Press and hold again for more than 3 seconds. the display briefly shows .
The PROGRAMME selection buttons set the programme: press the button corresponding to the programme you want to select (see Start and Programmes).
The OPTION buttons/indicators: these buttons select available options for your selected programme (see The Controls). The indicators on the display unit next to the bottom buttons light to show that the option has been selected.
The START/PAUSE button/light starts a selected programme. When a programme is running. pressing this button in pauses the programme. there will be one beep. the display will show and the dryer stops.
The light is green when the programme is running, flashing amber if the programme has been paused or flashing green if on standby waiting to start a programme (see Start and Programmes).
Note: This light also flashes amber during the Post Care phase of a programme.
The Display Unit gives warnings and information about the programme selected and its progress (see next page).
The CHILD LOCK button/icon : Press and hold this button after selecting your programme and any options. this prevents the programme settings from being changed. the display will briefly show . When the icon is lit. the other buttons are disabled. Hold the button to cancel and the icon will go out, the display will briefly show .
Note: This tumble dryer. in compliance with new energy saving regulations, is fitted with an automatic standby system which is enabled after about 30 minutes if no activity is detected. Press and hold the ON-OFF button until the display briefly shows . and the dryer then reactivates.
Laundry
Sorting laundry
Check the symbols on the care labels of the various garments to verify whether the garments can be safely tumble dried.
Sort laundry according to the type of fabric.
Empty all pockets and check for loose buttons.
Close zips and hooks and fasten belts and strings without tightening them.
Wring out garments to remove the maximum amount of water possible.
! Do not load the dryer when garments are dripping wet.
Maximum load sizes
Do not overload the drum.
The following values indicate the weight of dry garments:
Natural fibres: maximum 9kg
Synthetic fibres: maximum 3 kg
! Do not overload the dryer as^his may result is reduced drying performance.
Care labels
Always check the care labels, especially when placing garments in the tumble dryer for the first time. Below are the most commonly used symbols:
The Display
Selecting your language
The first time you turn on your dryer you should select your preferred language from the available list.
To change: the language current selection must flash, on the first line of the display.
Press the On/Off button to turn off the display then press and hold all 3 buttons:Heat Level,Timed Dry, andSensor Dry for 5 seconds.
Press the Heat Level or the Timed Dry button to scroll up or down through the list.
When your required language is flashing on the top line of the display, pressing the Sensor Dry button will select your choice.
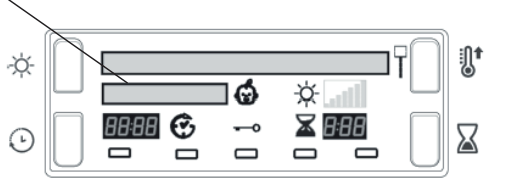
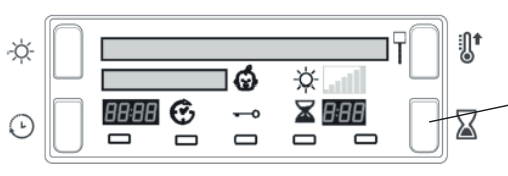
Understanding the display
Programme selection and display
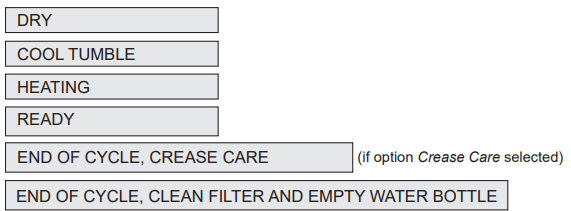
The selected programme is shown on the first line of the display, this message is shown while the programme is running.
Eight of the buttons have two selections, press the button once for the first choice and press again for the second choice, your selected programme is displayed. The final button selects My Cycle.
My Cycle. When you select the My Cycle button the Display will show your selected programme with 'M' before its name. ie. (see Start and Programmes).
Dryness levels
During programme selection for an automatic programme that has different dryness levels available (see Programmes Table).
The second line of the display shows the dryness level you require, for each press of the Dryness Level button the next option from the list below is selected and displayed. The display also shows 1 to 7 bars depending on your selection and these are displayed during the programmes progress.
! Some automatic programmes do not allow the dryness level to be changed or do not have all the dryness level options.
Programme progress
The second line of the display shows the status of the programme as it progresses: (long messages scroll across the line)
Timed drying
After selecting a programme that has a Timed Dry option, press the Timed button and the display will increment the selected time, each time you press and release the button (see Start and Programmes).
Each press reduces the time duration and number of available time options depending on the programme/material selected.
The Timed Dry icon is displayed next to the time.
The selected time remains displayed after the programme starts, but can be changed anytime you wish.
Delay and Time to End
Some programmes can have a delayed start (see Start and Programmes). Press the , Delay button and the icon flashes.
Each press of the Delay button advances the delay setting in 1 hour increments, from: to ,then and then after a couple of seconds cancels the delay
The delay time is shown on the display next to the Delay button.
The display counts down the minutes of the delay period after the Start/Pause button >|| is pressed. The second line of the display shows
You can change or cancel the delay time selected anytime if you wish.
After the Start/Pause button is pressed the Delay or Time to End is displayed in hours and minutes and counts down each minute.
Time to End
After the delay period finishes, or for all the programme if delay not selected, this part of the display will show:
the estimated time to the end of the programme, for automatic programmes
the actual time remaining during a timed programme
When timed programmes are selected the time displayed throughout the cycle is the actual time remaining.
When Automatic programmes are selected the time displayed is an estimate of the time remaining. When the programme is selected the display shows the time required to dry a full load. The time remaining is constantly monitored during the drying cycle and is updated to show the best forecast.
The colons between the hours and minutes in the display flash to show the time is counting down.
My Cycle button:
First time you press this button the display will show
After selecting your favorite programme and options you can save these settings by pressing and holding in the My Cycle button for at least 5 seconds, the top line will show a flashing M followed by the selected programme. The buzzer will then beep and the second line of the display shows
The next time you need this programme press the M, button, then the Start/Pause button (and this programme will run.
If you wish, you can change your stored favorite, by selecting a new programme and/or options and press and hold in the M button (as above).
Start and Programmes
Choosing a programme
1. Plug the dryer into the electrical socket.
2. Sort your laundry according to fabric type (see Laundry).
3. Open the door and make sure the filter is clean and in place and the water container is empty and in place (see Maintenance).
4. Load the machine and make sure items are not in the way of the door seal. Close the door.
5. If the Display is not lit: Press the ON/OFF button .
6. Press the Programmes Selection button that corresponds with the type of fabric being dried by checking the Programmes Table (see Programmes) as well as the indications for each type of fabric (see Laundry).
if the M button is selected; steps 7 and 8 are not required (see below).
7. Choose Timed Drying or Dryness Levels option:
If Timed Drying press and release the Timed button until the required time is displayed.
or - To change from default dryness setting, press and release the Dryness Levels button until required level is indicated.
! See Programmes Table, for more details: availability of Dryness Levels, Timed Dry and Options.
8. Set a delay time and other options if necessary (see The Display).
9. Press the Start/Pause button to begin. The display will show the estimated time to end. During the drying programme, you can check on your laundry and take out items that are dry while others continue drying. When you close the door again, press the Start/Pause button > II in order to resume drying.
If you open the door to check your laundry you will extend the drying time as the heat pump compressor will not start for 5 minutes after you close the door and press the Start/Pause button (see The Controls).
10. During the last few minutes of Drying Programmes, before the programme is completed, the final COOL TUMBLE phase is entered (fabrics are cooled), this phase should always be allowed to complete.
11. At the end of the drying cycle a message is displayed:
if is shown, the buzzer will beep 3 times (Note: If the SOUND option was selected the buzzer beeps 3 times every 30 seconds for 5 minutes).
if is shown, Crease Care option has been selected and if you do not remove the laundry immediately, the dryer will tumble occasionally for 10 hours or until you open the door, the buzzer will beep 3 times to confirm the programme is completed.
12. Open the door, take the laundry out, clean the filter and replace it. Empty the Water Container and replace it (see Maintenance).
13. Unplug the dryer.
Drying times
Drying times are approximate and may vary depending on the following:
Amount of water retained by items after the spin cycle: towels and delicate items retain a lot of water.
Fabrics: items of the same fabric, but with different texture and thickness may have different drying times.
Amount of laundry: single items and small loads may take longer to dry.
Drying: if items are to be ironed, they can be removed from the dryer while still slightly damp. Items that require complete drying can be left longer.
Heat setting.
Temperature of the room: the lower the temperature of the room, the longer it will take for the dryer to dry clothing.
Bulk: certain bulky items require special care during the drying process. We suggest removing these items and replacing them in the dryer once they have been shaken out: repeat this procedure several times during the course of the drying cycle.
! Do not over-dry items.
All fabrics contain natural dampness which helps to keep them soft and fluffy.
The drying times provided refer to the automatic Cupboard dry programmes.
The Timed drying settings are also indicated to enable you to select the most suitable timed option.
The weight refers to dry items.
n°
Programme
Description of program
The duration of the drying cycles can be checked on the display1.
1
Standard
Cotton
• This is a programme for cotton items.
• The Standard Cotton programme to EU Regulation 392/2012 is Programme 1 selection with High Heat and Dryness Level Cupboard Dry (the standard/default starting configuration). It is the most efficient programme in terms of energy consumption (to EU.392/2012).
max
Shirts
High heat option
• This is a programme for shirts made from cotton.
Medium heat option
• This is a programme for shirts made from synthetic materials or a mixture of natural and synthetic materials, such as polyester and cotton.
• Loads dried using the Cupboard Dry setting are usually ready to wear, the edges or seams may be slightly damp. If this is the case, try turning the shirts inside out and running the programme again for a short period.
3 kg
2
Bed & Bath
• This is a programme for cotton towels and sheets.
• Loads dried using the Extra Dry setting are usually ready to use, the edges or seams may be slightly damp especially on large items. If this is the case, try opening them out and running the programme again for a short period.
max
Anti
Allergy
• This programme has the ‘Seal of Approval’ endorsement from Allergy UK, which reflects the effective reduction and elimination of allergens from the clothes with the special Anti Allergy cycle. With this programme, thanks to the achievement of constant temperature for an extended period of time, the effects of the most common allergens (including House Mites and Pollen) are neutralised.
• Can be used on a full size wet load to dry and treat, or on a 4 kg dry load just to treat your laundry. If the display shows CLEAN FILTER TO ENSURE ANTI ALLERGY ACTION : Clean the filter and re-start the programme.
max or 4 kg
3
Synthetics
• This is a programme for items of Synthetic with low heat setting or Synthetic/Cotton mixtures with medium heat setting. (Some fabrics may require a further timed dry period for the desired dryness level, we recommend smaller loads use a low heat timed dry)
3 kg
Turbo Dry
• This programme has an extra fast cycle to dry cottons (ie. Cottons and Bed & Bath) by using a combination of temperature control and a special motor speed profile that takes advantage of our new Soft Motion motor system.
• It has been optimised for a 7kg load, other load sizes will not benefit from the optimised drying speeds and therefore may not give an improvement in drying time.
• The load must have been spun in the washing machine with a spin speed between 1200 - 1400 rpm.
7 kg
4
Jeans
• This is a programme for jeans made from denim cotton. Before drying your jeans turn the front pockets inside out.
• It can be used for load sizes up to 3 kg (approximately 4 pairs).
• Do not mix dark and light coloured items.
• It can also be used on other garments made from the same material, such as jackets.
• Loads dried using the Extra Dry setting are usually ready to wear, the edges or seams may be slightly damp. If this is the case, try turning the jeans inside out and running the programme again for a short period.
! We do not recommend that you use this programme if your jeans have elastic waist bands, studs or embroidery.
3 kg
Duvet
! Take care with this programme DO NOT dry any items that are damaged which could result in the filling blocking the filter and air vent resulting in a fire hazard.
• Must only be used on single size duvets: NOT suitable for double or king size items.
• Loads dried using this programme are usually ready to use, but may be slightly damp in places. If this is the case, try opening them out and shaking them and running the programme again for a short period.
• Also suitable for down filled jackets.
• Select high heat for Cotton Duvets and medium heat for Synthetic duvets.
-
• This is a programme for tumble dryer safe garments marked with the symbol .
• We recommend that garments are turned inside out before drying.
• Loads dried using this programme are usually ready to wear, but on some heavier garments the edges may be slightly
damp. Allow these to dry naturally as over-drying could damage garments.
! Unlike other materials, the mechanism of wool shrinkage is irreversible; i.e. it will not stretch back to original size and shape.
! This programme is not suitable for Acrylic garments.
5
1 kg
Silk
• This is a programme for drying your delicate silk.
• Loads dried using the Cupboard Dry setting are usually ready to use, but on some garments the edges may be slightly
damp. If this is the case, try opening them out or turn items inside out and running the programme again for a short period.
0,5 kg
Baby
Delicate
• This is a programme for drying your baby’s small delicate items of clothing and bedding (Cotton and Chenille) and for drying your delicate clothes.
• DO NOT dry items such as bibs and nappy pants with plastic coverings.
• Loads dried using this programme are usually ready to wear, but on some heavier garments the edges may be slightly damp. If this is the case, try turning items inside out and running the programme again for a short period.
2 kg
6
Dark Cycle
• This programme helps to maintain your dark coloured Cotton clothes, by controlling the motor speed and drum rotation, together with control of the lower drying temperature.
• The load must have been spun in the washing machine with a spin speed between 1200 - 1400 rpm.
• As this is a treatment programme aimed to protect your dark coloured clothes, the programme duration could be more than 4 hours.
•It dries to Cupboard Dry level.
3 kg
Cuddly Toy
• With this programme you can remove dust easier and wash the cuddly toys more often because the drying time is very much reduced compared to drying in the open air. It is a delicate drying cycle that dries at low temperature and with soft mechanical action to maintain at best the original look and shine of the fur.
Note: For allergy protection, just freeze cuddly toys for 24 hours then wash and dry them. Repeat every 6 weeks.
• Before drying remove accessories such as clothes, collars or sound boxes and protect plastic eyes with masking tape after drying them with a cloth.
•The programme time will vary dependant on the exact make up of the load. The maximum load should not exceed 2.5 kg and no individual item should be greater than 600 g.
7
2,5 kg
Heat & Enjoy
• This programme helps to heat towels & bathrobes for a warm sensation after a bath or shower. It is also useful for warming clothes before dressing during winter. The cycle heats clothes to 37°C (Body Temperature), the display shows HEATINGand runs at this temperature for a maximum of 4 hours or until you stop the cycle by opening the door when the display shows READY .
Note: The Start/Pause button is disabled during this programme.
3 kg
Easy Iron
•‘Easy Iron’is a short 10 minute programme (8 minutes of heat followed by a 2 minute cool tumble period) which fluffs the fibres of clothing that have been left in the same position/location for an extended period of time. The cycle relaxes the fibres and makes them easier to iron and fold.
! ‘Easy Iron’is not a drying programme and should not be used for wet articles of clothing.
• For best results:
1. Do not load more than the maximum capacity. These numbers refer to the dry weight: (Fabric-Maximum load) Cotton and
Cotton mixtures-2.5 kg; Synthetics-2 kg; Denim-2 kg.
2. Unload the dryer immediately after the end of the programme, hang, fold or iron the articles and put them away in the closet. Should this not be possible repeat the programme.
8
-
Refresh
! ‘Refresh’ is not a drying programme and should not be used for wet articles of clothing.
• It can be used on any load size, but is more effective on smaller loads.
• Do not overload your dryer (see Laundry).
• This is a 20 minute programme that airs your clothes with cool air. Also use to cool warm clothes.
The Controls
! Warning, after pressing the START/PAUSE button , the programme cannot be changed. To change a selected programme, press the START/PAUSE button the light flashes Amber to indicate the programme is paused. Select the new programme and any options required, the light will then flash green. Press the START/PAUSE button again and the new programme will start.
• Option buttons
These buttons serves to personalise the selected programme according to personal requirements. Not all options are available for all programmes. Some options are incompatible with the ones previously set. If the button of any unavailable option is pressed, the buzzer will beep 3 times. If the option is available, the option light will stay on.
Delay Timer (Time Delay)
The start of some programmes (see The Display and Programmes tables) can be delayed for up to 24 hours. Ensure the water container is emptied before setting a delayed start.
Pre Care
This option is only available if a delayed start has been selected. It tumbles the clothes occasionally during the delayed period to help prevent creases developing.
Post Care
When available and selected, the clothes are occasionally tumbled after the end of the drying and cool tumble cycles, to help prevent creases developing should you not be available to remove the load immediately the programme is complete.
Note: The Start/Pause light flashes Amber during this phase.
Note: If you have selected the Sound option this option is not available
Heat Level button, Display and Icons
Not all programmes allow you to change the heat level and some programmes allow all three heat level options:
Low, Medium and High.
When the heat level options are available pressing this button changes the heat level and the display briefly shows the selected heat level, along with a display of the selected level icon:
Sound
Available on all programmes and allows the buzzer to give a signal at the end of the drying cycle, to remind you that the clothes are ready to be removed.
Note: If you have selected the Crease Care option this option is not available.
Less Fluff
By reducing the mechanical action during the final drying stage the amount of lint and fluff produced is substantially reduced, protecting the fibres of your garments
• TIME DISPLAY
The display shows either the amount of time delay remaining or an indication of the amount of time left for a drying programme (see The Display). The display also shows if there is a problem with your dryer, if this occurs the display will show F followed by a fault code number (see Troubleshooting).
• Empty Water Container
(Messages about emptying can be ignored if you have plumbed your dryer into a drain as there is no need to empty the water container). Messages are displayed to reminds you to empty the water container (see The Display). If the water container fills during a programme, the heater turns off and the dryer does a period of Cool Tumble. After this it stops and a message tells you to . You must empty the water container and restart the dryer or the clothes will not dry. After re-starting the dryer the message will take a few seconds to go out. To avoid this always empty the water container each time you use the dryer (see Maintenance).
• Door Opening
Opening the door during a programme will stop the dryer and have the following effects:
Note: The START/PAUSE >||light flashes Amber during the Post Care phase of a programme
The display shows
During a delay phase the delay will continue to count down. The START/PAUSE button must be pressed to resume the delay programme. The display will change to show current status.
The START/PAUSE button must be pressed to resume the programme. The display will change to show the current status.
During the Post Care phase, the programme ends. Pressing the START/PAUSEbutton will restart a new programme from the beginning.
Note
If you have a power cut, switch off the power or remove the plug. When power is restored, press and hold the On/Off button until the display briefly shows and the dryer reactivates. Then press the START/PAUSEbutton and the programme will resume.
Troubleshooting
One day your dryer seems not to be working. Before you call your Service Centre (see Service), go through the following troubleshooting suggestions:
Problem:
Possible causes / Solution:
The tumble dryer won’t start.
• The plug is not plugged into the socket, or not making contact.
• There has been a power failure.
• The fuse has blown. Try to plug another appliance into the socket.
• You are using an extension cord? Try to plug the dryer’s power cord directly into the socket.
• The door is not closed securely?
• The programme has not been set properly (see Start and Programmes).
• The Start/Pause button has not been pressed (see Start and Programmes).
Drying cycle will not begin.
• You have set a delayed time (see Start and Programmes).
Its taking a long time to dry.
• The filter has not been cleaned (see Maintenance).
• The water container needs emptying? The empty water message is displayed? (see Maintenance).
• The condenser needs cleaning? (see Maintenance).
• The temperature setting is not ideal for the type of fabric you are drying (see Start and Programmes, and see Laundry).
• The correct drying time has not been selected for the load (see Laundry).
• The air intake grille is obstructed (see Installation, and see Maintenance).
• The items were too wet (see Laundry).
• The dryer was overloaded (see Laundry).
Empty water message is displayed but the dryer has only been running for a short period.
• The water container was probably not emptied at the start of the programme. Do not wait for the empty water signal, always check and empty the container before starting a new drying programme (see Maintenance).
Empty water message is displayed and the water container is not full.
• This is normal, the:
message is shown as a reminder to empty the container (see The Display and Start and Programmes).
Programme finishes and clothes are damper than expected.
! For safety the dryer has a maximum programme time of 5 hours. If an automatic programme has not sensed the required final moisture in this time the dryer will complete the programme and stop. Check the above points and run the programme again, if the results are still damp, contact the Service Centre (see Service).
The display shows a fault code F followed by one or two numbers.
• If the display shows a fault:
- Turn off and remove the plug. Clean the filter and the condenser (see maintenance). Then replace the plug, turn on and start another programme. If a fault is then displayed: Note down the code and contact the Service Centre (see Service).
The display briefly shows every 6 seconds.
• The dryer is in ‘Demo’ mode. Press and hold both the On/Off and Start/Pause buttons for 3 seconds. The display will show for 3 seconds and then the dryer will resume normal operation.
The lights on the dryer control panel are off although the dryer is switched on.
• The dryer has gone into standby mode to save power. This occurs if you have had a power cut or leave your dryer either without starting a programme or after your drying programme has finished.
- Press and hold the On/Off button and the lights will come on.


 : - if pressed when the dryer is running: If the display shows
  the dryer stops. If the display shows
  . hold the botton and the display counts down 3. 2. 1 and then stops. Press and hold again for more than 3 seconds. the display briefly shows
  .
. starts a selected programme. When a programme is running. pressing this button in pauses the programme. there will be one beep. the display will show
  and the dryer stops.
 : Press and hold this button after selecting your programme and any options. this prevents the programme settings from being changed. the display will briefly show
  . When the icon is lit. the other buttons are disabled. Hold the button to cancel and the icon will go out, the display will briefly show
  .
. . and the dryer then reactivates.
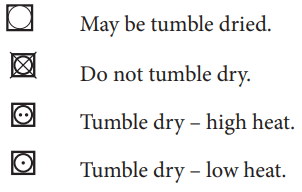

 Heat Level,
  Timed Dry, and
  Sensor Dry for 5 seconds.
 (see Start and Programmes).
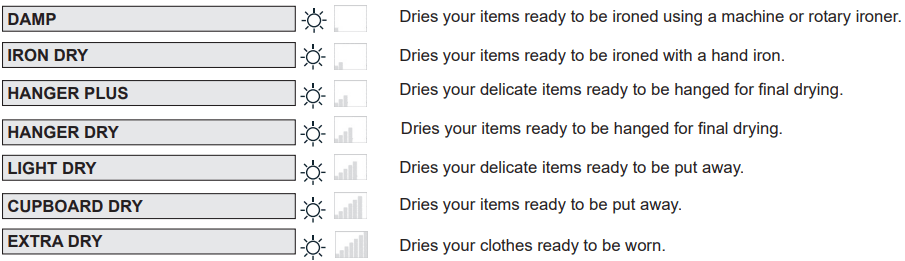

 , Delay button and the icon flashes.
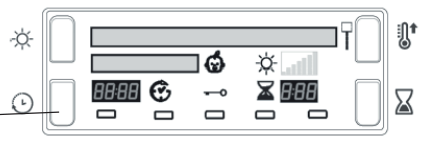
 to
to  ,then
,then and then after a couple of seconds cancels the delay


 .
.
 is shown, the buzzer will beep 3 times (Note: If the SOUND option was selected the buzzer beeps 3 times every 30 seconds for 5 minutes).
 is shown, Crease Care option has been selected and if you do not remove the laundry immediately, the dryer will tumble occasionally for 10 hours or until you open the door, the buzzer will beep 3 times to confirm the programme is completed.
 .
.

 Heat Level button, Display and Icons
 . You must empty the water container and restart the dryer or the clothes will not dry. After re-starting the dryer the message will take a few seconds to go out. To avoid this always empty the water container each time you use the dryer (see Maintenance).
 and the dryer reactivates. Then press the START/PAUSE
 message is shown as a reminder to empty the container (see The Display and Start and Programmes).
 every 6 seconds.