Loading ...
Loading ...
Loading ...
14
Clearances (cont.)
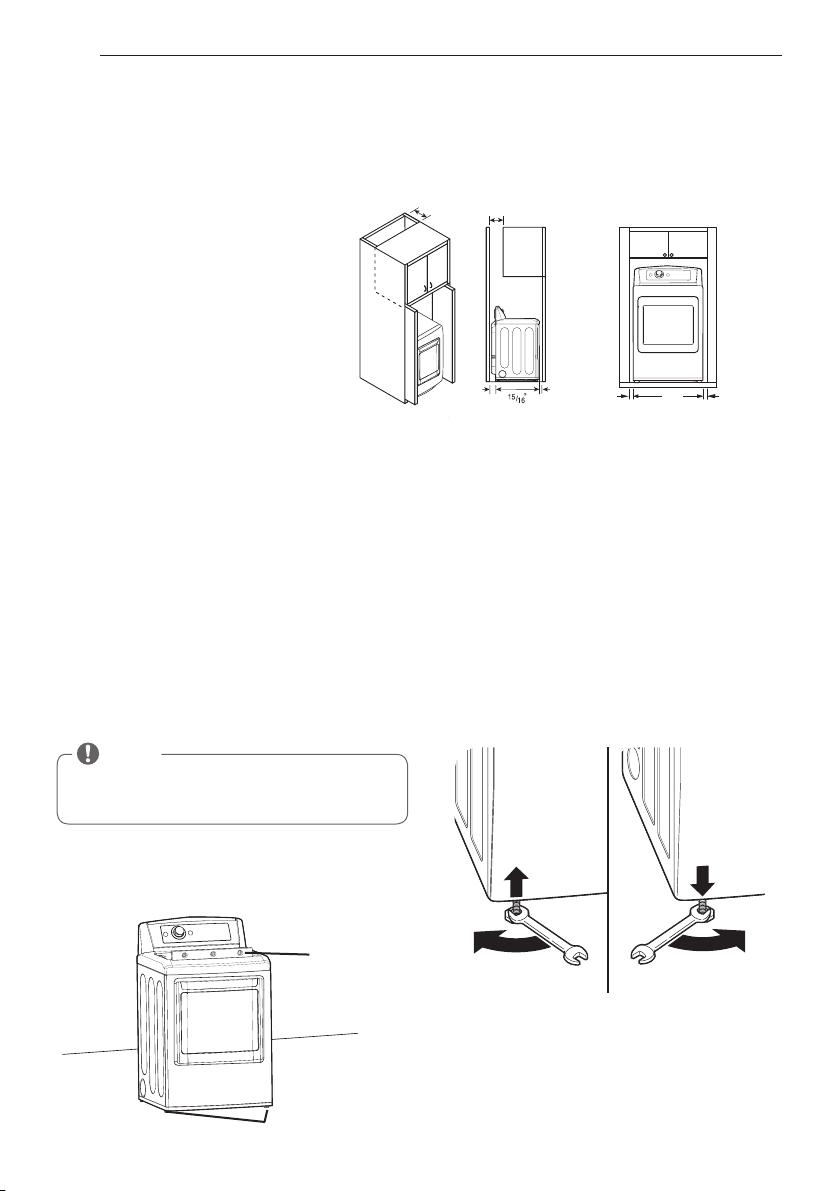
Recommended Installation Spacing For Cabinet Installation
• For cabinet installation with a door, minimum ventilation openings in the top of the cabinet are required.
*Required spacing
**For side or bottom venting,
2 inches (5.1 cm) spacing is allowed.
Leveling the Dryer
w
WARNING
Failure to follow this warning can cause serious injury
or death.
Failure to follow
this warning can cause serious injury or death.
To ensure that the dryer provides optimal drying
performance, it must be level. To minimize vibration,
noise, and unwanted movement, the floor must be a
perfectly level, solid surface.
1. Position the dryer in the final location. Place a level
across the top of the dryer.
• All four leveling feet must rest solidly on the floor.
Gently push on the top corners of the dryer to make
sure that the dryer does not rock from corner to corner.
If you are installing the dryer on the optional pedestal,
you must use the leveling feet on the pedestal to
level the dryer. The dryer leveling feet should be fully
retracted.
2. Use an adjustable wrench to turn the leveling feet.
Turn clockwise to raise the dryer or counterclockwise
to lower it. Raise or lower the leveling feet until dryer
is level from side to side and front to back.
Make sure that all 4 leveling feet are in firm contact with
the floor.
Level
Leveling Feet
NOTE
Adjust the leveling feet only as far as necessary to
level the dryer. Extending the leveling feet more than
necessary can cause the dryer to vibrate.
INSTALLATION INSTRUCTIONS
24 in.
2*
(155 cm
2
)
18" min.*
(45,7 cm)
1"*
(2,5 cm)
30"
(76,1 cm)
30"
(76,1 cm)
5"**
(12,7 cm)
48 in.
2*
(310 cm
2
)
14" max.*
(35,6 cm)
3"
*
(7,6 cm)
3"
*
(7,6 cm)
1"
(2,5 cm)
27"
(68,6 cm)
1"
(2,5 cm)
1"*
(2,5 cm)
5"**
(12,7 cm)
14" max.*
(35,6 cm)
18" min.*
(45,7 cm)
0"
(0 cm)
39"
(99,1 cm)
1"
(2,5 cm)
27"
(68,6 cm)
1"
(2,5 cm)
30"
(76,1 cm)
5"**
(12,7 cm)
1"**
(2,5 cm)
1"
(2,5 cm)
1"
(2,5 cm)
27"
(68,6 cm)
9"**
(22,9 cm)
7"* (17,8 cm)
7"* (17,8 cm)
1"* (2,5 cm)
5
"**
(14 cm)
1/2
77
1/2
"
(196,8 cm)
3"* (7,6 cm)
6"*(15,2 cm)
3"* (7,6 cm)
27"
(68,6 cm)
1"
(2,5 cm)
1"
(2,5 cm)
24 in.
2*
(155 cm
2
)
48 in.
2*
(310 cm
2
)
5
"
**
(12.7 cm)
14
"
max.*
(35.6
cm)
50
1
⁄
4
"
(127.5 cm)
28
15
⁄
16
"
(73.4 cm)
21
1
⁄4
"
(54 cm)
45
7
⁄16
"
(115.3 cm)
Closet Door Vent
Requirements
5
"
**
(12,7 cm)
14
"
max.*
(35,6
cm)
50
1
⁄
4
"
(127,5 cm)
28
15
⁄16
"
(73,4 cm)
21
1
⁄4
"
(54 cm)
45
7
⁄
16
"
(115,3 cm)
Requisitos de ventilación
de la puerta del armario
(2,54 cm) (2,54 cm)
(7,6 cm)
(7,6 cm)
(7.6 cm)
(7.6 cm)
(68,6 cm)
(2.54 cm) (2.54 cm)(68.6 cm)
28
(73.4 cm)
7"* (17.8 cm)
7"* (17.8 cm)
5"*
(12.7 cm)
1"*
(2.5 cm)
27
"
(68.6 cm)
1"
(2.54 cm)
1"
(2.54 cm)
28
(73,4 cm)
7"* (17,8 cm)
7"* (17,8 cm)
5"*
(12,7 cm)
1"*
(2,5 cm)
27
"
(68,6 cm)
1"
(2,54 cm)
1"
(2,54 cm)
3828EL2001R_en_170830.indd 14 2017.8.30 3:33:46 PM
Loading ...
Loading ...
Loading ...