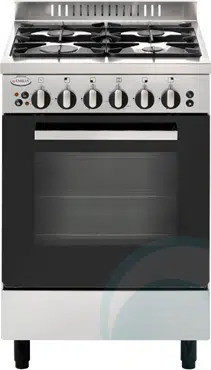
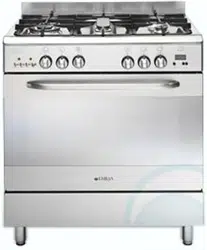
Emilia DI865MVI Freestanding Upright Gas Oven
Product's Documents
Below are documents related to this product, you can read online or download:
- User Manual - (English) Read Online | Download pdf
User manual Gas Oven
The combination of high-speed burners with those of a standard type allows all types of cooking to be achieved.
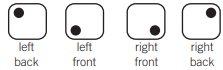
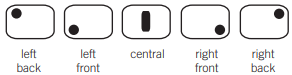
Burners Locations
53 - 60cm wide models
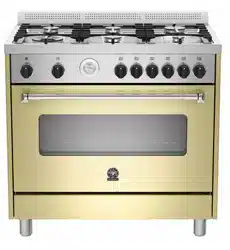
80 - 90cm wide models
1) Auto Flame Ignition - Some models To ignite any burners simply depress the corresponding control knob and rotate anti clockwise to the high flame position. As the knob is rotated the gas begins to flow and the electrode begins sparking.
2) Separate Electronic Ignition - Some models To ignite any burners, press ignition button first (the igniter should begin sparking), then simply depress the corresponding control knob & rotate anti clockwise to high flame position.
Warning: make sure all the burners are on OFF position (outside the one that you want to light) before pressing the electronic ignition. Please note - the ignition button is a spongy & sensitive button and does NOT need to be pressed hard. Pressing hard & roughly on this button can result to breakage.
In case of ignition malfunction or electricity failure a match can be used to ignite the burners. Strike a match and place it close to the selected burner. Depress the corresponding control knob and turn it anti clockwise to maximum flame.
3) Burners with Flame Failure Device - Some models If flame is accidentally extinguished, the flame failure devise will cut out the gas to prevent gas leakage.
Solid Hotplates
The solid cast hotplates are sealed all around which means that spilt liquids can not penetrate under the hotplates.
Rotate the knob to the position required for the needs of the cooking; the higher the number, the higher the heat. The plates marked with a central red spot are rapid heating elements.
Cleaning
For normal cleaning use a moist cloth and for very dirty hotplates use a domestic cleaner. After cleaning run the hotplate for a short time to dry the hotplate completely.
Ceramic hotplates
This cook top is made from ceramic glass. The cook top can hold heavy utensils but can be broken by being hit with sharp objects.
When a hotplate is on, the hot surface warning light will come on and remain on until the surface temperature falls below 60C.
Cleaning
Remove all spilt food with a razor blade scraper while the hotplate is still warm, NOT HOT.
If aluminium foil, sugar or plastic melt onto glass use a razor blade scraper immediately to remove immediately before the hotplate has cooled to avoid pitting.
When the ceramic hotplate has cooled, wipe clean with detergent on a clean cloth.
Do not use sponges or scourers on ceramic hotplates. Pitting, staining or scratching will NOT be covered by warranty.
The oven is equipped with a gas thermostat. Its purpose is to keep the temperature as a constant heat. The oven is fitted with electronic spark ignition and a safety shut off device.
Lighting the Oven
First remove grill tray and open oven door
For automatic ignition models
For separate electronic ignition models
Ignition Malfunction
In case of ignition malfunction or electricity failures depress and turn the oven knob in an anticlockwise direction to reach the maximum heating positioning.
Light a match and place it near the hole in the base panel, once the burner is lit keep the knob depressed for 15 sec.
When lighting the oven for the first time - if the electronic ignition fails to light the oven light the oven manually and run the oven in by running it at 200 degrees for 20 minutes.
Oven Preheating
After the oven has been switched on, keep the door open for a few minutes then close the door gently so there is no risk of extinguishing the flame. Set the oven knob to the required temperature and wait for about 20 minutes before introducing the food. Comply with the cooking indication chart in these instructions and to get the best out of the oven and choose the right shelf position.
Please note: Gas oven models do not have an indicator light for oven mode.
WARNING: Do not use oven base panel as a shelf, always make use of the oven shelves.
Removing and installing the oven shelves
On gas oven cookers the grill is operated by a separate button. On electric oven models the grill control is on the oven function selector knob.
The oven door must be closed during grill operation. Once the oven has been switched off, always wait a few minutes before switching on the grill.
The grill element is an infrared type, which provides an even controlled heat. When grill is on an indicator light will come on.
Using a standard shelf with a drip tray below filled with some water will avoid smoke build-up coming from burnt fat and at the same time assist in keep the food moist.
NOTE: Always grill with the oven door closed - the oven and grill cannot be operated at the same time.
The oven control knob sets the thermostatically controlled temperature for electric fan forced cooking. To operate the fan grill functions turn the temperature control knob past 250ºC to the fan grill symbol.
Multifunction Electric Oven - some models
Remove grill tray. Choose a function on the selector then position the thermostat knob to desired temperature & wait until the thermostat indicator light goes off, then introduce the food to be cooked. Below is a description of each of the functions
 Oven light - the oven light switches on and will stay on as long as the oven is in operation.
 Defrosting - the fan switches on without any heating. Food defrosting times reduce by approximately 1/3.
 Static convection mode (conventional cooking) - heat supplied from above and below. The oven must be preheated before food is placed inside. Static convection is ideal for cooking confectionery (dry-thin), Pizzas and bread. Characteristics of static cooking: Heat supplied from above and below, cooking possible on one shelf only, low moisture removal.
 Fan Forced - the circular heating element and the fan come into operation and the heat is distributed evenly to all levels of use. Various dishes can be cooked on different shelves. The oven must be preheated before food is placed inside. Fan mode is ideal for cooking confectionery (soft-thick), large amounts of food, cooking different dishes together. Characteristics of fan cooking: Heat supplied from every direction, cooking possible on several shelves, high moisture removal, defrosting possible with or without heat.
 Central Grill - used for small amounts of food (low energy consumption). Closed door grilling at all times.
 Double Grill - for grilling food that occupies a large surface. Closed door grilling at all times.
 Double Grill with Fan - the action of the fan combined with the powerful action of the two grill elements is ideal for cooking large pieces of food. Closed door grilling at all times.
 Bottom Element with Fan - the heat from below is spread evenly through the oven for slow, gentle cooking.
 Fan Assist - circulates hot air from the top to the bottom element - melt the cheese on the pizza and create a crisp base.
N.B: The thermostat pilot light switches on and off during cooking to show that the heating cycles are taking place properly. For Static and fan forced mode, the oven must always be preheated. For optimum results, try to open the oven door as little as possible, opening the door lowers the temperature suddenly and affects the thermostat cycles.
When cooking on different shelves simultaneously, put all containers in the centre of their shelves.
IMPORTANT: Never cook on the bottom base panel.

Notes:
| Problem | Cause | Solution |
| Cooking unevenly | Wrong location in oven Wrong size tray Heat variations in oven | Use shelf to place food in centre of oven Try alternatives Turn food whole cooking |
| Burning on top | Oven not preheated Aluminium foil in oven Baking tins too large Food too close to top of oven | Turn oven on and wait for light to go off before placing food in the oven Remove foil Use correct size according to recipe and place away from oven wall Place on lower shelf |
| Burning on bottom | Temperature too high Baking tins too large Baking tins are dark coloured Food too low Opening oven door too frequently | Lower temperature Use correct sized tins Use light coloured tins or reduce temperature Use higher shelf position Open less frequently |
| Meat and potatoes not browning | Poor heat distribution on food | Place food onto a rack to allow heat all around |
| Cakes have hard, split crust, seem overcooked | Temperature too high Food too high in oven Cake tin too deep Cake tin too dark | Lower temperature Cook on lower shelf Use correct size tin Use light coloured tins |
| Cakes sunk in centre, seem under cooked | Temperature too low Baking time too short Door opened too early | Increase temperature Increase cooking time Do not open door until late in the cycle |
FEATURES
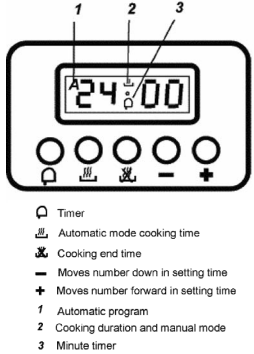
The 5 button programmable timer has the following features:
Minute minder – the programmable timer allows you to set a countdown time that will beep when the set time has elapsed.
Cooking time – you can set a cooking time. The timer will count down the preset cooking time and beep when the time has elapsed and turn the appliance off.
Stop cooking time – you can set a cooking finish time. A timer will count down the preset cooking time and beep when the finish time has been reached and turn the appliance off.
Delayed start cooking time – you can combine the cooking time and stop cooking time to switch the oven on and off at a specific time during the day.
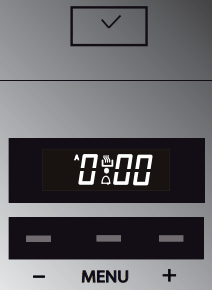
SETTING THE TIME OF DAY
First set the time of day before you operate your appliance. The“0.00” and “A” will alternately flash on the clock display when the power is connected.
1. Press buttons “COOK” and “STOP” together and hold down.
2. Whilst holding these buttons press the “-” or “+” buttons to set the time of day. When the time of day has been entered the manual cook symbol will appear in the display and the clock will advance minute by minute. The clock has a 24-hour display
SETTING THE MINUTE COUNT DOWN TIMER
1. Press the “TIMER” button.
2. Set the countdown time you want by using the “-” or “+” buttons. You will see the time of day and the timer symbol on the clock display.
3. Press the “TIMER” button briefly to check for time remaining. You will see the set time briefly before the time of day is displayed again.
4. To stop the beeper, press the “TIMER” button.
SETTING THE COOKING TIME –
Selecting the length of time you want the oven to run before automatically switching off
1. Check the clock displays the correct time of day.
2. Select the oven function and temperature. The oven indicator light will glow and the heating source will come on.
3. Press  button, then set the required cooking duration by using the “-” and “+” buttons. After 4 seconds the time of day and “A” will display with the cook symbol .
SETTING THE COOKING STOP TIME –
Selecting the time of day you want the oven to turn off automatically
1. Check the clock displays the correct time of day.
2. Select the desired oven function and temperatures. The oven indicator light will glow and the heating source will come on.
3. Press the  button, then use the “-” and “+” buttons to enter the time of day you want to finish cooking. After 4 seconds the time of day and “A” will display with the cook symbol.
SETTING THE DELAYED START COOKING TIME –
Selecting what time of day you want the oven to turn off automatically and the amount of time you want it to run for.
Program the “cooking time” and “cooking stop time” as described in the relevant sections. After 4 seconds the time of day and “A” will display, but the cook symbol will not display until the oven automatically turns on.
ON COMPLETION OF COOKING
The heat source will turn off, the timer will beep, the cooking symbol will disappear, and the “A” symbol will flash.
1. Turn the function and temperature controls to the off position.
2. Press the “TIMER” or “STOP” buttons to stop the timer from beeping.
3. To return the appliance to manual operation press the “COOK” and “STOP” buttons together.
TO CHECK YOUR COOKING SETTINGS
TO CANCEL YOUR COOKING SETTINGS
HANDY HINTS
Setting the clock
When the oven is first connected, or after a power failure, ‘0.00’ will flash on the display.
To set the clock, push the TIMER ON/OFF button, then the (+) or (–) buttons immediately. The time of day will be saved after 10 seconds.
Using the timer
The timer can be set for a maximum period of 99 minutes and a minimum of 10 seconds.
To set the timer, push the (+) or (-) button until you have set the required time. (wait 10 seconds if you have just set the time of day)
When the timer is operating the TIMER ON INDICATOR WILL BE LIT
Once the pre-set time has elapsed, the timer will beep Push the TIMER ON/OFF button to switch off.
The (–) button can also be used to change the volume of the beep.
OVEN LIGHT (all models)
Gas Oven: depress light button on left-hand side of the control panel to activate the light.
Electric oven: light function is located on your selector switch, first function when turning the knob clockwise.
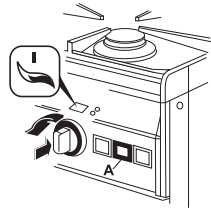
REPLACEMENT OF OVEN LIGHT
The oven light should be suitable for high temperature (300°C).
In order to replace the oven light (L) follow steps below:

The new DI and ML series of Glem and Emilia cookers have the latest oven door hinge design technology from Glem Gas. For the removal and re-installation of the oven door with the new hinges please follow these procedures.
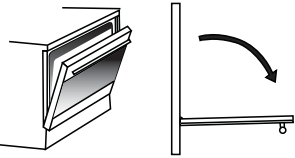
STEP 1 OPEN THE DOOR FULLY
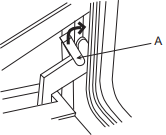
STEP 2. LOCK THE TWO HINGES
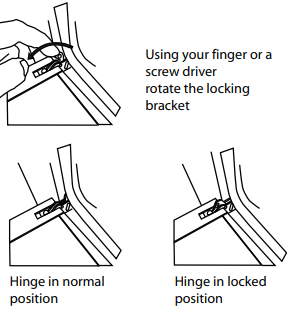
STEP 3. REMOVE THE DOOR
The door removal has to be done with the door open at an angle where there is 150mm gap at the top. THIS IS IMPORTANT
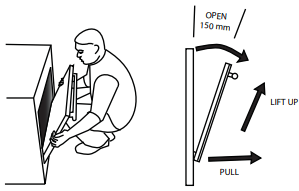
NOTE - ONCE YOU HAVE INSTALLED THE DOOR IF IT DOES NOT OPEN PROPERLY REPEAT THE PROCEDURE. DO NOT FORCE THE DOOR AT ANY TIME.
IMPORTANT Hold the door at an angle so there is a 150mm gap at the top.
Hook the hinges in first with the groove in the bottom of the hinge sitting on the roller housing.
Once the hinges are located properly fully open the door again and unlock the hinges and close the door.
IF THE DOOR DOES NOT OPEN FULLY AFTER THEN THE HINGES HAVE NOT BEEN LOCATED PROPERLY. REPEAT THE PROCEDURE. DO NOT FORCE THE DOOR.
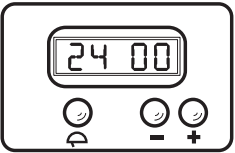
If your cooker is fitted with the Touch control programmer then you have the latest in cooker timers. The touch control digital programmer has the following features:
Minute minder - sets a countdown time that beeps when the set time has elapsed.
Automatic cooking time - the timer counts down the preset cooking time, turns the oven off and beeps when the time has elapsed.
Delayed start cooking time – the timer sets how long the oven runs for and the time of day that the oven switches off.
GETTING STARTED
When you first connect the power the display will flash on and off. This is normal. Your cooker is fitted with a touch control timer programmer. The timer has a key lock function and to activate it a key must be pressed for 2 seconds. After that it operates immediately and if left for 8 seconds reverts to key lock.
SETTING THE TIME OF DAY - First set the time of day before you operate your appliance.
SETTING THE MINUTE COUNTDOWN TIMER - The minute countdown timer works independently of the oven and is handy for checking time periods for all cooking tasks.
SETTING THE AUTOMATIC OVEN SWITCH OFF - This function allows you to set the length of cooking time.
PROGRAMMING THE OVEN TO SWITCH OFF AT A CERTAIN TIME OF DAY - Sometimes it is handy to set the time of day you want to finish cooking such as heating a casserole for dinner. This feature allows you to set the length of time you want the oven to run and the time of day when you would like the oven to turn off.
PROGRAMMING EXAMPLE:
I wish to use fan forced setting at 180 degrees to cook for 45 minutes including heat up and to finish cooking at 12.30 in time for lunch.
HANDY HINTS
WARNING: the oven and hob must be kept clean, as a build up of fat constitutes of a fire risk
1) Cleaning of Stainless Steel - All models
In order that your cooker retains its new appearance, care should be taken to protect the stainless steel finish. Never use gritty or abrasive sponges. We highly recommend stainless steel cleaners and protectors. Stubborn stains can be removed by soaking in hot water and stains can be prevented by using a clean cloth soaked in soapy water before a spillage becomes cold or dries up. Acid materials like milks, vinegar, citrus juice can damage the most resistant surfaces. If a spill occurs wipe it up immediately.
2) Oven Cleaning - All models
Oven spills should be cleaned straight away. Leaving them will cause burning and smoking inside the oven the next time it is used. Leaving spills can also cause permanent damage to the enamel and make it extremely hard to remove later. A non-caustic cleaner is recommended to clean the chamber of the oven. Do not use abrasive scourers, sponges or cleaning products. Wipe the oven out regularly while the oven is still warm using hot soapy water and a soft cloth. The removal of side shelves supports makes cleaning easier.
3) Gas Burners - All models
The burners can be removed from the cooker and cleaned in hot soapy water. The burner covers are made of cast iron so as soon as they are cleaned dry immediately to prevent rusting. Enamelled trivets are also recommended to be cleaned in hot soapy water or the dishwasher. Make sure all pieces are completely dry before placing them back onto the cooker.
4) Knobs and Control Panel - All models
All knobs are removable. Clean behind the knobs and around the control panel to prevent grease and grime build up that can cause jamming of the knobs/gas taps etc. The stainless steel panel should be cleaned with stainless steel cleaners, do not use anything abrasive.
5) Cleaning of Oven Door - All models
The inner door glass is held in by a number of screws and brackets, they can be removed and the glass taken out to allow cleaning in between the two sheets of glass. The glass can be soaked in hot soapy water or special glass cleaners. The outer glass should be cleaned with a specific glass and mirror cleaner. Soapy water will remove stains and but may leave streaks.
6) Removal of Side Shelf Supports - All models
The sides racks are removed by simply flexing the bottom rail off the support and unhooking at the top. To replace just reverse the procedure.
7) Grill Element/Top Element - All models
This element must never be sprayed with any detergents. A damp cloth and a bottlebrush can be used to clean the roof of the oven and the element itself. Never soak the element and always dry it after cleaning as not doing so can lead to deterioration. It is important to clean this area regularly as fats spit up and stick to the ceiling and element while grilling and they may burn, smoke and give out unpleasant odours.
WARNING: please follow these safety precautions.
Minimum Clearances
When the upright cooker is installed abutting a side or rear wall, the wall must be of non-combustible material, eg ceramic tiles. The following minimum clearances to combustible materials must be observed:
It is recommended that the adjacent kitchen surfaces should be capable of withstanding temperatures of 100°C.
Rangehoods
Rangehoods and overhead exhaust fans must be installed according to manufacturers’ instructions but in no case shall clearance from hob burners be less than 600 mm for a rangehood and 750 mm for overhead exhaust fan.
Ventilation
A cooker should not be installed in any room which has a volume less than 5.6 cu. m. (200 cu. ft.). If the room is between 5.6 Cu. m. (200 cu. ft.) and 11.2 cu. m. (400 Cu. ft.) in volume, provision must be made for permanent ventilation. Above 11.2 cu. m. (400 cu. ft.) volume, no special provision needs to be made unless other gas burning appliances are installed in the same room. Ventilation must always be provided if a cooker is installed in a cellar or a basement. The manufacturer does not accept damage caused directly or indirectly by failure to comply with the above.
Anti Tilt Chain
The upright cookers have an anti-tilting chain to prevent damage to the gas pipes if the upright cooker is moved and to prevent accidental tipping of the cooker. The chain must be secured to the wall behind the upright cooker by fitting an expansion plug with hook to the wall at the same height as the safety chain. The chain may then be attached to the hook.
Fitting the Feet to the Cooker Base
Remove feet from the plastic bag located inside the oven. Insert threaded parts into the holes on the base of the warming cabinet and screw them tight. Adjust the end part of the feet to level the cooker. Do not drag the cooker once feet are attached.
WARNING: once feet are fitted, do not drag the cooker from one location to another. Dragging the cooker with feet fitted may result in damage to the bottom panel.
BEFORE CONNECTING THE PLUG INTO THE POWER SOCKET, FOLLOW THESE INSTRUCTIONS:
IMPORTANT: If a power socket needs to be installed or relocated, the work must be done by a licensed electrician.
IMPORTANT: For models supplied without a plug a means for disconnection shall be incorporated in the fixed wiring according to the wiring rules of the local electrical authorities.
In New Zealand the cooking range must be connected to the supply by a supply cord fitted with an appropriately rated plug that is compatible with the socket-outlet fitted to the final sub-circuit in the fixed wiring that is intended to supply the cooking range.
These technical instructions have been prepared for use by Authorised persons. This unit MUST ONLY BE INSTALLED BY AN AUTHORISED PERSON – PROOF IS REQUIRED FOR WARRANTY SERVICE CLAIMS.
The requirements of the local gas and electrical authorities must be adhered to, consult AS5601 as appropriate.
Gas inlet fitting is 1/2” BSP (male) thread.
This appliance can be connected with rigid pipe as specified in AS5601 table 3.1.
This appliance is approved for hose connection in compliance with AS5601, clause 5.12.1.8. The flexible hose must comply with AS/NZS 1869 (AGA Approved), 10mm ID, class B or D, between 1 – 1.2 m long and in accordance with AS5601 for a high level connection. The hose should not be subjected to abrasion, kinking or permanent deformation and should be able to be inspected along its entire length. Unions’ compatible with the hose fittings must be used and all connections tested for gas leaks. The fixed consumer piping outlet should be at approximately the same height as the cooker connection point, pointing downwards and approximately 150mm to the side of the cooker. The hose should be clear of the floor when the cooker is in the installed position. Ensure that the safety chain is installed correctly so that the chain prevents strain on the hose connections when the cooker is pulled forward.
If the connection is for natural gas the test point pressure should be adjusted to 1.00kPa with the wok burner operating at maximum.
If installing for use with LPG ensure that an AGA approved gas regulator suitable for a supply pressure of 2.75kPa is part of the tank supply and the test point pressure is adjusted to 2.75kPa.
Oven burner
Check the aeration setting of the oven burner and if necessary adjust by following these procedures. Remove the shelves and vitreous enamelled floor (taking care not to damage the finishes). Set the flame to maximum and loosen the aeration sleeve fixing screw. Rotate or slide the aeration sleeve, depending on model, to increase or decrease the air intake. Tighten the fixing screw. Assembly is a reversal of the above procedure.
Check the low flame setting for each hob burner and the oven burner with the control engaged in the minimum position.
Hob Burner
Turn the control until it engages in the minimum position and remove the control knob. Insert a screwdriver in the adjusting screw (located to the side of the gascock shaft). To increase the flame, turn the adjusting screw anticlockwise. To decrease the flame, turn the adjusting screw clockwise. Adjust for a minimum, stable and clear flame. ENSURE THE MINIMUM FLAME WILL NOT BE EXTINGUISHED BY AIR DRAUGHTS.
Oven Burner
Light the oven burner and operate at maximum for 15 minutes. Turn the control until it engages in the minimum position and remove the control knob. Insert a screwdriver in the adjusting screw (located to the side of the gascock shaft or in the centre of the shaft).
To increase the flame, turn the adjusting screw anticlockwise. To decrease the flame, turn the adjusting screw clockwise. Adjust for a minimum, stable and clear flame.
ENSURE THE MINIMUM FLAME WILL NOT BE EXTINGUISHED WHEN THE OVEN DOOR IS CLOSED.
Operate all cooker burners on high and low flames and check that each burner ignites properly and has a stable flame. The following may be considered to be abnormal:
When satisfied with the operation of the cooker, please explain to the user the correct method of operation. If the cooker fails to operate correctly, contact your local service agent.
Check that the igniter for each burner successfully ignites the gas and that the burner remains alight. If an igniter fails to work or a burner fails to remain alight, first remove the plug from the electrical power outlet, and then check that all the electrical connections are in place. If the upright cooker fails to operate correctly, call Glem Gas Appliances Pty Ltd or their appointed agent for service. DO NOT ATTEMPT REPAIRS YOURSELF.
First shut off the gas to the appliance. Remove the sealing screw from the regulator test point at the rear of the cooker and attach the hose from the mamometer to the point.
Turn the gas back and light the largest burner and smallest burner at the maximum setting. Check the pressure and adjust at the regulator if necessary to the settings in the table or on the data plate. For propane gas adjust at the regulator at the cylinder. Turn regulator adjusting screw clockwise to increase pressure and anti clockwise to reduce pressure. Refit the test point sealing screw when finished.