7084 653-01
ECBN 50
Operating instructions Page 2
NoFrost combined refrigerator-freezer
Installation instructions Page 16
Safety instructions and warnings
•Topreventinjuryordamagetotheunit,theap-
plianceshouldbeunpackedandsetupbytwo
people.
•Intheeventthattheapplianceisdamagedon
delivery,contactthesupplierimmediatelybefore
connectingtothemains.
•Toguaranteesafeoperation,ensurethattheap-
plianceissetupandconnectedasdescribedin
theseoperatinginstructions.
•Disconnecttheappliancefromthemainsifany
faultoccurs.Pullouttheplug,switchofforremove
thefuse.
•Whendisconnectingtheappliance,pullonthe
plug,notonthecable.
•Anyrepairsandworkontheapplianceshould
only be carried out by the customer service
department,asunauthorisedworkcouldprove
highlydangerousfortheuser.Thesameapplies
tochangingthemainspowercable.
•Donotallownakedflamesorignitionsources
toentertheappliance.Whentransportingand
cleaningtheapplianceensurethattherefrigerant
circuitisnotdamaged.Intheeventofdamage,
make sure that there are no ignition sources
nearbyandkeeptheroomwellventilated.
•Donotstandontheplinth,drawersordoorsor
usethemtosupportanythingelse.
•Thisappliancecanbeusedbychildrenof8years
oldandover,andalsobypersonswithrestricted
physical,sensoryormentalcapacityorlackof
experienceandknowledge,iftheyaresupervised
orhavebeeninstructedonsafeuseoftheappli-
anceandunderstandtheresultingrisks.Children
mustnotbeallowedtoplaywiththeappliance.
Cleaning and user maintenance must not be
carriedoutbychildrenwithoutsupervision.
•Avoidprolongedskincontactwithcoldsurfaces
or chilled/frozen food. This could cause pain,
numbnessandfrostbite.Inthecaseofprolonged
skin contact, protective measures should be
taken,e.g.glovesshouldbeworn.
•Donoteaticecream,particularyicelolliesorice
cubes,immediatelyaftertakingthemfromthe
freezercompartmentasthereisariskof"burn-
ing"becauseoftheverycoldtemperatures.
•Donotconsumefoodwhichhasbeenstoredfor
toolong,asitcouldcausefoodpoisoning.
•Do not storeexplosivesorspraysusing com-
bustiblepropellantssuchasbutane,propane,
pentaneetc.intheappliance.Electricalcompo-
nentsmightcauseleakinggastoignite.Youmay
identifysuchspraysbytheprintedcontentsora
flamesymbol.
•Donotuseelectricalappliancesinsidetheap-
pliance.
•Theapplianceisdesignedforuseinenclosed
areas.Donotoperatetheapplianceoutdoorsor
inareaswhereitisexposedtosplashwateror
dampconditions.
•TheLEDlightstripsilluminatetheinteriorofthe
appliance.Theyarenotsuitable forlightinga
room.
Disposal notes
Theappliancecontainsreusablematerialsandshould
bedisposed ofproperly - notsimply withunsorted
household refuse. Appliances which are no longer
neededmust bedisposed ofin aprofessionaland
appropriateway,inaccordancewiththecurrentlocal
regulationsandlaws.
Whendisposingoftheappliance,ensurethattherefrigerantcircuit
isnotdamagedtopreventuncontrolledescapeoftherefrigerant
itcontains(dataontypeplate)andoil.
•Disabletheappliance.
• Pulloutthemainsplug.
•Cutthroughtheconnectioncable.
WARNING
Danger of suffocation due to packing material
and plastic film!
Do not allow children to play with packaging
material.
Take the packaging material to an official collec-
tion point.
2
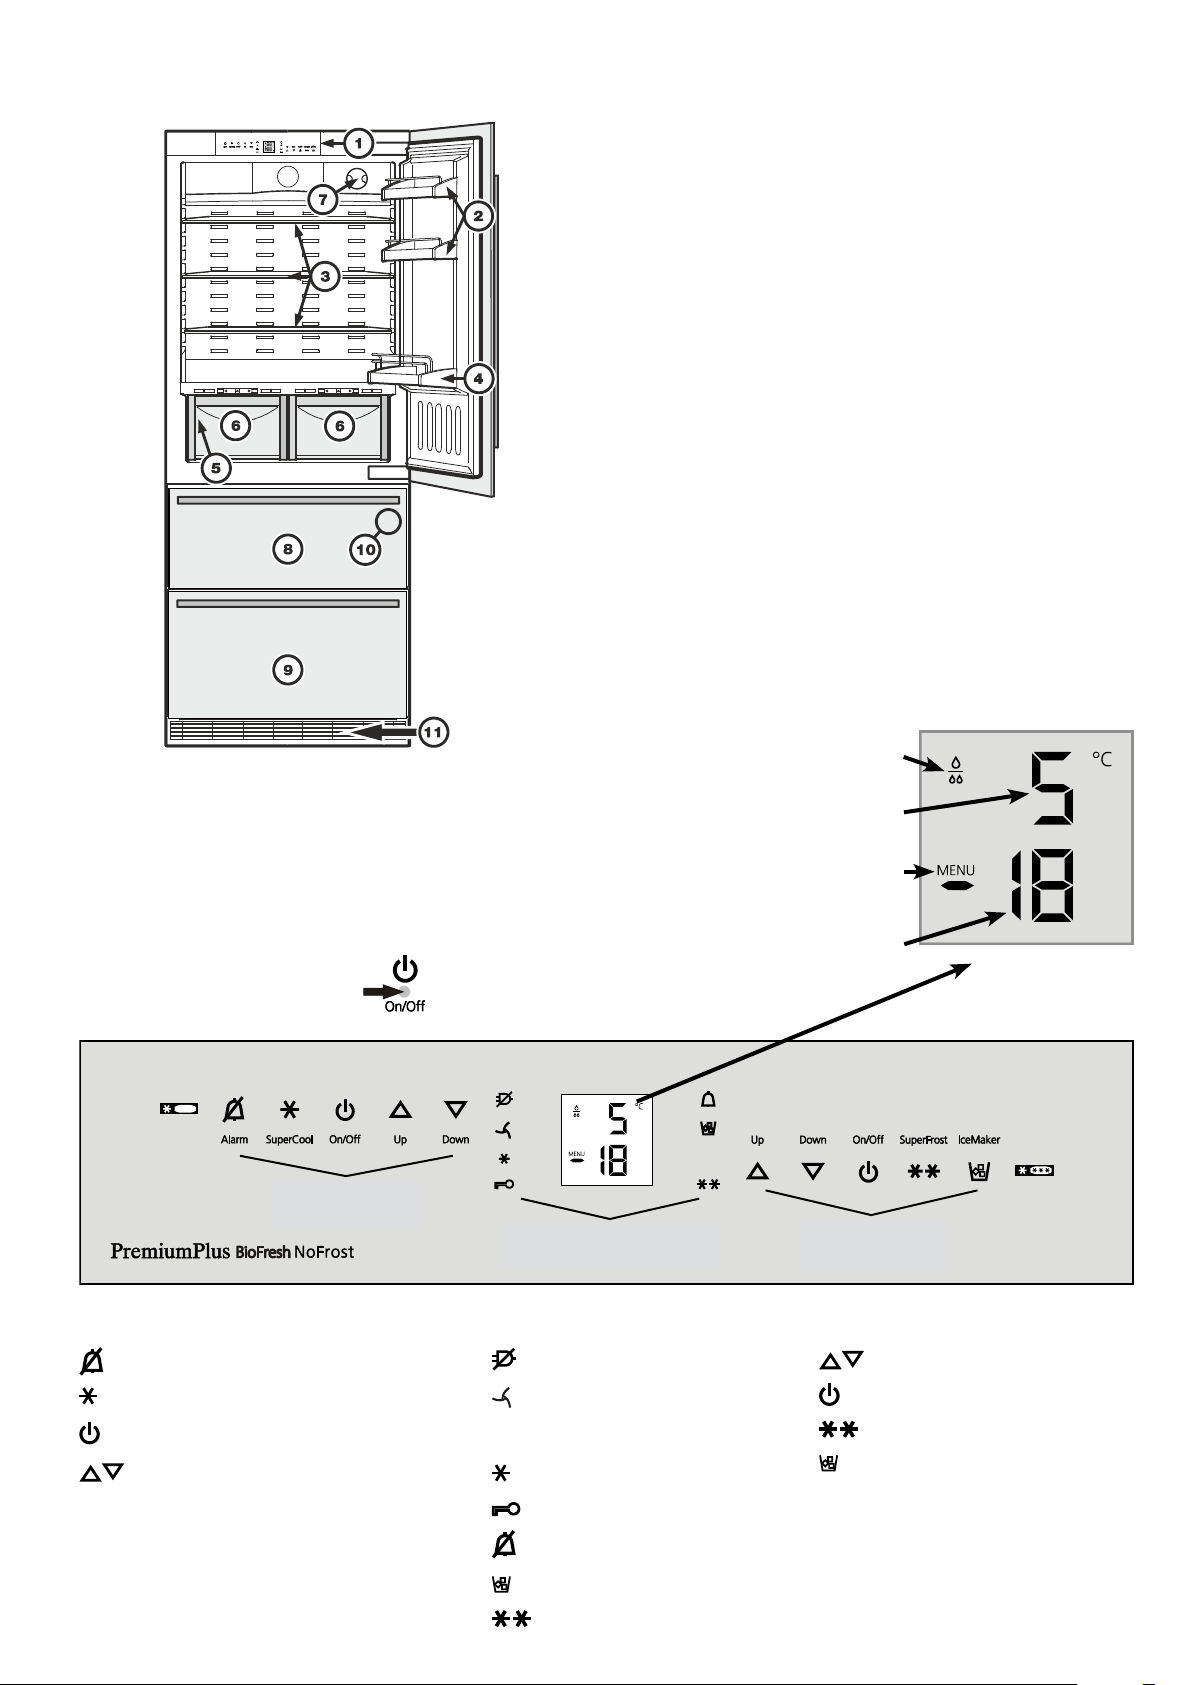
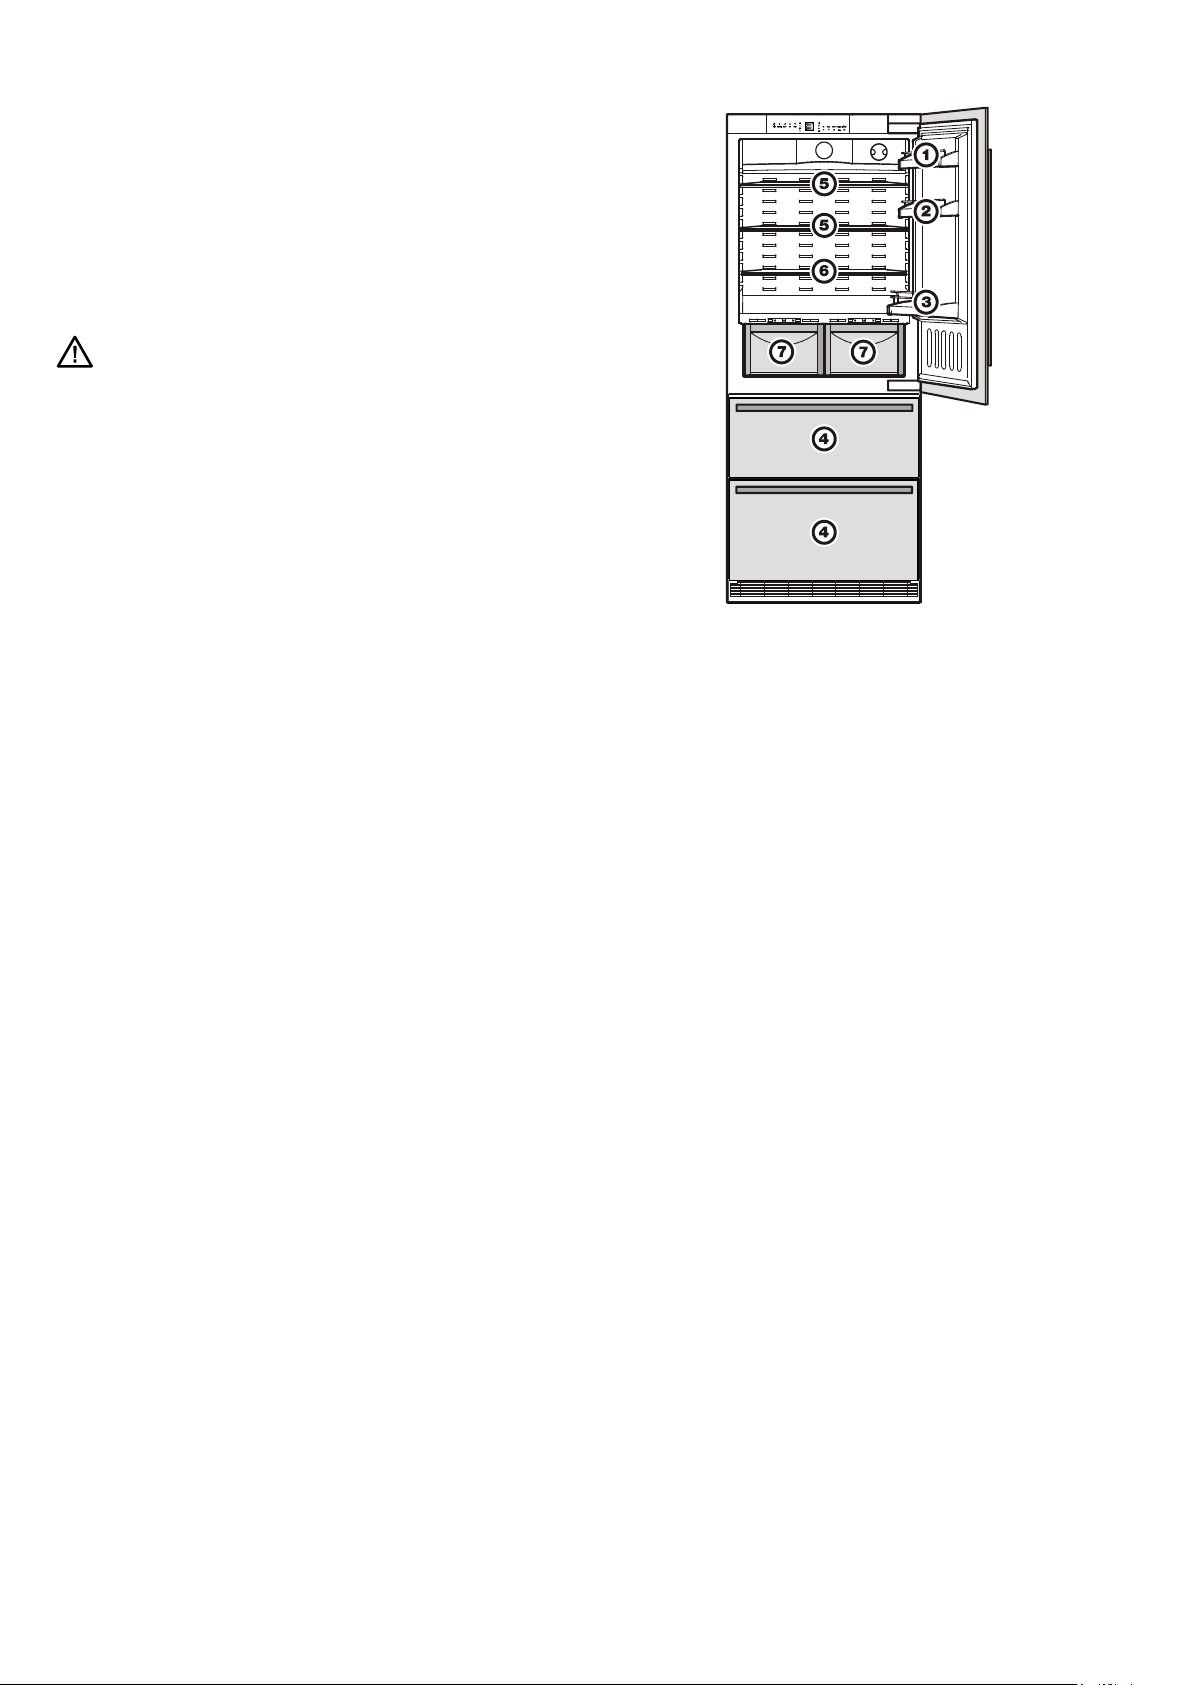
Description of the appliance
1
Operatingandcontrolelements
2
Adjustabledoorracks
3
Adjustablestorageshelves
4
Bottleracks
5
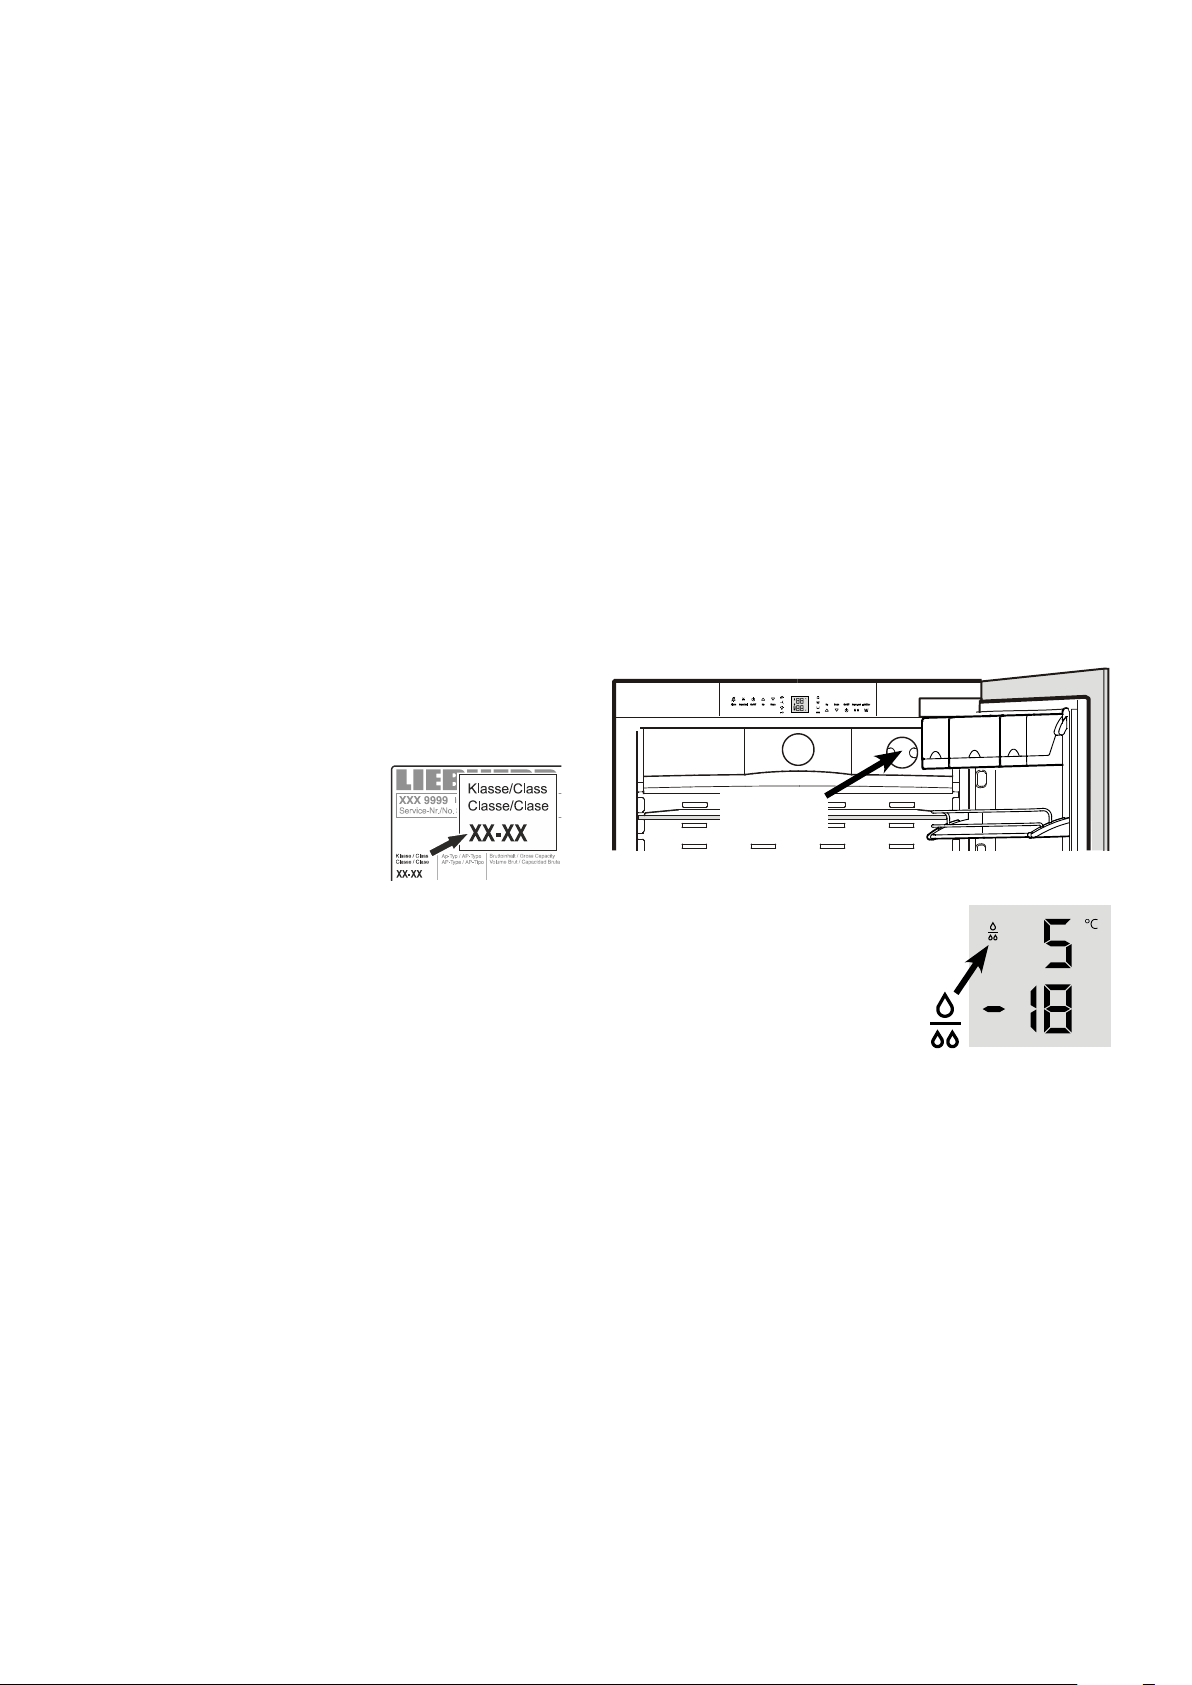
Typeplate(behindthevegetabledrawerontheleft-handside)
6
Vegetabledrawers
7
Waterfilter
8
Upperfreezerdrawer
9
Lowerfreezerdrawer
bl
IceMaker(intheinterioroftheupperfreezerdrawer)
bm
Ventilationgrille.Inthisarea,theexchangeofairfortherefrigeration
unittakesplace.
Never cover this grille or otherwise obstruct
the air flow!
Freezer operating icons
Temperaturesettingicons
FreezerON/OFF
SuperFrost
IceMakerON/OFF
Refrigerator
operating icons
Refrigerator operating icons
Mutealarm(refrigeratorandfreezer)
SuperCool
RefrigeratorON/OFF
Temperaturesettingbuttons
Freezer
operating icons
Control icons
PowerfailureLED
DustfilterLED
Thedustfilterintheappliance
plinthmustbecleaned.
SuperCoolLED
ChildlockLED
AlarmLED
IceMakerONLED
SuperFrostLED
Control
icons
Temperature and control display
Refrigeratortemperaturedisplay
Freezertemperaturedisplay
Waterfilterhastobechanged
Menumodeisactivated
(forsettingadditionalfunctions)
Operating and control elements
The electronic control panel has the "touch capacitance
technology". Any function can be activated by touching the
correspondingicon.
Theexactcontactpoint
isbetweenthesymbolanditslabel
3
Replacethefilterwhenthewaterdrop
symbol appears in the temperature
display.
Filterscanbeobtainedfromyourdealer.
The drop symbol must be cancelled
afterthefilterhasbeenchanged.For
detailedinstructionsseesectionentitled
"Setup mode".
Water filter
Beforeswitchingontheappliance,installthewaterfilterprovided
intheinteriorrearwalloftherefrigeratorcompartment.
Thisensuresgoodicecubequalityandkeepsthewatercircuit
freeofsolidssuchassand.
Caution!
To avoid the risk of bacteria growth, the water filter
must be changed when the waterdrop symbol appears
on the display!
Itisnotnecessarytoswitchoffthewatersupplywhenremoving
orinstallingthewaterfilter.
Waterfilter
location
Saving energy
- Alwaysensuregoodventilation.Donotcoverventilationopen-
ingsorgrille.
- Alwayskeepfanslitsclear.
- Donotplaceapplianceinareasofdirectsunlightornexttoa
cooker,radiatororsimilarobject.
- Theenergyconsumptiondependsontheinstallationconditions,
e.g.theambienttemperature.
- Keepthetimetheapplianceisopentoaminimum.
- Storefoodlogically.
- Ensurethatallfoodiswellpackedandcoveredforstorage.This
willpreventfrostfromforming.
- Firstcoolwarmfoodtoroomtemperaturebeforestoringit.
- Defrostfrozenfoodintherefrigerator.
- Emptyandswitchoffrefrigeratingunitforlongervacationpe-
riods.
Climate rating
The climate rating indicates the room
temperatureatwhichtheappliancemay
beoperatedinordertoachievefullrefrig-
erationperformance.
The climate rating is indicated on the
typeplate.
Thepositionofthetypeplateisshowninthesectionentitled
Description of the appliance.
Climate rating Room temperature
SN +10°C to +32°C
N +16°C to +32°C
ST +16°Cto+38°C
T +16°Cto+43°C
SN-ST +10°Cto+38°C
SN-T +10°Cto+43°C
Do not operate the appliance outside the
specified room temperature range.
Range of appliance use
Theapplianceissuitablesolelyforcoolingfoodin
adomesticenvironmentorsimilar.Thisincludes,
forexample,use
-instaffkitchenettes,bedandbreakfastestablish-
ments,
-byguestsincottages,hotels,motelsandother
formsofaccommodation.
The appliance is not intended for com-
mercial use such as in catering and
similar services in the wholesale trade.
Usetheappliancesolelyasiscustomarywithinadomesticen-
vironment.Allothertypesofuseareinadmissible.
Theapplianceisnotsuitableforstoringandcoolingmedicines,
bloodplasma,laboratorypreparationsorsimilarsubstancesand
productscoveredbythe2007/47/ECMedicalDevicesDirective.
Anymisuseoftheappliancemayresultindamagetoorspoilage
ofstoredgoods.
Furthermore,theapplianceisnotsuitableforoperationinpoten-
tiallyexplosiveatmospheres.
4
EN
Switching the appliance on and off
Youareadvisedtocleantheappliancebeforeswitchingitonfor
thefirsttime(see"Cleaning").
Donotloadwithfrozenfooduntilthetemperatureshowsatleast
-18°C.Therefrigeratorandfreezercompartmentscanbeoper-
atedseparately.
Switching off: keep the On/Off icons pressed for approx.
3seconds.
Temperature display
In normal operation, the following settings
willbedisplayed:
- theaveragerefrigeratortemperatureand
- thewarmestfrozenfoodtemperature.
Whenstartingupforthefirsttimeorwhenthe
applianceiswarm,dasheswillappearuntil
thetemperaturereachesalevelthatcanbe
displayed(below0°Cinthefreezer).
Thedisplaywillflash:
-ifyouchangethetemperatureor
-if the temperature rises by several degrees, indicating cold
loss,e.g.ifyouplacefresh,"warm"foodinthefreezerorifyou
removeorre-packfrozenfood,thetemperaturemayrisefora
shorttimeduetowarmairflowingintothefreezer.
If F1 to F5 appears in the display, the appliance has a fault.
Consult the customer service department indicating the fault
numberdisplayed.
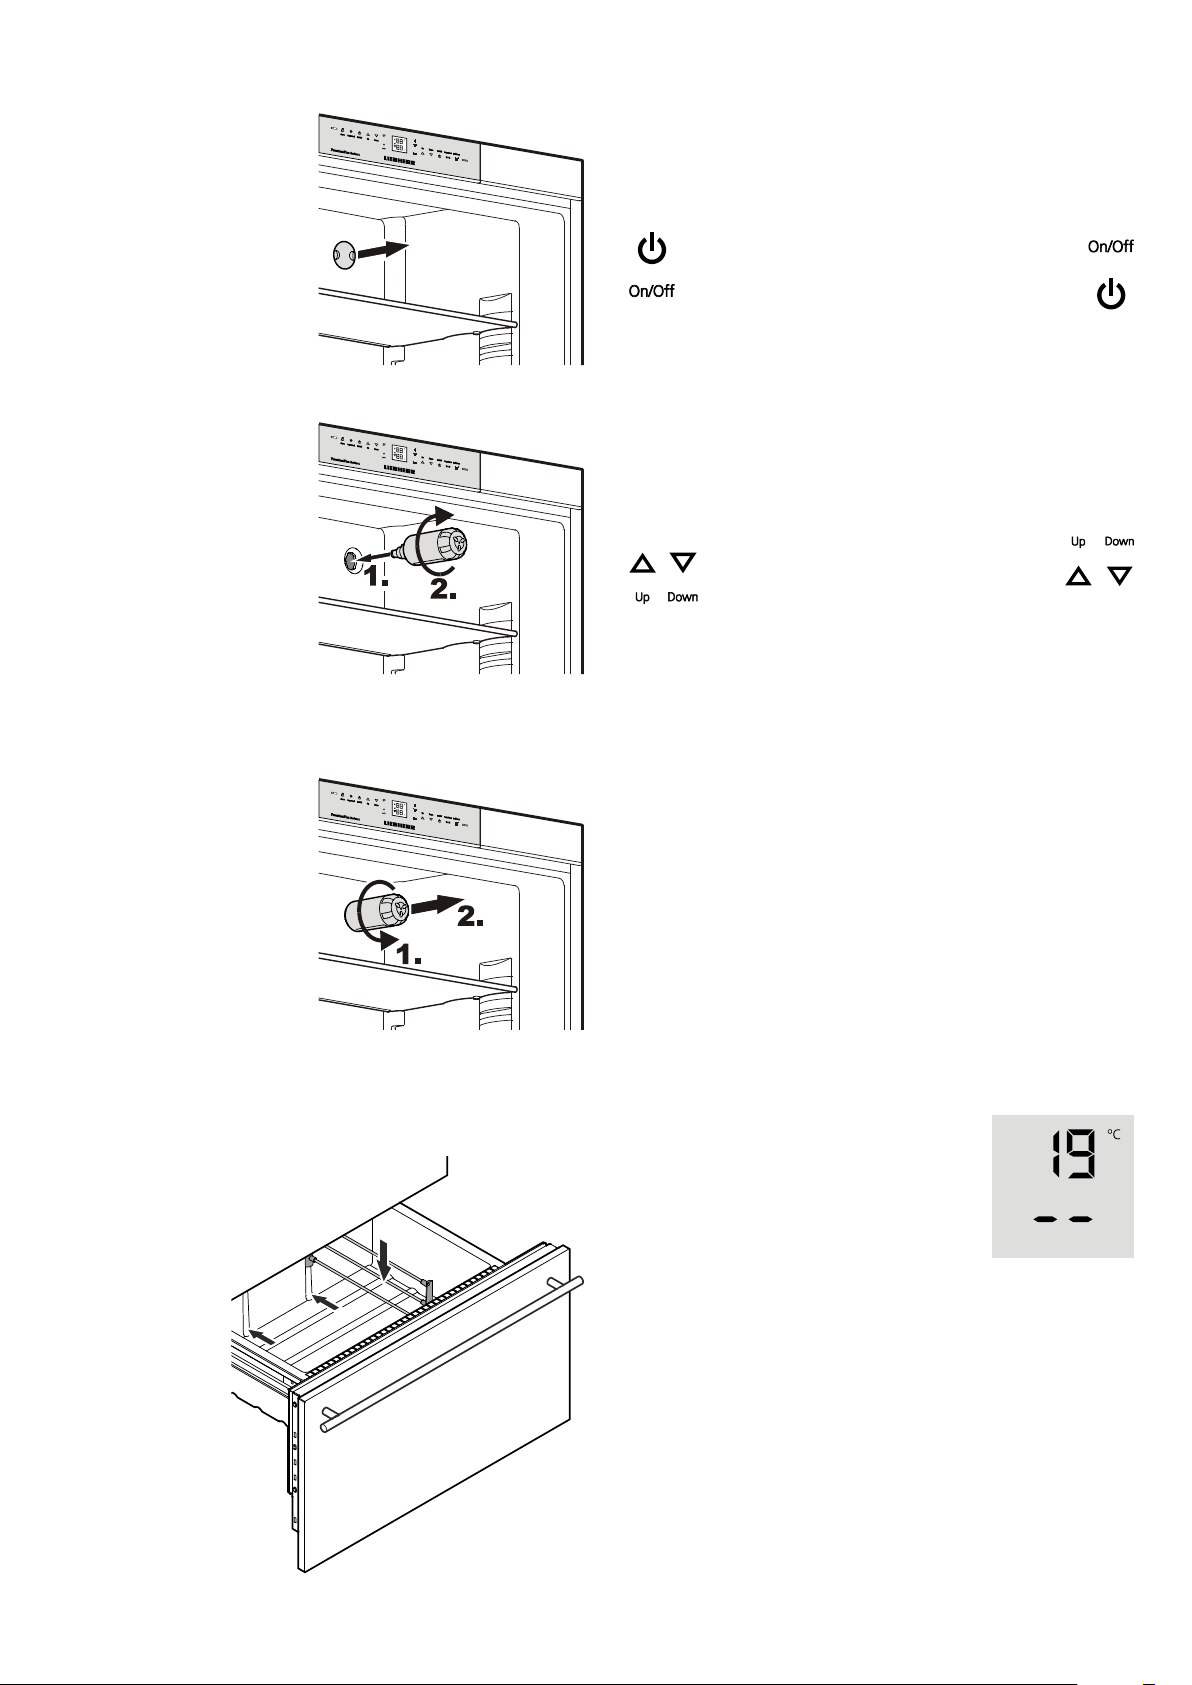
Switching on:touchtheOn/Officons(onleft
forrefrigerator,onrightforfreezer)sothatthe
temperaturedisplayslightuporflash.
Setting the temperature
Theapplianceispre-setfornormaloperation.Werecommend
temperaturesof+5°Cintherefrigeratorand-18°Cinthefreezer.
To reduce the temperature: touch the
Downicon;onleftforrefrigeratorandon
rightforfreezer.
To increase the temperature:touchthe
Upicon.
- Whileyouareenteringthetemperature,thesettemperature
willflashonthedisplay.
- Whenyoutouchthetemperaturesettingiconsforthefirsttime,
themostrecentsetting("referencesetting")isdisplayed.
- You can change thesettings inincrements of1°Cby briefly
touchingtheiconsagain.Iftheiconsareheld,thetemperature
settingwillchangefaster.
- Approximately5secondsafterthelasttouch,thedisplaywill
automaticallyshowtheactualfreezingorcoolingtemperature
("actualsetting").
- Youcanchangethetemperatures
intherefrigerator:between9°Cand3°Cand
inthefreezer:between-14°Cand-28°C.
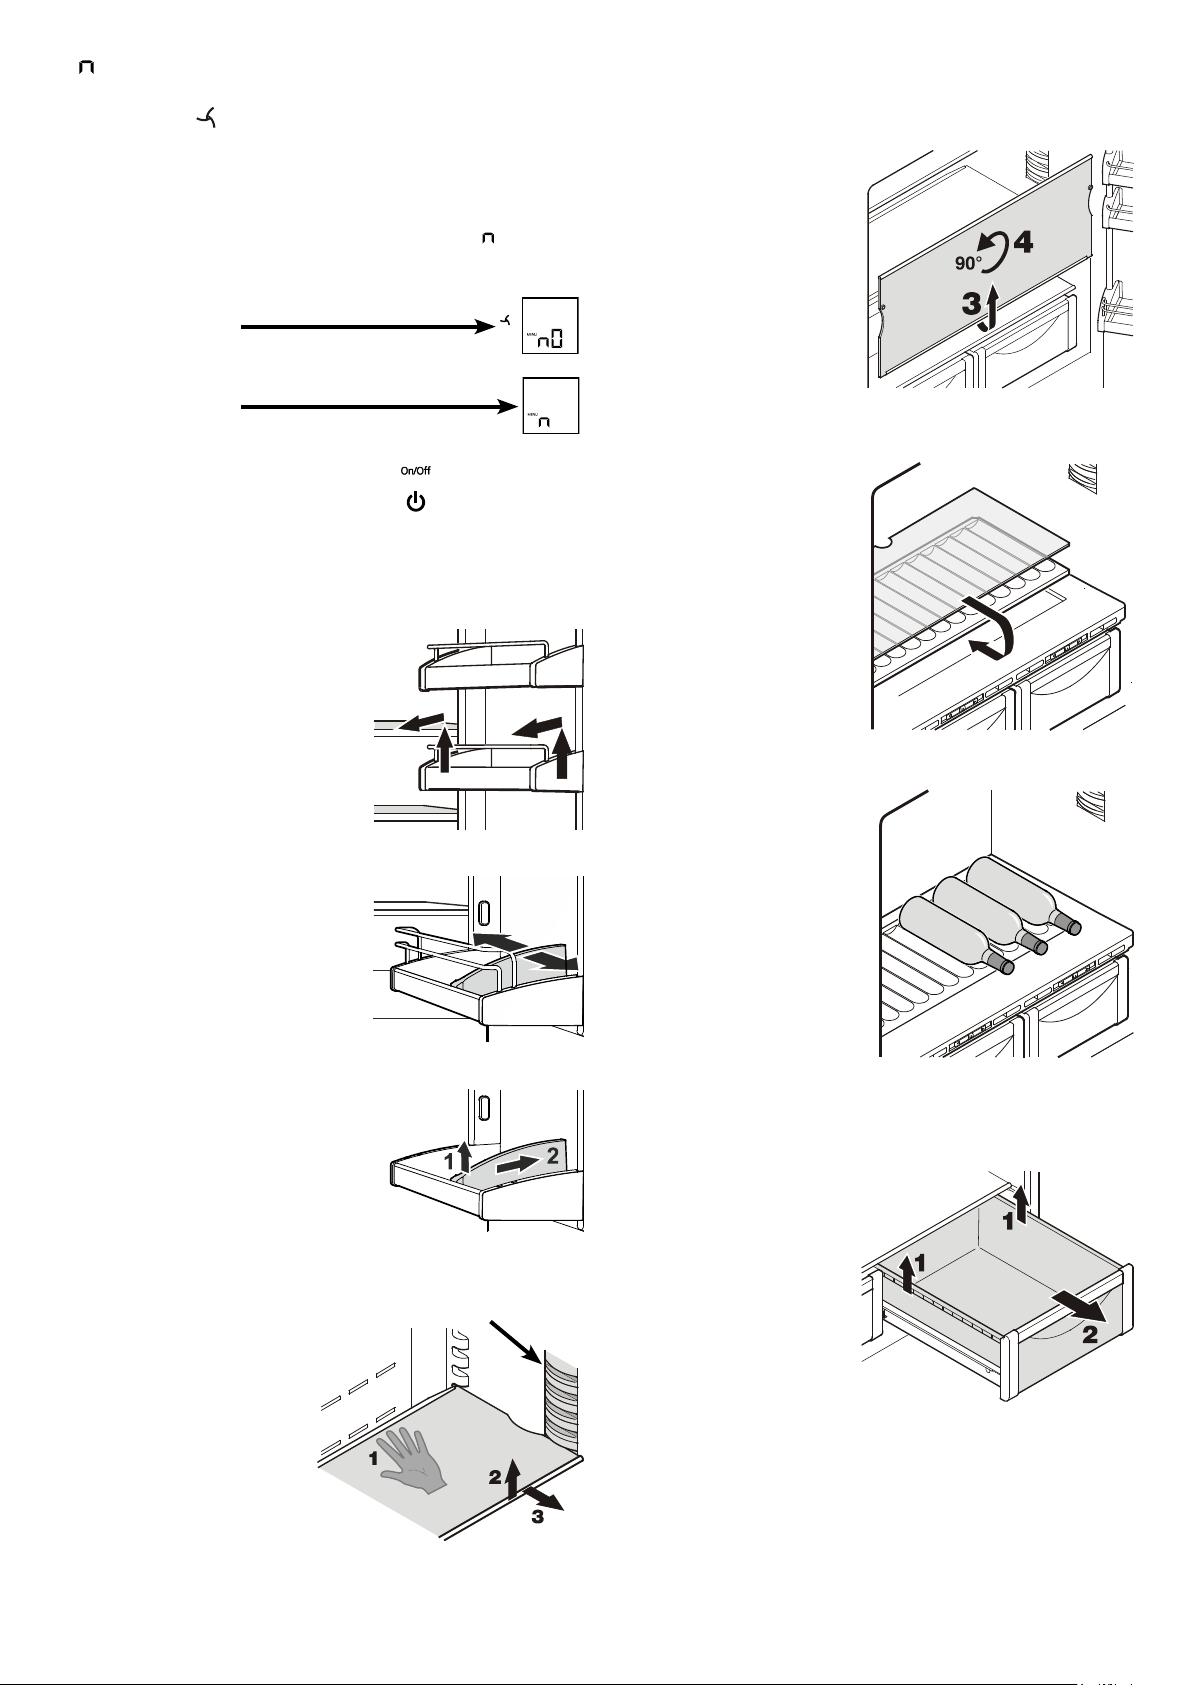
Installing the water filter
1. Removethecoverofthe
filtersocket.
2. Insertthefilterandturn
it90°clockwise.
Removing the water filter
3. Turn the filter 90° anti-
clockwiseandremove.
Partition for bottom freezer drawer
Ifrequired,thepartitionsuppliedintheacces-
sories set can be inserted in the bottom
drawerontheleftorright.
5
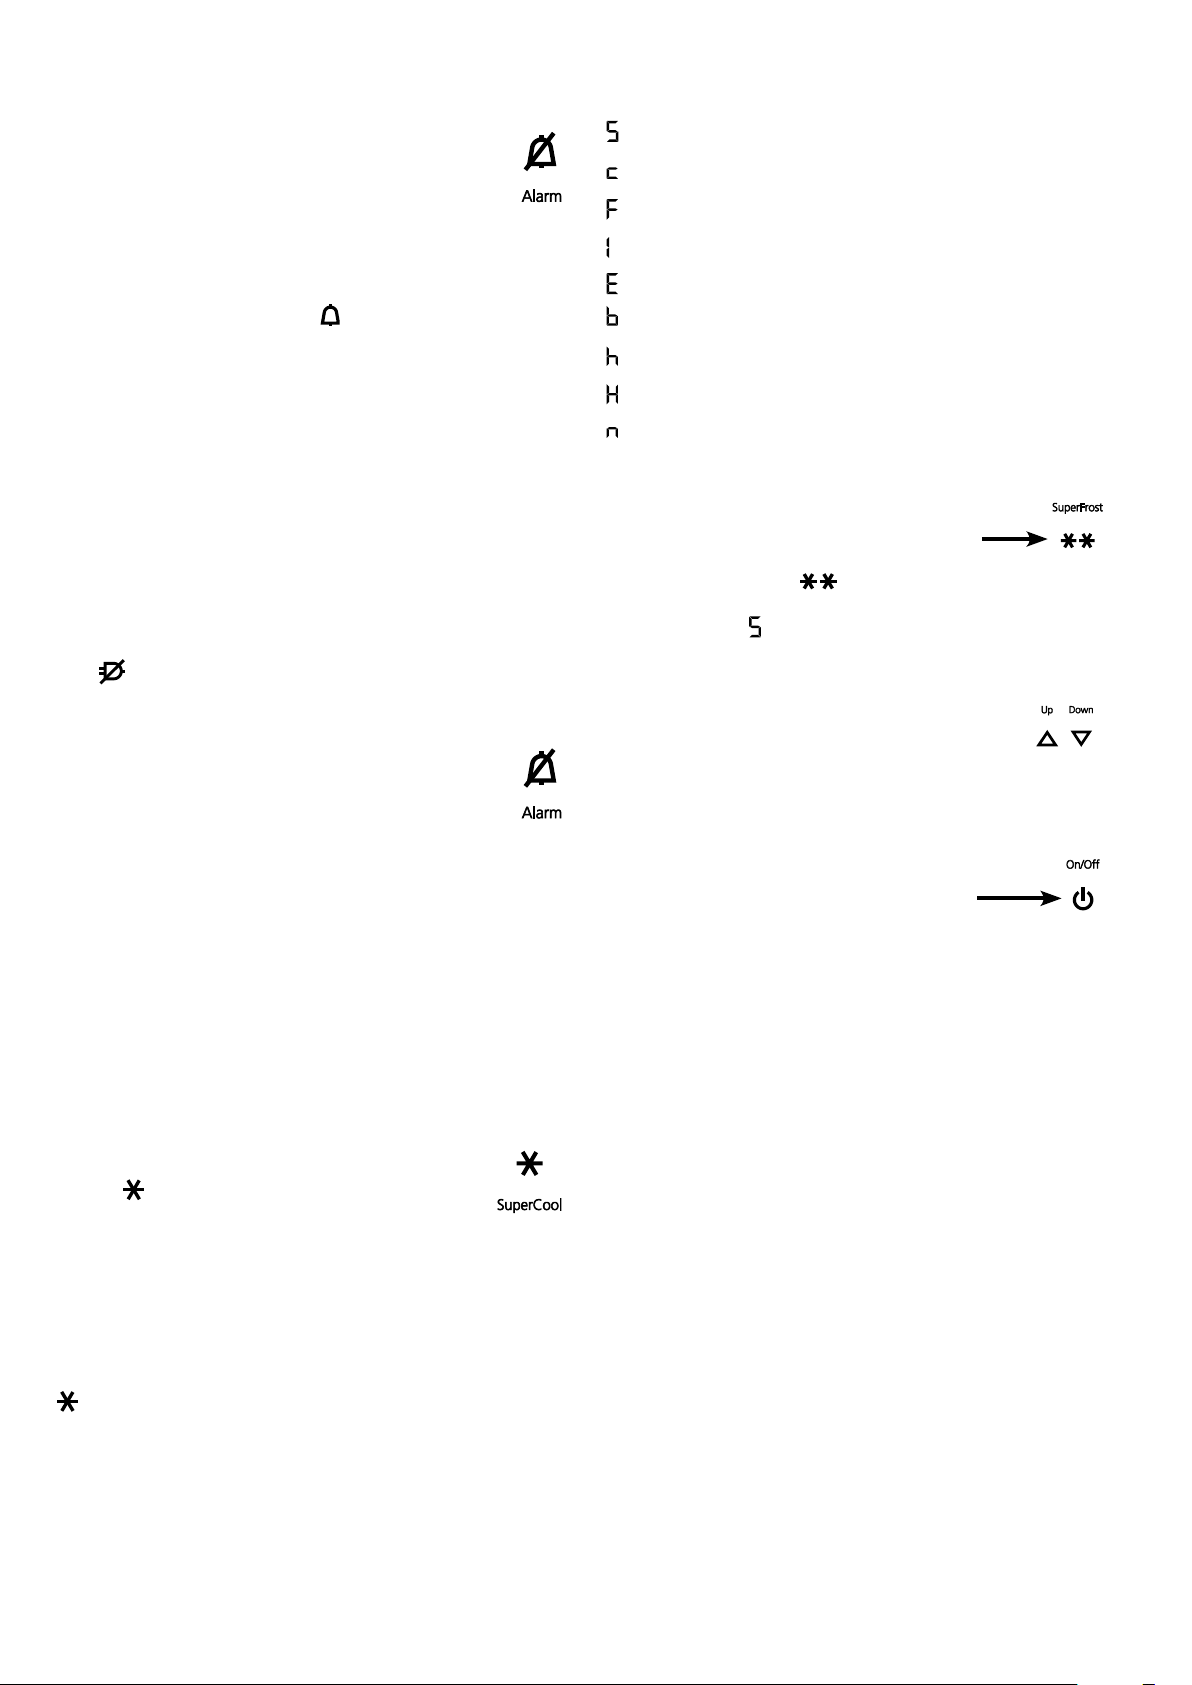
Power failure/FrostControl display
Ifthe LEDcomesononthecontrolpanel,thismeansthatthe
freezertemperaturehasrisentoohighduringthelastfewhours
ordaysduetoapowerfailure.
IfyoutouchtheALARMiconnow,thehighesttemperature
registeredduringthepowerfailurewillbedisplayed.
Ch e ck th e q u al i t yo ft he fo o da nd it ss u it a bi l it y fo rc on s um p -
tionincaseithasbecometoowarmorevendefrosted.
Thehighesttemperaturewillappearforappox.1minute.After
that,theactualtemperatureinthefreezerwillre-appear.
ThedisplaycanbeswitchedoffbytouchingtheALARMicon.
Audible warning signal
Theapplianceisequippedwithanalarmfunction.
Audible door alarm
Ifanappliancedoorisleftopenformorethan60seconds,
theaudiblewarningsignalwillsound.TouchtheALARM
icon to cancel the alarm. The alarm switches back to
standbywhenthedoorisshut.
Audible/visual temperature alarm
Itsoundswhenitisnotcoldenoughinthefreezercompartment.
Thetemperaturedisplayandthe
LEDwillalsoflash.
Theaudiblewarningdeviceisswitchedoffbytouching
theALARM icon.Thetemperaturedisplaywillcontinue
toflashuntilthecauseofthealarmhasbeenrectified.
This can be caused by:
• thefreezerdoorbeingleftopenforalongtime,allowingwarm
ambient air to enter;
• alongpowerfailure;
• afaultintheappliance.
Ineachcase,makesurefoodhasnotthawedorperished.
SuperCool
TouchingtheSuperCooliconswitchestherefrigeratorcompart-
menttomaximumcooling.Itisrecommendedparticularlyifyou
wishtocoollargequantitiesoffood,drinks,freshlybakedgoods
ormealsrapidly.
Switching on:TouchtheSuper Cooliconbrieflysothat
theLED
comeson.Therefrigeratortemperaturewill
droptoitslowestvalue.
Note
The SuperCool function uses slightly more energy. After ap-
proximatelysixhours,however,therefrigeratorswitchesback
automaticallytonormalenergy-savingoperation.Ifrequired,the
SuperCoolfunctioncanbeswitchedoffsooner.
Switching off:TouchtheSuperCooliconagainuntiltheLED
goesout.
Setup mode
Thefollowingfunctionscanbeactivatedinsetupmode:
=Sabbathmode
=Childlock
=Confirmwaterfilterchange
=Icemakervacationstate
=Waterquantityforicecubetray
=SetBioFreshtemperature
=Displaybrightness
=Doorgasketheatingcontrol
=Confirmdustfiltercleaning
Activating setup mode
• TouchtheSuperFrosticonforfiveseconds.
- TheSuperFrost LED comesonfor5seconds,
- after 5 seconds
willflashinthedisplay.
Theapplianceisinsetupmodenow.
Youcanselectthesetupmodefunctionsbytouching
thefreezercompartmenttemperaturesettingicons.
Note
Insetupmodethedisplaywillflashcontinuously.
Exiting setup mode
• TouchthefreezercompartmentOn/Off icon
Theappliancewillchangebacktonormaloperation.
6
EN
= Confirm water filter change
Afterthewaterfilterhasbeenchanged,the
dropsymbolonthedisplaymustbereset.
Resetting the drop symbol
•Activate setup mode by touching the
SuperFrosticonfor5seconds.
•TouchthefreezercompartmentDown icon
until
appearsinthedisplay.
• TouchtheSuperFrosticon.
- Thedisplayreads
• TouchtheSuperFrosticonagain.
- Thedisplayreads
• Thedropsymboldisappears.
• ExitsetupmodebytouchingthefreezercompartmentOn/Off
icon.
= Child lock
Thechildlockisdesignedtoprotecttheappliancefrombeing
switchedoffaccidentally.
Activating the child lock
• Activatesetupmodebytouching
theSuperFrosticonfor5seconds.
•TouchthefreezercompartmentDowniconuntil
appearsin
thedisplay.
- Thedisplayreads
• TouchtheSuperFrosticon.
- Thedisplayreads
• TouchtheSuperFrosticonagain.
- The
LEDislitandthechildlockisactivated.
• ExitsetupmodebytouchingthefreezercompartmentOn/Off
icon.
Deactivating the child lock
• Activatesetupmodebytouching
theSuperFrosticonfor5seconds.
- Thedisplayreads
• TouchtheSuperFrosticon.
- Thedisplayreads
• TouchtheSuperFrosticonagain.
- The
LEDgoesout.Thechildlockisdeactivated.
• ExitsetupmodebytouchingthefreezercompartmentOn/Off
icon.
= Sabbath mode
This function complies with the religious requirements to be
observedontheSabbathorreligiousholidays.
WhenSabbathmodeisactivated,someofthefunctionsofthe
controlelectronicsareswitchedoff.
• Theinteriorlightremainsswitchedoffifoneoftheappliance
doorsisopened.
• Theinteriorfanremainsinthestatuswhichiscurrentlyset(On
orOff)ifanappliancedoorisopened.
• Nodooropenalarm.
• Notemperaturealarm.
Activating the sabbath mode
• Activatesetupmodebytouching the SuperFrost icon for
5seconds.
- Thedisplayreads
• TouchtheSuperFrosticon.
- Thedisplayreads
• TouchtheSuperFrosticonagain.
- Thedisplayreads
Thesabbathmodeisactivated.
• ExitsetupmodebytouchingthefreezercompartmentOn/Off
icon.
Note
TheSabbathmodeisdeactivatedautomaticallyafter120hours.
Deactivating the sabbath mode
• Activatesetupmodebytouching the SuperFrost icon for
5seconds.
- Thedisplayreads
• TouchtheSuperFrosticon.
- Thedisplayreads
• TouchtheSuperFrosticonagain.
The
inthedisplaywillgoout.
Thesabbathmodeisdeactivated.
• ExitsetupmodebytouchingthefreezercompartmentOn/Off
icon.
7

= Lower hinge heating control
Ifcondensedwaterappearsinthelower
hi n ge ar e a o ro nt he ba s ep la teb e t we en
refrigeratorandfreezercompartment,
increasetheoutputoftheheatinglo-
catedbehindthebaseplate.
Thefactorysettingissetto
= me-
diumoutput.
Changing the heating output
• Activatesetupmodebytouchingthe
SuperFrosticonfor5seconds.
• TouchthefreezercompartmentDown
iconuntil
appearsinthedisplay.
• TouchtheSuperFrosticon.
- Thedisplayreads
• Touchthefreezercompartment
Up/Downiconstoselect
=atslightcondensation
=atheavycondensation
=heatingoff
• TouchtheSuperFrosticonatthedesiredvalue.
• ExitsetupmodebytouchingthefreezercompartmentOn/Off
icon.
Note
Withnormalambientconditionsnocondensationwillappear.With
highhumidityandlowambienttemperaturethisfeaturehelpsto
preventcondensation.
= Display brightness
Adjusting the display brightness
• Activate setup mode by touching the SuperFrost icon for
5seconds.
•TouchthefreezercompartmentDowniconuntil
appearsin
thedisplay.
• TouchtheSuperFrosticon.
- Thedisplayreads
• Touchthefreezercompartment
Up/Downiconstoselect
0 =minimumto
5 =maximumbrightness.
• TouchtheSuperFrosticonatthedesiredvalue.
• ExitsetupmodebytouchingthefreezercompartmentOn/Off
icon.
= Ice maker vacation state
Seesectionentitled"Ice maker".
= Water quantity for ice cube tray
If the produced ice cubes ofthe ice maker are too small, the
inflowingwaterquantitycanbeadjusted.
Adjusting the water quantity
• Activate setup mode by touching the SuperFrost icon for
5seconds.
•TouchthefreezercompartmentDowniconuntil
appearsin
thedisplay.
• TouchtheSuperFrosticon.
- Thedisplayreads
•TouchthefreezercompartmentUpicononceonlysothatE 4
appearsinthedisplay.
Caution!
Do not increase for more than one step. If the adjusted value
is too high, the ice cube tray of the ice maker could overflow.
• TouchtheSuperFrosticonagain.
• ExitsetupmodebytouchingthefreezercompartmentOn/Off
icon.
Checktheicecubesizewithinthenextdays.Iftheicecubesare
stilltoosmall,followthestepsaboveagain.
= Set BioFresh temperature
ThetemperatureintheBioFreshdrawersmaybechanged.
Setting the BioFresh temperature
• Activate setup mode by touching the SuperFrost icon for
5seconds.
•TouchthefreezercompartmentDowniconuntil
appearsin
thedisplay.
• TouchtheSuperFrosticon.
- Thedisplayreads
• TouchthefreezercompartmentUp/Down icons
and set
6 - 9toincreasethetemperature(warmer),
4 - 1 toreducethetemperature.
CAUTION!
For values b4 - b1, the temperature in the drawers can
drop to below 0°C. Food may freeze.
• TouchtheSuperFrosticonatthedesiredvalue.
• ExitsetupmodebytouchingthefreezercompartmentOn/Off
icon.
8
EN
Removing the BioFresh drawer
Pullthedrawerstraightout,
gripatthebackandliftout.
Inserting the BioFresh
drawer
Placethedraweronthepull-
outrails.Therailsmustbe
fully extended and aligned
withthefrontofthedrawer.
Slidethedrawerin.
Repositioning the shelves
1. Holdtheshelfunderneath
withyourhandtoprevent
from tipping down back-
wardswhenremoving.
2. Lifttheshelfatthefront.
3. Pulltheshelftowardsyou
until the round cutout of
theshelfisinlinewiththe
interiorlightcover.
4. Lifttheshelfupandreplace
inthedesiredposition.
Removing the shelves
1. Followthefirstthreesteps
inthechapterabove.
2. Movetheshelfdownand
stopjustoverthevegeta-
bledrawer.
3. Movethefrontoftheshelf
upwardsuntiltheshelfis
inaverticalposition.
4. Turntheshelfby90°and
remove.
Equipment
Repositioning the door racks
Lift door rack vertically, lift out to
thefrontandre-insertatadifferent
height,followingthesestepsinthe
reverseorder.
Lightcover
Bottle shelf
TheshelfabovetheBioFresh
drawerscanbeusedforstor-
ingbottleshorizontally.
Removetheglassplateand
insertitundertheshelfplate.
Therecessesintheshelfplate
ensure that the bottles are
storedsecurely.
Whenstoringtallbottles,the
bottom door rack must be
movedfurtherup.
Byshiftingthebottle holder you
canprotectthebottlesfromfalling
overwhenopeningorclosingthe
door.
Removing the bottle holder
Liftthe bottleholderverticallyatthe
front (1), move backwards (2) and
remove.
= Confirm dust filter cleaning
Oncethedustfilterintheapplianceplinthhasbeencleaned,the
dustfilterLED
inthedisplaymustbecancelled.
Cancelling the dust filter symbol
• Activate setup mode by touching the SuperFrost icon for
5seconds.
•TouchthefreezercompartmentDowniconuntil
appearsin
thedisplay.
• TouchtheSuperFrosticon.
- Thedisplayreads
• TouchtheSuperFrosticon.
- Thedisplayreads
• Thedustfiltersymbolhasbeencancelled.
• Exitsetupmodebytouching
thefreezercompartmentOn/Officon.
9
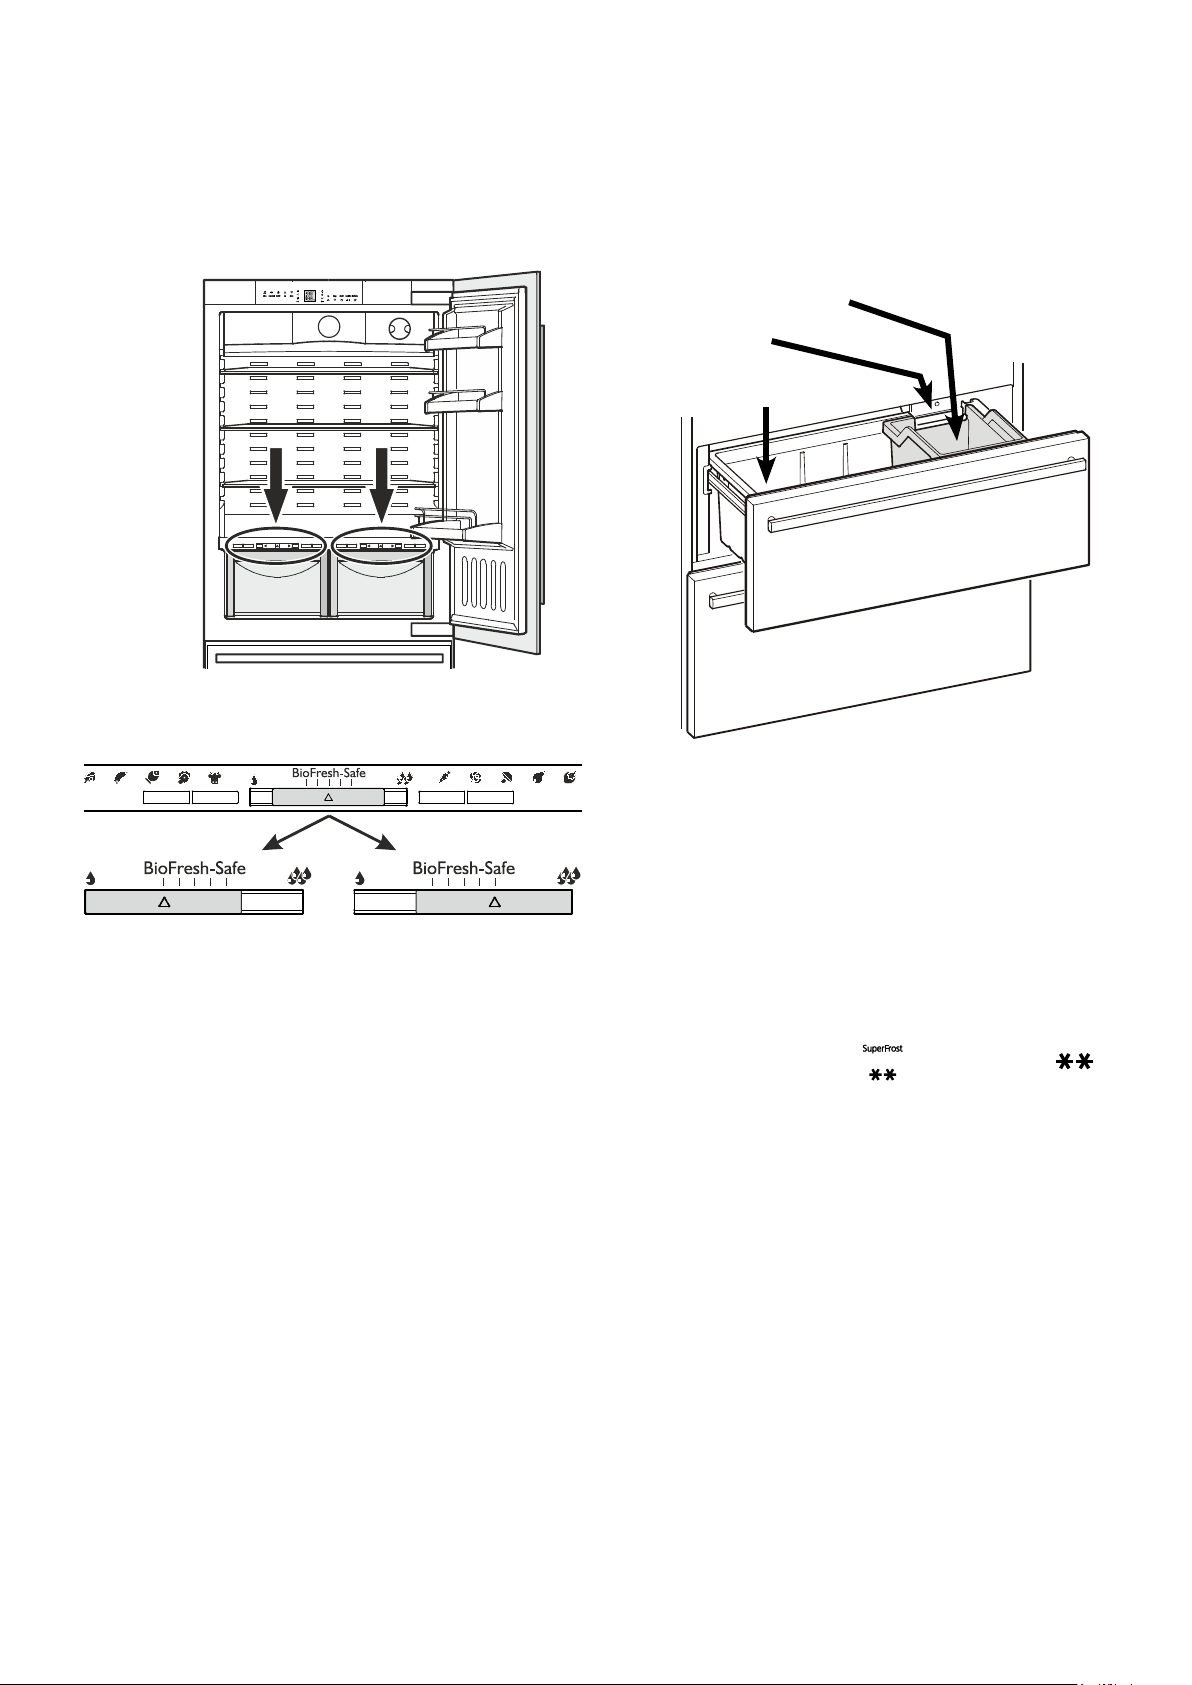
Arranging food
(1) butter,cheese
(2) eggs
(3) bottles
(4) frozenfood,icecubes
(5) meat,sausageproducts,dairyproducts
(6) bakedgoods,pre-cookedmeals
(7)fruit,vegetables,salads(forhighhumiditysetting)
meat,coldmeats,dairyproducts(forlowhumiditysetting)
TheadjustablehumidityisexplainedintheBioFresh com-
partmentsection.
Note
• Foodwhichgivesofforabsorbsodoursandflavoursaswellas
liquidsshouldalwaysbestoredcoveredorinclosedcontainers.
•High-percentagealcoholsshouldbetightlysealedandstored
upright.
Interior light
Theinteriorlightislocatedattheleft,rightandtopintherefrigerator
compartmentandaboveeachdrawerinthefreezercompartment.
Itcomesonifoneofthedoorsorafreezerdrawerisopened.
Thelightswitchesoffautomaticallyifoneofthedoorsorafreezer
drawerhasbeenleftopenformorethan15minutes.Theaudible
warningsignalsoundsatthesametime.
Ifoneofthestriplightsisnotlit,itisdefective.
The light intensity of the LED light corresponds to laser
class 1/1M.
Important
The light cover may only be removed by customer service
staff. If the cover is removed, do not look directly at the
light through optical lenses from close distance. This can
damage your eyes.
10
Freezing
Freshfoodshouldbefrozentothecoreasrapidlyaspossible.
Frozenfoodcanalsobegivenacoldboost.
ThisisprovidedbytheSuperFrostfacility.
Spaceforfreezingand
storage
Icemaker
Icecubebin
Freezer compartment description
Both drawers can be used for freezing of food or storage of
frozenfood.
Th ei c e cu b ebi ni nt he u p pe rdr awe ri si nte n d e dfo ri ce cu be so nl y.
Ifyouneedthewholeupperdrawerforfreezingorstorage,the
icecubebincanberemoved.
Important:theicemakerwillnotejecttheicecubesofitstrayif
thebinhasbeenremoved.
BioFresh compartment
TheBioFreshcompartmentenablesyoutokeepfoodforupto
3timeslongerthaninnormalrefrigerators.
Theconstanttemperatureofjustabove0°Candtheadjustable
humidityprovidetheidealstorageconditionsfordifferenttypes
offood.
TheBioFreshcompartmentsatisfiestherequirementsofachill
compartmenttoENISO15502.
Notes
•The humidity inthe compartmentdepends on the moisture
contentofthefoodinit,andthefrequencywithwhichthecom-
partmentisopened.
• Thefreshertheproductandthehigheritsquality,thelongerit
willkeep.
•Unwrapped animal and vegetable foods should be stored
separatelyinthedrawers.Ifthereisnotenoughspaceforthem
tobestoredseparately,makesurethattheyarewrapped.Do
notallowdifferenttypesofmeattocomeintocontactwithone
anotherbutkeepthem packaged separately soas to avoid
prematurebacterialspoilage.
• ThefollowingproductsshouldnotbestoredintheBioFresh
compartment:hardcheese,potatoes,cold-sensitivevegetables
suchascucumbers,aubergines,avocadoes,semiripetomatoes,
zucchini,allcold-sensitivetropicalfruitssuchaspineapples,
bananas,grapefruit,melons,mangos,papayas,etc.
Dry
Smallhumiditysymbol-slide
controltoleft.
Thissettingissuitablefordry
or wrapped food like dairy
products, meat, fish, cold
meats.
Humidity selection
Humid
Highrelativehumidityofmax.
90%,largehumiditysymbol-
slidecontroltoright.
This setting is suitable for
storing unwrapped food with
ahighmoisturecontentsuch
assalad,vegetablesandfruit.
Freezing with SuperFrost
• Touch theSuperFrosticon brieysothatthe LED
comeson.
• Wait24hours.
• Thenplacethefreshfoodinsidethefreezer.
• TheSuperFrostfunctionswitchesoff automatically.Depending
onthequantityoffoodplacedinthefreezer,thiswillnormally
bebetween30andmax.65hours.
You should not switch on the SuperFrost func tion:
- whenplacingfrozenfoodinthefreezer;
- whenfreezinguptoapprox.2kgfreshfooddaily.
EN
11
Ice maker
Safety instructions and warnings
•Theicemakerisdesignedexclusivelytomakeicecubesin
quantitiesrequiredbyahouseholdandmayonlybeoperated
withwatersuitableforthispurpose.
• Allrepairsandworkontheicemakermayonlybecarriedout
bycustomerservicepersonnelorothertrainedpersonnel.
• The first three batches of ice must not be consumed or
used. This applies both to using the appliance for the first
time and also to using it after it has not been used for a
lengthy period of time.
This ensures that the water supply
is purged.
• The manufacturer cannot accept liability for damage
caused by a faulty connection to the mains water supply.
• Theicemakerwillonlyworkifthecombinedrefrigerator-freezer
isconnectedtotheelectricitysupply.Itwillonlymakeicecubes
ifthefreezercompartmentisoperating.
• Ensurethatthedrawerisfullyclosed,astheicemakercan
otherwisenotproduceicecubes.
Notes on freezing
• Alwaysstoreidenticalfooditemstogether.
•Packfoodwhichyouarefreezingyourselfinquantitiesappro-
priatetoyourhousehold.Toensurethatthefoodfreezesright
through,thefollowingquantitiesshouldnotbeexceededper
package:fruit,vegetables:upto1kg,meat:upto2.5kg.
• Packfrozenfoodinstandardfreezerbagsorreuseableplastic,
metaloraluminiumcontainers.
• Donotallowfreshfoodwhichistobefrozentocomeintocon-
tactwithfoodalreadyfrozen.Alwayskeeppacksdryinorder
toavoidthemstickingtogether.
• Always write the date and contentson the pack and do not
exceedthestatedstoragetimeforthefood.
•Donotfreezebottlesandcanswhichcontaincarbonateddrinks
astheymightburst.
• Only take out as much food as is immediately required for
thawing.Usefoodwhichhasbeenthawedinpreparedmeals
asquicklyaspossible.
Frozen food can be thawed in the following ways:
–inafanoven,
–inamicrowaveoven,
–atroomtemperature,
–intherefrigerator:thecoldgivenoffbythefrozenfoodisused
forcooling.
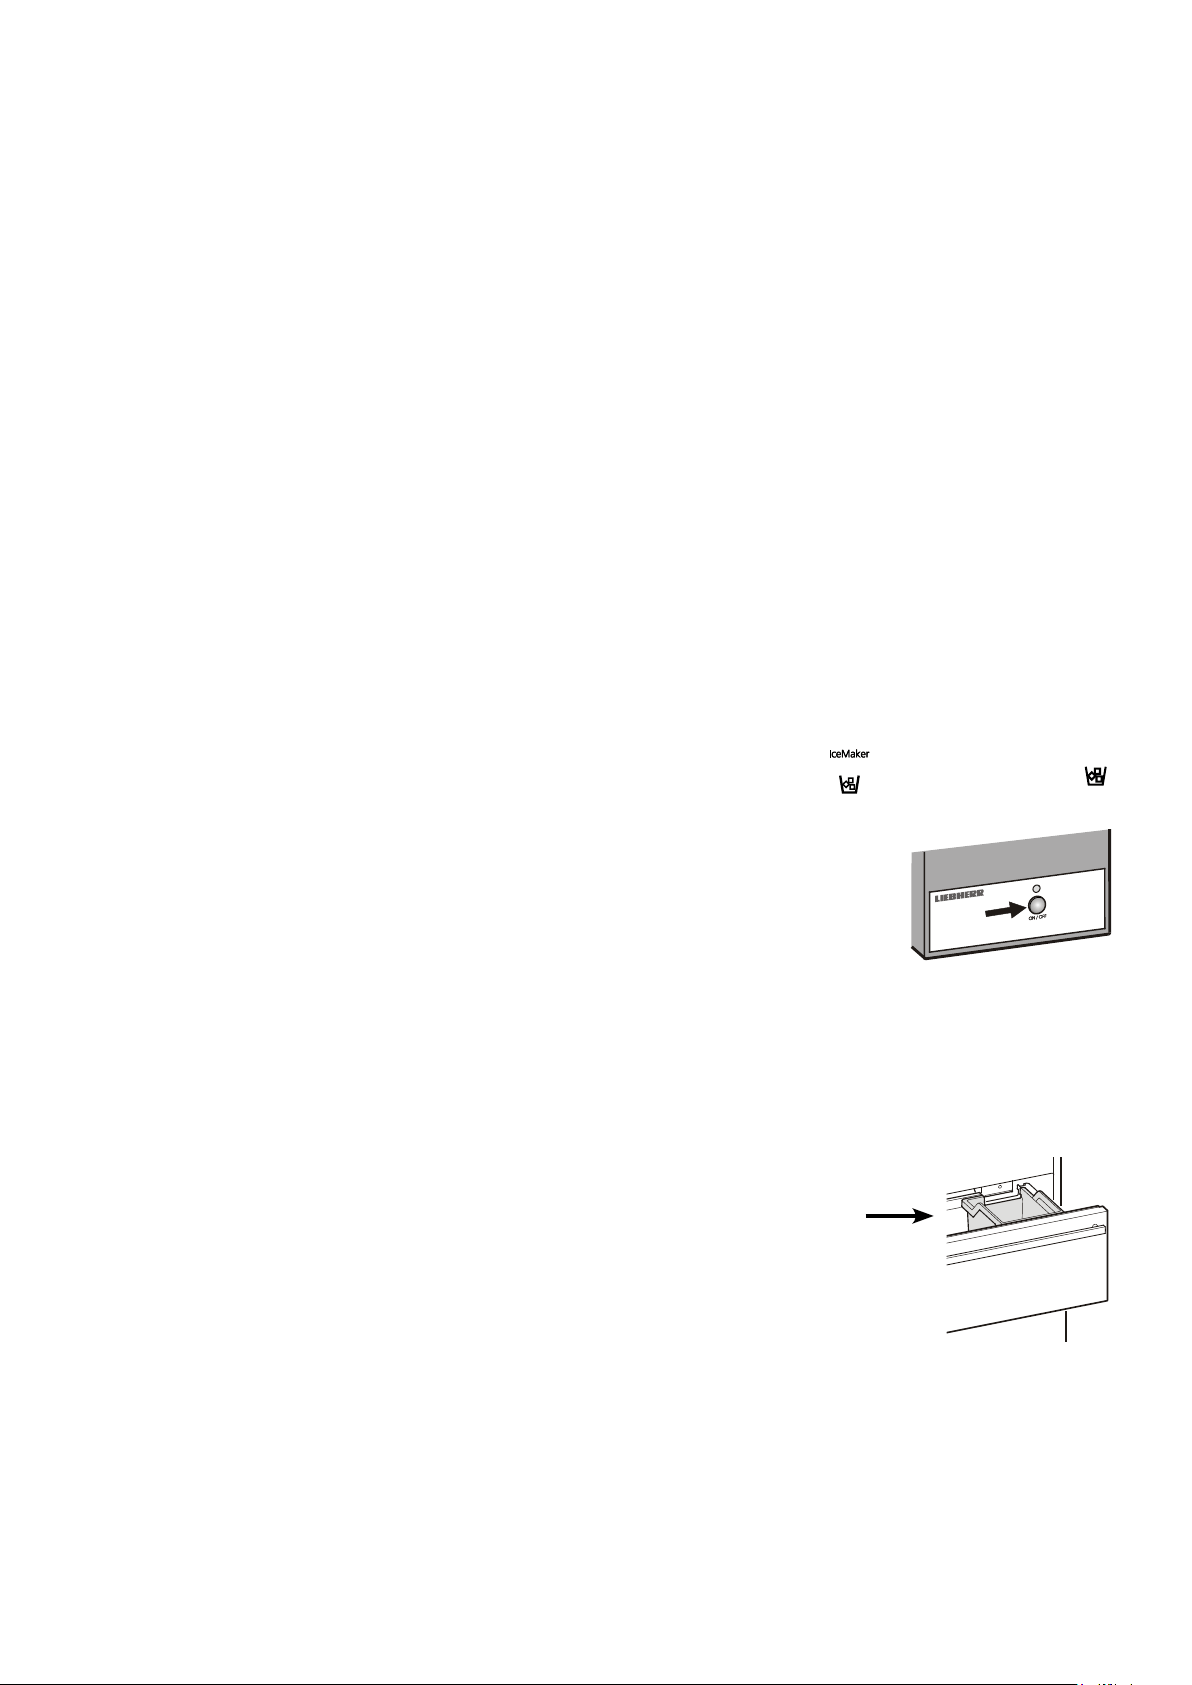
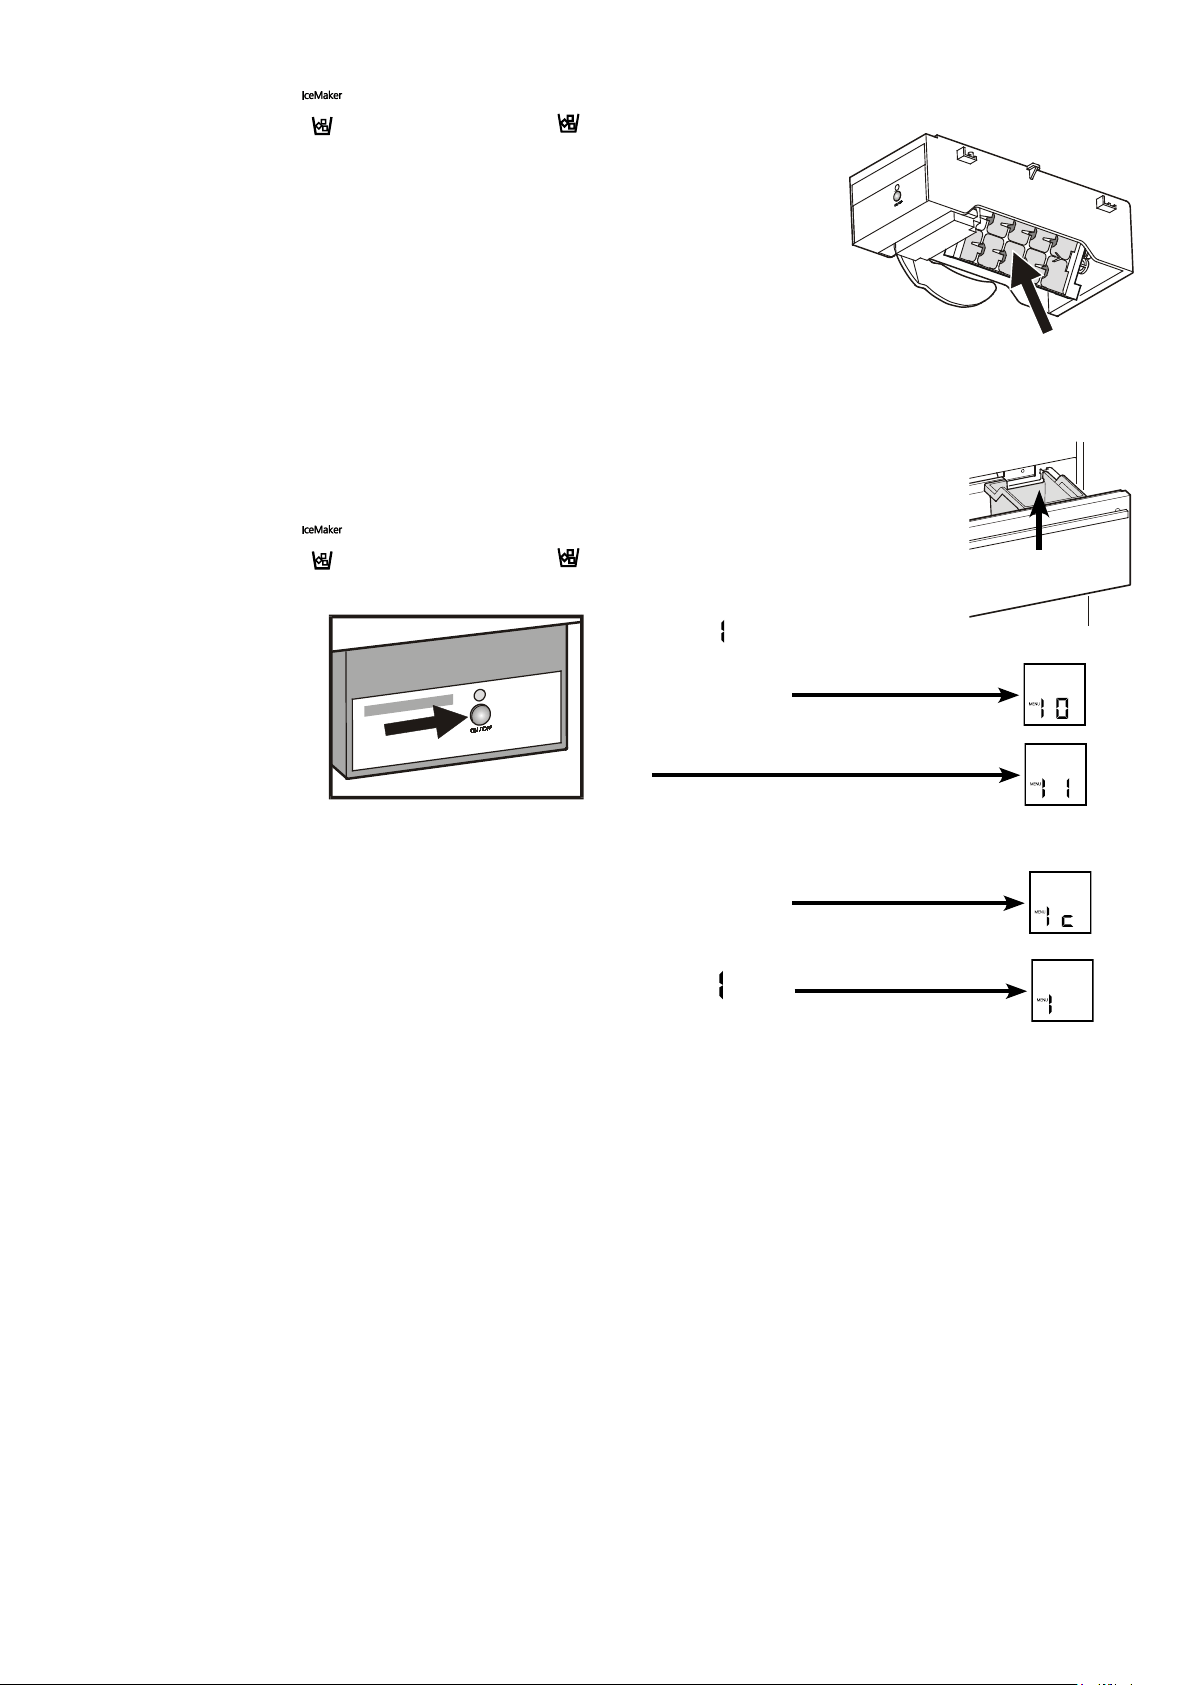
Bleeding the ice maker
Toensurethattheicemakerworksproperly,thewatersupply
linemustbebled.
• TouchtheIceMaker icon
sothattheIceMaker LED
comeson.
• Openthetopfreezerdrawer.
• PresstheON/OFFbuttonontheice
maker housing for approx. 3 sec-
onds. The LED above the button
startsflashing.
• Pressthebuttonagainbriefly.TheLEDflashesmorequickly.
•Closethefreezerdrawerimmediately.
Thewatersupplyvalveopensfor25secondsandpumpsallthe
airoutofthewatersupplysystem.
•Thentheicecubetrayoftheicemakermustbecompletely
emptied.SeethesectionActivating the ice maker vacation
state.
• Finally,cleantheicecubebin.
12
Switching the ice maker on
• TouchtheIceMaker icon sothattheIceMaker LED
comeson.
Afteryoustarttheicemakerforthefirsttime,itmaytakeupto
24hoursbeforethefirsticecubesareready.
Theproductioncapacitydependsonthetemperatureinsidethe
freezercompartment.Thelowerthetemperature,themoreice
cubescanbeproducedoveraperiodoftime.
Theicecubesfalloutoftheicemakerintotheicecubebin.When
theicereachesacertainlevelinthebin,theappliancestops
producingiceautomatically.
Switching the ice maker off
Ifyoudonotneedanyicecubes,theicemakercanbeswitched
offindependentlyofthefreezercompartment.
• TouchtheIceMaker icon
sothattheIceMaker LED
goesout.
The ice maker can also be
switchedonandoffusingthe
ON/OFFbu t to na tt he ic em a ker
housing.
Press the button for approxi-
mately1second.
EN
Activating the ice maker vacation state
Besuretheupperfreezerdraweriscom-
pletely closed and the ice cube bin is
installedcorrectly.
• Activate setup mode by touching the
SuperFrosticonfor5seconds.
• TouchthefreezercompartmentDown
iconuntil
appearsinthedisplay.
• TouchtheSuperFrosticon.
- Thedisplayreads
or
dependingonwhethertheicemakerisswitched
onoroff.
• TouchthefreezercompartmentDownicon.
- Thedisplayreads
• TouchtheSuperFrosticon.
- Thedigit
flashes.
Theicecubetrayrotatesdown.
Whentheinteriortemperatureappearsinthedisplay,thetrayisin
thedownpositionandtheicemakerisswitchedoffautomatically.
Ice maker vacation state
Incaseoflongervacations,theicecubetrayshouldbeemptied.
Bysettingtheicemakerintothe
vacationstate,thetraywill
rotate down and no water
remainsinthetray.
Thefreezerdrawermustbe
leftopensothatthesurface
ofthetraydriesupandnomould
orunpleasantodourscanoccur.
Icecubebin
13
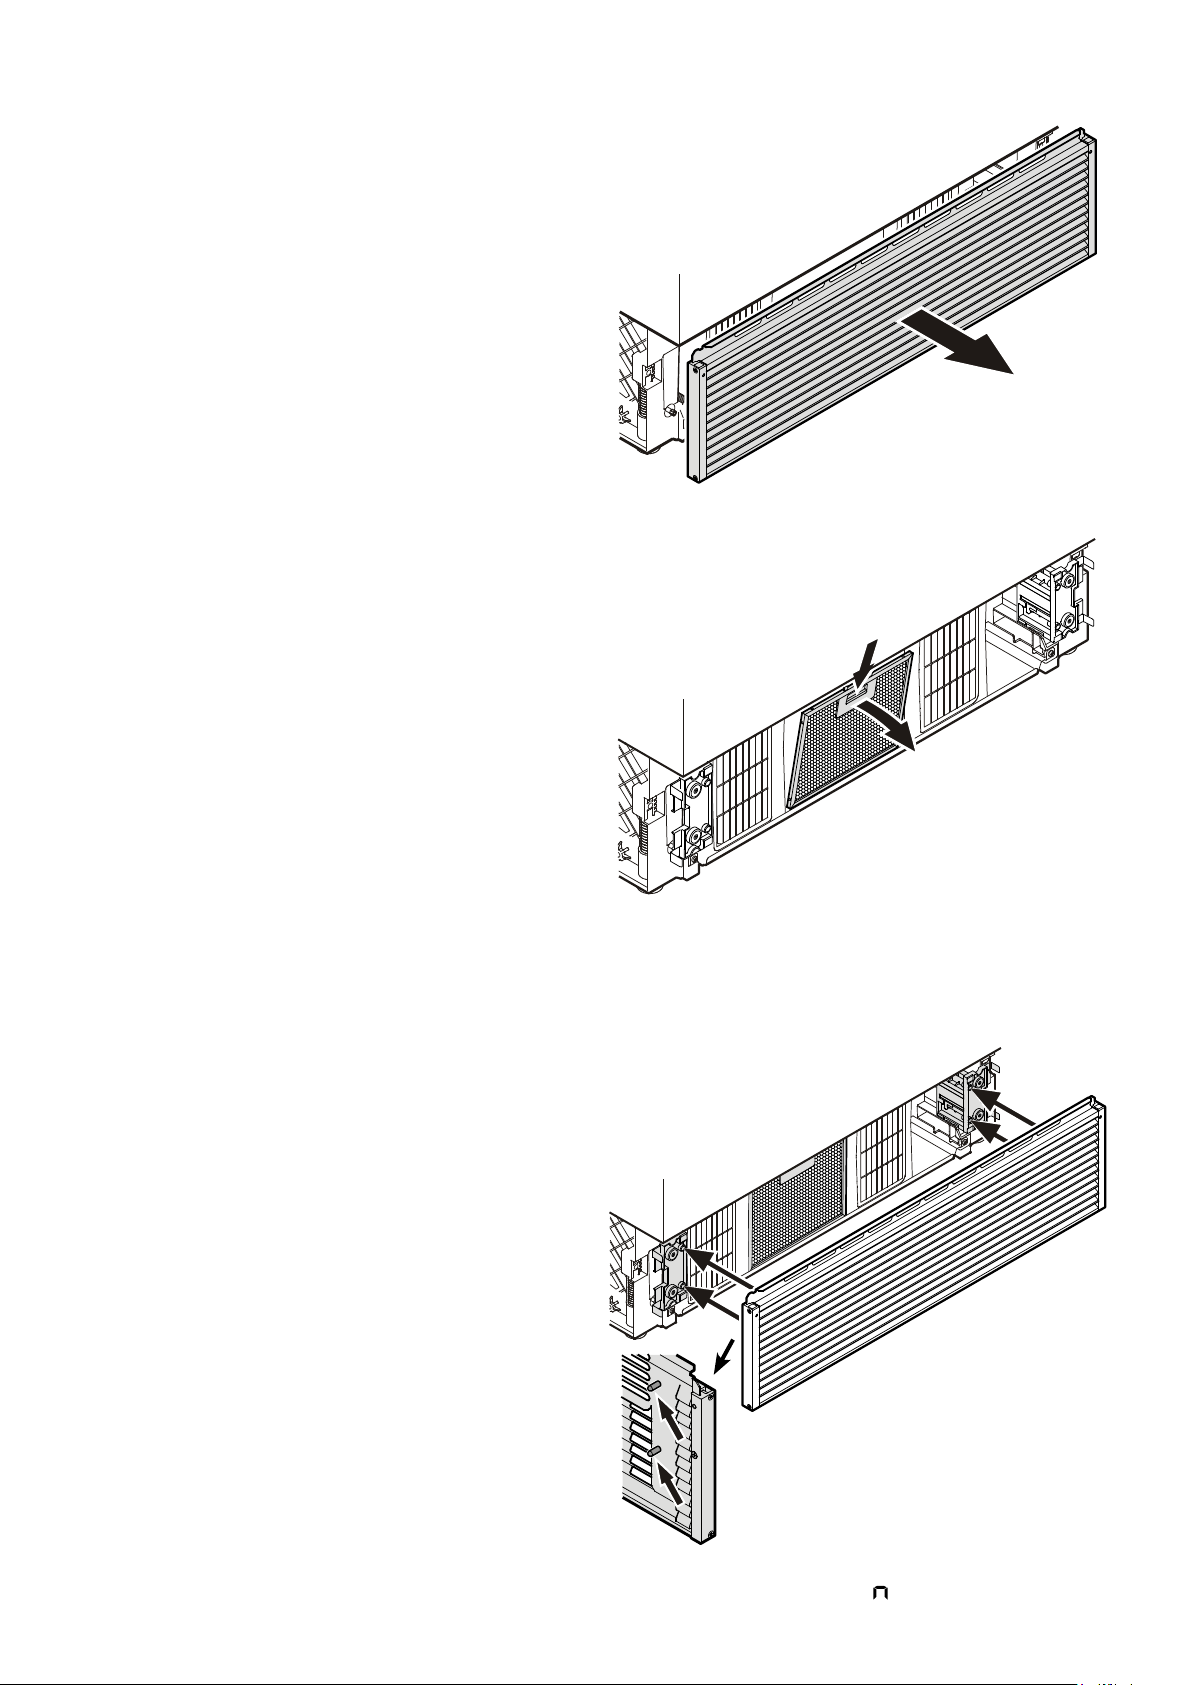
• Open the bottom freezer drawer and
remove the ventilation grille by pull-
ing forwards. The grille is supported
magneticallysonotoolisrequiredfor
removing.
• ResettheairfilterLED.
RefertochapterSetup Mode -
= ResetairfilterLED.
• Push down the button of the air
filter,tilttothefrontandremove.
Cleaning the air filter
• Cleanthefilterinadishwasherorbyhandwith
lukewarmwateranddishwasherdetergent.
• Installtheairfilterinthereverseorder.
• Installtheventilationgrille.
Thegrillehasboltsontheinside.These
boltsmustbeinsertedintotheholesof
thesupports.
Cleaning
Before cleaning always switch off the appliance. Pull out
the mains plug or switch off or unscrew the fuse.
• Cleantheinside,equipmentandouterwallswithlukewarmwater
andalittledetergent.Donotuseabrasiveoracidcleanersor
chemicalsolvents.
Do not use steam cleaners because of the
risk of injury and damage.
•Ensure that nocleaningwater penetrates intothe electrical
componentsorventilationgrille.
• Dryallpartswellwithacloth.
• Donotdamageorremovethetypeplateontheinsideofthe
appliance.Itisveryimportantforservicingpurposes.
Defrosting
Refrigerator compartment
Therefrigeratorcompartmentdefrostsautomatically.Thewater
thatformsontherearwalldrainsintoareservoiratthebackof
theapplianceandevaporatesautomaticallythroughthecom-
pressorheat.
Freezer compartment
TheNoFrostsystemautomaticallydefroststheappliance.
Anymoisturearisingcollectsontheevaporatorandfreezes,and
isperiodicallydefrostedandevaporated.
14

Malfunctions
You may be able to rectify the following faults by checking
the possible causes yourself:
Appliance does not function:
–Istheapplianceswitchedon?
–Istheplugcorrectlyfittedinthemainssocket?
–Isthefuseintact?
Loud running noise:
–Istheappliancesetupfirmlyonthefloor?
–Doestheappliancecausenearbyitemsoffurnitureorobjects
tovibrate?Pleasenotethatnoisescausedbytherefrigerant
circuitcannotbeavoided.
The temperature is not cold enough:
–Isthetemperaturesettingcorrect(see"Settingthetempera-
ture")?
–Haveexcessiveamountsoffreshfoodbeenplacedintheap-
pliance?
–Doestheseparatelyinstalledthermometershowthecorrect
reading?
–Istheventilationsystemworkingproperly?
–Istheappliancesetuptooclosetoaheatsource?
If none of the above causes
apply and you cannot rectify
thefaultyourself,contactthe
nearestcustomerservicede-
partmentstatingthetypedes-
ignation
1
,servicenumber
2
andappliancenumber
3
as
indicatedonthetypeplate.
Thepositionofthetypeplateisshowninthesectionentitled
Description of the appliance.
Shutting your appliance down
Ifyourapplianceistobeshutdownforanylengthoftime,switch
itoffanddisconnecttheplugorswitchofforunscrewthefuse.
Cleantheapplianceandleavethedooropeninordertoprevent
unpleasantsmells.
Theappliancecomplieswiththerelevantsafetyregulationsand
ECDirectives2004/108/ECand2006/95/EC.
EN
Removing the freezer drawer containers
• Opentherefrigeratordoor.
• Pulloutthefreezerdrawer.
• Pullthecontainerupwardsbytherightandleftcorners(1).
• Pushthecontainerbackwards(2).
• Tiltthecontaineratanangleandremove.
• Installthecontainerinthereverseorder.
Sideviewofthe freezer
drawerpulledout
15
Setting up
•Avoidpositioningtheapplianceindirectsunlightornearcook-
ers,radiatorsandsimilarsourcesofheat.
•Theflooronwhichtheappliancestandsshouldbehorizontal
andlevel.
• StandardEN378specifiesthattheroominwhichyouinstall
yourappliancemusthaveavolumeof1m³per8gofR600a
refrigerantusedintheappliance,soastoavoidtheformationof
inflammablegas/airmixturesintheroomwheretheappliance
islocatedintheeventofaleakintherefrigerantcircuit.The
quantityofrefrigerantusedinyourapplianceisindicatedon
thetypeplateontheinsideoftheappliance.
Electrical connection
Onlyoperatetheappliancewithalternating current (AC).
The permissible voltage and frequency are indicated on the
typeplate.
Thepositionofthetypeplateisshowninthesectionentitled
Description of the appliance (in the operating instructions).
Thesocketmustbeproperlyearthedandprotectedbyafuse.
Thetrippingcurrentofthefusemustbebetween10Aand16A.
Thesocketmustnotbesituatedbehindtheappli-
anceandmustbeeasilyaccessible.
Donotconnecttheapplianceusinganexten-
sioncableorextensionsocket.
Donotusestand-aloneinverters(conversion
of direct current to alternating/three-phase
current)orenergy-savingplugs.Riskofdam-
agetotheelectroniccontrolsystem!
Door swing clearance at
locations next to a wall
Please allow fordoor swingclear-
anceatlocationsnexttoawall.
Theillustratedmeasurementiswith-
outmountedfrontpanels.
Besuretoaddyourpanelthickness
andhandledepthtothismeasure-
mentinordertoavoidinterferences.
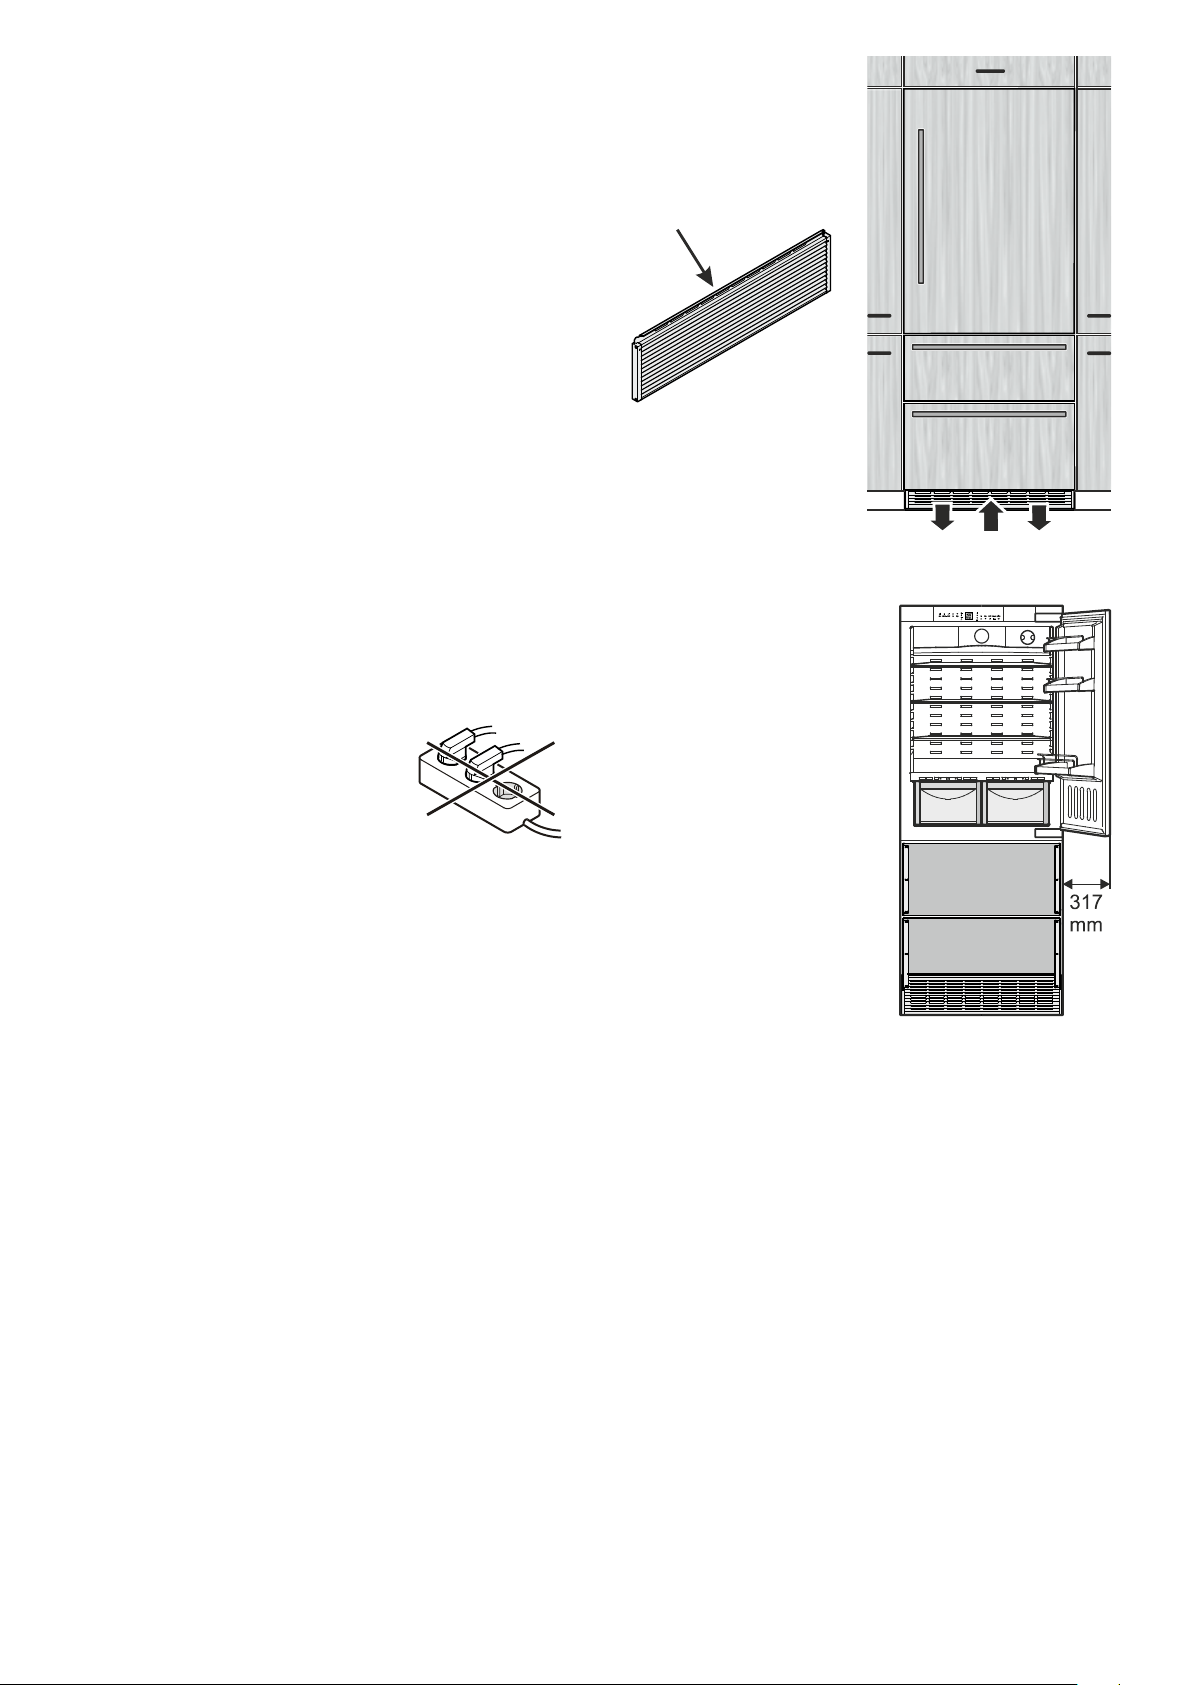
Appliance venting
Therequiredairflowisdirected
throughtheplinth.
Itisimportanttousetheprovided
ventilationgrillefortheventila-
tionopening.
Thisopeningmustnotbe
covered.
16
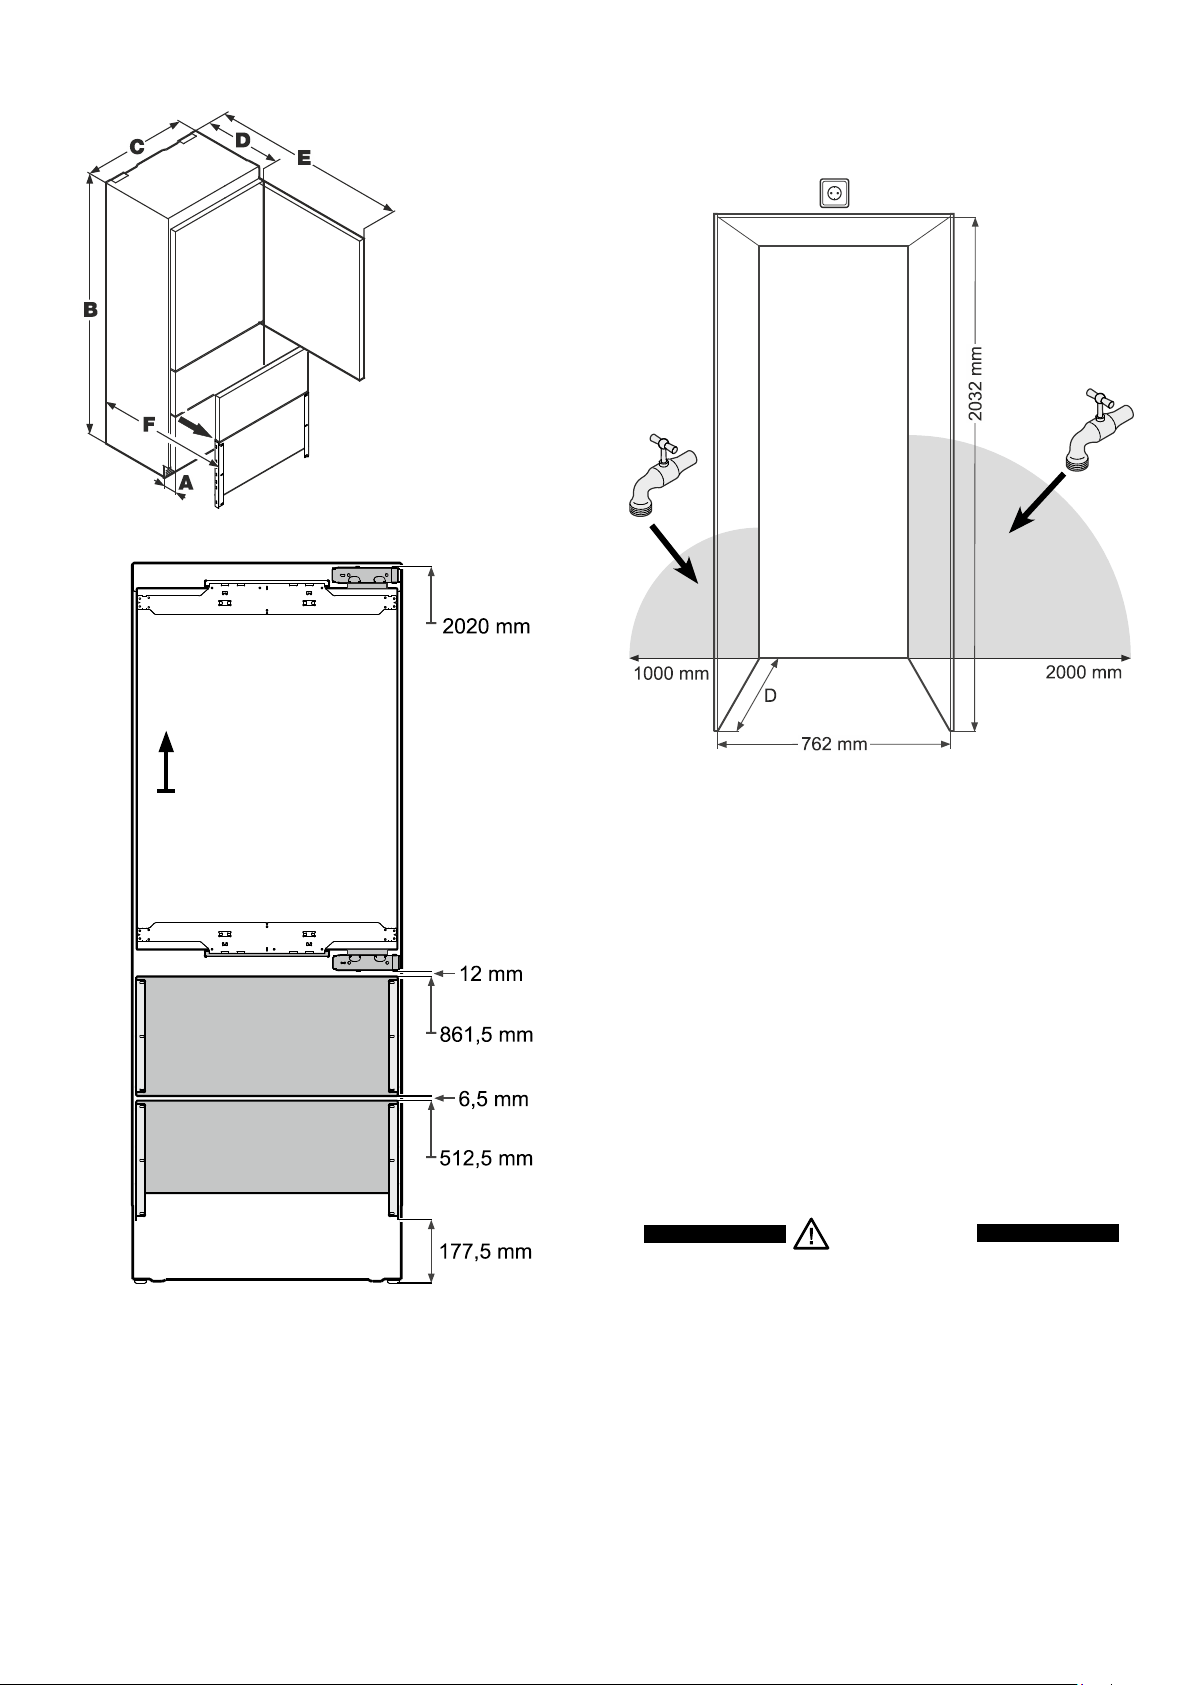
Appliance dimensions
A=76mm
B=2027mm
C=757mm
D=610mm
E=1413mm
F=952mm
Installation dimensions
Thelocationofthesocketcanwithinaradiusof2000mmfrom
theappliancetopcenter.
Theicemakerisfittedinthefreezercompartmentofthecom-
bined refrigerator-freezer. It must be connected to the mains
watersupplytowork.
Thewatershut-offtapmustbepositionedwithintheareasmarked
ingrey.
Important!
Donotinstalltheshut-offtapbehindtheappliance.
WARNING!
The water shut-o tap must not sit directly
above the socket!
The gap between the water shut-o tap
and the socket must comply with the
regulations of the country in which the
appliance is used!
Thistypeofdimension
lineindicatestheheight
measuredfromthefloor.
Cabinet depth D
625 mm + panel thickness>Insetinstallationstyle
625 mm>Framelessinstallationstyle
Explanationof"Installationstyles"seepage4.
17
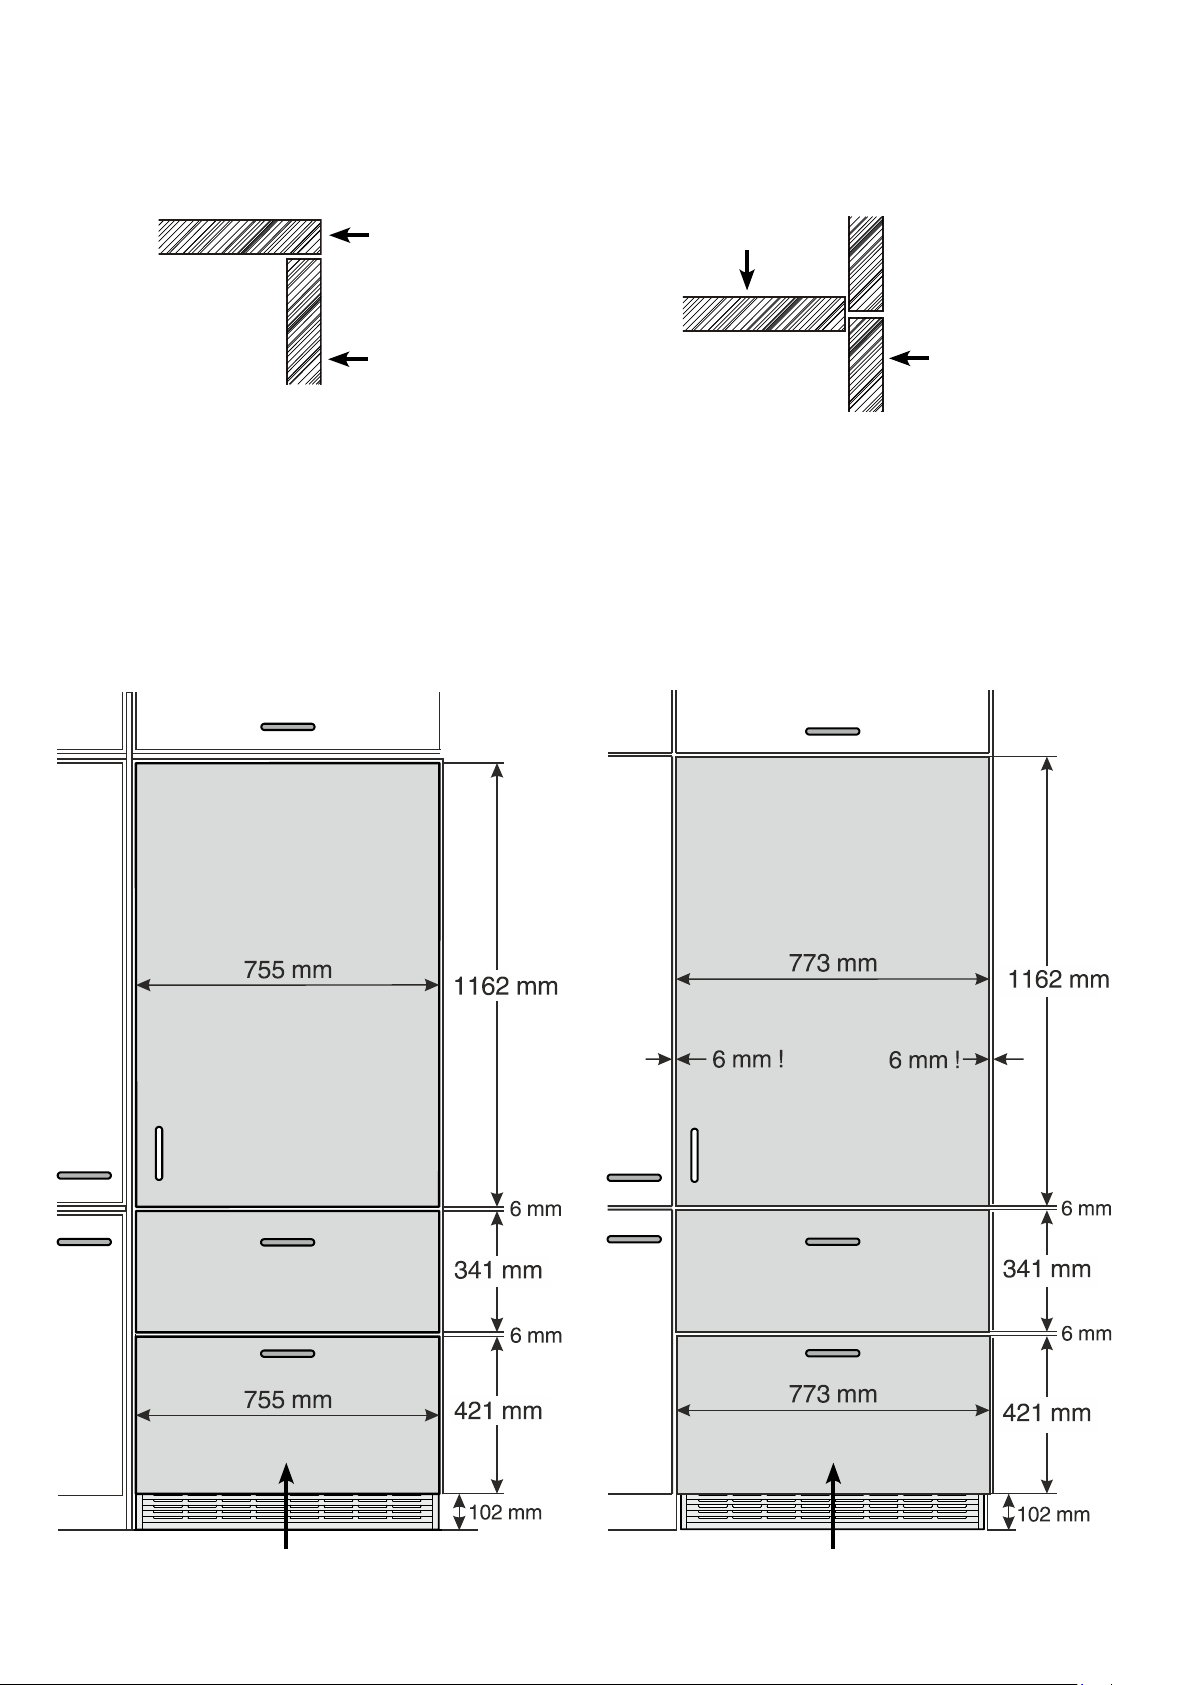
Panel dimensions - Inset installation style
Min.panelthickness=16mm
Max.panelthickness=38mm
Maximum panel weight
Refrigeratorpanel=27kg
Freezerdrawerpanel=10kg
Panel dimensions - Frameless installation style
Definition of Inset Installation Style
Applianceandpanelssitfullywithintheopeningandareflush
withwhatcouldbeitsownbox,betweentwopantrycabinetsor
decorativecolumns.
Definition of Frameless Installation Style
Withthisinstallationstyle,thesewiderappliancepanelspartially
overlaythesharedsidegablesofadjacentcabinetrysoasto
mimicthelookofaframelessstylecabinet.
Side view of cabinet (sectional view)
Cabinet frame
Doorpanel
Side view of cabinet (sectional view)
Cabinet frame
Doorpanel
The height of the bottom panel can be reduced by up to 50 mm to accommodate higher plinths
18
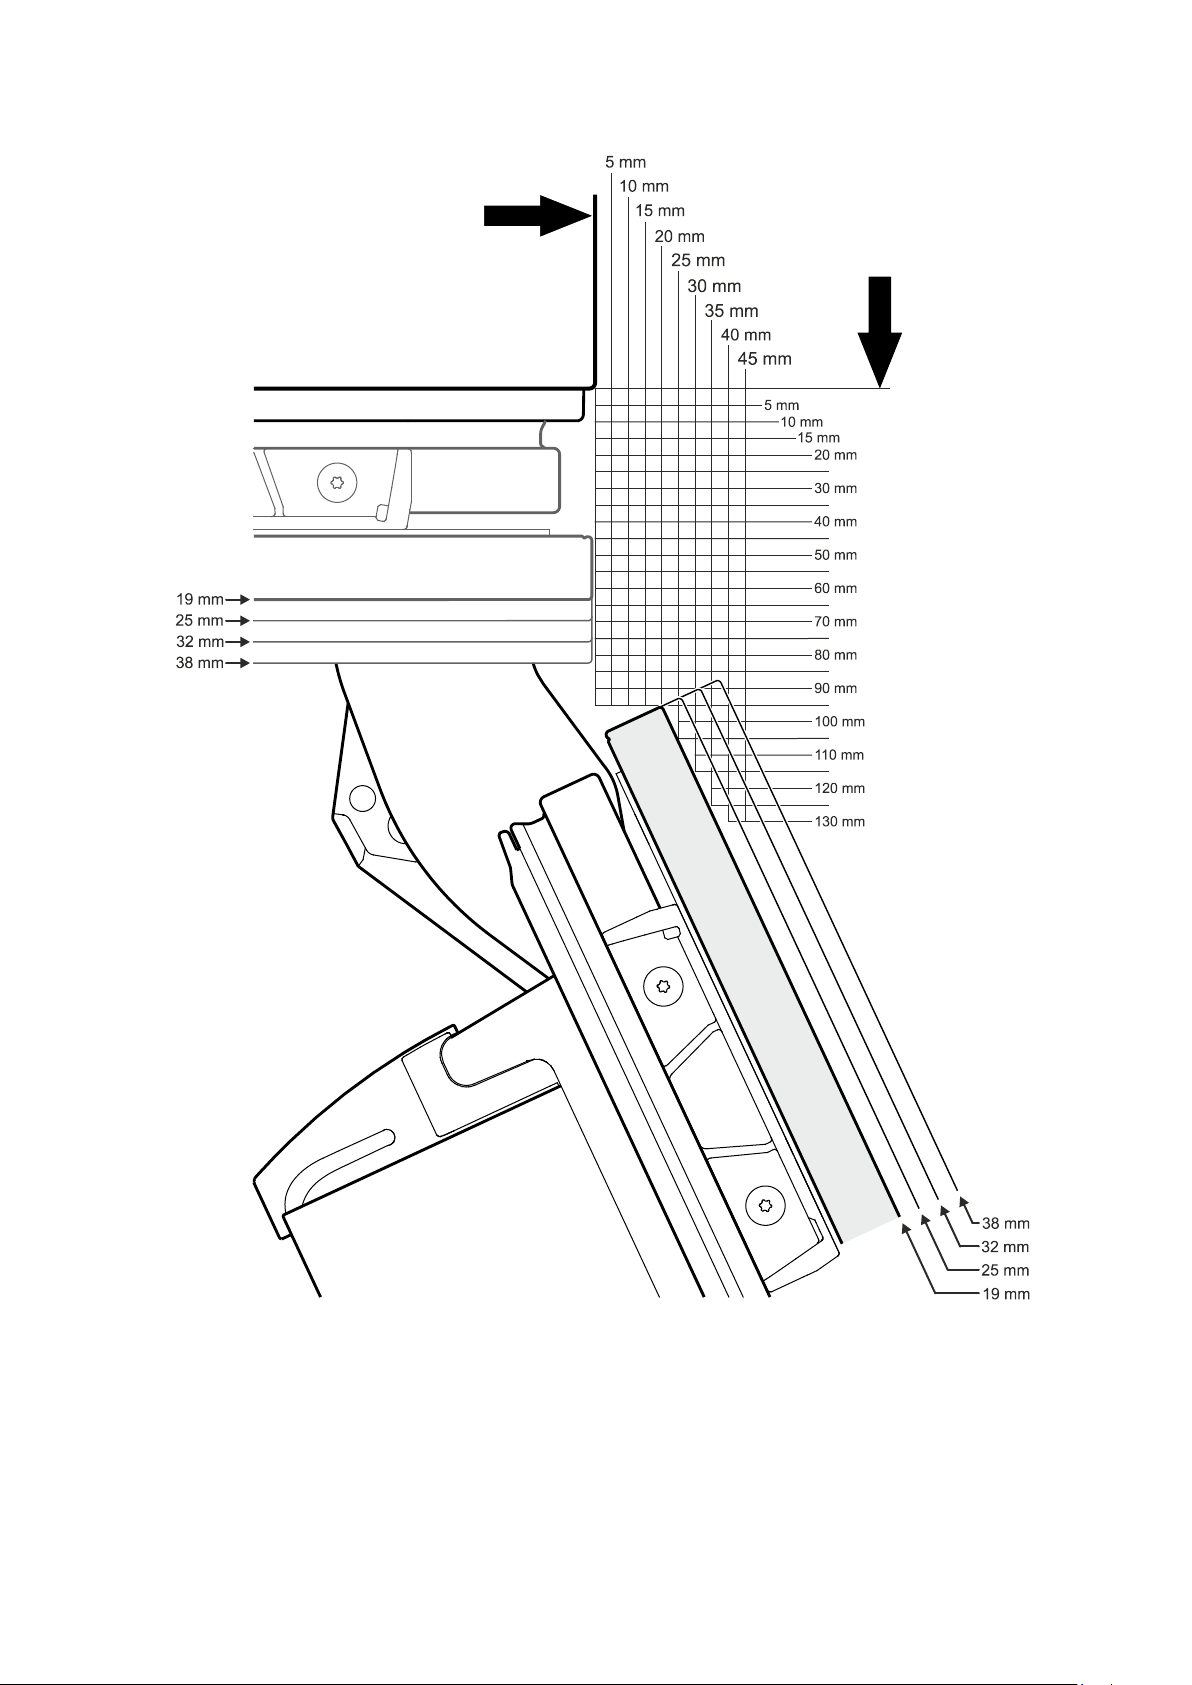
Rightsidewallofappliancehousing
Frontofappliancehousing
Top View
Frontpanel-doorclosed
Panel
thickness
Panel
thickness
Frontpanel-dooropeningangle=115°
Door swing clearance - Inset Installation Style
19
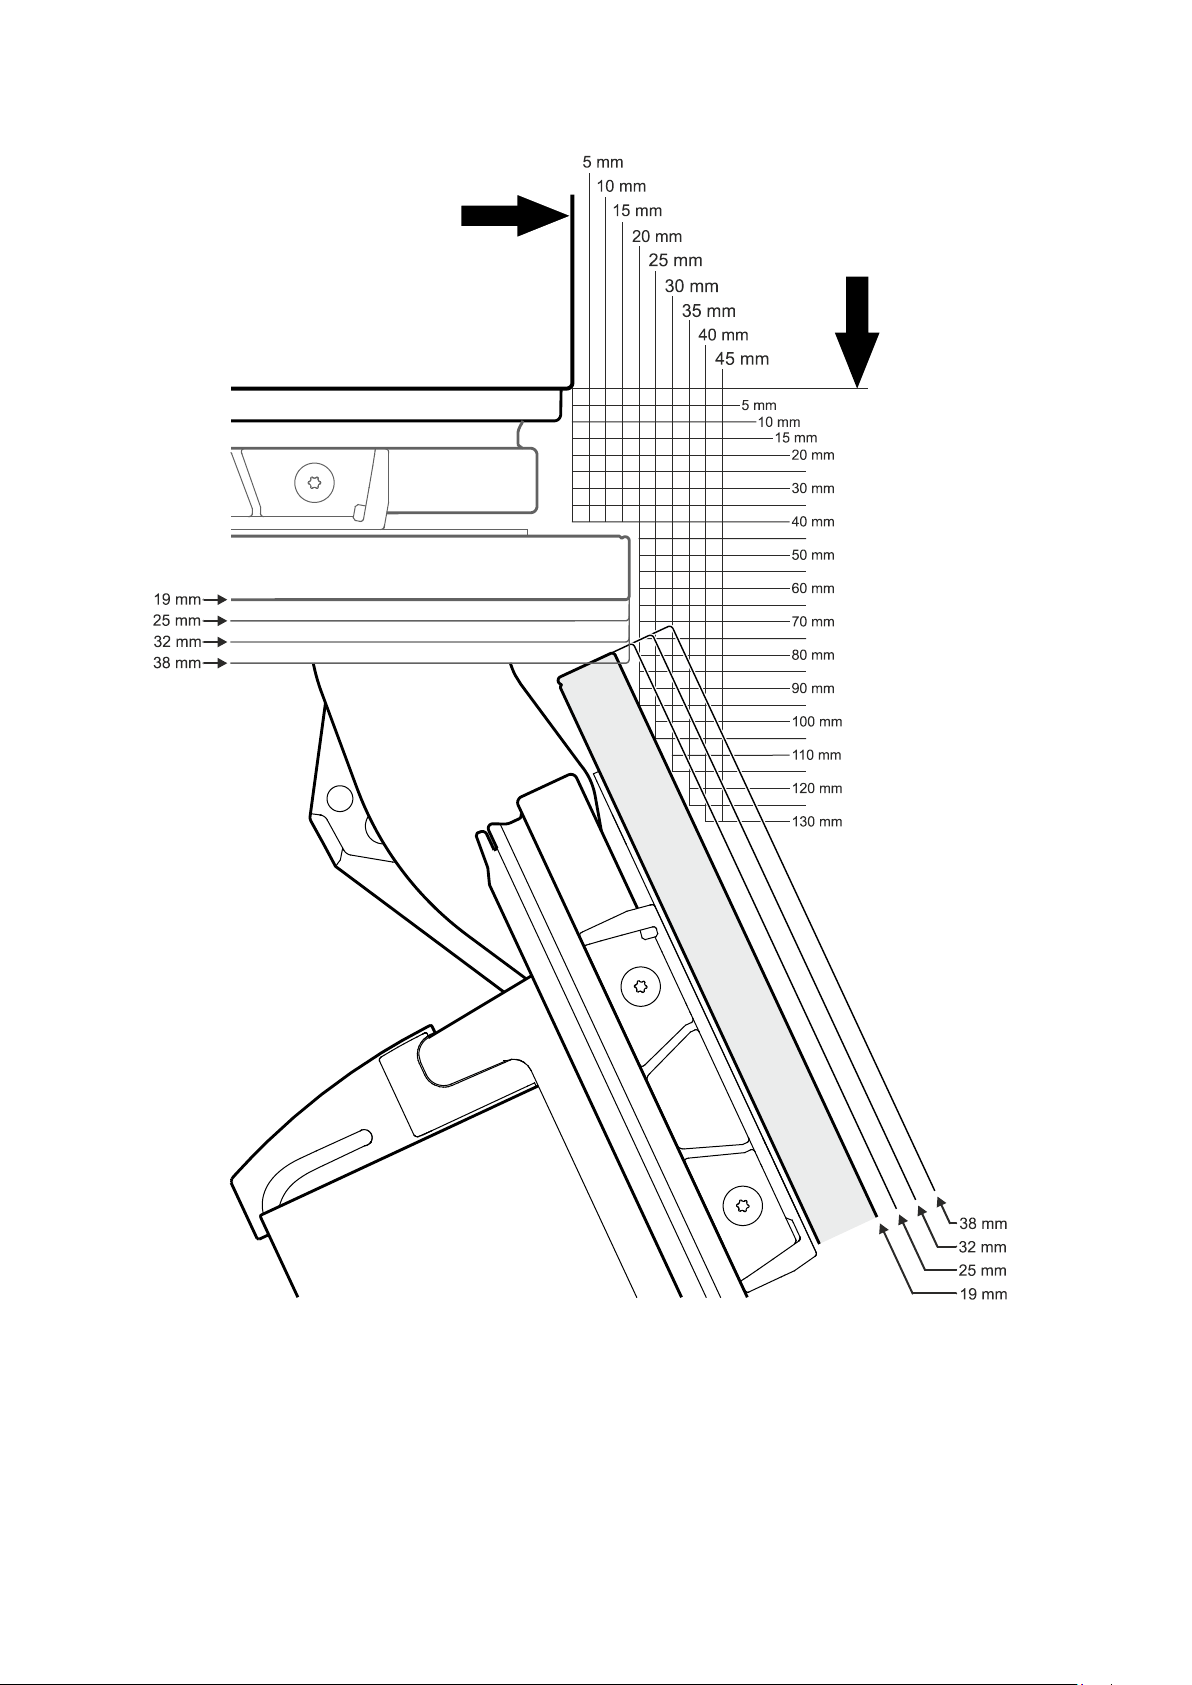
Rightsidewallofappliancehousing
Frontofappliancehousing
Top View
Frontpanel-doorclosed
Panel
thickness
Panel
thickness
Frontpanel-dooropeningangle=115°
Door swing clearance - Frameless Installation Style
20
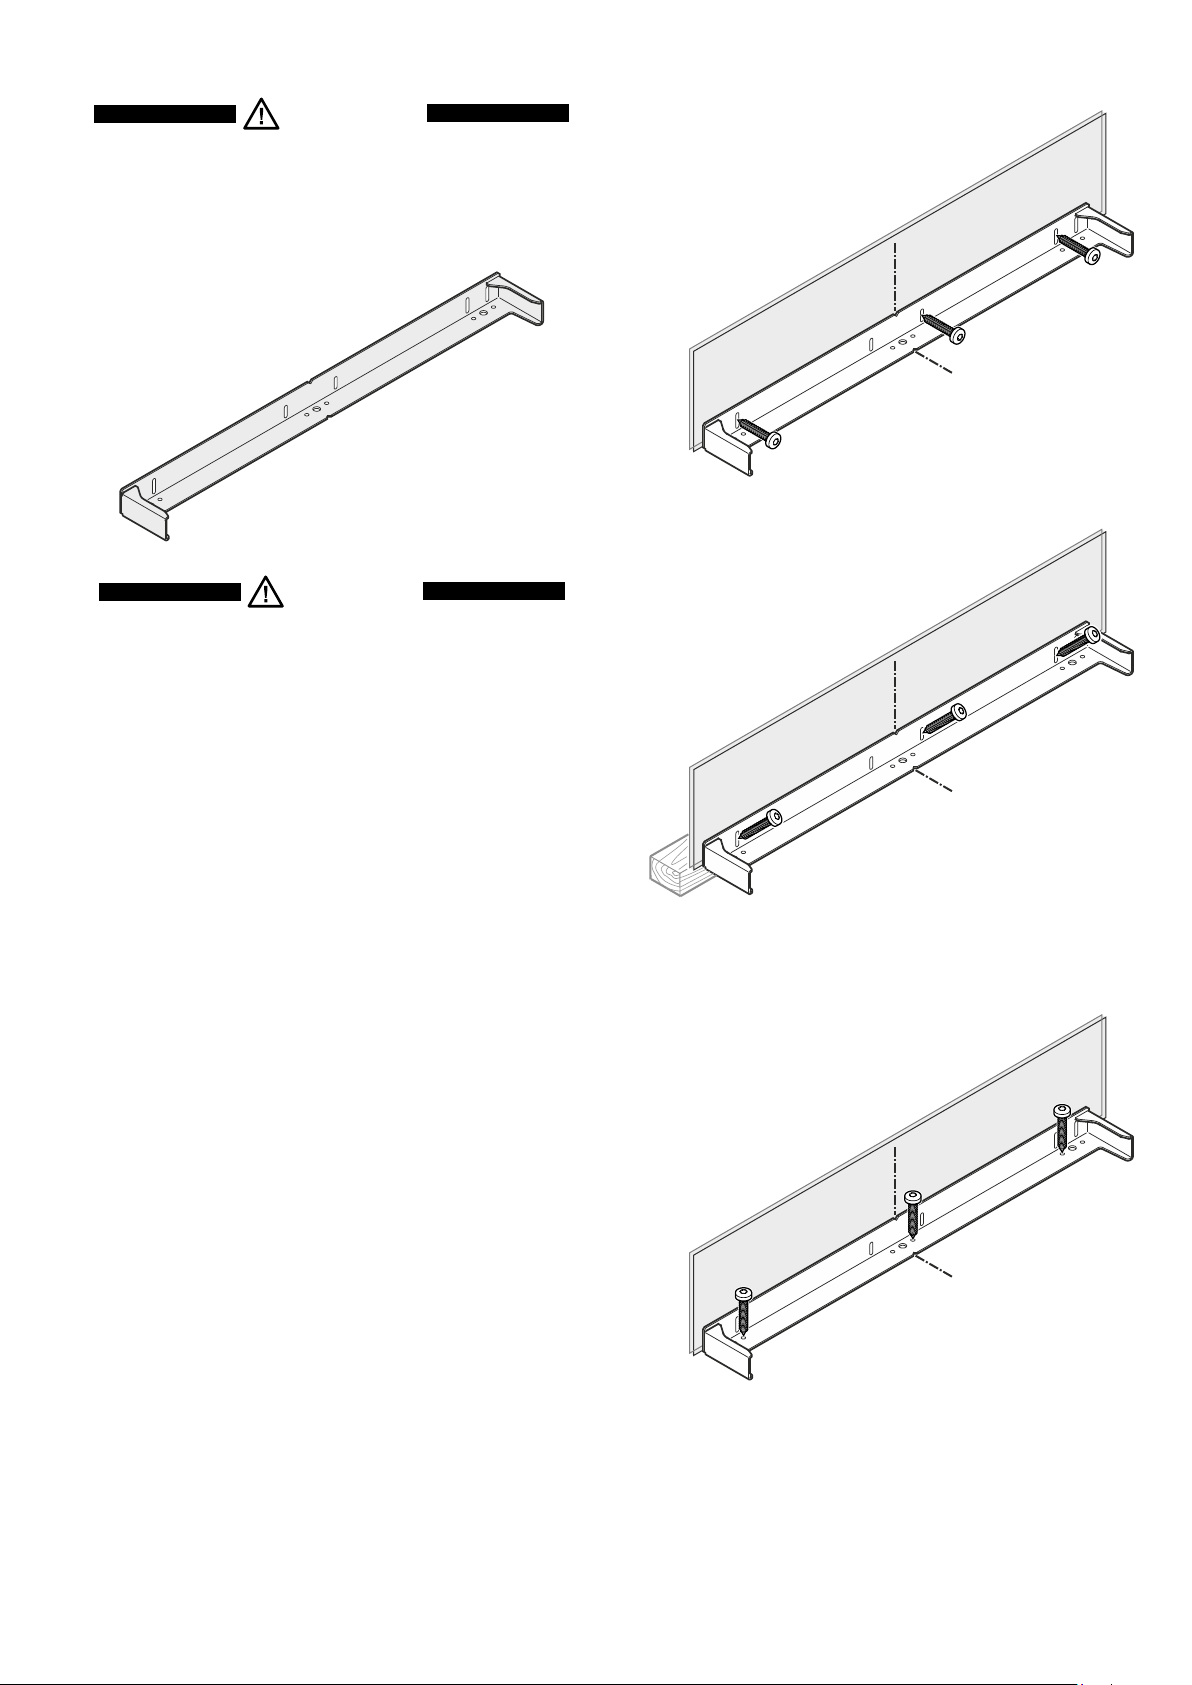
Mounting the anti-tipping device
WARNING!
The supplied anti-tipping bracket must be
installed in all cases. This prevents the appli-
ance from tipping over when the fully loaded
door is opened.
Installation:
1. Markthecentrelineoftheapplianceonthefloor.
Aligntheanti-tippingbracketcentretothecentreline.
2. Dependingontheconstitutionofthefloorandwall,useany
possiblemountingoptionasshowninchapterMounting Op-
tions.Th es cr ews(6 x 60)a re su pp li e dw it ht hea cc es s or y pac k .
Important!
If the floor slopes down sideways, the anti-tipping
bracket must be fitted horizontally. Lay down spacers
in the appropriate positions.
CAUTION!
Ensure that there are no electric cables or water
pipes in the wall section to which the anti-tipping
bracket is to be secured. These could be damaged
during installation.
Mounting options
Wall
Floor
Mountingthebracketwiththewallstuds.
Mountingwithplugstoconcretewalls.
3Screws6x60mm
Wall
Floor
Mountingwiththewallplateturningin
thescrewsatanangle.
3Screws6x60mm
Wall
Floor
Mountingwithwoodenfloors.
Mountingwithplugstoconcretefloors.
3Screws6x60mm
21
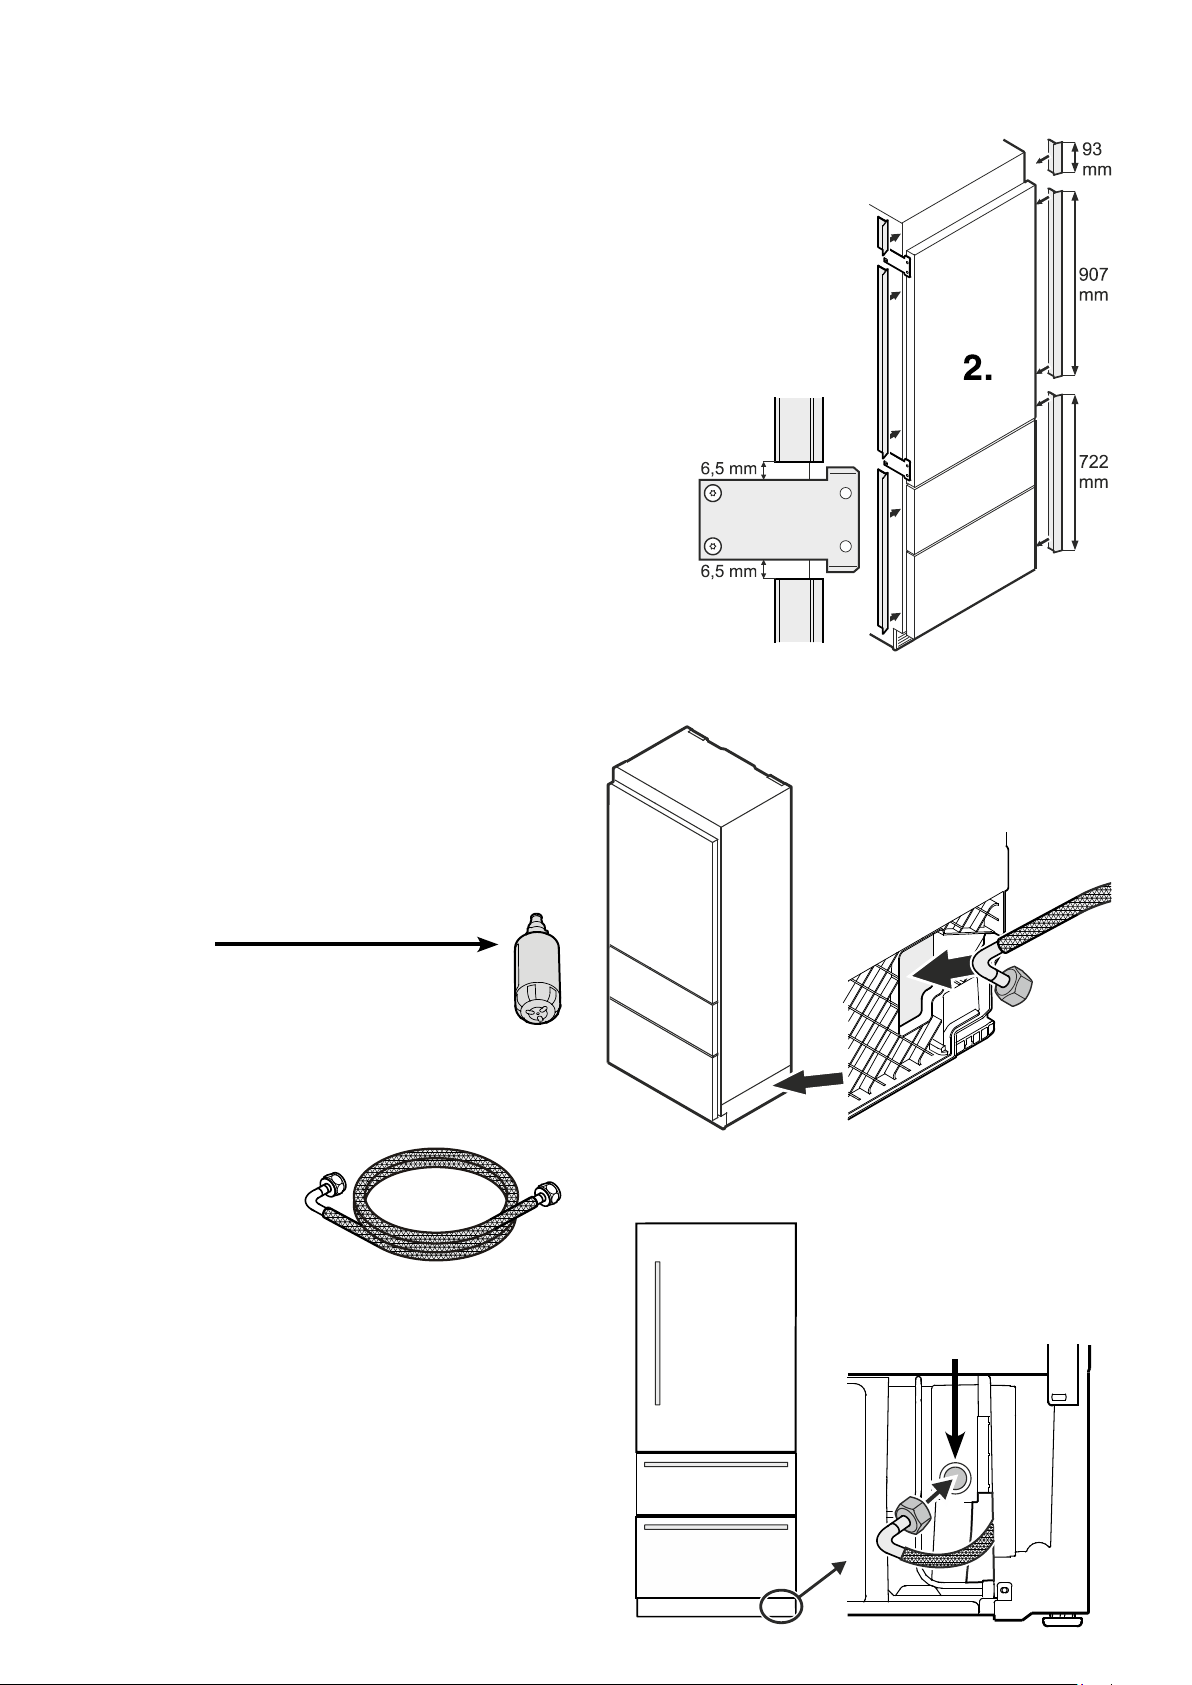
3.
4.
3. Insert the bent section of the hose
throughtheopeningattherightside
oftheappliance.
4. Movethehosetothefrontandcon-
nectwiththevalveconnector.
Be sure the connection is tightly
arranged.
Valve connector
Installation
1. Placetheapplianceinfrontoftheinstallationrecess.
2. A p p l y c ove rs tr i ps ab ove ,b et-
weenandbelowthesecuring
platesonthesidewallsofthe
appliance.
Cutthecoverstripstotheright
lengthforthispurpose.
Fittheadhesivecoverstrips
leaving a gap of 6,5 mm to
each securing plate. This
ensuresproblem-freefitting
ofthecovers.
Connection to the water supply
Safety instructions and warnings
•Do not connect to the watersupply while the
combined refrigerator-freezer is connected to
theelectricitysupply.
•Theconnectiontothemainswatersupplymay
onlybemadebytrainedpersonnel.
•Thewaterqualitymustcomplywiththedrinking
waterdirectivesofthecountryinwhichtheap-
plianceisused.
•Theicemakerisdesignedexclusivelytomake
icecubesinquantitiesrequiredbyahousehold
andmayonlybeoperatedwithwatersuitablefor
thispurpose.
•Allrepairsandworkontheicemakermayonly
becarriedoutbycustomerservicepersonnelor
othertrainedpersonnel.
•Themanufacturercannotacceptliabilityfordam-
agecausedbyafaultyconnectiontothemains
watersupply.
Water pressure
The water pressure must be between 150 and
600 KPa (1.5 - 6 bar).
Important!
Ifthewaterfilter
isinsertedintheappliance,thewater pressure
mustliebetween300 and 600 KPa (3 - 6 bar).
If the water pressure with the inserted water
filter is too low, this may cause the ice maker to
malfunction.
Thewatersupplytotheappli-
ancemustbethroughacold
waterpipethatcanwithstand
the operating pressure and
complies with the hygiene
regulations.
Forthis,usethestainlesssteelhosesupplied(length3m).
22
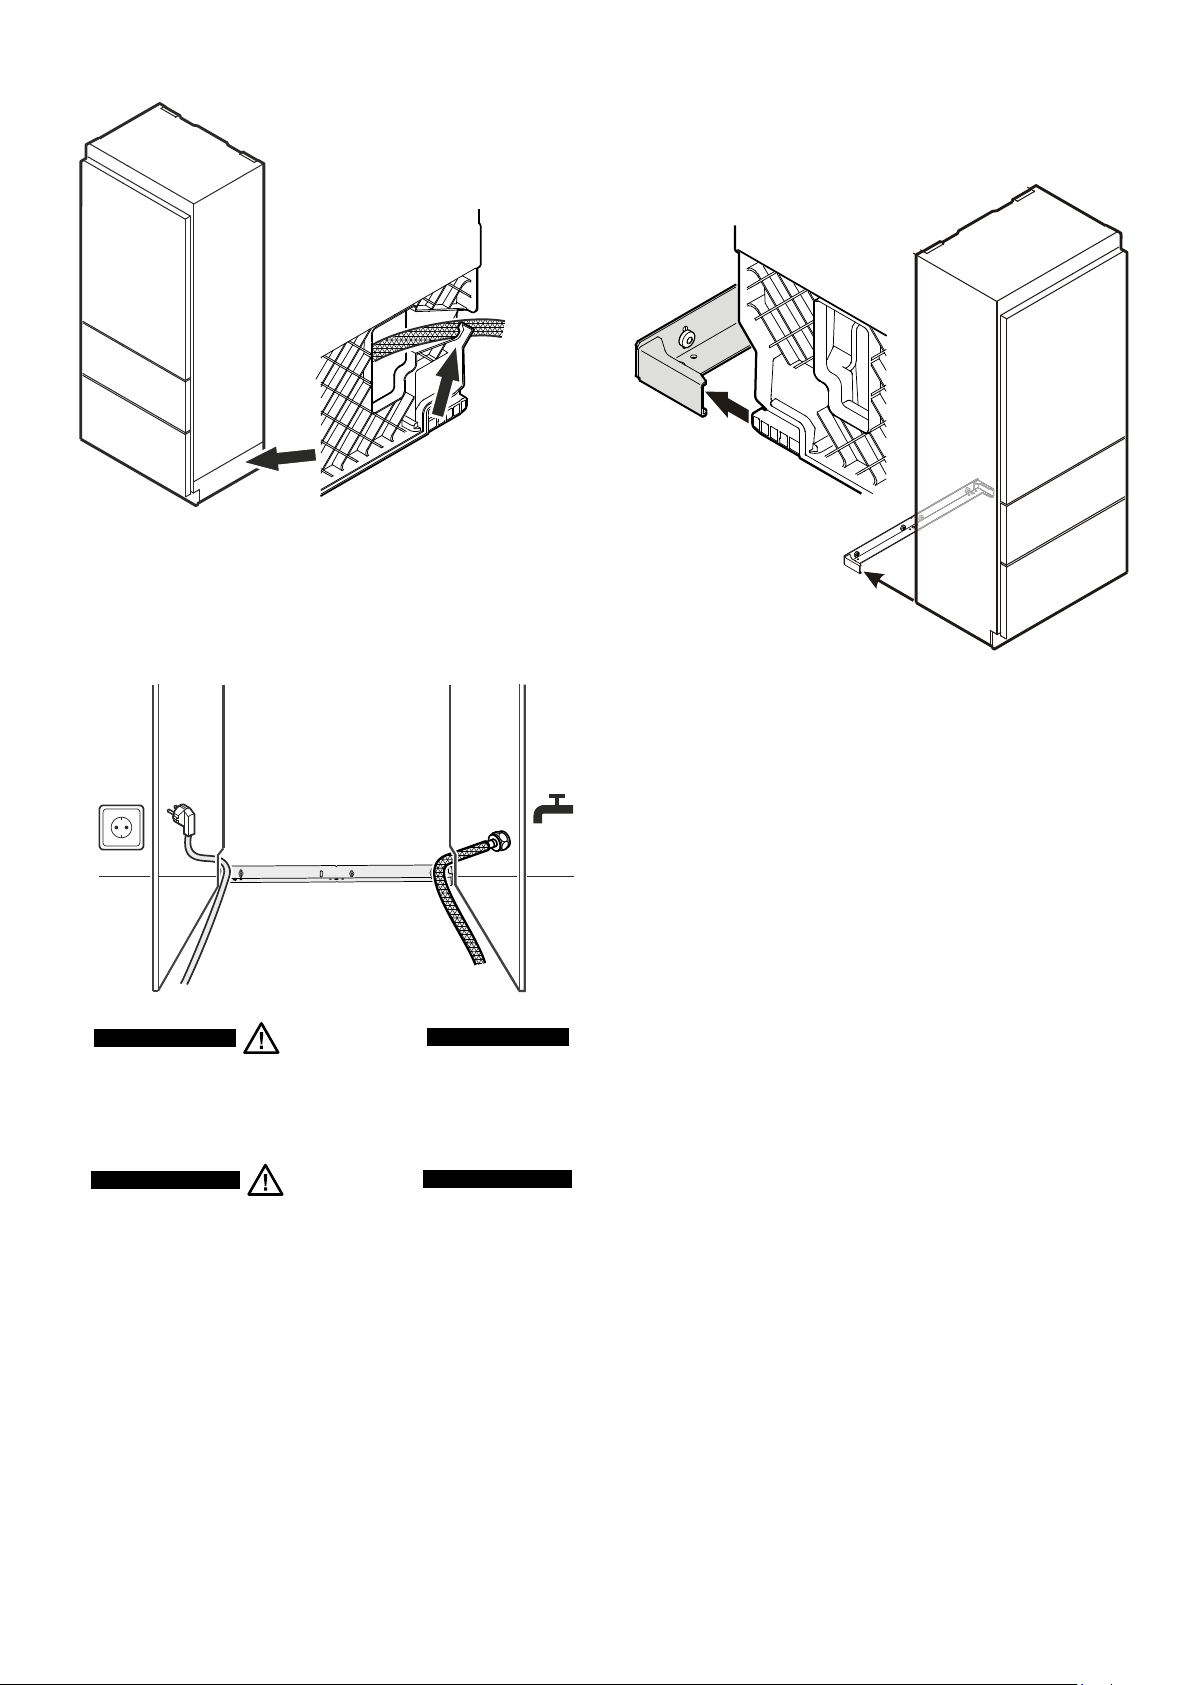
6. Routethemainscabletowardsthesocket.
7. Routethewaterhosetowardsthewatershut-offtap.
6.
7.
8. Pushtheapplianceslowlyintotherecessuntilthecompressor
mountingplatetouchestheanti-tippingbracket.
9. Fillthehosewithwaterandconnecttotheshut-offtap.
Be sure the connection is tightly arranged.
Opentheshut-offtapandcheckthesystemforleakage.
Important!
Aftertheicemakerhasbeenswitchedon,thewater
supplysystemmustbebled.
SeethesectionBleeding the ice makerintheop-
eratinginstructions.
8.
5. Locatethewaterhoseintotherailof
theappliancebase.
5.
WARNING!
Do not connect the appliance to the power supply
until the installation is completed.
CAUTION!
Lay the mains cable and the water hose in such
a way that they will not be damaged when the
appliance is slid into the installation recess.
23
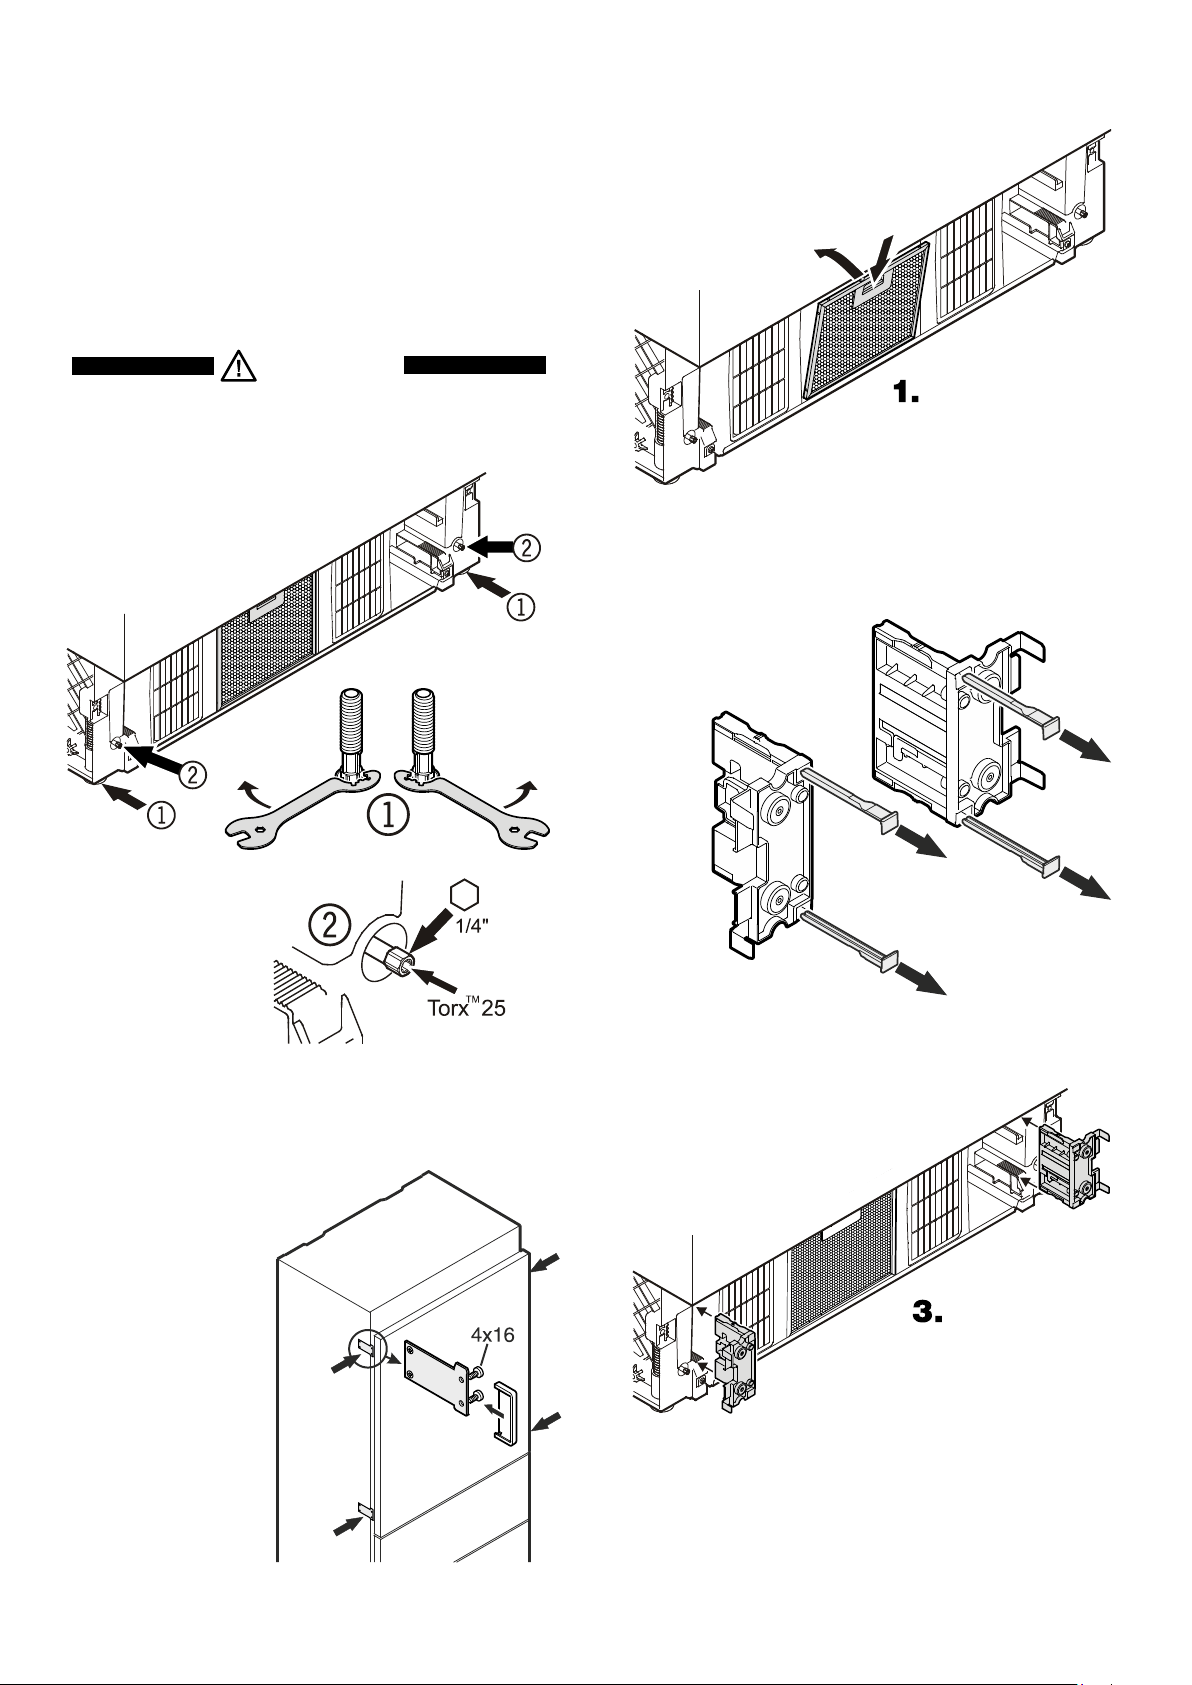
Mounting the ventilation grille
Pulloutthebottomfreezerdrawer.
1. Removetheblueprotectionfilmfromthedustfilter
providedandinsertthefilterintoitsopening
in the plinth. Engage the filter at the
bo t to m ,p r e ss do wn th eb u t to na n d
clickintoplace.
2.Remove the locking pins of
bothsupports.Thesupports
are provided with the appli-
anceaccessorypack.
2.
3.Insertthesupportsfortheventilationgrille
ontheleftandrightsidesinthemotor
compartment.
Fastening the appliance in the recess
Onceintherecess,securetheapplianceto
thebodyoftheunitusingthesecuring
plates(4x16screws).
Thenclickthecoverssup-
pliedintoplace.
Leveling the appliance
1. Adjusttheheightoftheapplianceatthefrontbytwistingthe
levelingfeet
1
.Usetheopen-endedspannerprovided.
Turnthespannercounterclockwisetoraisetheappliancefront
andclockwisetolowerit.
Positionthespanneraccordingly(
1
).
2. Adjusttheheightoftheapplianceattherearbyturningthe
adjustingbolts
2
. Use a 1/4"box spanner or the Torx 25
wrenchprovided.
3. Rotatelevelingfeet
1
untilfirmlyinplaceagainstthefloor.
WARNING!
To prevent the appliance from tipping forward
the leveling feet
1
must have contact with
the floor.
24
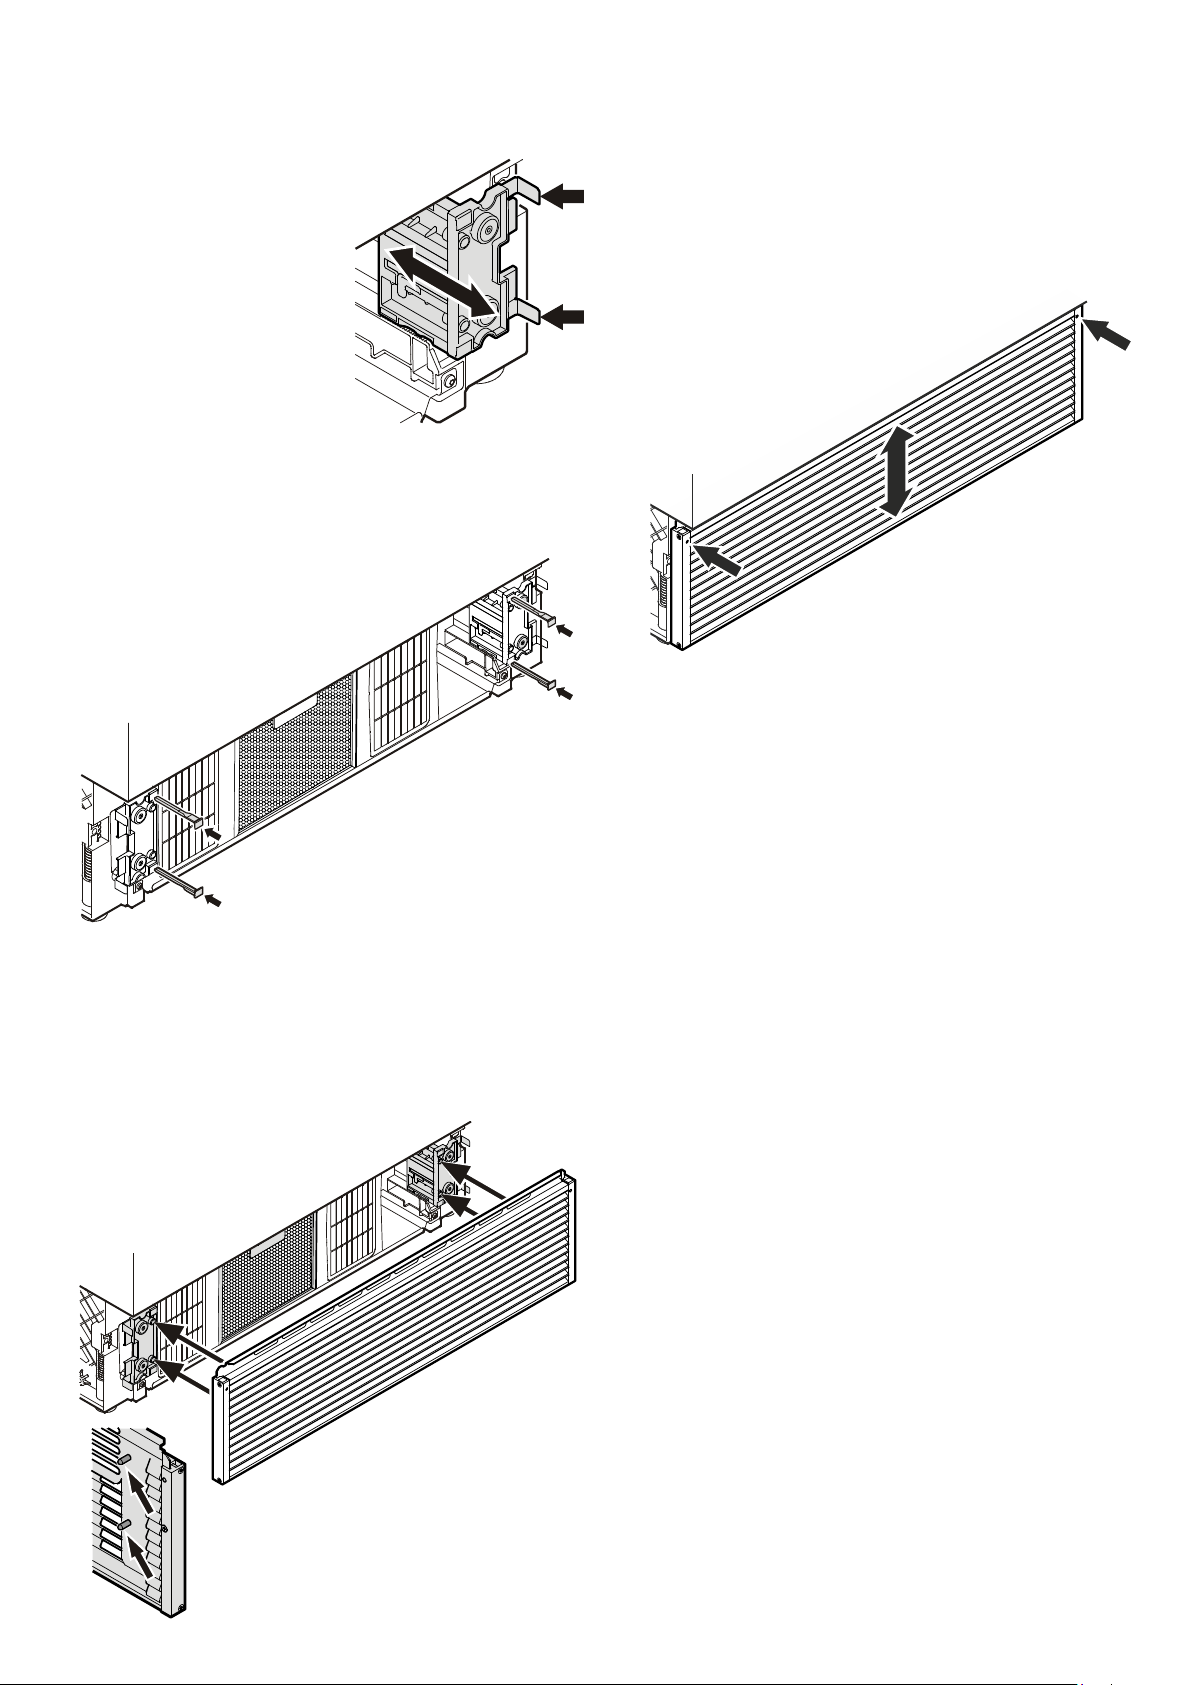
5.
5. Insert the locking pins to block the
supports.
6. Installtheventilationgrille.
Thegrillehasboltsontheinside(seedetailinthedrawing
below).Theseboltsmustbeinsertedintotheholesofthe
supports.
4. Thefrontedgeofthebrackets
is flush with the front of the
ventilationgrille.
Adjustthesupportsaccordingly.
7. Adjusttheheightoftheventilationgrille.
• Loosenthegrubscrewsatthefrontofthegrille(Allen key
A/F2.5).
• Adjusttheventilationgrilletothedesiredheight.
• Tightenthegrubscrews.
7.
4.
6.
25
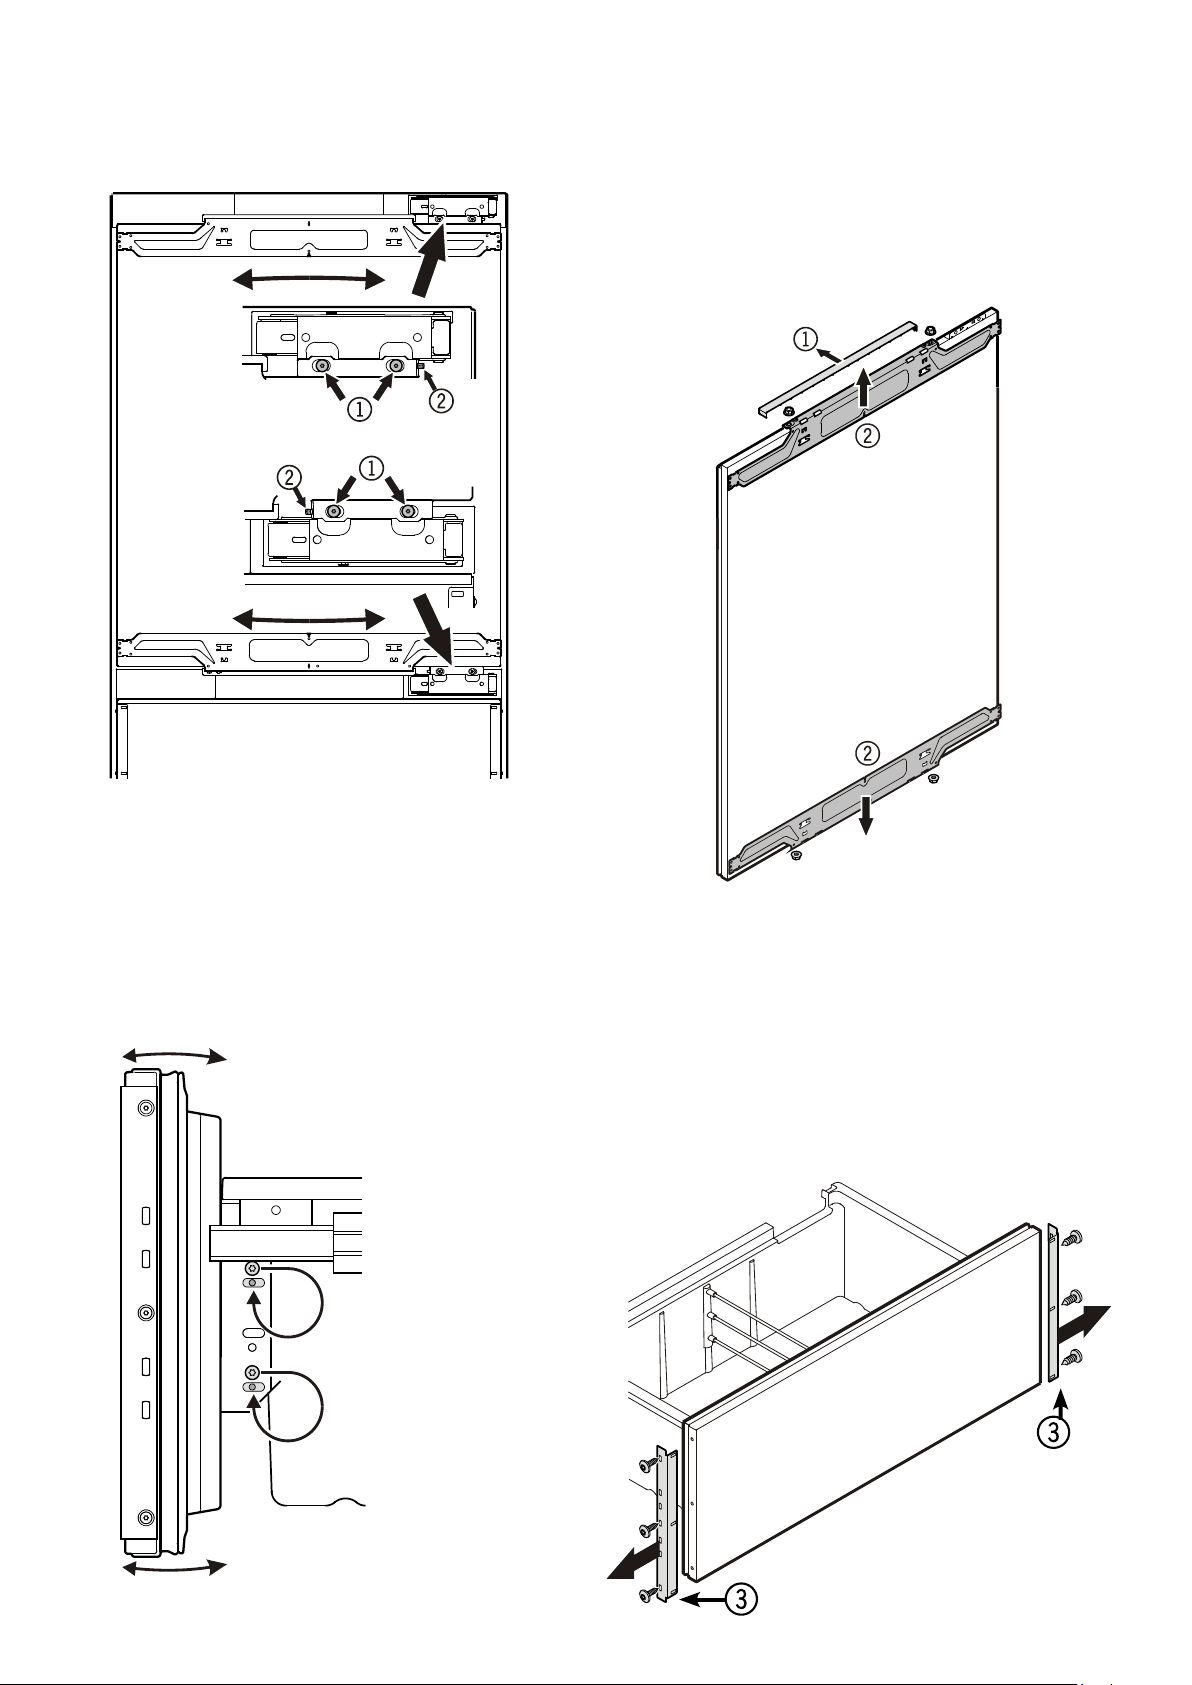
Removing the mounting accessories from the
refrigerator door
Removethecover
1
andunscrewthetopandbottomattach-
mentbrackets
2
fromtherefrigeratordoor.Theseattachment
bracketswillbemountedontotherefrigeratordoorpanel.
Important!
The securing nuts are needed for re-mounting the pre-
assembled door panel onto the refrigerator door.
Removing the mounting accessories from the
freezer drawers
Unscrewtheattachmentbrackets
3
fromthefreezerdrawers.
These attachment brackets will be mounted onto the freezer
panels.
Important!
The screws are needed for re-mounting the pre-assembled
freezer panels onto the freezer drawers.
Adjusting the refrigerator door
Thelateraltiltoftherefrigeratordoorcanbeadjustedifrequired.
Undoscrews
1
.Adjustthelateraltiltusingthegrubscrew
2
(AllenkeyA/F2.5).
Adjusting the front of the drawer
Ifrequired,thefrontofthefreezerdrawerscanbeadjusted.
Transferthescrewsshownintheillustration(ontheleftandright
sidesofthefreezerdrawer)individuallytothelongslotsbelow.
Tighten the screwsin thefront ofthedraweronce itisin the
rightposition.
Side view of the freezer drawer
pulled out
26
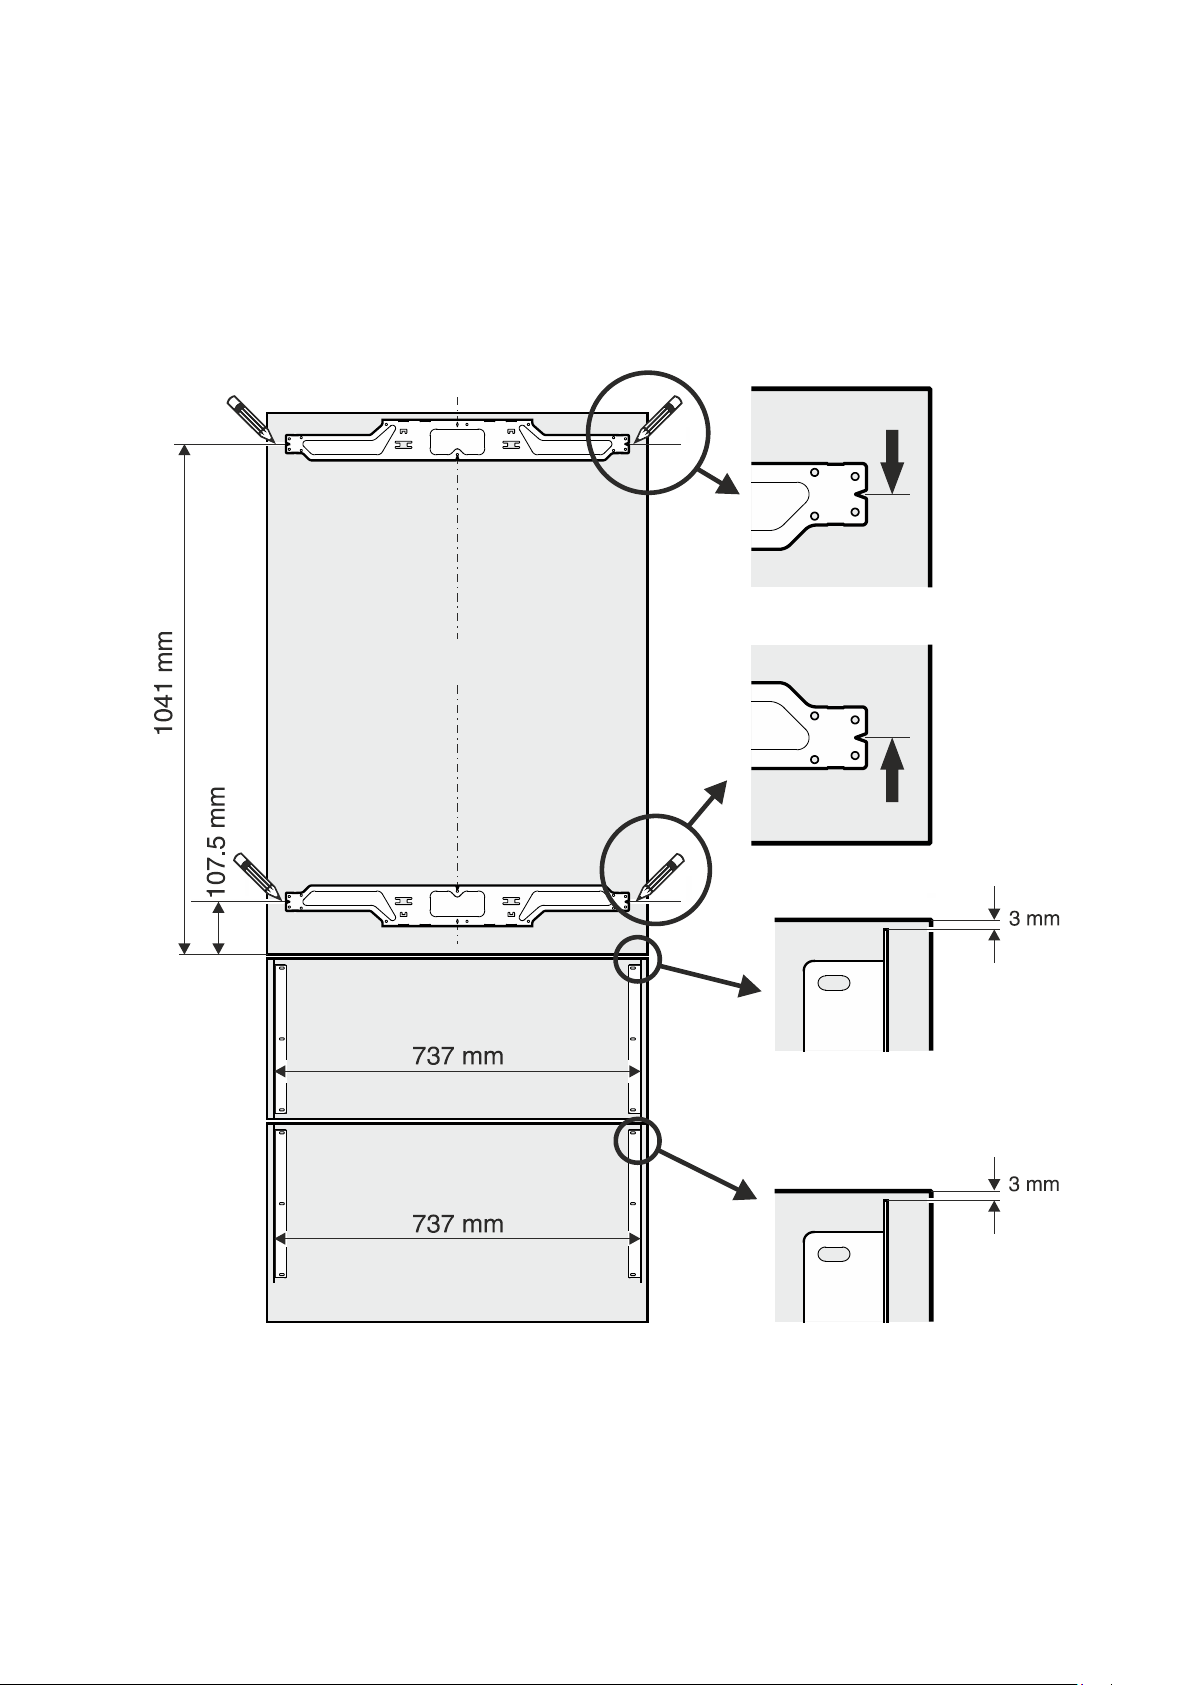
Mounting the attachment brackets onto the door panels
1. Drawaline1041mmfromthebottomsideofthedoorpanel.
2. Drawafurtherline107.5mmfromthebottomsideofthedoorpanel.
3. Alignoneoftherefrigeratordoorattachmentbracketstothetopline,asshownintheillustrationbelow,andsecurewithatleast
6screws(4x14).
4. Alignthesecondrefrigeratordoorattachmentbrackettothebottomline,asshownintheillustrationbelow,andsecurewithat
least6screws(4x14).
5. Secureeachoftheattachmentbracketsthathavebeenremovedfromthefreezerdrawersusing3screws(4x14),asshownin
theillustrationbelow.
Refrigeratordoorpanel
Freezerdrawerpanel
Freezerdrawerpanel
27
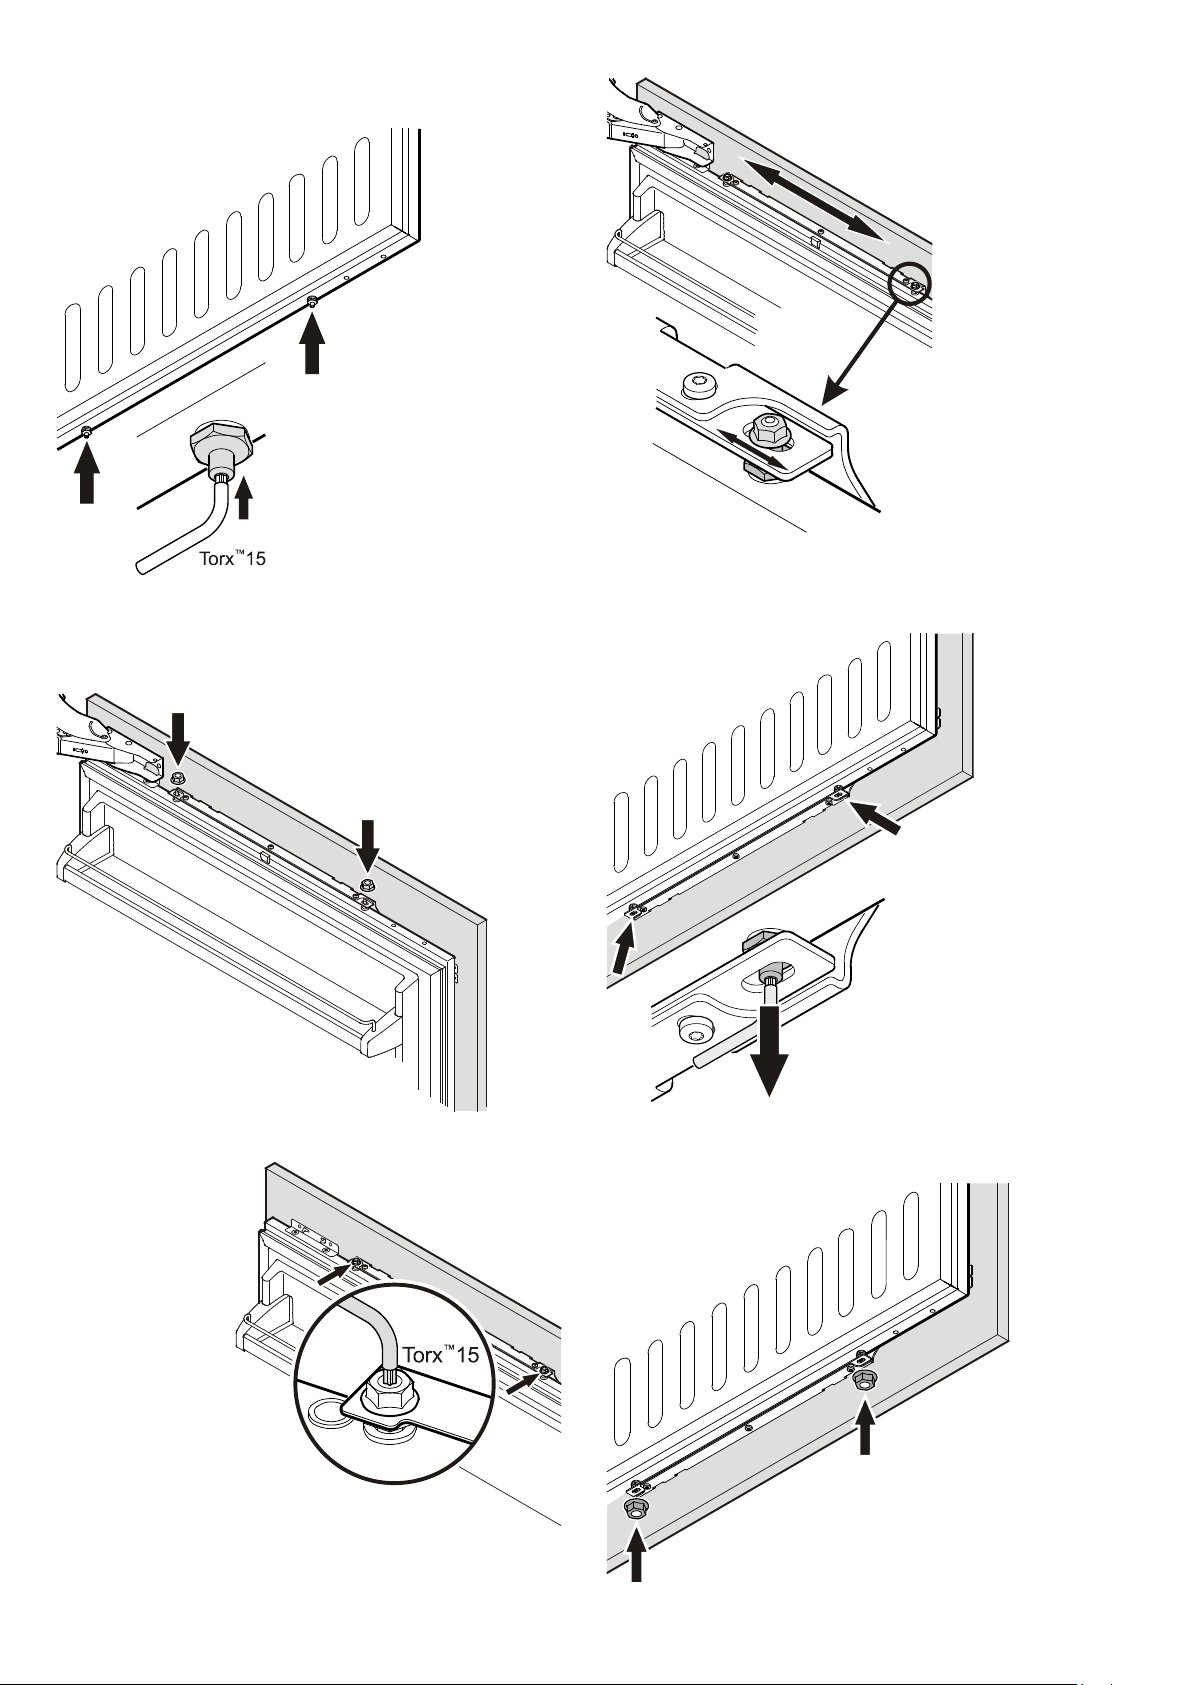
fig. D
Mounting the refrigerator panel
fig. A
fig. B
fig. C
1. Screwintheadjustingpinson
theundersideoftherefrigerator
doorcompletely(fig. A).
2. Opentherefrigeratordoorandsus-
pendtherefrigeratorpanelonthetop
adjustingpins(fig. B).
3. Screwsecuringnutsontotheadjust-
ingpinsandslightlytighten.
4. Closetherefrigeratordoorandchecktheheight
ofthepanel.
5. Adjust the heightofthepanelifnecessary.
Undothesecuringnutsandusetheadjusting
pinstoadjust(fig. C).
6. Adjustthepanelhorizon-
tally(usingthelongslots
intheattachmentbracket)
(fig. D).
7. Tightenthesecuringnuts.
fig. E
fig. F
8. Removetheadjustingpins
(bottom ofthe refrigerator
door)untilthesetouchthe
attachmentbracket(fig. E).
9. Screwonthesecuringnutsandtighten(fig. F).
28
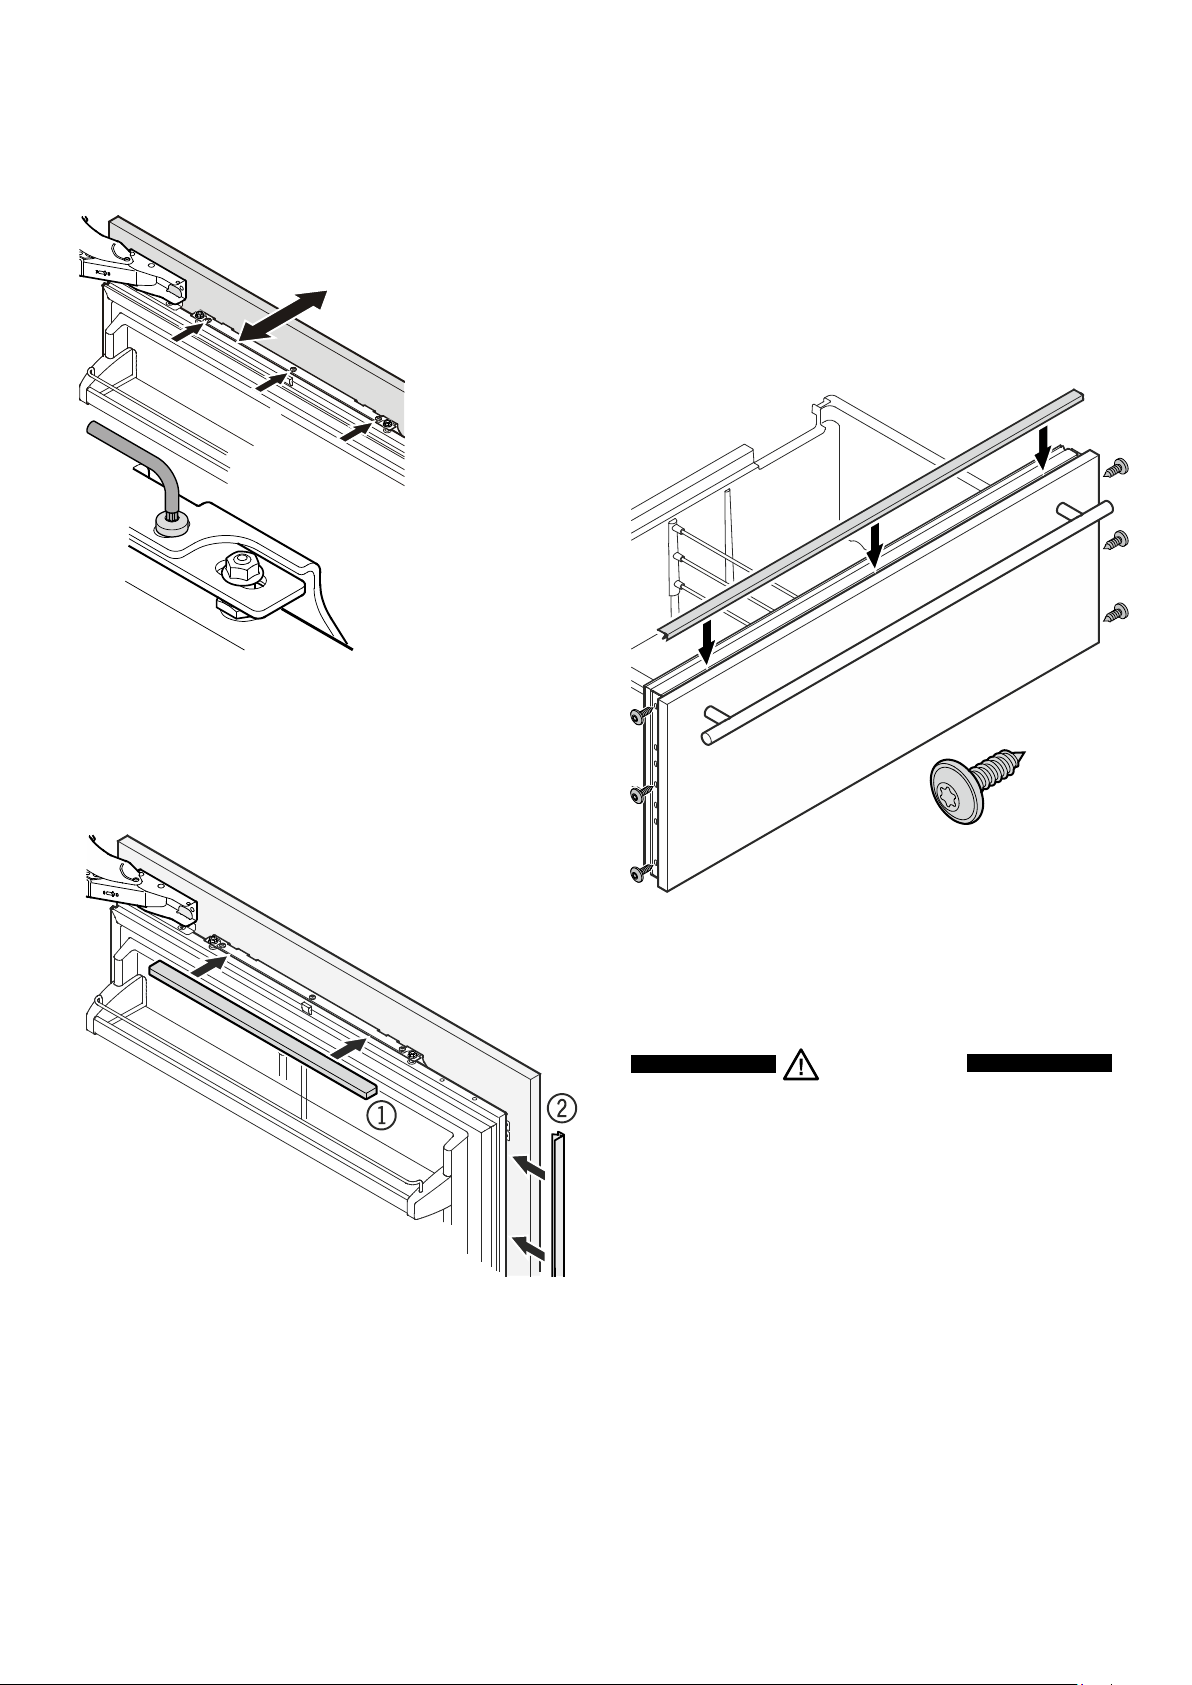
Mounting the freezer panels
1. Pulloutthetopfreezerdrawerandscrewonthepre-assembled
panel.Thesamescrewsmustbeusedasthoseusedtoscrew
ontheattachmentbrackets(3.5x13).
2. Closethefreezerdrawerandcheckthepositionofthepanel.
Adjusttheheightofthepanelbyundoingtheleftandright
screws.Tightenthescrews.
3.Pulloutthebottomfreezerdrawerandmountthepanelinthe
sameway.
4. Forbothdrawers,coverthegapbetweenthedrawerandthe
panelwiththecoverstripssupplied.Removetheprotective
filmfromthetrimandinsertintothegapatthetop.
3.5x13mm
Changing over door hinges
Doorhingesshouldonlybechangedbyatrainedexpert.
WARNING!
Do not try to change over the door hinges your-
self. The refrigerator door hinges are fitted with
strong closing springs. If the hinge accidentally
snaps shut, this can lead to serious injury.
11. Clickthetopandbottomcoversintoplace1 (fig. H)
Insertthecoverstripprovided2betweenrefrigeratordoor
andpanel.
fig. H
fig. G
10. Undothethreescrewsonthetopoftheattach-
mentbracket,adjustthedoorpanelasdisplayed
in fig. Gandthenretightenthescrews.Thesame
procedure can be carried out for the bottom
attachmentbracket.
29

30

31

LiebherrHausgeräteLienzGmbH*Dr.-Hans-Liebherr-Strasse1*A-9900Lienz**www.liebherr.com