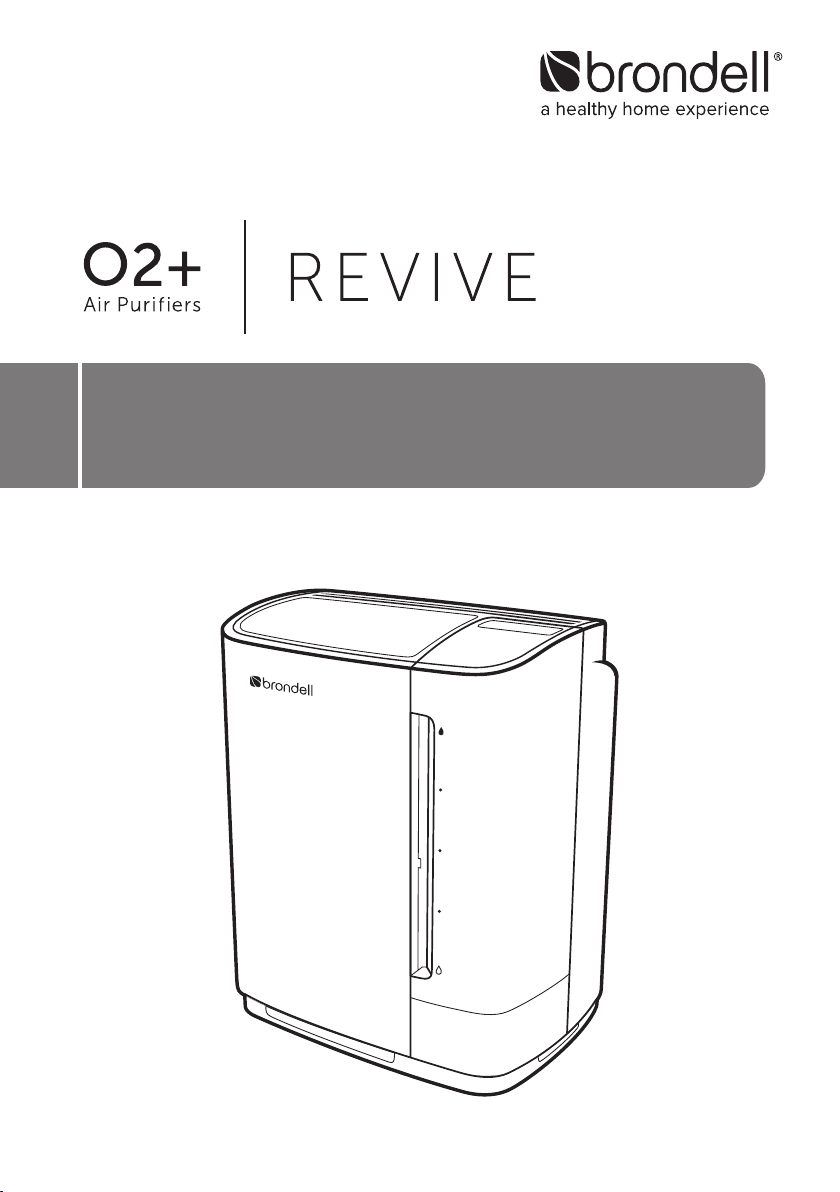
OWNER’S MANUAL
Revive PR50-W, PR50-B
True HEPA Air Purifier & Humidifier


1
CONTENTS
TECHNICAL INFO
29 TROUBLESHOOTING
31 PRODUCT SPECIFICATIONS
32 WARRANTY
33 CONTACT BRONDELL
MAINTENANCE
20 FILTER CHANGE INDICATOR
TRANSLATIONS
34 SPANISH VERSION
68 FRENCH (CANADIAN) VERSION
OPERATION
12 CONTROL PANEL
Buttons
Indicators
14 PREPARING FOR FIRST USE
Installing the Filters
Preparing the Humidifier
16 PRODUCT OPERATION
Powering the Revive On
Operating Modes
Automatic Humidity Control
Auto-Off Timer
Adjusting the Seasonal Allergy Setting
GENERAL INFORMATION
2 SAFETY INFORMATION
6 PRODUCT FEATURES
Main Features
Evaporative Humidification
8 PRODUCT COMPONENTS
Front View
Top View
Rear View
Air Filters
Humidifier Components
Read this Owner’s Manual for correct installation, use, and
maintenance of this product. After reading and completing
installation, keep this manual in a place that is easily accessible.
21 AIR FILTER MAINTENANCE
Air Filter Care Overview
Cleaning the Air Filters
Replacing the Air Filters
25 HUMIDIFIER MAINTENANCE
Cleaning the Humidifier Components
27 ADDITIONAL MAINTENANCE
Cleaning the Exterior
Cleaning the Air Quality Sensor

2
• Do not use a damaged power plug or plug into a loose electric outlet.
• Please connect the power plug to a grounded electrical outlet rated for 120 V ~ 60 Hz.
• Do not move the product by pulling on the power cord.
• Do not handle the product or power plug with wet hands.
• Do not forcefully bend the power cord or place heavy objects on it to prevent it from
being damaged or deformed.
• Do not connect and pull out the power plug or cord repeatedly.
• If the electric outlet is wet, carefully unplug the product and let the electric outlet dry
completely before subsequent use.
• Unplug the product before cleaning, repairing, inspecting, or replacing parts.
• Remove any dust or water from the power plug prior to plugging in.
• Do not plug the product into an electrical outlet or power strip that is being used by too
many other products. Use an electrical outlet adequate for the wattage of the product.
• Unplug the system if it is not going to be used for a long time.
• If the power cord is damaged – do not operate the product and do not attempt to repair,
modify, or replace the cord yourself. Contact the Brondell Service Center toll free at 888-
542-3355 or email us through our website.
• If the product produces a strange noise, a burning smell, or emits smoke, unplug it
immediately from the electrical outlet and contact Brondell. Failure to do so may result in
electric shock or fire.
• Do not insert any wires or sharp objects into the air sensor or any product gaps. This may
result in electric shock, fire, or product damage.
Be careful to keep this safety information. Please read this information
to prevent property loss and ensure safety.
DANGER: If not observed, serious injury or even death may occur as a result.
READ ALL INSTRUCTIONS BEFORE USING
SAVE THESE INSTRUCTIONS
SAFETY INFORMATION
IMPORTANT SAFEGUARDS

3
DANGER: If not observed, serious injury or even death may occur as a result.
• Do not place an electronic or gas heater near the product or place near heating vent. This
may result in fire or product deformation. Do not place any containers filled with water or
other liquids, food, metallic objects, or any flammable material on top of the product. If
foreign material enters the product, this may result in electric shock or fire.
• Do not use the product in locations exposed to excessive moisture or rain and do not
splash water onto the product. Never place the product in or near water.
• Do not use the product in areas where flammable gases or combustible materials are
used or stored.
• Do not spray any flammable materials such as insecticides or air fragrances near or into
the air inlet.
• Do not disassemble, repair, or modify the product yourself. If repair is needed please
contact the Brondell Service Center toll free at 888-542-3355 or email us through our
website.
• Clean the exterior with a damp cloth. Do not clean the product using benzene, thinner, or
abrasives.
• Do not use the air cleaner in a factory or industrial setting where machine oil may be
present in the air.
• Do not drink or ingest any of the water or material from the Water Tray.
• Avoid external impacts to the water tank. A strong impact may damage the water tank.
• Empty the water tray and the water tank before moving the product.
SAVE THESE INSTRUCTIONS
SAFETY INFORMATION (cont.)
IMPORTANT SAFEGUARDS

4
• To reduce the risk of fire, electric shock or injury, read and understand this user guide
before operating this appliance.
• Do not insert fingers or foreign objects into the air quality sensor, air inlet or air outlet.
• Do not let children play with the product or climb on it. Children should be supervised to
ensure that they do not play with the appliance.
• When removing the front cover, exercise caution that no clothing or body parts become
stuck in the top vent of the product.
• This appliance can be used by children, age 8 years and up, and persons with reduced
physical or mental capabilities if they have been given supervision or instruction
concerning use of the appliance in a safe way and understand the hazards involved.
• Cleaning and user maintenance shall not be performed by children without supervision.
• Do not run cord under carpeting. Do not cover cord with throw rugs, runners, or similar
coverings. Do not route cord under furniture or appliances. Arrange cord away from trac
area and where it will not be tripped over.
• Lack of proper cleaning and maintenance may result in fire, electric shock, or injury.
• Unplug or disconnect the appliance from the power supply before servicing.
• This appliance has a polarized plug (one blade is wider than the other). To reduce the risk
of electric shock, this plug is intended to fit in a polarized outlet only one way. If the plug
does not fit fully in the outlet, reverse the plug. If it still does not fit, contact a qualified
electrician. Do not attempt to defeat this safety feature.
WARNING: To reduce the risk of fire, electric shock or injury, read and understand
this user guide before operating this appliance.
SAVE THESE INSTRUCTIONS
SAFETY INFORMATION (cont.)
IMPORTANT SAFEGUARDS

5
• Do not install the product on a sloped or uneven surface.
• Do not apply force or impact to the product.
• Install the product so that no obstacles block the circulation of air around the product.
• Install the air cleaner away from strong artificial lighting or direct sunlight. Do not install
the air cleaner in a location exposed to direct sunlight.
• Replace the filters according to the filter replacement cycles.
• Clean the Mesh Pre-Filter with water regularly and dry it completely before reinstallation
or use.
• Drain all the water from the product before moving it. Move the unit by using the handle
only.
CAUTION: If not observed, minor physical injury or property damage may
occur as a result.
SAVE THESE INSTRUCTIONS
SAFETY INFORMATION (cont.)
IMPORTANT SAFEGUARDS
6
MAIN FEATURES
PRODUCT FEATURES
Dual True HEPA Air Filtration
Both of the Revive's True HEPA filters capture 99.97% of
particles 0.3µ and larger. The filter system has been optimized
to quickly remove pollutants from the air.
Efficient Double Suction System
The Revive utilizes a dual-filter system, with filters in the front
and in the rear. With two fans and two air inlets, the Revive
cleans the air quickly and efficiently.
Air Quality Indicator
The Air Quality Indicator is a light that changes color in real time
to indicate the air quality of the room, as measured by the Air
Quality Sensor.
Four Operating Modes
In Auto Mode and Eco Mode, the air flow speed is
automatically controlled based on the air quality in the room.
In Allergen Mode, the fan speed automatically goes to
maximimum, quickly removing pollutants in the room.
In Fan Speed Mode, or Manual Mode, the fan speed is set
to your liking, regardless of the air quality in the room.
Auto-Adjusting Humidifier
Both a Humidifier Filter and a Humidity Sensor work together to
control the amount of moisture released based on the room's
temperature and humidity level.
The Revive also features Evaporative Humidification. See page
7 for more details.
7
EVAPORATIVE HUMIDIFICATION
Humidification Method
The humidifying method used in the Revive is
the Evaporative Humidification method. This
method uses three parts: water tank, water tray
and wick filter. The water tank supplies water to
the water tray as the wick filter absorbs water.
Air is drawn into the Revive and passes through
the wick filter humidifying the air and expelling
it back into the room.
The expelled air temperature may feel cooler than the current room temperature. This is due to
the air picking up moisture through the wick filter and losing heat. Depending on the room size
this may have a cooling eect on the room’s temperature.
Be aware that the humidifying eect on the room may be aected by the surrounding humidity
or temperature. If the humidity is high or the temperature is low, the amount of moisture
supplied by the humidifier may be low.
Evaporative Method Advantages
With the Evaporative Humidification Method, the water particles used to humidify the room’s
atmosphere are small and light-weight. The smaller particle size can travel through the air
more easily and eciently, providing an even humidity throughout the room instead of over-
saturating the immediately-surrounding area.
Evaporative Humidification is self-regulating, as the room’s atmosphere determines how much
water evaporates from the humidifier into the air.
Coverage
The Revive’s Humidifying feature is designed for optimum performance for a room of 350
square feet. If the Revive is used in a larger room, the humidifier may be less eective. To
humidify a larger space set the fan speed to 3 in Humidifying Air Purifier Mode.
Humid air
Dry air
8
FRONT VIEW
TOP VIEW
PRODUCT COMPONENTS
1. Front Cover
2. Mesh Pre-Filter
3. Active Carbon Filter
4. True HEPA Filter
5. Control Panel
6. Water Tank
7. Humidifier Filter
8. Humidifier Filter Tray
9. Water Tray
1
2
3
4
6
5
7
8
9
1. Air Quality Indicator
2. Air Outlet Vents
3. Water Tank Handle
4. Control Panel
(see pages 12-13 for
more details)
1
2
3
4
9
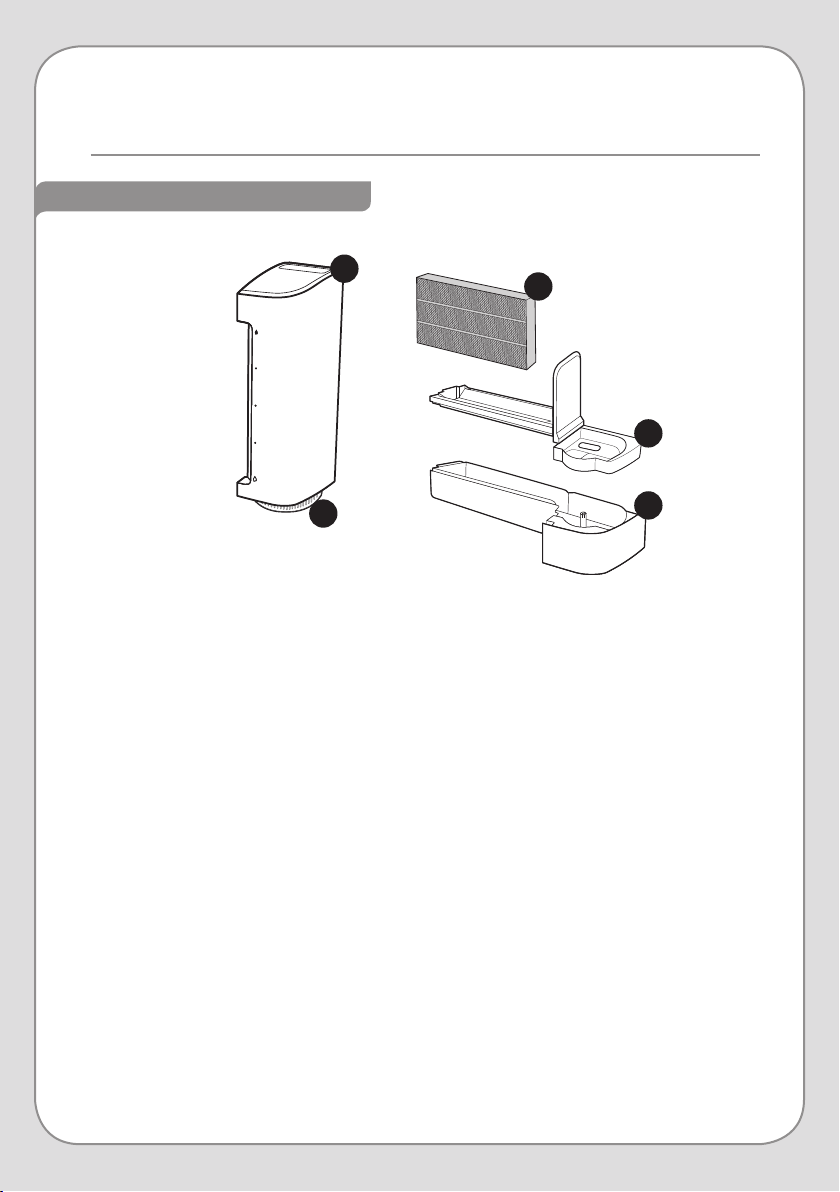
REAR VIEW
1. Handle
2. Power Cord
3. True HEPA Filter
4. Specialized Filter
5. Rear Cover
1
2
3
4
5
10
PRODUCT COMPONENTS (cont.)
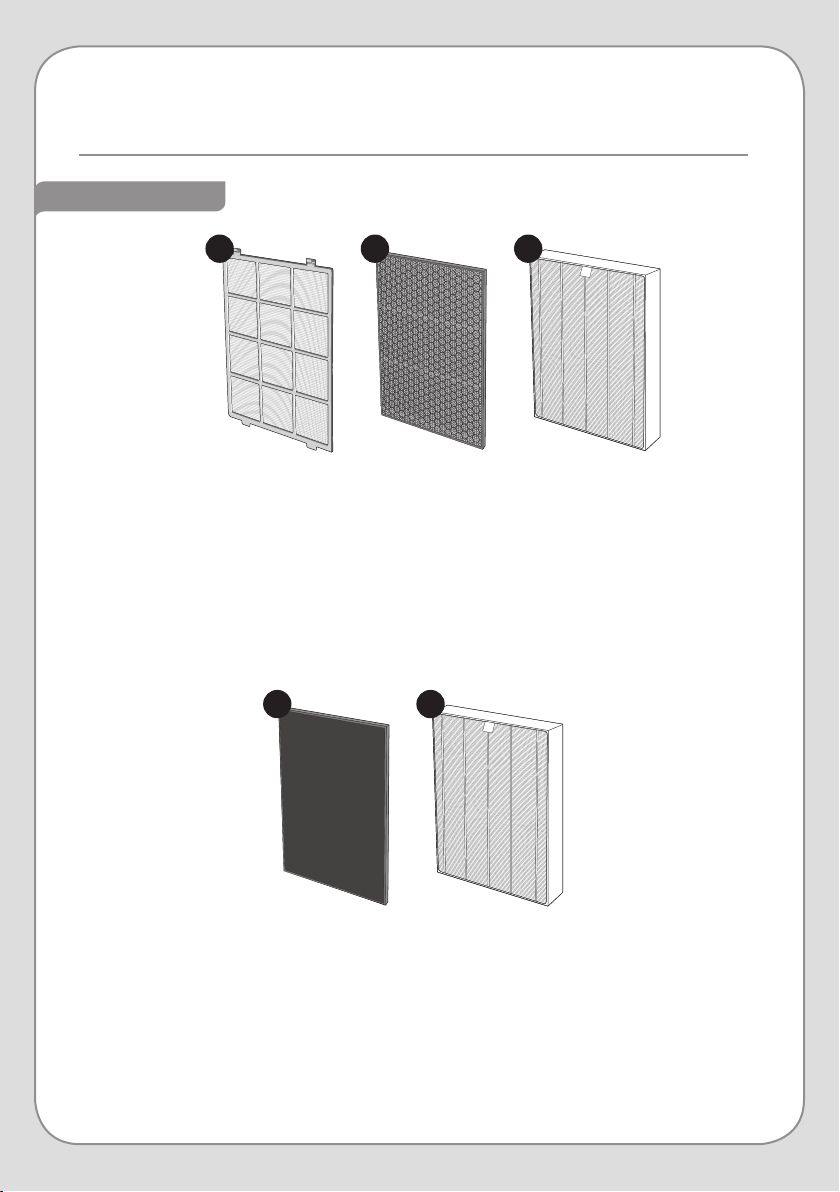
AIR FILTERS
FRONT
REAR
1. Mesh Pre-Filter
The Mesh Pre-Filter removes dust, mold, human hair, pet hair, and other large particles.
2. Active Carbon Filter
This filter contains granulated carbon, which traps and removes odors, harmful gases, and
VOCs.
3. True HEPA Filter
Our True HEPA Filter removes 99.97% of particles 0.3 microns and larger, like dust, cigarette
smoke, and pollen. It also reduces airborne bacteria and mold spores.
1. Specialized Filter
The Revive comes with an O-Gassing Reduction filter. Using a proprietary catalyst, this
filter eectively removes invisible substances like formaldehyde and VOCs (volatile organic
compounds that include benzene and toluene) that contribute to “Sick House Syndrome”
and can cause health and respiratory issues. Other Specialized Filters can be purchased
separately.
2. True HEPA Filter
This filter is exactly the same as the HEPA filter in the front of the Revive in order to give you
twice the filtration power.
1 2 3
21
11
HUMIDIFIER COMPONENTS
1. Water Tank
Stores 3.5 Liters of water and supplies water to the Water Tray.
2. Water Tank Cap
Secures water inside the Water Tank.
3. Humidifier Filter
The Humidifier Filter absorbs water. As the purified air from the air outlet passes through the
Humidifier Filter, naturally-humidified air is released.
4. Humidifier Filter Tray
Holds the Humidifier Filter in place. This tray sits on top of the Water Tray.
5. Water Tray
Supplies an appropriate amount of water from the water tank to the Humidifier Filter.
1
3
2
4
5
12
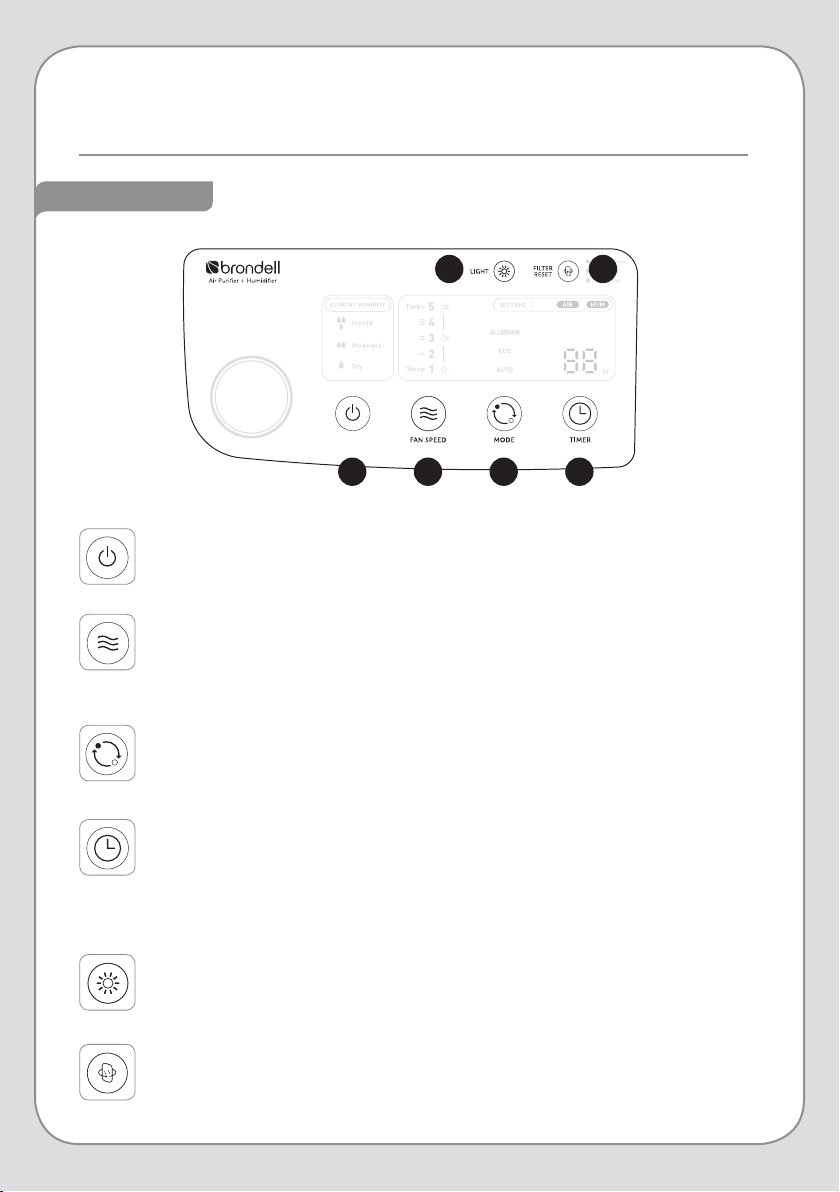
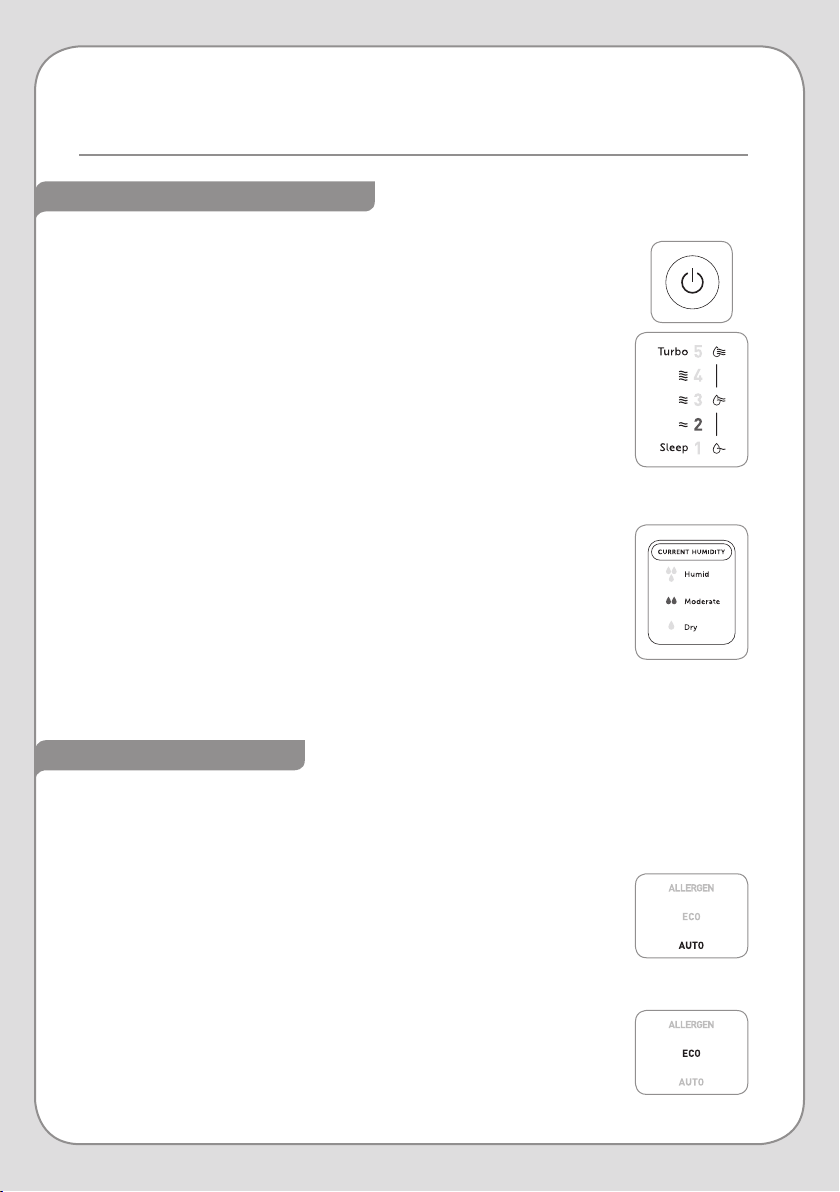
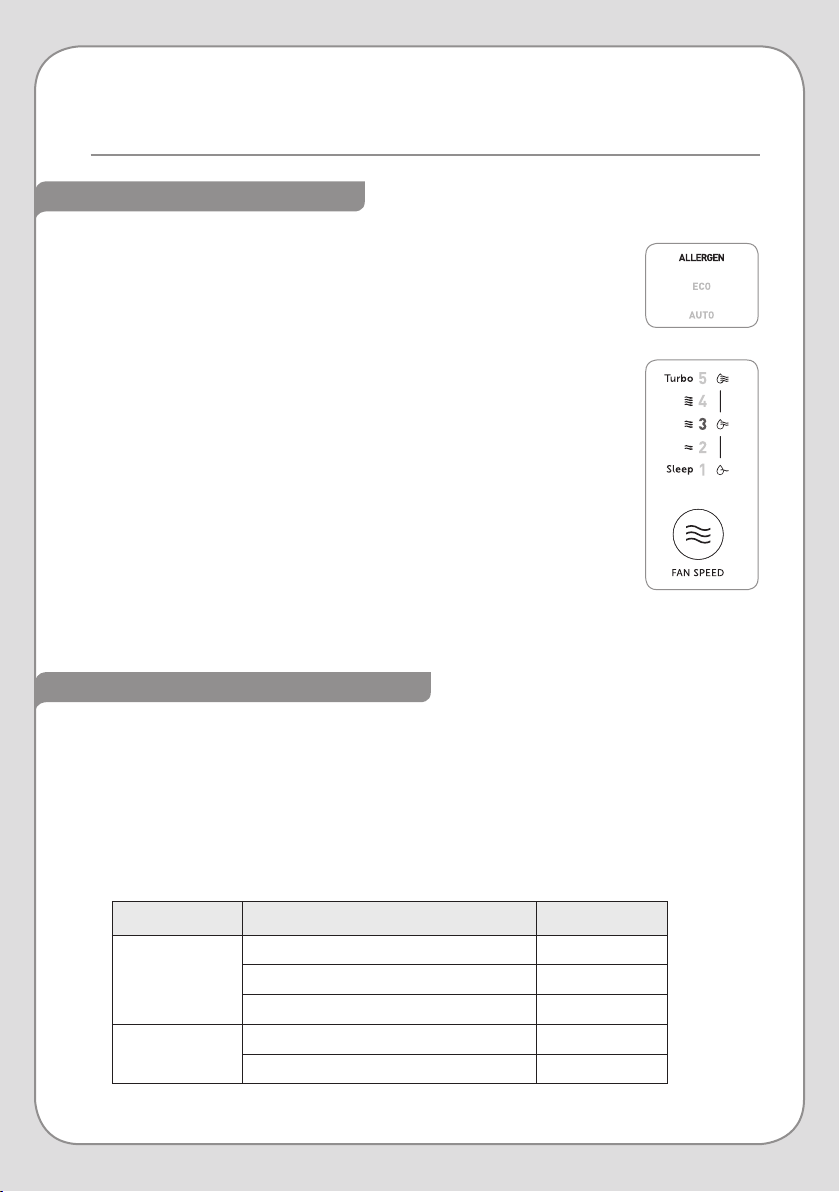
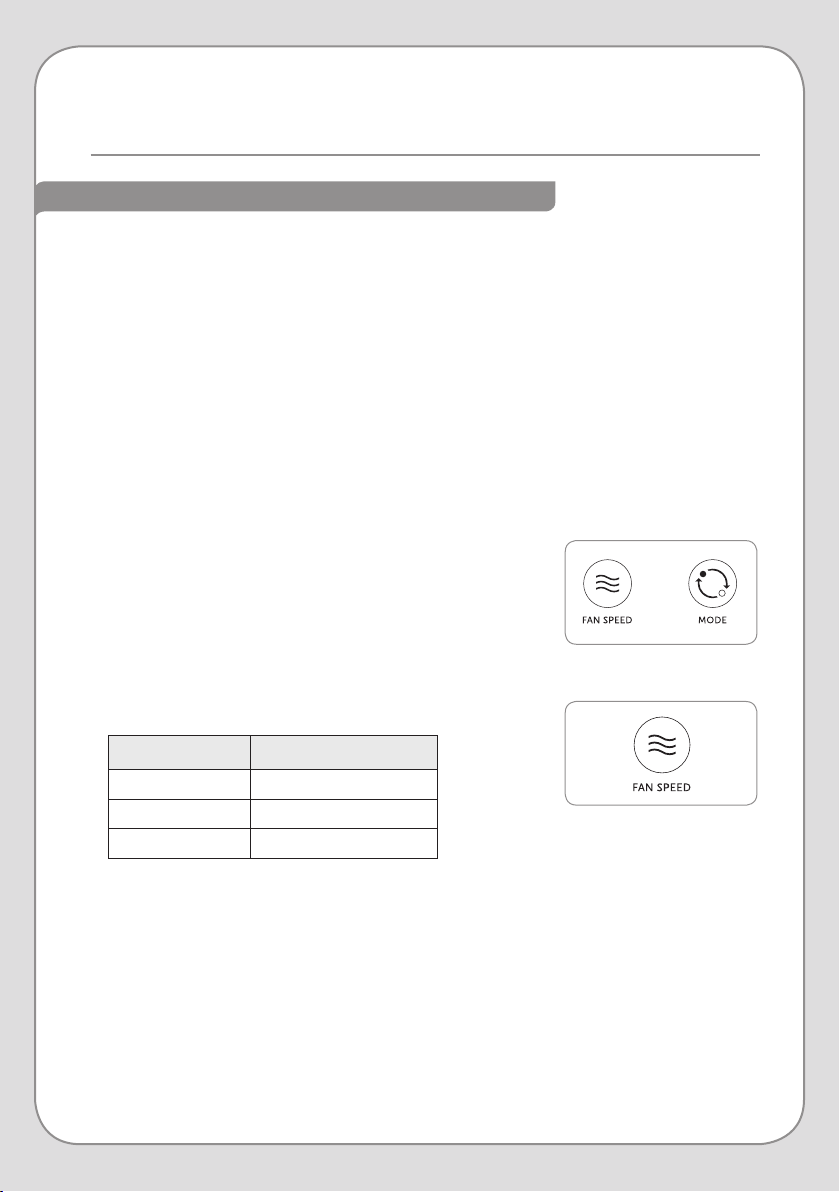
CONTROL PANEL
BUTTONS
1. Power Button
Powers the Revive on and o. To turn o the power, press and hold the power
button for approximately one second.
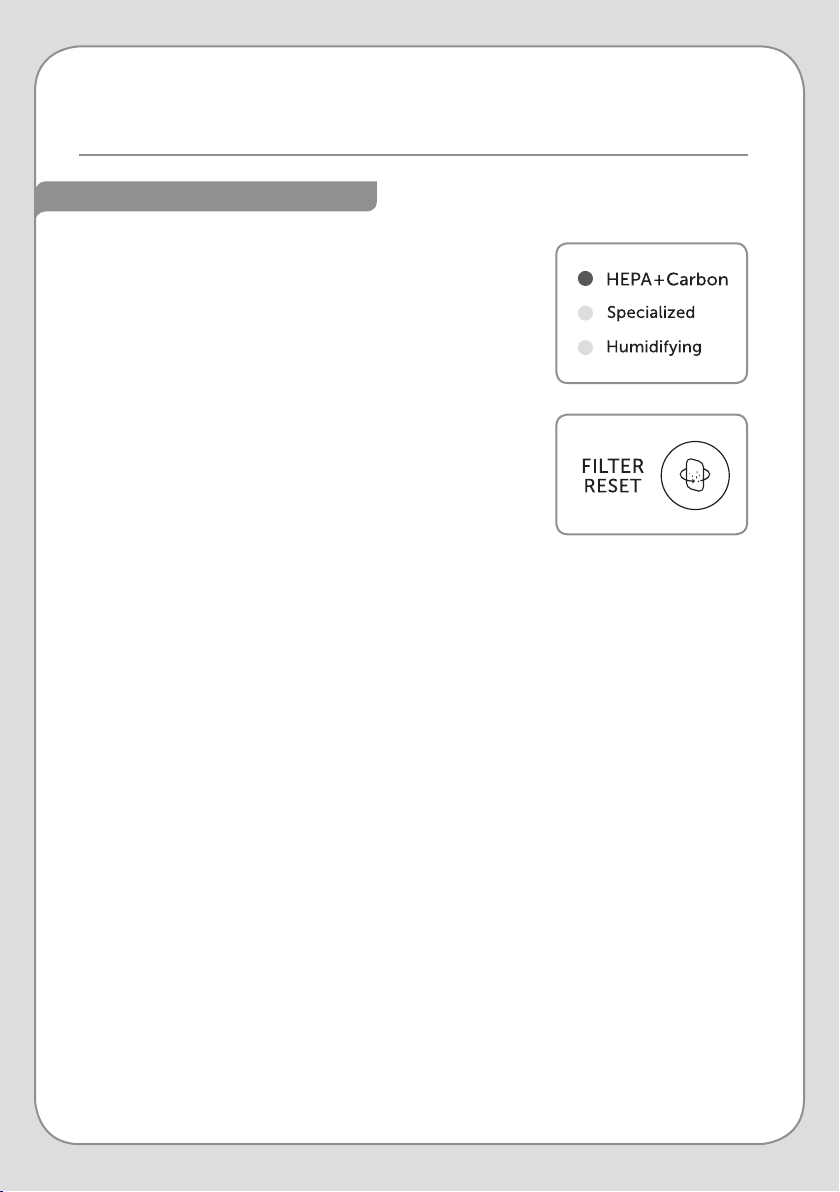
5. Light On/O Button
All displays except Air Purification indicator (AIR) and Humidifying indicator (HUM)
are turned o. These are indicated by #6 on the diagram on page 13.
6. Filter Reset Button
Press this button to reset the Filter Change Timer after you have replaced filters
in the Revive (see page 20 for more details).
4. Timer Button
This activates the Auto-O Timer. Pressing this button increases the duration
of the timer from 1 to 12 hours, in one-hour increments (indicated by #7 on the
diagram on page 13). Once the timer has expired, the Revive will power o.
To cancel the auto-o timer, press and hold the Timer Button for two seconds.
3. Mode Button
This button toggles between the three “automatic” Operating Modes: Auto, Eco,
and Allergen. See pages 16–17 for more detail on the individual operating modes.
2. Fan Speed Button
Use it to select the desired fan speed. When you touch the button, the fan speed
indicator changes in ascending order from 1 to 5. 1 is the lowest fan speed, and 5
is the highest.
41 2 3
5 6
13
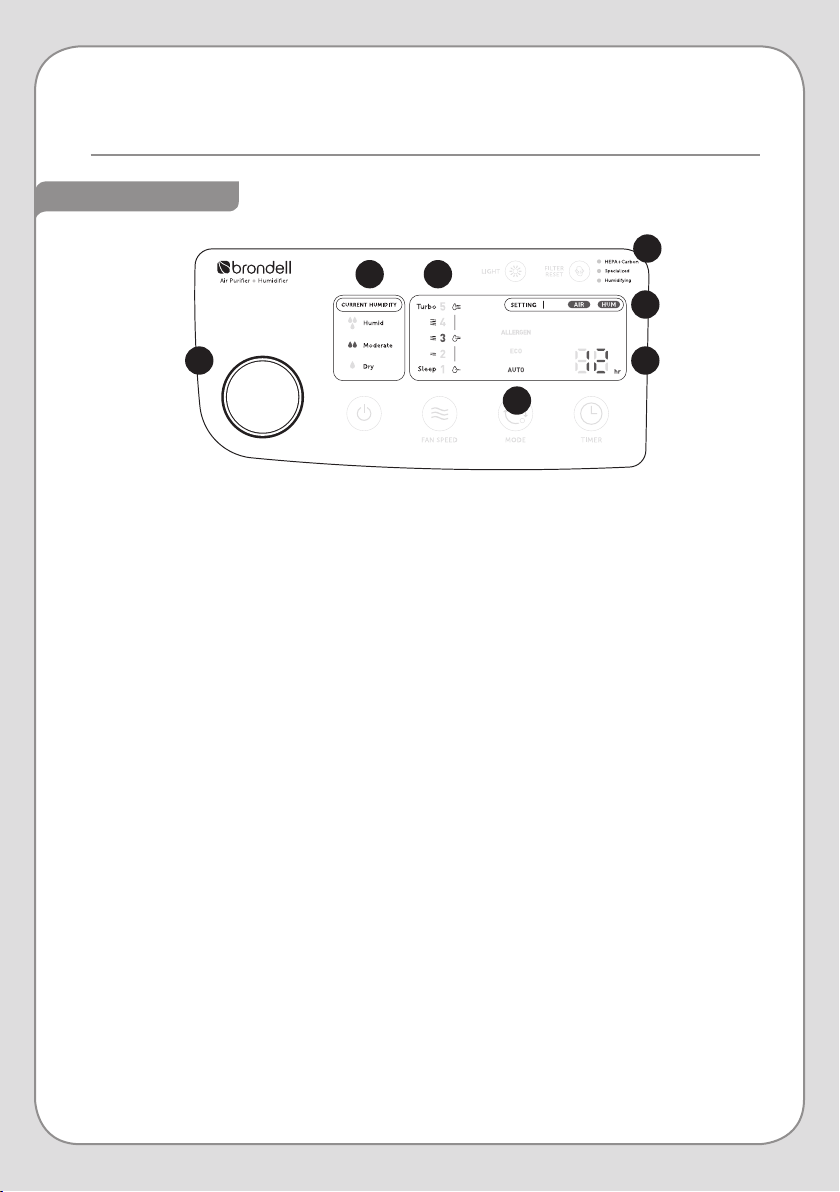
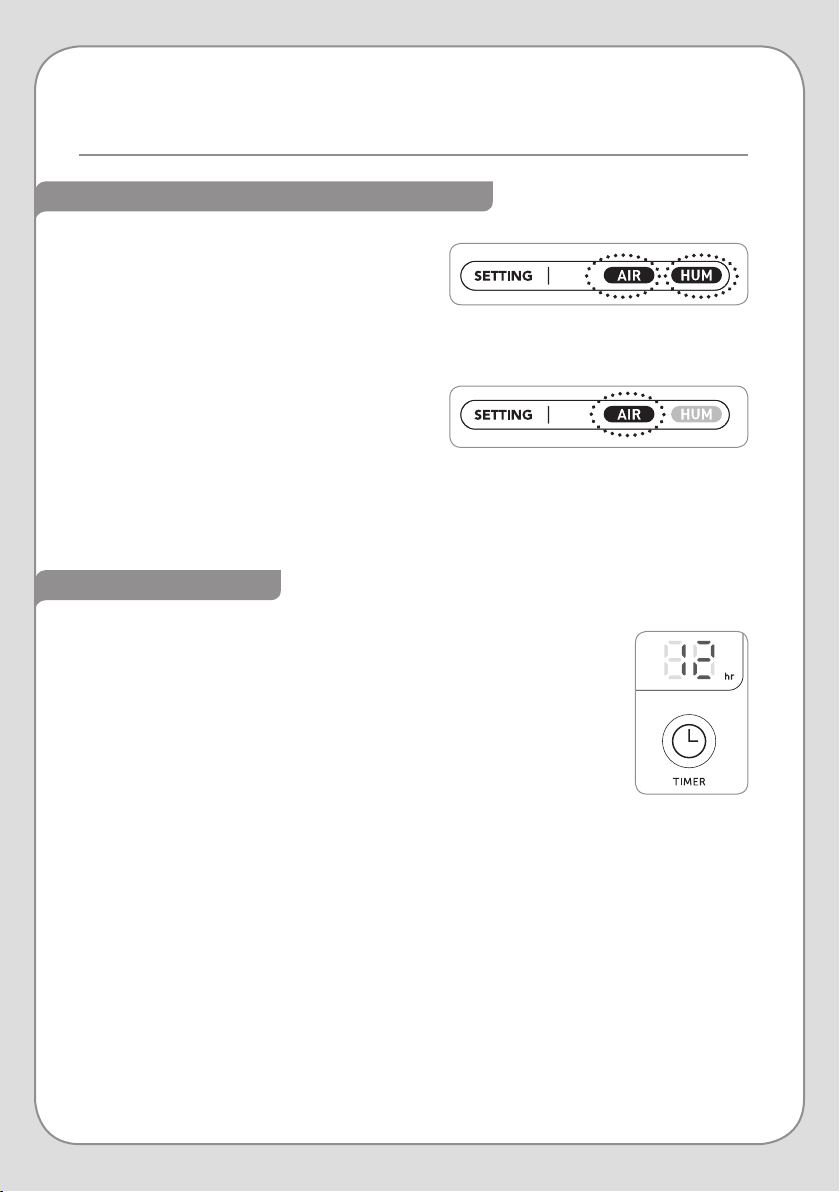
INDICATORS
1. Air Quality Indicator
Indicates the air quality in the room with three colors:
Blue = Good air. Violet = Fair air. Red = Poor air.
6. Air Purification / Humidifying Indicators
When the Water Tank has water in it, both the “AIR” and “HUM” symbols are displayed. This
indicates that the Revive is cleaning and humidifying the air. When the Water Tank is empty,
only the “AIR” symbol will be illuminated, meaning the Revive is not humidifying the air.
7. Timer Indicator
This displays the amount of time set for the Auto-O Timer. The duration of the timer
changes from 1 to 12 hours, in one-hour increments.
4. Mode Indicator
This shows which of the three “automatic” Operating Mode is currently active: Auto, Eco, or
Allergen. See pages 16–17 for more detail on the individual operating modes.
5. Filter Change Indicator
This shows which of the filters needs changing.
3. Fan Speed Indicator
This shows the current fan speed. The indicator changes in ascending order from 1–5.
1 is the lowest fan speed, and 5 is the highest.
2. Current Humidity Indicator
Indicates the humidity level in the room. See pages 17–18 for more details.
4
1
2 3
6
7
5
14
PREPARING FOR FIRST USE
Be sure to remove the plastic wrapping from the filters in the front and back of the
Revive before turning it on.
This product is for indoor use only.
When the unit is not in use, unplug it from the electrical outlet.
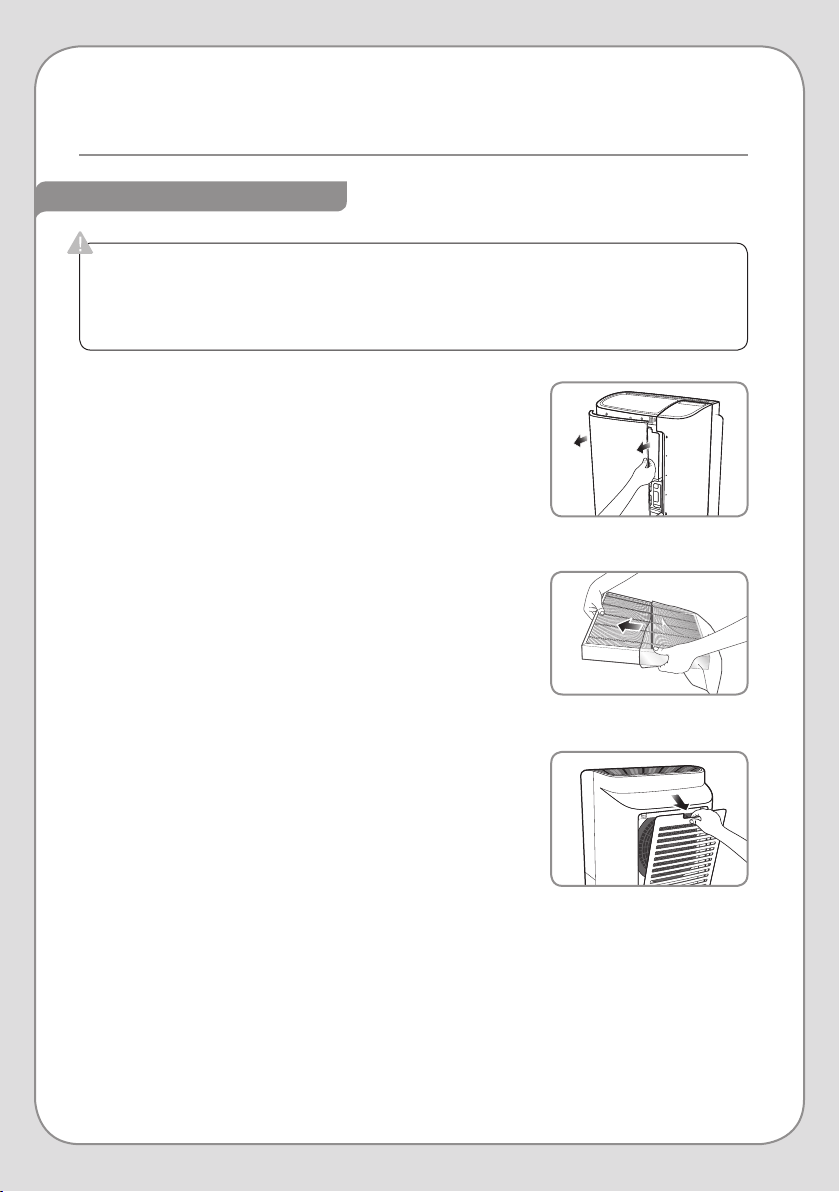
INSTALLING THE FILTERS
1. Remove the Front Cover by pulling the top of the cover
towards you. Lift up to disengage the bottom hinges.
2. Remove the Mesh Pre-Filter by pressing down on the two
tabs at the top of the filter, then pull the filter out of the
machine. Remove the other two filters.
3. Remove the plastic wrapping from the Active Carbon and
True HEPA filters.
4. Put the filters back into the machine in the following order,
ensuring that the pull-tabs on the True HEPA and Active
Carbon Filters face forward:
a. True HEPA Filter (this goes in first)
b. Active Carbon Filter
c. Mesh Pre-Filter
5. Put the Front Cover on the Revive. Be sure it is seated
correctly, as the unit will not power on if the Front Cover is
not secure.
6. Remove the Back Cover by pulling down on the
indentation at the top and lifting it away from the body of
the machine.
7. Remove the Specialized and True HEPA Filters from the
machine and remove the plastic wrapping from both
filters.
8. Put the filters back into the machine in the following
order, ensuring that the pull-tabs on the True HEPA and
Specialized Filters face forward:
a. True HEPA Filter (this goes in first)
b. Specialized Filter
9. Put the Back Cover on the Revive and ensure it is securely
in place.
Step 1
Step 3
Step 6
15
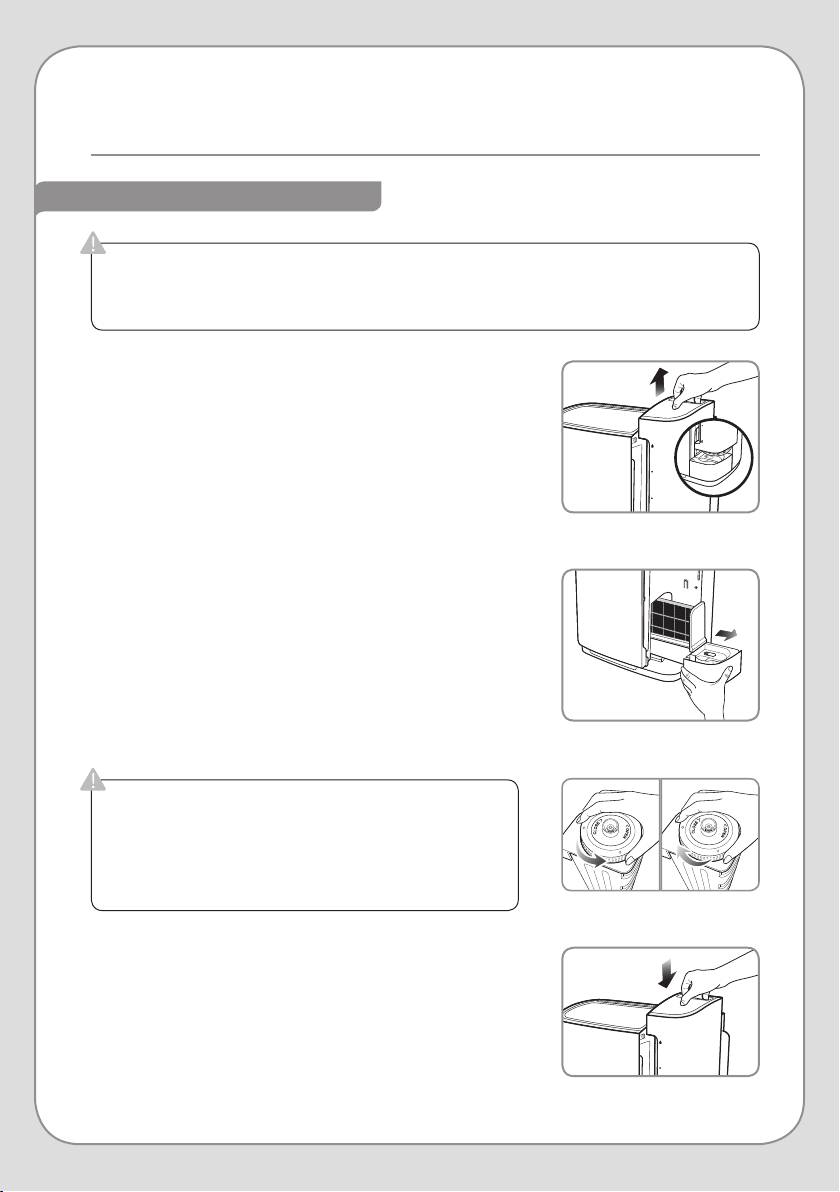
1. Remove the Water Tank by pulling the handle up. Then
move the tank away from the machine.
2. Lift the Water Tray slightly and slide it out of the machine.
3. Remove the Humidifier Filter from the Water Tray, remove
the plastic wrapping from the filter, and place back into
the Water Tray.
4. Slide the Water Tray back into the machine, ensuring that
it is seated correctly.
5. Fill the Water Tank:
a. Flip the tank over to access the Water Tank Cap.
b. Remove the Water Tank Cap by turning it counter-
clockwise.
c. Fill the Tank with cold water to the specified fill line.
d. Screw the Water Tank Cap back onto the Tank by
turning it clockwise until tight.
6. Put the Water Tank back onto the machine, ensuring that
it is seated correctly.
Step 1
Step 2
Step 5
Step 6
PREPARING THE HUMIDIFIER
NOTE: The amount of moisture supplied by the Humidifier
Filter may decrease when there is scale build-up.
Check the Humidifier Filter periodically and clean
it when necessary (refer to Step 3 on page 26 for
instructions).
If you do not want to use the Humidifier function, do not perform the steps below. Instead,
remove the Humidifier Filter and store it in a cool, dry location.
If the Water Tank or Water Tray are not properly seated, the Revive will not power on.
If the Water Tank is not properly tightened and seated,
leaking and product malfunction may occur.
Do not fill the Water Tank with water over 104°F.
Do not add disinfectants, essential oils, fragrances, or
any other additives to the water in the Water Tank.
16
PRODUCT OPERATION
POWERING THE REVIVE ON
OPERATING MODES
NOTE: If the Revive was previously in Auto Mode, it will begin sensing
the air quality in the room when powered on. During this time,
the Fan Speed will be set to 2, and the Air Quality Indicator will
show Violet. After 10 seconds, the Revive will adjust the fan
speed and Air Quality Indicator according to the air quality in
the room.
NOTE: During the five-second waiting period, the Humidity Indicator
lights will flash in sequence from Dry to Humid
Auto Mode
During Auto Mode, the Revive checks the air quality in the room every
10 seconds and adjusts the Fan Speed accordingly. The Air Quality
Indicator will also change depending on the air quality:
Blue = Good air. Violet = Fair air. Red = Poor air.
Eco Mode
In Eco Mode, the Revive will run on Fan Speed 2 for ten minutes, and
then power the fan o for thirty minutes. This cycle will alternate until
you change to a new Operating Mode.
1. To power the Revive on, press the Power Button. The Operating Mode
and Fan Speed setting will automatically resume with the settings from
when the unit was previously powered on.
1. Once the Revive has powered on and performed the air quality and
humidity auto-sensing, you are free to choose between the four
dierent Operating Modes:
2. Also, when the Revive is powered on, the Humidity Indicator turns on
after a period of five seconds, reflecting the humidity level in the room.
Dry = 40% humidity or less
Moderate = 40– 60% humidity
Humid = 60% humidity or more
Step 1
Step 2
17
OPERATING MODES (cont.)
AUTOMATIC HUMIDITY CONTROL
NOTE: Automatic Humidity Control will only work if the Water Tank contains water and is
seated correctly.
Allergen Mode
Allergen Mode is a three-step process by which the Revive’s fan speed
is maximized and then throttled-down over a period of time in order to
purify a large amount of air in the least amount of time. Below are the
steps and their durations:
Step 1: Ten minutes at Fan Speed 5
Step 2: Five minutes at Fan Speed 4
Step 3: Five minutes at Fan Speed 3
The timing and fan speed are pre-determined and do not change with
a change in air quality, unless you intervene to change to a new
Operating Mode.
After these steps have concluded, the Revive will switch to Auto Mode.
Fan Speed Mode
This can also be referred to as Manual Mode. Select the Fan Speed
at which you want the Revive to operate, and the fan speed with stay
constant, regardless of changes to the air quality in the room.
1. In Auto Mode and Eco Mode, the fan speed will change according to a combination of
humidity and air quality sensor readings. These combinations, and their resulting fan
speeds, are outlined below.
HUMIDITY AIR QUALITY & INDICATOR COLOR FAN SPEED
Humid or
Moderate
Level 1 – Blue 2
Level 2 – Violet 3
Level 3 – Red 4
Dry
Level 1 – Blue 3
Level 2 or 3 – Violet or Red 4
18
PRODUCT OPERATION cont.
AUTOMATIC HUMIDITY CONTROL (cont.)
AUTO-OFF TIMER
2. When the Revive is actively evaluating the
air quality and humidity levels, the “AIR” and
“HUM” indicators will be illuminated. This is
also an indication that the Water Tank has a
sucient amount of water for the humidifier
to function.
3. When the Water Tank is empty, or no longer
contains a sucient amount of water, the
Revive will stop Humidifying. In this instance,
only the “AIR” indicator will be illuminated.
To ensure that the Revive always has the
humidifier active, ensure that the Water Tank
contains sucient water.
1. You can set the Revive to power o entirely after a set amount of time.
Press the Timer Button until the desired duration appears. The Revive
will power o when the timer expires.
2. The Auto-O Timer can be set for 1–12 hours, in one-hour increments
3. To cancel the Auto-O Timer, press and hold the Timer Button for two
seconds.
Step 2
Step 3
Step 1
19
ADJUSTING THE SEASONAL ALLERGY SETTING
1. Touch and hold both the Fan Speed Button and the Mode
Button for two seconds to enter the Seasonal Allergy
Setting Mode. The fan speed numbers will blink while you
are making your selection.
2. Press the Fan Speed button to adjust the Seasonal
Allergy Setting. Each of the first three fan speed settings
corresponds to the sensitivity setting in Seasonal Allergy
Setting Mode.
3. If no button is pressed for 10 seconds after entering into
Seasonal Allergy Setting Mode, the previous sensitivity
level is automatically selected, and the Revive will return
to the last Operating Mode it was in.
During “allergy season”, or periods when pollen and other allergens are more prevalent in
your area, you may opt to increase the sensitivity of the Air Quality Sensor so that the Revive
increases the fan speed more frequently in Auto or Eco Mode.
Conversely, if you live in an area where allergens are not common, you can decrease the
sensitivity of the air quality sensor so that the Revive stays at a low fan speed more often in
Auto or Eco Mode.
NOTE: There are three levels for the Seasonal Allergy Setting:
Level 1: Low Sensitivity (for low allergen levels)
Level 2: Standard Sensitivity
Level 3: High Sensitivity (for high allergen levels)
The default Seasonal Allergy Setting is Level 2. To adjust the Revive’s Seasonal Allergy Setting,
follow the steps below.
FAN SPEED SENSITIVITY LEVEL
1 Level 1: Low
2 Level 2: Standard
3 Level 3: High
Step 1
Step 2
20
FILTER CHANGE INDICATOR
FILTER CHANGE INDICATOR
When the filter replacement cycle has been reached for one
or more of the filters, the Filter Change Indicator becomes
illuminated. A light will come on next to the name of the filter
(or filters) that needs to be replaced.
1. Follow the steps on page 24 to replace the aected
filter(s).
2. Once that process is complete, press the Filter Reset
Button for two seconds to reset the Filter Change
Indicator.
3. Forced reset of the Filter Change Indicator:
If you change any one of the filters before the
corresponding Filter Change Indicator has illuminated,
you will need to force the timer for that filter to reset.
a. Press and hold the Filter Reset Button for two seconds.
The “HEPA+Carbon” indicator will begin to blink.
b. Once the “HEPA+Carbon” indicator is blinking, press
the Filter Reset Button until the filter (or filters) you
replaced are blinking.
c. Press and hold the Filter Reset Button for two seconds
to reset the timer. If you replaced multiple filters, repeat
this process until all the filter timers have been reset for
the filters you replaced.
NOTE: If there is no activity for ten seconds after
completing step a, this reset mode will be cancelled and the
“HEPA+Carbon” indicator will stop blinking.
21
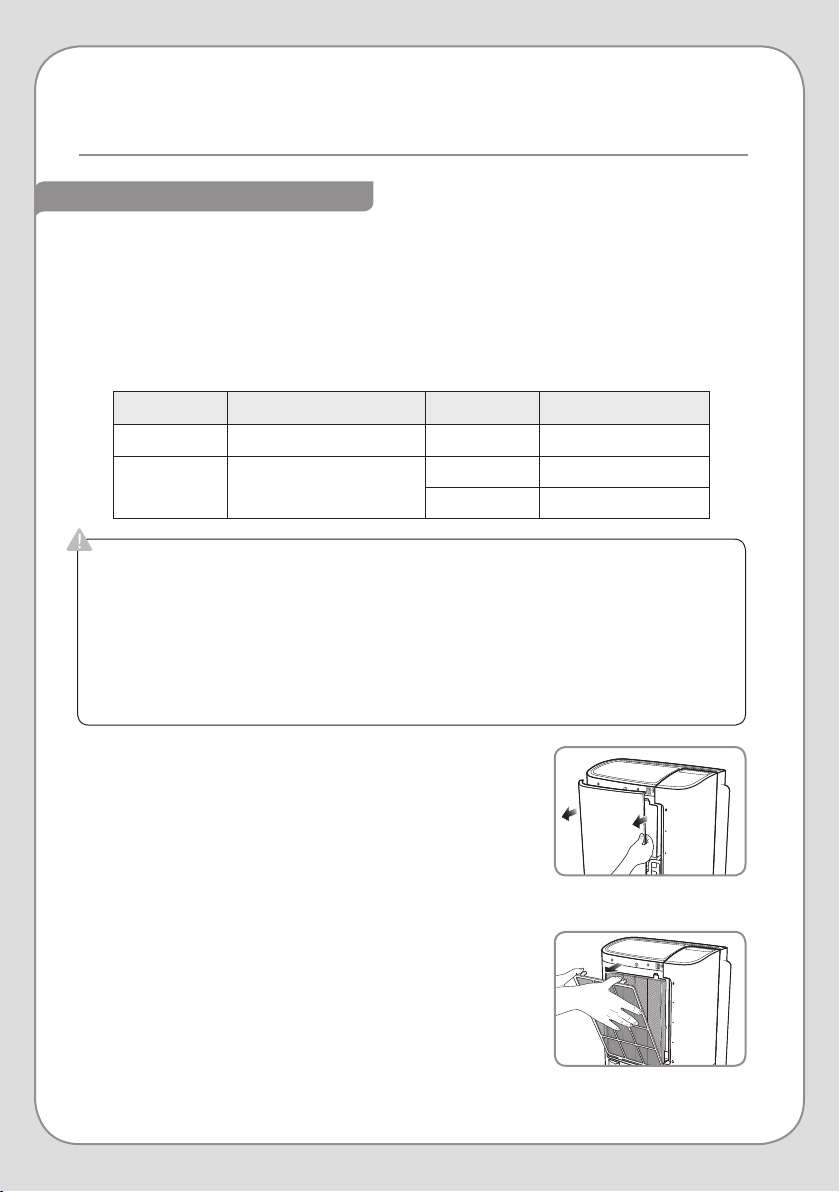
Always unplug the power cord before cleaning or replacing the filters.
AIR FILTER MAINTENANCE
AIR FILTER CARE OVERVIEW
LOCATION FILTER METHOD CLEANING CYCLE
Front Mesh Pre-Filter Clean Every 2-4 weeks
Front Active Carbon Filter Replace Every 12 months
Front True HEPA Filter Replace Every 12 months
Rear True HEPA Filter Replace Every 12 months
Rear Specialized Filter
Clean Every 2-4 weeks
Replace Every 4 months
Below is a recommended cleaning and replacement schedule for all of the Revive’s air filters.
This is only a guideline, however, as time of use and prevailing air quality will have the greatest
eect on how often the filters need to be cleaned or replaced.
In addition, it is highly recommended that you also adhere to the cleaning schedule for the
Humidifying Components on page 25.
22
AIR FILTER MAINTENANCE cont.
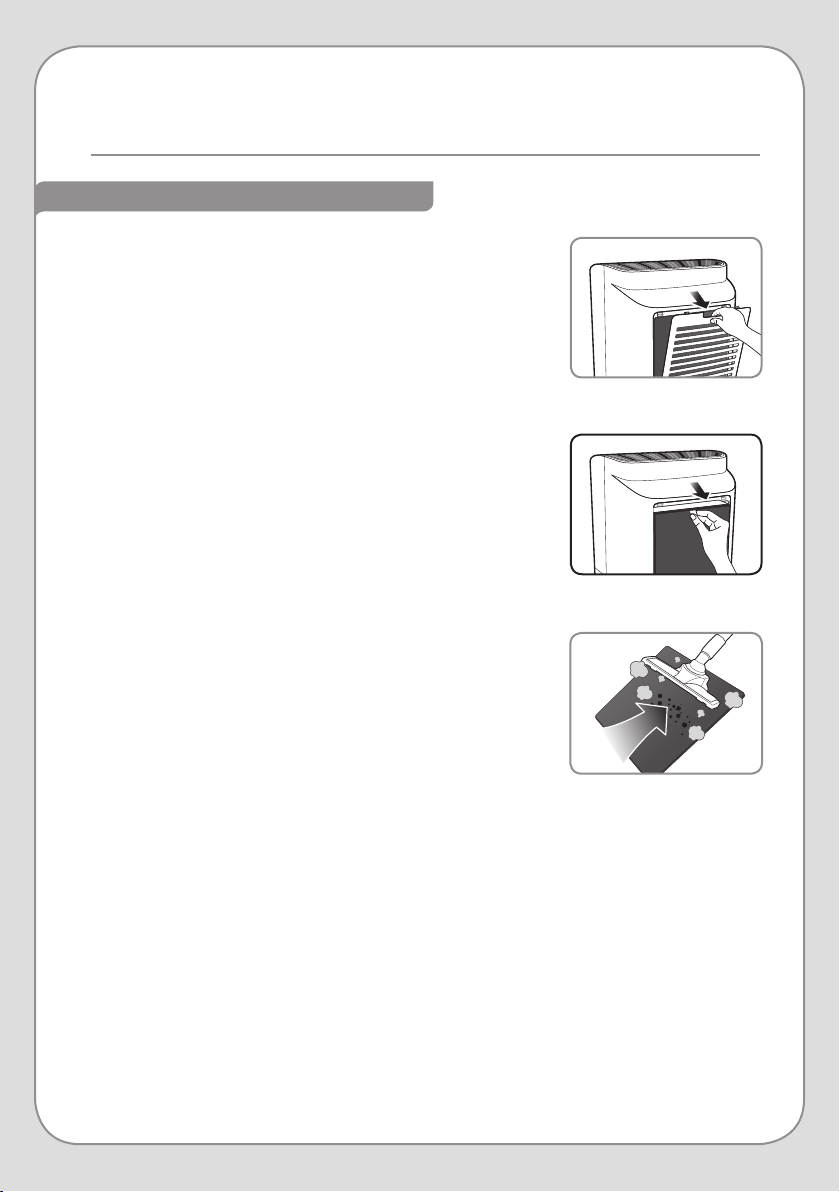
CLEANING THE AIR FILTERS
1. Cleaning the Mesh Pre-Filter
a. Remove the Front Cover by pulling the top of the cover
towards you. Lift up to disengage the bottom hinges.
b. Push down on the tabs at the top of the Mesh Pre-Filter
and pull the filter towards you to remove it.
c. Clean the Mesh Pre-Filter with a vacuum cleaner first. If
the mesh is still dirty, wash with warm water and air dry
before you put it back into the Revive.
d. Once it is clean, snap the Mesh Pre-Filter back into
place and put the Front Cover back onto the Revive.
Ensure that it is securely in place. If the Front Cover is
not seated properly, the Revive will not power on.
Always unplug the power cord before cleaning the filter(s).
The Mesh Pre-Filter is reusable and does not need to be replaced. If the Mesh Pre-Filter is
not kept clean, the Revive’s performance may deteriorate.
The Specialized Filter can be cleaned as well, but is also scheduled to be replaced every
four months.
The Active Carbon and True HEPA filters are not reusable. Do not attempt to clean them
with water.
The Revive uses several filters. Some of them should be cleaned on a regular basis, and others
must be replaced. Please see page 21 for the complete air filter cleaning and replacement
schedule.
Below is a recommended cleaning schedule for the Mesh Pre-Filter and the Specialized Filter.
This is only a guideline, however, as time of use and prevailing air quality will have the greatest
eect on how often the filters need to be cleaned or replaced.
Step 1a
Step 1b
LOCATION FILTER METHOD CLEANING CYCLE
Front Mesh Pre-Filter Clean Every 2-4 weeks
Rear Specialized Filter
Clean Every 2-4 weeks
Replace Every 4 months
23
2. Cleaning the Specialized Filter
a. Remove the Back Cover by pulling down on the
indentation at the top and lifting it away from the body
of the machine.
b. Pull out the Specialized Filter.
c. Clean the Specialized Filter with a vacuum cleaner first.
If the filter is still dirty, replace the filter. Do not clean
the Specialized Filter with water.
d. Once it is clean, put the Specialized Filter back into
place and put the Back Cover onto the Revive. Ensure
that it is securely in place.
Step 2a
Step 2b
Step 2c
CLEANING THE AIR FILTERS (cont.)
24
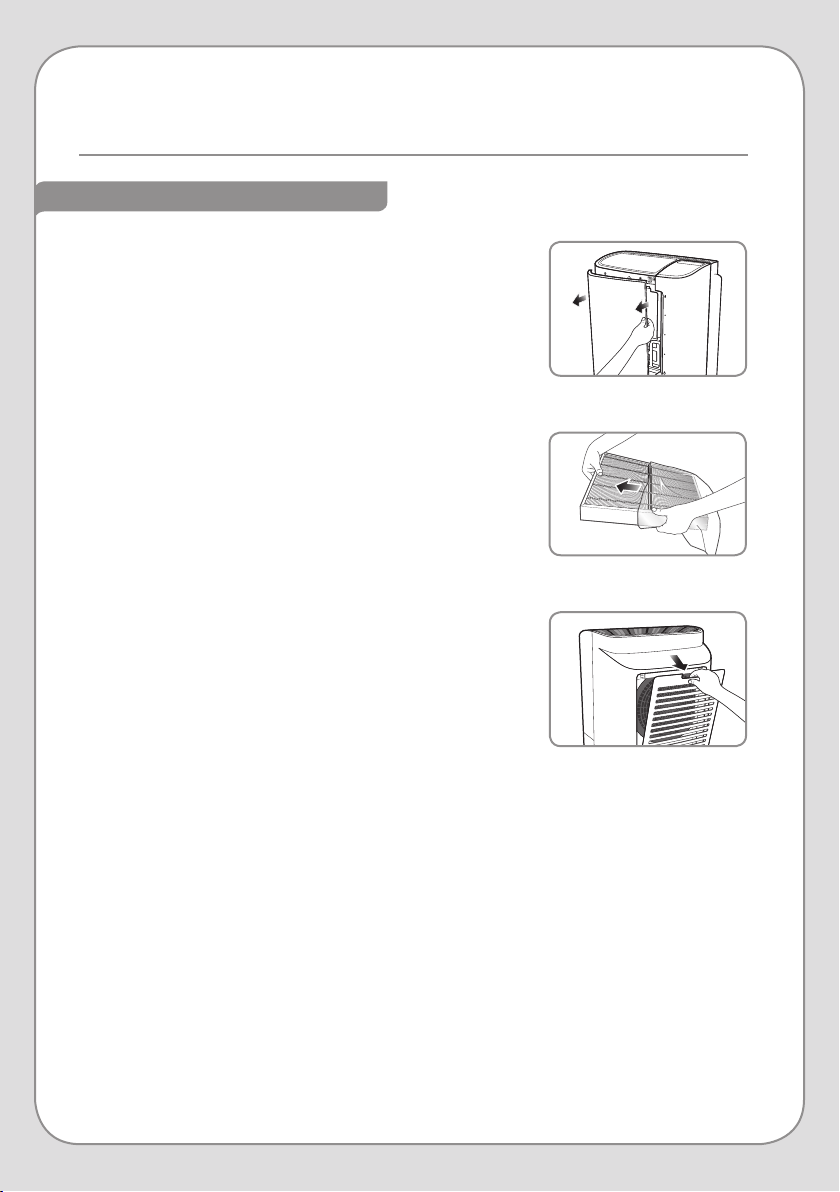
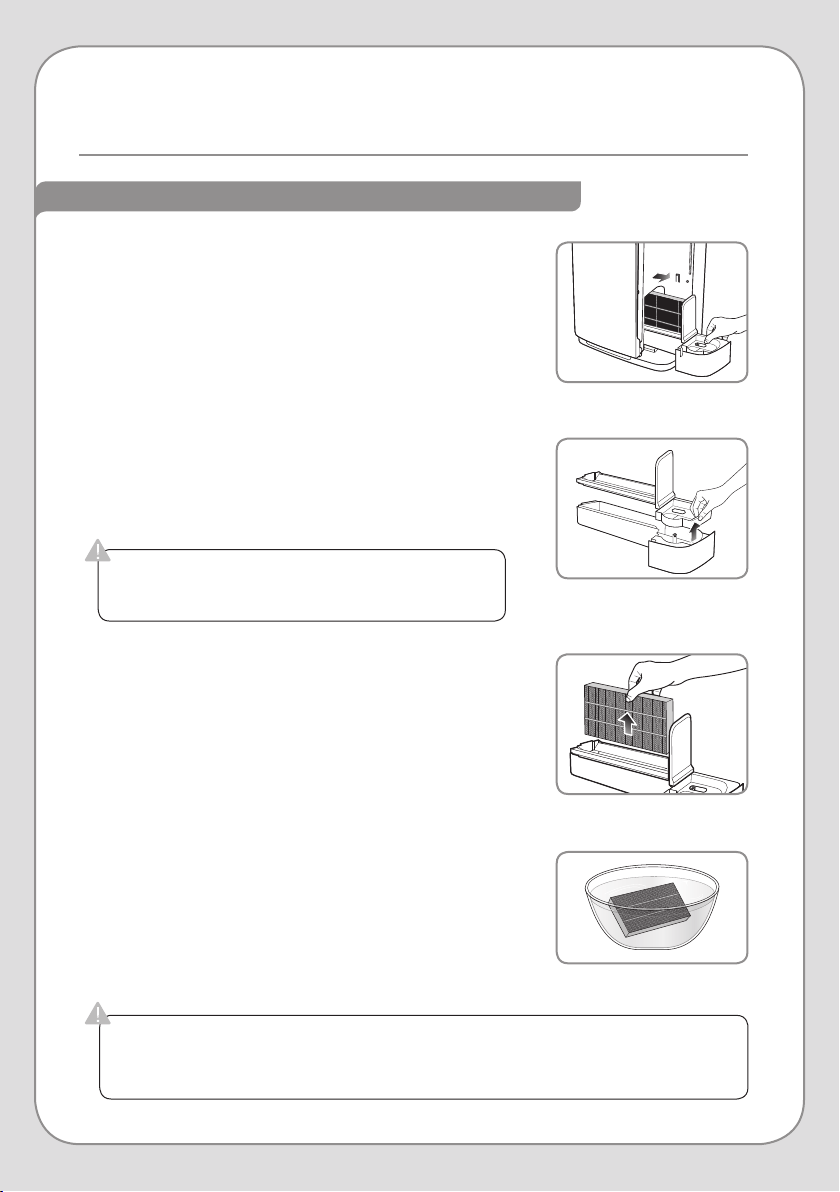
REPLACING THE AIR FILTERS
Step 6
1. Remove the Front Cover by pulling the top of the cover
towards you and then lifting up to disengage the bottom
hinges.
2. Remove the Mesh Pre-Filter by pressing down on the two
tabs at the top of the filter and pulling the filter out of the
machine. Remove the used Active Carbon and True HEPA
filters.
3. Remove the plastic wrapping from the new Active Carbon
and True HEPA filters.
4. Put the filters back into the machine in the following order,
ensuring that the pull-tabs on the True HEPA and Active
Carbon Filters face torwards you:
a. True HEPA Filter (this goes in first)
b. Active Carbon Filter
c. Mesh Pre-Filter
5. Put the Front Cover back on the Revive. Be sure it is
seated correctly, as the unit will not power on if the Front
Cover is not secure.
6. Remove the Back Cover by pulling down on the
indentation at the top and lifting it away from the body of
the machine.
7. Remove the used Specialized and True HEPA Filters from
the back of the Revive and remove the plastic wrapping
from the new filters.
8. Put the filters back into the machine in the following
order, ensuring that the pull-tabs on the True HEPA and
Specialized Filters face towards you:
a. True HEPA Filter (this goes in first)
b. Specialized Filter
9. Put the Back Cover back on the Revive and ensure it is
securely in place.
10. Follow the instructions in Step 3 on page 26 to clean the
Humidifier Filter.
Step 1
Step 3
AIR FILTER MAINTENANCE cont.
25
Always unplug the power cord before cleaning the Humidifier Components.
Do not use bleach, chlorine, abrasives, or soaps/detergents that contain solvents.
CLEANING THE HUMIDIFIER COMPONENTS
1. Cleaning the Water Tank
a. Remove the Water Tank by pulling the handle up. Then
move the tank away from the machine. Remove the
Water Tank Cap by turning it counter-clockwise.
b. Fill the Water Tank one-third of the way and add a small
amount of neutral detergent. Replace the Water Tank
Cap and shake the Water Tank vigorously to wash the
inside of the tank. Do not use abrasives.
c. Remove the Water Tank Cap and rinse the inside of
the Water Tank thoroughly, ensuring that there is no
leftover soap inside. While rinsing out the inside, wash
down the exterior of the tank. Do not use abrasives.
d. Dry o the exterior of the Water Tank completely. Fill
the Water Tank with cold water and replace the Water
Tank Cap. Reinstall the Water Tank, ensuring that it is
seated correctly.
NOTE: If you do not want the Revive to humidify the air,
do not fill the Water Tank before you re-install it.
Step 1a
Step 1b
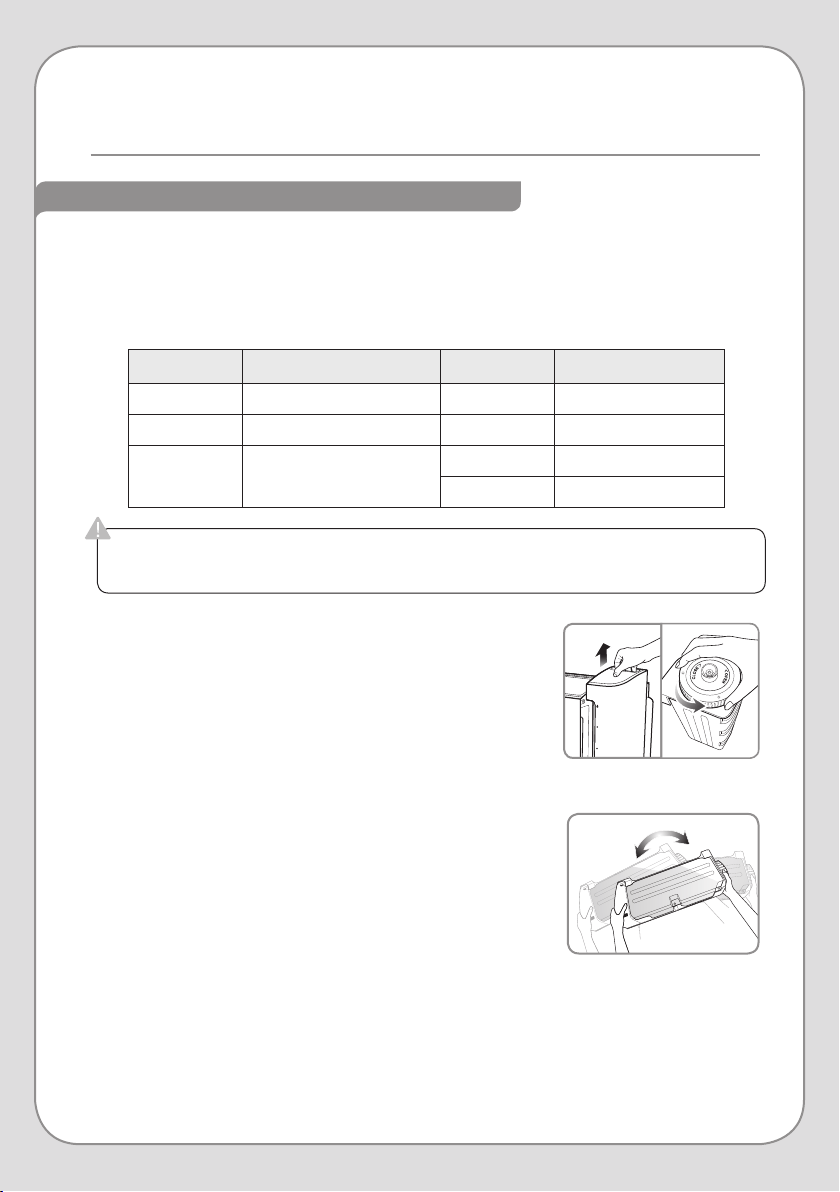
Below is a recommended cleaning schedule for the Revive’s Humidifier Components. The
frequency is designed to avoid the build-up of scale, mold and/or mildew in the Water Tank, the
Water Tray, and the Humidifier Filter. The frequency of scale build-up depends on the hardness
of the water put into the system. For maximum eectiveness, use a Brondell H2O+ Water
Filtration unit in combination with the Revive.
HUMIDIFIER MAINTENANCE
LOCATION FILTER/PART METHOD CLEANING CYCLE
Right Side Water Tank Clean Every 2 weeks
Right Side Water Tray Clean Every 2 weeks
Right Side
(Water Tray)
Humidifier Filter
Clean Every 2 weeks
Replace Every 4 months
26
HUMIDIFIER MAINTENANCE cont.
If proper cleanliness of the Humidifier Filter is not maintained, the Revive may start
giving o an odor. Proper maintenance of all the Humidifying Components is vital to the
Revive’s performance and sanitation.
If the Humidifier Filter Tray is not properly seated,
leaking and product malfunction may occur.
Step 2b
Step 3b
Step 2c
2. Cleaning the Water Tray
a. Remove the Water Tank and set it aside. If you also
need to clean the tank, follow the steps on page 25.
b. Remove the Humidifier Filter from the Water Tray and
set it aside (see Step 3 below if you need to also clean
the Humidifier Filter).
c. Lift the Humidifier Filter Tray from the Water Tray, and
clean them both with a soft cloth under running water.
Use a neutral detergent. Do not use abrasives.
d. Ensure that the Water Tray and Humidifier Filter Tray
are completely dry before reassembling. Place the
Humidifier Filter Tray back onto the Water Tray.
3. Cleaning the Humidifier Filter
a. Fill a large bowl with lukewarm water. It will be used as
a bath for Humidifier Filter.
b. Remove the Humidifier Filter from the Water Tray and
place it in the water bowl from the previous step.
c. Leave the Humidifier Filter in the water bath for 20
minutes, and then gently wash it with a soft brush, cloth,
or sponge.
NOTE: If there is a white build-up of scale on the
Humidifier Filter, run it under warm water while
you wash it with the a soft brush or cloth.
d. Place the Humidifier Filter Tray back onto the Water
Tray. Ensure that the Water Tray and Humidifier Filter
Tray are completely dry before reassembling.
Step 3c
CLEANING THE HUMIDIFIER COMPONENTS (cont.)
27
Humidifying
Specialized
HEPA+Carbon
Step 3a
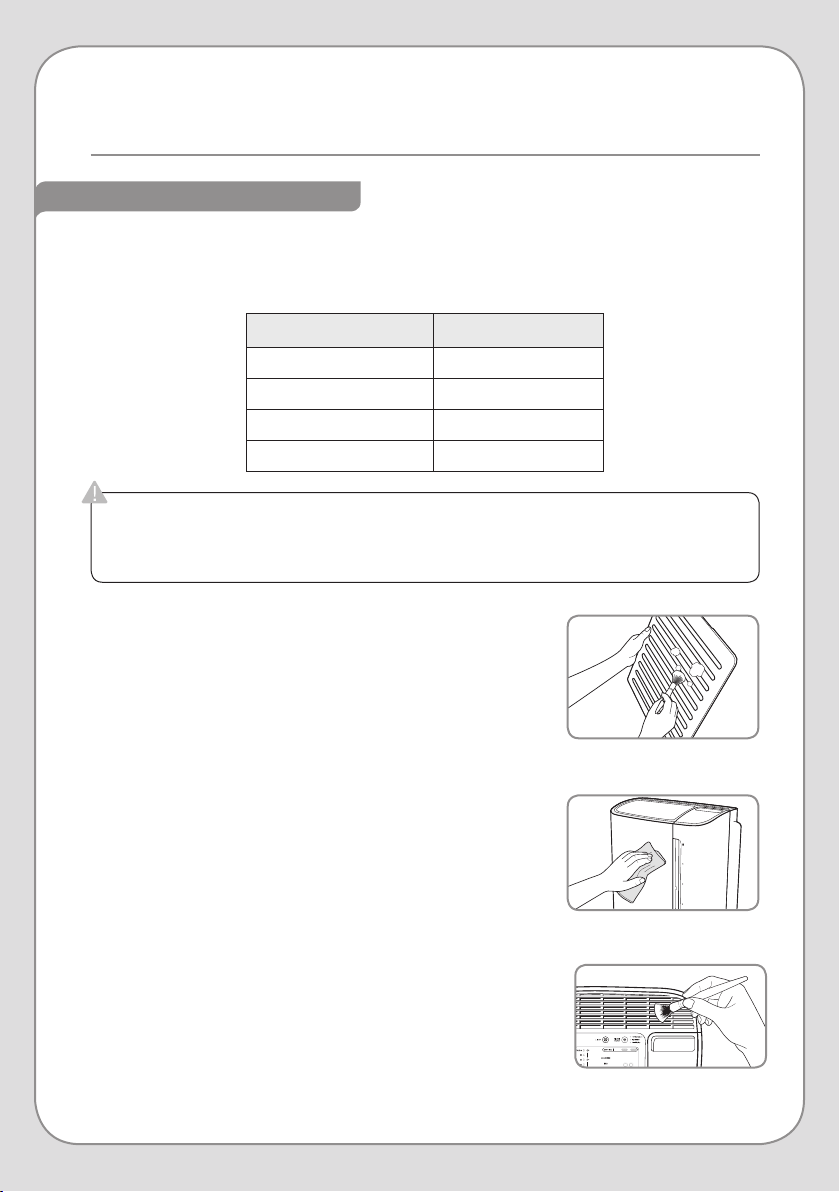
CLEANING THE EXTERIOR
1. Cleaning the Back Cover
a. Remove the Back Cover by pulling down on the
indentation at the top and lifting it away from the body
of the machine.
b. Clean o the Back Cover with a soft brush or cloth and
put the Back Cover onto the Revive. You can also use a
vacuum cleaner if desired.
2. Cleaning the Body Panels
a. Use a soft, dry cloth to sweep dust and loose particles
o of the Revive’s body.
b. Use a damp cloth to remove additional dirt. Do not use
abrasives.
3. Cleaning the Air Outlet Vents
a. Clean o the Air Outlet Vents with a soft brush or cloth.
You can also use a vacuum cleaner if desired.
Step 1b
Step 2a
COMPONENT CLEANING CYCLE
Back Cover Every 4 weeks
Body Panels Every 4 weeks
Air Outlet Vents Every 8 weeks
Air Quality Sensor Every 8 weeks
Always unplug the power cord before cleaning the Revive.
Do not use bleach, chlorine, abrasives, or soaps/detergents that contain solvents.
Do not spray water into or on the Revive to clean it.
Below is a recommended cleaning schedule for the Revive’s exterior and Air Quality Sensor.
This is only a guideline, however, as time of use and prevailing air quality will have the greatest
eect on how often these components need to be cleaned.
ADDITIONAL MAINTENANCE
28
ADDITIONAL MAINTENANCE cont.
CLEANING THE EXTERIOR (cont.)
a
b
c
Step 4c
Step 4a
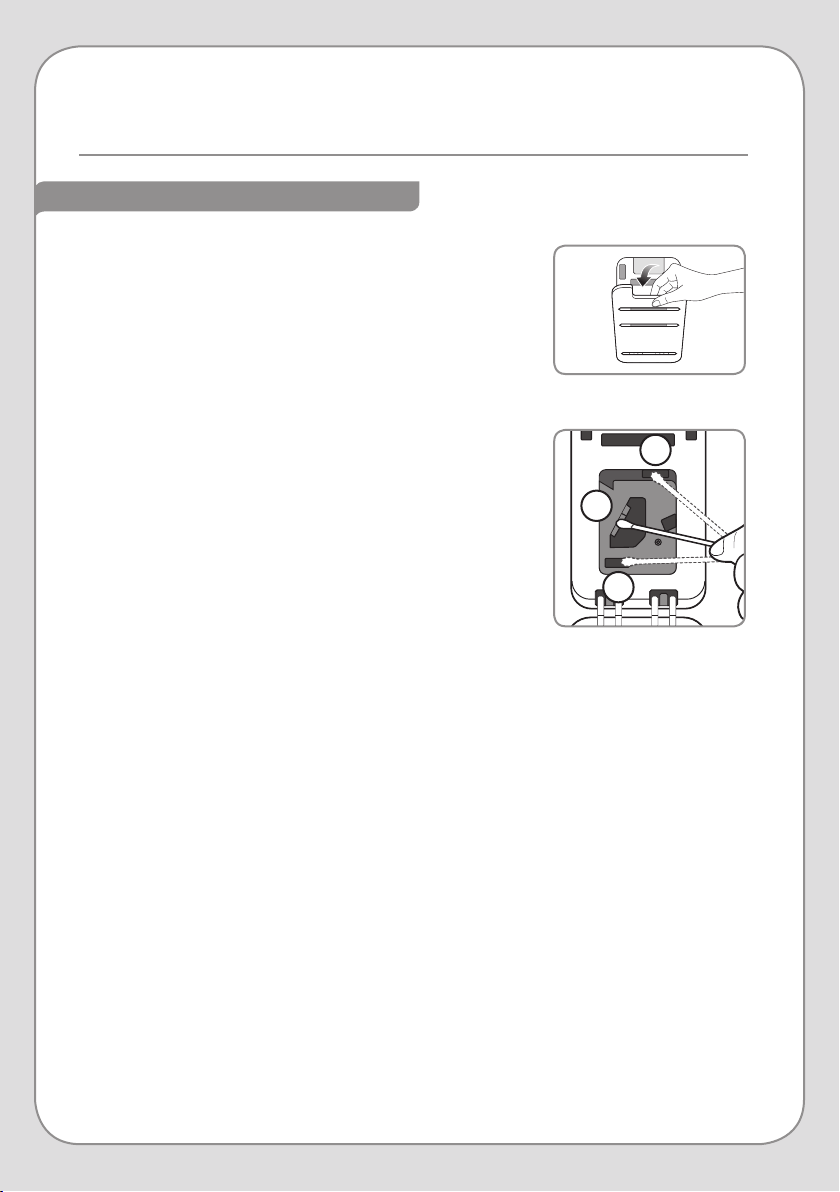
4. Cleaning the Air Quality Sensor
a. As you are facing the unit, locate the Air Quality Sensor
on the left side. Open the cover by pulling down on the
indentation at the top and lowering it to a 90° angle.
The cover is not removable, and will stay in place while
opened.
b. Clean the Air Quality Sensor Cover with a soft brush or
cloth. You can also use a vacuum cleaner if desired.
c. Using the diagram to the right as a guide, lightly
moisten a cotton swab and clean the Lens (a), Air Inlet
(b), and Air Outlet (c). Wipe o all moisture with a dry
cotton swab.
NOTE: Without regular cleaning, the Air Quality
Sensor’s performance will deteriorate.
In areas with a higher concentration of pollutants, clean
the Air Quality Sensor more often.

29
CONDITION POSSIBLE CAUSE POSSIBLE SOLUTION
No air is blowing.
Plastic packaging on filters was not
removed.
Remove the plastic packaging and
put the filters back in.
The power cord is not plugged in or
properly inserted into the electrical
outlet.
Plug the power cord into an electric
outlet rated for 120V.
Power plug or cord is damaged.
Contact the Brondell Service Center
at 888-542-3355.
The Revive is not powered on. Press the Power Button.
CONDITION POSSIBLE CAUSE POSSIBLE SOLUTION
Only the
Air Purification
(AIR) and
Humidifying (HUM)
indicators are
illuminated.
The Light O Button has been
pressed.
Press the Light O Button again
to restore the control panel to full
illumination.
CONDITION POSSIBLE CAUSE POSSIBLE SOLUTION
1. Fan speed does
not automatically
adjust when in
Auto Mode.
2. The color of the
Air Quality Indicator
never changes.
Manual Mode is selected.
1
Press the Mode Button until “Auto”
is illuminated.
Air Quality Sensor is dirty.
1, 2
Follow the steps on page 28 to
clean the Air Quality Sensor.
Air Quality Sensor sensitivity is
inadequate for the air quality in
the room.
1, 2
Follow the steps on page 19 to set a
dierent Seasonal Allergy Setting:
• If the Air Quality indicator is Blue,
use a higher sensitivity.
• If the Air Quality Indicator is
Purple or Red, use a lower
sensitivity.
Air Quality Sensor is broken or is
malfunctioning.
1, 2
Contact the Brondell Service Center
at 888-542-3355.
TROUBLESHOOTING

30
CONDITION POSSIBLE CAUSE POSSIBLE SOLUTION
The Air Quality
Indicator is blinking.
The Revive requires service.
Contact the Brondell Service Center
at 888-542-3355.
CONDITION POSSIBLE CAUSE POSSIBLE SOLUTION
There is an odor
eminating from
the Revive.
The Humidifying Components
have not been properly cleaned or
maintained.
See pages 25–26 for instructions
on proper care of the Humidifying
Components.
CONDITION POSSIBLE CAUSE POSSIBLE SOLUTION
The Revive runs
only in Fan Speed
3 or 4 while
humidifying is
active.
The air quality in the room is poor,
or the humidity level is low.
Put the Revive into Fan Speed
Mode, or Manual Mode. You can
also empty the Water Tank to stop
the Revive from humidifying (see
page 15).
CONDITION POSSIBLE CAUSE POSSIBLE SOLUTION
Airflow has
diminished, even
at high fan speeds.
Plastic packaging on filters was not
removed.
Remove the plastic packaging and
put the filters back in.
Blockage at Air Inlet or Air Outlet.
Contact the Brondell Service Center
at 888-542-3355.
Filters are due for replacement. Replace with a new filter set.
Clearance around air purifier is not
adequate for air ventilation.
Ensure that there is clearance of 20
inches on each side and 4 inches
behind the air purifier.
Missing filters or filters were inserted
in the wrong order.
Ensure the filters are placed in the
correct order (see pages 8–9).
Recommended room size has been
exceeded.
Suggested coverage area is a
medium-to-large room.
TROUBLESHOOTING cont.
31
PRODUCT SPECIFICATIONS
Model Revive PR50-W, PR50-B
Rated power source 120 V
~
60 Hz
Power consumption 65 W
CADR 225
Maximum recommended
room size
350 sq. ft.
Maximum airflow volume* 251 cu. ft./ min
Water tank capacity 0.92 gal / 3.5 L
Maximum Humidifying
capacity
350 ml/ hr
Dimensions
15.6” x 12.5” x 19”
396 mm x 318mm x 482 mm
Weight 20 lbs. / 9.1 kg
* The Maximum Airflow Volume was measured without installing the Humidifier Filter.
All the technical details above are made by the internal tests and some of the testing
values could be dierent depending on the testing condition

32
Brondell products are backed by some of the most comprehensive warranties in the industry. Brondell
warrants that the O2+ air pruifier shall be free from defects in material and workmanship under normal
use and service.
Residential Warranty for O2+ Air Purifiers – 3 year limited warranty
100% Coverage of defects or malfunctions of all electronic parts and labor for the entire product
excluding consumable filters for the first three years from original date of purchase.
Commercial Warranty for O2+ Air Purifiers – 1 year limited warranty
Warranty period 1 year from original purchase date for O2+ Air Purifiers. Warranties may not apply to
products that are used for heavy commercial, hospital, or other high-use non-residential applications.
Exclusions and Limitations
1. BRONDELL warrants its products to be free from manufacturing defects under normal use and
service. This warranty is extended only to the ORIGINAL PURCHASER.
2. BRONDELL’s obligations under this warranty are limited to repairs or replacement, at BRONDELL’s
option, of products or parts found to be defective, provided that such products were properly
installed and used in accordance with instructions. BRONDELL reserves the right to make such
inspections as may be necessary in order to determine the cause of the defect. BRONDELL will
not charge for labor or parts in connection with warranty repairs for the first full year from date of
purchase on all products except those that may be subject to commercial use limitations.
3. BRONDELL is not responsible for the cost of removal, return (shipping) and/or reinstallation of
products. This warranty does NOT apply to:
• Damage or loss which occurs during shipment.
• Damage or loss sustained through any natural or man-made causes beyond the control of
BRONDELL, including but not limited to fire, earthquake, floods, etc.
• Damage or loss resulting from sediments or foreign matter contained in a water system.
• Damage or loss resulting from negligent or improper installation including installation of a unit in a
harsh or hazardous environment.
• Damage or loss resulting from removal, improper repair, modification of the product, or improper
maintenance including damage caused by chlorine or chlorine related products
• Damage or loss resulting from acts which are not the fault of Brondell or which the Product is not
specified to tolerate.
4. This warranty gives you specific legal rights. You may have other rights which vary from state to state.
THIS WRITTEN WARRANTY IS THE ONLY WARRANTY MADE BY BRONDELL. REPAIR OR
REPLACEMENT AS PROVIDED UNDER THIS WARRANTY SHALL BE THE EXCLUSIVE REMEDY
AVAILABLE TO THE PURCHASER. BRONDELL SHALL NOT BE RESPONSIBLE FOR LOSS OF USE
OF THE PRODUCT OR FOR OTHER INCIDENTAL, SPECIAL, FOR CONSEQUENTIAL DAMAGES
OR EXPENSES INCURRED BY THE PURCHASER OR FOR LABOR OR OTHER COSTS DUE TO
INSTALLATION OR REMOVAL OR COSTS OF REPAIRS BY OTHERS, OR FOR ANY OTHER EXPENSE
NOT SPECIFICALLY STATED ABOVE. EXCEPT TO THE EXTENT PROHIBITED BY APPLICABLE LAW,
ANY IMPLIED WARRANTIES, INCLUDING THAT OF MERCHANTABILITY, ARE EXPRESSLY LIMITED TO
THE DURATION OF THIS WARRANTY. SOME STATES DO NOT ALLOW LIMITATIONS, SO THE ABOVE
LIMITATION AND EXCLUSION MAY NOT APPLY TO YOU.
How to Obtain Service
To obtain repair service under this warranty, you must contact an authorized BRONDELL Service Center
to obtain an RMA (Return Merchandise Authorization) number. Proof of purchase in the form of a copy
of the original receipt must accompany the returned unit for the warranty to be valid. Take or ship the
unit pre-paid to the closest Brondell authorized service center along with the RMA number and proof of
purchase. To obtain an RMA number, contact the BRONDELL Service Center at 1-888-542-3355.
WARRANTY

33
CONTACT:
Brondell, Inc.
PO Box 470085
San Francisco, CA 94147-0085
Phone: 1-888-542-3355
Email: [email protected]
Web: www.brondell.com
For questions, contact Brondell Customer Service: 1-888-542-3355
MANUFACTURED BY:
Brondell, Inc.
PO Box 470085
San Francisco, CA 94147-0085
REPLACEMENT FILTERS:
PRF-51 Standard Annual Replacement Filter Set
1 Active Carbon Filter
2 True HEPA Filters
PRF-52 Annual Replacement Humidity Filter Set
3 Humidity Filters
PRF-58 Annual Replacement O-Gassing Reduction Filter Set
3 O-Gassing Reduction Filters