
OWNER’S MANUAL
WASHING MACHINE
WM3470H*A
Before beginning installation, read these instructions carefully. This will simplify
installation and ensure that the washer is installed correctly and safely.
Leave these instructions near the washer after installation for future reference.
P/No.: MFL67360438
www.lg.com
ENGLISH
FRANÇAIS

2
PRODUCT FEATURES
PRODUCT FEATURES
INVERTER DIRECT-DRIVE MOTOR
The inverter motor, which is directly connected to the tub, minimizes energy loss and produces little noise and vibration.
SMARTDIAGNOSIS™
Should you experience any technical difficulty with your washing machine, it has the capability of transmitting data by phone to
the Customer Information Center. The call center agent records the data transmitted from your machine and uses it to analyze
the issue, providing a fast and effective diagnosis (Refer to page 38).
TUB CLEAN
Regular cleaning of the tub on a monthly basis using TUB CLEAN can help keep the tub clean and fresh.
MAGNETIC DOOR PLUNGER
Safely and conveniently secure the door slightly ajar with the magnetic door plunger. This will promote air circulation and allow
the interior of the machine to dry. To use this feature, after the load has been removed, do not close the door completely.
When the magnetic door plunger comes into contact with the metal washer cabinet, it will secure the door slightly open
allowing the interior of the washer to dry.
LARGE CAPACITY STAINLESS STEEL DRUM
The large capacity stainless steel drum offers extreme durability and is tilted to improve efficiency and allow easier access for
large items.
CHILD LOCK
Use this option to disable the controls during a wash cycle. This option can prevent children from changing cycles or operating
the machine.
DETERGENT DISPENSER DRAWER
The four-compartment dispenser drawer makes it easy to separate the pre-wash detergent, the main laundry detergent, liquid
bleach, and fabric softener into different compartments.
HIGH-EFFICIENCY STEAM CYCLES
During LG’s unique high-efficiency STEAM cycles, with hot steam a gently removes tough stains.
3
IMPORTANT SAFETY INSTRUCTIONS
ENGLISH
IMPORTANT SAFETY INSTRUCTIONS
READ ALL INSTRUCTIONS BEFORE USE
WARNING
For your safety, the information in this manual must be followed to minimize the risk of fire or explosion, electric shock, or to
prevent property damage, injury to persons, or death.
Your Safety and the safety of others are very important.
We have provided many important safety messages in this manual and on your appliance. Always read and obey all safety
messages.
This is the safety alert symbol.
This symbol alerts you to potential hazards that can kill or hurt you and others.
All safety messages will follow the safety alert symbol and either the word DANGER, WARNING or CAUTION.
These words mean:
DANGER
You will be killed or seriously injured if you don’t immediately follow instructions.
WARNING
You can be killed or seriously injured if you don’t follow instructions.
CAUTION
You may be slightly injured or cause damage to the product if you do not follow instructions.
All safety messages will tell you what the potential hazard is, tell you how to reduce the chance of injury, and tell you what can
happen if the instructions are not followed.

4
IMPORTANT SAFETY INSTRUCTIONS
IMPORTANT SAFETY INSTRUCTIONS
READ ALL INSTRUCTIONS BEFORE USE
WARNING
For your safety, the information in this manual must be followed to minimize the risk of fire or explosion, electric shock, or to
prevent property damage, injury to persons, or death.
BASIC SAFETY PRECAUTIONS
WARNING
To reduce the risk of fire, electric shock, or injury to persons when using this appliance, follow basic precautions, including the
following.
GROUNDING INSTRUCTIONS
This appliance must be grounded. In the event of malfunction or breakdown, grounding will reduce the risk of electric shock by
providing a path of least resistance for electric current. This appliance is equipped with a cord having an equipment-grounding
conductor and grounding plug. The plug must be plugged into an appropriate outlet that is properly installed and grounded in
accordance with all local codes and ordinances.
WARNING
Improper connection of the equipment-grounding conductor can result in risk of electric shock. Check with a qualified electrician
or servicer if you are in doubt as to whether the appliance is properly grounded. Do not modify the plug provided with the
appliance. If it does not fit the outlet, have a proper outlet installed by a qualified electrician. Failure to follow these warnings can
cause serious injury, fire, electric shock, or death.
•
Before use, the washer must be properly installed as
described in this manual.
•
Do not wash articles that have been previously cleaned in,
washed in, soaked in, or spotted with gasoline, dry cleaning
solvents, or other flammable or explosive substances,
as
they give off vapors that could ignite or explode.
•
Do not add gasoline, dry cleaning solvents, or other
flammable or explosive substances to the wash water.
These substances give off vapors that could ignite or
explode.
• Under certain conditions, hydrogen gas may be produced
in a hot water system that has not been used for 2 weeks
or more. HYDROGEN GAS IS EXPLOSIVE.
If the hot water
system has not been used for such a period, before using
the washer, turn on all hot water faucets and let the water
flow from each for several minutes.
This will release any
accumulated hydrogen gas. As the gas is flammable,
do not
smoke or use an open flame during this time.
•
Do not allow children to play on or in the washer. Close
supervision of children is necessary when the washer is
used near children.
•
Before the washer is removed from service or discarded,
remove the door to prevent children from climbing inside.
•
Do not install or store the washer where it will be exposed
to the weather or freezing temperatures.
•
Do not tamper with controls.
•
Do not repair or replace any part of the washer or attempt
any servicing other than as described in this manual.
We
strongly recommend that any service be performed by a
qualified technician.
•
See Installation Instructions for grounding requirements.
•
ALWAYS follow the fabric care instructions supplied by the
garment manufacturer.
•
Do not place items exposed to cooking oil in your washer.
Items contaminated with cooking oils may contribute to a
chemical reaction that could cause a load to catch fire.
•
Use fabric softeners or products to eliminate static only as
recommended by the manufacturer.
• This washer is not designed for maritime use or for mobile
installations such as in RVs, aircraft, etc.
•
Turn off the water faucets and unplug the washer if the
machine is to be left for an extended period of time, such as
during vacations.
•
Do not use to dry articles containing foam rubber or
similarly textured rubber-like materials.
• Packaging material can be dangerous for children. There is a
risk of suffocation!
Keep all packaging from children.
•
Always check the inside of the washer for foreign objects
before loading laundry. Keep the door closed when not in
use.
•
Do not reach into the appliance if the tub or agitator is
moving.

5
IMPORTANT SAFETY INSTRUCTIONS
ENGLISH
IMPORTANT SAFETY INSTRUCTIONS
READ ALL INSTRUCTIONS BEFORE USE
WARNING
For your safety, the information in this manual must be followed to minimize the risk of fire or explosion, electric shock, or to
prevent property damage, injury to persons, or death.
SAFETY INSTRUCTIONS FOR INSTALLATION
WARNING
To reduce the risk of fire, electric shock, or injury to persons when using this appliance, follow basic precautions, including the
following.
•
Refer to INSTALLATION INSTRUCTIONS for detailed
grounding procedures.
Installation instructions are packed
with the washer for installer’s reference. If the washer is
moved to a new location, have it checked and reinstalled by a
qualified service technician. Failure to follow this warning can
cause serious injury, fire, electric shock, or death.
•
Do not, under any circumstances, cut or remove the third
(ground) prong from the power cord.
Failure to follow this
warning can cause serious injury, fire, electric shock, or
death.
•
For personal safety, this appliance must be properly
grounded.
Failure to follow this warning can cause serious
injury, fire, electric shock, or death.
•
The power cord of this appliance is equipped with a 3-prong
(grounding) plug which mates with a standard 3-prong
(grounding) wall outlet
to minimize the possibility of electric
shock from this appliance.
•
This washer must be plugged into a 120 VAC, 60 Hz
grounded outlet.
Failure to follow this warning can cause
serious injury, fire, electric shock, or death.
•
Have the wall outlet and circuit checked by a qualified
electrician to make sure the outlet is properly grounded.
Failure to follow this warning can cause serious injury, fire,
electric shock, or death.
•
Where a standard 2-prong wall outlet is encountered, it
is your personal responsibility and obligation to have it
replaced with a properly grounded 3-prong wall outlet.
Failure to follow this warning can cause serious injury, fire,
electric shock, or death.
•
Do not install on carpet. Install washer on a solid floor.
Failure to follow this warning can cause serious leak damage.
•
Do not remove ground prong. Do not use an adapter or
extension cord. Plug into a grounded 3-prong outlet.
Failure
to follow these warnings can cause serious injury, fire,
electric shock, or death.
•
The washer should always be plugged into its own individual
electrical outlet which has a voltage rating that matches the
rating plate.
This provides the best performance and also
prevents overloading house wiring circuits which could cause
a fire hazard from overheated wires.
•
Never unplug your washer by pulling on the power cord.
Always grip plug firmly and pull straight out from the outlet.
Failure to follow this warning can cause serious injury, fire,
electric shock, or death.
•
Repair or immediately replace all power cords that have
become frayed or otherwise damaged. Do not use a cord
that shows cracks or abrasion damage along its length or at
either end.
Failure to follow this warning can cause serious
injury, fire, electric shock, or death.
•
When installing or moving the washer, be careful not to
pinch, crush, or damage the power cord.
Failure to follow
this warning can cause serious injury, fire, electric shock, or
death.
•
The washer must be installed and electrically grounded by
a qualified service person in accordance with local codes
to
prevent shock hazard and assure stability during operation.
•
The washer is heavy. Two or more people may be needed
to install and move the appliance.
Failure to do so can result
in back or other injury.
•
Store and install the washer where it will not be exposed
to temperatures below freezing or exposed to outdoor
weather conditions.
Failure to follow this warning can cause
serious leak damage.
•
Do not install the washer in humid spaces to reduce the risk
of electric shock
. Failure to follow this warning can cause
serious injury, fire, electric shock, or death.
•
To reduce the risk of injury to persons, adhere to all industry
recommended safety procedures including the use of long
sleeved gloves and safety glasses.
Failure to follow all of
the safety warnings in this manual could result in property
damage, injury to persons or death.

6
IMPORTANT SAFETY INSTRUCTIONS
IMPORTANT SAFETY INSTRUCTIONS
READ ALL INSTRUCTIONS BEFORE USE
WARNING
For your safety, the information in this manual must be followed to minimize the risk of fire or explosion, electric shock, or to
prevent property damage, injury to persons, or death.
SAFETY INSTRUCTIONS FOR USE, CARE, CLEANING, AND DISPOSAL
WARNING
To reduce the risk of fire, electric shock, or injury to persons when using this appliance, follow basic precautions, including the
following.
SAVE THESE INSTRUCTIONS
•
Unplug the washer before cleaning
to avoid the risk of
electric shock.
•
Never use harsh chemicals, abrasive cleaners, or solvents
to clean the washer.
They will damage the finish.
•
Do not put oily or greasy rags or clothing on top of the
washer.
These substances give off vapors that could ignite
the materials.
•
Do not wash items that are soiled with vegetable or cooking
oil.
These items may contain some oil after laundering. Due
to the remaining oil, the fabric may smoke or catch fire by
itself.
•
Disconnect this appliance from the power supply before
attempting any user maintenance. Turning the controls to
the OFF position does not disconnect this appliance from
the power supply.
Failure to follow this warning can cause
serious injury, fire, electric shock, or death.
•
Do not combine laundry products for use in one load unless
specified on the label.
•
Do not mix chlorine bleach with ammonia or acids such
as vinegar. Follow package directions when using laundry
products.
Incorrect usage can produce poisonous gas,
resulting in serious injury or death.
•
Do not reach into the washer while parts are moving.
Before loading, unloading, or adding items, press the START/
PAUSE button and allow the drum to coast to a complete
stop before reaching inside.
Failure to follow this warning
can cause serious injury, fire, electric shock, or death.
•
Do not allow children to play on or in the washer. Close
supervision of children is necessary when the washer
is used near children. As children grow, teach them the
proper, safe use of all appliances.
Failure to comply with
these warnings could result in serious injury to persons or
death.
•
Destroy the carton, plastic bag, and other packing materials
after the washer is unpacked. Children might use them for
play. Cartons covered with rugs, bedspreads, or plastic
sheets can become airtight chambers.
Failure to comply
with these warnings could result in serious injury to persons
or death.
•
Keep laundry products out of children’s reach. To prevent
injury to persons, observe all warnings on product labels.
Failure to comply with these warnings could result in serious
injury to persons or death..
•
Remove the door to the washing compartment to avoid the
danger of children or small animals getting trapped inside
before your washer is removed from service or discarded.
Failure to do so can result in serious injury to persons or
death.

7
TABLE OF CONTENTS
ENGLISH
TABLE OF CONTENTS
2 PRODUCT FEATURES
3 IMPORTANT SAFETY INSTRUCTIONS
4 BASIC SAFETY PRECAUTIONS
4 GROUNDING INSTRUCTIONS
5 SAFETY INSTRUCTIONS FOR INSTALLATION
6 SAFETY INSTRUCTIONS FOR USE, CARE, CLEAN-
ING, AND DISPOSAL
8
INTRODUCING YOUR WASHING MACHINE
8 Parts and Accessories
9 Control panel features
11 INSTALLATION INSTRUCTIONS
11 Preview installation order
12 Checking and choosing the proper location
13 Unpacking and removing shipping bolts
14 Connecting the water lines
15 Connecting the drain line
16 Leveling the washing machine
17 Plugging in the power cord and grounding
17 Test run
18 PREPARATION
18 Sorting wash loads
18 - Precautions for fabric care before wash cycle
19 - Fabric care labels
19 - Sorting laundry
20 Using detergent/fabric softener
20 - Recommended detergent
20 - Loading the dispenser
22 USING YOUR WASHING MACHINE
22 Basic operation
23 Cycle guide
24 Main cycle
24 - Reduce laundry allergen,
ALLERGIENE
™
24 - Reduce laundry bacteria,
SANITARY
24 - For white fabrics,
BRIGHT WHITES
™
24 - Blankets or bulky items, BULKY/LARGE
24 - Normal items, COTTON/NORMAL
24 - Heavy soiled items, HEAVY DUTY
24 - Wrinkle free items,
PERM. PRESS
24 - Sheer items,
DELICATES
24 - For towel items,
TOWELS
24 - Items labeled wool or hand-washable,
HAND
WASH/WOOL
24 - Quick wash, SPEED WASH
25 Cycle setting buttons
25 Setting options before cycle
25 - Setting the water temperature, WASH TEMP.
25 - Setting spin speed, SPIN SPEED
25 - Setting soil level of laundry, SOIL LEVEL
26 - Adjusts the melody and button tones, SIGNAL
26 - Prewashing, PRE-WASH
26 - Rinse, drain and spin only, RINSE + SPIN
26 - Adding extra rinse cycle, EXTRA RINSE
26 - Presetting the start time, DELAY WASH
26 - Efficiency cleaning, STEAM
27 - Saving energy, COLD WASH™
27 - Saving time, TURBOWASH™
27 Setting options during cycle
27 - Button lock feature, CHILD LOCK
27 - Saving customized wash cycle, PGM SAVE
28 - Selecting your customized cycle, CUSTOM PGM
28 -
Tumbles clothes to prevent Wrinkles, FRESH CARE
29 MAINTENANCE
29 Care
29 - Care after wash
29 - Care in cold climates
30 Cleaning
30 - Clean your the drum, TUB CLEAN
31 - Cleaning the detergent dispenser drawer
32 - Cleaning the water inlet filters
33 - Cleaning the drain pump filter
34 - Cleaning the door seal
35 TROUBLESHOOTING
35 Checking error messages
36 Before calling for service
37 SPECIFICATIONS
38 USING SMARTDIAGNOSIS™
39 WARRANTY
8
INTRODUCING YOUR WASHING MACHINE
NOTE
Contact LG Customer Service at 1-800-243-0000 (1-888-542-2623 in Canada) if any accessories are missing.
y
For your safety and for extended product life, use only authorized components. The manufacturer is not responsible for
y
product malfunction or accidents caused by the use of separately purchased unauthorized components or parts.
The images in this guide may be different from the actual components and accessories, and are subject to change by the
y
manufacturer without prior notice for product improvement purposes.
INTRODUCING YOUR WASHING MACHINE
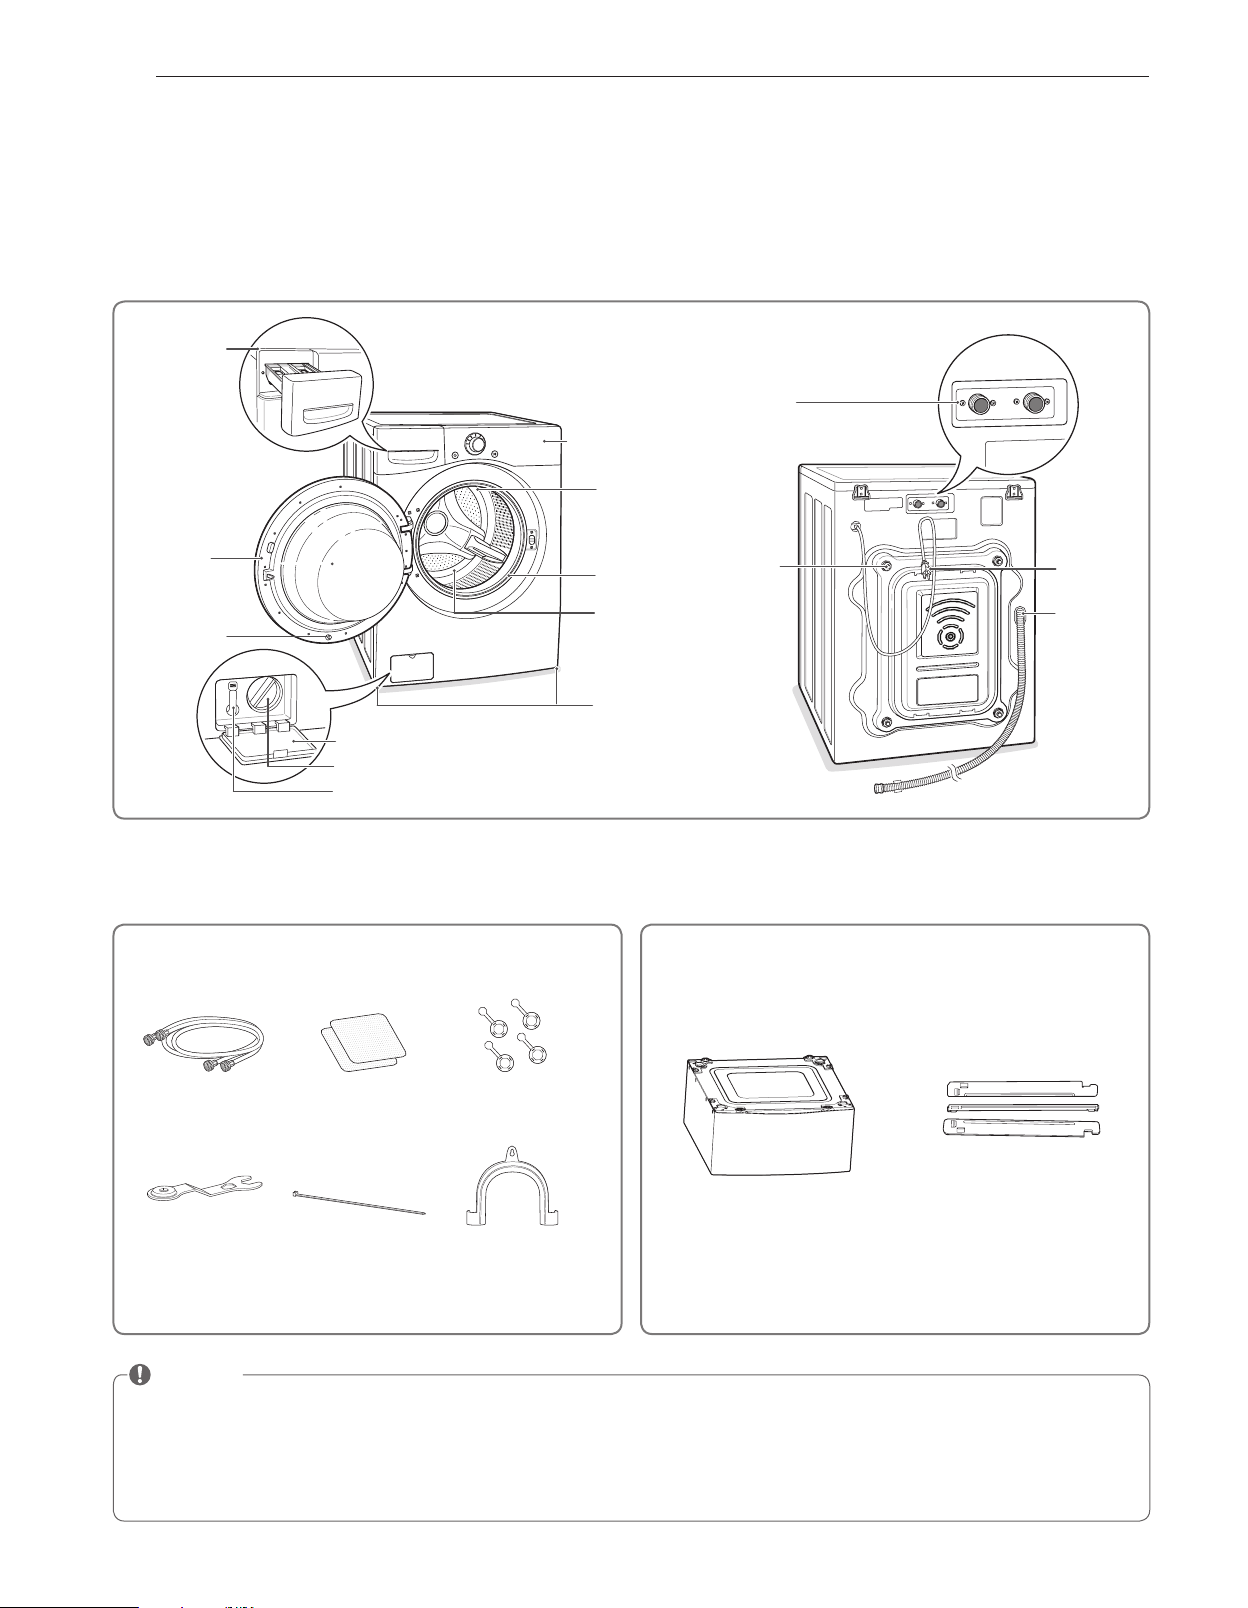
Parts and Accessories
Parts
Pedestal
(sold separately)
Stacking Kit
(sold separately)
Accessories
Hot/cold water hoses Non-skid pads
Caps for covering
shipping bolt holes
Wrench Tie strap Elbow bracket
(for securing drain hose)
Detergent
dispenser
drawer
(See page 20)
Door
Magnet Door
Plunger
(see page 2)
Control panel
(See page 9)
Door
seal
TurboWash™
Upper Nozzle
Tub
Leveling
feet
Drain pump filter cover
Drain pump filter
Drain hose
Water inlets
Shipping
bolts
Power cord
Drain hose
In c l u d e d Accessories Op t I O n a l Accessories
9
INTRODUCING YOUR WASHING MACHINE
ENGLISH
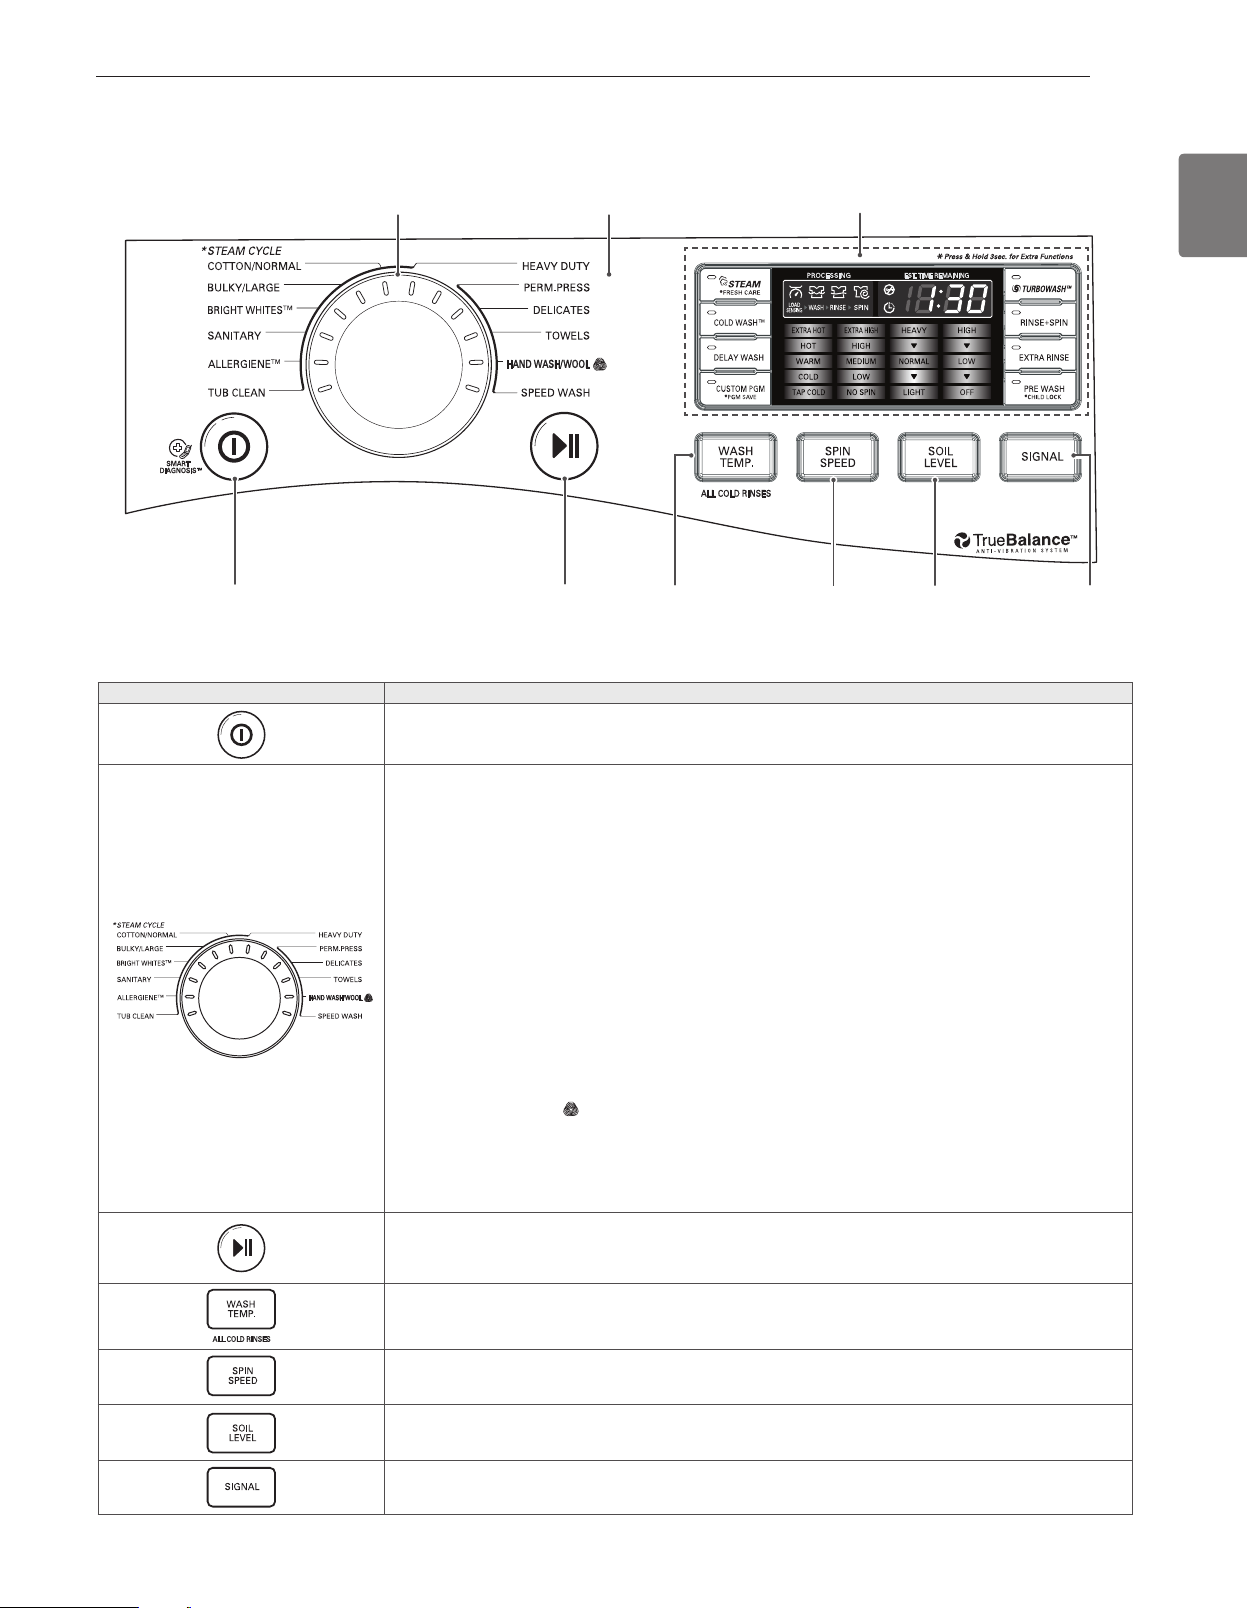
Button Description
Turns the washing machine on and off.
y
(During the wash cycle) stops operation, and cancels the settings.
y
ALLERGIENE™
y
- For cotton, underwear (see page 24)
SANITARY
y
- For underwear, diaper etc. (see page 24)
BRIGHT WHITES™
y
- For white fabrics (see page 24)
BULKY/LARGE
y
- For blankets or large bulky items (see page 24)
COTTON/NORMAL
y
- For general laundry, such as cotton T-shirts or towels (see page 24)
HEAVY DUTY
y
- For heavy soiled cotton fabric (see page 24)
PERM. PRESS
y
- For wrinkle-free fabrics (see page 24)
DELICATES
y
- For sheer and delicate fabrics (see page 24)
TOWELS
y
- For towels (see page 24)
HAND WASH/WOOL
y
- For wool or hand-wash fabrics (see page 24)
SPEED WASH
y
- For small quantities of lightly soiled items (see page 24)
TUB CLEAN
y
- For tub clean (see page 30)
Starts or pauses the washing machine cycle.
y
- If you do not press the
C
button within 4 minutes of selecting a cycle, the washing machine will
turn off automatically.
(Press repeatedly) Selects the water temperature for the wash cycle (see page 25).
y
- Select water temperature from 5 settings.
(Press repeatedly) Selects the spin speed in the desired level (see page 25).
y
- Selects spin speed from 5 settings.
(Press repeatedly) Selects a wash cycle by soil level (see page 25).
y
- Selects soil level from 5 settings.
(Press repeatedly) Selects a Melody or Button sound by signal(see page 26)
y
Control panel features
Operation
Operation
Display
Cycle selector
Soil
Level
Selection
Button
Signal
Sound
Selection
Button
Spin
Speed
Selection
Button
Water
Temperature
Selection
Button
Start/
Pause
Button
Power
Button
10
INTRODUCING YOUR WASHING MACHINE
Display
Operation (continued)
Button Description
(Press before wash cycle) Pre-wash heavily soiled laundry (See
y
page. 26).
(Press and hold during wash cycle) Lock/Unlock the button (See
y
page. 27).
Use this option to save time (See page.27).
y
Add extra rinse cycle to the selected one (See
y
page. 26).
Use this option to rinse detergent from load (See page. 26)
y
Set delay time of starting cycle (See
y
page. 26).
(Press before starting wash cycle) Use this option to add steam for extra cleaning power (See page 26)
y
(Press and hold before starting wash cycle) Tumbles clothes after cycle finishes to prevent wrinkles (See page 28)
y
Use this option to save your energy consumption (
y
See page. 27).
Use this option to save special combination of settings that you use frequently (
y
See page. 27~28).
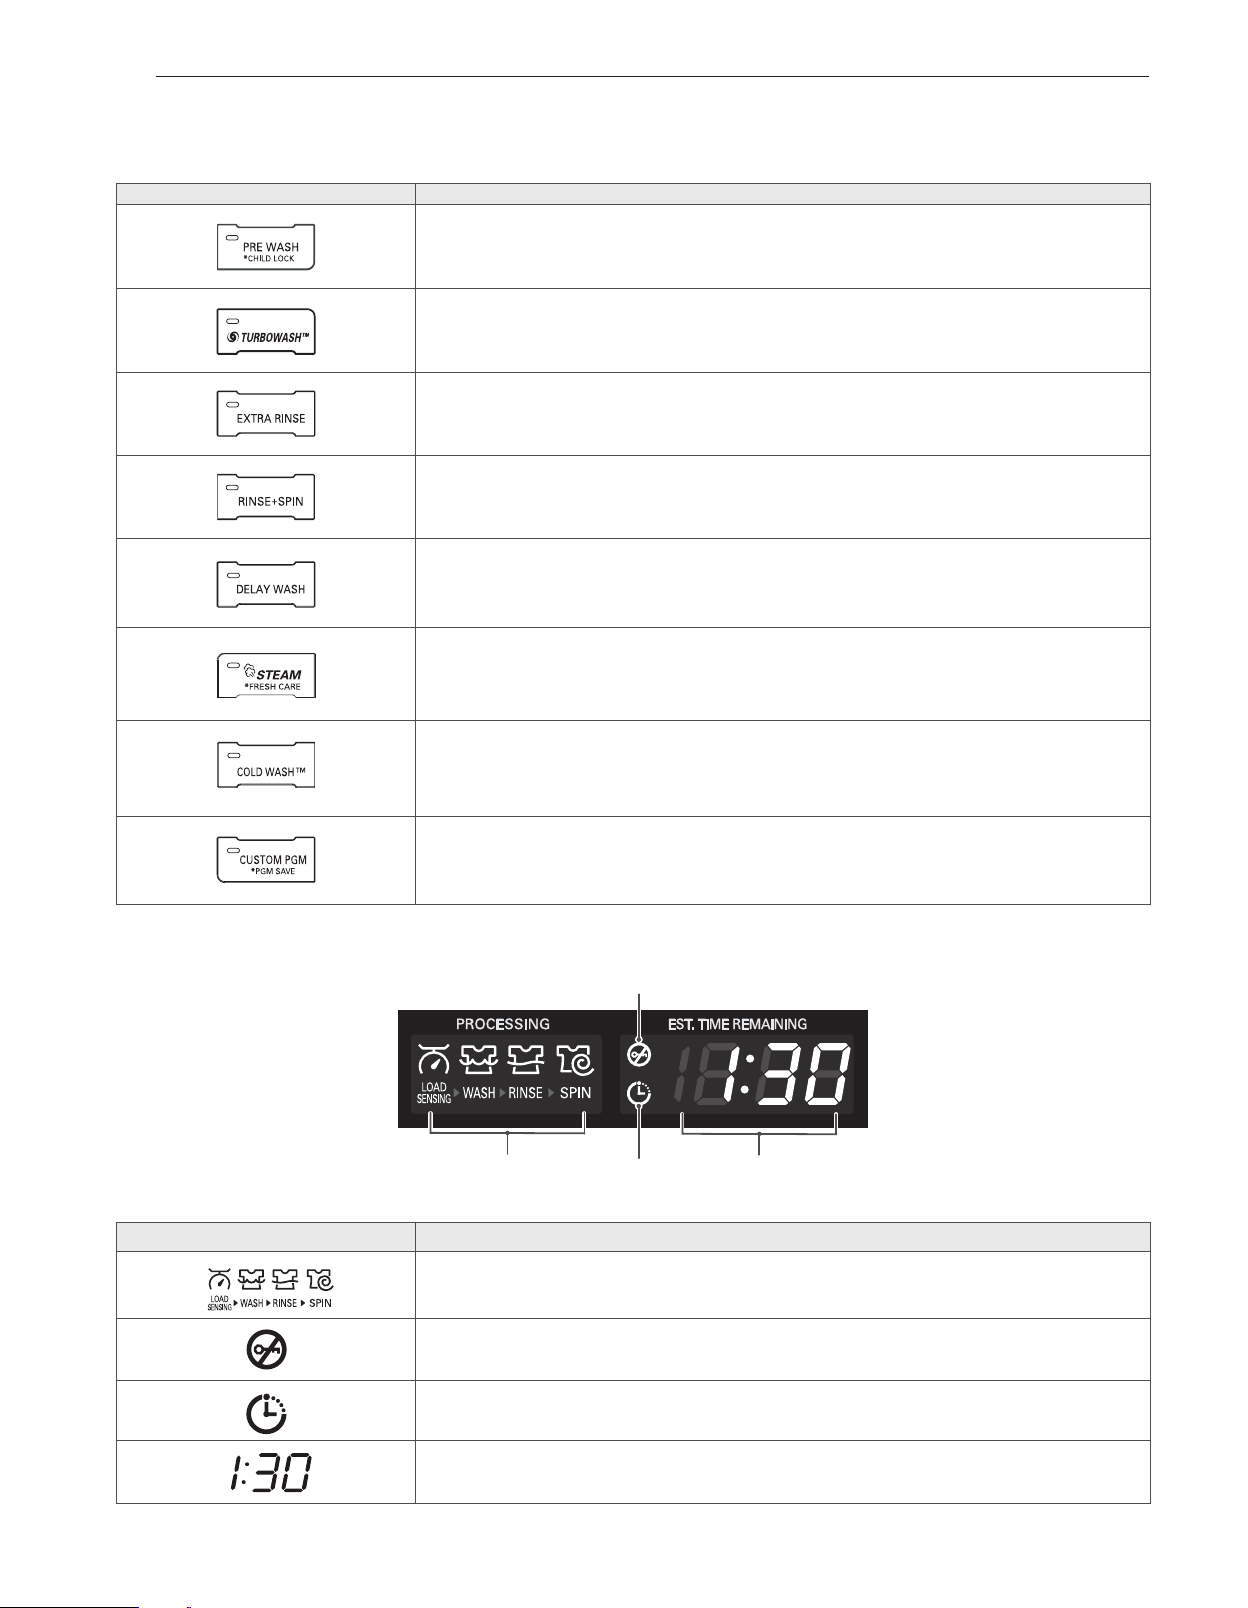
Display Icon Description
This portion of the display shows which stage of the wash cycle is currently underway (LOAD
y
SENSING, WASH, RINSE or SPIN).
Indicates that the door is locked. The washer door will lock while the washer is operating. The door
y
can be unlocked by pressing the START/ PAUSE button to stop the washer.
This indicator shows that the washer has been set for DELAY WASH. The washer will start
y
automatically after the set delay time has passed.
When the START/PAUSE button is pressed, the washer automatically detects the wash load (weight)
y
and optimizes the washing time, based on the selected cycle and options. The display will then
indicate the estimated time remaining for the selected wash cycle.
Door lock
indicator
Estimated time remaining/
error message display
(See page 35)
Cycle
process
indicator
Delay
wash
indicator
11
INSTALLATION INSTRUCTIONS
ENGLISH
INSTALLATION INSTRUCTIONS
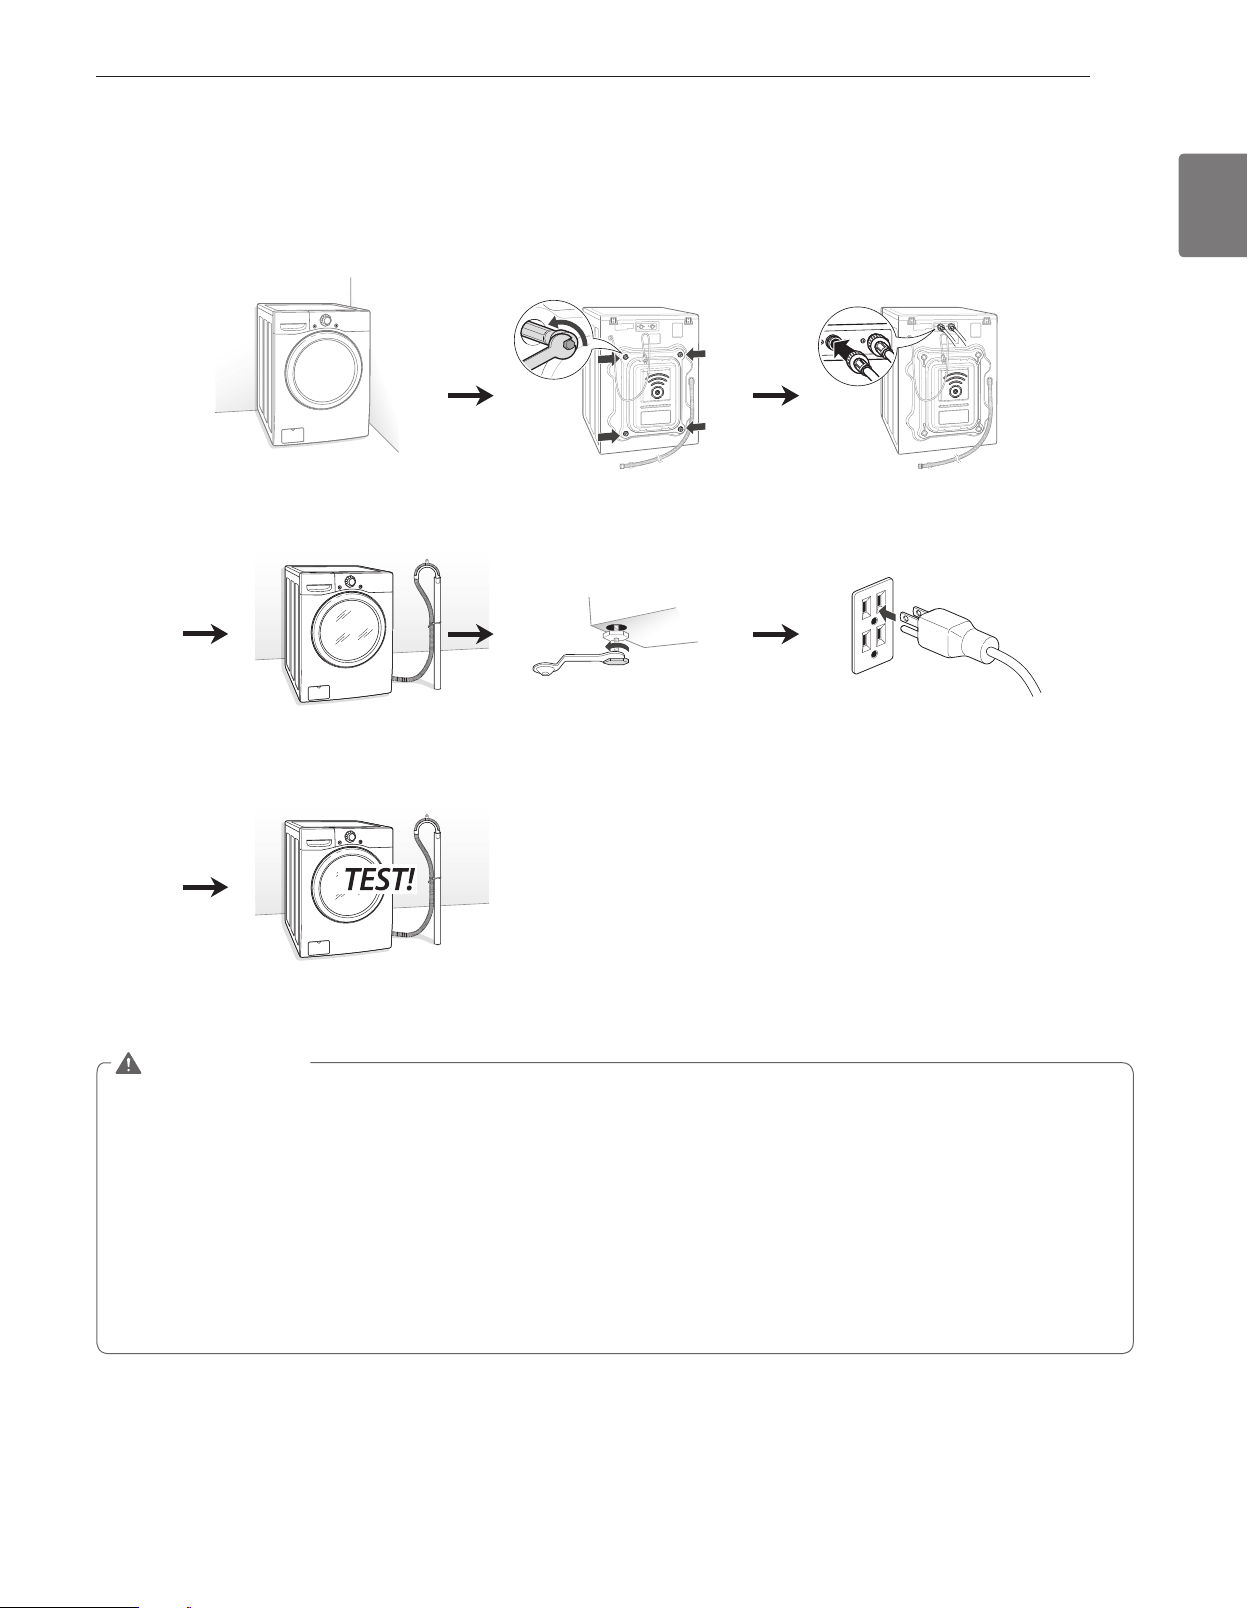
Preview installation order
WARNING
Washer is heavy! Two or more people are required when moving and unpacking the washer.
y
Failure to do so can result in
back or other injury.
Store and install the washer where it will not be exposed to temperatures below freezing or exposed to outdoor weather
y
conditions.
Failure to follow this warning can cause serious injury, fire, electric shock, or death.
Properly ground washer to conform with all governing codes and ordinances.
y
Failure to follow this warning can cause
serious injury, fire, electric shock, or death.
To reduce the risk of electric shock, do not install the washer in humid spaces.
y
Failure to follow this warning can cause
serious injury, fire, electric shock, or death.
The base opening must not be obstructed by carpeting when the washer is installed on a carpeted floor.
y
Do not remove ground prong. Do not use an adapter or extension cord. Plug into a grounded 3-prong outlet.
y
Failure to
follow this warning can cause serious injury, fire, electric shock, or death.
Checking and choosing the
proper location
Unpacking and removing
shipping bolts
Connecting the water line
Connecting the drain line Leveling the washing
machine
Plugging in the power cord
and grounding
Test run
12
INSTALLATION INSTRUCTIONS
Checking and choosing the proper
location
Install the washing machine on a solid floor that is strong and
rigid enough to support the weight of the washing machine,
even when fully loaded, without flexing or bouncing. If the
floor has too much flex, you may need to reinforce it to make
it more rigid. If the floor is not solid, it may cause severe
vibration and noise.
1
Clean the floor before installation.
- Make sure to select solid and smooth ground.
2
Two or more people are needed for moving and
unpacking the washing machine.
3
Allow for sufficient space between the walls and the
washing machine for installation.
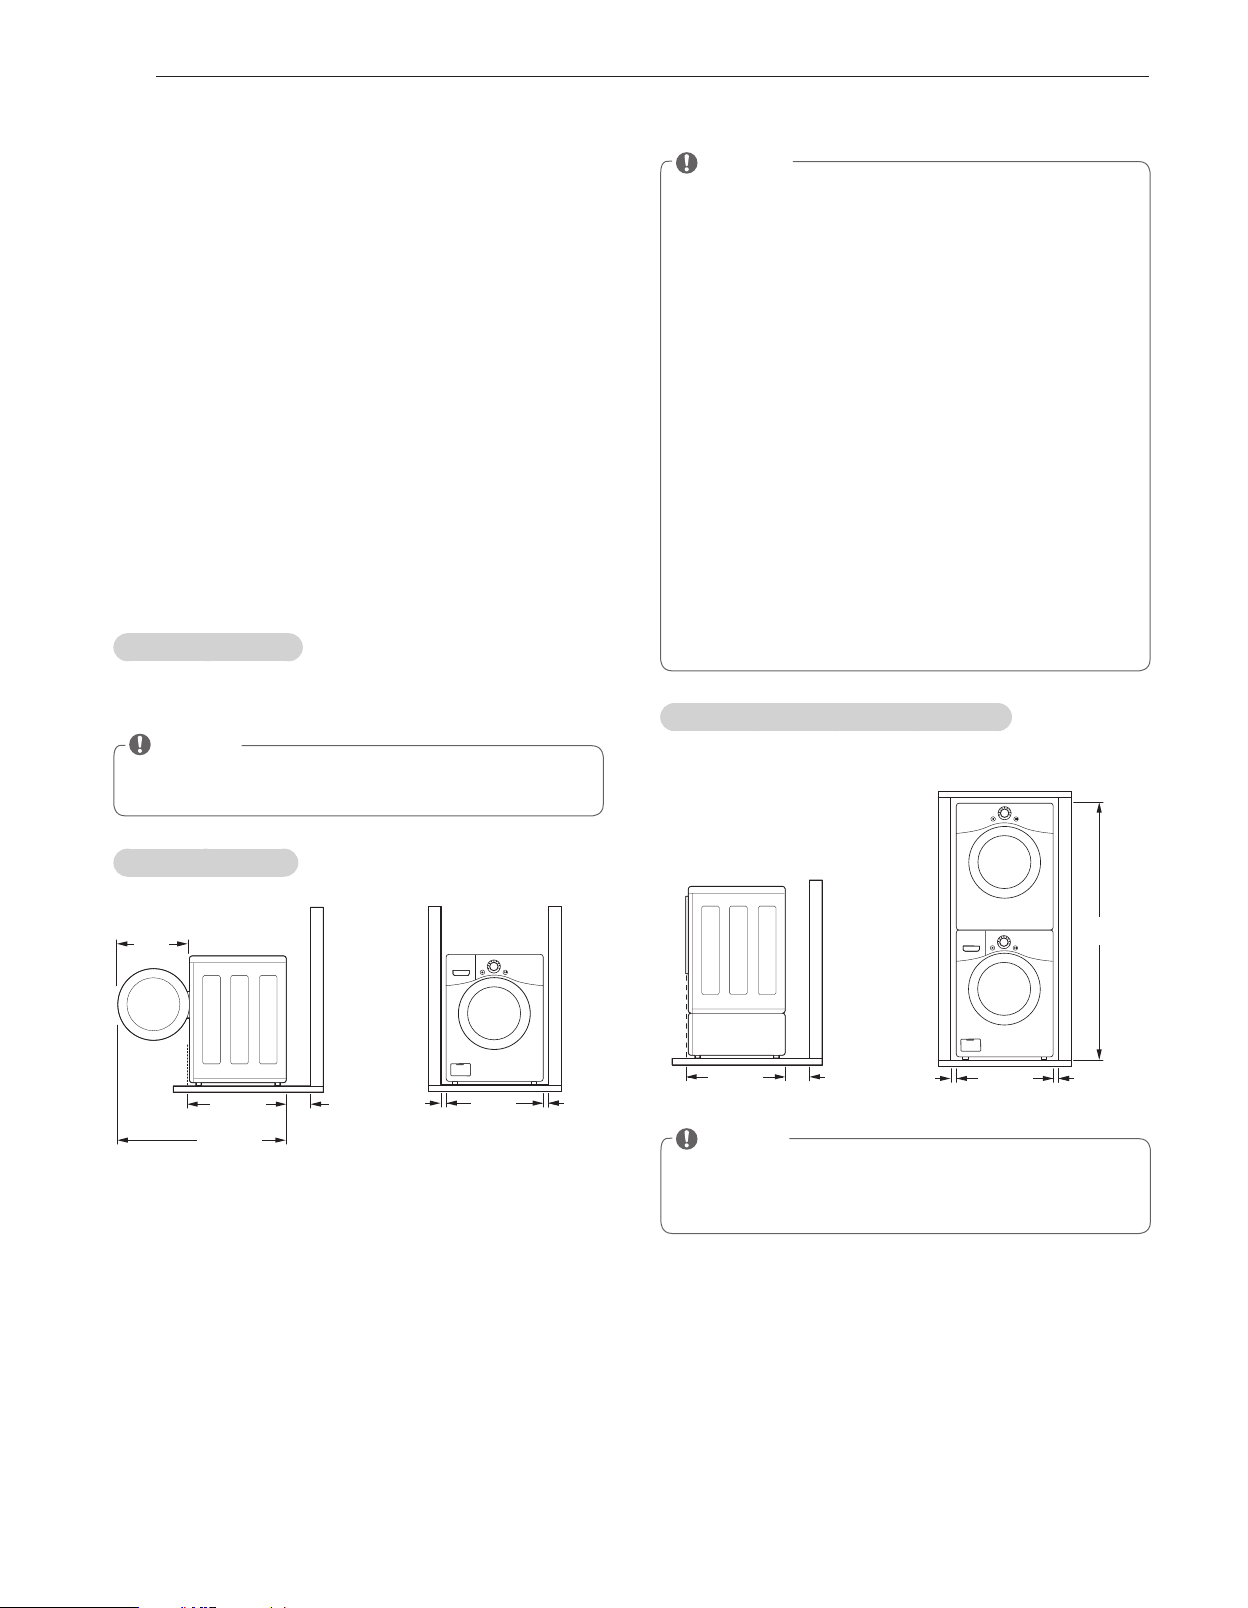
Space requirements
You must allow sufficient space for water lines, the drain
line, and airflow.
NOTE
Be sure to allow for wall, door, or floor moldings that
y
may increase the required clearances.
Installing on a floor
29
3
/4"
(75.6 cm)
4"
(10 cm)
51"
(129.5 cm)
22
1
/4"
(57 cm)
27"
68.6 cm
1"
(2.5 cm)
1"
(2.5 cm)
NOTE
The floor
y
must be strong and rigid enough to support
the weight of the washer, when fully loaded, without
flexing or bouncing. If your floor has too much flex,
you may need to reinforce it to make it more rigid.
A floor that is adequate for a top-loading washer may
not be rigid enough for a front loading washer, due to
the difference in the spin speed and direction. If the
floor is not solid, your washer may vibrate and you may
hear and feel the vibration throughout your house.
Before installing the washer, make sure the floor is
y
clean, dry and free of dust, dirt, water and oils so the
washer feet can not slide easily. Leveling feet that can
move or slide on the floor can contribute to excess
vibration and noise due to poor contact with the floor.
If a drip pan must be used, take extra care to follow the
y
instructions provided with the drip pan and make sure
the leveling feet are adjusted for firm and even contact
with the pan. Use of drip pans and failure to properly
level the machine may result in increased vibration and
noise during operation.
Installing on a pedestal or stacking kit
29
3
/4"
(75.6 cm)
4"
(10 cm)
27"
(68.6 cm)
1"
(2.5 cm)
1"
(2.5 cm)
77
1
/2"
(196.8 cm)
NOTE
Refer to the instructions packaged with the optional
y
PEDESTAL or STACKING KIT before installing with a
PEDESTAL or a STACKING KIT.
13
INSTALLATION INSTRUCTIONS
ENGLISH
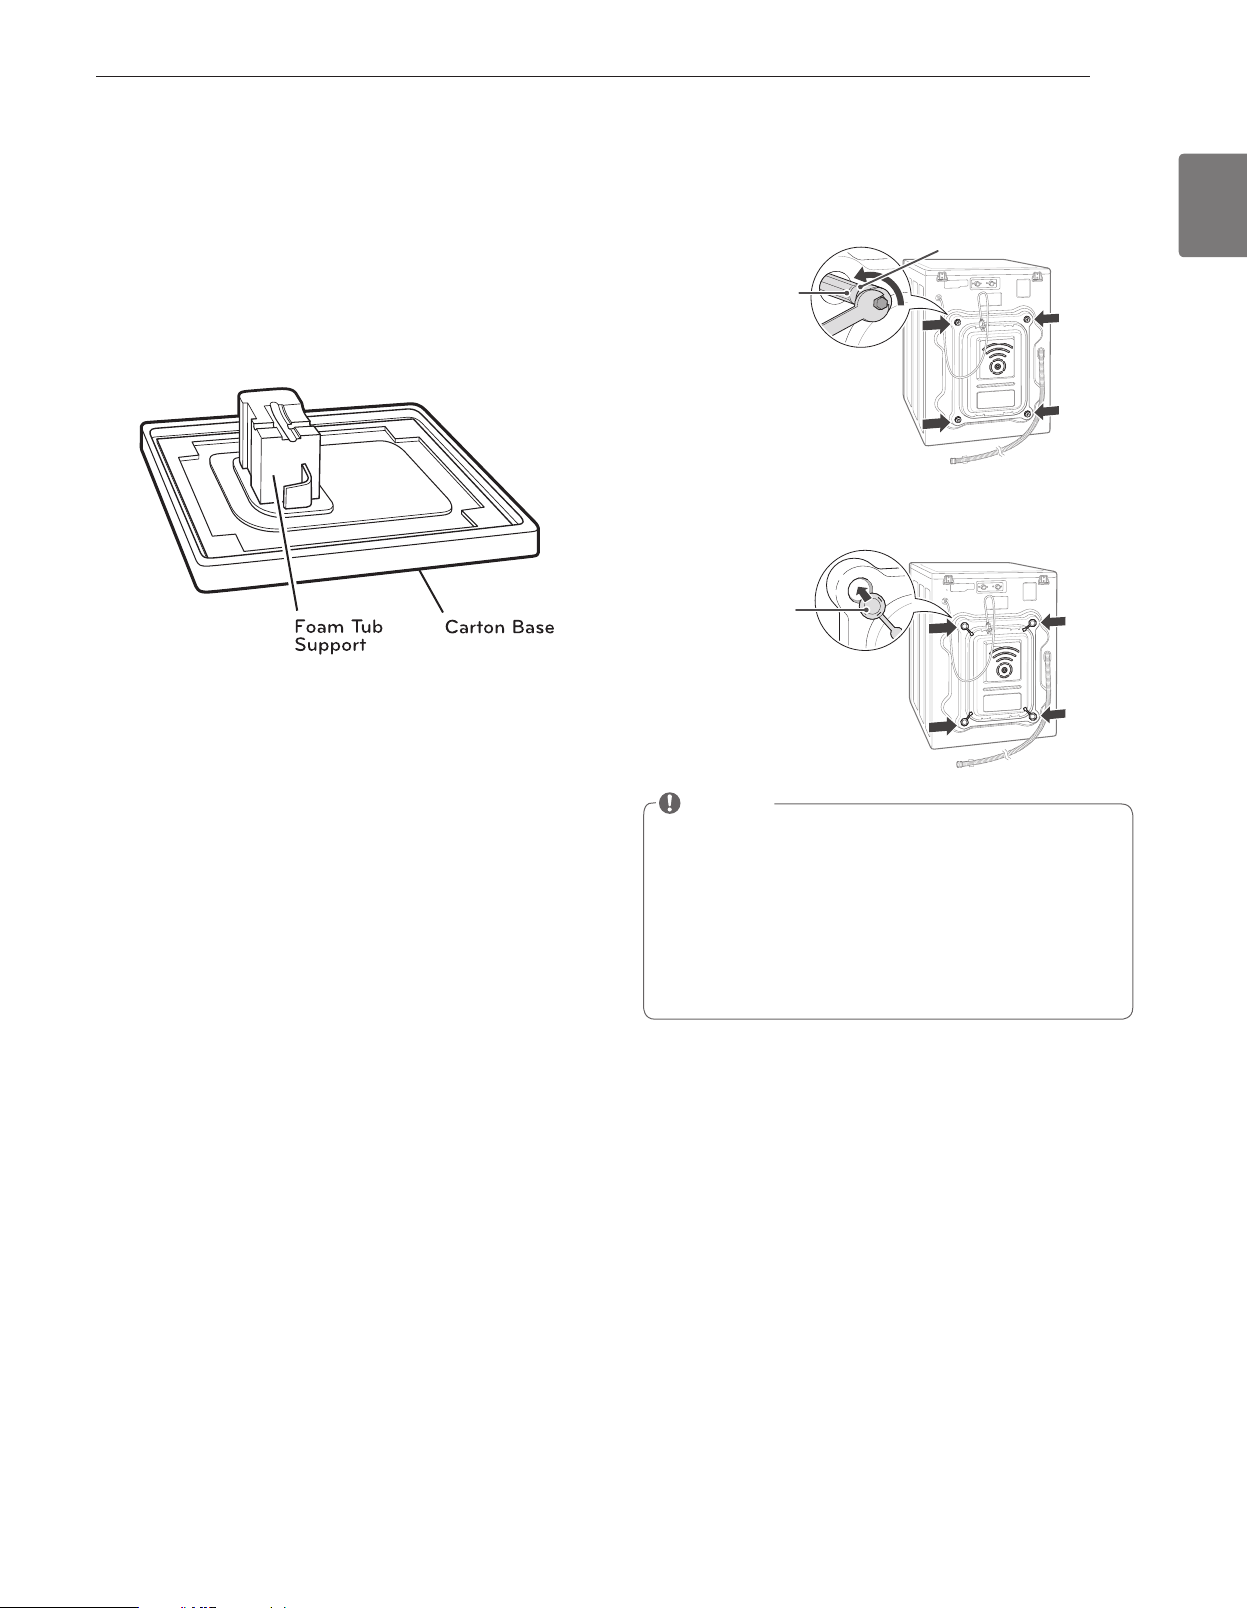
Unpacking and removing shipping bolts
When removing the washer from the carton base, be sure to
remove the foam drum support in the middle of the carton
base.
If you must lay the washer down to remove the base
packaging materials, always lay it carefully on its side.
Do NOT lay the washer on its front or back.
1
Remove the bottom two shipping bolts with the wrench
(included) to fully loosen all four shipping bolts by turning
them counterclockwise and then pulling them out.
Shipping
bolt
Retainer
2
Locate the four hole caps included in the accessory pack
and install them in the shipping bolt holes.
Cap
NOTE
Save the bolt assemblies for future use. To prevent
y
damage to internal components, DO NOT transport the
washer without reinstalling the shipping bolts.
Failure to remove shipping bolts and retainers may
y
cause severe vibration and noise, which can lead to
permanent damage to the washer. The cord is secured
to the back of the washer with a shipping bolt to help
prevent operation with shipping bolts in place.
14
INSTALLATION INSTRUCTIONS
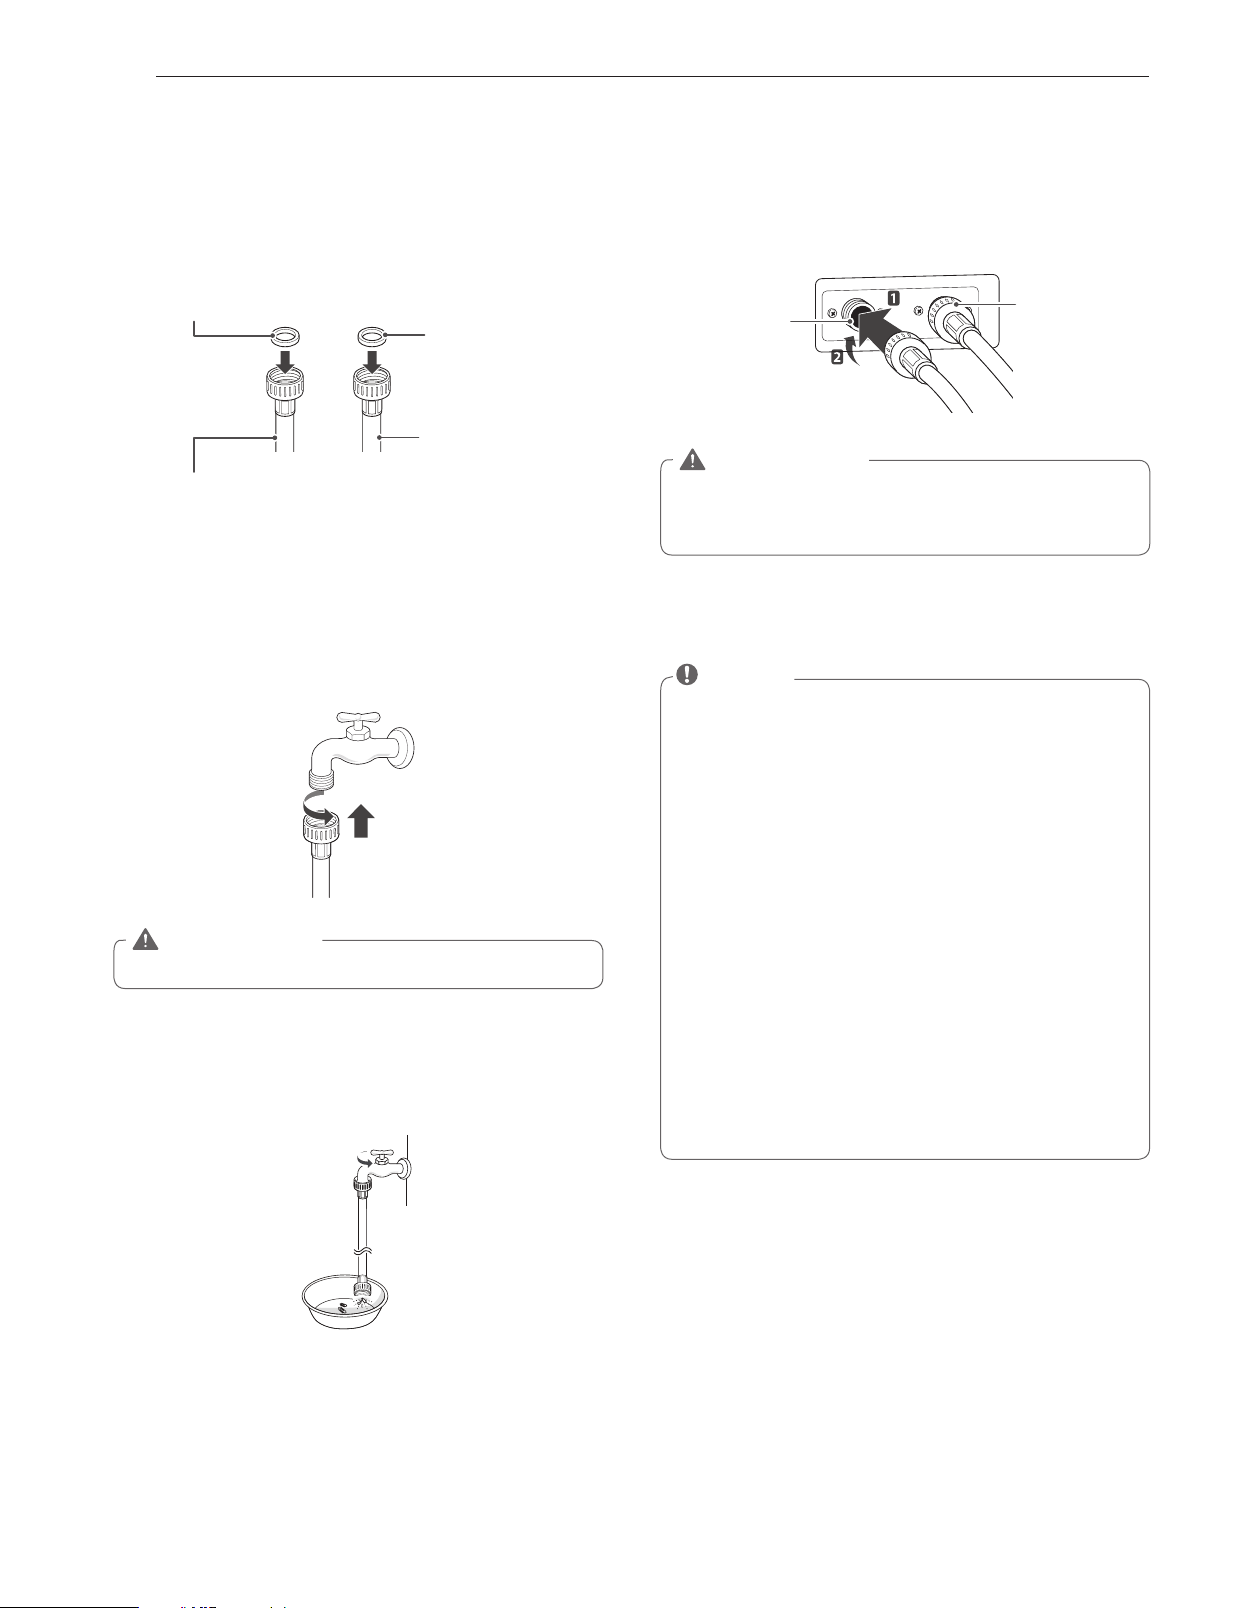
Connecting the water lines
1
Check the rubber seals on both sides of the hose.
- Insert a rubber seal into the threaded fittings on each
hose to prevent leaking.
Rubber seal
Water hose
(To water inlet on the
washing machine)
Rubber seal
Water hose
(To faucet)
2
Connect the water supply hoses to the HOT and COLD
water faucets tightly by hand and then tighten another
2/3 turn with pliers.
- Connect the blue hose to a cold water faucet and the
red hose to a hot water faucet.
WARNING
Do not overtighten.
y
Damage to the coupling can result.
3
After connecting inlet hose to water faucets, turn on the
water faucets to flush out foreign substances (dirt, sand
or sawdust) in the water lines. Let water drain into a
bucket, and check the water temperature.
4
Connect the hoses to the water inlets tightly by hand and
then tighten another 2/3 turn with pliers.
- Connect the blue hose to the cold water inlet and the
red hose to the hot water inlet.
Cold
water
inlet
Hot water
inlet
WARNING
Do not overtighten the hoses.
y
Overtightening can
damage the valves resulting in leaking and property
damage.
5
Check for leaks by turning on the faucets.
- If water leaks, check steps 1 to 4 again.
NOTE
For your safety, and for extended product life, use
y
only authorized components. The manufacturer is not
responsible for product malfunction or accidents caused
by the use of separately purchased unauthorized parts.
Use new hoses when you install the washing machine.
y
Do not reuse old hoses. Use only the inlet hoses
provided with the washer. LG does not recommend the
use of aftermarket hoses.
Periodically check the hoses for cracks, leaks and wear,
y
and replace the hoses every 5 years.
Do not stretch the water hoses intentionally, and make
y
sure that they are not crushed by other objects.
Water supply pressure must be between 14.5 PSI and
y
116 PSI (100~800 kPa). If the water supply pressure is
more than 116 PSI, a pressure reducing valve must be
installed.
To provide optimum washing performance the hot
y
water temperature should be set at 120-135°F (48-57°C)
and the cold at 60°F (15°C).
15
INSTALLATION INSTRUCTIONS
ENGLISH
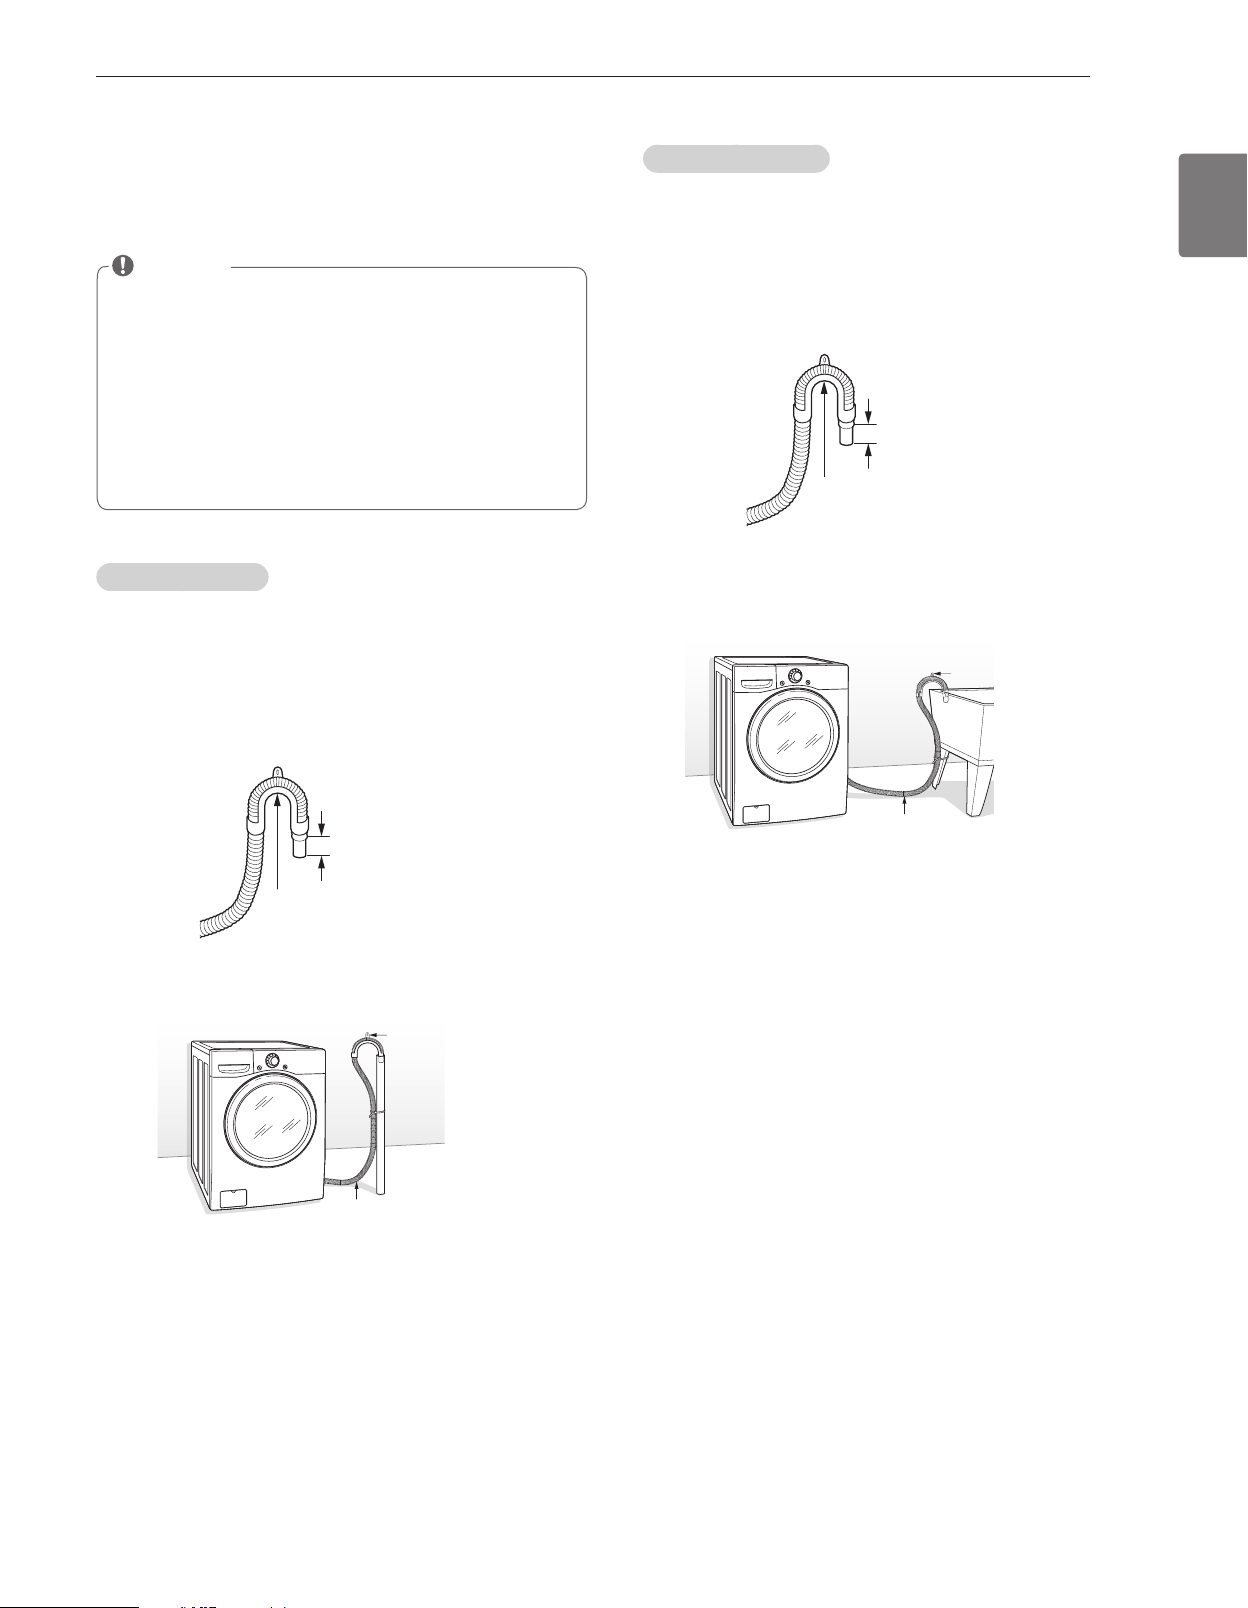
Connecting the drain line
Secure the drain hose in place to prevent moving and leaking.
NOTE
The drain hose should be properly secured. Failure to
y
properly secure the drain hose can result in flooding
and malfunction.
Total height of the house end should not exceed 96
y
inches (244.8 cm) from the bottom of the washer.
The drain must be installed in accordance with any
y
applicable local codes and regulations.
Make sure that the water lines are not stretched,
y
pinched, crushed, or kinked.
Using a standpipe
1
Clip the end of the hose into the elbow bracket.
- Connect the elbow bracket within 4 inches (10 cm) from
the end of the drain hose. If the drain hose is extended
more than 4 inches (10 cm) beyond the end of the
elbow bracket, mold or microorganisms could spread to
the inside of the washer.
No more than
4 inches (10 cm)
Elbow bracket
2
Insert the end of the drain hose into the standpipe.
Drain Hose
Elbow Bracket
3
Use a tie strap to secure the drain hose in place.
Using a laundry tub
1
Clip the end of the hose into the elbow bracket.
- Connect the elbow bracket within 4 inches (10 cm) from
the end of the drain hose. If the drain hose is extended
more than 4 inches (10 cm) beyond the end of the
elbow bracket, mold, or microorganisms could spread to
the inside of the washer.
No more than
4 inches (10 cm)
Elbow bracket
2
Hang the end of the drain hose over the side of the
laundry tub.
Elbow Bracket
Drain Hose
3
Use a tie strap to secure the drain hose in place.
16
INSTALLATION INSTRUCTIONS
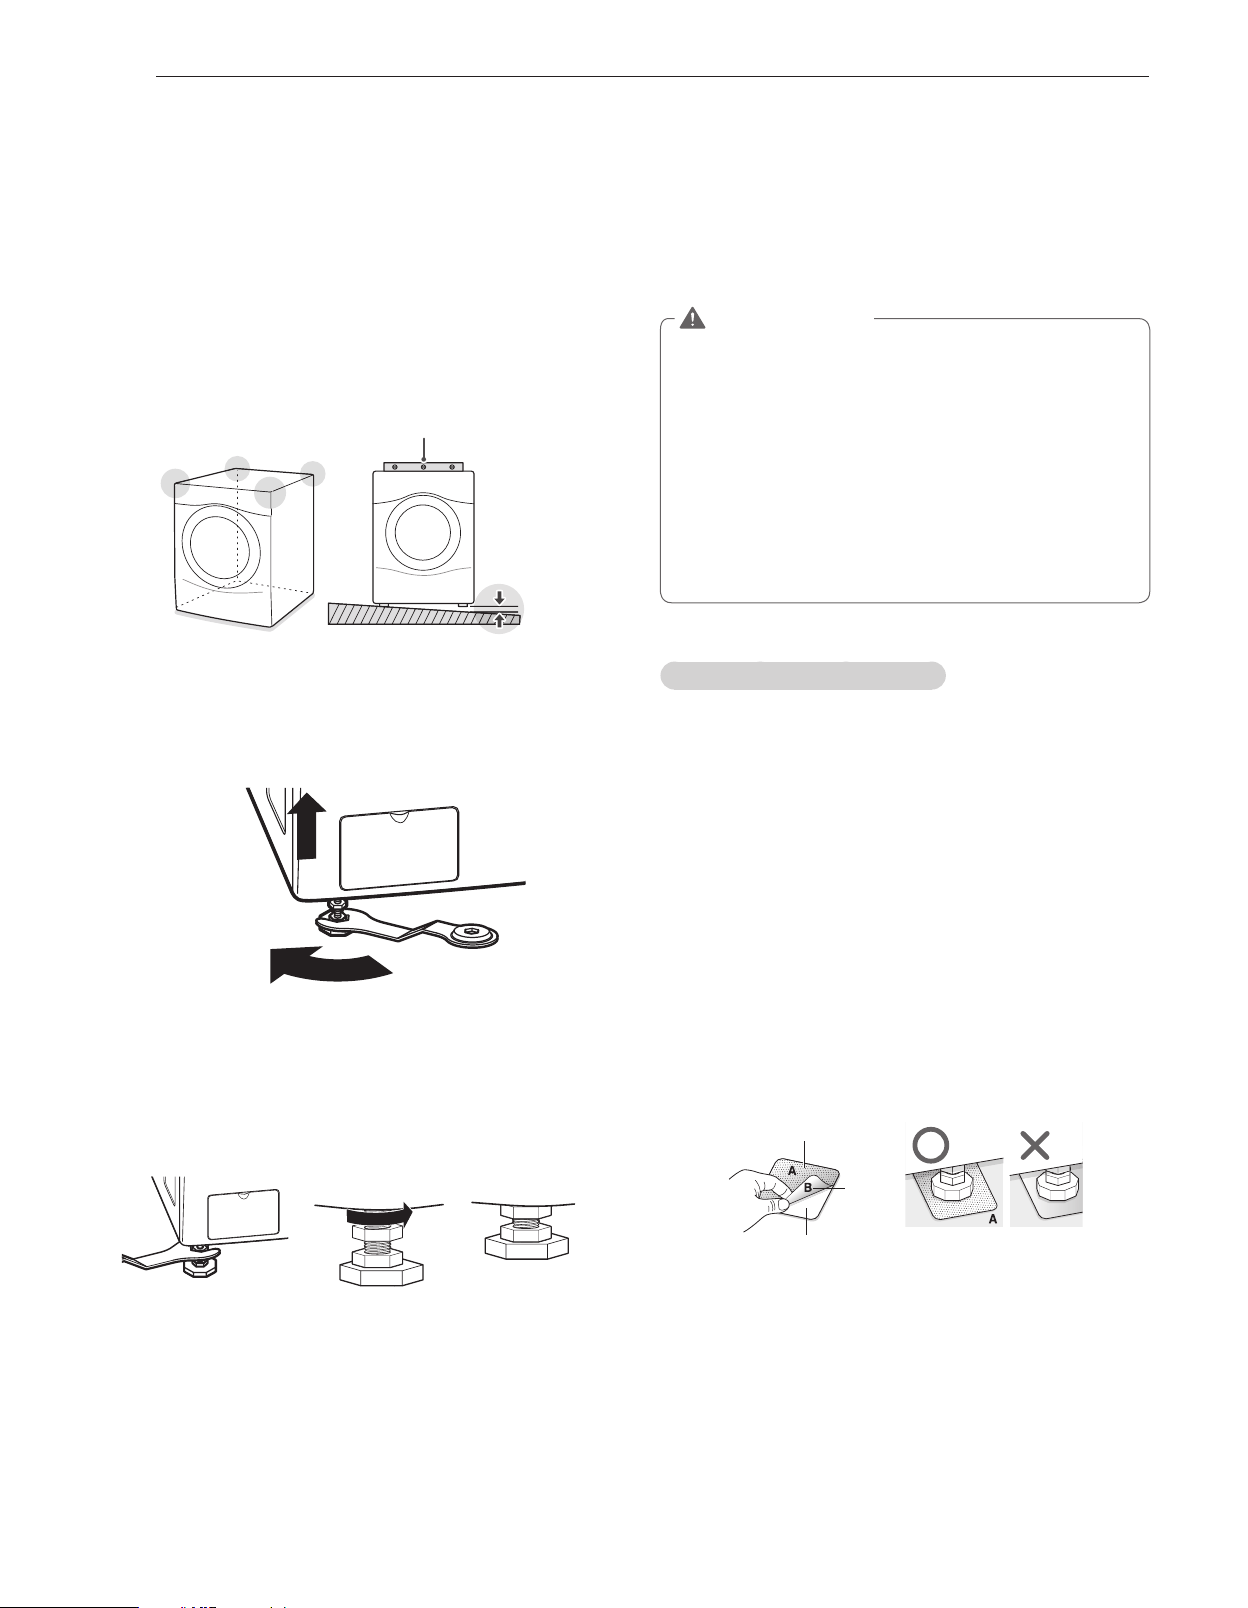
Leveling the washing machine
The washer tub of your new washing machine spins at very
high speeds. To minimize vibration, noise, and unwanted
movement, the floor must be perfectly level and solid.
1
Check the washing machine’s level.
- Check the precise level by rocking the top edges of
the washing machine or placing a level on the washing
machine. The slope beneath the washing machine must
not exceed 1°, and all four leveling feet must rest firmly
on the floor.
Level
1°
2
Turn the lower leveling feet clockwise to level the
washing machine.
- Turning the lower leveling feet clockwise raises the
washing machine.
Raise
3
Turn the locknuts counterclockwise and tighten them
when the washing machine is level.
Tighten all 4 lock
nuts securely using
the wrench.
4
Check the washing machine’s level again.
- Push or rock the top edges of the washing machine
gently to make sure that the washing machine does not
rock.
- If the washing machine rocks, repeat steps 1 to 3.
WARNING
Using the washing machine without leveling, it may
y
result in malfunction caused by the production of
excess vibration and noise.
If you are installing the washing machine on the
y
optional pedestal, you must adjust the leveling feet
on the pedestal to level the washing machine. The
washing machine´s leveling feet should be minimized
and turn the locknuts counterclockwise to secure.
Use the leveling feet only when you level the washing
y
machine.
If you raise the leveling feet unnecessarily, it
may cause abnormal vibration of the washing machine.
Using non-skid pads (optional)
If you install the washing machine on a slippery surface, it
may move because of excessive vibration. Incorrect leveling
may cause malfunction through noise and vibration. In the
event of this, lay the non-skid pads under the leveling feet
and adjust the level.
1
Clean the floor to attach the non-skid pads.
- Use a dry rag to remove and clean foreign objects or
moisture. If moisture remains, the non-skid pads may
slip.
2
Adjust the level after placing the washing machine in the
installation area.
3
Place the adhesive side of the non-skid pad on the floor.
- It is most effective to install the non-skid pads under the
front legs. If it is hard to place the pads under the front
legs, place them under the back legs.
Remove
backing
This side up
Adhesive
side
4
Check the washing machine’s level again.
- Push or rock the top edges of the washing machine
gently to make sure that the washing machine does not
rock. If the washing machine rocks, level the washing
machine again.
17
INSTALLATION INSTRUCTIONS
ENGLISH
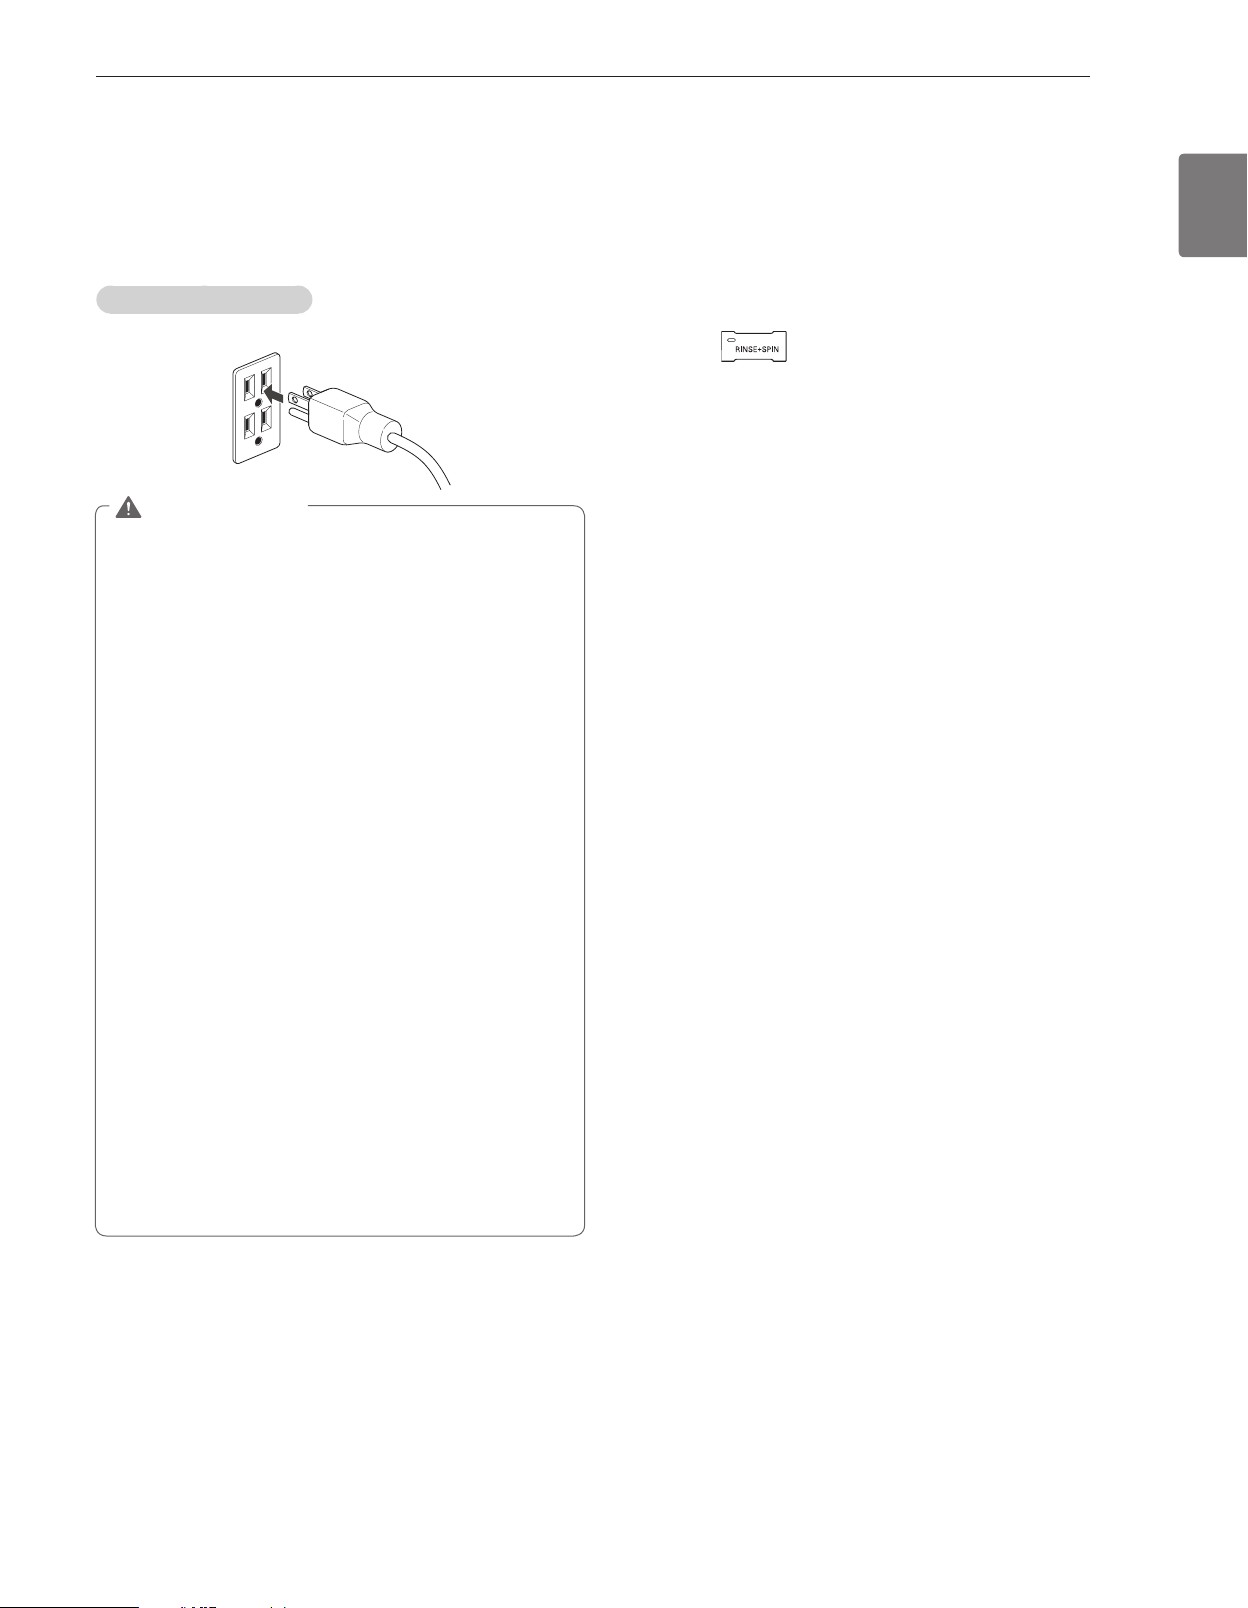
Plugging in the power cord and
grounding
Make sure to ground the washing machine to prevent a short
circuit or an electric shock when plugging in.
Using a 3-prong outlet
Plug in the electrical outlet without additional grounding.
WARNING
The power outlet must be within 60 inches (1.5 m) of either
y
side of the washer.
The appliance and outlet must be positioned so that the plug
y
is easily accessible.
Do not overload the outlet with more than one appliance.
y
The outlet must be grounded in accordance with current
y
wiring codes and regulations.
Time-delay fuse or circuit breaker is recommended.
y
It is the personal responsibility and obligation of the product
y
owner to have a proper outlet installed by a qualified
electrician.
Do not use a worn or damaged power cord or power plug.
y
Replace or repair it immediately.
Failure to do so may result
in death, fire, electric shock, or malfunction.
Do not modify the power cord and take care not to damage it
y
when installing or moving the washing machine.
Failure to do
so may result in death, fire, electric shock, or malfunction.
Make sure that the washing machine is grounded.
y
Connect this washing machine to a grounded outlet
y
conforming to the rating prior to use.
Failure to do so may
result in fire, electric shock, or malfunction.
Do not use adaptors or extension cords.
y
The washing
machine should always be plugged into its own individual
electrical outlet which has a voltage rating that matches the
rating plate. Failure to do so may result in fire, electric shock
or disorder.
Do not damage or cut off the ground prong of the power
y
cord.
Doing so may cause death, fire, electric shock, or
product malfunction.
Test run
Check if the washing machine is properly installed and run a
test cycle.
1
Load the washing machine with 6 pounds of laundry.
2
Press
A
and turn
B
on the right
3
Press to RINSE + SPIN.
4
Press
C
.
- The wash cycle starts.
5
Check if water is supplied, that the washing machine
does not rock or vibrates excessively, and that it drains
well during the spin cycle.
- If water leaks during water supply, see page 14,
Connecting the water lines
to connect them properly.
- If the washing machine rocks and vibrates excessively,
see page 16,
Leveling the washing machine
to level it
again.
- If the drain does not work, see page 15,
Connecting the
drain line
to install it properly.

18
PREPARATION
Check all pockets to make sure that they are empty.
u
-Items such as clips, matches, pens, coins, and keys can
damage both your washer and your clothes.
Close zippers, hooks, and drawstrings to prevent these
u
items from snagging or tangling on other clothes.
Pretreat heavily stained areas before washing.
u
- Doing so will produce clean, stain-free results.
Combine large and small items in a load. Load large items
u
first.
Large items should not be more than half of the total
u
washload.
The washer can be fully loaded, but the drum should not be
u
tightly packed with items.
-The door of the washer should close easily.
Do not wash single items, except for bulky items such as
u
blankets. Make sure to wash laundry in similar types of
loads.
- Washing a single small item may result in the tub
becoming unbalanced, vibrating and making a noise.
Do not wash waterproof clothes.
u
- This may cause abnormal vibration, or may cause the load
to bounce, which could damage the tub.
Check if there are any other foreign objects in the door seal
u
and take extra care that clothes do not get caught there.
- Foreign objects in the door seal may stain clothes, and
water may leak if clothes get caught in the door seal.
Wash underwear or small, light items in a laundry net.
u
- Small, light items may get caught in the door seal, and a
brassiere hook may damage other items or the tub.
Brush heavy soil, dust, or hair off fabrics before washing.
u
- Laundry may not wash clean if there is dirt or sand on
the fabrics, or they may damage due to particles rubbing
against sheer fabrics.
Wash blankets individually.
u
- Washing more than one blanket together may produce
unclean results due to tangling or an unbalanced load.
Always separate fabrics according to their colors and wash
u
them separately to prevent colors from running.
- Fabrics may damage or become stained due to fabric dyes
running, or due to foreign objects transferring from one
fabric to another.
PREPARATION
Sorting wash loads
Precautions for fabric care before wash cycle
Read and observe the following to prevent shrinkage or damage to clothes.

19
PREPARATION
ENGLISH
Category Label Directions
Washing
Hand Wash
Machine Wash, Normal Cycle
Use Permanent Press/Wrinkle
Resistant washing machine
setting (which has a cool down or
cold spray before the reduced
spin)
Use Gentle/Delicate washing
machine setting (slow agitation
and/ or reduced wash time).
Do Not Wash
Do Not Wring
Water Temperature
Hot
Warm
Cold/Cool
Bleach symbols
Any Bleach (When Needed)
Only Non-Chlorine Bleach (When
Needed)
Do Not Bleach
Colors
Whites / Lights / Darks
Soil
Heavy / Normal / Light
Fabric
Delicates / Easy Care / Sturdy Cottons
Lint
Lint Producers / Lint Collectors
Fabric care labels
Most articles of clothing feature fabric care labels that include
instructions for proper care.
Sorting laundry
It is recommended that you sort laundry into similar loads
that are washable in the same cycle.
Refer to the following chart for sorting clothes
20
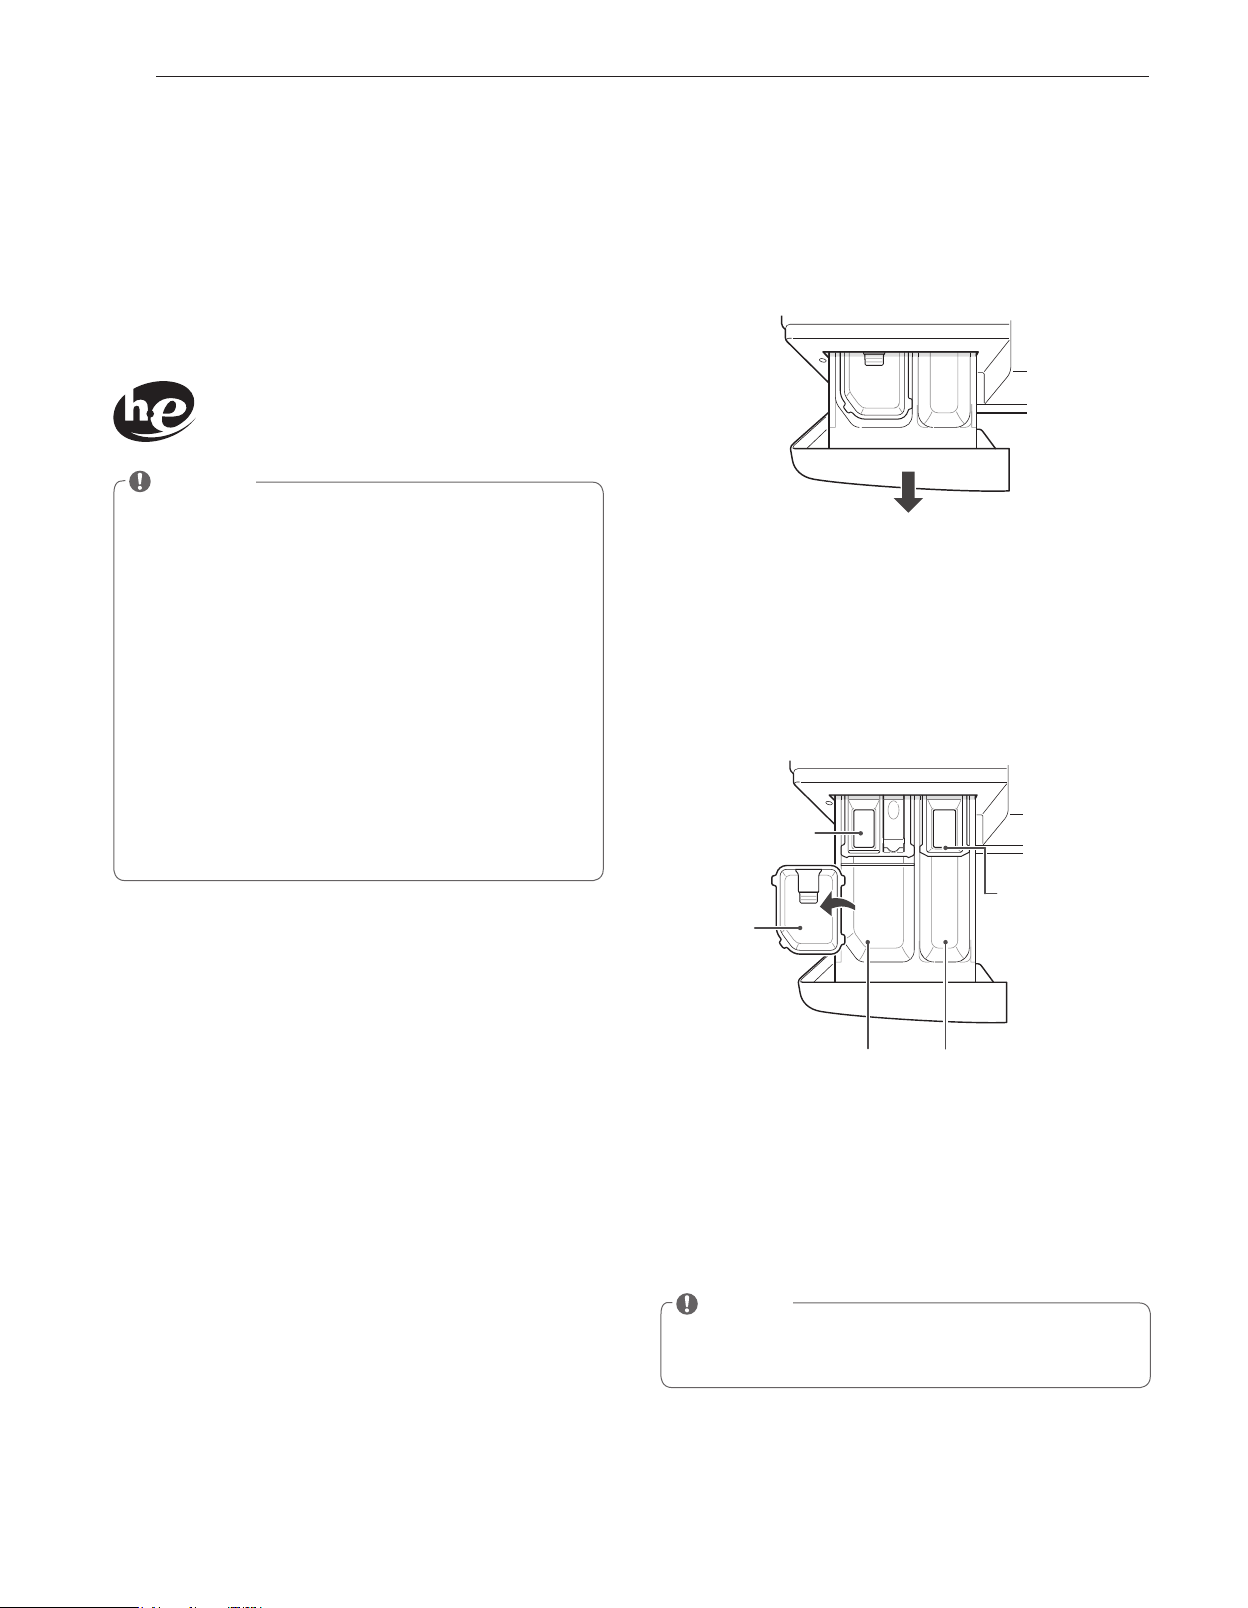
PREPARATION
Loading the dispenser
The detergent dispenser drawer of the washing machine has
a dispenser compartment for each detergent type. Add the
appropriate detergents into its respective compartments.
1
Pull out the detergent dispenser drawer.
2
Add the appropriate detergent to its allocated
compartment.
- If you use a liquid detergent, check if the liquid
detergent cup is in place.
- If you use a powdered detergent, remove the liquid
detergent cup and put the powder in the main wash
detergent compartment.
Liquid chlorine
bleach
compartment
Liquid
detergent
Cup
Main wash
detergent
compartment
Pre-wash
detergent
compartment
Liquid fabric
softener
compartment
3
Close the detergent dispenser drawer slowly.
- Slamming the detergent dispenser drawer may result in
the detergent overflowing into another compartment or
pouring into the tub earlier than programmed.
NOTE
It is normal for a small amount of water to remain in
y
the dispenser compartments at the end of the cycle.
Using detergent/fabric softener
Recommended detergent
Make sure to use HE (High-Efficiency) detergent for front-
loading washing machines. HE detergents dissolve more
efficiently and produce fewer suds to ensure efficient
washing and rinsing. Use the correct amount of detergent as
indicated on the label of the detergent packaging.
Designed specially to use only
HE (High-Efficiency) detergent
NOTE
Only use HE detergents, since using a regular
y
detergent may produce excessive suds.
HE detergents produce fewer suds, dissolve more
y
efficiently to improve washing and rinsing performance,
and help to keep the interior of your washer clean.
Use less detergent for soft water.
y
Wipe up any spills immediately, as liquids could
y
damage the finish and the control panel of the washing
machine.
Using too much detergent can cause a build-up in
y
the tub resulting in unsatisfactory performance and
machine malfunction.
If you use a detergent that does not dissolve easily or a
y
detergent with high viscosity, it will leave a residue on
the tub, which may not rinse properly.

21
PREPARATION
ENGLISH
Liquid Bleach Compartment
This compartment holds liquid chlorine bleach, which will be
dispensed automatically at the proper time during the wash
cycle.
NOTE
Do not add powdered or liquid color-safe bleach to this
y
compartment.
Always follow the manufacturer’s recommendations
y
when adding bleach. Do not exceed the maximum fill
line. Using too much bleach can damage fabrics.
Never pour undiluted liquid chlorine bleach directly onto
y
the load or into the drum. Fabric damage can occur.
Fabric Softener Compartment
This compartment holds liquid fabric softener, which will be
automatically dispensed during the final rinse cycle.
NOTE
Always follow the manufacturer’s recommendations
y
when adding fabric softener. Do not exceed the
maximum fill line. Using too much fabric softener may
result in stained clothes.
Dilute concentrated fabric softeners with warm water.
y
Do not exceed the maximum fill line.
Never pour fabric softener directly onto the load or into
y
the drum.
Pre-wash Detergent Compartment
Add liquid or powdered detergent to this compartment when
using the pre-wash option. Always use HE (High-Efficiency)
detergent with your washing machine.
NOTE
If liquid detergent is to be used for the main wash
y
when using the pre-wash option, the liquid detergent
cup accessory must be used in main wash dispenser
to prevent the main wash liquid detergent from being
dispensed immediately.
The amount of detergent added for the pre-wash option
y
is 1⁄2 the amount recommended for the main wash
cycle. For example, if the main wash cycle requires one
measure of detergent, add 1⁄2 measure for the pre-
wash option.
Main Wash Detergent Compartment
This compartment holds laundry detergent for the main wash
cycle, which is added to the load at the beginning of the
cycle. Always use HE (High-Efficiency) detergent with your
washing machine.
Never exceed the manufacturer’s recommendations when
adding detergent. Using too much detergent can result
in detergent buildup in clothing and the washer. Either
powdered or liquid detergent may be used.
NOTE
Liquid or powdered color-safe bleach may be added
y
to the main wash compartment with detergent of the
same type.
When using liquid detergent, make sure the liquid
y
detergent cup and insert are in place. Do not exceed
the maximum fill line.
When using powdered detergent, remove the insert
y
and liquid detergent cup from the compartment.
Powdered detergent will not dispense with the liquid
detergent cup and insert in place.
22
USING YOUR WASHING MACHINE
USING YOUR WASHING MACHINE
Basic operation
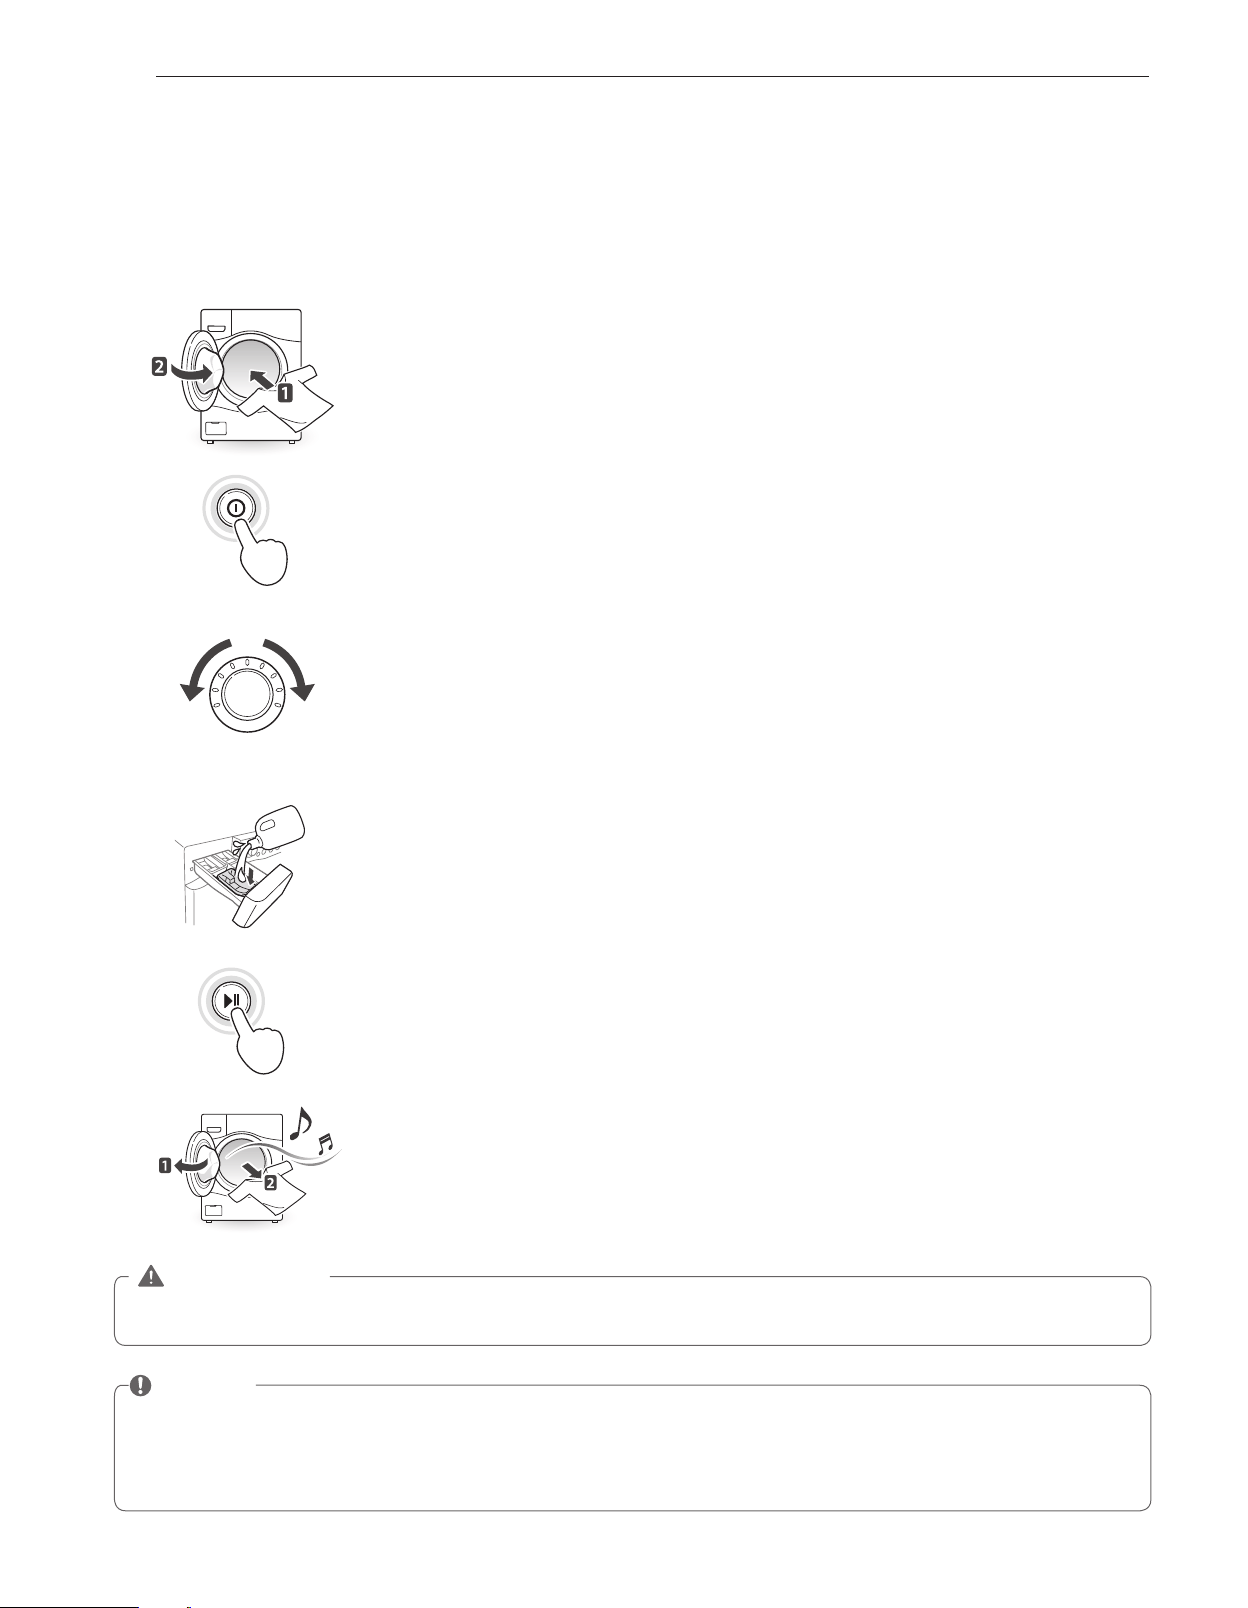
Load the laundry into the washing machine and close the door.
1
2
3
4
5
6
Press
A
.
- The lights around the cycle selector knob will illuminate and a chime will sound.
Turn
B
to the desired cycle.
- The proper default option is automatically set according to the wash cycle. See page 23,
Cycle
guide
, for more detailed default options for each cycle.
- See page 24,
Main cycle
, for details on the wash cycles.
- To change the options, press the option button and select the desired option. See page 25,
Setting options before cycle
, for more details on options.
- Skip to step 4 to use the default setting without changing the options.
Add the proper amount of detergent and additions (bleach, softener) into the detergent dispenser
drawer.
- See page 20,
Using detergent/fabric softener
, for more details on using detergent.
Press
C
.
- The washing machine will start.
When the melody plays, the wash cycle is finished.
- When the washing cycle is finished, the door will unlock. Open the door and remove the
laundry immediately.
- Make sure to check around the door seal when taking out the finished load. Small items may
be caught in the door seal.
NOTE
The front-load washing machine rotates the laundry in a way that allows it to use less water while still fully saturating your
y
clothing. It is normal to not be able to see water during the wash cycle.
If the temperature or the water level inside the machine is too high, the door locks and cannot be opened. To open the door
y
while washing, use the Rinse + SPIN feature.
WARNING
To reduce the risk of fire, electric shock, or injury to persons,
y
read the IMPORTANT SAFETY INSTRUCTIONS before
operating this appliance.
23
USING YOUR WASHING MACHINE
ENGLISH
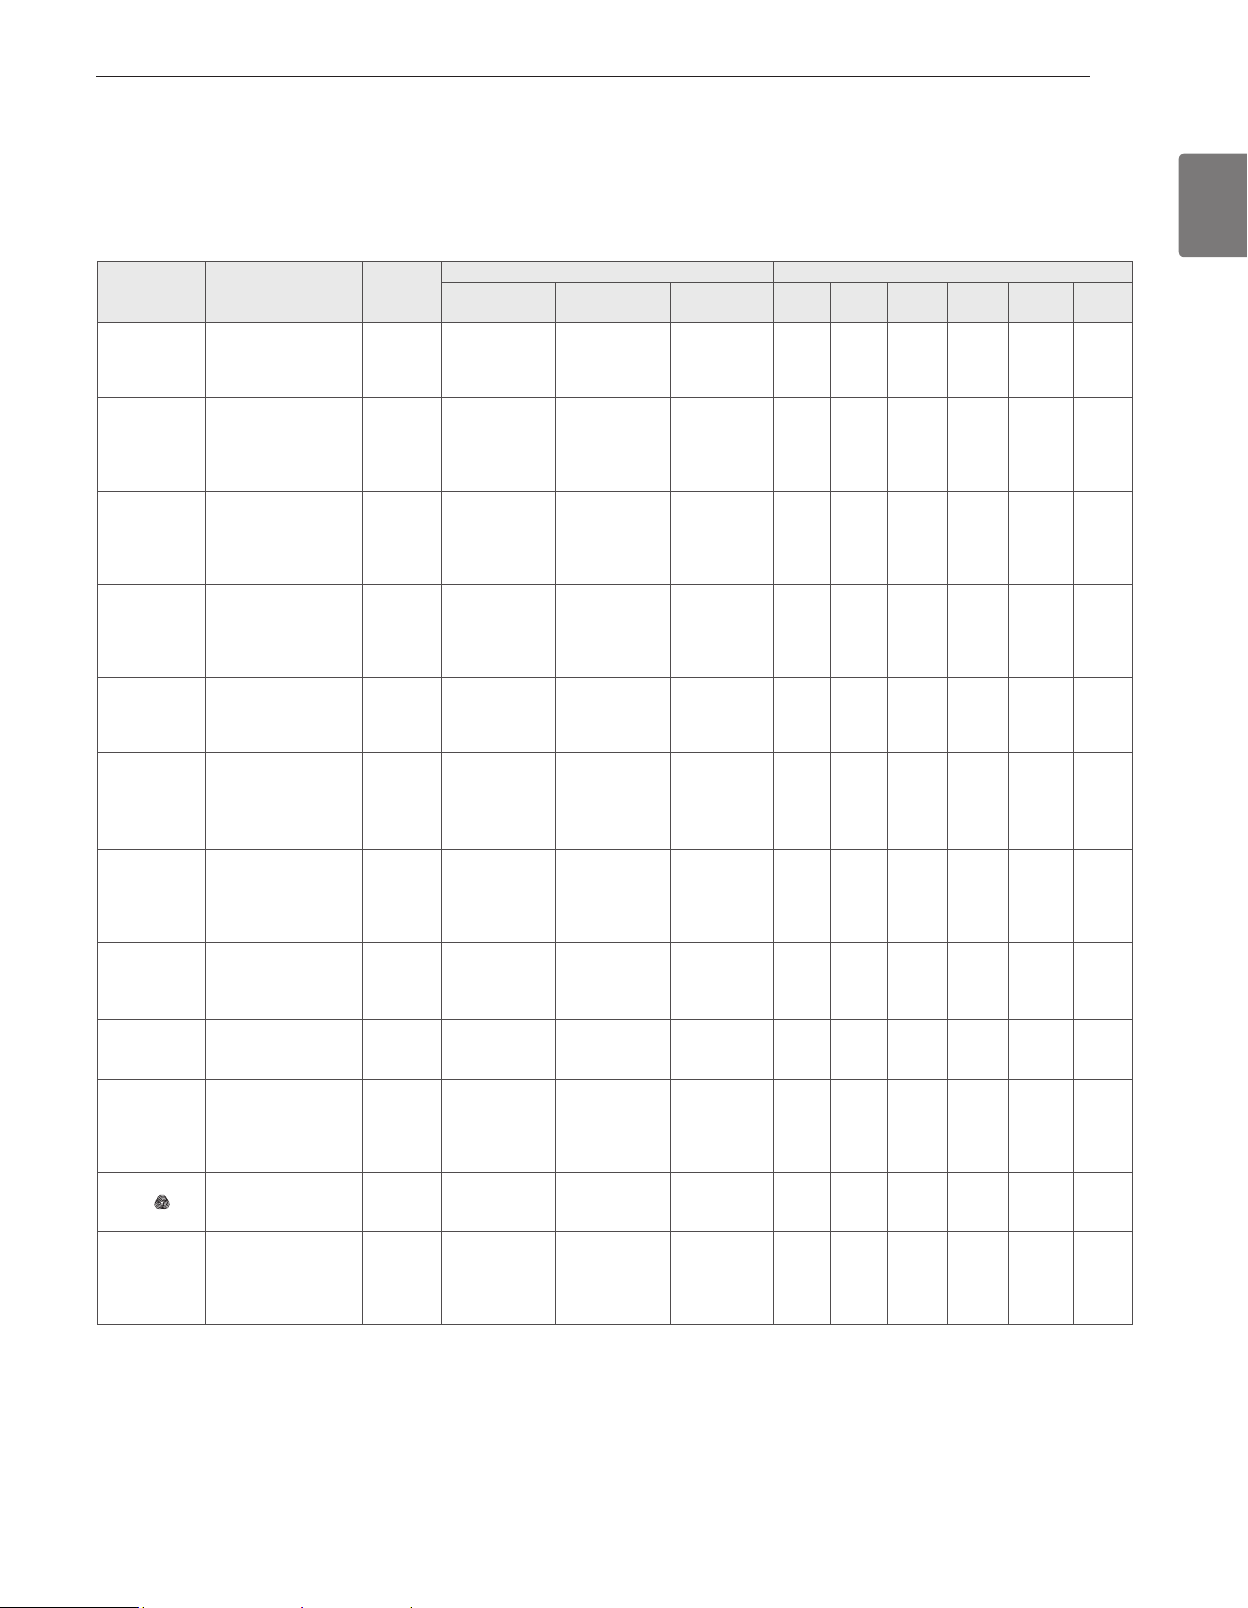
Cycle guide
The cycle guide below shows the options and recommended fabric types for each cycle.
●
= Available option
CYCLE FABRIC TYPE
DISPLAY
TIME(MIN)
BASIC OPTION (
=DEFAULT) ADDITIONAL OPTIONS
WASH
TEMP.
SPIN
SPEED
SOIL
LEVEL
PRE-
WASH
EXTRA
RINSE
STEAM
COLD
WASH™
TURBO
WASH
™
FRESH
CARE
TUB CLEAN This cycle is
designed to remove
a mildewy
89
ALLERGIENE™
Cotton, underwear,
pillow covers,
bed sheets, baby
wear
99 ~ 132
EXTRA HIGH
HIGH
MEDIUM
LOW
NO SPIN
SANITARY Heavily soiled
underwear, work
clothes, diapers, etc.
98 ~ 107
EXTRA HOT
EXTRA HIGH
HIGH
MEDIUM
LOW
NO SPIN
HEAVY
NORMAL
LIGHT
BRIGHT
WHITES
™
White Fabrics 66~76 HOT
WARM
COLD
TAP COLD
EXTRA HIGH
HIGH
MEDIUM
LOW
NO SPIN
HEAVY
NORMAL
LIGHT
BULKY/
LARGE
Large items such as
blankets and
comforters
56
HOT
WARM
COLD
TAP COLD
MEDIUM
LOW
NO SPIN
HEAVY
NORMAL
LIGHT
COTTON/
NORMAL
Cotton, linen, towels,
shirts, sheets, jeans,
mixed loads
32 ~ 50
HOT
WARM
COLD
TAP COLD
EXTRA HIGH
HIGH
MEDIUM
LOW
NO SPIN
HEAVY
NORMAL
LIGHT
HEAVY DUTY
Heavy soiled Cotton
Fabrics
80 ~ 98
HOT
WARM
COLD
TAP COLD
EXTRA HIGH
HIGH
MEDIUM
LOW
NO SPIN
HEAVY
NORMAL
LIGHT
PERM.
PRESS
Dress shirts/pants,
wrinkle-free clothing,
poly/cotton blend
clothing, tablecloths
35 ~ 44
HOT
WARM
COLD
TAP COLD
HIGH
MEDIUM
LOW
NO SPIN
HEAVY
NORMAL
LIGHT
DELICATES Dress shirts/blouses,
nylons, sheer or lacy
garments
41
WARM
COLD
TAP COLD
MEDIUM
LOW
NO SPIN
HEAVY
NORMAL
LIGHT
TOWELS Towels 55 ~ 65
HOT
WARM
COLD
TAP COLD
EXTRA HIGH
HIGH
MEDIUM
LOW
NO SPIN
HEAVY
NORMAL
LIGHT
HAND WASH/
WOOL
Items labeled
“hand-washable”
55
WARM
COLD
TAP COLD
LOW
NO SPIN
NORMAL
LIGHT
SPEED
WASH
Lightly soiled
clothing
and small loads
15
HOT
WARM
COLD
TAP COLD
EXTRA HIGH
HIGH
MEDIUM
LOW
NO SPIN
HEAVY
NORMAL
LIGHT
- Cycle time depends on water pressure, type and amount of load and chosen additional options.
- To protect your garments, not every wash/rinse temperature, spin speed, soil level, or option is available with every cycle.
- If the TURBOWASH™ option is on, you cannot select “No Spin” as your SPIN SPEED.
(If the TURBOWASH™ option is off, you can select “No Spin” as your SPIN SPEED.)
24
USING YOUR WASHING MACHINE
Heavy soiled items,
HEAVY DUTY
This cycle is for washing heavily soiled laundry though more
powerful tub rotation.
Wrinkle free items,
d
This cycle is for washing items such as wrinkle-free clothes
or tablecloths to minimize wrinkles.
Sheer items,
f
This cycle is for washing lingerie or sheer and lacy clothes
which can easily be damaged.
For towel items,
TOWELS
This cycle is for washing towels
Items labeled wool or hand-washable,
g
This cycle is for washing shrinkable woolen or hand-washable
items requiring delicate care. Only wash woolen items that
are labeled machine washable or hand-washable.
NOTE
Laundry weight should be less than 8 pound (3.6 kg) to
y
prevent damage to the fabric.
Use only natural or wool-safe detergent harmless to
y
fabrics and load 1/2 of the normal amount of detergent.
The HAND WASH/WOOL
y
cycle uses a gentle
tumble
rotation angle and low speed spin for the
ultimate fabric
care.
The wool wash cycle of this machine has been
approved by Woolmark for the washing of
machine washable Woolmark products provided
that the products are washed according to the
instructions on the garment label and those
issued by the manufacturer of this washing
machine, M0807
Quick wash,
h
Use the Speed Wash cycle to quickly wash lightly soiled
clothing and small load. For high wash and rinse efficiency,
it is recommended to wash small loads of 2-3 lightly soiled
garments.
NOTE
Use a little detergent in this cycle. If you want more
y
rinsing, you can add extra rinse by using the option
button.
Main cycle
You can wash laundry items more thoroughly by selecting
the wash cycle that best suits the type of items to be
washed. Turn the
B
to the desired cycle. When you select
a wash cycle, the light for the corresponding wash cycle will
turn on. See page 22,
Basic operation
, for more details on
operating methods.
Reduce laundry allergen,
ALLERGIENE™
This cycle is a powerful, high temperature cycle designed
specifically to reduce certain allergens.
NOTE
Selecting the ALLERGIENE™ cycle automatically
y
incorporates steam into the wash cycle.
The ALLERGIENE™ cycle can significantly reduce
y
allergens in bedding and clothing.
The ALLERGIENE™ cycle helps reduce dust mite
y
populations and helps reduce allergens.
Due to the higher energy and temperatures used, the
y
ALLERGIENE™ cycle is not recommended for wool,
silk, leather, or any other delicate or temperature
sensitive items
Reduce laundry bacteria,
SANITARY
This wash cycle reduces 99.9% bacteria on laundry through
high temperature.
Protocol P172
Sanitization Performance of Residential and
Commercial, Family Sized Clothes Washers
For white fabrics,
BRIGHT WHITES™
This cycle is for washing white items only.
Blankets or bulky items,
b
This cycle is for washing blankets or bulky items.
Normal items,
c
Use this cycle to wash all normal items, except delicate
fabrics such as wool or silk.
NOTE
If you press
y
A
and then
C
without selecting
another cycle, the washing machine proceeds to
c
.

25
USING YOUR WASHING MACHINE
ENGLISH
Cycle setting buttons
Each cycle has preset settings that are selected
automatically. You may also customize the settings using
the cycle setting buttons. Press the button for that option to
view and select other settings.
The washer automatically adjusts the water level for the
type and size of wash load for best results and maximum
efficiency. It may seem there is no water inside the drum in
some cycles, but this is normal.
NOTE
To protect your garments, not every wash/rinse
y
temperature, spin speed, soil level, or option is available
with every cycle. See the Cycle Guide for details.
Setting options before cycle
You can select and add the desired optional functions before
you start the washing machine.
Setting the water temperature,
WASH TEMP.
Set the water temperature for the wash cycle. Set the
appropriate temperature, as specified in the fabric care label.
1
Press
A
and turn
B
to the desired cycle.
2
Press repeatedly to select the desired water
temperature:
- When an optional item is selected, an indication light for
the corresponding optional item turns on.
3
Press the desired option button to use the other options.
- Skip to step 4 to use the default setting without
changing the options.
4
Press
C
.
NOTE
Cold rinses use less energy.
y
Your washer features a heating element to boost the
y
hot water temperature for Extra Hot settings. This
provides improved wash performance at normal water
heater settings.
Select the water temperature suitable for the type of
y
load you are washing. Follow the fabric care label for
best results.
Setting spin speed, SPIN SPEED
You can set the desired spin speed.
Use this feature properly according to the characteristics of
the load.
1
Press
A
and turn
B
to the desired cycle.
2
Press repeatedly to select the desired spin speed.
- When an optional item is selected, an indication light for
the corresponding optional item turns on.
3
Press the desired option to use the other options.
- Skip to step 4 to use the default setting without
changing the options.
4
Press
C
.
NOTE
The Spin Speed button also activates the Drain & Spin
y
cycle to drain the tub and spin clothes; for example,
if you want to remove clothes before the cycle has
ended.
Setting soil level of laundry,
SOIL LEVEL
You can wash your laundry more thoroughly by setting the
proper soil level on the washing machine.
1
Press
A
and turn
B
to the desired cycle.
2
Press repeatedly to select a soil level.
- When an optional item is selected, an indication light for
the corresponding optional item turns on.
3
Press the desired option to use the other options.
- Skip to step 4 to use the default setting without
changing the options.
4
Press
C
.
NOTE
This feature needs more time for heavily soiled loads or
y
less time for lightly soiled loads.

26
USING YOUR WASHING MACHINE
Adjusts the melody and button tones,
SIGNAL
The washing machine plays a melody when the wash cycle
is finished. The buttons make a sound each time a button is
pressed. The melody and button tones can be changed and
off as desired.
1
Press
A
.
2
Turn
B
to the desired cycle.
3
Press
. Adjust the melody and button tones as
desired.
4
Press the desired option to use the other options.
5
Press
C
.
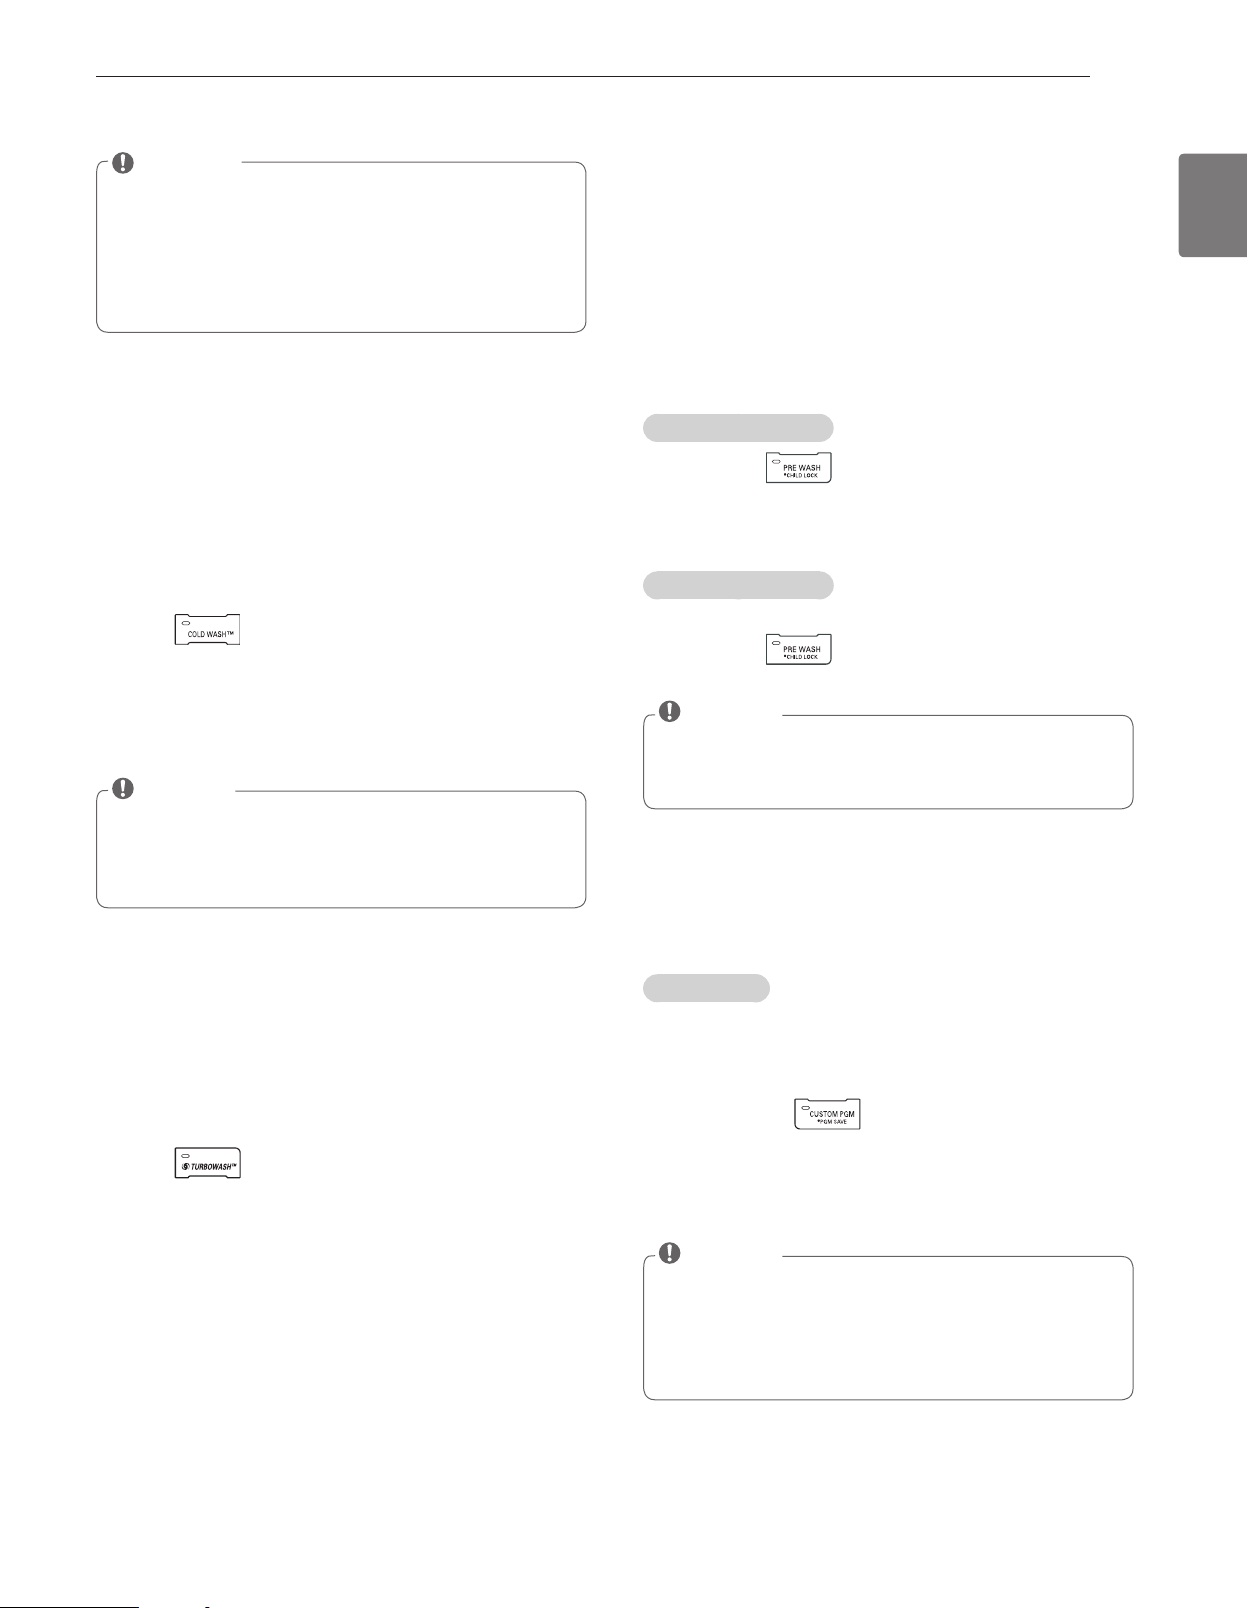
Prewashing, PRE-WASH
Pre-wash for 16 minutes when clothes are covered in dirt or
dust. This feature is suitable for heavily soiled items.
1
Press
A
and turn
B
to the desired cycle.
2
Press .
-
light will turn on.
3 Press the desired option to use the other options.
- Skip to step 4 to use the default setting without
changing the options.
4
Press
C
.
Rinse, drain and spin only, RINSE+SPIN
Use this cycle to rinse detergent from load.
1
Press
A
and turn
B
to the desired cycle.
2
Press .
3
Press the desired option to use the other options.
- Skip to step 4 to use the default setting without
changing the options.
4
Pulse
C
.
Adding extra rinse cycle, EXTRA RINSE
You can add an extra rinse cycle to the default rinse cycle.
1
Press
A
and turn
B
to the desired cycle.
2
Press .
-
light will turn on.
3
Press the desired option to use the other options.
- Skip to step 4 to use the default setting without
changing the options.
4
Press
C
.
Presetting the start time, DELAY WASH
You can set the desired start time.
1
Press
A
and turn
B
to the desired cycle.
2
Press the desired option to use the other options.
3
Press repeatedly to select the desired start time.
-
light will turn on.
- The set start time appears on the display panel.
- Each press of the button increases the delay time by
one hour, up to 19 hours.
4
Press
C
.
Efficiency cleaning, STEAM
Adding the Steam option to these cycles provides superior
cleaning performance while reducing energy and water
consumption.
By using a hot steam spray from above and cooler water
below, fabrics get the cleaning benefits of a super hot wash,
without the energy usage or potential damage to fabrics.
1
Press
A
and turn
B
to the desired cycle.
2
Press . The washer will automatically adjust the
cycle settings.
3
Set any other desired options.
4
Press
C
.
WARNING
Do not touch the door during steam cycles.
y
The door
surface can become very hot. Allow the door lock to
release before opening the door.
Do not attempt to override the door lock mechanism
y
or reach into the washer during a steam cycle.
Steam
can cause severe burns.
27
USING YOUR WASHING MACHINE
ENGLISH
NOTE
The steam option cannot be used with all cycles.
y
Steam may not be clearly visible during the steam
y
cycles. This is normal. Too much steam could damage
clothing.
Do not use steam with delicate fabrics such as wool,
y
silk, or easily discolored fabrics.
Saving energy, COLD WASH
™
Adding the COLD WASH™ option reduces energy usage and
provides the same washing performance as a warm water
wash.
By using 6 different washing motion (Tumbling, Rolling,
Stepping, Scrubbing, Swing, Filtration), fabrics get the
cleaning benefits, without the energy usage.
1
Press
A
and turn
B
to the desired cycle.
2
Press
. The washer will automatically adjust
the
cycle settings.
3
Set any other desired options.
4
Press
C
.
NOTE
When you select the COLD WASH™ option, wash time
y
will be increased up to 10 minutes.
For high wash efficiency, it is recommended to use
y
less than 8 pounds.
Saving time, TURBOWASH™
Adding the TurboWash™ option reduces cycle time and
provides good performance in normal cycle.
By using the TurboWash™, We can save the time without
sacrificing performance.
1
Press
A
and turn
B
to the desired cycle.
2
Press
. The washer will automatically adjust
the
cycle settings.
3
Set any other desired options.
4
Press
C
.
Setting options during cycle
You can add the desired options during the wash cycle.
Button lock feature, CHILD LOCK
You can lock the washing machine to prevent children or
others from changing the cycle settings by pressing the
buttons during the cycle.
To enable child lock
Press and hold for 3 seconds during the wash cycle.
- When the CHILD LOCK is enabled, a
N
message and the
remaining wash time are displayed, in turn, on the display
panel of the washing machine.
To disable child lock
(When the CHILD LOCK is activated.)
Press and hold
for 3 seconds during the wash cycle.
NOTE
CHILD LOCK lasts after the end of cycle. If you want to
y
deactivate this function, Press and hold the PREWASH
button for 3 seconds.
Saving customized wash cycle, PGM SAVE
You can save a cycle with all the settings and options you
use most frequently.
To save cycle
1
Press
A
and turn
B
to the desired cycle.
2
Press the desired option to use the other options.
3
Press and hold for 3 seconds during the wash
cycle.
- The cycle with your preferred settings and options is
saved.
NOTE
The Turbo Wash option cannot be used with all cycles.
y
Turbo Wash is available in the beginning of the Cotton/
y
Normal and Perm. Press cycles.
Press and hold the Turbo Wash button to change the
y
default settings.
28
USING YOUR WASHING MACHINE
Selecting your customized cycle,
CUSTOM PGM
You can recall the customized wash cycle you had previously
saved.
To recall cycle
1
Press
A
after then press .
2
Press
C
.
Tumbles clothes to prevent wrinkles,
FRESH CARE
Use this function when you are not able to take out your
clothes as soon as the wash cycle ends.
1
Press
A
and turn
B
to the desired cycle.
2
Press and hold for 3 seconds during the wash
cycle.
- The light will turn on.
3
Select any desired options.
- Skip to step 4 if you would like to use the default
settings without changing or adding any options.
4
Press
C
.
NOTE
This function provides periodic tumbling for up to about
y
19 hours to prevent wrinkles. If you press the START/
PAUSE or ON/ OFF button, you can unload your laundry
at anytime.
29
MAINTENANCE
ENGLISH
Care
Care after wash
After the cycle is finished, wipe the door and the inside of
the door seal to remove any moisture. Leave the door open
to dry the washer tub interior. Wipe the body of the washing
machine with a dry cloth to remove any moisture.
WARNING
y
Unplug the washer before cleaning to avoid the risk of
electric shock.
Failure to follow this warning can cause
serious injury, fire, electric shock or death.
y
Never use harsh chemicals, abrasive cleaners, or
solvents to clean the washer.
They will damage the finish.
y
Do not use volatile substances (benzene, paint thinner,
alcohol, acetone, etc.) or detergents with strong
chemical components when cleaning the washing
machine.
Doing so may cause discoloration or damage
to the machine, or it may cause a fire.
Care in cold climates
Storing the washing machine for an extended period of time
Follow the instructions for storing the washing machine
if you do not use it for an extended period of time in cold
climates below freezing point.
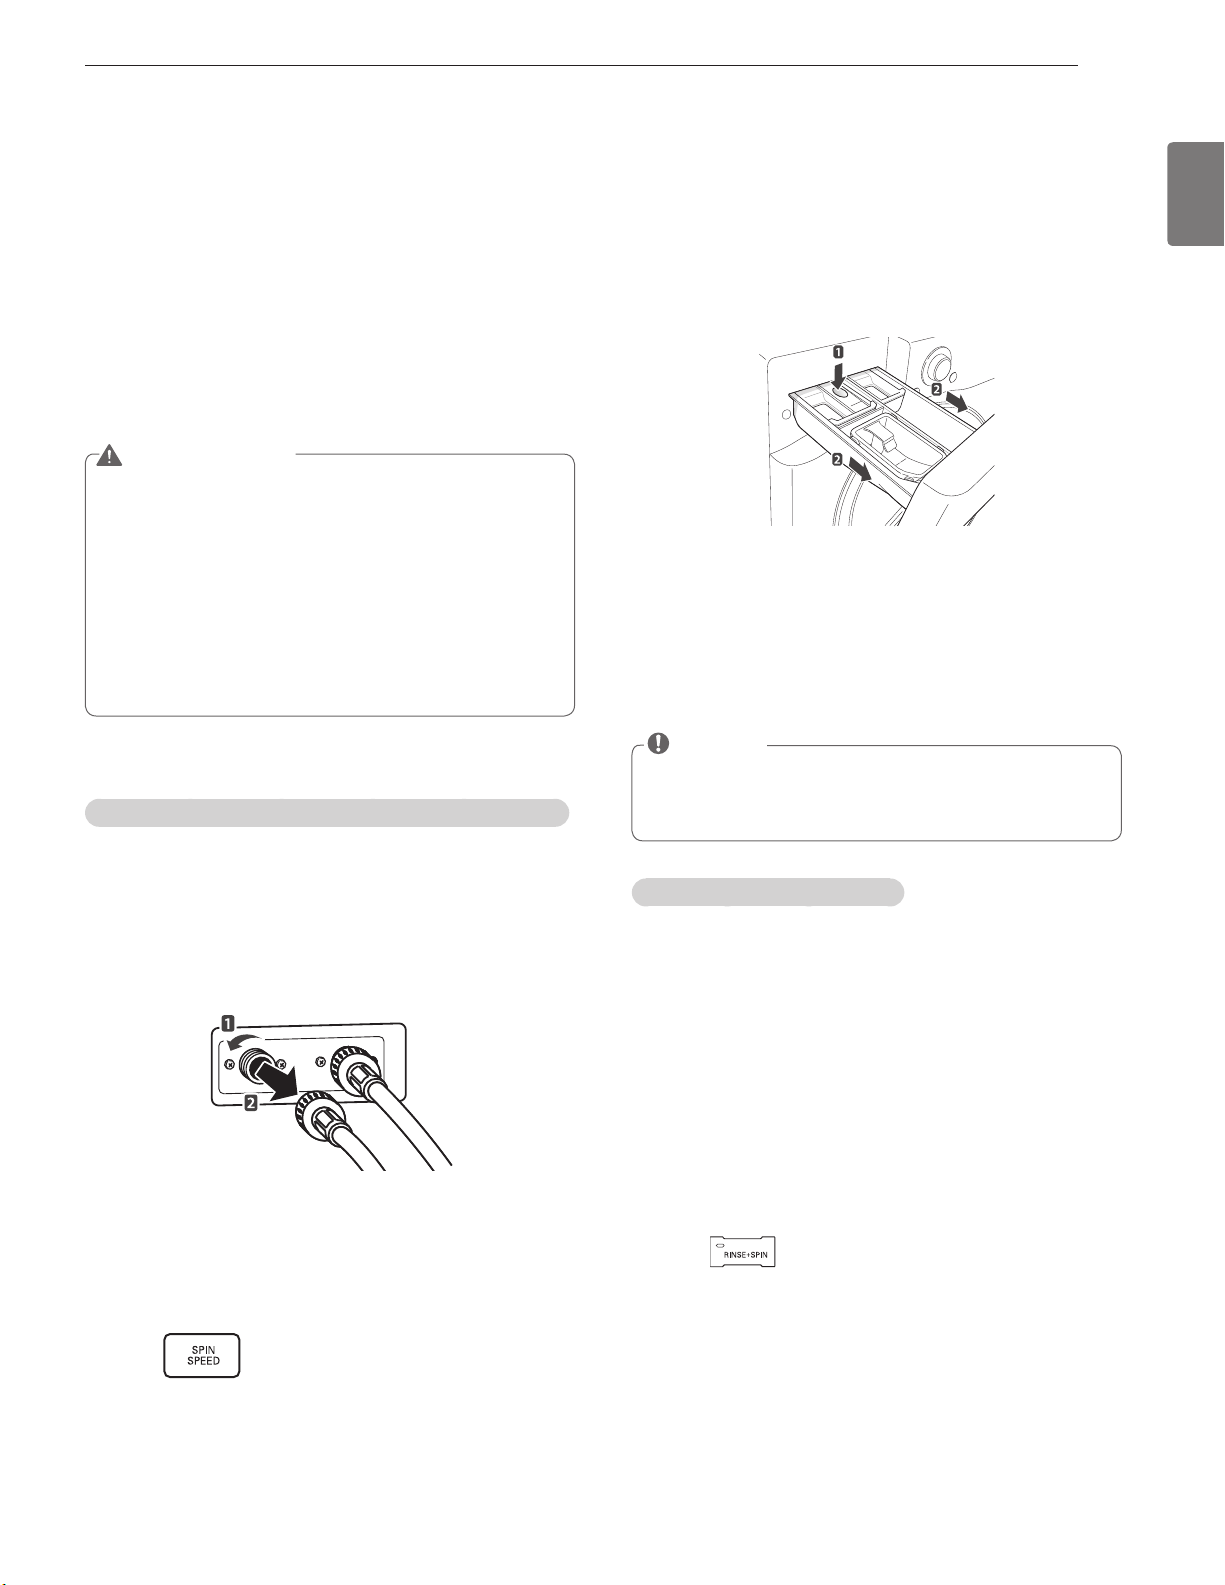
1
Turn off the faucets connected with the water lines.
2
Unscrew the water lines from back of the washer.
3
Empty any water out of the water lines.
4
Press
A
.
5
Open the door and add 1 gallon (3.8 L) of nontoxic
recreational vehicle (RV) antifreeze to the empty washer
tub. Close the door.
6
Press for draining and spinning.
7
Press
C
.
- Drain the water from the washing machine for 1 minute.
Not all of the RV antifreeze will be expelled.
MAINTENANCE
8
Press
A
to turn off the washing machine and pull out
the power plug.
9
Dry the tub interior of the washer tub with a soft cloth,
and close the door.
10
Press down hard on the disengage button and pull out
the detergent dispenser drawer.
11
Drain the water from the detergent dispenser drawer
and dry out each compartment.
12
Store the washing machine in an upright position.
NOTE
y
To remove the antifreeze after storing the washing
machine, add detergent to the dispenser, and run one
cycle. Do not load any laundry at this time.
When the water line is frozen
1
Turn off the faucets connected with the water lines.
2
Pour hot water on the frozen faucets to thaw the water
lines and pull them out.
3
Immerse the water lines in hot water to thaw them.
4
Connect the water lines with the water inlets of the
washing machine and faucets.
- See page 14,
Connecting the water lines
for details.
5
Turn on the faucets.
6
Press
A
.
7
Press .
8
Press
C
.
- Verify the water fills properly.

30
MAINTENANCE
When the Drain Line is Frozen
1
Pour hot water in the washer tub and close the door.
- Leave it for 10 minutes.
2
Press
A
after 10 minutes.
3
Press for draining and spinning.
4
Press
C
.
- Check if the water drains.
Cleaning
Periodically clean the washing machine to help maintain its
performance and to minimize the chance of malfunction.
Clean your the drum, TUB CLEAN
“Improper installation or use of the washing machine in a
humid space for a long period of time potentially could lead
to a buildup of detergent residue in the washing machine
that may produce mildew or musty smells. If you clean the
washer tub regularly on a monthly basis using TUB CLEAN it
will minimize the possibility that detergent residue will build
up and mildew or musty smells may occur.”
1
Add tub cleaner or lime scale remover into the detergent
dispenser drawer.
- Do not exceed the maximum detergent limit line when
you add it. Detergent may remain in the washer tub
after cleaning.
-
When you use liquid chlorine bleach,
load it into the
liquid chlorine bleach compartment.
-
When you use a powdered cleaner,
pull out the liquid
detergent cup and add it into the main wash detergent
compartment.
-
When you use cleaning tablets,
place them directly into
the washer tub. (Do not add tablet cleaner to the drawer.)
2
Press
A
.
3
Turn
B
to TUB CLEAN.
-
O
message appears in the display.
- The indication light for TUB CLEAN turns on.
4
Press
C
.
NOTE
y
Never load laundry while using TUB CLEAN. The
laundry may be damaged. Make sure to clean the
washer tub when it is empty.
y
It is recommended to leave the door open after
finishing the laundry to keep the tub clean.
y
It is recommended that TUB CLEAN should be
repeated monthly.
y
If you notice mildew or musty smells, run TUB CLEAN
for 3 consecutive weeks.
y
Safely and conveniently secure the door slightly ajar
with a magnetic door plunger. This will promote air
circulation and help the machine to dry.
31
MAINTENANCE
ENGLISH
Automatic alert for cleaning washing machine
When the power is on and the
O
message blinks, it
means the washer tub needs cleaning. Use TUB CLEAN
to clean the washer tub. The automatic indication alert for
cleaning the washer tub depends on the frequency of use,
however, the message will generally blink every 1~2 months.
Removing mineral buildup
If you live in an area with hard water, mineral scale can form
on the internal components of the washing machine. Take
extra care to periodically clean the mineral buildup on the
internal components to extend the lifespan of the washing
machine.
Removing mineral buildup from the washer tub
Check if the descaler is suitable for cleaning the washer tub
before using it and run the TUB CLEAN cycle. See page 30,
Tub clean
for details on tub clean.
NOTE
y
In areas with hard water, it is recommended to use a
water softener.
y
Make sure to remove all loads from the washer tub
before cleaning the washer tub. Cleaning the washer
tub together with a load may result in contamination of
or damage to the laundry.
Removing lime buildup on stainless steel
Wipe lime buildup or other spots on stainless steel with a
soft cloth soaked in stainless steel cleaner.
NOTE
y
Never use steel wool or abrasive cleansers. Doing so
may damage the washing machine.
Cleaning the detergent dispenser drawer
Leaving detergent in the detergent dispenser drawer for an
extended period of time or using the washing machine for a
long period of time may cause the build-up of scales in the
detergent dispenser drawer. Pull out and clean the detergent
dispenser drawer once a week.
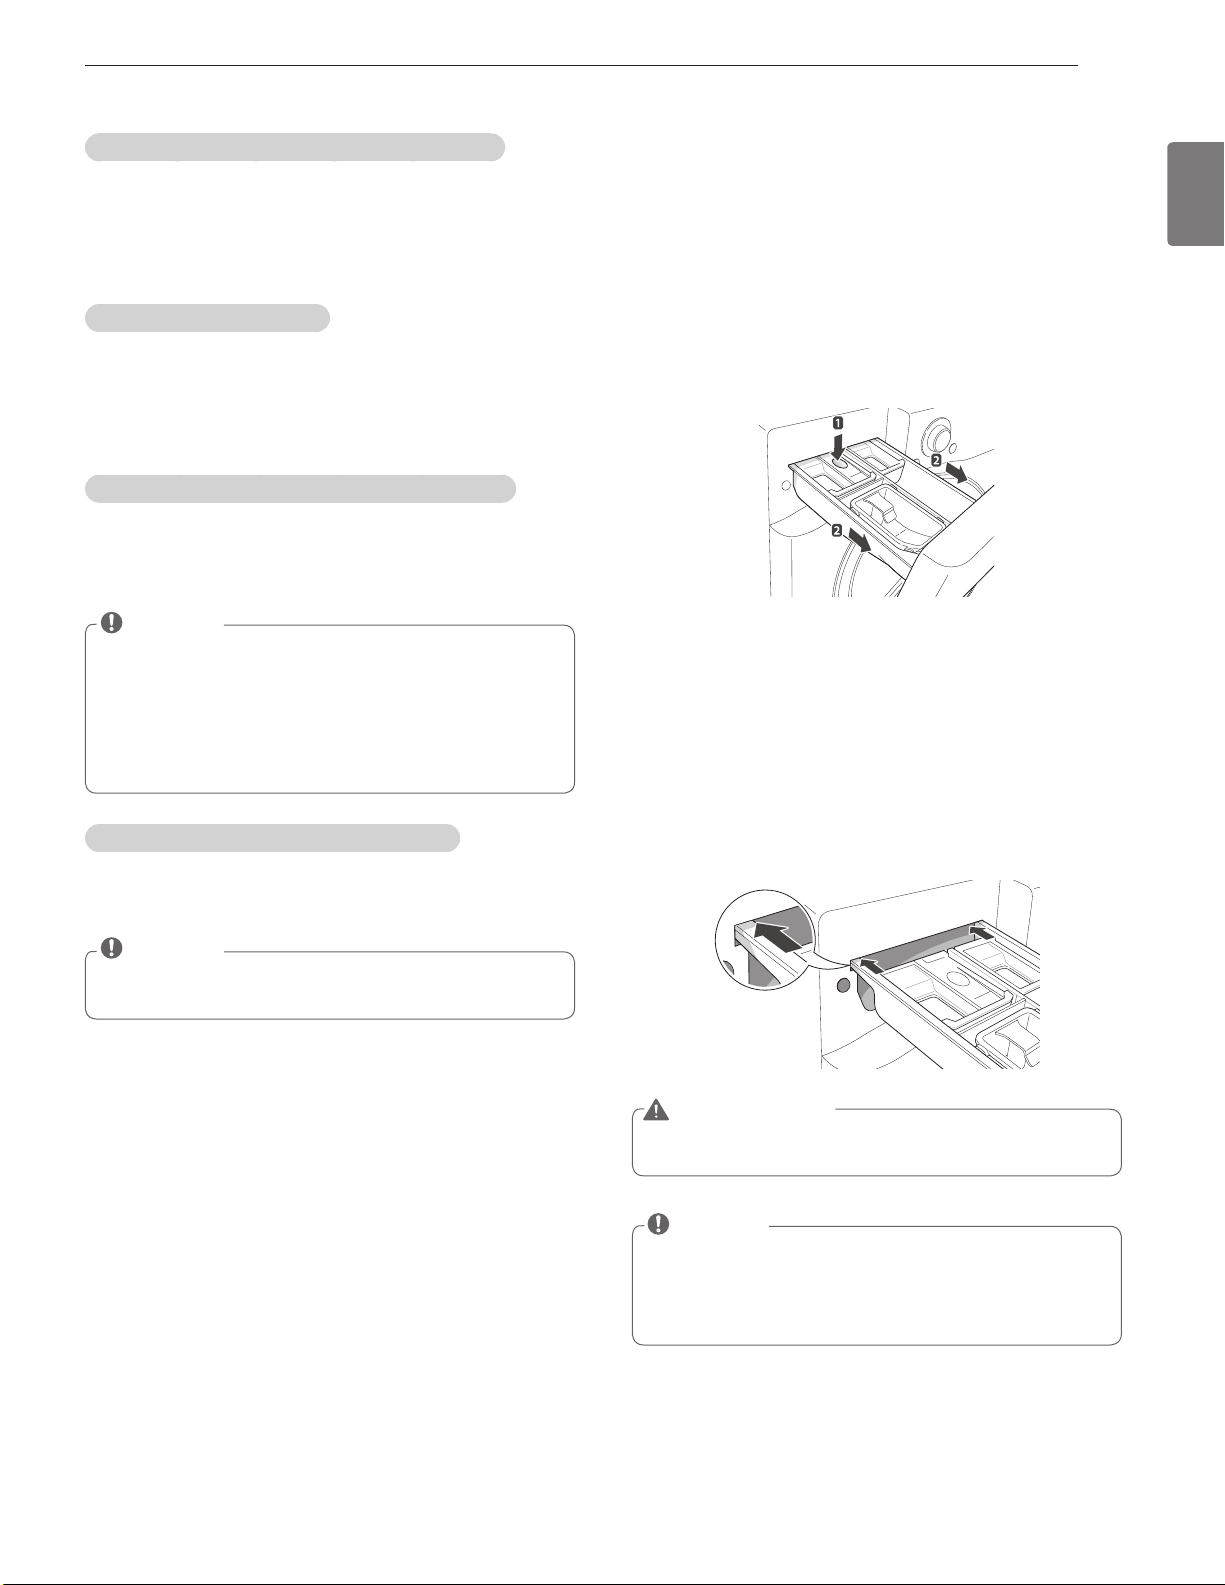
1
Pull out the detergent dispenser drawer.
2
Press down hard on the disengage button and pull out
the detergent dispenser drawer.
3
Remove the inserts from the drawer.
4
Clean them with warm water.
- Use a soft cloth or brush for cleaning and remove any
residue.
5
Wipe any moisture with a dry towel or cloth after
cleaning.
6
Replace the detergent dispenser drawer.
WARNING
y
Do not spray water inside the washing machine.
Doing
so may cause fire or electric shock.
NOTE
y
Use water only when you clean the detergent
dispenser drawer. Make sure to use RINSE+SPIN to
rinse the washer tub before the wash cycle when you
use a cleaning detergent to clean the washer tub.
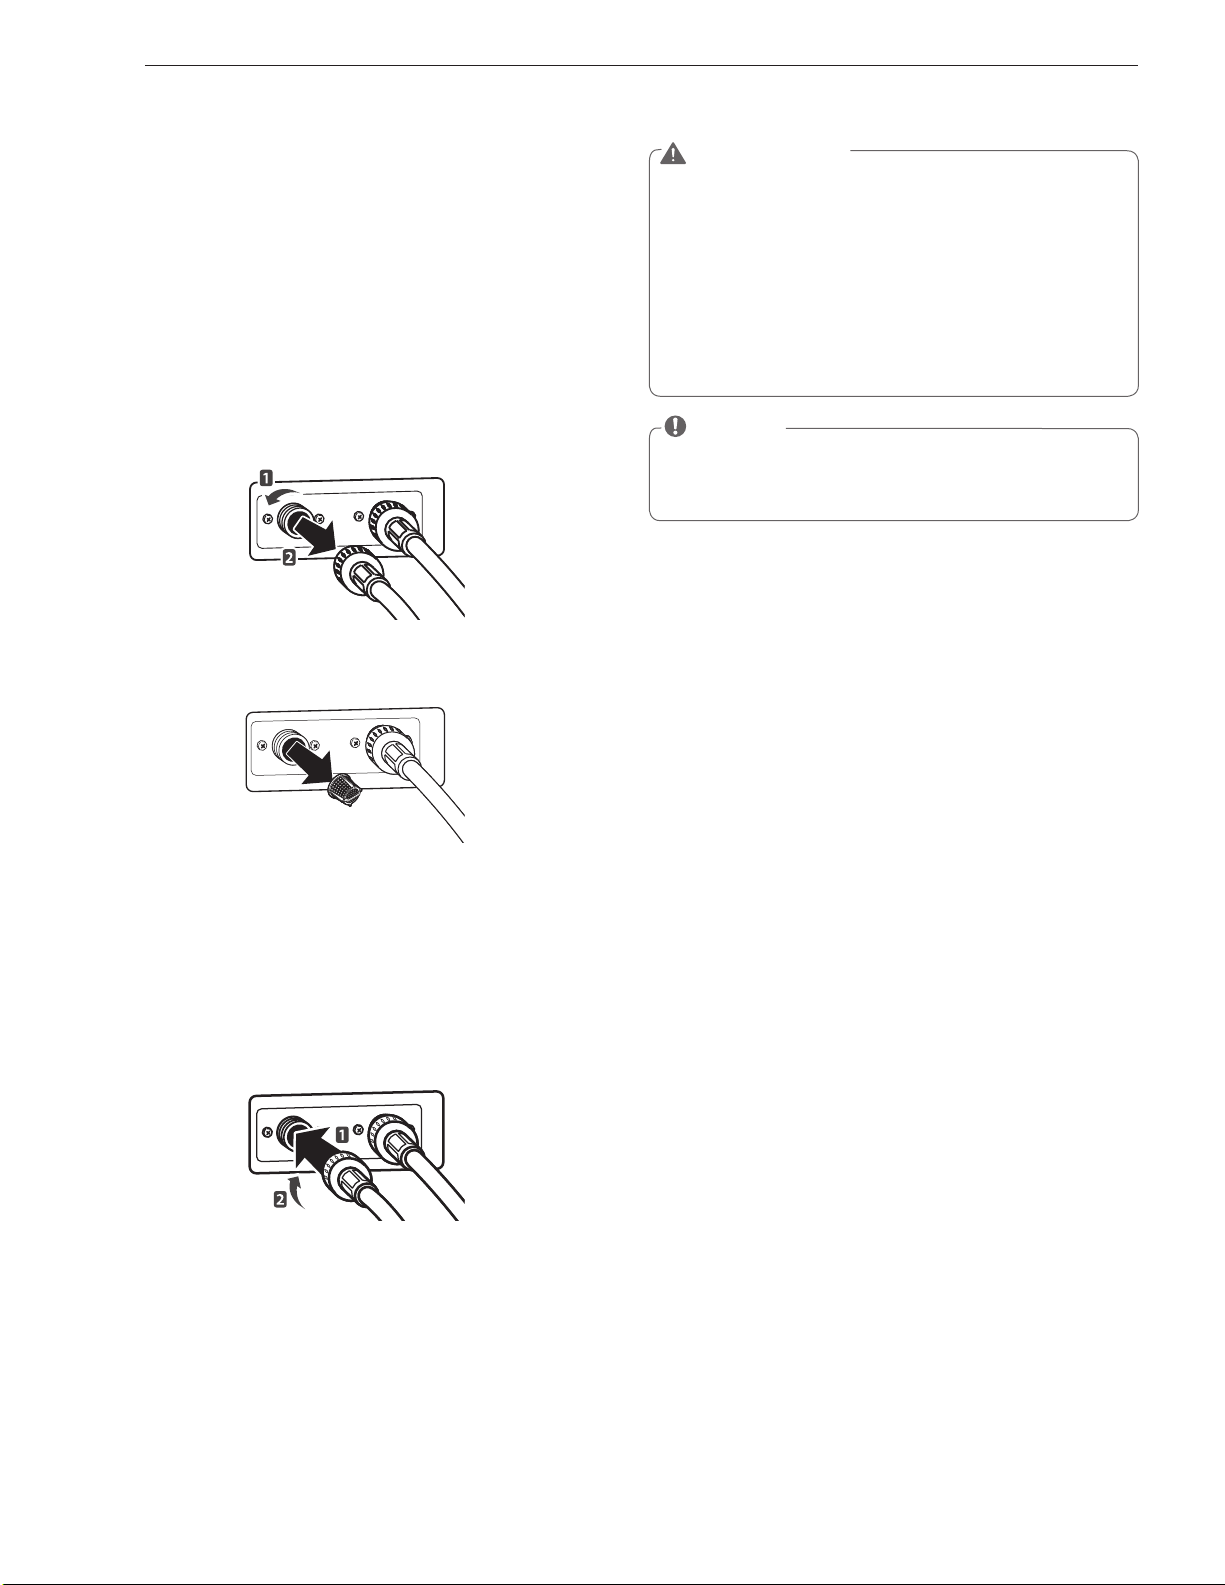
32
MAINTENANCE
WARNING
y
Unplug the power cord and turn off the faucets before
cleaning.
Failure to do so may cause electric shock.
y
Do not use the washing machine without the inlet
filters.
If you use the washing machine without the
inlet filters it will cause leaks and malfunction.
y
If you use the washing machine in an area with hard
water, the inlet filter may clog due to lime buildup.
Contact your nearest LG customer service center if the
inlet filter is not clean or is missing.
NOTE
y
P
message will blink on the display when the water
pressure in the detergent drawer is weak or an inlet
filter is clogged with dirt. Clean the inlet filter.
Cleaning the water inlet filters
Clean the water inlet filters periodically to prevent clogging.
Take extra care to clean the water inlet filters for areas using
hard water. Water may not be supplied if there are foreign
objects, such as rust, sand, or stones in the water inlet
filters.
1
Press
A
to turn off the washing machine and pull out
the plug.
2
Turn off the faucets connected with the water inlets.
3
Remove the water inlets.
4
Pull out the water inlet filter.
Inlet Filter
5
Remove foreign objects from the water filter inlet.
- Soak the water filter inlets in white vinegar or a lime
scale remover or use a toothbrush to remove foreign
objects and rinse thoroughly.
6
Press the water filter inlets back into place.
7
Reattach the water lines to the washing machine.
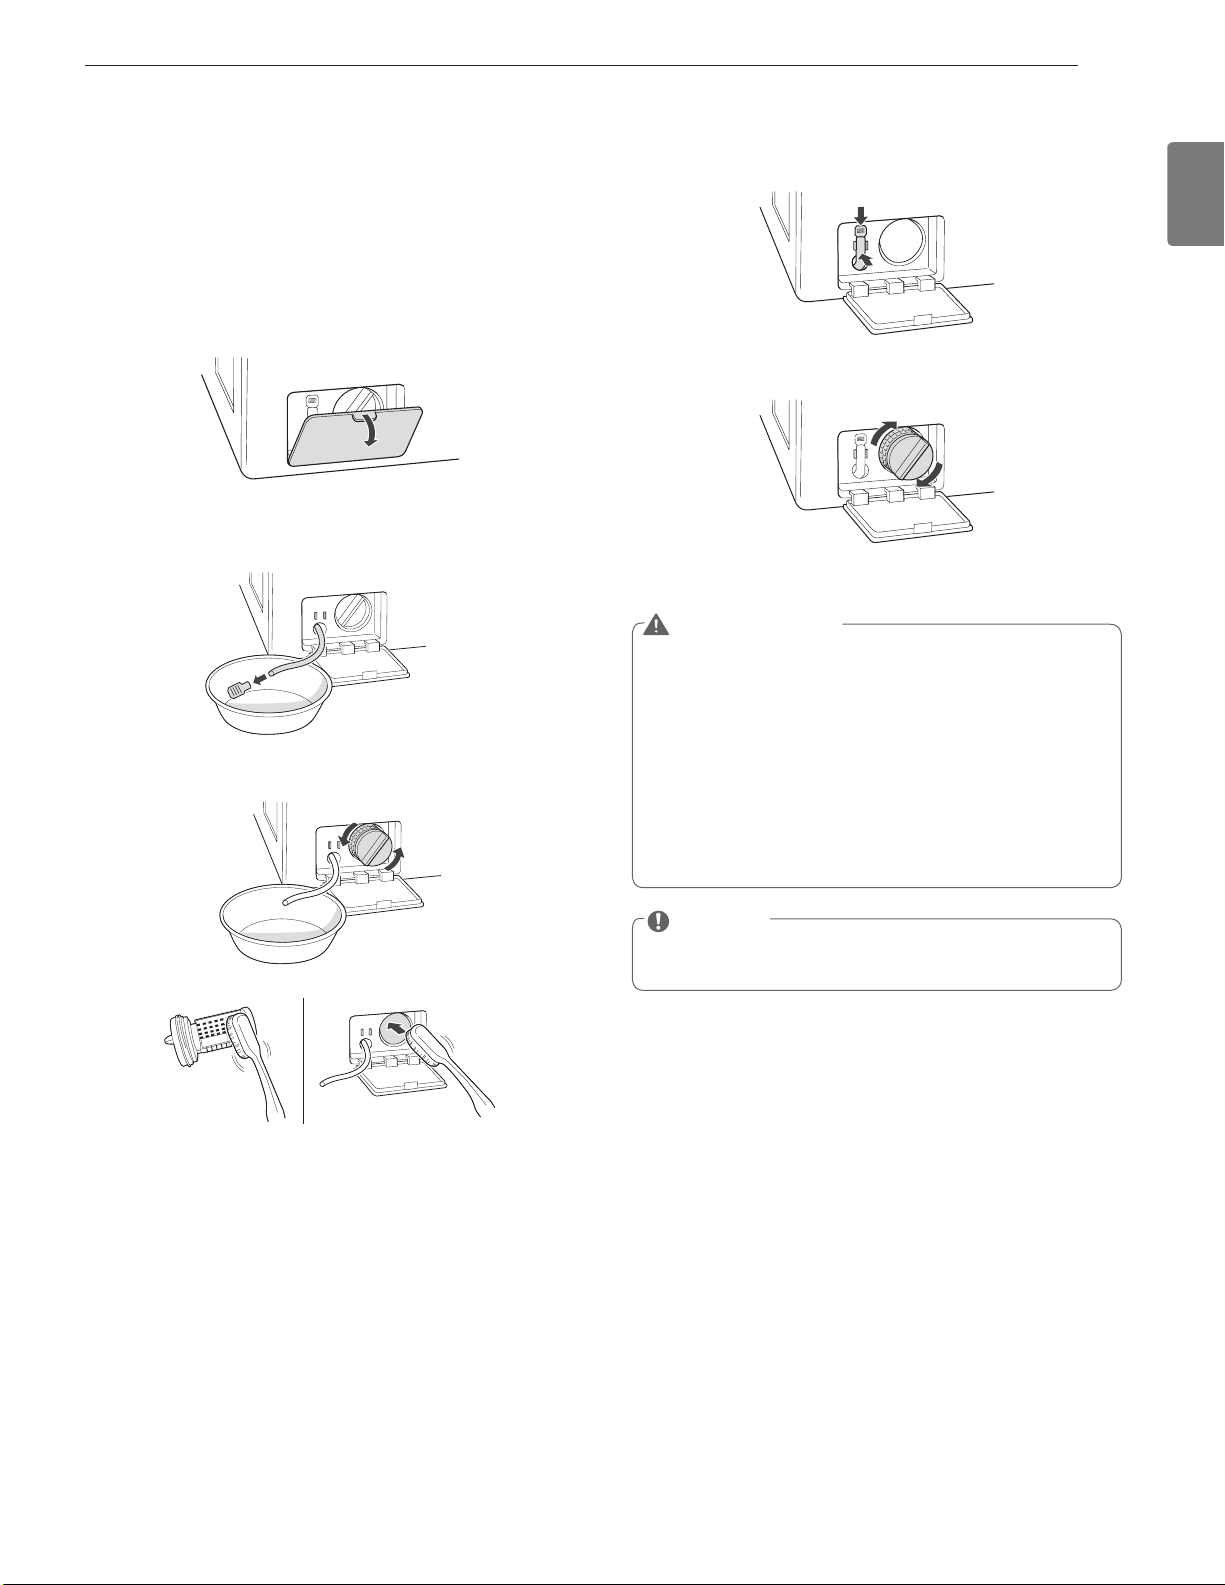
33
MAINTENANCE
ENGLISH
Cleaning the drain pump filter
The washing machine fails to drain if the drain pump filter is
clogged. Periodically clean the drain filter to prevent clogging
with foreign objects.
1
Press
A
to turn off the washing machine and pull out
the plug.
2
Open the drain pump filter cover.
3
Unclip the drain hose and remove the plug from the drain
hose to drain the remaining water.
4
Twist the pump filter counterclockwise to remove.
5
Clean the pump filter and opening.
6
Recap the plug onto the drain hose and reattach the drain
hose.
7
Insert the drain pump filter.
8
Close the drain pump filter cover.
WARNING
y
Make sure to pull out the plug before cleaning.
Failure
to do so may cause electric shock.
y
Opening the drain filter will result in water overflowing
if there is water in the washer tub.
Make sure to check
if the water is completely drained before opening the
drain filter.
y
If you use the washing machine with the drain filter
reassembled incorrectly after cleaning it, or if you use
the machine without the filter, it may cause leaks or
malfunction of the washing machine.
NOTE
y
Q
message will blink when the drain pump filter is
clogged with dirt. Clean the drain pump filter.

34
MAINTENANCE
Cleaning the door seal
Clean the door seal once a month to prevent build-up of dirt
in the door seal.
1
Wear rubber gloves and protective goggles.
2
Dilute 3/4 cup (177 ml) of liquid chlorine bleach in 1 gallon
(3.8 L) of water.
3
Soak a sponge or a soft cloth in this diluted solution and
wipe down all around the door seal.
4
Wipe any moisture with a dry towel or cloth after
cleaning.
5
Leave the door open to allow the door seal to dry
completely.
CAUTION
y
Cleaning the door seal with an undiluted solution
may cause malfunction of the door seal and washing
machine parts.
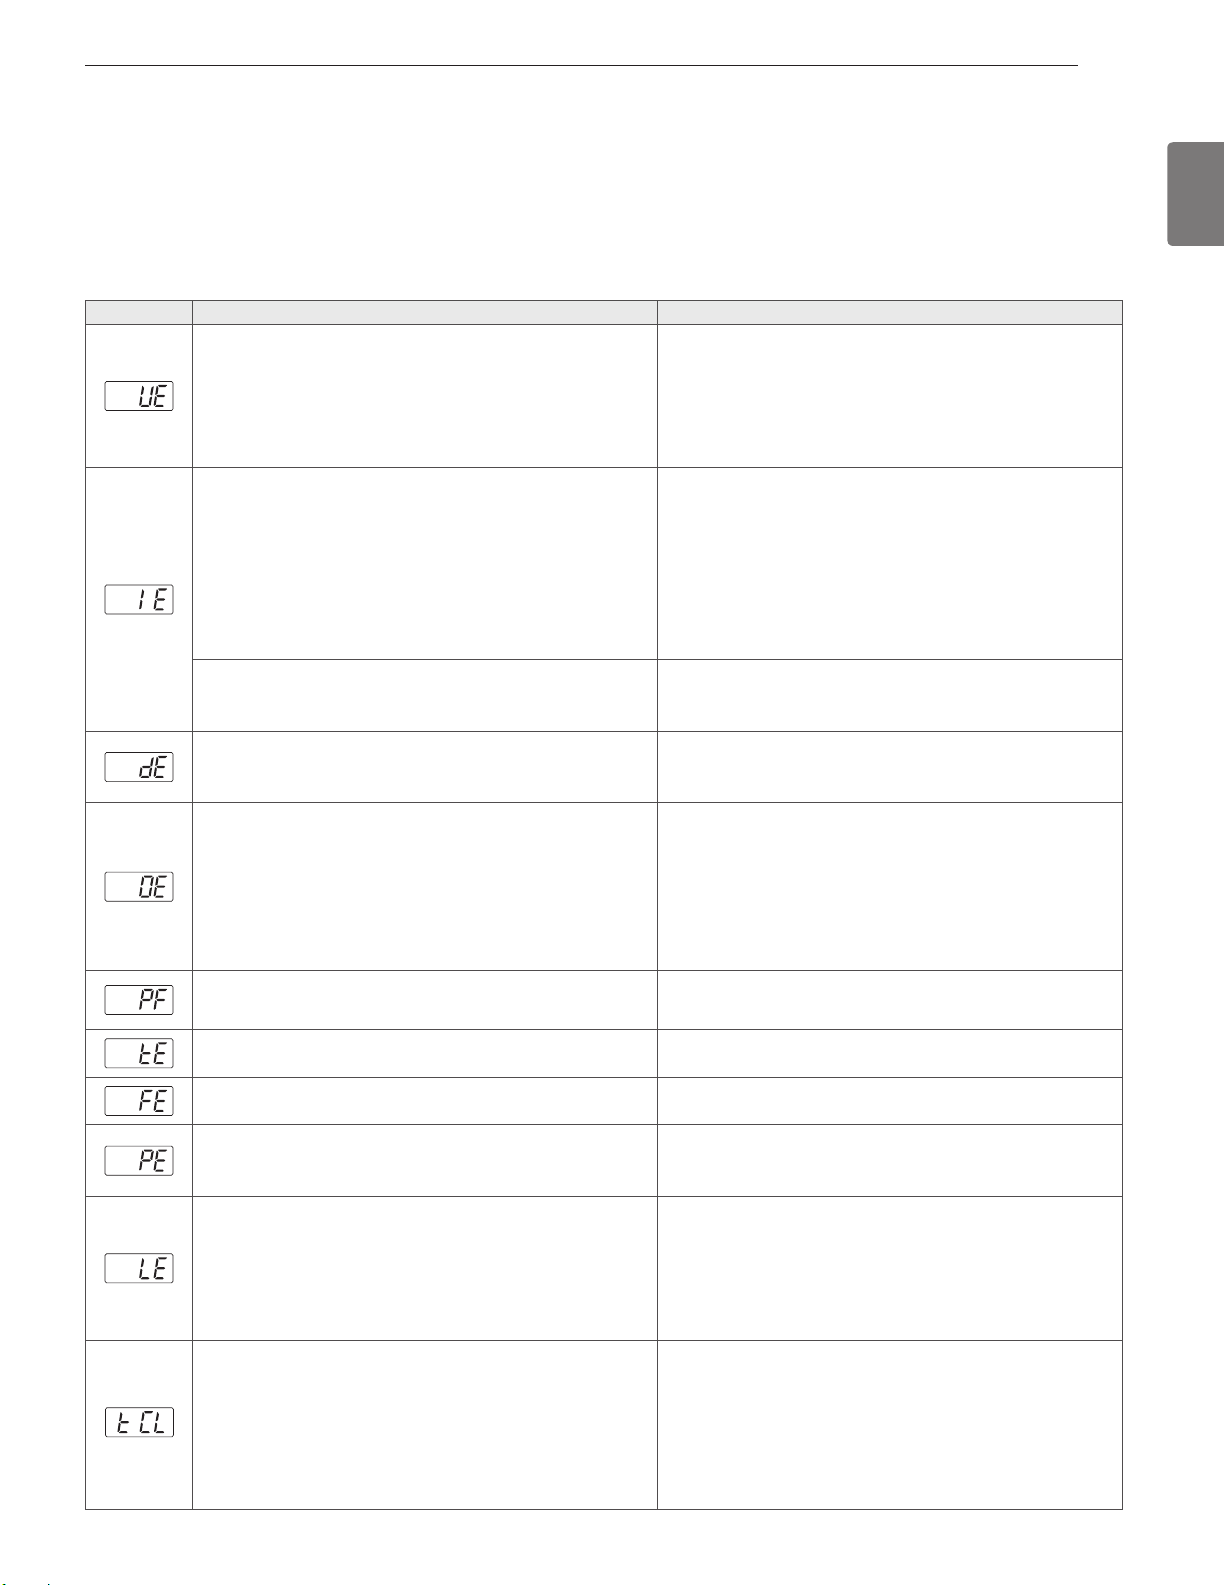
35
TROUBLESHOOTING
ENGLISH
TROUBLESHOOTING
Checking error messages
If the following message appears on the display, check the following and take the appropriate corrective action.
Message
Possible Causes Solutions
Item of clothing has gathered on one side of the tub.
y
There are not enough items in the machine.
y
Have your items gathered in one area, or is the load
too small?
y
Did you wash a stuffed animal, a mat, or knitwear?
y
Did you wash two different blankets together?
y
Rearrange items to help balance the load.
y
Stuffed animals or mats can become unbalanced
during spinning and the washing machine may fail to
drain. Rearrange the knitwear to help balance the load
and drain it again.
y
Put one blanket in at a time.
Water is not supplied or the water pressure is low
y
Is the faucet turned off?
y
Is the water supply stopped or the faucet frozen?
y
Is the water pressure low or is an inlet filter clogged?
y
Is the water line properly connected with the cold
water inlet?
y
Is the water line pinched or bent?
y
Turn on the faucets.
y
If a faucet is frozen, thaw it with warm water.
y
If the inlet filter is clogged, clean it. (see page 32)
y
Connect the water line properly with the cold water
inlet. (see page 14)
y
Check that the water lines are not pinched or bent.
Take extra care that water lines are not twisted or
pinched by other objects.
Water line leaks in connection
y
Are the water lines connected with the faucets
properly?
y
Connect the water lines properly with the faucets.
(see page 14)
The tub does not rotate
•
Is the door secured?
y
Close and secure the door. If the message keeps
appearing, unplug the power and contact your nearest
LG service center.
The washing machine drains slowly or not at all
y
Is the drain hose installed over 3 1/4 feet (1 m) beyond
the end of the elbow bracket?
y
Is the drain hose pinched or clogged inside?
y
Is the drain hose frozen?
y
Is the drain hose clogged with foreign objects?
y
Lower the drain hose within 3 feet below the end of
the elbow bracket.
y
Place the drain hose on a smooth surface to prevent
bending.
y
If the drain hoses are frozen, thaw them in warm
water.
y
Open the drain pump plug cap and remove the dirt.
A power failure has occurred.
y
Press
A
to turn off the washing machine and press it
again to turn it on.
Control Error.
y
Unplug the power cord and contact your nearest LG
service center.
The water supply does not stop
y
Do the water supply and the drain keep repeating in turn?
y
Unplug the power cord and contact your nearest LG
service center
The water level is not controlled
y
Is the water level too low or high compared with the
size of the load?
y
The water level sensor is not working correctly.
y
Unplug the power cord and contact your nearest LG
service center.
The tub does not rotate
y
Is the washing machine overloaded?
y
Rearrange the load size and restart the washing machine.
y
If the load size is big, the tub may not rotate due to
an overheated motor. Allow the washing machine to
stand for a while and restart the cycle. Unplug the
power cord and contact your nearest LG service center
if the same error message appears.
y
To clean up the tub, please run the TUB CLEAN cycle.
y
Please empty the tub and insert bleach into the
detergent dispenser and select the TUB CLEAN cycle.
y
If you want to skip the TUB CLEAN, turn the CYCLE
SELECTOR KNOB or push option buttons to select
desired cycle. In this case, you would see the message
again until few washing times and it would be disappear
until next point of time to clean the tub.
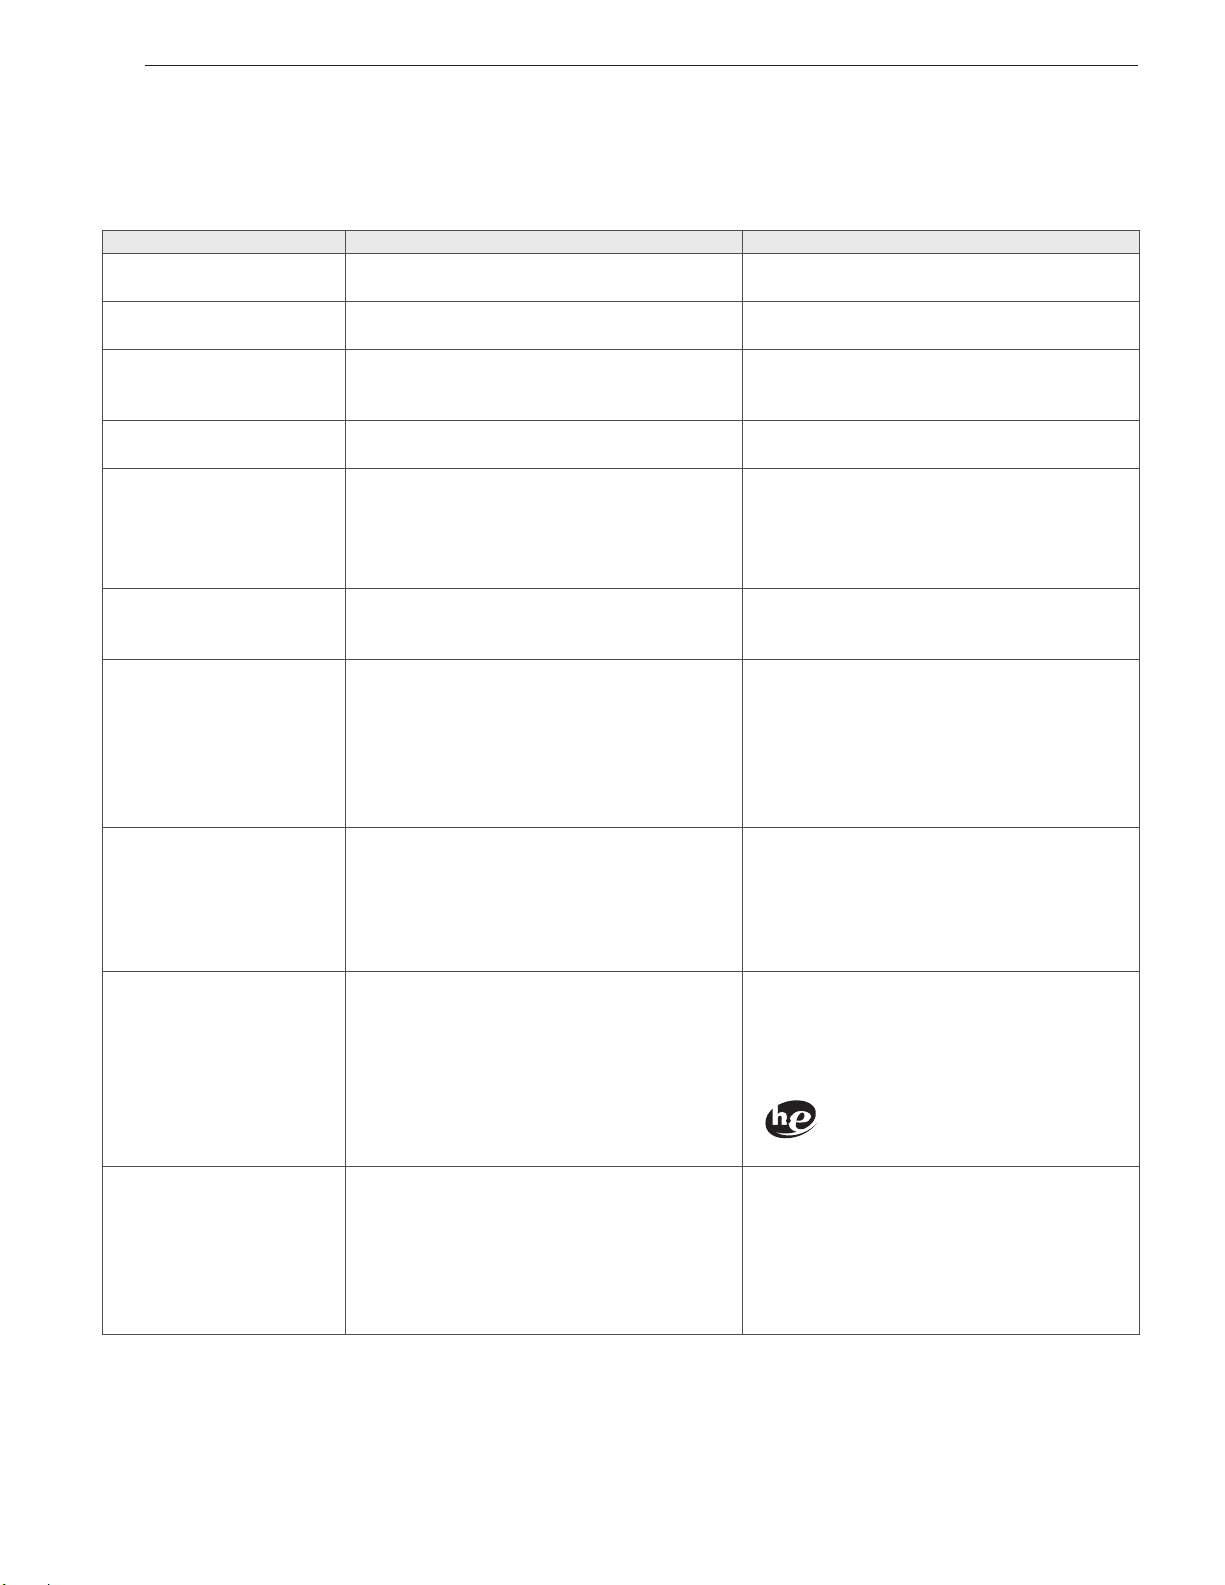
36
TROUBLESHOOTING
Before calling for service
Check the following before calling for service.
Problem Possible Causes Solutions
Clicking sound
y
Do you hear a sound when you close or lock
and unlock the door?
y
This sound is normal and occurs when the
door is closed, locked or unlocked.
Spraying or hissing sound
y
Is water spraying in the tub?
y
This sound is normal as water is spraying or
circulating during the cycle.
Buzzing or gushing
sound
y
Is the washing machine draining water?
y
This sound is normal as the drain pump drains
water from the washing machine after the
cycle.
Splashing sound
y
Is the washing machine washing a load of
laundry?
y
This sound is normal as the load is moving up
and down during the wash and rinse cycles.
Rattling and clanking noise
y
Are there any foreign objects such as keys,
coins, or safety pins in the tub or drain filter?
y
Check if there are any foreign objects in the
tub and drain the filter after stopping the
cycle.
y
Unplug the power cord and contact your
nearest LG service center if the noise persists.
Thumping sound
y
Is the washing machine overloaded?
y
Is the load out of balance?
y
This sound is normal and occurs when the
load is out of balance. Stop the cycle and
rearrange the load for balancing.
Vibrating noise
y
Are the shipping bolts removed?
y
Is the load evenly distributed in the tub?
y
Is the washing machine level balanced?
y
Is the washing machine installed on a solid
and smooth surface?
y
See page 13,
Unpacking and removing
shipping bolts
to remove the shipping bolts.
y
Stop the cycle and rearrange the load for
balancing.
y
See page 16,
Leveling the washing machine
to level the washing machine.
y
Check if the floor is solid and level.
Water leaking around
washer
y
Does water leak from a faucet or a water line?
y
Is a drain pipe or a drain hose clogged?
y
Check the faucets or water lines.
- If the water lines are loosely connected, see
page 14,
Connecting water lines
to connect
them properly.
y
Unclog the drain pipe or drain hose. Contact a
plumber if necessary.
Excessive suds or failure to
rinse
y
Did you use more than the recommended
amount of detergent?
y
Is the soil level higher than the size of the
load?
y
Use the recommended amount of detergent
for load.
y
If the contamination level is low, reduce
the detergent quantity to less than the
recommended level.
Only use detergent with the HE (High-
Efficiency) logo.
Staining
y
Did you add detergent directly to the tub?
y
Did you remove the load immediately after it
finished?
y
Did you sort and wash the clothes by color or
soil?
y
Make sure to load detergent into the
detergent dispenser drawer.
y
Remove the load immediately after it finishes.
y
Sort and separate dark colors from light or
white ones, and heavily soiled items from
lightly soiled ones. See page 19,
Sorting
laundry
for details

37
SPECIFICATIONS
ENGLISH
Problem Possible Causes Solutions
Wrinkling
y
Did you remove the load immediately after it
finished?
y
Did you overload the tub?
y
Did you reverse the hot and cold water inlets?
y
Remove the load immediately after it finishes.
y
Do not overload the tub.
y
Hot water rinse can cause garments to
wrinkle. Check the inlet hose connections.
Power is not turned on
y
Is the power cord plugged in properly?
y
Has a house fuse blown, a circuit breaker
tripped, or a power outage occurred?
y
Make sure that the plug is secured in a
grounded 3-prong, 120 V (60 Hz) outlet.
y
Reset the circuit breaker or replace the fuse.
Do not increase the fuse capacity. If the
problem is a circuit overload, have it corrected
by a qualified electrician.
The door does not open
when the cycle pauses or
finishes
y
Is the temperature in the tub too high?
y
Is the water level in washer high?
y
The washing machine has a safety lock built
into the door to prevent burning. Leave the
door closed and wait until the door lock icon
disappears from the display.
y
Allow the washer to complete the
programmed cycle, or Press the SPIN button.
The wash cycle time is
longer than usual
y
Is the washing machine overloaded? Are other
options added to the wash cycle?
y
This is normal. The washing machine
automatically adjusts the cycle time for the
amount of laundry, water pressure, water
temperature, and other operating conditions.
It is musty or moldy in the
tub
y
Has the incorrect detergent been used?
y
Did you clean the tub periodically?
y
Use only HE (High-Efficiency) detergent
recommended for a front-loading washing
machine.
y
See page 30, clean the inside and outside of
the washing machine periodically.
SPECIFICATIONS
Model WM3470H*A
Description Front-Loading Washer
Electrical requirements 120 VAC @ 60 Hz.
Max. water pressure 14.5 - 116 PSI (100 - 800 kPa)
Dimensions 68.6 cm (W) X 75.6 cm (D) X 98.3 cm (H), 129.5 cm (D with door open)
27" (W) X 29
3
/
4
" (D) X 38
11
/
16
" (H), 51" (D with door open)
Net weight 192 lb (87kg)
Max. spin speed 1,200 RPM

38
USING SMARTDIAGNOSIS™
- Only use this feature when instructed to do so by the call center. The transmission sounds similar to a fax machine, and so has
no meaning except to the call center.
- SMARTDIAGNOSIS™ cannot be activated if the washer does not power up. If this happens, then troubleshooting must be done
without SMARTDIAGNOSIS™.
If you experience problems with your washer, call 1-800-243-0000 (1-888-542-2623 in Canada). Follow the call center agent’s
instructions, and perform the following steps when requested:
1. Press the
A
to turn on the washer. Do not press any other buttons or turn the cycle selector knob.
2. When instructed to do so by the call center, place the mouthpiece of your phone very close to the POWER button.
3. Press and hold
for three seconds, while holding the phone mouthpiece to the icon or POWER button.
4. Keep the phone in place until the tone transmission has finished. This takes about 6 seconds, and the display will count down
the time.
• For best results, do not move the phone while the tones are being transmitted.
• If the call center agent is not able to get an accurate recording of the data, you may be asked to try again.
• Pressing the POWER button during the transmission will shut off the SMARTDIAGNOSIS™.
5. Once the countdown is over and the tones have stopped, resume your conversation with the call center agent, who will then be
able to assist you using the information transmitted for analysis at the call center.
USING SMARTDIAGNOSIS™

39
WARRANTY
ENGLISH
THIS LIMITED WARRANTY DOES NOT COVER:
1. Service trips to deliver, pick up, or install the product or for instruction on product use.
2. Replacing house fuses or resetting of circuit breakers, correction of house wiring or plumbing, or correction of product installation.
3. Damage or failure caused by leaky/ broken/ frozen water pipes, restricted drain lines, inadequate or interrupted water supply or inadequate
supply of air.
4. Damage or failure caused by accidents, pests and vermin, lightning, wind, fire, floods or acts of God.
5. Damage or failure resulting from misuse, abuse, improper installation, repair or maintenance. Improper repair includes use of parts not
approved or specified by LG.
6. Damage or failure caused by unauthorized modification or alteration to the product.
7. Damage or failure caused by incorrect electrical current, voltage, or plumbing codes.
8. Cosmetic damage, including scratches, dents, chips or other damage to the finish of the product, unless such damage results from defects
in materials or workmanship and is reported to LG within seven (7) calendar days from the date of delivery.
9. Damage or missing items to any display, open box, discounted, or refurbished product.
10. Product where the original factory serial numbers have been removed, defaced or changed in any way.
11. Repairs when product is used in other than normal and usual household use (e.g. rental, commercial use, offices, or recreational facilities)
or contrary to the instructions outlined in the owner’s manual.
12. The removal and reinstallation of the Product if it is installed in an inaccessible location.
HOW SERVICE IS HANDLED: In-Home Service
In-home service will be provided, as available, during the warranty period subject to servicer availability within the U.S. To receive in-home
service, the product must be unobstructed and accessible to service personnel. If the in-home service repair cannot be completed, it may be
necessary to remove, repair and return the product. If in-home service is unavailable, LG may elect, at its option, to provide for transportation
of the product to and from an LG authorized service center.
THIS WARRANTY IS IN LIEU OF ANY OTHER WARRANTY, EXPRESS OR IMPLIED, INCLUDING AND WITHOUT LIMITATION TO, ANY
WARRANTY OF MERCHANTABILITY OR FITNESS FOR A PARTICULAR PURPOSE. TO THE EXTENT ANY IMPLIED WARRANTY IS REQUIRED
BY LAW, THIS WARRANTY IS LIMITED IN DURATION TO THE TERM PERIOD EXPRESSED ABOVE. REPAIR OR REPLACEMENT AS PROVIDED
UNDER THIS WARRANTY IS THE EXCLUSIVE REMEDY FOR THE CUSTOMER. NEITHER THE MANUFACTURER NOR ITS U.S. DISTRIBUTOR
SHALL BE LIABLE FOR ANY INCIDENTAL, CONSEQUENTIAL, INDIRECT, SPECIAL, OR PUNITIVE DAMAGES OF ANY NATURE, INCLUDING
AND WITHOUT LIMITATION TO, LOST REVENUES OR PROFITS, OR ANY OTHER DAMAGE, WHETHER BASED IN CONTRACT, TORT, OR
OTHERWISE.
SOME STATES DO NOT ALLOW THE EXCLUSION OR LIMITATION OF INCIDENTAL OR CONSEQUENTIAL DAMAGES OR LIMITATIONS ON
HOW LONG AN IMPLIED WARRANTY LASTS, SO THE ABOVE EXCLUSION OR LIMITATION MAY NOT APPLY TO YOU. THIS WARRANTY
GIVES YOU SPECIFIC LEGAL RIGHTS AND YOU MAY ALSO HAVE OTHER RIGHTS THAT VARY FROM STATE TO STATE.
HOW TO OBTAIN WARRANTY SERVICE & ADDITIONAL INFORMATION: Write your warranty information below:
Call 1-800-243-0000 or visit our website at www.lg.com. Product Registration Information:
Mail to: LG Customer Information Center (ATTN: CIC) Model:
201 James Record Road, Huntsville, AL 35824 Serial Number:
Date of Purchase:
WARRANTY:
LG Electronics U.S.A., Inc. (“LG”) warrants your LG Washing Machine (“product”) against defect in materials or workmanship under normal
household use, during the warranty period set forth below, LG will, at its option, repair or replace the product. This limited warranty is valid only
to the original retail purchaser of the product, is not assignable or transferrable to any subsequent purchaser or user, and applies only when the
product is purchased through an LG authorized dealer or distributor and used within the United States (“U.S.”) including U.S. Territories.
Note: Replacement products and repair parts may be new or factory-remanufactured and are warranted for the remaining portion of the original
unit’s warranty period or ninety (90) days, whichever is longer. Please retain dated receipt or delivery ticket as evidence of the Date of Purchase
for proof of warranty (you may be required to submit a copy to LG or authorized representative).
WARRANTY PERIOD:
LG WASHING MACHINE LIMITED WARRANTY (USA)
Period
Scope of Warranty
Remark
Parts only. Customer will be responsible for any labor or in-home
service to replace defective parts.
One (1) year from date of
original retail purchase:
Any internal /functional
Parts & Labor
LG will provide parts & labor to
repair or replace defective parts.
Ten (10) years from date of
original retail purchase:
Drum Motor
(Stator, Rotor, and Hall Sensor)
Lifetime from date of
original retail purchase:
Stainless Steel Drum

40
WARRANTY
LG WASHING MACHINE LIMITED WARRANTY (CANADA)
WARRANTY:
Should your LG Washer (“Product”) fail due to a defect in material or workmanship under normal home use during the warranty period set forth
below, LG Canada will at its option repair or replace the Product upon receipt of proof of original retail purchase. This warranty is valid only to the
original retail purchaser of the product and applies only to a Product distributed in Canada by LG Canada or an authorized Canadian distributor
thereof. The warranty only applies to Products located and used within Canada.
Replacement products and parts are warranted for the remaining portion of the original warranty period or ninety (90) days, whichever is greater.
Replacement products and parts may be new or remanufactured.
LG Authorized Service Center warranties their repair work for thirty (30) days.
LG Canada’s sole liability is limited to the warranty set out above. Except as expressly provided above, LG Canada makes no and hereby
disclaims all other warranties and conditions respecting the product, whether express or implied, including, but not limited to, any implied
warranty or condition of merchantability or fitness for a particular purpose, and no representations shall be binding on LG Canada. LG Canada
does not authorize any person to create or assume for it any other warranty obligation or liability in connection with the product. To the extent
that any warranty or condition is implied by law, it is limited to the express warranty period above. LG Canada, the manufacturer or distributor
shall not be liable for any incidental, consequential, special, direct or indirect damages, loss of goodwill, lost profits, punitive or exemplary
damages or any other damage, whether arising
Directly or indirectly from any contractual breach, fundamental or otherwise, or from any acts or omissions, tort, or otherwise.
This warranty gives you specific legal rights. You may have other rights which may vary from province to province depending on applicable provincial laws.
Any term of this warranty that negates or varies any implied condition or warranty under provincial law is severable where it conflicts with
provincial law without affecting the remainder of this warranty’s terms.
This limited warranty does not cover:
1. Service trips to deliver, pick up, or install the product; instructing a customer on operation of the product; repair or replacement of fuses or correction of wiring, or
correction of unauthorized repairs/installation.
2. Failure of the product to perform during power failures and interruptions or inadequate electrical service.
3. Damage caused by leaky or broken water pipes, frozen water pipes, restricted drain lines, inadequate or interrupted water supply or inadequate supply of air.
4. Damage resulting from operating the Product in a corrosive atmosphere or contrary to the instructions outlined in the Product owner’s manual.
5. Damage to the Product caused by accidents, pests and vermin, lightning, wind, fire, floods, or acts of God.
6. Damage resulting from the misuse, abuse, improper installation, repair, or maintenance of the Product. Improper repair includes use of parts not approved or specified by
LG Canada.
7. Damage or product failure caused by unauthorized modification or alteration, or use for other than its intended purpose, or resulting from any water leakage due to
improper installation.
8. Damage or Product failure caused by incorrect electrical current, voltage, commercial or industrial use, or use of accessories, components, or cleaning products that are
not approved by LG Canada.
9. Damage caused by transportation and handling, including scratches, dents, chips, and/or other damage to the finish of your product, unless such damage results from
defects in materials or workmanship and is reported within one (1) week of delivery.
10. Damage or missing items to any display, open box, discounted, or refurbished Product.
11. Products with original serial numbers that have been removed, altered, or cannot be readily determined. Model and Serial numbers, along with original retail sales receipt,
are required for warranty validation.
12. Increases in utility costs and additional utility expenses.
13. Replacement of light bulbs, filters, or any consumable parts.
14. Repairs when your Product is used in other than normal and usual household use (including, without limitation, commercial use, in offices or recreational facilities) or
contrary to the instructions outlined in the Product owner’s manual.
15. Costs associated with removal of the Product from your home for repairs.
16. The removal and reinstallation of the Product if it is installed in an inaccessible location or is not installed in accordance with published installation instructions, including
the Product owner’s and installation manuals.
17. Accessories to the Product such as door bins, drawers, handles, shelves, etc. Also excluded are parts besides those that were originally included with the Product.
All costs associated with the above excluded circumstances shall be borne by the consumer.
For complete warranty details and customer assistance,
please call or visit our website:
Write your warranty information below:
Call 1-888-542-2623 (24 hours a day, 365 days a year) and select the
appropriate option from the menu, or visit our website
at http://www.lg.com
Product Registration Information:
Model:
Serial Number:
Date of Purchase:
Period
Scope of Warranty
Remark
Extended Component Warranty (Parts Only)
(Consumer will be charged for Labor after one (1) year from the date of
purchase)
One (1) year from the date of original
retail purchase
Parts and Labor
(internal/functional parts only)
Washer
Ten (10) years from the date of
original retail purchase
DD Motor
(Stator, Rotor, Hall Sensor)
Five ( 5 ) years from the date of original
retail purchase
Drum Tub
Define tub, ie, stainless steel wash tub
only

MANUEL D’UTILISATION
MACHINE À LAVER
WM3470H*A
vant de commencer à installer votre machine à laver, lisez
attentivement ces instructions. Cela simplifi era votre installation
et assurera que la machine à laver est installée correctement et
en toute sécurité. Conservez ces instructions à proximité de la
machine à laver après son installation, pour référence future.
P/No.: MFL67360438
www.lg.com
FRANÇAIS

2
CARACTERISTIQUES DU PRODUIT
CARACTERISTIQUES DU PRODUIT
INVERSEUR MOTEUR D’ENTRAINEMENT DIRECT
Le moteur de l’inverseur qui est directement connecté à la cuve réduit la perte énergétique et produit moins de bruits et de
vibrations.
SMARTDIAGNOSIS™
Si votre lave-linge présente des difficultés techniques, celui-ci a la capacité de transmettre des données par téléphone au Centre
d’informations clients. Le centre d’appels enregistre les données transmises depuis votre machine et les utilise pour analyser
l’incident et fournir un diagnostic rapide et efficace (voir page 38).
NETOYAGE DE LA CUVE DE LA VAGE
Un nettoyage mensuel de la cuve à l’aide de la fonction TUB CLEAN permet de garder la cuve propre et fraîche.
PISTON DE PORTE MAGNÉTIQUE
Fixez correctement la porte legerement entrebaillee a l’aide d’un piston de porte magnetique. Ceci va permettre a l’air de
circuler et de secher l’interieur de la machine. Pour utiliser cette fonction, apres avoir retire le linge, ne fermez pas la porte
completement. Lorsque le piston de porte magnetique entre en contact avec la carrosserie metallique de la laveuse, il maintient
la porte legerement ouverte pour permettre le sechage de l’interieur de la laveuse (lave-linge).
TAMBOUR A GRANDE CONTENANCE EN ACIER INOXYDABLE
Le tambour à grande contenance en acier inoxydable se caractérise par une extrême durabilité. Il est légèrement incliné pour
améliorer son efficacité et offre un accès plus facile pour des éléments volumineux.
CONTROLE PARENTAL
Utiliser cette option pour arrêter toutes les commandes pendant un cycle de lavage. Cette option empêche les enfants de
changer les cycles ou de faire fonctionner la machine.
TIROIR À DISTRIbUTEUR DE DÉTERGENT
Le bac du distributeur à quatre compartiments permet de séparer facilement le détergent de prélavage, le détergent de
lessivage principal, l’eau de javel liquide et l’assouplisseur de tissus dans les différents compartiments.
CYCLES DE VAPEUR HAUTE EFFICACITÉ
Le cycle vapeur propre à LG injecte un jet de vapeur chaude qui élimine en douceur les taches tenaces.

3
INSTRUCTIONS IMPORTANTES DE SÉCURITÉ
FRANÇAIS
INSTRUCTIONS IMPORTANTES DE SÉCURITÉ
LISEZ TOUTES LES DIRECTIVES AVANT D’UTILISER L’APPAREIL
AVERTISSEMENT
Pour votre sécurité, vous devez suivre l’information contenue dans ce manuel afi n de réduire les risques d’incendie et d’explosion,
de choc électrique ainsi que pour éviter les dommages matériels, les blessures corporelles ou un décès.
Votre sécurité et la sécurité des autres sont très importantes.
Ce manuel contient de nombreux messages relatifs à la sécurité et à votre appareil. Lisez toujours et suivez toujours toutes les
instructions relatives à votre sécurité.
C’est le symbole d’alerte à la sécurité.
Ce symbole vous alerte de dangers potentiels qui peuvent vous tuer ou vous blesser ou tuer ou blesser d’autres personnes.
Tous les messages relatifs à la sécurité suivent le symbole d’alerte à la sécurité et le mot DANGER, AVERTISSEMENT ou
CAUTION.
Ces mots signifient :
DANGER
Vous pouvez être tué ou gravement blessé si vous ne suivez pas immédiatement les instructions.
AVERTISSEMENT
Vous pouvez être tué ou gravement blessé si vous ne suivez pas les instructions.
CAUTION
Vous pouvez être blessé ou endommager le produit si vous ne suivez pas les instructions.
Tous les messages relatifs à la sécurité vous diront la nature du danger potentiel, comment réduire le risque de blessure et ce
qui peut se produire si vous ne suivez pas les instructions.

4
INSTRUCTIONS IMPORTANTES DE SÉCURITÉ
INSTRUCTIONS DE MISE À LA TERRE
Cet appareil doit être raccordé à la terre. Dans l’éventualité d’un dysfonctionnement ou d’une panne, la mise à la terre réduira
le risque de choc électrique en fournissant au courant électrique un chemin de moindre résistance. Cet appareil est équipé
d’un cordon, muni d’un conducteur de mise à la terre de l’appareil et d’une fiche de mise à la terre. La fiche doit être branchée
dans une prise appropriée, elle-même correctement installée et raccordée à la terre, conformément à toutes les normes et
réglementations locales.
AVERTISSEMENT
Un raccordement incorrect du conducteur de mise à la terre de l’appareil peut entraîner un risque de choc électrique. Consultez
un électricien ou un technicien qualifié si vous avez un doute sur la mise à la terre correcte de l’appareil. Ne modifiez pas la fiche
fournie avec l’appareil. Dans le cas où elle ne serait pas adaptée à la prise, faites installer une prise correcte par un électricien
qualifié. Le non-respect de ces instructions peut provoquer des blessures graves, un incendie, un choc électrique ou la mort.
INSTRUCTIONS IMPORTANTES DE SÉCURITÉ
LISEZ TOUTES LES DIRECTIVES AVANT D’UTILISER L’APPAREIL
AVERTISSEMENT
Pour votre sécurité, vous devez suivre l’information contenue dans ce manuel afi n de réduire les risques d’incendie et d’explosion,
de choc électrique ainsi que pour éviter les dommages matériels, les blessures corporelles ou un décès.
PRÉCAUTIONS DE SÉCURITÉ DE BASE
AVERTISSEMENT
Pour réduire les risques d’incendie, de choc électrique, ou des blessures corporelles en utilisant des électroménagers, vous devez
toujours suivre les précautions de base, y compris ce qui suit.
•
Avant de l’utiliser, la machine à laver doit être installée
correctement conformément aux directives données dans
ce manuel.
•
Ne lavez aucun article qui aurait précédemment été nettoyé,
lavé ou trempé dans de l’essence, des solvants pour
nettoyage à sec ou toute autre substance infl ammable ou
explosive non plus que tout article qui présenterait des
taches de ces substances
car les vapeurs qui s’en dégagent
pourraient s’enfl ammer ou exploser.
•
N’ajoutez aucune essence, solvants pour nettoyage à sec
ou autres substances infl ammables ou explosives à l’eau de
lavage.
Ces substances pourraient dégager des vapeurs qui
risquent de s’enfl ammer ou d’exploser.
• Dans certaines conditions, une certaine quantité d’hydrogène
peut être produite par un système à eau chaude qui n’a pas
été utilisé pendant 2 semaines ou plus. L’HYDROGÈNE EST
UN GAZ EXPLOSIF.
Si le système à eau chaude n’a pas été
utilisé pendant une telle période, avant de faire fonctionner
la machine à laver, faites couler tous les robinets d’eau
chaude pendant plusieurs minutes.
Cette technique libérera
tout hydrogène accumulé. Comme ce gaz est infl ammable,
ne fumez pas et n’utilisez aucune fl amme nue pendant ce
temps.
•
Ne laissez pas les enfants jouer dans la machine à laver ou
sur celle-ci. Vous devez les superviser de près lorsque vous
utilisez la machine à laver à proximité.
•
Avant d’inutiliser ou de mettre la machine à laver au rebut,
retirez-en la porte pour empêcher les enfants d’y pénétrer.
•
N’installez pas et n’entreposez pas la machine à laver dans
un endroit où elle serait exposée aux intempéries ou au gel.
•
Ne modifi ez pas les commandes.
•
Ne réparez pas et ne remplacez aucune des pièces de la
machine à laver à l’exception de ce qui est décrit dans ce
manuel.
De plus, n’effectuer que l’entretien décrit. Nous
vous recommandons fortement de faire effectuer toute
réparation par un technicien qualifi é.
•
Consultez les directives d’installation pour les exigences de
mise à la terre.
•
Suivez TOUJOURS les directives d’entretien des tissus
fournies par le fabricant du vêtement.
•
Ne placez pas les articles exposés à de l’huile de cuisson
dans votre machine à laver.
Des vêtements contaminés aux
huiles de cuisson peuvent entraîner une réaction chimique
qui pourrait faire enfl ammer une brassée.
•
Utilisez les assouplisseurs ou produits pour éliminer la
statique uniquement tel que recommandé par le fabricant.
• Cette machine à laver n’est pas conçue pour une utilisation
maritime ou pour installations mobiles comme dans un
véhicule récréatif, un avion, etc.
•
Fermez les robinets et débranchez la machine à laver si
la machine à laver doit être laissée pendant une période
étendue, comme durant vos vacances
.
• N’utilisez pas la machine pour sécher des articles qui
comportent du caoutchouc mousse ou tout autre matiere
similaire a du caoutchouc.
• Les matériaux d’emballage peuvent être dangereux pour les
enfants. Ils présentent un risque de suffocation!
Conservez
tous les matériaux d’emballage hors de portée des enfants.
•
Vérifi ez toujours l’intérieur de la machine à laver pour y
repérer tout corps étranger avant de charger une brassée
de lessive. Gardez la porte fermée lorsque vous ne l’utilisez
pas.
•
Ne tentez d’atteindre l’intérieur de l’appareil si la cuve ou
l’agitateur est en mouvement.

5
INSTRUCTIONS IMPORTANTES DE SÉCURITÉ
FRANÇAIS
INSTRUCTIONS IMPORTANTES DE SÉCURITÉ
LISEZ TOUTES LES DIRECTIVES AVANT D’UTILISER L’APPAREIL
AVERTISSEMENT
Pour votre securite, vous devez suivre l’information contenue dans ce manuel afin de reduire les risques d’incendie et
d’explosion, de choc electrique ainsi que pour eviter les dommages materiels, les blessures corporelles ou un deces.
PRÉCAUTIONS DE SÉCURITÉ POUR L’INSTALLATION
AVERTISSEMENT
Pour reduire les risques d’incendie, de choc electrique, ou des blessures corporelles en utilisant cet electromenager, vous devez
toujours suivre les precautions de base, y compris ce qui suit.
•
Consultez les Instructions d’installation pour y trouver des
procédures détaillées de mise à la terre.
Les instructions
d’installation sont emballees dans la machine a laver a
titre de reference pour l’installateur. Si vous demenagez
la machine a laver dans un nouvel emplacement, faites-la
verifier et reinstaller par un technicien qualifie de service.
Tout non-respect de cet avertissement peut entrainer des
blessures graves, un incendie, une electrocution ou la mort.
•
Ne coupez en aucune circonstance, ou n’enlevez jamais la
troisième broche (la broche de mise à la terre) du cordon
d’alimentation.
Tout non-respect de cet avertissement
peut entraîner des blessures graves, un incendie, une
électrocution ou la mort.
•
Pour votre sécurité personnelle, cette machine à laver
doit être bien mise à la terre.
Tout non-respect de cet
avertissement peut entraîner des blessures graves, un
incendie, une électrocution ou la mort.
•
Le cordon d’alimentation de cet appareil est équipé d’une fi
che à trois broches (mise à la terre) qui va dans une prise
à trois trous (mise à la terre) normal,
afi n de minimiser la
possibilité d’électrocution.
•
Vous devez brancher cette machine à laver dans une prise
mise à la terre de 120 VCA, 60 Hz.
Tout non-respect de
cet avertissement peut entraîner des blessures graves, un
incendie, une électrocution ou la mort.
•
Faites vérifi er par un électricien qualifi é la prise murale et
le circuit pour vous assurer que la prise est bien mise à la
terre.
Tout non-respect de cet avertissement peut entraîner
des blessures graves, un incendie, une électrocution ou la
mort.
•
Si vous avez une prise normale à deux trous, vous êtes
personnellement responsable et obligé de la faire remplacer
par une prise murale à trois trous bien mise à la terre.
Tout non-respect de cet avertissement peut entraîner des
blessures graves, un incendie, une électrocution ou la mort.
•
N’installez jamais sur un tapis. Installez la machine à
laver sur un plancher solide.
Tout non-respect de cet
avertissement peut entraîner des dommages sérieux dus à
des fuites.
•
N’enlevez jamais la broche de mise à la terre. N’utilisez
jamais un adaptateur ou une rallonge. Branchez dans\ une
prise à trois trous mise à la terre.
Tout non-respect de
cet avertissement peut entraîner des blessures graves, un
incendie, une électrocution ou la mort.
•
Vous devez toujours brancher la machine à laver dans sa
propre prise électrique. Celle-ci doit avoir une notation de
voltage qui correspond à celle de la plaque de signalisation
de la machine à laver.
Cela permet un meilleur rendement,
tout en empêchant une surcharge des circuits de câblage
de la maison, qui pourrait entraîner un danger d’incendie à la
suite d’une surchauffe des fi ls.
•
Ne débranchez jamais votre machine à laver en tirant sur le
cordon d’alimentation.
Saisissez toujours fermement la fi che
et faites-la sortir de la prise en la tirant droit. Tout non-respect
de cet avertissement peut entraîner des blessures graves, un
incendie, une électrocution ou la mort.
•
Réparez ou remplacez immédiatement tout cordon
d’alimentation usé ou endommagé. N’utilisez jamais un
cordon d’alimentation usé ou craqué sur sa longueur
ou à l’une de ses extrémités.
Tout non-respect de cet
avertissement peut entraîner des blessures graves, un
incendie, une électrocution ou la mort.
•
Quand vous installez ou bougez votre machine à laver,
faites bien attention de ne pas pincer, écraser ou
endommager le cordon d’alimentation.
Tout non-respect de
cet avertissement peut entraîner des blessures graves, un
incendie, une électrocution ou la mort.
•
Vous devez faire installer la machine à laver et la faire
mettre à la terre par un technicien qualifi é, conformément
aux codes locaux.
Cela empêchera le danger d’électrocution
et assurera la stabilité du fonctionnement.
•
La machine à laver est lourde. Vous avez peut-être besoin
de deux personnes, ou plus, pour installer et bouger cet
appareil.
Tout non-respect de cet avertissement peut
entraîner des blessures du dos ou d’autres blessures.
•
Rangez et installez votre machine à laver dans un endroit où
elle ne sera pas exposée à des températures inférieures à 0
degré ou à des conditions climatiques extérieures.
Tout non-
respect de cet avertissement peut entraîner des dommages
sérieux dus à des fuites.
•
Pour réduire le risque d’électrocution, n’installez jamais
votre machine à laver dans un emplacement humide.
Tout non-respect de cet avertissement peut entraîner des
blessures graves, un incendie, une électrocution ou la mort.
•
Pour reduire le risque de blessure, observer toutes les
procedures de securite recommandees par l’industrie,
y compris l’utilisation de gants a manches longues et
de lunettes de securite.
Le defaut de respecter toutes
les consignes de securite de ce manuel peut causer des
dommages, des blessures ou la mort.

6
INSTRUCTIONS IMPORTANTES DE SÉCURITÉ
INSTRUCTIONS IMPORTANTES DE SÉCURITÉ
LISEZ TOUTES LES DIRECTIVES AVANT D’UTILISER L’APPAREIL
AVERTISSEMENT
Pour votre securite, vous devez suivre l’information contenue dans ce manuel afin de reduire les risques d’incendie et d’explosion,
de choc electrique ainsi que pour eviter les dommages materiels, les blessures corporelles ou un deces.
PRÉCAUTIONS DE SÉCURITÉ POUR LA UTILISATION, LA ENTRETIEN ET NETTOYAGE, ET LA MISE AU REBUT
AVERTISSEMENT
Pour réduire les risques d’incendie, de choc électrique, ou des blessures corporelles en utilisant des électroménagers, vous devez
toujours suivre les précautions de base, y compris ce qui suit.
CONSERVEZ CES DIRECTIVES
•
Debranchez votre machine a laver avant de la nettoyer
pour
eviter le risque d’electrocution.
•
N’utilisez jamais de produits chimiques puissants, de
nettoyants abrasifs ou de dissolvants pour nettoyer votre
machine a laver.
Ils endommageront sa surface.
•
Ne mettez jamais de chiffons ou de vetements huileux ou
graisseux en haut de la machine a laver.
Ces substances
degagent des vapeurs qui peuvent mettre feu aux tissus.
•
Ne lavez pas d’articles qui ont ete salis par de l’huile vegetale
ou de l’huile de cuisson.
Ces articles peuvent conserver un
peu d’huile apres le lavage. A cause de cette huile qui reste
dans le tissu, le tissu peut se mettre a fumer ou peut prendre
feu par lui-meme.
•
Debranchez cet appareil de sa prise d’alimentation avant
de tenter de l’entretenir. Vous ne debranchez pas cet
appareil de son alimentation electrique en tournant les
commandes en position OFF (arret).
Tout nonrespect de
cet avertissement peut entrainer des blessures graves, un
incendie, une electrocution ou la mort.
•
Ne melangez jamais des produits de lavage pour la meme
charge, a moins que cela soit specifie sur leur etiquette.
•
Ne melangez jamais d’eau de Javel chloree avec de
l’ammoniaque ou des acides, comme le vinaigre. Suivez
les instructions des paquets pour utiliser des produits de
lavage.
Un mauvais usage peut produire des gaz toxiques qui
peuvent entrainer des blessures graves ou la mort.
•
Ne mettez jamais votre main dans la machine a laver quand
des pieces sont en mouvement. Avant de charger, de
decharger ou d’ajouter des articles, appuyez sur le bouton
START /PAUSE (demarrer/pause) et laissez le tambour
s’arreter completement avant d’y mettre votre main.
Tout non-respect de cet avertissement peut entrainer des
blessures graves, un incendie, une electrocution ou la mort.
•
Ne permettez jamais a des enfants de jouer dans la machine
a laver, ou sur la machine a laver. Vous devez surveiller
etroitement les enfants pour utiliser la machine a laver pres
d’enfants. Quand les enfants grandissent, apprenez-leur
comment bien utiliser, en toute securite, tous les appareils
electromenagers.
Tout non-respect de cet avertissement
peut entrainer des blessures graves.
•
Detruisez la boite en carton, le sac en plastique et tous
les autres materiaux d’emballage apres avoir deballe la
machine a laver. Des enfants peuvent les utiliser pour jouer.
Les boites en carton recouvertes de tapis, de garnitures
de lit ou de pellicules en plastique peuvent devenir des
chambres hermetiquement closes.
Tout nonrespect de cet
avertissement peut entrainer des blessures graves.
•
Rangez les produits de lavage hors de la portee des enfants.
Pour eviter des blessures, observez tous les avertissements
figurant sur les etiquettes de produits.
Tout non-respect de
cet avertissement peut entrainer des blessures graves.
•
Avant de jeter votre machine a laver, ou de la mettre
hors service, enlevez la porte du compartiment de lavage
pour eviter que des enfants ou de petits animaux soient
accidentellement enfermes.
Tout non-respect de cet
avertissement peut entrainer des blessures graves ou la
mort.

7
TABLE DES MATIERES
FRANÇAIS
TABLE DES MATIERES
2 CARACTERISTIQUES DU PRODUIT
3
INSTRUCTIONS IMPORTANTES DE SÉCU-
RITÉ
4 PRÉCAUTIONS DE SÉCURITÉ DE BASE
4 INSTRUCTIONS DE MISE À LA TERRE
5 PRÉCAUTIONS DE SÉCURITÉ POUR
L’INSTALLATION
6 PRÉCAUTIONS DE SÉCURITÉ POUR LA UTILI-
SATION, LA ENTRETIEN ET NETTOYAGE, ET LA
MISE AU REBUT
8
PRÉSENTATION DE LA MACHINE À LAVER
8 Pièces et Accessores
9 Caractéristiques du panneau de configuration
11
CONSIGNES RELATIVES À L’INSTALLATION
11 Aperçu de l’ordre d’installation
12 Vérification et sélection de l’emplacement approprié
13 Déballage et retrait des boulons d’expédition
14 Raccordement des conduites d’eau
15 Raccordement de la conduite d’évacuation
16 Stabilisation de la machine à laver
17
Branchement du cordon d’alimentation et mise à la terre
17 Test de fonctionnement
18 AVANT D’UTILISER LA MACHINE
18 Tri des charges de lessivage
18 - Précautions à prendre pour les vêtements avant le
cycle de lavage
19 - Étiquettes d’entretien des tissus
19 - Tri du linge
20 Utilisation du détergent/de l’assouplisseur de tissus
20 - Détergent recommandé
20 - Chargement du distributeur
22
UTILISATION DE VOTRE MACHINE A LAVER
22 Exploitation élémentaire
23 Orientations sur le cycle de lavage
24 Cycle principal
24 - Réduire les allergènes,
ALLERGIENE™
24 - Réduire las bacterias en la colada,
SANITARY
24 - Pour tissus blancs
BRIGHT WHITES™
24 - Couvertures et linges volumineux,
BULKY/LARGE
24 - Eléments normaux, COTTON/NORMAL
24 - Tissus en coton très sales, HEAVY DUTY
24 - Eléments sans plissage, PERM. PRESS
24 - Eléments extra fins, DELICATES
24 - Pour les serviettes,
TOWELS
24 - Eléments en laine, HAND WASH/WOOL
24 - Lavage rapide, SPEED WASH
25 Boutons de configuration de cycle
25 Configuration des options avant le cycle
25 - Réglage de la température de l’eau, WASH TEMP.
25 - Réglage de la vitesse d’essorage, SPIN SPEED
25 - Réglage du niveau de souillure du linge, SOIL LEVEL
26 - Réglage de la mélodie et du signal sonore des
touches, SIGNAL
26 - Prélavage, PRE-WASH
26 -
Rincer, essorer et vidanger uniquement, RINSE + SPIN
26 -
Ajout d’un cycle de rinçage supplémentaire, EXTRA RINSE
26 - Préréglage de commencer de l’heure, DELAY WASH
26 - Pour un lavage efficace, STEAM
27 - Pour économiser de l’énergie, COLD WASH™
27 - Enregistrement du temps, TURBOWASH™
27 Configuration des options pendant le cycle
27 -
Fonctionnalité du verrouillage des boutons, CHILD LOCK
27 -
Enregistrement du cycle de nettoyage personnalisé,
PGM SAVE
28 -
Sélection de votre cycle personnalisé, CUSTOM PGM
28 -
Sèche les vêtements sans les froisser, FRESH CARE
29 ENTRETIEN
29 Entretien
29 - Entretien après le lavage
29 - Entretien dans les zones à climat froid
30 Nettoyage
30 -
N
ettoyez le tamb
our, TUB CLEAN
31 - Nettoyage bac de distribution de détergent
32 - Nettoyage des filtres de l’orifice d’admission d’eau
33 - Nettoyage du filtre de la pompe de vidange
34 - Nettoyage du sas d’étanchéité
35 DEPANNAGE
35 Vérification des messages d’erreurs
36 Avant d’appeler le service de maintenance
37 SPÉCIFICATIONS
38
UTILISATION DE SMARTDIAGNOSIS
™
39 GARANTIE

8
PRÉSENTATION DE LA MACHINE À LAVER
REMARQUE
Contactez le Service à la clientèle LG au 1-800-243-0000 (1-888-542-2623 au Canada) si un accessoire quelconque est
y
manquant.
Pour votre sécurité et pour la longévité du produit, utilisez uniquement des composants autorisés. Le fabricant décline toute
y
responsabilité en cas de dysfonctionnement du produit ou d’accidents causés par l’utilisation des composants ou pièces
non autorisés et achetés de façon isolée.
Les illustrations fournies dans ce manuel peuvent être différentes des composants et accessoires réels, et ils peuvent faire
y
PRÉSENTATION DE LA MACHINE À LAVER
Pièces et Accessores
Pièces
Piédestal
(vendu separement)
Kit d’empilage
(vendu separement)
Accessores
Conduites d’eau
chaude/froide
Tampons
antidérapants
Bouchons de couverture des trous
des boulons fixés pour expédition
Clé Sangle d’attache
Support de coude
(pour la sécurisation
du tuyau de vidange)
Accessoires i n c l u s Accessoires e n o p t i o n
Bac de
distribution du
détergent
(voir page 20)
Porte
PISTON
DE PORTE
MAGNÉTIQUE
(voir page 2)
Panneau de
commande
(voir page 9)
Sas
d’étanchéité
TurboWash™
Tuyère
Supérieure
Tube
Pieds de
nivellement
Couvercle du filtre de la pompe de vidange
Filtre de la pompe de vidange
Tuyau de vidange
Orifices
d’admission de
l’eau
Boulons
fixés pour
l’expédition
Cordon
d’alimentation
Tuyau de
vidange
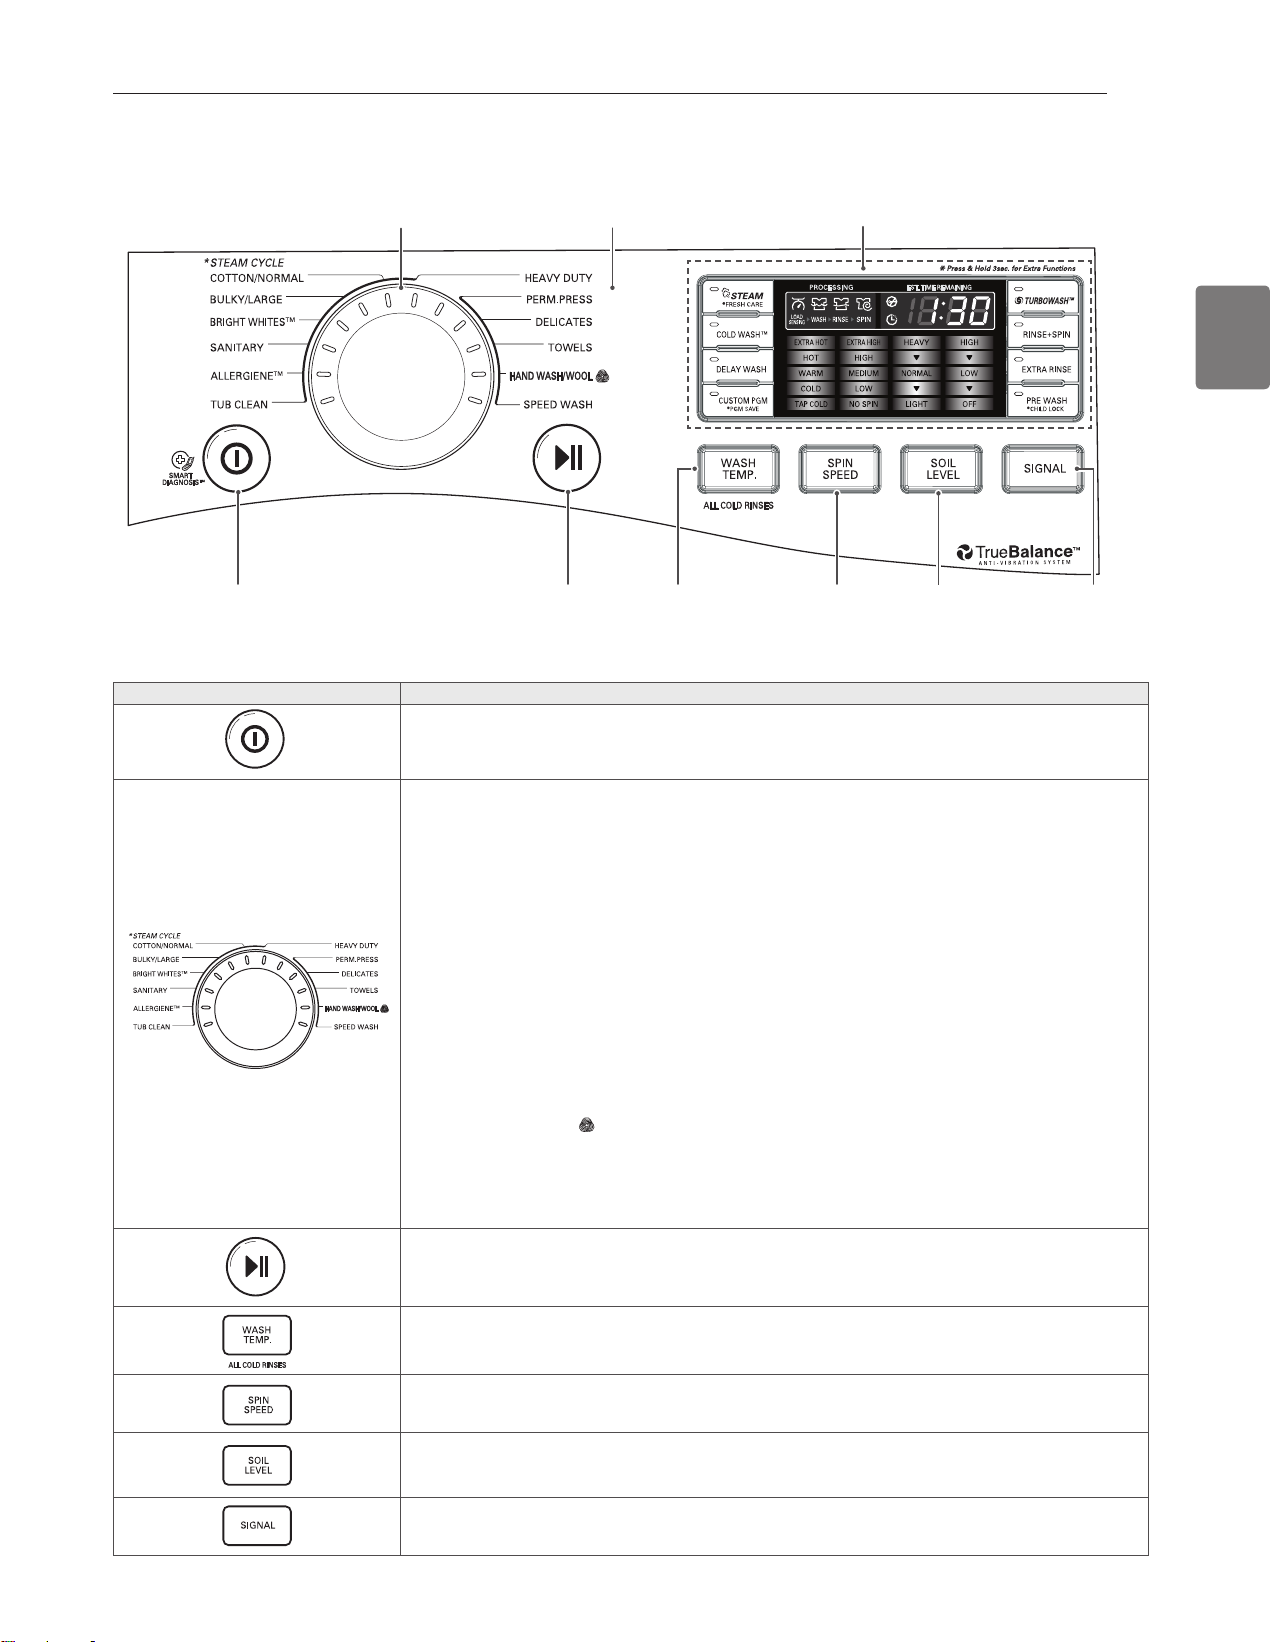
9
PRÉSENTATION DE LA MACHINE À LAVER
FRANÇAIS
Bouton Fonction
Permet de mettre la machine à laver en marche et hors tension.
y
(Pendant le cycle de lavage) permet d’arrêter le système d’annuler les paramètres.
y
ALLERGIENE™
y
- Pour coton, sous-vêtements (voir page 24)
SANITARY
y
- Pour sous-vêtements, couches (voir page 24)
BRIGHT WHITES™
y
- Pour tissus blancs (voir page 24)
BULKY/LARGE
y
- Pour les couvertures ou le linge grand et volumineux. (voir page 24)
COTTON/NORMAL
y
- Pour le linge général, comme les T-shirts ou les serviettes en coton. (voir page 24)
HEAVY DUTY
y
- Tissus en coton très sales (see page 24)
PERM. PRESS
y
- Pour les tissus sans plissage. (voir page 24)
DELICATES
y
- Pour les tissus fragiles et extra-fins. (voir page 24)
TOWELS
y
- Pour les serviettes (voir page 24)
HAND WASH/WOOL
y
- Pour les tissus en laine ou lavables à la main. (voir page 24)
SPEED WASH
y
- Pour des quantités réduites de linge légèrement souillé. (voir page 24)
TUB CLEAN
y
- pour baquet nettoyer (voir page 30)
Permet de démarrer ou de suspendre le cycle de la machine à laver.
y
- Si vous n’appuyez pas sur le bouton
C
en l’espace de 4 minutes pour la sélection d’un cycle, la
machine à laver va s’éteindre automatiquement.
(Appuyer de manière répétée)
y
Permet de sélectionner la température de l’eau pour le cycle de lavage
(voir page 25).
- Sélectionnez la température de l’eau entre 5 niveaux.
(Appuyer de façon répétée) Permet de régler la vitesse d’essorage au niveau souhaité (voir page 25).
y
- Permet de sélectionner la vitesse d’essorage à partir de 5 niveaux.
(Appuyer de façon répétée) permet de sélectionner le cycle de lavage en fonction du niveau de
y
souillure (voir page 25).
- Sélectionner un niveau de souillure de 1 jusqu’à 5.
y
((Appuyer de façon répétée) Choisi une mélodie ou un son de Bouton par signal (voir page 26).
y
Caractéristiques du panneau de configuration
Fonctionnement
Fonctionnement
Affichage
Sélecteur de Cycle
Bouton de
Sélection du
Niveau de
Souillure
Bouton de
sélection
designal de
sonore
Spin
Speed
Selection
Button
Bouton de
Sélection de la
Température de
L’eau
Bouton
Démarrer/
Suspendre
Bouton
D’alimentation
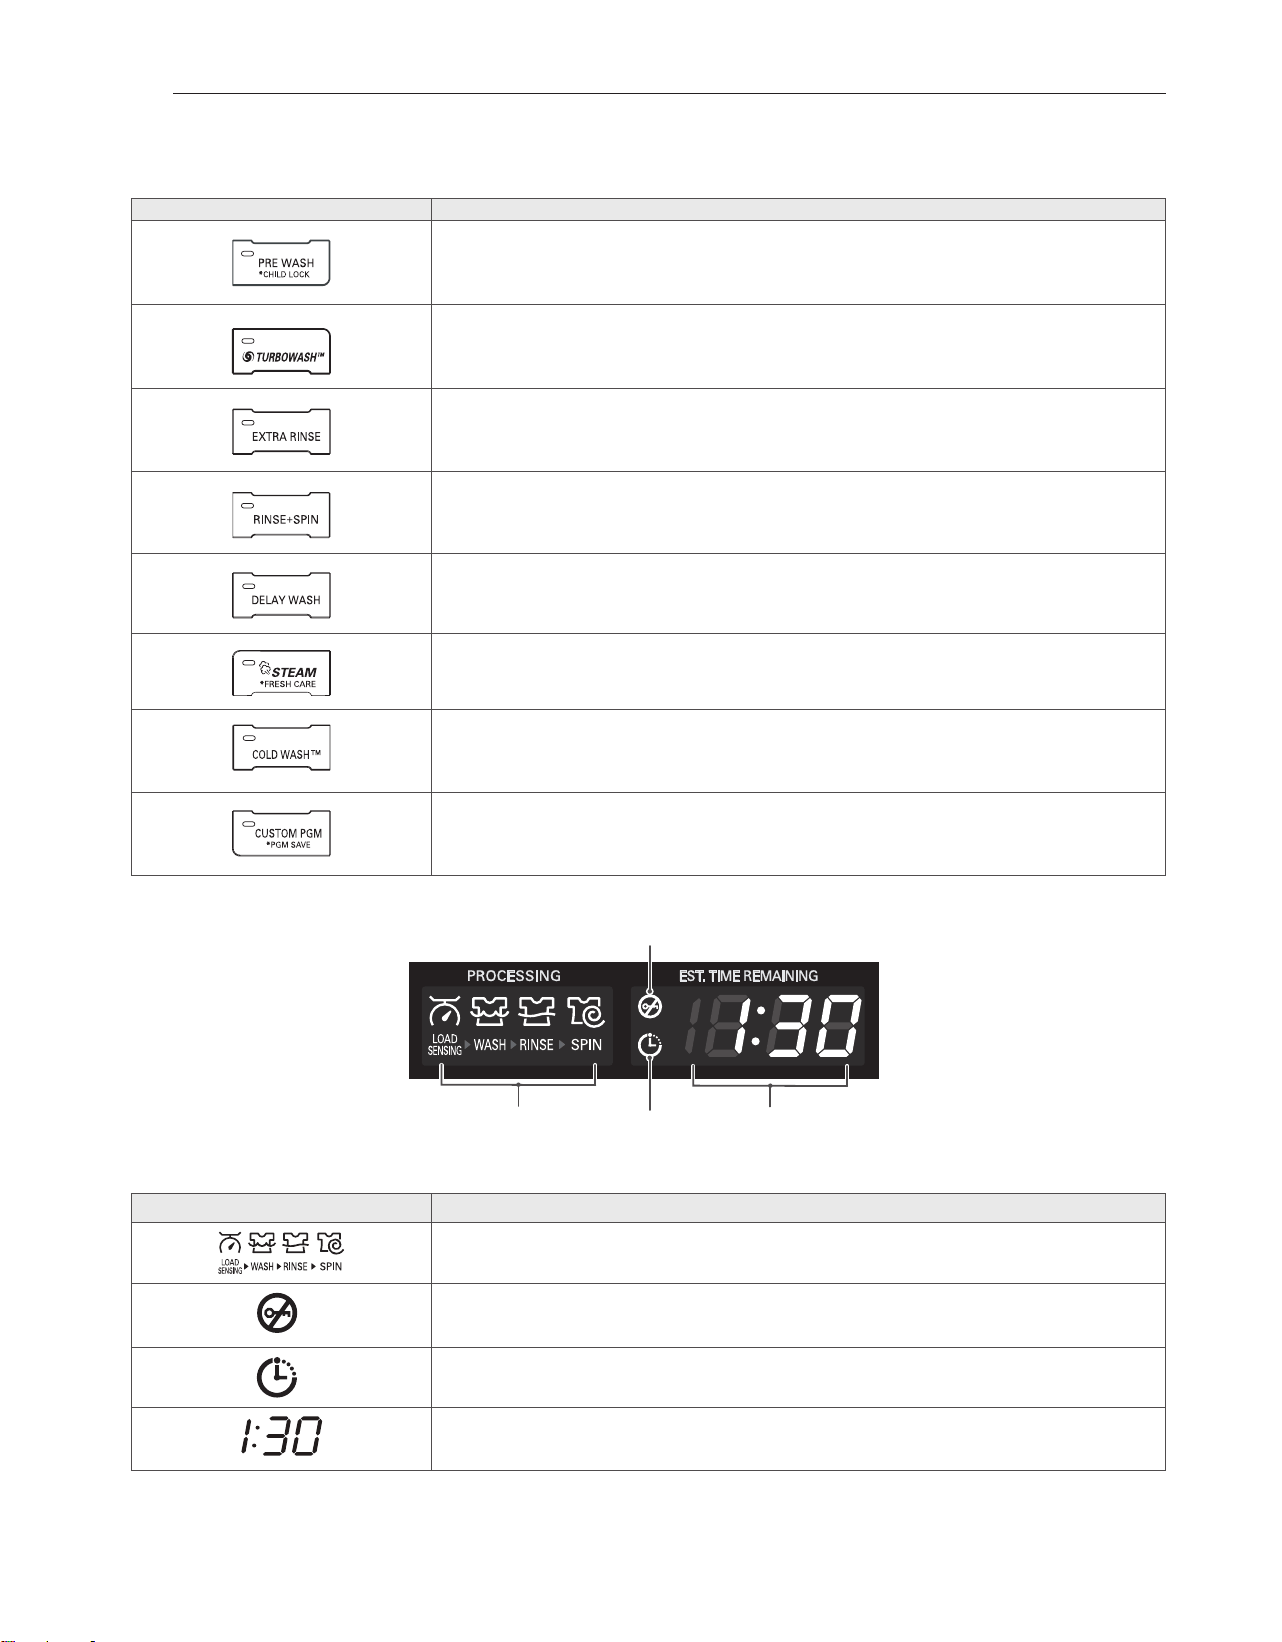
10
PRÉSENTATION DE LA MACHINE À LAVER
Fonctionnement (suite)
Affichage
Button Description
(Appuyer brièvement avant le cycle de lavage), sélectionnez Prélavage linge très sale
y
(Voir page 26).
(Maintenez appuyé pendant le cycle de lavage) Verrouiller/déverrouiller le bouton (Voir page 27).
y
Utilisez cette option pour enregistrer le temps (Voir page.27).
y
Presets le temps de retard au cours de laquelle le cycle va commencer (Voir page 26).
y
Utilisez cette option pour rincer le détergent du linge (Voir page.26).
y
Permet d’ajouter un cycle de rinçage supplémentaire au cycle sélectionné (Voir page 26).
y
(Appuyez avant de commencer le cycle de lavage) Utilisez cette option pour ajouter la vapeur pour plus de puissance de nettoyage (Voir page 26)
y
Appuyez et maintenez avant de commencer le cycle de nettoyage) Secoue les habits à la fin du cycle pour éviter les plis (Voir page 28)
y
Utilisez cette option pour réduire votre consommation d’énergie (
y
Voir page 27).
Utilisez cette option pour enregistrer une combinaison de paramètres que vous utilisez
y
fréquemment (Voir page 27~28)
Afficher l’icône Description
Cette partie de l’écran affiche à quelle étape du cycle de lavage se trouve actuellement la machine
y
: LOAD SENSING (détection de charge), WASH (lavage), RINSE (rinçage), ou SPIN (essorage).
Indique que la porte est verrouillée. La porte de la machine à laver se verrouillera automatiquement
y
lorsqu’elle est en fonction. La porte peut être déverrouillée à l’aide du bouton MARCHE/PAUSE
pour arrêter la machine.
Cet indicateur indique que la machine à laver a été réglée pour un DELAY WASH (délai de lessive).
y
Elle démarrera automatiquement une fois le délai programmé dépassé.
Lorsque le bouton MARCHE/PAUSE est enfoncé, la machine à laver détecte automatiquement la
y
brassée (poids) et optimise le temps de lavage en se basant sur le cycle et les options sélectionnés.
L’afficheur indique alors le TEMPS RESTANT ENV. pour le cycle de lavage choisi.
Indicateur de
door lock
Affichage temps restant
estimé/message d’erreur
(voir page 35).
Indicateur
du cycle de
traitement
Indicateur
de cycle
différé
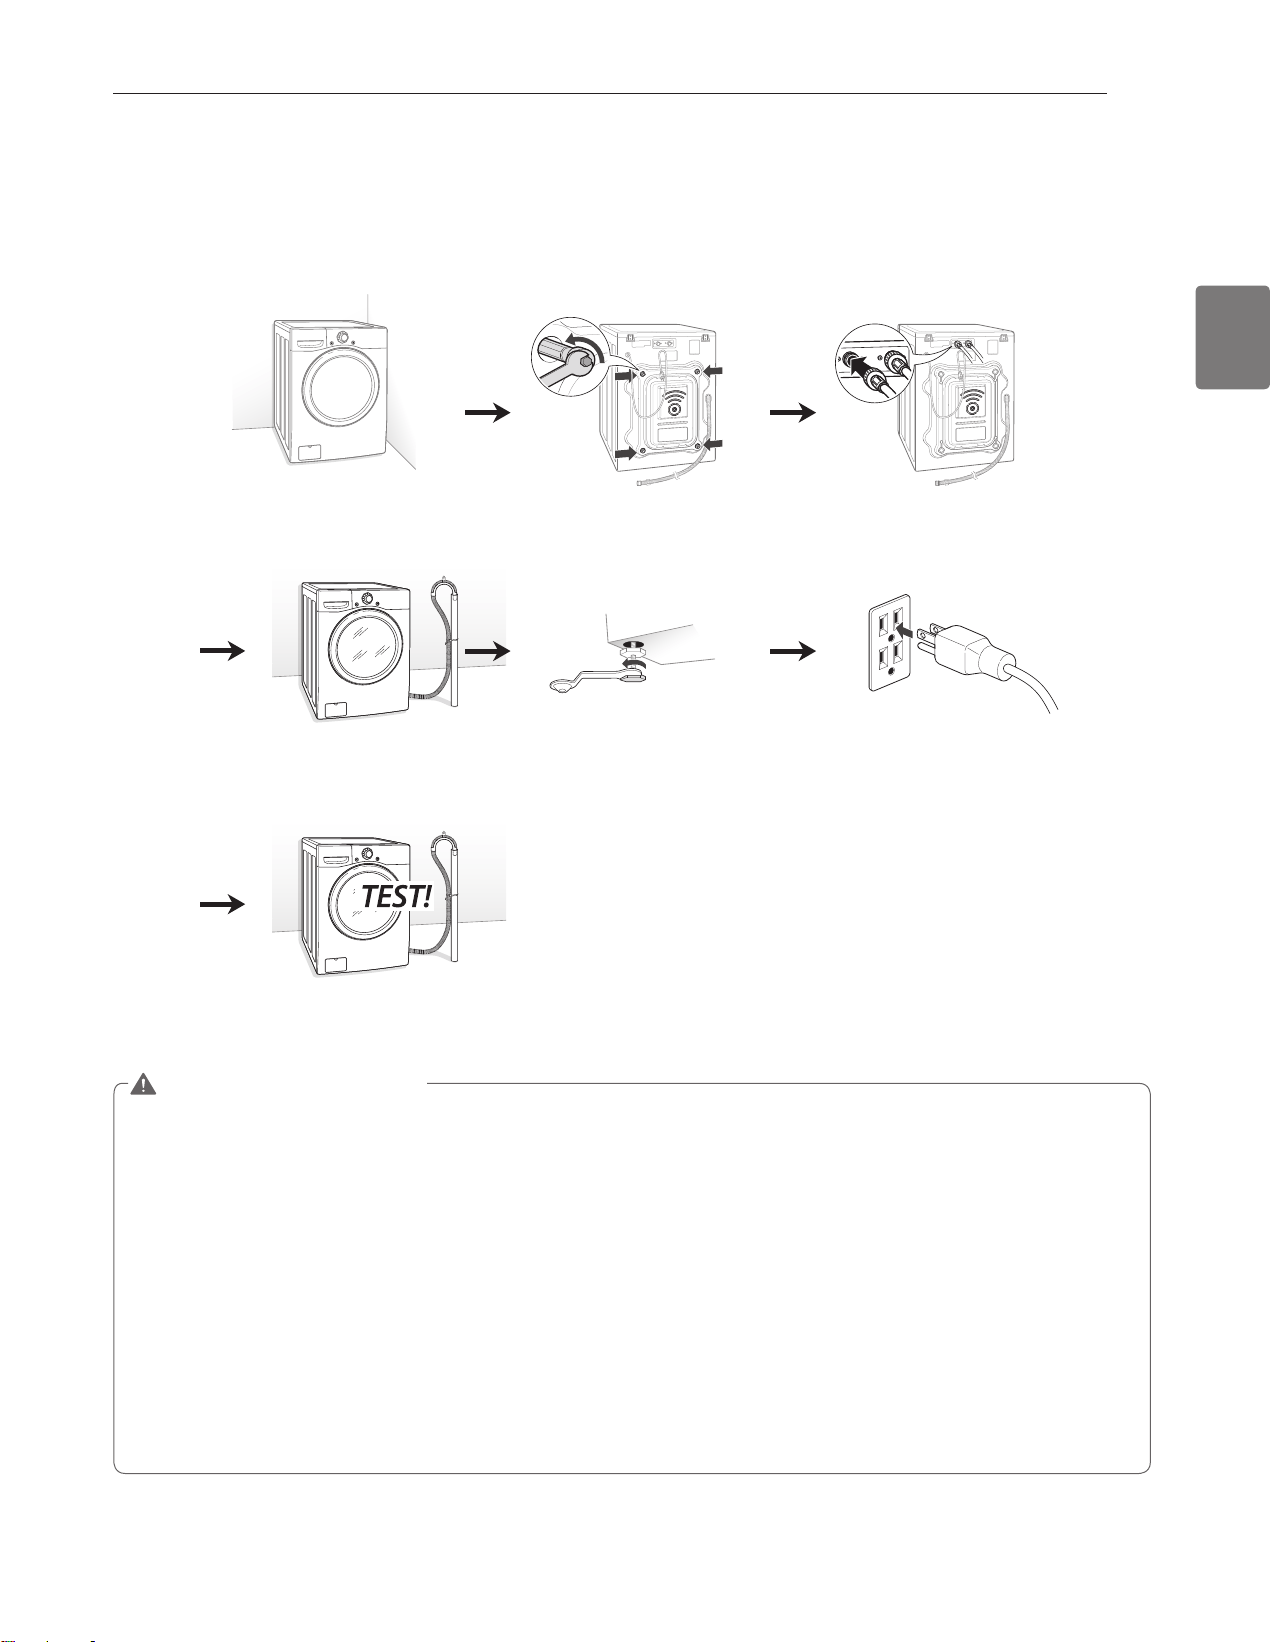
11
CONSIGNES RELATIVES À L’INSTALLATION
FRANÇAIS
CONSIGNES RELATIVES À L’INSTALLATION
Aperçu de l’ordre d’installation
AVERTISSEMENT
La machine a laver est lourde! Deux personnes ou plus sont necessaires lorsque vous deballez et deplacez la machine a
y
laver.
Tout non-respect de ces instructions peut entrainer des blessures du dos ou d’autres blessures.
Entreposez et installez la machine a laver a un endroit ou elle ne sera pas exposee a des temperatures sous le point de
y
congelation ou exposee aux intemperies.
Tout non-respect de cet avertissement peut entrainer des blessures graves, un
incendie, une electrocution ou la mort.
Vous devez bien mettre a la terre cet appareil, pour votre securite personnelle. Une machine a laver bien mise a la terre
y
se conformera a tous les codes et les ordonnances en vigueur.
Tout non-respect de cet avertissement peut entrainer des
blessures graves, un incendie, une electrocution ou la mort.
Pour reduire le risque de choc electrique, n’installez pas la machine a laver dans un espace humide.
y
Tout non-respect de
cet avertissement peut entrainer des blessures graves, un incendie, une electrocution ou la mort.
L’ouverture de la base ne doit pas être obstruée par une moquette si la machine a laver est installee sur un plancher
y
recouvert de tapis.
N’enlevez jamais la broche de mise a la terre. N’utilisez jamais un adaptateur ou une rallonge. Branchez dans une prise a
y
trois trous mise a la terre.
Tout non-respect de cet avertissement peut entrainer des blessures graves, un incendie, une
electrocution ou la mort.
Vérification et sélection de
l’emplacement approprié
Déballage et retrait
des boulons d’expédition
Raccordement de la
conduite d’eau
Raccordement de la
conduite d’évacuation
Stabilisation de la
machine à laver
Branchement du cordon
d’alimentation et mise à la terre
Test de fonctionnement
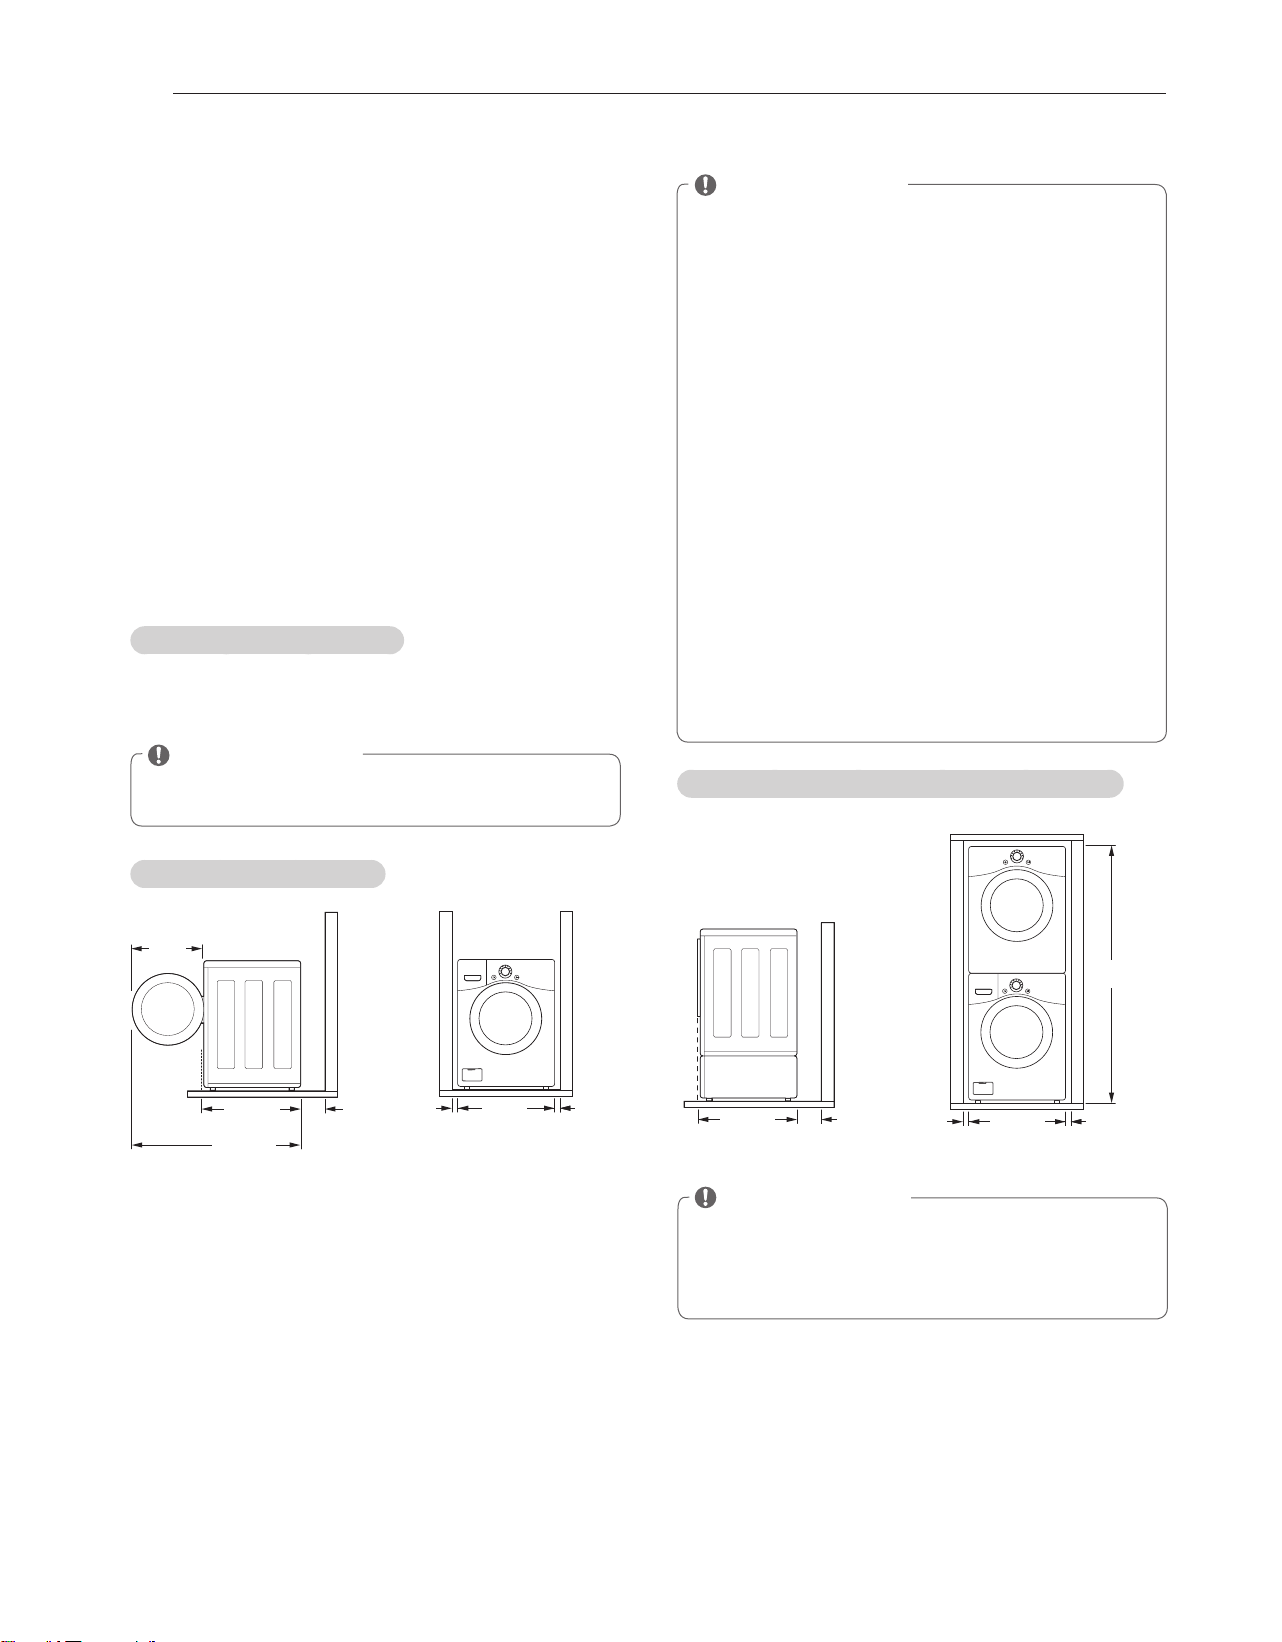
12
CONSIGNES RELATIVES À L’INSTALLATION
Vérification et sélection de l’emplacement
approprié
Installez la machine à laver sur un sol ferme, suffisamment
résistant et dur pour supporter son poids même lorsqu’il est
entièrement chargé, sans flexion, ni rebond. Si le sol est très
mou, vous devez le renforcer pour le rendre plus résistant.
Si le sol n’est pas ferme, cela peut provoquer de fortes
vibrations et d’énormes bruits.
1
Nettoyez le sol avant d’installer la machine.
- Assurez-vous que le sol est solide et uniforme.
2
Il faut deux ou plusieurs personnes pour déplacer et
déballer la machine à laver.
3
Aménagez un espace suffisant entre les murs et la
machine à laver pour des besoins d’installation.
Exigences relatives à l’espace
Vous devez prévoir un espace suffisant pour les conduites
d’eau, la conduite d’évacuation et l’écoulement de l’air.
REMARQUE
Conserver un espace suffisant pour la machine – mur,
y
porte, plinthes.
Installation sur un plancher
29 po
3
/4
(75.6 cm)
4 po
(10 cm)
51 po
(129.5 cm)
22 po
1
/
4
(57 cm)
27 po
68.6 cm
1 po
(2.5 cm)
1 po
(2.5 cm)
REMARQUE
Si votre sol est trop souple, vous devrez le renforcer
y
afin de le rendre plus rigide. Un sol qui peut supporter
un lave-linge à chargement par le haut peut ne pas
être assez rigide pour supporter un lave-linge frontal,
à cause du sens et de la vitesse de l’essorage. Si le
sol n’est pas dur, la machine peut vibrer et le bruit des
vibrations peut se faire entendre dans toute la maison.
Avant d’installer la machine a laver, assurez-vous que
y
le plancher est propre, sec et exempt de poussiere,
salete, eau et huiles afin que les pieds de l’appareil ne
glissent pas facilement. Les pieds de nivellement qui
peuvent se deplacer ou glisser sur le plancher peuvent
entrainer des vibrations et du bruit excessifs en raison
du mauvais contact avec le plancher.
Si un plateau d’egouttement doit etre utilise, prenez
y
le soin de suivre les instructions fournies avec le
plateau d’egouttement et assurezvous que les pieds de
nivellement sont regles de maniere a ce qu’ils soient en
contact ferme et uniforme avec le plateau. L’utilisation
de plateaux d’egouttement et tout manquement a bien
mettre a niveau la machine pourraient faire augmenter
les vibrations et le bruit durant l’utilisation.
Installation sur un piédestal ou un kit d’empilage
29
3
/4 po
(75.6 cm)
4 po
(10 cm)
27 po
(68.6 cm)
1 po
(2.5 cm)
1 po
(2.5 cm)
77
1
/
2
po
(196.8 cm)
REMARQUE
Référez-vous aux instructions fournies dans les
y
sections PIEDESTAL (Facultatif) ou KIT D’EMPILAGE
avant d’installer le produit avec un PIEDESTAL
(facultatif) ou un KIT D’EMPILAGE.
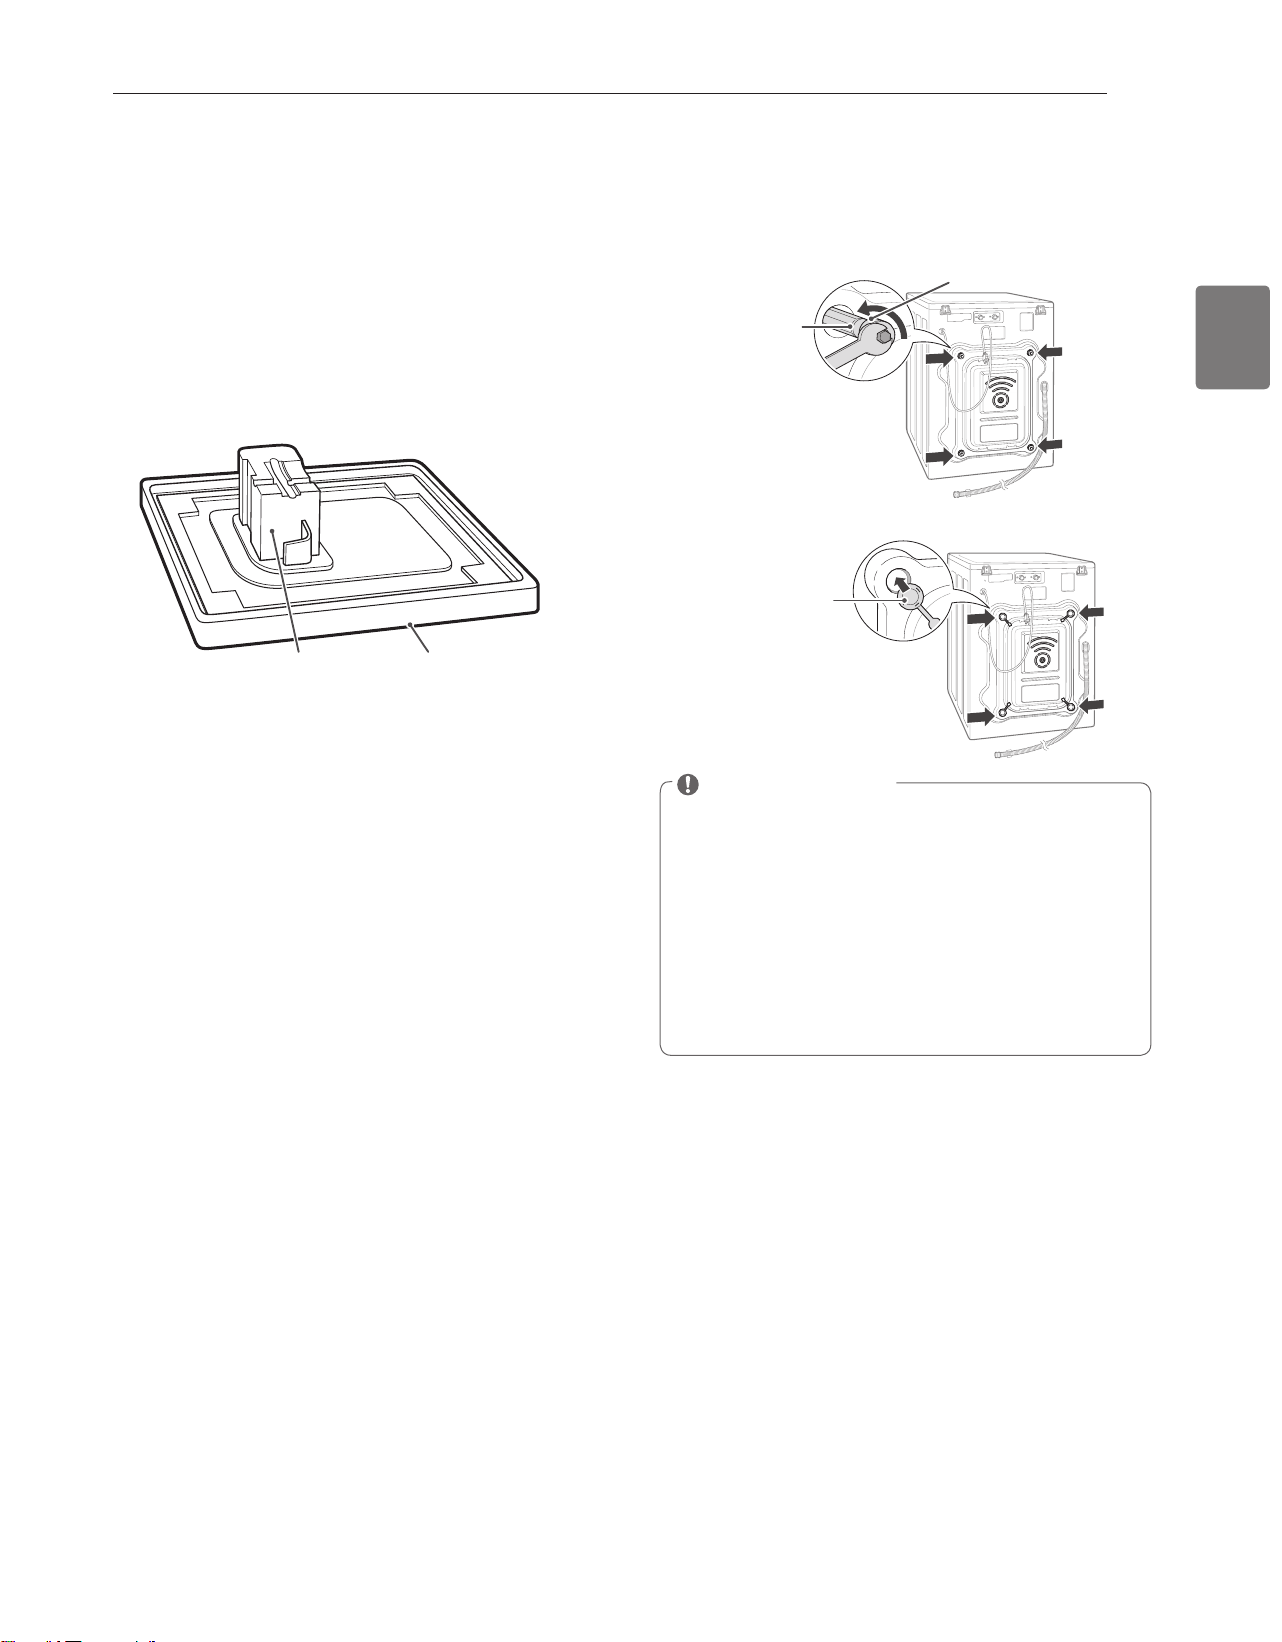
13
CONSIGNES RELATIVES À L’INSTALLATION
FRANÇAIS
Déballage et retrait des boulons
d’expédition
Al retirar la lavadora de la base de carton, asegurese de quitar
el soporte de tambor de espuma colocado en la mitad de la
base de carton.
Si debe asentar la lavadora hacia abajo para quitar los
materiales de embalaje de la base, hagalo siempre
cuidadosamente sobre su parte lateral. NO asiente la lavadora
sobre su parte frontal o posterior.
Support en
mousse
Base de
carton
1
Enlever les deux boulons du bas avec la clé (inclus) pour
pouvoir desserrer complètement les quatre boulons en
les tournant dans le sens inverse des aiguilles d’une
montre et pour pouvoir ensuite les retirer
Boulons fixés à
l’expédition
Attache
2
Poussez les bouchons (fournis) à l’intérieur des trous de
boulons.
Capuchon
REMARQUE
Conserver les pièces pour une utilisation future. Pour
y
éviter d’endommager les composants internes du lave-
linge, NE PAS le transporter sans avoir au préalable ré-
installer les boulons.
Ne pas vous y conformer pourrait causer de graves
y
vibrations et du bruit, ce qui pourrait entrainer des
dommages permanents a la machine a laver. Le cordon
est fixe a l’arriere de la machine a laver a l’aide d’un
boulon d’expedition pour aider a prevenir l’utilisation de
la machine alors que les boulons sont encore en place.
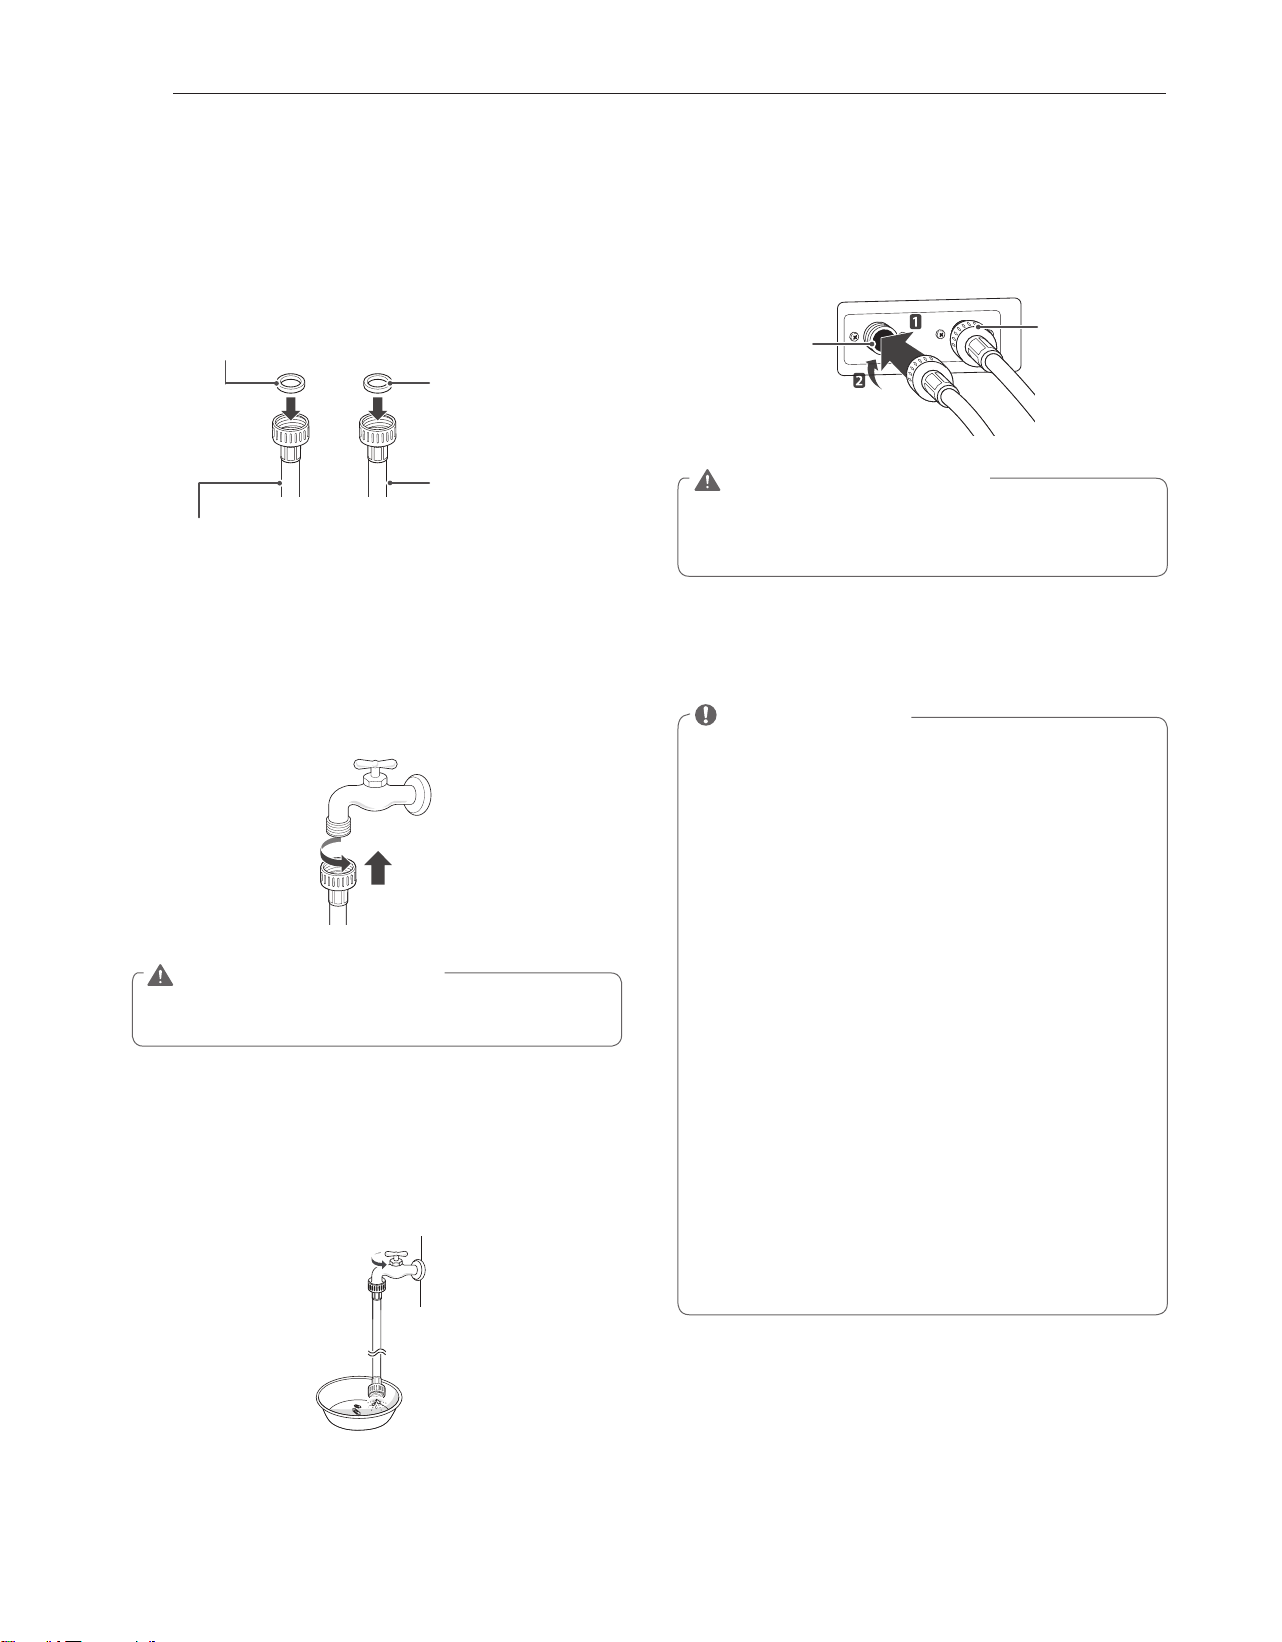
14
CONSIGNES RELATIVES À L’INSTALLATION
Raccordement des conduites d’eau
1
Vérifiez les joints en caoutchouc sur les deux côtés du
tuyau.
- Introduisez un joint en caoutchouc dans les raccords
filetés de chaque tuyau pour empêcher des fuites..
Joint en caoutchouc
Tuyau d’eau
(admission d’eau dans la
machine à laver)
Joint en
caoutchouc
Tuyau d’eau
(pour le robinet)
2
Raccordez les tuyaux d’arrivee d’eau aux robinets d’eau
CHAUDE et FROIDE en vissant d’abord fermement a la
main, puis en serrant encore 2/3 de tour avec une pince.
- Raccordez le tuyau bleu sur un robinet d’eau froide et le
tuyau rouge sur un robinet d’eau chaude.
AVERTISSEMENT
Ne pas serrer trop fort.
y
Vous risquez d’endommager
leraccordement.
3
Après avoir raccordé le tuyau d’entrée sur le robinet
d’eau, ouvrez les robinets d’eau pour chasser les corps
étrangers (saleté, sable ou la sciure) qui sont à l’intérieur
des conduites d’eau. Recueillez l’eau dans un sceau et
vérifiez sa température.
4
Raccordez les tuyaux aux orifices d’admission d’eau,puis
en serrant encore 2/3 de tour avec une pince.
- Raccordez le tuyau bleu sur un orifice d’admission d’eau
froide et le tuyau rouge sur un orifice d’admission d’eau
chaude.
Orifice
d’admission
d’eau froide
Orifice
d’admission
d’eau
chaude
AVERTISSEMENT
Ne pas trop serrez les tuyaux.
y
Le serrage excessif peut
endommager les valves ayant pour résultat la fuite et
les dégâts matériels.
5
Contrôlez les fuites en ouvrant les robinets.
- S’il y a fuite d’eau, vérifiez de nouveau de l’étape 1 à 4.
REMARQUE
Pour votre sécurité et la longévité du produit,
y
utilisez exclusivement les composants autorisés.
Le fabricant décline toute responsabilité en cas
de dysfonctionnement du produit ou d’accidents
consécutifs à l’utilisation des pièces non autorisées et
achetées de façon isolée.
Utilisez de nouveaux tuyaux lorsque vous installez la
y
machine à laver. Evitez de réutiliser des tuyaux usés.
Utilisez uniquement des tuyaux d’alimentation fournis
avec la machine à laver. LG ne recommande pas
l’utilisation des tuyaux de seconde main.
Contrôlez régulièrement les tuyaux pour détecter des
y
fissures, des fuites et des signes d’usure; remplacez
les tuyaux tous les 5 ans.
Ne tendez pas intentionnellement les tuyaux d’eau et
y
assurez-vous qu’ils ne sont pas écrasés par d’autres
objets.
La pression des conduits d’eau doit se situer entre
y
100 - 800 kPa (14.5 PSI - 116 PSI). Si la pression des
conduites d’eau est supérieure à 799.7 kPa (116 PSI),
un robinet réducteur pression doit être installé.
Pour offrir une performance de lavage optimale, la
y
température d’eau chaude devrait être placée à 120-
135˚F (48-57˚C), et au froid à 60˚F (15˚C).

15
CONSIGNES RELATIVES À L’INSTALLATION
FRANÇAIS
Utilisation de la cuve de lavage
1
Fixez l’extrémité du tuyau sur le support du coude.
- Raccordez le support du coude à 4 pouces (10cm) à
partir de l’extrémité du tuyau d’évacuation. Si le support
du coude est raccordé à plus de 4 pouces (10cm) de
l’extrémité du tuyau d’évacuation, la moisissure ou des
micro-organismes pourraient s’introduire à l’intérieur de
la machine à laver.
Pas plus de 10cm
(4 pouces)
Support de coude
2
Accrochez l’extrémité du tuyau de vidange sur le côté de
la cuve de lavage.
Support de coude
Tuyau de vidange
3
Utilisez une sangle d’attache pour maintenir le tuyau
d’évacuation en place.
Raccordement de la conduite d’évacuation
Fixez et sécurisez le tuyau d’évacuation pour éviter le jeu et
des fuites.
REMARQUE
Le tuyau d’évacuation doit être correctement sécurisé.
y
Dans le cas le contraire, il peut provoquer le trop-plein
ou des dysfonctionnements.
La longueur totale du tuyau d’évacuation doit être inférieure
y
à 2,43 m 96 pouces) à partir du bas de la machine à laver.
L’évacuation doit être installée conformément aux
y
codes et aux textes applicables au niveau local.
Ne tendez pas intentionnellement les tuyaux d’eau et
y
assurez-vous qu’ils ne sont pas écrasés par d’autres
objets.
Utilisation du tuyau du réservoir cylindrique
1
Fixez l’extrémité du tuyau sur le support du coude.
- Raccordez le support du coude à 0,1m (4 pouces) à
partir de l’extrémité du tuyau d’évacuation. Si le support
du coude est raccordé à plus de 0,1 m (4 pouces) de
l’extrémité du tuyau d’évacuation la moisissure ou des
micro-organismes pourraient s’introduire à l’intérieur de
la machine à laver.
Pas plus de 0,1 m
(4 pouces)
Support de coude
2
Insérez l’extrémité du tuyau d’évacuation dans le siphon
de sol.
Support de coude
Tuyau de vidange
3
Utilisez une sangle d’attache pour maintenir le tuyau
d’évacuation en place.
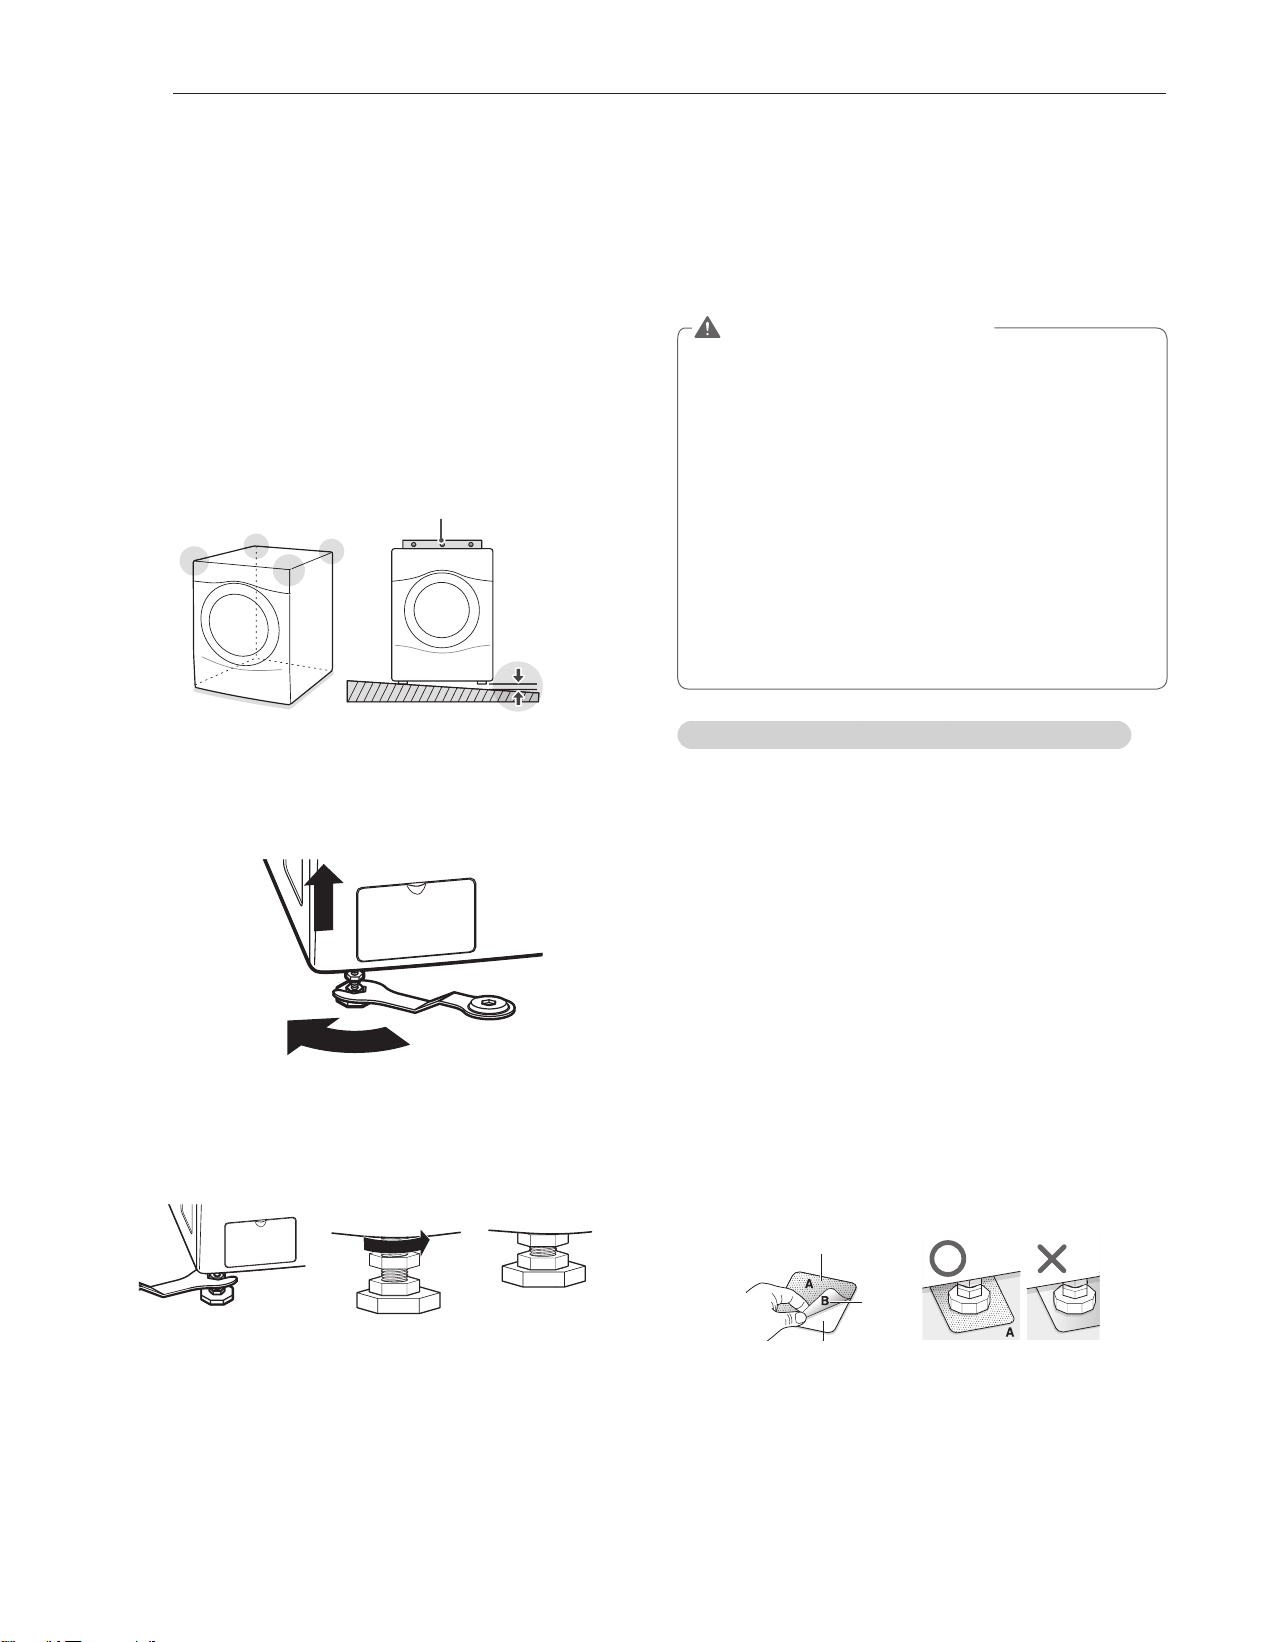
16
CONSIGNES RELATIVES À L’INSTALLATION
Stabilisation de la machine à laver
La cuve de lavage de votre nouvelle machine tourne à une
à grande vitesse. Pour réduire des vibrations, des bruits, et
tout déplacement accidentel de la machine, le plancher doit
être parfaitement uniforme et solide.
1
Vérifiez le niveau de la machine à laver.
- Vérifiez le niveau exact en balançant les extrémités
supérieures de la machine à laver ou en plaçant un
niveau sur la machine. L’inclinaison au-dessous de la
machine à laver ne doit pas dépasser 1°. Toutes les
pattes de nivellement doivent solidement être placées
sur le sol.
Mise a niveau
1°
2
Tournez la patte de nivellement inférieure dans le sens
des aiguilles d’une montre pour stabiliser la machine.
- Le fait de tourner la patte de nivellement inférieure dans
le sens des aiguilles d’une montre soulève la machine.
Élever
3
Tournez les écrous de blocage dans le sens anti-horaire
et serrez-les lorsque la machine à laver est stabilisée.
Serrez solidement
les 4 contre-ecrous
4
Vérifiez le niveau de la machine à laver une seconde fois.
- Poussez ou balancez délicatement les extrémités
supérieures de la machine à laver pour vous assurer que
la machine ne balance pas.
- Si la machine à laver balance, répétez de l’étape 1 à 3.
AVERTISSEMENT
Le fait d’utiliser la machine à laver sans la stabiliser peut
y
déboucher sur des dysfonctionnements consécutifs à
une production excessive des vibrations et des bruits.
Si vous installez la machine à laver sur un bac
y
d’égouttement avec piédestal optionnel, vous devez
ajuster la patte de nivellement sur le piédestal pour
stabiliser la machine. La patte de nivellement de la
machine à laver doit être réduite au minimum, puis
tournez les boulons de verrouillage dans le sens anti-
horaire pour sécuriser le système.
Utilisez la patte de nivellement seulement lorsque
y
vous stabilisez la machine à laver.
Le fait de soulever
inutilement la patte de nivellement pourrait provoquer
des vibrations anormales de la machine à laver.
Utilisation des tampons antidérapants (facultatif)
Si vous installez la machine à laver sur une surface glissante,
elle peut bouger à cause des vibrations excessives. Une
stabilisation approximative de la machine peut provoquer un
dysfonctionnement à cause des bruits et des vibrations. Si un
tel scénario se présente, placez les tampons antidérapants
sous la patte de nivellement et ajustez le niveau.
1
Nettoyez le sol pour fixer les tampons antidérapants.
- Utilisez un chiffon sec pour retirer les corps étrangers ou
l’humidité. S’il y a une humidité résiduelle, les tampons
antidérapants peuvent glisser.
2
Ajustez le niveau après avoir installé la machine à laver
dans l’emplacement prévu à cet effet.
3
Placez le côté adhésif du tampon antidérapant sur le sol.
- Une sécurisation plus efficace est assurée en plaçant
les tampons antidérapants au dessous des pieds avant.
Dans le cas où vous avez des difficultés à placer ces
tampons sous les pieds avant, installez-les au-dessous
des pieds arrière.
Ce côté vers le naut
Retirer la
protection
Coller
au sol
4
Vérifiez le niveau de la machine à laver une seconde fois.
- Poussez ou balancez délicatement les extrémités
supérieures de la machine à laver pour vous assurer
que la machine ne balance pas. Si la machine à laver
balance, stabilisez-la de nouveau.
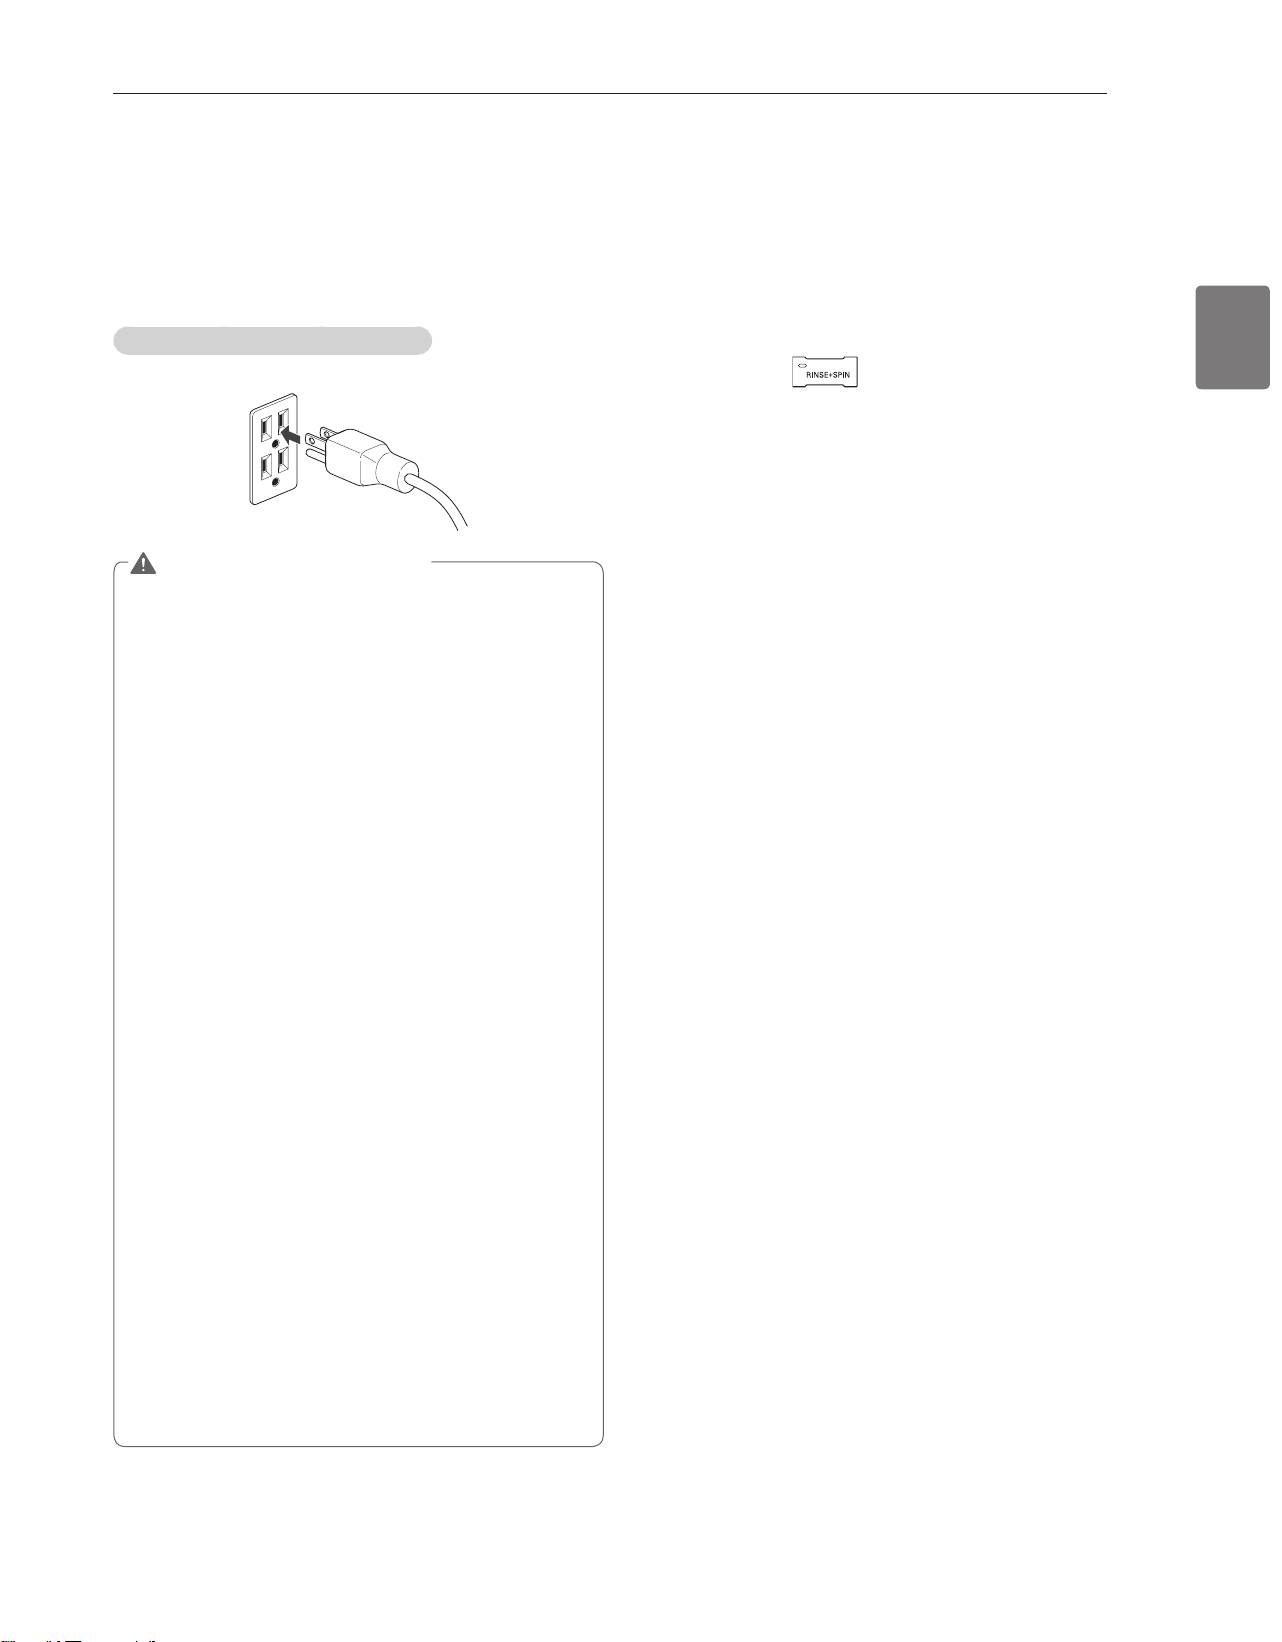
17
CONSIGNES RELATIVES À L’INSTALLATION
FRANÇAIS
Branchement du cordon d’alimentation et
mise à la terre
Veillez à ce que la machine à laver soit mise à la masse pour
éviter un court circuit ou un choc électrique lorsque vous la
branchez.
Utilisation de la sortie à 3 broches
Branchez la sortie électrique sans mise à la terre supplémentaire.
AVERTISSEMENT
La prise de courant doit se trouver à moins de 60 po (1,5 m)
y
d’un cote ou de l’autre de la machine a laver.
L’appareil et la prise doivent être placés de facon a ce que
y
la fiche soit facilement accessible.
Ne surchargez pas la prise murale avec plus d’un
y
electromenager.
La prise doit être mise à la terre conformément aux codes
y
et reglements de cablage actuels.
Un fusible à action différée ou un disjoncteur est
y
recommande.
Il est de la responsabilite personnelle et de l’obligation du
y
proprietaire de faire installer une prise adequate par un
electricien qualifie.
N’utilisez pas un cordon ou une fiche d’alimentation
y
usés ou endommagés. Remplacez-les ou réparez-les
immédiatement.
Le fait de ne pas prendre ces mesures
peut provoquer la mort, un incendie, un choc électrique ou
une défaillance du produit.
Ne modifiez pas le cordon d’alimentation et prenez des
y
précautions pour ne pas l’endommager lors de l’installation
ou du déplacement de la machine à laver.
Le fait de ne pas
prendre ces mesures peut provoquer la mort, un incendie,
un choc électrique ou une défaillance du produit.
Assurez-vous que la machine à laver est mise à la masse.
y
Raccordez cette machine à laver sur une sortie mise à la
y
terre conformément aux valeurs nominales avant toute
utilisation.
Le fait de ne pas prendre ces mesures peut
provoquer un incendie un choc électrique ou une défaillance
du produit.
N’utilisez pas d’adaptateurs ou de rallonges électriques.
y
La
machine à laver doit toujours être branchée séparément sur
sa propre sortie électrique avec une tension nominale qui
correspond à celle de la plaque signalétique. Le fait de ne
pas prendre ces mesures peut provoquer un incendie, un
choc électrique ou des perturbations.
Evitez d’endommager ou de couper le cordon
y
d’alimentation de la prise de terre.
Un tel scénario pourrait
provoquer la mort, un incendie, un choc électrique ou un
dysfonctionnement du produit.
Test de fonctionnement
Vérifiez si la machine est correctement installée et exécutez
un test de cycle.
1
Chargez la machine à laver avec un linge de 6 livres/2.7kg.
2
Appuyez sur
A
et tourner
B
sur la droite.
3
Appuyez sur pour RINSE + SPIN.
4
Appuyez sur
C
.
- Le cycle de lavage démarre.
5
Assurez-vous que l’eau est approvisionnée, que la
machine ne balance et ne vibre pas de façon excessive,
et que l’évacuation est parfaite pendant le cycle
d’essorage.
- S’il y a une fuite d’eau lorsque l’eau est approvisionnée,
référez-vous à la page 14,
Raccordement des conduites
d’eau:
raccordez-les correctement.
- En cas de vibrations et balancements excessifs de la
machine à laver, référez-vous à la page 16,
Stabilisation
de la machine à laver
pour la stabiliser de nouveau.
- Dans le cas où le circuit d’évacuation ne fonctionne pas,
référez-vous à la page 15,
Raccordement de la conduite
d’évacuation
pour l’installer de façon appropriée.

18
AVANT D’UTILISER LA MACHINE
AVANT D’UTILISER LA MACHINE
Tri des charges de lessivage
Précautions à prendre pour les vêtements avant le cycle de lavage
Lisez et respectez les instructions suivantes pour éviter d’endommager ou de rétrécir les vêtements.
Verifiez toutes les poches pour vous assurer qu’elles sont
u
vides.
- Des articles comme des trombones, des allumettes, des
stylos, de la monnaie et des cles peuvent endommager
votre machine a laver et vos vetements.
Fermez les fermetures-éclair, les crochets et les cordons
u
pour les empecher de s’accrocher ou de s’emmeler aux
autres vetements.
Traitez les endroits sérieusement entachés au préalable
u
avant le lavage.
- Un tel traitement va produire un linge propre et immaculé.
Combinez les articles grands et petits dans une brassee.
u
Chargez d’abord les articles les plus grands.
Les grands articles ne doivent pas composer plus de la
u
moitie de la brassee totale.
Mais le tambour ne doit pas être bourré.
u
- La porte de la machine a laver doit pouvoir se fermer
facilement.
Ne lavez pas d’éléments isolés, à l’exception du linge
u
volumineux comme les couvertures. Assurez-vous que vous
lavez du linge dans des charges de types identiques.
- Le fait de laver séparément un élément de faible volume
peut provoquer le déséquilibre, des vibrations ou des bruits
au niveau de la cuve de lavage.
Ne lavez pas de vêtements imperméables à l’eau.
u
- Ils peuvent causer des vibrations anormales ou des
rebondissements susceptibles d’endommager la cuve de
lavage.
Vérifiez s’il y a d’autres corps étrangers dans le sas
u
d’étanchéité et veillez particulièrement à ce qu’aucun
vêtement ne s’y accroche.
- La présence des corps étrangers dans le sas d’étanchéité
peut entacher les vêtements et des fuites d’eau peuvent
être observées si des vêtements s’accrochent au niveau
de ce sas.
Lavez les sous-vêtements ou les éléments légers et petits
u
dans un filet pour blanchissage.
- Les éléments de cette nature peuvent s’accrocher sur
le sas d’étanchéité et un crochet de soutien-gorge peut
endommager les autres éléments ou la cuve de lavage.
Brossez les vêtements très souillés, poussiéreux ou des
u
tissus de poils fins avant le lavage.
- Il est possible que le linge ne soit pas propre s’il y a
la saleté ou le sable sur les vêtements, ou il peut être
endommagé à cause du frottement des particules contre
des tissus diaphanes.
Lavez les couvertures l’une après l’autre.
u
- Le fait de laver plusieurs couvertures en même temps peut
produire de mauvais résultats à cause de l’enchevêtrement
d’une charge déséquilibrée.
Triez toujours les tissus en fonction de leurs couleurs et
u
lavez-les séparément pour éviter qu’ils se déteignent.
- Les tissus peuvent être endommagés ou s’entacher à
cause du linge qui se déteint, ou des corps étrangers qui
passent d’un tissu à l’autre.
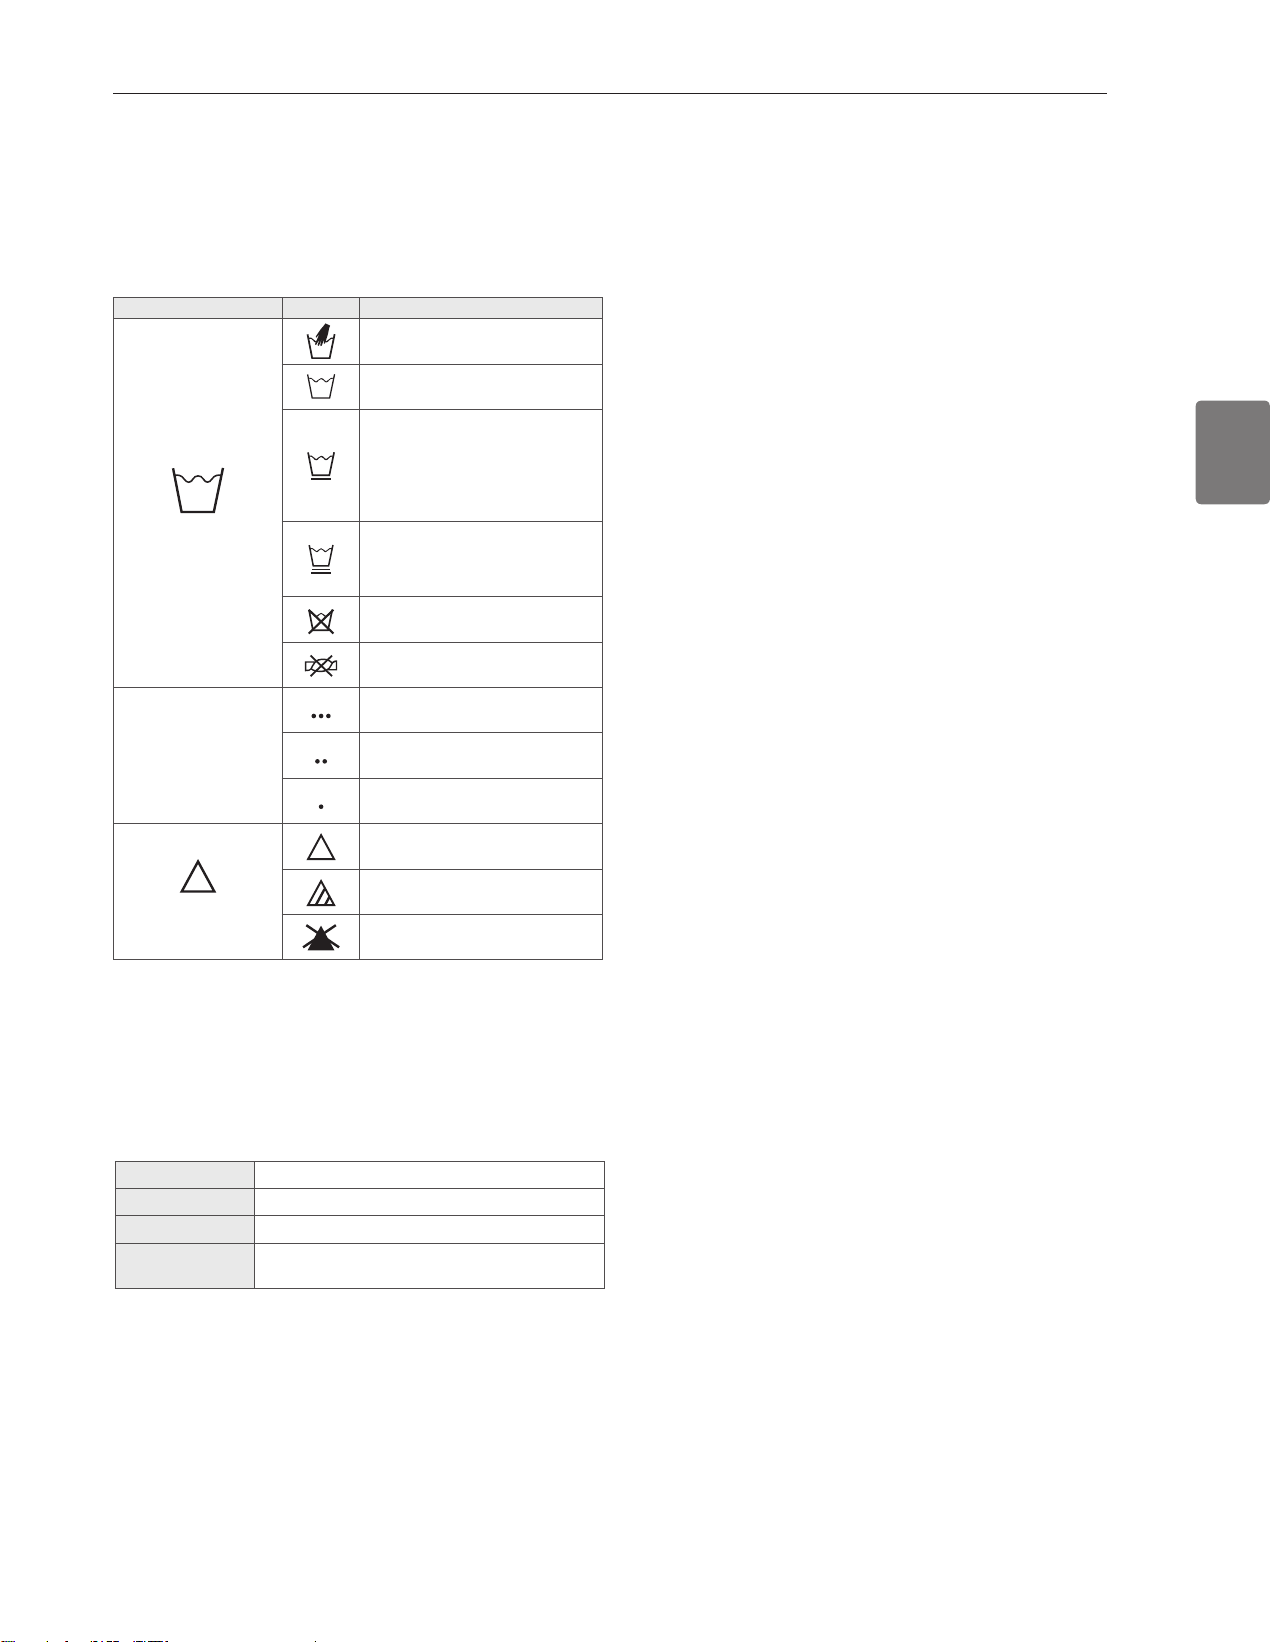
19
AVANT D’UTILISER LA MACHINE
FRANÇAIS
Etiquette Directives
Lavage
Lavage manuel
Lavage avec la machine, cycle
normal
Utilisez le paramètre Pressage
permanent/Résistant au plissage
au niveau de la machine à laver
(qui est dotée d’un pulvérisateur
de refroidissement ou de froid
avant la réduction de l’essorage).
Utilisez le paramètre Fragile/
Délicat de la machine à laver
(faible agitation et/ou réduction
du temps de lavage).
Ne pas laver
Ne pas essorer
Température de l’eau
Élevée
Moyenne
Froide
Eau de javel
Toutes les eaux de javel si
nécessaire
Eaux de javel sans chlore si
nécessaire
Eau de javel interdite
Couleurs
Blanche / Claire / Sombre
Souillure
Excessive / Normale / Légère
Tissu
Fragile / Entretien facile / Coton rigide
Tissu gratté
Producteurs de tissus grattés / collecteurs de
tissus grattés
Étiquettes d’entretien des tissus
La plupart des vetements possedent des etiquettes
d’entretien des tissus qui affichent les directives pour un soin
approprie.
Tri du linge
Il est recommandé de trier le linge par charges similaires
lavables au cours d’un même cycle.
Référez-vous au diagramme suivant pour le tri des
vêtements.
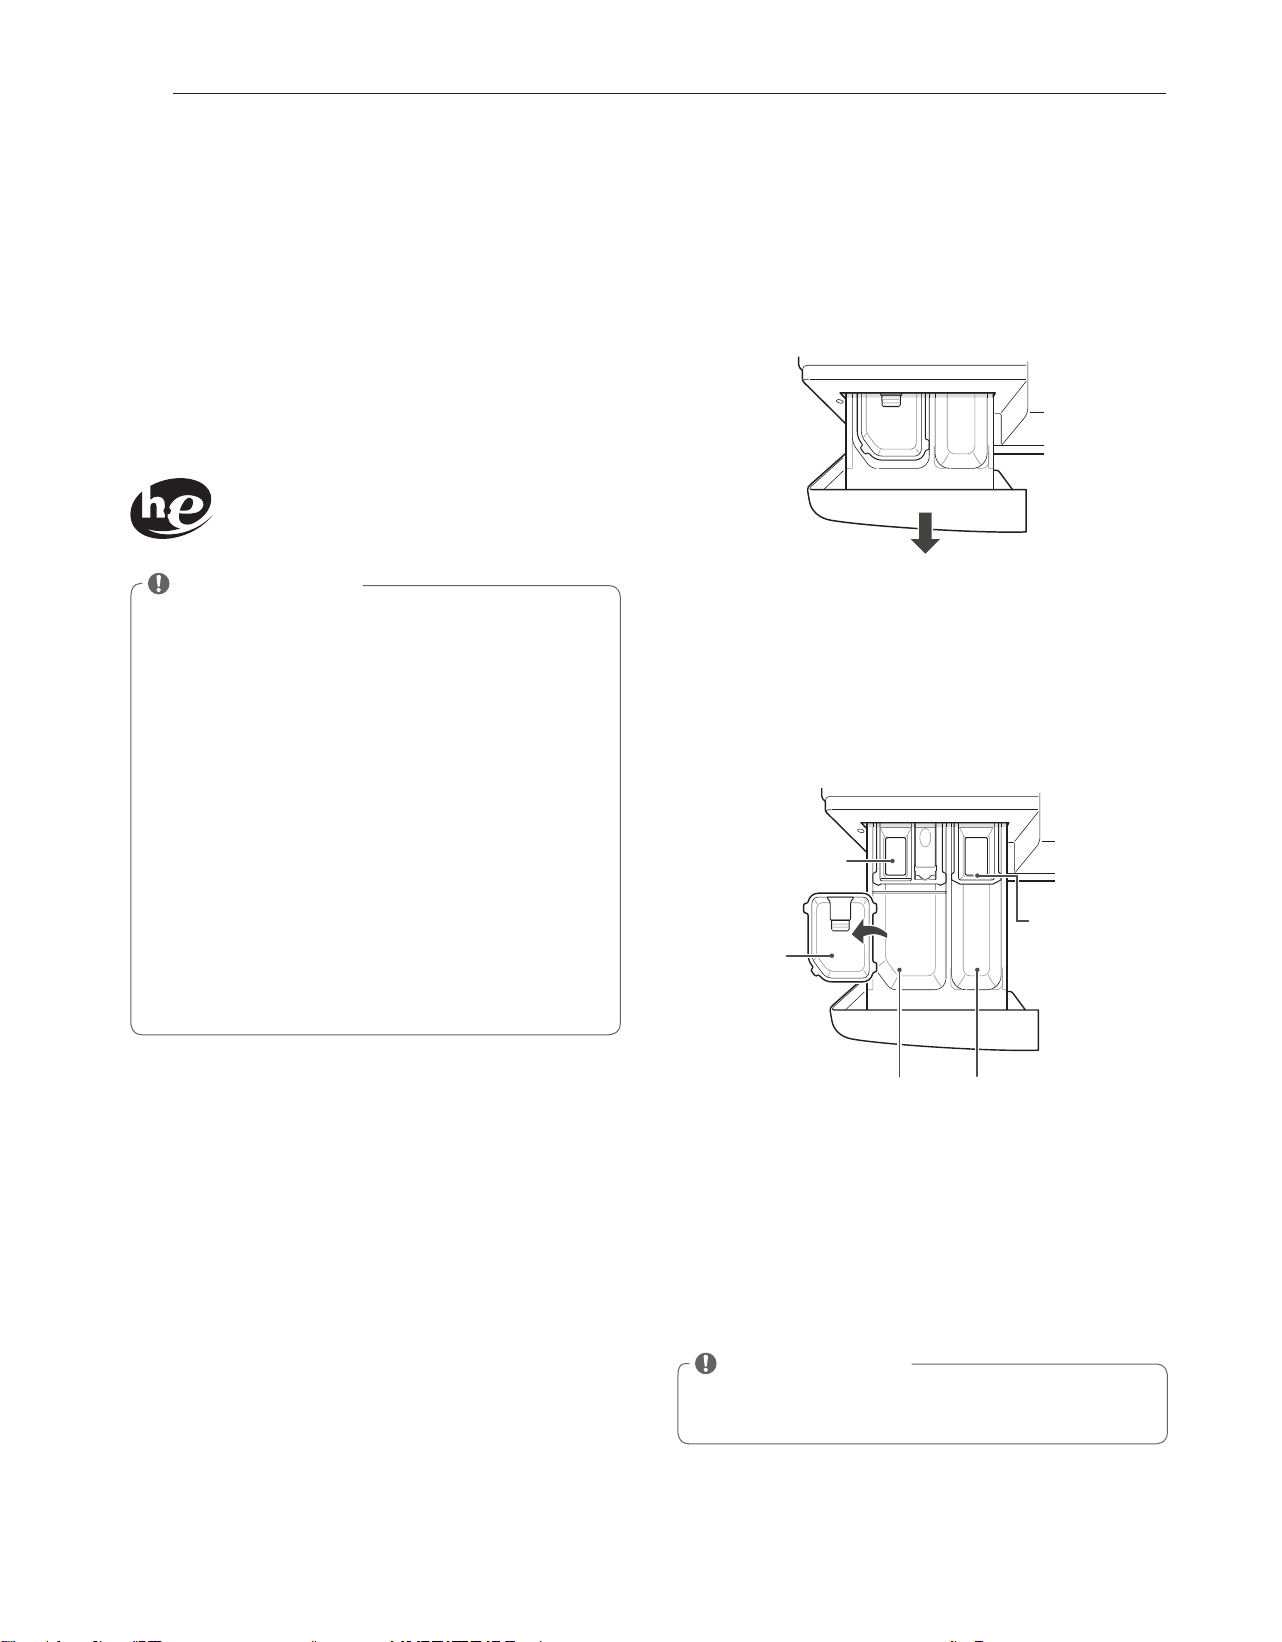
20
AVANT D’UTILISER LA MACHINE
Chargement du distributeur
Le bac de distribution du détergent de la machine à laver est
doté d’un compartiment du distributeur pour chaque type
de détergent. Ajoutez les détergents appropriés dans leurs
compartiments respectifs.
1
Tirez le bac de distribution du détergent.
2
Mettez le détergent approprié dans le compartiment
correspondant.
- Si vous utilisez un détergent liquide, vérifiez si le godet
de ce détergent est en place.
- Si vous utilisez un détergent en poudre, enlevez le godet
du détergent liquide et mettez le détergent en poudre
dans le compartiment du détergent de lavage principal.
Compartiment de
l’eau de javel liquide
avec chlore
Godet du
détergent
liquide
Compartiment
du détergent
de lavage
principal
Compartiment
du détergent de
prélavage
Compartiment
de
l’assouplisseur
de tissus liquide
3
Fermez lentement le bac de distribution du détergent.
- Le fait de fermer violemment le bac de distribution du
détergent peut provoquer un trop-plein vers un autre
compartiment et un versement du produit dans la cuve
de lavage plus tôt que prévu.
REMARQUE
Il est normal qu’une petite quantite d’eau demeure
y
dans les distributeurs a la fin du cycle.
Utilisation du détergent/de
l’assouplisseur de tissus
Détergent recommandé
Assurez-vous que vous utilisez un détergent HE (hautement
efficace) pour le chargement frontal des machines à laver.
Les détergents HE se dissolvent plus efficacement et
produisent moins de mousse pour assurer un nettoyage
et un lavage efficaces Utilisez la quantité de détergent
appropriée comme l’indique l’étiquette de l’emballage du
détergent.
Conçu spécialement pour un usage unique
Détergent HE (hautement efficace)
REMARQUE
Utilisez uniquement des détergents HE parce qu’une
y
utilisation d’un détergent ordinaire peut provoquer une
mousse excessive.
Les détergents HE produisent moins de mousse,
y
se dissolvent plus efficacement pour améliorer les
performances de lavage et rinçage tout en maintenant
l’intérieur de votre laveuse propre.
Utilisez moins de détergent pour l’eau douce.
y
Essuyez immédiatement tout liquide renversé, car
y
un tel liquide pourrait endommager le panneau de
commande et de finition de la machine à laver.
L’utilisation d’une forte quantité de détergent peut
y
provoquer une accumulation au niveau de la cuve de
lavage, entraînant une mauvaise performance et un
fonctionnement anormal de la machine.
Si vous utilisez un détergent qui ne se dissout pas facilement
y
ou un détergent avec une viscosité élevée, il y aura un reste
dans la cuve de lavage, ce qui va empêcher un rinçage parfait.

21
AVANT D’UTILISER LA MACHINE
FRANÇAIS
Compartiment à javellisant liquide
Ce compartiment contient l’eau de Javel chlorée, qui sera
distribuee automatiquement au bon moment durant le cycle
de lavage.
REMARQUE
N’ajoutez pas de javellisant en poudre ou liquide a ce
y
compartiment.
Conformez-vous toujours aux recommandations
y
du fabricant lorsque vous ajoutez le javellisant. Ne
depassez pas la ligne de remplissage maximum.Trop
de javellisant peut endommager les tissus.
Ne versez jamais d’eau de Javel chlorée non diluee
y
directement dans la brassee ou dans le tambour. Vous
pourriez endommager les tissus.
Compartiment à assouplissant liquide
Ce compartiment contient l’assouplissant liquide,
qui sera automatiquement distribue durant le
cycle du rincage final.
REMARQUE
Conformez-vous toujours aux recommandations du
y
fabricant lorsque vous ajoutez l’assouplissant. Ne
depassez pas la ligne de remplissage maximum. Trop
d’assouplissant pourrait tacher les vetements.
Diluez les assouplissants concentrés à l’eau tiede. Ne
y
depassez pas la ligne de remplissage maximum.
Ne versez jamais d’assouplissant directement dans la
y
brassee ou dans le tambour.
Compartiment à détergent de prélavage
Ajoutez du detergent liquide ou en poudre a ce compartiment
pour distribution automatique lorsque vous utilisez l’option
de prelavage.
Utilisez toujours du detergent haute efficacite avec votre
machine a laver.
REMARQUE
Si vous utilisez du detergent liquide pour le lavage
y
principal lorsque vous utiliser l’option de prelavage,
il FAUT utiliser la tasse a detergent liquide. Sinon, le
detergent liquide pour le lavage principal peut etre
distribuer immediatement.
La quantité de détergent ajoutée à l’option de prelavage
y
est de la moitie de la quantite recommandee pour
le cycle de lavage principal. Par exemple, si le cycle
de lavage principal requiert une tasse de detergent,
ajoutez 1/2 tasse pour l’option de prelavage.
Compartiment à détergent de lavage principal
Ce compartiment contient le detergent a lessive pour le
cycle de lavage principal, qui est ajoute a la brassee au debut
du cycle. Utilisez toujours du detergent haute efficacite avec
votre machine a laver.
N’excedez jamais les recommandations du fabricant lorsque
vous ajoutez le detergent. Utiliser trop de detergent peut
causer une accumulation de detergent dans les vetements
et dans la machine a laver. Vous pouvez utiliser un detergent
liquide ou en poudre.
REMARQUE
Vous pouvez ajouter du javellisant liquide ou en poudre
y
sur pour les couleurs au compartiment du lavage
principal avec un detergent de meme type.
Lorsque vous utilisez du détergent liquide, assurez-vous
y
que la tasse a detergent et la languette sont en place.
Ne depassez pas la ligne de remplissage maximum.
Lorsque vous utilisez du détergent en poudre,
y
retirez la languette et la tasse a detergent liquide du
compartiment. Le detergent en poudre ne sera pas
distribue si la tasse a detergent et la languette sont en
place.
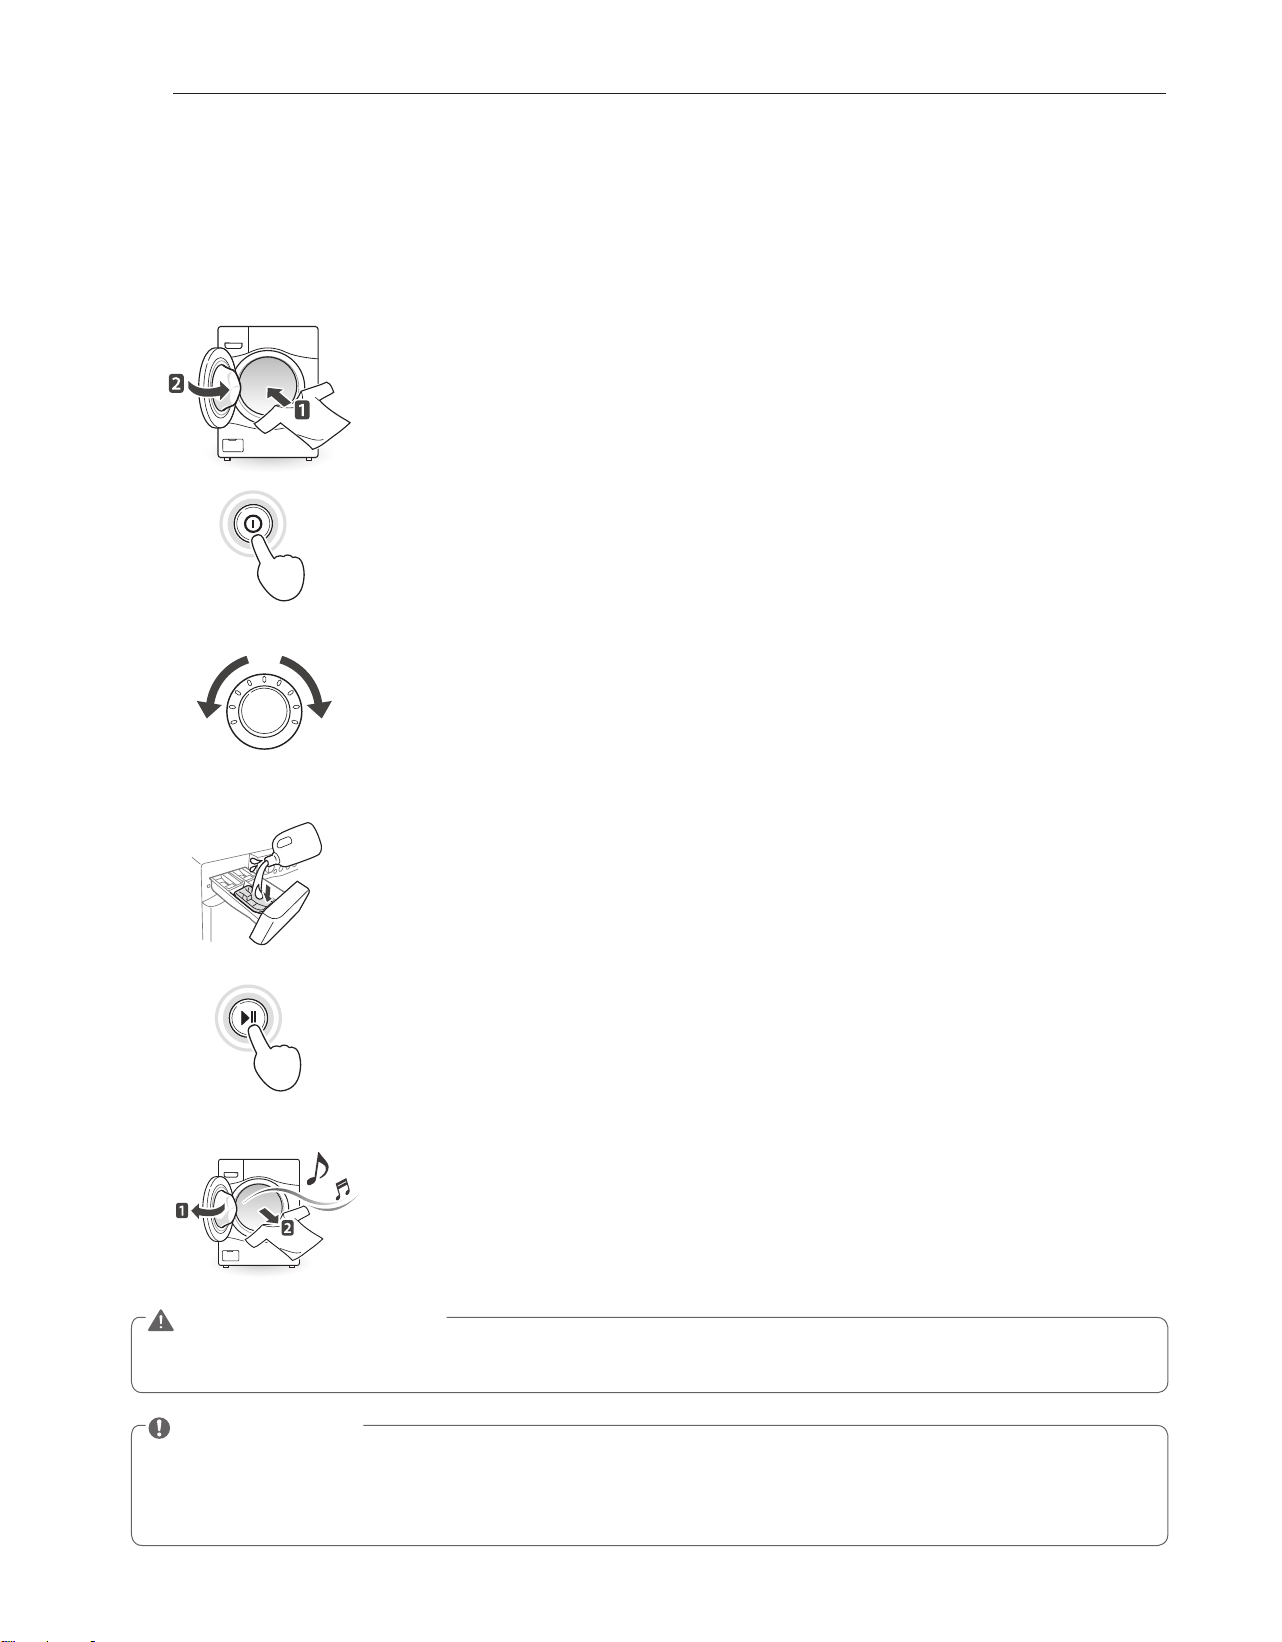
22
UTILISATION DE VOTRE MACHINE A LAVER
UTILISATION DE VOTRE MACHINE A LAVER
Exploitation élémentaire
Chargez le linge dans la machine à laver et fermez la porte.
1
2
3
4
5
6
Appuyez sur
A
.
- Les voyants placés autour du bouton de sélection des cycles s’allument et un son se fait
entendre.
Tournez
B
en fonction du cycle souhaité.
- L’option correcte par défaut est automatiquement définie sur le cycle de lavage. Voir page 23,
Orientations sur le cycle de lavage
, pour des détails sur les options par défaut de chaque cycle.
- Référez-vous à la page 24,
Cycle principal
, pour des détails sur les cycles de lavage.
- Pour changer d’option, appuyez sur le bouton d’option et sélectionnez l’option souhaitée. Voir
page 25,
Configuration des options avant le cycle
pour plus d’informations sur les options.
- Passez à l’étape 4 pour utiliser la configuration par défaut sans modifier les options.
Ajoutez la quantité de détergent appropriée et les solutions (eau de javel, assouplissant) dans le
bac de distribution du détergent.
- Référez-vous à la page 20,
Utilisation du détergent/de l’assouplisseur de tissus
pour plus
d’informations sur l’utilisation du détergent.
Appuyez sur
C
.
- La machine à laver va se mettre en marche.
Le cycle de lavage se termine avec la lecture de la mélodie.
- Lorsque le cycle de lavage se termine, la porte est déverrouillée. Ouvrez la porte et retirez le
linge immédiatement.
- Contrôlez les alentours du joint d’étanchéité lorsque vous retirez la charge traitée. Le linge de
faible volume peut s’accrocher sur le sas d’étanchéité.
REMARQUE
Le sens de rotation du lave-linge à chargement par le haut lui permet d’utiliser moins d’eau tout en saturant complètement
y
d’eau le linge. Il est normal de ne pas pouvoir voir d’eau pendant le cycle de lavage.
Si la température ou le niveau d’eau est très élevé à l’intérieur de la machine, les serrures de la porte ne peuvent pas
y
souffrir. Pour ouvrir la porte au cours du lavage, utilisez la fonctionnalité Evacuation+Essorage.
AVERTISSEMENT
Pour reduire tout risque d’incendie, d’electrocution ou de blessures,
y
lisez les INSTRUCTIONS IMPORTANTES DE SECURITE
avant de mettre cet appareil en fonctionnement.
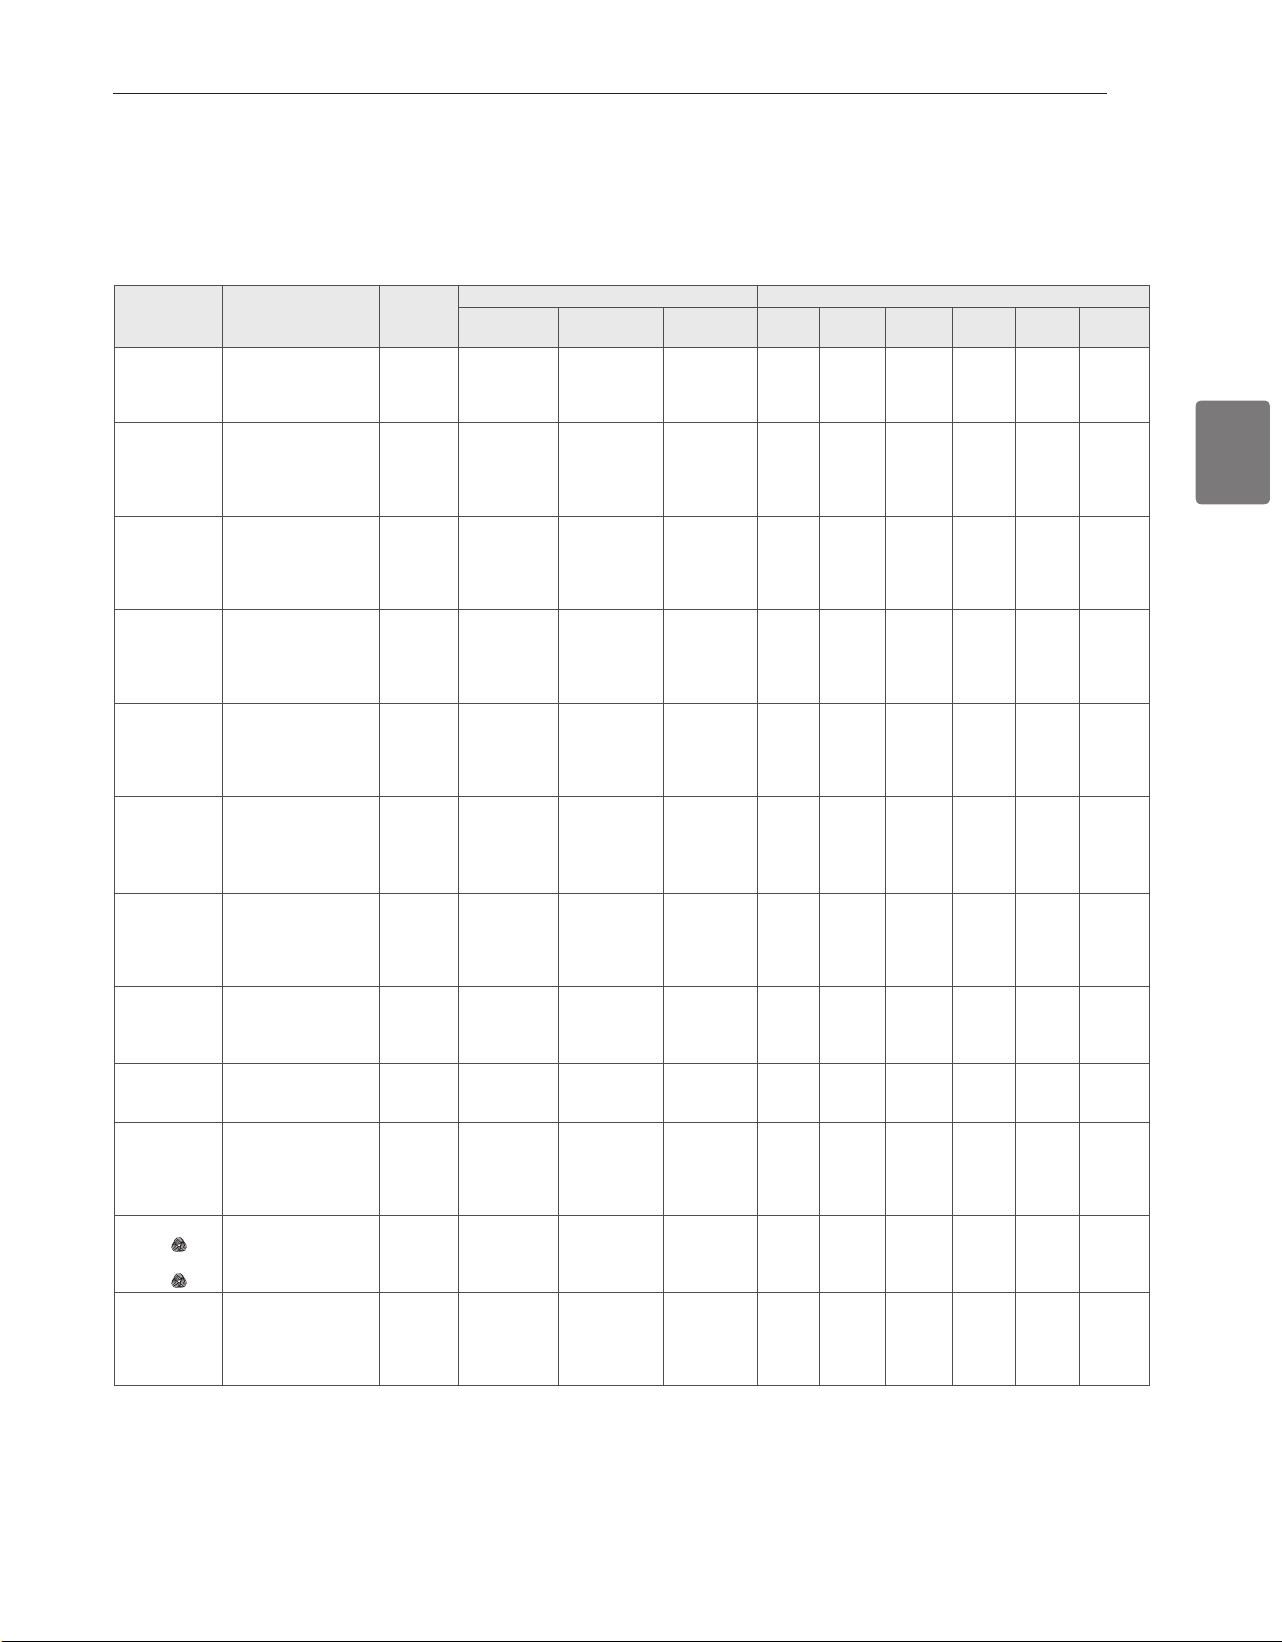
23
FRANÇAIS
UTILISATION DE VOTRE MACHINE A LAVER
CYCLE TISSU
AFFICHAGE
TEMPS
(MIN.)
OPTION DE BASE (
=PAR DEFAUT) OPTIONS SUPPLEMENTAIRES
TEMPÉRATURE
DE L’EAU
ESSORAGE SALETÉ
PRE-
LAVAGE
RINÇAGE
SUPPLÉMENTAIRE
VAPEUR
COLD
WASH™
TURBO
WASH
™
SOIN
FRAÎCHEUR
TUB CLEAN
(MISE À
NIVEAU)
Le cycle TUB CLEAN + (mise
à niveau) est spécifiquement
conçu pour éliminer moisissure
dans la machine à laver.
89
ALLERGIENE
™ Vêtements de bébé
légèrement souillés
99 ~ 132
EXTRA HAUT
HAUT
MOYEN
FAIBLE
PAS D’ESS
SANITARY
(SANITAIRE)
Sous-vêtements très
sales/vêtements de
travail/couches
souillées
98 ~ 107
EXTRA
CHAUD
EXTRA HAUT
HAUT
MOYEN
FAIBLE
PAS D’ESS
FORTE
NORMAL
LÉGÈRE
BRIGHT
WHITES™
Tissus blancs 66~76 CHAUD
TIÈDE
FROID
FROID DU ROBINET
EXTRA HAUT
HAUT
MOYEN
FAIBLE
PAS D’ESS
FORTE
NORMAL
LÉGÈRE
BULKY/
LARGE
(VRAC/
GROS)
Morceaux de
grandes
dimensions, comme
couvertures et
douillettes
56 CHAUD
TIÈDE
FROID
FROID DU ROBINET
MOYEN
FAIBLE
PAS D’ESS
FORTE
NORMAL
LÉGÈRE
COTTON/
NORMAL
(COTON/
NORMAL)
Coton, lin, serviettes,
chandails, draps,
denim,
brassées mixtes
32 ~ 50 CHAUD
TIÈDE
FROID
FROID DU ROBINET
EXTRA HAUT
HAUT
MOYEN
FAIBLE
PAS D’ESS
FORTE
NORMAL
LÉGÈRE
HEAVY DUTY
(GROSSE
CHARGE)
Tissus en coton très
sales
80 ~ 98 CHAUD
TIÈDE
FROID
FROID DU ROBINET
EXTRA HAUT
HAUT
MOYEN
FAIBLE
PAS D’ESS
FORTE
NORMAL
LÉGÈRE
PERM.
PRESS
(Pressage.
Perm.
Chemises/pantalons,
vêtements infroissables,
vêtements en poly/coton,
serviettes de table
35 ~ 44 CHAUD
TIÈDE
FROID
FROID DU ROBINET
HAUT
MOYEN
FAIBLE
PAS D’ESS
FORTE
NORMAL
LÉGÈRE
DELICATES
(DÉLICATS)
Chemises/blouses, de
nylon, vêtements
transparents, dentelle
41
TIÈDE
FROID
FROID DU ROBINET
MOYEN
FAIBLE
PAS D’ESS
FORTE
NORMAL
LÉGÈRE
TOWELS
(SERVIETTES)
Serviettes 55 ~ 65 CHAUD
TIÈDE
FROID
FROID DU ROBINET
EXTRA HAUT
HAUT
MOYEN
FAIBLE
PAS D’ESS
FORTE
NORMAL
LÉGÈRE
HAND WASH/
WOOL
(LESS. MAIN/
LAINE)
Vêtements marqués
du symbole
« laver à la main
55
TIÈDE
FROID
FROID DU ROBINET
FAIBLE
PAS D’ESS
NORMAL
LÉGÈRE
SPEED
WASH
(LESSIVE
RAPIDE)
Vêtements
légèrement
souillés et petites
brassées
15 CHAUD
TIÈDE
FROID
FROID DU ROBINET
EXTRA HAUT
HAUT
MOYEN
FAIBLE
PAS D’ESS
FORTE
NORMAL
LÉGÈRE
- La durée du cycle dépend de la pression d’eau, du type et de la quantité de la charge, ainsi que des options sélectionnées.
- Pour protéger vos vêtements, les différentes options de température de lavage/rinçage, vitesse d’essorage, niveau de saleté ou
autres ne sont pas toutes disponibles avec chacun des cycles.
- Si l’option TURBOWASH™ est en marche, vous ne pouvez pas sélectionner “Sans Essorage” comme votre VITESSE
D’ESSORAGE.
(Si l’option TURBOWASH™ n’est pas en marche, vous pouvez sélectionner “Sans Essorage” comme votre VITESSE
D’ESSORAGE.)
Orientations sur le cycle de lavage
Le guide de cycle ci-dessous montre les options et les types de tissus recommandés pour chaque cycle
●
= Option disponible

24
UTILISATION DE VOTRE MACHINE A LAVER
Tissus en coton très sales,
HEAVY DUTY
Ce cycle est conçu pour laver le linge très sale mais plus
puissant raoation baignoire.
Eléments sans plissage,
d
Ce cycle permet de laver des éléments comme des
vêtements résistants au plissage ou des nappes de table
pour réduire des plis.
Eléments extra fins,
f
Ce cycle est prévu pour le lavage de la lingerie ou des
vêtements extra fins ou en dentelle qui peuvent facilement
se gâter.
Pour les serviettes,
TOWELS
Ce cycle est pour le lavage des serviettes.
Eléments en laine,
g
Ce cycle sert à lessiver la laine susceptible de se rétrécir ou
le linge lavable à la main nécessitant des soins particuliers.
Lavez uniquement des vêtements étiquetés en laine qui
peuvent être lessivés à la main ou avec la machine.
REMARQUE
Le poids du linge doit être inférieur à 8pound(3.6kg)
y
pour éviter d’endommager le tissu.
Utilisez uniquement un détergent naturel ou sans
y
danger pour la laine et les tissus, puis chargez la moitié
de la quantité de détergent normale.
Le cycle HAND WASH/WOOL
y
(
LAVAGE MANUEL/
LAINE
) utilise un angle
de rotation et de culbutage
délicat ainsi qu’une faible vitesse d’essorage pour un
meilleur traitement du tissu.
Le cycle de lavage du laine de cette machine
a été approuvé par Woolmark pour le lavage
des produits Woolmark lavables à la machine
à condition que ces produits soient lavés
conformément aux instructions figurant sur
l’étiquette du vêtement et à celles qui ont été
publiées par le fabricant de cette machine à laver.
Lavage rapide,
h
Le cycle Speed Wash (Lessive Rapide) permet de laver rapidement
des vetements peu sales et un petit volume de linge. Pour obtenir de
meilleures performances de lavage, nous recommandons de laver de
petites quantites avec 2 ou 3 vetements peu salis.
REMARQUE
Pour ce cycle, utilisez peu de detergent. Pour un
y
rincage plus profond, ajoutez un rincage supplementaire
a l’aide du bouton d’option.
Cycle principal
Vous pouvez du linge plus efficacement en sélectionnant
le cycle de lavage qui correspond le mieux aux types de
vêtements à laver. Pour ce faire, tournez
B
sur le cycle
souhaité. Lorsque vous sélectionnez un cycle de lavage, le
voyant du cycle correspondent va s’allumer. Référez-vous à
la page 22
Exploitation élémentaire
pour plus de détails sur
les méthodes de fonctionnement.
Reducir les allergènes,
ALLERGIENE
™
Ce cycle puissant a haute temperature concu precisement
pour reduire certains allergenes.
REMARQUE
En sélectionnant le cycle ALLERGIENE™, de la vapeur est
y
automatiquement integree au cycle de lavage.
Le cycle ALLERGIENE™ peut reduire considerablement les
y
allergenes dans la literie et les vetements.
Le cycle ALLERGIENE™ aide a reduire les acariens
y
detriticoles et les allergenes.
Compte tenu de l’énergie et des températures plus
y
elevees qui sont utilisees, il n’est pas recommande d’utiliser
le cycle ALLERGIENE™ pour les lainages, la soie, le cuir ou
tout autre article delicat ou thermosensible.
Reducir las bacterias en la colada,
SANITARY
Ce cycle de lavage réduit à 99% les bactéries sur le linge à
travers une forte température.
Protocole P172
Performance en matiere d’assainissement
des laveuses residentielles et commerciales
de grande taille
Pour tissus blancs,
BRIGHT WHITES
™
Ce cycle lave uniquement des vêtements blancs.
Couvertures et linges volumineux,
b
Ce cycle est destiné au lavage des couvertures ou du linge
volumineux.
Eléments normaux,
c
Utilisez ce cycle de lavage pour laver toute sortes de linge
normal en dehors des tissus délicats comme la laine ou la soie.
REMARQUE
Si vous appuyez sur
y
A
et sur
C
sans sélectionner
un autre cycle, la machine à laver va basculer à
c
.

25
FRANÇAIS
UTILISATION DE VOTRE MACHINE A LAVER
Boutons de configuration de cycle
Chaque cycle possede des reglages preprogrammes qui se
selectionnent automatiquement. Vous pouvez egalement personnaliser
les reglages a l’aide des boutons de configuration de cycle. Appuyez sur
le bouton correspondant a cette option pour voir et selectionner d’autres
parametres. La machine a laver ajuste automatiquement le niveau
d’eau au type et a la taille de la brassee pour de meilleurs resultats et
une efficacite maximale. Il peut sembler ne pas y avoir d’eau dans le
tambour dans certains cycles mais c’est normal.
REMARQUE
Pour proteger vos vetements, les differentes options de
y
temperature de lavage/rincage, vitesse d’essorage, niveau de
salete ou autres ne sont pas toutes disponibles avec chacun
des cycles. Consultez le Guide de cycle pour les details.
Configuration des options avant le cycle
Vous pouvez sélectionner et ajouter les fonctions
optionnelles souhaitées avant de démarrer la machine à
laver.
Réglage de la température de l’eau,
WASH TEMP.
Permet de régler la température de l’eau pour le cycle
de lavage. Réglez la température appropriée selon les
spécifications de l’étiquette de traitement du tissu.
1
Appuyez sur
A
et tournez
B
en fonction du cycle
souhaité.
2
Appuyez sur plusieurs fois pour sélectionner la
température souhaitée pour l’eau:
- Lorsqu’un élément optionnel est sélectionné, le voyant
correspondant à cet élément s’allume.
3
Appuyez sur le bouton d’option pour utiliser les autres
options.
- Passez à l’étape 4 pour utiliser la configuration par
défaut sans modifier les options.
4
Appuyez sur
C
.
REMARQUE
Le rinçage à l’eau froide utilise moins d’énergie.
y
Votre machine à laver comporte un élément chauffant
y
pour augmenter la temperature de l’eau jusqu’a des
temperatures extra chaudes. La performance du lavage
en est amelioree lorsque vous optez pour les parametres
normaux de chauffage de l’eau.
Selectionnez la temperature appropriee pour le type de
y
brassee que vous desirez faire. Suivez les directives de
l’etiquette d’entretien du tissu pour de meilleurs resultats.
Réglage de la vitesse d’essorage,
SPIN SPEED
Vous pouvez régler la vitesse d’essorage de votre choix.
Utilisez cette fonctionnalité correctement en fonction des
caractéristiques de la charge.
1
Appuyez sur
A
et tournez
B
en fonction du cycle
souhaité.
2
Appuyez sur plusieurs fois pour sélectionner la vitesse
d’essorage souhaitée.
- Lorsqu’un élément optionnel est sélectionné, le voyant
correspondant à cet élément s’allume.
3
Appuyez sur le bouton d’option de votre choix pour utiliser
les autres options.
- Passez à l’étape 4 pour utiliser la configuration par
défaut sans modifier les options.
4
Appuyez sur
C
.
REMARQUE
Le bouton Spin Speed (vitesse d’essorage) active aussi
y
le cycle de vidange et d’essorage pour vidanger la
cuve et essorer les vetements; par exemple, si vous
souhaitez retirez les vetements avant que le cycle soit
termine.
Réglage du niveau de souillure du linge,
SOIL LEVEL
Vous pouvez laver le linge plus efficacement en réglant le
niveau de souillure approprié sur la machine à laver.
1
Appuyez sur
A
et tournez
B
en fonction du cycle souhaité.
2
Appuyez sur de façon répétée pour sélectionner un niveau
de souillure.
- Lorsqu’un élément optionnel est sélectionné, le voyant
correspondant à cet élément s’allume.
3
Appuyez sur le bouton d’option de votre choix pour
utiliser les autres options.
- Passez à l’étape 4 pour utiliser la configuration par
défaut sans modifier les options.
4
Appuyez sur
C
.
REMARQUE
Cette fonctionnalité nécessite plus de temps pour des
y
charges excessivement souillées et moins de temps
pour celles qui sont légèrement souillées.

26
UTILISATION DE VOTRE MACHINE A LAVER
Règle la mélodie et le signal sonore des
touches, SIGNAL
La machine à laver joue une musique lorsque le cycle de
lavage est terminé. Les touches émettent un signal sonore
chaque fois que vous appuyez dessus. Vous pouvez changer
et désactiver la mélodie et le signal sonore des touches
comme vous le souhaitez.
1
Appuyez
A
.
2
Tournez
B
sur votre cycle préférez.
3
Appuyez
. Réglez la mélodie et le signal sonore des
touches à votre guise.
4
Sélectionnez les autres options de votre choix.
5
Appuyez
C
.
Prélavage, PRE-WASH
Effectuez un prélavage pendant 16 minutes les
vêtements sont recouverts de saleté ou de poussière.
Cette fonctionnalité est disponible pour les éléments
excessivement souillés.
1
Appuyez sur
A
et tournez
B
en fonction du cycle
souhaité.
2
Appuyez sur .
-
Le voyant va s’allumer.
3
Appuyez sur le bouton d’option de votre choix pour
utiliser les autres options.
- Passez à l’étape 4 pour utiliser la configuration par
défaut sans modifier les options.
4
Appuyez sur
C
.
Rinse, drain and spin only, RINSE+SPIN
Use this cycle to rinse detergent from load.
1
Appuyez sur
A
et tournez
B
en fonction du cycle
souhaité.
2
Appuyez sur .
3
Appuyez sur le bouton d’option de votre choix pour utiliser
les autres options.
- Passez à l’étape 4 pour utiliser la configuration par
défaut sans modifier les options.
4
Appuyez sur
C
.
Ajout d’un cycle de rinçage supplémentaire,
EXTRA RINSE
Vous pouvez ajouter un cycle de rinçage supplémentaire au
cycle de rinçage par défaut.
1
Appuyez sur
A
et tournez
B
en fonction du cycle
souhaité.
2
Appuyez sur .
-
Le voyant va s’allumer.
3
Appuyez sur le bouton d’option de votre choix pour
utiliser les autres options.
- Passez à l’étape 4 pour utiliser la configuration par
défaut sans modifier les options.
4
Appuyez sur
C
.
Préréglage de commencer de l’heure,
DELAY WASH
Vous pouvez régler l’heure de commencer à votre
convenance.
1
Appuyez sur
A
et tournez
B
en fonction du cycle souhaité.
2
Appuyez sur .
-
Le voyant va s’allumer.
-
L’heure de fin configurée apparaît sur le panneau d’affichage.
- La plage de l’heure de fin du cycle se situe entre 1
heure minimum et 19 heures maximum.
3
Appuyez sur le bouton d’option de votre choix pour
utiliser les autres options.
- Passez à l’étape 4 pour utiliser la configuration par
défaut sans modifier les options.
4
Appuyez sur
C
.
Pour un lavage efficace, STEAM
Ajouter l’option de vapeur a ces cycles vous fournira une
performance de nettoyage superieure tout en reduisant l’energie et
la consommation d’eau. Grace a un jet de vapeur chaude provenant
du haut et a de l’eau plus froide de dessous, les tissus obtiennent
les bienfaits d’un lavage super chaud, sans la consommation
energetique ou les dommages potentiels aux tissus.
1
Appuyez sur
A
et tournez
B
en fonction du cycle
souhaité.
2
Appuyez sur . La machine a laver ajustera
automatiquement les parametres du cycle.
3
Reglez toute autre option desiree.
4
Appuyez sur
C
.
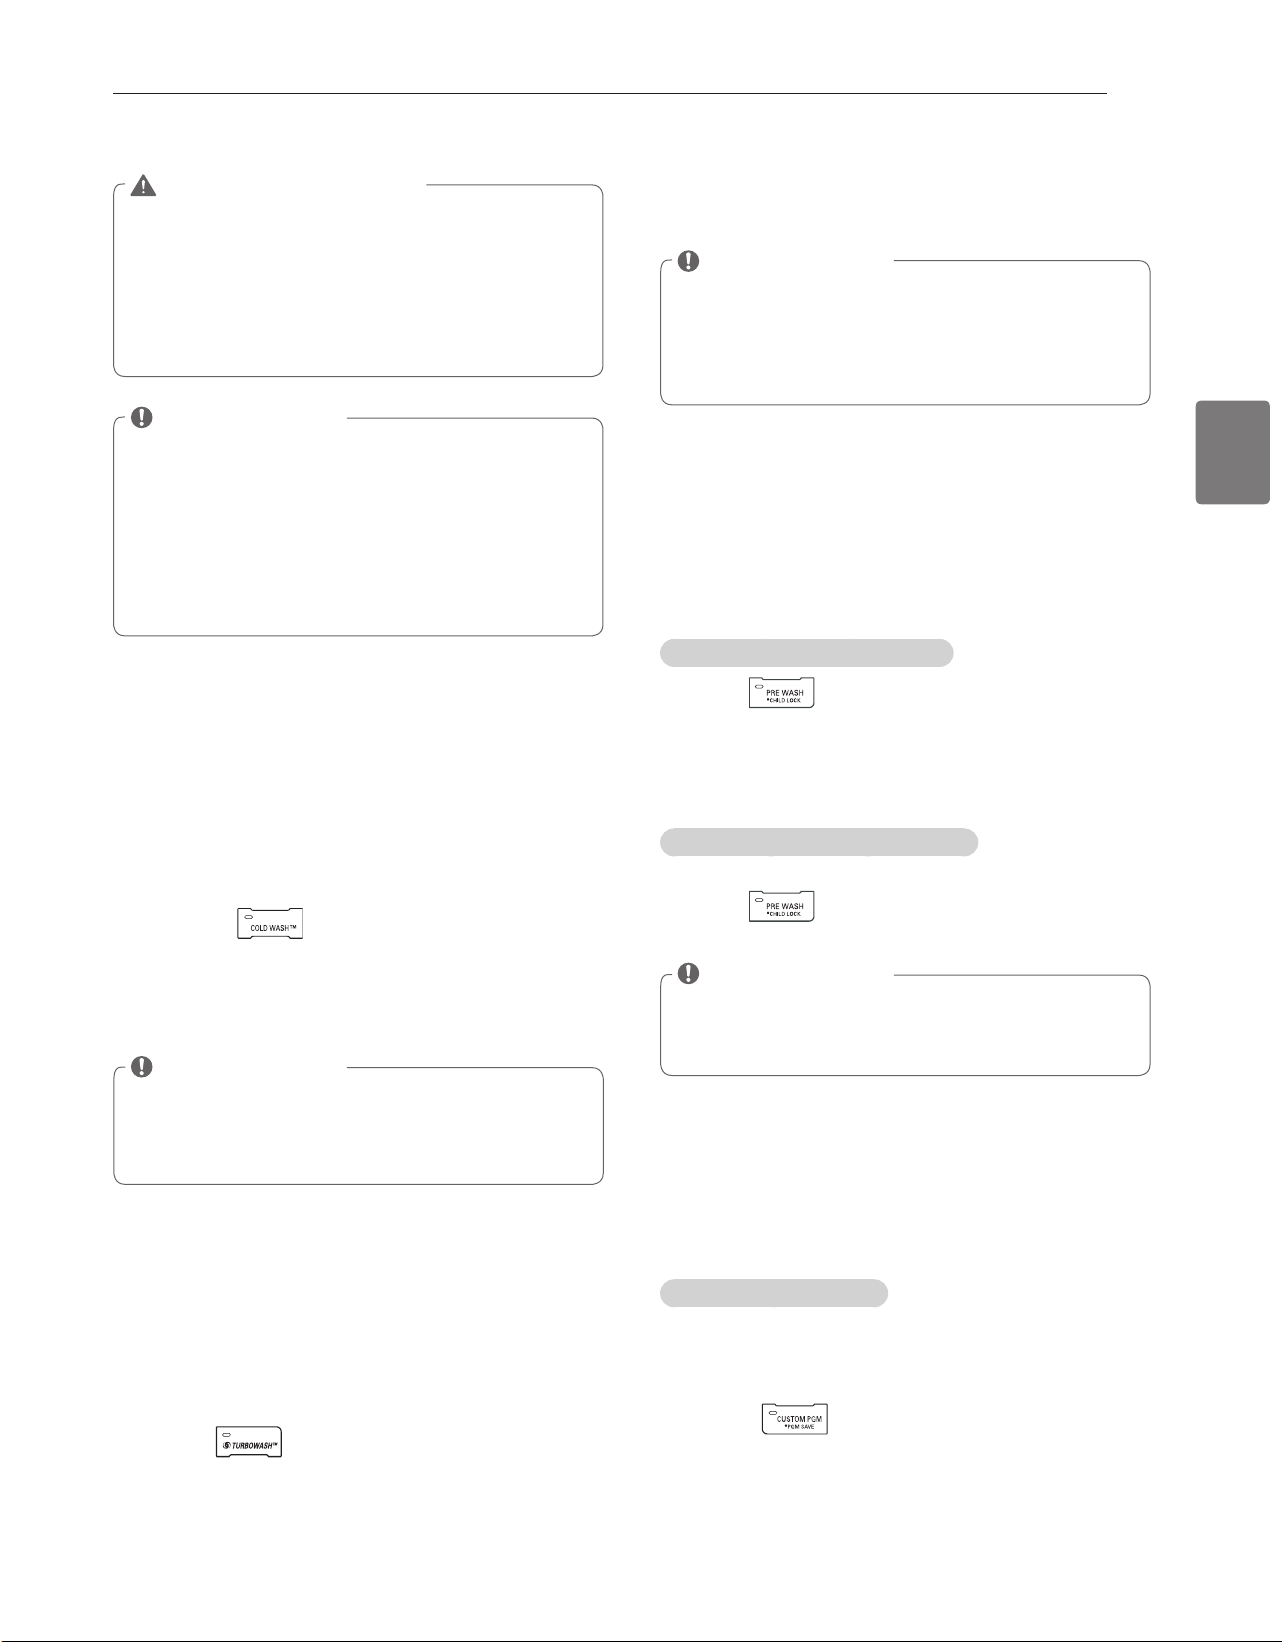
27
FRANÇAIS
UTILISATION DE VOTRE MACHINE A LAVER
AVERTISSEMENT
Ne touchez pas a la porte durant les cycles de vapeur.
y
Sa surface peut devenir extremement chaude. Laissez
la porte se deverrouiller avant de tenter de l’ouvrir.
N’essayez pas de contourner le mecanisme de
y
verrouillage de la porte ou de prendre quelque chose
dans la machine a laver durant un cycle de vapeur.
La
vapeur peut causer de graves brulures.
REMARQUE
Les cycles ne peuvent pas tous etre utilises avec
y
l’option STEAM (Vapeur).
La vapeur pourrait ne pas être clairement visible durant
y
les cycles de vaporisation. C’est normal. Trop de vapeur
pourrait endommager les vetements.
N’utilisez pas la vaporisation sur des tissus delicats
y
comme la laine, la soie ou sur des tissus qui se
decolorent facilement.
Pour économiser de l’énergie, COLD WASH™
Ajouter l’option COLD WASH™ a ces cycles permet de reduire
l’utilisation d’energie et d’obtenir la meme performance de
lavage qu’un lavage chaud. En utilisant 6 mouvements de lavage
differents (culbutage, roulement, marche, recurage, balancement,
filtration), les tissus beneficient des ameliorations de nettoyage,
sans l’utilisation d’energie
1
Appuyez sur
A
et tournez
B
en fonction du cycle
souhaité.
2. Appuyez sur
La machine a laver ajustera
automatiquement les parametres du cycle.
3. Reglez toute autre option desiree.
4. Appuyez sur
C
.
REMARQUE
Lorsque vous sélectionnez l’option COLD WASH™, le temps
y
de lavage sera augmente jusqu’a 10 minutes.
Pour une efficacité supérieure de lavage, nous vous
y
recommandons d’utiliser moins de 8 lb.
Enregistrement du temps, TURBOWASH™
L’option Turbo Wash™ réduit la durée du cycle tout en
offrant de bonnes performances pour un cycle normal.
En utilisant le TurboWash™, nous pouvons économiser
le temps sans sacrifier la performance.
1
Appuyez
A
et tournez
B
sur le cycle souhaité.
2
Appuyez
. La machine à laver ajustera
automatiquement les paramètres du cycle.
3
Sélectionnez les autres options souhaitées.
4
Appuyez
C
.
REMARQUE
L’option Turbo Wash ne peut pas être utilisée avec tous les cycles.
y
Les cycles Coton/Normal et Textiles infroissables ont l’option
y
Turbo Wash activée par défaut.
Si vous maintenez enfoncée la touche Turbo Wash, le réglage
y
par défaut sera modifié.
Configuration des options pendant le cycle
Vous pouvez ajouter des options souhaitées pendant le cycle de lavage.
Fonctionnalité du verrouillage des boutons, CHILD LOCK
Vous pouvez verrouiller la machine à laver pour éviter que les enfants ou
d’autres personnes changent les paramètres du cycle en appuyant sur des
boutons pendant que le cycle est en cours.
Activation du controle parental
Maintenez enfoncé pendant 3 secondes pendant le
cycle de lavage.
- Lorsque le CONTROLE PARENTAL est activé, un message (
N
)
et le temps restant apparaissent de façon consécutive sur le
panneau d’affichage de la machine à laver.
Désactivation du controle parental
(Lorsque le CONTROLE PARENTAL est activé)
Maintenez
enfoncé pendant 3 secondes pendant le
cycle de lavage.
REMARQUE
Le verrouillage pour enfants demeure active apres la fin du
y
cycle. Si vous souhaitez desactiver cette fonction, appuyez et
maintenez le bouton de PRELAVAGE pendant 3 secondes.
Enregistrement du cycle de lavage
personnalisé, PGM SAVE
Vous pouvez utiliser un cycle avec tous les paramètres
et options que vous utilisez fréquemment.
Pour enregistrer le cycle
1
Appuyez
A
et tournez
B
jusqu’au cycle souhaité.
2
Appuyez le bouton souhaité pour utiliser les autres options.
3
Appuyez pendant 3 secondes pendant le cycle de
lavage.
- Le cycle contenant vos paramètres et options préférées
est enregistré.
28
UTILISATION DE VOTRE MACHINE A LAVER
Sélection de votre cycle personnalisé,
CUSTOM PGM
Vous pouvez annuler le cycle personnalisé précédemment
enregistré.
Pour annuler le cycle
1
Appuyez
A
puis sur .
2
Appuyez
C
.
Sèche les vêtements sans les froisser,
FRESH CARE
Utilisez cette fonction si vous n’etes pas en mesure de retirer
votre linge, tout de suite apres la fin du cycle de lavage.
1
Appuyez
A
et tournez
B
jusqu’au cycle souhaité.
2
Appuyez
pendant 3 secondes pendant le cycle
de lavage.
- La lumière s’allumera.
3 Choisissez une option de votre souhaitée.
- Sautez l’étape 4 si vous souhaitez utiliser les paramètres
par défaut sans changer ni ajouter des options.
4
Appuyez
C
.
REMARQUE
Cette fonction permet de retourner periodiquement le
y
linge jusqu’a environ 19 heures pour eviter qu’il ne se
froisse. Si vous appuyez sur le bouton DEMARRER/
PAUSE ou MISE EN MARCHE/ARRET, vous pouvez
retirer votre linge a tout moment.
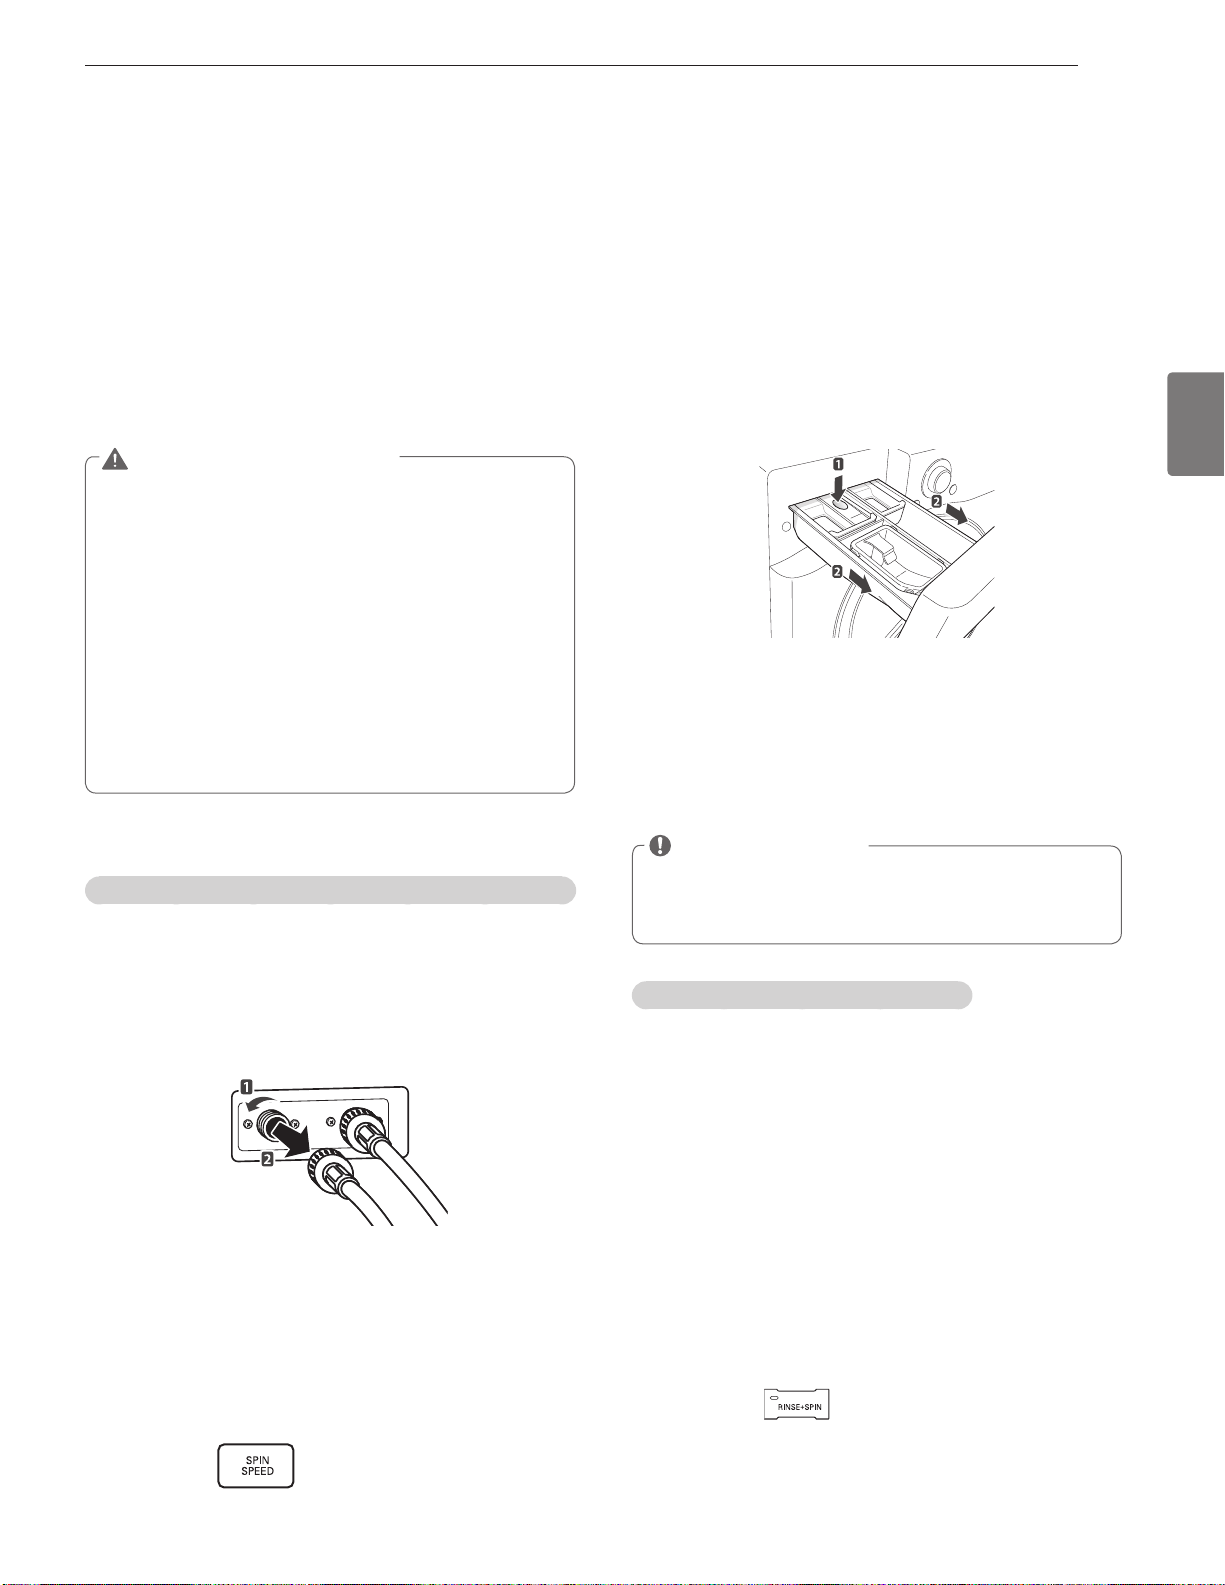
29
MAINTENANCE
FRANÇAIS
Entretien
Entretien après le lavage
A la fin du cycle, essuyez la porte et l’intérieur du sas d’étanchéité
pour enlever la moisissure. Laissez la porte ouverte pour faire
sécher l’intérieur de la cuve de lavage. Essuyez la coque de la
machine à laver à l’aide d’un tissu sec pour enlever l’humidité.
AVERTISSEMENT
y
Débranchez votre machine à laver avant de la nettoyer
pour éviter le risque d’électrocution.
Tout nonrespect de
cet avertissement peut entraîner des blessures graves, un
incendie, une électrocution ou la mort.
y
N’utilisez jamais de produits chimiques puissants, de
nettoyants abrasifs ou de dissolvants pour nettoyer votre
machine à laver.
Ils endommageront sa surface.
y
N’utilisez pas de substances volatiles (benzène, diluant
de peinture, alcool, l’acétone, etc.) ou des détergents
avec de puissants composants chimiques lors du
nettoyage de la machine à laver.
Leur usage peut
soit entraîner la décoloration ou la détérioration de la
machine, soit provoquer un incendie.
Entretien dans les zones à climat froid
Conservation de la machine à laver pendant une période prolongée
Suivez les instructions de stockage contenues dans la
machine à laver si vous ne l’utilisez pas pendant une période
prolongée dans les climats froids au-dessous du point de
congélation.
1
Fermez les robinets raccordés sur les conduites d’eau.
2
Dévissez les conduites d’eau des robinets.
3
Videz complètement les conduites d’eau.
4
Appuyez sur
A
.
5
Ouvrez la porte et ajoutez 3, 8 L (1 gallon) d’antigel non
toxique pour véhicule de plaisance (VP) à l’intérieur de la
cuve de lavage vide. Fermez la porte.
6
Appuyez sur .
ENTRETIEN
7
Appuyez sur
C
.
- Evacuez l’eau de la machine à laver pendant 1 minute.
La quantité d’antigel VP ne sera pas entièrement
expulsée.
8
Appuyez sur
A
pour mettre la machine à laver hors
tension et débranchez la fiche d’alimentation.
9
Séchez l’intérieur du tube de la cuve à laver avec un tissu
doux et fermez la porte.
10
Appuyez fortement sur le bouton dégagé et tirez le bac
de distribution du détergent.
11
Evacuez l’eau du bac de distribution du détergent et
séchez chaque compartiment.
12
Conservez la machine à laver dans une position verticale.
REMARQUE
y
Pour enlever l’antigel après le stockage de la machine à
laver, ajoutez le détergent dans le distributeur et exécutez
un cycle. Ne chargez pas de linge à ce niveau.
Lorsque la conduite d’eau se congèle
1
Fermez les robinets raccordés sur les conduites d’eau.
2
Versez l’eau chaude dans les robinets gelés pour dégivrer
les conduites d’eau et tirez-les vers l’extérieur.
3
Plongez les conduites d’eau dans l’eau chaude pour les
décongeler.
4
Raccordez les conduites d’eau sur les entrées d’eau de la
machine à laver et les robinets.
-
Référez-vous à la page 14,
Raccordement des conduites
d’eau
pour des détails sur le raccordement de ces conduites.
5
Ouvrez les robinets.
6
Appuyez sur
A
.
7
Appuyez sur
.
8
Appuyez sur
C
.
- Vérifiez correctement les canalisations de remplissage.

30
MAINTENANCE
Lorsque la conduite d’évacuation se congèle
1
Versez l’eau chaude dans la cuve à laver et fermez la
porte. Patientez pendant 10 minutes.
2
Appuyez sur
A
après 10 minutes.
3
Appuyez sur pour le drainage et la filature.
4
Appuyez sur
C
.
- Vérifiez si l’eau est évacuée.
Nettoyage
Lavez périodiquement la machine à laver pour aider à
conserver sa performance et minimiser les risques de
dysfonctionnement.
Nettoyez le tambour, TUB CLEAN
Une mauvaise installation ou utilisation de la machine à laver
dans un environnement humide pendant une période prolongée
peut entraîner une accumulation de résidus de lessive dans la
machine à laver et produire une odeur de moisi ou de renfermé.
En nettoyant la cuve de la machine à laver mensuellement à
l’aide de la fonction TUB CLEAN, vous minimiserez le risque
d’accumulation de résidus de lessive qui produisent une odeur
de moisi ou de renfermé.
1
Ajoutez un nettoyant de cuve ou un produit séquestrant en
oxyde de calcium dans le bac de distribution du détergent.
- Ne dépassez pas la limite de détergent maximum lorsque
vous l’ajoutez. Le détergent peut rester dans la cuve à
laver après le nettoyage.
-
Lorsque vous utilisez l’eau de javel liquide avec chlore,
chargez-la dans le compartiment correspondant.
-
Si vous utilisez un détergent en poudre,
tirez le godet
du détergent liquide et ajoutez le détergent dans le
compartiment de lavage principal.
-
Si vous utilisez des comprimés de nettoyage,
mettez-les
directement dans la cuve de lavage.
2
Appuyez sur
A
.
3
Appuyez sur
B
le TUB CLEAN.
- (
O
) un message s’affiche à l’écran.
- Le voyant de l’option TUB CLEAN va s’allumer
4
Appuyez sur
C
.
REMARQUE
y
Ne chargez jamais de linge lorsque vous utilisez la fonction
TUB CLEAN. Vous pourriez endommager votre linge. Veillez à
nettoyer la cuve de la machine à laver.
y
Il est recommandé d’utiliser l’option NETTOYAGE DE LA
CUVE la nuit ou lorsque vous êtes déjà parti(e).
y
Assurez-vous que vous utilisez une eau de javel avec
chlore pour nettoyer la cuve. L’utilisation d’une eau de javel
oxygénée peut aboutir sur une faible stérilisation.
y
Si vous remarquez des odeurs de moisi ou de renfermé,
utilisez la fonction TUB CLEAN pendant trois semaines
consécutives.
y
Assurez-vous que vous avez vérifié et respecté la quantité
de détergent recommandé par le fabricant.
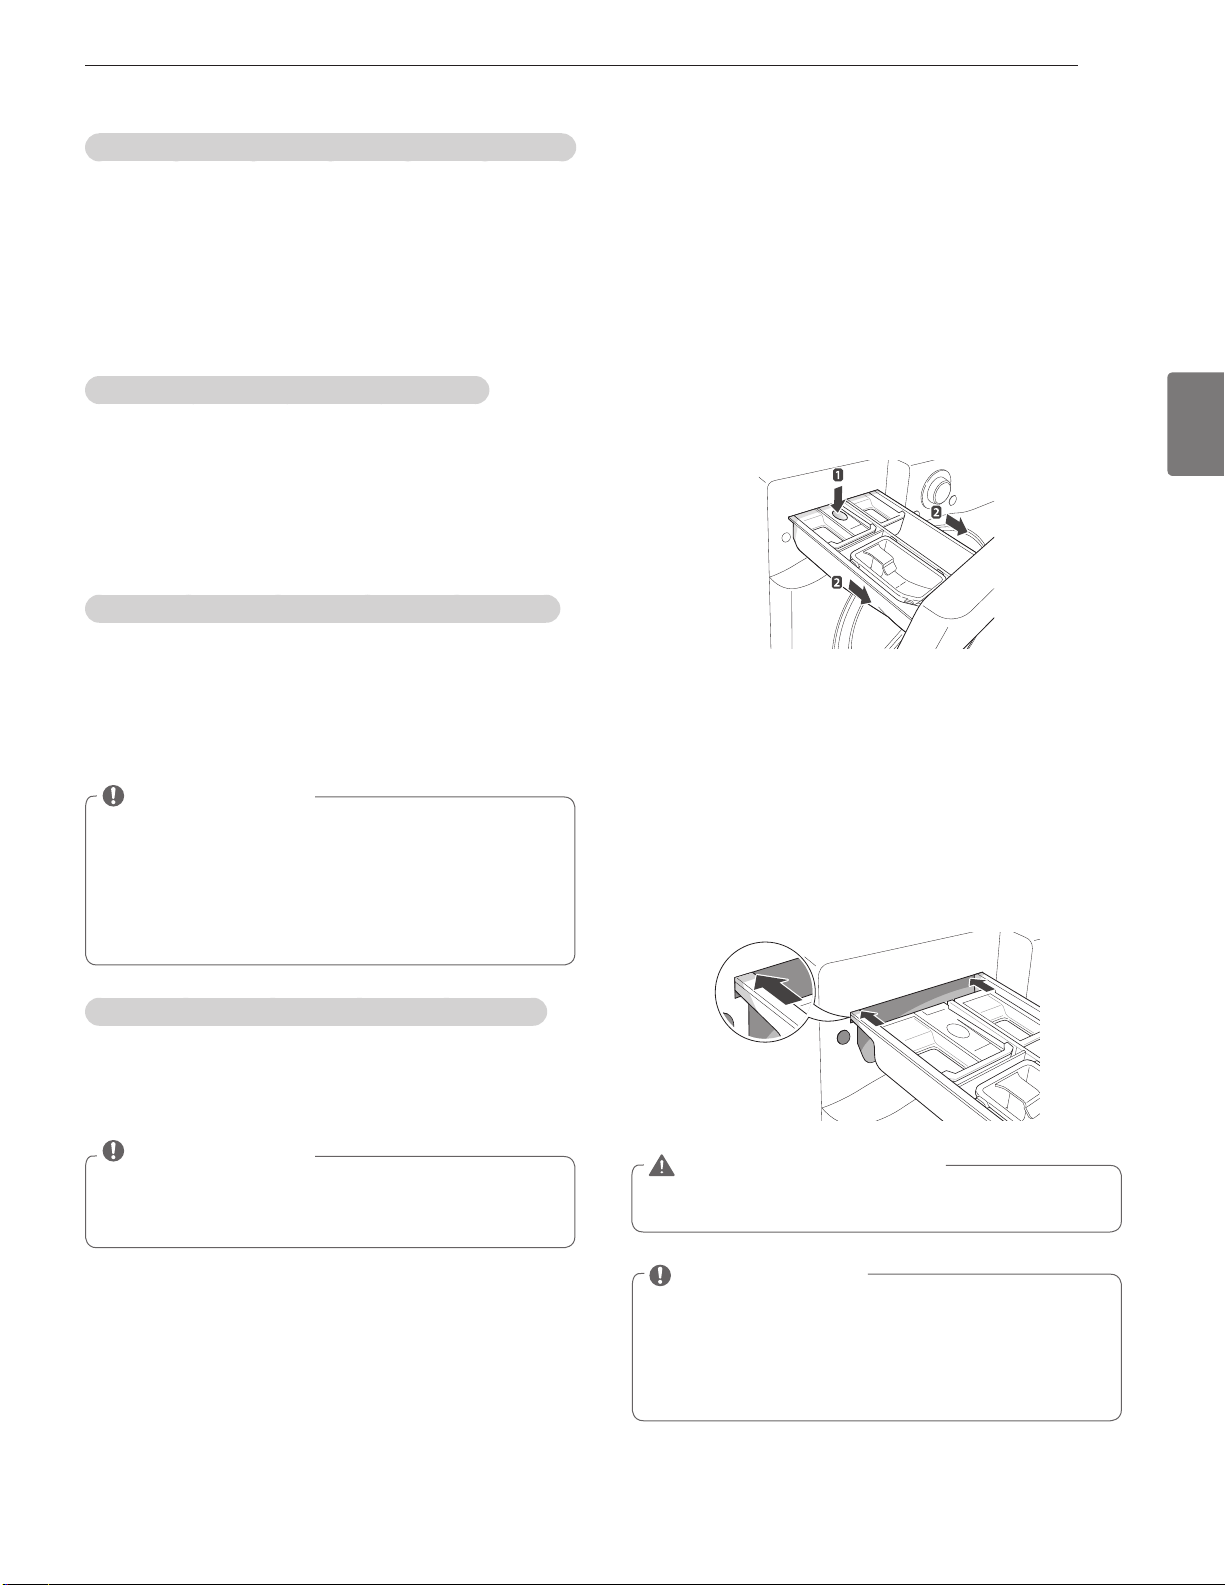
31
MAINTENANCE
FRANÇAIS
Alarme automatique pour le nettoyage de la machine à laver
Lorsque le système est sous tension et si le message
tcL clignote, cela signifie que la machine à laver doit être
nettoyé. Utilisez l’option NETTOYAGE DE LA CUVE pour
nettoyer la cuve à laver. L’alarme d’indication automatique
pour le nettoyage de la cuve à laver dépend de la fréquence
d’utilisation, toutefois, le message clignote généralement
chaque 1~2 mois.
Retrait de l’accumulation de l’oxyde calcium
Si vous vivez dans une zone caractérisée par une eau dure,
le tartre peut se former sur les composants internes de la
machine à laver. Prenez des précautions
supplémentaires pour nettoyer l’accumulation de l’oxyde
calcium sur les composants internes de la machine à laver
afin de prolonger sa durée de vie.
Retrait de l’accumulation de l’oxyde de calcium de la cuve à laver
Vérifiez si le détartrant est adapté pour le nettoyage de
la cuve de lavage avant de l’utiliser et exécutez le cycle
NETTOYAGE DE LA CUVE. Référez-vous à la page 31,
Nettoyage de la cuve pour plus d’informations sur le
nettoyage de la cuve de nettoyage.
REMARQUE
y
Dans les zones caractérisées par l’eau dure, il est
recommandé d’utiliser un adoucisseur d’eau.
y
Assurez-vous que vous avez retiré toutes les charges
de la cuve de lavage avant de la nettoyer. Le nettoyage
de la cuve alors qu’elle contient une charge peut
provoquer la contamination ou la détérioration du linge.
Retrait de l’oxyde de calcium sur l’acier inoxydable
Essuyez l’accumulation de l’oxyde de calcium ou d’autres
endroits sur l’acier inoxydable à l’aide d’un tissu doux trempé
dans un agent de nettoyage d’acier inoxydable.
REMARQUE
y
N’utilisez jamais de nettoyants en laine, en acier, ou de
détergents abrasifs. Leur utilisation peut endommager
la machine à laver.
Nettoyage bac de distribution de
détergent
Le fait de laisser le détergent pendant une période prolongée
à l’intérieur du bac de distribution du détergent ou l’utilisation
de la machine à laver pendant une période prolongée peut
provoquer l’accumulation du tartre dans le bac de distribution
du détergent. Tirez et nettoyez le bac de distribution du
détergent une fois par semaine.
1
Tirez le bac de distribution du détergent.
2
Appuyez fortement sur le bouton dégagé et tirez le bac
de distribution du détergent.
3
Retirez les plaquettes du bac.
4
Nettoyez-les avec l’eau chaude.
- Utilisez un tissu doux ou une brosse pour le nettoyage
et enlevez tous les résidus.
5
Essuyez l’humidité avec une serviette ou un tissu secs
après le nettoyage.
6
Remplacement du bac de distribution de détergent
AVERTISSEMENT
y
N’a
spergez pas l’eau à l’intérieur de la machine à laver.
Cela peut provoquer des chocs électriques.
REMARQUE
y
Utilisez l’eau uniquement lorsque vous nettoyez le bac de
distribution
du détergent. Assurez-vous que vous utilisez
l’option RINÇAGE+ESSORAGE (référez-vous à la page 26)
pour rincer la cuve avant le cycle de lavage lorsque vous
utilisez un détergent pour nettoyer la cuve de lavage.
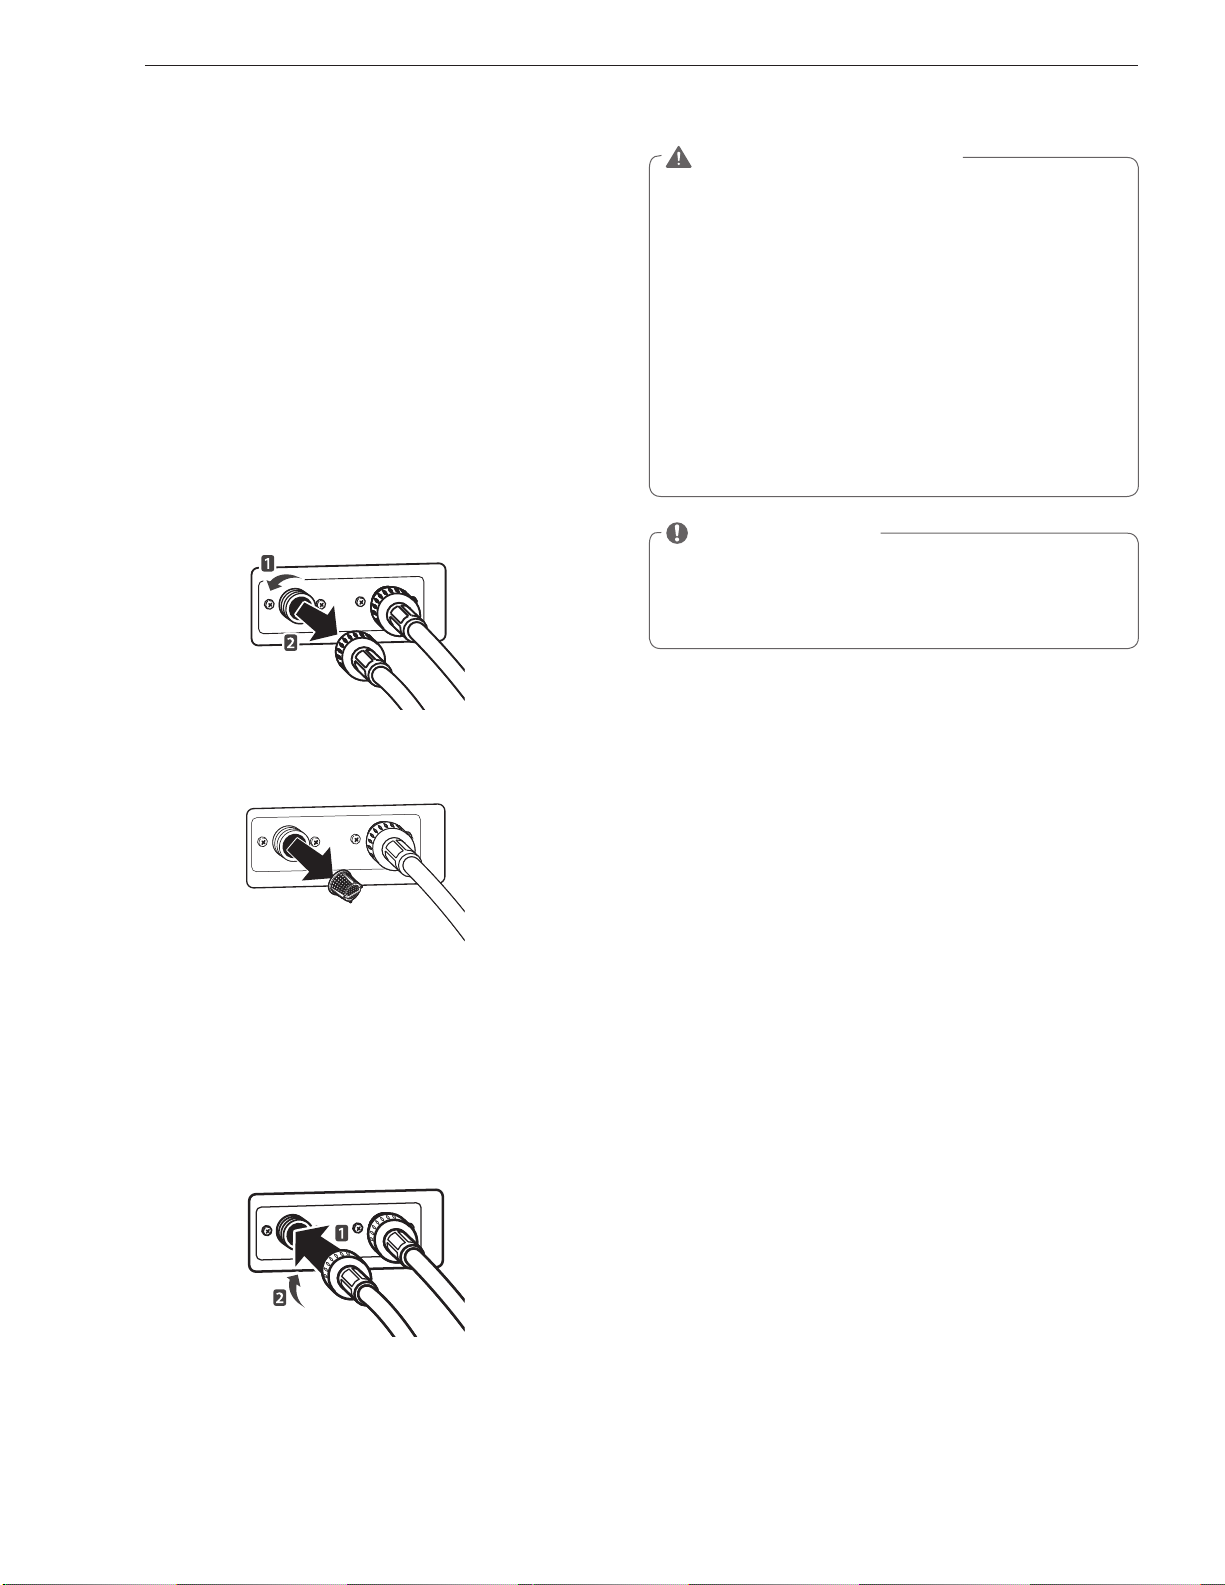
32
MAINTENANCE
AVERTISSEMENT
y
Débranchez le cordon d’alimentation et fermez les
robinets avant le nettoyage. Dans le cas contraire, il
existe un risque de choc électrique.
y
N’utilisez pas la machine à laver sans filtres d’entrée.
L’utilisation de la machine à laver sans filtres d’entrées
va provoquer des fuites et un fonctionnement anormal
du système.
y
Si vous utilisez la machine à laver dans une zone avec
de l’eau dure, il est possible que le filtre ne soit pas
nettoyé correctement à cause de l’accumulation de
l’oxyde de calcium. Contactez le centre de services à la
clientèle de LG le plus proche si le filtre d’entrée n’est
pas nettoyé ou disponible.
REMARQUE
y
Le message (
P
) va clignoter sur l’affichage lorsque la
pression de l’eau à l’intérieur du bac de distribution est
faible ou un filtre est bouché par la saleté. Nettoyez le
filtre d’entrée.
Nettoyage des filtres de l’orifice
d’admission d’eau
Nettoyez les filtres des orifices d’admission d’eau de temps
en temps pour éviter qu’ils soient bouchés.
Prenez des précautions particulières en nettoyant les filtres
des orifices d’admission d’eau pour les zones qui utilisent l’eau
dure. Il est possible que l’eau ne soit pas approvisionnée s’il
existe des corps étrangers comme la rouille, le sable, ou des
pierres au niveau des filtres des orifices d’admission d’eau.
1
Appuyez sur
A
pour mettre la machine à laver hors
tension et débranchez la fiche d’alimentation.
2
Fermez les robinets raccordés sur les orifices d’admission d’eau.
3
Retirez les orifices d’admission d’eau.
4
Retirez le filtre de l’orifice d’admission d’eau.
Filtre d’admission
5
Retirez tous les corps étrangers de l’orifice d’admission d’eau.
- Trempez ces orifices dans du vinaigre blanc ou dans un
antidétatrant ou utilisez une brosse à dent pour extraire
les corps étrangers et rincez-les parfaitement.
6
Remettez les filtres des orifices d’admission d’eau en place.
7
Réinstallez les conduites d’eau sur la machine à laver.
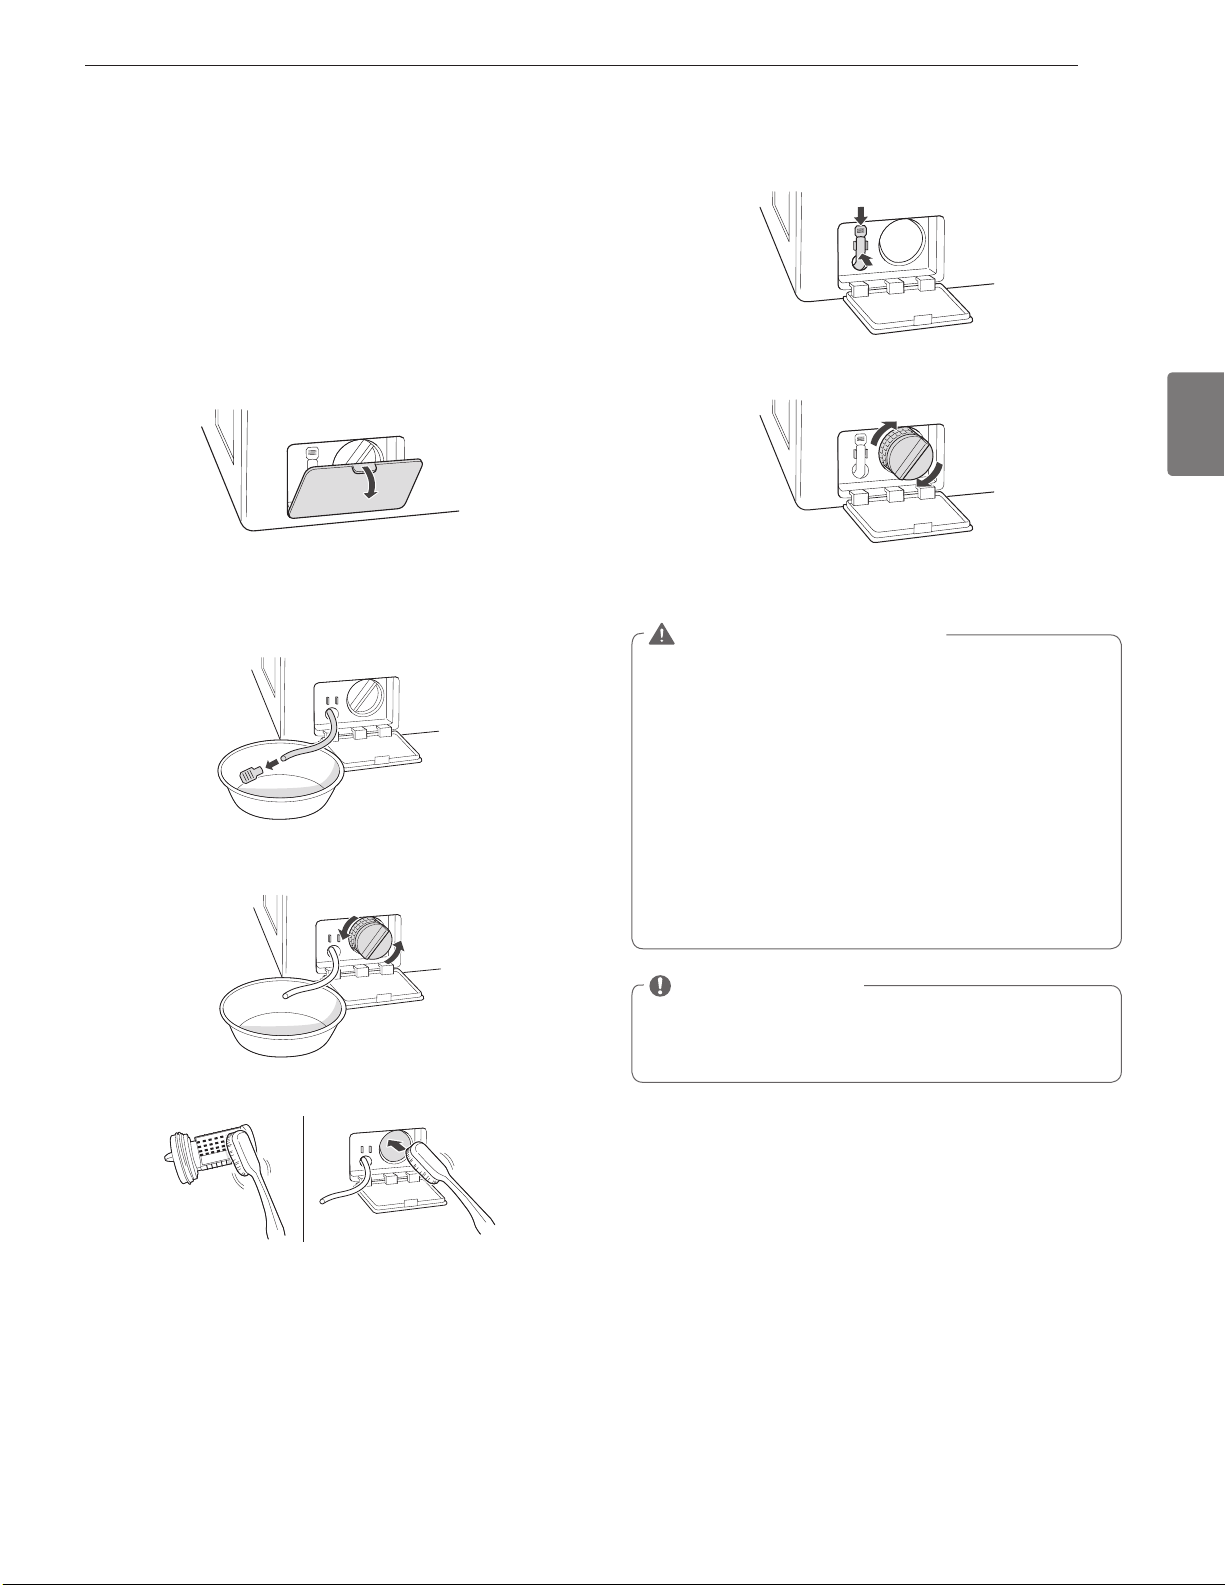
33
MAINTENANCE
FRANÇAIS
Nettoyage du filtre de la pompe de
vidange
Il est impossible de vidanger la machine à laver si le filtre de
la pompe de vidange est bouché. Nettoyez régulièrement
le filtre d’entrée d’eau pour éviter qu’il soit bouché par des
corps étrangers.
1
Appuyez sur
A
pour mettre la machine à laver hors
tension et débranchez la fiche d’alimentation.
2
Ouvrez le couvercle du filtre de la pompe de vidange.
3
Tirez le tuyau de vidange hors de l’agrafe et enlevez la
fiche du tuyau de vidange pour évacuer l’eau résiduelle.
4
Tordez le filtre de la pompe dans le sens anti-horaire pour
le retirer.
5
Nettoyez le filtre et l’ouverture de la pompe.
6
Replacez la fiche sur le tuyau de vidange et insérez-le
dans l’agrafe.
7
Insérez le filtre de la pompe de vidange.
8
Fermez le couvercle du filtre de la pompe de vidange.
AVERTISSEMENT
y
Assurez-vous que vous avez retiré la fiche avant le
nettoyage.
Dans le cas contraire, il existe un risque de
choc électrique.
y
Le fait d’ouvrir le filtre de vidange va provoquer un
trop-plein d’eau si la cuve de lavage contient de l’eau.
Vérifiez si l’eau est complètement évacuée avant
d’ouvrir le filtre de vidange.
y
Si vous utilisez la machine à laver alors que le filtre de
vidange est monté de façon incorrecte après l’avoir
nettoyé, ou si vous utilisez la machine sans filtre, il
existe un risque de fuite ou de dysfonctionnement de
la machine à laver.
REMARQUE
y
Le message (
Q
) va clignoter lorsque le filtre de la
pompe de vidange est bouché ou sale. Nettoyez le filtre
de la pompe de vidange.

34
MAINTENANCE
Nettoyage du sas d’étanchéité
Nettoyez le sas d’étanchéité une fois par mois pour éviter
l’accumulation de la saleté à ce niveau.
1
Mettez les gangs en caoutchouc et des lunettes de
sécurité.
2
Diluez 3/4 du gobelet (177ml) de l’eau de javel liquide
avec chlore dans 3,8 L (1 gallon) d’eau.
3
Trempez une éponge ou un tissu doux dans la solution
diluée et essuyez le pourtour du sas d’étanchéité.
4
Essuyez l’humidité avec une serviette ou un tissu secs
après le nettoyage.
5
Laissez la porte ouverte pour permettre au sas
d’étanchéité de sécher complètement.
CAUTION
y
Le fait de nettoyer le sas d’étanchéité avec une solution
non diluée peut causer des dysfonctionnements à ce
niveau ou au niveau des organes de la machine à laver.
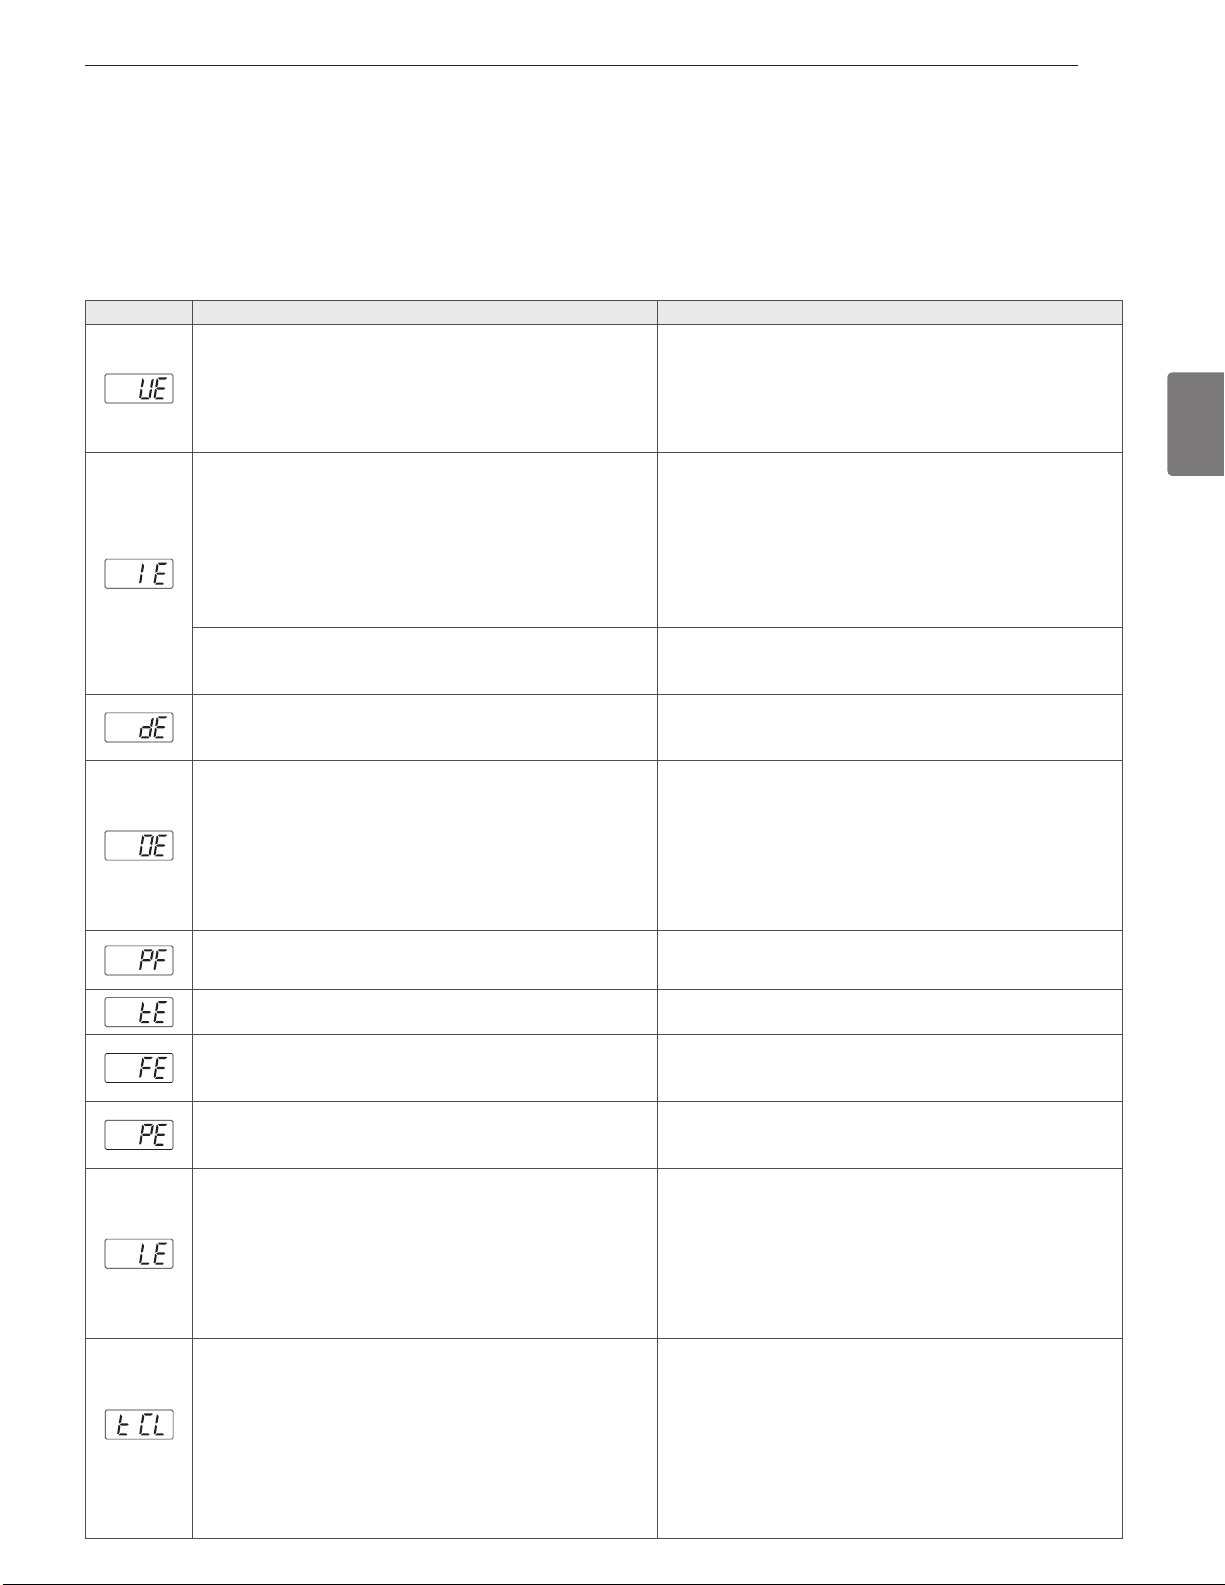
35
FRANÇAIS
DEPANNAGE
DEPANNAGE
Vérification des messages d’erreurs
Si le message ci-dessous s’affiche à l’écran, vérifiez les éléments suivants et prenez les mesures correctives nécessaires.
Message
Causes probables Solutions
Le linge s’est accumulé sur un côté de la cuve de lavage dans la machine.
y
Votre linge s’est-il accumulé à un seul endroit ou la charge est-elle très
petite?
y
Avez-vous lavé un animal en peluche, une natte ou des vêtements tricotés?
y
Avez-vous lavé deux couvertures différentes au même moment?
y
Disposez le linge de nouveau pour équilibrer la charge.
y
Les animaux en peluche ou les nattes peuvent provoquer un
déséquilibre pendant l’essorage, empêchant le fonctionnement du
circuit d’évacuation de la machine à laver. Disposez les vêtements
tricotés de nouveau pour équilibrer la charge, puis, vidangez à nouveau.
y
Mettez une couverture à la fois.
L’eau n’est pas approvisionnée ou la pression de l’eau est faible.
y
Le robinet est-il fermé?
y
L’alimentation en eau est-elle arrêtée ou le robinet est-il gelé?
y
La pression de l’eau est-elle faible ou un filtre d’entrée est-il
bouché?
y
La conduite d’eau est-elle correctement raccordée à l’orifice
d’admission d’eau froide?
y
La conduite d’eau est-elle pincée ou courbée .
y
Ouvrez les robinets.
y
Si un robinet est gelé, décongelez-le avec de l’eau chaude.
y
Si le filtre d’entrée est bouché, nettoyez-le (voir page 32).
y
Raccordez la conduite d’eau correctement à l’orifice
d’admission d’eau froide (voir page 14).
y
Assurez-vous les conduites d’eau ne sont pas pincées
ou courbées. Assurez-vous que les conduites d’eau ne
sont pas tordues ou pincées par d’autres objets.
Il y a fuite dans la conduite d’eau raccordée.
y
Les conduites d’eau sont-elles connectées
normalement sur les robinets?
y
Connectez les conduites d’eau normalement sur les
robinets (voir page 14).
La cuve ne tourne pas.
•
La porte est-elle sécurisée?
y
Fermez et sécurisez la porte. Si le message continue
de s’afficher, débranchez l’alimentation et contactez le
centre de services à la clientèle de LG le plus proche.
Le circuit d’évacuation de la machine à laver fonctionne
lentement ou ne fonctionne pas du tout.
y
Le tuyau de vidange est-il installé à plus d’1 m au-
dessus de l’extrémité du support du coude?
y
Le tuyau de vidange est-il pincé ou bouché?
y
Le tuyau de vidange est-il gelé?
y
Le tuyau de vidange est-il bouché par des corps étrangers?
y
Baissez le tuyau de vidange à 3 feet au-dessous de
l’extrémité du support du coude.
y
Placez le tuyau de vidange sur une surface uniforme
pour éviter tout inclinaison.
y
Si les tuyaux de vidange sont gelés, décongelez-les
avec l’eau chaude.
y
Ouvrez le bouchon sur la fiche de la pompe de vidange et
enlevez la saleté.
L’alimentation est momentanément arrêtée pendant le
service.
y
Appuyez sur
A
pour arrêter la machine à laver et
appuyez de nouveau sur ce bouton pour la rallumer.
Erreur de commande.
y
Débranchez le cordon d’alimentation et contactez votre
centre de services LG le plus proche.
L’alimentation en eau ne s’arrête pas.
y
Le cycle de l’alimentation en eau et celui du circuit
d’évacuation se répète-t-il de manière consécutive?
y
Débranchez le cordon d’alimentation et contactez votre
centre de services LG le plus proche.
Le niveau d’eau n’est pas contrôlé.
y
Le niveau d’eau est-il très faible ou élevé par rapport à
la taille de la charge?
y
Le capteur du niveau d’eau ne fonctionne pas correctement.
y
Débranchez le cordon d’alimentation et contactez votre
centre de services LG le plus proche.
La cuve ne tourne pas.
y
La machine à laver est-elle surchargée?
y
Arrangez la taille de la charge de nouveau et
redémarrez la machine.
y
Si la taille de la charge est grande, il est possible
que la cuve ne tourne pas à cause de la surchauffe
du moteur. Laissez la machine pendant quelques
instants et redémarrez le cycle. Débranchez le cordon
d’alimentation et contactez votre centre de services LG
le plus proche si le même message d’erreur s’affiche.
y
Pour sélectionner la cuve, veuillez sélectionner son
cycle de nettoyage.
y
Veuillez vider la cuve et mettez l’eau de javel dans le
distributeur du détergent, puis appuyez sur le cycle
TUB CLEAN (NETTOYAGE DE LA CUVE).
y
Si vous voulez ignorer l’option TUB CLEAN, tournez
leBOUTON DE SELECTION DE CYCLES ou appuyez sur
les boutons d’options pour sélectionner le cycle souhaité.
Dans ce cas, le message va s’afficher de nouveau
un certain nombre de fois au cours du lavage et il va
disparaître l’instant suivant pour nettoyer la cuve.
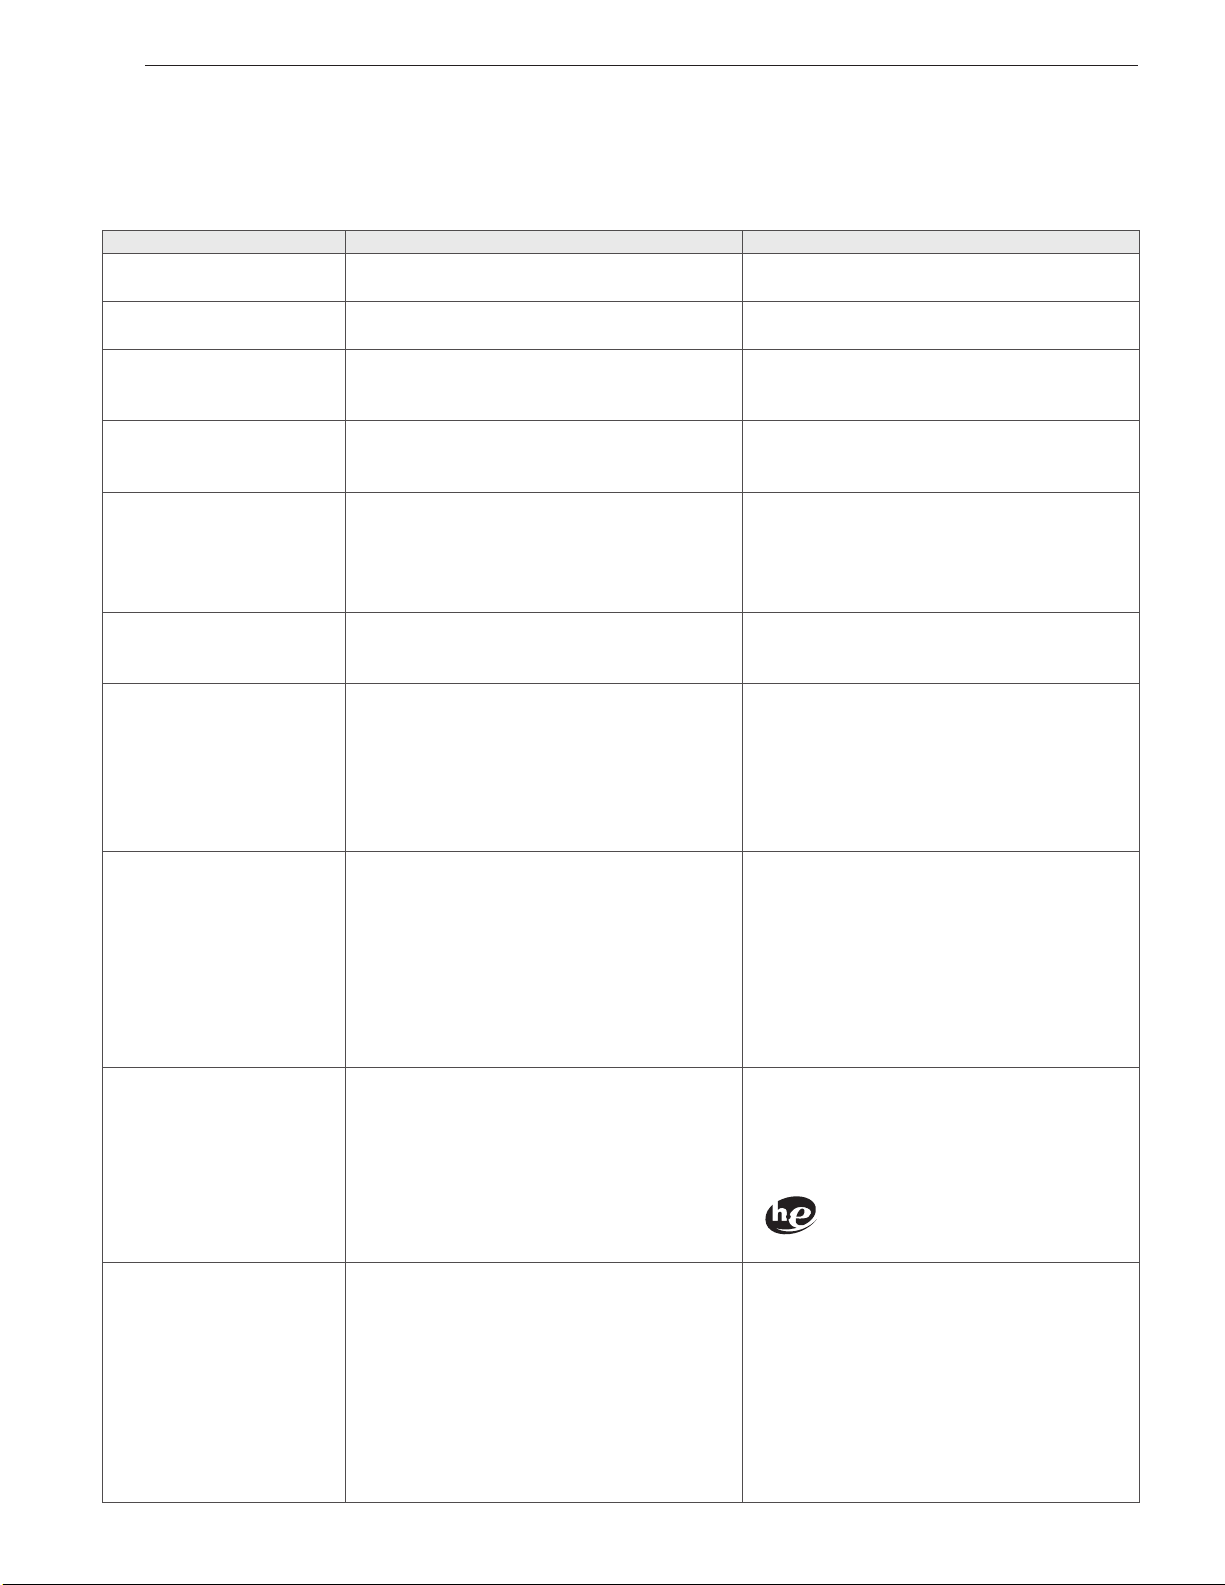
36
DEPANNAGE
Avant d’appeler le service de maintenance
Vérifiez les éléments suivants avant d’appeler le service.
Problème Causes probables Solutions
Clic perceptible
y
Entendez-vous un son lorsque vous fermez,
verrouillez ou déverrouiller la porte?
y
Ce son est normal et est perceptible lorsque la
porte est fermée, verrouillée ou déverrouillée.
Halètement ou autre bruit
sifflant
y
L’eau est-elle aspergée dans la cuve?
y
Ce son est normal lorsque l’eau est aspergée
ou en circulation pendant le cycle.
Bourdonnement ou bruit de
giclage
y
La machine à laver évacue-t-elle l’eau?
y
Ce bruit est normal lorsque la pompe de
vidange évacue l’eau de la machine à laver
après le cycle.
Clapotis
y
La machine lave-t-elle une charge de
lessivage?
y
Ce bruit est normal lorsque la charge se
déplace de haut en bas pendant le cycle de
lavage et de rinçage.
Bruit de sonnette ou cliquetis
y
Existe-t-il des corps étrangers comme les clés,
des pièces d’argent ou des épingles dans la
cuve ou dans le filtre de vidange?
y
Vérifiez s’il existe des corps étrangers dans la
cuve et vidangez le filtre après l’arrêt du cycle.
y
Débranchez le cordon d’alimentation et
contactez votre centre de services LG le plus
proche si le bruit persiste.
Bruit sourd
y
La machine à laver est-elle surchargée?
y
La charge est-elle déséquilibrée?
y
Ce bruit est normal et se produit lorsque la
charge est déséquilibrée. Arrêtez le cycle et
réarrangez la charge pour rétablir l’équilibre.
Vibrations
y
Les boulons fixés à l’expédition ont-ils été
retirés?
y
La charge est-elle distribuée de manière
uniforme dans la cuve?
y
La machine à laver est-elle équilibrée?
y
La machine à laver est-elle installée sur une
surface solide et uniforme?
y
Référez-vous à la page 13,
Retrait des boulons
fixés à l’expédition
pour enlever ces boulons.
y
Arrêtez le cycle et réarrangez la charge pour
rétablir l’équilibre.
y
Référez-vous à la page 16,
Stabilisation de la
machine à laver
pour stabiliser la machine.
y
Vérifiez si le plancher est solide et uniforme.
Fuite d’eau autour de la
laveuse
y
y a – t – il une fuite d’eau à partir d’un robinet
ou d’une conduite d’eau?
y
Un tuyau d’évacuation ou de vidange est-il
bouché?
y
Vérifiez les robinets ou les conduites d’eau.
- Si les conduites d’eau ne sont pas
raccordées normalement, référez-vous à la
page 14,
Déballage et retrait des boulons
d’expédition
pour les raccorder de façon
appropriée.
y
Débouchez le tuyau d’évacuation ou de
vidange. Contactez un plombier le cas
échéant.
Mousse excessive ou échec
de rinçage
y
Avez-vous utilisé une quantité de détergent
supérieure à celle qui est recommandée?
y
Le niveau de souillure est-il plus élevé que la
taille de la charge?
y
Utilisez la quantité de détergent recommandée
pour la charge.
y
Si le niveau de contamination est faible,
réduisez la quantité de détergent à une valeur
inférieure au niveau recommandé.
Utilisez exclusivement le détergent avec le
logo HE (haute efficacité).
Taches
y
Avez-vous ajouté le détergent directement
dans la cuve?
y
Avez-vous enlevé la charge immédiatement
après la fin du cycle?
y
Avez-vous trié et lavé les vêtements par
couleur ou par niveau de souillure?
y
Assurez-vous que vous avez chargé le
détergent dans le bac de distribution
correspondant.
y
Retirez la charge immédiatement dès qu’elle
est finie.
y
Triez et séparez les couleurs sombres
des couleurs claires ou blanches, le linge
excessivement souillé du linge légèrement
souillé. Référez-vous à la page 19,
Tri du linge
pour des détails.

37
SPECIFICATIONS
FRANÇAIS
Problème Causes probables Solutions
Plissage
y
Avez-vous enlevé la charge immédiatement
après la fin du cycle?
y
Avez-vous surchargé la cuve?
y
Avez-vous inversé les entrées d’eau chaude et
d’eau froide?
y
Retirez la charge immédiatement dès qu’elle
est finie.
y
Ne surchargez pas la cuve.
y
Le rinçage à l’eau chaude peut provoquer
le plissage des vêtements. Vérifiez les
raccordements du tuyau d’entrée
Pas d’alimentation
y
Le cordon d’alimentation est-il branché
correctement?
y
Un fusible ou un disjoncteur de la maison a- t
– sauté ou y a – t – il une coupure de courant?
y
Assurez-vous que la fiche est sécurisée dans une
sortie de 120 V (60 Hz) à 3 broches mise à la masse.
y
Réinitialisez le disjoncteur ou remplacez
le fusible. N’augmentez pas la capacité du
fusible. Si le problème se pose au niveau du
disjoncteur, faites intervenir un électricien
pour le résoudre.
La porte ne s’ouvre
pas lorsque le cycle est
suspendu ou terminé.
y
La température de la cuve est-elle très
élevée?
y
La cuve est-elle remplie d’eau?
y
La machine à laver est dotée d’un verrouillage
de sécurité au niveau de la porte pour empêcher
des brûlures. Laissez la porte fermée et patientez
jusqu’à ce que l’icône de verrouillage de la porte
disparaisse de l’écran.
y
Laissez la machine à laver compléter le cycle
programme ou effectuez un cycle DRAIN &
SPIN pour vider l’eau.
Le cycle de lavage dure plus
longtemps que prévu.
y
La machine à laver est-elle surchargée?
D’autres options ont-elles été ajoutées au
cycle de lavage?
y
Cette situation est normale. La machine à
laver ajuste automatiquement la durée du
cycle en fonction de la quantité du linge, de la
pression de l’eau, de la température de l’eau
et d’autres conditions de fonctionnement.
La cuve est moisie ou sent le
renfermé
y
Avez-vous utilisé le détergent approprié?
y
Avez-vous régulièrement nettoyé la cuve?
y
Utilisez uniquement le détergent HE
(Hautement efficace) recommandé pour une
machine à laver à chargement frontal.
y
Référez-vous à la page 30, nettoyez
l’intérieur et l’extérieur de la machine à laver
régulièrement.
SPÉCIFICATIONS
Modèle WM3470H*A
Description Laveuse à chargement frontal
Exigences électriques 120 VAC @ 60 Hz.
Pression d’eau max. 100 - 800 kPa (14.5 - 116 PSI)
Dimensions 68.6 cm (largeur) X 75.6 cm (P) X 98.3 cm (H), 129.5 cm (P avec la porte ouverte)
27” (W) X 29
3
/
4
” (P) X 38
11
/
16
” (H), 51” (P avec la porte ouverte)
Poids net 87 kg (192 lb)
Vitesse d’essorage max. 1,200 RPM

38
UTILISATION DE SMARTDIAGNOSIS™
- Utilisez cette fonction uniquement selon les instructions du centre d’appels. Le son de la transmission ressemble à celui d’un télécopieur et seul
le centre d’appel peut l’interpréter.
- SmartDiagnosisMC ne peut être activé que si le lave-linge est sous tension. Si ce n’est le cas, il convient alors d’utiliser la procédure classique
de détection des pannes.
En cas d’incident avec votre lave-linge, appelez le 1-800-243-0000(1-888-542-2623 au Canada). Suivez les instructions communiquées par
l’agent du centre d’appels et exécutez les étapes suivantes à la demande de l’agent :
1. Appuyez sur la touche
A
(Marche/Arrêt) pour mettre le lave-linge en marche.
N’appuyez sur aucun autre bouton ni tournez le sélecteur de cycle.
2. la demande du centre d’appel, placez le microphone de votre téléphone le plus possible à proximité du bouton POWER.
3.Appuyez et maintenez enfoncé le bouton pendant trois secondes tout en maintenant le microphone du téléphone sur l’icône ou sur
le bouton power.
4. Maintenez le téléphone en place jusqu’à la fin de la transmission des données. Cette opération peut prendre environ 6 secondes et l’affichage
marque ce temps par un compte à rebours.
• Pour un meilleur résultat, ne bougez pas le téléphone alors que la tonalité indique une transmission.
• Si l’agent du centre d’appel n’est pas en mesure d’obtenir un enregistrement précis des données, celui-ci peut vous demander de
recommencer.
• Si vous appuyez sur le bouton power durant la transmission, vous fermez la fonction SmartDiagnosisMC.
5.À l’issue du compte à rebours et une fois les tonalités de transmission terminées, reprenez votre conversation avec l’agent du centre d’appels,
L’agent est maintenant en mesure de vous assister en se basant sur les informations transmises pour analyse au centre d’appel.
UTILISATION DE SMARTDIAGNOSIS
™

39
FRANÇAIS
GARANTIE
GARANTIE LIMITEE POUR LA MACHINE A LAVER LG (CANADA)
GARANTIE:
En cas de défaillance de votre machine à laver (“produit”) consécutive à une défaillance matérielle ou à un vis de fabrication dans
le cadre d’une exploitation ménagère normale pendant la période de garantie définie ci-dessous, LG Canada va, à sa convenance réparer ou
remplacer le produit dès réception de la preuve d’achat initial en détail. Cette période de garantie est valide uniquement pour l’acheteur initial du
produit en détail et s’applique exclusivement à un Produit distribué au Canada par LG Canada ou un représentant agréé de celui-ci au Canada. La
garantie s’applique uniquement aux produits qui sont utilisés au Canada.
PERIODE DE GARANTIE : (Note: Si la date d’achat initiale ne peut pas être vérifiée, la période garantie va commencer soixante (60) jours à compter de la date de fabrication).
.
Machine à laver
Garantie prolongée pour les composants (pièces uniquement)
(Le consommateur sera facturé pour la main d’œuvre après un (1) an à compter de la date d’achat).
Un (1) an à compter de la date initiale
d’achat en détail
Dix (10) ans à compter de la date initiale d’achat au détail Cinq (5) ans à compter de la date initiale d’achat au détail.
Pièces et main d’oeuvre
(pièces internes/fonctionnelles uniquement)
Moteur DD
(Stator, rotor, et capteur d’ambiance)
Tambour, cuve
Définir la cuve, c’est – à – dire cuve de lavage SS uniquement
Les produits et les pièces de rechange sont couvertes par une garantie qui s’étale sur le reste de la période de garantie initiale ou sur quatre
vingt dix (90) jours, selon la période la plus longue.
Les pièces et les produits de rechange peuvent être neufs ou fabriqués.
Le Centre de services agréé de LG offre une garantie de trente (30) jours pour leurs travaux de dépannage.
L’obligation unique de LG Canada se limite à la garantie définie ci-dessus. Sauf disposition contraire expresse, LG Canada n’offre aucune autre
garantie et rejette, par la présente, toutes les autres garanties et clauses inhérentes au produit, qu’elles soient expresses ou implicites, y
compris, mais sans se limiter à une garantie ou clause expresse ou implicite, à une garantie de qualité marchande ou de conformité pour un but
particulier, et aucune représentation ne doit être contraignante pour LG Canada. LG Canada n’autorise aucune personne à offrir ou à assumer
une autre obligation de garantie ou responsabilité
inhérentes au produit. Selon les limites de toute garantie implicite requise par la loi, cette garantie est limitée à la période susmentionnée. LG
Canada, le fabricant ou le distributeur ne doivent pas être liés pour des dommages indirect ou consécutifs, particuliers, directs, la défection des
clients, les pertes de profit, les dommages intérêts punitifs ou d’autres dommages, qu’ils soient
liés directement ou indirectement à une violation du contrat, fondamentale ou autrement, ou à toute action ou omission, à un préjudice ou autre.
La présente garantie vous confère des droits légaux spécifiques. Vous pouvez jouir d’autres droits qui peuvent varier en fonction de la province et
des lois qui y sont appliquées.
Toute clause de la présente garantie qui casse ou modifie une clause ou une garantie implicites conformément à la loi provinciale doit être
annulée dans le cas où elle tranche avec la loi provinciale affectant le reste des clauses de cette garantie.
cette garantie limitée ne couvre pas:
1. les déplacements du service pour livrer, porter, installer le produit ou donner des instructions sur son utilisation, le dépannage ou le remplacement des fusibles ou
la correction du câblage ou la correction d’une installation ou d’un dépannage non autorisés.
2. Dysfonctionnement du produit en cas de défaillance ou de coupures électriques, ou un service électrique inadapté.
3. Les dommages ou défaillances consécutifs aux fuites, aux fissures et à la congélation des conduites d’eau, aux conduites d’évacuation réduites, à une
alimentation en eau interrompue ou inappropriée ou à une mauvaise alimentation en air.
4. Dommages consécutifs à l’utilisation du produit dans une atmosphère corrosive ou contraires aux instructions spécifiées dans le manuel d’utilisation du produit.
5. Dommages du produit consécutifs aux accidents, aux insectes nuisibles, à la vermine, au tonnerre, au vent, aux incendies, aux inondations ou aux catastrophes naturelles.
6. Dommages consécutifs à une mauvaise utilisation, au mauvais traitement, à une installation, à un dépannage ou à une maintenance appropriés du Produit. Un
mauvais dépannage inclut l’utilisation des pièces non approuvées ou non spécifiées par LG Canada.
7. Les dommages ou la défaillance du produit consécutifs à un changement ou une modification non autorisés du produit, ou une application autre que celle pour
laquelle il a été conçu; ou dommages consécutifs à une fuite d’eau provoquée par une mauvaise installation.
8. Dommages ou défaillance du Produit consécutifs à un courant électrique incorrecte, à une tension, une application commerciale ou industrielle inappropriées, ou à
l’utilisation d’accessoires et de composants, ou de produits de nettoyage non approuvés par LG Canada.
9. Dommages consécutifs au transport et au traitement du produit y compris des égratignures, des bosses, des ébréchures et/ou d’autres dommages du produit fini, à moins
que de tels dommages soient consécutifs à des défaillances matérielles ou aux vis de fabrication et qu’elles soient rapportés une (1) semaine après la livraison.
10. Dommages ou éléments manquants au niveau d’un affichage, d’un boîtier ouvert, d’un produit diminué ou modifié.
11. Produits dont les numéros de série originaux ont été effacés, modifiés, ou ne peuvent être déterminés avec exactitude. Les numéros de modèles et de séries
ainsi que le reçu original de vente en détail sont requis pour une validation de la garantie.
12. Augmentation des coûts d’utilités et dépenses d’utilités supplémentaires.
13. Remplacement des ampoules, des filtres ou d’autres pièces consommables.
14. Dépannages effectués lorsque le Produit est utilisé à des fins autres que l’application ménagère traditionnelle et normale (exemple: location, usage commercial,
bureaux, ou installations de plaisance) ou contraires aux instructions spécifiées dans le manuel d’utilisation.
15. Coûts associés au déplacement du Produit à partir de votre maison pour des travaux de dépannage.
16. Le déplacement et la réinstallation du Produit, s’il est installé dans un endroit inaccessible ou s’il n’est pas installé conformément aux instructions d’installation
publiées, y compris celles des manuels d’installation et d’utilisation.
17. Accessoires du Produit comme la porte, les coffres, les tiroirs, les poignées, les étagères, etc. Par ailleurs, les pièces qui ont été fournis en plus de celles qui
faisaient partie de la livraison sont exclues.
Tous les coûts associés aux conditions exclues ci-dessus doivent être supportés par le client.
Pour des détails complets sur la garantie et l’assistance à la clientèle,
veuillez appeler ou visiter notre site:
Ecrivez les informations relatives à votre garantie ci-dessous;
Appelez au 1-888-542-2623 (24 heures/24 365 jours/365r) et sélectionnez
l’option appropriée à partir du menu, ou visitez notre site
au http://www.lg.ca
Informations relatives à l’enregistrement du produit:
Modèle:
Numéro de série:
Date d’achat:

This product qualifies for ENERGY STAR in the
“factory default (Home Use)” setting.
Changing the factory default settings or enabling other
features may increase power consumption that could
exceed the limits necessary to quality for ENERGY STAR.
1-800-243-0000
1-888-542-2623
USA
CANADA
Register your product Online!
LG Customer Information Center
www.lg.com