Air Fry Toaster Oven With No Preheat Use and Care Manual
IMPORTANT SAFEGUARDS.
This product is for household use only.
When using electrical appliances, basic safety precautions should always be followed to reduce the risk of fire, electric shock, and/or injury, including the following:
READ ALL INSTRUCTIONS BEFORE USING.
• Do not touch hot surfaces. Use handles or knobs.
• To protect against electrical shock, do not immerse cord, plug, or appliance in water or other liquid.
• Close supervision is necessary when any appliance is used by or near children.
• Unplug from outlet when not in use and before cleaning. Allow time to cool before putting on or taking off parts.
• Do not operate any appliance with a damaged cord or plug, or if the appliance malfunctions or has been damaged in any manner. Contact consumer support at the toll-free number listed in the warranty section.
• The use of accessory attachments not recommended by the appliance manufacturer may cause injuries.
• Do not use outdoors.
• Do not let cord hang over edge of table or counter, or touch hot surfaces.
• Do not place on or near a hot gas or electric burner, or in a heated oven.
• Extreme caution must be used when moving an appliance containing hot oil or other hot liquids.
• To disconnect, while cooking, press the TIME knob, then unplug from wall outlet. If not cooking, just unplug from wall outlet.
• Do not use appliance for other than intended use.
• Use caution when removing tray or disposing of hot grease.
• Do not clean oven with metal scouring pads. Pieces can break off the pad and touch electrical parts, causing risk of electric shock.
• Do not attempt to clean the heating elements.
• Oversized foods or metal utensils must not be inserted in a toaster oven, as they may create fire or risk of electric shock.
• A fire may occur if the toaster oven is covered or touching flammable materials including curtains, draperies, walls, and the like, when in operation. Do not store any item on top of the unit while in operation.
• Do not store any material, other than manufacturer’s recommended accessories, in this oven when not in use.
• Do not place any of the following materials in the oven: paper, cardboard, plastic, and other items not constructed of oven safe metal and glass pans.
• Do not cover crumb tray or any part of this oven with metal foil. This will cause overheating in the oven.
• To turn off oven while cooking, press the TIME knob. The NOW.
COOKING display will turn off and the oven will beep three times.
• This appliance is not intended for use by persons (including children) with reduced physical, sensory or mental capabilities, or lack of experience and knowledge, unless they have been given supervision or instructions concerning use of the appliance by a person responsible for their safety.
• Children should be supervised to ensure that they do not play with the appliance.
• The appliance is not intended to be operated by means of an external timer or separate remote-control system.
• Do not leave unattended while in operation. Food ignition may occur. If this happens, unplug the unit, but DO NOT open door. To reduce the risk of fire, keep oven interior completely clean and free of food residues, oil, grease and other combustible materials.
• Extreme caution should be exercised when using containers constructed of other than metal or glass.
GROUNDED PLUG
As a safety feature, this product is equipped with a grounded plug, which will only fit into a three-prong outlet. Do not attempt to defeat this safety feature. Improper connection of the grounding conductor may result in the risk of electric shock. Consult a qualified electrician if you are in doubt as to whether the outlet is properly grounded.
TAMPER-RESISTANT SCREW
Warning: This appliance is equipped with a tamper-resistant screw to prevent removal of the outer cover. To reduce the risk of fire or electric shock, do not attempt to remove the outer cover. There are no user-serviceable parts inside. Repair should be done only by authorized service personnel.
ELECTRICAL CORD
a) A short power-supply cord is provided to reduce the risks resulting from becoming entangled in or tripping over a longer cord.
b) Extension cords are available and may be used if care is exercised in their use.
c) If an extension cord is used:
1) The marked electrical rating of the extension cord should be at least as great as the electrical rating of the appliance;
2) If the appliance is of the grounded type, the extension cord should be a grounding-type 3-wire cord; and
3) The cord should be arranged so that it will not drape over the counter top or tabletop where it can be pulled on by children or tripped over.
Note: If the power cord is damaged, please contact the warranty department listed in these instructions.
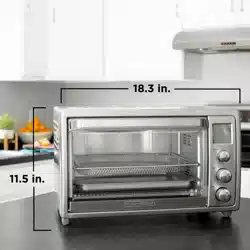
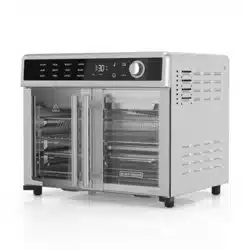
GETTING TO KNOW YOUR AIR FRY TOASTER OVEN
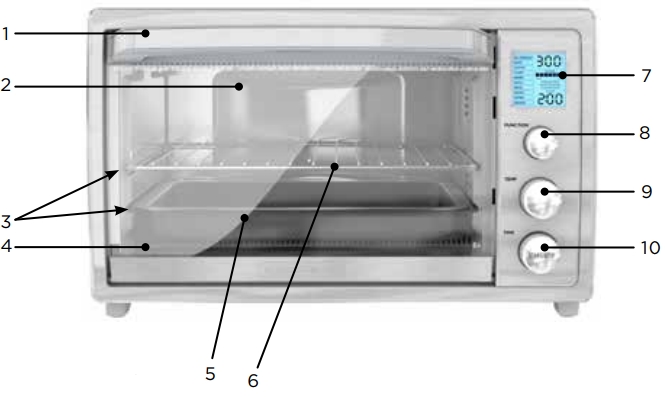
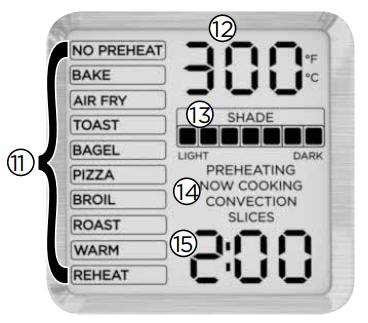

1. Door handle
2. Easy view glass door
3. 2 slots for racks
4. Slide out crumb tray (visible when door is open) (Part# TOD5030-01)
5. Baking pan (Part# TOD5030-02)
6. Wire rack (Part# TOD5030-03)
7. Digital display
8. Function knob
9. Temperature knob
10. Time knob with Start/Stop function
11. Function options
12. Temperature
13. Toast shade
14. Heating display
15. Timer
16. Air Fry mesh cooking rack (Part# TOD5035-01)
Product may vary slightly from what is illustrated.
GETTING STARTED
This appliance is intended for household use only.
• Remove all packing material, any stickers, and the plastic band around the power plug.
• Remove and save literature.
• Please go to www.prodprotect.com/blackanddecker to register your warranty.
• Wash all removable parts as instructed in Care and Cleaning Section.
• Select a location where this unit is to be used, allowing enough space from the back of the unit and wall to allow heat to flow without damage to cabinets and walls.
• Ensure crumb tray is in place before use.
Important information about using your oven
1. This oven gets hot. When in use, always use oven mitts or potholders when touching any outer or inner surface of the oven.
2. When using the oven for the first time, you may notice smoke or a slight odor during the first few minutes. This is normal.
3. Be sure food or baking pan does not come within 1 1/2 inches (3.8 cm) of the upper heating elements.
4. Food should not extend beyond the edges of the baking pan to avoid drippings from falling onto the heating elements.
5. The heating elements will cycle on and off to maintain even heat distribution.
6. Many factors influence cook times such as altitude, humidity and variations in electrical grids. For best results, monitor the end of the cook cycle.
7. After the cooking cycle is completed, the main display will stay illuminated for a short time if not unplugged.
Changing to and from Celsius and Fahrenheit
Hold in the Time knob (START/STOP)and rotate the Function knob to select between Fahrenheit and Celsius.
Sleep mode
Hold in the Time knob for 3 seconds to put the unit into sleep mode.
OPERATING YOUR OVEN
1. Plug into outlet.
2. Display light will illuminate and all function lights will light up momentarily.
3. When turned on, the oven will default to the last setting used.
USING THE CONTROLS
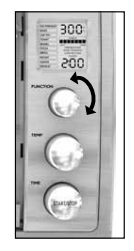
1. Select a function with the FUNCTION knob.

2. Using the TEMP knob, adjust temperature.
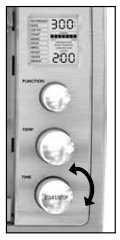
3. Using the TIME knob, adjust time to recommended cook time. If using the NO PREHEAT function, do NOT add in extra time for preheating—the oven does not need to preheat when the no preheat option is chosen.
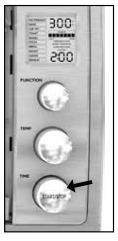
4. Press the TIME knob (START/STOP) to begin cooking.
5. There will be 3 beeps once the cycle is complete. The oven will stop heating.
6. To turn off the oven at any time, press the Time knob (START/STOP). Note: If you want the oven to stay on instead, see “STAY ON FUNCTION”.
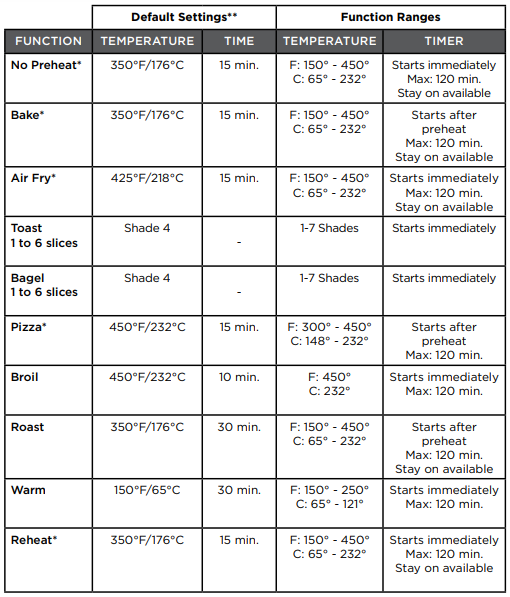
NO PREHEAT
No Preheat function allows you to use your toaster oven to cook without waiting for it to heat up to the desired cooking temperature. The No Preheat function saves you time, and works great with frozen pizza or your favorite frozen snacks in addition to your usual foods.
Note: The No Preheat function can’t be used in conjunction with other functions.
1. Select the NO PREHEAT function.
2. Place food directly on wire rack or insert pan into the rack guide.
3. Turning the TEMP knob, adjust temperature to desired temperature.
4. Turning the TIME knob, adjust time to set cook time. You may choose STAY ON so the oven does not stop cooking until you press Stop. To choose STAY ON, turn the time knob counterclockwise past 0 (zero) until you see “ON”. Press the Time knob (START/STOP) to begin cooking RIGHT AWAY!
5. There will be 3 audible beeps once the baking cycle is complete and the oven will stop heating.
6. Unplug the appliance when not in use.
BAKE
Note: During Bake mode, the convection fan cycles on and off to circulate air and create optimal heat distribution.
1. Place wire rack in the upper rack position or insert pan in the upper rack position.
2. Select BAKE function using function knob.
3. Turning the TEMP knob, adjust temperature to desired temperature.
4. Turning the TIME knob, adjust time to set cook time. You may choose STAY ON so the oven does not stop cooking until you press Stop. To choose STAY ON, turn the time knob counterclockwise past 0 (zero) until you see “ON”.
5. Press the Time knob (START/STOP) to begin preheating.
6. The temperature display will blink while the oven is preheating.
7. Once the oven has preheated, you will hear 2 audible beeps and the cook time set will automatically begin counting down.
8. Place food directly on wire rack or insert pan into rack guide.
9. There will be 3 audible beeps once the baking cycle is complete and the oven will stop heating.
10. Unplug the appliance when not in use.
AIR FRY
Air Fry technology uses high intensity hot air to bake, brown, and crisp your favorite fried foods with little to no oil.
The oven provides an adjustable temperature range for air frying. Use the cooking instructions in the recipe book or follow the food package recommended cook temperature and time for baking. Adjust the cook time as needed to achieve your preferred crispiness.
NOTE: It is not necessary to preheat the oven for air frying. The oven timer will begin immediately when in air fry mode.
NOTE: Arrange your food in a single layer on the mesh tray for optimal air frying results.
1. Place food on Air Fry mesh rack
2. Open door and slide Air Fry mesh rack with food into the upper rack position
3. Select AIR FRY function using function knob.
4. Turning the TEMP knob, set oven to desired temperature.
5. Turning the TIME knob, adjust time to set cook time. You may choose STAY ON so the oven does not stop cooking until you press Stop. To choose STAY ON, turn the time knob counterclockwise past 0 (zero) until you see “ON”.
6. Press the Time knob (START/STOP) to begin cooking.
7. There will be 3 audible beeps once the baking cycle is complete and the oven will stop heating.
8. To turn off the oven at any time press the Time knob (START/STOP).
9. Open the oven door. Using oven mitts or pot holders, slide the rack out to remove the cooked food. Note: Clean out the crumb tray frequently when using the air fry setting.
10. Unplug the appliance when not in use.
TOAST
1. Select TOAST function using function knob.
2. Use the TEMP knob to select desired toast shade, with 1 being the lightest and 7 being the darkest.
3. Turn the TIME knob to select the number of bread slices being toasted.
4. Place food directly on wire rack in the upper rack position. Press the Time knob (START/STOP) to begin toasting.
5. There will be 3 audible beeps once the toasting cycle is complete and the oven will stop heating.
BAGEL
1. Select BAGEL function using function knob.
2. Use the TEMP knob to select desired toast shade, with 1 being the lightest and 7 being the darkest.
3. Turn the TIME knob to select the number of bagel slices being toasted.
4. Place bagel slices, cut side up, directly on the wire rack in the upper rack position. Press the Time knob (START/STOP) to begin toasting.
5. There will be 3 audible beeps once the cycle is complete and the oven will stop heating.
PIZZA
1. Place wire rack in the lower rack position.
2. Select the PIZZA function using the function knob. Turning the TEMP knob, adjust temperature to desired temperature.
3. Turning the TIME knob, adjust time to set cook time.
4. Press the Time knob (START/STOP) to begin preheating.
5. The temperature display will blink while the oven is preheating. Note: For best results place baking pan in oven while preheating, then place pizza on preheated pan to bake.
6. Once the oven has preheated, you will hear 2 audible beeps and the timer will automatically begin counting down.
7. Place pizza directly on pan and place in oven.
8. There will be 3 audible beeps once the baking cycle is complete and the oven will stop heating.
9. Unplug the appliance when not in use.
BROIL
Note: It is not necessary to preheat the oven before broiling.
1. Place wire rack or baking pan in the upper rack position.
2. Slide the baking pan under the wire rack to catch drippings during broiling.
3. Select the BROIL function. The oven will default to 450˚F. NO PREHEAT, and CONVECTION are not available on the BROIL setting.
4. If needed, turn the TIME knob to set cook time.
5. Press the Time knob (START/STOP) to begin broiling. Note: For best results when broiling meat, turn over the meat half-way through broiling.
6. There will be 3 audible beeps once the broiling cycle is complete. The oven will stop heating.
7. Unplug the appliance when not in use.
ROAST
1. Place wire rack in the lower rack position.
2. Select the ROAST function using the function knob. NO PREHEAT, and CONVECTION are not available on the ROAST setting.
3. Turning the TEMP knob, adjust temperature to desired temperature.
4. Turning the TIME knob, adjust time to set cook time. You may choose STAY ON so the oven does not stop cooking until you press Stop. To choose STAY ON, turn the time knob counterclockwise past 0 (zero) until you see “ON”.
5. Press the Time knob (START/STOP) to begin preheating.
6. The temperature display will blink while the oven is preheating.
7. Once the oven has preheated, you will hear 2 audible beeps and the time set will automatically begin counting down.
8. Place food (on rack or pan) in the lower rack position.
9. There will be 3 audible beeps once the baking cycle is complete and the oven will stop heating.
10. Unplug the appliance when not in use.
Note: When cooking meat, use a meat thermometer to test for doneness by placing the thermometer in the thickest part of the meat.
WARM
1. Place wire rack in the upper rack position.
2. Select the WARM function using the function knob. .
3. Turning the TIME knob, adjust time to set cook time. You may choose STAY ON so the oven does not stop warming until you press Stop. To choose STAY ON, turn the time knob counterclockwise past 0 (zero) until you see “ON”.
4. Place food on rack or in pan. Press the Time knob to begin warming.
5. There will be 3 audible beeps once the warming cycle is complete. The oven will stop warming.
6. Unplug the appliance when not in use.
REHEAT
1. Place wire rack in the upper rack position.
2. Select the REHEAT function using the function knob. You are not able to deselect NO PREHEAT. If you would like to preheat the oven or reheat without convection, please refer to TRADITIONAL BAKE instructions.
3. Turning the TEMP knob, adjust temperature to recommended temperature.
4. Turning the TIME knob, adjust time to set cook time. You may choose STAY ON so the oven does not stop cooking until you press Stop. To choose STAY ON, turn the time knob counterclockwise past 0 (zero) until you see “ON”.
5. Place food or pan directly on rack. Press the Time knob (START/STOP)to begin cooking.
6. There will be 3 audible beeps once the baking cycle is complete and the oven will stop heating.
7. Unplug the appliance when not in use.
STAY ON
The STAY ON function is available for BAKE, ROAST, WARM, REHEAT, and NO PREHEAT. To set the oven to STAY ON, turn the TIME knob counterclockwise past 0 (zero) until you see “ON” in the display panel. The oven will stay on until the Time knob is pressed.
CARE AND CLEANING
This product contains no user serviceable parts. Refer to service qualified service personnel.
Cleaning
Important: Before cleaning any part, be sure the oven is off, unplugged, and cool.
Note: Do not allow food debris to accumulate in oven cavity. Do not use aerosol or spray oven cleaners.
1. Clean the glass door with a sponge, soft cloth, or nylon pad and dish soap and warm water. Do not use a spray cleaner.
2. Remove wire rack, air fry mesh cooking rack, and bake pan; wash in hot water with dish soap. To remove stubborn spots, use a polyester or nylon pad.
Note: The wire rack and air fry mesh cooking rack are dishwasher safe. We recommend washing the bake pan and crumb tray by hand in hot water with dish soap.
3. Pull out crumb tray and dispose of crumbs. Wash and dry thoroughly before placing back into the oven.
4. Wipe the outside of the oven with a damp cloth or sponge. Dry thoroughly. 5. Do not attempt to clean the heating elements. Any food that comes into contact with the elements will burn off on its own.
Cooking Containers
Metal, ovenproof glass or ceramic bakeware can be used in your oven. Follow the manufacturer’s instructions. Be sure the top edge of the container is at least 1 1/2 inches (3.81cm) away from the top heating elements.
Caution: Extreme Caution should be exercised when using containers constructed of other than metal or glass.
FUNCTION CHART