User Manual
Features and Functions
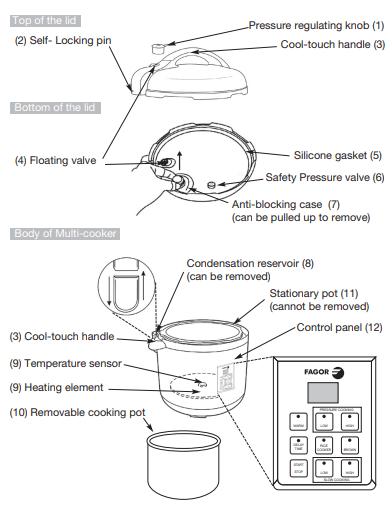
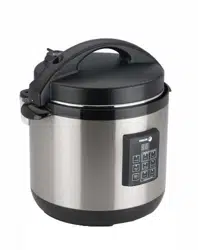
1. Pressure Regulating Knob: Turn the knob to the “Pressure” position when cooking under pressure or using the rice cooking function. Turn the knob to the “Steam” position to release the pressure after pressure cooking or when using the slow cooker or warm functions.
2. Self-Locking Pin: The lid will lock automatically when you slide it in place. While cooking under pressure you will not be able to open the lid until all of the pressure is released.
3. Cool-touch handles: The cool to the touch handles of the multi cooker allows for easy handling and opening of the pot.
4. Floating Valve: The safety-floating valve controls the amount of pressure inside the cooker by allowing excess pressure to be released.
5. Silicone Gasket: Creates an airtight seal needed for the Multi-cooker to build up pressure. Check the gasket for tears or cracks before using the pressure cooking or rice cooking function.
6. Safety Pressure Valve: The safety pressure valve allows excess pressure to escape from the cooker when it is being used for pressure cooking. It works independently of the floating valve.
7. Anti-Blocking Case: Pull it towards yourself to release the pressure regulator knob for cleaning.
8. Condensation Reservoir: Collects excess condensation during cooking. If there is some liquid in the reservoir after cooking, simply empty it.
9. Heating element and Temperature sensor: Both elements regulate the cooking temperature inside the pot.
10. Removable Cooking Pot: Aluminum pot with Teflon Classic non-stick coating; dishwasher safe removable pot will make clean-up a breeze.
11. Stationary Pot: This pot cannot be removed from the electric multi-cooker and should never be used for cooking. For cooking, only use the removable cooking pot.
12. Control Panel: The easy to use controls allow you to select the different programs available with a touch of a finger. Available for selection are: two pressure settings, rice cooking, two slow cook settings, brown and warm functions, and a timer.
- Pressure settings - High: use this function to cook at high pressure, equivalent to 9 psi (pounds of pressure per square inch). Every time you press the high pressure button, the cooking time will increase by 1 minute.
- Pressure settings - Low: use this function to cook at low pressure, equivalent to 5 psi (pounds of pressure per square inch). Every time you press the low pressure button, the cooking time will increase by 1 minute. This pressure setting is more suitable to cook delicate foods such as tender vegetables or certain types of fish.
- Rice cooking: This is a simple 6-minute program for cooking dishes such as rice, polenta and risotto.
- Slow Cooking: cooks your food slowly, for up to 9.5 hours, at a temperature of 190°F (LOW) or 212°F (HIGH). Slow cooking helps food retain maximum flavor and tenderness. Press the button to increase the cooking time by 30-minute increments.
- Warm: reheats or keeps cooked food warm until you are ready to enjoy it. There isn’t a maximum time limit for the warm function.
- Brown: allows you to brown or sauté your food before cooking. • Delay Time: allows you to delay the cooking process up to 8 hours.
CAUTION: DO NOT USE THE DELAY TIME FUNCTION WHEN COOKING FOODS THAT MIGHT SPOIL IF LEFT OUT AT ROOM TEMPERATURE.
Getting Started
Read the safety instructions found in this manual before plugging in and operating. Before using the Multi-cooker for the first time, follow these steps:
1. Remove all packing materials and literature from within the Multi-cooker. Lift the inner cooking pot and remove any pieces of paper from under it. Remove the plastic protection from the control panel and any stickers from the lid or stainless steel housing.
2. Wash all removable parts in warm soapy water. Rinse and dry all parts thoroughly. Wipe the stainless steel outer housing with a clean damp cloth. NEVER submerge the stainless steel outer housing in water or any other liquid. Only the removable cooking pot is dishwasher safe.
3. Make sure the silicone gasket is seated properly inside the lid. To make sure it has been fitted correctly, fill the removable cooking pot with water up to two thirds full, and cook on HIGH PRESSURE for 15 minutes. Release the pressure by turning the pressure regulator knob to STEAM. The steam is released and the floating valve will drop. If steam is not being released, the gasket probably hasn’t been fitted correctly and the cooker hasn’t built up any pressure: re-adjust the gasket to make sure it is fitted properly, and repeat this step.
4. Let the appliance cool to room temperature and then empty and clean.
Pressure Cooker Program
This program will allow you to cook foods under pressure in much less time, as cooking time is reduced up to 70% compared to traditional cooking methods. Pressure cooking is Fast, Easy, Healthy!
1. Before every use, make sure the silicone gasket and the pressure regulating valves are clean and in place.
2. Plug the cord into a wall outlet.
3. Position the removable cooking pot in the Multi-cooker, and add the ingredients following the recipe. When cooking foods under pressure, a minimum of 1 cup (8 oz) of liquid is required.
SAFETY NOTES:
- Do not fill the pot more than 2/3 full with food and liquid. Do not fill the unit more than ½ full when cooking foods that expand during cooking.
- The following foods should not be cooked under pressure: applesauce, cranberries, pearl barley, oatmeal, split peas, noodles, pasta or rhubarb. These foods tend to foam, froth and sputter, and may block the pressure valve.
4. Place the lid on the Multi-cooker; align the protruding part of the handle with the condensation collector, and turn it counterclockwise until it locks into place. The locking pin will click into place.
5. Turn the pressure regulator knob to PRESSURE.
6. Choose the desired cooking mode by pressing either the HIGH or LOW pressure button on the control panel. The light on the HIGH/LOW button will flash and the digital display will show 1. This equals 1-minute cooking time.
7. Set the desired time by pressing the high or low button once for each additional minute or by continuously holding the button down. The longest cooking time is 99 minutes.
8. Press the START/STOP button to begin cooking. The indicator light will stop flashing. If you forget to select a desired cooking time or forget to press the START/STOP button, the unit will beep twice and the digital display will read 0.0 after 30 seconds.
9. The unit will begin to count down in minutes once the appropriate pressure has been reached. The floating valve will rise when the pressure is reached.
WARNING: NEVER TRY TO FORCE THE LID OPEN WHILE YOU ARE COOKING UNDER PRESSURE. THIS CAN RESULT IN A SERIOUS ACCIDENT.
WARNING: NEVER DEEP FRY OR PRESSURE FRY IN THE MULTI-COOKER. IT IS DANGEROUS AND MAY CAUSE A FIRE AND SERIOUS DAMAGE.
10. The Multi-cooker will beep once the cooking time ends. It will turn the automatic “Warm” function on until you press the START/STOP button to cancel the program. After pressing the START/STOP button, release the pressure. You have two options for releasing the pressure:
a. Quick release method: release the pressure immediately by turning the pressure regulator knob to STEAM. All the pressure will be released in seconds.
CAUTION: THE STEAM COMING OUT OF THE COOKER WILL BE HOT, AND MIGHT CONTAIN DROPLETS OF HOT LIQUID. ALWAYS TURN THE JET OF STEAM AWAY FROM YOUR FACE AND HANDS.
b. Natural release method: let the pressure drop naturally without turning the pressure regulator knob to “Steam”. This will take several minutes, during which the food inside will continue cooking. Some recipes (such as risotto) benefit from this extra cooking time. You will know when the pressure has been released because the floating valve will drop and you will be able to open the lid.
NOTE: If you do not press the START/STOP button at the end of the cooking time, the Multi-cooker will beep periodically to remind you that the cooking has ended.
11. Once all the pressure is released, remove the lid by turning it clockwise, lifting it up and tilting it away from you to avoid being scalded by some remaining steam or hot water condensation dripping from the inner part of the lid.
WARNING: AFTER COOKING, THE INNER COOKING POT WILL BE HOT. USE POTHOLDERS TO HANDLE IT OR LET IT COOL DOWN BEFORE REMOVING.
Rice Cooking Program
This is a 6-minute program for cooking dishes such as rice, polenta and risotto. If you prefer your grain steamed instead of cooked, use a removable steamer basket (not included).
1. Position the removable cooking pot in the Multi-cooker.
2. Add at least 8 oz. of water or cooking liquid to the cooking pot.
3. Add the appropriate amount of grain to the liquid, following the grain to liquid ratio indicated by the recipe. Do not fill the pot more than half-full.
4. Place the lid on the Multi-cooker; align the handle with the condensation collector, and turn it counterclockwise until it locks into place. The locking pin will click into place. Turn the pressure regulator knob to PRESSURE.
5. Press the RICE COOK button. The light on the RICE COOK button will flash and the digital display will read “6”
6. Press the START/STOP button to begin cooking. The indicator light will stop flashing. The program will cook for 6 minutes from the moment it builds the right amount of pressure. If you forget to press the START/STOP button, the unit will beep twice and the digital display will read 0.0 after 30 seconds.
7. When the cooking time ends, the unit will beep and automatically turn the “Warm” function on until you press the START/STOP button to cancel the program.
Basic guidelines to use the automatic rice cooking program for different types of rice:
- 1½ cup rice to 3½ cups liquid for risotto (we suggest to leave it sitting for extra 3-5 minutes after cooking time is up)
- 1½ cup rice to 2½ cups liquid for sushi (with short-grain sushi rice)
- 1½ cup rice to 1½ - 2 cups liquid for regular, fluffy rice
Slow Cooking Program
This setting will allow you to cook slow cooker classics such as pot roasts, soups and stews in up to 9 and a half hours. Load your ingredients in the morning and dinner will be waiting for you.
1. Place the removable cooking pot in the Multi-cooker.
2. Place the food to be slow cooked in the cooking pot.
3. Place the lid on the Multi-cooker; align the handle with the condensation collector, and turn it counterclockwise until it locks into place. The locking pin will click into place. Turn the pressure regulator knob to STEAM.
4. Choose the desired cooking mode by pressing either the HIGH or LOW slow cooking button on the control panel. The light on the HIGH/LOW button will flash and the digital display will show “.5”. This equals one half hour of cooking time.
5. Set the desired time by pressing the SLOW COOK button once for each additional half hour or by continuously holding the button down. The longest cooking time is 9.5hours at either 190°F (LOW) or 212°F (HIGH).
6. Press the START/STOP button to begin cooking. The indicator light will stop flashing. If you forget to select a desired cooking time or forget to press the START/STOP button, the unit will beep twice and the digital display will read 0.0 after 30 seconds.
7. The unit will begin to count down in half hour increments after the temperature reaches either 190°F (LOW) or 212°F (HIGH).
8. When the cooking time is up the unit will beep and go automatically into “Warm” function until you press the START/STOP button to cancel the program.
Warm Program
This program reheats or keeps cooked food warm.
1. Place cooked food in the removable cooking pot.
2. Place the lid on the Multi-cooker; align the handle with the condensation collector, and turn it counterclockwise until it locks into place. The locking pin will click into place.
3. Turn the pressure regulator knob to STEAM.
4. Press the WARM button. The light on the warm button will flash and the digital display will read 0.0.
5. Press the START/STOP button to begin the program. The indicator light will stop flashing.
6. Since pressure is not built up while warming the food, you can open the lid to check if your food is warm enough. To turn the program off, simply press the START/STOP button.
NOTE: When you are using the pressure cooking, the rice cooking or the slow cooking programs, the Warm setting will automatically start after the cooking time ends. The selected program’s LED light will turn off, and the Warm function light will turn on. The food will stay warm until you press the START/STOP button.
Brown Program
This program allows you to brown food before cooking. Brown your meat or poultry for the best flavor and texture, unless otherwise indicated in the recipe.
Pat dry food with a paper towel before browning. For best results, make sure the oil is hot before adding your meat or poultry. Brown the food in batches to keep the correct oil temperature for even browning.
1. Place the removable cooking pot in its place.
2. Add the appropriate amount of oil as indicated in the recipe.
3. Press the BROWN button. The light on the BROWN button will flash and the display will read 0.0. The lid should remain off.
4. Press the START/STOP button. The indicator light will stop flashing and the cooker will start heating the oil.
5. After about one minute of preheating, add food and begin browning.
6. Once you are done browning, press the START/STOP button to cancel the brown function. Now you can use any of the cooking programs –pressure, rice or slow cooking- to continue preparing the recipe. Follow the instructions for each program.
Delay Time Program
This function allows you to delay the cooking process up to 8 hours in half hour increments. You can use the delay time setting with following programs: slow cook, rice cook, high and low pressure cooking.
CAUTION: DO NOT LEAVE PERISHABLE FOODS SUCH AS MEAT, POULTRY, FISH, CHEESE AND DAIRY PRODUCTS AT ROOM TEMPERATURE FOR MORE THAN 2 HOURS (OR MORE THAN 1 HOUR WHEN THE ROOM TEMPERATURE IS ABOVE 90°F). WHEN COOKING WITH THESE FOODS, DO NOT SET THE DELAY TIME FUNCTION FOR MORE THAN 1-2 HOURS.
1. Press the DELAY TIME button. The light under the button will blink and the panel will read “.5” meaning half an hour of delay. Press the button until you reach the desired delay time.
2. Select the desired cooking program and cooking time by pressing the corresponding program button (high/low pressure, rice cooking or slow cooker) following the instructions for each program.
3. Press the START/STOP button. The Multi-cooker will begin cooking after the delay set time has elapsed.
FOR EXAMPLE: say it is 10am and you want your dinner to be ready by 6pm. Your recipe calls for 12 minutes of high pressure cooking. You can program your delay time for 7 and a half hours and then the pressure cooking program for 12 minutes. You do this by pressing the delay time button until the panel reads 7.5 and then the high pressure setting button until it reads 12. Next you press the start/stop button, and you’re all set. The cooker will start cooking at 5:30 pm and your dinner will be ready at 5:42pm. The automatic warm function will ensure that it doesn’t get cold!
Cleaning and Maintenance
Do not wash any parts of the Multi-cooker in the dishwasher except for the removable cooking pot. Always wash the Multi-cooker thoroughly after every use, or if it has not been used for an extended period.
1. Unplug and let the unit cool before cleaning.
2. Remove the removable cooking pot and wash with warm soapy water or in the dishwasher. Rinse and dry thoroughly.
3. Wipe the outer housing with a clean damp cloth. Do not submerge in water.
4. Remove the condensation reservoir by pulling it down. Wash with warm, soapy water. Rinse and dry thoroughly. Replace by pushing into place.
5. Turn the lid upside down; grip the silicone gasket and pull up to remove. Clean the silicone gasket with warm soapy water. Rinse and dry thoroughly. Replace the gasket by positioning it inside the edge of the lid and pushing it down. Make sure the groove in the center of the gasket is positioned around the metal ring on the inside edge of the lid.
NOTE: The silicone gasket must always be properly positioned on the underside of the lid; otherwise the unit will not work. Check periodically to make sure that it is clean, flexible, and not cracked or torn. (See “Getting started” section in this manual.)
6. If the silicone gasket appears damaged, cracked or torn, do not use the unit and contact our customer service department at 1-800-207-0806.
7. For optimal performance, the bottom of the Multi-cooker, in the area under the removable cooking pot where the temperature sensor and heating pad are located must be cleaned after each use. Wipe with a soft damp cloth and be sure to dry thoroughly.
8. Never use abrasive cleaners or scouring pads to clean any of the parts.
Cleaning the Pressure Regular Knob
ALWAYS check that the pressure regulator knob and the pressure safety valves are in good working order before each use.
1. After the unit has cooled, remove the lid.
2. Press down and at the same time turn the pressure regulator knob counterclockwise past STEAM to CLEAN setting and carefully lift to remove. Look through the holes to make sure there is no particle build up, and put it under running water.
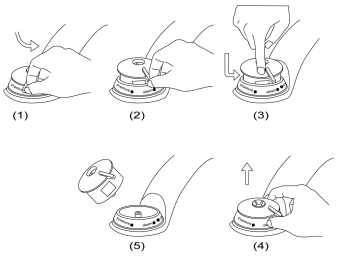
3. Turn the lid over and place on a table top. Pull out the anti-locking case. Using a brush or toothpick, check and remove any food or foreign particles that may be lodged in the floating valve. Replace the anti-locking case by pressing down.
4. Replace the pressure regulator knob by lining the two notches up to the inside wall of the pressure regulator chamber in the lid and turning clockwise. The white button on the lid should line up with the pressure or steam setting on the pressure regulator knob. If it doesn’t, remove the knob again and try realigning the notches the other way around.
Recommended Cooking Times
Pressure cooking times are approximate times. Use these times as general guidelines. Size and variety will alter cooking times.

Hints and Tips
- To ensure best cooking performance when cooking under pressure, always use at least 8 oz. of water or liquid in your recipes to create enough steam to produce pressure.
- When using the high and low pressure settings, the timer should not begin counting down until there is enough pressure. If after a reasonable time the counter hasn’t started counting down, it can mean one of three things:
- you haven’t turned the dial to a pressure setting
- the gasket has not been fitted properly into the lid
- there isn’t enough cooking liquid
- When cooking under pressure, if you are unsure of the cooking time, it is better to under cook and use the quick release method and check for doneness.
- Never fill the Multi-cooker more than 2/3 full. The Multi-cooker must have enough liquid space within the unit to generate steam or the food will not cook properly. If you are cooking foods that expand during cooking, do not fill more than half full.
- If the electric circuit is overloaded with other appliances, your Multi-cooker appliance may not operate. The Multi-cooker should be operated on a separate electrical circuit.
- Tougher, less expensive cuts of meat are better suited for the pressure cooking program because cooking under pressure breaks the fibers down for more tender results.
- Fresh fruit should be cooked on low pressure.
- Add a tablespoon of oil to the water to reduce the amount of foam produced by dry beans.