❑ Do not use oven door handle for transporting or handling the unit during installation.
❑ WARNING: Connection and first start of the appliance may only be performed by an authorised specialist.
❑ Connection must be made using an H05VV-F mains connection cable. ❑ Nominal connected loading, nominal voltage and model number of the appliance: see the rating plate, located behind the oven door, fixed to the lower left facing edge of the oven.
❑ The unit's nameplate is located at on the right sidewall of the unit.
❑ Electrical safety of the appliance can be ensured only if the equipment earth in the building installation has been installed according to regulations.
❑ On the installation side a isolating device shall be provided. Any switch with a contact gap exceeding 3 mm may be considered a separating device. Other examples are LS switches, fuses and contactors.
❑ In the case of repairs interrupt all power connections to the unit.
❑ Connection diagram
Kitchen furniture
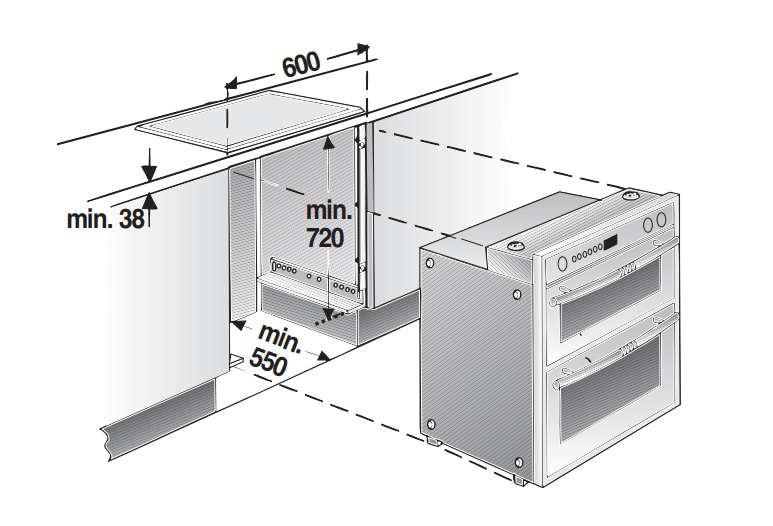
Oven housing units from virtually all lines of kitchen furniture are suitable for installing the built-in oven. However, the veneers or plastic laminates on the housing unit must be applied with heat-resistant glue (90 °C). If plastic laminate or glue are not sufficiently heat-resistant, warping, bubbling or detachment of the finish may result.
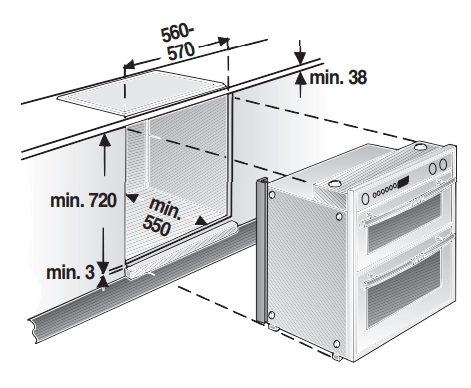
Installation without cupboard
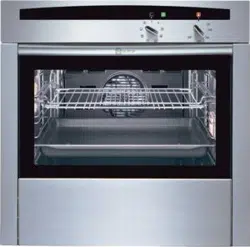
Installation of the built-in oven
❑ To burn-in the insulation, heat up the oven prior to installing the unit.
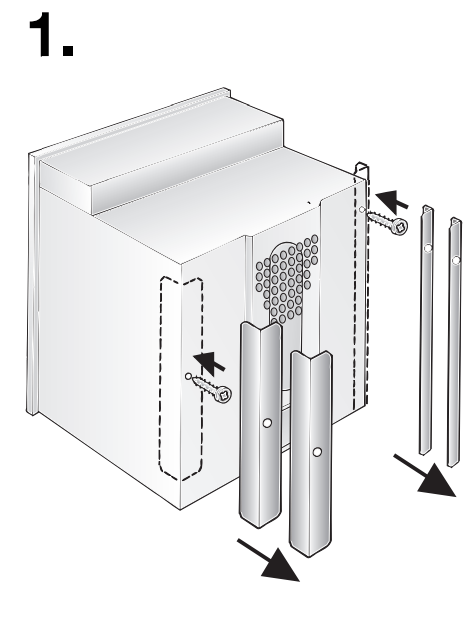
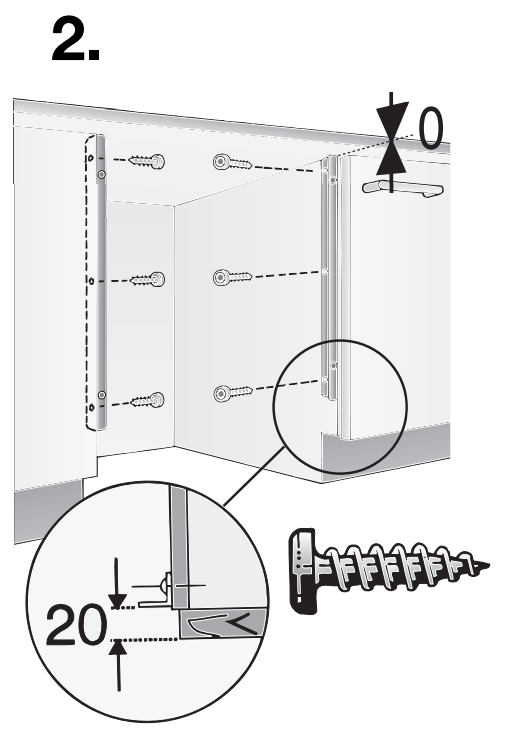
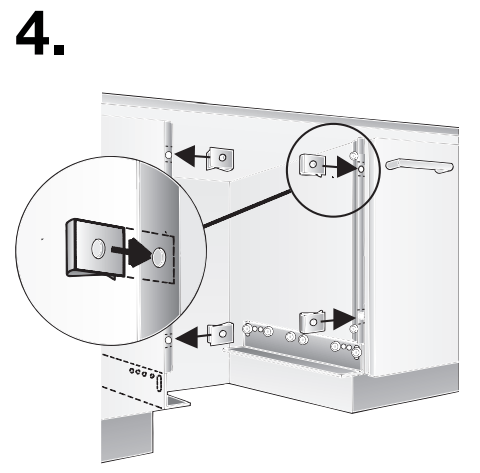
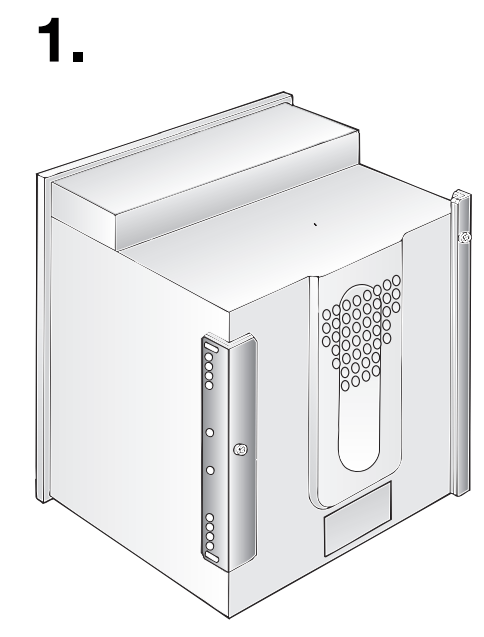
❑ Push the built-in oven into the housing unit and align the unit until it is in a level position.
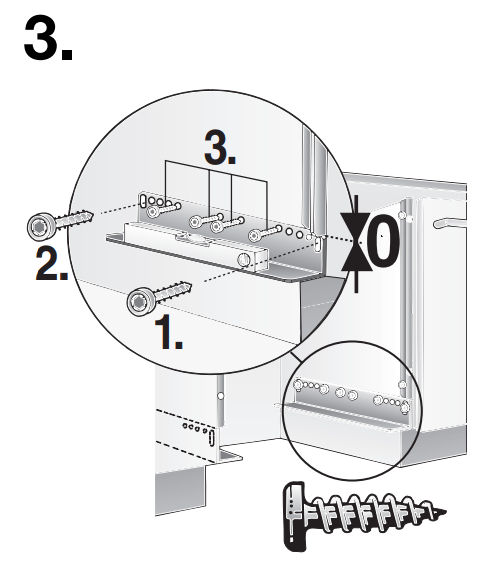
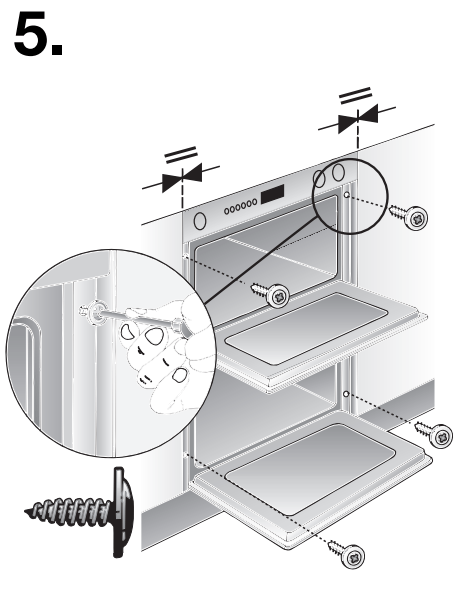
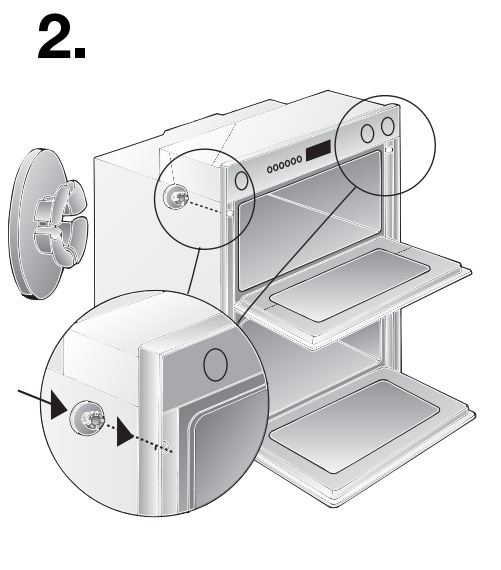
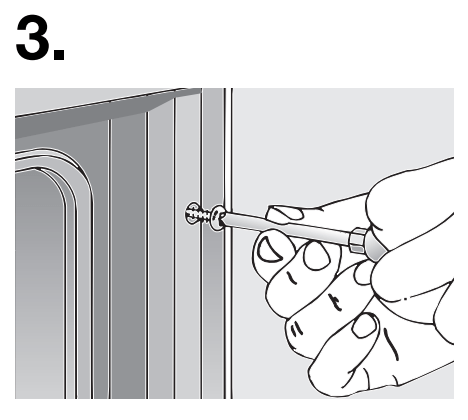
❑ Open the oven door and, using one screw on each side, fasten the built-in oven to the side strips of the housing unit (see illustration). The two screws (supplied with the builtin oven) must be started slightly outward.
❑ Verify that the built-in oven is positioned securely and in a level position, and that the required installation dimensions have been maintained.
❑ The properly installed appliance must be covered on all sides in such a fashion that not even components with rough insulation are exposed to the touch. The cover must be removable with tools only.
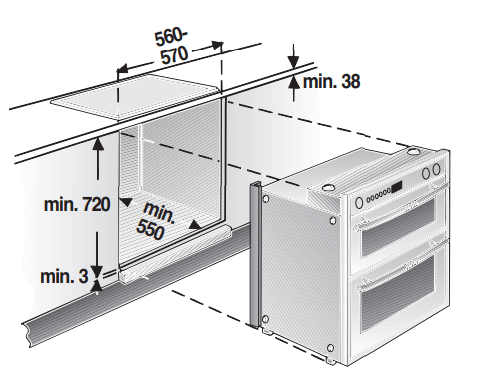
Installation with cupboard
Installation of the built-in oven
❑ To burn-in the insulation, heat up the oven prior to installing the unit.
❑ Push the built-in oven into the housing unit and align the unit until it is in a level position.
❑ Open the oven door and, using one screw on each side, fasten the built-in oven to the side strips of the housing unit (see illustration). The two screws (supplied with the builtin oven) must be started slightly outward.
❑ Verify that the built-in oven is positioned securely and in a level position, and that the required installation dimensions have been maintained.
❑ The properly installed appliance must be covered on all sides in such a fashion that not even components with rough insulation are exposed to the touch. The cover must be removable with tools only.
Maintenance
How do I change my oven bulb?
Most of our ovens use an E14 bulb. A special pack can be ordered from us which includes an E14 bulb and special tool to remove the bulb cover. Always make sure the oven is switched off and cold before replacing the bulb. The tool includes locating lugs to grip the cover. It can then be loosened by twisting and removed. This is a good opportunity to clean the bulb cover. The E14 bulb can then be changed and the cover replaced.
How do I clean my oven's fiberglass gasket?
Do not clean the fiberglass gasket.
How do I clean my oven's flat rack?
Wash with hot, soapy water and a soft cloth, rinse and then dry. Do not clean the rack in the self-cleaning oven. If flat racks are cleaned in the oven during the self-cleaning mode, they will lose their shiny finish and may not glide smoothly. If this happens wipe the rack edges with a small amount of vegetable oil, then wipe off.
How do I clean my oven's glass surfaces?
Wash with hot, soapy water and a soft cloth, rinse and then dry or use a glass cleaner.
How do I clean my oven's grill pan and grid?
Wash with hot, soapy water and a soft cloth, rinse and then dry. Do not clean the grill pan and grid in the oven during self-cleaning mode.
How do I clean my oven's painted surfaces?
Wash with hot, soapy water and a soft cloth, rinse and then dry. Do not use powder cleaning agents, steel wool pads, oven cleaners and other abrasive cleaning materials.
How do I clean my oven's telescopic racks?
Wash with hot, soapy water and a soft cloth, rinse and then dry. Avoid getting cleansing powder or residue in the telescopic slides. Re-lubricate the telescopic slides as needed by using high-temperature food-grade lubricants. Do not clean the rack in the oven during self-cleaning mode.
How do I use E-cloths?
Dusting: Use the green cloth dry for dusting. The static will pick up the dust particles. Cleaning grease and dirt: Fold the green cloth and use damp to remove any grease and dirt.
Glass cleaning and polishing: Lightly spray water on the blue cloth and wipe appliance with the cloth.
Stainless steel: Wet the green cloth and wipe away any grease. Spray the surface with water and polish with the blue cloth. Always wipe in the direction of the grain. Always make sure your cloths are clean to avoid scratching surfaces. E-cloths (part # 00466148) can be purchased in the Bosch online accessories store.
How should I protect stainless steel surfaces from marking?
You can treat the surface with a tested and approved oil impregnated Conditioning Cloth (can be ordered from us) will assist fingerprint and mark resistance. Some people use baby oil or similar products on stainless steel. However, these products do not work as they attract dust and fluff, causing a residue to form. The same Conditioning Oil as in the cloths can be ordered in a bottle from us. It is food-safe and can be used on surfaces which are in contact with food.
How to activate the oven’s self-cleaning process?
Note: Applicable for models with self-cleaning function only.
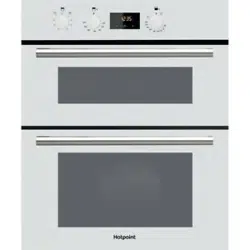
Please refer to the user manual to check if your oven has a self-cleaning function. If yes, follow the instructions in the user manual to activate the self-cleaning process. Before doing so wipe away spills, pools of oil, and excessive debris with a cloth. Those may cause smoke mission and possibly be a fire risk. Do not clean oven parts or accessories in the self-cleaning oven. The light in the oven cannot be turned on during the self-cleaning process. The special heat-resistant enamel and the polished components in the oven may become discoloured over time. This is normal and does not affect operation. Do not use scouring pads, abrasive cleaners or cleaners with high alcohol content, as they might damage the oven. Remove all accessories, racks and broiling pans before activating the self-cleaning process. In double ovens, the self-cleaning process is only available for one oven at a time.
How to remove grease from stainless steel surfaces?
Remove any deposits with our tested and approved Stainless Steel Cleaning Powder. This will remove dirt and spillages without damaging the surface. Make sure the powder is used on a damp cloth as a ‘paste’ and wipe along the grain of the metal. This product can be ordered from us.
Troubleshooting
Error code / error display / signal
The buttons on the control panel are dirty or jammed.
Reason: The buttons on the control panel are dirty or jammed.
Solution: Press all buttons. Clean the control panel with a dry cloth. Open and close the appliance door.
Odours
Odours
Reason: Food remnants in the cooking compartment
Solution: Put a couple drops of lemon juice in a cup of water. Place a spoon in the receptacle to prevent delayed boiling. Heat the water for 1 to 2 minutes at maximum microwave power.
Mechanical damage
Knob
The buttons on the control panel are dirty or jammed.
Reason: The buttons on the control panel are dirty or jammed.
Solution: Press all buttons. Clean the control panel with a dry cloth. Open and close the appliance door.
Knob-cooking area
The buttons on the control panel are dirty or jammed.
Reason: The buttons on the control panel are dirty or jammed.
Solution: Press all buttons. Clean the control panel with a dry cloth. Open and close the appliance door.
Lamp
No light on in the oven
Reason: The oven light is defective.
Solution: For a detailed description, see the instruction manual. Please only use bulbs which have been recommended by the manufacturer.
Other mechanical damage / surface defect
The buttons on the control panel are dirty or jammed.
Reason: The buttons on the control panel are dirty or jammed.
Solution: Press all buttons. Clean the control panel with a dry cloth. Open and close the appliance door.
Rust on the appliance
Rust
Reason: Fat or other residue appears as corrosion.
Solution: Clean the appliance with detergents recommended in the instruction manual.
Rust on stainless steel surface
Reason: Stainless steel surfaces have been cleaned incorrectly.
Solution: Read the instructions for care in the instruction manual. To ensure the stainless steel surface does not rust, it is important to always clean stainless steel surfaces in the polishing direction. Use a mild cleaning agent when doing so. Never use caustic or abrasive cleaning agents. Please visit our store to buy tested and approved products. Do not use stainless-steel cleaning agents on the controls. Use a damp cloth and a mild detergent. Dishcloths may contain salts. They encourage rust. Always rinse out new dishcloths and sponges thoroughly. Set aside a special cloth for stainless steel surfaces. If you use e.g. the same cloth for your iron pans and stainless steel surfaces, there is the risk of rust forming. Once rust has formed, it can no longer be removed.
Malfunction
Condensation or humidity
Condensation in the cooking compartment
Reason: When baking cakes which have a very moist coating or cooking a joint, condensation may occur.
Solution: Open and close appliance door while cooking.
Condensation in the cooking compartment or inner pane of the door
Reason: Condensation in the cooking compartment or inner pane of the door. When food with a high moisture content and frozen products are being prepared, increased condensation can accumulate in the cooking compartment or inner pane of the door.
Solution: This is due to physical causes and is not a defect. It does not affect the cooking results or the functioning of the oven.
Does not function
Check socket
Reason: No power at the socket
Solution: Check function of the socket, e.g. with a lamp. If the socket does not function, check whether the residual-current-operated circuit-breaker (FI) or the domestic fuse for the electric circuit has tripped. Mains fuse and residual-current-operated circuit-breaker (FI) are for your safety and respond if there has been an overload or short-circuit in the electric circuit. Check whether other appliances in the electric circuit have caused an overload. If required, contact an electrician.
Does not start
Reason: Door not closed properly.
Solution: Open and close the door. Check whether food remnants or a foreign object are jammed in the door.
Switch-off shortly after start
Reason: Door was not closed properly.
Solution: Open and close the door.
The buttons on the control panel are dirty or jammed.
Reason: The buttons on the control panel are dirty or jammed.
Solution: Press all buttons. Clean the control panel with a dry cloth. Open and close the appliance door.
Light does not work
No light on in the oven
Reason: The oven light is defective.
Solution: For a detailed description, see the instruction manual. Please only use bulbs which have been recommended by the manufacturer.
Other function problem
Switch-off shortly after start
Reason: Door was not closed properly.
Solution: Open and close the door.
The buttons on the control panel are dirty or jammed.
Reason: The buttons on the control panel are dirty or jammed.
Solution: Press all buttons. Clean the control panel with a dry cloth. Open and close the appliance door.
Oven does not heat up
Oven does not heat
Reason: The oven door has not been closed properly.