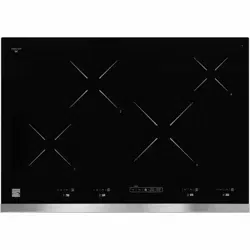
Right Front Cooking Zone 4A. Center Rear Cooking Zone
Right Rear Cooking Zone
Main Cooktop Controls
Left Rear Cooking Zone Control Pads
Left Front Cooking Zone Control Pads
Right Rear Cooking Zone Control Pads
Right Front Cooking Zone Control Pads
Center Rear Cooking Zone Control Pads
Cooktop Power Indicator LED Light
Cooktop Power Key Pad
Controls Lockout Indicator LED Light
Controls Lockout Key Pad
Minute Timer Power Key Pad
Minute Timer Down Arrow Key pad
Minute Timer Up Arrow Key pad
Main Control Display Window
Element On/Off Indicator LED Light
Element On/Off Key Pad
Power Boost Indicator LED Light
Power Boost Key Pad
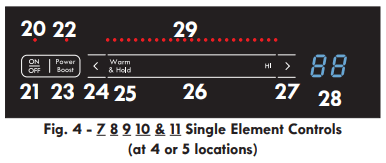
Decrease Power Key Slew pads (One for each cooking zone)
Warm & Hold Setting Key Pad
Increase & Decrease Slider Zone pads (One for each cooking zone)
Increase Power Key Slew pads (One for each cooking zone)
Cooking Zone Power Level Display (One for each cooking zone)
Power Level Indicator LED Lights (One for each cooking zone)
“Induction-ready” Griddle Plate
Before Using the Cooktop
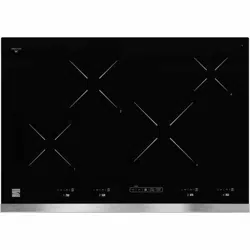
Induction Cooktop Features
A COOLER COOKTOP - A unique feature of the Induction Cooktop is whether turned ON or OFF, the cooktop surface remains cooler than standard ceramic cooktops.
CAUTION: The Cooking Zones may appear to be cool while turned ON and after they have been turned OFF. But the glass surface may be HOT from residual heat transferred from the cookware and burns may occur.
MAGNETIC DETECTOR - The coil sensor automatically detects if a pan is magnetic; if it is not, the Cooking Zone will not activate.
PAN SIZE DETECTION - The pan detection sensor automatically adapts the size of Cooking Zones to the pan sizes in use.
EFFICIENT - Induction cooking heats faster while using less energy. Induction power boils more quickly and simmers more evenly
Use the Correct Cookware Type
The magnetic Cooking Zone sensors located below the cooktop surface require the use of cookware made with magnetic material in order to start the heating process on any of the Cooking Zones.
When purchasing pans, look for cookware specifically identified by the manufacturer for use with Induction cooktops. If you are not sure, use a magnet to test whether the cookware type will work. If a magnet sticks to the bottom of the cookware, the material type is correct for Induction cooking (Fig. 5).
It is recommended to always use heavier high quality stainless steel cookware on your Induction Cooktop surface. This will greatly reduce the possibility of developing scratches on the ceramic surface.
Even quality cookware can scratch the cooktop surface, especially if cookware is slid over the ceramic cooktop surface without being lifted up. Over time sliding ANY type of cookware over the ceramic cooktop will likely alter the overall appearance of the cooktop. Eventually the buildup of scratches will make cleaning the surface difficult and degrade the overall appearance of the cooktop
Use Quality Cookware in Good Condition
The cookware used with the Induction Cooktop should have flat bottoms that make good contact with the entire surface of the Cooking Zone. Check for flatness by rotating a ruler across the bottom of the cookware (See Fig. 6). Be sure to follow all the recommendations for using cookware
Also remember to:
Use cookware made with the correct material type for Induction Cooking (Fig. 5).
Use quality cookware with heavier bottoms for better heat distribution allowing for more even cooking results.
The pan size should match the amount of food being prepared.
Do not let pans boil dry. This may cause permanent damage in the form of breakage, fusion, or marring that can affect the ceramic cooktop. (This type of damage is not covered by your warranty).
Do not use dirty pans with grease buildup. Always use pans that are easy to clean after cooking.
CAUTION: The Cooking Zones may appear to be cool while turned ON and after they have been turned OFF. But the glass surface may be HOT from residual heat transferred from the cookware and burns may occur.
CAUTION: DO NOT TOUCH HOT COOKWARE or PANS directly with hands. Always use oven mitts or pot holders to protect hands from burns.
CAUTION: DO NOT SLIDE Cookware across the cooktop surface. Doing so may permanently damage the appearance of the ceramic cooktop.
Prior to using your cooktop for the first time, apply the recommended cooktop cleaning creme to the ceramic surface. Buff with a non-abrasive cloth or no-scratch cleaning pad. This will make cleaning easier when soiled from cooking. The special cooktop cleaning creme leaves a protective finish on the glass to help prevent scratches and abrasions
Induction Cookware Recommendations
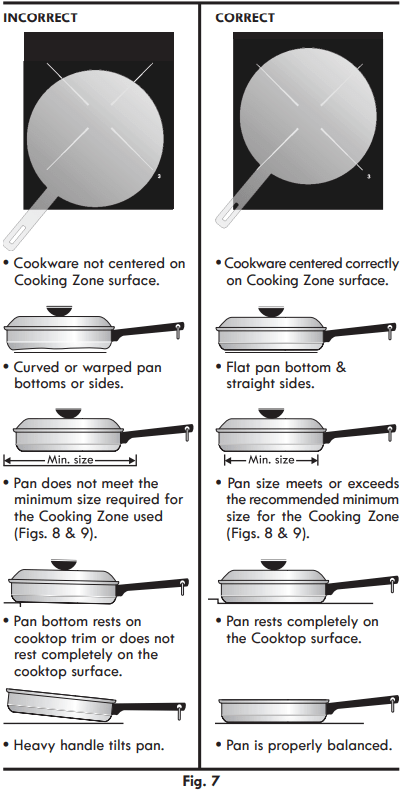
PLEASE NOTE- ANY one of the incorrect conditions listed above may be detected by the sensors located below the ceramic cooktop surface. If the cookware meets any of these incorrect conditions, one or more of the Cooking Zones will not heat indicated by a flashing power level display. Correct the problems before attempting to reactivate the cooktop.
Minimum Pan Size Requirements
NOTE: Pan bottoms should not extend more than ½” (13mm) beyond outer Cooking Zone (Induction).
The Cooking Zones available on the Induction Cooktop require a MINIMUM pan size to be used at each location
The outer tip of each Cooking Zone cross-hair is helpful to determine the pan MAXIMUM size. After centering the cookware on the cooktop, make sure the cookware does not extend more than 1/2” beyond the outer tip of cross-hair of the Cooking Zone. The pan must make FULL contact on the glass surface without the bottom of the pan touching the metal cooktop trims.
NOTE: If a pan made of the correct material is centered properly on any of the active Cooking Zones but is TOO SMALL, the affected Cooking Zone display will flash the power level and the pan will not heat.
Cooktop Control Pads
Using the Touch Control
Be sure that your finger is placed in the center of the touch pad. If the finger is not placed on the center of a pad, the cooktop may not respond to the selection made. Lightly contact the pad with the flat part of your entire fingertip. Do not just use the narrow end of your fingertip
Cooktop Power Pad
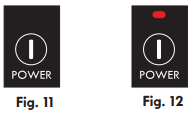
The Cooktop POWER key pad activates the entire Cooktop. To power the cooktop, touch and hold the POWER key pad for 2 seconds. A beep will sound and the Power LED will glow (Fig. 12). The cooktop will be in a ready mode for 10 seconds. If no other key pads are touched the Cooktop Main POWER will turn OFF automatically.
To turn the Main Power OFF touch and hold the Main POWER key pad for 1 second. A beep will sound and the Power LED will turn OFF (Fig. 11).
Controls Lock Pad
This feature allows the cooktop to be locked only when the cooktop is switched to OFF.
To turn on the Controls Lock feature, touch and hold the LOCK key pad for 3 seconds. A beep will sound and the Lock LED will glow (Fig. 14). Once locked, no other displays will glow and no Cooking Zones will activate (Except the hot surface message “HE” if the zone is hot).
To turn the Controls Lock OFF, touch and hold the LOCK key pad for 3 seconds. A beep will sound, the Lock LED will turn OFF (Fig. 13) and the cooktop may be used normally.
Minute Timer
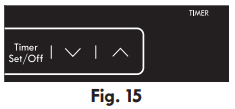
The Minute Timer feature may be useful in the kitchen if a recipe calls for keeping track of time. This feature will keep track of time from 1 to 99 minutes. The display located to the left of the Timer UP/DOWN arrow key pads will begin to count down minutes once set.
To Set the Minute Timer:
Start the cooktop timer by touching the “Timer Set/Off” pad. Touching and releasing the or the key pads will increase or decrease the Minute Timer setting by 1 minute with each key press (up to 99 minutes). You may also hold the or key to slew the time to your designated time.
Once the Timer display the desired amount of time, release the or arrow key pads. The timer will display the time remaining in minutes within the countdown process. During the last 60 seconds, the timer will countdown in seconds. Note: After the timer is set, it is normal for the displayed value to automatically go down by one minute. This is due to the fact that the display only shows the minutes remaining and does not show the countdown process in the back ground. For example when setting the timer for 3 minutes, the timer will start counting down at 02 min 59 seconds, but the timer display will only show 02 minutes, not the remaining seconds. Once the Minute Timer reaches 00, it will flash and a long beep will sound every 5 seconds indicating that the time is up. The Minute Timer will keep beeping until the “Timer Set/Off” key pad is touched.
To Cancel the Minute Timer:
At any time to cancel the minute timer, press the Timer Set/ Off pad.
Using the Slider Zone Control
The Slider zone control is a new and innovative way to set your cooking zone power. Heat is controlled by just the touch of a finger, resulting in a clean look uncluttered by knobs or dials. These controls are intuitive, precise and very stylish. Three methods of setting these controls are available for a better ease of use.
Powering On/Off the Cooking Zone
Once the cooktop is active, touch the Cooking Zone On/Off pad (Fig. 16) to activate the slider zone control.
Setting the Warm & Hold Feature
When the cooking zone is on, press the Warm & Hold pad (Fig. 17) to keep food at serving temperature.
Setting the Power Boost Feature
Your induction cooktop is equipped with a power boost feature on each cooking zone. The power boost is used to bring large quantities of water or food to cooking temperature at the fastest speed possible. The power boost feature will give you up to 139% power output for a maximum of 10 minutes on most inductors (except for the right cooking zone on the 36” model which gives you 6 minutes of power boost). After 10 (or 6) minutes, the cooking zone will continue to heat at Hi position.
To turn ON the power boost feature:
Press the Power Boost pad, Pb will appear in the display (Fig. 18) and the power boost LED will glow as long as your zone is on.
To turn OFF the power boost feature:
Touch the or select directly the position desired in the slider touch area.
Using the Slider Zone Control
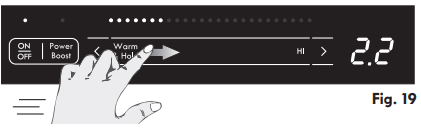
Method 1
Slide your finger in the slider touch area (Fig. 19).
Method 2
Directly touch any position in the slider touch area (Fig. 20).
Method 3
Touch or/and slew pads for precise power value setting. At startup, pressing will set the control at Low (Fig. 21) and pressing will set it at Hi (Fig. 22).
Zone Control Power levels
Over 25 power levels are available with the slider controls. Here are the exact positions for those precise settings (Fig. 23).
Setting Cooktop Controls
Operating the Cooking Zones
The Induction cooktop has Cooking Zones designed for cookware of various sizes. Be sure to place cookware that meets the minimum and maximum pan size requirements (Figs. 8 & 9) for the Cooking Zone desired and is best for the amount of food being prepared. Place the cookware with the prepared food on the Cooking Zone BEFORE setting any of the Cooktop controls.
To Turn ON one or more of the Cooking Zones:
Place the prepared food using the correct type and size cookware on the desired Cooking Zone. Be sure to center the cookware on the Cooking Zone.
Touch and hold the key pad for 2 seconds (or until a beep sounds). The Power LED located above the key pad will turn ON. NOTE: If no other key pad is touched within 10 seconds the request to Power ON the cooktop will clear.
To start one or more of the Cooking Zones lightly touch the key pad for the Cooking Zones needed. A beep will sound and the chosen Cooking Zone display will show “- -” (Fig. 16) indicating no power level for the Zone has been set yet. NOTE: If no other key pad is touched within 10 seconds the request to Power ON the Cooktop Zone will clear.
Set the desired power level for the Cooking Zone by using one of the three methods explained earlier. If the key pad (Fig. 22) is touched the Cooking Zone will start at HI power level (the Cooking Zone display will indicate HI). If the key pad (Fig. 21) is touched once the Cooking Zone will start at the low power level (the Cooking Zone display will show “Lo” and the control will beep once). PLEASE NOTE: If the cookware requirements for the Cooking Zone are not met the sensors will detect a problem and the display will flash with the power level in the affected Cooking Zone display. Any problems must be corrected before proceeding.
NOTE: Touch once, or repeatedly touch the or key pads to adjust or scroll through power levels at any time during the cooking process (To scroll through the power levels quickly touch and hold the or key pads until the power level desired is reached). Once the Cooking Zone power level has been set the food will begin to heat at that level until the power level is manually changed.
To Turn OFF the Cooking Zones:
Once cooking is complete, touch the key pad to turn the Cooking Zone OFF.
The corresponding Cooking Zone ON/OFF LED located above the key pad will turn OFF. A beep will sound and the chosen Cooking Zone display will turn off. If no other key pads are touched the Cooking Zone will shut OFF.
When any Cooking Zone is OFF, the corresponding Cooking Zone display may show HE if the Cooking Zone temperature is HOT. The display will continue to indicate HE, and even if the Cooktop is switched OFF the display will continue to indicate HE as long as the cooking zone remains HOT.
CAUTION: The Cooking Zones may appear to be cool while turned ON and after they have been turned OFF. But the glass surface may be HOT from residual heat transferred from the cookware and burns may occur if surface is touched.
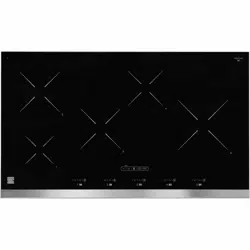
Operating the Bridge Cooking Zones
The bridge mode joins the two left cooking zones together. To use the bridge cooking zone, both left side cooking zone should be off. Press the Bridge key pad (Fig. 24), the bridge indicator light will turn on (Fig. 24). Adjust the power setting by using left front or left rear cooking zone control. To exit Bridge mode, press the Bridge key pad, the bridge indicator light will turn off.
NOTE: Power Boost is not available when bridge mode is active.
Power Level Settings
The Cooking Zones have separate Power Level displays. Once active, the Cooking Zones will provide 25 Power Levels to choose from. These include Hd, LO, 1.2, 1.4, 1.6, 1.8, 2.0, 2.2, 2.4, 2.8, 3.0, 3.5, 4.0, 4.5, 5.0, 5.5, 6.0, 6.5, 7.0, 7.5, 8.0, 8.5, 9.0, 9.5, HI, Pb. The highest setting of Pb or “Power Boost” provides up to 139% power for 10 minutes (except for the right cooking zone on the 36” model which gives you 6 minutes of power boost). Each key pad touch (or just holding down the Power Level key pad) will scroll through all the available power levels for any Cooking Zone quickly.
Preheat Recommendations
When preheating a pan on the cooktop always watch carefully. Whenever using the cooktop, always pay attention to any items cooking and remain attentive until the cooking process is complete.
Keep in mind that induction may decrease the amount of time required to preheat a cooking utensil.
Residual Heat
Once any Cooking Zone has been used for cooking and turned OFF, and if the cooktop surface temperature on any of the Cooking Zones is still too HOT, HE will appear in the display of the affected Cooking Zone. The HE will continue to display if the temperature is still too HOT.
Important operating notes
Fluids spilled or objects lying on the controls area of the cooktop may cause the cooktop to display an error code and turn OFF while cooking. Clean the spills or remove the objects from the cooktop.
Be sure the cooktop vent holes are NOT blocked. If the vent holes are blocked the cooktop internal sensor may shut OFF the cooktop to avoid overheating the appliance.
If the cookware or pan is moved from the center of any active Cooking Zone for any reason, a sensor will detect the situation and the cookware will no longer heat. The affected Cooking Zone display will flash the power level set for the Cooking Zone. The Cooking Zone will remember the power level setting for up to 3 minutes before the Cooking Zone will automatically shut OFF.
Pan Detection
All Cooking Zones will provide a Pan Detection message. If a Cooking Zone is turned ON and no pan is detected, or the pan has been moved or is not centered correctly, or is not made of magnetic material, the power level will flash in the affected Cooking Zone display. If no pan is detected, no heat will be generated and the cooking zone will turn off after 3 minutes.
Error Codes Display Message
The control display will show C then XX and if the surface is hot it will show C then XX then HE and then it will repeat.
Power Sharing
In order to give you more flexibility, your induction cooktop is equipped with more cooking zones than the number of induction generators. Each of those generators is assigned to power a specific cooking zone (Fig. 25). One or two cooking zones are assigned to each generator. To be able to give you access to the highest power ratings, the generator will focus its power onto only one cooking zone. If you use more than one cooking zone at high power on the same generator, the generator will need to share its power to both cooking zones, thus lowering the power level of one of the cooking zones.
When you are sharing power (cooking in both zones), the last zone set will cook at the power setting you selected. The other zone will experience a slight decrease from its power setting if both zones are set high enough.
Depending on the size of your cooktop, 2 or 3 sections are available:
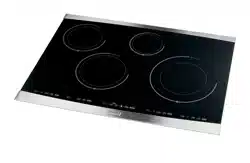
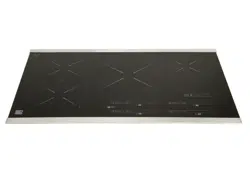
The 30” cooktop is equipped with 4 cooking zones within 2 sections.
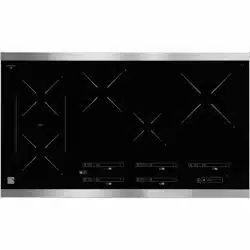
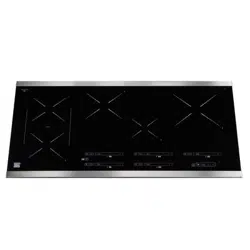
The 36” cooktop is equipped with five cooking zones within 3 sections. Note that on the 36” cooktop the right cooking zone has its own section and will not share its power.
To get the highest power output from your cooking zones, cook with only one cookware per heating section. If you need to use most of your cooking zones at once, start your cooking process on only one cooking zone within the heating section and then add your second cookware on the second cooking zone when the first one has already reached its cooking temperature. Remember to select the power setting last for the cooking zone you want to maintain at full power or set the altered power to where you want it.
Operational Noises
The electronics generating the induction fields are pretty much noiseless but they do produce heat at high power level. A soft-sounding cooling fan activates when the unit is running multiple cooking zones at once or when a cooking zone is set at very high power settings.
The buzzing sound you could hear from your cooktop is not coming from the electronics but from the cookware you are using. Here are some causes of this noise:
Most induction-ready cookware are made of several layers of materials. An encapsulated steel layer is usually used to harness the induction field and transform it into heat, which is then transferred to the other materials by radiant energy. The induction field will cause the steel layer to vibrate against the other materials in which it is encapsulated. This is the most common cause of noise from the induction process. This buzzing only happens at the higher power level settings. Note that high quality cookware manufacturers weld this steel layer in place which lowers or cancel this noise.
Light weight cookware may also vibrate. We recommend using heavy weight quality cookware.
Cookware with warped bottoms can vibrate on the ceramic glass surface at high power settings.
CAUTION: The power output of your induction cooktop is capable of warping an empty pan. Never use the higher power settings on an empty pan. Even the highest quality cookware is vulnerable to warping.
Riveted handles on cookware can also cause buzzing sounds from the vibrations.
Solid cast iron and enamelware cookware should not emit any noise. Top quality cookware made of several layers should also be relatively quiet.
General Care and Cleaning
Cleaning Various Parts of Your Cooktop
Before cleaning any part of the cooktop, be sure all controls are turned OFF and the cooktop is COOL. Remove spill overs and heavy soiling as soon as possible. Regular cleanings now will reduce the difficulty and extent of a major cleaning later.
Surfaces
How to Clean
Aluminum (Trim Pieces)
Use hot, soapy water and a cloth or paper towel. Dry with a clean cloth.
Painted and Plastic Control Knobs, Body Parts, and Decorative Trim
For general cleaning, use hot soapy water and a cloth. For more difficult soils and built-up grease, apply a liquid detergent directly onto the soil. Leave on soil for 30 to 60 minutes. Rinse with a damp cloth and dry. DO NOT use abrasive cleaners on any of these materials; they can scratch or dull the finish.
Stainless Steel, Chrome parts Decorative Trim Cooktop
Clean with hot, soapy water and a dishcloth. Rinse with clean water and cloth. Do not use cleaners with high concentrations of chlorides or chlorines. Do not use harsh scrubbing cleaners. Only use kitchen cleaners that are especially made for cleaning stainless steel. Always be sure to rinse the cleaners off from the surface as bluish stains may occur during heating that cannot be removed
Ceramic Glass Cooktop
See Ceramic Glass Cooktop Cleaning & Maintenance in this Use & Care Guide.
Ceramic Glass Cooktop Cleaning & Maintenance
Consistent and proper cleaning is essential to maintaining your Ceramic glass cooktop
Prior to using your cooktop for the first time, apply the recommended CookTop® Cleaning Creme to the ceramic surface (on the web visit www.sears.com for replacement cooktop cleaner, item number 40079). Buff with a nonabrasive cloth or no-scratch cleaning pad. This will make cleaning easier when soiled from cooking. The special cooktop cleaning cream leaves a protective finish on the glass to help prevent scratches and abrasions.
Sliding aluminum or copper clad bottom pans on the cooktop can cause metal markings on the cooktop surface. These marks should be removed immediately after the cooktop has cooled using the cooktop cleaning cream. Metal marks can become permanent if not removed prior to future use. Cookware (cast iron, metal, ceramic or glass) with rough bottoms can mark or scratch the cooktop surface. Do not slide anything metal or glass across the cooktop. Do not use your cooktop as a cutting board or work surface in the kitchen. Do not cook foods directly on the cooktop surface without a pan. Do not drop heavy or hard objects on the glass cooktop, because they may cause it to crack.
Cleaning Recommendations for the Ceramic Glass Cooktop
CAUTION: Before cleaning the cooktop, be sure the controls are turned to OFF and the cooktop is COOL.
CAUTION: DO NOT use a cooktop cleaner on a hot cooktop. The fumes can be hazardous to your health, and can chemically damage the ceramic glass surface.
For light to moderate soil:
Apply a few drops of CookTop® Cleaning Creme directly to the cooktop. Use a paper towel or use a non-abrasive plastic type no-scratch pad to clean the entire cooktop surface. Make sure the cooktop is cleaned thoroughly, leaving no residue.
For heavy, burned on soil:
Apply a few drops of CookTop® Cleaning Creme directly to the soiled area. Rub the soiled area using a non-abrasive plastic type no-scratch pad, applying pressure as needed. Do not use the pad you use to clean the cooktop for any other purpose.
If soils remain, carefully scrape soils with a metal razor blade scraper, holding scraper at a 30 degree angle to the surface. Reapply CookTop® Cleaning Creme and buff surface clean.
Cleaning Recommendations for the Ceramic Glass Cooktop
IMPORTANT NOTE: Damage to the ceramic glass cooktop may occur if you use an abrasive type scratch pad. Only use cleaning products that have been specifically designed for ceramic glass cooktop.
Plastic or foods with a high sugar content:
These types of soils need be removed immediately if spilled or melted onto the ceramic cooktop surface. Permanent damage (such as pitting of the cooktop surface) may occur if not removed immediately. After turning the surface elements OFF, use a razor blade scraper or a metal spatula with a mitt and scrape the soil from the hot surface (as illustrated). Allow the cooktop to cool, and use the same method for heavy or burned on soils.
Do not use the following on the ceramic glass cooktop:
Do not use abrasive cleaners and scouring pads, such as metal and some nylon pads. They may scratch the cooktop, making it more difficult to clean.
Do not use harsh cleaners, such as chlorine bleach, ammonia or oven cleaners, as they may etch or discolor the cooktop.
Do not use dirty sponges, cloths or paper towels, as they can leave soil or lint on the cooktop which can burn and cause discoloration.
Special Caution for Aluminum Foil and Aluminum Cooking Utensils
Aluminum foil Use of aluminum foil will damage the cooktop. Do not use under any circumstances.
Aluminum utensils Since the melting point of aluminum is much lower than that of other metals, care must be taken when aluminum pots or pans are used. Pans that boil dry may permanently damage cooktop by breaking, fusing to, or marking it.
Care and Cleaning of Stainless Steel (some models)
Some models are equipped with stainless steel exterior parts. Special care and cleaning are required for maintaining the appearance of stainless parts. Refer to the General Care & Cleaning table for detailed cleaning instructions.
Before You Call
OCCURRENCE
POSSIBLE CAUSE/SOLUTION
Entire cooktop does not operate.
Cooktop controls are locked. Set the cooktop controls to unlock the Cooktop.
Make sure household electrical circuit breaker is ON and that power is properly supplied to the Cooktop.
Service wiring is not complete.
Electrical power outage. Check house lights to be sure. Call your local electric company for service.
Cooktop turns OFF while cooking
Cooktop internal heat sensor has detected high temperatures inside the appliance. Be sure the appliance vent holes are not blocked. Refer to the Installation Instructions supplied with the cooktop for more detailed cooktop installation information.
Fluids spilled or object lying on controls area of cooktop. Clean spills or remove object. Repower cooktop
Cooking Zone does not heat food (Power level flashing).
No cookware was placed on the Cooking Zone, or the cookware material type is incorrect for Induction Cooking.
Cookware bottom not large enough for Cooking Zone
Cookware is warped or in poor condition.
Cookware is not centered on Cooking Zone
Cookware resting on cooktop trim or does not rest completely on cooktop surface
Cooking Zone does not heat food.
No power to the appliance. Check steps under "Entire cooktop does not operate" in this checklist.
ncorrect Cooking Zone control setting. Make sure the correct control is ON for the Cooking Zone being used
Cooking Zone heats food too hot or not hot enough.
Incorrect power level setting. Adjust the power level setting higher or lower and refer to recipe for guidance and adjust accordingly
Food does not heat evenly.
Lightweight or warped pans were used. Be sure to use good quality cookware.
Use only flat bottom, evenly balanced medium or heavyweight cookware. Heavy and medium weight pans heat evenly. Because lightweight pans heat unevenly, foods may burn more easily.
Adjust Cooking Zone power level setting until the proper amount of heat is obtained.
Poor cooking results.
Many factors affect cooking results. Adjust the recipe’s recommended power levels or cooking times
Cookware is too lightweight or warped. Use heavier quality cookware so foods being prepared may cook more evenly
Cooktop Zone Control displays C or timer display displays a 2 digits error code.
Induction Cooktop main control has detected a fault or error condition. Try turning electrical power supply OFF and back ON to cooktop in order to reset Cooktop main controls. Make sure nothing touch control panel area (utensils, cookware, etc.). If fault recurs, record fault number and turn power supply to Cooktop OFF.
Cooking Zone LED continuously flashes.
Induction Cooktop pan detection sensors do not see the correct cookware. Test with a magnet to be sure cookware is made with Induction compatible material.
Cookware has been removed from the Cooking Zone without turning the Cooking Zone OFF. Place cookware back on to the Cooking Zone or if finished cooking turn off the affected Cooking Zone.
Cookware is not centered over the Cooking Zone properly. Refer to Fig. 7 for correct cookware placement
Metal marks on ceramic cooktop surface
Sliding or scraping of metal utensils on cooktop surface. DO NOT slide cookware or cooking utensils across the cooktop surface. Use the recommended ceramic glass cooktop cleaning creme to remove the marks. See "Cooktop Cleaning & Maintenance" in the General Care & Cleaning section.
Scratches or abrasions on ceramic cooktop surface
Coarse particles such as salt or sand between cooktop and cookware or cooking utensils can cause scratches. Be sure cooktop surface and bottoms of utensils are clean before placing on cooktop. Small scratches do not affect cooking and will become less visible with time
Cleaning materials not recommended for ceramic-glass cooktop have been used. See "Cooktop Cleaning & Maintenance" in the General Care & Cleaning section.
Cookware with rough bottoms was used. Use smooth, flat-bottomed cookware ONLY.
Brown streaks or specks on ceramic cooktop surface
Boil overs are cooked onto cooktop surface. Use a razor blade scraper to remove soil. See "Cooktop Cleaning & Maintenance" in the General Care & Cleaning section.
Areas of discoloration with metallic sheen on ceramic cooktop surface
Mineral deposits from food and/or water. Remove using a ceramic-glass cooktop cleaning creme. Remember to use cookware with clean, dry bottoms. For more information See "Cooktop Cleaning and Maintenance" in the General Care & Cleaning section.


 or the
  key pads will increase or decrease the Minute Timer setting by 1 minute with each key press (up to 99 minutes). You may also hold the

 or select directly the position desired in the slider touch area.

 slew pads for precise power value setting. At startup, pressing

 key pad for 2 seconds (or until a beep sounds). The Power LED located above the
  key pad for the Cooking Zones needed. A beep will sound and the chosen Cooking Zone display will show “- -” (Fig. 16) indicating no power level for the Zone has been set yet.
  key pad (Fig. 22) is touched the Cooking Zone will start at HI power level (the Cooking Zone display will indicate HI). If the
  key pad (Fig. 21) is touched once the Cooking Zone will start at the low power level (the Cooking Zone display will show “Lo” and the control will beep once).