User Guide
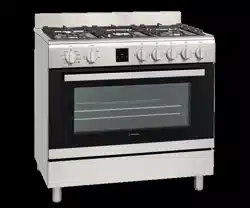
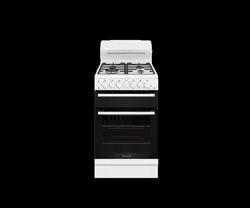
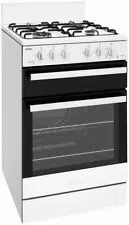
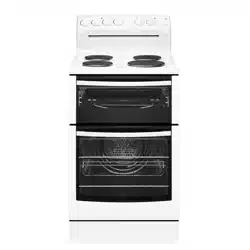
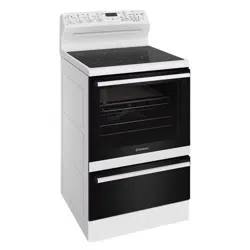
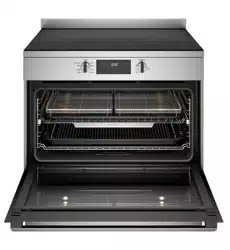
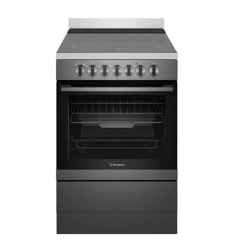
Description of your appliance

Control Panel
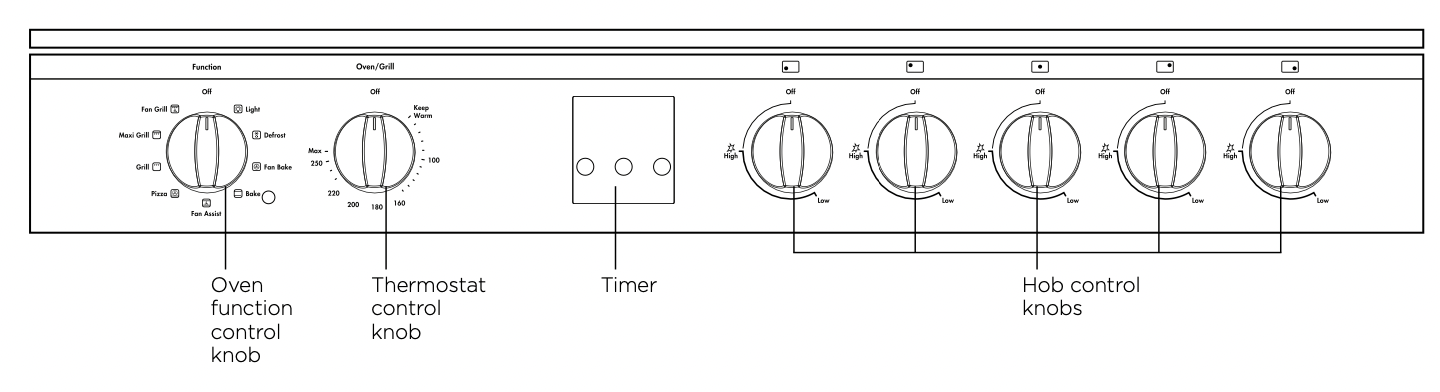
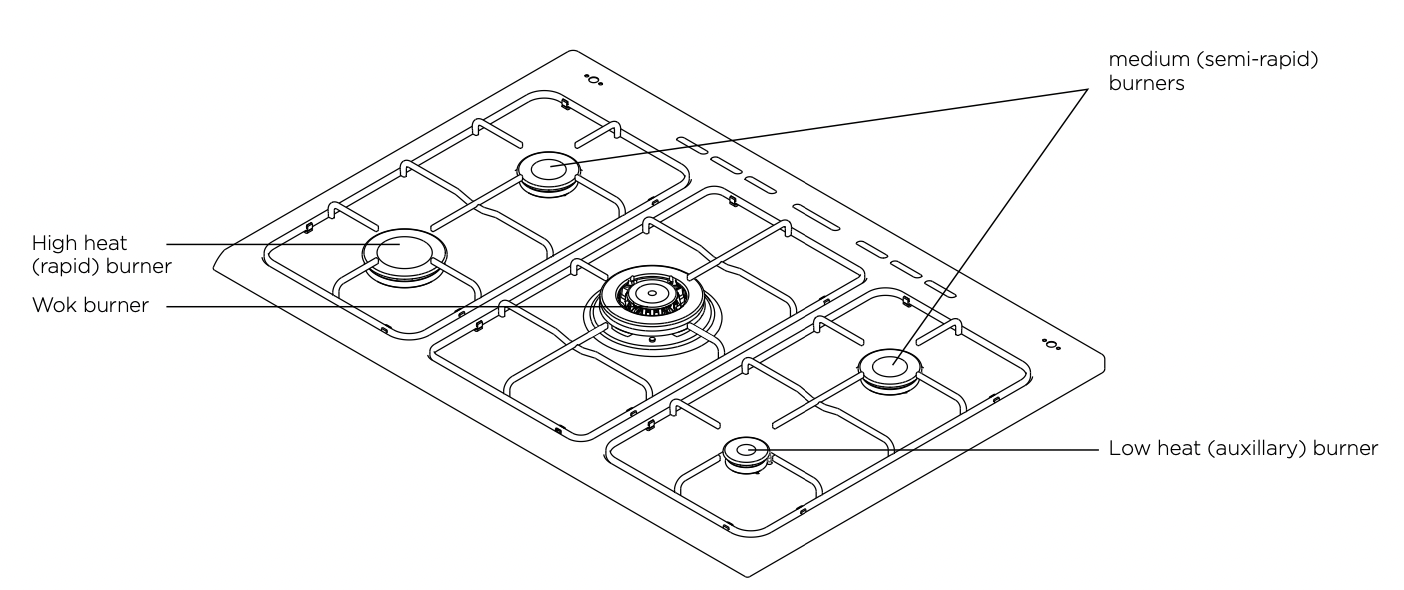
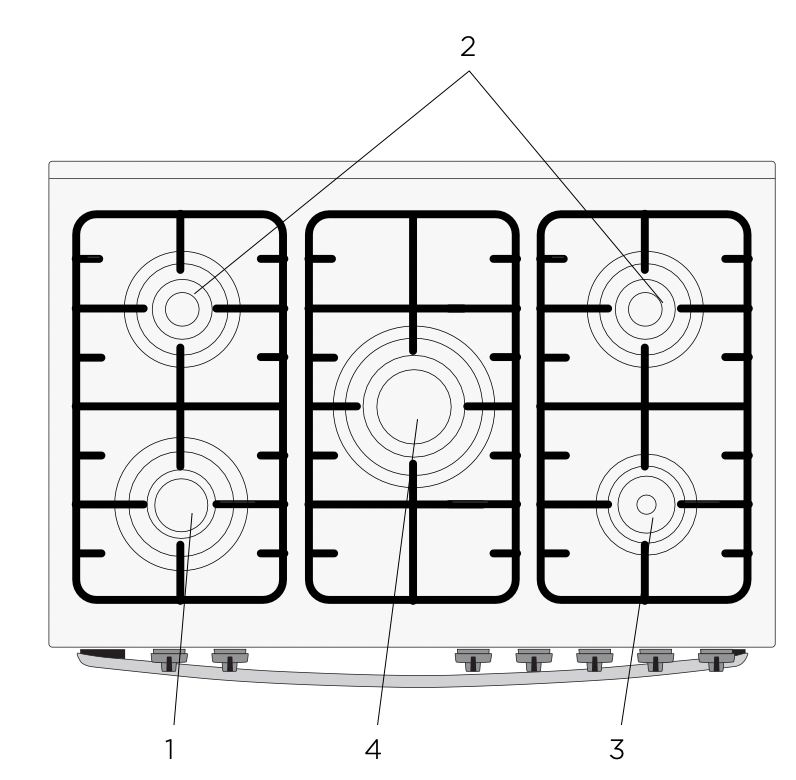
Gas Hob
Before operating your appliance for the first time
Preparing your appliance for the first time
- Please remove all internal boxes and bags from the oven before operation.
- Please wipe out the oven interior prior to operation with warm soapy water and polish dry with a soft clean cloth. Do not close the oven door until the oven is completely dry.
- New appliances can have an odour during first operation. It is recommended to ‘run in’ your oven before you cook for the first time. Run the oven at 180°C for 2 hours and ensure that the room is well ventilated.
- DO NOT line the oven with foil, it will damage the enamel.
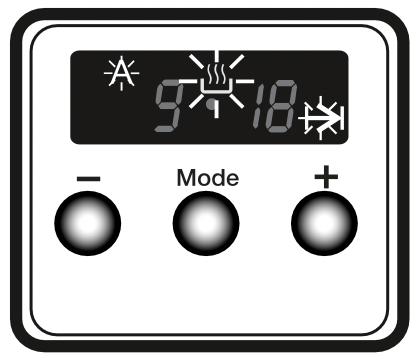
Use of Digital Timer
Time adjustment
The time must be set before you start using the oven. Following the power connection, the symbol "A" and three "0" s will flash on the screen.
NOTE: The oven functions cannot be operated until the the time has been set.
In the event of power failure the time will be reset and need to be reprogrammed
- Press "+" and "-" keys simultaneously. Symbol will appear, and the dot in the middle of the screen will start to flash.

- Adjust the time while the dot is flashing, using the "+" and "-" keys.
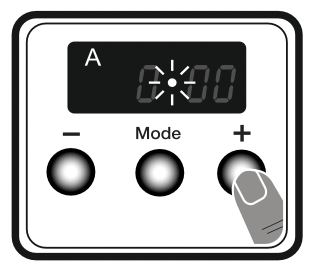
- After a few seconds the dot will stop flashing and light continuously. The time of day will be displayed and your clock is now set.

Using your gas cooktop
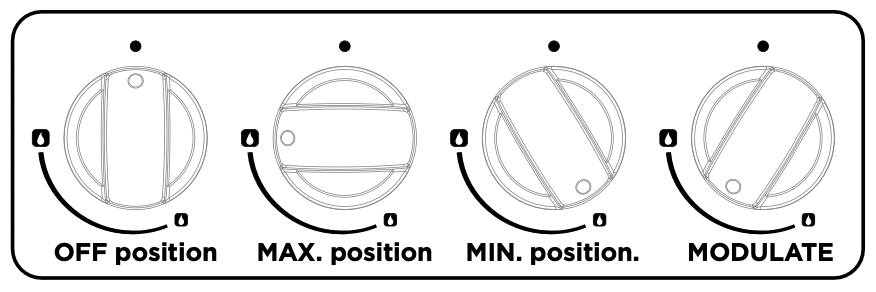
Using your gas hotplates
NOTE: Gas controls turn anticlockwise from ‘Off’ and have limited movement.
Lighting the burners
Electronic ignition
These hobs are fitted with mains powered electronic ignition. When the appliance has been connected and the power is on, depressing any knob will release sparks to all burners. To light a burner, depress the corresponding knob and while continuing to depress knob turn anti-clockwise to ‘HI’ position. The knob may be released once the flame is established, and turned further anti-clockwise to r,educe the flame height as desired.
The burners are equipped with a flame failure device providing security in case of an accidentally extinguished flame. If such a case occurs, the device will block the burners gas lines and will avoid any accumulation of unburned gas. Wait 90 seconds before re-igniting an extinguished gas burner
WARNING
- Keep hands clear of burners when lighting.
- If burner does not light within 5 seconds, turn knob to ‘Off’ position, allow gas to disperse, then try lighting again.
- Burners MUST be operated between ‘HIGH’ and ‘LOW’ settings only.
ENVIRONMENT
To conserve gas, place the pan centrally over the burner and adjust the flame so that it does not go past the edge of the cookware.
Your hob has burners of different diameters. The most economic way of using gas is to choose the correct size gas burners for your cooking pan size and to bring the flame to minimum position once the boiling point is reached. It is recommended to always cover your cooking pan. In order to obtain maximum performance from the main burners, use pots with the following flat bottom diameters. Using smaller pots than the minimum dimensions stated below will cause energy loss.
Intense heat wok Burner: 22-26cm
Medium heat (Semi-rapid) Burner: 14-22cm
Low heat (auxiliary) Burner: 12-18cm
Make sure that the tips of the flames do not spread out of the outer circumference of the pan, as this may also harm the plastic accessories around the pan (handles etc.).
NOTE: In the absence of electrical power, carry out the ignition directly to the burner with a hand held ignition source.
- High heat burner (11.2 MJ/h)
Used for fast heating with large size cookware items.
- Medium heat burner (6.60 MJ/h)
Used for normal cooking and simmering with mid size cookware items.
- Low heat burner (3.90 MJ/h)
Used for simmering with small cookware items.
- Intense heat wok burner (13.0 MJ/h)
Used for very fast heating with woks and other large size cookware items.
Using your oven
Oven Function Control Knob:
To select the desired cooking function, turn the knob to the related symbol. the details of the oven functions are explained in the next section.
Oven Thermostat Control Knob:
After the cooking function has been set, the desired temperature can be adjusted by oven thermostat knob and the oven will start to operate (timer must be adjusted, if available).The thermostat signal light will be on or off according to the thermostat operation.
Oven Functions
Light
Only the oven light will be turned on and it remains on in all the cooking functions.
Bake
The oven’s thermostat and warning lights will be turned on, the lower and upper heating elements will start operating.
The static cooking function emits heat, ensuring even cooking of the lower and upper food. This is ideal for making pastries, cakes, baked pasta, lasagne and pizza. Prehating the oven for 10 minutes is recommended and it is best to cook on only one shelf at a time in this function.
Defrost Function
The oven’s warning lights will be turned on, the fan starts operating.
To use the defrost function, take your frozen food and place it in the oven on a shelf placed in the third slot from the bottom. It is recommended that you can place an oven tray under the defrosting food, to catch the water accumulated due to melting ice. This function will not cook or bake your food, it will only help to defrost it.
Grill Function
The oven’s thermostat and warning lights will be turned on, the grill heating element will start operating.
The function is used for grilling and toasting foods, use the upper shelves of oven. Lightly brush the wire grid with oil to stop foods sticking and place foods in the center of the grid. Always place a tray beneath to catch any drips of oil or fat. It is recommended to pre-heat the oven about 10 minutes.
WARNING: When grilling, the oven door must be closed and the oven temperature should be adjusted to 190°C.
Maxi Grill
The oven’s thermostat and warning lights will be turned on, the grill and upper heating elements will start operating.
The function is used for faster grilling and for covering a larger surface area, such as grilling meats, use the upper shelves of oven. Lightly brush the wire grid with oil to stop foods sticking and place foods in the center of the grid. Always place a tray beneath to catch any drips of oil or fat. It is recommended to pre-heat the oven about 10 minutes.
WARNING: When grilling, the oven door must be closed and the oven temperature should be adjusted to 190°C.
Fan Bake
The oven’s thermostat and warning lights will be turned on, the ring heating element and fan will start operating.
The turbo function evenly disperse the heat in the oven. All foods on all racks will be cooked evenly. It is recommended to pre-heat the oven about 10 minutes.
Fan Assist
The oven’s thermostat and warning lights will be turned on, the upper and lower heating elements and fan will start operating.
This function is very good for obtaining results in baking pastry. Cooking is carried out by the lower and upper heating element within the oven and by the fan providing air circulation, which will give a slight grill effect to the food. It is recommended to pre-heat the oven about 10 minutes.
Pizza Function
The oven’s thermostat and warning lights will be turned on, the ring and lower heating elements and fan will start operating.
Fan and lower heating function is ideal for baking food, such as pizza, equally in a short time. While the fan evenly disperses the heat of the oven, the lower heating element ensures the baking of food dough.
Fan Grill
The oven’s thermostat and warning lights will be turned on, the grill heating element and fan will start operating.
The function is ideal for thicker foods when grilling, use the upper shelves of oven. Lightly brush the wire grid with oil to stop foods sticking and place foods in the center of the grid. Always place a tray beneath to catch any drips of oil or fat.
WARNING:
When grilling, the oven door must be closed and the oven temperature should be adjusted to 190°C.
Once the food is cooked, turn the temperature selector off in an anticlockwise direction. Do not force it right round in a clockwise direction as this will result in damage to the thermostat. Turn the multifunction selector off.
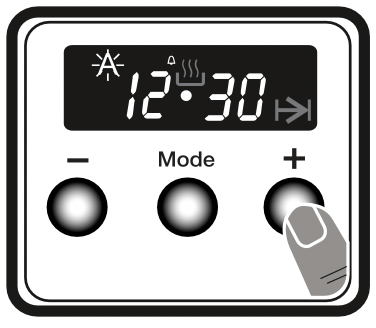
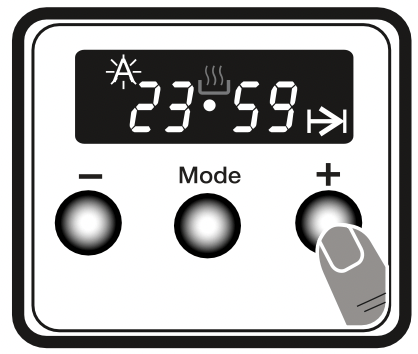
Audible warning time adjustment
The audible warning time can be set to any time between 0:00 and 23:59 hours. Audible warning time is for warning purposes only. The oven will not be activated with this function.
- Press MODE. The symbol
 will begin to flash and three "0" s will appear.
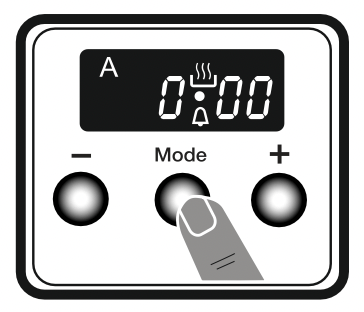
- Select the desired time period in minutes using the - and + keys while
 is flashing.

- The symbol
 lights continuously, the time is saved and the warning is set.

Note: The timer will countdown but the countdown time will not be shown on the display.
When the timer reaches zero an audible warning will sound and the symbol  will flash. Press any key to stop the audible warning. The symbol will disappear.
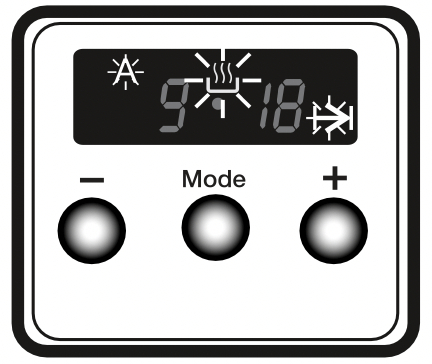
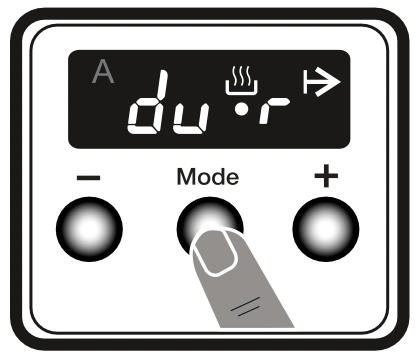
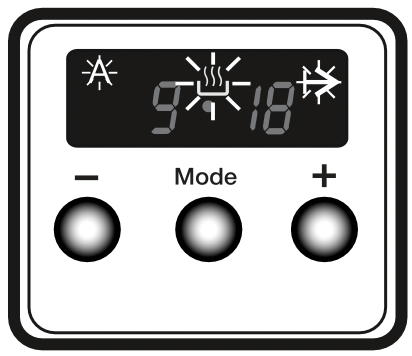
Semi-automatic time adjustment (cooking period)
This function helps you to cook for a fixed period of time. A time range between 0 and 10 hours can be set. Prepare the food for cooking and put it in the oven.
- Select the desired cooking function and the temperature by turning the control knobs.
- Press MODE until you see "dur/
 " on the screen. The symbol "A" will flash.
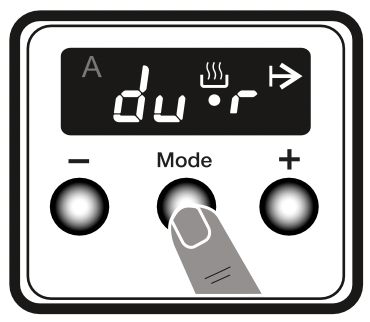
- Select the desired cooking time period using the "-" and "+" keys.
- The current time reappears on the screen, "A",
 and
and  light continuously.

When the timer reaches zero, the oven will switch off and an audible warning will sound. The symbol "A",  will flash. Turn both control knobs to position "0" and press any key on the timer to stop the audible warning. The symbol will disappear and the timer will switch back to manual function.
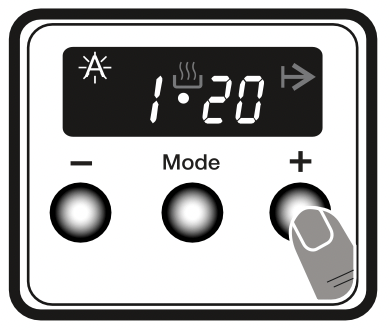
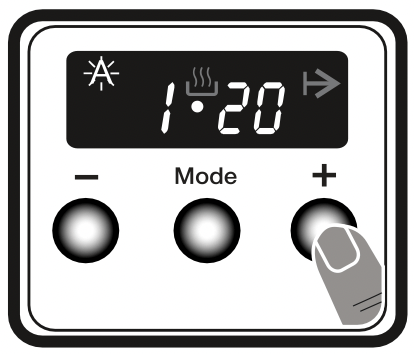
Semi-automatic time adjustment (finishing time)
This function automatically starts the oven so that cooking finishes at a set time. You can set an end time up to 10 hours after the current time. Prepare the food for cooking and put it in the oven.
- Select the desired cooking function and the temperature by turning the control knobs.
- Press MODE until you see "end/
 " on the screen. "A" and the days time will flash.
- The current time reappears on the screen, "A" and light continuously.
- The current time reappears on the screen, "A",
 and
and  light continuously.
When the timer reaches zero, the oven will switch off and an audible warning will sound. The symbol "A" and  will flash. Turn both control knobs to position "0" and press any key on the timer to stop the audible warning. The symbol will disappear again and the timer will switch back to manual function.
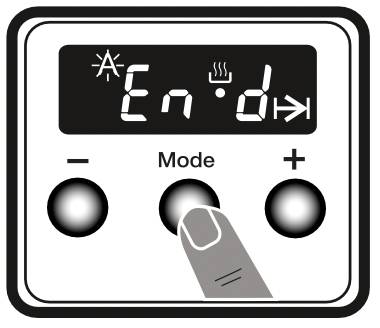
Full-automatic programming
This function is used to cook after a certain period of time and within a certain duration. A time up to 10 hours after the actual time can be set. Prepare the food for cooking and put it in the oven.
- Select the desired cooking function and the temperature by turning the control knobs.
- Press MODE until you see "dur/" on the screen. The symbol "A" will flash.
- Select the desired cooking time period using the "-" and "+" keys.
- The current time reappears on the screen, "A", and light continuously.
- Press MODE until you see "end/ " on the screen. "A", and the time will flash.
- Select the desired finishing time using the "-" and "+" keys.
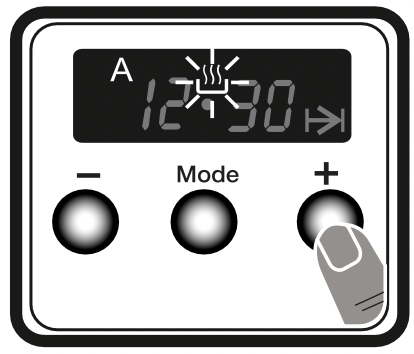
- Add the cooking period to the actual time. You can set a time up to 23 hours and 59 minutes after this.
- The current time reappears on the screen, "A", and light continuously.
The oven will calculate the time and automatically start the oven so that cooking finishes at the set finishing time. When the timer reaches zero, the oven will switch off and an audible warning will sound. The symbol "A", will flash. Turn both control knobs to position "0" and press any key to stop the audible warning. The symbol will disappear and the timer switch back to manual function.
On completion of cooking
- The heat source will turn off, the timer will beep and the end time and/or cook time ‘indicators’ will flash.
- Even though the heating element turns off the oven will still retain substantial heat. This will continue to cook the food until it is removed or the oven cools down. If you do not plan on being present when the oven turns off, you should take this extra heating time into account.
- Turn the function and temperature controls to the off position.
- Press any button to stop the timer beeping.
Cooling/Venting fan
Your appliance is fitted with a cooling fan.
This prevents your appliance from overheating and reduces the condensation inside the oven. It will operate whenever you are using your oven or grill and will expel warm air from the appliance. In some appliances the cooling fan may continue to operate after the appliance is turned off. It will switch off by itself once the oven is cool
Condensation
Excess condensation may fog the oven door. This may happen when you are cooking large quantities of food from a cold start. You can minimise condensation by:
- Keeping the amount of water used whilst cooking to a minimum.
- Making sure that the oven door is firmly closed.
- Baking custard in a baking dish that is slightly smaller than the water container.
- Cooking casseroles with the lid on.
NOTE: If you are using water in cooking, this will turn to steam and may condense outside your appliance. This is not a problem or fault with your oven.
Cooking test
Get to know your new oven with this ‘Simple Test Cake’
Although we strive for a perfect performing oven, it’s possible that there will be some variation in colour when baking. Therefore, we suggest this simple, easy and delicious to make Simple Test Cake, it can help you understand your new oven. All ovens do sometimes have hot or cold spots, therefore it is important to judge with your eye as you may require to rotate during baking.
‘Simple Test Cake’
- 125g butter, softened to room temperature
- 1 cup caster sugar
- 1 teaspoon pure vanilla essence
- 4 large eggs
- 2 cups self-raising flour
- pinch of salt
- 4 tablespoons (80ml) full-cream milk
NOTE: If desired substitute butter for either margarine or olive oil spread. Recipe is based on the Australian standard metric 250ml cup and 20ml tablespoon sets.
Method:
- Butter base and sides of two 20cm straight-sided round or square cake pans. Then line the base with grease proof or baking paper.
- Preheat oven to moderate ‘180°C’ (170°C fan forced) and ensure oven shelf is in the centre position of oven.
- Cream softened butter and sugar until light in colour.
- Add vanilla essence.
- Then eggs one at a time, beating well after each addition.
- Sift flour and salt into the mixture and beat until well combined.
- Add milk and beat or stir to combine.
- Spoon mixture equally between prepared cake pans.
- Bake in preheated oven, middle shelf for about 25 to 35 minutes or until when tested with a fine cake skewer it comes out clean, or the edges of the cakes have come away slightly from the sides of the cake pans.
- Remove from oven to wire cake rack and rest for 5 minutes before removing from cake pans. Cool completely.
To Serve: sandwich together with your favourite jam or conserve, and dust top with pure icing sugar.
- For best baking results preheat oven for 30 minutes.
- Select the correct shelf location for food being cooked.
- Make sure dishes will fit into the oven before you switch it on.
- Keep edges of baking dishes at least 40mm from the side of the oven. This allows free circulation of heat and ensures even cooking.
- Do not open the oven door more than necessary.
- Do not place foods with a lot of liquid into the oven with other foods. This will cause food to steam and not brown.
- After the oven is turned off it retains the heat for some time. Use this heat to finish custards or to dry bread.
- Do not use a lot of cooking oil when roasting. This will prevent splattering oil on the sides of the oven and the oven door. Polyunsaturated fats can leave residue which is very difficult to remove.
- When cooking things which require a high heat from below (e.g. tarts), place the cooking dish on a scone tray in the desired shelf position.
- For sponges and cakes use aluminium, bright finished or non-stick utensils.
- Remove unnecessary trays or dishes when roasting or baking.
Oven shelf location
Your oven has five positions for shelves. These are number from 1 (the lowest shelf position to 5 (the highest shelf position) See diagram.
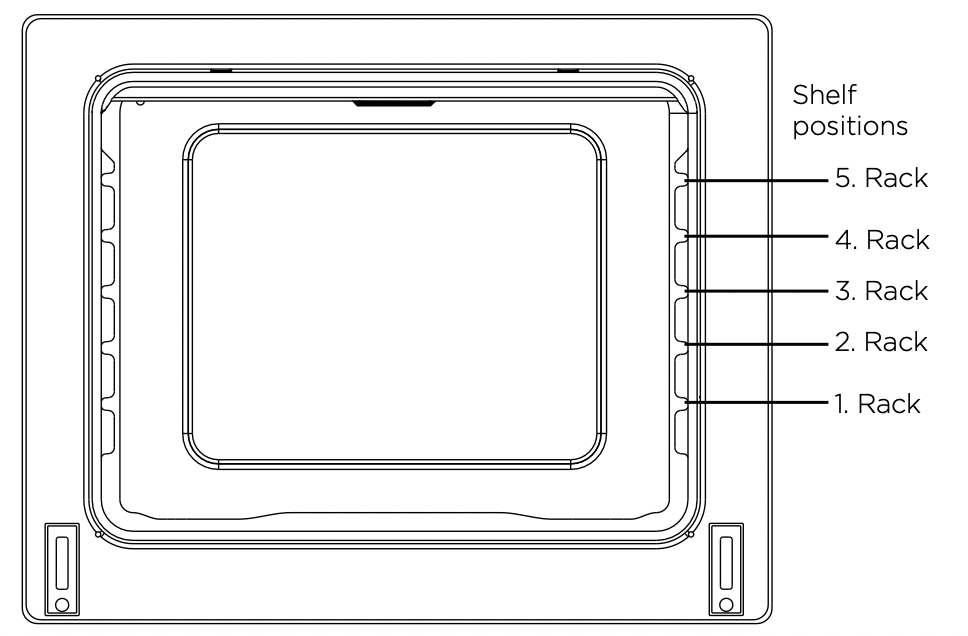
To give maximum space above and below the shelves, load them in this way:
- When cooking with 1 shelf, use position 3 or 4.
- When cooking with 2 shelves, use position 1 and 4.
Use the oven efficiently, by cooking many trays of food at the same time. For example:
- Cook 2 trays of scones, small cakes or sausage rolls.
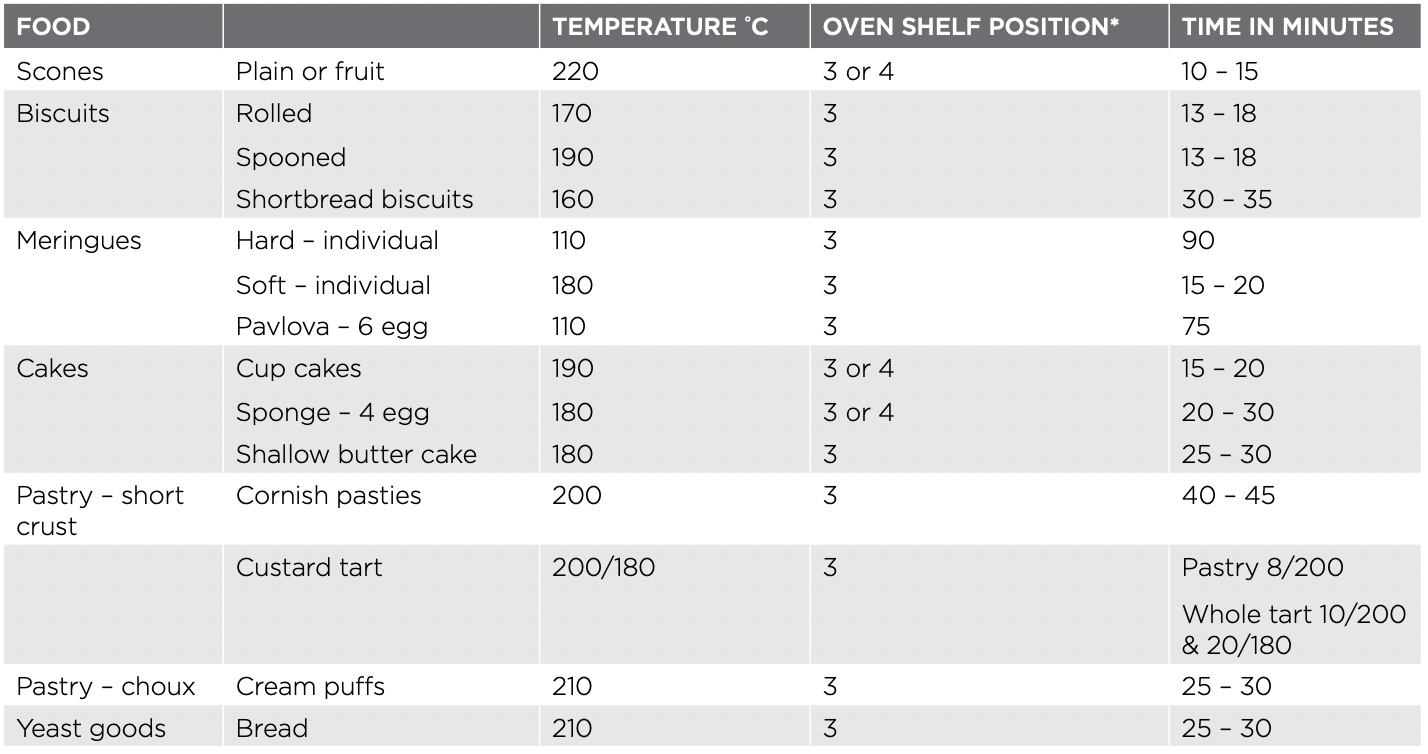
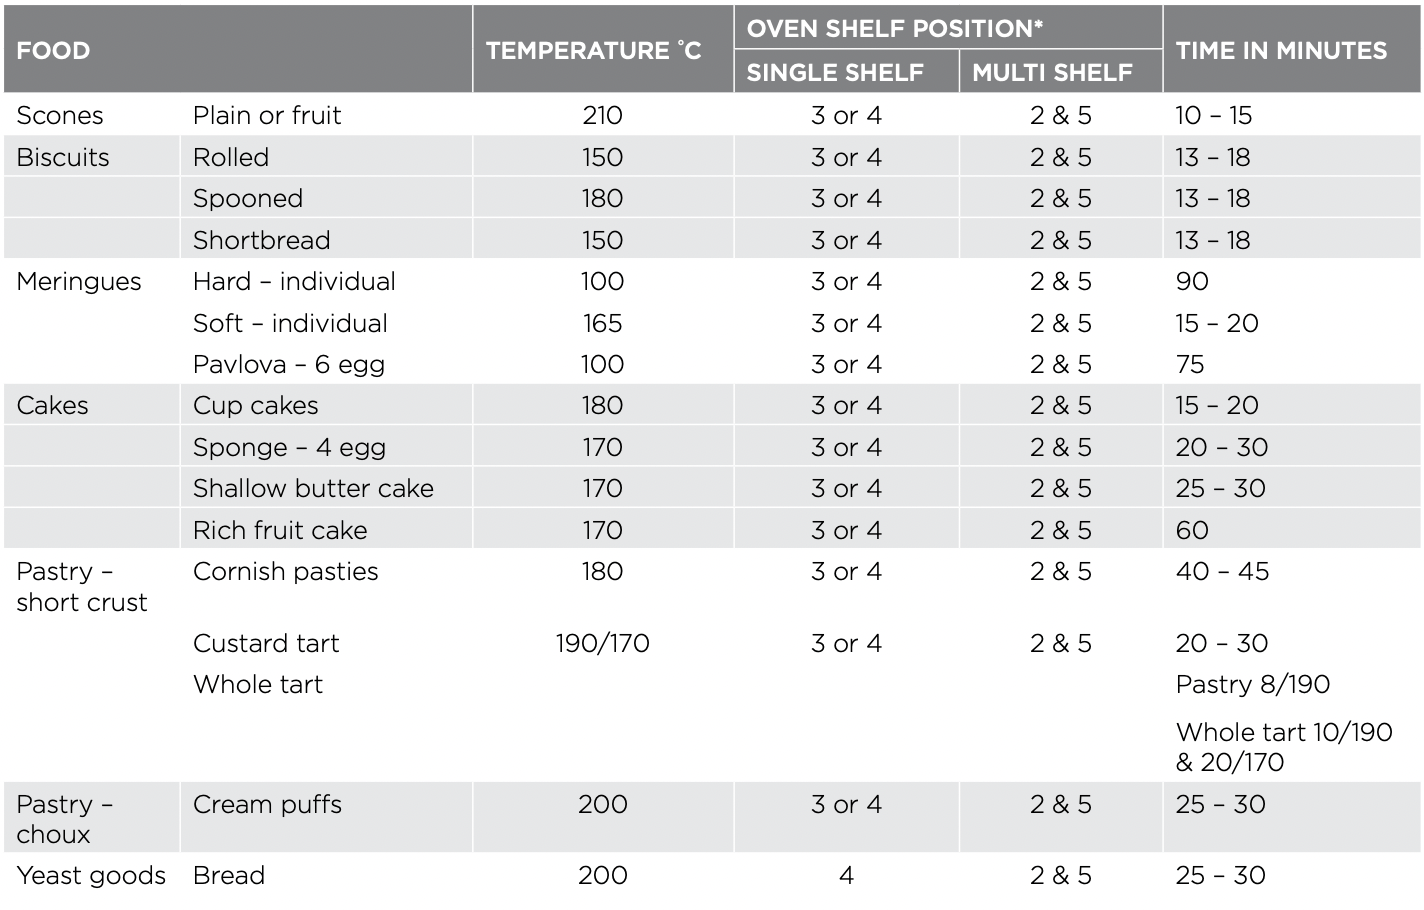
Cooking Guide
Choosing the best oven settings
The following table is intended as a guide and experience may show some variation in cooking times necessary to meet individual requirements. We recommend that you preheat your oven for 30 minutes.
Modes without oven fan
Modes with oven fan
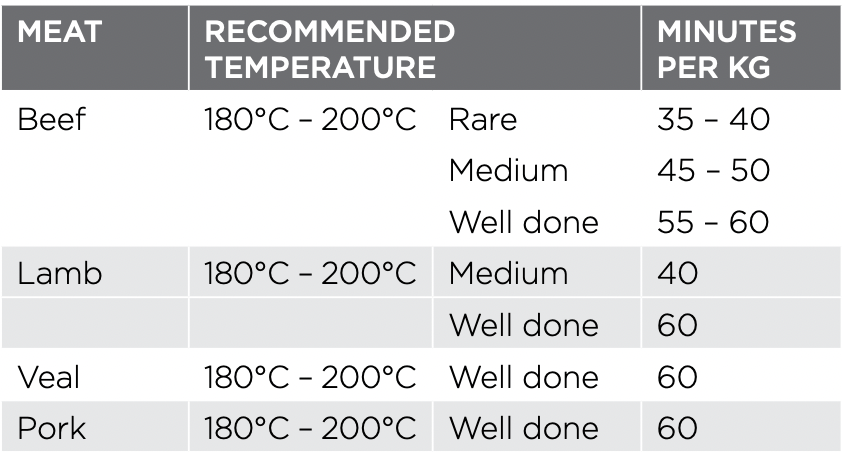
Roasting Meat
- Place the meat in the oven and set the temperature between 180°C and 200°C. (It is recommended to wrap your meats in an oven roasting bag or foil to prevent fats and oils from splattering, making it easier to clean your oven.)
- Use the grill/oven dish and grill insert.
Place the meat on the insert.
- Do not pierce the meat, as this will allow juices to escape.
- When the meat is cooked, take the roast out of the oven, wrap in aluminium foil and leave to stand for about 10 minutes. This will help retain the juices when the meat is carved. The table shows temperatures and cooking times for different kinds of meat. These may vary depending on the thickness or bone content of the meat.
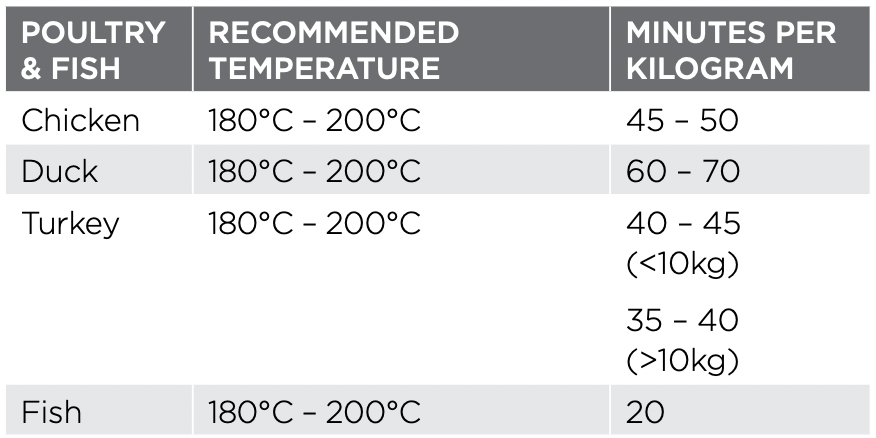
Roasting poultry and fish
- Place the poultry or fish in an oven set at a moderate temperature of 180°C.
- Place a layer of foil over the fish for about three quarters of the cooking time.
The table shows temperatures and cooking times for different kinds of fish and poultry. These may vary depending on the thickness or bone content of the meat.
Grilling Guide
WARNING: Always clean the grill/oven dish after every use. Excessive fat build up may cause a fire.
Grilling is conducted with the oven door closed
As a method of cooking, grilling can be used to:
- Enhance the flavours of vegetables, fish, poultry and meat.
- Seal the surface of the food and retain the natural juices.
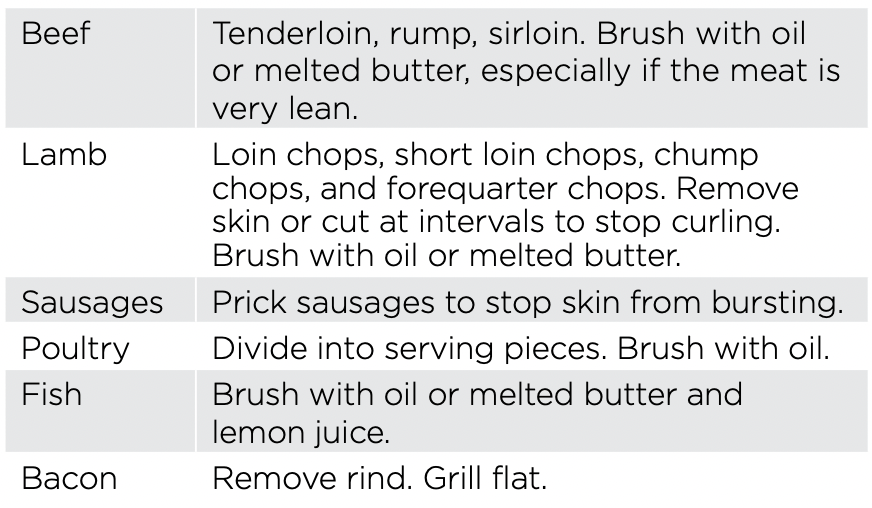
This table shows how to grill different types of meat:
Guide to better grilling
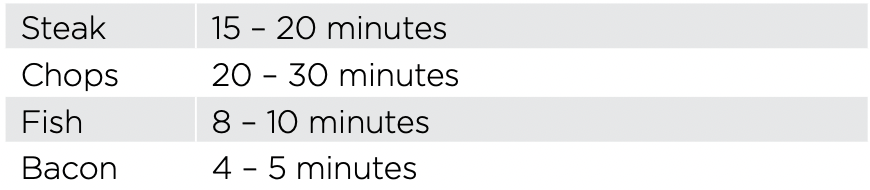
No definite times can be given for grilling because this depends on your own tastes and the size of the food. These times should only be used as a guide and remember to turn the food over halfway through the cooking process.
For better grilling results, follow these easy instructions:
- Preheat grill for at least 5 minutes.
- Choose only prime cuts of meat or fish. If the cut is less than 5mm thick it will dry out. If the cut is more than 40mm thick, the outside may burn whilst the inside remains raw.
- Do not place aluminium foil under the food as this prevents fats and oils from draining away, which could result in a fire.
- Baste the food during cooking with butter, olive oil or marinade. Grilled food is better if marinated before cooking.
- Use tongs to turn food as a fork pierces the surface and will let juices escape.
Fan Grill
The “Fan Grill” assists the grilling process by circulating the heat evenly around the food. The recommended temperature setting is 180°C for all fan grilling functions.
- Place the grill dish on the bottom rack.
- Place meat/poultry on an oven shelf above the grill dish.
- Wipe off any oil or fat which spatters while the oven is still warm.
Dealing with cooking problems
| PROBLEM |
CAUSES |
REMEDIES
|
| Uneven cooking |
- Incorrect shelf position.
- Oven tray too large.
- Trays not centralised.
- Air flow in oven uneven.
- Grill dish affecting thermostat.
|
- Select shelf that puts food in the centre of the oven.
- Experiment with other trays or dishes.
- Centre trays.
- Rotate food during cooking.
- Remove grill dish from oven on bake modes.
|
|
Baked products too brown on top
|
- Oven not preheated.
- Baking tins too large for the recipe.
- Baking tins not evenly spaced.
- Products not evenly sized or spaced on trays.
- Baking temperature too high.
|
- Preheat the oven.
- Use correct size tins.
- Stagger baking tins at least 3cm between tins and the oven walls.
- Make into same size and shape, & spread evenly over trays.
- Lower the temperature.
|
| Baked products too brown on bottom |
- Baking tins too large for the recipe.
- Baking tins are dark metal or glass.
- Food too low in the oven.
- Oven door opened too frequently during baking.
- Baking temperature too high.
- Grill dish affecting thermostat.
|
- Use correct size tins.
- Change to shiny, light tins or lower the temperature by 10°C.
- Cook one shelf higher.
- Don’t open the oven door until at least half the cooking time has passed.
- Lower the temperature.
- Remove grill dish from oven on bake modes.
|
|
Cakes have a cracked, thick crust
|
- Baking temperature too high.
- Food too high in oven.
- Cake batter over mixed.
- Pan too deep.
- Baking pans dark.
|
- Lower the temperature.
- Cook one shelf lower.
- Mix just long enough to combine ingredients.
- Check size of pan and use recommended size.
- Change to shiny pans.
|
| Baked products are pale, flat and undercooked |
- Baking temperature too low.
- Food too low in oven.
- Baking time too short.
- Incorrect tin size.
|
- Raise the temperature.
- Cook one shelf higher.
- Increase cooking time.
- Use correct size tin.
|
|
Cakes fallen in the centre
|
- Baking temperature too low.
- Baking time too short.
- Proportions of ingredients incorrect in the recipe.
- Opening door too early in baking.
|
- Raise the temperature.
- Increase cooking time.
- Check recipe.
- Do not open the door until the last quarter of cooking time.
|
|
Roast meat and potatoes not browning in fan oven
|
- Poor hot air circulation.
- Grill dish affecting thermostat.
|
- Elevate food onto a rack to allow air circulation.
- Remove grill dish from oven on bake modes.
|
|
Juices running out of meat
|
|
- Do not pierce meat with fork, turn with tongs.
|
|
Grilled meats overcooked on outside and raw in the centre
|
|
- Grill at lower insert position.
|
|
Grilled chops and steaks curling
|
|
- Cut into fat every 2cm (1/2”).
|
Cleaning your appliance
WARNING
- Always make sure that the oven is electrically isolated before cleaning. This can be done by the functional switch nearby.
- Do not line the bottom of the oven with foil or cookware.
- Do not use steam cleaners.
Stainless steel
WARNING:
- The oven door trim, the control panel and the storage compartment are decorated with stainless steel and should only be cleaned with warm water and a mild detergent. Do not use stainless steel cleaners, abrasive cleaners or harsh solvents on these parts.
NOTE: Make sure you follow the polish or brushing lines in the stainless steel.
- All grades of stainless steel can stain, discolour or become greasy. You must clean these regularly by following the procedures below if you want your appliance to look its best, perform well and have a long life.
- Care must be taken when wiping exposed stainless steel edges, they can be sharp!
- The stainless steel gas hob can be cleaned with stainless steel cleaners if it becomes soiled or discoloured.
- A suitable cleaner can be purchased from Electrolux Customer Care Centres.
Glass
- Glass surfaces on doors and control panels are best cleaned immediately after soiling.
- A damp cloth may help remove baked on food deposits.
WARNING:
- The door glass on this appliance is made from a tough, durable material that withstands heating and cooling without breaking. However, it must be remembered that it is GLASS, it may break. Treat it accordingly! Should you have any questions about the glass in your new appliance, please contact the customer care centre by dialling 1300 363 640.
- Do not use harsh abrasive cleaners or sharp metal scrapers to clean the oven door since they can scratch the surface, which may result in the shattering of glass.
Gas hotplate
- The trivets can be removed for cleaning by carefully lifting them from the hob.
- Clean by washing with warm soapy water.
- The burner caps and crowns are also removable for cleaning.
- If the caps, crowns and cups are heavily soiled, use a non-abrasive cleaning compound.
- Flame port blockages should be removed by using a matchstick or brush.
- Do not clean them with abrasive or caustic type cleaners, or clean them in a dishwasher.
Oven
- Always keep your appliance clean. Ensure that fats and oils do not accumulate around elements, burners or fans.
IMPORTANT
- Always keep the oven dish, baking trays, grill dish and grill dish inserts clean, as any fat deposits may catch fire.
- Always wrap your meats in foil or an oven roasting bag to minimise cleaning. Any polyunsaturated fats can leave a varnish-like residue which is very difficult to remove.
Grill
- Always keep the grill dish and grill dish insert clean, as any fat deposits may catch fire.
Cleaning oven accessories
Removing the trays and shelves from your appliance
- Slide the dish and grill tray towards you until they reach the front stop.
- Tilt them up at the front to clear the side supports, taking care not to spill the contents.
- Lift them clear.
- Wash the tray and shelves in hot soapy water.
- Reverse the above steps to put the grill tray and shelves back again.
- Ensure that they are placed between the 2 support wires.
Removal of side rack
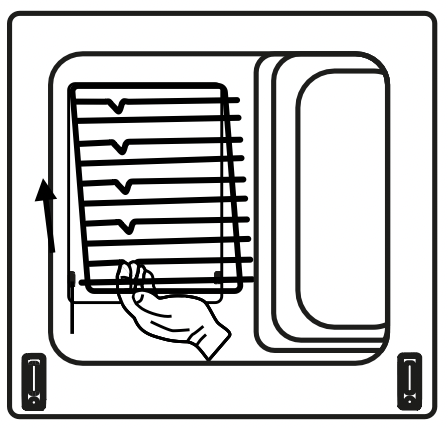
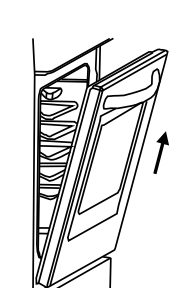
To remove the side rack: Pull the side rack as shown in the figure. After releasing it from clips (a), lift it up.
Removal of inner Glasses
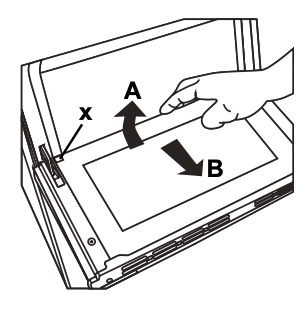
Before cleaning the oven door glass, youB must remove the inner glass as shown:
Note: the door will lift when the glass panels are removed so it is strongly recommended to have ay person assist with this to hold the door down while the glass panels are removed.
- Push the glass towards direction B and release from the location bracket (x). Pull out the glass towards direction A.
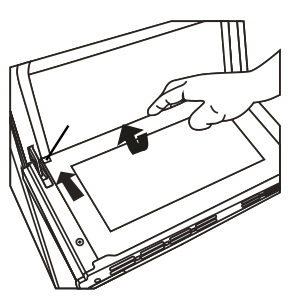
To replace the inner glass;
- Push the glass towards and under the location bracket (y) towards todirection B.
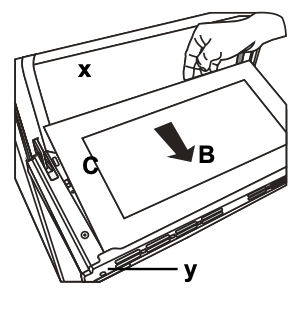
- Place the yglass under the locationbracket (x) towards to direction C.
WARNING: If the oven door is a triple glass ovendoor, the third glass layer can beremoved the same way as the second glass.
Removal of Oven Door
It is not necessary to remove the door to clean it however the door can be removed for better access for oven cavity cleaning if necessary. Due to size and weight of the door it is recommended this is done with two people present to assist with the handling of the door.
- Open the oven door.
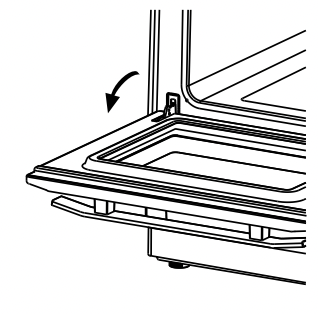
- Open the saddle bracket (a) (with the aid of a screw driver) up to the end position.

- Close the door until it almost reaches thefully closed position and remove the doorCleaning your oven door by pulling it towards you.
Put the door with the outer side down on a soft cloth on a stable surface. This is to prevent scratches.
CAUTION
Rough handling of the glass, especially around the edges of the front panel, can cause the glass to break.
Replace the door by following these steps in reverse order.
WARNING
- DO NOT use the oven without the inner and middle door glass fitted.
- NEVER spray any caustic cleaners on any surface of the door or damage to the surface coatings will result.
- DO NOT use metal utensils, scrapers, scourers, or abrasive cleaners to clean the glass or any of the door trims. These will damage or scratch the surface coatings and degrade the finish and appearance.
- DO NOT place glass in dishwasher.
- Use only warm water and liquid detergent with a soft cloth to clean the glass or trims.
- Before refitting the glass panes to the door ensure they are dried with a soft cloth.
- The glass edges have been specially ground to remove any sharp edges. However it is glass, and should be handled carefully to avoid injury to your person and damage to the glass.
WARNING: Make sure the appliance power is switched off at the isolating switch before you remove or replace parts, to avoid the possibility of electric shock.
Changing the light globes
- There is one oven globe located in the top right hand corner of the cavity.
- To remove, turn oven light glass anticlockwise.
- A special high temperature resistant globe should be used. This can be purchased from the customer care centre.
Troubleshooting
Faults
If there is a problem with the oven and/or grill, please:
- Check the points listed below before calling for service. It may be possible to avoid a call by fixing the problem yourself – and so continue cooking.
NOTE: We may charge for service even in the guarantee period if your problem is due to the causes listed below.
|
PROBLEM
|
POSSIBLE CAUSE |
WHAT TO DO |
| Oven or grill not working |
Power not turned on
Household fuse blown
Controls incorrectly set
Circuit breaker tripped
Clock not set
Child Lock ‘ON’ (for WFE946 & WFE916)
|
Switch on electricity
Check fuses
Reset controls
Check circuit breaker
Set time of day on timer
Deactivate DEMO Mode. Refer to ‘Using your oven’
Deactivate Child Lock. Refer to ‘Using your oven’
|
|
Oven not heating enough
|
Foil or trays on bottom of oven
|
Remove foil or trays
|
|
Light & fans on continuously
|
Timer not in manual mode
|
Set timer to manual mode
|
|
Oven not working
|
Timer not in manual mode
Household fuse blown
|
Set timer to manual mode
Check fuses
|
| Oven light not working |
Household fuse blown
Circuit breaker tripped
Lamp blown or loose in socket
|
Check fuses
Check circuit breaker
Replace or tighten lamp
|
|
Cooker smoking when first used
|
Protective oils being removed
|
Turn grill on high for 30 mins and then the oven on 220°C for 1 hour
|
|
Too much condensation building up when baking
|
Too much water used when cooking
|
Reduce amount of water
Leave oven door open after cooking
|
|
Condensation on back wall adjacent to the rear of the appliance
|
High moisture content air is being exhausted from the rear vents
|
The appliance is rear vented so this is normal when cooking high moisture content foods
|
|
Smells when first using oven
|
Protective oils being removed
|
This is normal
|
|
Timer flashing
|
Power failure or interruption
|
Reset time of day
|
|
Burner will not light even though the sparker is working
|
Knob not held down long enough in ‘High’ position for flame safeguard (where fitted) to engage
Gas supply valve turned off
Wrong knob turned off
Port blockage in ignition area
Ignition spark plugs wet or dirty
|
Repeat lighting procedure and hold knob down for 5 seconds in ‘High‘ position
Turn on gas supply to appliance
Ensure the knob you are turning corresponds to the burner you wish to light
Ensure the ports in the ignition area are clean and dry
Dry or clean ignition spark plugs
|
|
No spark is obtained when control knob is activated
|
Electricity supply is disconnected or switched off
Ignition spark plugs wet or dirty
|
Switch on electricity or check fuses
Dry or clean ignition spark plugs
|
|
Flames uneven or tending to lift
|
Flame ports blocked or wet
Burner incorrectly fitted
|
Clean or dry flame ports
Ensure this component is fitted correctly
|
|
Flames not staying on when knob released
|
Knob not held down long enough in ‘High’ position for flame safeguard (where fitted) to engage
Knob not set between ‘High’ and ‘Low’
Dirt or spillage on flame safeguard sensor (where fitted)
|
Repeat lighting procedure and hold knob down for 5 seconds in ‘High‘ position
Knob MUST be set between these positions
Clean flameguard sensor tip
|
|
Low heat, slow cooking
|
Incorrect cooking pot or pan being used
|
Refer to cooktop section for correct selection
|
| Benchtop or knobs overheating |
Incorrect cooking pot or pan being used
Pot or pan not located on burner properly
|
Refer to cooktop section for correct selection
Ensure pot or pan is centrally located on burner
|
NOTE: Only authorised personnel should carry out servicing. If the household fuse continues to blow, call the Customer Care Centre. In the event of a power failure the gas burners may be lit with a hand held igniter and used. Take care to avoid letting unburnt gas flow for more than 5 seconds when attempting to light the burner.
Further information
When you need information, service or replacement parts or have a warranty enquiry, please contact the Customer Care Centre:
- Australia - 1300 363 640, 8.00am - 5.00pm EST Monday to Friday
- New Zealand - 09 573 2384, 8.00am - 5.00pm EST Monday to Friday
Please have the following information ready: Model, Model Number & Serial Number. This is shown on the data plate which is visible when the oven door is open.