ADW7000X
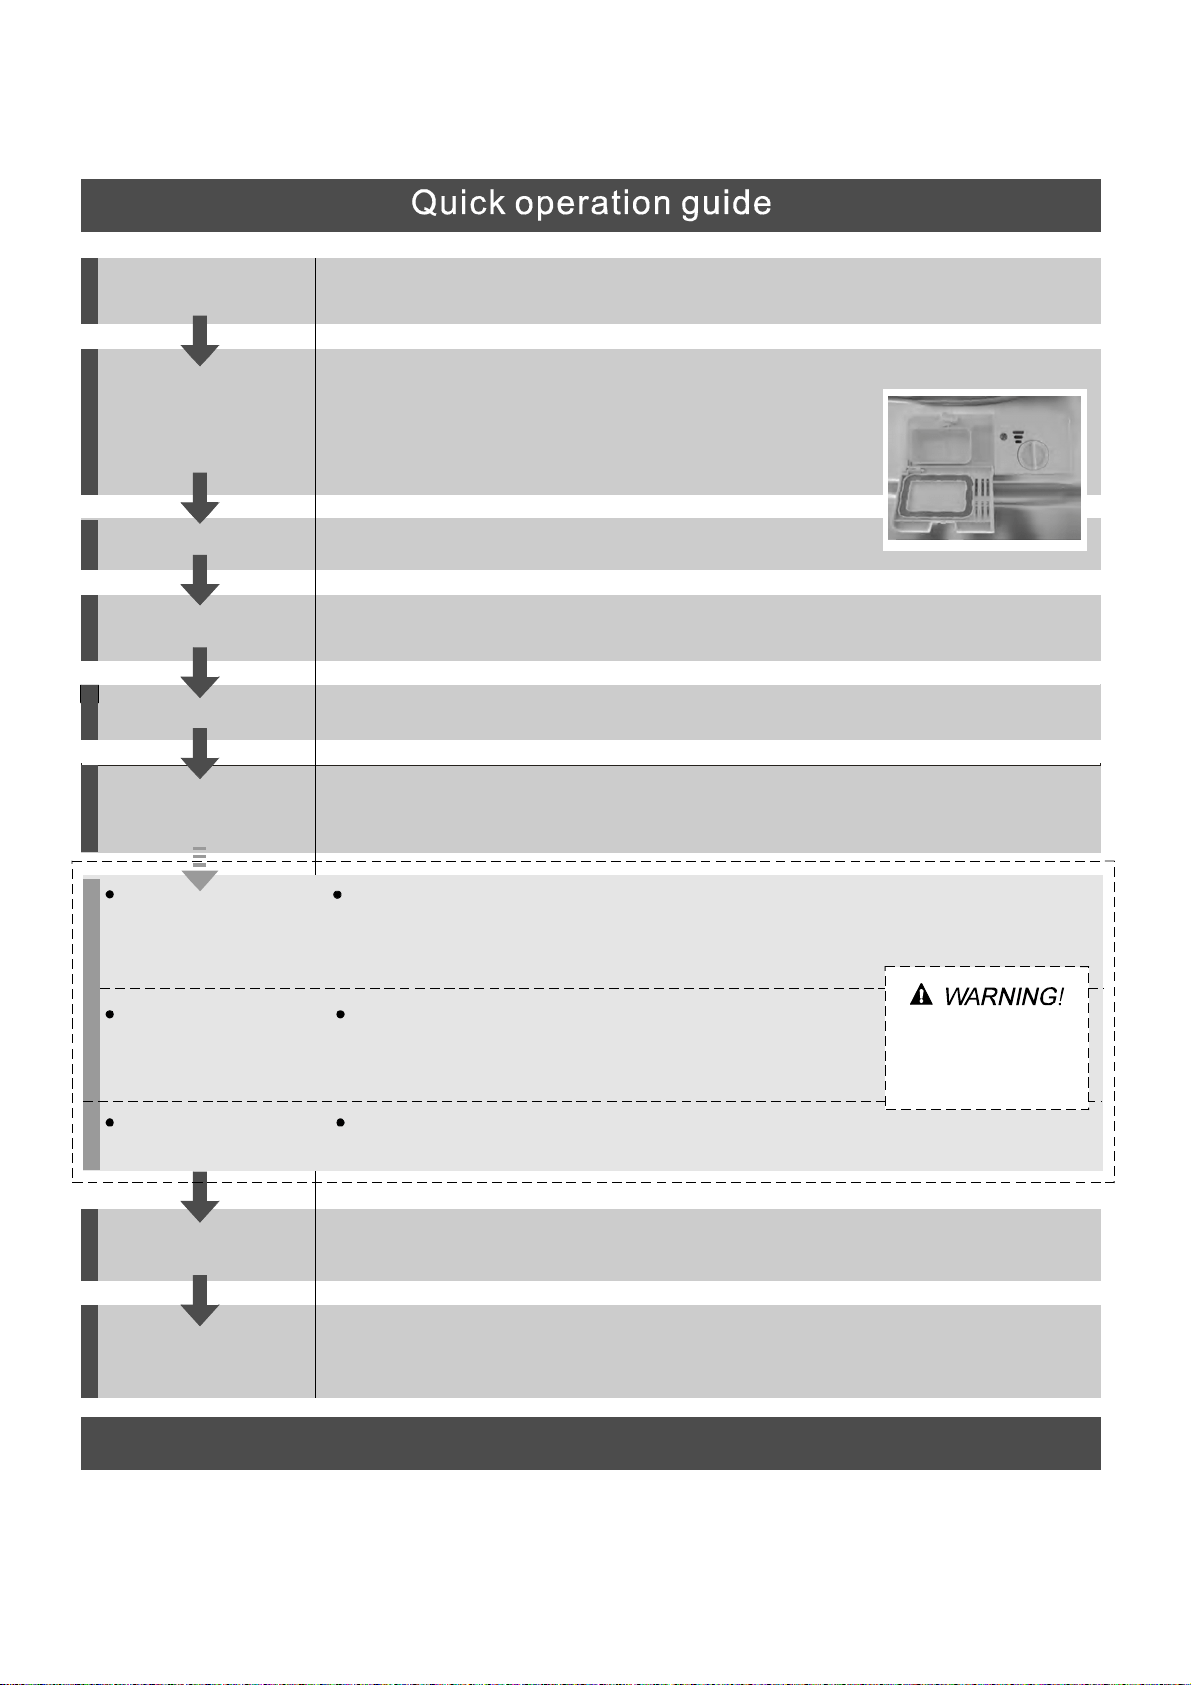
Compartment A:
Fill main-wash detergent.
Compartment B:
Fill pre-wash detergent.
(Follow the user instr uctions!)
Mechanical indicator C.
Check the rinse aid le vel
Load the baskets
Selec t a programme
Running the dishwasher
Switch off the appliance
Turn off the water tap,
unload the ba skets
Fill the detergent dispenser
Warning: wait a few minutes (about 15 minutes) before unloading the dishwasher to avoid handling
the dishes and utensils while they are still hot and more su sceptible to break.
They will also dry better. Unload the appliance, starting from the lower basket.
Scrape o ff any large amount of leftover food. Soften remnants of burnt food in pans,
then load the baskets. Refer to the dishwa sher loading instructions.
When the working cycle has finished, the b uzzer of the dishwasher will sound 8 times, then stop.
Turn off the appliance using the ON/OFF button.
Switch on the appliance Press the On/Off button to switch on the appliance, Open the door.
Electric indicator on control p anel (if provided).
Fordetailed operatingmethod readt hecorresponding conten tontheinstruction manual.
Changing theprogramme
Add forgotten dishes in the
dishwasher.
If the appliance is switched
off during a wash cycle.
Open th e doo r caref ully.
Hot st eam may escape
when the door is open ed!
If the appliance is switched off durin g a wash cycle, when switched
on again, please re-se lect the washing cycle and operate the dishwasher
according to the origin al Power-on state.
1.Open the doo r a little to stop the dishwasher.
2.After th e spra y ar ms stop working, you can open the door completely.
3.Add the forgotten dishes.
4.Close the door , the dishwasher will start running again after 10 seconds.
1.A running cycle can only be modified if it has been running for a short time . Otherwise the deter gent
m ay have already been released and the water already drained. If this is the case, the detergent
dispenser mus t be refilled.
2. Press the current programme button for more than 3 seconds to cancel the running prog ramme.
3. Select a new program .
4. Restart the dishwasher.
Close the door, power on, press the Prog. button to select the desired program.
( See the section entitled“Operation instruction”).
Turn o n the water t ap, Press the Start/Pause b utton, The m achine will st art working af ter abo ut 10
seconds.
A
B
C
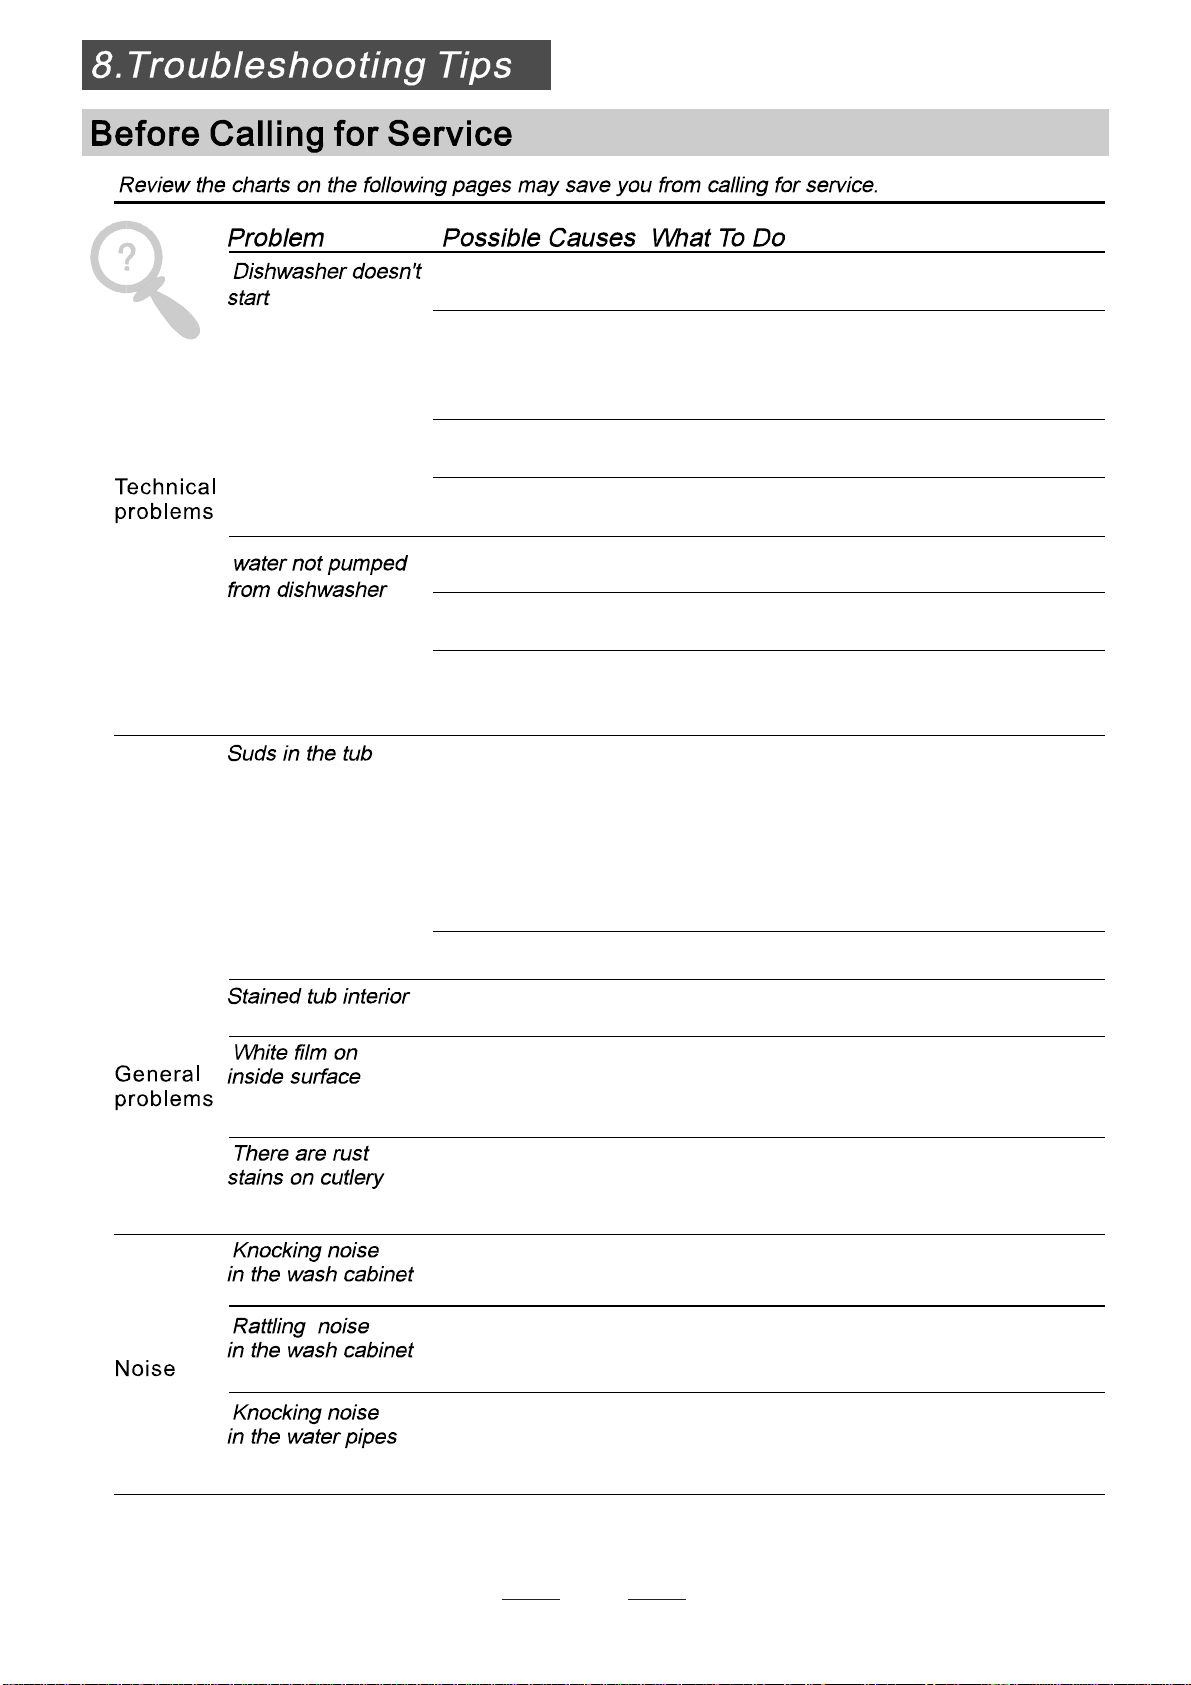
To re view the se ction on t roubl eshooting Tip s
willhelp youtosolve somecommon problems
by your self.
Dear Cu s to me r,
Pleasecarefully read thismanual beforeusing t he
dishwasher, itwill helpyou to useand maintain t he
di shw a sher pro pe rly.
Passit ontoanysubsequentowner of the appliance.
Thi s manu al c on tain s sec t ion s on safety In str u ct ion s,
OperatingInstructions,InstallationInstructionsand
Tr oubl es hooti ng Tip s , et c.
The man ufactu rer, f ollowing ap olicy of c onstant
develo pmenta ndu pdating of t hepr oduct, may
make m odifications w ithout gi ving prior notice .
Keepit toreferto it at a laterdate.
Ifyo ucan not solv ethe pr oblems b yyo urself ,
please ask f or t he help o fp rofessiona l te chnician s.
DishwasherFeatures.......................................2
At tentio n b efore o r afte r lo adin g the D ishwas her
Baskets..........................................................6
Filt eringSystem............... ..............................11
Caringforthe Dishwasher..................... .........12.
A. Fill the RinseAid Dispenser............. .. ..3..... ....
B.Functionof Detergent ..........................4........
Load ingt heu ppe r ...... .... ..... . ..... ... ...... 7Ba ske t .. .
Lo ad ing t he Low e r .. ... .... .. ...... ... .. ..... . ... 7Basket ..
Cutlery Basket.. ..............................................8
WashCycleTable...................................... .....9
TurningontheAppliance......................... .......10
ChangetheProgramme.............. ............... .10....
At theendof theWash Cycle...........................10
Po siti on ing the A pp lian ce .... .. ... ... ...... . .... .. ... . 13..
Water Co nne cti on.... ... . ..... . ... ..... . .. .... ... .. .. .... . 14.
About PowerConne ction........................ ....... 13.
Startof dishwasher............................ .... ......15..
Be for e c al l ing fo rs e rv ic e.. ... .. ... . .. . ... ... .. .. .. . .....1 6.
Errorcodes.................................... ..............1 7.
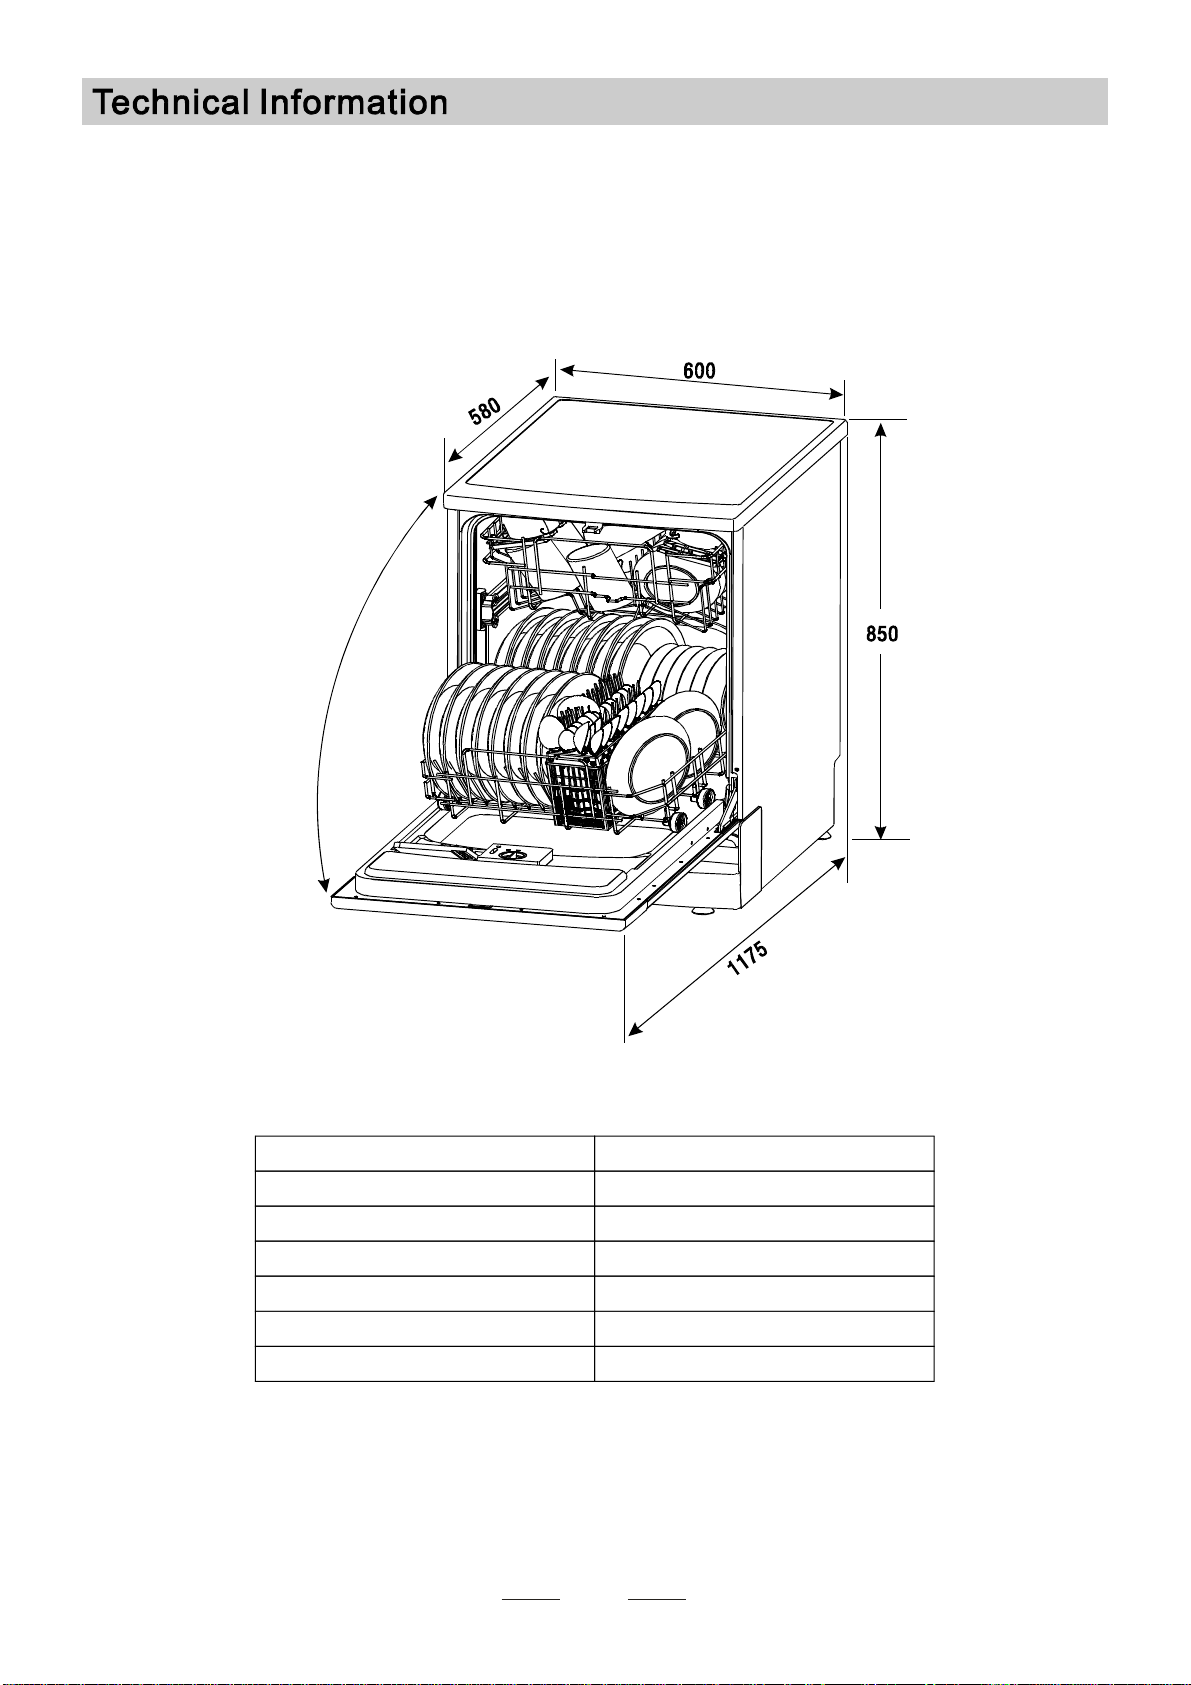
Technical information.............................. .....18..
C on tro l P an el.... . .. ....... . . ... ....... ... . .... . ......... . ..... .2
Th is a ppli ance is in tended t obe use din h ous ehol d
andsimilarapplications suchas:
-s taff kitch en ar eas in s hop s,off ices and oth er
w orkin genviro nme nts;
-farm houses;
-b ycli ents inh otels ,mo tels and othe rres ident ia l
t ype env iro nme nt s;
-bedandbreakfast type environments.
1
This appliance must be grounded. In the event of a
malfunction or breakdown, grounding will reduce
the risk of anelectric shock by providing a path of
least resistance of electric current. This appliance
is equipp ed with a cord having an equipment-
grounding conductor and a grounding plug.
The plug must be plugged into an appropriate outlet
that is installed and grounded in accordance with
all local codes and ordinances.
Improper connection of the equipment-grounding
conductor can result in the risk of an electri c shock.
Check with a qualified electrician or service
representative if you are in doubt whether the
appliance is properly grounded. Do not modify the
plug provided with the appliance; If it does not fit
the outlet. Have a proper outlet installed by a
qualified electrician.
Keep children away from detergent and rinse aid, keep
child away fromthe open door of the dishwasher,
there could stil l be some det ergent left inside.
ren
Do not abuse, sit on, or stand on the door or dish
rack of the dishwasher.
Do not touch the heating element during or
immediately after use.
(This instruction is only applicable to machines
with a visual heating element.)
Do not wash plastic items unless they are marked
dishwasher safe or the equivalent. For plastic items
n
ot so marked, check the manufacturer's
recommendations.
Us eon ly deterge nt and rins ead ditiv es
design ed for an aut oma tic d ishwash er.
Ne ver u ses oap,l aundr yde terg ent, or h and
wa shin gdeterg ent inyou r dishwash er.K eep
these produ cts out of th ere ach ofchi ldr en.
During installation, thepowersupply mustnot
be excessively ordangerouslybentorflattened.
Do not tamper with controls.
Do not operat e your dishwasher unless all
enclosure panels are properly in place. Open
the door very carefully if the dishwasher is
operating, there is a risk of wat er squirti ng out.
Do not place any heavy objects the
door when it is open. The appliance could tip
forward.
on or stand on
When lo ad in g i te ms to be w ash ed:
1) Locatesharp itemssothattheyarenotlikely
todamagethedoor seal;
2 Warning: Kni ves and other u te nsils wi th
sh a rp p oi n ts mu st be loa d ed i n t h e ba sk et
w ith their points d own or p lace din a
horizontalposition.
)
When us ing you rdishw asher, you sh ould
preve ntpl astic items from com in gint oco ntac t
wit hthe he ating el ement.(This instru ction is only
applica ble to machi nes w ith a visual h eat in g
ele ment.)
I fthes upply cord i sd amaged, it must be repl aced
by th em anu facturer or it sse rvic eagent or a
si mi larly q uali fie d pers on i n o rde r to av oid a
hazar d.
Pl ease dispos e of pack ing mater ials properl y.
U se th e dishwasher only for its intended function.
Remove the door to the washing compartmentwhen
removing an old dishwasher from service or discarding it.
Dishwasherdetergentsarestronglyalkaline,they
can be ext rem ely d ang e rous if s wa llow e d .A voi d
contact with skin and eye san dkeep child ren away
from the dishw asherwh en t he d oor is op en.
Check that the detergentcomparment isempty
aft er compl etio nof thew ashcycl e.
The app lian cei s to b econne cted tot he w ater
mainsusing new hosesetsandthatoldhose-sets
should n ot be reu sed .
The maximumnumberof placesettingstobe
was hed i s1 2 .
The maximumpermissibleinlet waterpressureis
1Mp a .
The minimumpermissibleinletwater pressureis
0.04Mpa.
Children should besupervised toensure that they do
not play with the appliance.
T his appliance is not intended for use by persons
(including children with reduced physical, sensory or
ment al capabilities, or lack of experience and
knowledge ,unless they hav e been given supervision
o r instruction concerning use of the appliance by a
person responsible for their safety.
)
When u sin g your dishw ashe r, follow t he pr ecaut i ons lis ted below:
Th edoo rsh ould not be l efto pen,
since th isco uld incr ease the risk of tr ipping.
10 11
Ba ck Vie w
Front view
2
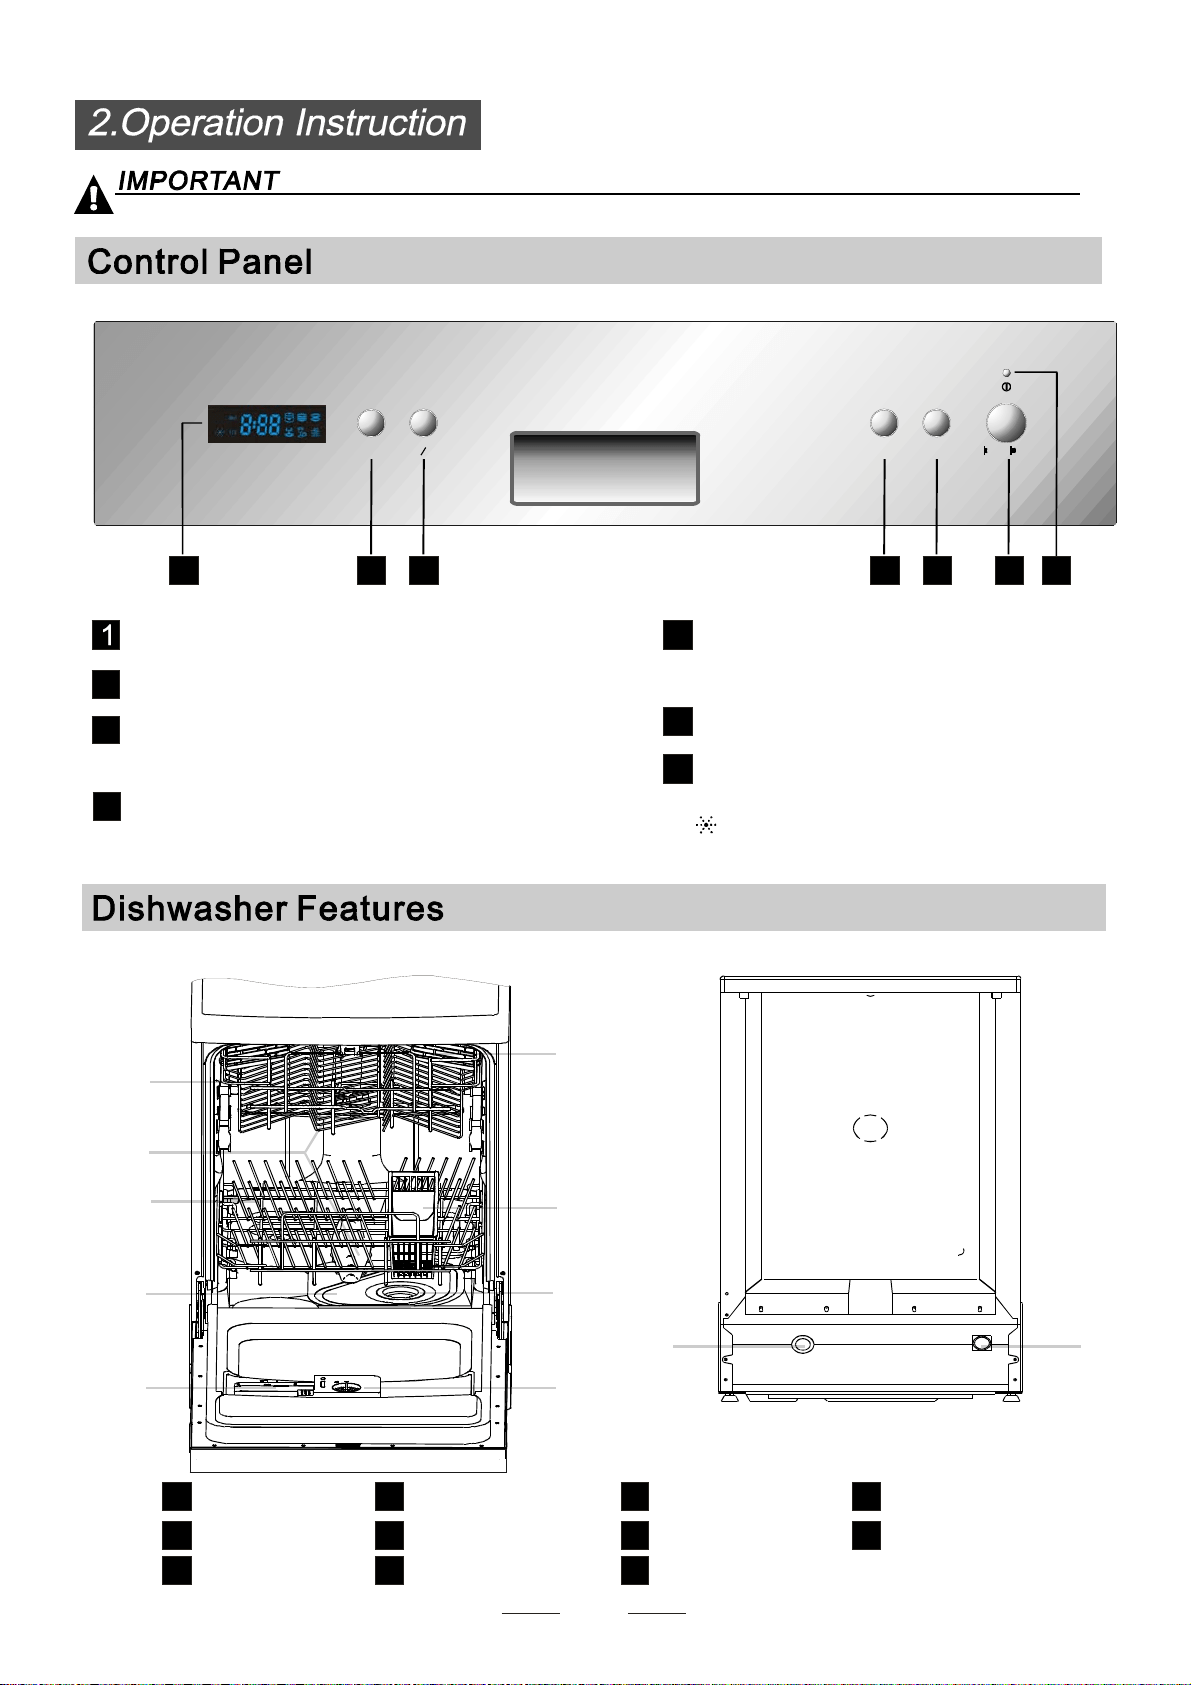
MainFilter
Dete rg entD ispense r
Cup She lf
CutleryBasket
CoarseFilter
Ri ns e Ai d Disp enser
Inlet pipe connector
Drain pipe connector
Lower Baske t
SprayA r ms
Up per Baske t
1
5
6
7
8
9
10
11
3
2
4
1
2
3
4
5
6
7
8
9
before u si ngit fo rthe f irst tim e.
Tog etthe best performancef romyourdishwasher,read all o perating instructions
2
3
Powe rindica tor li ght:Tosh owt hep owe rsupply.
Star t/Pa use but ton: To st art t he s elec ted
washing pr ogram o r paus eth ewa shing pr ogram
whenthemachineis working.
Po wer swi tch:To t urn on/ offth e pow er suppl y.
4
5
Washing Program Selector:To select one of
the washingprograms.seven
7
6
DelayButton :to delaythewashing time.
Delay
12
Prog.
Start/Pause
On Off/
17 23456
Hal fload function Button:To selectHalf load
fun c tion. (H al f load f unc ti on m ea ns t h e l ow e r
sprayarmwill notrun,so youshouldload the
upperbasketonly).
Display window: Disp lay the pr ogram, pr ogram
remainin g time, delay time, fa ult c odes, half load
function and f ill ri nse aid e t c.
R i nse a id w a r n in g lights : To s h ow w hen
the dispe nser n eed to be r efilled.
Befo re u sing you r dishwas her for the first time:
3
A. Fill t heri nse aid disp ense r
B. Fillindetergent
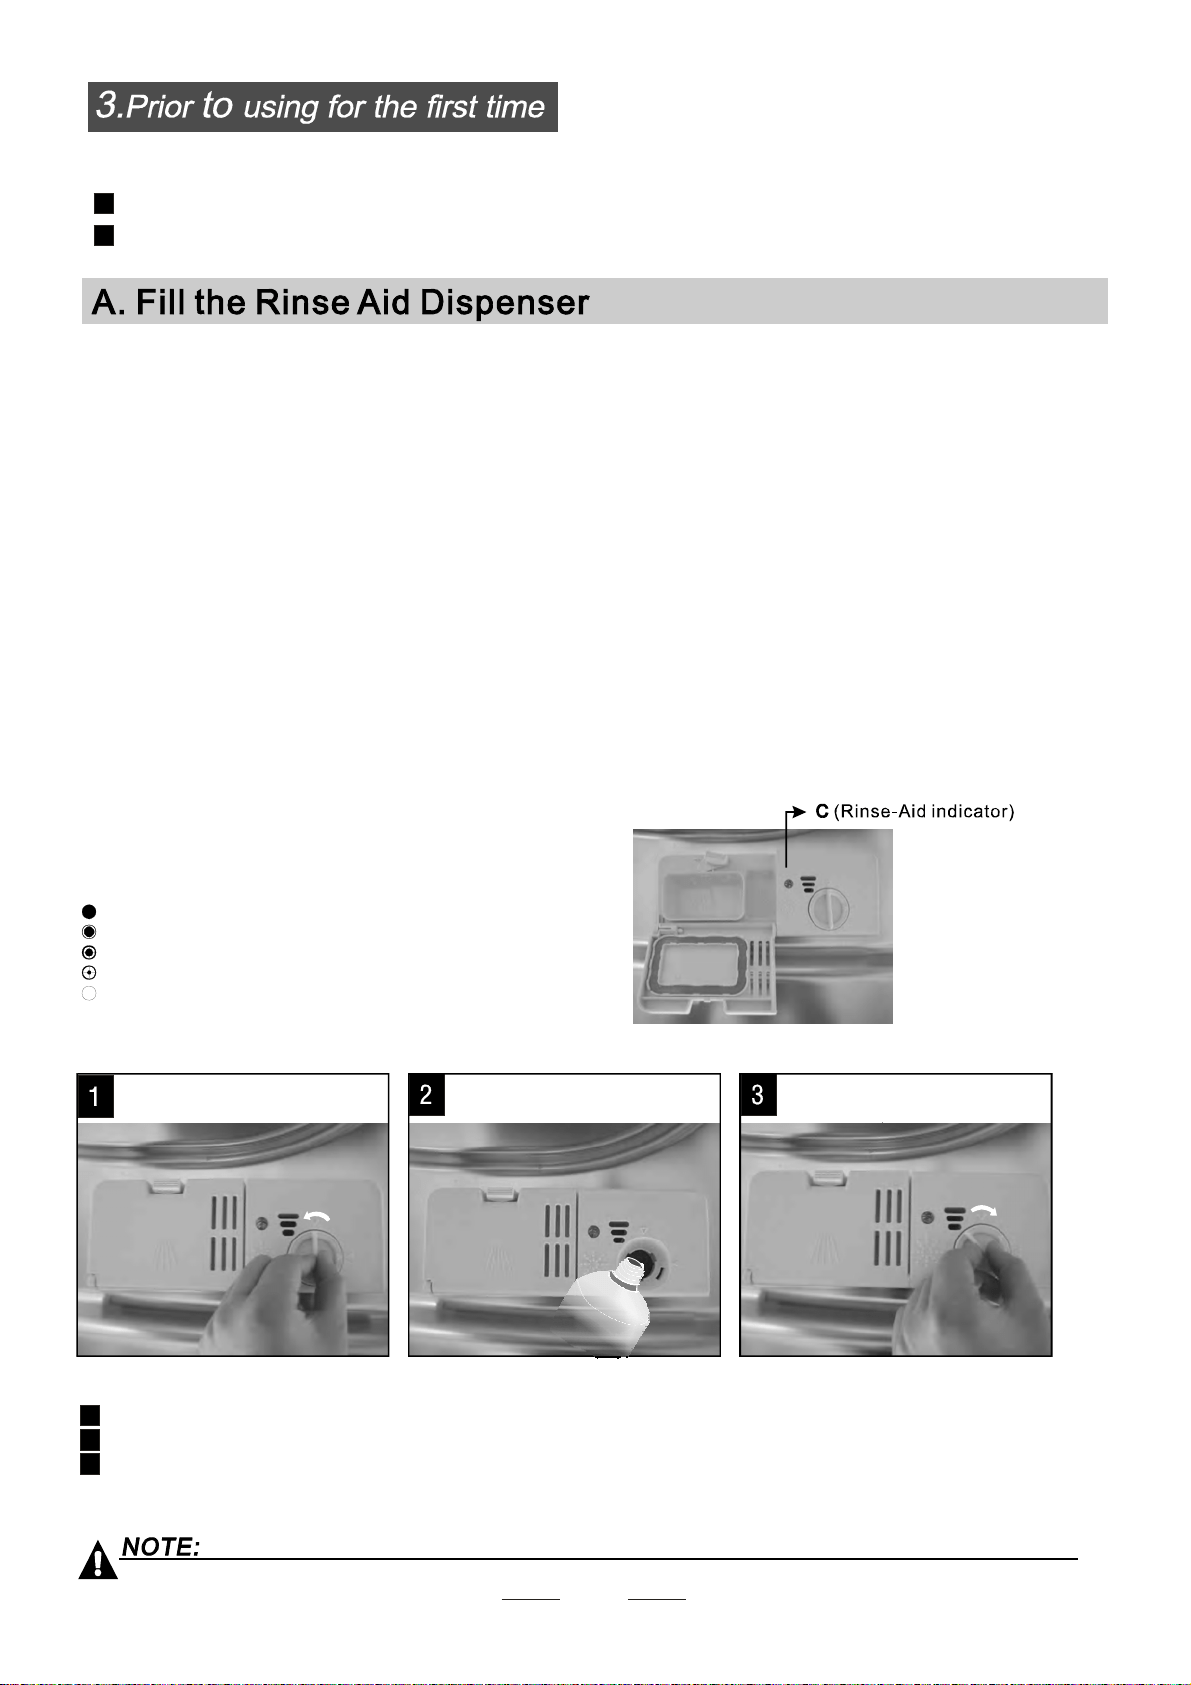
Th eri nse aid i srel ea se dduring t he fi nal rin se to pr event wat er fro m for ming drop lets o nyo ur dis he s, w hich can l eave
spots ands treaks. It al so improvesd rying by allow in g water to roll off thed ishes. Your di shwasheri s desi gned t o
usel iquidr ins eaids. The rin se aid di spense ri sl ocated inside t hed oor next tot he detergent d ispenser.To fill th e
dispenser,openthecapand pour the rinse aidintothedispenseruntil thelevelindicatorturnscompletelyblack.
Thevo lume o fthe rins eaid container is about 110ml.
RinseAidDispenser
Function of RinseAid
Rinse ai d is aut oma ticall ya dded d uring t hel astr inse, ensur ing thor ough rinsi ng, and spo tan ds treakf ree drying.
Attention!
Onlyusebranded rinseaidfor dishwasher. Neverfilltherinseaiddispenserwithanyothersubstances
(e.g. Dishwasher cleani ng ag ent, liq uid dete rge nt). Th is would dam age t he app liance .
To op e nthe dispen ser,t urn t he ca p to t he "o pen" (le ft) a rrow an dl ift i t out .
Pour t he rinse aid into the d ispe nser,be ing caref uln otto o verfi ll .
Repla ce the ca pby inserting it a ligned with " open" arr ow and t urning it to the closed (ri ght)a rr ow.
1
2
3
As t he rins eai dd iminis hes,t he siz eof theb lack dot
on t he rins eai dlev elin dica tor changes ,as illus trate dbe low.
Full
3/4full
1/2full
1 / 4f ull - S hould re fill t oeli min ate s pott ing
Empty
Whento Refillthe RinseAid Dispenser
Ifthereis norinse-aid warning light inthecontrolpanel,youcan estimatethe amountfromthecolour
of t he optic al le ve l indicat or C loc at ed n e x t to t he c ap . Whe n th e r inse -ai d c o ntain er is full , t he whole
in dicat or w ill be da rk.A sthe rin se-a iddi minishes ,th esize of t he dark dot decr eas es.You s hou ldne ver l et
therinseaidlevel fall1 /4 full.
dur ing then ext wash. D on't forget to rep lace the cap before y ou c lose dis hwas her doo r.
C l ea n up a ny r ins e ai d spi lt while dur in g fil l ing wit h an absor bent clot h t o avo id exces sive foami ng
""
RINSEAID DISPENSER
Be c ar eful no t to ov erfi ll th e di sp ense r, bec ause t his c oul d cau se over s uds ing. Wi pea way an y sp ills
witha dampcloth. Don'tforgettoreplacethecapbeforeyouclosethedishwasherdoor.
4
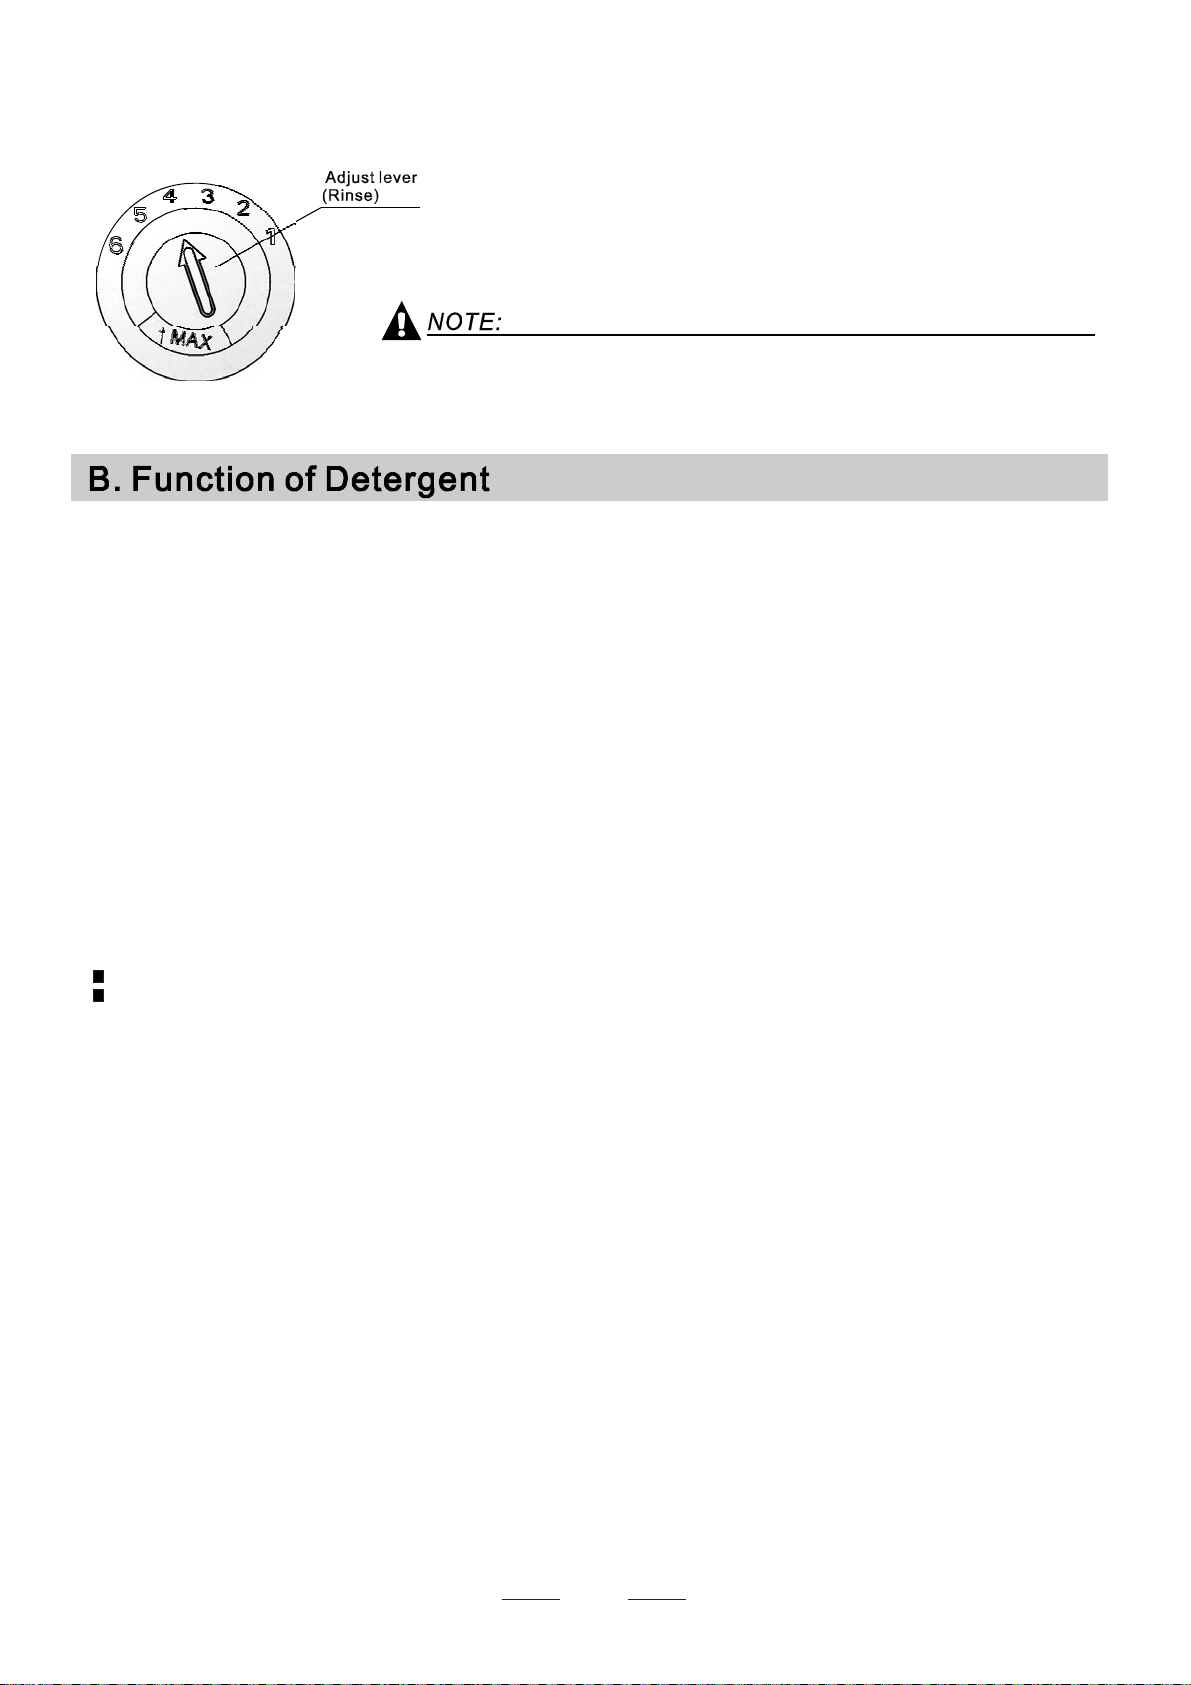
Adjusting RinseA id Dispenser
The r inse aid dispe nser ha ssi x or four sett ings.Always sta rt wi th the d ispens er
set o n"4". I fspot s and p oor dryin gare a problem, i ncrea se t he amoun tof r inse
aid d ispensed b y removin g thed ispe nserl idan dr otat ingt he d ial to "5". If t he
dishes a re sti ll notd rying prope rlyo r s pots, adjust the dia l t o the ne xt
highe r lever un til your dish es a resp ot-f ree. The r ecomm end ed setti ngis "4".
(Factory value is "4".)
showi ng
Increasethedose if thereare drops of waterorlimespotsonthe dishes afterwashing.
Reduceitifthere aresticky whitis hstainson your dishesorabluishfilmon glasswareor
knife blades.
Deterge nts w ith its chem ic al ingr edients a rene cessary t ore move dirt, c rus hdirt an d trans port it ou tof t he di shwashe r.
U s e onl y deterge n t specifical ly made for t h e use in dishw asher s.
Detergents
There ar e 3 s ort s of det e rgents
1.Withphosphateandwithchlorine
2.With phos phate andwit hout c hlorine
3.Wi thou tphosph ate and without chlo rine
Basedontheir chemicalcomposition, detergentscanbesplitintwo basic types:
The useof normal washingprogramsincombinationwithconcentrated detergents
r ed uce s p o l lut i o n an d is g oo d fo r you r dis hes; th e se w as h progr ams a r e s p e c i fica l ly m a tched
to t h edi rt- diss olving pro pert i es oft he e nz yme s of the conc ent rated deterg ent. For this reas on
normal washprogramsin whichconcentrated detergentsareused canachievethe same
resultsthatcanotherwiseonlybe achievedusing intensive programs.
“”
“”
“”
Detergenttabletsofdifferent brandsdissolve atdifferent speeds.For this reasonsome
dete rgen tta blets ca nnot dissolve and dev elop the irf ul lcle anin gpo wer dur ing s hort
prog ra ms.T here fore please u se l ong prog ram swh enu sin gd eterg ent t able ts, t o
ensure the com plete r e moval of de terg e n t re si du al s.
The dispens er m ust b ere filled be fore the star t of each was hcycle f ollowing the inst ructions
provided i nt he w ash cycle ta ble . You r dis hwasher uses le ssde tergent and rins eaid tha n
Conventionaldishwasher.Generally,onlyone tablespoon ofdetergent isneededfor
anormal washload.Moreheavily soileditemsneedmore detergent.Alwaysaddthe
dete rgen tj us tbefore star ting the dish was her, othe rwis e it coul dg et da mp a nd w ill n ot
di s solv e pr ope rl y.
Concentrated Detergent
DetergentTablets
DetergentDispenser
conventional,alkaline detergentswith causticcomp onents
l ow alk alinec onc entr ated deter ge nts w ith natura l e nzy mes
Normally ne wpu lverised det ergent is with out phos pha te.T hus the wate rsoften erfu nction of
phosphate i s no t gi ven. In t h i s c a se w e r e comm e nd t o f i l l sa lt i n th e sa lt co nt a in er e ven whe n
the h ard ness o fwate ris o nly 6 d H.I f dete rgents w itho ut phosp hate ar e used in the case of hard wat er
often wh ites pots appear ond ishes a nd gl asses.I nth is cas epl ease add mo re deter gent to r each
better r esul ts . D et e r gen ts wit h o ut chl orine d o on ly bl e ac h a l it tle. Stro ng and c ol o u red sp o t s w i ll no t
ber emoved complete ly.I nth isc ase p lease ch oos ea p rogram with a hi gher tem pera ture .
°
Amount of Detergentto Use
Proper U se o fDe terg ent
Use o nly det erge n ts peci fical l ym ade for th eu s ein dis h was her s.K e ep y our det erg ent fr e sh a nd dry.
Don'tputpowdereddetergentinto the dispenseruntilyou'reready towash dishes.
Dishwash erde tergent i scorrosi ve!Ta kec are to kee pi t out of reach ofc hildr en.
Always a ddth edeterg entjust before st art ing ea chwash cycle.
Only use bran ded detergen t and rin sea id fo rdi shwasher.
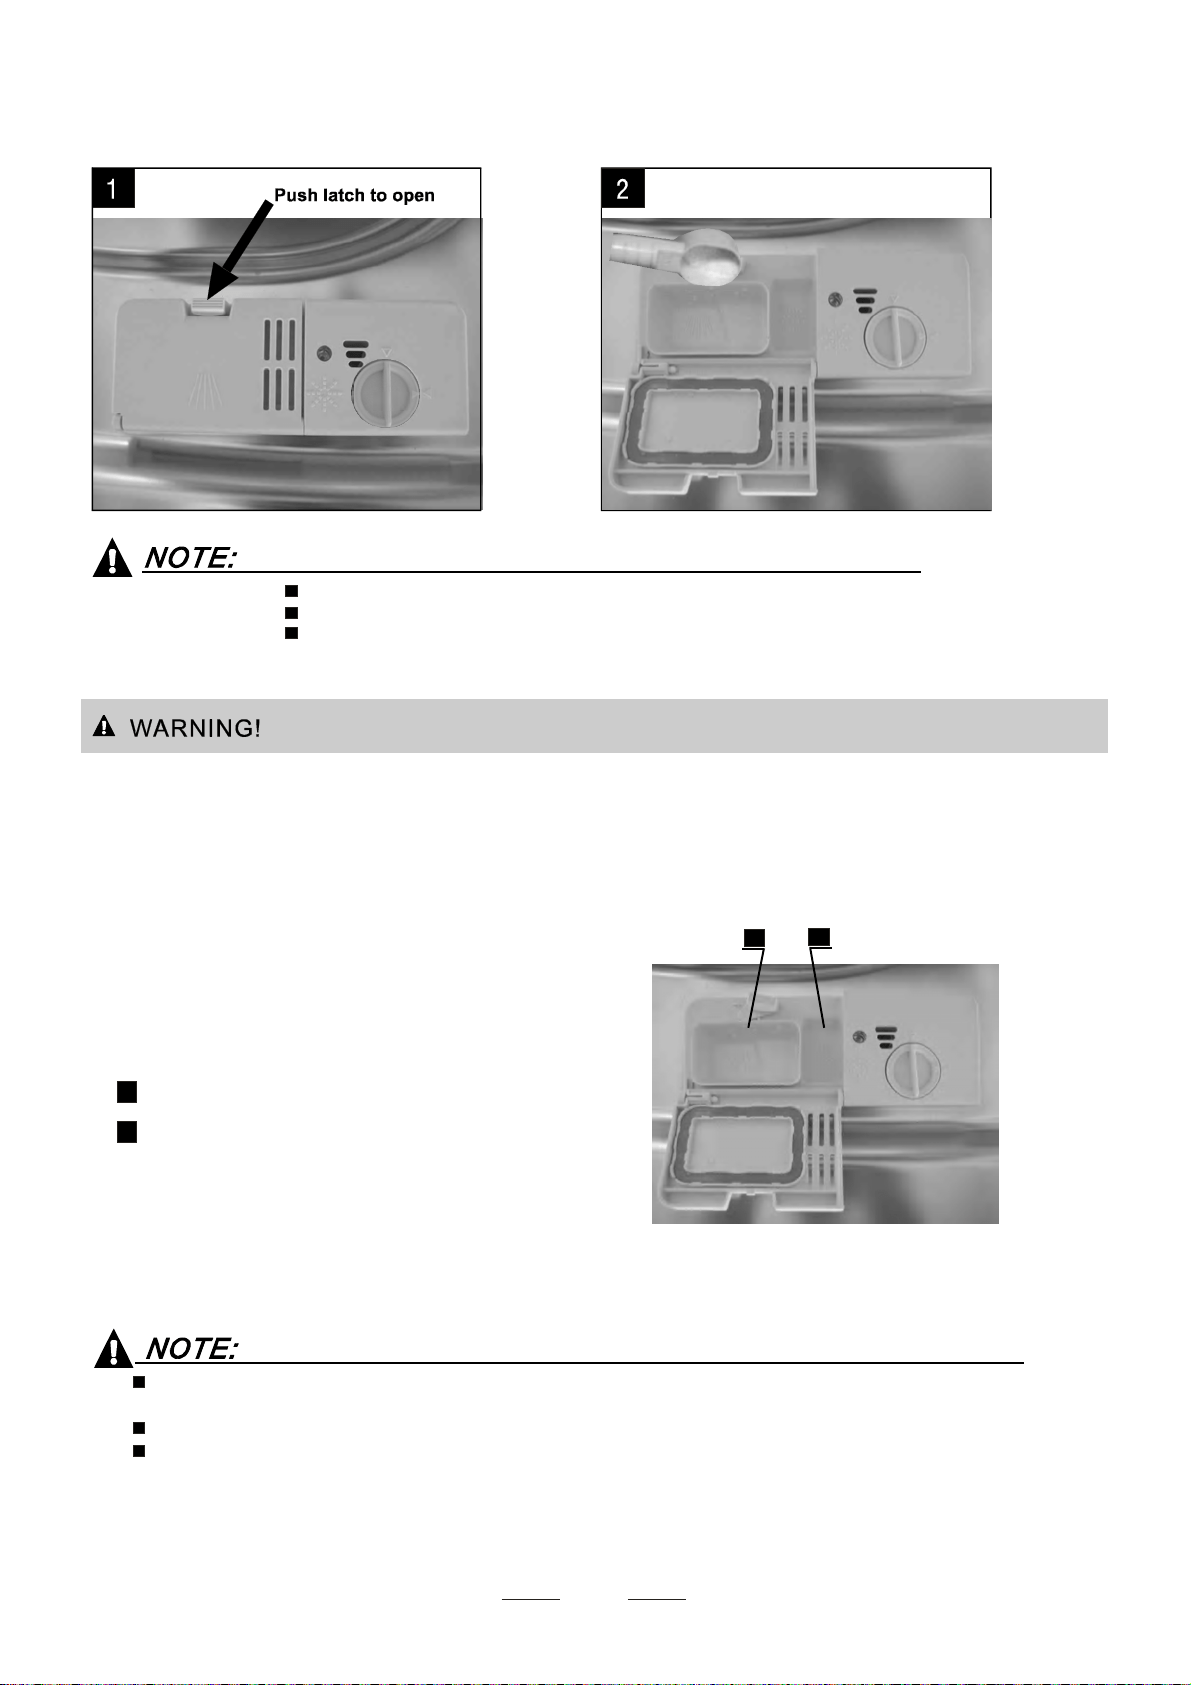
If th elid i sclose d: press release button.T hel id will sp ring ope n.
5
Fill t hed etergen tdis penser w ith dete rgent.
Th e ma rkin g in dicat es t he dosin g l ev e ls , as
illustratedontheright:
Theplaceofmainwash cycledetergentplaced.
The pla ceo f pr e-washcy cle deterge ntpl aced .
Pleaseobserve themanufacturersdosingandstorage
Recommenda tio ns a sst ated ont he deter gent pac kaging.
Close th e lid and pr ess u ntil i tl oc ks in pla ce.
Ifth ed ishes are hea vily soile d, p lace ana dditiona l
deterge nt do sei n the pre -wa sh d eter gent ch amber. T his deter gent w il ltak ee ffect during the pr e-wash phas e.
A
B
Fill in Detergent
The in formation about t he amount o fdet ergent f ort he s ingle pr ogram me please refe rto t he Wash Cycl e
Tab le on th epage 9.
Plea seaware, t hat accordi ng to the level soil ing an dthe spec ific har dness of water d ifferences are pos sible.
Plea seobserv e th eman ufacturer's r ecommendat ions on the de terg ent pa ckaging.
A
B
Cutlery withwooden,horn chinaor
mother -of-pearl handle s
Plast ici te ms t hat ar enot heat resis tant
Older cutl eryw ith glued partst hat a renot
temperatureresistant
Bonded c utlery i te msor dish es
Pewter or coop er ite ms
Crystal gl ass
Steel item ssu bject to rust ing
Wooden p latte rs
Items madefromsyntheticfibres
Some ty pes ofg lasses c anb ecome
dull after a lar ge n u mb e r of w ash e s
Silv er an da l umi num par ts ha ve a
tendency to discolourduringwashing
Glazedpatternsmay fadeifmachine
washed frequent ly
Are notsuitable
Are of limited suitability
Dishesanditemsofcutlerymustnot lie insideoneanother, orcover eachother.
Toav oidd amage to gl asse s,th eym ust not t ouc h.
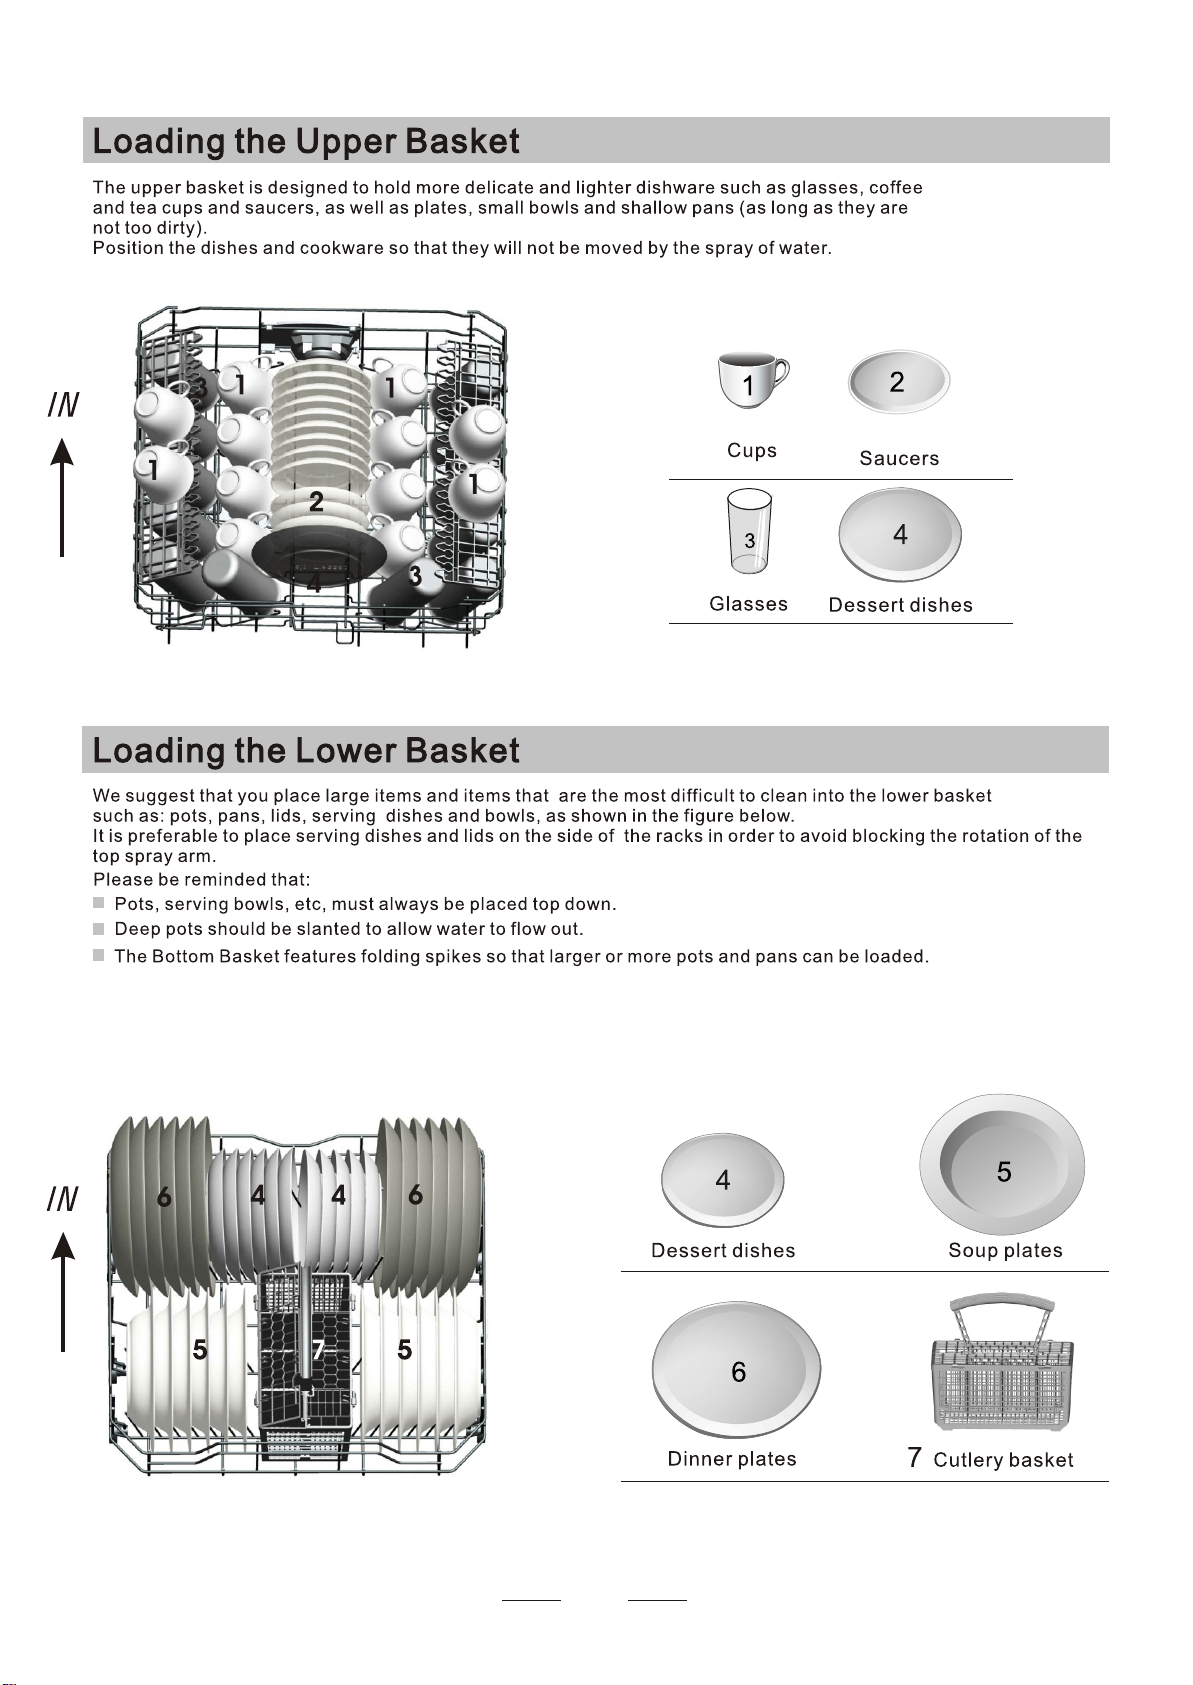
Lo ad large items w hich are mo stdi fficult to c lea nin tothe lowe rbask et.
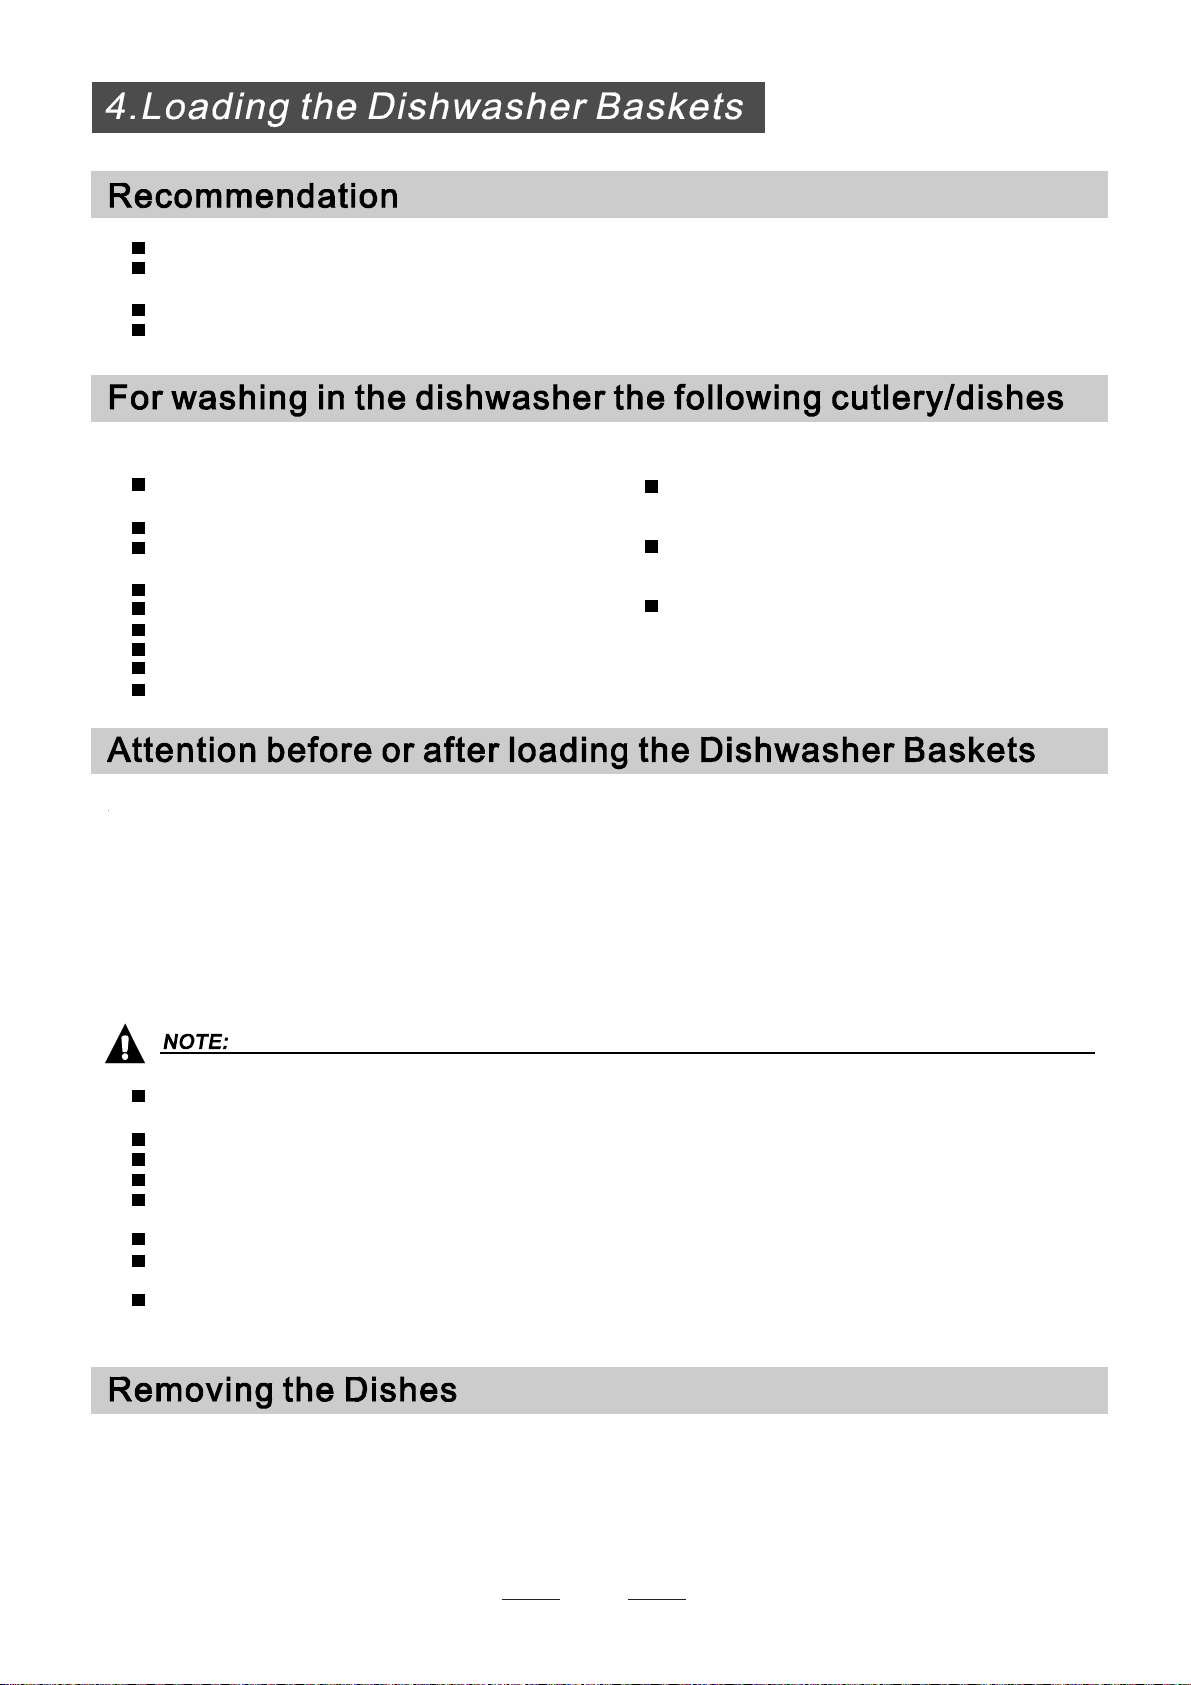
The u pper bas ket i sdes igned to ho ldm ore deli cate and li ghter d ishware such as gl asses , coffee
andteacups
Lo ng bladed k nives stored i nan upr ight po sition are a p otent ial haza rd!
Lo ng and/or s harp itemso f cut lery such as carv ing kniv esmust be p ositi oned
h orizon tallyin t he upp erb asket .
P lease do n ot ove rload yo urdi shwasher. T his is i mp ortan tf orgoo dresu lts a ndf or
r easonab leconsu mption of en ergy.
Load h oll ow i tems suc has cup s,gl asses, p ans etc. With the opening faci ngdow nward ss o t hat
w a t er canno t c o l l ec t i n the c ont a i n e r or a de epba se.
Usea milddetergentthatisdescribedas'kindtodishes'. Ifnecessary,seekfurther
informationfromthedetergentmanufacturers.
Forparticular items,select aprogramwithaslowa temperatureaspossible.
To pr even t da mage , ta ke g la ss and c ut ler y ou t of t he dis hwa she r a sso on as p oss ible
aft er the p rogram h as ended.
Consider buyingutensilswhichare identifiedasdishwasher-proof.
(For b estperf ormance of t he di shwasher, follow the seload inggu ide li nes.
Featu res and appeara nce of baske tsand cutl eryba sketsm ayvar y from your mod el.)
Scrape off any larg eamount so fleft over foo d.S often remnan ts of b urnt food in pans.
It i sno tnecess ary to ri nse t hed ishesu nder running water.
Pl ace obje cts in the dishwa sher i n followi ng way :
1.Items su ch as cups, g lasses, pots /pans, e tc.a re fa ced dow nwards.
2.Curved i tems, or ones with reces ses, sh ould b el oadeda slant s oth atw ater can run off.
3.All u tensils a rest acked secu rely and can not ti pov er.
4.All u tensils a re placed in t he way t hatt he s pray arms can rot atefr eely d uring w ashing.
Very sm all it em ss houldn otb ewashe di nthe dish washer as they c ould ea sily f all out o f the basket.
To pre vent wa ter drippi ngfr omt heuppe r ba sket into the lower baske t, we rec ommend tha tyou
empty the lower ba sket first and the nt he upp er ba sk et.
6
7

8
Cutlery s hould be pla ced in the cutlery baske t with the han dles at the bo ttom. If ther ack has side bas kets ,the
spoons shoul d be loa ded s ep arately into the ap propriate slot s,espe cially long utensils shoul db eplace din the
horizont al p osition at the fron tof t heuppe rbask et as s how nin the p icture.
Folding Spikes of Lower Basket
For better st acki ng of po tsan dpans,
the spikes c anb efolded down as
sho w in th e p ict u re righ t.
Adjusting the Upper Basket
The height o fthe upper b asket ca nbe ad jus ted in order t o c rea te mor e space fo rlar geu tensils
both for the uppe r/lower basket. The heigh tof the u pperb asket c anbe adjust ed by placi ng the
wheels o nd ifferent h eight of the r ails. L ongitem s,se rving cutlery, salad se rver sand kn ives
should b eplaced on the shelf so t hatthey do not o bstruct t herotat iono f th es praya rms.
The she lf ca nbe folded b ack or be re moved when notrequ ired for use .
D ono t let any item e xte ndth rough th e bo ttom.
Al wayslo ads harp u ten sil swi th t hesharp poi ntdow n!
Teaspoons
4
Soup spoons
2
Forks
1
Knife
5
3
Dessert spoons
4
3
5
2
55
44 44
41
2
3
2
3
2
3
2
3
2
1
1
1
1
1
555
3
555
4
444244
2
1
2
3
2
3
2
3
2
3
3
555
1
1
1
1
1
3
9
Means: need tofill rinseintothe Rinse-AidDispenser.
()
Star ting a c yc le wash
Drawoutthe lowerandupperbasket,load the dishesand pushthemback.
Itis recommendedtoloadthe lowerbasketfirst,then theupperone(seethe sectionentitled
Lo ading th e Dishw asher ).
Pour in the d ete rgent (s eeth e sectio nen titled Detergent and Rin seA id ).
Inse rt the p lugi ntot hes ocket. T hep ower sup ply i s22 0-240 VAC/ 50 H Z, th e sp ecifi catio n
of th eso cket is 10A 250 VAC . M ake sure that t he water supply is tu rned on tofu ll pr essure.
Closethedoor, pressthe Power button, and thePowerlightwillturnon.
Press t hep rogram s elect or to select your des ired progr am .
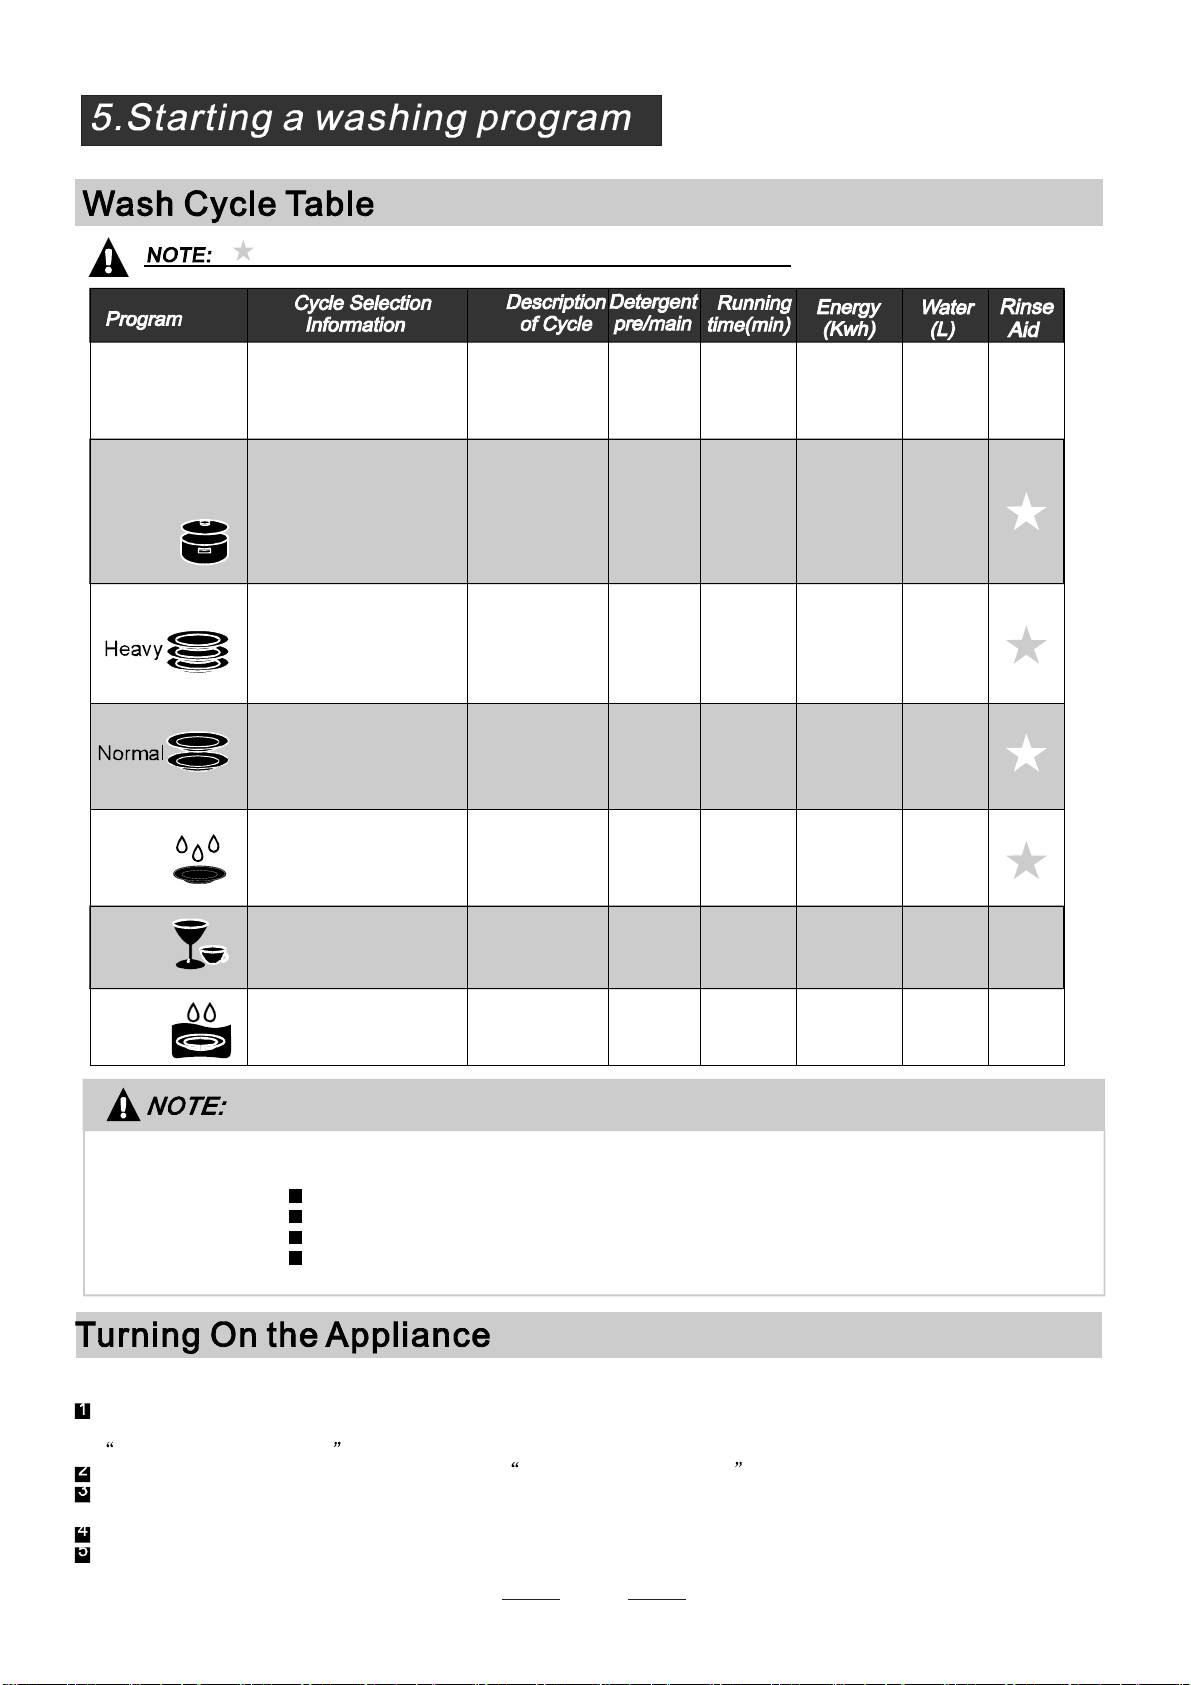
* :T his progra m is th e t e st cy cl e. The inf o rma tion for c om p ara bi l ity t e s t
in ac c ordanc e wit h , as f o llows:
AS/NZS 2007.1
AS/NZS2007.1
Capacity: 12setting
Po sitio nUppe r ba sket: upp er w heels o nra ils
Rinse aid setting: 6
O pen t he door s l i ght l y 50mm to a s s i s t i n dr yin g of t he di she s a fte r e ver y w ash
12
150
1.2
3in1
5/25g
5/25g
3i n1
For so i le d l oads,
suc h as ,pl at es, g lasses
and lig htly so ile d pans .
standarddaily cycle.
po ts
commonly
Pre-wash(50 )
Pre-wash
Wash (65 )
Rinse
Rinse
Rinse (55 )
Drying
℃
℃
℃
Pre-wash(50 )
Wash (50 )
Rinse
Rinse (65 )
Drying
℃
℃
℃
Wash (40 )
Rinse
Rinse (45 )
℃
℃
20g .
Pre-wash 50
wash 50
rinse 70
drying
(℃)
(℃)
(℃)
160
130
30
80
1.2
1.4
0.45
0.8
22
15
5/25g
Wash (55 )
Rinse
Drying
℃
Rinse
Rinse
(55 )℃
110 0.90 12.0
8
12
Pre- wash
Was h (4 0 )
Rinse
Rinse(60 )
Drying
℃
℃
/
8
4
0.01
Pre-wash
Fo r heavy so i led loa d s,
such as , plates,glasses
and lightly soiledpans.
standard dailycycle.
pots
F orthehe aviestsoiledload s,
suchas p ots,pans, casserol e
di shesand dishes thathave
beensitting with dried food
onthemfora while.
F ornormal soiled loads,su ch
as plates,glasses ,bowls and
lightlysoiledpans.
Fordishesthatneedtobe
ri nseda nd dried o nly.
To rinse dishes thatyou
pl antowash lat er thatd ay.
Ashorter washfor l ightly
soiledloads thatdo not
needdryin g.
Int ensive
Rin se
Rapid
Soak
(AS/NZS 2007. 1 )
/
10
It is d an gerou s to open t he door w hen w as hi ng , be c a use the hot wate r ma y s cal d y ou .
W h en th e wor ki n g c y cl e has finis hed , the bu z zer of t he di s hw a sh e r w ill s o u nd for 8 seco n d s , th en s t op . Tu r n o ff
t he a ppliance usi ng the O N/O FFb utto n, sh uto ffth ewa ter s upp ly and op en t he door of th edi shwashe r.
Wait for a few mi nutes b efore unlo ading th edis hwashe rto a voidha ndlin gthe di shes and ute nsils w hile th ey
are s til l h ot and m ore susc eptible tobr eak age. The ywil lals odry be tter.
SwitchOfftheDishwasher
The f , only i nthi scas ethe prog ramme has end ed.
1.Sw itch off the di shwasher by p ressin gthe O N/OFF but ton.
2.Turnoffthewatertap!
in ish l igh t is o n
Openthedoor carefully.
Hot di shes are sensi tive to kn ocks.The di shes shou ld t herefor ebe a llowedt o cool d own arou nd 15 minut es
beforeremovingfromtheappliance.
Open t hed ish washer 's door, l eave it ajar and wai ta f ewmi nutes bef orerem oving t he dis hes.I n this way they
will be cooler and the dryi ng wi llb eimpr oved.
Unloadingthedishwasher
Iti s normal that t he di shwashe r is wet inside.
Empty the low erba sket f irst a nd then the up peron e.This w ill avoid water dripp ing f rom t he uppe r Basket on to
the dishes in the l ower one.
Ifyou open thedoor , themachine willpause. T heprogram lightw ill
stop blinkingand thebuzzer w illsoundeveryminuteunlessy ouclosethe door. After
you close thedoor ,the machine will keep on working after10 seconds.
duringa washcycle
When youpresstheStart/Reset buttontopa use duringwashing,the program lightwill
stopblinking and thedishwasher will mooing every minuteunlessyoupress the
Start/ Reset bu tton t osta rt.
Aforgotten dish can be added any time before the detergent cup opens.
Add forg otten dishes.
Close the doo r
After the spray arms stop working,you can open the door
completel y .
2
3
Open the door a little to stop the washing.
1
4
5
The dishwasher will run after 10 seconds.
PREMISE:
Ot her wis e, th e de t ergent may h ave al rea dy been r eleased,
an dthe app liance ma y have a lready dra ined the w ash wate r. If t his is the case,
th e deter gen tdis pens erm ust b e ref ill ed (see the s ection en titled "Lo adin gthe
Detergent " ).
Th ere ar etw owa yso f cha nging the p rog ramme:
1. Pressthebutton ofrunning prog. more than 3 seconds tocancelit, thenpush thebutton ofdesired prog.
and it willr un af ter10 sec onds.(see the sect ion e nti tl ed " S tarting aw ash c ycle ").
2. Pr essB utto nof desir edpr og.( exce ptbu ttom o fru nnin g pro. ) m oret han 3 seco nds toc hange
th e runni ng prog. i nto the prog . which you pre ss, i t w ill run a fter 1 0 second s.
You can modified thewashingp rogram, just the dishwasher has been
running forashort time.
The p rogr am li ght ss h ow th e s tate o f t hedis hw ash er :
a) Allprogramlightsoff------- -------------------------------------standb y
b) Oneof thep rogramlights on--------------------------------------pause
c) Oneofth eprogramlights blinking-----------------------------------run
c) Someof the up threeprogram lights blinkingfleetly------------error
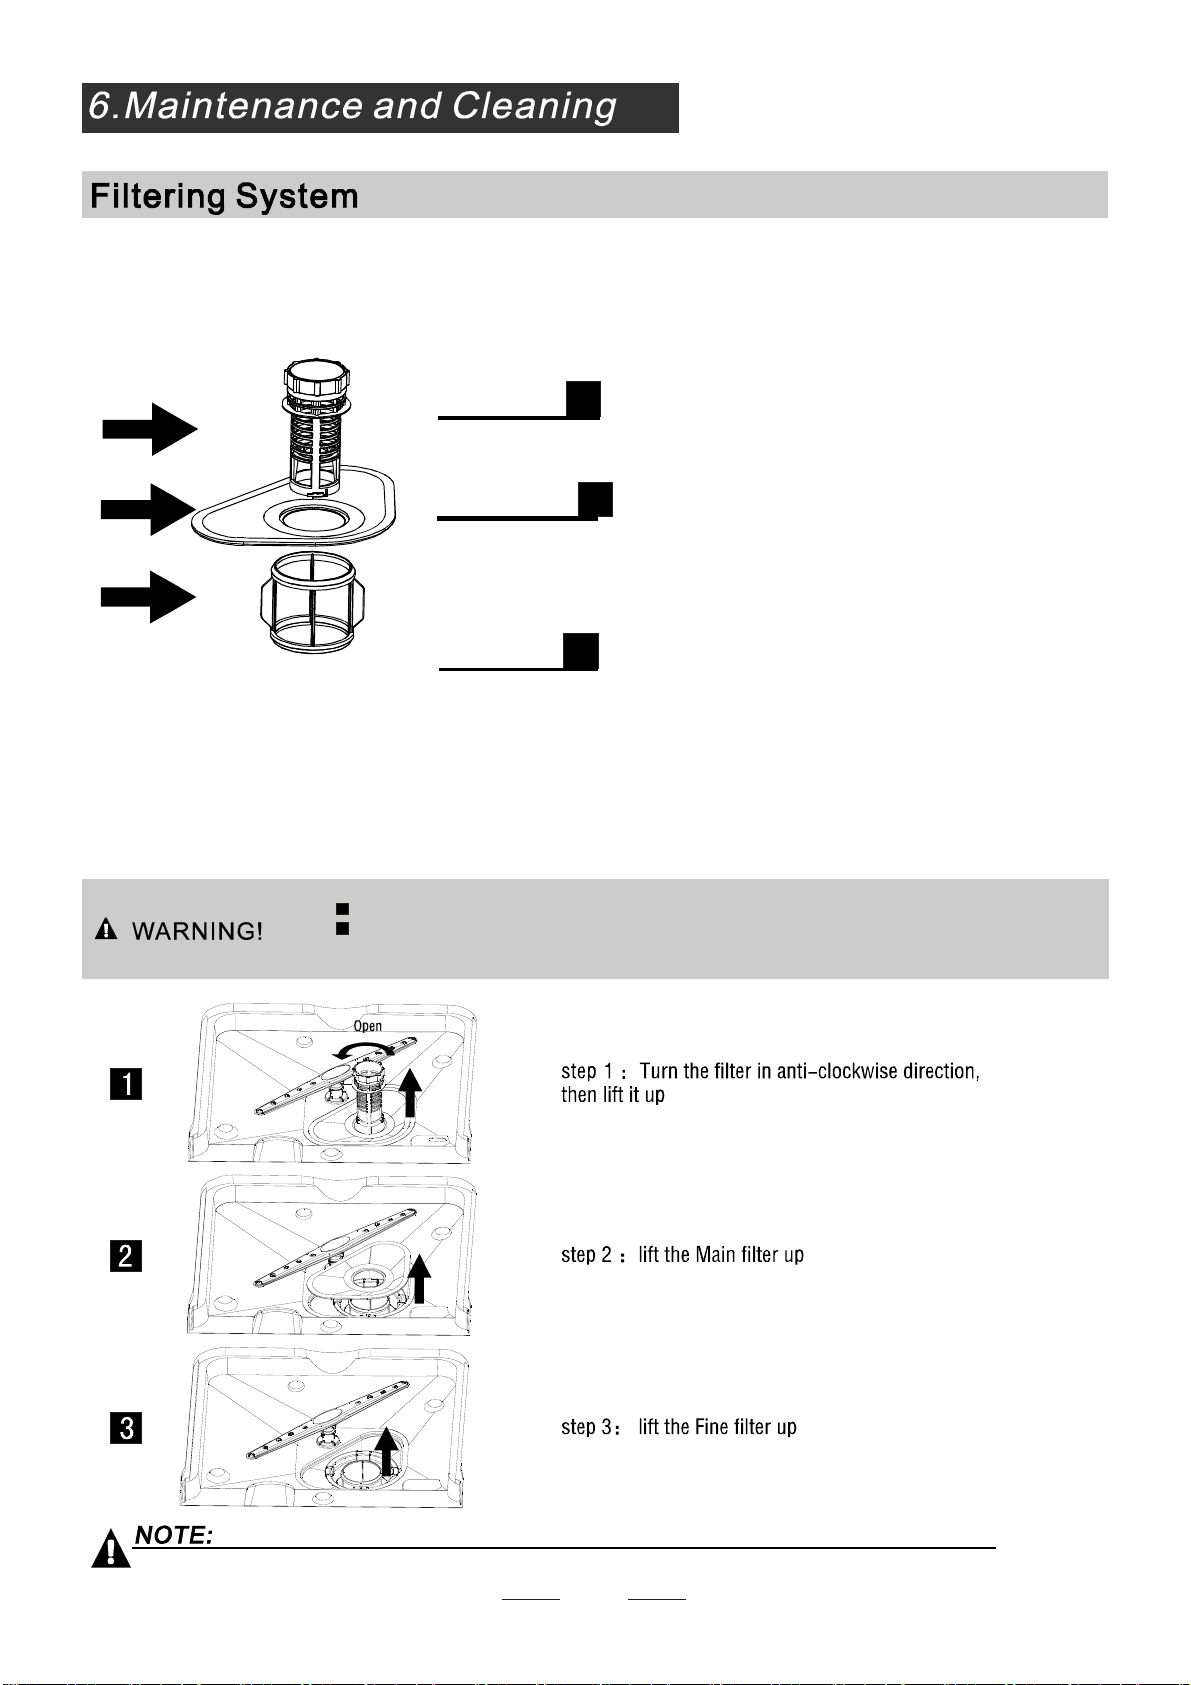
The fil ter pre ventsl arger remn ant sof food or o ther obj ects from get ting insi deth epu mp.
Theresidues may blockthefilter, inthiscasethey mustbe removed.
The fi lter system c onsi sts of a coarse f ilter, a flat (M ain f ilter)
A n da mi cro fi lte r( F i ne fi l ter) .
Food and soil particles trapped inthisfilter arepulverizedby a
specia l jet ont hel ower spray a rman dw ashe dd own t od rain.
Larg er it ems, s uc h as pi e c es of bo ne s or gl as s, t ha t could blo ck
thedrainaretrappedinthe coarse filter.To remove theitems
caugh t by t he filter, gen tly s queeze the tap o nth eto pof this
filterandliftout.
Thisfilter holds soilandfood residuesinthe sumpareaand
preventsitfrombeingredepositonthe dishes duringwashcycle.
Main filter
1
Coarse filter
2
Fine filter
3
2
3
1
Filterassembly
Thefilter efficiently
For b est p er formance and res ults, the f il ter mu stbe cleane dre gula rly. t hisr eason,i t i sa goo di deat o
r emove t hela rger foo dpa rti cl est rapp edin the filte r aft ere ach was hcyc leby rin sing the s emicirc ular filte rand
c up u nderru nnin gw ater. To re moveth efil terd evice ,pull t hec upha ndle in t he upwa rdd irection.
re mo vesf ood part icle sfrom th ewa sh w ater,allowin git to be rec ycle ddu ring the cycle.
For
11
T he di sh was her mus t ne ver beused w i t hout t he f il t er s.
Imp ro per r eplace mentof the f ilter may red uce the perform anc elev elo fthe applian ce
and damagedishesand utensils.
When following this proced ure from step1 to step 3, the filter system will be removed;
when following it from Step 3 to Step 1, the f ilter system will be installed.
The cont rol p ane lcan be clea ned by u singa lig htly dampen edc loth .
Afte rcle aning, m ake sure to dry it tho roug hly.
For the e xte ri or, us e a good app l ianc e po li s h wax.
Neveru ses harp objects ,sco ur ing pa ds o rh ar sh c lea ners ona ny p art o fthe di shwa sher.
ProtectAgainst Freezing
1.Cutoff theelectricalpower tothedishwasher.
2.Turnoff the wat ersu pply an dd is connec t the wat eri nletpi pe from the wate rval ve.
3.Drainthewater fromthe inletpipeandwatervalve. (Use apantocatchthewater)
4.Reconnect t he wate rinl etpi pet othe wate rvalve.
5.Remove the filter at the bottom o f the tub and use a spong eto soak up wate rin t he sump.
pl ease take fros t protect io n meas ureso nt he di shwasher in winter.Ev ery fter washing c ycles,
pl ease oper ateas follows
time a
:
- Ins pect t he filte rsfo rblo ckinga ftere very tim eth edis hwa sher ha sbe enused .
- By uns crewing the c oar sefi lter, you can r emove t he filter syst em .Re movea nyfoo dre mna nts and
cleanthefilters underrunningwater.
Remarks:
Cleaning the Filter
CleaningTheDoor
To c lean t h e c o a rs e f il t er and t he fi ne filte r , us e a cl eani n g bru sh . Re as se mble t he f ilter par t s as sho wn in th e f igur es
on th e la st pa ge a nd r ein sert t he e nti re assem bly in the dis hwa sher, pos itio ning it i n i tss eat and pres sing dow nwar ds.
Theentire filterassembly shouldbe cleanedonce a week.
Whencleaning thefilters, don't knock on them.Otherwise, thefilters could b e
contorted andtheperformance ofthedishwashercouldbedecreased.
To cle an th ee dge around t hedoor,you sho uld u seonly a sof twa rm, d amp cl oth.
To avoid pene trat iono f wa terin tot hed oor lock and el ectrical co mponen ts,do not
usea spray c leaner of any kind.
Never u sea spr ay c leaner t oclean t he door panel as i tm aydam age the door loc k
and electricalcomponents.
Abr asive ag entso r some pa per towels s hou ldnot be u sed b ecauseo f t heri skof
sc r a t c hing o r leav ing spots on the st ain les s st eel s urfa ce.
12
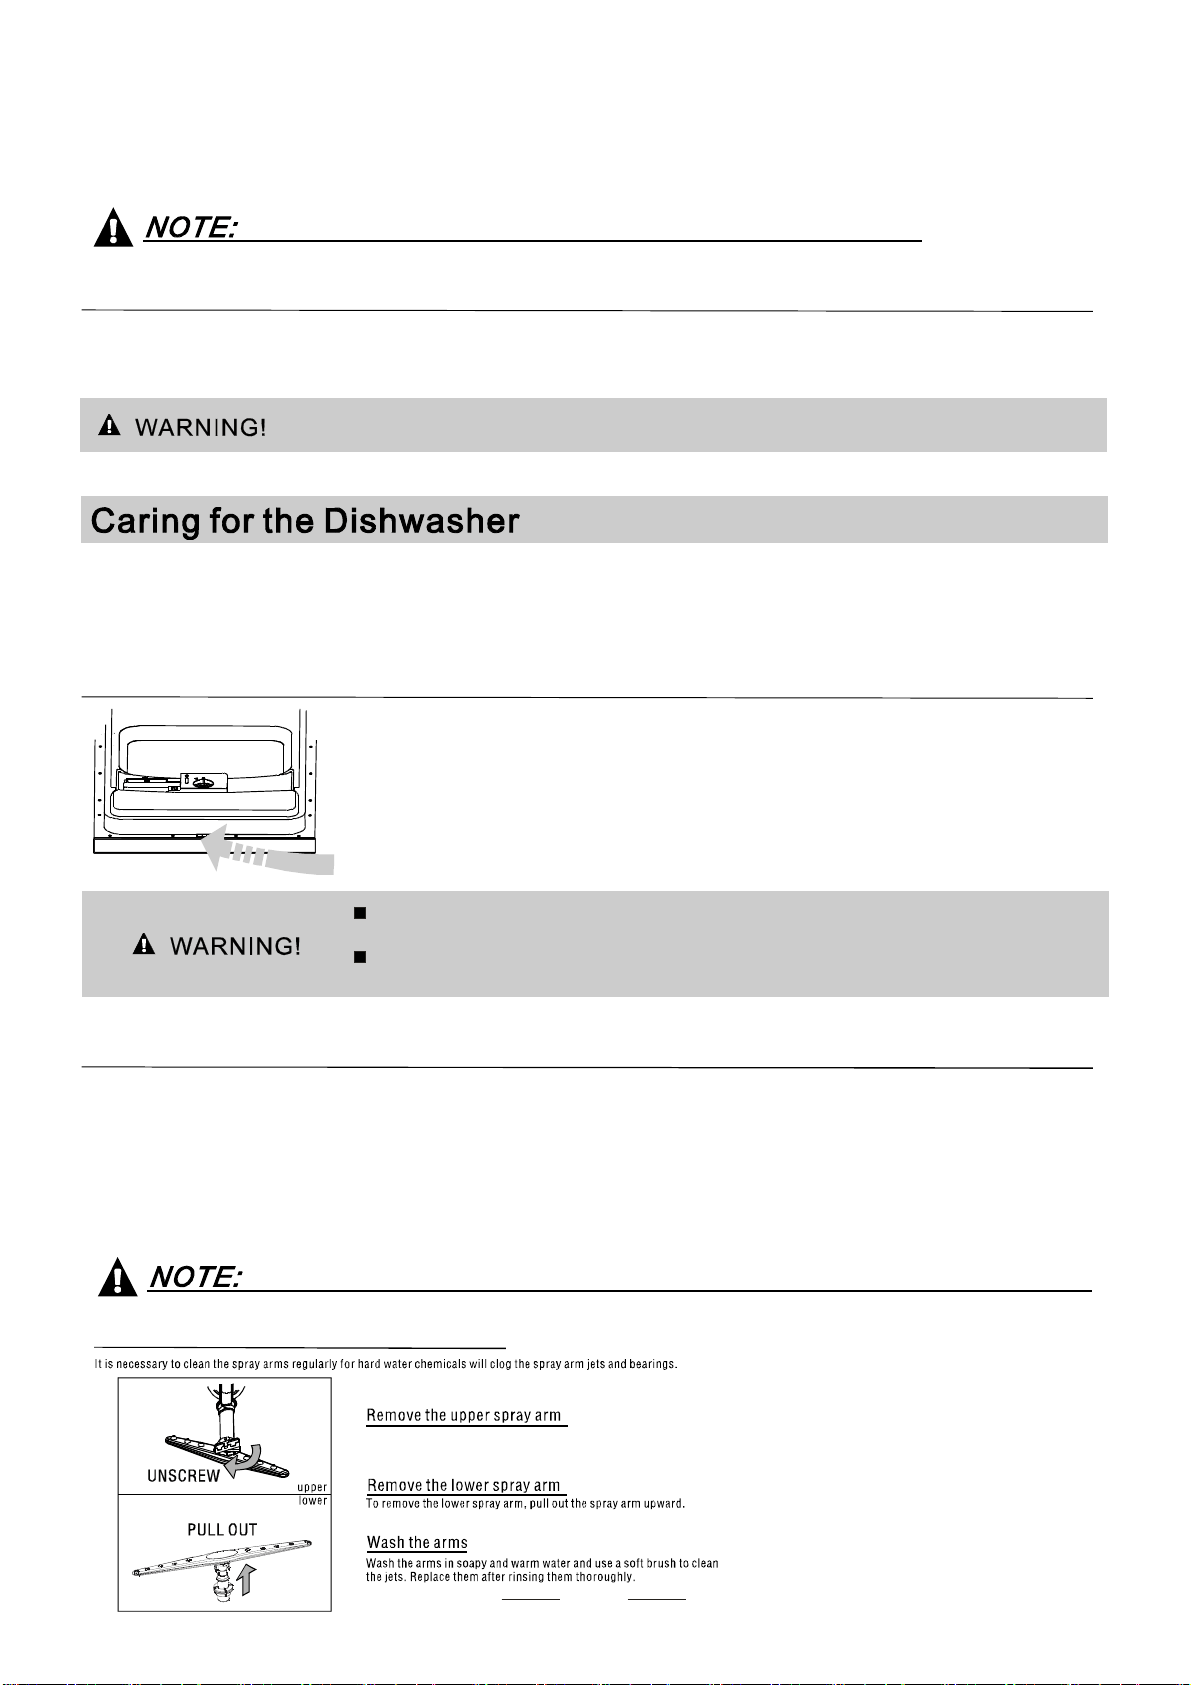
Cleaning the SprayArms
I f y ou r dishwa sher cann ot wor k be ca u s e of the i ce, p l e a se c ont a ct pr ofess ional s er v i ce p erso ns.
To remove the upper spray arm, screw off the nut clockwise then remove
the arm.
Itisrecommendthatyourun awashcyclewiththe
dish washer e mptyan dthe nre move t hepl ugfro mthe
socket, t urn o ff th ewa ter supp ly and l eave the door of
t he app l ia n c e s l i ghtly open. T h i s wil l help t h e doo r
sealstolastlongerandpreventodoursfromforming
withintheappliance.
If th eapp lian cem ustbe move d,t ryt o keep i tin t he
verticalposition. Ifabsolutelynecessary, itcanbe
positi oned on its back.
Oneofthefactorsthatcauseodourstoforminthe
dishwasher is foo dth atre main str app edi n the seal s.
Periodic cleaning with a d amp sponge wi llp rev entt his
f r o m oc curr ing.
Ensu reth evoltag ea nd f requenc yo f the p owe rbeing c orrespond st o
t hose on the rating plate . Onl yin sert the p lug into an electrica lso cke twhich i sear thed
pr op erly. I fthe el ectrical sock et t owhi ch thea pplianc emu stb ec onne cted is not
appropriatefortheplug, replacethe socket, ratherthan usingaadaptors or thelike as
they couldcause overheatingan dburns.
Plea selook at th erat ing label to know the rat ing v oltage a nd c onn ectt he dishw asher to t he app ropr iate power s upply.
Use the r equi red fuse 1 0amp ,tim ede lay f use orc ircui tbre ake rrec ommend ed and provide separate circ uits ervi ng
only this appl ianc e.
This appliance must be earthed. In the event of a malfunction or breakdown, earthing will reduce the risk of
electric shock by providing a path of least resistance for the electric current. This appliance is equipped with a
cord having an equipment-earthing conductor and an earthing plug. The plug must be plugged into an
appropriate outlet that is installed and earthed in accordance with all local standards and requirements.
Posi tion the ap pliance i n t he d esired lo cati on.The back sho uld r est ag ainst t hew all behin dit, and the sides,
along the adj acent ca bine tsor wa lls.T he d ishw asheri s equippe dwi th water supply a nd d rain hos es th at can
be pos itioned either to the righ tor the l eft s idest o facilit atep rop er in stal lation.
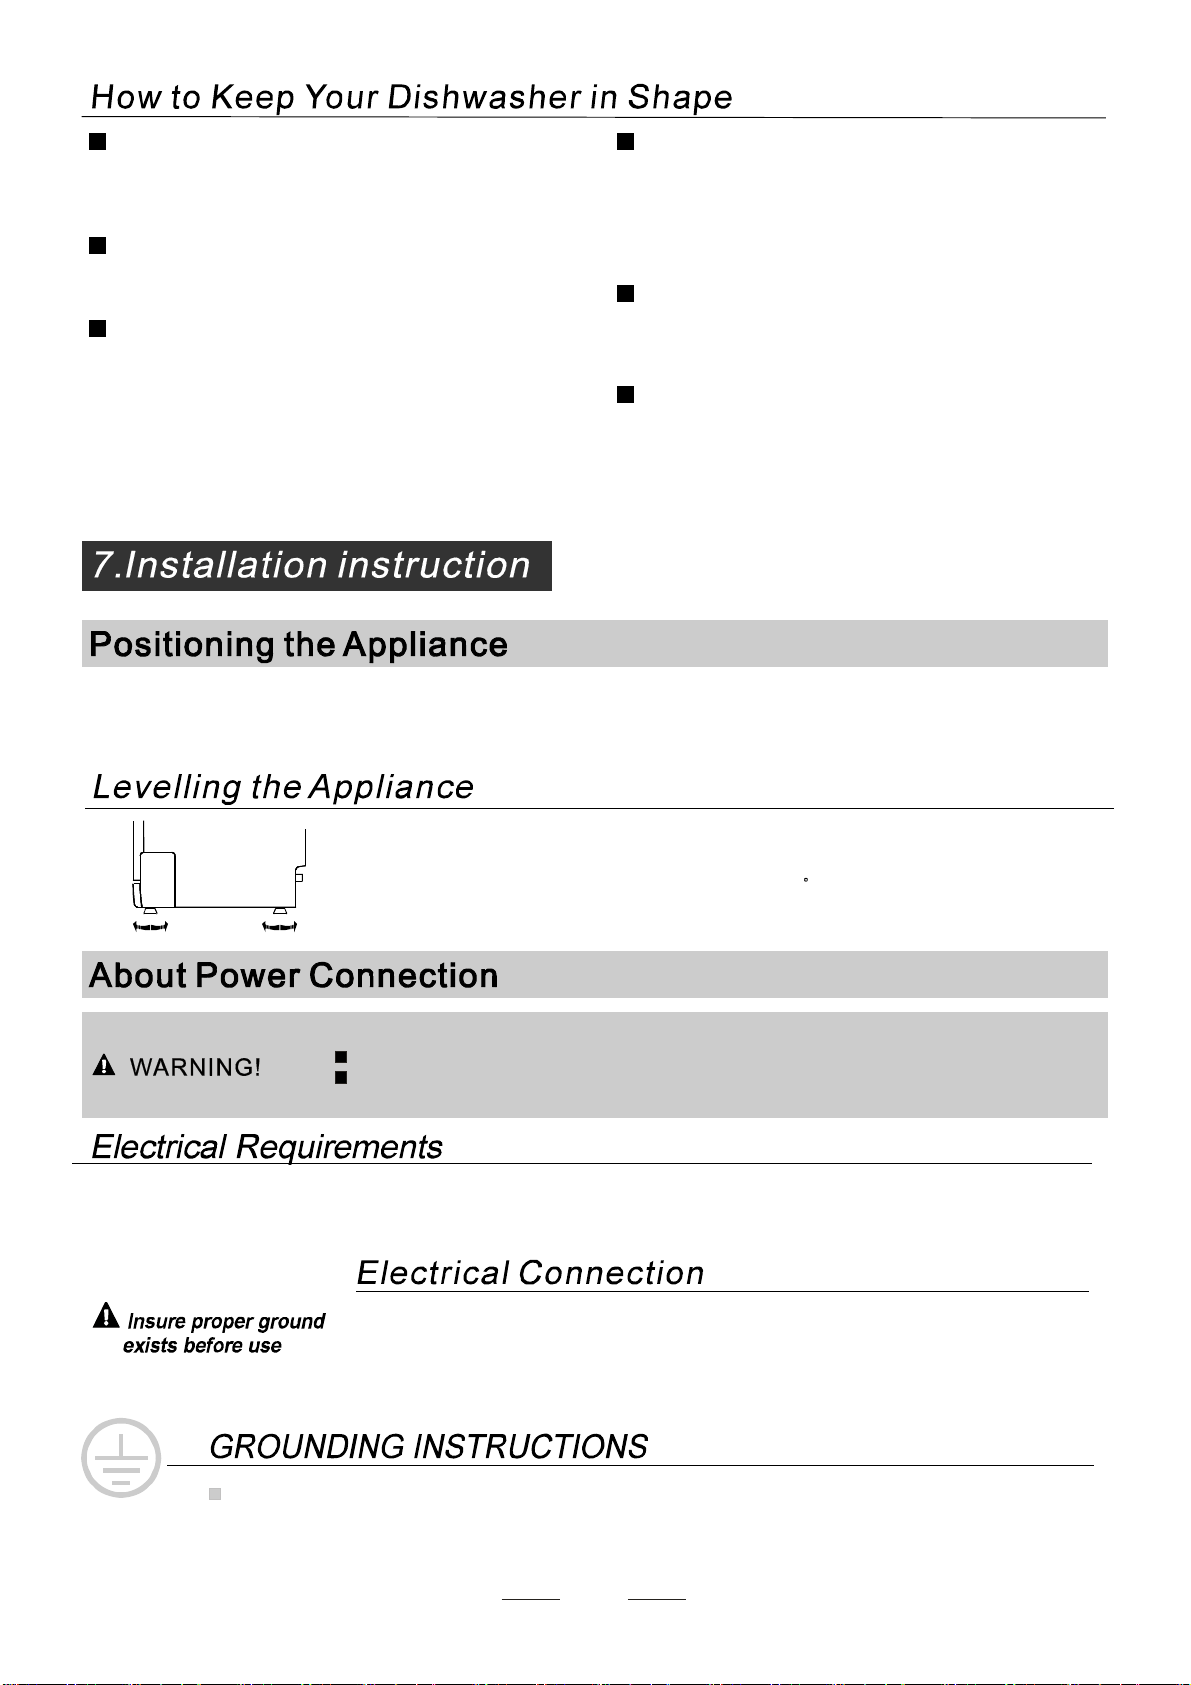
O nce the applianc eis positione dfor leve llin g,t hehei ghtof the di shwashe r
m ay be a ltered v iaad justment of the scre wing level o fthe fee t. In any cas e,
th eapplia nce sho uld not b einclin ed more than 2 .
For personal safety:
DO NOT USE AN EXTENSION CORD OR AN ADAPTER PLUG WITH THIS APPLIANCE.
DO NOT, UNDERANY CIRCUMSTANCES, CUTOR REMOVETHE EARTHING
CONNECTION FROM THE POWER CORD.
Aft er ever y wash, turn off t hew ater supp lyto the
applia nce and l eave t he doo rsli ghtl yop en soth at
m oisturea nd odour sa reno ttra pped i nside.
Befo re cl eaning or p erforming mainten ance, always
remove th eplug f romt he socket.
Tocleanthe exteriorandrubberparts of thedishwasher,
donot usesolventsor abrasivecleaningproducts.
O nly use a c lo th w ith w arm soapy wate r.
To rem ov e s pots or s t ain s f rom the sur f ace oft h e
interi or, usea clothdampened withwatera na little
v inega r, o r a c lean ing pro duct mad es peci fically fo r
dishwashers.
After EveryWash
Remove the Plug
No Solvents orAb ras ive C leani ng
Mov ing t heA ppli ance
Seals
WhennotinUse foraLongTime
13
for personal safety:
DO NOT USE AN EXTENSION CORD OR AN ADAPTER PLUG WITH THIS APPLIANCE.
DO NOT, UNDER ANY CIRCUMSTANCES, CUT OR REMOVE THE
FROM THE POWER CORD.
EAR THING
CONNECTION
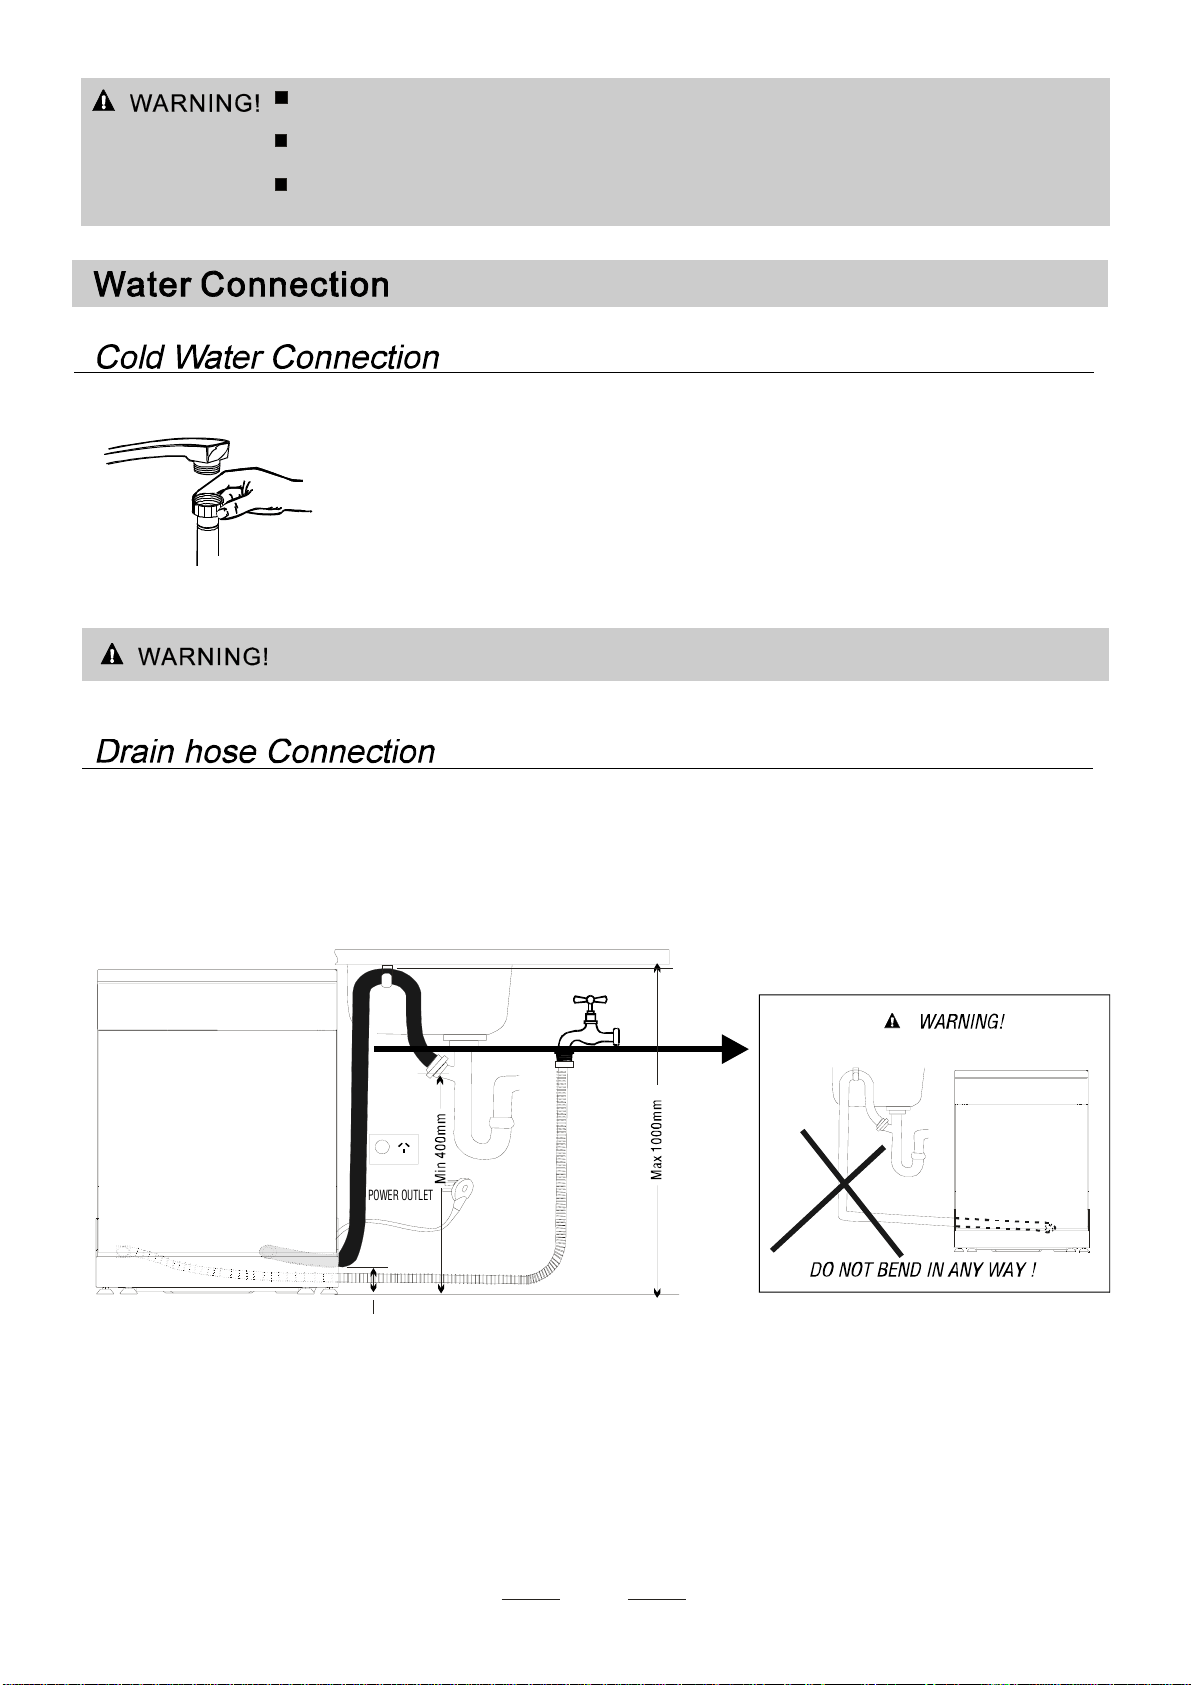
C onne ct th ec o ld w ater s upply hose t oa t hreaded 3/4 (inc h) conne ctor an dm ake s ure
t hati tis f astened t ight ly in place.
I fthe w at erpi pes ar en ewo rhave n ot been use dfor an e xtended perio dof ti me , let the
w ater run to make sure th atthe w ater i s clear.Thi sp recauti on is need ed to avoid the
r isk of the wate rinlet t o be bl ocked and d amage thea pplian ce.
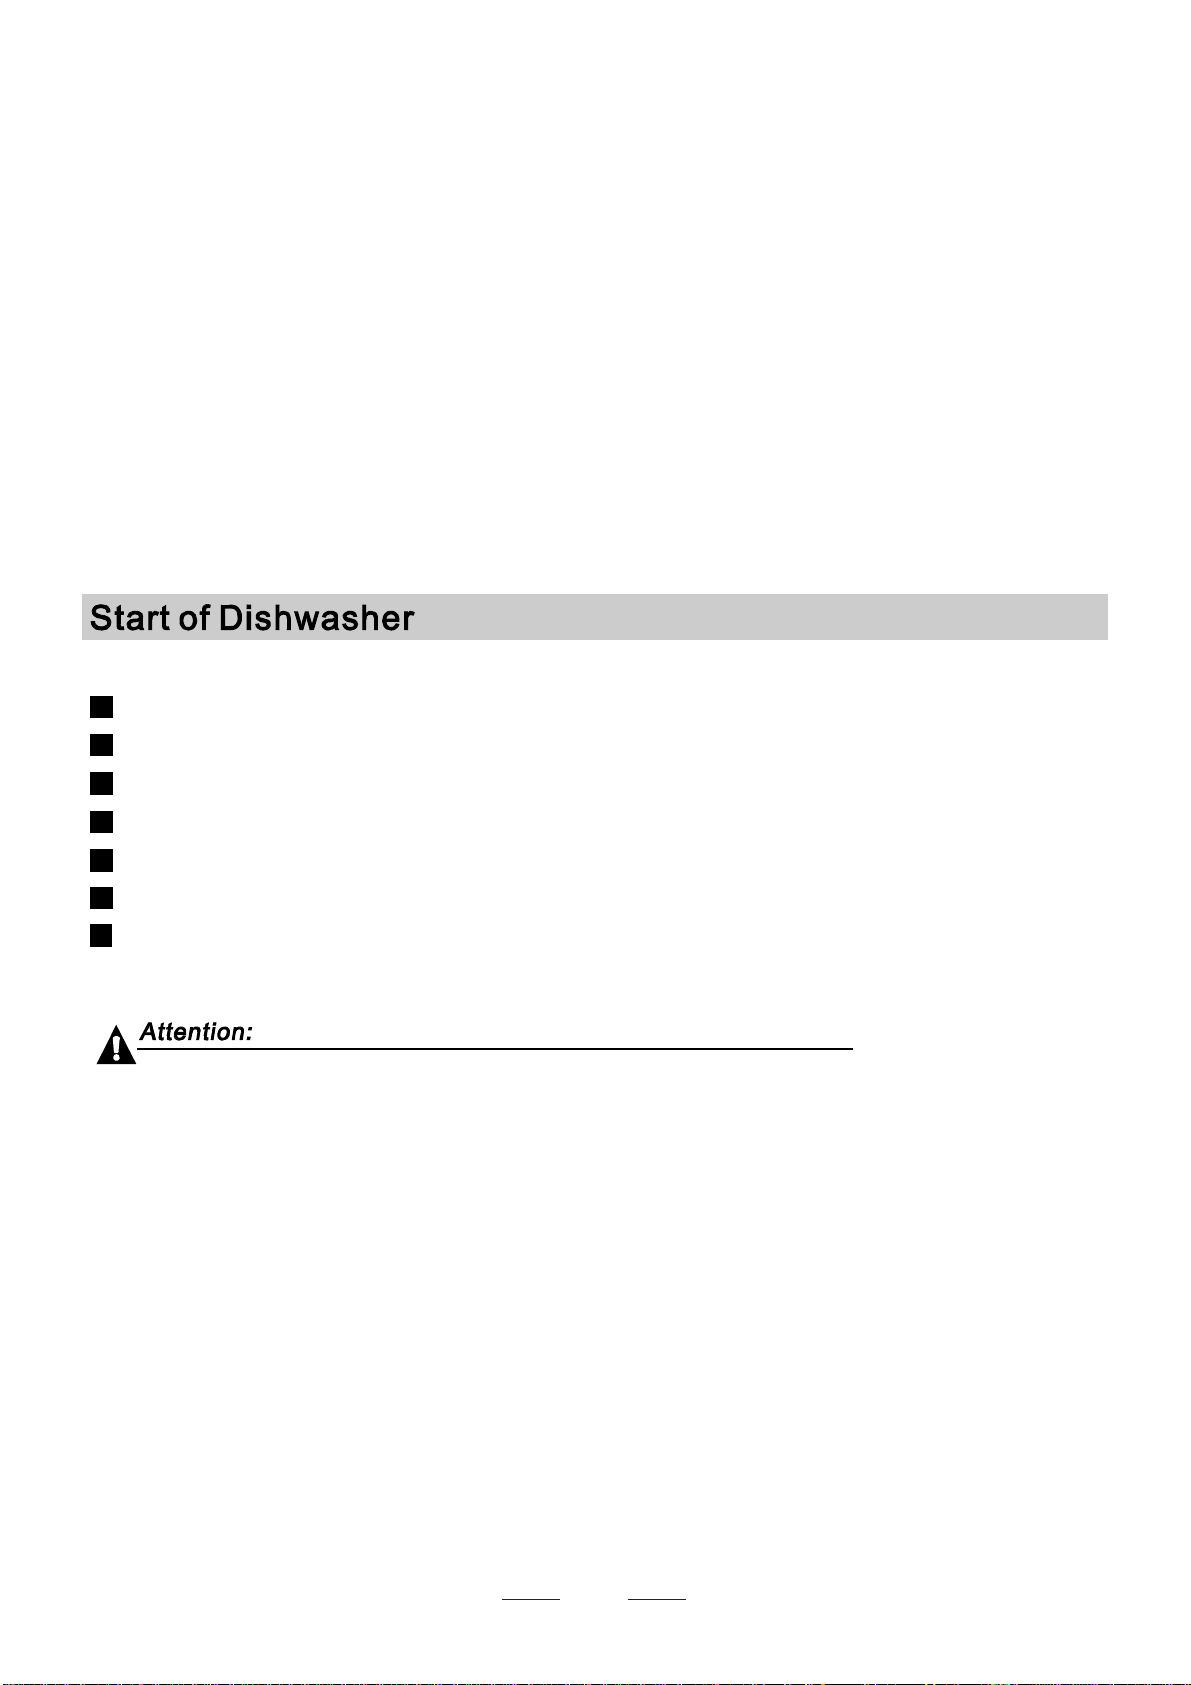
Insert the dra inho se i nto a dra inpi pewi tha minimu mdiame tero f 4c m,o r let it run i nto t he sink , ma king sur eto
avoidbendingorcrimping. Usethe specialplasticsupportthatcomes withthe appliance.Thefreeendofthehose
must be a ta h eigh tbetwee n40 and 100 cm and must not be i mmer sed inw ater.
Improper connection of the equipment earthing conductor can result in the risk of an
electric shock.
Check with a qualifi ed elect rician or service representative if you are in doubt whether the
appliance is properly earthed.
Do not modify the plug provided with the appliance. If the plug does not fit properl y to the
outlet, please have a qualified electrician to install a proper outlet.
Please close the hydrant afterusing.
14
FRONT VIEW
Inlet pipe connector Drain pipe connector
P
O
W
E
R
O
U
T
L
E
T
SINK
DISHWASHER
Min 100mm
15
Thefollowingthingsshouldbechecked beforestarting thedishwasher.
Syphon Connection
Th ew aste conne ction mustb e at a he ight of be tween 4 0 cm (m inimum) and 100 cm (max imum)
from t he b ot to mof the dis h.T he w ater drain ho sesh oul db e fix edb ya h ose c lip.
The contentof this m anualis very helpful to t he users.
Afterin stallation,pl ease make sure to keep this manual.
ExtensionHose
Ifyo une eda dr ainh ose extensi on, make sure to use a si milar dra in hose .
Itm ustb eno lo nger than 4 m etres; othe rwise the cleani ng effect of the dish was her coul dbe reduced .
1
Thedishwasher is leveland fixedproperly
2
T he i nle t va lv ei s o pen
3
There is aleakageat theconnectionsofthe conducts
4
Thewiresaretightlyconnected
5
The poweris switchedon
6
The i nlet and dr ain ho ses a re k notte d
7
Allpackingmaterials andprintings shouldbe takenout fromthedishwasher
Wa t e r O u t l et
Connect the wat erd rain h ose.Th edr ain h ose mu stbe correct lyfit tedt o avoid wate r leak s.
Ensur e tha tth ewate rinl etho sei sn otki nked or s quas hed.
I f the sink is 1 000m m h i gh er fr om the f l oor, the exc e ss w a ter i n h o se s ca nno t b e dr aine d dir ect l y
into the sink.Itwillbe necessary todrainexcesswaterfromhoses into abowlorsuitable
conta ine r tha tis held out side and low erth anthe s ink.
How toDrain ExcessWater FromHoses
Fuse blown, or th e
circuit breaker triggered
Replace fuse or reset circuit breaker. Remove any other
appliances sharing the same circuit with the dishwasher
Spilled rinse -aid
Always wipe up rinse-aid spills imm ediately.
Hard water minerals
The affec ted items are
notcorrosion resistant.
Aspayarmis
knocking against
an item in a basket
r
Items of croc kery
are loose in the
wash cabinet
This may be caused
by on-site installation
or the cross- section of
the piping.
To clean the interior, use a damp sponge with
dishwasher detergent and wear rubber gloves.
Never use any other cleaner than dishwasher
detergent for the risk of foaming or suds.
Interrupt the programme, and rearrange the items
which are obstructing the sp ay arm.r
Interrupt the programme,
and rearrange the items of crockery .
This has no influence on the dishwasher function.
if in doubt, contact a suitably qualified plumbe r.
Detergent with
colourant was used
Make sure that the detergent is the one without
colourant.
Improper deter gent
Make sure the dishwasher is turned on and the door is
closed securely.
Check that the water supply is connected p roperly and
the water is turned on.
Make sure to close the door properly and latch it.
Make sure the power cord is properly plugged into the
wall socket.
Power supply is not
turned on
W ater pressure is low
Door of dishwasher
not properly closed.
Kink in drain hose
Filt er clogged
Kitchen sink clogged
Check drain hose.
Check coarse the filter
(see section titled )" Cleaning The Filter "
Check the kitchen sink to make sure it is draining well.
If the problem is the kitchen s ink not draining ,you may
need a plumber rather than a serviceman for dishwashers.
Use only the special dishwasher detergent to avoid suds.
If this occurs, open the dishwasher and let suds evaporate.
Add 1 gallon of cold water to the tub. Close and latch the
dishwasher, then select any cycle. Dishwasher will drain
out the water at the first step.
Repeat if necessary.
Open the doo r after the
draining has stopped and check if the suds have
disappeared.
16
T he items should be corrosion resist a nt.
The dishes were not
loaded correctly.
See notes in " Loading the Dishwasher Baskets ".
Select a more intensive programme.
See" Wash Cycle Table ."
Use more detergent, or change your detergent.
Rearrange the items so that the sp ay can rotate freely.r
Clean and/or fit the filter combination correctly.
Clean the sp ay arm jets. See "Cleaning the Spray
Arms".
r
Use les s detergent if you have soft water and select
a shortest cycle to wash the glassware and to get
them clean.
Use a mild abrasive cleaner to eliminate those marks.
Re-loading the dishes properl y.
Load the dishwasher as suggest ed in the directions.
Increase the amount of rinse-aid/ refill the rinse-aid
dispenser.
Do not empty your dishwasher immediately after
washing. Open the door sl ightly so that the steam can
escape. Begin unloadi ng the dishwasher only once t
he dishes are barely warm to the touc h. Empty the low
basket first. This prevents water form dropping off
dishes in the upper basket.
In short program the washing temperature is lower.
This also lowers cleaning performance. Choose
a program with a long washing time.
Water drainage is m ore difficult wi th these items.
Cutlery or dishes of this type are not suitable for
washing in the dishwasher.
The programme was
notpowerful enough.
Not enough detergen t
was dispensed.
Items are blocking
the path of sp ay arms.r
The filter combination
inthebaseofwash
cabinet is not clean or
is not correc t ly fitted.
This may cause
the sp a y arm jet s
to get blocked.
r
Combination of soft
water and too much
detergent.
Aluminum utensils
have rubbed against
dishes.
Dishes block
detergent cups.
Improper loading
Too little rinse-aid
Dishes are remo ved
too soon
Wrong program
has been selected
Use of cutlery with
a low-quality coa ting
17
Uns a ti s
-factory
was hin g
res u lt
Uns a ti s
-factory
dry i ng
res u lt
If overflow occu rs, tur n off the main water supply b ef ore calling a service.
If there is water in the base pan because of an overfill or small leak,
the water should be removed before resta rti ng the dishwasher .
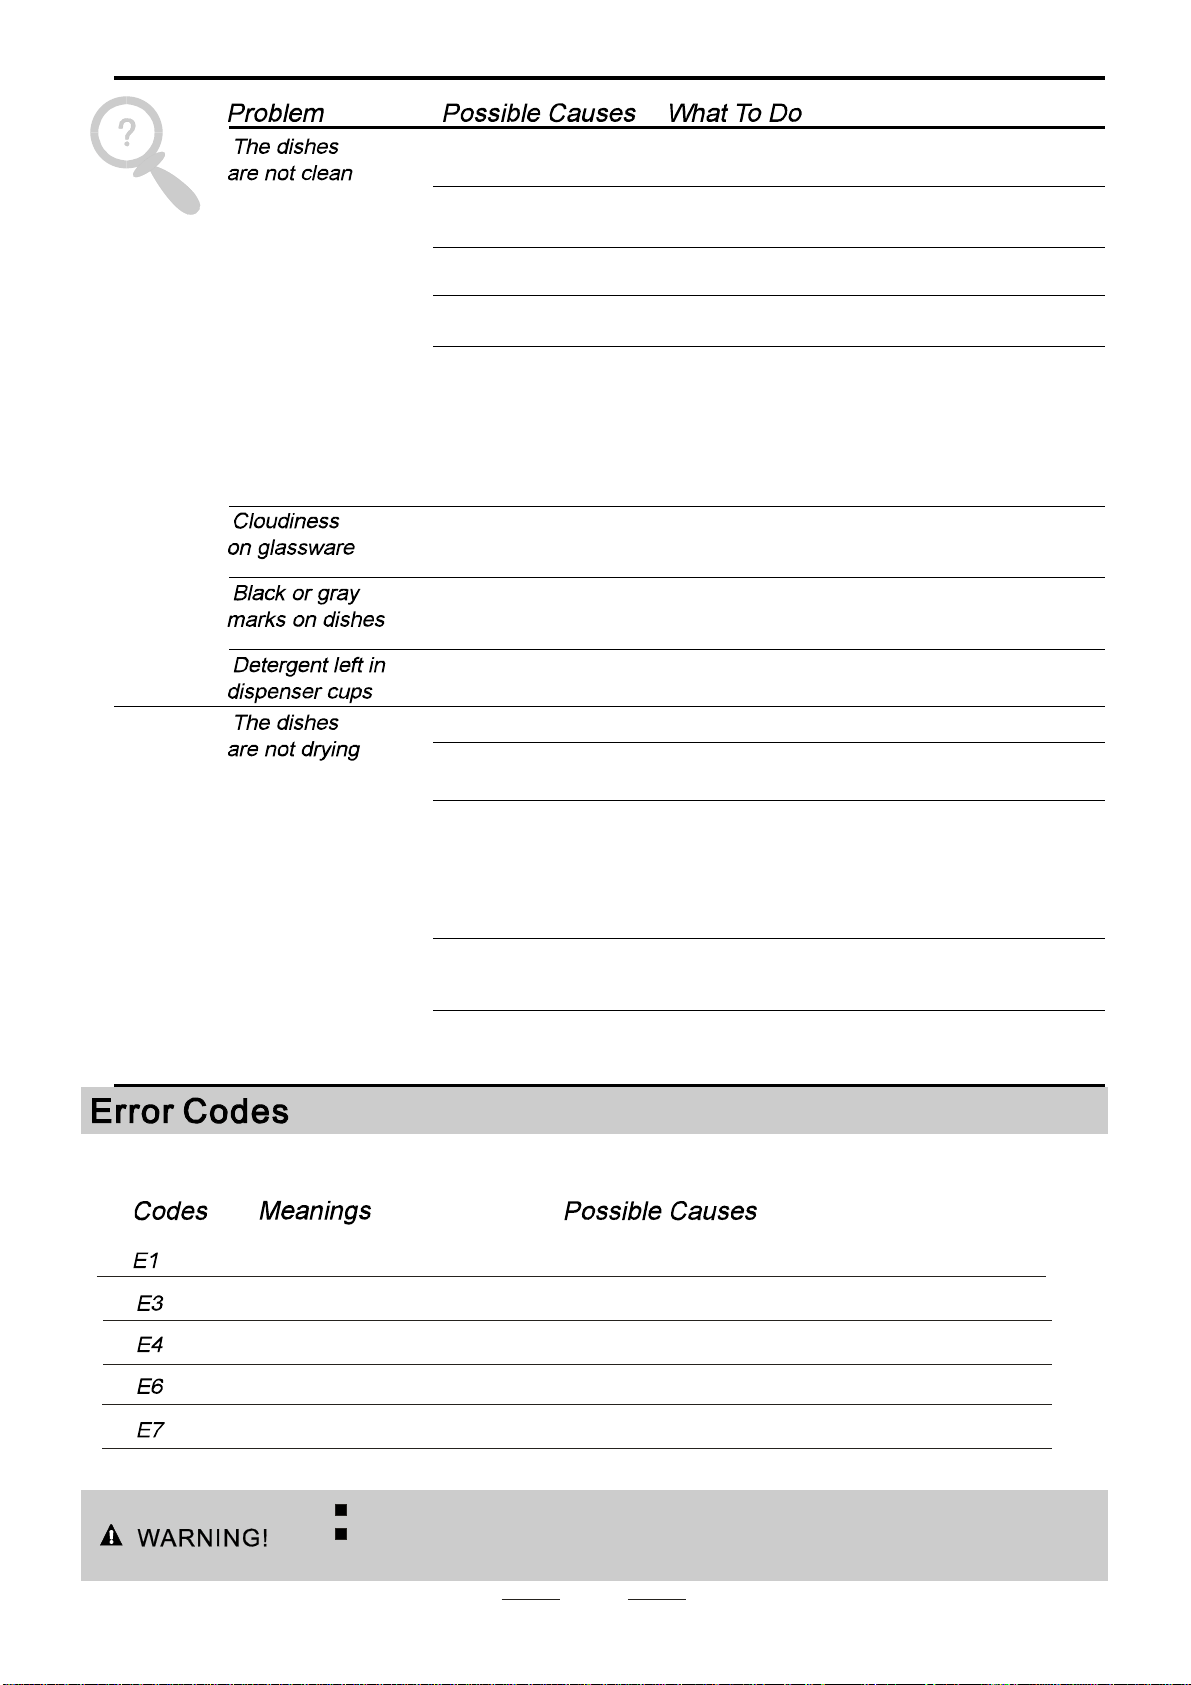
When s ome malfunctions come on, the appliance will display error codes to warn you:
Longer inlet t ime.
Faucets is not opened, or wa ter intake is restricted,or water pressure
is too low.
Malfunction of temperature sensor or of heating element.
Too much inlet water. .
Short circuit or break of temperature sensor
Opencircuit or break of temperature sensor
Longer heating time,
but not reaching required temperature
Overfilled.
Failure of temperature sensor
Failure of temperature sensor
18
Height : 850mm
Width : 600mm
Depth : 580mm
Voltage connected Load : see rating label
Water pressure: 0.04-1.0MPa
Power supply: see rating label
Capacity: 12 Place settings

Warranty Card
Worldwide Appliances Pty Limited
A.B.N. 45868077422
Oce:
48-50 Moore Street, Leichhardt N.S.W 2040
Post:
Locked Bag 3000, Annandale, N.S.W 2038
P: 1300 694 583
WARRANTY REGISTRATION
Your ongoing satisfaction with your artusi
product is important to us. We ask that you
complete the enclosed Warranty Registration
Card and return it to us so that we have a record
of the artusi product purchased by you.
PRIVACY
Worldwide Appliances respects your
privacy and is committed to handling your
personal information in accordance with the
National Privacy Principles and the Privacy
Act 1988 (Cth). A copy of the Worldwide
Appliances Privacy Policy is available at
www.artusi.com.au. Worldwide Appliances will
not disclose any personal information set out
in the Warranty Registration Card (“Personal
Information”) without your consent unless
required by:
1. law;
2. any Worldwide Appliances related company;
3. any service provider which provide services
to artusi or assist artusi in providing services
(including repair and warranty services) to
customers. Our purpose in collecting the
Personal Information is
to keep a record of the artusi product purchased
by you, in order to provide a better warranty
service to you in the unlikely event that there is
a problem with your artusi product. Worldwide
Appliances may contact you at any one or more
of the address, email address or telephone
numbers set out in the Warranty Registration
Card. Please contact artusi on 1300 694
583 should you not wish to be contacted by
Worldwide Appliances.
WARRANTY
1. Warranty
Worldwide Appliances warrants that each artusi
product will remain, for a period of either 12
months or 24 months of warranty. All Warranties
are valid from the original date of purchase, And
warranty claims must be accompanied by the
proof of purchase.
24 months warranty products:
All Built-in Appliances – Limited to Ovens,
Gas, Induction and Electric Cooktops, and All
Rangehoods
Freestanding Cookers - Gas and Electric Models
(900mm Width)
artusi.com.au
Dishwashers - Freestanding, Fully Integrated,
Semi Integrated and built-in
12 months warranty products:
Freestanding Cookers - Gas and Electric Models
in 50cm, 54cm and 60cm Widths
Portable Appliances* – Benchtop Models and
Portable Gas Models
2. What is not Covered by the Warranty.
The Warranty does not apply if an artusi product
is defective by a factor other than a defect arising
in the manufacture of the artusi product, including
but not limited to:
(a) damage through misuse (including failure
to maintain, service or use with proper care),
neglect, accident or ordinary wear and tear
(including deterioration of parts and accessories
and glass breakage);
(b) use for purpose for which the artusi product
was not sold or designed;
(c) use or installation which is not in accordance
with any specied instructions for use or
installation;
(d) use or operation after a defect has occurred or
been discovered;
(e) damage through freight, transportation or
handling in transit (other than when Worldwide
Appliances is responsible);
(f) damage through exposure to chemicals, dusts,
residues, excessive voltage, heat, atmospheric
conditions or other forces or environmental
factors outside the control or Worldwide
Appliances;
(g) repair, modication or tampering by the
purchaser or any person other than Worldwide
Appliances, an employee of Worldwide
Appliances or an authorised artusi service
contractor*;
(h) use of parts, components or accessories
which have not been supplied or specically
approved by artusi.
(i) damage to surface coatings caused by cleaning
or maintenance using products not recommended
in the artusi product handbook provided to the
purchaser upon purchase of the artusi product;
(j) damage to the base of an electric oven due to
items having been placed on the base of the oven
cavity or covering the base, such as aluminium
foil (this impedes the transfer of heat from the
element to the oven cavity and can result in
irreparable damage); or
(k) damages, dents or other cosmetic
imperfections not aecting the performance of the
artusi in respect of an artusi product purchased
as a “factory second” or from display
The Warranty does not extend to light globes
used in artusi products.
3. Domestic Use
Each artusi product is made for domestic use.
This Warranty may not extend to artusi products
used for commercial purposes.
Continued over...
Artusi Warranty March 2014.indd 1 6/03/2014 10:08 am

4. Time for Claim under the Warranty
You must make any claim under this Warranty
within twenty eight (28) days after the occurrence
of an event which gives rise to a claim pursuant
to the Warranty, by booking a service call on the
telephone number below.
5. Proof of Purchase
Customers must retain proof of purchase in order
to be eligible to make a warranty claim in respect
of an artusi product.
6. Claiming under the Warranty
Customers will bear the cost of claiming under
this Warranty unless Worldwide Appliances
determines the expenses are reasonable, in which
case the customer must claim those expenses
by providing written evidence of each expense
to Worldwide Appliances at the address on the
Warranty Registration Card.
7. Statutory Rights
(a) These terms and conditions do not aect your
statutory rights.
(b) The limitations on the Warranty set out in this
document do not exclude or limit the application
of the consumer guarantees set out in the Act or
any other equivalent or corresponding legislation
in the relevant jurisdiction where to do so would:
(i) contravene the law of the relevant jurisdiction;
or
(ii) cause any part of the Warranty to be void.
(c) Worldwide Appliances excludes indirect or
consequential loss of any kind (including, without
limitation, loss of use of the artusi product) and
(other than expressly provided for in these terms
and conditions) subject to all terms,
conditions and warranties implied by custom, the
general law, the Act or other statute.
(d) The liability of Worldwide Appliances to you
for a breach of any express or non-excludable
implied term, condition or warranty is limited at
the option of Worldwide Appliances to:
(i) replacing or repairing the defective part of the
artusi product;
(ii) paying the cost of replacing or repairing the
defective part of the artusi product;
(iii) replacing the artusi product; or
(iv) paying the cost of replacing the artusi
product.
(e) Our goods come with guarantees that cannot
be excluded under the Australian Consumer
Law. You are entitled to a replacement or refund
for a major failure and for compensation for any
other reasonably foreseeable loss or damage.
You are also entitled to have the goods repaired
or replaced if the goods fail to be of acceptable
quality and the failure does not amount to a
major failure.
8. Defects
Any part of an artusi product deemed to be
defective and replaced by Worldwide Appliances
is the property of Worldwide Appliances.
Worldwide Appliances reserves the right to
inspect and test artusi products in order to
determine the extent of any defect and the
validity of a claim under the Warranty.
*To locate your closest artusi authorised service
agent please contact us on 1300 652 100 or visit
www.artusi.com.au
ALL SERVICE CALLS MUST BE BOOKED
THROUGH AN AUTHORISED DEALER OR
WARRANTY DEPARTMENT ON 1300 652 100
OR stokesaps.com.au/artusi-service
01032014
Warranty Card continued
artusi.com.au
2
Please complete and send to ARTUSI at: REPLY PAID 83617
LEICHHARDT NSW 2040
Last Name: First Name:
Address:
State: Postcode: Email:
Home Phone: Mobile:
Purchase Date: / / (Please attach proof of purchase to validate warranty)
MODEL NUMBER
SERIAL NUMBER
(if you cannot locate the serial number please call ARTUSI on 1300 694 583)
1
2
3
4
WARRANTY REGISTRATION CARD
01052013
01032014
Warranty Card tear off
Artusi Warranty March 2014.indd 2 6/03/2014 10:08 am