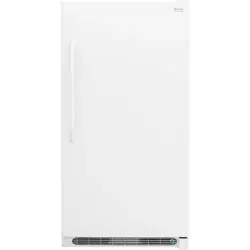
A Green LED Power On Light B Wire Freezer Basket C Freezer Control *D Freezer Shelf E LED Light Bulb *F Fixed Door Bins G Magnet (Door Open Sensor) *H Freezer Shelf
IMPORTANT:
Cleaning your Appliance
Remove tape and glue residue from surfaces before turning on the appliance. Rub a small amount of liquid dish soap over the adhesive with your fingers. Rinse with warm water and dry with a soft cloth. Do not use sharp instruments, rubbing alcohol, flammable fluids, or abrasive cleaners to remove tape or glue. These products can damage the surface of your appliance. After you remove all of the package materials, clean the inside of your appliance before using it. See the CARE & CLEANING section in this manual. See important information about cleaning glass shelves and covers in the STORAGE FEATURES section of this manual.
Moving your Appliance
Your appliance is heavy. When moving the appliance for cleaning or service, raise the anti-tip bracket (see “Setting the anti-tip bracket”). Be sure to cover the floor with cardboard or hardboard to avoid floor damage. Always pull the appliance straight out when moving it. Do not wiggle or “walk” the appliance when trying to move it as floor damage could occur.
INSTALLATION
This Use & Care Guide provides general operating instructions for your model. Use the appliance only as instructed in this Use & Care Guide. Before starting the appliance, follow these important first steps.
Location
Choose a place that is near a grounded electrical outlet. Do Not use an extension cord or an adapter plug.
If possible, place the appliance out of direct sunlight and away from the range, dishwasher or other heat sources.
The appliance must be installed on a floor that is level and strong enough to support a fully loaded appliance.
CAUTION: Do not block the lower front of your appliance. Sufficient air circulation is essential for the proper operation of your appliance.
Installation
Installation clearances
Allow the following clearances for ease of installation, proper air circulation, and plumbing and electrical connections: Sides & Top - ⅜ in.; Back - 1 in.
NOTE: If your appliance is placed with the door hinge side against a wall, you may have to allow additional space for the handle so the door can be opened wider.
Guidelines for final positioning of your appliance:
All 4 corners of the cabinet must rest firmly on the floor.
The cabinet should be level at the front and rear.
Door should be level.
Setting the anti-tip bracket:
Models are equipped with an anti-tip bracket. The anti-tip brackets are located on the lower front corners of the cabinet. Lower the anti-tip on each side clockwise until they contact the floor. Do not raise the cabinet.
WARNING: The anti-tip device must be installed according to the instructions in your Use & Care Manual. Failure to do so will result in injury.
DOOR REMOVAL/REVERSAL (SOME MODELS)
NOTE: The direction in which your appliance doors open (door swing) can be reversed, from left to right or right to left, by moving the door hinges from one side to the other. Reversing the door swing should be performed by a qualified person.
IMPORTANT: Before you begin, turn the appliance temperature control to “off” and remove the electrical power cord from the wall outlet. Remove any food from door shelves.
Door removal and reversal instructions:
Gently pry the hinge cover upward with a flat head screwdriver. Remove the 3 screws from the top hinge using a Phillips screwdriver or 5/16” wrench. Set the hinge and screws aside (see Figure 1).
Gently pry the hinge bearing out from the door with a flat head screwdriver. Install the hinge bearing on the opposite side of the door. Remove the door from the unit by lifting it up (see Figure 2). NOTE: Place the door on a padded surface to avoid damage.
Flip the door over to access the bottom. Remove the screw from the hinge bearing and the door closer (see Figure 3).
Using a flat head screwdriver, gently pry the closer/bearing assembly out of the door (see Figure 3).
Separate the door closer and hinge bearing (see Figure 3).
Flip the door closer over 180º and reinstall the closer onto the bearing (see Figure 3).
Reinstall the closer/bearing assembly to the opposite side of the door and reinstall the screws (see Figure 3).
Gently bend the tabs of the hinge cover out while pulling the cover towards the front of the unit to remove.
Remove the screw from the door stop. Using a flat head screwdriver, gently pry the door closer off of the lower hinge pin. Using an adjustable wrench, remove the lower hinge pin (see Figure 4).
Reinstall the hinge pin into the outer hole and tighten with an adjustable wrench. Flip door stop over 180º and reinstall onto the opposite hinge. Reinstall the screw (see Figure 5).
Reinstall the hinge covers, Gently bend the tabs of the cover outward, push back over the hinge into place.
To reinstall the door, place door on lower hinge pin at 90° and rotate to the closed position, (see Figure 6).
Attach the upper hinge using the three 5/16” screws. Replace the hinge cover. Plug in electrical power cord (see Figure 7)
DOOR HANDLE INSTALLATION (SOME MODELS)
CAUTION: Wear gloves and use extreme CAUTION when installing these handles. The rounded end of the handles may be sharp.
IMPORTANT: To ensure proper installation of handle, please review these instructions and illustrations thoroughly prior to installing the handle. Additionally, before installing the door handle, make sure the door swing is correct. Your model will have either a right-hand or left-hand door swing. Follow instructions in the Use & Care Guide to reverse the doors, if necessary
Remove handle from carton and any other protective packaging.
Position freezer handle end caps over upper and lower pre-installed shoulder bolts (A) that are fastened into door, ensuring the holes for the set screws are facing towards the hinge.
While holding handle firmly against door, fasten upper and lower Allen set screws (B) with supplied Allen wrench.
CONTROLS AND SETTINGS
Cool Down Period
To ensure safe food storage, allow the Appliance to operate with the door closed for at least 8 hours before loading it with food.
Appliance Control
NOTE: When first turning appliance on, adjust control to Recommended. After 24 hours, adjust the controls as needed.
IMPORTANT: Adjusting the appliance temperature control to “off” turns off the compressor and prevents the appliance from cooling, but does not disconnect the power to the light bulb and other electrical components. To turn off power to your appliance, you must unplug the power cord from the wall outlet.
Temperature Adjustment
Adjust temperature gradually: adjust the knob in small increments, allowing the temperature to stabilize.
For colder temperatures, adjust the knob towards Coldest.
For warmer temperatures, adjust the knob towards Cold.
Alarms
High Temp Alert If the temperature inside the cabinet exceeds 23°F (-5°C), the LED light at the bottom of the cabinet will flash and the alarm will sound. The alarm can be reset by opening the door. The LED will continue to flash until the cabinet temperature is below 23°F (-5°C).
Door Ajar Alert This alert will sound to alert you that the door has been open for 5 minutes or more. The audible alert will sound until the door is closed.
Power On Light The green LED Power On light indicates that the appliance is properly connected to electrical power. The light glows even when the temperature control is turned to OFF. If the light goes out, refer to “Appliance does not run” in the SELF HELP section.
Shelf Adjustment
Appliance shelves are easily adjusted to suit individual needs. Before adjusting the shelves, remove all food.
To adjust shelves, lift the front of the shelf and pull forward.
To replace shelves, insert the rear of the shelf into any pair of shelf rails and carefully push the shelf back into position, making sure the shelf clips go in the notch in the liner.
Door Storage
Door bins and shelves are provided for convenient storage of jars, bottles, and cans. Frequently used items can be quickly selected.
To remove the door bin:
Push in on each side of the door bin to release from the locking tabs.
Lift up on the bin and pull it straight out. Wire Shelf Freezer Basket The freezer basket is ideal for large items or items that do not store well on the shelves.
To install the door bins:
Push the bin back and down into the locking tabs.
The bin sides will lock into the tabs.
Freezer Basket
The freezer basket is ideal for large items or items that do not store well on the shelves.
CARE AND CLEANING
Protecting your investment
Keeping your appliance clean maintains appearance and prevents odor build-up. Wipe up any spills immediately and clean the appliance at least twice a year. When cleaning, take the following precautions:
Never use CHLORIDE or cleaners with bleach to clean stainless steel.
Do not wash any removable parts in a dishwasher.
Always unplug the electrical power cord from the wall outlet before cleaning.
Remove adhesive labels by hand. Do not use razor blades or other sharp instruments which can scratch the appliance surface.
Do not remove the serial plate.
Do not use abrasive cleaners such as window sprays, scouring cleansers, brushes, flammable fluids, cleaning waxes, concentrated detergents, bleaches or cleansers containing petroleum products on plastic parts, interior doors, gaskets or cabinet liners. Do not use paper towels, metallic scouring pads, or other abrasive cleaning materials or strong alkaline solutions.
NOTE: If you set your temperature controls to turn off cooling, power to lights and other electrical components will continue until you unplug the power cord from the wall outlet.
CAUTION:
Pull the appliance straight out to move it. Shifting it from side to side may damage flooring.
Damp objects stick to cold metal surfaces. Do not touch refrigerated surfaces with wet or damp hands.
Care & Cleaning Tips
Part
What To Use
Tips and Precautions
Interior & Door Liner
Soap and water
Baking soda and water
Use 2 tbsp of baking soda in 1 qt of warm water. Be sure to wring excess water out of sponge or cloth before cleaning around controls, light bulb or any electrical part.
Door Gasket
Soap and water
Wipe gaskets with a clean soft cloth.
Exterior (Stainless Steel Models Only)
Soap and water
Stainless Steel Cleaners
Never use CHLORIDE or cleaners with bleach to clean stainless steel.
Clean stainless steel front and handles with nonabrasive soapy water and a dishcloth. Rinse with clean water and a soft cloth. Use a non-abrasive stainless steel cleaner. These cleaners can be purchased at www.frigidaire.com or major department stores. Always follow manufacturer’s instructions. Do not use household cleaners containing ammonia or bleach.
NOTE: Always clean, wipe and dry with the grain to prevent scratching. Wash the rest of the cabinet with warm water and mild liquid detergent. Rinse well, and wipe dry with a clean soft cloth.
Replacing Light Bulbs
Unplug appliance
Wear gloves
Remove light cover
Replace old bulb
Replace light cover
Plug in the appliance
CAUTION: Wear gloves when replacing AC LED light bulbs to avoid getting cut. Use same wattage when replacing bulb.
CAUTION: Use only a 5-watt or less AC LED light bulb.
TROUBLESHOOTING
Let us help you troubleshoot your concern! This section will help you with common issues. If you need us, visit our website, chat with an agent, or call us. We may be able to help you avoid a service visit
Common Occurrences
Before calling for service, review this list. It may save you time and expense. This list includes common occurrences that are not the result of defective workmanship or materials in this appliance.
Appliance does not run.
Ensure plug is tightly pushed into electrical outlet.
Check/replace fuse with a 15-amp time-delay fuse. Reset circuit breaker.
The appliance control is turned to “OFF”.
Appliance may be in defrost cycle. Wait 20 minutes and check again.
Appliance temperature is unsatisfactory.
Check freezer temperatures and adjust the temperature control as needed.
Appliance temperature is warmer than preferred.
Set control to a colder setting until appliance temperature is satisfactory. Allow 24 hours for the temperature to stabilize.
Appliance is noisy or vibrates.
The cabinet is not level.
Adjust the anti-tip bracket. See “Setting the antitip bracket” in the INSTALLATION section.
Floor is weak.
Odors in appliance.
Interior needs to be cleaned.
Foods that produce odors should be covered or wrapped.
Cabinet light not working.
Replace light bulb.
Ensure plug is tightly pushed into electrical outlet.