Check the symbols on the care labels of the various garments to verify whether the garments can be safely tumble dried.
Sort laundry according to the type of fabric.
Empty all pockets and check for loose buttons.
Close zips and hooks and fasten belts and strings without tightening them.
Wring out garments to remove the maximum amount of water possible.
! Do not load the dryer when garments are dripping wet.
Maximum load sizes Do not overload the drum. The following values indicate the weight of dry garments: Natural fibres: maximum kg Synthetic fibres: maximum kg
! Do not overload the dryer as this may result is reduced drying performance.
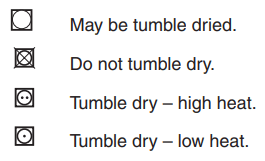
Care labels
Always check the care labels, especially when placing garments in the tumble dryer for the first time. Below are the most commonly used symbols:
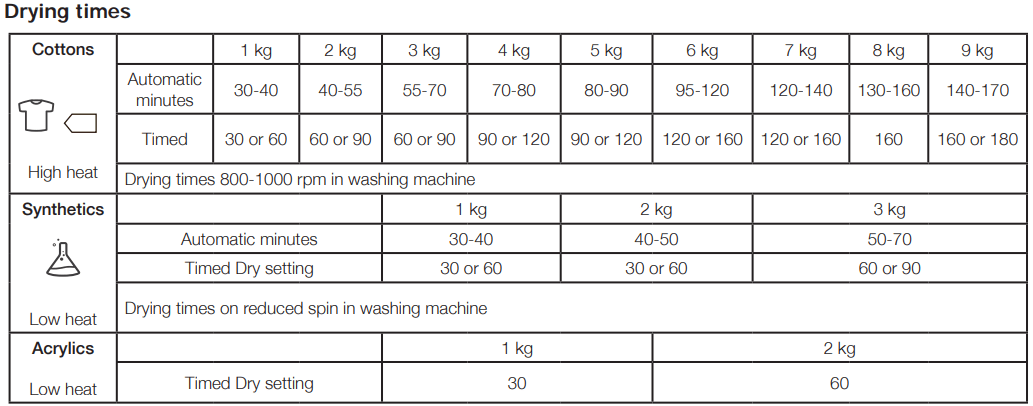
Drying times
Drying times are approximate and may vary depending on the following:
Amount of water retained by items after the spin cycle: towels and delicate items retain a lot of water.
Fabrics: items of the same fabric, but with different texture and thickness may have different drying times.
Amount of laundry: single items and small loads may take longer to dry.
Drying: if items are to be ironed, they can be removed from the dryer while still slightly damp. Items that require complete drying can be left longer.
Heat setting.
Temperature of the room: the lower the temperature of the room, the longer it will take for the dryer to dry clothing.
Bulk: certain bulky items require special care during the drying process. We suggest removing these items and replacing them in the dryer once they have been shaken out: repeat this procedure several times during the course of the drying cycle.
! Do not over-dry items. All fabrics contain natural dampness which helps to keep them soft and fluffy.
The drying times provided refer to the automatic Cupboard dry programmes. The Timed drying settings are also indicated to enable you to select the most suitable timed option. The weight refers to dry items.
Warnings
! This appliance has been designed and built according to international safety standards. These warnings are given for safety reasons and must be followed carefully.
General safety
This appliance can be used by children aged from 8 years and above and persons with reduced physical, sensory or mental capabilities or lack of experience and knowledge if they have been given supervision or instruction concerning use of the appliance in a safe way and understand the hazards involved.
This tumble dryer has been designed for home, and not professional, use.
Do not touch the appliance while barefoot or with wet hands or feet.
Unplug the machine by pulling on the plug, not the cord.
After using the dryer, turn it off and unplug it. Keep the door closed to make sure that children do not use it as a toy.
Children should be supervised to ensure that they do not play with the dryer.
Cleaning and user maintenance shall not be made by children without supervision.
Children of less than 3 years should be kept away from the appliance unless continuously supervised.
The appliance must be installed correctly and have proper ventilation. The air intake at the front of the dryer should never be obstructed (see Installation).
Never use the dryer on carpeting where the pile height would prevent air from entering the dryer from the base.
Check to see if the dryer is empty before loading it.
The back of the dryer could become very hot. Never touch it while in use.
Do not use the dryer unless the filter, watercontainer and condenser are securely in place (see Maintenance).
Do not overload the dryer (see Laundry for maximum loads).
Do not load items that are dripping wet.
Carefully check all instructions on clothing labels (see Laundry).
Do not tumble dry large, very bulky items.
Do not tumble dry acrylic fibres at high temperatures.
Do not turn off the dryer when there are still warm items inside.
Clean the filter after each use (see Maintenance).
Empty the water container after each use (see Maintenance).
Clean the condenser unit at regular intervals (see Maintenance).
Do not allow lint to collect around the dryer.
Never climb on top of the dryer. It could result in damage.
Always follow electrical standards and requirements (see Installation).
Always buy original spare parts and accessories (see Service).
To minimise the risk of fire in your tumble dryer, the following should be observed:
Tumble dry items only if they have been washed with detergent and water, rinsed and been through the spin cycle. It is a fire hazard to dry items that HAVE NOT been washed with water.
Do not dry garments that have been treated with chemical products.
Do not tumble dry items that have been spotted or soaked with vegetable or cooking oils, this constitutes a fire hazard. Oil-affected items can ignite spontaneously,especially when exposed to heat sources such as a tumble dryer. The items become warm, causing an oxidisation reaction with the oil, Oxidisation creates heat. If the heat cannot escape, items can become hot enough to catch fire. Piling, stacking or storing oil-effected items can prevent heat from escaping and so create a fire hazard.If it is unavoidable that fabrics containing vegetable or cooking oil or those that have been contaminated with hair care products be placed in a tumble dryer they should first be washed with extra detergent - this will reduce, but not eliminate the hazard. They should not be removed from the dryer and piled or stacked while hot.
Do not tumble dry items that have previously been cleaned in or washed in, soaked in or soiled with petrol/ gasoline, dry cleaning solvents or other flammable or explosive substances. Highly flammable substances commonly used in domestic environments including cooking oil, acetone, denatured alcohol, kerosene, spot removers, turpentine, waxes and wax removers. Ensure these items have been washed in hot water with an extra amount of detergent before being dried in the tumble dryer.
Do not tumble dry items containing foam rubber (also known as latex foam), or similarly textured rubber like materials. Foam rubber materials can, when heated, produce fire by spontaneous combustion.
Fabric softener or similar products should not be used in a tumble dryer to eliminate the effects of static electricity unless the practice is specifically recommended by the manufacturer of the fabric softener product.
Do not tumble dry undergarments that contain metal reinforcements eg. bras with metal reinforcing wires. Damage to the tumble dryer can result if the metal reinforcements come loose during drying.
Do not tumble dry rubber, plastic articles such as shower caps or babies waterproof covers, polythene or paper.
Do not tumble dry rubber backed articles, clothes fitted with foam rubber pads, pillows, galoshes and rubber coated tennis shoes.
Remove all objects from pockets such as lighters and matches.
WARNING: Never stop the dryer before the end of the drying cycle unless all items are quickly removed and spread out so that the heat is dissipated.
Save energy and respect the environment
Wring out all items to eliminate excess water before tumble drying (if you use a washing machine first, select a high spin cycle). Doing this will save time and energy during drying.
Always dry full loads - you save energy: single items or small loads take longer to dry.
Clean the filter after each use to contain energy consumption costs (see Maintenance).
Maximum load sizes: 9 kg
Care and maintenance
Disconnecting the power supply
Disconnect the dryer when not in use or during cleaning and maintenance operations.
Cleaning the filter after each cycle
The filter is a fundamental component of the dryer: its function is to collect lint and fluff that form during drying. Clean the filter once drying is completed, by rinsing it under running water or cleaning it with a vacuum cleaner. Should the filter become clogged, the flow of air inside the dryer will be seriously hampered: drying times becomes longer and more energy is consumed. Moreover, the dryer may become damaged.
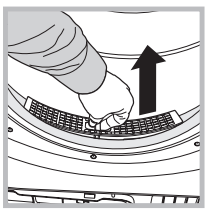
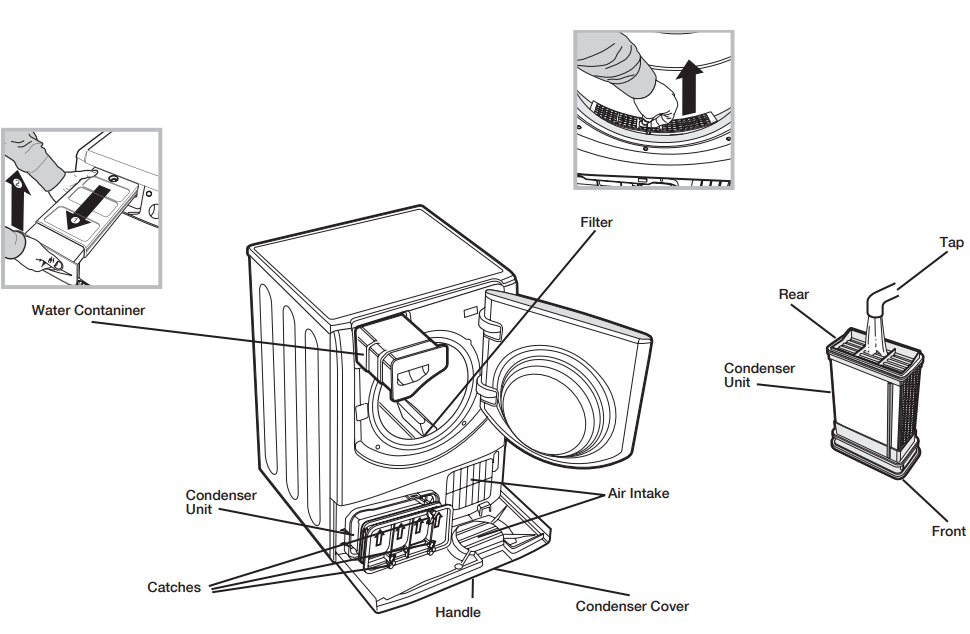
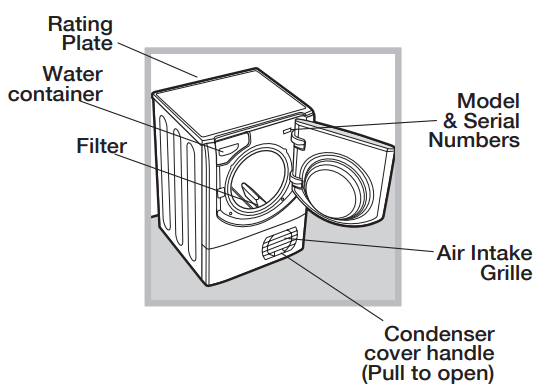
The filter is located in front of the dryer seal (see Picture).
Removing the filter:
Pull the filter’s plastic handle upwards (see Picture).
Clean the fluff off the filter and replace it correctly. Ensure that the filter is pushed fully home. ! Do not use the dryer unless the filter has been replaced in its holder.
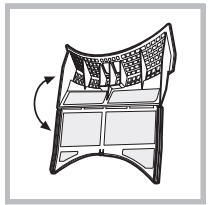
Checking the drum after each cycle
Rotate the drum manually to remove smaller items (handkerchiefs) that could have been left inside the dryer.
Cleaning the drum ! Avoid using abrasives, steel wool or stainless steel cleaning agents to clean the drum. A coloured film may appear on the stainless steel drum surface: it may be caused by a combination of water and/or cleaning agents such as washsofteners. This coloured film does not affect the dryer’s performance.
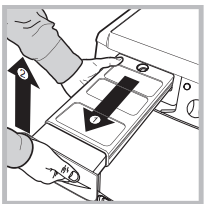
Emptying the water container after each cycle
Remove the water container and empty it into a sink or other suitable drain outlet, then replace it correctly. Always check the water container and empty it before starting a new drying cycle.
Failure to empty the water container may cause the following:
The dryer stops heating (thus the load may still be damp at the end of the drying cycle).
The “Empty water container” LED activates to show that the water container is full. Priming the Water Collection System When your dryer is new, the Water Container will not collect Water until the system is primed, this will take 1 or 2 drying cycles. Once primed it will collect Water during every cycle.
Cleaning the condenser unit.
Remove the condenser (see Picture below) unit regularly (monthly) and clean off any fluff deposits from the plates by rinsing it with cold water running on the rear end of the condenser.
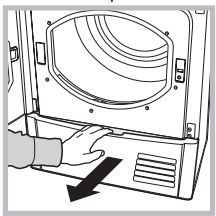
Removing the condenser:
Disconnect the dryer from the power supply and open the door.
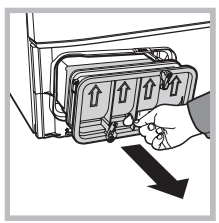
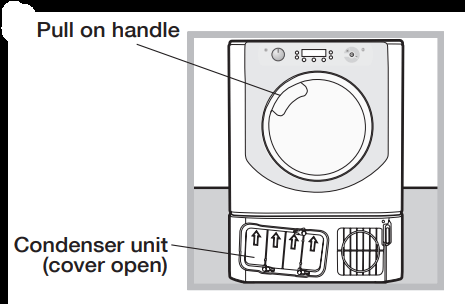
Open the condenser cover (see Picture below), unlock the three catches by turning them 90° anticlockwise, then pull on the grip to remove the condenser.
Clean the surface of the seals and replace the unit with the arrows pointing upwards, while making sure that the catches are securely fixed.
Cleaning the tumble dryer
The external metal, plastic and rubber parts can be cleaned with a damp cloth.
Clean the front air intake grille regularly (every 6 months) with a vacuum cleaner to remove any lint, fluff or dust deposits. Furthermore, remove any lint deposits from the front part of the condenser and from the filter area, using a vacuum cleaner every so often.
! Do not use solvents or abrasives. ! Have the dryer checked regularly by authorised technical personnel in order to ensure that the electrical and mechanical parts work safely (see Assistance).
Quick Tips !Remember to clean your filter and Condenser unit after each load. ! Remember to empty your water container after each load. ! Doing this will keep your machine working at its BEST!
Dryer Description
To open door
The Features
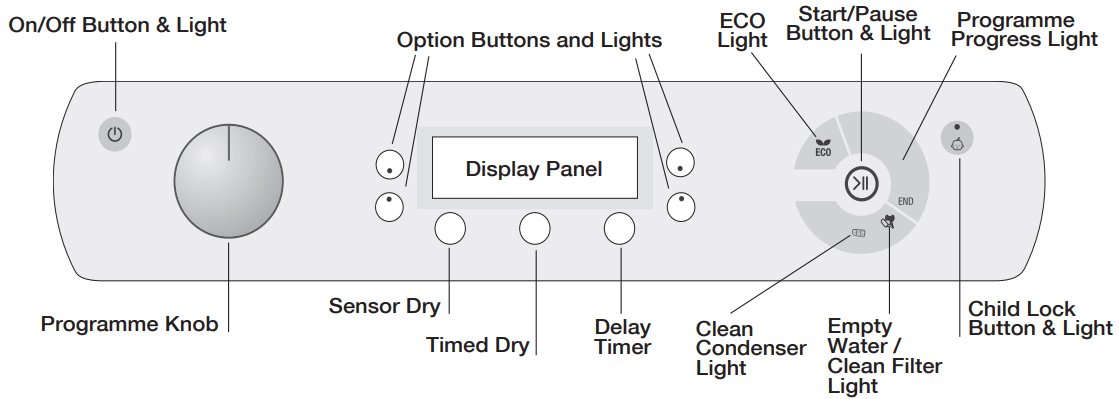
Control Panel
The On/Off button/ light , if the dryer is running and this button is pressed and held for more than 3 seconds the dryer is turned off. The light signals that your dryer is in use or ready to select a programme.
The Programmes knob sets the programme: rotate until the indicator is pointing to the programme you want to select (see Start and Programmes).
The Option buttons/ lights select available options for your selected programme. The lights indicate that the option has been selected (see Start and Programmes).
The Display Panel has three sections: Sensor Dry = Drying level, Timed dry = Drying time and Time to End / Delay start each with a corresponding selection button (see The Display).
START/PAUSE button with indicator light : when the green indicator light flashes slowly, press the button to start the programme. When the cycle has started, the indicator light is illuminated in a fixed manner. To pause the programme, press the button again; the indicator light will turn orange and begin to flash again. To restart the programme from the point at which it was interrupted, press the button again (see Start and Programmes).
The Programme Progress Lights indicate each state of the programme by turning on as appropriate (see Start and Programmes).
Note: this light also flashes amber during post care phase.
The Empty Water indicator “h2o” signals that the water container should be emptied. The light will take a few seconds to go out after replacing the empty water container; the dryer must be running for this to happen (see The Controls).
Note: if the water bottle is full the display shows “h2o” and the indicator flashes, the heat is turned off and your clothes will not dry.
The Empty Water / Clean Filter Light gives a reminder before every programme, that its essential to clean the filter and empty the water container every time the dryer is used (see Maintenance and Care).
The Clean Condenser Light gives a reminder, that its essential to clean the condenser at regular intervals (see Maintenance and Care).
The Child Lock button/light Press and hold this button after selecting your programme and any options. This prevents the programme settings from being changed. When the light is lit the other buttons and programme knob are disabled. Hold the button to cancel and the light will go out.
ECOLight - this light is illuminated as you select options that use less energy (see the controls).
The Display
The Display has three sections each with its corresponding button.
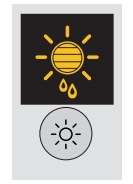
Sensor Dry
After selecting a programme that has a Sensor Dry Option, press and release the button until the required dryness sensing level is displayed. If the sensing option is not available the display will flash and the buzzer beeps three times.
! Some drying programmes are not compatible with all sensor drying levels.
Dryness levels available
Damp dry: the most delicate level which makes sure that your clothes are not dripping wet. After a hand-wash the perfect level to then hang your clothes if you do not want to tumble dry them all the way to the end. Iron Dry: a very delicate drying, It is useful for garments you would like to iron afterwards. Hanger plus: just the drying status to hang delicate garments up (as curtains). Hanger Dry: just the drying level to hang the garments up. Light dry: ideal for delicate clothes to be folded and placed into the cupboard. Cupboard Dry: the garments are completely dry and are ready to be folded and placed in the cupboard. Ready to Wear: used for clothes to be worn straight away once the cycle is completed.
Timed Dry
After selecting a Programme that has a Timed Dry Option, press the Timed Button to select a drying time. The display will reduce the selected time each time you press and release this button (see Start and Programmes). Each press decreases the set time 180, 160, 120, 90, 60, 30, 20 and then repeats. If the Timed Dry option is not available the display will flash and the buzzer beeps three times. The selected time remains displayed after the programme starts and can be changed during the programme if you wish.
! You can either choose a sensor dry level or a drying time.
Delay Timer
After selecting a Programme that has a Delay Start Option a delay start time can be selected. Each press of the Delay start button advances the delay setting in 1 hour increments from “1h” to “24h” then “OFF” and then after five seconds cancels the delay. For delays of 10 hours or more the display counts down the time in hours until 10 hours, then the display shows “9:59” and then counts down in minutes. For delays of 9 hours or less the display shows hours and minutes and then counts down in minutes for all of the delay. After the Start/Pause Button is pressed the delay time can be changed or cancelled, if you wish. When the delay period finished the symbol is off and the Time to End is displayed, if you wish. If you have chosen a timed drying the display during programming will show the drying time only in the timed drying display in the middle. After having pressed start the machine will turn the time display on and visualize the countdown of the programme time.
Time to End
If the delay icon is off the time displayed is the Time to End of the programme running. When timed programmes are selected the time displayed throughout the cycle is the actual time remaining. When an Automatic programme is selected the time displayed is an estimate of the time remaining. When the programme is selected the display shows the time required to dry a full load. The remaining time is constantly monitored during the drying cycle and is updated to show the best forecast. The time to end is displayed in hours and minutes and counts down each minute. The colon between the hours and minutes display flashes to show that the time is counting down. The Display also shows if there is a problem with your dryer, if this occurs the display will show F followed by a fault code number, the four option lights and the pause light will also flash Orange (see Troubleshooting).
Start and Programmes
Choosing a Programme
Plug the dryer into the electrical socket.
Sort your laundry according to fabric type (see Laundry).
Open the door and make sure the filter is clean and in place and the water container is empty and in place (see Maintenance).
Load the machine and make sure that the items are not in the way of the door seal. Close the door.
If the ON/Off light is not lit; press the On/Off Button .
Select the Programmes selection that corresponds with fabric being dried by checking the Programmes table (see Programmes) as well as the indications for each type of fabric (see Laundry).
Where available, choose Sensor Dry or Timed Dry option pressing and releasing the corresponding button until the desired level or time is displayed. ! See programmes table, for more details.
Set a delay time and other options as necessary (see The Display).
If you wish the buzzer to sound at the end of the programme, press the Sound button . If you have selected the Crease Care option, this option is not available.
Press the START button to begin. The display will show the estimated time to end. During the drying programme, you can check on your laundry and take out the items that are dry while the others continue drying. When you close the door again, press START in order to resume drying
During the last few minutes of Drying Programmes before the programme is completed, the final COOL TUMBLE phase is entered (fabrics are cooled), this phase should always be allowed to complete.
To let you know that your programme is complete the buzzer will beep 3 times and the display shows END (Note: if the SOUND option was selected the buzzer beeps 3 times every 30 seconds for 5 minutes). Open the door, take your laundry out, clean the filter and replace it. Empty the water container and replace it (see Maintenance). If the Crease Care option has been selected and you do not take the clothes out immediately the clothes will tumble occasionally for 10 hours or until you open the door.
Switch dryer off using the On/Off button
Standby mode
This tumble dryer, in compliance with new energy saving regulations, is fitted with an automatic standby system which is enabled after about 30 minutes if no activity is detected. Press the On-Off button to reactivate the dryer.
Special Programmes
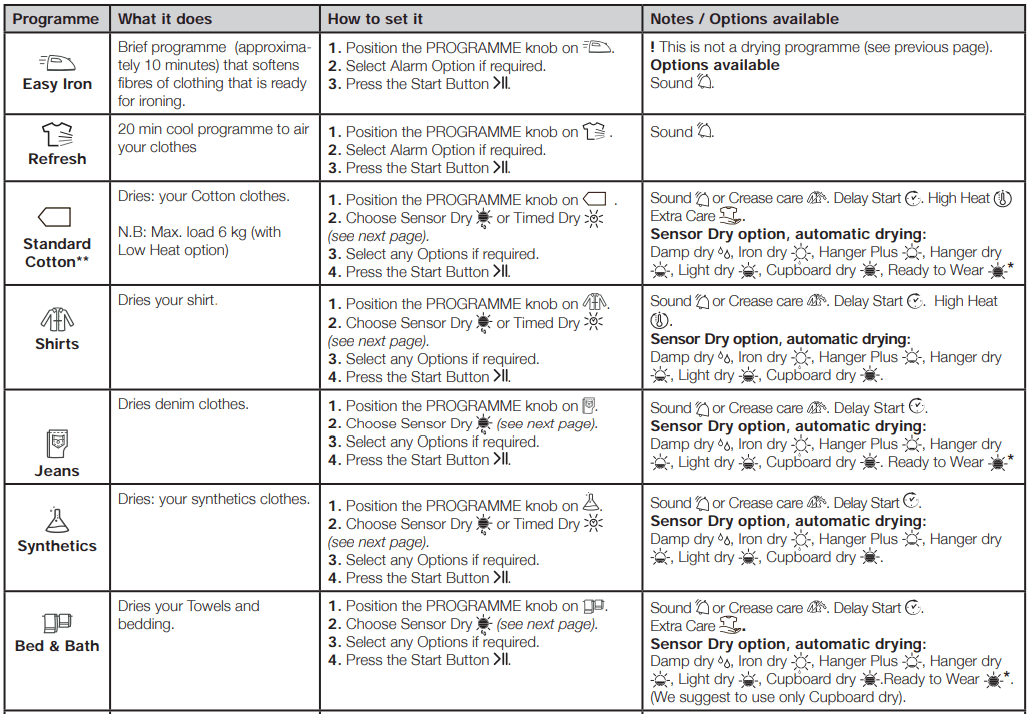
Easy Iron Programme
Easy Iron is a short 10 minute programme (8 minutes of heat followed by a 2 minutes cool tumble period) which fluffs the fibres of clothing that has been left in the same position/location for an extended period of time. The cycle relaxes the fibres and makes them easier to iron and fold. ! Easy Iron is not a drying programme and should not be used for wet articles of clothing.
For best results:
Do not load more than maximum capacity. These numbers refer to dry weight: Fabric: Max Cotton and Cotton mix: 2.5 kg Synthetics: 2 Denim: 2
Unload the dryer immediately after the end of the drying cycle, hang, fold or iron the articles and put them away in the closet. Should this not be possible, repeat the cycle. The Easy Iron effect varies from one fabric to the next. It works very well on traditional fabrics like Cotton or Cotton mix, and less well on acrylic fibres and on materials such as Tencel.®
Wool Programme
This is a programme for tumble dryer safe garments marked with the symbol .
It can be used for load sizes up to 1 kg (approximately 3 sweaters).
We recommend that garments are turned inside out before drying.
This programme will take about 60 minutes, but may take longer depending on the size and density of the load and the spin speed used in your washer.
Loads dried using this programme are usually ready to wear, but on some heavier garments the edges may be slightly damp. Allow these to dry naturally as over-drying could damage garments.
! Unlike other materials, the mechanism of wool shrinkage is irreversible; i.e. it will not stretch back to original size and shape. ! This program is not suitable for Acrylic garments.
Jeans
This is a programme for Jeans made from Denim Cotton. Before drying your Jeans turn the front pockets inside out.
It can be used for load sizes up to 3 kg (approximately 4 pairs).
It can also be used on other garments made from same material such as jackets. •
The duration of this programme will depend on the size of the load, the dryness setting selected and the spin speed used in your washer.
Loads dried using this programme are usually ready to wear; the edges or seams may be slightly damp. If this is found try turning the jeans inside out and running the programme again for a short period.
Use this cycle only for a 100% cotton load, do not mix dark and light coloured items. Do not use this cycle for garments with embroidery and accessories (pins,...), turn the pockets insideout
! We do not recommend that you use this programme if your jeans have elastic waist bands or embroidery.
Shirts - Low Heat option
This is a programme for Shirts made from synthetic materials or a mixture of natural and synthetics materials such as Polyester and Cotton.
It can be used for load sizes up to 3 kg (approximately 14 shirts).
The duration of this programme will depend on the size of the load, the dryness setting selected and the spin speed used in your washer.
Loads dried using this programme are usually ready to wear; the edges or seams may be slightly damp. If this is found try turning the shirts inside out and running the programme again for a short period.
Shirts - High Heat option
This is a programme for Shirts made from Cotton.
It can be used for load sizes up to 3 kg (approximately 10 shirts).
The duration of this programme will depend on the size of the load, the dryness setting selected and the spin speed used in your washer.
Loads dried using this programme are usually ready to wear; the edges or seams may be slightly damp. If this is found try turning the shirts inside out and running the programme again for a short period.
Silk
This is a programme for drying your Delicate Silk.
It can be used for load sizes up to 0.5 kg.
The duration of this programme will depend on the size of the load, the dryness setting selected and the spin speed used in your washer.
Loads dried using this programme are usually ready to use, but on some heavier garments the edges may be slightly damp. If this is found try removing the load and open them out then run the programme again for a short period.
Only for garments labelled suitable for tumble drying
Duvet programmes
! Take care with these programme do not dry any items that are damaged which could result in the filling blocking the filter and air path resulting in a fire hazard.
Must only be used on Single size duvets not suitable for double or king size items.
Loads dried using this programme are usually ready to use, but may be slightly damp in places. If this is found try removing the load and open them out and shake then run the programme again for a short period.
Also suitable for down filled jackets.
Duvet - High Heat option
This is a programme for drying your Cotton Duvets. With Cotton outer cover and down filling.
The duration of this programme will depend on the size of the load and the spin speed used in your washer.
Only for garments labelled suitable for tumble drying.
Duvet - Low Heat option
This is a programme for drying your Synthetic Duvets, with synthetic filling.
The duration of this programme will depend on the size of the load and the spin speed used in your washer.
Only for garments labelled suitable for tumble drying.
Baby Delicate
This is a programme for drying your baby’s small delicate items of clothing and bedding (Cotton and Chenille) and for drying your Delicate Clothes.
Do not dry items such as bibs and nappy pants with plastic coverings.
It can be used for load sizes up to 2 kg.
The duration of this programme will depend on the size of the load, the dryness setting selected and the spin speed used in your washer.
Loads dried using this programme are usually ready to use, but on some heavier garments the edges may be slightly damp. If this is found try turning them inside out and running the programme again for a short period.
Bed & Bath
This is a programme for Cotton Towels and sheets.
It can be used for load sizes up to 9 kg.
The duration of this programme will depend on the size of the load, the dryness setting selected and the spin speed used in your washer.
Loads dried using this programme are usually ready to use; the edges or seams may be slightly damp especially on large items. If this is found try opening them out and running the programme again for a short period.
Refresh
Thanks to a cool air flow, oxygen penetrates the fibers and transports unpleasant odors such as cigarette smoke, frying, smog out of the clothes. With this short program, you can easily refresh your garments in just 20 minutes. ! Airing is not a drying programme and should not be used for wet articles of clothing.
If can be used on any load size up to 9 kg, but is more effective on smaller loads. 20-minute programme that airs your clothes with cool air. Use also to cool warm clothes.
Anti Allergy
The programme has the ‘Seal of Approval’ endorsement from ‘Allergy UK’, which reflects the effective reduction and elimination of allergens from the clothes. With this programme, thanks to the achievement of constant temperature for an extended period of time, the effects of the most common allergens (including House Dust Mite) are neutralized. Can be used on wet load to dry and treat or on a dry load just to treat your laundry.Maximum load is 9 kg for a wet load and 4 kg for a dry load.
Quick Dry
Your drying time for small loads is very much reduced with a huge time saving up to 53% on cottons (with High Heat option) and 50% on synthetics (with Low Heat option).
Load: 1 Kg. Dryness level: only Cupboard Dry
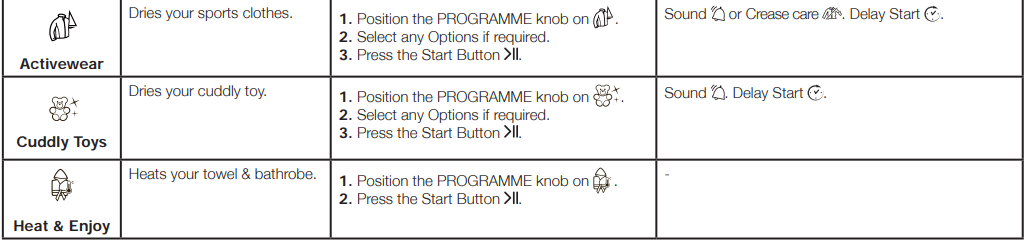
Activewear
This programme is specific for drying water-repellent fabrics and sports jackets (e.g. Gore-Tex, polyester, nylon). Drying the garment after a wash cycle has a beneficial effect as it reactivates the garment’s water-repellent treatment. It can be used for loads of up to 2 kg.The duration of this programme will depend on the size of the load, the dryness setting selected and the spin speed used in your washer. Dryness level: only Cupboard Dry
Cuddly Toys
With the cuddly toy cycle user can remove dust easier and wash the cuddly toys more often because the drying time is very much reduced compared to drying in the open air. It’s a delicate drying cycle that dries at low temperature and with soft mechanical action to maintain at best the original look and the shine of the hair. Note: For allergy protection, just freeze for 24hrs your cuddly toys, wash and dry. Repeat every 6 weeks. Before drying remove accessories such as clothes, collars, or sound boxes and protect plastic eyes (using masking tape). The programme time will vary dependant on the exact make up of the load. The maximum load should not exceed 2.5 kg and no individual item should be greater than 600 g.
Heat & Enjoy
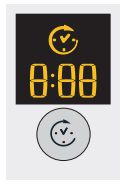
The Heat & Enjoy cycle helps to heat towels & bathrobes for a warm sensation after a bath or a shower. It is also useful for warming clothes before dressing during winter. The cycle heats the clothes up to 37° (the body temperature) and keeps the same temperature for a maximum of 4 hours or until the user stops the cycle by opening the door. Load: 3 Kg. ! Note: during this programme a icon rotates in the display until the temperature target is reached at which point the dryness level icon flashes.
Sensor Drying and Timed Drying
First select a programme (see programmes table).
Programme
What it does
How to set it
Notes / Options available
Sensor Drying
Always use Sensor Dry if possible for drying your clothes. It will guarantee you best drying results. The heat setting depends on the programme (material option) selected.
Press and release the sensor Dry button until the display shows the desired selection. Each press advances and then repeats. ! Some sensing programmes do not have all 7 dryness level options.
Select any Options if required. Press the Start Button .
Options available
Sound or Crease care . Delay Start . High Heat . Extra Care . Consult suggested drying times (see Laundry). The last few minutes of these programmes is the cool tumble phase.
Always use timed drying option if you want to decide the drying time. The heat setting depends on the Programme (material option) selected.
Press and release the Timed Button until the display shows the required selection. Each decreases time 180, 160, 120, 90, 60, 30, 20 and then repeats.
Baby Delicates and Synthetics have a maximum time of 160.
Select any Options if required. 3
Press the Start Button .
Options available
Sound or Crease care . Delay Start . High Heat . Consult suggested drying times (see Laundry). The last few minutes of these programmes is the cool tumble phase.
! For the best performance do not open the door before the cycle has finished.
Programmes Table
! If the On/Off light is not lit; Press the On/Off Button and then select programme
* just with High Heat option on ** This is the most efficient program in terms of energy consumption (EU 392/2012). To reach maximum efficiency, select the CUPBOARD DRY level and the highest temperature option (Standard/Default starting configuration)
The Controls
Programme knob ! Warning, if after pressing the start button the programme knob position is changed, the new position will NOT change the programme selected. To change programme press Start/Pause Button to pause the programme, the light flashes Amber, select new programme and any option, the light will then flash green. Press the Start/Pause Button and the new programme will start.
Option Buttons/ Lights These buttons are used to customise the selected programme to your requirements. Not all options are available for all programmes (see Start and Programmes). If an option is not available and you press the button, the buzzer will beep three times. If the option is available there will be one beep and the option light next to the button lights to confirm the selection.
ECO Light This light is illuminated when you select programme options that will use less energy than the default setting. Examples are if you choose an Automatic or sensing programme or use a timed dry setting less than the default time. This light does not indicate that the optimum setting for energy use has been selected; it only shows you that your selected options will use less energy.
Progress ( Drying, Cool tumble, END) Lights The Progress lights show you the status of the programme. At each stage of the programme the corresponding light turns on.
Delay Timer The start of some programmes (see Start and Programmes) can be delayed for up to 24 hours (see The Display). Ensure the water bottle is emptied and the filter is cleaned before setting a delayed start.
Extra Care The Anti-ageing function for Cottons helps to maintain the brightness of your laundry for longer thanks to the use of the right drum rotation (reduced in the last part of cycle) and the correct drying temperature. Note: It cannot be used with the “Ready to Wear”, “Cupboard Dry” and “Light Dry” dryness levels
Sound A buzzer sounds at the end of the drying cycle to signal that the programme has ended and the garments are ready to be removed. If you have selected the Crease Care option, this option is not available.
Crease Care When a delayed start and this option have been selected the clothes are tumbled occasionally during the delayed period to help prevent creases developing. After end of the drying and cool tumble cycles, the clothes are occasionally tumbled to help prevent creases developing, should you not be available to remove the load immediately after the programme is complete. The END light is on during this phase after end of the cycle and the start/pause light flashes amber. flashes amber. If you have selected the Sound option, this option is not available.
High Heat When a drying time is selected, pressing this button sets a high heat drying and the indicator light above the button lights up.
Empty Water Clean Filter Light “h2o” (If you have plumbed your dryer to a drain the light can be ignored for the water bottle, as there is no need to empty the water container). When is on (not flashing) it reminds you to empty the water container. If the water container fills during a programme, the heater turns off and the dryer does a period of Cool Tumble then the light flashes and the buzzer sounds. You must empty the container and restart the dryer or the clothes will not dry. After re-starting the dryer the light will take a few seconds to go out. To avoid this always empty the water container each time you use the dryer (see Maintenance). ! Please note that you ALWAYS have to clean the filter even if you have plumbed your dryer to a drain.
Door Opening Opening the door (or pressing the Start/Pause Button) during a programme will stop the dryer and have the following effects. Note: The Start/Pause Light flashes Amber during the Post Care phase of a programme.
During a delay phase the delay will continue to count down. The start button must be pressed to resume the delay programme. One of the delay lights will flash to show the current delay setting.
The start button must be pressed to resume the programme. The progress lights will change to show the current status and the Start/Pause light will stop flashing and turn green.
During the post creasecare phase of a drying program, the Programme will finish. Pressing the Start/Pause button will restart a new program at the beginning.
Changing the Programmes knob will select a new programme and the Start/Pause Light will flash green. You can use this to select the “Refresh” programme to cool the clothes if you find them dry enough. Pressing the start/pause button to begin new Programme.
Note: If you have a power cut, switch off the power or remove the plug. When power is restored, plug in the machine, press and hold the ON/OFF button until the dryer reactivates, then press Start/Pause button.
Troubleshooting
One day your dryer seems not to be working. Before you call your Service Centre (see Service), go through the following troubleshooting suggestions.
Problem
Possible causes / Solutions:
The dryer won’t start
The plug is not plugged into the socket, or not making contact.
There has been a power failure.
The fuse has blown. Try to plug another appliance into the socket.
You are using an extension cord. Try to plug the dryer’s power cord directly into the socket.
The door is not closed securely.
The programme has not been set properly (see Start and Programmes).
The START button has not been pressed (see Start and Programmes).
Drying cycle will not begin.
You have set a delay time (see Start and Programmes).
You have pressed the start button; there will be a short delay before the dryer starts. Wait for drying to begin,do not press the start button again or the dryer will pause and not begin drying
It is taking a long time to dry
The filter has not been cleaned (see Maintenance).
The water container needs emptying? The empty water light is flashing and “h2o” message is displayed? (see Maintenance).
The condenser needs cleaning (see Maintenance).
The temperature setting is not ideal for the type of fabric you are drying (see Start and Programmes, and Laundry).
The correct drying time has not been selected for this load (see Laundry).
The air intake grille are obstructed (see Installation and see Maintenance).
The items are too wet (see Laundry).
The dryer is overloaded (see Laundry).
The Empty water light is flashing but the dryer has only been running for a short period.
The water container was probably not emptied at the start of the programme. Do not wait for the empty water signal always check and empty the container before starting a new drying programme (see Maintenance).
Empty water light is on and the water container is not full.
This is normal the empty water flashes when the container is full. If the light is on but not flashing its just a reminder to empty the container (see Start and Programmes).
Programme finishes and clothes damper than expected.
! For safety the dryer has a maximum programme time of 5 hours. If an automatic programme has not sensed the required final moisture in this time the dryer will complete the programme and stop. Check the above points and run the programme again, if the results are still to damp, contact the service centre (see Service).
The Display shows a fault code F followed by one or two numbers, the option lights and pause light are flashing
If the display shows a Fault, Turn off and remove plug, Clean the Filter and Condenser (see Maintenance). Then replace plug turn on and start another program. If the Fault is then displayed contact the service centre (see Service). If any other number is shown; Note down the number and contact the service centre (see Service)
The display briefly shows “dOn” every 6 seconds.
The dryer is in ‘Demo’ mode. Press and hold both the On/Off and Start/Pause buttons for 3 seconds. The display will show “dOn” for 3 seconds and then the dryer will resume normal operation.
Time to End display changes during drying
The time to end is continuously monitored throughout the drying cycle and the time is adjusted to give the best-estimated time. The displayed time may increase during the cycle and this is normal.
The dryer makes a thumping noise during the first few minutes of operation.
This is normal, particularly if the dryer has not been used for a while. If the noise persists throughout the whole drying cycle then contact the service centre.
The lights on the dryer control panel are off although the dryer is switched on.
The dryer has gone into standby mode to save power. This occurs if you have left the dryer on or have had a power cut. It occurs after 30 minutes: - if you leave the dryer without starting a programme; - after your drying programme has finished. Press and hold the ON/OFF button until the dryer reactivates
 The back of the dryer could become very hot. Never touch it while in use.
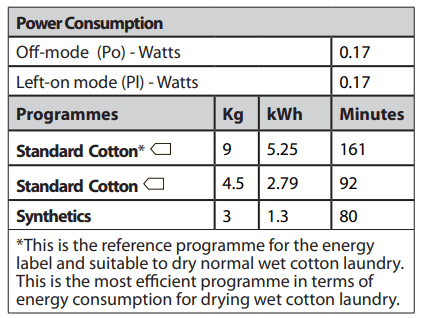
 , if the dryer is running and this button is pressed and held for more than 3 seconds the dryer is turned off. The light signals that your dryer is in use or ready to select a programme.
 indicator flashes, the heat is turned off and your clothes will not dry.
 gives a reminder, that its essential to clean the condenser at regular intervals (see Maintenance and Care).
 Press and hold this button after selecting your programme and any options. This prevents the programme settings from being changed.
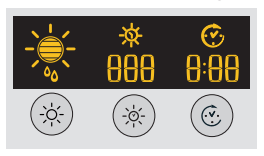
 Damp dry: the most delicate level which makes sure that your clothes are not dripping wet. After a hand-wash the perfect level to then hang your clothes if you do not want to tumble dry them all the way to the end.
  Iron Dry: a very delicate drying, It is useful for garments you would like to iron afterwards.
  Hanger plus: just the drying status to hang delicate garments up (as curtains).
  Hanger Dry: just the drying level to hang the garments up.
  Light dry: ideal for delicate clothes to be folded and placed into the cupboard.
  Cupboard Dry: the garments are completely dry and are ready to be folded and placed in the cupboard.
  Ready to Wear: used for clothes to be worn straight away once the cycle is completed.
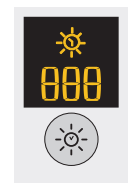
 button advances the delay setting in 1 hour increments from “1h” to “24h” then “OFF” and then after five seconds cancels the delay.
  is pressed the delay time can be changed or cancelled, if you wish.
  or Timed Dry
  option pressing and releasing the corresponding button until the desired level or time is displayed.
  . If you have selected the Crease Care option, this option is not available.
 option has been selected and you do not take the clothes out immediately the clothes will tumble occasionally for 10 hours or until you open the door.

 .
.


 icon rotates in the display until the temperature target is reached at which point the dryness level icon flashes.
 and then repeats.
  .
. or Crease care
  . Delay Start
  . High Heat
  . Extra Care
  .
. 

 Drying,
  Cool tumble, END) Lights