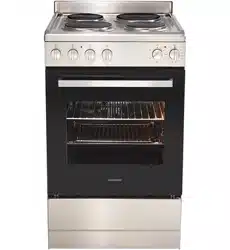
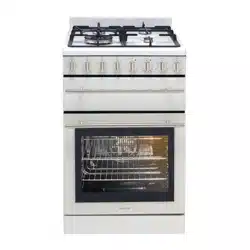
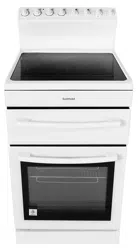
Description of cooker with separate grill and rear controls
1. Hob (Solid, coil and ceramic)
2. Heat shield (coil element models only)
3. Telescopic runner
4. Grill drawer
5. Oven shelf (2 supplied)
6. Enamelled oven baking tray (1 supplied)
7. Oven inner door glass
8. Oven door
9. Control panel
10. Grill element (inside compartment)
11. Grill tray wire rack insert (reversible to adjust height)
12. Enamelled grill tray (1 supplied)
13. Fan & element cover
14. Oven rear fan forced element
15. Hidden oven base element
16. Rear adjustable anti slip feet (2)
17. Anti tilt floor bracket
18. Kick panel (stability bolt located behind kick panel)
19. Front adjustable anti slip feet (2)
Controls
2. Hotplate Indicator Lamp (where fitted)
• Comes on when a hotplate is turned on.
3. Grill Indicator Lamp
• Comes on when grill is below set temperature, cycles on and off during grilling.
4. Oven Indicator Lamp
• Lamp is on when oven element is heating up oven, then cycles on and off.
5. Grill Temperature Control Knob
• Adjusts grilling temperature.
6. Oven Temperature Control Knob
• Adjusts oven temperature.
7. Function switch Control Knob
• Sets oven function / mode.
8. 120 Minute Ringer Timer (where fitted)
• Sets “reminder” alarm count-down time or if oven is being used, switches oven OFF after cooking time set has ended.
9. Ceramic Cook top Control Knob
• Adjusts temperature of ceramic cook top. Can be rotated in either direction.
Using the oven
Operation
1) Oven Function Knob
Description of each oven function (mode)
Lamp “ ”
The lamp of the oven is on. No heating elements are on.
Conventional cooking / no fan (uses hidden bottom element) “ ”
Suitable for cakes, biscuits, slow cooking and ideal for blind baking. Good for slow cooking at lower tempeartures (below 150 degrees celsius).
Do not use lowest shelf position as base of food can burn as it is close to the element.
Bottom Element with Fan (Pizza) Cooking “ ”
The bottom heating element and the fan come on. Suitable for pastries, pizzas, cakes and puddings in baking tins or moulds
Do not use lowest shelf position
Fan-forced Cooking “ ”
The rear circular heating element and the fan come on to make heat distributed more uniformly throughout the oven. Ideal for cooking on more than one level at a time.
This mode is ideal for general purpose cooking such as baking cakes, muffins and roasting meat. Cooki on multiple shelf positions at the same time.
Defrosting Mode “ ”
Only the fan operates. It is located on the back of the oven, causing makes the air to circulate at room temperature around the food. This is recommended for the defrosting of all types of food, but in particular for delicate types of food which do not require subsequent cooking, such as for example: ice cream cakes, cream or custard desserts, fruit cakes. By using this mode, the defrosting time is approximately halved.
2) Oven Temperature (thermostat) Knob
• Selection of cooking temperature is carried out by turning the knob clockwise to the required temperature, between 60ºC to MAX.
• If the appliance is electric the “oven indicator lamp” will come on when the oven is heating up. When it goes out it means that it reaches the required temperature. The oven indicator lamp going ‘on & off’ during use is then normal. This means that oven temperature is being constantly maintained at the selected level.
3) Set Cooking Time
■ 120 Minute Ringer Timer with “Oven ON/OFF”
• Operating oven without Timer - Turn knob counterclockwise to “ ” symbol. The oven will operate with use of the timer function.
• Operating oven using the Timer - To set the timer, simply turn the knob clockwise to the required number of minutes. The timer will automatically shut down the oven after the set minutes and the timer will ring at the same time.
■ Programmable Clock (some models only)
Heating indication
Clock indication
Hour indication
Second indication
Minute indication
Up
Set
Down
Understanding cooking problems
Problem
Causes
What to do
Uneven cooking
Incorrect shelf position
Select shelf that puts food in centre of oven
Oven tray too large
Remove oven tray. Use smaller trays or dishes
Trays not in centre
Put trays in centre
Oven fan causing uneven browning or small cakes to lean over
Rotate food during cooking, or use Conventional Mode (i.e. no fan)
Baked products too brown on top
Oven not preheated
Preheat the oven
Baking tins too large (diameter) for recipe
Use correct size tins
Fan-forced mode with oven temperature too high
Check recipe. Reduce oven temperature by 10 - 20 or more
Cooking time too long
Next time, shorten cooking time
Baking tins not evenly spaced
Stagger baking tins at least 3cm between tins and the oven walls
Items to be cooked are not evenly sized or spaced on trays
Make into same size and shape and spread evenly over trays
Baked products too brown on bottom
Baking tins too large (diameter)
Use correct size tins
Baking tins are dark metal or glass
Change to shiny, light tins or lower the temperature by 10°-20 C
Food too low in oven
Cook one shelf higher
Oven door opened too frequently during baking
Don’t open the oven door until at least half the cooking time has passed
Baking temperature too high
Lower the temperature
Oven tray blocking heat (below thermostat)
Use higher shelf position for oven tray
Cakes have a cracked thick crust
Baking temperature too high
Lower the temperature
Food too low in oven
Cook one shelf higher
Cake batter over mixed
Mix just long enough to combine the ingredients
Baking tin too deep or wrong size
Check size of tin and use recommended size
Baking tins dark
Change to shiny light tins
Baked products are pale, flat and under cooked
Baking temperature too low
Raise the temperature
Food too low in oven
Cook one shelf higher
Baking time too short
Increase cooking time
Incorrect baking tin size
Use correct size tin
Cakes fallen in centre
Baking temperature too low
Raise the temperature
Baking time too short
Increase cooking time
Proportions of ingredients incorrect for recipe
Check recipe
Opening door too early during baking
Do not open door until the last quarter of cooking time
Roast meat and potatoes not browning in fan oven
Poor hot air circulation
Elevate food onto a rack to allow air circulation
Oven temperature is too low
Increase temperature to 200 - 220
Not long enough in oven
Continue cooking for another 15+ minutes
Fitting oven accessories and cleaning
Safety warnings about cleaning
• Always make sure that the cooker is turned off before cleaning.
• Always clean cooker immediately after use.
• Use of steam cleaners is prohibited to clean this appliance.
• Do not use caustic - based cleaners. These will damage aluminum parts, and remove enamel gloss.
Cleaning the enamel
• Keep enamel clean by wiping it with a soft cloth dipped in warm soapy water.
• Rub difficult stains with a nylon scourer or creamed powder cleanser.
• Do not use abrasive cleaners, dry powder cleaners, steel wool or wax polishes.
• If you use an oven cleaner, then follow the instructions on the product carefully
Cleaning the control panel
• Make sure control knobs are in off position.
• Clean the control panel by wiping it with a soft cloth dipped in warm soapy water and squeezed dry.
• Take care when cleaning around knobs to ensure printing on control panel is not removed, this can occur if abrasive cleaners are used, therefore, should not used at all.
Cleaning the electric cook top
Radiant hotplates
These coiled hotplates are self cleaning. To clean the trim rings, lift front of element and remove trim ring. Then wash in warm, soapy water. To clean the spillage bowl, lift element and pull out of socket. Remove spillage bowl and wash in warm soapy water
DO NOT PUT ELEMENTS IN WATER!
Solid hotplates
• For normal cleaning use a moist cloth.
• For very dirty hotplates use any commercial cleanser.
• After cleaning, remove any cleanser remaining and dry the hotplate completely by running the element for a short period.
• Over time, the hotplates can discolour from spills during cooking. We recommend to use Hillmark ‘Shine On’ hotplate protector, on a regular basis to extend the life of the hotplates and reduce the risk of rusting as this forms a protective waterproof coating on the hotplates..
• Permanent heat- discolouration of the trim ring is normal.
Ceramic hotplates
• Remove all spilt food with the razor blade scraper supplied while the hotplate is still warm turned off) – NOT HOT.
• If aluminium foil, plastic items or foods with a high sugar content melt onto glass, use the razor blade scraper to remove immediately before the hotplate has cooled, otherwise pitting of the surface may occur. High sugar content foods include jam, fruit, carrots, tomatoes and peas.
• When the ceramic hotplate has cooled, wipe clean with dishwashing detergent on a damp cloth.
NOTE: Do not use abrasive sponges or scourers, oven sprays or stain removers on ceramic hotplates. These may damage, scratch or stain the ceramic cook top. Any pitting, staining or scratching will not be covered by warranty.
Cleaning the Gas Hob
Removing the trivets (Refer Figure 1)
• The trivets locate in the recessed area of the hob.
• They can be removed for cleaning by carefully lifting them from the hob.
• Clean by washing in warm soapy water. Dry thoroughly.
• Take care when replacing the trivets as dropping them onto the hob may damage the enamelled surface.
Removing the burner parts (Refer Figure 2)
• The burner caps and crowns are removable for cleaning.
• Flame port blockage should be removed by means of a match stick or brush.
• If the caps, crowns and cups are heavily soiled, use a non-abrasive cleaning compound.
• Do not clean them with abrasive or caustic type cleaners, or put in a dishwasher as they will be damaged.
Refitting the burner crowns and caps
• The burner crown must be fitted correctly into the burner cup or damage will occur during operation.
• To do this, ensure that the 2 ribs on either side of the spark plug hole are positioned into the 2 slots on the burner cup. (See figure 2).
• The burner cap is simply positioned over the top of the burner crown.
NOTE: When the burner is correctly fitted it will sit level on the hob.
If ignition is difficult or fails after cleaning, or the flames are not even around the burner, then either burner parts are not dry / parts have not been positioned correctly or incorrect cap is fitted.
Cleaning the grill compartment
• Lift the enamelled grill tray out.
• Clean the sides an bottom of compartment with hot soapy water.
If stronger action is needed use a non abrasive cleaner applied with a nylon scourer.
Cleaning the Oven
• Open the door fully.
• Remove oven shelves and side racks.
• Clean in hot soapy water.
• Thoroughly dry with a soft cloth to remove excess water that may be present.
Cleaning the oven door / How to remove the oven doors
For a more thorough clean, you can remove and disassemble the oven door. Proceed as follows:
• Open the door to the full extent (fig. 1)
• Open the lever A completely on the left and right hinges (fig. 2)
• Hold the door as shown in (fig. 3) approximatley 30 degree angle upwards
• Gently close the door (fig. 3) until left and right hinge levers A (fig. 2) are hooked to part B (fig. 2) of the door
• Withdraw the hinge hooks from their location following arrow C (fig. 4)
• Rest the door on a soft surface, to reduce risk of damage to the door
• To replace the door, repeat the above steps in reverse order
Removing the Inner Pane of Glass
• Triple Glazed oven door: Remove the top frame (G) by unscrewing the 2 screws, located on the left and right sides
• Gently pull out the inner pane of glass (fig. 2). Also remove the centre pane of door glass, not shown here.
• Clean the glass panes with an appropriate cleaner. Dry thoroughly, and place on a soft surface.
• Now you can also clean the inside of the outer glass.
Cleaning the door glass
• Clean the glass door using non-abrasive products or sponges and dry it with a soft cloth.
• Do not use the oven without the inner door panes fitted correctly. When re-fitting inner glass door panes ensure they go back in facing the same way they came out. The doors are coated with a very slight reflective coating to reflect the heat back into the oven cavity and keep the outer door cooler to touch.
• Do not use harsh abrasive cleaners or sharp metal scrapers to clean the oven door glass since they can scratch the surface, which may result in shattering of the glass.
Replacing the Oven Lamp
• Disconnect the oven from the power supply at the fuse-box by means of the switch used to connect the appliance to the electrical mains or unplug the appliance if a gas model.
• Remove the glass cover of the lamp-holder by rotating anti-clockwise. Be aware that the glass may be difficult to remove if there is a build up of oil and grease created during cooking. In this case the glass may need to be cleaned with hot soapy water to break this build up.
• Remove the lamp and replace with a lamp resistant to high temperatures (300ºC) with the following characteristics:
• Voltage: 220-240V
• Wattage: 25W
• Type: E 14 Replace the glass cover.
Reconnect the appliance to the mains power supply
Solving Problems
If you have a problem with your appliance, check the table below before calling service. You may be able to avoid a service call by and avoid unnecessary inconvenience and expense.
For cooking problems, refer to Handling Baking Problems.
Problem
Causes
What to do
No spark obtained when gas burner knob is pushed / turned
Power not turned on or connected
Switch on electricity
Household fuse blown
Check fuses
Circuit breaker tripped
Check circuit breaker
Spark plug is wet or dirty
Dry or clean spark plug
Burner will not light even though spark can be seen/heard
Gas supply valve is turned off
Turn on gas supply
burner crown & cap not positioned correctly
Remove parts and refit carefully
Port blockage in ignition area
Make sure that ports and ignition area are clean and dry
Oven or grill not working
Digital Clock not set properly
Refer to digital timer instructions
120 min Timer not in “Manual” position
Refer to 120 min timer instructions
Power not turned on
Switch on electricity
Household fuse blown
Check fuses
Controls incorrectly set
Reset controls
Circuit breaker tripped
Check circuit breaker
Oven light not working
Power not turned on
Switch on electricity
Household fuse blown
Check fuses
Circuit breaker tripped
Check circuit breaker
Lamp blown or loose in socket
Replace or tighten globe
‘Oven heating' indicator lamp does not go OFF
No fault if you are using temps > 180 with conventional or pizza mode slected, this is normal
It can take a long time (50 - 70 mins or more) for the oven indicator lmap to go OFF / start cycling.
Oven not hot enough
Heat escaping through incorrectly sealed door
Check shelves or dishes are not preventing door closing properly, Check that door is fitted properly after door removal for cleaning
Door seal is worn or has moved
Replace seal or refit it
Digital timer display flashing
Power failure or interruption
Reset time of day
Household fuse blown or power supply is off
Check fuses, power supply
Unit smoking when first used
Protective oils being removed
This is normal
Odour on first use of oven
This is normal
Allow 1-4 hours for odour to dissipate (open all windows)
120 minute timer buzzer not audible
Timer not wound sufficiently
Turn timer knob past 15 minute mark Then turn to the required number of minutes
Oven shelf tight
Oven shelf not inserted correctly, may be upside down or back to front
Remove shelf and insert as per diagram
Clock display off
Household fuse blown or power supply is off
Check fuses, power supply
NOTE: Only service centers should carry out servicing. Otherwise warranty may be void.Fitting oven accessories and cleaning


 ”
” ”
” ”
” ”
”  ”
”

 ” symbol. The oven will operate with use of the timer function.