User Manual
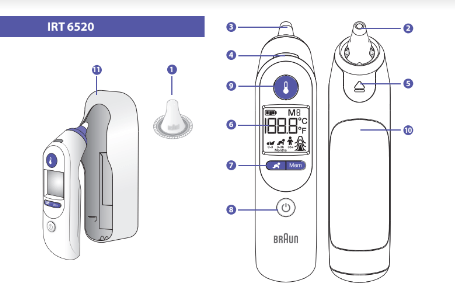
Product description
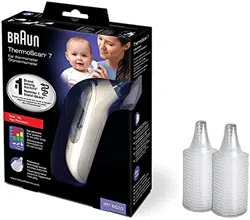
- Lens filter (Box of 20)
- Probe tip
- Probe
- ExacTemp light
- Lens filter ejector
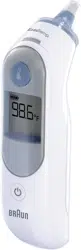
- Display
- Age Precision and Memory buttons
- Power button
- Start button
- Battery door
- Protective case
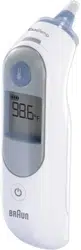
The Braun ThermoScan thermometer has been carefully developed for accurate, safe and fast temperature measurements in the ear.
The shape of the thermometer probe prevents it from being inserted too far into the ear canal, which can hurt the eardrum.
However, as with any thermometer, proper technique is critical to obtaining accurate temperatures. Therefore, read the instructions carefully and thoroughly.
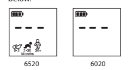
The Braun ThermoScan thermometer is indicated for intermittent measurement and monitoring of human body temperature for people of all ages. It is intended for household use only.
Use of IRT 6520 along with Age PrecisionTM feature is not intended as a substitute for consultation with your physician.
Body temperature
Normal body temperature is a range. It varies by site of measurement, and it tends to decrease with age. It also varies from person to person and fl uctuates throughout the day. Therefore, it is important to determine normal temperature ranges. This is easily done using Braun ThermoScan.
Practice taking temperatures on yourself and healthy family members to determine the normal temperature range.
Note: When consulting your physician, communicate that the ThermoScan temperature is a temperature measured in the ear and if possible, note the individual’s normal ThermoScan temperature range as additional reference.
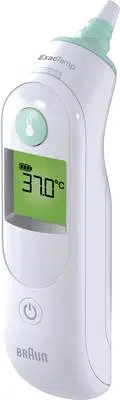
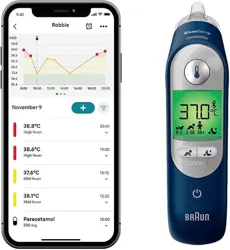
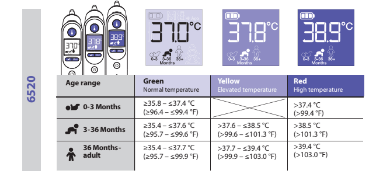
Age PrecisionTM color-coded display
Clinical research shows the definition of fever changes as newborns grow into little kids and little kids grow into adults1
Braun’s Age PrecisionTM color-coded display takes the guesswork out of interpreting temperature for the entire family.
Simply use the Age PrecisionTM button to select the appropriate age setting, take a temperature and the color-coded display will glow green, yellow or red to help you understand the temperature reading.
How does Braun ThermoScan work?
Braun ThermoScan measures the infrared heat generated by the eardrum and surrounding tissues. To help avoid inaccurate temperature measurements, the probe tip is warmed to a temperature close to that of the human body. When the Braun ThermoScan is placed in the ear, it continuously monitors the infrared energy. The measurement is finished and the result displayed when the thermometer detects that an accurate temperature measurement has been taken.

Why measure in the ear?
The goal of thermometry is to measure core body temperature1 which is the temperature of the vital organs. Ear temperatures accurately refl ect core body temperature2 since the eardrum shares blood supply with the temperature control center in the brain3 the hypothalamus. Therefore, changes in body temperature are reflected sooner in the ear than at other sites. Axillary temperatures measure skin temperature and may not be a reliable indicator of core body temperature. Oral temperatures are influenced by drinking, eating and mouth breathing. Rectal temperatures often lag behind changes in core body temperature and there is a risk of cross-contamination.

How to use your Braun ThermoScan
1. Remove the thermometer from the protective case.

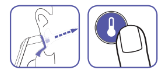
2. Push the Power button

.
During an internal self-check, the display shows all segments.
Then the last temperature taken will be displayed for 5 seconds.

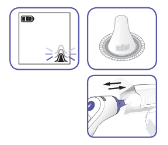
3. The lens filter indicator will blink to signal one is needed.
To achieve accurate measurements, make sure a new, clean lens filter is in place before each measurement.
Attach a new lens filter by pushing the thermometer probe straight into the lens filter inside the box and then pulling out.
Note: The Braun ThermoScan will not work unless a lens filter is attached.
4. Select age with Age PrecisionTM button

as shown below.
Press button to toggle through each age group.
NOTE: You must select an age in order to take a measurement.
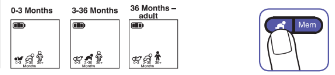
The thermometer is ready to take a temperature when the display looks like the images below.
5. Fit the probe snuggly into the ear canal, then push and release the Start button  .
.
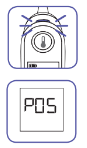
6. ExacTemp light will pulse while temperature measurement is in progress. The light will remain solid for 3 seconds to indicate that a successful temperature reading has been achieved.
NOTE: If the probe has been properly inserted into the ear canal during the measurement, a long beep will sound to signal the completed measurement.
If the probe has NOT been constantly placed in a stable position in the ear canal, a sequence of short beeps will sound, the ExacTemp light will go out and the display will show an error message (POS = position error).
See «Errors and troubleshooting» section for more information.
7. The confirmation beep indicates that an accurate temperature measurement has been taken.
The result is shown on the display.
8. For the next measurement, press Eject  button to remove and discard used lens filter, and put on a new, cleanlens fi lter.
NOTE: Defaults to last age setting used if you do not change.
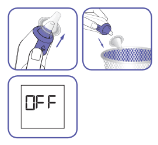
The Braun ThermoScan ear thermometer turns off automatically after 60 seconds of inactivity.
The thermometer can also be turned off by pressing the Power button

.
The display will briefly flash OFF and it will go blank.
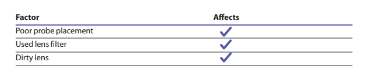
Temperature-taking hints
Always replace disposable lens filters to maintain accuracy and hygiene. The right ear measurement may differ from the measurement taken in the left ear. Therefore, always take the temperature in the same ear. The ear must be free from obstructions or excess earwax build-up to take an accurate reading.
External factors may influence ear temperatures, including when an individual has:
In the cases below, wait 20 minutes prior to taking a temperature.

Use the untreated ear if ear drops or other ear medications have been placed in the ear canal.
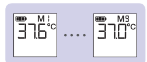
Memory mode

- This model stores the last 9 temperature measurements. To display the stored measurement, the thermometer must be turned on.
- Press the Mem button. The display shows the temperature, and when releasing the Mem button, the stored temperature for that memory number is displayed, together with “M”.
- Each time the Mem button is pushed, the stored reading and an M is displayed to indicate each temperature measurement (eg. M2). Memory mode is automatically exited by not pressing the memory button for 5 seconds.
Night light feature
The thermometer includes a convenient night light to illuminate the display in a dim environment.
The light will turn on when you press any button. It will stay on until the thermometer is inactive for up to 15 seconds even after temperature is taken.

Changing the temperature scale
Your Braun ThermoScan is shipped with the Celsius (°C) temperature scale activated. If you wish to switch to Fahrenheit (°F) and/or back from Fahrenheit to Celsius, proceed as follows:

- Make sure the thermometer is turned off .
- Press and hold down the Power
 button . After about 3 seconds the display will show this sequence: °C / SET / °F / SET.
- Release the Power button when the desired temperature scale is shown. There will be a short beep to confi rm the new setting, then the thermometer is turned off automatically.
Care and cleaning

The probe tip is the most delicate part of the thermometer.
It must be clean and intact to ensure accurate readings.
If the thermometer is ever accidentally used without a lens filter, clean the probe tip as follows:
Very gently wipe the surface with a cotton swab or soft cloth moistened with alcohol. After the alcohol has completely dried out, you can put a new lens filter on and take a temperature measurement.

If the probe tip is damaged, please contact Consumer Relations.
Use a soft, dry cloth to clean the thermometer display and exterior. Do not use abrasive cleaners.
Never submerge this thermometer in water or any other liquid. Store thermometer and lens filters in a dry location free from dust and contamination and away from direct sunlight.
Additional lens filters (LF 40) are available at most stores carrying Braun ThermoScan.
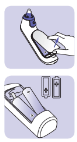
Replacing the batteries
The thermometer is supplied with two 1.5 V type AA (LR 06) batteries. For best performance, we recommend Duracell® alkaline batteries.
- Insert new batteries when the battery symbol appears on the display.
- Open the battery compartment. Remove the batteries and replace with new batteries, making sure the poles are in the right direction.
- Snap battery door into place.
 Only discard empty batteries. To protect the environment, dispose of empty batteries at your retail store or at appropriate collection sites according to national or local regulations.
Calibration
This device was designed and manufactured for a long service life, however it is generally recommended to have the device inspected once a year to ensure correct function and accuracy.
Please contact the authorized service centre located in your country.
Note: The calibration checking is not a free service. Please contact the Authorized Service Centre to get a quotation before you send out the product.
Manufacturing date is given by the LOT number located in the battery compartment. The first three (3) digits after LOT represent the Julian date that the product was manufactured and the next two (2) digits represent the last two numbers of the calendar year the product was manufactured. The last identifiers are the letters that represent the manufacturer.
An example: LOT 11614k, this product has been manufactured on the 116th day of the year 2014.
Errors and troubleshooting

- No lens fi lter is attached.
- Attach new, clean lens fi lter.

- The thermometer probe was not positioned securely in the ear. An accurate measurement was not possible.
- Take care that the positioning of the probe is correct and remains stable.
- POS = position error
- Replace lens fi lter and reposition. Press Start button to begin a new measurement.

- Ambient temperature is not within the allowed operating range (10 - 40 C or 50 – 104 °F).
- Allow the thermometer to remain for minutes in a room where the temperature is between 10 and 40 °C or 50 and 104 °F .


- Temperature taken is not within typical human temperature range (34 - 42C or 93.2 – 108 °F).
- Make sure the probe tip and lens are clean and a new, clean lens fi lter is attached. Make sure the thermometer is properly inserted. Then, take a new temperature.
HI = too high
LO = too low

- System error – self-check display flashes continuously and will not be followed by the ready beep and the ready symbol.
- Wait 1 minute until the thermometer turns off automatically, then turn on again.
- If error persists,
- ... reset the thermometer by removing the batteries and putting them back in.
- If error persists,
- ... please contact the Service Centre.

- Battery is low, but thermometer will still operate correctly.

- Battery is too low to take correct temperature measurement.