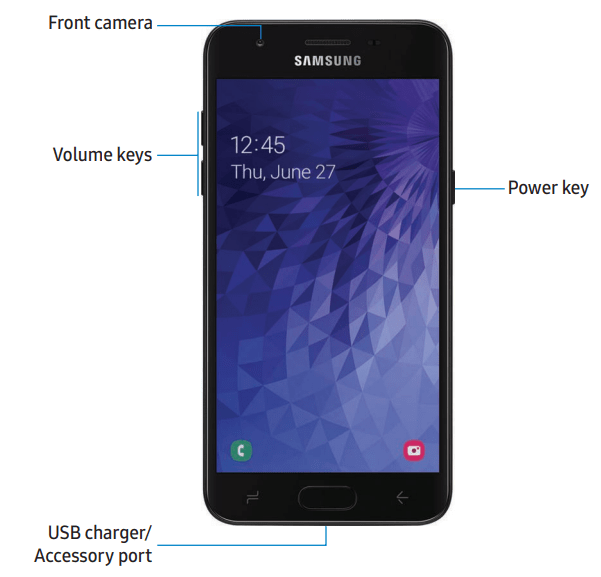
Your device uses a nano-SIM card. A SIM card may be preinstalled, or you may be able to use your previous SIM card. Contact your carrier for more details.
Install cards and the battery
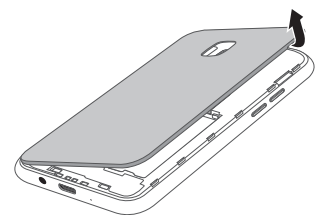
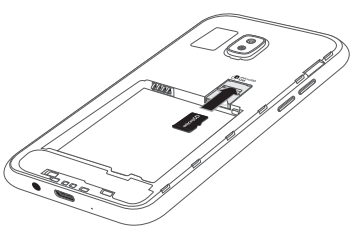
The SIM card, optional microSD card, and battery are installed in the back of the device.
Lift the cover up and to the left of the device.
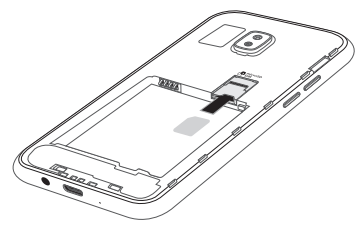
Carefully slide the SIM card into the SIM card slot. Make sure that the card’s gold contacts face down into the device.
Slide the microSD card into the slot with the gold contacts facing down.
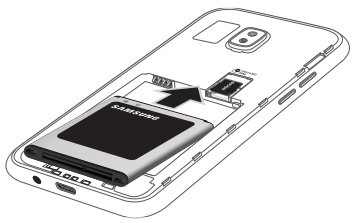
Insert the battery into the opening on the back of the device, making sure the connectors align.
Gently press down to secure the battery.
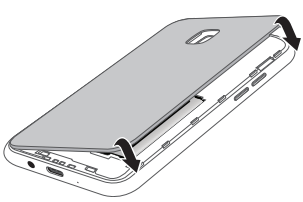
Place the back cover onto the back of the device and press down.
Press along the edge of the back cover until you have a secure seal.
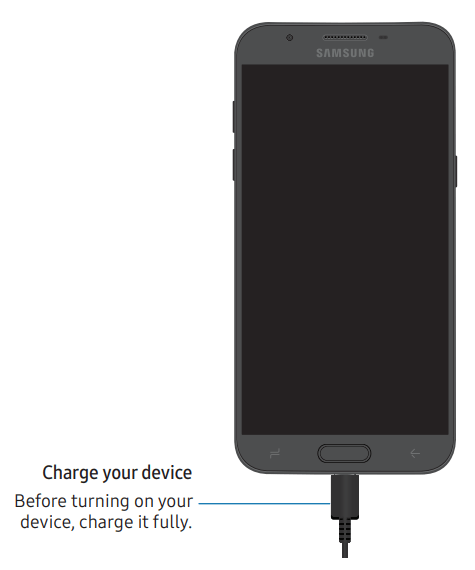
Charge the battery
Your device is powered by a rechargeable battery. A charger (charging head and USB cable) is included with the device for charging the battery from a power outlet.
While charging, the device and the charger may become hot and stop charging. This usually does not affect the device’s lifespan or performance and is in the device’s normal range of operation.
TIP: Disconnect the charger from the device and wait for the device to cool down. For more information, visit samsung.com/us/support/answer/ANS00076952.
Access Settings
There are a couple of ways to access your device settings.
Drag down the Status bar, and then tap Settings.
From Apps, tap Settings.
Search for Settings
If you are not sure exactly where to find a certain setting, you can search for it.
From Settings, tap Search, and enter keywords.
Tap an entry to go to that setting.
Connections
Manage connections between your device and a variety of networks and other devices.
Wi-Fi
You can connect your device to a Wi-Fi network to access the Internet without using your mobile data.
From Settings, tap Connections > Wi-Fi, and then tap to turn on Wi-Fi and scan for available networks.
Tap a network, and enter a password if required.
Manually connect to a Wi-Fi network
If the Wi-Fi network you want is not listed after a scan, you can still connect to it by entering the information manually.
Ask the Wi-Fi network administrator for the name and password before you begin.
From Settings, tap Connections > Wi-Fi, and then tap to turn on Wi-Fi.
Tap Add network at the bottom of the list.
Enter information about the Wi-Fi network:
Network name: Type the exact name of the network.
Security: Select a security option from the list, and enter the password if required.
Auto reconnect: Choose this option if you want to automatically reconnect to this network whenever you are in range.
Advanced: Add any advanced options, such as IP and Proxy settings.
Tap Save.
Advanced Wi-Fi settings
You can configure connections to various types of Wi-Fi networks and hotspots, manage saved networks and look up your device's network addresses.
From Settings, tap Connections > Wi-Fi, and then tap to turn on Wi-Fi.
Tap Advanced.
Switch to mobile data: When enabled, your device will switch to mobile data whenever the Wi-Fi connection is unstable. When the Wi-Fi signal is strong, it switches back to Wi-Fi.
Turn on Wi-Fi automatically: Turn on Wi-Fi in frequently-used locations.
Wi-Fi notifications: Receive notifications when open networks in range are detected.
Show Wi-Fi pop-up: Alert me that Wi-Fi is available when opening apps.
Manage networks: View saved Wi-Fi networks and configure whether to auto reconnect to or forget individual networks.
Tap View more to see additional network settings.
Wi-Fi control history: View apps that have recently turned your Wi-Fi on or off.
Hotspot 2.0: Connect automatically to Wi-Fi networks that support
MAC address: View your device’s MAC address, which is required when connecting to some secured networks (not configurable).
IP address: View your device’s IP address (not configurable).
Wi-Fi Direct
Wi-Fi Direct uses Wi-Fi to share data between devices.
From Settings, tap Connections > Wi-Fi, and then tap to turn on Wi-Fi.
Tap Wi-Fi Direct.
Tap a device, and then follow the prompts to connect.
TIP When sharing a file, tap Wi-Fi Direct to use this feature.
Disconnect from Wi-Fi Direct
Disconnect your device from a Wi-Fi Direct device.
From Settings, tap Connections > Wi-Fi > Wi-Fi Direct. Tap a device to disconnect it.
Bluetooth
You can pair your device to other Bluetooth®-enabled devices, like Bluetooth headphones or a Bluetooth-enabled vehicle infotainment system. Once a pairing is created, the devices remember each other and can exchange information without having to enter the passkey again.
From Settings, tap Connections > Bluetooth, and then tap to turn on Bluetooth.
Tap a device and follow the prompts to connect.
TIP When sharing a file, tap Bluetooth to use this feature.
Rename a paired device
You can rename a paired device to make it easier to recognize.
From Settings, tap Connections > Bluetooth, and then tap to turn on Bluetooth.
Tap Settings next to the device name, and then tap Rename.
Enter a new name, and tap Rename.
Unpair from a Bluetooth device
When you unpair from a Bluetooth device, the two devices no longer recognize each other.
From Settings, tap Connections > Bluetooth, and then tap to turn on Bluetooth.
Tap Settings next to the device, and then tap Unpair.
TIP You will need to pair with the device again in order to connect to it.
Advanced options
Additional Bluetooth features are available in the Advanced menu.
From Settings, tap Connections > Bluetooth
Tap Advanced for the following options:
Phone name: Change the name of your device for Bluetooth connections.
Received files: View a list of files received using Bluetooth.
Media volume sync: Sync the volume level set on the connected Bluetooth devices to your device.
Ringtone sync: Use the ringtone set on your phone when you receive calls through a connected Bluetooth device.
Bluetooth control history: View apps that have used Bluetooth recently.
Airplane mode
Airplane mode disconnects your device from all networks and turns off connectivity features.
From Settings, tap Connections > Airplane mode.
Tap to enable this feature.
Mobile networks
Use Mobile networks to configure your device's ability to connect to mobile networks and use mobile data.
From Settings, tap Connections > Mobile networks.
Data roaming access: Configure access to mobile networks while roaming.
Roaming state: Enable or disable data while roaming on other mobile networks.
Signal strength: View mobile signal strength.
Network mode: You can select which network modes your mobile device can use.
Access Point Names: Choose or add APNs, which have the network settings your device needs to connect to your provider.
Network operators: Choose available and preferred networks.
Network extenders: Scan for cells that can extend your network connection.
TIP Use these features to help manage connection settings that may affect your monthly bill.
Data usage
Check your current mobile and Wi-Fi data usage. You can also customize warnings and limits.
From Settings, tap Connections > Data usage.
Turn on Data saver
Use Data saver to reduce your data consumption by preventing selected apps from sending or receiving data in the background.
From Settings, tap Connections > Data usage > Data saver.
Tap to turn on Data saver.
To allow some apps to have unrestricted data usage, tap Allow app while Data saver on, and tap next to each app to specify restrictions.
Monitor mobile data
You can customize your mobile data access by setting limits and restrictions.
From Settings, tap Connections > Data usage. The following options are available:
Mobile data: Use mobile data from your plan.
Mobile data only apps: Set apps to always use mobile data, even when your device is connected to Wi-Fi.
Alert me about data usage: Enable alerts for when your mobile data usage reaches the amount you chose.
Mobile data usage: View data usage over mobile connections over a period of time. You can view total usage as well as usage by app.
Billing cycle and data warning: Change the monthly date to align with your carrier’s billing date.
TIP Use these features to keep an eye on your estimated data usage.
Monitor Wi-Fi data
You can restrict Wi-Fi data access by customizing usage limits and networks.
From Settings, tap Connections > Data usage.
Tap Wi-Fi data usage to view data usage over Wi-Fi connections over a period of time. You can view total usage as well as usage by app.
Mobile hotspot
Mobile hotspot uses your data plan to create a Wi-Fi network that can be used by multiple devices.
From Settings, tap Connections > Mobile hotspot and tethering > Mobile hotspot.
Tap to turn on Mobile hotspot.
On the devices you want to connect, activate Wi-Fi and select your device’s Mobile hotspot. Enter the Mobile hotspot password to connect.
TIP Check with your carrier about service fees.
Change the mobile hotspot password
You can customize your Mobile hotspot password to make it easier to remember.
From Settings, tap Connections > Mobile hotspot and tethering > Mobile hotspot.
Tap the password, enter a new password, and then tap Save.
Allowed devices list
Create a custom list of devices that are allowed to connect to your Mobile hotspot.
From Settings, tap Connections > Mobile hotspot and tethering > Mobile hotspot.
Tap More options > Allowed devices, and then tap Add to enter the other device’s Device name and MAC address.
Tap Add to add the device.
To restrict connections to your Allowed devices list, tap Allowed devices only.
TIP You need the device name and MAC address of devices that you want to add to the Allowed devices list.
Configure mobile hotspot settings
You can customize your mobile hotspot's security and connection settings.
From Settings, tap Connections > Mobile hotspot and tethering > Mobile hotspot.
Tap More options > Configure mobile hotspot for the following settings:
Network name: View and change the name of your Mobile hotspot.
Hide my phone: Prevent your Mobile hotspot from being discoverable by other devices.
Security: Choose the security level for your Mobile hotspot.
Password: If you choose a security level that uses a password, you can view or change it.
Show advanced options: Configure additional Mobile hotspot settings.
Timeout settings
You can set the Mobile hotspot to automatically turn off when there are no connected devices.
From Settings, tap Connections > Mobile hotspot and tethering > Mobile hotspot.
Tap More options > Timeout settings, and then select an interval.
TIP This feature can help you manage your data usage.
Tethering
You can use tethering to share your device’s Internet connection with another device.
From Settings, tap Connections > Mobile hotspot and tethering.
Tap an option:
Tap Bluetooth tethering to share your device’s Internet connection using Bluetooth.
Connect the computer to the device using a USB cable, and then tap USB tethering.
Nearby device scanning
Easily set up connections to other available devices by turning on Nearby device scanning. This feature sends you a notification when there are available devices to connect to.
From Settings, tap Connections > More connection settings > Nearby device scanning.
Tap to turn on the feature.
Connect to a printer
Connect your device to a printer on the same Wi-Fi network to easily print documents and images from your device.
From Settings, tap Connections > More connection settings > Printing.
Tap Download plugin and follow the prompts to add a print service.
Tap the print service, and then tap More options > Add printer.
TIP Make sure the app you want to print from supports printing.
Virtual Private Networks
A Virtual Private Network (VPN) allows you to connect to a private secured network from your device. You will need the connection information from your VPN administrator.
From Settings, tap Connections > More connection settings > VPN.
Tap More options > Add VPN profile.
Enter the VPN network information provided by your network administrator, and tap Save.
TIP A secured screen lock is required to set up a VPN.
Manage a VPN
Use the VPN settings menu to edit or delete a VPN connection.
From Settings, tap Connections > More connection settings > VPN.
Tap Settings next to a VPN.
Edit the VPN and tap Save, or tap Delete to remove the VPN.
Connect to a VPN
Once you have set up a VPN, connecting to and disconnecting from a VPN is easy.
From Settings, tap Connections > More connection settings > VPN.
Tap a VPN, enter your log in information, and tap Connect.
To disconnect, tap the VPN, and then tap Disconnect.
Private DNS
You can configure your device to connect to a private DNS host.
From Settings, tap Connections > More connection settings > Private DNS.
Tap one of the available options to configure a private DNS connection.
Tap Save.
Sounds and vibration
You can control the sounds and vibrations used to indicate notifications, screen touches, and other interactions.
Sound mode
You can change the sound mode on your device without using the volume keys.
From Settings, tap Sounds and vibration > Sound mode, and then choose a mode:
Sound: Use the sounds, vibrations, and volume levels you have chosen in Sound settings for notifications and alerts.
Vibrate: Use vibration only for notifications and alerts.
Mute: Set your device to make no sounds.
Temporary mute: Set a time limit for muting the device.
TIP Use the sound mode setting instead of the volume keys to change the sound mode without losing your customized sound levels.
Easy mute
Quickly mute sounds by covering the screen or turning the device over.
From Settings, tap Advanced features > Motions and gestures > Easy mute, and tap to enable.
Vibrations
You can control how and when your device vibrates
From Settings, tap Sounds and vibration.
Tap options to customize:
Vibrate while ringing: Set your device to vibrate in addition to ringing when you receive a call.
Vibration pattern: Choose from preset vibration patterns.
Volume
Set the volume level for call ringtones, notifications, and other audio.
From Settings, tap Sounds and vibration > Volume, and drag the sliders.
TIP You can also use the Volume key to adjust the volume. Slide the volume controls to customize all volume options.
Use Volume keys for media
Set the default of the Volume key to control the media volume.
From Settings, tap Sounds and vibration.
Tap Use Volume keys for media to enable this feature.
Media volume limiter
Limit the maximum output of the device’s volume while using headphones or Bluetooth speakers (not included).
From Settings, tap Sounds and vibration > Volume.
Tap More options > Media volume limiter.
Tap to enable this feature.
To set the maximum output volume, drag the Custom volume limit slider.
To require a PIN to make changes to the volume setting, tap Set volume limit PIN.
Ringtone
Customize your call ringtone by choosing from preset sounds or adding your own.
From Settings, tap Sounds and vibration > Ringtone.
Tap a ringtone to hear a preview and select it, or tap Add to use an audio file as a ringtone.
Notification sounds
Choose a preset sound for all notification alerts.
From Settings, tap Sounds and vibration > Notification sounds.
Tap a sound to hear a preview and select it.
TIP You can also customize notifications sounds to be unique for each app using the App settings menu.
System sounds
Customize your device's sounds and vibrations for actions like tapping the screen and charging the device.
From Settings, tap Sounds and vibration > System sounds for the following options:
Touch sound: Play tones when you touch or tap the screen to make selections.
Screen lock sound: Play a sound when you unlock the screen.
Emergency tone: Set the emergency tone to alert, vibrate, or silent.
Charging sound: Play a sound when a charger is connected.
Dialing keypad tone: Play a tone when dialing numbers on the Phone keypad.
Keyboard sound: Play a sound when typing with the Samsung keyboard.
Dolby Atmos
Enjoy Dolby Atmos quality when playing content that was specifically mixed for
Atmos. This feature may only be available with a headset connected.
From Settings, tap Sounds and vibration > Advanced sound settings > Sound quality and effects.
Tap Dolby Atmos to experience breakthrough audio that flows above and around you.
Equalizer
Choose an audio preset that is customized to different genres of music, or manually change your audio settings.
From Settings, tap Sounds and vibration > Advanced sound settings > Sound quality and effects.
Tap Equalizer to choose a music genre.
Headset audio options
Enhance the sound resolution of music and videos for a clearer listening experience.
These features are only available with a headset connected.
From Settings, tap Sounds and vibration > Advanced sound settings > Sound quality and effects, and tap an option to turn it on:
Tube Amp Pro: Simulates the soft timbre of a tube amplifier.
Concert hall: Simulates the reverb of a concert hall.
Adapt sound
Customize the sound for each ear and enhance your listening experience.
From Settings, tap Sounds and vibration > Advanced sound settings > Sound quality and effects > Adapt sound.
Tap the sound profile that fits you best, and tap Settings to customize.
TIP Tap Add personalized sound profile to take a hearing test and let your device identify the best sound for you.
Notifications
You can prioritize and streamline app alerts by changing which apps send notifications and how notifications alert you.
Manage notifications
You can configure notifications from apps and services.
From Settings, tap Notifications.
App icon badges: Identify which apps have active notifications with badges that appear on their icons. Tap to choose whether or not badges indicate the number of unread notifications.
Do not disturb: Block sounds and notifications while this mode is turned on.
Specify exceptions for people, apps, and alarms.
Status bar: Modify how many notifications appear on the Status bar.
To block notifications from an app, tap next to the app. Tap See all to open the complete list of apps.
Customize app notifications
You can change notification settings for each app.
From Settings, tap Notifications > See all.
Tap an app for the following options:
Show notifications: Receive notifications from this app.
App icon badges: Show a badge on the icon when there are notifications.
Categories: Configure notification options that are specific to this app.
Smart alert
You can set the device to notify you about missed calls and messages by vibrating when you pick it up.
From Settings, tap Advanced features > Motions and gestures > Smart alert, and tap to enable.
Display
You can configure the screen brightness, timeout delay, font size, and many other display settings.
Screen brightness
Adjust the screen brightness according to lighting conditions or personal preference.
From Settings, tap Display.
Customize options under Brightness:
Drag the Brightness slider to set a custom brightness level.
Tap Outdoor mode to increase the screen brightness for 15 minutes for greater visibility when outdoors.
Night mode
Night mode allows you to switch to a darker theme to keep your eyes more comfortable at night.
From Settings, tap Display > Night mode for the following options:
Turn on now: Put your device in Night mode.
Turn on as scheduled: Configure Night mode for either Sunset to sunrise or Custom schedule.
Screen mode
Your device has several screen mode options which adjust the screen quality for different situations. You can select the mode according to your preference.
From Settings, tap Display > Screen mode.
Tap an option to set a different screen mode.
Font size and style
You can change the font size and style to customize your device.
From Settings, tap Display > Font size and style for the following options:
Drag the Font size slider to adjust the size of text.
Tap Font style to choose a different font.
Tap a font to select it, or tap Download fonts to add fonts from Galaxy Store.
Tap Bold font to make all fonts appear with bold weight.
Screen zoom
Adjust the zoom level to increase or decrease the size of content on the screen.
From Settings, tap Display > Screen zoom.
Drag the Screen zoom slider to adjust the zoom level.
Screen timeout
You can set the screen to turn off after a set amount of time.
From Settings, tap Display > Screen timeout, and tap a time limit to set it.
Screen saver
You can display colors or photos when the screen turns off or while charging.
From Settings, tap Display > Screen saver.
Tap to enable the feature and configure the following options:
Colors: Tap the selector to display a changing screen of colors.
Photo table: Display pictures in a photo table.
Photo frame: Display pictures in a photo frame.
Photos: Display pictures from your Google Photos account.
Tap Preview for a demonstration of the selected Screen saver.
TIP Tap Settings next to a feature for additional options.
Reduce animations
Decrease certain motion effects, such as when opening apps.
From Settings, tap Advanced features > Reduce animations, and tap to enable the feature.
One-handed mode
You can change the screen layout to accommodate operating your device with one hand.
From Settings, tapAdvanced features > Motions and gestures > One-handed mode.
Tap to enable the following:
Gesture: Swipe up diagonally from either bottom corner to reduce the display size.
Button: Tap Home three times in quick succession to reduce the display size.
Device maintenance
View the status of your device’s battery, storage, and memory. You can also automatically optimize your device’s system resources.
Quick optimization
The quick optimization feature improves device performance through the following actions:
Identifying apps that use excessive battery power and clearing unneeded items from memory.
Deleting unnecessary files and closing apps running in the background.
Scanning for malware.
To use the quick optimization feature:
From Settings, tap Device care > Optimize now.
Battery
View how battery power is used for your various device activities.
From Settings, tap Device care > Battery for options:
Battery usage: View power usage by app and service.
Power mode: Select a power mode to extend battery life.
Usage by apps: View power usage by app today or over the past week.
More options > Settings: Configure advanced battery settings and notifications.
Storage
View the device storage and usage. You can also mount, unmount, or format an optional memory card (not included).
Device storage
Quickly optimize your device’s storage, increasing available memory.
From Settings, tap Device care > Storage > Clean now.
Memory card
Once an optional microSD memory card (not included) has been installed in your device, the card memory is displayed in the Storage setting.
For more information, see Assemble your device on page 5.
Mount a memory card
When you install an optional memory card, it is automatically mounted (connected to the device) and prepared for use. However, should you unmount the card without removing it from the device, you need to mount it before it can be accessed.
From Settings, tap Device care > Storage.
Tap More options > Storage settings.
Under Portable storage, tap your SD card, and then tap Mount.
Remove a memory card
To prevent damage to information stored on the memory card, unmount the card before removing it from the device.
From Settings, tap Device care > Storage.
Tap More options > Storage settings.
Under Portable storage, tap your SD card, and then tap Unmount.
Remove your memory card from the device.
Format a memory card
When formatting an SD card, you should back up your music and photo files that are stored on the card because formatting the SD card deletes ALL stored files.
From Settings, tap Device care > Storage.
Tap More options > Storage settings.
Under Portable storage, tap your SD card, tap Format, and then follow the prompts.
Memory
Check the amount of available memory. You can close background apps and reduce the amount of memory you are using to speed up your device.
From Settings, tap Device care > Memory.
The used and available memory are shown.
To free up as much memory as possible, tap Clean now and follow the prompts.
The selected apps and services in the list will be closed.
Language and input
Configure your device’s language and input settings.
Change the device language
You can add languages to your list and organize them according to preference. If an app does not support your default language, then it will move to the next supported language in your list.
From Settings, tap General management > Language and input > Language.
Tap Add language, and select a language from the list.
Tap Set as default to change the device language.
To switch to another language on the list, drag Move next to the desired language to the top of the list, and then tap Apply.
Default keyboard
You can select a default keyboard for your device’s menus and keyboards. Additional keyboards can be downloaded from the Google Play store.
From Settings, tap General management > Language and input.
Tap Default keyboard, and select a keyboard.
Google Voice typing
Speak rather than type your text entries using Google Voice™ typing.
From Settings, tap General management > Language and input.
Tap On-screen keyboard > Google Voice typing to customize settings.
Manage on-screen keyboards
Enable or disable on-screen keyboards.
From Settings, tap General management > Language and input.
Tap On-screen keyboard > Manage keyboards.
Tap each keyboard to enable or disable.
Physical keyboards
Customize options when you have a physical keyboard connected to your device (sold separately).
From Settings, tap General management > Language and input.
Tap Physical keyboard, and then choose an option:
Show on-screen keyboard: Show the on-screen keyboard while a physical keyboard is also being used.
Keyboard shortcuts: Show explanations of the keyboard shortcuts on the screen.
Autofill service
Save time entering information using autofill services.
From Settings, tap General Management > Language and input.
Tap Autofill service and select your preferred service.
Text-to-speech
Configure your Text-to-Speech (TTS) options. TTS is used for various accessibility features, such as Voice Assistant.
From Settings, tap General management > Language and input > Text-to-speech for options:
Preferred engine: Choose either the Samsung or Google Text-to-speech engine. Tap Settings for options.
Language: Set the default speech language.
Speech rate: Set the speed at which the text is spoken.
Pitch: Set the pitch of the speech.
Play: Tap to play a short demonstration of speech synthesis.
Reset: Reset the speech rate and pitch.
Pointer speed
Configure pointer speed for an optional mouse or trackpad (not included).
From Settings, tap General management > Language and input.
Under Pointer speed, drag the slider to the right to go faster or to the left to go slower.
Primary mouse button
You can define which mouse button that you favor as primary.
From Settings, tap General management > Language and input.
Tap Primary mouse button, and choose either Left or Right.
Date and time
By default, your device receives date and time information from the wireless network.
Outside of network coverage, you can set the date and time manually.
From Settings, tap General management > Date and time. The following options are available:
Automatic date and time: Receive date and time updates from your wireless network. When Automatic date and time is disabled, the following options are available:
Select time zone: Choose a new time zone.
Set date: Enter the current date.
Set time: Enter the current time.
Use 24-hour format: Set the format for displaying time.
Troubleshooting
You can also check for software updates, and if necessary, reset services on your device.
System updates
Check for and install available software updates for your device.
From Settings, tap System updates for the following options:
Check for system updates: Manually check for available software updates.
Show system update history: View previous software updates.
Use Software Upgrade Assistant: Install a tool to install system updates.
Reset
Reset device and network settings. You can also reset your device to its factory defaults.
Reset settings
You can reset your device to its factory default settings, which resets everything except the security, language, and account settings. Personal data is not affected.
From Settings, tap General management > Reset > Reset settings.
Tap Reset settings, and confirm when prompted.
Reset network settings
You can reset Wi-Fi, mobile data, and Bluetooth settings with Reset network settings.
From Settings, tap General management > Reset > Reset network settings.
Tap Reset settings, and confirm when prompted.
Reset accessibility settings
You can reset device accessibility settings. Accessibility settings in downloaded apps and your personal data are not affected.
From Settings, tap General management > Reset > Reset accessibility settings.
Tap Reset settings, and confirm when prompted.
Auto restart
Optimize your device by restarting it automatically at set times. Any unsaved data will be lost when the device restarts.
From Settings, tap General management > Reset > Auto restart.
Tap to activate Auto restart, and then set the following parameters:
Day: Select the day of the week to automatically restart your device.
Time: Set the time of day to restart your device.
Factory data reset
You can reset your device to factory defaults, erasing all data from your device.
This action permanently erases ALL data from the device, including Google or other account settings, system and application data and settings, downloaded applications, as well as your music, photos, videos, and other files.
NOTE When you sign in to a Google Account on your device, Factory Reset
Protection is activated. This protects your device in the event it is lost or stolen.
If you reset your device to factory default settings with the Factory Reset Protection (FRP) feature activated, you must enter the user name and password for a registered Google Account to regain access to the device. You will not be able to access the device without the correct credentials.
NOTE If you reset your Google Account password, it can take 24 hours for the password reset to sync with all devices registered to the account.
Before resetting your device:
Verify that the information you want to keep has transferred to your storage area.
Log in to your Google Account and confirm your user name and password.
To reset your device:
From Settings, tap General management > Reset > Factory data reset.
Tap Reset and follow the prompts to perform the reset.
When the device restarts, follow the prompts to set up your device.
Factory reset protection
When you sign in to a Google Account on your device, Factory Reset Protection is activated. Factory Reset Protection (FRP) prevents other people from using your device if it is reset to factory settings without your permission. For example, if your device is lost or stolen and a factory data reset is performed, only someone with your Google Account username and password can use the device.
You will not be able to access the device after a factory data reset if you do not have your Google Account username and password.
CAUTION Before sending your device to Samsung or taking it to a Samsungauthorized service center, remove your Google Account and then perform a factory data reset. For more information, visit samsung.com/us/support/frp.
Enable factory reset protection
Adding a Google Account to your device automatically activates the FRP security feature.
Disable factory reset protection
To disable FRP, remove all Google Accounts from the device.
From Settings, tap Accounts and backup > Accounts > [Google Account].
Tap Remove account.
Lock screen and security
You can secure your device and protect your data by setting a screen lock.
Screen lock types
You can choose from the following screen lock types that offer high, medium, or no security: Swipe, Pattern, PIN, Password, and None.
Set a secure screen lock
It is recommended that you secure your device using a secure screen lock (Pattern, PIN, or Password).
From Settings, tap Lock screen > Screen lock type and tap a secure screen lock (Pattern, PIN, or Password).
Tap to enable showing notifications on the lock screen. The following options are available:
View style: Display notification details or hide them and show only an icon.
Hide content: Do not show notifications in the notification panel.
Tap Done when finished.
Configure the following screen lock options:
Smart Lock: Unlock your device automatically when trusted locations or other devices have been detected. A secure screen lock is required for this feature.
Secure lock settings: Customize your secure lock settings. A secure screen lock is required for this feature.
Clock and information
You can configure features that appear on the Lock screen, like the clock and other useful information.
From Settings, tap Lock screen for the following options:
Clock style: Set the type and color of the clock on the Lock screen.
Roaming clock: Change to digital clocks showing both local and home time zones when roaming. lj-
FaceWidgets: Enable widgets on the Lock screen to get quick access to useful information.
Contact information: Show your contact information, such as your phone number or email address.
Notifications: Select which notifications to display on the Lock screen.
App shortcuts: Select which apps to open from the Lock screen.
About Lock screen: Update the Lock screen’s software.
Google Play Protect
You can configure Google Play Protect to regularly check your apps and device for security risks and threats.
From Settings, tap Security > Google Play Protect.
Tap options to customize security features.
Find My Device
You can protect your device from loss or theft by allowing your device to be locked, tracked online, and for your data to be deleted remotely.
From Settings, tap Security > Find My Device.
If you are not logged in to a Google Account, tap Find My Device won’t work and follow the prompts to sign in.
The following options are available:
Find My Device: Download the app from Google Play.
Web: Access Find My Device on the Internet.
Google: Search for “find my device” topics online.
TIP A Google Account is required, and Google location service must be turned on.
Security update
You can easily check the date of the last installed security software update and find out if newer updates are available.
From Settings, tap Security > Security update to see the latest security update installed and check if a newer update is available.
Install unknown apps
You can allow installation of unknown third-party apps from selected apps or sources.
From Settings, tap Security > Install unknown apps.
Tap an app or source, and then tap Allow from this source.
TIP Installing unknown third-party apps could make your device and personal data more vulnerable to security risks.
Secure Folder
You can create a secure folder on your device to protect private content and apps from anyone who may be using your device.
From Settings, tap Security > Secure Folder and follow the prompts to secure content on your device.
TIP You must sign in to your Samsung account, and use secured lock on your device to set up and use Secure Folder.
Secure startup
You can protect your device by requiring a PIN, pattern, or password when your device is turned on.
TIP A secure screen lock (Pattern, PIN, or Password) is required to use Secure startup.
From Settings, tap Security > Secure startup and select an option. fJSettings
Encrypt SD card
You can encrypt your optional memory card (not included) to protect its data. This only allows the SD card information to be accessed from your device with a password.
From Settings, tap Security > Encrypt SD card.
Tap Encrypt SD card and follow the prompts to encrypt all data on your memory card.
NOTE Performing a Factory data reset on your device prevents it from accessing an encrypted SD card. Before initiating a Factory data reset, make sure to decrypt the installed SD card first.
Decrypt SD card
You can decrypt an optional memory card (not included) if it was encrypted by this device. You may want to decrypt the memory card if you plan to use it with another device or before performing a Factory data reset.
From Settings, tap Security > Decrypt SD card.
Tap Decrypt SD card and follow the prompts to decrypt all data on your memory card.
Set up SIM card lock
You can set up a PIN to lock your SIM card, which prevents unauthorized use of your SIM card if someone attempts to use it another device.
From Settings, tap Security > Other security settings > Set up SIM card lock and follow the prompts.
Tap Lock SIM card to turn on the feature.
Tap Change SIM card PIN to create a new PIN.
View passwords
You can have characters displayed briefly in password fields as you type them.
From Settings, tap Security > Other security settings > Make passwords visible to turn on the feature.
Security update service
You can set your device to automatically check for security updates.
From Settings, tap Security > Other security settings, and then tap Security policy updates to check for security updates.
Device administration
You can authorize security features and apps (like Find My Device) to have administrative access to your device.
From Settings, tap Security > Other security settings > Device admin apps.
Tap an option to turn it on as a device administrator.
Credential storage
You can manage the trusted security certificates installed on your device, which verify the identity of servers for secure connections.
From Settings, tap Security > Other security settings for the following options:
Storage type: Select a storage location for credential contents.
View security certificates: Display certificates in your device’s ROM and other certificates you have installed.
User certificates: View user certificates that identify your device.
Install from phone storage: Install a new certificate from storage.
Clear credentials: Erase credential contents from the device and reset the password.
Advanced security settings
You can use these options to configure advanced security settings to better protect your device.
From Settings, tap Security > Other security settings for the following options:
Trust agents: Allow trusted devices to perform selected actions when connected.
This option is only displayed when a lock screen is turned on.
Pin windows: Pin an app on your device screen, which prevents access to other features of your device.
Location
Location services use a combination of GPS, mobile network and Wi-Fi to determine the location of your device.
From Settings, tap Security > Location.
Tap to turn on Location services.
Tap Improve accuracy to use other connections for determining your location:
Wi-Fi scanning: Allow apps and services to scan for Wi-Fi networks automatically, even when Wi-Fi is turned off.
Bluetooth scanning: Allow apps to scan for and connect to nearby devices automatically through Bluetooth, even when Bluetooth is turned off.
TIP Some apps require location services be turned on for full functionality.
Recent location requests
View a list of apps that have requested your location.
From Settings, tap Security > Location.
Tap to turn on Location services.
Tap an entry under Recent location requests to view the app’s settings.
Location services
Location services store and use your device’s most recent location data. Certain apps can use this data to improve your search results based on places that you have visited.
From Settings, tap Security > Location.
Tap an entry under Location services to see how your location information is used.
App permissions
Apps might access features of your device that you permit them to (like the camera, microphone, or location) when they are running in the background, not just when you are using the app. You can set your device to notify you when this happens.
From Settings, tap Security > App permissions.
Tap a category, and tap next to the apps you want to be notified about.
Tap an app to select which permissions you want to be notified about.
Permission usage monitor
Apps might use permissions of your device when they are running in the background, not just when you are using the app. You can set your device to notify you when this happens.
From Settings, tap Security > Permission usage monitor.
Tap next to the apps you want to be notified about.
Send diagnostic data
Send diagnostic information about your device to Samsung when you are having technical problems.
From Settings, tap Security > Send diagnostic data.
Read and accept the consent information to enable this feature.
Accounts
You can connect to and manage your accounts, including your Google Account,
Samsung account, email, and social networking accounts.
Add an account
You can add and sync all your email, social networking, and picture and video sharing accounts.
From Settings, tap Accounts and backup > Accounts > Add account.
Tap one of the account types.
Follow the prompts to enter your credentials and set up the account.
Tap Auto sync data to enable automatic updates to your accounts.
Account settings
Each account has its own custom settings. You can configure common settings for all accounts of the same type. Account settings and available features vary between account types.
From Settings, tap Accounts and backup > Accounts.
Tap an account to configure that account’s sync settings.
Tap other available options for the account type.
Remove an account
You can remove accounts from your device.
From Settings, tap Accounts and backup > Accounts.
Tap the account and then tap Remove account.
Backup and restore
You can configure your device to back up data to your personal accounts.
Google Account
You can enable backup of your information to your Google Account.
From Settings, tap Accounts and backup > Backup and restore for options:
Back up my data: Enable back up of application data, Wi-Fi passwords, and other settings to Google servers.
Backup account: Select a Google Account to be used as your backup account.
Automatic restore: Enable automatic restoration of settings from Google servers.
External storage transfer
You can back up your data to a USB storage device, or restore backup data using Smart Switch.
From Settings, tap Accounts and backup > Backup and restore > External storage transfer.
Google settings
You can configure your device’s Google settings. Available options depend on your Google Account.
From Settings, tap Google, and select an option to customize.
Accessibility
There are accessibility settings for people who need help seeing, hearing, or otherwise operating their device. Accessibility services are special features that make using the device easier for everyone. For more information about Accessibility for Samsung products, please contact us at [email protected].
Screen Reader
Use special controls and settings that let you navigate without needing to see the screen.
From Settings, tap Accessibility > Screen reader and tap an option:
Voice assistant: Receive spoken feedback when using your device, such as what you touch, select, or activate.
Tutorial: Lean how to use Voice assistant.
Settings: Configure Voice assistant to better assist you.
Visibility enhancements
You can configure Accessibility features to assist with visual aspects of your device.
Colors and clarity
You can adjust the colors and contrast of text and other screen elements for easier viewing.
From Settings, tap Accessibility > Visibility enhancements and tap an option:
High contrast theme: Adjust colors and screen fonts to increase the contrast for easier viewing.
High contrast fonts: Adjust the color and outline of fonts to increase the contrast with the background.
High contrast keyboard: Adjust the size of the Samsung keyboard and change its colors to increase the contrast between the keys and the background.
Show button shapes: Show buttons with shaded backgrounds to make them stand out better against the wallpaper.
Remove animations: Remove certain screen effects if you are sensitive to motion.
Color inversion: Reverse the display of colors from white text on a black background to black text on a white background.
Color correction: Adjust the color of the screen if you find it difficult to see some colors.
Size and zoom
You can increase the size of supported screen elements and create shortcuts for accessibility features on your device.
From Settings, tap Accessibility > Visibility enhancements and tap an option:
Magnifier window: Magnify content shown on the screen.
Magnification: Use exaggerated gestures such as triple-tapping, double pinching, and dragging two fingers across the screen.
Large mouse/touchpad pointer: Use a large pointer for a connected mouse or touchpad (accessories not included).
Font size and style: Configure screen fonts.
Screen zoom: Configure the screen zoom level.
Hearing enhancements
You can configure Accessibility features to assist with audial aspects of the device.
Sounds
You can adjust audio quality when using hearing aids or earphones.
From Settings, tap Accessibility > Hearing enhancements and tap an option:
Mute all sounds: Turn off all notifications and audio for privacy.
Hearing aid support: Improve the sound quality to work better with hearing aids.
Left and right sound balance: Use the slider to adjust the left and right balance when listening to audio in stereo.
Mono audio: Switch audio from stereo to mono when using one earphone.
Text display
You can convert speech to text and watch closed captions when viewing multimedia.
From Settings, tap Accessibility > Hearing enhancements and tap an option:
Samsung subtitles (CC): Use Samsung subtitles with multimedia files when available.
Google subtitles (CC): Use Google subtitles with multimedia files when available.
Interaction and dexterity
You can configure Accessibility features to assist with limited dexterity when interacting with your device.
Alternate input
You can control your device using different kinds of inputs and controls.
From Settings, tap Accessibility > Interaction and dexterity and tap an option:
Universal switch: Control your device with your customized switches.
Assistant menu: Improve device accessibility for users with reduced dexterity.
Click after pointer stops: Automatically click on an item after the pointer stops over it.
Interactions
You can simplify the motions needed to answer phone calls or respond to notifications and alarms.
From Settings, tap Accessibility > Interaction and dexterity and tap an option:
Answering and ending calls:
Read caller names aloud: Hear callers’ names read aloud when using Bluetooth or headsets (not included).
Press Home key to answer calls: Use the Home key to answer calls.
Answer automatically: Answer calls after a set duration when using
Bluetooth or headsets (not included).
Press Power key to end: End calls by pressing the Power key.
Interaction control: Customize areas of screen interactions, hardkeys, and the keyboard.
Touch settings
You can adjust your screen to be less sensitive to taps and touches.
From Settings, tap Accessibility > Interaction and dexterity and tap an option:
Touch and hold delay: Select a time interval for this action.
Tap duration: Set how long an interaction must be held to be recognized as a tap.
Ignore repeated touches: Set a time duration in which to ignore repeated touches.
Advanced settings
You can customize additional accessibility features and services for your device.
TIP Additional accessibility apps may be downloaded from the Google Play store.
Direct access
From Settings, tap Accessibility > Advanced settings and tap an option:
Power and Volume up keys: Configure selected Accessibility settings to open by quickly pressing the Power and Volume up keys at the same time.
Volume up and down keys: Configure selected services to turn on when you press and hold the Volume up and Volume down keys for three seconds.
Notifications
From Settings, tap Accessibility > Advanced settings and tap an option:
Flash notification: Flash either the camera light or the screen when you receive notifications or when alarms sound.
Notification reminders: Set periodic reminders for any unread notifications.
Direction lock: Unlock the screen by swiping in a series of directions.
Installed services
You can install additional assistance services for your device.
From Settings, tap Accessibility > Installed services.
NOTE Additional accessibility services are listed and configured here after they are installed.
Other settings
Configure features on your device that make it easier to use.
Help
View the user manual on your device.
From Settings, tap Help.
Manage game features
Automatically arrange all your games in one place. For more information on Game Launcher, visit samsung.com/us/support/owners/app/game-launcher.
From Settings, tap Advanced features for the following options:
Game Launcher: Organize all your games in one place and access extra features.
Game Tools: Access useful options and features that enhance your gameplay experience.
Dual Messenger
Use two separate accounts for the same app.
From Settings, tap Advanced features > Dual Messenger.
Tap next to supported apps to enable the feature for each app.
To select which contacts have access to the secondary messenger app, tap Use separate contacts list.
About phone
View information about your device, including current status, legal information, hardware and software versions, and more.
From Settings, tap About phone, and then view your phone number, model number, serial number, and IMEI information.
Tap additional items to view more information about your device.
TIP You can view your device's FCC ID from About phone > Status.

 Settings.
 Settings.
 Search, and enter keywords.
 Connections > Wi-Fi, and then tap
  to turn on Wi-Fi and scan for available networks.
 Add network at the bottom of the list.
 Wi-Fi Direct to use this feature.
 Bluetooth to use this feature.
 Settings next to the device name, and then tap Rename.
 More options > Allowed devices, and then tap Add to enter the other device’s Device name and MAC address.
 Download plugin and follow the prompts to add a print service.
 Sounds and vibration > Sound mode, and then choose a mode:
 Advanced features > Motions and gestures > Easy mute, and tap
  Add to use an audio file as a ringtone.
 Settings to customize.
 Add personalized sound profile to take a hearing test and let your device identify the best sound for you.
 Notifications.
 Advanced features > Motions and gestures > Smart alert, and tap
  Display.
 Download fonts to add fonts from Galaxy Store.
 Device care > Optimize now.
 More options > Settings: Configure advanced battery settings and notifications.
 General management > Language and input > Language.
 Add language, and select a language from the list.
 Move next to the desired language to the top of the list, and then tap Apply.
 Manage keyboards.
 Settings for options.
 System updates for the following options:
 to activate Auto restart, and then set the following parameters:
 Accounts and backup > Accounts > [Google Account].
 Lock screen > Screen lock type and tap a secure screen lock (Pattern, PIN, or Password).
 Security > Google Play Protect.
 Accounts and backup > Accounts >
  Add account.
 Google, and select an option to customize.
 Accessibility > Screen reader and tap an option:
 Help.
Help. Advanced features for the following options:
 next to supported apps to enable the feature for each app.
 About phone, and then view your phone number, model number, serial number, and IMEI information.