Documents: Go to download!
- Owner's manual - (English)
- GETTING TO KNOW YOUR COFFEEMAKER
- HOW TO USE
- GETTING STARTED
- SETTING THE CLOCK
- BREWING COFFEE
- SNEAK-A-CUP® FEATURE
- BREW LATER
- CARE AND CLEANING
- AUTO CLEAN® SYSTEM
- TROUBLESHOOTING
Table of contents
User manual Coffee Maker
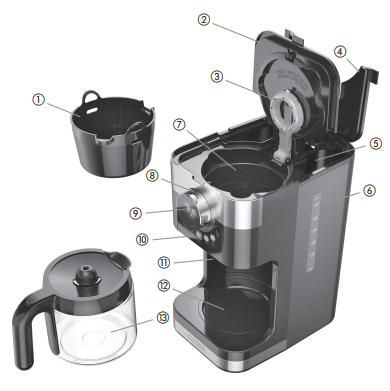
GETTING TO KNOW YOUR COFFEEMAKER

1. Removable filter basket (Part # CM4200-01)
2. Filter basket cover
3. Vortex Showerhead
4. Water reservoir lid
5. Water reservoir fill opening
6. Water level markings
See other models: TR4300SSD IR20VR-2 CM5000B RC516 SB1001B
7. Filter basket holder
8. Serving control dial
9. Digital display
10. Control buttons
11. Sneak-A-Cup™ interrupt feature
12. Nonstick “Keep hot” carafe plate
13. 12 Cup Glass Carafe with lid (Part # CM4200-02)
14. Built-in Cord storage (not shown)
HOW TO USE
This product is for household use only.
GETTING STARTED
- Remove all packing material, any stickers, and the plastic band around the power plug.
- Go to www.prodprotect.com/blackanddecker to register your product.
- Wash removable parts as instructed in CARE AND CLEANING.
- Pour fresh cold water to the
 icon in the water reservoir.
 - Place basket-style paper filter into removable filter basket. Place basket into filter basket holder.
- Plug cord into standard electrical outlet.
- Turn the serving control dial to the
 cup* position.
 - Brew water through appliance without adding coffee grounds.
- Discard water from the carafe and paper filter from filter basket.
- Turn off appliance; unplug and allow to cool down.

SETTING THE CLOCK
1. Plug appliance into standard electrical outlet.
2. The digital clock display flashes 12:00.
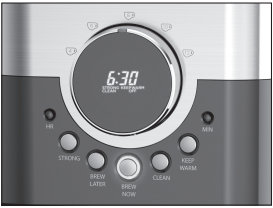
3. To change the time: Press HR (hour) button until the correct hour appears on the display. When the time passes noon “PM” illuminates to let you know you are in PM time. If the “PM” is not illuminated it is AM time.
4. Press the MIN button to select the minutes.
Note: If the appliance is unplugged or power is interrupted even momentarily, the time may need to be reset.
BREWING COFFEE
1. Open water reservoir cover.
2. Fill water reservoir with desired amount of water. Do not fill past the MAX line. Close water reservoir cover.
3. Open filter basket cover.
4. Place an 8-12 cup basket-style paper filter into removable filter basket. Place basket into filter basket holder.
5. Add desired amount of ground coffee. Close filter basket cover.
6. Make sure carafe lid is properly attached to the empty carafe. Close the lid.
Note: Coffee may overflow if carafe lid is not properly placed.
IMPORTANT: The coffeemaker will brew without the right amount of water. Always check that the amount of water in the reservoir is equal to or greater than the number of cups selected.
7. Place empty carafe on the carafe plate.
8. Plug power cord into an outlet.
9. Turn the serving control dial to the number of cups you wish to brew.
10. If regular brew strength is desired, your coffeemaker is set to brew coffee.
11. If strong coffee is desired, press the STRONG button once to select the strong brew. The word STRONG is displayed.
12. Press Brew Now button and brewing begins.
13. Once coffee grounds have cooled, carefully open cover and, discard used grounds. Close cover.
14. The coffeemaker will keep brewed coffee hot for 2 hours and then automatically turn off. This can be adjusted by using the KEEP WARM button. Options are Off, 30, 60, 90, 120 minutes.
To turn off the coffeemaker at any time: press the Brew Now button, making certain that the light ring around the button turns off. Unplug appliance when not in use.
SNEAK-A-CUP® FEATURE
Remove the carafe and brewing is paused. The carafe must be placed back on the carafe plate in 30 seconds to prevent overflow. Brewing begins again.
BREW LATER
1. Follow steps 1 through 9 under BREWING COFFEE.
2. Make sure clock has been set to correct time of day.
3. Press the BREW LATER button.
4. The digital clock will flash 12:00.
Note: If the coffeemaker has not been unplugged, the last delayed brewing time will appear on the digital display.
5. To set or change the brewing later time: Press HOUR button until the desired hour appears on the display. Press the MIN button to select the minutes.
6. After 4 seconds with no button pressed, the delayed brewing will be activated and BREW LATER SET will be displayed.
7. To check the preset brewing time, press the BREW LATER button. Four seconds after the button is released, the clock time will display again.
8. If you want to change the preset brewing time, go through steps 3 to 6 as outlined above.
9. To cancel this function, press the BREW NOW button. The words BREW LATER will go off from the digital display and the unit will begin to brew.
CARE AND CLEANING
This product contains no user serviceable parts. Refer service to qualified service personnel.
CLEANING
- Be sure the unit is unplugged and has cooled.
- Open the cover.
- To remove the filter basket, grip the handles and lift straight up. Discard the paper filter, if used, and the coffee grounds.
- Wash the filter basket and carafe in the top rack of the dishwasher or wash by hand with hot water and dish soap.
- Wipe the appliance’s exterior surface, control panel and carafe plate with a soft damp cloth. Do not use abrasive cleansers or scouring pads. Never immerse the coffeemaker in water.
- To clean the inside of the cover, open the cover and leave in the open position. Wipe surfaces with a damp cloth.
AUTO CLEAN® SYSTEM
De-scaling With Auto Clean™
Over time, calcium deposits or “scale” may build up in your brewer. Scale is non-toxic but if scale is not cleaned regularly, your machine may not brew properly or even permanently cease to function. Regularly de-scaling your brewer helps to maintain quality coffee as well as the lifespan of the heating element, and other internal parts that come in contact with water throughout the brew process.
To make the de-scaling process as effortless as possible, an Auto Clean™ system has been programmed into your coffeemaker.
When should I use Auto Clean™?
After every 60 brews, the word “CLEAN” will be displayed and blink. This notifies you it is time to run the Auto Clean™ system. “CLEAN” will be displayed until you run the Auto Clean™ system. If you would like to clean your coffeemaker prior to 60 brew cycles, you may do so by following the steps below.
How do I use Auto Clean™?
Follow the simple steps below. Your coffeemaker will take care of the rest.
- In the carafe combine by filling to the
 icon with white vinegar, then adding to the
  icon with cold water.
 - Pour into water reservoir.
- Place an 8 to 12 cup basket style paper filter in the filter basket. Place basket into filter basket holder. Close filter basket cover.
- Make sure the lid of the carafe is closed and place empty carafe on the carafe plate.
- Plug power cord into an outlet.
- Turn the serving control dial to the
 position.
 - Press CLEAN to activate cleaning cycle; the word CLEAN is displayed.
- Part of the mixture will brew through. Remaining mixture will be held in coffeemaker for 30 minutes before completing its brew through. Note: The entire cleaning cycle will take 45–60 minutes to complete.
- When the coffeemaker completes the AUTO CLEAN cycle, it shuts off automatically.
- Brew fresh water through appliance following instructions given in GETTING STARTED before brewing coffee again.
TROUBLESHOOTING
| PROBLEM | POSSIBLE CAUSE | SOLUTION |
| Coffeemaker does not turn on. | Coffeemaker is not plugged in. | Make sure appliance is plugged into a working outlet. |
| Coffeemaker is leaking. | Water reservoir may be overfilled. | Make sure water reservoir has not been filled beyond the max line. |
| Carafe lid may not be closed. | Make sure lid is closed on carafe. | |
| Carafe may not be correctly placed on the carafe plate. | Make sure carafe is placed securely onto the carafe plate. | |
| The filter basket overflows. | The carafe has been removed for longer than 30 seconds when using the Sneak-ACup™ feature. | Make sure to replace the carafe within 30 seconds during the brewing cycle. |
| Excessive amount of coffee was used. | Reduce the amount of coffee used. | |
| Coffee sediment in brewed cup of coffee. | The paper filter and/or the filter basket were not properly placed. | Insert basket-shaped paper filter into filter basket and insert basket properly into holder. |
| The coffeemaker brews slowly. | The coffeemaker needs cleaning. | Follow the instructions in the “Auto Clean” section. |
| Brewed volume is less than selected. | The coffeemaker needs cleaning. | Follow the instructions in the “Auto Clean” section. |
| There was not enough water in the tank. | Make sure the amount of water in the reservoir is equal to or greater than the number of cups selected. | |
| Excessive amount of coffee was used. | Reduce the amount of coffee used. | |
CHECK WATER warning  is flashing in the digital display is flashing in the digital display |
There is not enough water in the tank. | Make sure the amount of water in the reservoir is equal to or greater than the number of cups selected. |
| The coffeemaker needs cleaning. | Follow the instructions in the “Auto Clean” section. |
If additional assistance is needed, please contact our consumer service team at 1-800-465-6070.
