User Manual
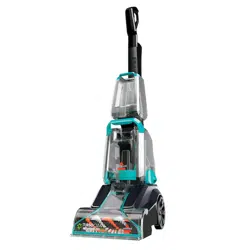
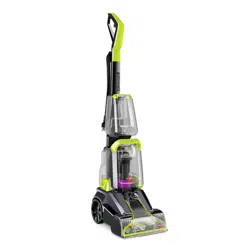
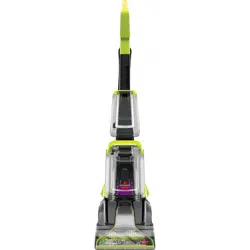
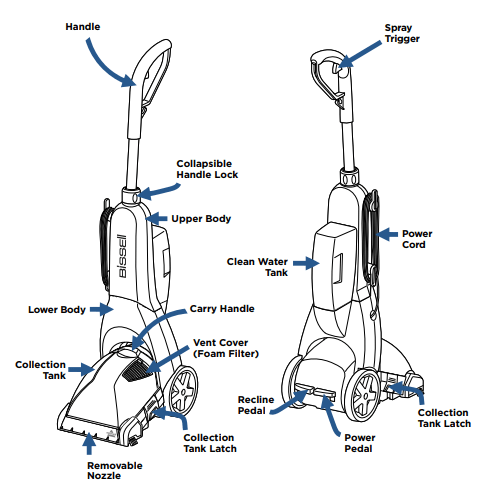
Getting to Know Your Deep Cleaner
Assembly
Slide upper body onto lower body.
Secure with screws.

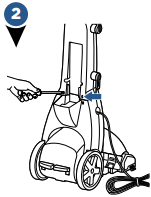
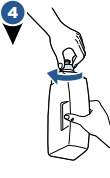
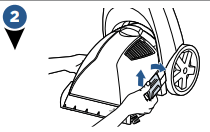
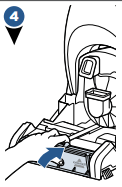
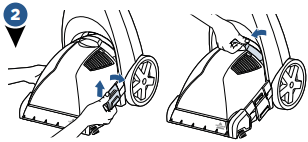
Slide upper Handle Post into the body by aligning the pin and sliding the Post down into place.
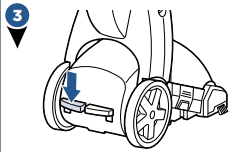
Be sure to secure upper handle before lifting. Rotate lock collar to secure.
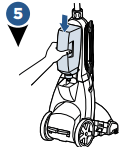
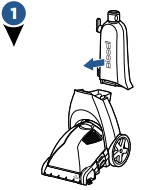
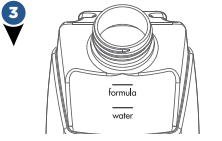
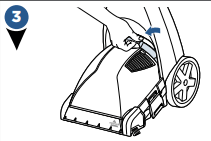
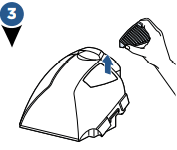
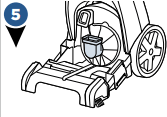
Place Clean Water Tank on back of unit. The tank will make a “CLICK” noise when seated properly.
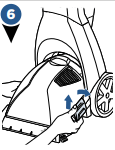
Wrap power cord.
- If cleaning an entire room, consider moving your furniture to another area.
- Use a dry vacuum cleaner over area before using your deep cleaner.
- Remove any large, solid debris before wet cleaning.
- Pre-treat stains with BISSELL PreTreat to improve performance on coffee stains and ground-in dirt.
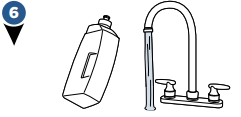
Fill Clean Water Tank
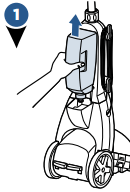
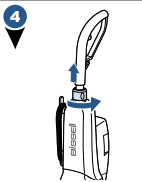
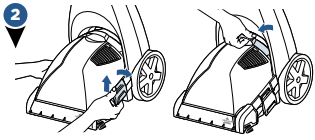
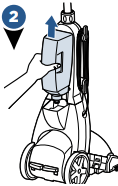
Remove the clean water tank lifting straight up and away from lower body
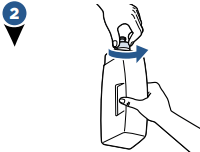
Unscrew the cap at the bottom of the clean water tank
Fill with warm tap water to the WATER line. Fill the rest of the tank with BISSELL Formula to the FORMULA line.
Replace and tighten the cap, then return the clean water tank to lower body. The tank will make a “CLICK” noise when seated properly.
A few notes about filling the clean water tank:
- Fill with hot (140°F/60°C MAX) tap water and add the appropriate BISSELL solution. DO NOT USE BOILING WATER. DO NOT HEAT WATER OR TANK IN MICROWAVE.
NOTICE: Do not over wet carpet. Be careful not to run over loose objects or edges of area rugs. Stalling the brush may result in premature belt failure.
NOTE: Do not substitute BISSELL 2X Formula cleaning solution with other household cleaning products.
 Pour in more power with BISSELL Boosts
- Fill tank with water and 2X formula (Step 3 above).
- Add 1 ounce of any BISSELL Boost per 1/2 gallon of water.
- The 2085 machine series have 1/2 gallon clean water tanks.
Cleaning Your Carpet
Important! Please check manufacturer’s tag before cleaning area rugs for any specialized cleaning instructions. We do not recommend deep cleaning delicate, silk, wool, antique or area rugs without a manufacturer’s tag.
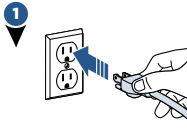
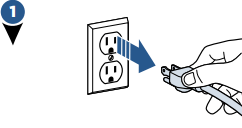
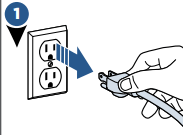
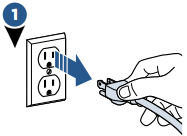
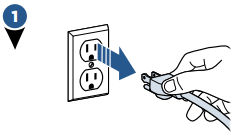
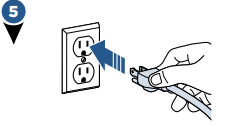
Plug into a proper outlet.
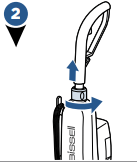
Extend the Collapsible Handle Post by turning the collar counterclockwise and lifting the handle up. Turn the collar clockwise to secure.
IMPORTANT BEFORE USE: Make sure the handle post is fully extended up and the collar lines up with the lock symbol before you begin cleaning.
With foot, press the grey recline lever located next to power button.
With foot, press the red power button, located on the back of the machine.
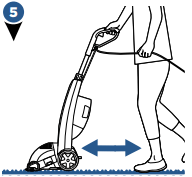
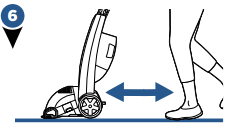
Cleaning Pass:
1. While pressing the trigger, make one slow forward wet pass and another one back.
2. Release the trigger and make one slow forward and backward pass over the same area.
3. Repeat steps 1 and 2 until solution being pulled up appears clean.
4. Empty the collection tank when dirty water reaches the full line, and fill with fresh warm water and formula when the Clean Water Tank is empty.
Empty Collection Tank
WARNING To reduce the risk of fire, electric shock or injury, turn power OFF and disconnect plug from electrical outlet before performing maintenance or troubleshooting.
With foot, press the red power button, to turn off unit and then unplug.
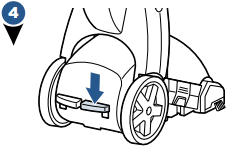
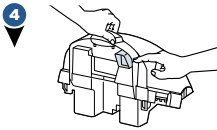
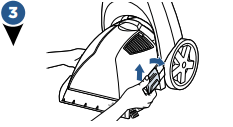
Release Collection Tank latches (on each side) by pulling up from the bottom of latch and then out.
Carefully remove tank by lifting up on the tank carry handle.
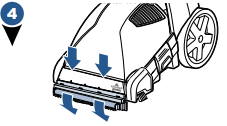
Carry the Collection Tank to a toilet or sink. To empty, pour out contents using opening at back of tank
Rinse the Collection Tank thoroughly and replace on unit. Secure latches on both sides of the tank.
Refill the Clean Water Tank and continue cleaning or if you’re done cleaning, wait for the pieces to dry before storing your machine.
Cleaning Machine After Use
Unplug the unit.
Remove and rinse the Collection Tank thoroughly
Remove tank vent & foam filter (located on top of the Collection Tank) and rinse
To remove and clean the nozzle, keep the Collection Tank off of the unit.
Gently pull the two tabs that point up near the front of the unit. The nozzle will unhook to remove. Rinse under running water. When finished, slightly tilt the machine so the foot raises up so you can align the nozzle hooks at the floor of the unit. Rotate the nozzle up to clip back into place
Remove lint and hair from red gasket in base of unit. (Do not remove gasket)
Once the parts have been rinsed clean and dried, replace the Collection Tank to the base of the machine and secure with both latches. Wrap power cord around Quick Release Cord Wrap™ on side of the machine. Wipe all surfaces with a soft cloth and store cleaner upright in a protected, dry area.
NOTICE: To reduce the risk of a leaking condition, do not store unit where freezing may occur. Damage to internal components may result.
Replacing Belts & Brush Rolls
What you will need: 1 Phillips screwdriver & 1 flathead screwdriver
Turn the machine off and unplug from wall outlet.
Remove the Clean Water and Collection Tanks.
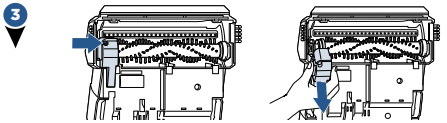
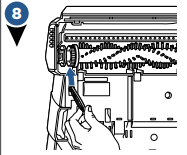
Lay machine down to access the bottom of the machine. With a Phillips head screwdriver, unscrew the belt cover and remove.
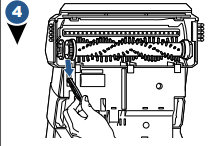
If you want to replace or clean the brush roll, remove the belt by slightly lifting the brush roll to maneuver the belt and remove it. If the belt is broken and needs to be replaced, remove it and replace with a new belt.
When removing the brush roll, the brush roll cap will come with it. Do not lose this part.
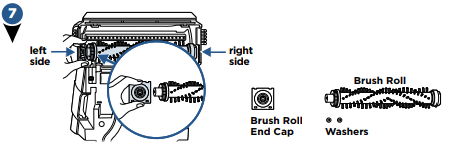
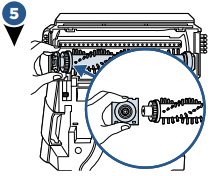
Clean or replace the brush roll and belt. When finished cleaning these parts, reassemble them to the machine. Insert the brush into the right side end cap. Adjust the right side of the brush into place and tuck the left brush roll cap (separate piece that attaches to brush roll) into place.
Maneuver the belt to wrap around the pulley. Wrap the belt around the cog of the brush roll. Secure the brush roll into place by sliding the square piece to align the brush roll.
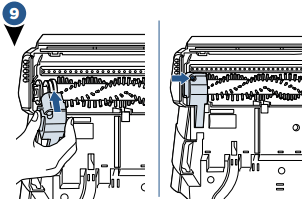
Reattach belt cover and screw into place.
NOTE: Manually rotate brush to make sure it rotates freely and the belt is aligned.
With foot, press the red power button, to turn off unit and then unplug.
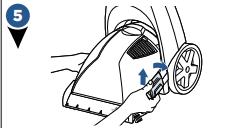
Remove the clean water tank lifting straight up and away from lower body.
Release Collection Tank latches (on each side) by pulling up from the bottom of latch and then out.
Attach the hard floor tool by hooking it into the front of the nozzle. Rotate down until it snaps into place.
Return both tanks to the machine and plug into a proper outlet.
Follow the “Cleaning Pass” instructions on the previous page
Troubleshooting
Reduced spray OR no spray
- Clean Water Tank is empty
- Refill tank with water and formula
- Lint screen on Clean Water Tank cap clogged
- Soak Clean Water Tank cap in warm water and then rinse under running water
- Spray nozzle clogged
- Clean spray nozzle by rinsing under water
- Upper handle is not in the upright and locked position
- Rotate the retractable handle lock, pull handle up and return the handle lock to the locked position
Deep cleaner not picking up cleaning solution
- Collection Tank is not aligned/ secured
- Check tank alignment and secure with side latches
- Collection Tank is full
- Removable nozzle installed improperly
- Unplug unit and align two "hooks" into bottom first, then snap into place on top
- Removable nozzle full of debris
- Unplug unit, remove nozzle and rinse under running water
- Red lint screen under Collection Tank is clogged
- Remove debris from lint screen
Warranty
This warranty gives you specific legal rights, and you may also have other rights which may vary from state to state. If you need additional instruction regarding this warran�ty or have questions regarding what it may cover, please contact BISSELL Consumer Care by e-mail or telephone as described below.
Limited One-Year Warranty
Subject to the *EXCEPTIONS AND EXCLUSIONS identified below, upon receipt of the product BISSELL will repair or replace (with new or remanufactured components or products), at BISSELL’s option, free of charge from the date of purchase by the original purchaser, for one year any defective or malfunctioning part. See information below on "If your BISSELL product should require service".
This warranty applies to product used for personal, and not commercial or rental service. This warranty does not apply to fans or routine maintenance components such as filters, belts, or brushes. Damage or malfunction caused by negligence, abuse, neglect, unauthorized repair, or any other use not in accordance with the User's Guide is not covered.
BISSELL IS NOT LIABLE FOR INCIDENTAL OR CONSEQUENTIAL DAMAGES OF ANY NATURE ASSOCIATED WITH THE USE OF THIS PRODUCT. BISSELL’S LIABILITY WILL NOT EXCEED THE PURCHASE PRICE OF THE PRODUCT.
Some states do not allow the exclusion or limitation of incidental or consequential damages, so the above limitation or exclusion may not apply to you.
*EXCEPTIONS AND EXCLUSIONS FROM THE TERMS OF THE LIMITED WARRANTY THIS WARRANTY IS EXCLUSIVE AND IN LIEU OF ANY OTHER WARRANTIES EITHER ORAL OR WRITTEN. ANY IMPLIED WARRANTIES WHICH MAY ARISE BY OPERATION OF LAW, INCLUDING THE IMPLIED WARRANTIES OF MERCHANTABILITY AND FITNESS FOR A PARTICULAR PURPOSE, ARE LIMITED TO THE ONE YEAR DURATION FROM THE DATE OF PURCHASE AS DESCRIBED ABOVE.
Some states do not allow limitations on how long an implied warranty lasts so the above limitation may not apply to you.