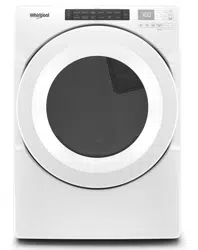
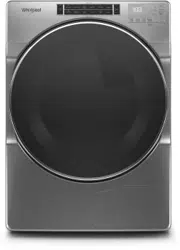
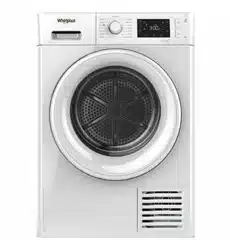
User Manual
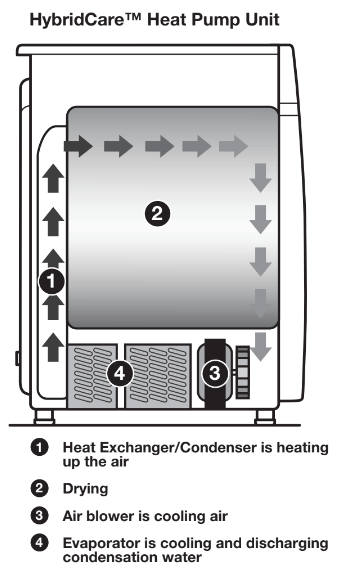
HybridCareTM HEAT PUMP TECHNOLOGY
A typical dryer uses large amounts of energy; this dryer consumes a fraction of the energy by recycling and reclaiming heat.
The HybridCareTM dryer is a ventless heat pump dryer that uses a refrigeration system to dry and recycle the same air.
The laundry is dried with low temperatures; therefore it may feel cooler than expected during and after the drying process.
The heat pump dryer’s heating phase is longer than in traditional dryers. If possible, do not open the dryer door during the process as heat can escape from the drum and can make longer drying times.
Benefits of HybridCareTM Heat Pump
- ENERGY: Regenerates energy to reduce overall energy consumption.
- PERFORMANCE: Two available modes allow flexibility to manage drying performance and energy savings.
- FABRIC CARE: Capability to use less heat than vented dryer.
- VENTLESS DESIGN: Allows installation in more locations throughout the home.
New Sounds from HybridCareTM Heat Pump
- Dryer runs on a compressor like your refrigerator and you may notice a hum from the compressor.
- The water from wet clothes is pumped out to your drain. You may notice a gurgling sound occasionally.
Use Automatic Cycles for better fabric care and energy savings
Use the Automatic Cycles to provide the most energy savings and enhanced fabric care from the dryer. During Automatic Cycles, drying air temperature, heat pump unit temperature, and moisture level are sensed in the load. This sensing occurs throughout the drying cycle and the dryer shuts off when the load reaches the selected dryness. Use the NORMAL dryness level to provide optimal energy savings.
With Timed Dry, the dryer runs the amount of time set and can result in shrinkage, wrinkling, and static due to over-drying. Use Timed Dry for the occasional damp load that needs a little more drying time or when using the drying rack.
CONTROL PANEL AND FEATURES
NOTE: The control panel features a sensitive surface that responds to a light touch of your finger. To ensure your selections are registered, touch the control panel with your finger tip, not your fingernail. When selecting a setting or option, simply touch its name.
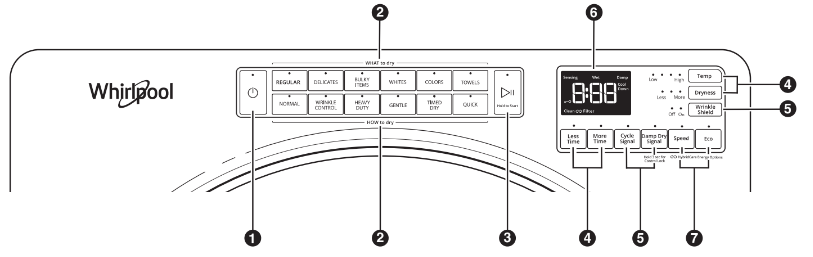
1. POWER
Touch to turn the dryer on and off. Touch to stop/cancel a cycle at any time.
2. WHAT TO DRY/HOW TO DRY
Once a “What to Dry” is selected, the dryer automatically selects the recommended or last-used “How to Dry” option, as well as the recommended/last-used modifiers. Both the “How to Dry” and modifiers can be changed if desired. See the “Cycle Guide” for details.
3. START/PAUSE
Touch and hold until LED counts down “3-2-1” and the dryer starts; then let go to start a cycle, or touch once while a cycle is in process to pause it.
4. MODIFIERS
Use to select available modifiers for your dryer. Not all cycles and options are available on all models.
Temp
When using Timed Dry/Quick Cycle, you may select a dry temperature based on the type of load you are drying. Use the warmest setting that is safe for the garments in the load. Follow garment label instructions.
NOTE: Automatic Cycles will give you up to four temperatures to adjust, depending on the model and the "What to Dry” or “How to Dry” selections that have been made.
Dryness
You may adjust the Dryness on Automatic Cycles, if desired.
NOTE: Dryness is for use with Automatic Cycles only.
More Dry\Less Dry Timed Dry Adjust
Touch MORE TIME or LESS TIME with the Timed Dry/ Quick cycle to increase or decrease the length of the cycle.
5. OPTIONS
Use to select available options for your dryer. Not all cycles and options are available on all models.
Wrinkle ShieldTM Option
If you will be unable to remove a load immediately, touch Wrinkle ShieldTM to add up to 150 minutes of periodic tumbling to help reduce wrinkling.
NOTE: If you open the dryer door prior to the end of the Wrinkle ShieldTM option, the dryer will go into standby. You will need to touch Power to turn off or touch Start/Pause to continue Wrinkle ShieldTM option.
Steam Refresh (steam models only)
This cycle is best for reducing wrinkles and odors from dry items. Cycle time will increase, depending on number of items. This is an independent cycle that cannot be combined with any other cycle.
Cycle Signal
Use this option to turn the signal indicating the end of a drying cycle to low, medium, high, or off. The volume you select here will also be applied to the Damp Dry
Signal.
NOTE: You may also turn off the tones that sound when a feature, setting, or option is touched. Touch and hold CYCLE SIGNAL for about three seconds to turn sounds to low, medium, high, or off.
Damp Dry Signal
Touch to select the Damp Dry signal on or off. When selected, a series of beeps will sound when the load is damp, but not completely dry. This will allow you to take clothes out of the load that do not need to dry completely. This option is available on some cycles. The Damp Dry signal is selected as a default for the Bulky Items/Normal, Bulky Items/Wrinkle Control, and Bulky Items/Heavy Duty, as a reminder to manually reposition bulky loads midway through the cycle.
Control Lock
Use this option to lock the controls of the dryer and avoid an accidental change in cycle options or preferences during a drying cycle.
Touch and hold DAMP DRY SIGNAL (depending on the model) for 3 seconds to lock or unlock the controls of the dryer. During this time, the LED Display will count down “3-2-1”. Once the controls are locked, the LED Display will display “Loc.”
NOTE: The Control Lock function may be enabled when recovering from a power failure. To unlock the control, touch and hold DAMP DRY SIGNAL for at least 3 seconds.
6. LED DISPLAY
When you select a cycle, its default settings will light up and the Estimated Time Remaining (for Automatic Cycles) will vary depending on “What to Dry” and “How to Dry” selections, or actual time remaining for Timed Dry cycles (for Manual Cycles) will be displayed.
CYCLE STATUS INDICATORS
The Cycle Status Indicators show the progress of a cycle. Not all indicators are available on all models.
Sensing
The Sensing indicator will light periodically during Sensor Cycles to indicate that the moisture sensor on the dryer is operating. This indicator will not light during Timed Cycles or options such as Wrinkle ShieldTM.
Wet
The load is still wet and/or the cycle just started.
Damp
This indicator shows that the load is partially dried and items that you may wish to hang up or iron while still damp may be removed.
Cool Down
The dryer has finished drying with heat and is now tumbling the load without heat to cool it down.
Clean HybridCareTM Filter
Clean HybridCareTM Filter light comes on after every th cycle. Light will reset after filter is cleaned and loaded back into dryer cabinet. For additional cleaning information, see “Dryer Care.”
NOTE: If there are other error issues during a cycle, the Clean HybridCareTM Filter indicator will not light up. See "Troubleshooting” section.
End
This will indicate that the selected cycle has ended and the load may be removed from the dryer. If Wrinkle ShieldTM has been selected, the dryer may continue to tumble the load, even if “End” is displayed.
Control Lock 
This will illuminate once the controls are locked.
 7. HybridCareTM Energy OPTIONS
Use to select an available mode for your dryer. Your HybridCareTM dryer is more efficient in all modes than your typical dryer.
A. Speed
This option saves time, but uses more energy.
B. Eco
Eco is the default option for all cycles, which allows you to increase your energy savings by using a lower heat level. This will increase dry times.
NOTE: Energy savings may vary across loads and cycles.
USING YOUR DRYER
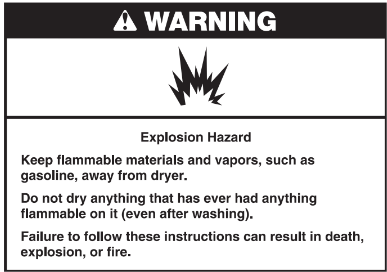
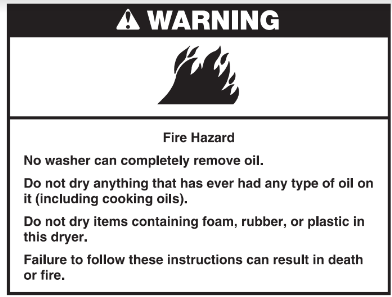
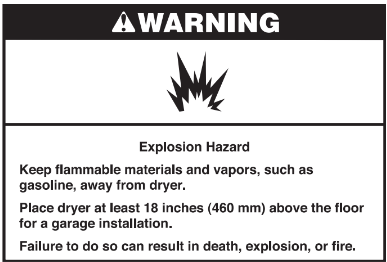
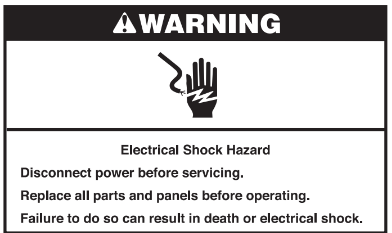
WARNING: To reduce the risk of fire, electric shock, or injury to persons, read the IMPORTANT SAFETY INSTRUCTIONS before operating this appliance.
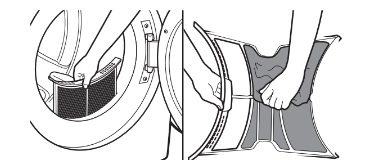
1. Clean the lint screen
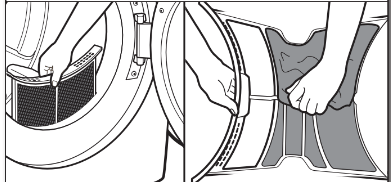
Clean the lint screen before each load. Pull the lint screen straight up and out. Press tab down and open lint screen. Roll lint off the screen with your fingers. Push the lint screen firmly back into place.
IMPORTANT: Clean lint screen before each dryer use as a screen blocked with lint will increase drying time.
2. Clean HybridCareTM Filter
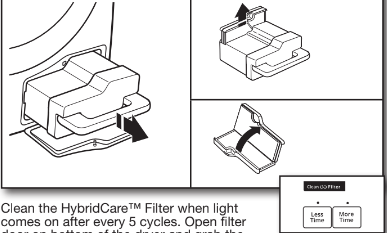
Clean the HybridCareTM Filter when light comes on after every 5 cycles. Open filter door on bottom of the dryer and grab the handle to pull out filter. Set filter on the dryer and pull out lint screen on bottom of filter. Roll lint off screen with fingers and place back in filter housing. (There maybe some water in the filter and this is normal.) For additional cleaning information, see “Dryer Care.”
IMPORTANT: For best drying performance, clean HybridCareTM Filter after every 5th load. Light will reset after filter is cleaned and loaded back into filter housing.
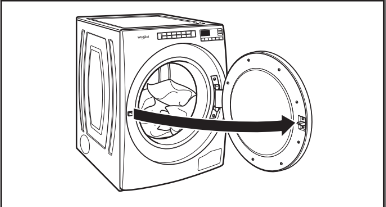
3. Load the dryer
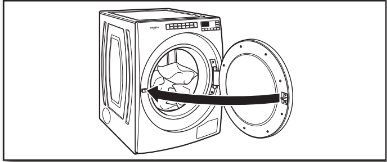
Open the door by pulling on the handle. Place laundry in the dryer. Add a dryer sheet to wet load if desired. Close the door.
IMPORTANT: Do not tightly pack the dryer. Items need to tumble freely. Tightly packing can lead to poor drying performance and may increase wrinkling and tangling.
4. Touch POWER

Touch POWER to turn on the dryer.
5. Select type of load to dry
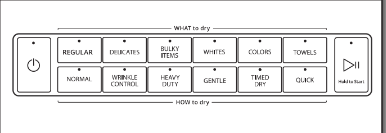
First select a cycle from the “What to Dry” (Automatic cycles) and then select the “How to Dry” to get the best combination cycle available for the type of items you are going to dry. See "Cycle Guide” for cycle details. Not all cycles are available on all models.
Automatic Cycles:
You can select a different dryness level, depending on your load. Touch DRYNESS to scroll to Less to More. Selecting Less to More automatically adjusts the dryness level at which the dryer will shut off. Dryness level can be changed in the first 5-8 minutes of the cycle.
NOTE: Automatic Cycles give the best drying in the shortest time. Drying time varies based on fabric type, load size, and dryness setting.
NOTE: Automatic Cycles will give you up to 4 temperatures to adjust and it varies, depending on the “What to Dry” or “How to Dry” selections that have been made.
TIMED DRY Cycle:
When you select Timed Dry/Quick, the default time appears in the display. Touch MORE TIME or LESS TIME to increase or decrease the time in 5 minute increments. The default temperature may be changed by pressing Temperature until the desired dry temperature is lit.
6. Adjust cycle modifiers, if desired
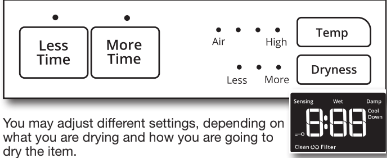
You may adjust different settings, depending on what you are drying and how you are going to dry the item.
NOTE: Not all options and modifiers are available with all cycles. Not all cycles are on all models.
7. Select any additional options

Add additional options such as Cycle Signal, Damp Dry Signal and/or Wrinkle ShieldTM by touching that option. If you will be unable to remove the load promptly, select Wrinkle ShieldTM before touching START/PAUSE.
NOTE: Not all options and settings are available with all cycles.
8. Select HybridCareTM Energy options

The display will show the HybridCareTM Energy Options for all cycles. To adjust an option, touch its name – Speed or Eco.
NOTE: All settings and options are not available with all programs.
9. Touch and hold START/PAUSE to begin cycle

Touch and hold START/PAUSE to begin the cycle.
10. Remove garments promptly after cycle is finished
Promptly remove garments after cycle has completed to reduce wrinkling.
ADDITIONAL FEATURES
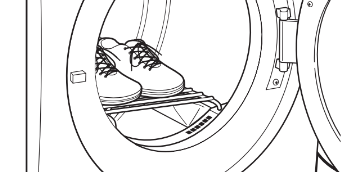
USING THE DRYING RACK
To purchase a drying rack for your dryer, see “Accessories” section for more information. You will need your model and serial number and the purchase date. Remove and discard any packing material before use. Use the Drying Rack for items that you do not want to tumble dry, such as sweaters and tennis shoes. When you use the drying rack, the drum continues to turn, but the rack remains stationary.
The drying rack is intended for use with the Manual Dry/ Timed Dry cycles only. The drying rack cannot be used with Automatic cycles.
To use the drying rack:
IMPORTANT: Do not remove the lint screen.
1. Open dryer door.
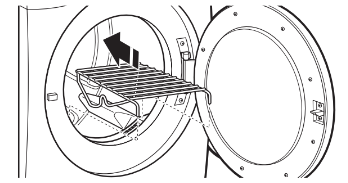
2. Align the two hooks on the front of the drying rack with the holes in the dryer door opening and press down fully into holes. Rest the rear support on the dryer back ledge.
3. Place wet items on top of the drying rack. Allow space around items for air to circulate. The drying rack does not move, but the drum will rotate; be sure to leave adequate clearance between items and the inside of the dryer drum. Make sure items do not hang over the edges or between drying rack grille.
4. Close the door.
5. Select a Timed Dry, or Low Temperature cycle. Items containing foam, rubber, or plastic must be dried on a clothesline.
6. When the cycle is selected, the Estimated Time Remaining display shows the default time. You can change the actual time in the cycle by increasing or decreasing the cycle time.
7. Start the dryer.
NOTE: Check the lint screen and remove any lint accumulated from items dried on the drying rack after the cycle is finished.
DRYER CARE
CLEANING THE DRYER LOCATION
Keep dryer area clear and free from items that would block the airflow for proper dryer operation. This includes clearing piles of laundry in front of the dryer.
CLEANING THE DRYER INTERIOR
To clean dryer drum:
- Use a mild hand dish detergent mixed at a low concentration with very warm water, and rub with a soft cloth.
- Rinse well with a wet sponge or towel.
- Tumble a load of clean clothes or towels to dry drum
OR
Use a microfiber cloth and hot water in a spray bottle to clean the drum and a second microfiber towel to dry.
NOTE: Garments that contain unstable dyes, such as denim blue jeans or brightly colored cotton items, may discolor the rear of the dryer interior. These stains are not harmful to your dryer and will not stain future loads of clothes. Dry unstable dye items inside out to avoid transfer of dye.
REMOVING ACCUMULATED LINT
From Inside the Dryer Cabinet
Lint should be removed every 2 years, or more often, depending on dryer usage. Cleaning should be done by a qualified appliance servicer.
CLEANING THE LINT SCREEN
Clean lint screen after every load
The lint screen is located in the door opening of the dryer. A screen blocked by lint can increase drying time.
To clean:
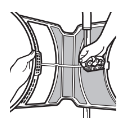
1. Pull the lint screen straight up and out. Press tab down and open lint screen. Roll lint off the screen with your fingers.
2. Push the lint screen firmly back into place.
IMPORTANT: Do not run the dryer with the lint screen loose, damaged, blocked, or missing. Doing so can cause overheating and damage to both the dryer and fabrics.
As needed cleaning
Laundry detergent and fabric softener residue can build up on the lint screen. This buildup can cause longer drying times for your clothes, or cause the dryer to stop before your load is completely dry. The screen is probably clogged if lint falls off while the screen is in the dryer.
Clean the lint screen with a nylon brush every 6 months, or more frequently, if it becomes clogged due to a residue buildup.
To wash lint screen:
- Roll lint off the screen with your fingers.
- Wet both sides of lint screen with hot water.
- Wet a nylon brush with hot water and liquid detergent. Scrub lint screen with the brush to remove residue buildup.
- Rinse screen with hot water.
- Thoroughly dry lint screen with a clean towel. Reinstall screen in dryer or lint filter.
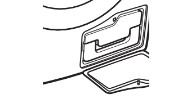
CLEANING THE HybridCareTM FILTER AND FILTER LINT SCREEN
Clean HybridCareTM filter after every 5 loads
The filter is located in bottom corner of dryer. The control panel has an indicator light to remind you to clean the HybridCareTM filter.
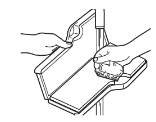
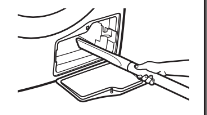
1. Open the bottom filter door. Lift handle up and pull out filter. Set filter on the dryer and pull out lint screen located at the back of the filter. Remove lint off the screen with your fingers.
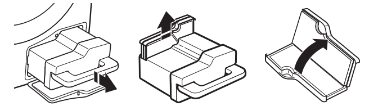
NOTE: If lint still remains on screen then wet both sides with hot water. If necessary, wet a nylon brush with hot water and liquid detergent. Scrub lint screen with the brush to remove residue buildup. Rinse screen with hot water.
2. Clean the filter housing and mesh inside with a damp cloth, household vacuum cleaner, or soft brush. Clean the screen at the back of the filter cabinet once a month.
3. Put lint screen back into filter and put filter back in dryer cabinet. Dryer will not operate without filter and make sure the handle is downward to lock in place. LF will display if not properly seated.
IMPORTANT: Do not run the dryer with the filter loose, damaged, blocked, or missing. Doing so can cause overheating and damage to both the dryer and fabrics.
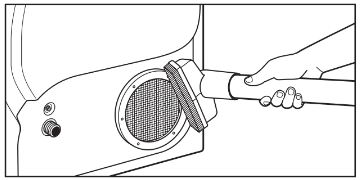
CLEANING THE COOLING FAN SCREEN
The cooling fan screen is located on the back lower right of the dryer. Pull dryer away from wall and vacuum cooling fan screen with brush attachment.
IMPORTANT: Clean cooling fan screen, if needed, for optimal performance. A blocked screen will increase drying time.
NON-USE, STORAGE, AND MOVING CARE
Install and store your dryer where it will not freeze. Because some water may stay in the hose, freezing can damage your dryer. If storing or moving your dryer during freezing weather, winterize it.
Non-Use or Storage Care
Operate your dryer only when you are at home. If you will be on vacation or not using your dryer for an extended period of time, you should:
- Unplug dryer or disconnect power.
- Clean lint screen. See “Cleaning the Lint Screen.”
Moving Care
For power supply cord-connected dryers:
- Unplug the power supply cord.
- Make sure leveling legs are secure in dryer base.
- Use tape to secure dryer door.
For direct-wired dryers:
- Disconnect power.
- Disconnect wiring.
- Make sure leveling legs are secure in dryer base.
- Use tape to secure dryer door.
Reinstalling the Dryer
Follow the Installation Instructions to locate, level, and connect the dryer.
TROUBLESHOOTING
Dryer Operation
Dryer will not run Door not closed completely.
- Make sure the dryer door is closed completely.
START/PAUSE not touched firmly or held long enough.
- Touch and hold START/PAUSE 2–5 seconds.
Lint filter and/or HybridCareTM filter not in place.
- Place filter back in dryer and make sure the handle is properly seated. LF will display if not properly seated.
Household fuse is blown or circuit breaker has tripped.
- There may be 2 household fuses or circuit breakers for the dryer. Check that both fuses are intact and tight, or that both circuit breakers have not tripped. Replace the fuses or reset the circuit breaker. If the problem continues, call an electrician.
Incorrect power supply.
- Electric dryers require 240 V power supply. Check with a qualified electrician.
Wrong type of fuse.
Dryer will not heat
Household fuse is blown or circuit breaker has tripped.
- The drum may be turning, but you may not have heat. Electric dryers use 2 household fuses or circuit breakers. Replace the fuses or reset the circuit breaker. If the problem continues, call an electrician.
Incorrect power supply.
- Electric dryers require 240 V power supply. Check with a qualified electrician.
Unusual Noise
Thumping noise
Dryer hasn’t been used in a while.
- This is due to temporary flat spots on the drum rollers. The thumping sound will diminish after a few minutes.
Rattling or vibrating noise
A small object caught between the edges of dryer drum.
- Check the front and rear edges of the drum for small objects. Clean out pockets before laundering.
Dryer isn’t properly leveled.
- The dryer may vibrate if not properly installed. See the Installation Instructions. All four dryer feet should be in firm contact with the floor.
Clothing is balled up in dryer.
- When balled up, the load will bounce, causing the dryer to vibrate. Separate the load items and restart the dryer.
Loud humming or increased noise during cycle
Load is packed tightly.
- Reduce load size to recommended load size in “Cycle Guide.” Run the dryer for 5–10 minutes.
Dryer Results
Clothes are not drying satisfactorily or drying times are too long
Lint screen is clogged with lint.
- Clean lint screen before each load.
HybridCareTM filter and screen is clogged with lint.
- Clean HybridCareTM filter after every 5th cycle. Clean screen behind filter once a month.
Cooling fan screen is blocked with lint.
- Pull dryer out and make sure cooling fan has proper ventilation. Clean cooling fan screen on back of dryer monthly, or as needed.
The dryer is not level.
- Clothes not contacting the moisture sensors during Automatic cycles. See “Level Dryer” in the Installation Instructions.
The load is too large and heavy to dry quickly.
- Separate the load to tumble freely.
Fabric softener sheets are blocking the grille.
- The air outlet grille is just inside the door, behind the lint screen. Check that it is not blocked by a fabric softener sheet. Use only one fabric softener sheet, and use it only once.
The dryer is located in a room with temperature below 45oF (7oC).
- Proper operation of dryer cycles requires temperatures above 45oF (7oC).
The dryer is located in a closet.
- Closet doors must have ventilation openings at the top and bottom of the door. The front of the dryer requires a minimum of 1" (25 mm) of airspace, and, for most installations, the rear of the dryer requires 5" (127 mm). See the Installation Instructions.
There may be some water in the HybridCareTM filter or on floor
The dryer is not level.
- Dryer needs to have a slope less than 1" (25 mm). See “Level Dryer” in the Installation Instructions.
HybridCareTM filter is not properly seated.
- Make sure filter is placed in the housing cabinet correctly. See "Cleaning the HybridCareTM Filter and Lint Screen.”
Drain hose is longer than what was provided.
- Drain hose can be installed no higher than 72" (1.8 m) from bottom of the dryer. See “Drain System” in the Installation Instructions.
Cycle time is too short
The load may not be contacting the sensor strips on Automatic Cycles.
- Level the dryer. See the Installation Instructions. All four dryer feet should be in firm contact with the floor.
The automatic cycle is ending early.
- Change the dryness level setting on Automatic Cycles. Increasing or decreasing the dryness level will change the amount of drying time in a cycle. If loads are consistently ending too early, also see “Changing the Automatic Cycle settings to increase or decrease drying time.”
Lint on load Lint screen is clogged with lint. Clean lint screen before each load.
Stains on load
Improper use of fabric softener.
- Add dryer fabric softener sheets at the beginning of the cycle. Fabric softener sheets added to a partially dried load can stain your garments. Do not use fabric softener sheets with steam cycles.
Stains on drum
Loose dyes in clothes.
- Drum stains are caused by dyes in clothing (usually blue jeans). These will not transfer to other clothing.
Loads are wrinkled
The load was not removed from dryer at the end of the cycle.
- Refer to garment care label instructions. Dry-clean-only garments are not recommended.
The dryer was tightly packed.
- Dry smaller loads that can tumble freely. Results may also vary depending on fabric type.
Odors
Recent painting, staining, or varnishing in the area where your dryer is located.
- Ventilate the area. When the odors or fumes are gone from the area, rewash and dry the clothing.
Odors are left in garments after wearing.
- Rewash and dry the clothing.
Load too hot
Load removed before cool down portion of cycle complete.
- Allow the dryer to complete the cool down portion of the cycle before removing the load.
Using Timed Dry cycle with a high temperature setting.
- Select an Automatic Cycle with a lower heat setting to avoid overdrying the load.
Stains or lint build-up on wall behind dryer
Dryer to close to wall.
- Move dryer away from wall and make sure you have proper ventilation.
Clean HybridCareTM Filter indicator is lit
The HybridCareTM Filter and/or lint screen is clogged.
- The dryer will continue to run when this indicator is lit.
Try the following:
- Clean lint screen.
- Clean the HybridCareTM Filter and screen in back of filter cabinet. Must be cleaned every 5 cycles for best performance.
Dryer Displaying Code Message or Cycle Status Indicator Lights Up
“LF”
Lint filter removed.
- Indicates that the HybridCareTM filter has been removed. Place filter into dryer and make sure the handle is properly seated.
“PF” (power failure)
The drying cycle has been interrupted by a power failure.
- Touch and hold START to restart the dryer.
NOTE: The Control Lock function may be enabled when recovering from a power failure. To unlock the control, touch and hold CONTROL LOCK for at least 3 seconds.
“L2” Diagnostic Code (low or no line voltage condition)
There may be a problem with your home power supply, keeping the dryer’s heater from turning on.
- The dryer will continue to run when this diagnostic code is present. Touch any pad to clear the code from the display and return to the estimated time remaining.
NOTE: This error will only show during the initial installation. Try the following: Check to see if a household fuse has blown or circuit breaker has tripped. Electric dryers use two household fuses or breakers. Replace the fuse or reset the circuit breaker. Confirm that the power cord is properly installed. Refer to the Installation Instructions for details. Select a Timed Dry heated cycle, and restart the dryer. If the message persists, consult a qualified electrician.
“F# E#” (F1 E1, F3 E1, etc.) variable service codes
The dryer is in need of service.
- If a code beginning with an “F” appears in the display, alternating between F# and E#, the dryer control has detected a problem that requires service. Call for service.
“Loc”
The Control Lock is enabled.
- Touch and hold CONTROL LOCK for 3 seconds to unlock the controls of the dryer. During this time the LED Display will count down 3-2-1. When the Control Lock is disabled, the LED Display will clear.