
2

en-us
3
Table of contents
en-us Operating instructions
( Safety Definitions. . . . . . . . . . .5
( IMPORTANT SAFETY
INSTRUCTIONS . . . . . . . . . . . .6
ƒ Causes of Damage. . . . . . . . . .9
* Getting Started . . . . . . . . . . . .10
, Rinse Aid. . . . . . . . . . . . . . . . .12
- Loading the Dishwasher . . . .13
. Detergent . . . . . . . . . . . . . . . .21
/ Dishwasher Cycles . . . . . . . .23
0 Dishwasher Cycle Options . .24
1 Operating the Dishwasher. . .26
2 Care and Maintenance. . . . . .29
3 Troubleshooting . . . . . . . . . . .33
4 Customer Service. . . . . . . . . .37
‡ Statement of Limited Product
Warranty . . . . . . . . . . . . . . . . .38

en-us
4
'HDU9DOXHG&XVWRPHU
7KDQN\RXIRUVHOHFWLQJD%RVFK
GLVKZDVKHU<RXKDYHMRLQHGWKH
PDQ\FRQVXPHUVZKRGHPDQGTXLHWDQGVXSHULRUSHUIRUPDQFHIURP
WKHLUGLVKZDVKHUV
,I\RXKDYHDQ\TXHVWLRQVRUFRPPHQWVSOHDVHFRQWDFWXVE\SKRQHDW
:KLOHWKHUHGRQ·WIRUJHWWRUHJLVWHU\RXUQHZGLVKZDVKHUE\FOLFNLQJ
RQWKH´6XSSRUWµWDERUILOOLQJRXWWKHSURGXFWUHJLVWUDWLRQFDUG
HQFORVHGZLWK\RXUQHZXQLW
ZZZERVFKKRPHFRPXV86$
RU
ZZZERVFKKRPHFD&DQDGD
7ROHDUQPRUHDERXW\RXUGLVKZDVKHUDQGDYDLODEOHDFFHVVRULHVDV
ZHOODVPDQ\RWKHUWRSTXDOLW\%RVFKDSSOLDQFHVYLVLWRXUZHEVLWHDW
7KLVPDQXDOZDVZULWWHQZLWK\RXUVDIHW\DQGFRQYHQLHQFHLQPLQG
DQGWKHLQIRUPDWLRQFRQWDLQHGKHUHLQLVYHU\LPSRUWDQW:HKLJKO\
UHFRPPHQGWKDW\RXUHDGWKLVPDQXDOEHIRUHXVLQJ\RXUGLVKZDVKHU
IRUWKHILUVWWLPH
%6++RPH$SSOLDQFHV&RUSRUDWLRQ
0DLQ6WUHHW6XLWH
RUZULWHXVDW
,UYLQH&$

Safety Definitions en-us
5
( Safety Definitions
Safety Definitions
9 WARNING
This indicates that death or
serious injuries may occur as a
result of non-observance of this
warning.
9 CAUTION
This indicates that minor or
moderate injuries may occur as
a result of non-observance of
this warning.
NOTICE
This indicates that damage to the
appliance or property may occur as a
result of non-compliance with this
advisory.
Note: This alerts you to important
information and/or tips.

9
IMPORTANT SAFETY INSTRUCTIONS
READ AND SAVE THESE INSTRUCTIONS
6
( IMPORTANT SAFETY INSTRUCTIONS
IMPORTANT SAFETY INSTRUCTIONS
READ AND SAVE THESE INSTRUCTIONS
This dishwasher is provided with
Installation Instructions and this Use
and Care Manual. Read and
understand all instructions before
using the dishwasher.
This dishwasher is intended for use
up to a maximum altitude of
13,000 ft (4,000 meters) above sea
level.
To reduce the risk of fire, electrical
shock, or serious injury, observe the
following:
Risk of fire, electrical shock, or serious injury
9 WARNING
RISK OF INJURY OR DEATH!
Misuse of the dishwasher can
result in serious injury or death.
Do not use the dishwasher in
any way not covered in this
manual or for any purpose other
than those explained in the
following pages.
9 WARNING
RISK OF INJURY!
Severe injury and/or product
damage could result from the
use of unauthorized service
technicians or non-original
replacement parts. All repairs
must be performed by an
authorized service technician
using only original equipment
factory replacement parts.
9 WARNING
RISK OF ELECTRICAL SHOCK
OR FIRE!
Electrical shock or fire could
result if the electrical supply for
the dishwasher covered in this
manual is incorrectly installed or
if the dishwasher has been
improperly grounded. Do not
use the dishwasher covered in
this manual unless you are
certain the electrical supply has
been correctly installed and the
dishwasher has been properly
grounded.
9 WARNING
HEALTH HAZARD!
Never use harsh chemicals to
clean your dishwasher. Some
chloride-containing products
can damage your dishwasher
and may present health
hazards!

9
IMPORTANT SAFETY INSTRUCTIONS
READ AND SAVE THESE INSTRUCTIONS
7
GROUNDING INSTRUCTIONS
This appliance must be grounded to
a metal, permanent wiring system or
an equipment grounding conductor
must be run with the circuit
conductors and connected to the
equipment grounding terminal or
lead on the dishwasher. See the
Installation Instructions included with
this dishwasher for more information
on electrical requirements.
9 WARNING
RISK OF ELECTRIC SHOCK!
This appliance must be
grounded. In the event of a
malfunction or breakdown,
grounding will reduce the risk of
electric shock by providing a
path of least resistance for
electric current. This appliance
is equipped with a cord having
an equipment-grounding
conductor.
Improper connection of the
equipment-grounding conductor
can result in risk of electric
shock. Check with a qualified
electrician if you are in doubt
whether the appliance is
properly grounded.
Safe Operation
Use this dishwasher only for its
intended function, which is the
washing of household dishware and
kitchenware rated as dishwasher
safe.
Use only detergents or rinsing agents
recommended for use in a
dishwasher, and keep them out of
the reach of children.
9 CAUTION
When loading items to be
washed:
■ Locate sharp items so they
are not likely to damage the
door seal.
■ Load knives and other sharp
utensils with their HANDLES
UP to reduce the risk of
cut-type injuries.
■ Do not wash plastic items
unless they are marked
“dishwasher safe” or the
equivalent. For plastic items
not so marked, check the
manufacturer’s
recommendations.
■ Do not operate your
dishwasher unless all
enclosure panels are in
place.
■ Do not tamper with or
override controls and
interlocks.
Do not abuse, sit or stand on the
door or dish racks of the dishwasher.
9 WARNING
RISK OF INJURY!
To avoid risk of injury, always
use caution when opening the
door during or following a wash
cycle as hot water or steam
may escape. Do not fully open
the door until water noises have
stopped and steam has
subsided.
NSF/ANSI 184 Certified residential
dishwashers are not intended for
licensed food establishments.

9
IMPORTANT SAFETY INSTRUCTIONS
READ AND SAVE THESE INSTRUCTIONS
8
Child Safety
To reduce risk of injury, do not allow
children to play in or on the
dishwasher.
When children become old enough
to operate the appliance, it is the
responsibility of the parents/legal
guardians to ensure the children are
instructed in safe practices by
qualified persons.
Proper Care and Maintenance
9 WARNING
RISK OF EXPLOSION!
Under certain conditions,
hydrogen gas may be produced
in a hot water system that has
not been used for two weeks or
more. Hydrogen gas is
explosive. Before using a
dishwasher that is connected to
a hot water system that has
been unused for two weeks or
longer, turn on all hot water
faucets and let the water flow
from each for several minutes.
This will release any
accumulated hydrogen gas. As
the gas is explosive, do not
smoke or use an open flame
during this time.
Remove the dishwasher door to the
washing compartment when
removing an old dishwasher for
service or discarding.
To avoid floor damage and possible
mold growth, do not allow wet areas
to remain around or under the
dishwasher.
To avoid dishwasher damage, do not
allow water to remain in your
dishwasher systems through
extended periods of freezing
temperatures. Freezing temperatures
can damage the water fill valve and
potentially other components of your
dishwasher.
NOTICE
It is highly recommended for the end
user to become familiar with the
procedure to shut off the incoming
water supply and the procedure to
shut off the incoming power supply.
See the Installation Instructions or
contact your installer for more
information.
9 WARNING
STATE OF CALIFORNIA
PROPOSITION 65 WARNINGS!
This product contains one or
more chemicals known to the
State of California to cause
cancer, birth defects, or other
reproductive harm.

Causes of Damage en-us
9
ƒ Causes of Damage
Causes of Damage
NOTICES
■ Never use steam cleaning
products to clean your
dishwasher. The manufacturer will
not be liable for the possible
damages or consequences.
■ Bleach-based wipes can cause
stainless-steel doors and tubs to
rust.
■ Using harsh chemicals
(e.g. bleach), abrasive cleaners,
scouring pads (metal or plastic),
or abrasive cloths/paper towels
can damage your dishwasher’s
exterior door panel, fascia panel
and buttons.
■ To avoid dishwasher damage, do
not load the dishwasher with
paper products, plastic bags,
packing materials or anything
other than normal, dishwasher
safe dishware and kitchenware.
en-us Getting Started
10
* Getting Started
Getting Started
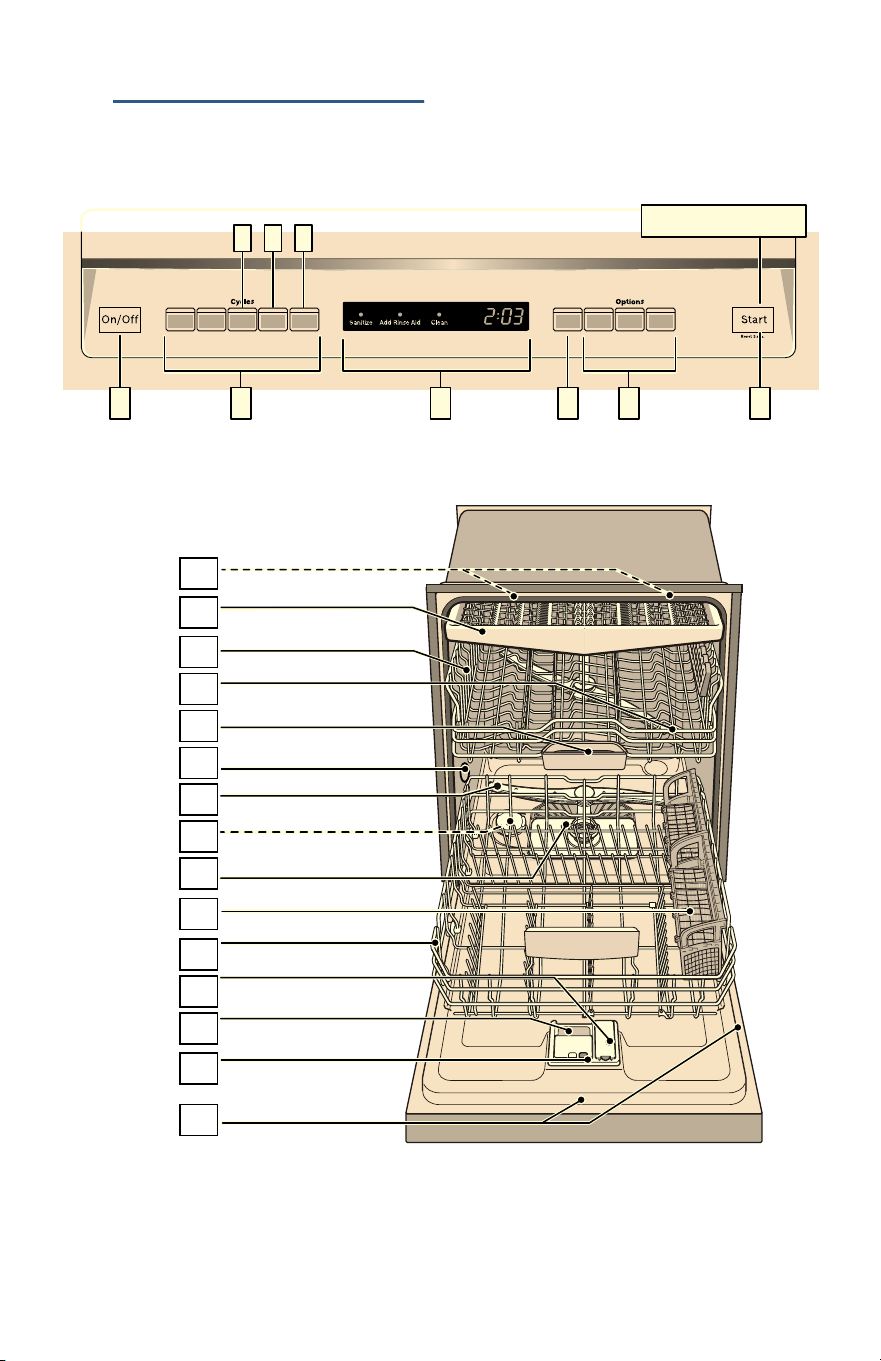
Appliance overview
The dotted lines show optional
features which may or may not be
included with your dishwasher.
5HVHWVHF
%
&
&KLOG/RFN
$

Getting Started en-us
11
The numbers stated below refer to
the overview images on the previous
page of this manual.
Operating panel
Dishwasher interior
components
* optional feature which may or may
not be included with your
dishwasher.
Display indicators
--------
Menu overview
The dishwasher has been preset with
certain settings for your convenience.
You can change these factory
settings.
Use the function keys #, + and
3 to change the settings.
--------
( On/Off button
0 Wash cycles
8 Digital display
@ Delay start button
H Wash cycle options
P Start button
1" Interior light *
1* Third rack
12 Upper rack
1: Upper spray arm
1B Detergent tab tray
1J Vent hole
1R Lower spray arm
1Z Dispenser for special salt*
1b Filters
1j Silverware basket
9" Lower rack
9* Rinse aid dispenser
92 Detergent dispenser
9: Lock for detergent dispenser
9B Rating plate
‹:‹‹
Cycle time remaining
Clean
Lights up when dishes are
clean
Sanitize
Lights up when sanitation
requirements are met
Add Rinse
Aid
Lights up when rinse aid is low
Setting Factory setting Description
§ Rinse aid
§:‹‹ - §:‹‡
§:‹† Amount of rinse aid affects drying. When using
Multitabs, select setting 0.
š Intensive drying
š:‹‹ - š:‹‚
š:‹‹ / Off Improved drying for glasses and plasticware.
˜ Auto power off
˜:‹‹ - ˜:‹ƒ
˜:‹‚ Dishwasher switches off automatically after wash
cycle is complete.
en-us Rinse Aid
12
, Rinse Aid
Rinse Aid
To achieve proper drying, always use
a liquid rinse aid, even if your
detergent contains a rinse aid or
drying additive.
Note: The dishwasher indicates low
rinse aid by turning on the Rinse Aid
indicator on the display 8. If this
indicator lights up, you need to refill
the rinse aid dispenser 9* by
following the directions below.
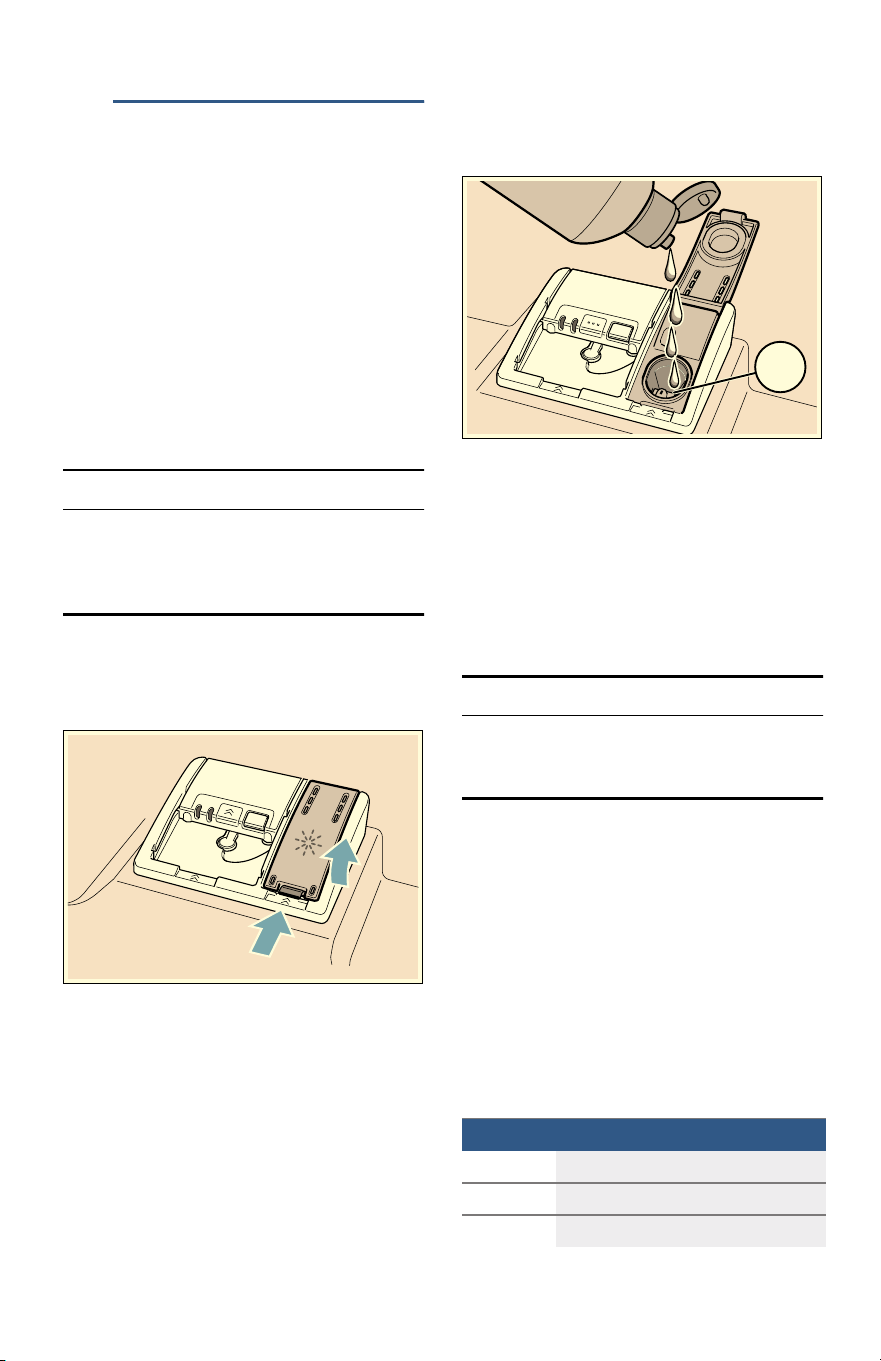
Adding rinse aid
NOTICE
To avoid oversudsing or clogging, do
not overfill the rinse aid
dispenser 9*. Wipe up any spills
with a damp cloth.
1.
Open the rinse aid dispenser 9*
by pressing on the latch of the lid
and pull it open.
2.
Add liquid rinse aid to the
dispenser 9* until it is full. Do
not overfill.
3.
Close the lid. Lid must be fully
closed until it clicks in order to
seal.
4.
Wipe up any excess rinse aid that
may have puddled when the
dispenser reservoir is full.
The indicator light will go out a few
moments after the dishwasher door
is shut.
NOTICE
Do not fill the rinse aid dispenser 9*
with detergent. Doing so will damage
the dishwasher.
Setting the amount of rinse
aid used
The amount of rinse aid dispensed
can be set from §:‹‹ to §:‹‡. The
factory setting is §:‹†.
You should only change the setting if
streaks remain on the dishes (lower
the amount), or if dishes are not
getting dry enough (increase the
amount).
Setting Amount
§:‹‹ dispenser is OFF
§:‹‚ lowest setting
§:‹ƒ low setting
PD[

Loading the Dishwasher en-us
13
1.
Press the On/Off button (.
2.
Hold down the function key #
and press the Start button P
until the display 8 indicates
š:‹x (x can be any number).
Release both buttons.
3.
Press the function key # until
the display 8 shows §:‹†.
4.
Press the function key 3 to
select the desired setting.
5.
Press the Start button P to
save the setting.
Turning off rinse aid
indicator
Proceed as described in the section
“Setting the amount of rinse aid
used” and set value to §:‹‹. The
rinse aid indicator is now turned off.
NOTICE
Using no rinse aid or setting the
dispenser to §:‹‹ may result in
longer cycle times consuming more
energy and water. The higher
temperatures and longer cycle times
can damage fine china or glassware.
- Loading the
Dishwasher
Loading the Dishwasher
Dishware material
Note: Before using your dishwasher
for the first time, check the
information in this section. Some
items are not dishwasher-safe and
should be hand washed; others
require special loading.
§:‹„ medium setting
§:‹… medium/high setting
§:‹† high setting
§:‹‡ highest setting
Setting Amount
Recommended
Aluminum Colored anodized aluminum
may fade over time.
Minerals in your water may
cause the aluminum to
darken or spot. This can
usually be removed with a
soap-filled steel wool pad.
China, Crystal,
Stoneware
Some hand-painted utensils
may discolor, fade or spot.
Hand wash these utensils.
Position fragile glassware so
that it will not topple over or
come in contact with other
utensils during the wash
cycle.
Glass Milk glass may discolor or
become yellow.
Non-stick
Coatings
Apply a light coating of
vegetable oil to non-stick
surfaces after drying.
Plastics Make sure the plasticware is
dishwasher-safe.
Stainless Steel,
Sterling Silver
and Silver
Plates
Load these so they do not
come in contact with other
metals, stainless steel
dishwasher tub walls or the
inner door.

en-us Loading the Dishwasher
14
Loading the racks
For best dishwashing results,
observe the following when loading
the dishwasher:
■ Do not pre-wash items with
loosely attached food soil.
■ Remove all food particles, bones,
toothpicks and excessive grease.
■ Pre-treat items having burned-on,
baked-on or starchy soils.
■ Load dishes in the dishwasher
racks so the insides of bowls,
pots and pans are facing the
spray arms.
■ Avoid nesting and contact points
between dishes.
■ Separate items of dissimilar
metals. Use care to not block
movement of the spray arms.
■ Only wash household dishware
and kitchenware rated as
dishwasher-safe.
Refer to the Dishware Materials
section for more information
about dishware suitability.
NOTICE
To avoid dishwasher damage, do not
load the dishwasher with paper
products, plastic bags, packing
materials or anything other than
normal, dishwasher safe dishware
and kitchenware.
Loading the upper rack
Ensure items do not protrude through
the bottom of the racks and block the
spray arms.
Note: When pushing the upper
rack 12 into the dishwasher, push it
until it stops against the back of the
tub so the upper rack spray
arm 1: connects to the water
supply at the back of the tub. Do not
push racks in using the door.
Loading the lower rack
Place large items in the lower
rack 9". Load pots, pans and bowls
upside down. Do not block the vent
hole 1J with tall baking sheets.
Load these items on the right side of
the dishwasher.
Not Recommended
Acrylic Crazing or small cracks
throughout the acrylic, may
occur.
Adhesive-
Joined Pieces
Adhesives that join
materials such as plastic,
wood, bone, steel, copper,
tin, etc. may loosen.
Bone-Handled
Utensils
Handles may separate.
Iron Iron will rust. Hand wash
and dry immediately.
Non-Dishware
Items
Your dishwasher is intended
for use in cleaning ONLY
standard household
dishware and kitchenware.
Pewter, Brass,
Bronze
These items will tarnish.
Hand wash and dry
immediately.
Tin Tin will stain. Hand wash
and dry immediately.
Wood Wooden bowls, wooden
utensils and utensils with
wooden handles can crack,
warp and lose their finish.
Loading the Dishwasher en-us
15
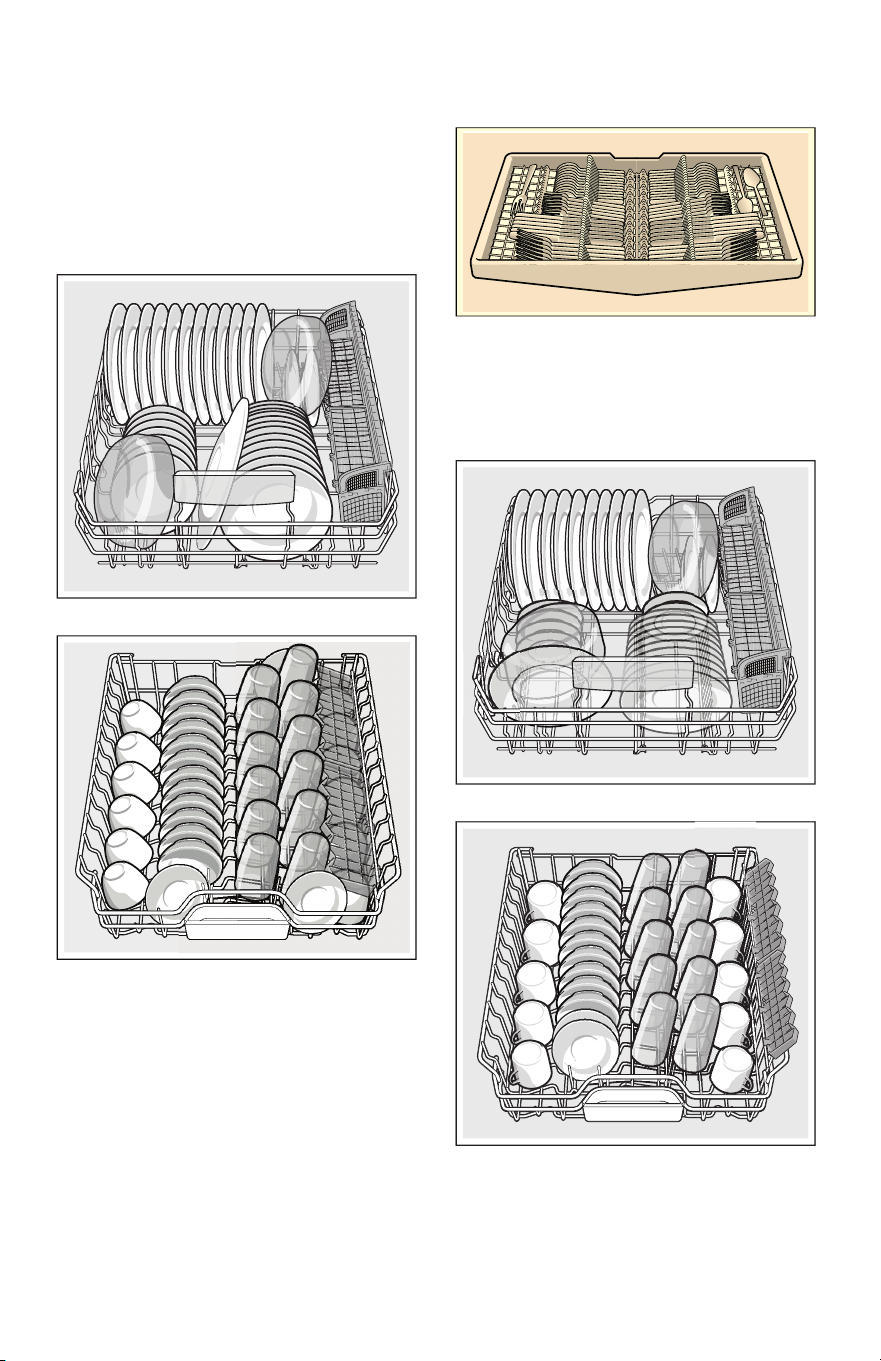
Recommended loading
pattern
For daily, regular or typical use
12 place setting
Lower rack 9"
Upper rack 12
Note: Folding the cup shelves down
will allow the cups to sit at an
increased angle and reduce water
pooling on cup bottoms.
Third rack 1*
Additional loading pattern
10 place setting
Lower rack 9"
Upper rack 12
Note: Folding the cup shelves down
will allow the cups to sit at an
increased angle and reduce water
pooling on cup bottoms.
en-us Loading the Dishwasher
16
Third rack 1*
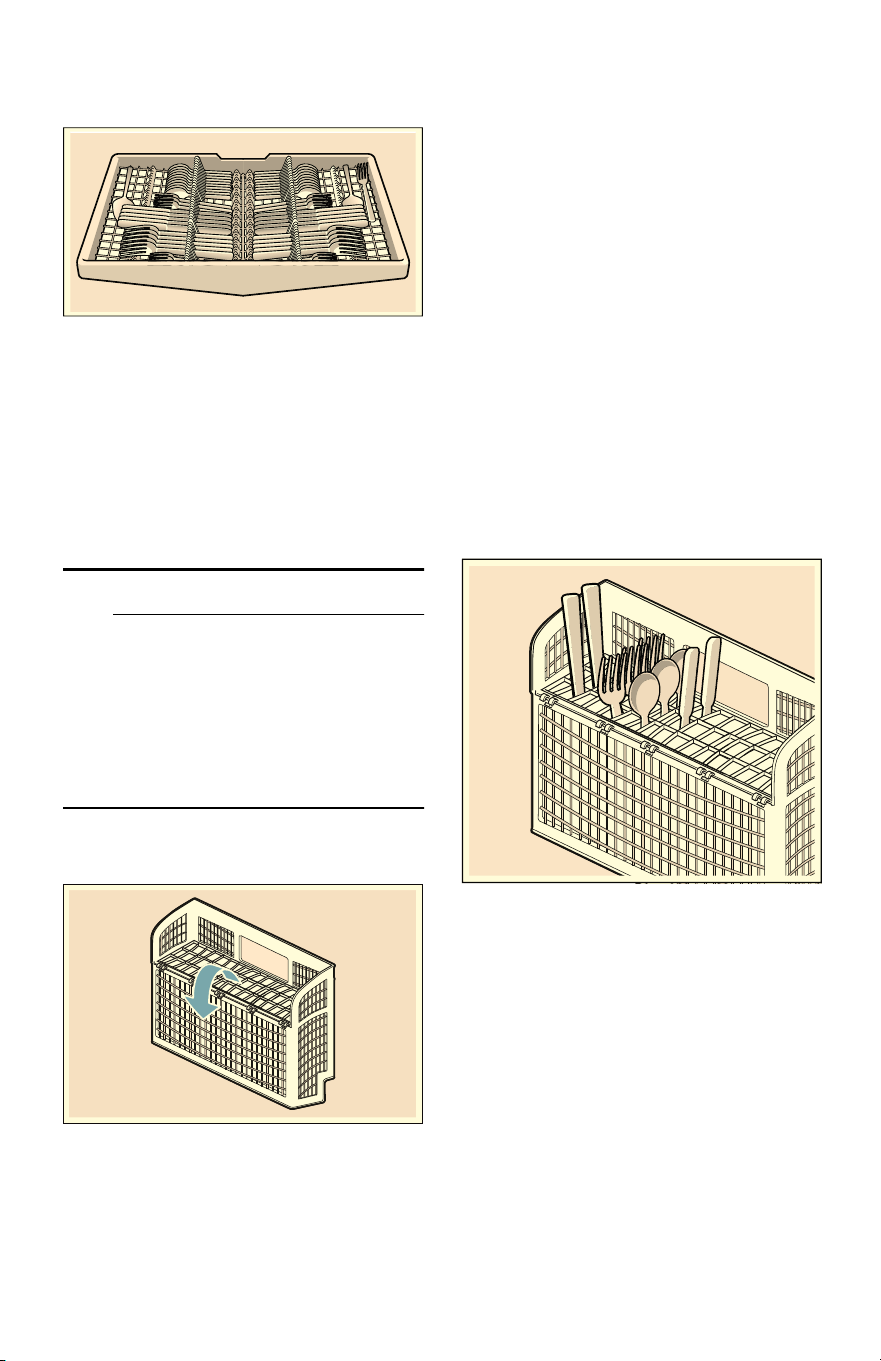
Loading the silverware
basket
Place knives and sharp utensils with
their handles up and forks and
spoons with their handles down. If
large or oddly-shaped items are
loaded in the silverware basket, be
sure they do not nest together.
9 WARNING
RISK OF INJURY!
The sharp points and edges of
knives and other sharp utensils
can cause serious injury. Load
knives and other sharp utensils
with edges down. Do not allow
children to handle or play near
knives and sharp utensils.
Long silverware basket
Note: The silverware basket lid may
also be folded downward in order to
leave the basket open.
This dishwasher is equipped with a
silverware drawer that should
accommodate most silverware
loading needs.
However, if you are washing while the
silverware drawer has been removed,
or with excess silverware, a
silverware basket is also included.
When loading the silverware basket
you should avoid excessive contact
points and nesting of similar items
(allowing two spons to rest inside
one another).
A good way to avoid excessive
contact points is to load the
silverware basket with the lids
closed, inserting each piece of
silverware into one of the individual
slots as shown.
Unloading the dishwasher
When unloading the dishwasher, to
prevent water from dripping onto dry
dishes, unload the lower
rack 9" first. Next, unload the
silverware basket 1j followed by
the upper rack 12, and then the
third rack (if equipped).
Note: Dishes are more likely to chip
when unloading before cooling.
Loading the Dishwasher en-us
17
Adjusting the height of the
rack
If required, the height of the upper
rack 12 can be adjusted to create
more space for taller utensils either in
the upper or lower rack.
Arrange large plates up to a diameter
of 13.4 in (34 cm) in the lower
basket 9" as illustrated.
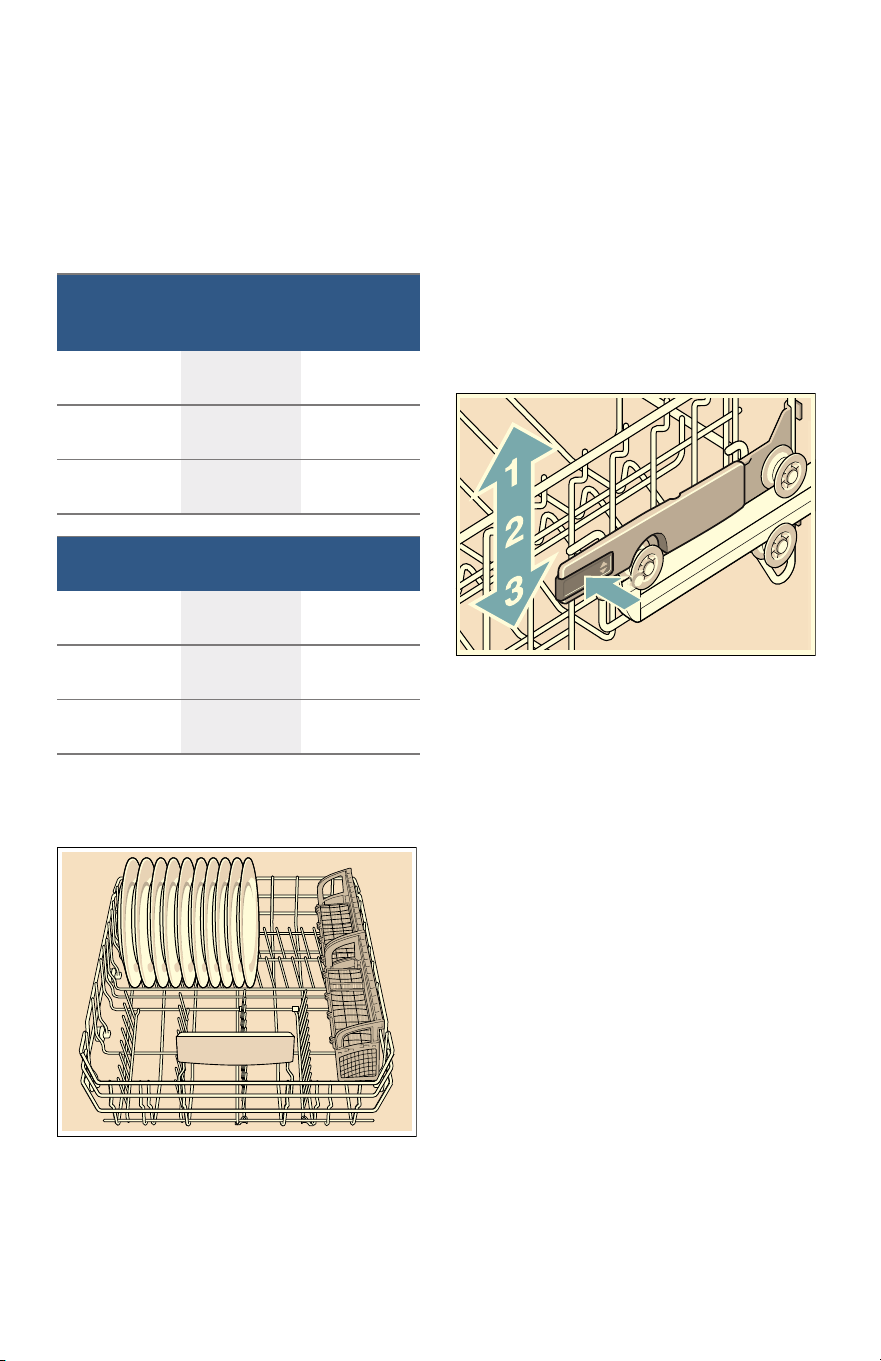
RackMatic
®
The height of the upper rack 12 can
be adjusted in 3 steps to create more
space.
1.
Pull the upper rack out of the
dishwasher until it stops.
2.
To lower the rack, push the
RackMatic® lever inward.
3.
To raise the rack, hold the basket
on the sides of the upper rack
and lift it up.
Note: Check spray arm for clearance
after adjustment.
With
silverware
basket
Upper rack Lower rack
Setting 1
max. ø
9.4 in
(24 cm)
13.4 in
(34 cm)
Setting 2
max. ø
10.4 in
(26.5 cm)
12 in
(30.5 cm)
Setting 3
max. ø
11.4 in
(29 cm)
11 in (28 cm)
With
third rack
Upper rack Lower rack
Setting 1
max. ø
7 in (18 cm) 13.4 in
(34 cm)
Setting 2
max. ø
8 in
(20.5 cm)
12 in
(30.5 cm)
Setting 3
max. ø
9 in
(23 cm)
11 in (28 cm)
en-us Loading the Dishwasher
18
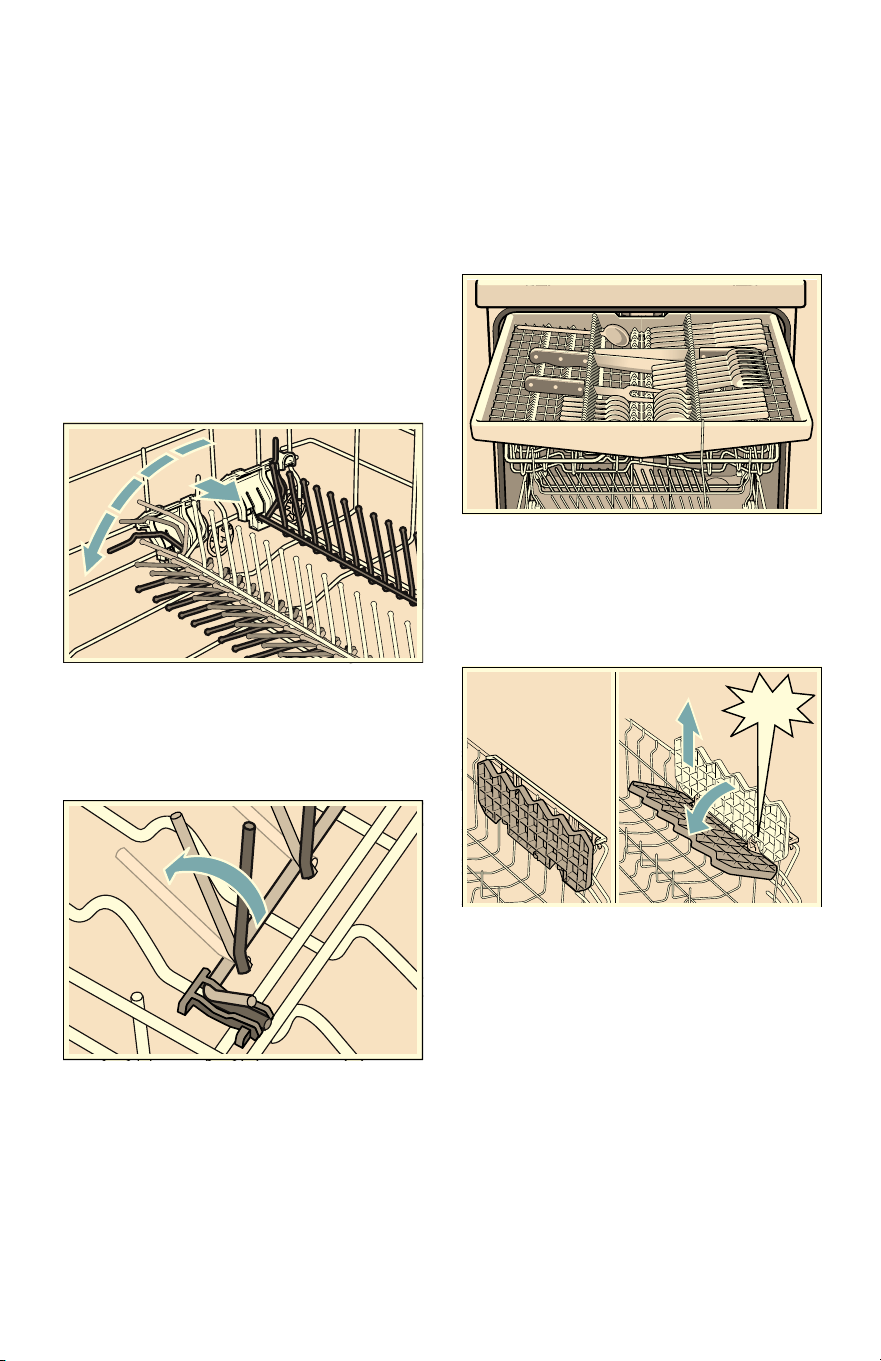
Rack accessories
Flip tines
The upper and lower rack are fitted
with flip tines that can be folded
down depending on what you may
need to load in the rack.
Lower rack flip tines: To fold down,
pull flip tine gently forward and
release it from the notch. Push the
flip tine downward. To fold up, push
flip tines into an upright position until
the holder engages in the notch.
Upper rack flip tines: To fold down,
push flip tines downward with gentle
pressure. To fold up, push flip tines
into an upright position until the
holder engages in the notch.
Third rack
The third rack 1* horizontally
positions knives, spatulas and other
oversized tools for improved cleaning
and easier loading and unloading.
Arrange cutlery in third rack as
illustrated.
Cup shelves
The cup shelves and the space
underneath them can be used for
small cups or for larger serving
utensils.
&/,&.
Loading the Dishwasher en-us
19
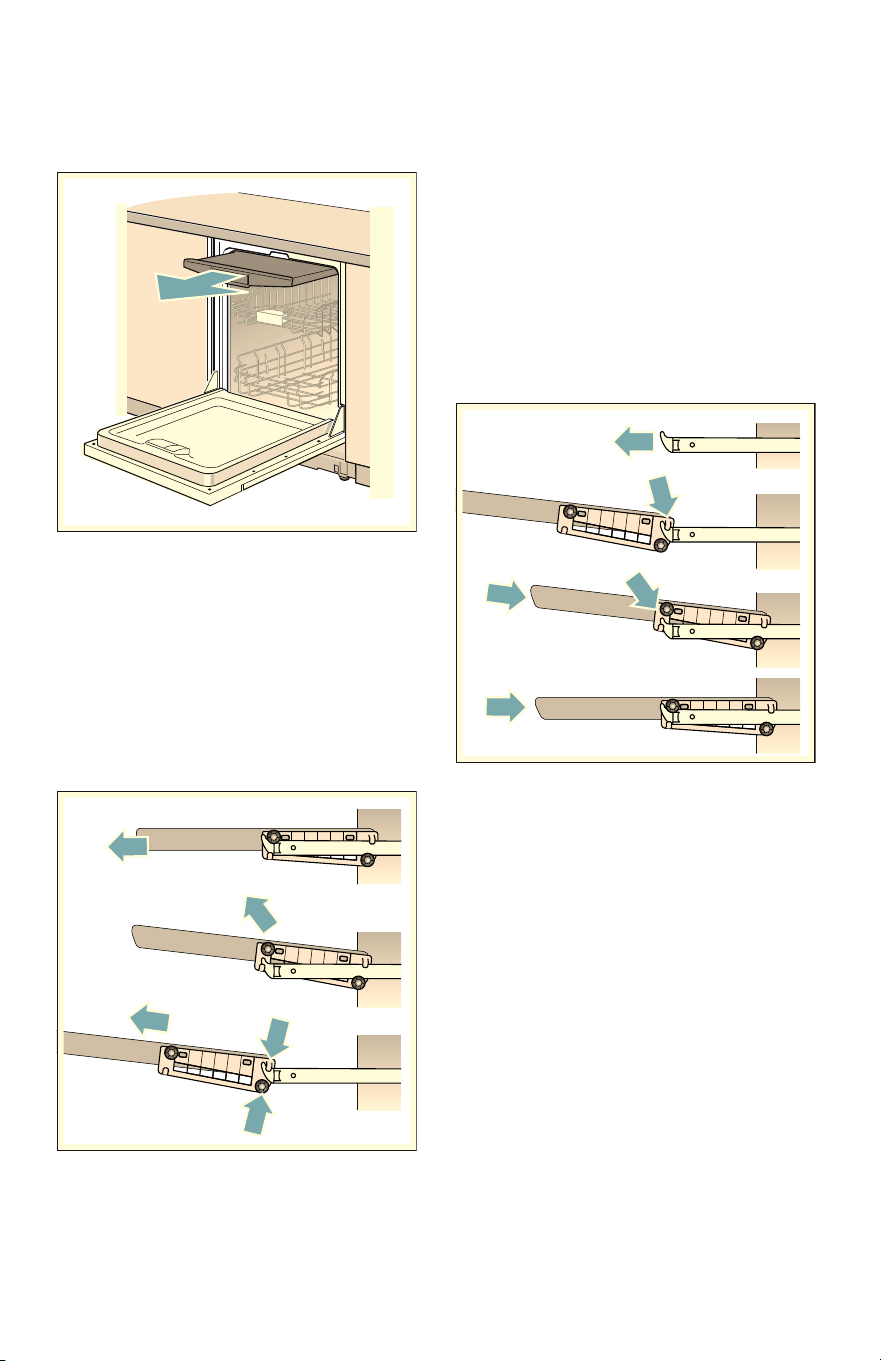
Removing/Installing third
rack
Removing third rack 1*
1.
Pull out third rack all the way (1).
2.
Lift upper rollers over the stopper
hooks of both rails (2).
3.
Pull third rack out forward and
upward so the the holding hooks
and the lower rollers of the rack
slide over the stopper hooks of
both rails (3).
Installing third rack 1*
1.
Pull out third rack rails all the
way (1).
2.
Insert third rack at an angle. Make
sure that the stopper hooks of
both rails slide in between the
holding hooks and the lower
rollers of the third rack (2).
3.
Slide third rack in and lift the
upper rollers over the front
stopper hooks of both rails (3).
4.
Push in third rack (4).

en-us Loading the Dishwasher
20
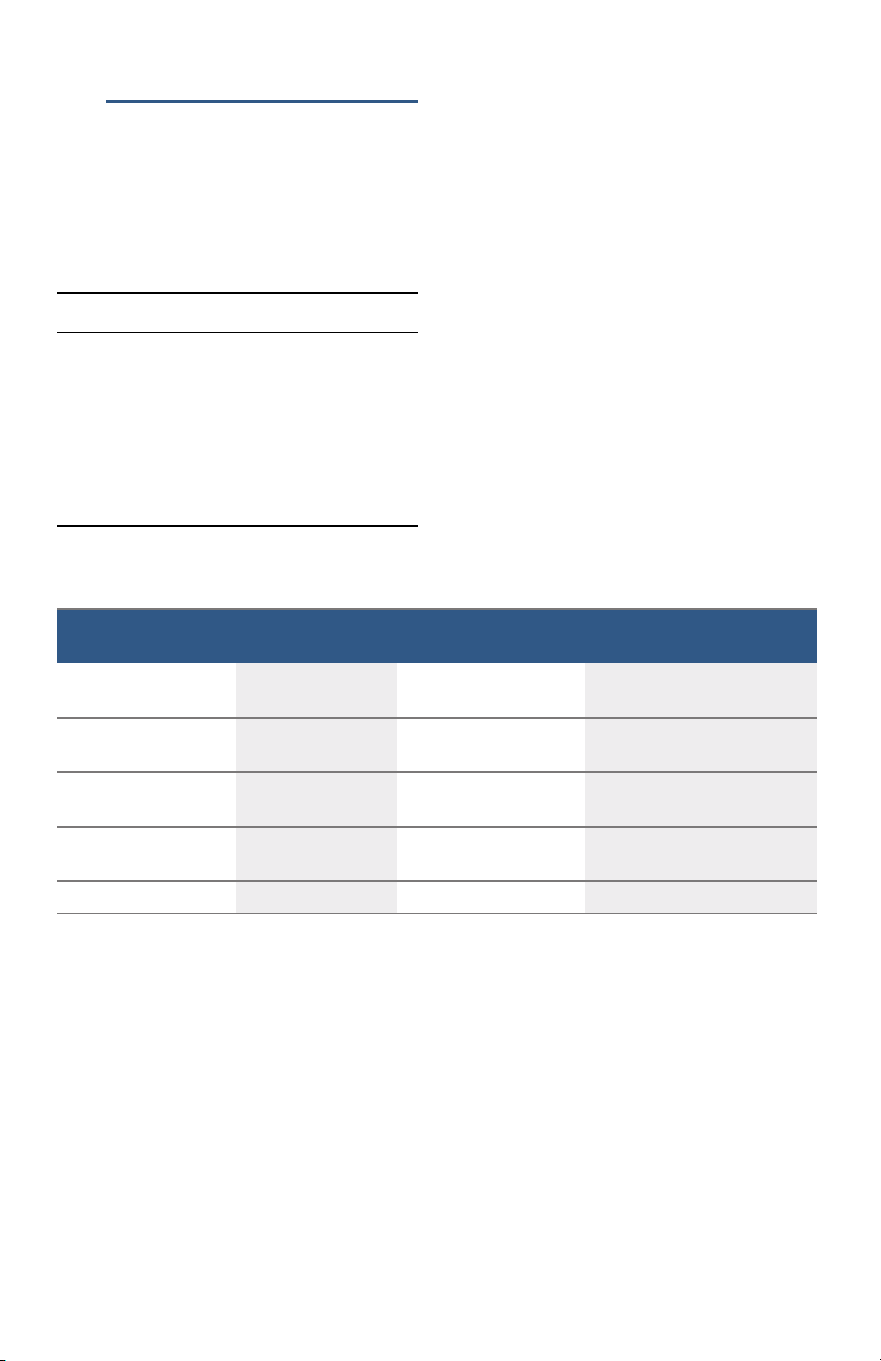
Removing/Installing upper
rack with Rackmatic
®
Removing upper rack 12
1.
Pull out upper rack all the way (1).
2.
Lift front rollers over the stopper
hook of the rail (2).
3.
Pull out upper rack forwards and
upwards so that the upper and
lower rollers of the rack slide over
the stopper hooks of both
rails (3).
Installing upper rack 12
1.
Pull out upper rack rails all the
way (1).
2.
Insert upper rack at an angle.
Make sure that the stopper hooks
of both rails slide in between the
upper and lower rollers on the
rear side of the rack (2).
3.
Slide upper rack in and lift the
upper rollers over the front
stopper hooks of both rails (3).
4.
Push in upper rack (4).
Detergent en-us
21
. Detergent
Detergent
Use only detergent specifically
designed for dishwashers. For best
results, use fresh powdered
dishwashing detergent or detergent
tabs.
NOTICE
To avoid dishwasher damage:
■ Do not use hand dishwashing
products in your dishwasher.
■ Do not use too much detergent if
your water is soft. Using too much
detergent with soft water may
cause etching in glassware and
fine china.
This dishwasher uses less water than
most, therefore, less detergent is
required. With soft water,
1 tablespoon (15 ml) of detergent
will clean most loads. The detergent
dispenser cup has lines that measure
detergent to 1 tablespoon (15 ml)
and 1.75 tablespoons (25 ml).
3 tablespoons (45 ml) of detergent
will completely fill the detergent
dispenser.
Note: If you do not know the
hardness of your water supply, use
15 ml of detergent. Increase the
amount if necessary to the least
amount required to get your
kitchenware clean.
Use the measuring lines in the
detergent dispenser cup as a guide
to measure the amount of detergent
recommended in the following table.
Wash Cycle Hard Water/
Heavy Soil
Medium Water/
Medium Soil
Soft Water/
Little Soil
Heavy 3 tbsp
(45 ml)
3 tbsp
(45 ml)
1.75 - 3 tbsp
(25 - 45 ml)
Auto 1.75 - 3 tbsp
(25 - 45 ml)
1.75 tbsp
(25 ml)
1 - 1.75 tbsp
(15 - 25 ml)
Normal 1.75 - 3 tbsp
(25 - 45 ml)
1.75 tbsp
(25 ml)
1 - 1.75 tbsp
(15 - 25 ml)
Speed60
®
1.75 tbsp
(25 ml)
1 - 1.75 tbsp
(15 - 25 ml)
1 tbsp
(15 ml)
Rinse none none none
en-us Detergent
22
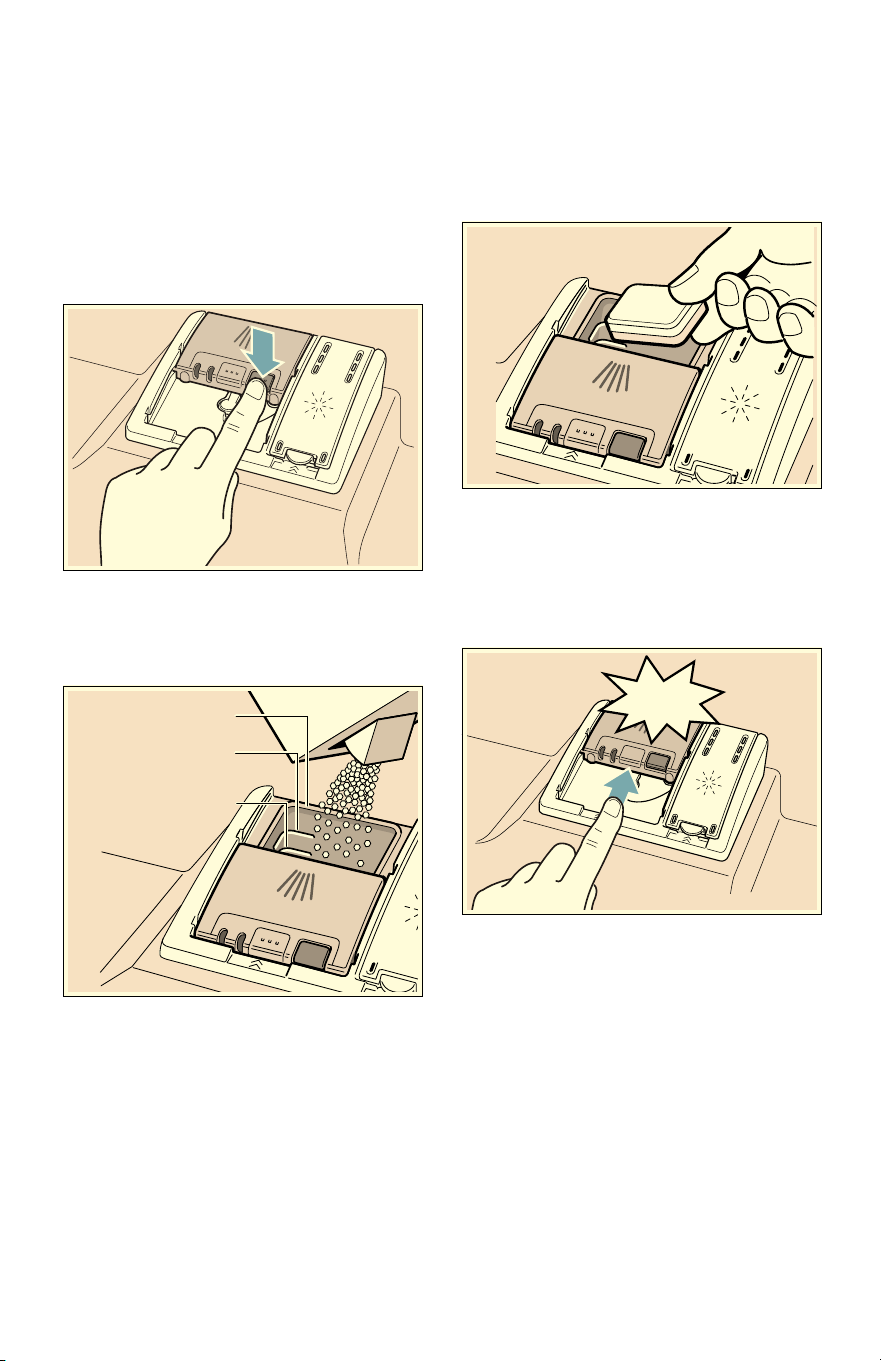
Adding detergent
1.
If the detergent dispenser 92 is
still closed, actuate the locking
bar 9: to open it.
Note: Make sure the detergent
dispenser is dry and clear of
detergent residue.
2.
Pour detergent into the dry
detergent dispenser 92 only.
Add detergent. Do not overfill the
detergent dispenser.
When using detergent tabs, lay
them such that they do not come
in contact with the cover, insert a
detergent tab flat, not on its side.
Note: Do not place detergent
tabs or utensils in the detergent
tab tray 1B. Place tabs or other
detergent forms directly in the
detergent dispenser 92.
Dosage: see manufacturer’s
instructions on the packaging.
3.
Close the lid by placing the finger
on the lid as shown. Slide the lid
closed and press down firmly until
it clicks.
The detergent dispenser will open
automatically at the ideal time for
the set cycle. The powder or liquid
detergent is distributed in the
appliance and is dissolved,
detergent tabs will fall into the
detergent tab tray 1B where it
dissolves during the cycle.
Tip: If the dishware is only lightly
soiled, slightly less than the indicated
amount of detergent is usually
adequate.
WEVSPO
WEVSPO
PD[
WEVSPO
&/,&.

Dishwasher Cycles en-us
23
/ Dishwasher Cycles
Dishwasher Cycles
Note: The Energy Guide label was based on the Normal soil sensing cycle as
follows: The unit was tested without any rinse aid (liquid) in the rinse aid
dispenser 9*. A single dose of detergent was inserted into the detergent
dispenser 92, with no detergent being used in the prewash. The unit was not
subjected to truncated testing per the definitions in the test procedure. We
recommend that dish loads such as the one in the energy certification test
have the rack position set in the highest position.
Wash cycle Recommended use Possible wash cycle option
Heavy Best for cleaning items with baked-on
food or grease. These dishes would
normally require soaking or hand
scouring.
all
Auto Smartest cycle, with most flexible soil
sensing, which is ideal for mixed dishware
and food soils.
all
Normal
(see note at
bottom of table)
Recommended for daily, regular or typical
use to completely wash a full load of
normally soiled dishes.
all
Note: In order to obtain optimal
performance with minimum energy
consumption, it is recommended to
disable all available options and
settings, except Auto Power Off - set
to ˜:‹‚~ "Auto power off"
on page 27
Speed60
®
Cleans freshly soiled dishes with easy to
remove soils.
This cycle reduces cycle time while still
including drying.
Delay
Extra Dry
®
Rinse Use this cycle if you need to pre-rinse
dishes to avoid odors. Place unrinsed
dishes inside the dishwasher and select
the Rinse cycle. Uses less water than
hand rinsing and very low energy.
Delay

en-us Dishwasher Cycle Options
24
0 Dishwasher Cycle
Options
Dishwasher Cycle Options
Delay
Allows you to delay the start time of
your dishwasher up to 24 hours.
Half Load
Can reduce water consumption when
washing small, lightly soiled loads
that fill approximately half of the
dishwasher’s capacity.
Sanitize
Increases the temperatures and
retains them for an extra long time to
obtain a defined disinfecting
performance. Continuous use of this
function increases the hygiene status.
This additional option is ideal for
cleaning items such as chopping
boards and baby bottles.
Using the Sanitize option may also
improve drying. The cycle time and
energy usage may be increased.
Extra Dry
Used in combination with a wash
cycle (except Rinse), the Extra Dry
option raises the temperature and
extends the drying time to further
enhance drying results and provide a
brilliant shine. The energy usage may
be increased.
Wash Cycle Information
To save energy, this dishwasher has
EcoSense where the sensors in the
dishwasher automatically adjust the
cycle length, temperature and water
changes based on the amount of
food soil and the incoming water
temperature. The “Smart Control”
makes decisions that can cause the
cycle time and water usage to adjust
intermittently. Wash cycle times are
based on 120°F (49° C) water
supply. If your household water
supply is different than 120°F
(49° C), your dishwasher’s cycle
times may be impacted.
Heavy Auto Normal
Speed60
®
Rinse
Cycle time
min.
110 - 135 105 - 129 130 - 135 60 9
Water usage
gal/L
4.9-6.4/
18.6-24.2
3.4-6.4/
12.9-24.1
2.3-5.5/
8.8-21.0
3.8/
14.3
1.1/
4.1
Wash temp.
°F/°C
151-160/
66-71
127-131/
53-55
113-131/
45-55
122/
50
in-
coming
Rinse temp.
°F/°C
162/
72
153-162/
67-72
156/
69
158/
70
in-
coming

Dishwasher Cycle Options en-us
25
Note: Only sanitizing cycles have been designed to meet the requirements of
Section 6 of the NSF/ANSI Standard for Residential Equipment for soil removal
and sanitization efficacy. There is no intention, either directly or indirectly, to
imply that all cycles have passed sanitization performance tests.
Half Load
Cycle time
min.
114 90-105 90-99 N/A N/A
Water usage
gal/L
4.7/
17.9
2.7-4.4/
10.2-16.5
2.8-3.7/
10.8-13.9
N/A N/A
Rinse temp.
°F/°C
162/
72
131-151
55-60
162/
72
N/A N/A
Sanitize
Cycle time
min.
130-150 125-150 135-155 N/A N/A
Water usage
gal/L
4.9-6.4/
18.6-24.2
3.4-6.4/
12.9-24.1
2.3-5.5/
8.8-21.0
N/A N/A
Rinse temp.
°F/°C
162/
72
162/
72
162/
72
N/A N/A
Extra Dry
Cycle time
min.
130-150 125-150 135-155 60 N/A
Water usage
gal/L
4.9-6.4/
18.6-24.2
3.5-6.5/
13.1-24.5
2.4-5.5/
8.8-20.8
3.8/
14.3
N/A
Rinse temp.
°F/°C
162/
72
162/
72
162/
72
158/
60
N/A
Heavy Auto Normal
Speed60
®
Rinse

en-us Operating the Dishwasher
26
1 Operating the
Dishwasher
Operating the Dishwasher
9 WARNING
RISK OF INJURY!
To avoid risk of injury, always
use caution when opening the
door during or following a wash
cycle as hot water or steam
may escape. Do not fully open
the door until water noises have
stopped and steam has
subsided.
Protection against
unintentional operation
Your dishwasher is equipped with a
function that helps to prevent
unintentional operation (e.g. by
children).
After setting the dishwasher, the
dishwasher door has to be closed
within 4 seconds, otherwise the
operation will be paused. There will
be a signal on the control panel
advising you to press the Start button
again and close the door.
This function will be activated when:
■ pressing Start to begin a wash
cycle
■ setting Delay time and pressing
Start
■ opening the door while Delay time
is active
■ opening the door during a wash
cycle.
Note: This function cannot be
deactivated.
Operating the touch buttons
Buttons are sensitive and should be
touched gently. Avoid any grease or
food particles resting on the buttons
as they could activate the
dishwasher.
Wiping and cleaning can also
activate the dishwasher. For best
results, use bare, clean hands when
touching the buttons.
To clean the touch buttons wipe them
with a dry or slightly damp cloth.
AquaSensor
AquaSensor
The AquaSensor is an optical
measuring device which measures
the cleanliness of the rinse water.
The AquaSensor is used according
to the wash cycle. If the AquaSensor
is active, “clean” rinse water can be
transferred to the next rinse and
water consumption can be reduced
by 0.8–1-5 gal (3–6 liters). If the
rinse water is not yet clear, the water
is drained and is replaced with fresh
water. In the automatic wash cycles
the temperature and running time
can also be adjusted to the degree of
soiling.

Operating the Dishwasher en-us
27
Switching the appliance on
1.
Turn the water supply on fully.
2.
Press the On/Off button (.
The AUTO wash cycle has been
preset as a default whenever the
appliance starts. This wash cycle
remains selected if no other wash
cycle button 0 is pressed.
Select any desired option.
3.
Press Start button P.
Wash cycle sequence starts.
Note: Your dishwasher is protected
against unintentional operation. If the
appliance door remains open for
more than 4 seconds after pressing
the Start button, the operation will be
paused. Close the appliance door
and press the Start button P again.
Time display
When a wash cycle is selected the
remaining wash cycle time is shown
on the display 8.
The wash cycle time is determined
during the wash cycle by the water
temperature, the amount of dishes,
as well as the degree of soiling and
may vary (depending on the selected
wash cycle).
Delay start
You can delay the start of the cycle in
one hour increments up to 24 hours.
To set Delay start:
1.
Press On/Off button (. Select a
cycle.
2.
Press Delay button @ until the
displayed time corresponds with
your requirements.
3.
Press Start button P to activate
Delay start.
To cancel Delay start:
1.
Press Delay button @ until œ:‹‹
is indicated on the digital
display 8.
2.
Press Start button P to save
setting.
Note: Your dishwasher is protected
against unintentional operation. If the
appliance door remains open for
more than 4 seconds after pressing
the Start button, the operation will be
paused. Close the appliance door
and press the Start button P again.
Wash cycle end
The wash cycle has ended when the
display 8 reads ‹:‹‹.
Auto power off
This setting determines the length of
time the control panel stays
illuminated after the cycle is
complete. To save energy the
recommended setting is ˜:‹‚.
This setting can be adjusted from
˜:‹‹ to ˜:‹ƒ.
To change the setting:
1.
Press the On/Off button (.
2.
Hold down the function key #
and press the Start button P
until the display 8 indicates
š:‹x (x can be any number).
3.
Release both buttons.
4.
Press the function key # until
the display 8 indicates ˜:‹x.
5.
Press the function key 3 until
the display corresponds with your
requirements.
6.
Press the Start button P.
œ:‹‚ 1 hour delay
œ:ƒ… 24 hours delay
˜:‹‹ dishwasher does not turn off
automatically
˜:‹‚ dishwasher turns off
automatically after 1 minute
˜:‹ƒ dishwasher turns off
automatically after
120 minutes (2 hours)

en-us Operating the Dishwasher
28
Switching off the appliance
Short time after the end of the wash
cycle:
1.
Press On/Off button (.
2.
Turn off water supply.
3.
Remove the utensils when they
have cooled down.
9 WARNING
RISK OF INJURY!
To avoid risk of injury, always
use caution when opening the
door during or following a wash
cycle as hot water or steam
may escape. Do not fully open
the door until water noises have
stopped and steam has
subsided.
Interrupting the wash cycle
9 CAUTION
Expansion (overpressure) may
cause the appliance door to
open and/or water to escape! If
the door was opened on an
appliance which has a hot water
connection or is heated, always
leave the door ajar for several
minutes and then close.
1.
Press On/Off button (.
The LED’s go out. The wash cycle
is saved.
2.
To continue the wash cycle, close
the door and press On/Off button
( again.
Note: Your dishwasher is protected
against unintentional operation. If the
appliance door remains open for
more than 4 seconds after pressing
the Start button, the operation will be
paused. Close the appliance door
and press the Start button P again.
Terminating the wash cycle
(Reset)
Terminating the wash cycle
1.
Press and hold Start button P
for approximately 3 seconds until
the display reads ‹:‹‚.
2.
Wait about 1 minute while the
dishwasher drains.
3.
Press On/Off button (.
You may now power the dishwasher
back on and begin a new cycle if
desired.
Changing the wash cycle
When the Start button ( has been
pressed, the wash cycle cannot be
changed. The only way a wash cycle
can be changed is by terminating the
wash cycle (Reset).
Child Lock (panel lock)
The child lock will lock the panel
while the dishwasher is in operation
to prevent that a wash cycle is
interrupted unintenionally (e.g. by
children).
To set the panel lock:
1.
Start the desired wash cycle.
2.
Hold down the button that says
‘Child Lock’ underneath it for
approximately 3 seconds until the
display reads ’–.
The panel lock is active.
’– will be indicated now if any button
is pressed and the program will not
be reset.
To deactivate the panel lock hold
down the button that says ‘Child
Lock’ underneath it for approximately
3 seconds until the display no longer
reads ’–.
The panel lock is deactivated
automatically when the wash cycle is
completed. In case of a power
outage the panel lock will remain
active. The panel lock has to be
activated with each new wash cycle.

Care and Maintenance en-us
29
Intensive drying
The final rinse uses a higher
temperature which improves the
drying result. The cycle time and
energy usage may be increased.
(Caution if utensils are delicate!)
This feature has two settings:
1.
Press the On/Off button (.
2.
Hold down function key # and
press Start button P until the
display 8 indicates š:x (x can
be any number).
3.
Release both buttons.
4.
Press function key # until the
display 8 indicates the factory
set value š:‹‹.
5.
Press function key 3 to switch
the intensive drying feature on
š:‹‚ or off š:‹‹.
6.
Press Start button P to save
setting.
2 Care and
Maintenance
Care and Maintenance
A regular inspection and
maintenance of your machine will
help to prevent faults. This saves time
and prevents future problems.
Overall condition of the
dishwasher
NOTICE
■ Never use a steam cleaner to
clean your dishwasher. The
manufacturer is not liable for any
resulting damage.
■ Regularly wipe the front of the
appliance with a damp cloth -
water and a small amount of
liquid soap is adequate. Do not
use sponges as they could
scratch the surfaces.
■ Do not use bleach-based wipes
as they could damage the surface
or printing.
■ Stainless steel appliances: To
prevent corrosion, do not use
sponges or chlorine based
cleaners. Use a stainless steel
polish to seal and protect the
surface. Do not use chlorine
based cleaners or wipes.
■ Clean the outer edges of the
inside door panel regularly to
remove debris that may collect
from normal loading. If spots
begin to appear on the stainless
steel, make sure the rinse agent is
full and functioning properly.
■ Clean the door seal regularly with
a damp cloth to remove food
particles that may collect from
normal loading and cause odor. A
soiled door seal may not seal
properly.
š:‹‹ Off
š:‹‚ On
en-us Care and Maintenance
30
9 WARNING
Use caution when removing
parts for cleaning as some
debris may be sharp.
Filters
The Bosch
®
filter system 1b is
designed to prevent the need to
pre-rinse normally attached food soils
from your dishes. Simply scrape
leftover food soils off of dishware
before loading. This process will
conserve time, water and the energy
require to heat your household water
supply.
Your dishwasher filter system is
designed to filter 100% of the water
entering the spray arms to provide a
continuous supply of clean water to
remove food soils from your
dishware.
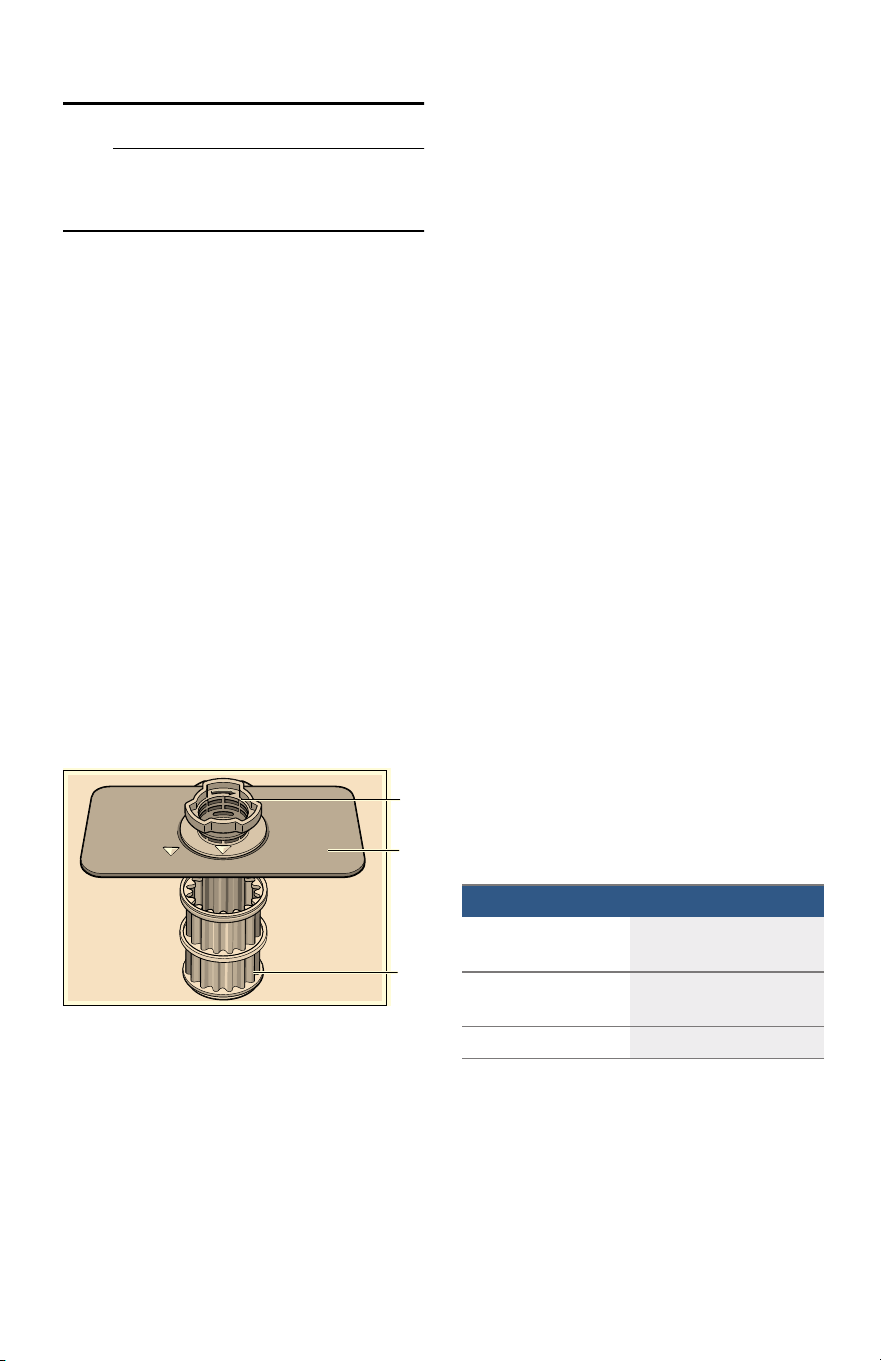
Filter components
The filter system 1b consists of
three parts.
Cleaning intervals
The filter system 1b is designed to
minimize maintenance while
providing premium cleaning
performance and minimum energy
consumption.
Depending on use habits and water
hardness, the filter system will require
some maintenance to sustain
premium cleaning performance.
Your filter system may need to be
cleaned when:
■ You notice food soils remaining
on the filter system or objects
trapped in the Large Object Trap.
■ A drop in cleaning performance
or a gritty film forms on the
dishware.
When washing normally attached
food soils that have been scraped
before loading, in a household that
runs the dishwasher every other day,
your filter should be cleaned:
Note: Clean the filter after washing
loads with large amounts of food
soils or loads with a heavy starch
content, like potatoes and pasta, to
maintain optimal performance.
A Large Object Trap
Prevents objects that should not
be placed in your dishwasher
from damaging the dishwasher
pump system or clogging your
household drain.
$
%
&
B Flat Fine Filter
Prevents food particles from
entering the wash chamber and
directs particles toward the micro
filter.
C Micro Filter
Directs the smallest of particles
to the household plumbing drain.
Cleaning interval Use this setting,
3-6 times a year if you rinse before
loading
4-12 times a year if you only scrape
before loading
12 times a year if you have hard water
Care and Maintenance en-us
31
To check or clean the filter system:
1.
Unscrew the Large Object Trap as
illustrated and remove the entire
filter system.
2.
Remove any residue and clean
filters by rinsing under running
water. Note: do not use abrasive
brushes or steel wool, etc., as
they may damage the filter.
3.
Reinstall the filter system in
reverse sequence and lock into
place by screwing the Large
Object Trap until the marking
arrows align.
Spray arms
Check spray arms 1:, 1R for
grease and limescale deposits. If you
find such deposits:
■ Fill detergent dispenser 92 with
detergent and start the appliance
without utensils in the cycle with
the highest rinsing temperature.
~ "Wash Cycle Information"
on page 24
■ Clean the appliance with
detergents/appliance cleaners
which are particularly suitable for
use with dishwashers.
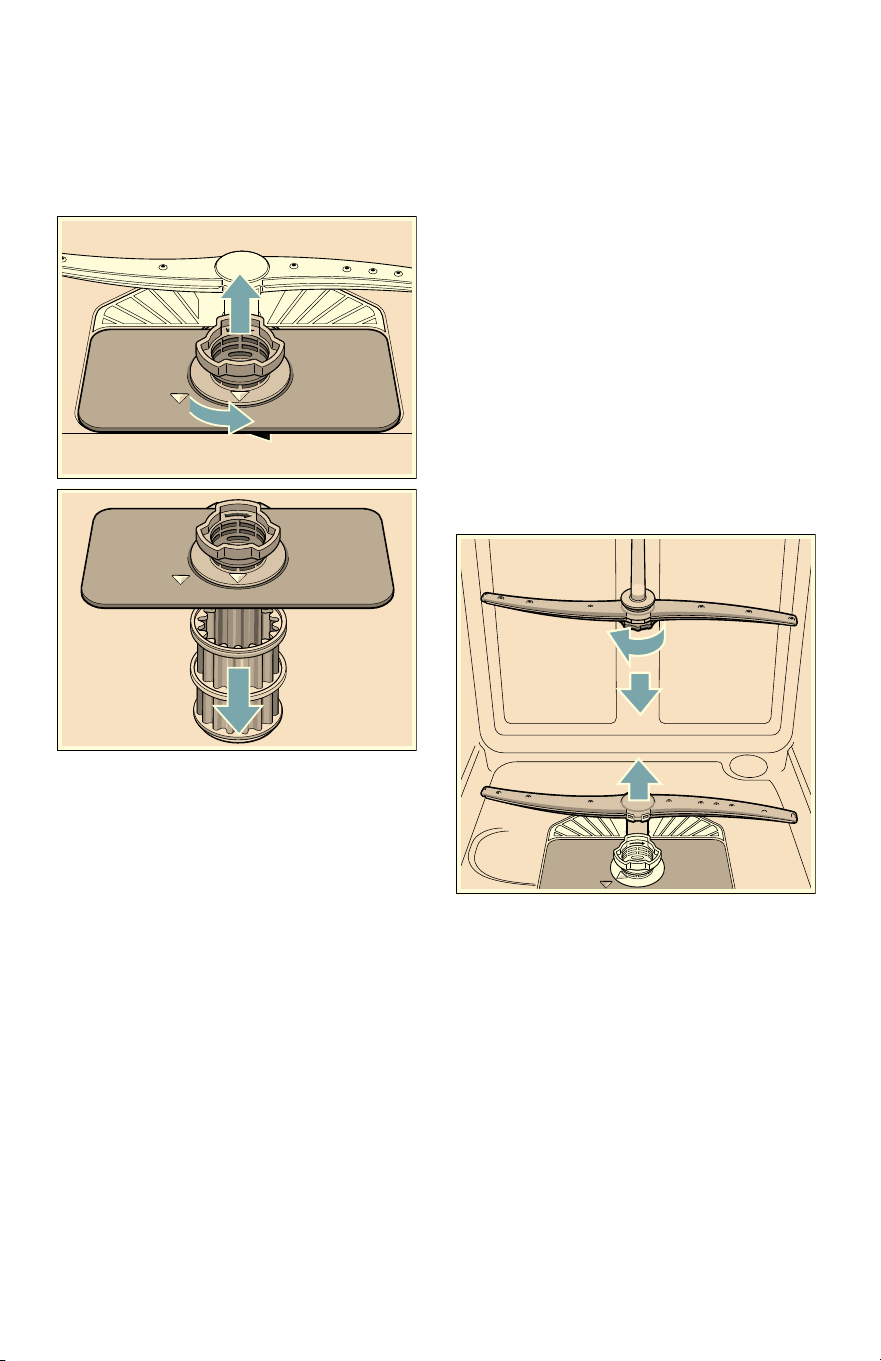
■ Unscrew the upper spray arm
1: and pull off the lower spray
1R arm as shown. Inspect for
deposits.
en-us Care and Maintenance
32
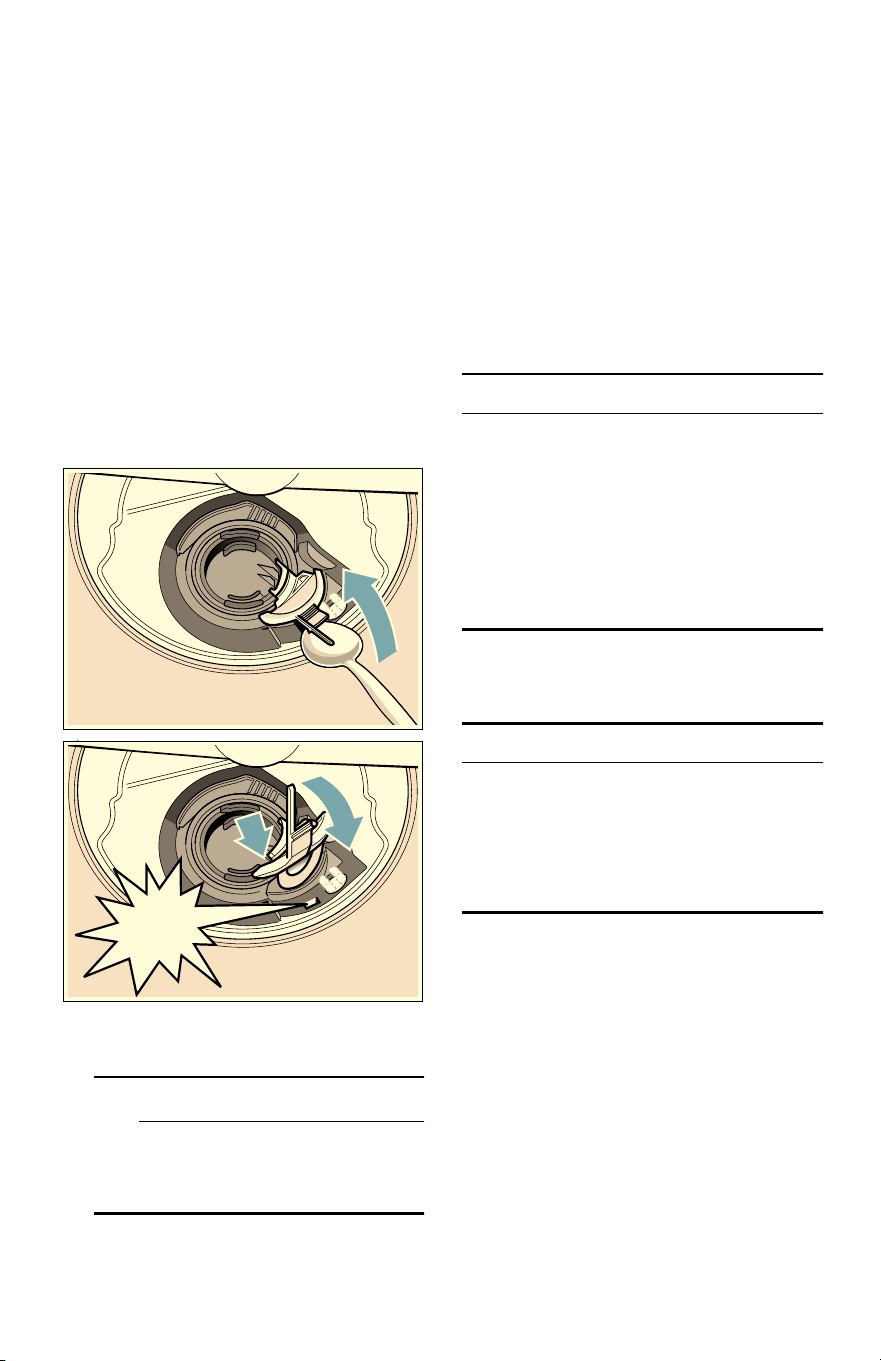
Drain pump
Large food remnants in the rinsing
water not retained by the filters may
block the waste water pump. In this
case:
■ Disconnect the appliance from the
power supply.
■ Remove the filters. ~ "Filters"
on page 30
■ Scoop out standing water - use a
sponge if necessary.
■ Using a spoon, pry off the pump
cover until it clicks, then grip the
cover and pull upward until it
resists and then pull forward.
■ Check inner compartment and
remove any foreign objects.
9 WARNING
Use caution when removing
parts for cleaning as some
debris may be sharp.
■ Place cover in the original
position, press down and engage.
■ Reinstall filters.
Note: The drain pump will not work
properly if the drain pump cover is
not snapped in completely until it
clicks.
Preparing your unit for
vacation
NOTICE
Before leaving for vacation during
warmer weather, besides turning off
the main valve, also turn off water
supply at the nearest point to the
dishwasher. Do not leave soiled
dishware in unit and leave door
slightly open. During colder weather,
please follow the instructions for
winterizing your unit below.
Winterizing your unit
NOTICE
If your dishwasher will be unused for
a period of time in a location that
experiences freezing temperatures
(holiday home or through a vacation
period), have your dishwasher
winterized by a professional service.
&OLFN
Troubleshooting en-us
33
3 Troubleshooting
Troubleshooting
Dishwashers may occasionally
exhibit problems that are unrelated to
a malfunction of the dishwasher itself.
The following information may help
you with a dishwasher problem
without involving a repair
professional.
Problem Cause Action
Dishwasher
does not start
Door may not be properly latched. Shut the door completely until you hear a
click.
Dishwasher may not be turned on. Press the main power switch ( to turn
dishwasher on.
Dishwasher not reset or previous
cycle not completed.
Reset the dishwasher.
Delay start engaged. Reset Delay start.
Interruption of electrical power
supply to dishwasher or blown fuse.
Check circuit breaker.
The door may have been closed
without first selecting a cycle.
Select a cycle and close the door.
Water supply may not be turned on. Check and turn on water supply.
Cycle does not
resume after
door is opened
and closed
during cycle.
Door is opened longer than
4 seconds after a cycle has started.
Press Start button again to resume cycle.
Display does
not illuminate
A fuse may have been blown or
circuit breaker tripped.
Check the fuse or circuit breaker box and
replace the fuse or reset the breaker if
necessary.
Door not closed or latched.
Note: For models with controls on
top of the door, the display only
illuminates when the door is opened
and controls are visible.
Ensure door is properly latched and
completely closed.

en-us Troubleshooting
34
Dishwasher
seems to run a
long time
Incoming water is not warm
enough.
Before starting a cycle, run hot water faucet
at the sink closest to the dishwasher.
Cycle time can vary due to soil and
water conditions.
Sensors in the dishwasher automatically
increase the cycle time to ensure a good
wash when heavy soil is detected.
Rinse aid dispenser 9* is empty,
or rinse aid setting has been set to
“0”.
Add rinse aid, or change rinse aid setting.
Dishwasher connected to cold
water supply.
Note: Check the typical wash cycle
length. ~ "Wash Cycle
Information" on page 24
Verify dishwasher is connected to hot water
supply plumbing.
Dishes are not
getting clean
enough
Spray arm movement obstructed. Ensure that spray arm movement is not
blocked by hand rotating spray
arms 1:, 1R before starting cycle.
Spray arm nozzles clogged. Remove spray arms 1:, 1R and clean
them. ~ "Spray arms" on page 31
Improper use of detergents. Increase or decrease detergent depending
on the water hardness.
Filters 1b could be clogged. Clean the filters 1b. ~ "Filter
components" on page 30
Dishes are nested or loaded too
closely together.
Rearrange load such that water spray can
reach all items in the dishwasher.
~ "Loading the Dishwasher" on page 13
Selected wash cycle is not suitable
for food soil conditions.
Refer to Wash Cycle Information.
~ "Wash Cycle Information" on page 24
Streaks on
glassware or
residue on the
dishes
Incorrect rinse aid setting. Depending on the hardness of water, adjust
the rinse agent dispenser 9*. ~ "Rinse
Aid" on page 12
Dishes are not
getting dry
enough
Note: Plastic or
Teflon do not
typically dry as
well as other
items due to
their inherent
properties.
Rinse aid dispenser 9* is empty
or incorrect rinse aid amount is set.
Add rinse aid or adjust setting - the use of
rinse agent improves drying, use the Auto
cycle, use the Sanitize option.
Improper loading of dishes. Rearrange load to ensure items are not
nesting. ~ "Loading the Dishwasher"
on page 13
Note: Select models offer an extra heating
option to improve drying performance.

Troubleshooting en-us
35
Odor
Note: Water
testing is done
in the factory.
Occasionally
water may still
appear in
dishwasher at
purchase which
may create an
odor.
Food debris is present at the
bottom of the dishwasher.
Remove the filters and clean them.
~ "Care and Maintenance" on page 29
Food particles are present near the
door seal.
~ "Care and Maintenance" on page 29
Residual water is present at the
bottom of the dishwasher.
Ensure the dishwasher has completely
drained from the last cycle.
Drain hose is obstructed. Remove any obstructions from the drain
hose by calling qualified personnel.
Note: If odor still persists, run the Normal/
Regular cycle until it flushes and interrupt
the cycle and place an 8 oz. cup of distilled
white vinegar solution on the upper rack and
then finish the cycle.
Dishwasher not
filling with
water or
“Check water
supply” display
lights up
Restriction in the water supply
system.
Ensure that the water supply valve (typically
located under kitchen sink) is open and
check that the water supply line has no
kinks or clogs.
Previous wash cycle was not
completed.
~ "Operating the Dishwasher" on page 26
Delay start is active. Cancel the delay start or wait until delay
start time completes.
Household water supply turned off. Turn on water supply.
Fascia panel
discolored or
marked
Abrasive cleaner used. Use mild detergents with soft damp cloth.
Noise during
wash cycle
Dishes may not be arranged
properly.
Water circulation sound is normal, but if you
suspect items are banging into each other
or into the spray arms, check optimal
arrangement of dishes. ~ "Loading the
Dishwasher" on page 13
Water leaks
Suds. Using wrong type of detergent or overfilling
the rinse aid dispenser results in suds and
leaks - use only dishwasher detergents. If
suds still persist, add one tablespoon of
vegetable oil at the bottom of the
dishwasher and run the desired cycle.
Door seal could be pulled away
from track.
Ensure the door seal is in the track.
Condensation vent is blocked. Ensure that condensation vent is not
blocked.
Improper installation. Have proper installation verified by qualified
personnel (water supply, drain system,
leveling, plumbing).

en-us Troubleshooting
36
--------
Tub stains Stains on the dishwasher interior
are due to water hardness.
Concentrated lemon juice can reduce the
build-up of hard water stains. Run
Normal/Regular cycle until it flushes and
interrupt the cycle and then place an 8 oz.
cup of the concentrated lemon solution on
the upper rack and finish the cycle. This can
be done periodically to avoid build-up.
Silverware in contact with tub. Ensure that silverware does not make
contact with the tub while running a cycle.
Detergent
dispenser
cover will not
shut
Improper operation of detergent
cover.
For instructions on opening and closing the
dispenser ~ "Detergent" on page 21
Previous cycle was not finished or
interrupted.
~ "Operating the Dishwasher" on page 26
Unable to
select desired
cycle
Previous cycle not finished. ~ "Operating the Dishwasher" on page 26
Customer Service en-us
37
4 Customer Service
Customer Service
Your Bosch® dishwasher requires no
special care other than that
described in the Care and
Maintenance section of this manual.
If you are having a problem with your
dishwasher, before calling for service
please refer to the Troubleshooting
Guide section of the manual. If
service is necessary, contact your
dealer or installer or an authorized
service center. Do not attempt to
repair the appliance yourself. Any
work performed by unauthorized
personnel may void the warranty.
If you are having a problem with your
Bosch® dishwasher and are not
pleased with the service you have
received, please take the following
steps until the problem is corrected
to your satisfaction:
1.
Call us at 1-800-944-2904
2.
Contact Customer Service from
our web site:
www.bosch-home.com/us or
www.bosch-home.ca
3.
Contact your installer or the
Bosch Authorized Service
Contractor in your area.
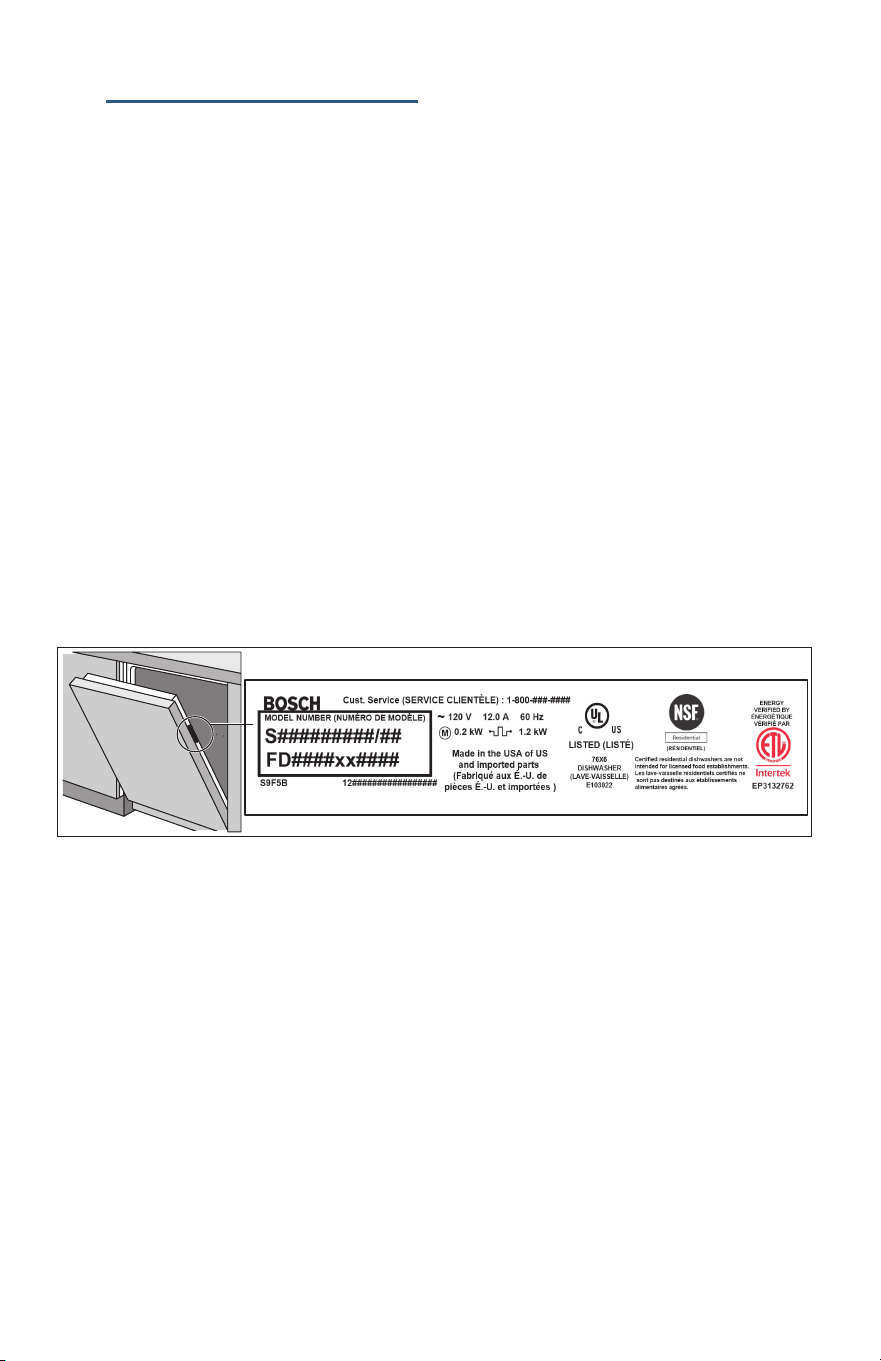
4.
Write us:
BSH Home Appliances Corporation
1901 Main Street
Irvine, CA 92614
Please be sure to include your model
information as well as an explanation
of the problem and the date it
started. You will find the model and
serial number information on the
label located on the edge of the
dishwasher door. Please make a
copy of your invoice and keep it with
this manual. The customer may be
required to show proof of purchase
to validate warranty coverage.

en-us Statement of Limited Product Warranty
38
‡ Statement of Limited
Product Warranty
Statement of Limited Product Warranty
What this Warranty Covers
& Who it Applies to:
The limited warranty provided by
BSH Home Appliances Corporation
(BSH) in this Statement of Limited
Product Warranty applies only to
Bosch® dishwashers (“Product”)
sold to you, the first using purchaser,
provided that the Product was
purchased:
■ for your normal, household
(non-commercial) use, and has in
fact at all times only been used
for normal household purposes;
■ new at retail (not a display, “as
is”, or previously returned model),
and not for resale, or commercial
use; and
■ within the United States or
Canada, and has at all times
remained within the country of
original purchase. The warranties
stated herein apply only to the
first purchaser of the Product and
are not transferable.
Please make sure to return your
registration card; while not necessary
to effectuate warranty coverage, it is
the best way for BSH to notify you in
the unlikely event of a safety notice or
product recall.
How Long the Warranty
Lasts
BSH warrants that the Product is free
from defects in materials and
workmanship for a period of three
hundred sixty five (365) days from
the date of purchase. The foregoing
timeline begins to run upon the date
of purchase, and shall not be stalled,
tolled, extended, or suspended, for
any reason whatsoever.
This Product is also warranted to be
free from cosmetic defects in
material and workmanship (such as
scratches of stainless steel,
paint/porcelain blemishes, chip,
dents, or other damage to the finish
of the Product), for a period of thirty
(30) days from the date of purchase
or closing date for new construction.
This cosmetic warranty excludes
slight color variations due to inherent
differences in painted and porcelain
parts, as well as differences caused
by kitchen lighting, product location,
or other similar factors. This
cosmetic warranty specifically
excludes any display, floor, “As Is”,
or “B” stock appliances.
Extended Limited Warranty
BSH also provides these additional
limited warranties:
■ 5 year limited warranty on
electronics: BSH will repair or
replace any BSH microprocessor
or printed circuit board if it proves
to be defective in materials or
workmanship (excludes labor
charges).
■ 5 year limited warranty on dish
racks: BSH will replace the upper
or lower dish rack (excluding rack
components), if the rack proves
defective in materials or
workmanship (excludes labor
charges).
■ Lifetime warranty against stainless
steel rust through: BSH will repair
or replace your dishwasher with
the same model or a current
model that is substantially
equivalent or better in
functionality, if the inner liner
should rust through (excludes
labor charges).
■ BSH will repair or replace the
stainless steel door if the door
should rust through (excludes
labor charges).

Statement of Limited Product Warranty en-us
39
Repair/Replace as Your
Exclusive Remedy
During this warranty period, BSH or
one of its authorized service
providers will repair your Product
without charge to you (subject to
certain limitations stated herein) if
your Product proves to have been
manufactured with a defect in
materials or workmanship. If
reasonable attempts to repair the
Product have been made without
success, then BSH will replace your
Product (upgraded models may be
available to you, in the sole discretion
of BSH, for an additional charge). All
removed parts and components shall
become the property of BSH at its
sole option. All replaced and/or
repaired parts shall assume the
identity of the original part for
purposes of this warranty and this
warranty shall not be extended with
respect to such parts. BSH’s sole
liability and responsibility hereunder
is to repair manufacturer-defective
Product only, using a BSH-authorized
service provider during normal
business hours. For safety and
property damage concerns, BSH
highly recommends that you do not
attempt to repair the Product
yourself, or use an unauthorized
servicer; BSH will have no
responsibility or liability for repairs or
work performed by a non-authorized
servicer. If you choose to have
someone other than an authorized
service provider work on your
Product, THIS WARRANTY WILL
AUTOMATICALLY BECOME NULL
AND VOID. Authorized service
providers are those persons or
companies that have been specially
trained on BSH products, and who
possess, in the opinion of BSH, a
superior reputation for customer
service and technical ability (note
that they are independent entities
and are not agents, partners,
affiliates or representatives of BSH).
Notwithstanding the foregoing, BSH
will not incur any liability, or have
responsibility, for the Product if it is
located in a remote area (more than
100 miles from an authorized service
provider) or is reasonably
inaccessible, hazardous, threatening,
or treacherous locale, surroundings,
or environment; in any such event, if
you request, BSH would still pay for
labor and parts and ship the parts to
the nearest authorized service
provider, but you would still be fully
liable and responsible for any travel
time or other special charges by the
service company, assuming they
agree to make the service call.
Out of Warranty Product
BSH is under no obligation, at law or
otherwise, to provide you with any
concessions, including repairs,
pro-rates, or Product replacement,
once this warranty has expired.
Warranty Exclusions
The warranty coverage described
herein excludes all defects or
damage that are not the direct fault
of BSH, including without limitation,
one or more of the following:
■ Use of the Product in anything
other than its normal, customary
and intended manner (including
without limitation, any form of
commercial use, use or storage of
an indoor product outdoors, use
of the Product in conjunction with
air or water-going vessels);

en-us Statement of Limited Product Warranty
40
■ Any party’s willful misconduct,
negligence, misuse, abuse,
accidents, neglect, improper
operation, failure to maintain,
improper or negligent installation,
tampering, failure to follow
operating instructions,
mishandling, unauthorized service
(including self-performed “fixing”
or exploration of the appliance’s
internal workings);
■ Adjustment, alteration or
modification of any kind;
■ A failure to comply with any
applicable state, local, city, or
county electrical, plumbing and/or
building codes, regulations, or
laws, including failure to install the
product in strict conformity with
local fire and building codes and
regulations;
■ Ordinary wear and tear, spills of
food, liquid, grease
accumulations, or other
substances that accumulate on,
in, or around the Product;
■ Any external, elemental and/or
environmental forces and factors,
including without limitation, rain,
wind, sand, floods, fires, mud
slides, freezing temperatures,
excessive moisture or extended
exposure to humidity, lightning,
power surges, structural failures
surrounding the appliance, and
acts of God.
In no event shall BSH have any
liability or responsibility whatsoever
for damage to surrounding property,
including cabinetry, floors, ceilings,
and other structures or objects
around the Product. Also excluded
from this warranty are Products on
which the serial numbers have been
altered, defaced, or removed; service
visits to teach you how to use the
Product, or visits where there is
nothing wrong with the Product;
correction of installation problems
(you are solely responsible for any
structure and setting for the Product,
including all electrical, plumbing or
other connecting facilities, for proper
foundation/flooring, and for any
alterations including without limitation
cabinetry, walls, floors, shelving,
etc.); and resetting of breakers or
fuses.
TO THE EXTENT ALLOWED BY LAW,
THIS WARRANTY SETS OUT YOUR
EXCLUSIVE REMEDIES WITH
RESPECT TO PRODUCT, WHETHER
THE CLAIM ARISES IN CONTRACT
OR TORT (INCLUDING STRICT
LIABILITY, OR NEGLIGENCE) OR
OTHERWISE. THIS WARRANTY IS IN
LIEU OF ALL OTHER WARRANTIES,
WHETHER EXPRESS OR IMPLIED.
ANY WARRANTY IMPLIED BY LAW,
WHETHER FOR MERCHANTABILITY
OR FITNESS FOR A PARTICULAR
PURPOSE, OR OTHERWISE, SHALL
BE EFFECTIVE ONLY FOR THE
PERIOD THAT THIS EXPRESS
LIMITED WARRANTY IS EFFECTIVE.
IN NO EVENT WILL THE
MANUFACTURER BE LIABLE FOR
CONSEQUENTIAL, SPECIAL,
INCIDENTAL, INDIRECT, “BUSINESS
LOSS”, AND/OR PUNITIVE
DAMAGES, LOSSES, OR EXPENSES,
INCLUDING WITHOUT LIMITATION
TIME AWAY FROM WORK, HOTELS
AND/OR RESTAURANT MEALS,
REMODELLING EXPENSES IN
EXCESS OF DIRECT DAMAGES
WHICH ARE DEFINITIVELY CAUSED
EXCLUSIVELY BY BSH, OR
OTHERWISE. SOME STATES DO
NOT ALLOW THE EXCLUSION OR
LIMITATION OF INCIDENTAL OR
CONSEQUENTIAL DAMAGES, AND
SOME STATES DO NOT ALLOW
LIMITATIONS ON HOW LONG AN
IMPLIED WARRANTY LASTS, SO
THE ABOVE LIMITATIONS MAY NOT
APPLY TO YOU. THIS WARRANTY
GIVES YOU SPECIFIC LEGAL
RIGHTS, AND YOU MAY ALSO HAVE
OTHER RIGHTS WHICH VARY FROM
STATE TO STATE. No attempt to
alter, modify or amend this warranty

Statement of Limited Product Warranty en-us
41
shall be effective unless authorized in
writing by an officer of BSH Home
Appliances Corporation.
How to Obtain Warranty
Service
TO OBTAIN WARRANTY SERVICE
FOR YOUR PRODUCT, YOU
SHOULD CONTACT THE NEAREST
BSH AUTHORIZED SERVICE
CENTER, OR CALL 1-800-944-2904

fr-ca
42
Table des matières
fr-ca Notice d'utilisation
( Indications de sécurité . . . . . 44
( CONSIGNES DE SÉCURITÉ
IMPORTANTES . . . . . . . . . . . 45
ƒ Causes de pannes . . . . . . . . 49
* Mise en marche . . . . . . . . . . . 50
, Produit de rinçage . . . . . . . . 52
- Chargement du
lave-vaisselle. . . . . . . . . . . . . 54
. Détergent . . . . . . . . . . . . . . . . 62
/ Cycles du lave-vaisselle . . . . 64
0 Options de cycles du
lave-vaisselle. . . . . . . . . . . . . 65
1 Mise en marche du
lave-vaisselle. . . . . . . . . . . . . 68
2 Entretien et maintenance . . . 72
3 Dépannage. . . . . . . . . . . . . . . 77
4 Service à la clientèle. . . . . . . 81
‡ Déclaration de la garantie
limitée du produit . . . . . . . . . 82

Statement of Limited Product Warranty fr-ca
43
0HUFLGDYRLUFKRLVLXQODYHYDLVVHOOH%RVFK
9RXVrWHVPDLQWHQDQW
6LYRXVDYH]GDXWUHVTXHVWLRQVRXGHVFRPPHQWDLUHV
8QHIRLVjFHWWHSDJHQRXEOLH]SDVGHQUHJLVWUHUYRWUHQRXYHDXODYH
ZZZERVFKKRPHFRPXV(8
RX
ZZZERVFKKRPHFD&DQDGD
3RXUSOXVGLQIRUPDWLRQVVXUYRWUHODYHYDLVVHOOHOHVDFFHVVRLUHV
%6++RPH$SSOLDQFHV&RUSRUDWLRQ
0DLQ6WUHHW6XLWH
RXHQQRXVpFULYDQWjODGUHVVH
,UYLQH&$
&KHUFOLHQW
OXQGHVQRPEUHX[FRQVRPPDWHXUVTXLH[LJHQWGHOHXUODYHYDLVVHOOH
XQIRQFWLRQQHPHQWVLOHQFLHX[HWXQUHQGHPHQWpOHYp
&HPDQXHODpWpUpGLJpHQSUHQDQWHQFRPSWHYRWUHVpFXULWpHWYRWUH
HQWLqUHVDWLVIDFWLRQHWOHVLQIRUPDWLRQVTXLOFRQWLHQWVRQWGXQH
LPSRUWDQFHFDSLWDOH1RXVYRXVUHFRPPDQGRQVYLYHPHQWGHOHOLUH
DYDQWODSUHPLqUHXWLOLVDWLRQGHFHODYHYDLVVHOOH
GLVSRQLEOHVHWGDXWUHVpTXLSHPHQWV%RVFKGHKDXWHTXDOLWp
FRQVXOWH]QRWUHVLWH,QWHUQHWjODGUHVVH
YDLVVHOOHHQFOLTXDQWVXUORQJOHW©$VVLVWDQFHªRXHQUHPSOLVVDQWOD
ILFKHGHQUHJLVWUHPHQWGXSURGXLWHQYR\pHDYHFYRWUHQRXYHODSSDUHLO
YHXLOOH]QRXVFRQWDFWHUHQDSSHODQWDX

fr-ca Indications de sécurité
44
( Indications de
sécurité
Indications de sécurité
9 AVERTISSEMENT
Ceci indique des risques de
blessures graves ou mortelles
en cas de non-respect de cette
mise en garde.
9 ATTENTION
Ceci indique des risques de
blessures mineures ou de
gravité moyenne en cas de
non-respect de cette mise en
garde.
AVIS
Ceci indique un risque
d'endommagement de l'appareil ou
de biens en cas de non respect de
ces consignes.
Remarque : Ceci vous signale des
informations et/ou indications
importantes.

9
CONSIGNES DE SÉCURITÉ IMPORTANTES
LISEZ ET CONSERVEZ CES INSTRUCTIONS
45
( CONSIGNES DE SÉCURITÉ IMPORTANTES
CONSIGNES DE SÉCURITÉ IMPORTANTES
LISEZ ET CONSERVEZ CES INSTRUCTIONS
Ce lave-vaisselle est livré avec des
instructions de montage et ce
Manuel d'utilisation et d'entretien.
Lisez et assurez-vous d'avoir bien
assimilé toutes les instructions avant
d'utiliser le lave-vaisselle.
Ce lave-vaisselle est conçu pour une
utilisation jusqu'à une altitude de
13 000 pieds (4000 m) au-dessus
du niveau de la mer.
Pour réduire le risque d'incendie, de
choc électrique, ou de blessures
graves, respectez les consignes
suivantes :
Risque d'incendie, de choc électrique, ou de blessures graves
9 AVERTISSEMENT
RISQUE DE BLESSURE OU DE
DÉCÈS !
La mauvaise utilisation du
lave-vaisselle peut causer des
blessures graves ou mortelles.
Évitez d'utiliser le lave-vaisselle
d'une manière non conforme
aux directives énoncées dans
ce manuel ou à d'autres fins
que celles énoncées dans les
pages suivantes.
9 AVERTISSEMENT
RISQUE DE BLESSURES !
La réparation de l'appareil par
des techniciens d'entretien non
qualifiés ou l'utilisation de
pièces de rechange non
originales peuvent causer des
blessures graves ou
endommager l'équipement.
Tous les travaux de réparation
doivent être effectués par un
technicien d'entretien qualifié
utilisant uniquement des pièces
de rechange d'origine.
9 AVERTISSEMENT
RISQUE DE CHOC
ÉLECTRIQUE OU D'INCENDIE !
Un choc électrique ou un
incendie peut survenir si
l'alimentation électrique du
lave-vaisselle décrit dans le
présent manuel est mal installée
ou s'il n'est pas correctement
mis à la terre. Le lave-vaisselle
décrit dans ce manuel ne doit
pas être utilisé à moins d'être
certain de la bonne installation
de l'alimentation électrique et
de la mise à la terre correcte du
lave-vaisselle.
9 AVERTISSEMENT
RISQUE POUR LA SANTÈ !
N'utilisez jamais des produits
chimiques agressifs pour
nettoyer votre lave-vaisselle.
Certains produits contenant du
chlore peuvent endommager le
lave-vaisselle et présenter des
risques pour la santé!

9
CONSIGNES DE SÉCURITÉ IMPORTANTES
LISEZ ET CONSERVEZ CES INSTRUCTIONS
46
INSTRUCTIONS DE MISE À LA
TERRE
Cet équipement doit être mis à la
terre au niveau d'un système de
câblage permanent en métal, ou un
conducteur de mise à la masse
d'équipement doit être intégré aux
conducteurs d'alimentation et
connecté au terminal de mise à la
masse de l'équipement ou à la
broche de raccordement du
lave-vaisselle. Voir la rubrique
Instructions de montage fournie pour
avoir plus d'informations sur les
exigences électriques.
9 AVERTISSEMENT
RISQUE DE CHOC
ÉLECTRIQUE !
Cet appareil doit être mis à la
terre. En cas de
dysfonctionnement, la mise à la
terre réduira le risque de choc
électrique en fournissant une
voie de moindre résistance au
courant électrique. Cet appareil
est équipé d'un câble disposant
d'un conducteur de mise à la
terre.
La mauvaise connexion du
conducteur de mise à la terre
peut provoquer un risque de
choc électrique. En présence
d'un électricien qualifié, vérifiez,
en cas de doute, si l'appareil est
correctement mis à la terre.
Fonctionnement normal
Utilisez ce lave-vaisselle uniquement
aux fins spécifiées, notamment le
lavage de vaisselle et d'ustensiles de
cuisine indiqués comme lavables au
lave-vaisselle.
Utilisez uniquement des détergents
ou des produits de rinçage
recommandés pour un lave-vaisselle,
puis tenez-les hors de la portée des
enfants.
9 ATTENTION
Lors du chargement de
vaisselle à laver :
■ identifiez les objets
tranchants pour éviter qu'ils
n'endommagent le joint de la
porte.
■ les couteaux et autres
ustensiles tranchants doivent
être placés debout, les
POIGNÉES EN HAUT, afin
de réduire le risque de
coupures.
■ ne lavez pas les objets en
plastique, sauf s'ils portent
l'inscription « lavable au
lave-vaisselle » ou une
indication équivalente. Pour
les objets en plastique ne
portant pas cette indication,
consultez les
recommandations de leurs
fabricants respectifs.
■ évitez de mettre votre votre
lave-vaisselle en marche à
moins que tous les
panneaux ne soient en
place.
■ ne touchez pas ou ne
passez pas outre les
commandes et verrouillages.
Évitez de vous asseoir, de vous
appuyez ou d'utiliser de manière

9
CONSIGNES DE SÉCURITÉ IMPORTANTES
LISEZ ET CONSERVEZ CES INSTRUCTIONS
47
abusive la porte ou les paniers à
vaisselle du lave-vaisselle.
9 AVERTISSEMENT
RISQUE DE BLESSURES !
Pour éviter des risques de
blessures, faites toujours
attention lorsque vous ouvrez la
porte pendant ou après un
cycle de lavage car des rejets
d'eau chaude ou de vapeur
peuvent survenir. N'ouvrez pas
complètement la porte avant
que les bruits d'eau n'aient
cessés et que la vapeur ne soit
dissipée.
Les lave-vaisselle domestiques
certifiés NSF/ANSI 184 ne sont pas
destinés aux établissements de
services alimentaires agréés.
Sécurité pour enfants
Pour réduire le risque de blessure,
interdisez aux enfants de jouer dans
ou sur le lave-vaisselle.
À l'âge adulte leur permettant
d'utiliser la machine, les enfants sont
sous la responsabilité de leurs
parents/tuteurs légaux qui doivent
s'assurer qu'ils sont suffisamment
instruits sur les bonnes pratiques par
des personnes qualifiées.
Entretien et maintenance corrects
9 AVERTISSEMENT
RISQUE D’EXPLOSION !
Sous certaines conditions, de
l'hydrogène gazeux peut se
créer dans un système d'eau
chaude inutilisé pendant deux
semaines ou plus. L'hydrogène
gazeux est de nature explosive.
Avant d'utiliser un lave-vaisselle
connecté à un système d'eau
chaude inutilisé pendant deux
semaines ou plus, ouvrez tous
les robinets d'eau chaude et
laissez l'eau s'écouler pendant
plusieurs minutes. Tout
l'hydrogène gazeux accumulé
sera ainsi évacué. Compte tenu
de la nature explosive du gaz,
évitez de fumer ou d'utiliser des
flammes nues à ce moment.
Retirez la porte du lave-vaisselle
menant au compartiment de
nettoyage lors du retrait d'un ancien
lave-vaisselle dans le cadre de
l'entretien ou de la mise au rebut.
Pour éviter d'endommager le
plancher et la propagation des
moisissures, les alentours et le
dessous du lave-vaisselle ne doivent
pas rester humides.
Afin de ne pas endommager le
lave-vaisselle, évitez de laisser l'eau
pénétrer dans les systèmes de votre
appareil pendant de longues
périodes à des températures de gel.
Par temps de gel, la vanne de
remplissage d'eau ainsi que d'autres
composants de votre lave-vaisselle
peuvent s'endommager.

9
CONSIGNES DE SÉCURITÉ IMPORTANTES
LISEZ ET CONSERVEZ CES INSTRUCTIONS
48
AVIS
Il est vivement recommandé à
l'utilisateur final de se familiariser
avec les procédures d'arrêt de
l'alimentation en eau ainsi qu'avec
les procédures d'arrêt de
l'alimentation électrique entrante.
Consultez les instructions de
montage ou contactez votre
installateur pour de plus amples
informations.
9 AVERTISSEMENT
MISES EN GARDE
CONFORMÉMENT À LA
PROPOSITION 65 DE L'ÉTAT
DE CALIFORNIE !
Ce produit contient un ou
plusieurs produit(s) chimique(s)
réputé(s) par l'État de Californie
comme causant le cancer, des
anomalies congénitales ou
d'autres dommages à l'appareil
reproducteur.

Causes de pannes fr-ca
49
ƒ Causes de pannes
Causes de pannes
AVIS
■ N'utilisez jamais de nettoyants à
vapeur pour laver votre
lave-vaisselle. Le fabricant n'est
pas responsable des dommages
ou des conséquences éventuels.
■ Les lingettes à base d'eau de
javel peuvent entraîner la rouille
des réservoirs et des portes en
acier inoxydable.
■ L'utilisation de produits chimiques
acides (p. ex. javel), de nettoyants
abrasifs, de tampons à récurer
(métalliques ou plastiques) ou
d'éponges/essuie-tout abrasifs
peut endommager le panneau de
porte extérieure, le panneau avant
et les boutons de votre
lave-vaisselle.
■ Afin de ne pas endommager le
lave-vaisselle, n'y chargez pas
d'objets en papier, de sacs en
plastique, de matériaux
d'emballage ou tout article autre
qu'un article normal, de la
vaisselle ou des ustensiles de
cuisine lavables au lave-vaisselle.
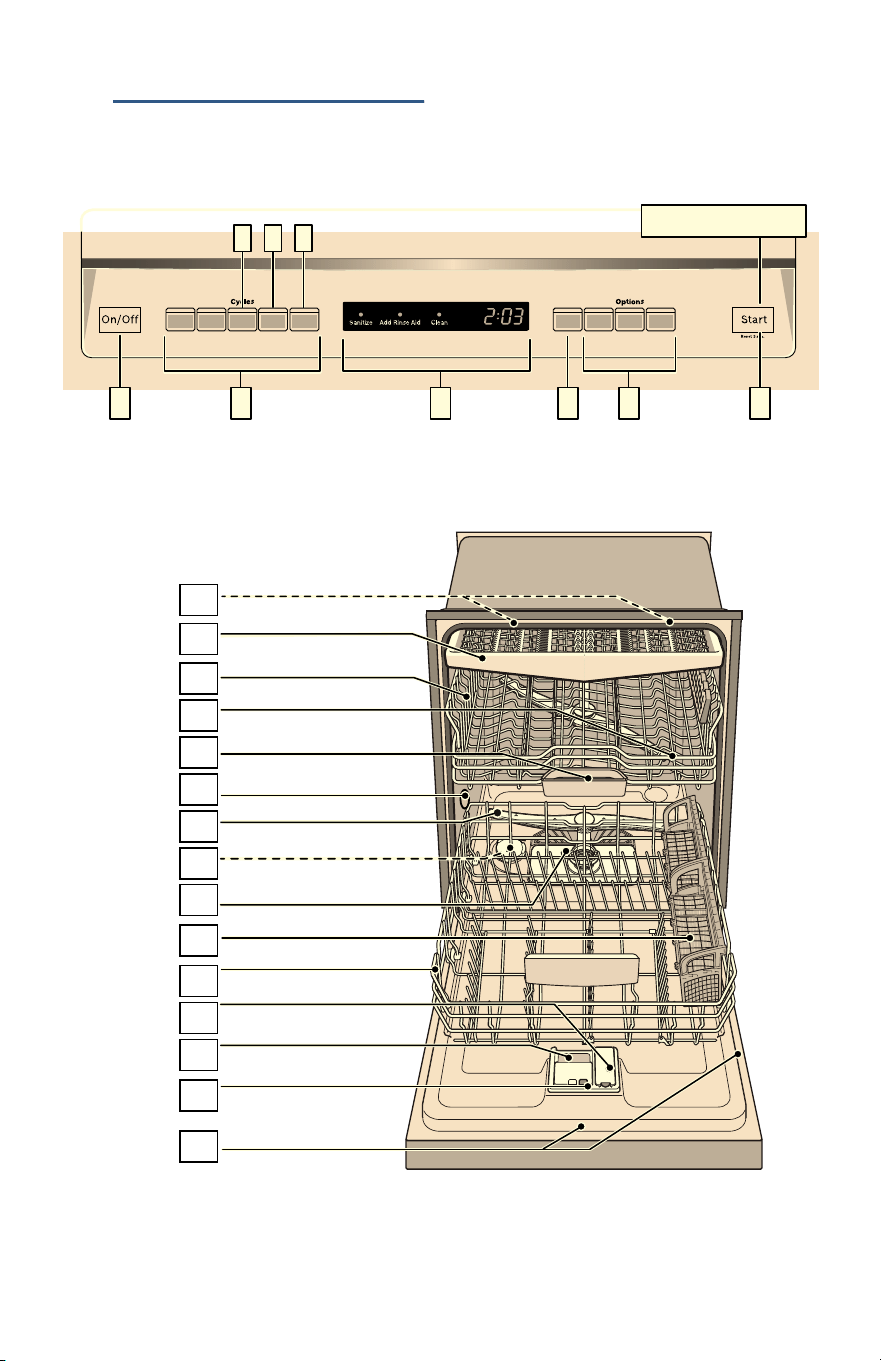
fr-ca Mise en route
50
* Mise en marche
Mise en route
Vue d'ensemble de l'appareil
Les lignes pointillées indiquent des
fonctions facutlatives qui pourraient
éventuellement être comprises avec
votre lave-vaisselle.
5HVHWVHF
%
&
&KLOG/RFN
$

Mise en route fr-ca
51
Les numéros mentionnés ci-dessous
font référence aux images d'aperçu
sur la page précédente du présent
manuel.
Panneau de commande
Composants internes du
lave-vaisselle
* option facultative qui peut être ou
ne pas être incluse avec votre
lave-vaisselle.
Indicateurs
--------
Réglages
Le lave-vaisselle a été configuré avec
certains réglages pour votre confort.
Il est possible de modifier ces
réglages usine.
Utilisez les touches de fonction #,
+ et 3 pour modifier ces
valeurs.
--------
( Bouton On/Off (Marche/Arrêt)
0 Cycles de nettoyage
8 Affichage digital
@ Départ différé
H Options de cycle de nettoyage
P Bouton Démarrer
1" Éclairage intérieur *
1* Troisième panier
12 Panier à vaisselle supérieur
1: Bras d'aspersion supérieur
1B Coupelle interceptrice des
pastilles
1J Orifice de ventilation
1R Bras d'aspersion inférieur
1Z Réservoir de sel spécial*
1b Filtres
1j Panier à couverts
9" Panier à vaisselle inférieur
9* Réservoir de liquide de rinçage
92 Compartiment à détergent
9: Verrou de fermeture du
compartiment à détergent
9B Plaque signalétique
‹:‹‹
Temps de cycle restant
Clean
(nettoyer)
S'allume lorsque la vaisselle
est propre
Sanitize
(désinfecter)
S'allume lorsque les exigences
en matière de désinfection
sont remplies
Add Rinse
Aid
(Ajoutez le
produit de
rinçage)
S'allume lorsque la quantité de
produit de rinçage est faible
Réglage Réglages
d'usine
Description
§ Produit de rinçage
§:‹‹ - §:‹‡
§:‹† La quantité de produit de rinçage utilisée affecte
le séchage. Sélectionnez 0 si vous utilisez des
comprimés tout-en-un.
š Séchage intensif
š:‹‹ - š:‹‚
š:‹‹ / Off
(Arrêt)
Séchage amélioré pour les verres et la vaisselle
en plastique.
˜ Auto power off
˜:‹‹ - ˜:‹ƒ
˜:‹‚ le lave-vaisselle s'arrête automatiquement à la fin
du cycle de lavage.
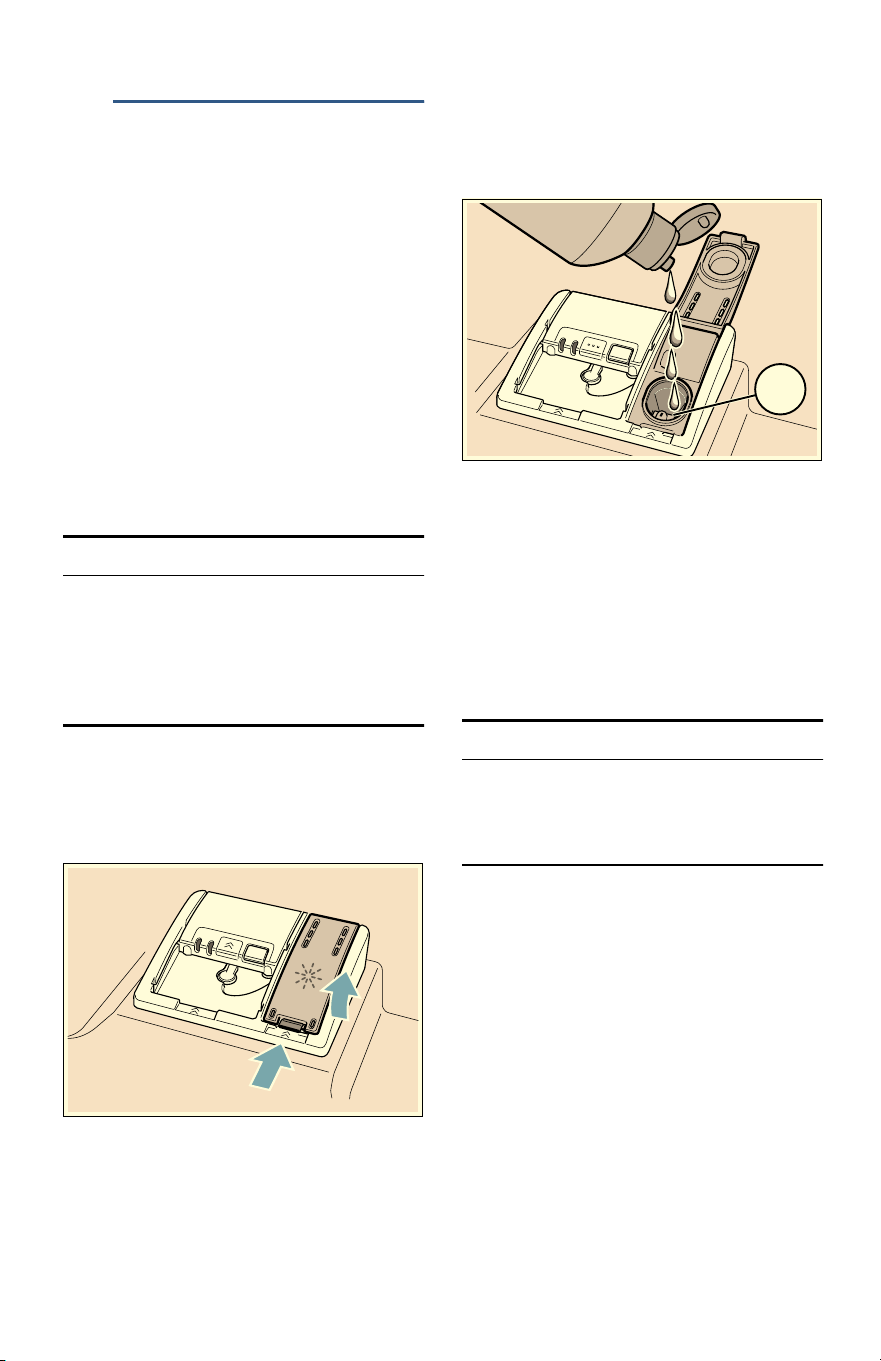
fr-ca Produit de rinçage
52
, Produit de rinçage
Produit de rinçage
Pour un séchage optimal, utilisez
toujours un produit de rinçage
liquide, même si votre détergent
contient un produit de rinçage ou des
additifs de séchage.
Remarque : Le lave-vaisselle signale
une faible quantité de produit de
rinçage lorsque l'indicateur
Recharger produit de rinçage 8
est activé. Si cet indicateur s'allume,
vous devez recharger le distributeur
de produit de rinçage 9* dans le
respect des instructions suivantes.
Ajout de produit de rinçage
AVIS
Pour éviter l'excès de mousse ou
l'engorgement, ne remplissez pas le
distributeur de produit de
rinçage 9*. Essuyez les
déversements à l'aide d'un chiffon
humide.
1.
Ouvrez le distributeur de liquide
de rinçage 9* en appuyant sur
le loquet du couvercle et en tirant
celui-ci.
2.
Ajoutez le produit de rinçage
liquide au distributeur 9* à
pleine capacité. Ne le remplissez
pas outre mesure.
3.
Fermez le couvercle. Le couvercle
doit être hermétiquement fermé
jusqu'à l'encliquetage du loquet,
pour garantir son étanchéité.
4.
Essuyez tout excédent de produit
de nettoyage déversé lorsque le
réservoir est plein.
Le témoins lumineux s'éteindra peu
après la fermeture de la porte du
lave-vaisselle.
AVIS
Ne pas remplir le distributeur de
rinçage auxiliaire 9* avec de la
lessive. Sinon, vous pourriez
endommager le lave-vaisselle.
PD[
Produit de rinçage fr-ca
53
Réglage de la quantité de
produit de rinçage utilisé
La quantité de produit de rinçage
distribuée peut être définie dans la
plage de §:‹‹ à §:‹‡. Le paramètre
d'usine est §:‹†.
Tout changement de paramètre doit
se faire uniquement si les plats
présentent des traces (diminuer la
quantité), ou si les plats ne sèchent
pas complètement (augmenter la
quantité).
1.
Appuyez sur le bouton On/Off
(Marche/Arrêt) (.
2.
Maintenez la touche enfoncée
# et appuyez sur le bouton
Start (Démarrer) P jusqu'à ce
que l'afficheur 8 indique š:‹x
(x peut être un nombre
quelconque). Relâchez les deux
boutons.
3.
Appuyez sur la touche de fonction
# jusqu'à ce que l'afficheur 8
indique §:‹†.
4.
Appuyez sur la touche de fonction
3 pour sélectionner la valeur
désirée.
5.
Appuyez sur le bouton Start
(Démarrer) P pour enregistrer
le paramètre.
Désactivation de l'indicateur
de produit de rinçage
Procédez comme décrit dans la
section « Réglage de la quantité de
produit de rinçage utilisée » et réglez
la valeur à §:‹‹. L'indicateur de
produit de rinçage est maintenant
désactivé.
AVIS
En utilisant aucun produit de rinçage
ou le réglage du distributeur à §:‹‹
peut conduire à des durées de cycle
plus longues, ce qui consommera
plus d'énergie et plus d'eau. Les
températures plus élevées et des
durées de cycle plus longues
peuvent endommager la porcelaine
fine ou la verrerie.
Paramètre Quantité
§:‹‹ le distributeur est en ARRÊT
§:‹‚ valeur minimale
§:‹ƒ valeur faible
§:‹„ valeur moyenne
§:‹… valeur moyenne/élevée
§:‹† valeur élevée
§:‹‡ valeur maximale
fr-ca Chargement du lave-vaisselle
54
- Chargement du
lave-vaisselle
Chargement du lave-vaisselle
Matériaux lavables au
lave-vaisselle
Remarque : Avant la première
utilisation de votre lave-vaisselle,
vérifiez les informations énoncées
dans la présente rubrique. Certains
objets ne peuvent pas être lavés au
lave-vaisselle et doivent l'être à la
main ; d'autres doivent être chargés
de manière spéciale.
Recommandé
Aluminium L'aluminium anodisé et
coloré peut se décolorer au
fil du temps. Les minéraux
présents dans l'eau peuvent
ternir ou tacher l'aluminium.
En général, ils sont éliminés
à l'aide d'un tampon en laine
d'acier imbibé de savon.
Porcelaine
chinoise, cristal,
grès
Certains ustensiles peints à
la main peuvent se
décolorer ou se tacher.
Lavez ces ustensiles à la
main. Positionnez la verrerie
fragile de manière à ce
qu'elle ne bascule pas ou
n'entre pas en contact avec
d'autres ustensiles au cours
du cycle de nettoyage.
Verre Le verre de lait peut se
décolorer ou jaunir.
Revêtements
anti-adhésifs
Appliquez une légère
couche d'huile végétale aux
surfaces anti-adhésives
après séchage.
Plastiques Assurez-vous que les
articles plastiques sont
lavables au lave-vaisselle.
Acier
inoxydable,
argent sterling
et métal
argenté
Chargez ces objets de
manière à ce qu'ils n'entrent
pas en contact avec d'autres
métaux, les parois de la
cuve du lave-vaisselle en
acier inoxydable ou la porte
intérieure.
Non recommandé
Acrylique Des craquelures ou de
petites fissures peuvent
survenir sur l'acrylique.
Pièces
assemblées par
un adhésif
Les adhésifs permettant
d'assembler des matériaux
comme le plastique, le bois,
l'os, l'acier, le cuivre, l'étain,
etc. peuvent perdre en
adhérence.
Ustensiles à
poignée en os
Les poignées peuvent se
séparer.
Fer Le fer va rouiller. Lavez à la
main et séchez
immédiatement.
Articles autres
que la vaisselle
Votre lave-vaisselle est
destiné au nettoyage de
vaisselle et d'articles de
cuisine standards
UNIQUEMENT.
Potin, laiton,
bronze
Ces articles terniront. Lavez
à la main et séchez
immédiatement.
Étain L'étain peut se tacher.
Lavez à la main et séchez
immédiatement.
Bois Les bols et ustensiles en
bois, ainsi que les ustensiles
dotés de poignées en bois
peuvent se fissurer, se
déformer et perdre de leur
éclat.
Recommandé
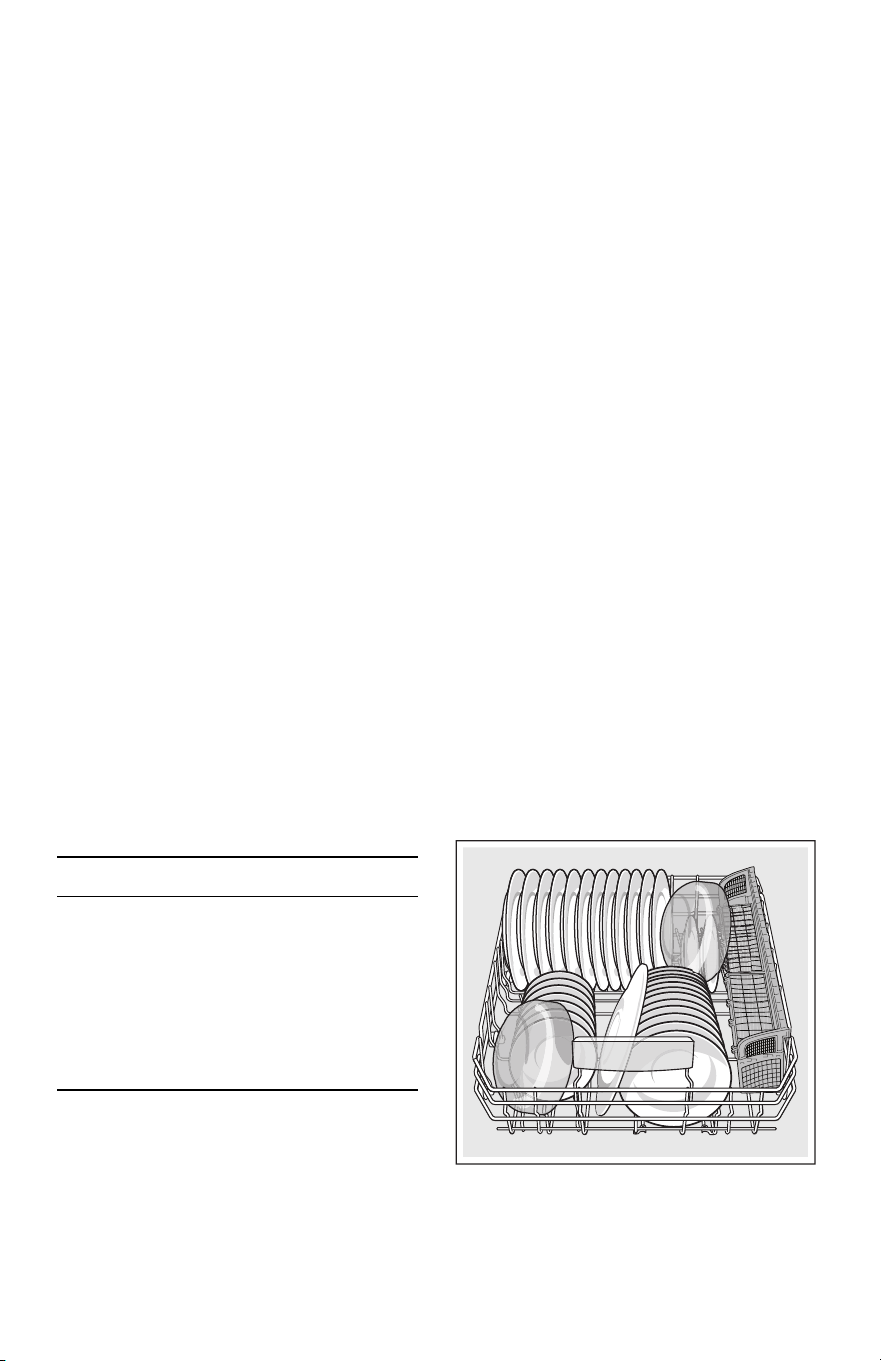
Chargement du lave-vaisselle fr-ca
55
Chargement des paniers
Pour obtenir les meilleurs résultats,
respectez les instructions suivantes
lors du chargement de la vaisselle :
■ Les articles avec de légères
incrustations de résidus
alimentaires ne doivent pas être
pré-lavés.
■ Retirez toutes les particules
d'aliments, os, cure-dents et
excès de graisse.
■ Pré-lavez les articles souillés par
les matières brûlées, cuites ou
féculeuses.
■ Chargez les plats dans les
paniers du lave-vaisselle de telle
sorte que les parois internes des
bols, chaudrons et casseroles
font face aux bras gicleurs.
■ Évitez l'emboîtement et les points
de contact entre les plats.
■ Séparez les objets à base de
métaux différents. Veillez à ne pas
bloquer les bras gicleurs.
■ Lavez uniquement la vaisselle et
les articles de cuisine indiqués
comme lavables au lave-vaisselle.
Reportez-vous à la rubrique
Matériaux lavables au
lave-vaisselle pour plus
d'informations sur la vaisselle
adaptée.
AVIS
Afin de ne pas endommager le
lave-vaisselle, n'y chargez pas des
objets en papier, des sacs en
plastique, des matériaux d'emballage
ou tout article autre qu'un article
normal, de la vaisselle ou des
ustensiles de cuisine lavables au
lave-vaisselle.
Chargement du panier supérieur
Assurez-vous que les articles ne
dépassent le fond des paniers et ne
bloquent les bras gicleurs.
Remarque : Lors du l'insertion du
panier supérieur 12 dans le
lave-vaisselle, poussez-le jusqu'à ce
qu'il bute contre la paroi arrière du
bac à laver. Ainsi, le bras gicleur du
panier supérieur 1: se connecte à
l'alimentation en eau à l'arrière du
bac à laver. Ne poussez pas les
paniers à l'aide de la porte.
Chargement du panier inférieur
Placez les objets volumineux dans le
panier inférieurs 9". Chargez les
chaudrons, casseroles et bols à
l'envers. Ne bloquez pas le trous de
ventilation 1J avec de grandes
plaques à pâtisserie. Chargez ces
objets du côté droit du lave-vaisselle.
Mode de chargement
recommandé
Pour un usage quotidien, régulier ou
normal
Réglage 12 places
Panier inférieur 9"
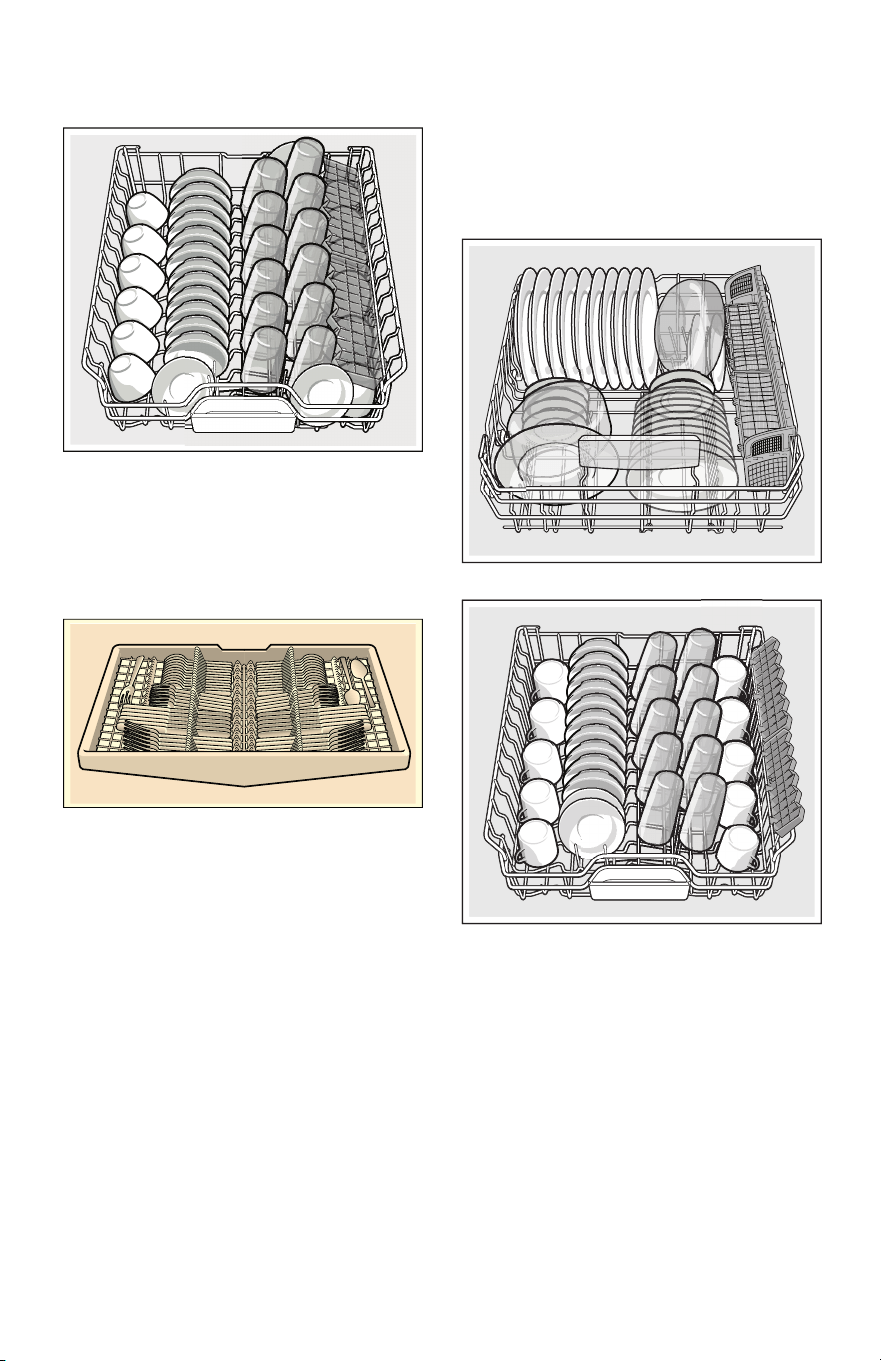
fr-ca Chargement du lave-vaisselle
56
Panier supérieur 12
Remarque : Le repliage des étagères
à tasses permet aux tasses d'être
disposée selon un angle accru et de
réduire les accumulations d'eau au
fond de celles-ci.
Troisième panier 1*
Configuration de
chargement supplémentaire
Réglage 10 places
Panier inférieur 9"
Panier supérieur 12
Remarque : Le repliage des étagères
à tasses permet aux tasses d'être
disposée selon un angle accru et de
réduire les accumulations d'eau au
fond de celles-ci.
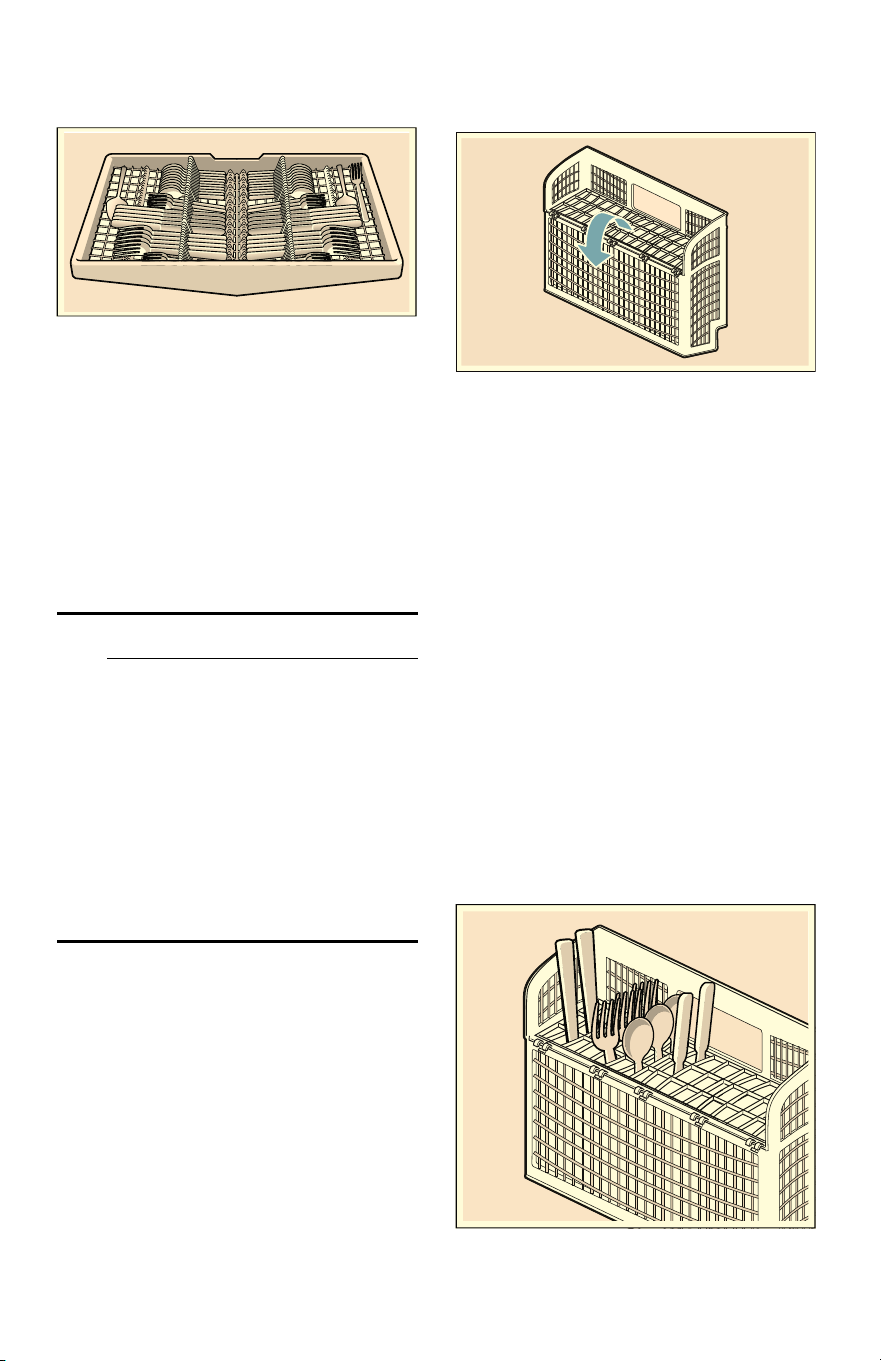
Chargement du lave-vaisselle fr-ca
57
Troisième panier 1*
Chargement du panier à
ustensiles
Les couteaux et ustensiles tranchants
doivent être placés avec les
poignées en haut, les cuillères et
fourchettes avec les poignées en
bas. Si des objets volumineux ou aux
formes irrégulières sont chargés
dans le panier à ustensiles, veillez à
ce qu'ils ne s'entassent pas.
9 AVERTISSEMENT
RISQUE DE BLESSURES !
Les points et bords tranchants
des couteaux et autres
ustensiles coupants peuvent
causer des blessures graves.
Lors du chargement, les pointes
des couteaux et autres
ustensiles tranchants doivent
être tournés vers le bas. Les
enfants ne doivent pas utiliser
ou jouer près des couteaux et
ustensiles tranchants.
Paniers à ustensiles longs
Remarque : Le couvercle du panier à
ustensiles peut également être
rabattu afin de laisser le panier
ouvert.
Ce lave-vaisselle est équipé d'un
tiroir d'argenterie qui devrait
répondre à la plupart de vos besoins
en chargement de ce type d'objet.
Toutefois, si vous faites un lavage
sans tiroir d'argenterie ou si vous
avez trop d'argenterie, un panier
d'argenterie est également compris.
En chargeant le panier d'argenterie,
évitez les points de contact excessifs
ainsi que l'emboîtement d'ustensiles
(par ex. un cuillère nichée à l'intérieur
d'une autre).
Pour ce faire, fermez les couvercles
du panier d'argenterie et insérez
chaque ustensile dans chaque trou
individuel, tel qu'illustré.
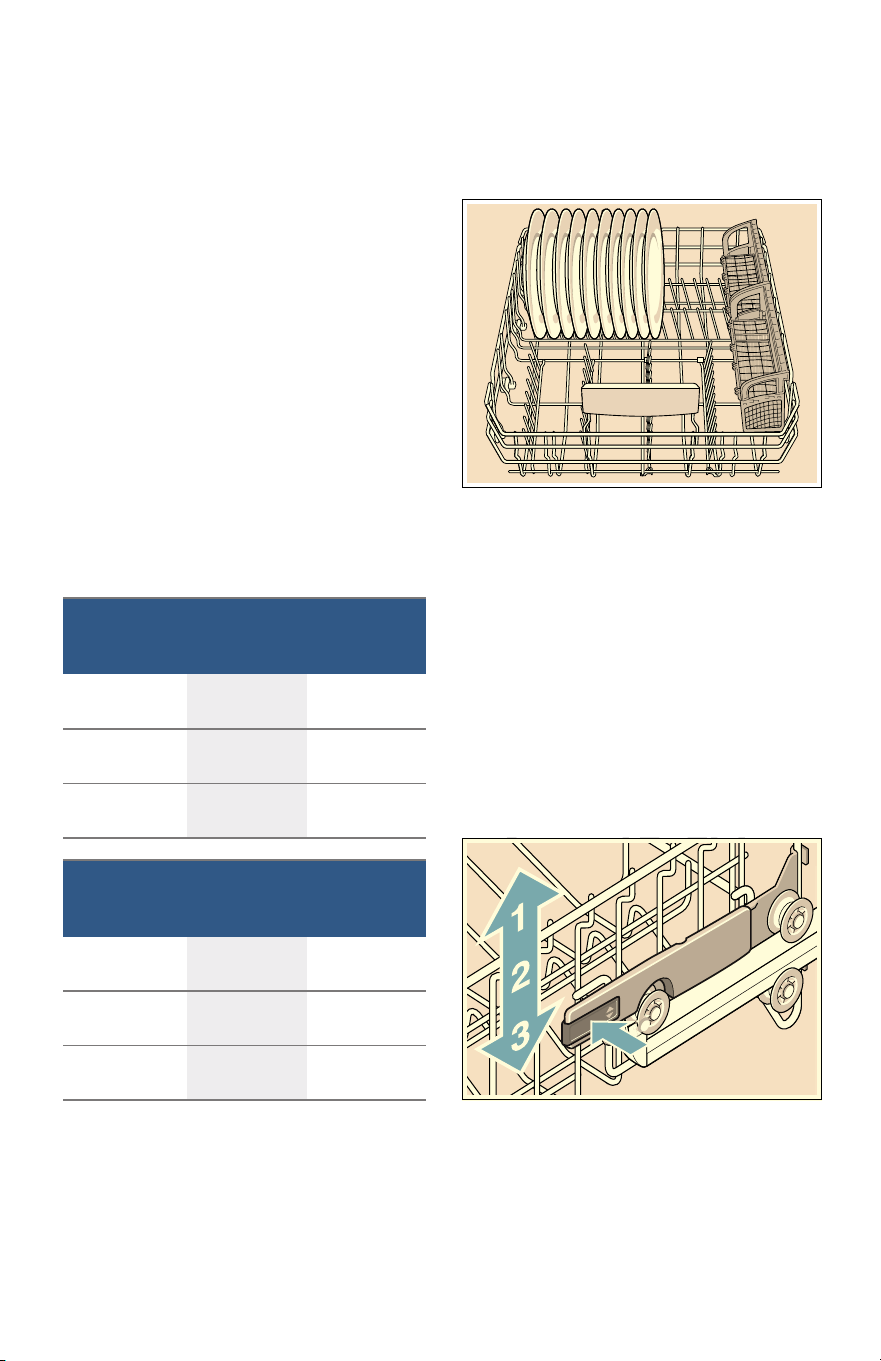
fr-ca Chargement du lave-vaisselle
58
Retrait de la vaisselle
Lors du retrait de la vaisselle, pour
éviter que l'eau ne coule sur les plats
secs, videz d'abord le panier
inférieur 9". Ensuite, déchargez le
panier à couverts 1j suivi par le
panier supérieur 12 et le troisième
panier (si équipé).
Remarque : Les plats sont plus
susceptibles de s'ébrécher lorsqu'ils
sont déchargés avant d'être refroidis.
Réglage de la hauteur du
panier
Au besoin, la hauteur du panier
supérieur 12 peut être ajustée pour
libérer plus d'espace pour les
ustensiles de grande taille, dans le
panier supérieur comme inférieur.
Disposez les grosses assiettes d'un
diamètre maximal de 34 cm
(13,4 po) dans le panier inférieur
9"tel qu'illustré.
RackMatic
®
La hauteur du panier supérieur 12
peut être ajustée à 3 niveaux afin de
créer plus d'espace.
1.
Faites sortir le panier supérieur du
lave-vaisselle jusqu'à la butée.
2.
Pour abaisser le panier, poussez
le levier RackMatic
®
lever vers
l'intérieur.
3.
Pour relever le panier, tenez les
côtés du panier supérieur et
soulevez-le.
Remarque : Vérifiez que le bras
gicleur n'est pas bloqué après
réglage.
Avec le
panier à
ustensiles
Panier
supérieur
Panier
inférieur
Configuration
1 ø max.
24 cm (9,4
po)
34 cm (13,4
po)
Configuration
2 ø max.
26,5 cm
(10,4 po)
30,5 cm (12
po)
Configuration
3 ø max.
29 cm (11,4
po)
28 cm (11
po)
Avec le
troisième
panier
Panier
supérieur
Panier
inférieur
Configuration
1 ø max.
18 cm (7 po) 34 cm (13,4
po)
Configuration
2 ø max.
20,5 cm (8
po)
30,5 cm (12
po)
Configuration
3 ø max.
23 cm (9 po) 28 cm (11
po)
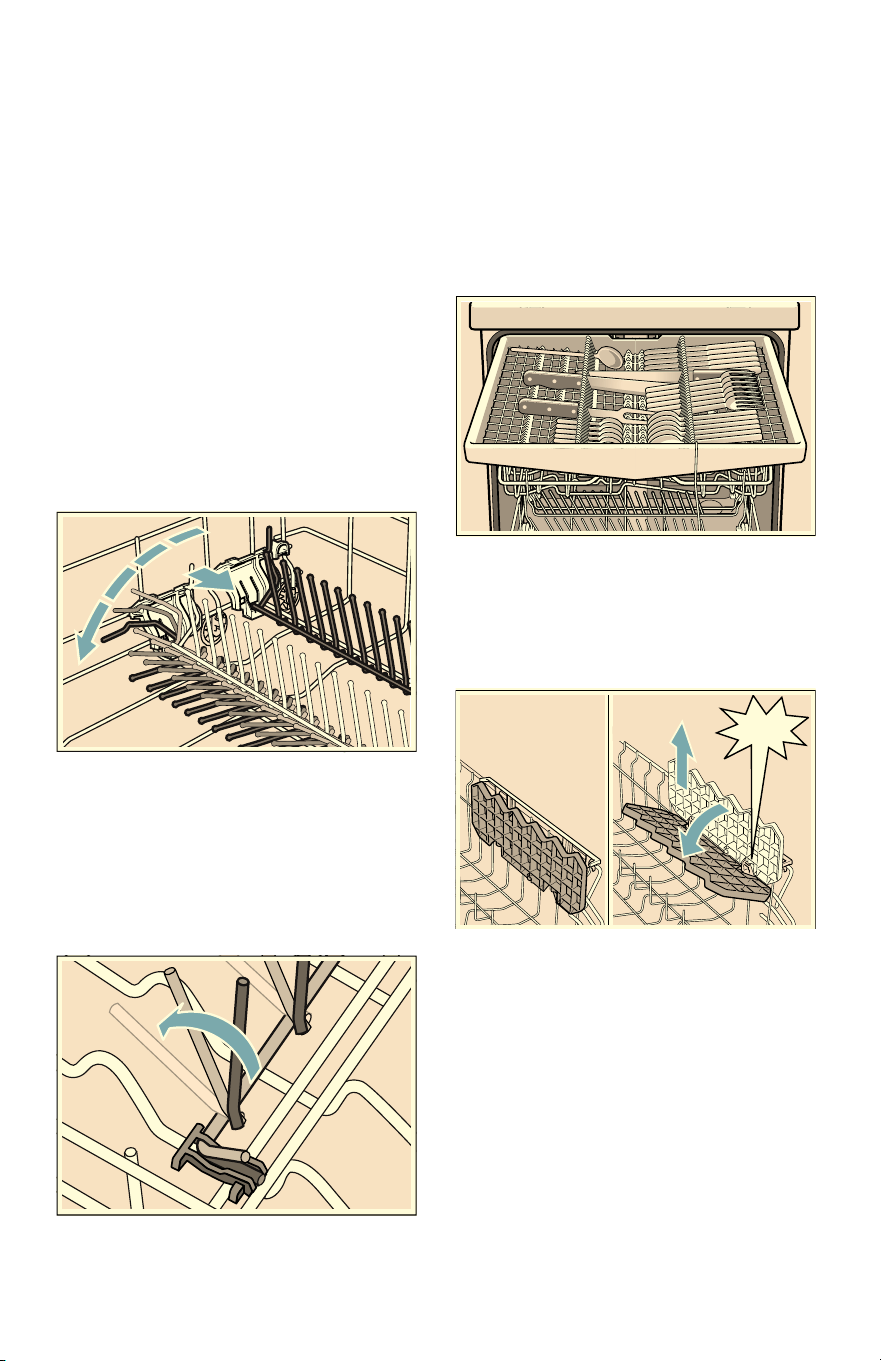
Chargement du lave-vaisselle fr-ca
59
Accessoires de panier
Peignes rabattables
Les paniers supérieur et inférieur
sont équipés de peignes rabattables
qui peuvent être repliés en fonction
des objets que vous souhaitez
charger dans le panier.
Peignes rabattables du panier
inférieur : Pour les abaisser, tirez
légèrement le peigne rabattable vers
l'avant et dégagez-le de l'encoche.
Poussez le peigne rabattable vers le
bas. Pour les élever, poussez les
peignes rabattables dans une
position verticale jusqu'à ce que le
support s'encliquette dans l'encoche.
Peignes rabattables du panier
supérieur : Pour les abaisser,
poussez légèrement les peignes
rabattables vers le bas. Pour les
élever, poussez les peignes
rabattables dans une position
verticale jusqu'à ce que le support
s'encliquette dans l'encoche.
3ème panier
Le 3ème panier 1* permet de
placer horizontalement les couteaux,
spatules et autres outils de grande
taille pour un meilleur nettoyage et un
chargement et déchargement faciles.
Disposez la coutellerie dans le 3ème
panier tel qu'illustré.
Étagère pour tasses
Les étagères pour tasses et l'espace
en dessous peuvent être utilisés pour
les petites tasses ou pour des
ustensiles plus larges.
&/,&.
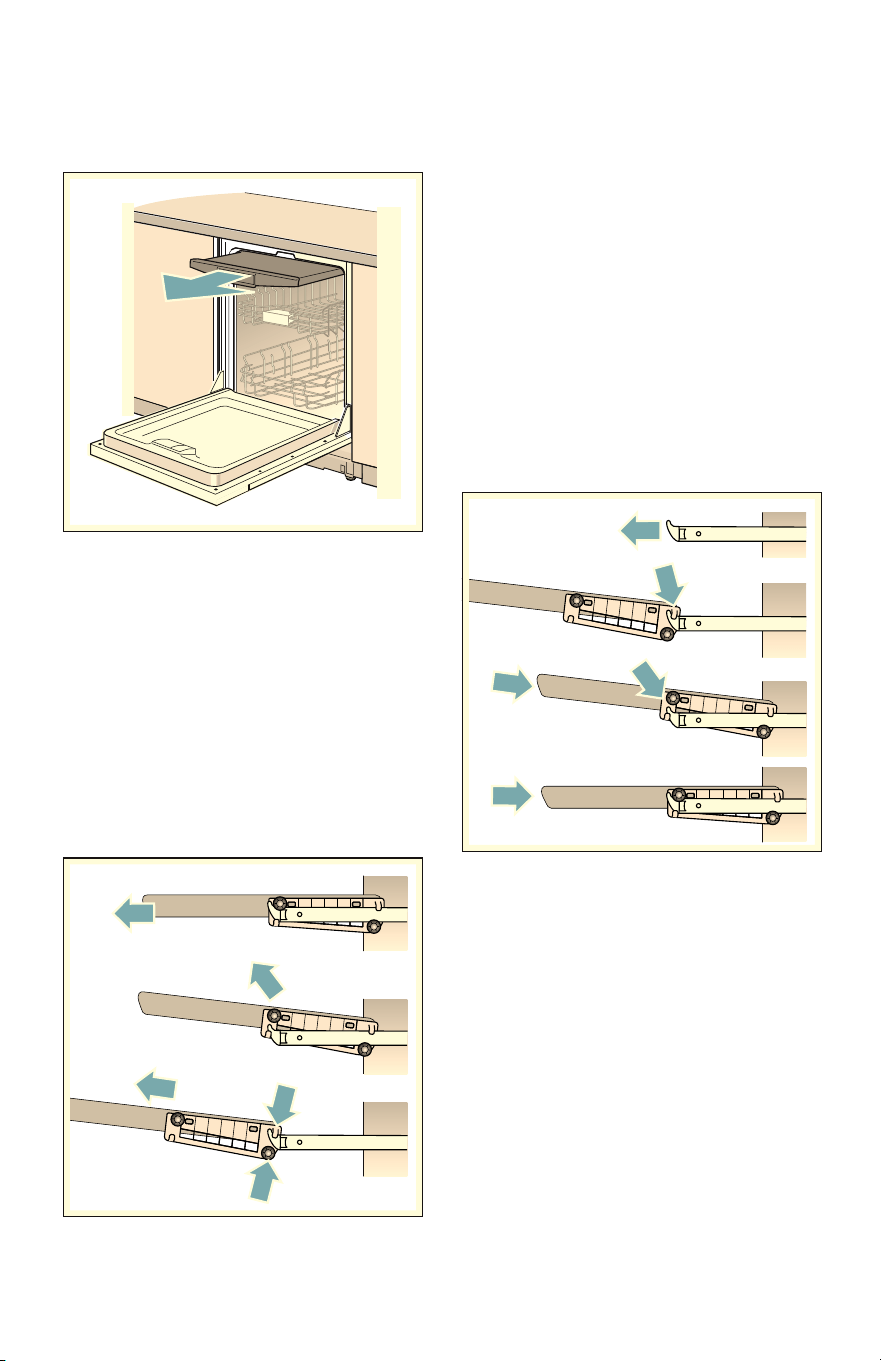
fr-ca Chargement du lave-vaisselle
60
Retirer/installer le troisième
panier
Retirer le troisième panier 1*
1.
Sortez le troisième panier
jusqu'au bout (1).
2.
Soulevez les galets supérieurs
au-dessus des crochets de butée
des deux glissières (2).
3.
Sortez le troisième panier vers
l'avant et vers le haut, de sorte
que les coins de retenue et les
galets inférieurs du panier
passent au-dessus des crochets
de butée des deux glissières (3).
Installer le troisième panier 1*
1.
Sortez les glissières du troisième
panier jusqu'au bout (1).
2.
Insérez le troisième panier incliné.
Assurez-vous que les crochets de
butée des deux glissières
coulissent entre les coins de
retenue et les galets inférieurs du
troisième panier (2).
3.
Glissez le troisième panier à
l'intérieur et soulevez les galets
supérieurs au-dessus des
crochets de butée avant des deux
glissières (3).
4.
Insérez le troisième panier en le
poussant (4).
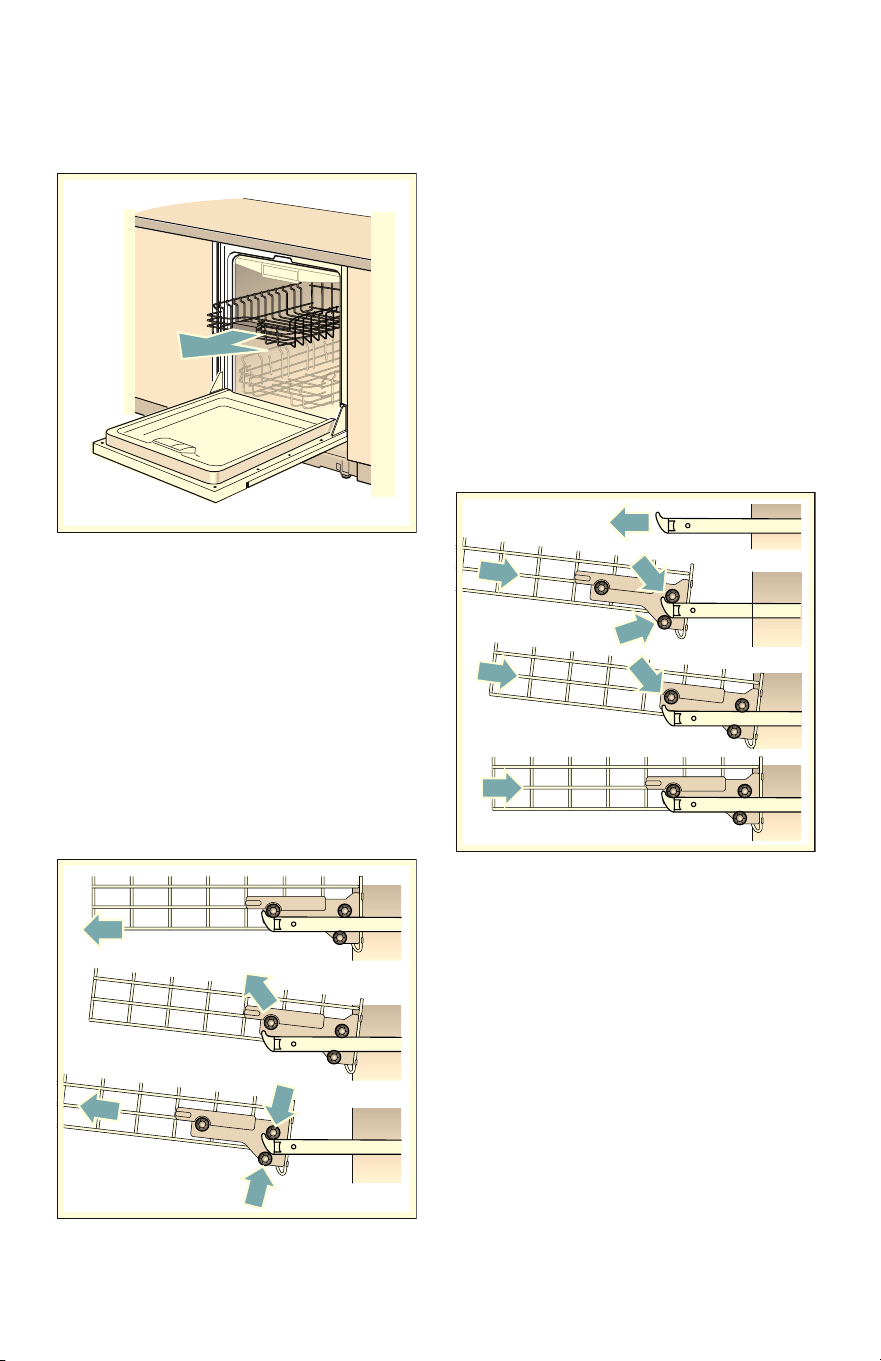
Chargement du lave-vaisselle fr-ca
61
Retirer/installer le panier
supérieur avec Rackmatic
®
Retirer le panier supérieur 12
1.
Sortez le panier supérieur
jusqu'au bout (1).
2.
Soulevez les galets avant sur le
crochet de butée de la
glissière (2).
3.
Sortez le panier supérieur vers
l'avant et vers le haut, de sorte
que les galets supérieurs et
inférieurs du panier coulissent
au-dessus des crochets de butée
des deux glissières (3).
Installer le panier supérieur 12
1.
Sortez les glissières du panier
supérieur jusqu'au bout (1).
2.
Insérez le panier supérieur incliné.
Assurez-vous que les crochets de
butée des deux glissières
coulissent entre les galets
supérieurs et inférieurs sur le côté
arrière du panier (2).
3.
Glissez le panier supérieur à
l'intérieur et soulevez les galets
supérieurs au-dessus des
crochets de butée avant des deux
glissières (3).
4.
Insérez le panier supérieur en le
poussant (4).
fr-ca Détergent
62
. Détergent
Détergent
Utilisez uniquement un détergent
spécialement conçu pour les
lave-vaisselle. Pour de meilleurs
résultats, utilisez un détergent pour
lave-vaisselle en poudre ou des
comprimés détergents.
AVIS
Pour éviter d'endommager le
lave-vaisselle :
■ évitez d'utiliser des détergents
pour vaisselle à la main dans
votre lave-vaisselle.
■ n'utilisez pas trop de détergent si
l'eau utilisée est douce.
L'utilisation d'une quantité
excessive de détergent avec une
eau douce peut rayer la verrerie
et la porcelaine fine.
Ce lave-vaisselle nécessite moins
d'eau que les autres, et par
conséquent, moins de détergent.
Avec de l'eau froide, 1 cuillère à
soupe (15 ml) de détergent suffira
pour le nettoyage. Le distributeur de
détergent dispose de traits de
graduation correspondant à
1 cuillère à soupe (15 ml) et
1,75 cuillères à soupe (25 ml).
3 cuillères à soupe (45 ml) de
détergent rempliront complètement
le distributeur de détergent.
Remarque : Si vous ignorez la dureté
de votre eau, utilisez 15 ml de
détergent. Si nécessaire, ajoutez la
quantité minimale nécessaire au
nettoyage impeccable de vos
ustensiles de cuisine.
Servez-vous des lignes de référence
du distributeur de détergent comme
aide à la mesure de la quantité de
détergent recommandée dans le
tableau suivant.
Cycle de nettoyage Eau dure/
Souillure
importante
Eau à dureté
moyenne/
Souillure moyenne
Eau douce/
Souillure légère
Heavy (Intensif) 3 c. à soupe
(45 ml)
3 c. à soupe
(45 ml)
1,75 à 3 c. à soupe
(25 à 45 ml)
Auto 1,75 à 3 c. à soupe
(25 à 45 ml)
1,75 c. à soupe
(25 ml)
1 à 1,75 c. à soupe
(15 à 25 ml)
Normal 1,75 à 3 c. à soupe
(25 à 45 ml)
1,75 c. à soupe
(25 ml)
1 à 1,75 c. à soupe
(15 à 25 ml)
Speed60
MC
1,75 c. à soupe
(25 ml)
1 à 1,75 c. à soupe
(15 à 25 ml)
1 c. à soupe
(15 ml)
Rinse (Rinçage) Aucun Aucun Aucun
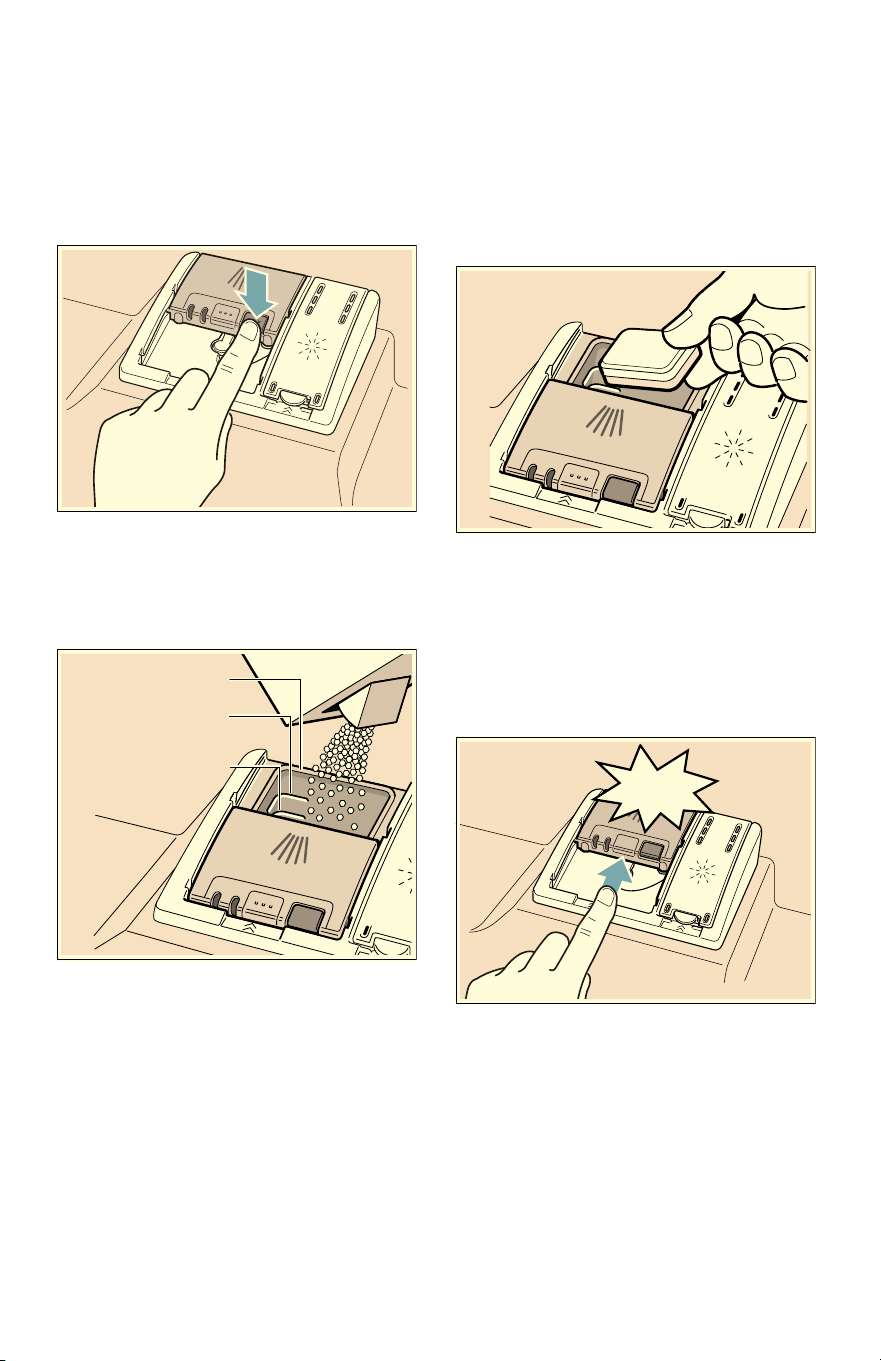
Détergent fr-ca
63
Ajout de détergent
1.
Si le distributeur de détergent 92
demeure fermé, actionnez la
barre de verrouillage 9: pour
l'ouvrir.
2.
Ne versez du détergent que dans
le distributeur de détergent
sec92. Ajoutez le détergent. Ne
remplissez pas le distributeur de
détergent outre mesure.
En cas d'utilisation de comprimés
détergents, placez-les de telle
sorte qu'ils n'entrent pas en
contact avec le couvercle.
Insérez-les à plat et non sur le
côté.
Remarque : Ne placez pas les
comprimés détergents dans le
compartiment à détergent 1B.
Placez les comprimés ou d'autres
formes de détergent directement
dans le distributeur de
détergent 92.
Dosage : voir les instructions du
fabricant sur l’emballage.
3.
Fermez le couvercle en plaçant le
doigt sur le couvercle tel
qu'illustré. Faites glisser le
couvercle pour fermer et appuyez
dessus fermement jusqu'à
entendre un clic.
Le distributeur de détergent
s'ouvrira automatiquement au
moment approprié pour le cycle
défini. Le détergent liquide ou en
poudre est dispersé dans
l'appareil et dissout, les
comprimés détergents tombent
dans le compartiment à
détergent 1B où ils se dissolvent
tout au long du cycle.
FjVRXSHPO
FjVRXSHPO
PD[
FjVRXSHPO
&/,&.

fr-ca Cycles du lave-vaisselle
64
Conseil : Si les ustensiles sont peu
souillés, une quantité de détergent
légèrement inférieure à celle
recommandée est suffisante.
/ Cycles du
lave-vaisselle
Cycles du lave-vaisselle
Remarque : L'étiquetage Energy Guide se base sur le cycle de détection du
niveau de saleté Normal comme suit : l'unité a été testée avec un distributeur
de produit de rinçage (liquide) vide 9*. Une seule dose de détergent a été
introduite dans le distributeur de détergent 92, aucun détergent n'étant utilisé
dans le cycle de prélavage. L'appareil n'a pas été soumis à un processus
d'essai tronqué aux termes des définitions décrites dans la procédure d'essai.
Nous recommandons, pour les chargements de vaisselle tel que celui décrit
dans le test de certification en matière de performance énergétique, que le
panier soit placé à la position la plus élevée.
Cycle de
nettoyage
Usage recommandé Option du cycle de nettoyage
possible
Heavy (Intensif) Idéal pour le nettoyage d'ustensiles salis
par les aliments cuits ou la graisse. Ils
nécessitent généralement un temps de
trempage ou un récurage à la main.
tout
Auto Le cycle le plus intelligent, avec la
détection de salissure la plus souple,
idéal pour la vaisselle mélangée et
souillée par les aliments.
tout
Normal
(voir la note au
bas du tableau)
Recommandé pour une utilisation,
quotidienne, régulière ou typique pour le
lavage complet d'un chargement plein de
vaisselle à souillure normale.
tout
Remarque : Pour obtenir un
rendement optimal avec une
consommation minimale d'énergie, il
est recommandé de désactiver
toutes les options et tous les réglages
disponibles à l'exception de l'option
Auto Power Off (Arrêt automatique)
- réglée à ˜:‹‚~ "Auto power off
(Arrêt automatique)" à la page 70
Speed60
MC
Nettoie les plats fraîchement souillés et
faciles à nettoyer.
Ce cycle a une durée réduite, mais il
comprend malgré tout un cycle de
séchage.
Delay (Retardé)
Extra Dry
Rinse
(Rinçage)
Utilisez ce cycle si vous désirez faire un
rinçage préalable de vos plats afin
d'éviter des odeurs. Placez les plats non
rincés dans le lave-vaisselle et
sélectionnez le cycle Rinse (Rinçage).
Utilise moins d'eau qu'un lavage manuel
et une puissance très faible.
Delay (Retardé)

Options de cycles du lave-vaisselle fr-ca
65
0 Options de cycles
du lave-vaisselle
Options de cycles du lave-vaisselle
Delay (Retardé)
Vous permet de retarder le
démarrage de votre lave-vaisselle
jusqu'à 24 heures.
Half Load
(Chargement partiel)
Peut réduire la consommation d'eau
lors du nettoyage de petites
vaisselles légèrement souillées,
remplissant pratiquement à moitié la
capacité du lave-vaisselle.
Sanitize (Désinfecter)
Cette fonction augmente les
températures et les maintient
pendant une durée prolongée afin
d'obtenir des performances
d’assainissement prédéfinies.
L'utilisation continue de cette fonction
améliore le niveau d'hygiène. Cette
option supplémentaire est idéale
pour le lavage d'articles tels que des
planches à découper et des
biberons.
Cette option peut également
améliorer le séchage. Cela pourrait
rallonger le cycle et faire augmenter
la consommation d'énergie.
Extra Dry (Extra sec)
Utilisée conjointement avec un cycle
de nettoyage (à l'exception du
rinçage), l'option Extra Dry (extra sec)
augmente la température et rallonge
le temps de séchage pour un
meilleur résultat et un plus beau
lustre. Cela pourrait faire augmenter
la consommation d'énergie.

fr-ca Options de cycles du lave-vaisselle
66
Informations sur le cycle
de lavage
Pour économiser de l'énergie, ce
lave-vaisselle dispose d'un système
EcoSense dans lequel les capteurs
du lave-vaisselle ajustent
automatiquement les variations de
longueur, de température et d'eau du
cycle en fonction du niveau de
souillure alimentaire et de la
température de l'eau entrante. Les
décisions prises par le « Contrôle
intelligent » peuvent causer un
ajustement intermittent du temps et
de l'eau utilisée pour le cycle. Les
temps du cycle de lavage sont
définis en fonction température
d'alimentation en eau de 120°F
(49° C). Si la température
d'alimentation en eau de votre
maison est autre que 120°F (49° C),
les temps de cycle de votre
lave-vaisselle peuvent être affectés.
Heavy Auto Normal
Speed60
MC
Rinse
Temps de
cycle
min.
110 - 135 105 - 129 130 - 135 60 9
Utilisation
d'eau gal/l
4,9-6,4/
18,6-24,2
3,4-6,4/
12,9-24,1
2,3-5,5/
8,8-21,0
3,8/
14,3
1,1/
4,1
Temp. de
nettoyage
°F/°C
151-160/
66-71
127-131/
53-55
113-131/
45-55
122/
50
au
départ
Temp. de
rinçage °F/°C
162/
72
153-162/
67-72
156/
69
158/
70
au
départ
Half load (chargement partiel)
Temps de
cycle
min.
114 90-105 90-99 s/o s/o
Utilisation
d'eau gal/l
4,7/
17,9
2,7-4,4/
10,2-16,5
2,8-3,7/
10,8-13,9
s/o s/o
Temp. de
rinçage °F/°C
162/
72
131-151
55-60
162/
72
s/o s/o
Sanitize (désinfecter)
Temps de
cycle
min.
130-150 125-150 135-155 s/o s/o
Utilisation
d'eau gal/l
4,9-6,4/
18,6-24,2
3,4-6,4/
12,9-24,1
2,3-5,5/
8,8-21,0
s/o s/o
Temp. de
rinçage °F/°C
162/
72
162/
72
162/
72
s/o s/o

Options de cycles du lave-vaisselle fr-ca
67
Remarque : Seuls les cycles de désinfection ont été conçus de manière à
respecter les exigences de la Section 6 de la norme NSF/ANSI relative aux
Équipements à usage résidentiel destinés à l'élimination de salissures et à la
désinfection efficace. À cet effet, aucune indication ne spécifie, directement ou
indirectement, que tous les cycles ont passé avec succès les tests de
performance en matière d’assainissement.
Extra Dry (extra sec)
Temps de
cycle
min.
130-150 125-150 135-155 60 s/o
Utilisation
d'eau gal/l
4,9-6,4/
18,6-24,2
3,5-6,5/
13,1-24,5
2,4-5,5/
8,8-20,8
3,8/
14,3
s/o
Temp. de
rinçage °F/°C
162/
72
162/
72
162/
72
158/
60
s/o
Heavy Auto Normal
Speed60
MC
Rinse

fr-ca Mise en marche du lave-vaisselle
68
1 Mise en marche du
lave-vaisselle
Mise en marche du lave-vaisselle
9 AVERTISSEMENT
RISQUE DE BLESSURES !
Pour éviter des risques de
blessures, faites toujours
attention lorsque vous ouvrez la
porte pendant ou après un
cycle de lavage car des rejets
d'eau chaude ou de vapeur
peuvent survenir. N'ouvrez pas
complètement la porte avant
que les bruits d'eau n'aient
cessés et que la vapeur ne soit
dissipée.
Protection contre une
opération involontaire
Votre lave-vaisselle est équipé d'une
fonction qui aide à empêcher toute
utilisation involontaire (par exemple
par des enfants).
Après avoir réglé le lave-vaisselle, la
porte doit être fermée dans les
4 secondes qui suivent ou l'opération
sera interrompue. Un signal
apparaîtra alors sur le panneau de
contrôle, vous invitant à appuyer de
nouveau sur le bouton Départ et à
fermer la porte.
Cette fonction s'active lorsque :
■ vous appuyez sur Départ pour
lancer un cycle de lavage
■ vous réglez le Départ différé et
appuyez sur Départ
■ vous ouvrez la porte alors que le
Départ différé est enclenché
■ vous ouvrez la porte au cours
d'un cycle de lavage
Remarque : Il est impossible de
désactiver cette fonction.
Utilisation des boutons
tactiles
Les boutons sont sensibles et
doivent être légèrement touchés.
Évitez que la graisse ou les
particules d'aliments ne se déposent
sur les boutons, cela peut activer le
lave-vaisselle.
L'essuyage et le nettoyage peuvent
également activer le lave-vaisselle.
Pour un rendement optimal, touchez
les boutons avec des mains nues et
propres.
Pour nettoyer les boutons tactiles,
essuyez-les avec un chiffon sec ou
légèrement humide.
AquaSensor
AquaSensor
L'AquaSensor est un outil de mesure
optique qui évalue la propreté de
l'eau de rinçage.
L'AquaSensor est utilisé en fonction
du cycle de lavage. Si l'AquaSensor
est activé, l'eau de rinçage « propre »
peut être réutilisée pour le prochain
rinçage et la consommation d'eau
peut ainsi être réduite de 0,8 à
1,5 gal (3 à 6 litres). Si l'eau de
rinçage n'est pas encore propre,
celle-ci est évacuée et remplacée par
de l'eau claire. Pour les cycles de
lavage automatiques, la température
ainsi que la durée du cycle peuvent
également être ajustées en fonction
du degré de souillure.

Mise en marche du lave-vaisselle fr-ca
69
Mise sous tension de
l'appareil
1.
Ouvrez complètement
l'approvisionnement en eau.
2.
Appuyez sur le bouton On/Off
(Marche/Arrêt) (.
Le cycle de nettoyage AUTO a été
réglé comme option par défaut au
démarrage de l'appareil. Ce cycle
de lavage demeure sélectionné si
vous n'appuyez sur aucun autre
bouton 0 de cycle de lavage.
Sélectionnez les options
souhaitées.
3.
Appuyez sur Start (Démarrer)
P.
Le cycle de lavage démarre.
Remarque : Votre lave-vaisselle est
protégé contre les mises en marche
involontaires. Si la porte de l'appareil
reste ouverte durant plus de 4
secondes après que vous ayez
appuyé sur le bouton Start
(démarrer), l'opération est
suspendue. Fermez la porte de
l'appareil et appuyez de nouveau sur
le bouton Start (démarrer) P.
Affichage de l'heure
Lorsqu'un cycle de nettoyage est
sélectionné, la durée restante du
cycle est indiquée sur l'afficheur 8.
La durée du cycle de nettoyage est
déterminée par la température de
l'eau lors du cycle de nettoyage, la
quantité de vaisselle, ainsi que son
degré de souillure. Elle peut aussi
varier selon le cycle de lavage choisi.
Démarrage retardé
Vous pouvez choisir de retarder le
démarrage du cycle d'environ
24 heures, par intervalles d'une
heure.
Pour définir le démarrage retardé :
1.
Appuyez sur le bouton On/Off
(Marche/Arrêt) (. Sélectionnez
un cycle.
2.
Appuyez sur le bouton Delay
(retardé) @ jusqu'à ce que le
temps affiché corresponde à vos
besoins.
3.
Appuyez sur le bouton Start
(Démarrer) P pour activer le
Démarrage retardé.
Pour annuler le démarrage retardé :
1.
Ouvrez la porte et appuyez sur le
bouton Delay (retardé) @
jusqu'à ce que œ:‹‹ soit affiché
sur l'afficheur numérique 8.
2.
Appuyez sur le bouton Start
(Démarrer) P pour enregistrer
le réglage.
Remarque : Votre lave-vaisselle est
protégé contre les mises en marche
involontaires. Si la porte de l'appareil
reste ouverte durant plus de 4
secondes après que vous ayez
appuyé sur le bouton Start
(démarrer), l'opération est
suspendue. Fermez la porte de
l'appareil et appuyez de nouveau sur
le bouton Start (démarrer) P.
Fin du cycle de nettoyage
Le cycle de nettoyage est terminé
lorsque l'afficheur 8 indique ‹:‹‹.
œ:‹‚ Retard de 1 heure
œ:ƒ… Retard de 24 heures

fr-ca Mise en marche du lave-vaisselle
70
Auto power off
(Arrêt automatique)
Ce réglage détermine la durée
d'illumination du tableau de
commande une fois le cycle terminé.
Afin d'économiser de l'énergie, le
réglage recommandé est ˜:‹‚.
Ce paramètre peut être réglé dans la
plage de ˜:‹‹ à ˜:‹ƒ.
Pour changer le réglage :
1.
Appuyez sur le bouton On/Off
(Marche/Arrêt) (.
2.
Maintenez la touche #
enfoncée et appuyez sur le
bouton Start (Démarrer) P
jusqu'à ce que l'afficheur 8
indique š:‹x (x peut être un
nombre quelconque).
3.
Relâchez les deux boutons.
4.
Appuyez sur la touche de fonction
# jusqu'à ce que l'afficheur 8
indique ˜:‹x.
5.
Appuyez sur la touche de fonction
3 jusqu'à ce que l'afficheur
corresponde à vos besoins.
6.
Appuyez sur le bouton Start
(Démarrer) P.
Mise hors tension de
l'appareil
Peu de temps après la fin du cycle
de nettoyage :
1.
Appuyez sur le bouton On/Off
(Marche/Arrêt) (.
2.
Fermez l'approvisionnement en
eau.
3.
Sortez les ustensiles lorsque
ceux-ci ont refroidi.
9 AVERTISSEMENT
RISQUE DE BLESSURES !
Pour éviter des risques de
blessures, faites toujours
attention lorsque vous ouvrez la
porte pendant ou après un
cycle de lavage car des rejets
d'eau chaude ou de vapeur
peuvent survenir. N'ouvrez pas
complètement la porte avant
que les bruits d'eau n'aient
cessés et que la vapeur ne soit
dissipée.
Interruption du cycle de
nettoyage
9 ATTENTION
Une pression trop excessive
peut provoquer l'ouverture de la
porte et le ruissellement d'eau!
Si la porte a été ouverte et que
celle-ci est chaude ou que le
raccordement est chaud,
laissez-la toujours entrouverte
quelques minutes, puis
fermez-la.
1.
Appuyez sur le bouton On/Off
(Marche/Arrêt) (.
Les DEL s'éteignent. Le cycle de
nettoyage a été sauvegardé.
˜:‹‹ le lave-vaisselle ne s'arrête
pas automatiquement
˜:‹‚ le lave-vaisselle s'arrête
automatiquement après
1 minute
˜:‹ƒ le lave-vaisselle s'arrête
automatiquement après
120 minutes (2 heures)

Mise en marche du lave-vaisselle fr-ca
71
2.
Pour relancer le cycle de
nettoyage, Fermez la porte de
l'appareil et appuyez de nouveau
sur le bouton On/Off
(Marche/Arrêt) (.
Remarque : Votre lave-vaisselle est
protégé contre les mises en marche
involontaires. Si la porte de l'appareil
reste ouverte durant plus de 4
secondes après que vous ayez
appuyé sur le bouton Start
(démarrer), l'opération est
suspendue. Fermez la porte de
l'appareil et appuyez de nouveau sur
le bouton Start (démarrer) P.
Arrêt du cycle de nettoyage
(réinitialisation)
Arrêt du cycle de nettoyage
1.
Maintenez enfoncé le bouton
Start (Démarrer) P pendant
environ 3 secondes jusqu'à ce
que l'afficheur indique ‹:‹‚.
2.
Patientez environ 1 minute, le
temps pour le lave-vaisselle d'être
drainé.
3.
Appuyez sur le bouton On/Off
(Marche/Arrêt) (.
Vous pouvez maintenant redémarrer
le lave-vaisselle et commencer un
nouveau cycle si désiré.
Changement du cycle de
lavage
Après avoir appuyé sur la touche
Start P, il est impossible
de changer de cycle de lavage. Un
changement de cycle de lavage n’est
possible que via l’abandon
d’un cycle de lavage (Réinitialisation
(Reset)).
Verrouillage automatique du
panneau/à l'épreuve des
enfants
La sécurité enfants empêche
l'ouverture du lave-vaisselle lorsqu'il
fonctionne afin de prévenir
l'interruption du cycle de nettoyage
(par ex. par des enfants).
Pour régler le verrouillage :
1.
Lancez le cycle de nettoyage
désiré.
2.
Maintenez enfoncé le bouton
au-dessous duquel il est inscrit «
Child Lock » (sécurité enfants)
pendant environ 3 secondes,
jusqu'à ce que l'afficheur indique
’–.
Le verrouillage est enclenché.
’– devrait maintenant apparaître si
un bouton est enfoncé. Le
programme ne sera pas réinitialisé.
Pour désactiver le verrou, maintenez
enfoncé le bouton « Child Lock »
(sécurité enfants) pendant environ
3 secondes, jusqu'à ce que
l'afficheur n'indique plus ’–.
Le verrouillage est complètement
désactivé une fois le cycle de
nettoyage terminé. Dans l'éventualité
d'une panne, le verrouillage
demeurera enclenché. Le
verrouillage doit être activé à chaque
nouveau cycle de nettoyage.

fr-ca Entretien et maintenance
72
Séchage intensif
Le rinçage final utilise une
température supérieure qui améliore
le résultat de séchage. Cela pourrait
rallonger le cycle et faire augmenter
la consommation d'énergie.
(Attention si les ustensiles sont
fragiles!)
Cet équipement possède deux
réglages :
1.
Appuyez sur le bouton On/Off
(Marche/Arrêt) (.
2.
Maintenez la touche #
enfoncée et appuyez sur le
bouton Start (Démarrer) P
jusqu'à ce que l'afficheur8
indique š:x (x peut être un
nombre quelconque).
3.
Relâchez les deux boutons.
4.
Appuyez sur la touche de fonction
# jusqu'à ce que l'afficheur 8
indique la valeur réglée à l'usine
š :‹‹.
5.
Appuyez sur la touche de fonction
3 pour mettre la fonction Extra
sec sur On (activée) š:‹‚ ou sur
Off (désactivée) š:‹‹.
6.
Appuyez sur le bouton Start
(Démarrer) P pour enregistrer
le réglage.
2 Entretien et
maintenance
Entretien et maintenance
Une inspection régulière et une
maintenance de votre appareil vous
aideront à prévenir d'éventuelles
pannes. Ceci vous permet de sauver
du temps et de parer à de nouveaux
problèmes.
État général du
lave-vaisselle
AVIS
■ N'utilisez jamais un nettoyeur à
vapeur pour laver votre
lave-vaisselle. Le fabricant ne sera
en aucun cas responsable des
dégâts causés.
■ Essuyez régulièrement la face
avant de l'appareil à l'aide d'un
chiffon légèrement humide (il est
important d'utiliser de l'eau et une
petite quantité de savon liquide).
Évitez d'utiliser des éponges,
elles pourraient rayer les
surfaces.
■ N'utilisez pas de lingettes à base
d'eau de javel, elles pourraient
endommager la surface ou
l'impression.
■ Appareils en acier inoxydable :
pour empêcher la corrosion,
n'utilisez pas d'éponges ou de
détergents à base de chlore.
Utilisez un produit à polir pour
acier inoxydable pour sceller et
protéger la surface. N'utilisez pas
de nettoyants ou de lingettes à
base de chlore.
■ Nettoyez régulièrement les bords
extérieurs du panneau intérieur de
la porte afin d'éliminer les résidus
déposés lors du chargement
normal. Si des taches
apparaissent sur l'acier
š:‹‹ Off (Désactivé)
š:‹‚ On (Activé)
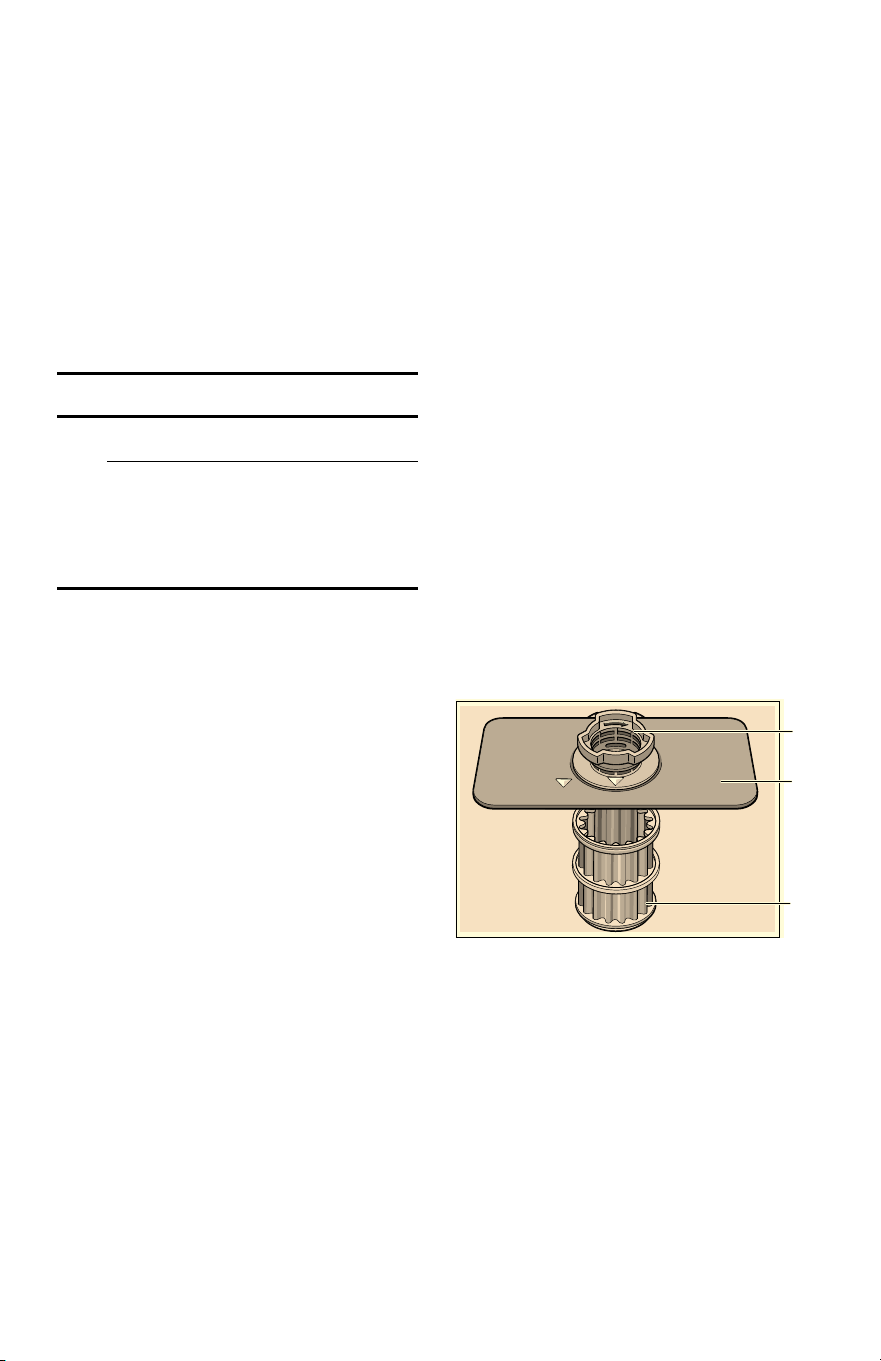
Entretien et maintenance fr-ca
73
inoxydable, assurez-vous que
l'agent de rinçage est rempli et
fonctionne correctement.
■ Nettoyez régulièrement le joint de
la porte avec un chiffon
légèrement humide afin d'éliminer
les particules alimentaires
déposées lors du chargement
normal et qui peuvent causer des
odeurs. Un joint de porte souillé
peut empêcher le bon
verrouillage de celle-ci.
9 AVERTISSEMENT
Faites preuve de prudence
lorsque vous démontez les
pièces pour le nettoyage, car
certains débris peuvent être
tranchants.
Filtres
Le système de filtre Bosch
®
1b est
conçu pour éviter la nécessité de
faire un nettoyage préalable des
résidus alimentaires salissants
incrustés sur vos plats. Il vous suffit
tout simplement de racler la vaisselle
pour en éliminer les résidus
d'aliments avant de la charger. Ce
procédé permet de faire des
économies de temps, d'eau et
d'énergie nécessaire au chauffage
de l'alimentation en eau de votre
maison.
Le système de filtrage de votre
lave-vaisselle est conçu de manière à
filtrer à 100 % l'eau entrant dans les
gicleurs, assurant ainsi un apport
continu d'eau propre nécessaire à
l'élimination des résidus d'aliments
de votre vaisselle.
Éléments de filtrage
Le système de filtration 1b est
constitué de trois éléments.
A Filtre à gros éléments
Il empêche aux objets qui ne
devraient pas être placés dans
votre lave-vaisselle
d'endommager le système de
pompage du lave-vaisselle ou
d'obstruer le système
d'évacuation de votre maison.
B Filtre fin plat
Il empêche aux particules
d'aliments d'entrer dans la
chambre de lavage et dirige ces
particules vers le micro-filtre.
$
%
&
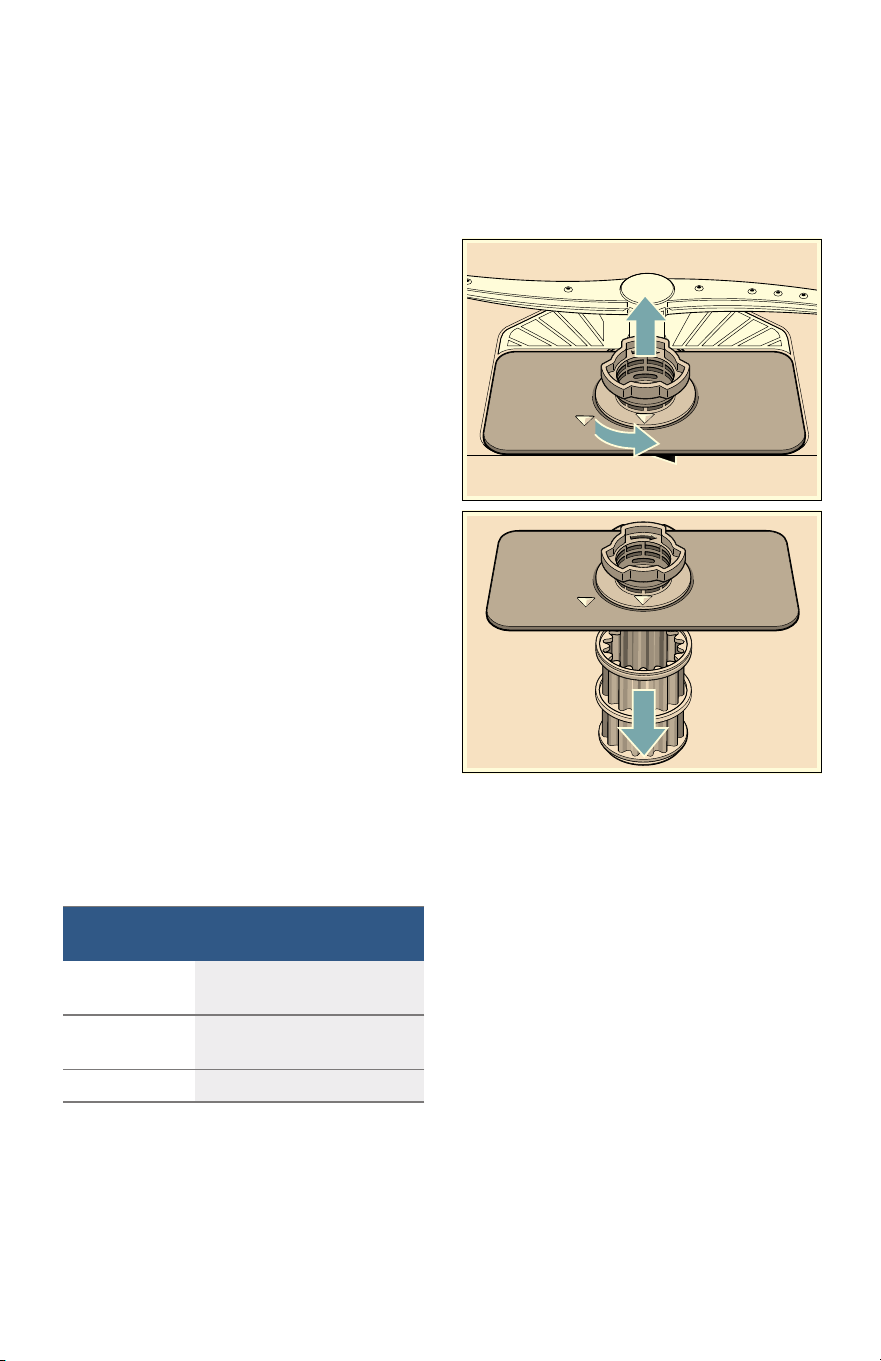
fr-ca Entretien et maintenance
74
Intervalles de nettoyage
Le système de filtration 1b est
conçu de manière à minimiser
l'entretien tout en assurant un
rendement de nettoyage élevé et une
faible consommation d'énergie.
Selon les habitudes d'utilisation et la
dureté de l'eau, le système de
filtration nécessite un certain
entretien afin de garder un haut
rendement de nettoyage.
Vous pouvez nettoyer le système de
filtration :
■ lorsque vous y trouvez des
résidus d'aliments ou si des
éléments sont retenus dans le
filtre à gros éléments.
■ en cas de baisse du rendement
de nettoyage ou si un film
granuleux se forme sur la
vaisselle.
En cas de nettoyage de résidus
alimentaires à incrustation normale
raclés avant l'insertion de la vaisselle
dans l'appareil, dans un ménage où
le lave-vaisselle fonctionne un jour
sur deux, le filtre de l'appareil doit
être nettoyé :
Remarque : Nettoyez le filtre après le
lavage d'une vaisselle à grande
quantité de résidus alimentaires ou
d'une vaisselle à forte teneur en
fécule afin de garder un rendement
optimal.
Pour vérifier ou nettoyer le système
de filtration :
1.
Dévissez le filtre à gros éléments
tel qu'illustré et retirez tout le
système de filtration.
2.
Retirez tout résidu et nettoyez les
filtres en les rinçant à l'eau claire.
Remarque : n'utilisez pas des
brosses abrasives ou des chiffons
de laine, etc., ils pourraient
endommager le filtre.
3.
Remontez le système de filtration
dans l'ordre inverse et fixez le
filtre à gros éléments en le vissant
jusqu'à ce que les flèches de
marquage soient alignées.
C Micro-filtre
Il dirige les particules les plus
petites vers le système de
plomberie de la maison.
Intervalle de
nettoyage
Utilisez ce paramètre,
3-6 fois par an si vous rincez avant le
chargement
4-12 fois par
an
si vous grattez simplement
avant le chargement
12 fois par an en cas d'eau dure
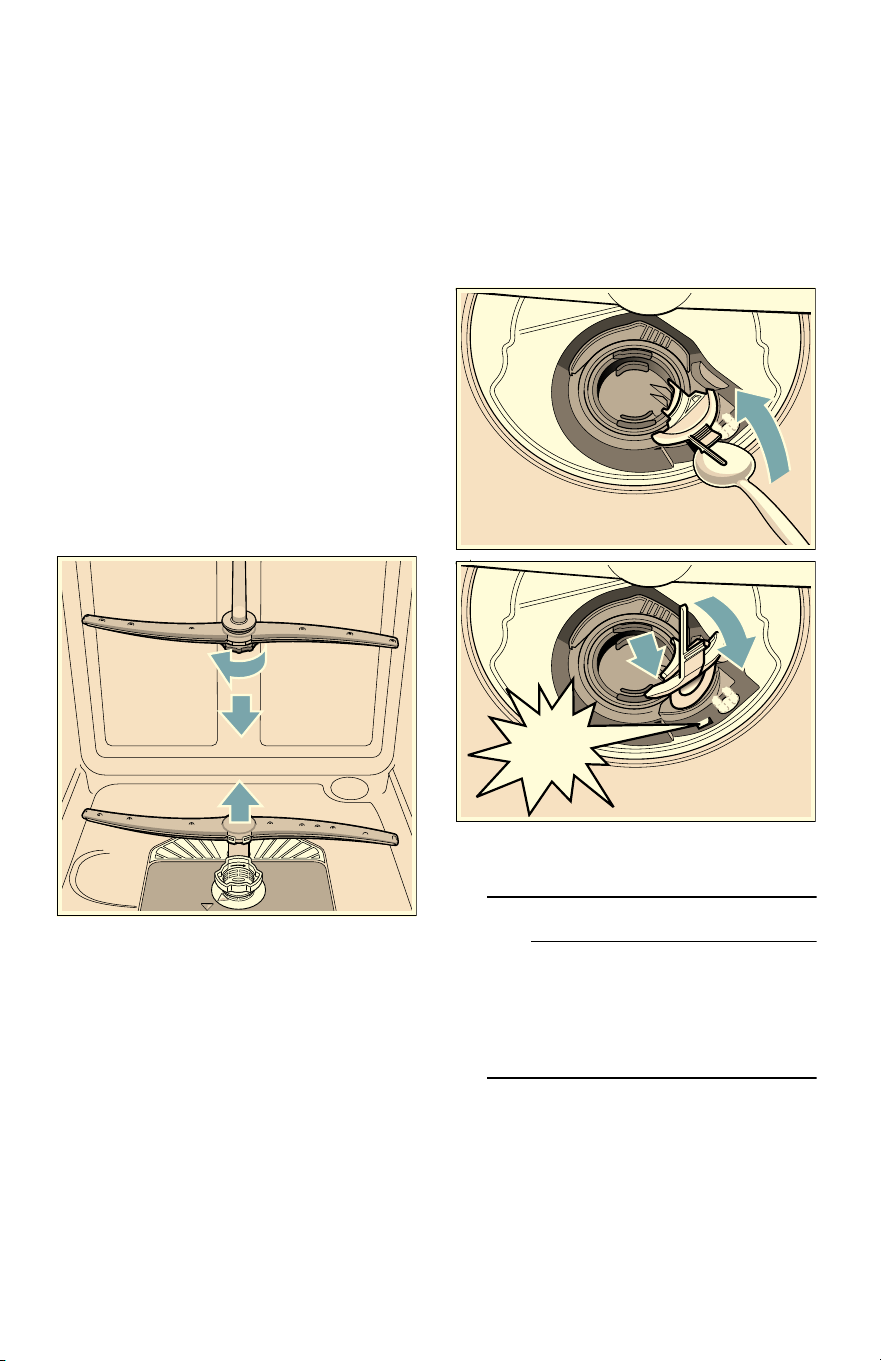
Entretien et maintenance fr-ca
75
Bras gicleurs
Vérifiez les dépôts 1:, 1R de
graisse et de tartre sur les gicleurs.
En cas de présence de dépôts :
■ dans le distributeur de
détergent, 92 faites le plein de
détergent et démarrez l'appareil à
vide, au cycle dont la température
est la plus élevée.
~ "Informations sur le cycle de
lavage" à la page 66
■ nettoyez l'appareil à l'aide de
détergents/nettoyants
spécialement appropriés pour les
lave-vaisselles.
■ Dévissez le bras gicleur supérieur
1: et décrochez le bras gicleur
inférieur 1R tel qu'indiqué.
Contrôler la présence de dépôts.
Pompe pour eaux
résiduaires
De gros résidus alimentaires
présents dans l'eau de rinçage et
non retenus par les filtres peuvent
obstruer la pompe pour eaux
résiduaires. Dans ce cas :
■ débranchez l'appareil du réseau
électrique.
■ retirez les filtres. ~ "Filtres"
à la page 73
■ écopez l'eau résiduelle - utilisez
une éponge si besoin.
■ à l'aide d'une cuillère, débloquez
le couvercle de la pompe jusqu'à
entendre un clic, saisissez-le
ensuite et tirez-le jusqu'à ce
qu'une légère résistance se fasse
sentir, puis tirez-le vers l'avant.
■ contrôlez le compartiment interne
et éliminez tout objet étranger.
9 AVERTISSEMENT
Faites preuve de prudence
lorsque vous démontez les
pièces pour le nettoyage,
car certains débris peuvent
être tranchants.
■ placez le couvercle à sa position
initiale, appuyez et bloquez-le.
■ remontez les filtres.
&OLFN

fr-ca Entretien et maintenance
76
Remarque : La pompe de vidange
ne fonctionnera pas correctement si
elle n'est pas totalement insérée,
jusqu'à ce qu'elle émette un « clic ».
Rangement de l'appareil en
cas d'inactivité
AVIS
Par temps chaud, avant d'aller en
vacances, en plus de l'arrêt de la
vanne principale, arrêtez également
l'alimentation en eau au point le plus
proche du lave-vaisselle. Ne pas
laisser la vaisselle sale dans
l'appareil et laisser la porte
légèrement ouverte. Par temps froid,
veuillez respecter les instructions
suivantes relatives à la préparation
de l'appareil pour l'hiver.
Préparation de l'appareil
pour l'hiver
AVIS
En cas d'inutilisation de votre
lave-vaisselle pour une période dans
un emplacement aux températures
hivernales (maison de vacances ou
pendant une période de vacances),
faites préparer votre lave-vaisselle
pour l'hiver par un personnel qualifié.

Dépannage fr-ca
77
3 Dépannage
Dépannage
Les lave-vaisselle peuvent
occasionnellement présenter des
problèmes sans rapport avec un
dysfonctionnement dudit
lave-vaisselle. Les informations
suivantes peuvent vous aider à
résoudre un problème afférent au
lave-vaisselle sans la nécessité de
recourir à un professionnel.
Problème Cause Mesure
Le
lave-vaisselle
ne démarre pas
La porte peut ne pas être
correctement verrouillée.
Fermez complètement la porte jusqu'à
l'encliquetage.
L'unité peut ne pas être allumée. Appuyez sur l'interrupteur d'alimentation
principale ( pour la mettre sous tension.
Unité non réinitialisée ou cycle
précédent inachevé.
Réinitialisez l'unité.
Démarrage retardé activé. Réinitialisez le démarrage retardé.
Interruption de la tension
d'alimentation électrique vers le
lave-vaisselle ou fusible sauté.
Vérifiez le disjoncteur.
La porte a probablement été
fermée sans que le cycle ne soit
préalablement sélectionné.
Sélectionnez un cycle et fermez la porte.
L'approvisionnement en eau est
probablement coupé.
Vérifiez et rétablissez l'approvisionnement
en eau.
Le cycle ne
continue pas
après que la
porte soit
ouverte et
fermée au
cours d’un
cycle.
La porte est ouverte pendant plus
de 4 secondes après le début d’un
cycle.
Appuyez de nouveau sur le bouton Start
(Démarrer).
L'afficheur ne
s'allume pas
Un fusible a peut être sauté ou le
disjoncteur s'est déclenché.
Vérifiez le fusible ou le boîtier de disjoncteur
et remplacez le fusible ou réinitialisez le
disjoncteur si nécessaire.
Porte non fermée ou verrouillée.
Remarque : Pour les modèles
équipés de commandes situées sur
la partie supérieure de la porte,
l'afficheur ne s'allume que lorsque
la porte est ouverte et les
commandes sont visibles.
Assurez-vous que la porte est correctement
fermée et complètement verrouillée.

fr-ca Dépannage
78
Le
lave-vaisselle
semble
fonctionner
trop longtemps
L'eau entrante n'est pas assez
chaude.
Avant de démarrer un cycle, ouvrez le
robinet d'eau chaude au niveau de l'évier le
plus proche du lave-vaisselle.
Le temps de cycle peut varier en
raison de l'état de souillure et de
l'eau.
Les capteurs dans le lave-vaisselle
augmentent automatiquement le temps du
cycle pour assurer un bon lavage lorsque la
souillure est détectée.
Le distributeur de 9* produit de
rinçage est vide ou le réglage du
distributeur à “0”.
Ajoutez le produit de rinçage ou changez le
réglage.
Lave-vaisselle connecté à
l'alimentation en eau froide.
Remarque : Vérifiez la durée
spécifique du cycle de lavage.
~ "Informations sur le cycle de
lavage" à la page 66
Vérifiez que le lave-vaisselle est connecté à
la plomberie d'alimentation en eau chaude.
Les plats ne
sont pas assez
propres
Mouvement du bras gicleur bloqué. Assurez-vous que le mouvement bras
gicleur n'est pas bloqué en actionnant
manuellement les bras des gicleurs
rotatifs 1:, 1Ravant le démarrage du
cycle.
Buses du bras gicleur obstruées. Retirez les bras gicleurs 1:, 1R et
nettoyez-les. ~ "Bras gicleurs"
à la page 75
Utilisation inadéquate de
détergents.
Augmentez ou réduisez la quantité de
détergent en fonction de la dureté de l'eau.
Les filtres 1b pourraient être
obstrués.
Nettoyez les filtres 1b. ~ "Éléments de
filtrage" à la page 73
La vaisselle s'emboîte ou les
articles sont chargés de manière
très rapprochée.
Re-disposez le chargement de manière à ce
que les jets d'eau parviennent à tous les
objets dans le lave-vaisselle.
~ "Chargement du lave-vaisselle"
à la page 54
Le cycle de nettoyage sélectionné
n'est pas adapté aux conditions de
souillure alimentaire.
Reportez-vous aux informations sur le cycle
de lavage. ~ "Informations sur le cycle de
lavage" à la page 66
Rayures sur la
verrerie ou
résidus sur les
plats
Valeur du produit de rinçage
incorrecte.
Selon la dureté de l'eau, ajustez le
distributeur d'agent de rinçage 9*.
~ "Produit de rinçage" à la page 52

Dépannage fr-ca
79
Les plats ne
sèchent pas
complètement
Remarque :
Le plastique ou
le téflon ne
sèchent pas de
la même
manière que
d'autres
articles en
raison de leurs
propriétés
inhérentes.
Le distributeur de produit de
rinçage 9* est vide ou la réglage
est incorrect.
Ajoutez du produit de rinçage ou changez la
réglage - l'utilisation d'un agent de rinçage
améliore le séchage, utilisez le cycle Auto,
utilisez l'option Désinfecter.
Chargement incorrect de vaisselle. Réorganisez la chargement pour éviter tout
enchevêtrement d'articles.
~ "Chargement du lave-vaisselle"
à la page 54
Remarque : Certains modèles offrent une
option de chauffage supplémentaire pour
améliorer les performances de séchage.
Odeur
Remarque :
L'essai à flot se
fait en usine.
Parfois, de l'eau
peut être
présente dans
le lave-vaisselle
au moment de
l'achat, ce qui
peut laisser une
odeur.
Présence de débris d'aliments au
fond du lave-vaisselle.
Retirez les filtres et nettoyez-les.
~ "Entretien et maintenance"
à la page 72
Des particules d'aliments sont
présentes près du joint de porte.
~ "Entretien et maintenance"
à la page 72
Présence d'eau résiduelle au fond
du lave-vaisselle.
Assurez-vous que l'appareil a été
entièrement vidangé au cycle précédent.
Flexible de vidange obstrué. Faites tout corps obstruant le flexible de
vidange par un personnel qualifié.
Remarque : Si l'odeur persiste, activez le
cycle Normal/ Régulier jusqu'à ce que le
système soit vidangé et le cycle arrêté et
mettez 8 onces de vinaigre blanc distillé sur
le panier supérieur puis terminez le cycle.
Les voyants
Lave-vaisselle
non rempli
d'eau ou
« Vérifier
l'alimentation
en eau »
s'affiche
Obstruction dans le système
d'approvisionnement en eau.
Assurez-vous que la vanne d'alimentation en
eau (se trouvant généralement en dessous
de l'évier de cuisine) est ouverte et vérifiez
que la tuyauterie d'alimentation en eau n'est
pas entortillée ou obstruée.
Le cycle de nettoyage précédent ne
s'est pas achevé.
~ "Mise en marche du lave-vaisselle"
à la page 68
Le démarrage retardé est actif. Annulez le démarrage retardé ou patientez
jusqu'à la fin du compte à rebours.
Approvisionnement en eau du
domicile arrêté.
Vérifiez l'approvisionnement en eau.
Panneau de
bordure de toit
décoloré ou
marqué
Agent de nettoyage abrasif utilisé. Utilisez des détergents doux avec un chiffon
légèrement humide.

fr-ca Dépannage
80
--------
Bruits au cours
du cycle de
lavage
La vaisselle est probablement mal
disposée.
La présence d'un bruit de circulation d'eau
est normale, mais si vous suspectez que les
objets s'entrechoquent les uns contre les
autres ou contre les bras gicleurs, alors
contrôlez la bonne disposition de la
vaisselle. ~ "Chargement du
lave-vaisselle" à la page 54
Fuites d'eau
Mousses. Des détergents de mauvaise qualité ou un
remplissage excessif du distributeur de
produit de rinçage peut provoquer
l'apparition de mousses et de fuites - utilisez
uniquement des détergents appropriés pour
le lave-vaisselle. Si la mousse persiste,
ajoutez une cuillère à soupe d'huile végétale
dans la partie inférieure du lave-vaisselle et
exécutez le cycle désiré.
Le joint de porte ne peut être extrait
du rail.
Assurez-vous que le joint de porte se trouve
dans le rail.
L'aération réduisant la
condensation est bloquée.
Assurez-vous que l'aération réduisant la
condensation n'est pas bloquée.
Installation incorrecte. Faites vérifier l'installation correcte par un
personnel qualifié (approvisionnement en
eau, système de drainage, nivellement,
plomberie).
Taches sur la
cuve à lavage
Les taches sur la paroi interne du
lave- vaisselle sont dues à la dureté
de l'eau.
Du jus de citron concentré peut réduire la
formation des taches dues à la dureté de
l'eau. Activez le cycle Normal/Regulair
jusqu'à ce que le système soit vidangé et le
cycle arrêté, puis mettez 8 onces de jus de
citron concentré sur le panier supérieur puis
terminez le cycle. Cette mesure peut être
prise régulièrement pour éviter la formation
de taches.
Contact de l'argenterie avec le bac
à laver.
Assurez-vous que l'argenterie n'entre pas en
contact avec le bac à laver pendant
l'exécution d'un cycle.
Le couvercle
du distributeur
de détergent
ne se ferme
pas
Fonctionnement incorrect du
couvercle du détergent.
Pour les instructions sur l'ouverture et la
fermeture du distributeur
Le cycle ne s'est pas achevé ou le
cycle a été interrompu.
~ "Mise en marche du lave-vaisselle"
à la page 68
Impossible de
sélectionner le
cycle désiré
Le cycle précédent ne s'est pas
achevé.
~ "Mise en marche du lave-vaisselle"
à la page 68
Service à la clientèle fr-ca
81
4 Service à la clientèle
Service à la clientèle
Votre lave-vaisselle BoschMC ne
nécessite pas d'entretien autre que
les mesures décrites dans la
rubrique Entretien et maintenance du
présent manuel. En cas de
défaillance de votre lave-vaisselle,
veuillez vous référer à la rubrique
Guide de dépannage du présent
manuel, avant de contacter le service
client. Si la maintenance est
nécessaire, contactez votre
revendeur ou installateur, ou un
centre de service agréé. N'essayez
pas de réparer votre appareil
vous-même. Tout travail effectué par
un personnel non autorisé peut
annuler la garantie.
En cas de problème avec votre
lave-vaisselle BoschMC et si vous
n'êtes pas satisfait du service que
vous avez reçu, veuillez suivre les
étapes suivantes jusqu'à ce que le
problème soit résolu à votre entière
satisfaction :
1.
Contactez-nous au
1-800-944-2904
2.
Contactez le Service client à partir
de notre site internet :
www.bosch-home.com/us or
www.bosch-home.ca
3.
Contactez votre installateur ou le
Fournisseur de services agréé
Bosch de votre région.
4.
Écrivez-nous :
BSH Home Appliances Corporation
1901 Main Street
Irvine, CA 92614
Veuillez vous assurer d'indiquer les
informations relatives à votre modèle
ainsi qu'une explication du problème
et la date à laquelle celui-ci a débuté.
Vous trouverez les informations
relatives au modèle et au numéro de
série sur l'étiquetage se trouvant à
l'extrémité de la porte du
lave-vaisselle. Veuillez faire une copie
de votre facture et conservez-la avec
ce manuel. Pour bénéficier du
service de garantie, il peut être
demandé au client de présenter une
preuve d'achat de l'équipement.

fr-ca Déclaration de la garantie limitée du produit
82
‡ Déclaration de la
garantie limitée du
produit
Déclaration de la garantie limitée du produit
Ce que couvre cette
garantie et à qui elle
s'applique :
La garantie limitée prévue par BSH
Home Appliances Corporation (BSH)
dans cette Déclaration de garantie
limitée du produit s'applique aux
lave-vaisselle Bosch® (« Produit »)
mis à votre disposition, en tant que
premier acquéreur, à condition que
le Produit ait été acheté :
■ pour vos besoins, personnels
(non-commerciaux), et qu'il ait été
utilisé, à tout moment, à des fins
familiales normales ;
■ neuf au détail (pas en tant
qu'objet exposé, « en l'état », ou
un modèle précédemment
retourné), et non pour la revente,
ou pour une utilisation
commerciale ; et
■ aux États-Unis ou au Canada, et
est à tout moment resté
opérationnel dans le pays d'achat.
Les garanties mentionnées dans
le présent manuel s'appliquent
uniquement au premier acquéreur
du Produit et ne sont pas
transférables.
Assurez-vous de retourner votre carte
d'enregistrement ; alors qu'il n'est
pas nécessaire d'effectuer une
couverture de garantie, il s'agit
toutefois du meilleur moyen pour
BSH de vous notifier en cas de
notice de sécurité ou de rappel de
produit.
Quelle est la durée de la
garantie
BSH garantit que le Produit est
exempt de défauts matériels et de
défauts liés à la finesse d'exécution,
laquelle garantie s'applique pour une
période de trois cent soixante-cinq
jours (365) à compter de la date
d'achat. La période susmentionnée
commence à partir de la date d'achat
et ne doit pas être limitée, prolongée,
ou interrompue pour une quelconque
raison.
Ce Produit est également garanti
contre tout défaut de matériau et de
fabrication apparent (tels les
éraflures sur l'acier inoxydable, les
défauts d'aspect de la peinture ou de
la porcelaine, les ébréchures, les
bosselures, ou autres dégâts au fini
du Produit), pendant une période de
trente (30) jours à compter de la date
d'achat ou de la date de clôture pour
une nouvelle construction. Cette
garantie relative à l'apparence exclut
les légères variations de couleur
découlant des différences inhérentes
aux pièces peintes et en porcelaine,
ainsi que découlant des différences
causées par l'éclairage de cuisine,
l'emplacement du produit ou d'autres
facteurs similaires. Cette garantie
relative à l'apparence exclut plus
particulièrement tout appareil
électroménager en exposition, de
plancher, « En l'état » ou de
stock « B ».

Déclaration de la garantie limitée du produit fr-ca
83
Garantie limitée prolongée
BSH fournit également les garanties
limitées supplémentaires ci-après :
■ 5 ans de garantie limitée sur les
appareils électroniques : BSH se
chargera de la réparation ou du
remplacement de tout
microprocesseur BSH ou carte de
circuit imprimée en cas de
défaillance matérielle ou de
défauts liés à la fabrication (à
l'exception des coûts de travail).
■ 5 ans de garantie limitée sur les
paniers de vaisselle : BSH se
chargera du remplacement du
panier supérieur ou inférieur
(excepté les composants de
panier) si le panier présente des
défaillances matérielles ou des
défauts liés à la fabrication (à
l'exception des coûts de travail).
■ Garantie à vie contre la rouille de
l'acier inoxydable : BSH se
chargera de la réparation ou du
remplacement de votre
lave-vaisselle par un modèle
similaire ou un tout nouveau
modèle pratiquement équivalent
ou meilleur en termes de
fonctionnalités, si le revêtement
intérieur rouille (à l'exception des
coûts de travail).
■ BSH se chargera de la réparation
ou du remplacement de la porte
en acier inoxydable en cas de
rouille (à l'exclusion des coûts de
travail).
Réparer/Remplacer, Votre
recours exclusif
Pendant cette période de garantie,
BSH ou l'un de ses fournisseurs de
services agréés réparera
gratuitement votre Produit (soumis à
certaines restrictions
susmentionnées) si celui-ci présente
des défauts de fabrication matériels
ou des défauts liés à la finesse
d'exécution. Si des tentatives de
réparation du Produit ont été
entreprises, sans succès toutefois,
alors BSH remplacera votre Produit
(des modèles améliorés peuvent être
mis à votre disposition, à la seule
discrétion de BSH, moyennant une
majoration). Toutes les pièces et tous
les composants retirés demeurent la
propriété de BSH à sa seule
discrétion. Toutes les pièces
remplacées et/ou réparées doivent
assumer l'identité de la pièce
originale aux fins de la présente
garantie et cette dernière ne doit pas
être prolongée en considération de
telles pièces. La seule responsabilité
de BSH, en vertu des présentes, se
limite à la réparation des Produits
défectueux au départ de l'usine, par
le biais d'un fournisseur de services
BSH pendant les heures de travail
normales. Pour des considérations
de sécurité et d'endommagement de
propriétés, BSH vous recommande
vivement de ne pas essayer de
réparer le Produit vous-même, ou de
faire appel à un agent d'entretien non
autorisé ; BSH n'est en aucun cas
responsable des réparations ou des
travaux effectués par un agent non
qualifié. Si vous faites appel à un
agent d'entretien autre qu'un
fournisseur de services agréé pour la
réparation de votre Produit, CETTE
GARANTIE SERA
AUTOMATIQUEMENT ANNULÉE.
Les fournisseurs de service agréés
désignent ces personnes ou
entreprises ayant reçu des
formations spéciales sur les produits
BSH, et qui ont, de l'avis de BSH, une
très bonne réputation en matière de
service apporté à la clientèle et
d'aptitude technique (notez qu'elles
sont des entités indépendantes et
non des agents, partenaires, sociétés
affiliés ou représentants de BSH).
Nonobstant ce qui précède, BSH
n'encourra aucune responsabilité,
pour le Produit si ce dernier est
utilisé dans une zone éloignée (à
plus de 100 miles d'un fournisseur

fr-ca Déclaration de la garantie limitée du produit
84
de services agréé) ou s'il se trouve
dans un environnement
raisonnablement inaccessible, à
risque, menaçant, ou hostile ; à cet
effet, BSH se chargera, à la
demande, du paiement des travaux
et pièces, et les enverra au
fournisseur de services agréé le plus
proche de votre localité, mais vous
serez entièrement responsable des
frais de déplacement ou d'autres
frais spéciaux encourus par
l'entreprise de services, en espérant
qu'elle accepte d'intervenir pour la
réparation.
Produit hors garantie
BSH n'est pas tenu, légalement ou
autrement, de faire des concessions,
y compris des réparations, des
partages de frais ou un
remplacement du Produit une fois
que cette garantie a expirée.
Exclusions de garantie
La couverture de garantie décrite
dans le présent manuel exclut tous
les défauts ou dommages dont BSH
n'est pas directement responsable, y
compris, sans pour autant s'y limiter,
l'un ou plusieurs des points suivants :
■ L'utilisation du Produit dans des
conditions anormales ou
inhabituelles, (y compris, mais
sans limitation, toute forme
d'utilisation commerciale,
l'utilisation ou le stockage à
l'extérieur d'un produit destiné à
un usage interne, l'utilisation du
Produit conjointement avec des
réservoirs d'air ou d'eau
courante) ;
■ Une faute intentionnelle d'un tiers,
la négligence, la mauvaise
utilisation, l'utilisation abusive, des
accidents, l'exploitation
inadéquate, le manque
d'entretien, la mauvaise
installation, la falsification, le non
respect des instructions
d'utilisation, la manipulation sans
précaution, les réparations non
autorisées ( y compris les
réparations effectuées par
l'utilisateur ou l'étude du
fonctionnement interne de la
machine par celui-ci) ;
■ Tout ajustement, toute altération
ou toute modification ;
■ Le non respect des codes,
règlements ou lois locaux,
étatiques ou départementaux
applicables au système
électrique, à la plomberie et/ou
aux bâtiments, y compris la non
installation du produit
conformément aux règlements et
codes de sécurité locaux
applicables au bâtiment et à la
prévention des incendies ;
■ L'usure et la détérioration
normales, les déversements
d'aliments et de liquides, les
accumulations de graisses ou
d'autres substances sur, dans ou
autour du Produit ;
■ Les forces et facteurs externes,
élémentaires et/ou
environnementaux, y compris,
mais sans limitation, la pluie, le
vent, le sable, les inondations, les
incendies, coulées de boue,
températures de gel, moisissures
excessives ou l'exposition
prolongée à l'humidité, la foudre,
les surtensions, défaillances de
structure autour de l'appareil, et
catastrophes naturelles.
BSH n'est en aucun cas tenu pour
responsable de de tout dommage
sur les propriétés adjacentes,
notamment les armoires, planchers,
plafonds et autres structures ou

Déclaration de la garantie limitée du produit fr-ca
85
objets se trouvant aux alentours du
Produit. Également exclus de la
garantie sont des Produits sur
lesquels les numéros de série ont été
altérés, oblitérés ou effacés ; les
visites de service vous enseignant
comment utiliser le Produit ; la
correction des défauts sur
l'installation (vous êtes entièrement
responsable de toute structure et
paramètre liés au produit, y compris
tous les circuits électriques, la
plomberie ou d'autres installations de
raccordement , des revêtements de
plancher/fondation, et de toutes les
altérations y compris, mais sans
limitation, aux armoires, murs,
planchers, étagères, etc.); et de la
réinitialisation des disjoncteurs ou
fusibles.
DANS LA MESURE OÙ LA LOI
L'AUTORISE, CETTE GARANTIE
DÉFINIT VOTRE RECOURS
EXCLUSIF QUANT AU PRODUIT,
QUELLE QUE SOIT LA NATURE DE
LA DÉCLARATION, QU'IL S'AGISSE
D'UN CONTRAT OU D'UN
PRÉJUDICE (INCLUANT LA
RESPONSABILITÉ ABSOLUE OU LA
NÉGLIGENCE) OU AUTREMENT.
CETTE GARANTIE REMPLACE
TOUTE AUTRE GARANTIE,
EXPRESSE OU ÉCRITE. TOUTE
GARANTIE IMPLICITEMENT VISÉE
PAR LA LOI, DE QUALITÉ
MARCHANDE OU D'ADÉQUATION
POUR UN USAGE PARTICULIER, OU
AUTREMENT NE SERA EFFECTIVE
QUE POUR LA PÉRIODE DE
VALIDITÉ DE LA PRÉSENTE
GARANTIE. LE FABRICANT NE
SERA EN AUCUN CAS
RESPONSABLE DE TOUTE « PERTE
COMMERCIALE » IMMATÉRIELLE,
PARTICULIÈRE, ACCESSOIRE,
INDIRECTE, ET/OU DES
DOMMAGES PUNITIFS, DES
PERTES OU DES DÉPENSES, Y
COMPRIS, SANS LIMITATION,
L'ABSENCE AU POSTE, LES FRAIS
D'HOTÊLS ET/OU DE REPAS PRIS
AU RESTAURANT, LES DÉPENSES
DE RESTRUCTURATION EN SUS
DES DOMMAGES DIRECTEMENT
CAUSÉS PAR BSH, OU
AUTREMENT. CERTAINS ÉTATS
N'AUTORISENT PAS L'EXCLUSION
OU LA LIMITATION DES
DOMMAGES IMMATÉRIELS OU
ACCESSOIRES ET D'AUTRES
N'AUTORISENT PAS LES
LIMITATIONS SUR LA DURÉE DE LA
GARANTIE IMPLICITE, IL EST DONC
POSSIBLE QUE LES RESTRICTIONS
SUSMENTIONNÉES NE VOUS
CONCERNENT PAS. CETTE
GARANTIE VOUS ACCORDE DES
DROITS SPÉCIFIQUES LÉGAUX,
LESQUELS PEUVENT VARIER D'UN
ÉTAT À L'AUTRE. Aucun
changement, aucune modification ou
aucun amendement apporté à la
présente garantie ne prendra effet à
moins d'être autorisé par écrit par un
responsable du groupe BSH Home
Appliances Corporation.
Comment bénéficier d'un
service de garantie
POUR BÉNÉFICIER D'UN SERVICE
SOUS GARANTIE POUR VOTRE
PRODUIT, VEUILLEZ CONTACTER
LE CENTRE DE SERVICES BHS
AGRÉÉ LE PLUS PROCHE, OU
APPELEZ LE 1-800-944-2904


.BJO4USFFU4VJUF
#4))PNF"QQMJBODFT$PSQPSBUJPO
*SWJOF$"
#4)TFSÎTFSWFMFESPJUEFNPEJGJFSMFTEPOOÎFTUFDIOJRVFTPVMFEFTJHO
TBOTQSÎBWJT$FSUBJOTNPEÑMFTTPOUDFSUJGJÎTQPVSVOFVUJMJTBUJPOBV$BOBEB
VOFVUJMJTBUJPOBV$BOBEB7ÎSJGJFSBVQSÑTEVONBSDIBOEPVEJTUSJCVUFVSDBOBEJFO
#4)OFTUQBTSFTQPOTBCMFQPVSMFTQSPEVJUTUSBOTQPSUÎTEFT±UBUT6OJTQPVS
#4)SFTFSWFTUIFSJHIUUPDIBOHFTQFDJGJDBUJPOTPSEFTJHOXJUIPVUOPUJDF
4PNFNPEFMTBSFDFSUJGJFEGPSVTFJO$BOBEB#4)JTOPUSFTQPOTJCMFGPS
QSPEVDUTXIJDIBSFUSBOTQPSUFEGSPNUIF6OJUFE4UBUFTGPSVTFJO$BOBEB
$IFDLXJUIZPVSMPDBM$BOBEJBOEJTUSJCVUPSPSEFBMFS
*9001238146*
9001238146
(9609)