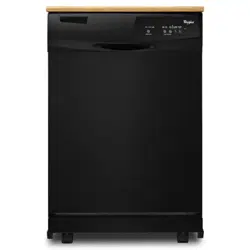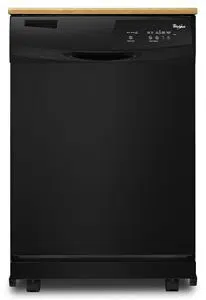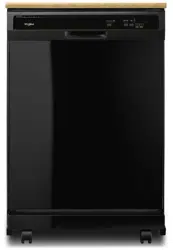
DISHWASHER
USER INSTRUCTIONS
Table of Contents
DISHWASHER SAFETY ......................................................................... 1
CONNECTED APPLIANCE REGULATORY NOTICE
............................ 3
WHAT’S NEW IN YOUR DISHWASHER
................................................ 4
PARTS AND FEATURES
........................................................................ 5
QUICK STEPS
....................................................................................... 6
CONNECTIVITY FEATURES
.................................................................. 6
CONNECTIVITY SETUP
......................................................................... 7
DISHWASHER USE – BASIC OPERATION
........................................... 8
DISHWASHER USE – SMART OPERATION
....................................... 10
CYCLE AND OPTION DESCRIPTIONS............................................... 11
DISHWASHER FEATURES
.................................................................. 13
FILTRATION SYSTEM
.......................................................................... 15
DISHWASHER CARE
........................................................................... 16
TROUBLESHOOTING – CONNECTIVITY
........................................... 17
TROUBLESHOOTING
.......................................................................... 19
OPEN SOURCE LICENSE USAGE
...................................................... 22
WARRANTY
.......................................................................................... 23
THANK YOU for purchasing this high-quality product. Register your new dishwasher at www.whirlpool.com. In Canada, visit our
website at www.whirlpool.ca.
Get Internet connection instructions, terms of use, and privacy policy at www.whirlpool.com/connect. If you have any problems or
questions, call the Whirlpool Connected Appliance Team at 1-866-333-4591. In Canada, visit www.whirlpool.ca/en_CA and click
on the Whirlpool
®
Connected Appliances link.
For future reference please make a note of your product model and serial numbers. These can be located near the door on the
right-hand or left-hand side of the dishwasher interior.
Model Number _____________________________________________ Serial Number _____________________________________________
W10901525A
Dishwasher Safety
You can be killed or seriously injured if you don't immediately
You
can be killed or seriously injured if you don't
follow
All safety messages will tell you what the potential hazard is, tell you how to reduce the chance of injury, and tell you what can
happen if the instructions are not followed.
Your safety and the safety of others are very important.
We have provided many important safety messages in this manual and on your appliance. Always read and obey all safety
messages.
This is the safety alert symbol.
This symbol alerts you to potential hazards that can kill or hurt you and others.
All safety messages will follow the safety alert symbol and either the word “DANGER” or “WARNING.”
These words mean:
follow instructions.
instructions.
DANGER
WARNING
2
IMPORTANT SAFETY INSTRUCTIONS
WARNING: When using the dishwasher, follow basic precautions, including the following:
SAVE THESE INSTRUCTIONS
■
Read all instructions before using the dishwasher.
■
Use the dishwasher only for its intended function.
■
Use only detergents or rinse agents recommended for use in
a dishwasher, and keep them out of the reach of children.
■
When loading items to be washed:
1) Locate sharp items so that they are not likely to damage
the door seal; and
2) Load sharp knives with the handles up to reduce the risk
of cut-type injuries.
■ Do not wash plastic items unless they are marked
“dishwasher safe” or the equivalent. For plastic items not so
marked, check the manufacturer's recommendations.
■ Do not touch the heating element during or immediately after
use.
■
Do not operate the dishwasher unless all enclosure panels
are properly in place.
■ Do not tamper with controls.
■
Do not abuse, sit on, or stand on the door, lid, or dish racks
of the dishwasher.
■
To reduce the risk of injury, do not allow children to play in
or on the dishwasher.
■ Under certain conditions, hydrogen gas may be produced in
a hot water system that has not been used for two weeks or
more. HYDROGEN GAS IS EXPLOSIVE. If the hot water
system has not been used for such a period, before using
the dishwasher turn on all hot water faucets and let the
water flow from each for several minutes. This will release
any accumulated hydrogen gas. As the gas is flammable,
do not smoke or use an open flame during this time.
■ Remove the door or lid to the washing compartment
when removing an old dishwasher from service or
discarding it.
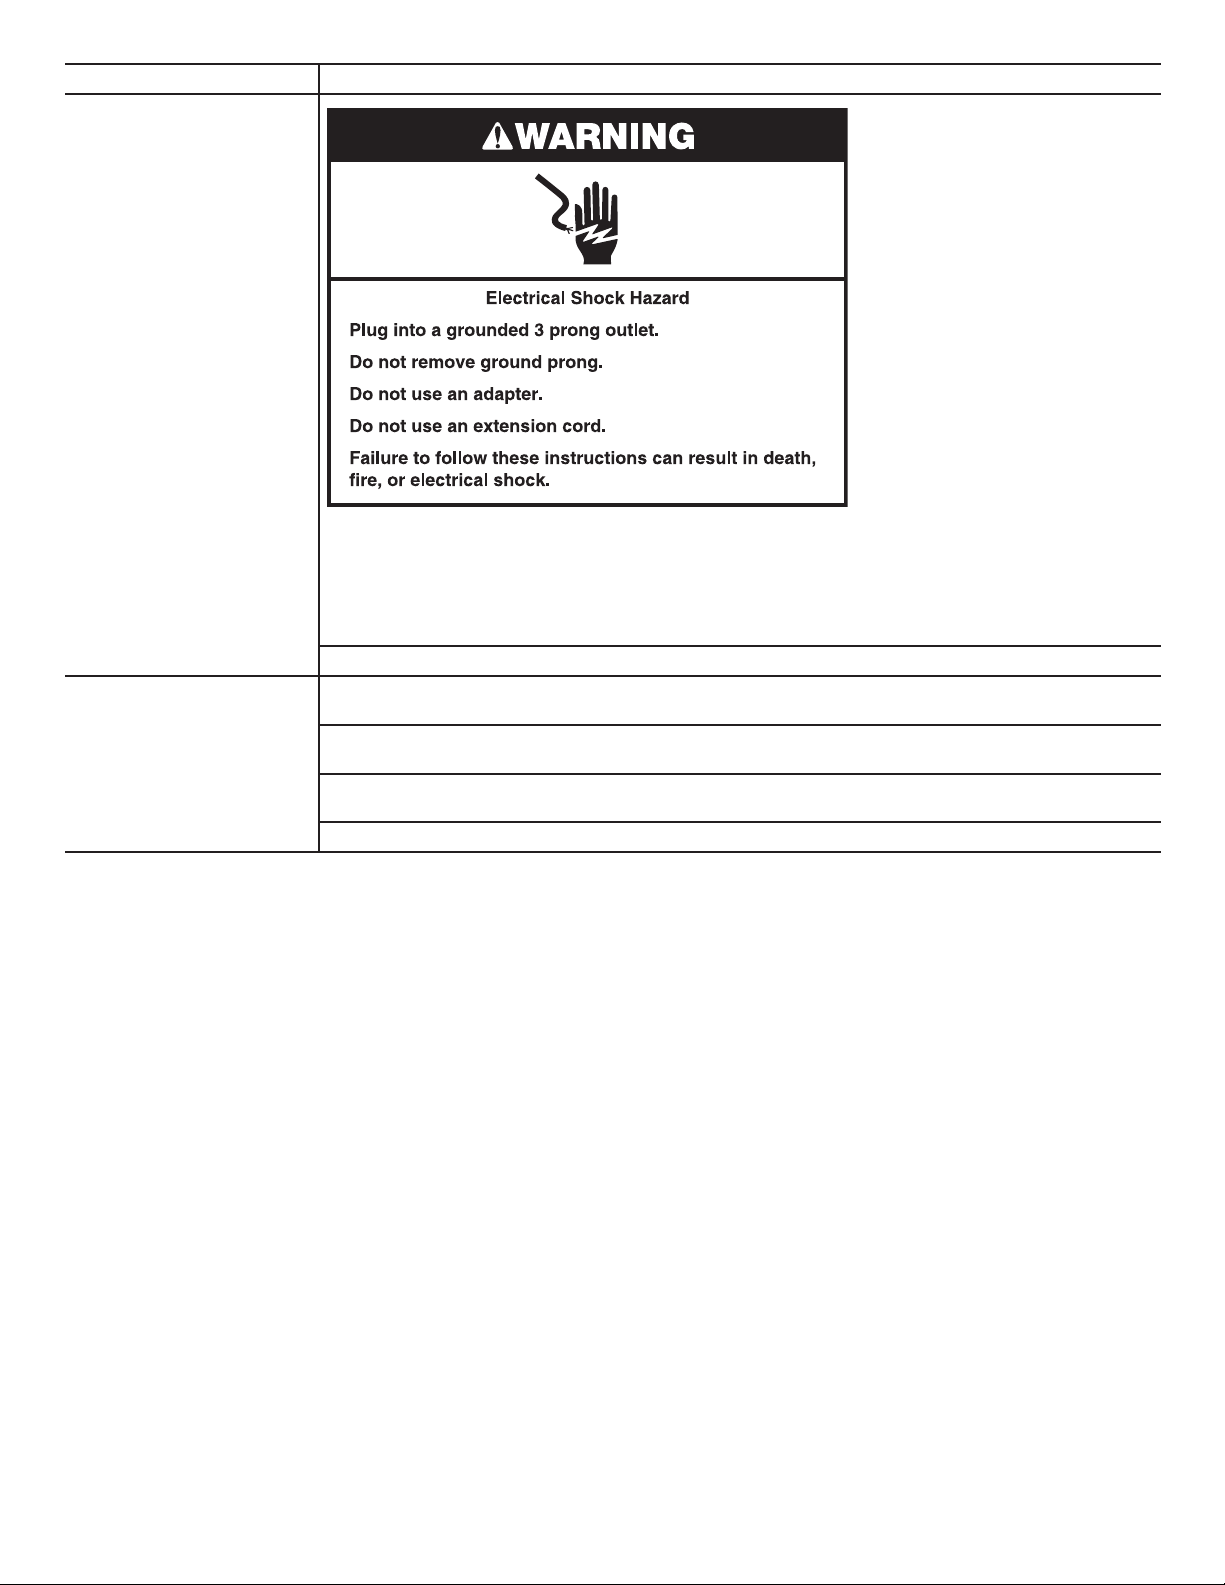
GROUNDING INSTRUCTIONS
SAVE THESE INSTRUCTIONS
■
For a grounded, cord-connected dishwasher:
The dishwasher must be grounded. In the event of a
malfunction or breakdown, grounding will reduce the risk of
electric shock by providing a path of least resistance for
electric current. The dishwasher is equipped with a cord
having an equipment-grounding conductor and a grounding
plug. The plug must be plugged into an appropriate outlet
that is installed and grounded in accordance with all local
codes and ordinances.
WARNING:
Improper connection of the equipment-
grounding conductor can result in a risk of electric shock.
Check with a qualified electrician or service representative
if you are in doubt whether the dishwasher is properly
grounded. Do not modify the plug provided with the
dishwasher; if it will not fit the outlet, have a proper outlet
installed by a qualified electrician.
■
For a permanently connected dishwasher:
The dishwasher must be connected to a grounded metal,
permanent wiring system, or an equipment-grounding
conductor must be run with the circuit conductors and
connected to the equipment-grounding terminal or lead on
the dishwasher.
Tip Over Hazard
Do not use dishwasher until completely installed.
Do not push down on open door.
Doing so can result in serious injury or cuts.
WARNING
3
Connected Appliance Regulatory Notices
Federal Communications Commission (FCC)
Compliance Notice
This equipment has been tested and found to comply with the limits for a
Class B digital device, pursuant to Part 15 of the FCC Rules. These limits
are designed to provide reasonable protection against harmful interference
in a residential installation. This equipment generates, uses, and can radiate
radio frequency energy and, if not installed and used in accordance with the
instructions, may cause harmful interference to radio communications.
However, there is no guarantee that interference will not occur in a
particular installation. If this equipment does cause harmful interference to
radio or television reception, which can be determined by turning the
equipment off and on, the user is encouraged to try to correct the
interference by one of the following measures:
– Reorient or relocate the receiving antenna.
– Increase the separation between the equipment and receiver.
– Connect the equipment into an outlet on a circuit different from that to
which the receiver is connected.
– Consult the dealer or an experienced radio/TV technician for help.
This device complies with Part 15 of the FCC Rules. Operation is subject to
the following two conditions:
1. This device may not cause harmful interference, and
2. This device must accept any interference received, including interference
that may cause undesired operation.
Changes or modifications not expressly approved by the party responsible
for compliance could void the user’s authority to operate the equipment.
RF Exposure Information
To comply with FCC/IC RF exposure requirements for mobile transmitting
devices, this transmitter should only be used or installed at locations where
there is at least 20 cm separation distance between the antenna and all
persons.
To comply with FCC/IC RF exposure limits for general
population/uncontrolled exposure, the antenna(s) used for this transmitter
must be installed to provide a separation distance of at least 20 cm from all
persons and must not be co-located or operating in conjunction with any
other antenna or transmitter.
Industry Canada (IC) Compliance Notice
This Device complies with Industry Canada License-exempt RSS
standard(s). Operation is subject to the following two conditions:
1. This device may not cause interference,
2. This device must accept any interference, including interference that may
cause undesired operation of the device.
Under Industry Canada regulations, this radio transmitter may only operate
using an antenna of a type and maximum (or lesser) gain approved for the
transmitter by Industry Canada. To reduce potential radio interference to
other users, the antenna type and its gain should be so chosen that the
equivalent isotropically radiated power (e.i.r.p.) is not more than that
necessary for successful communication.
The radio transmitters IC: 10248A-WICHAM01 and 10248A-FLDAAM01
have been approved by Industry Canada to operate with the antenna types
listed below with the maximum permissible gain and required antenna
impedance for each antenna type indicated. Antenna types not included in
this list, having a gain greater than the maximum gain indicated for that type,
are strictly prohibited for use with this device.
Antenna Type
Maximum Permissible
Antenna Gain (dBi)
Required
Impendance (OHM)
Slot
1.2
50
Monopole
(WICHAM01 only)
0.5
50
Dipole
3.0
50
F
1.60
50
Planar F
4.2
50
To comply with FCC and Industry Canada RF radiation exposure limits for
general population, the antenna(s) used for this transmitter must be installed
such that a minimum separation distance of 20 cm is maintained between
the radiator (antenna) and all persons at all times and must not be co-
located or operating in conjunction with any other antenna or transmitter.
Le présent appareil est conforme aux CNR d’Industrie Canada applicables
aux appareils radio exempts de licence. L’exploitation est autorisée aux
deux conditions suivantes :
(1) l’appareil ne doit pas produire de brouillage, et
(2) l’utilisateur de l’appareil doit accepter tout brouillage radioélectrique subi,
même si le brouillage est susceptible d’en compromettre le fonctionnement.
Conformément à la réglementation d’Industrie Canada, le présent émetteur
radio peut fonctionner avec une antenne d’un type et d’un gain maximal (ou
inférieur) approuvé pour l’émetteur par Industrie Canada. Dans le but de
réduire les risques de brouillage radioélectrique à l’intention des autres
utilisateurs, il faut choisir le type d’antenne et son gain de sorte que la
puissance isotrope rayonnée équivalente (p.i.r.e.) ne dépasse pas l’intensité
nécessaire à l’établissement d’une communication satisfaisante.
Le émetteurs radio IC : 10248A-WICHAM01 et 10248A-FLDAAM01 ont été
approuvés par Industrie Canada pour fonctionner avec les types d’antenne
énumérés ci-dessous et ayant un gain admissible maximal et l’impédance
requise pour chaque type d’antenne. Les types d’antenne non inclus dans
cette liste, ou dont le gain est supérieur au gain maximal indiqué, sont
strictement interdits pour l’exploitation de l’émetteur.
Type d’antenne
Gain admissible
maximal d’antenne (dBi)
L’impédance
requise (OHM)
À fentes
1,2
50
Monopôle (WICHAM01
seulement)
0,5
50
Dipole
3,0
50
F
1,60
50
Planaire F
4,2
50
Pour satisfaire aux exigences de la FCC et IC d’exposition aux
radiofréquences, une distance de séparation de 20 cm ou plus doit être
maintenue entre cet appareil et des personnes lors de fonctionnement du
dispositif. Pour assurer la conformité des opérations au plus près que cette
distance n’est pas recommandée. L’antenne utilisée pour ce transmetteur
ne doit pas être co-localisés en conjonction avec toute autre antenne ou
transmetteur.
OEM Responsibilities to comply with FCC and
Industry Canada Regulations
The WICHAM01 / FLDAAM01 Modules have been certified for integration
into products only by OEM integrators under the following conditions:
1. The antenna(s) must be installed such that a minimum separation
distance of 20 cm is maintained between the radiator (antenna) and all
persons at all times.
2. The transmitter module must not be co-located or operating in
conjunction with any other antenna or transmitter.
As long as the two conditions above are met, further transmitter testing will
not be required. However, the OEM integrator is still responsible for testing
their end-product for any additional compliance requirements required with
this module installed (for example, digital device emissions, PC peripheral
requirements, etc.).
IMPORTANT NOTE: In the event that these conditions cannot be met
(for certain configurations or co-location with another transmitter), then the
FCC and Industry Canada authorizations are no longer considered valid and
the FCC ID and IC Certification Number cannot be used on the final product.
In these circumstances, the OEM integrator will be responsible for re-
evaluating the end product (including the transmitter) and obtaining a
separate FCC and Industry Canada authorization.
End Product Labeling
The WICHAM01 / FLDAAM01 Modules are labeled with FCC ID and IC
Certification Number. If the FCC ID and IC Certification Number are not
visible when the module is installed inside another device, then the outside
of the device into which the module is installed must also display a label
referring to the enclosed module. In that case, the final end product must be
labeled in a visible area or display the following:
“Contains FCC ID: A5UWICHAM01”
“Contains IC: 10248A-WICHAM01”
or
“Contains FCC ID: A5UFLDAAM01”
“Contains IC: 10248A-FLDAAM01”
The OEM of the WICHAM01 / FLDAAM01 Module must only use the
approved antenna(s), which have been certified with this module. The OEM
integrator has to be aware not to provide information to the end user
regarding how to install or remove this RF module or change RF related
parameters in the user manual of the end product.
The user manual for the end product must include the
following information in a prominent location:
“To comply with FCC and Industry Canada RF radiation exposure limits for
general population, the antenna(s) used for this transmitter must be installed
such that a minimum separation distance of 20 cm is maintained between
the radiator (antenna) and all persons at all times and must not be co-
located or operating in conjunction with any other antenna or transmitter.”
4
What’s New in Your Dishwasher
Energy
Congratulations on purchasing your water and energy efficient dishwasher! This dishwasher cleans
by spraying the dishes with water and pauses to allow the detergent to soak into and release the
soils on the dishes. The cycles are longer due to the soak and pauses for exceptional cleaning.
Your dishwasher contains an optical water sensor. The optical water sensor is used to determine
the optimum water and energy consumption for great cleaning performance. Efficient dishwashers
run longer to save water and energy, just as driving a car slower saves on gas. The first cycle using
the sensor will run longer to calibrate the optical sensor.
Performance
Rinse Aid
Using rinse aid will optimize your drying and wash performance.
This dishwasher is specifically designed to be used with rinse aid
for improved drying performance and controlling buildup of hard
water deposits. Energy efficient dishwashers use less water and
energy, so they depend on the water “sheeting” action of rinse
aid for total optimal performance.
SLIDE
Detergent
The United States and Canada have passed regulations limiting
the amount of phosphorus (phosphates) in the household
dishwasher detergents. Major manufacturers have reformulated
their dishwasher detergent for this change in detergents as
another step in eco-conscious awareness. With these changes,
we recommend quality tablets and packs for convenience and
improved performance.
SLIDE
Filtration System
Your dishwasher has the latest technology in dishwasher
filtration. This triple filtration system minimizes sound and
optimizes water and energy conservation while providing optimal
cleaning performance. Maintenance of your filters regularly will
sustain peak cleaning performance. We suggest you clean both
your upper and lower filters and rinse under running water at
least once a month.
P
U
S
H
D
O
W
N
&
T
U
R
N
L
O
C
K
U
N
L
O
C
K
5
Parts and Features
BOTTOM RACK
TOP RACK
Upper level wash
Water inlet opening
Upper spray arm
Silverware basket
Cup shelf
Overfill protection float
Water feed tube
Model and serial number label
Heating element
Detergent dispenser
Total Coverage Spray Arm (on some
models) cleans with twice the jets for
more coverage. A smarter sequence
of spray patterns from multiple nozzles
hits dishes throughout the cycle.
Rinse aid dispenser reduces
spotting and improves drying.
Cup shelf
(on some models)
Fold-down tines
Fold-down tines
Resource Efficient Wash System
removes soil from water and
improves cleaning action.
SAID and MAC ID numbers
THIRD LEVEL RACK (on some models)
6
1
Remove bulk food and load dishwasher.
Scrape off excess food into
garbage or food disposer.
Load dishes so that
water spray will reach
every surface.
2
Add detergent and rinse aid.
SLIDE
SLIDE
3
Select a cycle and options (varies by model).
4
Start dishwasher.
To start and resume a cycle,
press the (Start) keypad
and close the door within
4 seconds. If the door is not
closed within 4 seconds, the
Start keypad LED will flash,
an audible tone will sound,
and the cycle will not start.
5
Unload dishwasher and
clean the filter.
See “Recommended Time
Interval to Clean Your Filter”
in the “Filtration System”
section for the recommended
cleaning schedule.
Quick Steps
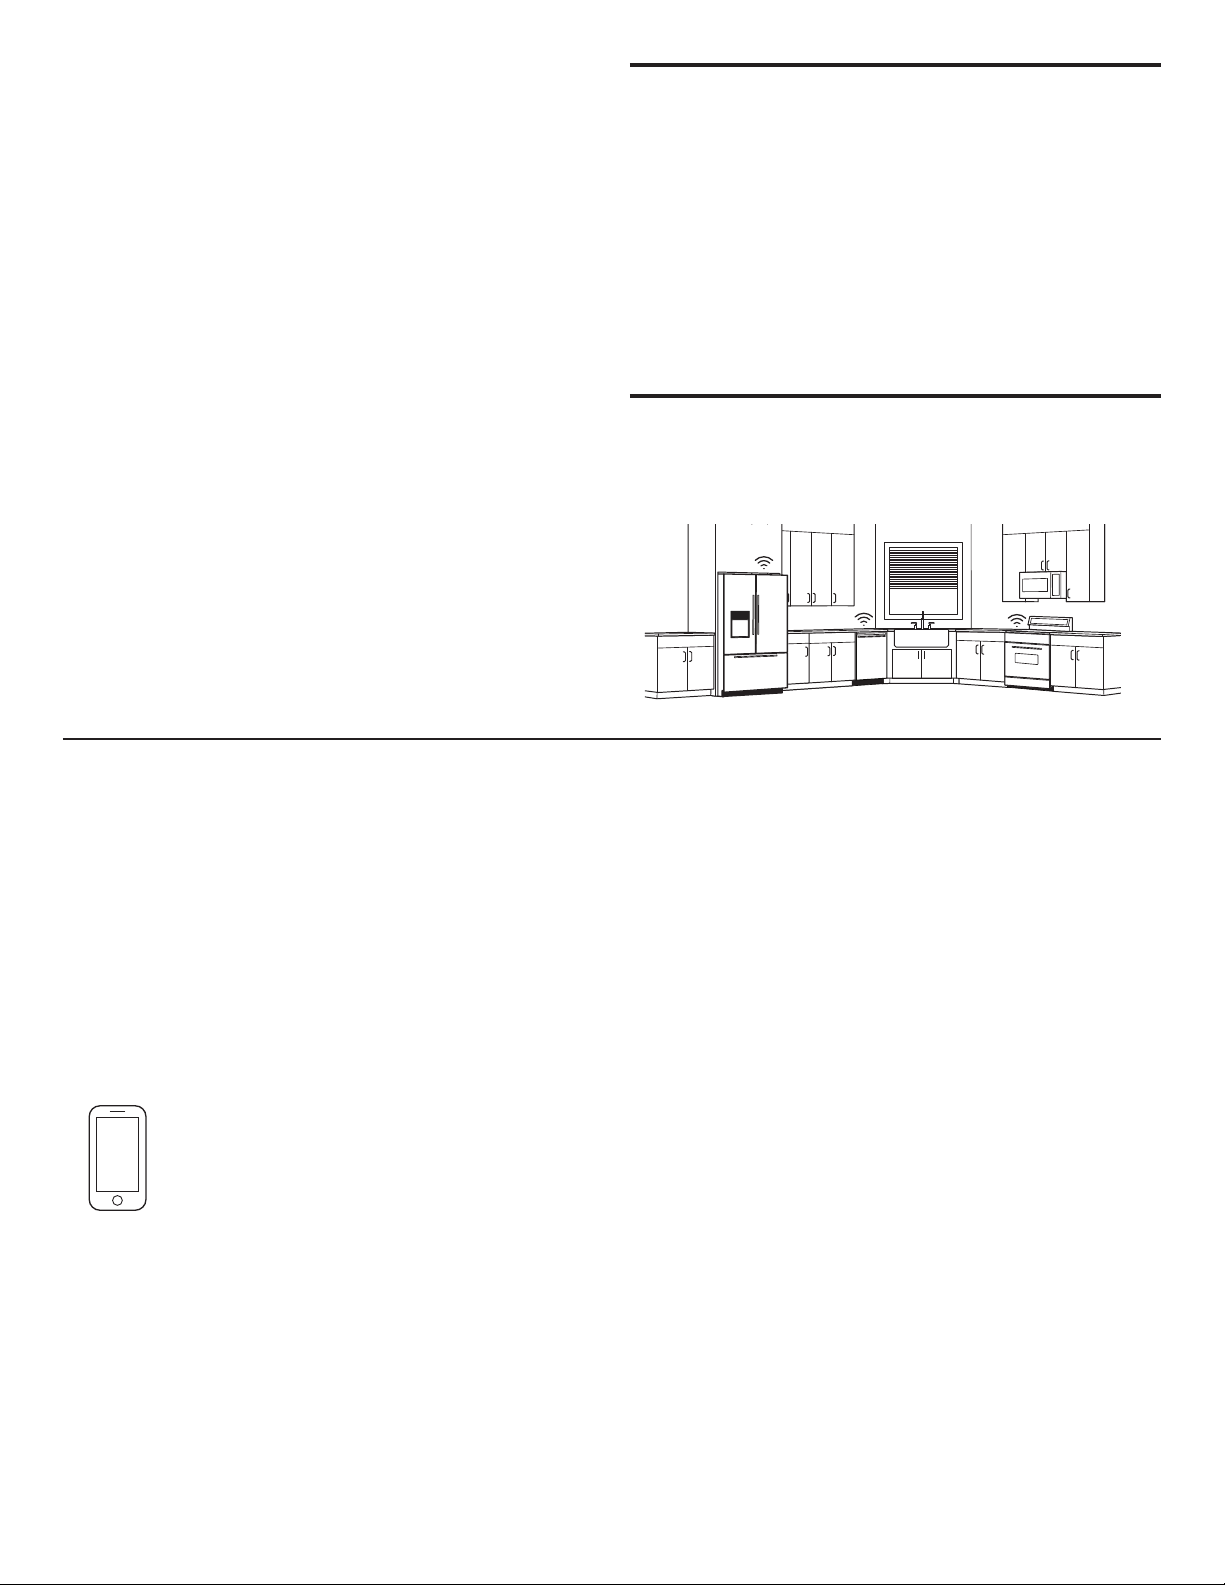
Connectivity Features
Wi-Fi connectivity allows your Smart dishwasher to connect to the Internet and interact with the Whirlpool
®
app from your smartphone
or mobile device. This connection opens up several Smart options to you. App features and functionality are subject to change. The
options described are typical and may change. Please refer to the Whirlpool
®
app for up-to-date connectivity features.
SMART FEATURES
Smart features help make your every day more efficient by
letting you remotely monitor, manage, and maintain your
dishwasher. Your dishwasher may have additional features not
mentioned here. Please refer to your app for a complete listing
of additional features.
Remote Enable
What it does: Allows you to send remote control of your
dishwasher to your smartphone or mobile device via the
Whirlpool
®
app.
What it does for you: When enabled, allows you to start your
dishwasher from anywhere and, therefore, manage when it
gets done.
Cycle Progress
What it does: Gives you an up-to-the-minute look at your
progress.
What it does for you: Lets you know the dishwasher status
time from anywhere.
Notification (Opt-In)
What it does: Your dishwasher will send you a push notification.
What it does for you: Alerts you precisely when the dishwasher
is done, so you can do what comes next and move on to other
things.
7
Specialty Cycles and My Cycle (on some dishwashers)
What it does: Allows you to browse additional cycles available in
the Whirlpool
®
app and download a cycle to the dishwasher with
the Download & Go™ option. You can also create and save your
own customized cycles.
What it does for you: Lets you choose what settings work for you
and saves the settings to use again and again.
Quiet Mode
What it does: Lets you turn off the tones and beeps coming
from your dishwasher.
What it does for you: Allows you to use your dishwasher without
disturbing anyone else in the household.
Issue Alerts (Opt-In)
What it does: Sends you a push notification if something has
gone wrong.
What it does for you: Alerts you in advance and provides
guidance to fix simple issues through videos and step-by-step
instructions.
If the issue is more complex, you can email or call our service
center directly from the Whirlpool
®
app.
Kosher Consumer Friendly Mode (App only)
What it does: During this mode, the controls and lights will not
operate and the interior lights will be off.
What it does for you: Automatically sets up the use of your
dishwasher for observance of the Sabbath.
SMART ABOUT ENERGY (on some dishwashers)
Your Smart dishwasher can monitor and respond to changing
energy demand levels on the power grid.
Smart Delay
(Opt-In when available through local utility company)
What it does: When energy demand is high, it delays starting
the dishwasher cycle until demand levels are lower. You can
opt out permanently or override a current Smart Delay.
What it does for you: Reduces power demands on the local
electrical grid during peak times. Some consumers may even
see a lower energy bill.
If you need to start the dishwasher cycle immediately, you can
override a Smart Delay. The dishwasher will return to energy
monitoring on the next cycle.
GET STARTED
Refer to the “Connectivity Setup” section in this User Instructions
and follow the instructions to get connected.
Check the Whirlpool
®
app frequently for additional information
and features.
Connectivity Setup
Get the App and Get Connected
With your mobile device, get the app, connectivity setup instructions, terms of use, and privacy policy at:
www.whirlpool.com/connect
In Canada, visit
www.whirlpool.ca/en_CA
and click on the Whirlpool
®
Connected Appliances link.
IMPORTANT: Proper installation of your appliance prior to use is your responsibility. Be sure to read and follow the Installation
Instructions that came with your appliance.
Connectivity requires Wi-Fi and account creation. App features and functionality subject to change. Data rates may apply. If you have
any problems or questions, call Whirlpool Corporation Connected Appliances at 1-866-333-4591.
You Will Need:
SET UP
■ A home wireless router supporting Wi-Fi, 2.4Ghz preferably with WPA2 security. If you are unsure of your router’s
capablilities, refer to the router manufacturer’s instructions.
■ The router to be on and have a live internet connection.
■ The 10-character SAID code for your appliance. The SAID code is either printed on a label on the appliance or can
be found on the LCD screen. Refer to the appliance User Guide for the location.
Once installed, launch the app. You will be guided through the steps to set up a user account and to connect your appliance. If you
have any problems or questions, call Whirlpool Corporation Connected Appliances at 1-866-333-4591.
8
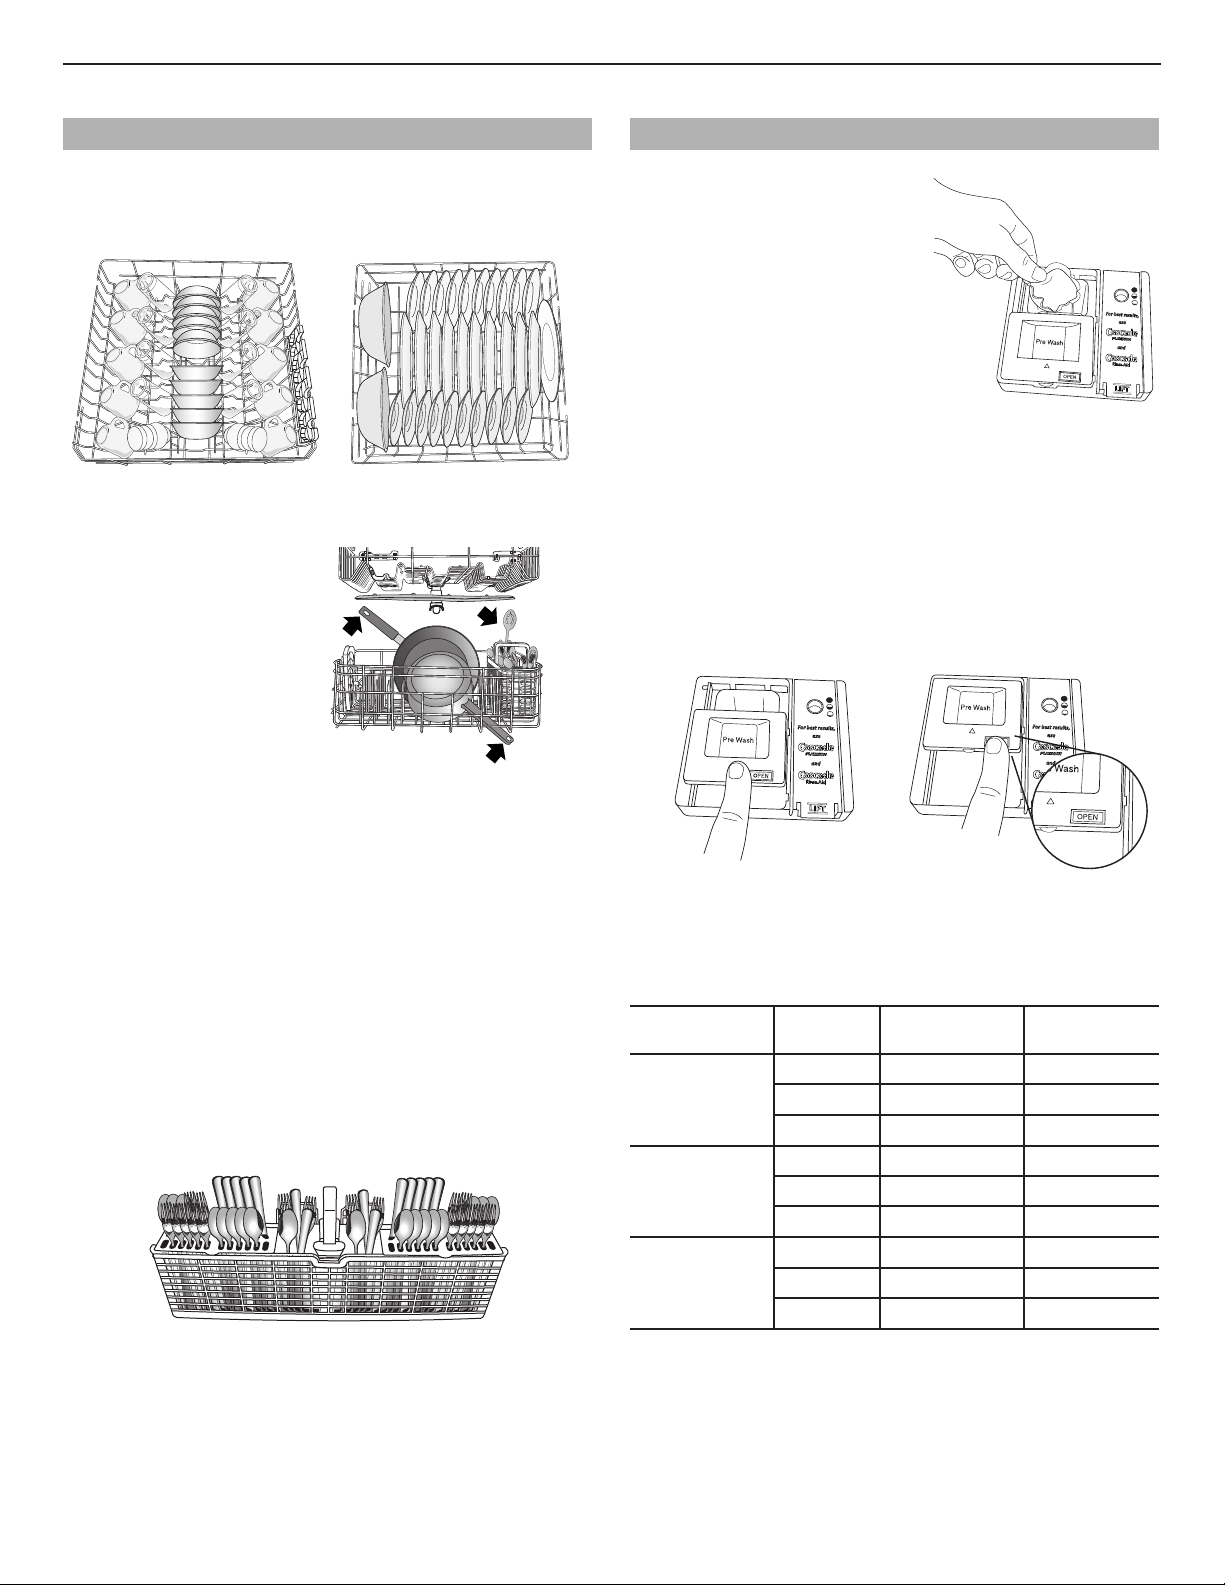
Dishwasher Use – Basic Operation
STEP 1
Prepare and Load the Dishwasher
IMPORTANT: Remove leftover food, bones, toothpicks, and
other hard items from the dishes. Remove labels from containers
before washing.
Upper rack Lower rack
■ Check that nothing blocks the upper or lower spray arm.
Items in rack can block
the spray arms.
■ Check that when the dishwasher door is closed, no items
are blocking the detergent dispenser.
■ Tough soiled items should be loaded with soiled surfaces
facing down and inward to the spray. This will improve
cleaning and drying results.
■ Avoid overlapping items like bowls or plates that may
trap food.
■ Place plastics, small plates, and glasses in the upper rack.
Wash only plastic items marked “dishwasher safe.”
■ To avoid thumping/clattering noises during operation,
load dishes so they do not touch one another. Make sure
lightweight load items are secured in the racks.
■ When loading silverware, always place sharp items pointing
down. Mix items in each section of the basket with some
pointing up and some down to avoid nesting. Spray cannot
reach nested items.
■ Use slots in the covers and suggested loading patterns to
keep your silverware separated for optimum wash.
PUSH
NOTE: The AnyWare™ silverware basket will fit on the inner door,
on the front of the lower rack, and inside the lower rack.
STEP 2
Add Detergent
Premeasured Detergents
SLIDE
High-quality premeasured tablets
and packs are recommended for
improved performance.
Quality tablets and packs have
been proven better than powder,
liquid, or gel detergents at reducing
filming on dishes. Using tablets
and packs over time will start to
reduce or eliminate white film.
They are suitable for all hardness
and soil levels. Also, by using a
rinse aid, you can minimize repeat buildup of white film (not all
packs and tablets contain rinse aid). Always place premeasured
detergents in main compartment and slide lid closed.
NOTE: Follow instructions on the package when using other
dishwasher detergent types.
■ Use automatic dishwasher detergent only. Add detergent
just before starting a cycle.
■ Fresh automatic dishwasher detergent results in better
cleaning. Store tightly closed detergent container in a cool
dry place.
To close lid To open lid
SLIDE
SLIDE
Place selected detergent in
the dispenser. Place finger, as
shown, and slide lid closed.
Press firmly until it clicks.
Push OPEN, as shown,
and the lid will slide open.
Powders and Gels
Water
Hardness
Soil Level Prewash
Compartment*
Main Wash
Compartment
Soft
(0–4 grains
per U.S.
gallon)
Light None “Soft” fill line
Normal None “Soft” fill line
Heavy Full “Soft” fill line
Medium
(5–9 grains
per U.S.
gallon)
Light None “Soft” fill line
Normal Full Full**
Heavy Full Full**
Hard
(10–14 grains
per U.S.
gallon)
Light Full Full**
Normal Full Full**
Heavy Full Full**
*The prewash compartment is on top of the sliding door of
the dispenser.
**A full main wash compartment contains 2 Tbsp (30 ml).
IMPORTANT: Extremely hard water mineral deposits (15 grains
per U.S. gallon or more) can cause damage to your dishwasher
and make it difficult to achieve good results. A water softener is
recommended to avoid damage and achieve good results.
NOTE: Follow instructions on the package when using other
dishwasher detergent types.
9
STEP 3
Rinse Aid
SLIDE
IMPORTANT: Your dishwasher is designed to use rinse aid.
The use of rinse aids greatly improves drying by allowing water
to drain from the dishes after the final rinse. Rinse aid also keeps
water from forming droplets that can dry as spots or streaks.
Filling the dispenser
Full
Ad
d
The dispenser holds 5 oz (150 mL) of rinse
aid. Under most conditions, this will last
1 to 3 months.
NOTE: Indicator reads correct fill level
when door is completely opened.
1.
Pre
Wash
OPEN
SLIDE
To add rinse aid, open the
rinse aid dispenser lid by
gently pushing in the center of
the lid with your thumb and
pulling up on the edge.
2. Pour rinse aid into the
opening until the dispenser
is full. Do not overfill.
3. Clean up any spilled rinse aid.
Spilled rinse aid can create excessive suds.
4. Close the dispenser by pushing down gently on the lid.
Rinse Aid Setting
Your rinse aid dispenser is adjustable. For most
water conditions, the factory setting will give
good results. If you have hard water and notice
calcium buildup on your dishware, you may want
to try a higher setting. If you notice foam in your
dishwasher, use a lower setting.
To adjust the setting:
Turn the arrow adjuster to a higher number
to increase the amount of rinse aid.
STEP 4
Select a Cycle (varies by model)
Efficient dishwashers run longer to save water and energy, just
as driving a car slower saves gas. Cycle times may increase or
decrease depending on selections. Estimated cycle times after
calibration are listed in the “Cycles” chart in the “Cycle and
Option Descriptions” section.
Select the desired cycle by pressing a cycle keypad.
Select Options (varies by model)
See the “Options” chart in the “Cycle and Option Descriptions”
section.
You can customize the cycles by selecting the options desired.
STEP 5
Start or Resume a Cycle
■ If needed, run hot water at the sink nearest your dishwasher
until the water is hot. Turn off water.
■ For best dishwashing results, water should be 120ºF (49ºC)
as it enters the dishwasher.
■ Select the wash cycle and options desired.
Within 4 seconds of pressing Start/Resume
you must firmly push the door closed. If
the door is not closed within 4 seconds,
the Start/Resume LED will flash, an audible
tone will be heard, and the cycle will not
start.
■ You can add an item at the beginning of the cycle. Open the
door slowly and add the item. Press START/RESUME and
close the door firmly within 4 seconds. If the door has been
open more than 4 seconds, the LED will flash, a tone will
sound and the dishwasher will not resume unless you press
Start/Resume again.
IMPORTANT: If the door has been opened after starting a cycle
(even during the Delay Hours option), the Start/Resume keypad
must be pressed again.
10
Dishwasher Use – Smart Operation
NOTE: You must have successfully completed the “Connectivity Setup” section for the following features to function. Verify that the
Wireless Status icon and either the Amber House icon or Blue House icon are illuminated. Check the Whirlpool
®
app for additional
dishwasher features, including Remote Enable (B).
u
q
u
q
u
q
u
q
Wireless icon Remote Enable icon Amber House icon
(peak electric rate)
Blue House icon
(normal electric rates)
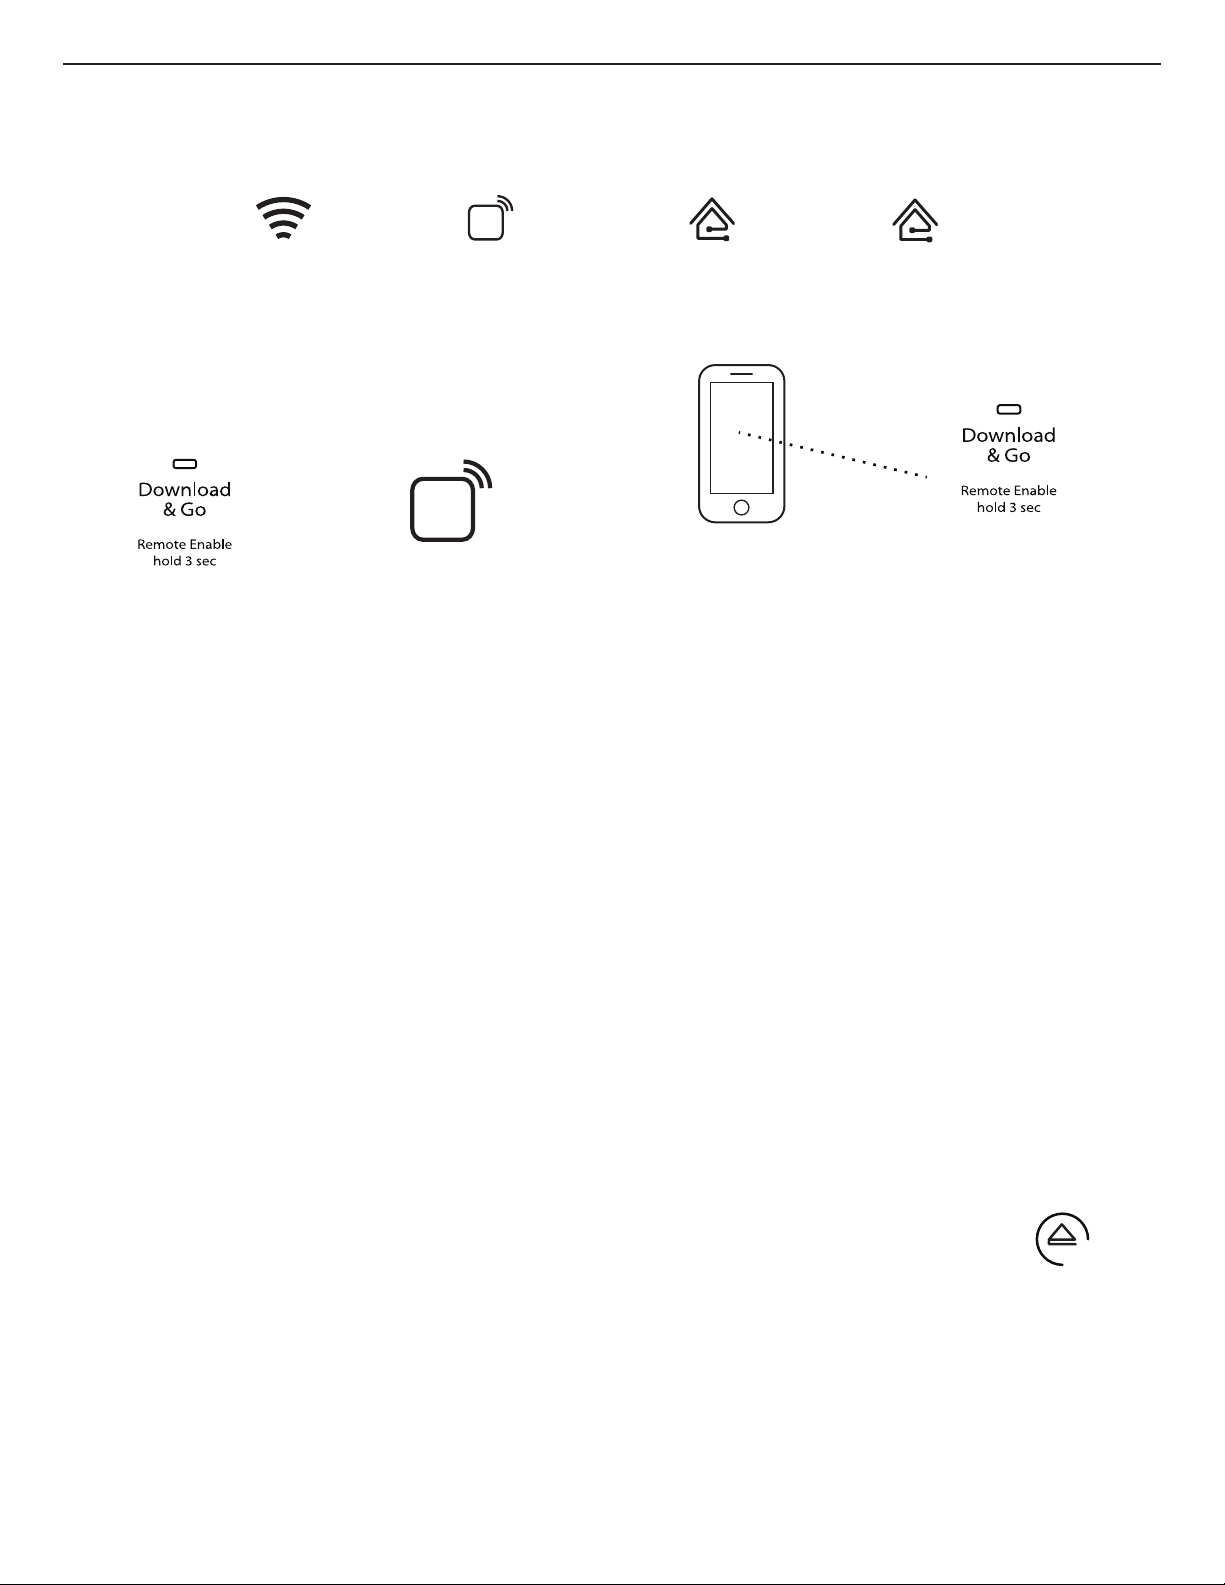
Set a Remote Enable
Remote Enable requires Wi-Fi and account creation. App features
and functionality subject to change. Subject to Terms of Service
are available at: www.whirlpool.com/connect. Data rates may
apply. In Canada, visit www.whirlpool.ca/en_CA and click on the
Whirlpool
®
Connected Appliances link.
u
q
Remote Enable
Remote Enable mode allows you to start your dishwasher
remotely from the Whirlpool
®
app.
After loading the dishwasher and selecting your cycle settings,
press and hold DOWNLOAD & GO for 3 seconds. The Remote
Enable icon will be solidly lit.
When a remote start command is received from the app, the
dishwasher will start the cycle. The Remote Enable icon will
remain lit.
NOTE: If no Wi-Fi connection is available, the Remote Enable
will not be set and the Wireless icon will blink for 2 seconds,
then go out.
HELPFUL TIP: Make sure that your dishwasher door remains
closed and the cycle is not changed until you start the cycle.
Opening the door after a Remote Enable has been set will
cancel the Remote Enable. The Remote Enable will need to
be reinitiated.
Follow Cycle Progress
Follow Cycle Progress lets you remotely monitor your dishwasher
and anticipate when it will finish the current cycle. Open the app
and select DISHWASHER. The cycle progress is displayed in
the app.
Select or Deselect Push Notifications
Push notifications let you choose which events will be announced
with a text message. Open the app and select DISHWASHER,
then open PREFERENCES. Turn on the push notifications you
want to receive.
Download a Specialty Cycle or My Cycle
The Download & Go™ feature lets you select a Specialty cycle
or you can design a My Cycle on the Whirlpool
®
app and send it
to your dishwasher. When the dishwasher receives the cycle, the
Download & Go LED lights up for several minutes to indicate the
cycle has been received. When you want to use this cycle, press
DOWNLOAD & GO to select the cycle, just as you would do for
any other cycle. Press the Start/Resume keypad and close the
door within 4 seconds to start the cycle.
HELPFUL TIP: The cycle will be remembered for future use until
a different cycle is downloaded to the dishwasher.
NOTE: If Download & Go is pressed without a cycle ready for
selection, the LED will blink and you will hear an “invalid key
press” sound (if key activation sounds are turned on). When a
remote start command is received from the app, the dishwasher
will start the cycle. The Remote Enable icon will remain lit.
Enable Quiet Mode
Enable Quiet mode lets you remotely silence the on-dishwasher
tones such as the end-of-cycle signal. Open the app and select
QUIET MODE.
Issue Alerts
Issue Alerts lets you know by text message if something needs
your attention and provides guidance about what to do. You
may turn off Issue Alerts from the app by going to the Appliance
Details page, choosing the Preferences option, and toggle off all
notifications, and click save in the top right corner.
Enable Kosher Consumer Friendly Mode
The Kosher Consumer Friendly mode lets you automatically
configure the dishwasher for observance of the Sabbath. Open
the app, select DISHWASHER, and then turn on SABBATH mode.
The dishwasher will continue to operate in Sabbath mode at the
appointed time every week until Sabbath mode is turned off.
Smart Delay
(Opt-in through Whirlpool
®
app and when
supported by your local utility)
During times of peak electrical rates (if you have opted in), you
may see the Smart Delay icon. When this occurs, your dishwasher
will delay according to your opt-in choices to help alleviate peak
power demands on the local utility. The dishwasher will start up
automatically when the peak power demand has decreased. You
may override Smart Delay through the app.
u
q
11
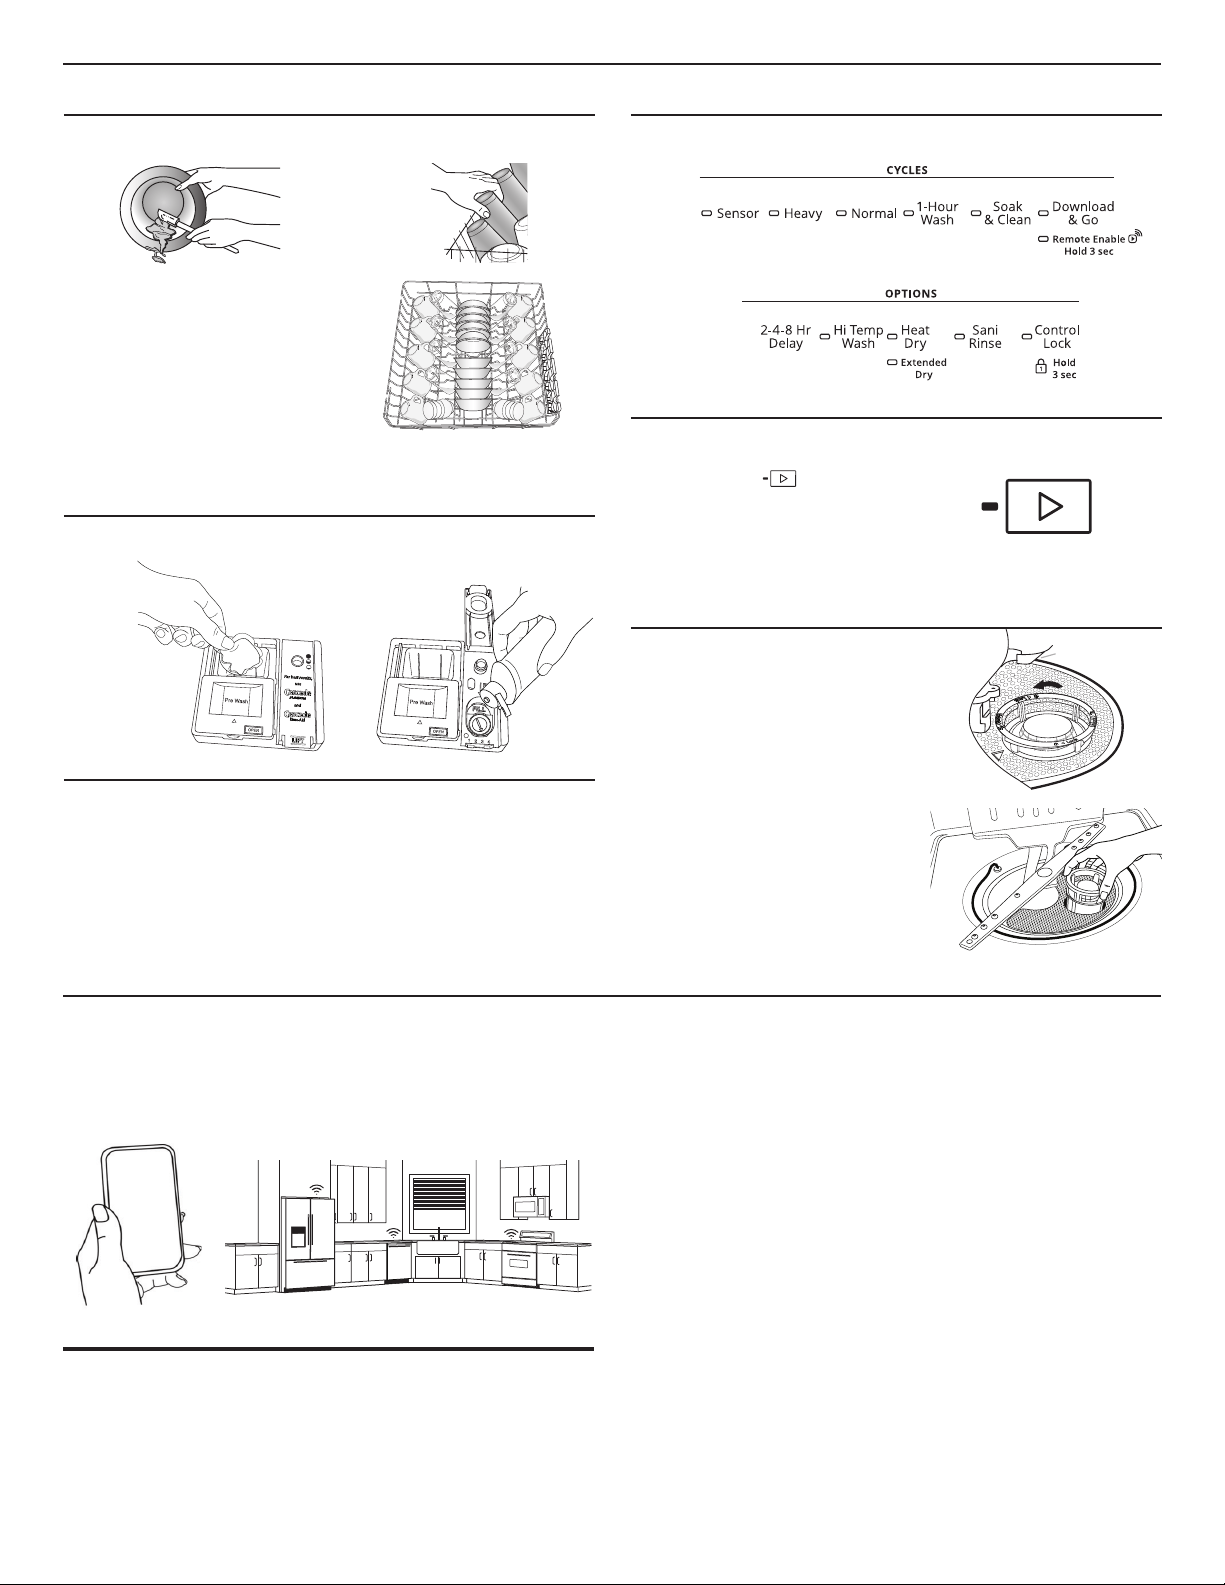
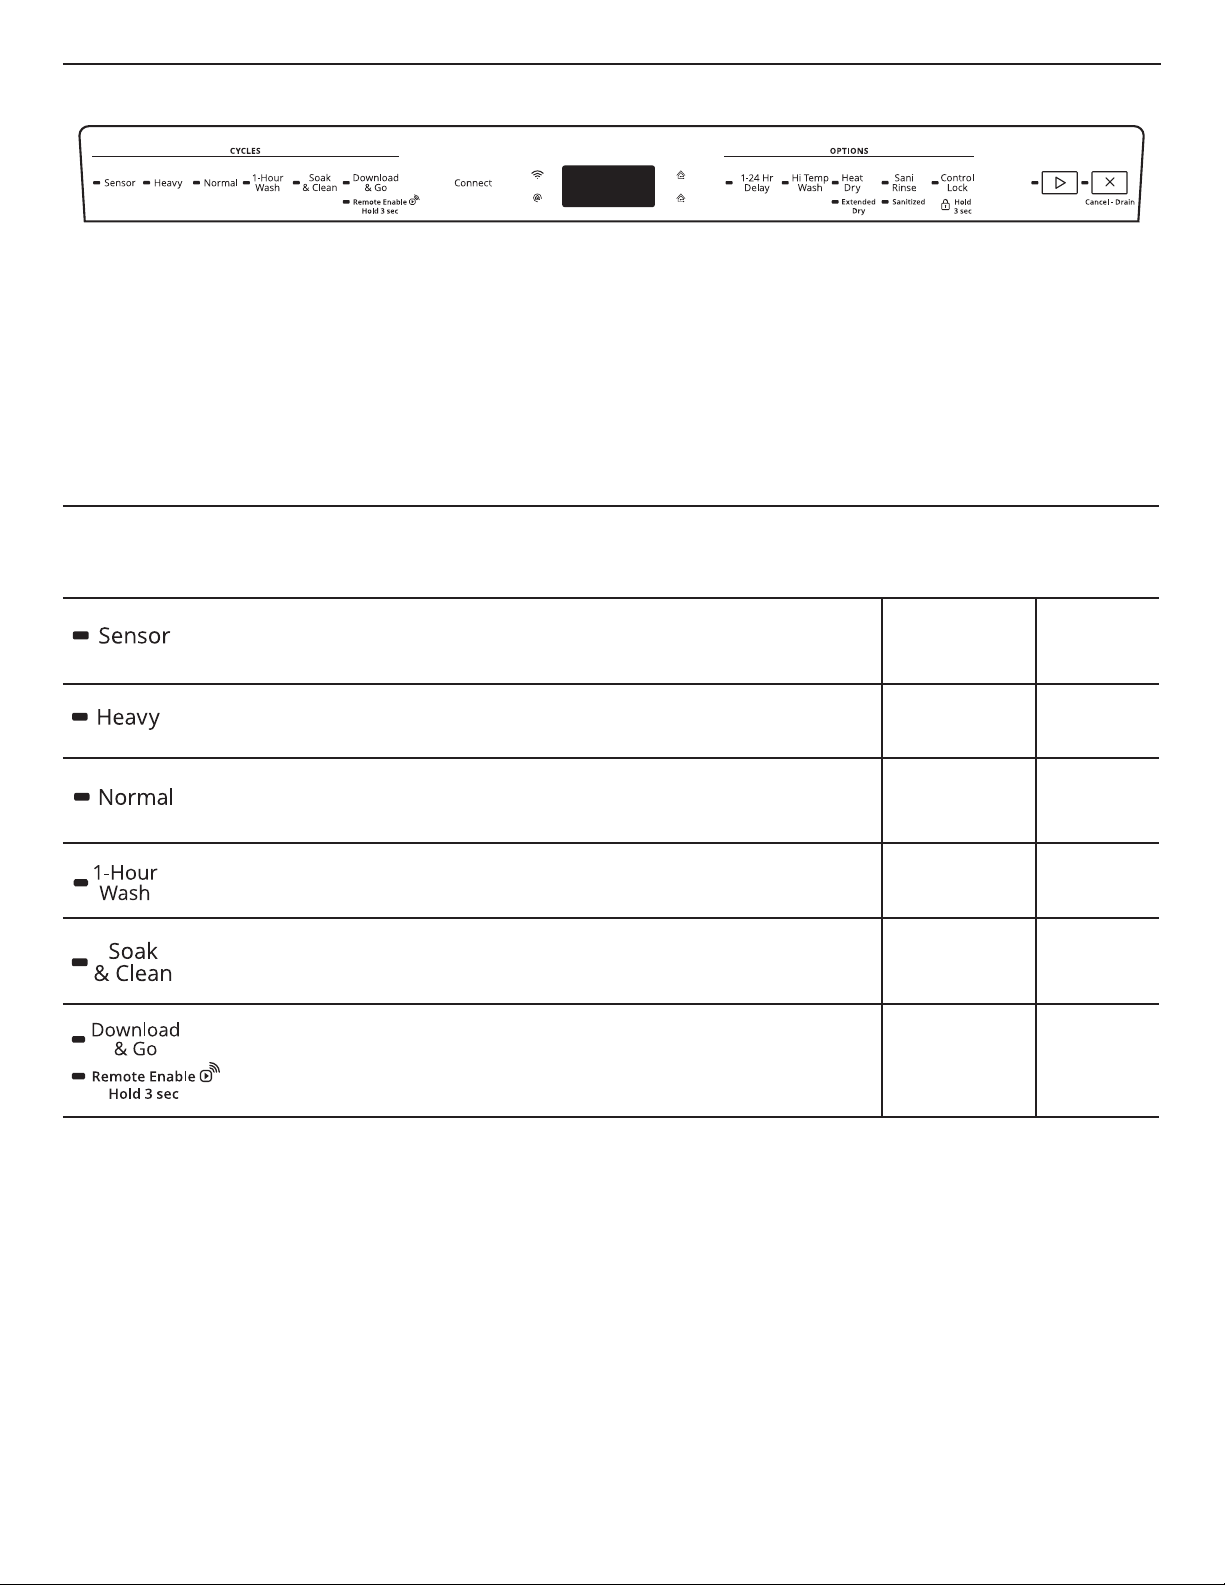
Cycle and Option Descriptions
Estimated cycle times may increase or decrease depending on water temperature, soil conditions, dish load size, and options selected.
You can customize your cycle by selecting an option.
See option selections. If you change your mind, press the option again to turn off the option, or select a different option. You can change
an option anytime before the selected option begins. At each stage of the wash cycle, you may hear noises that you are not used to
hearing in your previous dishwasher. Each cycle will provide a series of pauses and water sprays throughout the wash cycle. This is
normal and will provide optimal cleaning performance.
CYCLE SELECTIONS
This information covers several different models. Your dishwasher may not have all of the cycles and options described.
IMPORTANT: The sensor in your dishwasher monitors the soil level. Cycle time and/or water usage can vary as the sensor adjusts
the cycle for the best wash performance. If the incoming water is less than the recommended temperature or food soils are heavy,
the cycle will automatically compensate by adding time, heat, and water as needed.
CYCLES ESTIMATED
WASH TIME
W/O OPTIONS
(HH:MM)
WATER
USAGE
GALLONS
(LITERS)
This cycle senses the load size, soil amount, and toughness of soil to adjust
the cycle for improved cleaning, using only the amount of water and energy
needed. The Sensor cycle is automatically selected if you first press the Start/
Resume keypad.*
2:10 to 3:15
3.38 to 7.4
(12.8 to 28.0)
Use for hard-to-clean, heavily soiled pots, pans, casseroles, and tableware. 2:45 to 3:25 7.4 (28.1)
This cycle is recommended for daily, regular, or typical use to completely wash
and dry a full load of normally soiled dishes. This dishwasher’s government
energy certifications were based on the Normal cycle with only the Heated Dry
option selected.**
2:00 to 3:10 2.4 to 7.4
(9.09 to 28)
For fast results, 1-Hour Wash will clean dishes using slightly more water
and energy. Select the Heat Dry or Extended Dry options for better drying
performance.
0:55 to 1:05 7.87 (29.8)
This cycle quietly soaks dishes with an extended prewash, which eliminates the
need to presoak dishes, saving personal time and effort. For optimal cleaning
results during the Soak & Clean cycle, add prewash detergent. Use this cycle
for loads with heavy amounts of dried-on or hard to clean baked-on food.
6:45 to 7:25 7.4 (28.0)
This is a specialty cycle that you select from the Whirlpool
®
app and download
to your dishwasher. Your dishwasher remembers this cycle until you replace it
by downloading another cycle from the Whirlpool
®
app.
Variable Variable up
to 7.87 (29.8)
*The government energy certifications are not based on this cycle. See the Normal cycle description for the government energy
certification cycle. Using the Sensor cycle may increase your energy usage.
**No other washing and drying temperature options were selected, and it was not subject to truncated testing. Rinse aid was not used,
and there was no detergent used in the prewash.
12
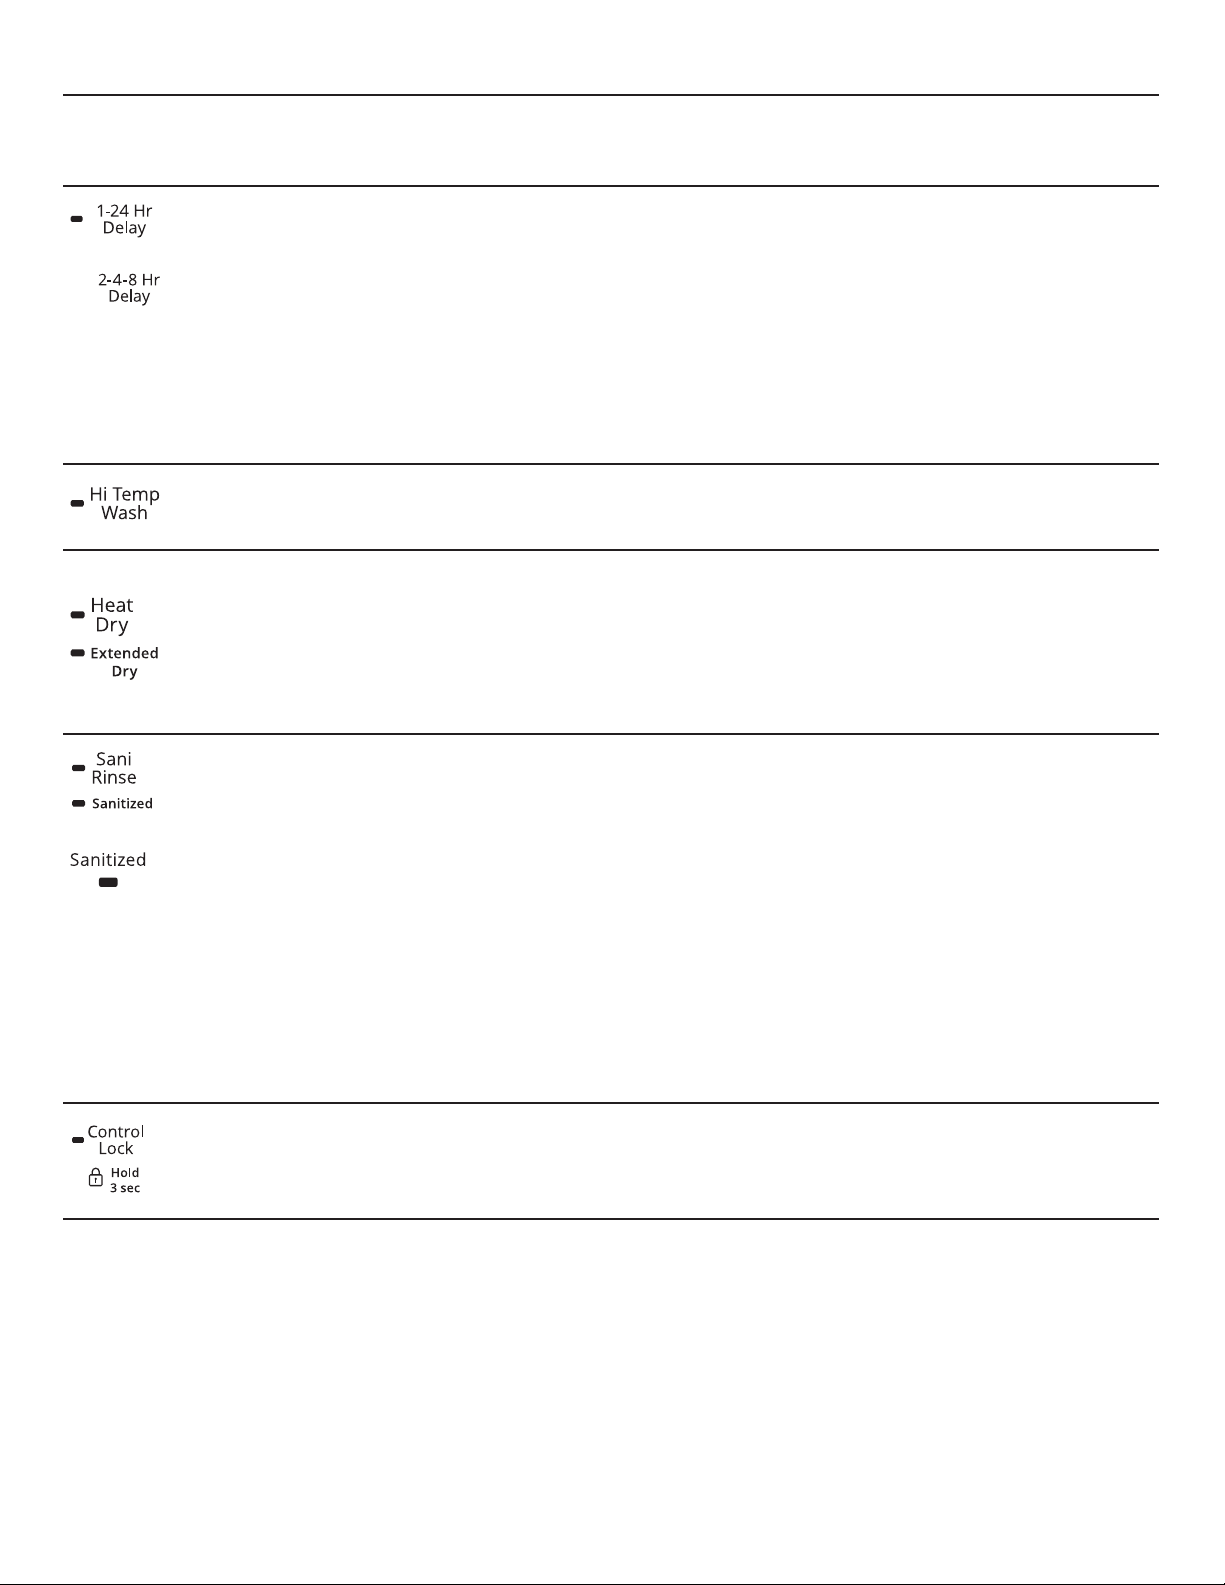
OPTION SELECTIONS
OPTIONS CAN BE
SELECTED
WITH
WHAT IT DOES ADDED
TIME TO
CYCLE
ADDED
WATER
GALLONS
(LITERS)
(varies by
model)
Runs dishwasher at a later time. Select a wash
cycle and options. Each time you press the Delay
keypad, it will display the next available delay time.
Press START/RESUME, then close the door firmly.
NOTES:
■ The dishwasher remembers the last delay you
selected. To reset the delay time to something
other than what is displayed, continue to press
the Delay keypad until the desired delay time
is reached.
■ Anytime the door is opened (such as, to add
a dish), the Start/Resume keypad must be
pressed again to resume delay countdown.
Available with
any cycle
Delays start of
a cycle up to
24 hours.
NA NA
Raises main wash temperature to improve cleaning
for loads containing tough, baked-on food.
Sensor
Heavy
Normal
Soak & Clean
Raises the
main wash
temperature to
135°F (57°C).
0:05 to 0:13 0 to 3.86
(0 to 14.6)
Dries dishes with heat. This option, with the use
of rinse aid, will provide better drying performance.
Plastic items are less likely to deform when loaded
in the top rack. Use Heat Dry for optimum dry
performance. Turn the Heat Dry option off for
air dry.
Extended Dry lengthens the time that Heat Dry
is active. This option with the use of rinse aid will
provide better drying performance.
Sensor
Heavy
Normal
Soak & Clean
Uses heating
element to speed
drying times.
Heat Dry option
defaults to on
when any cycle is
selected, except
for 1-Hour Wash.
0:08 to 0:46 0
(location of
“Sanitized”
indicator varies
by model)
Sanitizes dishes and glassware in accordance
with NSF International NSF/ANSI Standard 184
for Residential Dishwashers. Certified residential
dishwashers are not intended for licensed food
establishments. Only sanitizing cycles have been
designed to meet the requirements of the NSF/
ANSI 184 performance standard for soil removal
and for sanitization efficacy. There is no intention,
either directly or indirectly, that all cycles on a
NSF/ANSI 184 certified dishwasher meet the NSF/
ANSI 184 performance standard for soil removal
and for sanitization efficacy.
At end of the cycle, the “Sanitized” indicator will
glow. If your load did not properly sanitize, the
indicator will flash at the end of the cycle. This can
happen if the cycle is interrupted or if the water
does not reach the required temperature. The light
goes off when you open and close the door or
press CANCEL.
Sensor
Heavy
Normal
Raises the
main wash
temperature to
135°F (57°C) and
the final rinse
temperature to
156°F (69°C).
0:05 to 1:06 0 to 3.86
(0 to 14.6)
Avoids unintended use of dishwasher between cycles, or cycle and option changes during a cycle.
To turn on Lock, press and hold CONTROL LOCK for 3 seconds. Control Lock light will stay on for a short time,
indicating that it is activated and all keypads are disabled. If you press any keypad while your dishwasher is locked,
light flashes 3 times. Dishwasher door can still be opened/closed while the controls are locked.
To turn off Lock, press and hold CONTROL LOCK for 3 seconds. Light turns off.
13
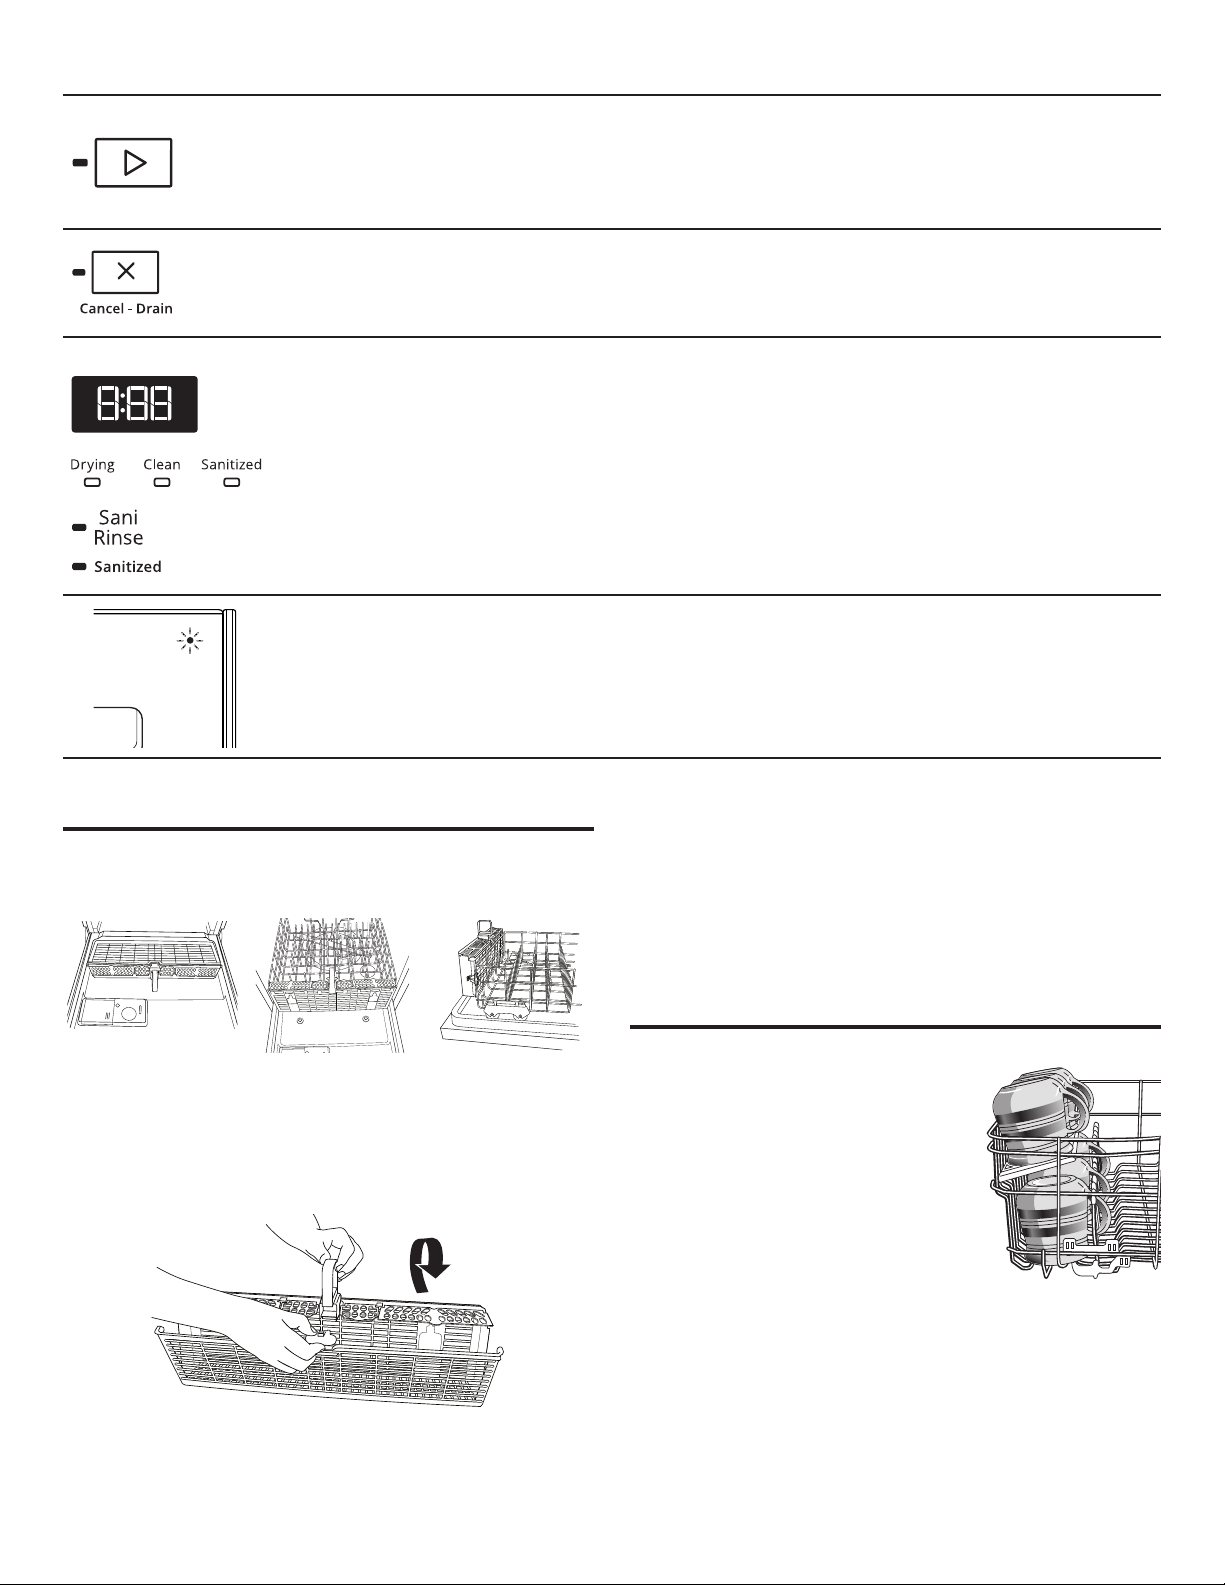
CONTROLS AND CYCLE STATUS
Press to start or resume a wash cycle.
If the door is opened during a cycle or the power is interrupted, the Start/Resume indicator LED flashes.
The cycle will not resume until door is closed and the Start/Resume keypad is pressed.
NOTE: Push door firmly closed within 4 seconds of pressing the Start/Resume keypad or the dishwasher
will not start. If door is not closed within 4 seconds, the Start/Resume LED will flash and an audible tone will
sound when the door is closed.
Press to cancel a wash cycle.
Close the door firmly. The dishwasher starts a 2-minute drain (if needed). Let dishwasher drain completely.
Display varies by model
The display allows you to follow the progress of the dishwasher cycle.
Models with a numeric display count down while the cycle is running. If you open the door to view this
display, you must resume the cycle by pressing the Start/Resume keypad and closing the door within
4 seconds.
Models without a numeric display have indicators that glow for Drying, Clean, and Sanitized.
If you select Sani Rinse option, when cycle is finished, the “Sanitized” indicator glows. If your dishwasher
did not properly sanitize your dishes, the light flashes at the end of the cycle. This can happen if the cycle
is interrupted or water could not be heated to required temperature. The light goes off when you open and
close door or press Cancel.
The exterior status light on the front of the door panel will glow blue when washing, red while it is drying,
and white when the cycle is complete.
Dishwasher Features
AnyWare™ Silverware Basket
The AnyWare™ silverware basket can be hung on the door, the
bottom rack, or placed inside the bottom rack.
Door position Rack position Rack position side
To open the AnyWare™ silverware basket:
To unlock, grasp the front panel, pull up, and rotate 90° as shown.
Make sure the front panel is up all the way before rotating. To
unlock and rotate the front panel, grasp the front panel as shown
and pull it up and out.
PUSH
NOTE: Be sure the front panel of the silverware basket is
completely locked into place before pulling out the bottom
rack and before closing the dishwasher door.
To remove the basket from the door:
1. Grasp the silverware basket by the handle. Slide it toward
the top of the door.
2. Lift the basket off the holding buttons.
To replace the basket in the door:
1. Set the silverware basket on the holding buttons.
2. Slide the basket toward the bottom of the door until it locks
into place.
Cup Shelves
Fold down the extra shelf on the left-hand
or right-hand side of the top rack to hold
additional cups, stemware, or long items
such as utensils and spatulas. For best
results on cups, stagger the spacing so
that the cups on the shelf are not directly
above the cups below.
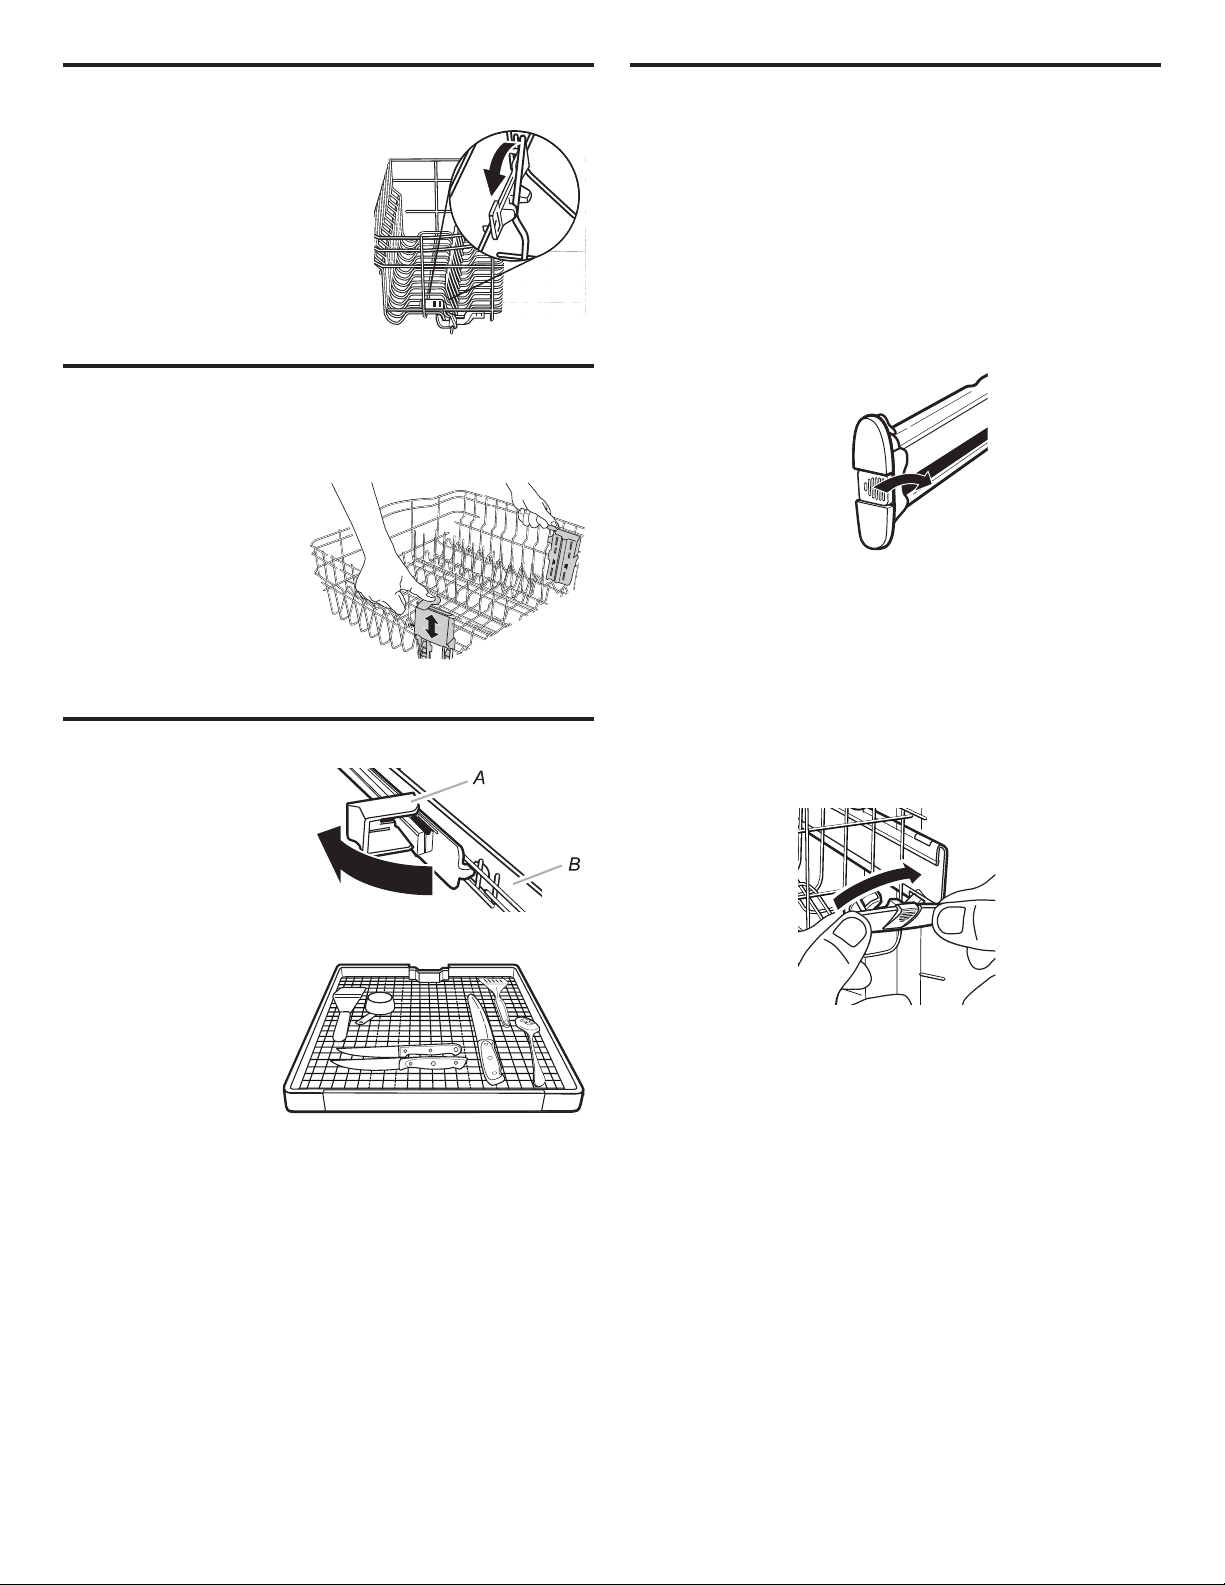
14
Fold-Down Tines
The row of tines on the left-hand
and right-hand sides of the upper,
or in the back of lower rack can
be adjusted to make room for a
variety of dishes.
To adjust the fold-down tines:
1. Grasp the tip of the tine that
is in the tine holder.
2. Gently push the tine out of
the holder.
3. Lay the tines down, toward
the center of the rack.
EZ-2-Lift™ Top Rack Adjuster
You can raise or lower the top rack to fit tall items in either the top
or bottom rack. Adjusters are located on each side of the top rack.
To raise the rack:
Press both rack adjuster
thumb levers and lift the rack
until it is in the Up position
and level.
To lower the rack:
Press both rack adjusters
thumb levers and slide the
rack to its Down position
and level.
NOTE: The top rack must be level.
Easy-to-Remove Third Level Rack (on some models)
If additional space is
needed in the upper
rack, the third level
rack can easily be
removed.
To remove, fully
extend rack until it
stops. Then, open the
track stops on each
side and slide the rack
out to remove.
Low-profile items,
such as serving
utensils and
silverware, may be
loaded on the third
level rack.
A. Track stop B. Track
Removable Top Rack
The removable top rack allows you to wash larger items, such
as pots, roasters, and cookie sheets in the bottom rack.
IMPORTANT: Remove dishes prior to removing the top rack
from dishwasher.
To remove the rack:
1. To gain access to the track stops, pull the upper rack forward
about halfway out of the tub.
2. Press on the edge of the ridged area on the track stop while
tipping the track stop toward the center of the dishwasher.
This action releases a small retaining tab that locks the track
stop to the track (see Track stop – left).
NOTE: It is helpful to use 2 hands. Take special note of the
orientation of the track stops.
Track stop – left
3. With the retaining tab released, pull the track stop straight
toward the opposite track to remove it.
4. After removing both track stops, gently pull the top rack out
of the tracks by rolling it toward you.
5. Replace the track stops by coming up from under the track
and slipping the lower tab of the track stop into the lower slot
of the track (see Track stop – right) and rotate the track stop
into place. Then press on the edge of the ridged area while
pushing the track stop straight toward the track. This action
locks the retaining tab back into place.
Track stop – right
6. Test the track stop by pulling it toward the opposite track to
ensure that it is locked in place.
To replace the rack:
1. Gently pull the tracks forward in dishwasher until they stop.
Remove track stops. See steps 1 through 3 above.
2. Place the back wheels on each side of the rack into the track
and roll the rack into the tracks, but do not push the rack all
the way into the tub.
3. Insert front rack wheels on each side of the rack into the track.
4. Slide the rack into the dishwasher.
5. Replace the track stops. See steps 5 and 6 above.
IMPORTANT: Be sure that the track stops are locked in
place and cannot be easily removed. They keep the rack
from coming out of the track.
15
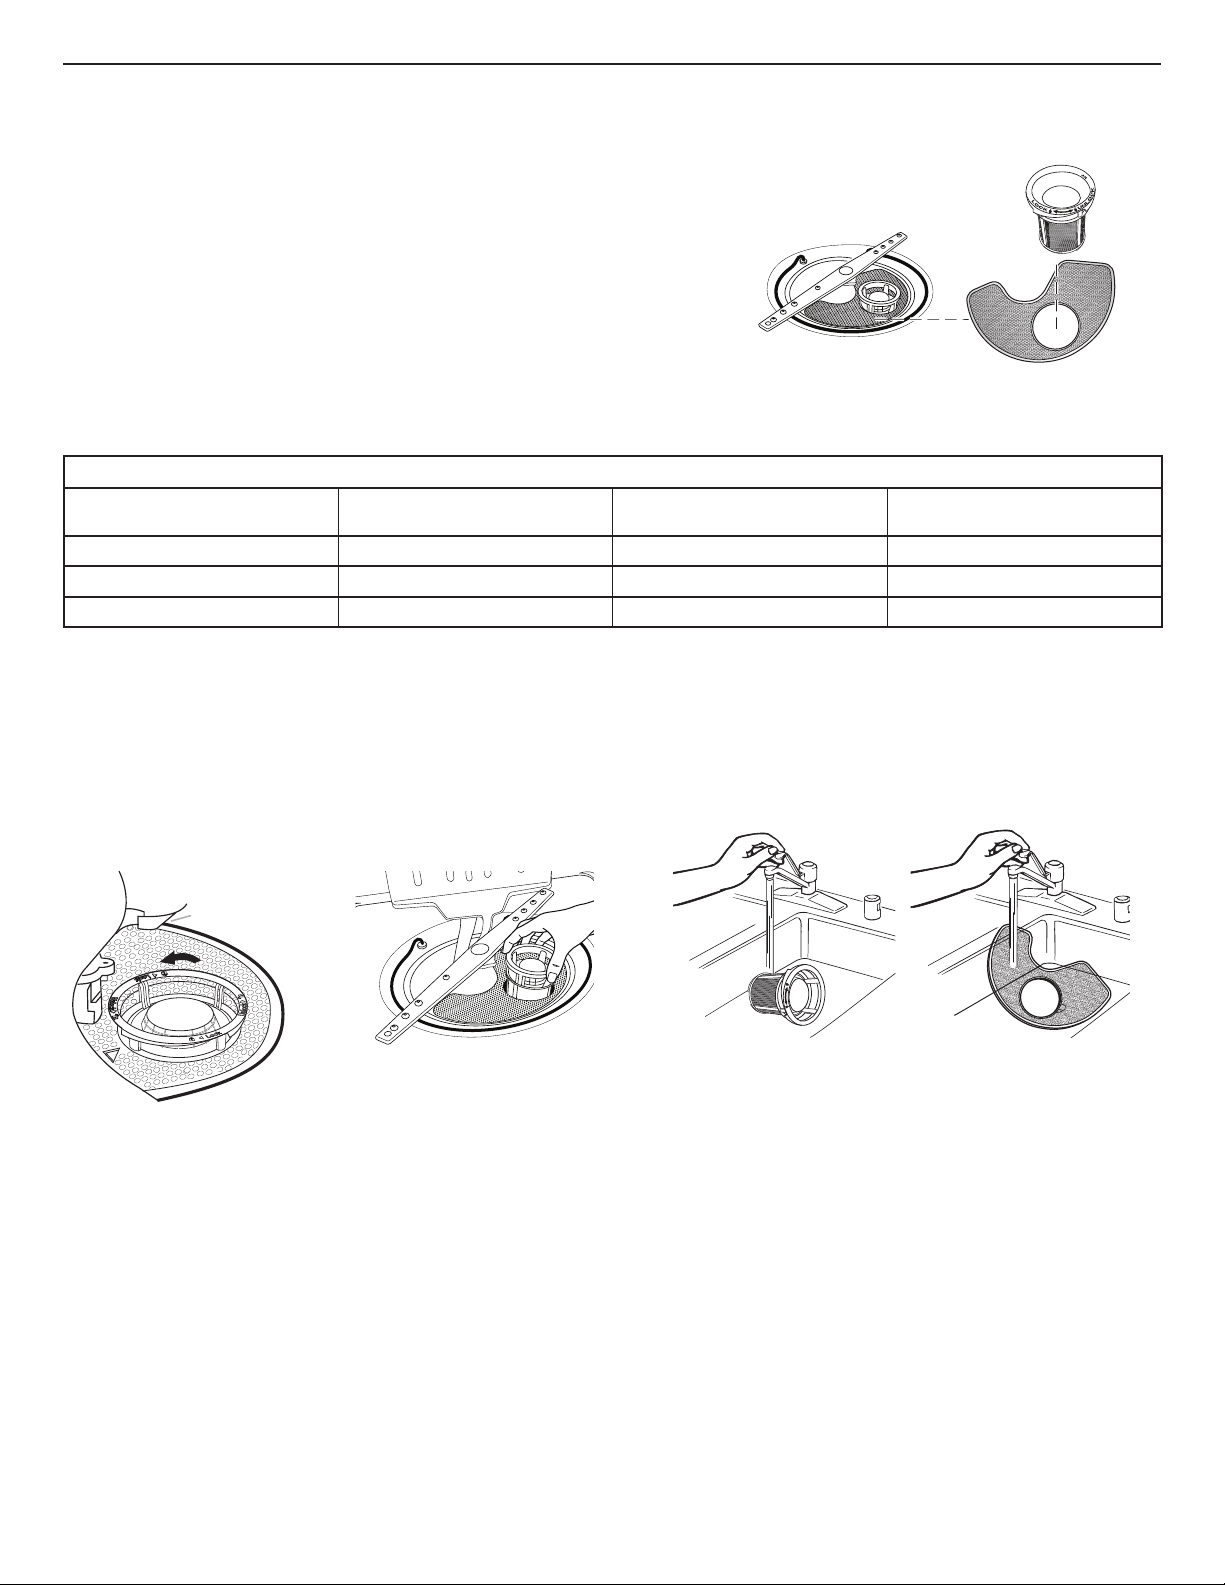
Filtration System
Your dishwasher has latest technology in dishwasher filtration. This filtration system minimizes sound and optimizes water and energy
conservation while providing superior cleaning.
The filter system consists of 2 parts an upper filter assembly and a lower filter.
IMPORTANT: To avoid damage to dishwasher, do not operate your dishwasher
without filters properly installed. Be sure lower filter is securely in place and upper
filter assembly is locked into place. If upper assembly turns freely, it is not locked
into place.
The filters may need to be cleaned when:
■ Visible objects or soils are on the upper filter assembly.
■ Dishes feel gritty to the touch.
Lower filter
Upper filter
assembly
It is very easy to remove and maintain the filters. The chart below shows the recommended cleaning frequency.
RECOMMENDED TIME INTERVAL TO CLEAN YOUR FILTER
Number of Loads Per Week If you only scrape
before loading*
If you scrape and rinse
before loading
If you wash before loading
8–12 Every 2 months Every 4 months Once per year
4–7 Every 4 months Once per year Once per year
1–3 Twice per year Once per year Once per year
*We recommend this practice because it will conserve the water and energy that you would have used to prepare your dishes. This will
also save you time and effort.
Very Hard Water
If you have hard water (above 15 grains), clean your filter at least
once per month. Buildup of white residue on your dishwasher
indicates hard water. For tips on removing spots and stains, see
the “Troubleshooting” section.
Filter Removal Instructions
1. Turn the upper filter assembly 1/4 turn counterclockwise
and lift out.
Locating tab
To remove upper filter assembly
2. Separate the upper filter assembly by gently pulling apart.
3. Clean the filters as shown.
Cleaning Instructions
IMPORTANT: Do not use wire brush, scouring pad, etc., as they
may damage the filters.
Rinse filter under running water until most soils are removed.
If you have hard-to-remove soils or calcium deposits from
hard water, a soft brush may be required.
P
U
S
H
D
O
W
N
&
T
U
R
N
L
O
C
K
U
N
L
O
C
K
16
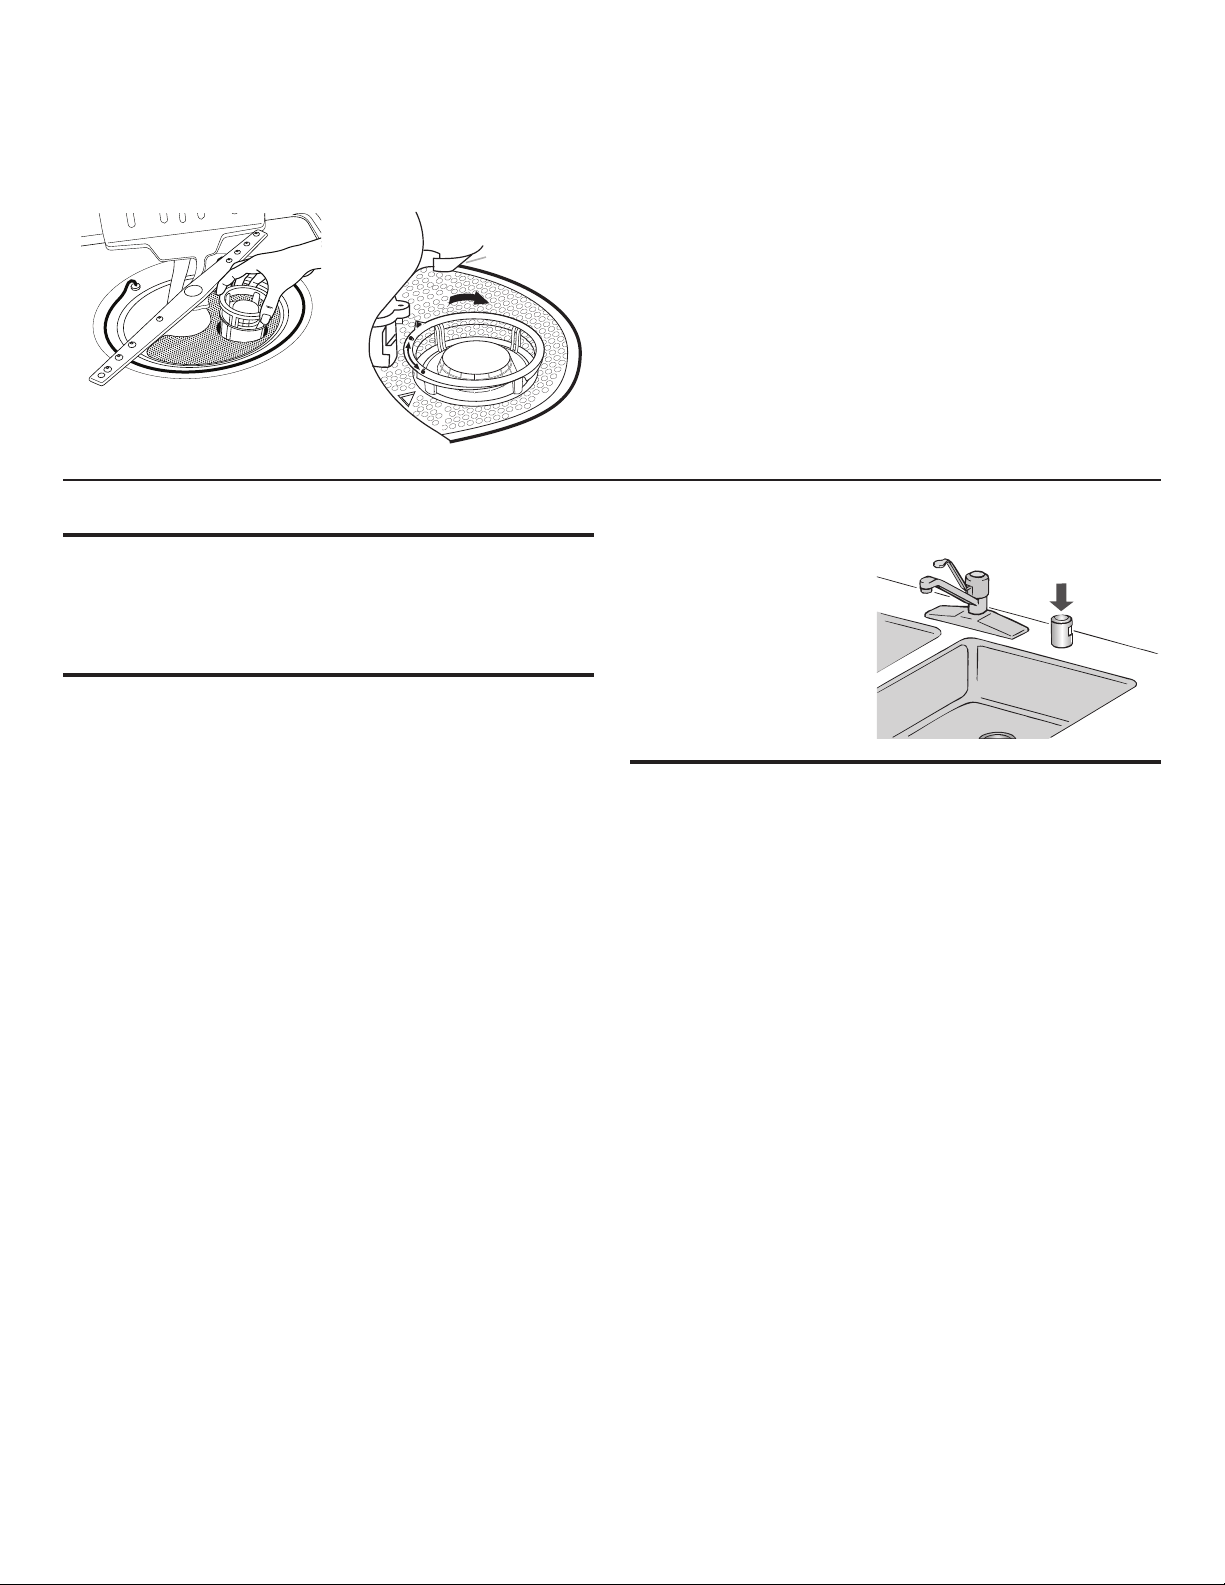
Filter Reinstallation Instructions
1. Noting the previous illustrations, place the lower filter under
the locating tabs in the bottom of the dishwasher, so the
round opening for the upper filter assembly lines up with
the round opening in the bottom of the tub.
2. Insert the upper filter assembly into the circular opening
in the lower filter.
To replace upper filter assembly
L
O
C
K
U
N
L
O
C
K
P
U
S
H
D
O
W
N
&
T
U
R
N
Locating tab
3. Slowly rotate the filter clockwise until it drops into place.
Continue to rotate until the filter is locked into place. If the
filter is not fully seated (still turns freely), continue to turn the
filter clockwise until it drops and locks into place.
NOTE: The upper filter assembly arrow does not have to align
with the arrow in the lower filter as long as the filter is locked.
IMPORTANT: To avoid damage to dishwasher, do not operate
your dishwasher without the filters properly installed. Be sure the
lower filter is securely in place and the upper filter assembly is
locked into place. If the upper filter assembly turns freely, it is not
locked into place.
Dishwasher Care
Cleaning the Exterior
Clean the exterior of dishwasher with a soft, damp cloth and
mild detergent. If your dishwasher has a stainless steel exterior,
a stainless steel cleaner, such as affresh
®†
Stainless Steel Cleaner
is recommended. Avoid using abrasive cleaning products on the
exterior of the dishwasher.
Cleaning and Maintaining the Interior
Many detergents may leave white spots or a white residue on
dishware and on the interior of the dishwasher. Over time this
residue can become unsightly and could affect dishwasher
performance. Use of a dishwasher cleaning product such as
affresh
®
Dishwasher Cleaner can help to remove the residue.
Monthly use of affresh
®
Dishwasher Cleaner is recommended
to help maintain the dishwasher.
To Use:
1. If cleaning without dishes, place one tablet in the detergent
dispenser. Do not add detergent (If significant buildup is
noticeable, a second tablet can be placed in the bottom
of the dishwasher.)
2. If cleaning with dishes, place one tablet in the bottom of the
dishwasher. Place detergent in the dispenser.
3. Run a Normal wash cycle.
Another method to remove white residue is to use a vinegar rinse.
However, vinegar is an acid and using it too often could damage
your dishwasher.
Place (do not pour), 2 cups (500 mL) white vinegar in a glass
or dishwasher-safe measuring cup on the bottom rack. Run
the dishwasher through a complete washing cycle using an
air-dry or an energy-saving dry option. Do not use detergent.
Vinegar will mix with the wash water.
NOTE: Whirlpool recommends the use of high-quality,
premeasured detergent tablets or packs, and the use of rinse
aid for dishwasher cleaning and daily care.
†
®
affresh is a registered trademark of Whirlpool, U.S.A.
I
f you have a drain air gap,
check and clean it if the
dishwasher isn’t draining well.
To Reduce Risk of Property Damage During Vacation
or Extended Time Without Use
■ When you will not be using the dishwasher during the
summer months, turn off the water and power supply to
the dishwasher.
■ Make sure the water supply lines are protected against
freezing conditions. Ice formations in the supply lines
can increase water pressure and cause damage to your
dishwasher or home.
■ Damage from freezing is not covered by the warranty.
■ When storing your dishwasher in the winter, avoid water
damage by having your dishwasher winterized by authorized
service personnel.

17
Troubleshooting – Connectivity
First try the solutions suggested here. If you need further assistance or more recommendations that may help you avoid a service call,
refer to the “Connectivity Setup” section in this manual or contact the Connected Appliance Team.
In the U.S.A., contact the Connected Appliance Team:
Visit www.whirlpool.com/connect
Call: 1-866-333-4591 M–F 8 am – 8 pm EST
Email: [email protected]
In Canada, contact the Connected Appliance Team:
Visit: www.whirlpool.ca/en_CA and click on the Whirlpool
®
Connected Appliances link
Call: 1-866-333-4591 M–F 8 am – 8 pm EST
Email: [email protected]
By mail:
Connected Appliance Team
Whirlpool Customer eXperience Center
553 Benson Road
Benton Harbor, MI 49022-2692
By mail:
Connected Appliance Team
Whirlpool Customer eXperience Centre
200 – 6750 Century Ave.
Mississauga, Ontario L5N 0B7
Please include a daytime phone number in the correspondence.
A
D
C
B
A. Wireless Status icon
B. Remote Enable icon
C. Amber House icon (peak electric rates)
D. Blue House icon (normal electric rates)
CONNECTION STATUS CONTROL PANEL INDICATOR LIGHTS
Dishwasher is not connected
All icons are off.
Dishwasher is attempting to connect to home Wi-Fi router
Wireless icon is blinking slowly.
Dishwasher is connected to home Wi-Fi router, but Whirlpool
®
app or Smart Grid functions do not work
Wireless icon is on.
Blue Internet icon is blinking slowly.
Dishwasher is connected to home Wi-Fi router and the
Whirlpool
®
app works
Wireless icon is on.
Blue or Amber House icon is on – it is not blinking
PROBLEM SOLUTION
DISHWASHER IS NOT
CONNECTED TO HOME
WI-FI ROUTER (WIRELESS
ICON IS OFF)
The dishwasher may be in Standby mode. Press POWER on the dishwasher and observe indicators.
All indicator lights are off when in Standby mode.
Check that the dishwasher has been connected to the home Wi-Fi router. See the “Connectivity
Setup” section.
Press and hold CONNECT for 3 seconds. The Wireless Status icon should blink while connecting (this
may take up to 2 minutes).
Check whether the router connection is on and working with other computers or devices in the home
(able to access the Internet). Have you changed the router or its password?
There may be weak signal strength or signal interference between the dishwasher and router. Try to
place the wireless router closer to the dishwasher. It may be necessary to install a Wi-Fi range extender.
Check the mobile app to verify that the dishwasher is not offline. If it is offline, do the following
to reconnect:
1. Go to “Preferences” in the mobile app find and select DELETE APPLIANCE.
2. Follow the mobile app instructions to add an appliance.
18
PROBLEM SOLUTION
WIRELESS ICON DOES
NOT LIGHT AT ALL
AFTER PRESSING THE
CONNECT KEYPAD
Unplug or disconnect dishwasher power for 30 seconds, then reconnect power. Repeat Wi-Fi
connect process. If there is no connection after several attempts, use alternate setup instructions
available at www.whirlpool.com/connect. In Canada, visit www.whirlpool.ca/en_CA and click on
the Whirlpool
®
Connected Appliances link.
Appliance may be assigned to a Wi-Fi network that is not active. Verify that the network it is assigned
to is operating properly.
Verify that the dishwasher operates correctly, except for not being able to connect. Call for service.
DISHWASHER IS
CONNECTED TO HOME
WI-FI ROUTER (WIRELESS
ICON IS ON), BUT
WHIRLPOOL
®
APP OR
SMART GRID FUNCTIONS
DO NOT WORK
Check whether either the Blue or Amber House icon is on continuously; if not, press CONNECT to
reestablish wireless connection.
Connection to the Whirlpool
®
app and Smart Grid service may be unavailable. Check if the Blue House
icon is off or blinking.
Check that your user account is set up. See the “Connectivity Setup” section or the Whirlpool
®
app
directly for account setup and dishwasher registration instructions.
Verify that the dishwasher is paired with your account in the app.

19
PROBLEM SOLUTION
DISHWASHER DOES
NOT RUN
NOTE: It is normal for the dishwasher to repeatedly pause several times during a cycle.
If the Start/Resume light is blinking, press Start/Resume and close the door within 4 seconds.
Be sure the door is closed and latched.
■ Check that there is not an interference with large casserole dishes and the wash system
at the back of the dishwasher.
■ Check to see if any items are protruding through the bottom or back of the rack. Also check to
see if tall items are hitting the upper rack or spray arm. Adjust loading as necessary to ensure
door is closed and latched.
Press the Start/Resume or Cancel keypad or open and close the door before selecting your cycle/
option. Controls must be awakened after a period of inactivity.
Be sure the Control/Lock feature is not on. If the control lock indicator is lit, press and hold SANI
RINSE for 3 seconds. The Control Lock LED will turn off and you can then operate the controls.
Be sure you have selected a cycle. See the “Cycle and Option Descriptions” section.
Be sure there is power to the dishwasher. A circuit breaker or fuse may have tripped.
If lights other than Start/Resume blink and the unit will not run, you will need to call for service.
If the numeric display shows a code “F2E2”, you will need to call for service.
DETERGENT REMAINS
IN THE DISPENSER OR
TABLET IS ON BOTTOM
OF TUB
Check for dishware, such as cookie sheets, cutting boards, or large containers, etc., that may be
blocking the detergent dispenser from opening properly.
Be sure your detergent is fresh and lump free.
Be sure the cycle has completed (the Clean light is on). If it has not completed, you will need to
resume the cycle by pressing the Start/Resume keypad and closing the door within 4 seconds.
CYCLE RUNS TOO LONG NOTES:
■ To use less water and reduce energy consumption, you will encounter cycles that typically run
for up to 3 hours.
■ A water heater setting of 120°F (49°C) is best the dishwasher will delay longer while heating
cooler water.
■ Some options will add time to the cycle. See the “Cycle and Option Descriptions” section.
The Heat Dry option adds approximately 45 minutes.
Try the 1-Hour Wash cycle.
Run the hot water at a faucet close to the dishwasher before starting the cycle.
DISHWASHER NOT DRYING
NOTE: Plastic and items with nonstick surfaces are difficult to dry because they have a porous
surface, which tends to collect water droplets. Towel drying may be necessary.
Use of rinse aid along with the Heat Dry option is needed for proper drying.
Proper loading of items can affect drying. (See specific loading instructions within this guide.)
Glasses and cups with concave bottoms hold water. This water may spill onto other items
when unloading.
■ Unload the bottom rack first.
■ Locate these items on the more slanted side of the rack for improved results.
WILL NOT FILL
Be sure the water to the dishwasher is turned on.
Check that the overfill protection float is free from obstructions. See the “Parts and Features” section.
Check for suds in the dishwasher. If foam or suds are detected, the dishwasher may not operate
properly or may not fill with water. See “Blinking Lights” in the “Troubleshooting” section.
Troubleshooting
If you have successfully connected your dishwasher previously and are experiencing difficulties, first try the solutions suggested here.
If you need further assistance or more recommendations that may help you avoid a service call, refer to the warranty page in this manual
and scan the code with your mobile device, or visit www.whirlpool.com/product_help. In Canada, visit www.whirlpool.ca.Contact us
by mail with any questions or concerns at the address below:
In the U.S.A.:
Whirlpool Brand Home Appliances
Customer eXperience Center
553 Benson Road
Benton Harbor, MI 49022-2692
In Canada:
Whirlpool Brand Home Appliances
Customer eXperience Centre
200 – 6750 Century Ave.
Mississauga, Ontario L5N 0B7
Please include a daytime phone number in the correspondence.

20
PROBLEM SOLUTION
WATER REMAINS IN THE
TUB/WILL NOT DRAIN
Be sure the cycle has completed (the Clean indicator is on). If it has not, you will need to resume the
cycle by pressing the Start/Resume keypad and closing the door within 4 seconds.
If dishwasher is connected to a food waste disposer, be sure the knockout plug has been removed
from the disposer inlet.
Check for kinks in the drain hose.
Check for food obstructions in the drain or disposer.
Check your house fuse or circuit breaker.
HARD WATER
(WHITE RESIDUE ON
DISHWASHER INTERIOR
OR GLASSWARE)
NOTE: Extremely hard water mineral deposits can cause damage to your dishwasher and make
it difficult to achieve good cleaning. A water softener is strongly recommended if your hardness
is 15 grains or more. If a water softener is not installed, the following steps may help:
Use a commercial cleaner designed for dishwashers once per month.
Clean the upper and lower filters at least once per month. See “Cleaning Instructions” in the
“Filtration System” section.
Always use a rinse aid.
Always use a high-quality, fresh detergent.
Use a detergent booster/water softener additive designed for dishwashers.
ODORS
NOTE: If the dishwasher is not used daily, you can run a rinse cycle with the partial load until a full
load is ready to run.
Run a vinegar rinse through the dishwasher by putting 2 cups (500 mL) of white vinegar in an upright
glass measuring cup in the lower rack. Run a Normal cycle with the Heat Dry option turned off. Do
not use detergent.
The dishwasher may not be draining properly. See “Water Remains In The Tub/Will Not Drain” in the
“Troubleshooting” section.
NOISY
Surging sounds can occur periodically throughout the cycle while the dishwasher is draining.
Normal water valve hissing may be heard periodically.
A normal snap sound may be heard when the detergent dispenser opens during the cycle and when
the door is opened at the end of the cycle.
Improper installation will affect noise levels.
Be sure the filters are properly installed.
A thumping sound may be heard if items extend beyond the racks and interfere with the wash arms.
Readjust the dishware and resume the cycle.
FOOD SOILS REMAIN
ON DISHES
Be sure the dishwasher is loaded correctly. Improper loading can greatly decrease the washing
performance. See the “Dishwasher Use” section.
Check filter to ensure it is properly installed. Clean it if needed. See “Cleaning Instructions” in the
“Filtration System” section for details.
Select the proper cycle and option for the type of soils. The Heavy cycle with the Hi Temp Wash
option can be used for tougher loads.
Be sure the incoming water temperature is at least 120°F (49°C).
Use the proper amount of fresh detergent. More detergent is needed for heavier soiled loads and
hard water conditions.
Scrape food from dishes prior to loading (do not prerinse).
DISHES DIRTY/SUDS IN
DISHWASHER/CYCLE
NOT COMPLETE
If foam or suds are detected by the dishwasher sensing system, the dishwasher may not operate
properly or may not fill with water.
Suds can come from:
■ Using the incorrect type of detergent, such as dish detergent for hand washing dishes,
laundry detergent, or hand soap.
■ Not replacing the rinse aid dispenser cap after filling (or refilling) the rinse aid.
■ Using an excessive amount of dishwasher detergent.
■ Inadequate rinsing off detergent from dishes washed by hand before loading them into
the dishwasher.
Call for service.
If no water was present in the machine at any time during a heated wash cycle, the cycle will end and
the Clean indicator will not come on. See “Will Not Fill” in the “Troubleshooting” section.
DID NOT SANITIZE
If the Sanitized light is blinking, the load is NOT sanitized. The cycle was interrupted in the final rinse
or the temperature for your water heater is set too low. Set your water heater to 120ºF (49°C).
DAMAGE TO DISHWARE
Improper loading can cause dishes to become chipped or damaged. (See specific loading
instructions within this guide.)

21
PROBLEM SOLUTION
BLINKING LIGHTS
Blinking indicators will occur when the cycle is paused or when the cycle has been interrupted by
opening the door. If the Start/Resume light is blinking, press the Start/Resume keypad and close the
door within 4 seconds.
See “Start or Resume a Cycle” in the “Dishwasher Use” section.
If the Clean light or any other lights are blinking and the dishwasher will not run, call for service.
CLOUDY OR SPOTTED
DISHWARE (AND HARD
WATER SOLUTION)
Add or adjust the amount of liquid rinse aid for better drying and to reduce spotting. See the
“Detergent and Rinse Aid” section.
Use the correct amount of detergent.
Confirm that the cloudiness is removable by soaking the item in white vinegar for 5 minutes. If the
cloudiness disappears, it is due to hard water. Adjust the amount of detergent and rinse aid. See
“Hard Water (White Residue on Dishwasher Interior or Glassware)” in the “Troubleshooting” section.
If it does not come clear, it is due to etching (see below).
Be sure the incoming water temperature is set at 120°F (49°C).
Try using the Hi Temp Wash and Sani Rinse options.
To remove spotting, run a vinegar rinse through the dishwasher.
■ Wash and rinse the affected dishware and load into dishwasher. Remove all silverware and
metal items. Put 2 cups (500 mL) of white vinegar in a glass measuring cup in the lower rack.
Run a Normal cycle with the Heat Dry option turned off. No detergent is needed.
ETCHING (PERMANENT
CLOUDINESS)
This is an erosion of the surface of the glassware and can be caused by a combination of: water that
is too hot, from using too much detergent with soft water, or by pre-washing. Detergent needs food
soil to act upon. If etching has occurred, the glassware is permanently damaged. To avoid further
etching, adjust the detergent amount to match the water hardness, stop pre-washing, and use water
heating options only when incoming water temperature is below 120°F (49°C).
LEAKING WATER
Be sure dishwasher has been installed properly and is level.
Suds can cause the dishwasher to overflow. Measure the detergent accurately and use only
detergents designed for use in a dishwasher. Less detergent is needed in soft water. Try another
brand of detergent if sudsing continues.
To avoid rinse aid leaking from the dispenser, be sure the lid is securely attached and avoid overfilling.
TUB IS DISCOLORED
High iron content in the water can discolor the tub.
Tomato-based foods can discolor the tub or dishware. Large amounts of tomato-based foods should
be removed from the dishes before loading.
A citrus-based cleaner can be used to clean.

22
Open Source License Usage
The following statements refer to the portions of this software
based in part on FreeRTOS v7.0.2, http://www.freertos.org.
The use of this software is governed by the terms of GNU General
Public License v. 2, which is available at:
http://www.gnu.org/licenses/gpl-2.0.html. A copy of the source
code may be obtained by written request for the software by
name to [email protected], along with the address
for delivery.
The following statements refer to those portions of the software
copyrighted by Eclipse Foundation, Inc. Copyright (c) 2007,
Eclipse Foundation, Inc. and its licensors. All rights reserved.
Redistribution and use in source and binary forms, with or without
modification, are permitted provided that the following conditions
are met:
• Redistributions of source code must retain the above copyright
notice, this list of conditions, and the following disclaimer.
• Redistributions in binary form must reproduce the above
copyright notice, this list of conditions, and the following
disclaimer in the documentation and/or other materials
provided with the distribution.
• Neither the name of the Eclipse Foundation, Inc. nor the
names of its contributors may be used to endorse or promote
products derived from this software without specific prior
written permission.
THIS SOFTWARE IS PROVIDED BY THE COPYRIGHT
HOLDERS AND CONTRIBUTORS “AS IS” AND ANY EXPRESS
OR IMPLIED WARRANTIES, INCLUDING, BUT NOT LIMITED
TO, THE IMPLIED WARRANTIES OF MERCHANTABILITY AND
FITNESS FOR A PARTICULAR PURPOSE ARE DISCLAIMED.
IN NO EVENT SHALL THE COPYRIGHT OWNER OR
CONTRIBUTORS BE LIABLE FOR ANY DIRECT, INDIRECT,
INCIDENTAL, SPECIAL, EXEMPLARY, OR CONSEQUENTIAL
DAMAGES (INCLUDING, BUT NOT LIMITED TO,
PROCUREMENT OF SUBSTITUTE GOODS OR SERVICES;
LOSS OF USE, DATA, OR PROFITS; OR BUSINESS
INTERRUPTION) HOWEVER CAUSED AND ON ANY THEORY
OF LIABILITY, WHETHER IN CONTRACT, STRICT LIABILITY,
OR TORT (INCLUDING NEGLIGENCE OR OTHERWISE)
ARISING IN ANY WAY OUT OF THE USE OF THIS SOFTWARE,
EVEN IF ADVISED OF THE POSSIBILITY OF SUCH DAMAGE.
Portions of this software are copyright (c) Sawtooth Consulting
Ltd. 2006-2015 All rights reserved.
Portions of this software are copyright (c) Arrayent, Inc.
2015 All rights reserved.
The following statements refer to those portions of the software
copyrighted by Swedish Institute of Computer Science.
Copyright (c) 2001-2004 Swedish Institute of Computer Science.
All rights reserved.
Redistribution and use in source and binary forms, with or without
modification, are permitted provided that the following conditions
are met:
1. Redistributions of source code must retain the above
copyright notice, this list of conditions, and the following
disclaimer.
2. Redistributions in binary form must reproduce the above
copyright notice, this list of conditions, and the following
disclaimer in the documentation and/or other materials
provided with the distribution.
3. The name of the author may not be used to endorse or
promote products derived from this software without specific
prior written permission.
THIS SOFTWARE IS PROVIDED BY THE AUTHOR “AS IS”’
AND ANY EXPRESS OR IMPLIED WARRANTIES, INCLUDING,
BUT NOT LIMITED TO, THE IMPLIED WARRANTIES OF
MERCHANTABILITY AND FITNESS FOR A PARTICULAR
PURPOSE ARE DISCLAIMED. IN NO EVENT SHALL THE
AUTHOR BE LIABLE FOR ANY DIRECT, INDIRECT, INCIDENTAL,
SPECIAL, EXEMPLARY, OR CONSEQUENTIAL DAMAGES
(INCLUDING, BUT NOT LIMITED TO, PROCUREMENT OF
SUBSTITUTE GOODS OR SERVICES; LOSS OF USE, DATA, OR
PROFITS; OR BUSINESS INTERRUPTION) HOWEVER CAUSED
AND ON ANY THEORY OF LIABILITY, WHETHER IN CONTRACT,
STRICT LIABILITY, OR TORT (INCLUDING NEGLIGENCE OR
OTHERWISE) ARISING IN ANY WAY OUT OF THE USE OF
THIS SOFTWARE, EVEN IF ADVISED OF THE POSSIBILITY
OF SUCH DAMAGE.
The following statements refer to those portions of the software
copyrighted by Marvell International Ltd. Copyright (c) Marvell
International Ltd. All rights reserved.
DISCLAIMER. THIS SOFTWARE IS PROVIDED BY THE
COPYRIGHT HOLDERS AND CONTRIBUTORS “AS IS”
AND ANY EXPRESS OR IMPLIED WARRANTIES, INCLUDING,
BUT NOT LIMITED TO, THE IMPLIED WARRANTIES OF
MERCHANTABILITY AND FITNESS FOR A PARTICULAR
PURPOSE ARE DISCLAIMED. IN NO EVENT SHALL THE
COPYRIGHT OWNER OR CONTRIBUTORS BE LIABLE FOR
ANY DIRECT, INDIRECT, INCIDENTAL, SPECIAL, EXEMPLARY,
OR CONSEQUENTIAL DAMAGES (INCLUDING, BUT NOT
LIMITED TO, PROCUREMENT OF SUBSTITUTE GOODS OR
SERVICES; LOSS OF USE, DATA, OR PROFITS; OR BUSINESS
INTERRUPTION) HOWEVER CAUSED AND ON ANY THEORY
OF LIABILITY, WHETHER IN CONTRACT, STRICT LIABILITY,
OR TORT (INCLUDING NEGLIGENCE OR OTHERWISE)
ARISING IN ANY WAY OUT OF THE USE OF THIS SOFTWARE,
EVEN IF ADVISED OF THE POSSIBILITY OF SUCH DAMAGE.

23
W10901525A
®
/™ ©2017 Whirlpool. Used under license in Canada. All rights reserved. 04/17
11/14
WHIRLPOOL
®
MAJOR APPLIANCE
LIMITED WARRANTY
ATTACH YOUR RECEIPT HERE. PROOF OF PURCHASE IS REQUIRED
TO OBTAIN WARRANTY SERVICE.
Please have the following information available when you call the
Customer eXperience Center:
■ Name, address and telephone number
■ Model number and serial number
■ A clear, detailed description of the problem
■ Proof of purchase including dealer or retailer name and address
IF YOU NEED SERVICE:
1. Before contacting us to arrange service, please determine whether your product requires repair. Some
questions can be addressed without service. Please take a few minutes to review the Troubleshooting or
Problem Solver section of the Use and Care Guide, scan the QR code on the right to access additional
resources, or visit www.whirlpool.com/product_help.
2. All warranty service is provided exclusively by our authorized Whirlpool Service Providers
. In the U.S. and
Canada, direct all requests for warranty service to:
Whirlpool Customer eXperience Center
In the U.S.A., call 1-800-253-1301. In Canada, call 1-800-807-6777.
If outside the 50 United States or Canada, contact your authorized Whirlpool dealer to determine whether another warranty applies.
www.whirlpool.com/product_help
ONE YEAR LIMITED WARRANTY
WHAT IS COVERED WHAT IS NOT COVERED
For one year from the date of purchase, when this major
appliance is installed, operated and maintained
according to instructions attached to or furnished with
the product, Whirlpool Corporation or Whirlpool Canada
LP (hereafter “Whirlpool”) will pay for Factory Specified
Replacement Parts and repair labor to correct defects in
materials or workmanship that existed when this major
appliance was purchased, or at its sole discretion
replace the product. In the event of product
replacement, your appliance will be warranted for the
remaining term of the original unit's warranty period.
YOUR SOLE AND EXCLUSIVE REMEDY UNDER THIS
LIMITED WARRANTY SHALL BE PRODUCT REPAIR AS
PROVIDED HEREIN. Service must be provided by a
Whirlpool designated service company. This limited
warranty is valid only in the United States or Canada and
applies only when the major appliance is used in the
country in which it was purchased. This limited warranty
is effective from the date of original consumer purchase.
Proof of original purchase date is required to obtain
service under this limited warranty.
1. Commercial, non-residential, multiple-family use, or use inconsistent with publishe
d
user, operator or installation instructions.
2. In-home instruction on how to use your product.
3. Service to correct improper product maintenance or installation, installation not in
accordance with electrical or plumbing codes or correction of household electrical or
plumbing (i.e. house wiring, fuses or water inlet hoses).
4. Consumable parts (i.e. light bulbs, batteries, air or water filters, preservation so
lutions,
etc.).
5. Defects or damage caused by the use of non-genuine Whirlpool parts or accessories.
6. Conversion of products from natural gas or L.P. gas.
7. Damage from accident, misuse, abuse, fire, floods, acts of God or use with products
not approved by Whirlpool.
8. Repairs to parts or systems to correct product damage or defects caused by
unauthorized service, alteration or modification of the appliance.
9. Cosmetic damage including scratches, dents, chips, and other damage to the
appliance finishes unless such damage results from defects in materials and
workmanship and is reported to Whirlpool within 30 days.
10
. Discoloration, rust or oxidation of surfaces resulting from caustic or corr
osive
environments including but not limited to high salt concentrations, high moisture or
humidity or exposure to chemicals.
11. Food or medicine loss due to product failure.
12. Pick-up or delivery. This product is intended for in-home repair.
13. Travel or transportation expenses for service in remote locations where an authorized
Whirlpool servicer is not available.
14. Removal or reinstallation of inaccessible appliances or built-in fixtures (i.e. trim,
decorative panels, flooring, cabinetry, islands, countertops, drywall, etc.) that interfere
with servicing, removal or replacement of the product.
15. Service or parts for appliances with original model/serial numbers removed, altered or
not easily determined.
The
cost of repair or replacement under these excluded circumstances shall be borne
by the customer.
DISCLAIMER OF IMPLIED WARRANTIES
IMPLIED WARRANTIES, INCLUDING ANY IMPLIED WARRANTY OF MERCHANTABILITY OR IMPLIED WARRANTY OF FITNESS FOR A
PARTICULAR PURPOSE, ARE LIMITED TO ONE YEAR OR THE SHORTEST PERIOD ALLOWED BY LAW. Some states and provinces do not allow
limitations on the duration of implied warranties of merchantability or fitness, so this limitation may not apply to you. This warranty gives you
specific legal rights, and you also may have other rights that vary from state to state or province to province.
DISCLAIMER OF REPRESENTATIONS OUTSIDE OF WARRANTY
Whirlpool makes no representations about the quality, durability, or need for service or repair of this major appliance other than the representations
contained in this warranty. If you want a longer or more comprehensive warranty than the limited warranty that comes with this major appliance,
you should ask Whirlpool or your retailer about buying an extended warranty.
LIMITATION OF REMEDIES; EXCLUSION OF INCIDENTAL AND CONSEQUENTIAL DAMAGES
YOUR SOLE AND EXCLUSIVE REMEDY UNDER THIS LIMITED WARRANTY SHALL BE PRODUCT REPAIR AS PROVIDED HEREIN. WHIRLPOOL
SHALL NOT BE LIABLE FOR INCIDENTAL OR CONSEQUENTIAL DAMAGES. Some states and provinces do not allow the exclusion or limitation
of incidental or consequential damages, so these limitations and exclusions may not apply to you. This warranty gives you specific legal rights, and
you also may have other rights that vary from state to state or province to province.
24
INSTRUCCIONES PARA EL
USUARIO DE LA LAVAVAJILLAS
Índice
SEGURIDAD DE LA LAVAVAJILLAS ............................................................... 24
AVISOS NORMATIVOS PARA ELECTRODOMÉSTICOS CONECTADOS ..... 26
QUÉ HAY DE NUEVO EN SU LAVAVAJILLAS ................................................ 27
PIEZAS Y CARACTERÍSTICAS ....................................................................... 28
PASOS RÁPIDOS ............................................................................................ 29
CARACTERÍSTICAS DE CONECTIVIDAD ...................................................... 29
CONFIGURACIÓN DE LA CONECTIVIDAD ................................................... 30
USO DE LA LAVAVAJILLAS – OPERACIÓN BÁSICA..................................... 31
USO DE LA LAVAVAJILLAS – OPERACIÓN INTELIGENTE .......................... 33
DESCRIPCIÓN DE CICLOS Y OPCIONES ..................................................... 34
CARACTERÍSTICAS DE LA LAVAJILLAS ....................................................... 37
SISTEMA DE FILTRACIÓN .............................................................................. 39
CUIDADO DE LA LAVAVAJILLAS ................................................................... 40
SOLUCIÓN DE PROBLEMAS – CONECTIVIDAD .......................................... 41
SOLUCIÓN DE PROBLEMAS .......................................................................... 43
USO DE LICENCIA DE ORIGEN ABIERTO ..................................................... 46
GARANTÍA ........................................................................................................ 47
LE AGRADECEMOS la compra de este producto de alta calidad. Registre su nueva lavavajillas en www.whirlpool.com. En Canadá,
registre su lavavajillas en www.whirlpool.ca.
Obtenga las instrucciones de conexión a Internet, los términos de uso y la política de privacidad en www.whirlpool.com/connect.
Si tiene consultas o problemas, llame al equipo de Whirlpool Connected Appliance al número 1-866-333-4591. En Canadá, visite
www.whirlpool.ca/en_CA y haga clic en el vínculo a Whirlpool
®
Connected Appliances.
Para referencia futura, tome nota del número de modelo y de serie del producto. Los puede encontrar cerca de la puerta en el lado
derecho o izquierdo del interior de la lavavajillas.
Número de modelo _______________________________________ Número de serie ___________________________________________
Seguridad de la lavavajillas
Si no sigue las instrucciones de inmediato, usted puede
morir o sufrir una lesión grave.
Si no sigue las instrucciones, usted puede morir o sufrir
una lesión grave.
Todos los mensajes de seguridad le dirán el peligro potencial, le dirán cómo reducir las posibilidades de sufrir una lesión y lo que
puede suceder si no se siguen las instrucciones.
Su seguridad y la seguridad de los demás es muy importante.
Hemos incluido muchos mensajes importantes de seguridad en este manual y en su electrodoméstico. Lea y obedezca siempre
todos los mensajes de seguridad.
ADVERTENCIA
PELIGRO
Este es el símbolo de alerta de seguridad.
Este símbolo le llama la atención sobre peligros potenciales que pueden ocasionar la muerte o una lesión a
usted y a los demás.
Todos los mensajes de seguridad irán a continuación del símbolo de advertencia de seguridad y de la palabra
“PELIGRO” o “ADVERTENCIA”. Estas palabras significan:
25
INSTRUCCIONES IMPORTANTES DE SEGURIDAD
ADVERTENCIA: Cuando use la lavavajillas siga precauciones básicas, incluyendo las siguientes:
GUARDE ESTAS INSTRUCCIONES
■ Lea todas las instrucciones antes de usar la lavavajillas.
■ Use la lavavajillas únicamente para las funciones que fue
diseñada.
■
Use únicamente detergentes o agentes de enjuague
recomendados para ser usados en las lavavajillas y
manténgalos fuera del alcance de los niños.
■ Al introducir los artículos para lavar:
1) Coloque los artículos puntiagudos de manera que no
dañen el sello de la puerta
2) Introduzca los cuchillos filosos con los mangos hacia
arriba para reducir el riesgo de cortaduras.
■ No lave artículos de plástico que no lleven la indicación
“lavables en la lavavajillas” u otra similar. Lea las
recomendaciones del fabricante para los artículos de
plástico que no lleven tal indicación.
■ No toque el elemento de calefacción durante o
inmediatamente después de usar la lavavajillas.
■ No haga funcionar la lavavajillas a menos que todos los
paneles estén colocados debidamente en su lugar.
■ No juegue con los controles.
■ No abuse, ni se siente ni se pare sobre la puerta, la tapa o
sobre las canastas de la lavavajillas.
■ Para reducir el riesgo de lesión, no permita que los niños
jueguen dentro ni sobre la lavavajillas.
■ Bajo ciertas condiciones, un sistema de agua caliente que
no ha sido usado por dos semanas o más puede producir
gas hidrógeno. EL GAS HIDRÓGENO ES EXPLOSIVO. Si
el sistema de agua caliente no ha sido usado por ese
período, abra todas las llaves de agua caliente y deje que
corra el agua por varios minutos antes de usar la
lavavajillas. Esto permitirá que los gases acumulados
escapen. Debido a que el gas es inflamable, no fume ni
encienda ninguna llama abierta durante este tiempo.
■ Quite la puerta o la tapa del compartimiento de lavado
cuando remueva o deje de usar para siempre una vieja
lavavajillas.
INSTRUCCIONES DE CONEXIÓN A TIERRA
GUARDE ESTAS INSTRUCCIONES
■
Para una lavavajillas con cable eléctrico y conexión a
tierra:
La lavavajillas debe estar conectada a tierra. En caso de
funcionamiento defectuoso o avería, la conexión a tierra
reduce el riesgo de choque eléctrico al establecer una ruta
de menor resistencia para la corriente eléctrica. La
lavavajillas viene equipada con un cable eléctrico que tiene
un conductor para conexión a tierra y un enchufe con
conexión a tierra. El enchufe debe ser conectado a un
contacto apropiado que esté instalado y conectado a tierra
de acuerdo con todos los códigos y ordenanzas locales.
ADVERTENCIA: La conexión inadecuada del
conductor de conexión a tierra puede resultar en riesgo
de choque eléctrico. Pregunte a un electricista
calificado o a un agente de servicio si no está seguro si
la lavavajillas está adecuadamente conectada a tierra.
No modifique el enchufe que viene con la lavavajillas. Si
no cabe en el contacto, pida que un electricista
calificado instale un contacto apropiado.
■
Para lavavajillas con conexión permanente:
Esta lavavajillas debe estar conectada a un sistema de
cableado de metal permanente, conectado a tierra, o se
debe tender un conducto para la conexión a tierra del
equipo con los conductores de circuito y conectado a la
terminal de tierra del equipo o al conductor de
suministro de la lavavajillas.
Peligro de Vuelco
No use la lavavajillas antes de estar completamente instalada.
No se apoye en la puerta abierta.
No seguir estas instrucciones puede ocasionar heridas serias o cortaduras.
ADVERTENCIA

26
Avisos normativos para electrodomésticos conectados
Aviso de conformidad con la Comisión Federal
de Comunicaciones (FCC)
Este equipo ha sido evaluado y se determinó que cumple con los
límites para un dispositivo digital de clase B, de acuerdo con la
parte 15 de las reglas de la FCC. Estos límites están destinados
a proporcionar una protección razonable contra interferencia
perjudicial en una instalación residencial. Este equipo genera, usa
y puede irradiar energía de radiofrecuencia y, si no se instala y usa
según las instrucciones, puede causar interferencia perjudicial a
las radiocomunicaciones. Sin embargo, no se garantiza que tal
interferencia no se produzca en una instalación en particular. Si
este equipo de hecho causa interferencia perjudicial a la recepción
de radio o televisión, lo cual se puede determinar apagando y
encendiendo el equipo, se recomienda al usuario que intente
corregir la interferencia con una de las siguientes medidas:
– Reoriente o reubique la antena receptora.
– Aumente la separación entre el equipo y el receptor.
– Conecte el equipo en un tomacorriente en un circuito separado
del que se usa para conectar el receptor.
– Consulte con el distribuidor o con un técnico en radio/TV con
experiencia para pedir ayuda.
Este dispositivo cumple con la parte 15 de las reglas de la FCC.
La operación está sujeta a las dos condiciones siguientes:
1. Este aparato no puede causar interferencias nocivas y
2. Este aparato debe aceptar cualquier interferencia recibida,
incluida una interferencia que pueda causar una operación
no deseada.
Los cambios o las modificaciones sin aprobación expresa de la
parte responsable del cumplimiento podrían anular la autorización
del usuario para operar el equipo.
Información sobre exposición a RF
Para cumplir con los requisitos de exposición a RF de la FCC/IC
para dispositivos transmisores móviles, este transmisor solo debe
usarse o instalarse en lugares donde haya al menos 20 cm de
distancia de separación entre la antena y todas las personas.
Para cumplir con los límites de exposición a RF de la FCC/IC
para exposición no controlada/de la población general, las antenas
usadas para este transmisor deben instalarse de modo que se
proporcione una distancia de separación de al menos 20 cm de
todas las personas y no se debe ubicar ni operar junto con ninguna
otra antena o transmisor.
Aviso de conformidad con Industry Canada (IC)
Este dispositivo cumple con las normas RSS exentas de licencia
de Industry Canada. La operación está sujeta a las siguientes
condiciones:
1. Este aparato no puede causar interferencias,
2. Este aparato debe aceptar cualquier interferencia recibida,
incluida una interferencia que pueda causar una operación
no deseada del aparato.
Según la normativa de Industry Canada, este radiotransmisor
solo puede operar con una antena de un tipo y máxima (o menor)
ganancia aprobada para el transmisor por Industry Canada. Para
reducir la potencial interferencia de radio para otros usuarios, el tipo
de antena y su ganancia se deben elegir de modo que la potencia
radiada isotrópicamente equivalente (e.i.r.p.) no sea mayor que la
necesaria para una comunicación satisfactoria.
Este radiotransmisor IC: 10248A-WICHAM01 et 10248A-FLDAAM01
ha sido aprobado por Industry Canada para operar con los tipos
de antena enumerados a continuación con la máxima ganancia
permitida y la impedancia de antena requerida para cada tipo de
antena indicado. Los tipos de antena no incluidos en esta lista que
tengan una ganancia mayor que la ganancia máxima indicada para
ese tipo están estrictamente prohibidos para el uso con este aparato.
Tipo de antena Ganancia de
antena máxima
permitida (dBi)
Impedancia
requerida (OHM)
Ranura 1,2 50
Monopolo
(solo WICHAM01)
0,5 50
Dipolo 3,0 50
F 1,60 50
Planar F 4,2 50
Para cumplir con los límites de exposición a RF de la FCC y de
Industry Canada para la población general, las antenas usadas para
este transmisor deben instalarse de modo que se mantenga una
distancia de separación mínima de 20 cm entre el radiador (antena)
y todas las personas en todo momento y no se debe ubicar ni operar
junto con ninguna otra antena o transmisor.
Responsabilidades de OEM para cumplir con las
normativas de la FCC y de Industry Canada
El módulo WICHAM01/FLDAAM01 ha sido certificado para la
integración con productos solo de integradores OEM según las
siguientes condiciones:
1. Las antenas deben instalarse de modo que se mantenga una
distancia de separación mínima de 20 cm entre el radiador
(antena) y todas las personas en todo momento.
2. El módulo transmisor no se debe ubicar ni operar junto con
ninguna otra antena o transmisor.
Siempre y cuando las dos condiciones anteriores se cumplan, no se
requerirán otras pruebas del transmisor. Sin embargo, el integrador
OEM es igualmente responsable de hacer pruebas a su producto
final para cualquier requisito de conformidad adicional requerido
con este módulo instalado (por ejemplo, emisiones de dispositivos
digitales, requisitos de periféricos de PC, etc.).
NOTA IMPORTANTE: En caso de que estas condiciones no puedan
cumplirse (para determinadas configuraciones o la ubicación junto
con otro transmisor), las autorizaciones de la FCC y de Industry
Canada dejan de ser consideradas válidas y la ID de la FCC y el
número de certificación de IC no pueden utilizarse en el producto
final. En esas circunstancias, el integrador OEM será responsable de
volver a evaluar el producto final (incluido el transmisor) y de obtener
una autorización separada de la FCC y de Industry Canada.
Etiquetas del producto final
El módulo WICHAM01/FLDAAM01 está etiquetado con su propia
ID de la FCC y número de certificación de IC. Si la ID de la FCC y
el número de certificación de IC no están visibles cuando el módulo
se instala dentro de otro aparato, el exterior del aparato dentro del
cual se instale el módulo también debe mostrar una etiqueta que
mencione el módulo incluido. En ese caso, el producto final debe
estar etiquetado en un área visible con lo siguiente:
“Contiene módulo transmisor, ID de la FCC: A5UWICHAM01”
“Contiene módulo transmisor, IC: 10248A-WICHAM01”
o bien
“Contiene ID de la FCC: A5UFLDAAM01””
“Contiene IC: 10248A-FLDAAM01”
El OEM del módulo WICHAM01/FLDAAM01 debe usar solo las
antenas aprobadas que se han certificado con este módulo.
El integrador OEM debe tener presente que no debe brindar
información al usuario final sobre cómo instalar o retirar este módulo
de RF o cómo cambiar parámetros relacionados con RF en el manual
del usuario del producto final.
El manual del usuario para el producto final debe incluir
la siguiente información en un lugar destacado:
“Para cumplir con los límites de exposición a RF de la FCC y de
Industry Canada para la población general, las antenas usadas para
este transmisor deben instalarse de modo que se mantenga una
distancia de separación mínima de 20 cm entre el radiador (antena)
y todas las personas en todo momento y no se debe ubicar ni operar
junto con ninguna otra antena o transmisor”.
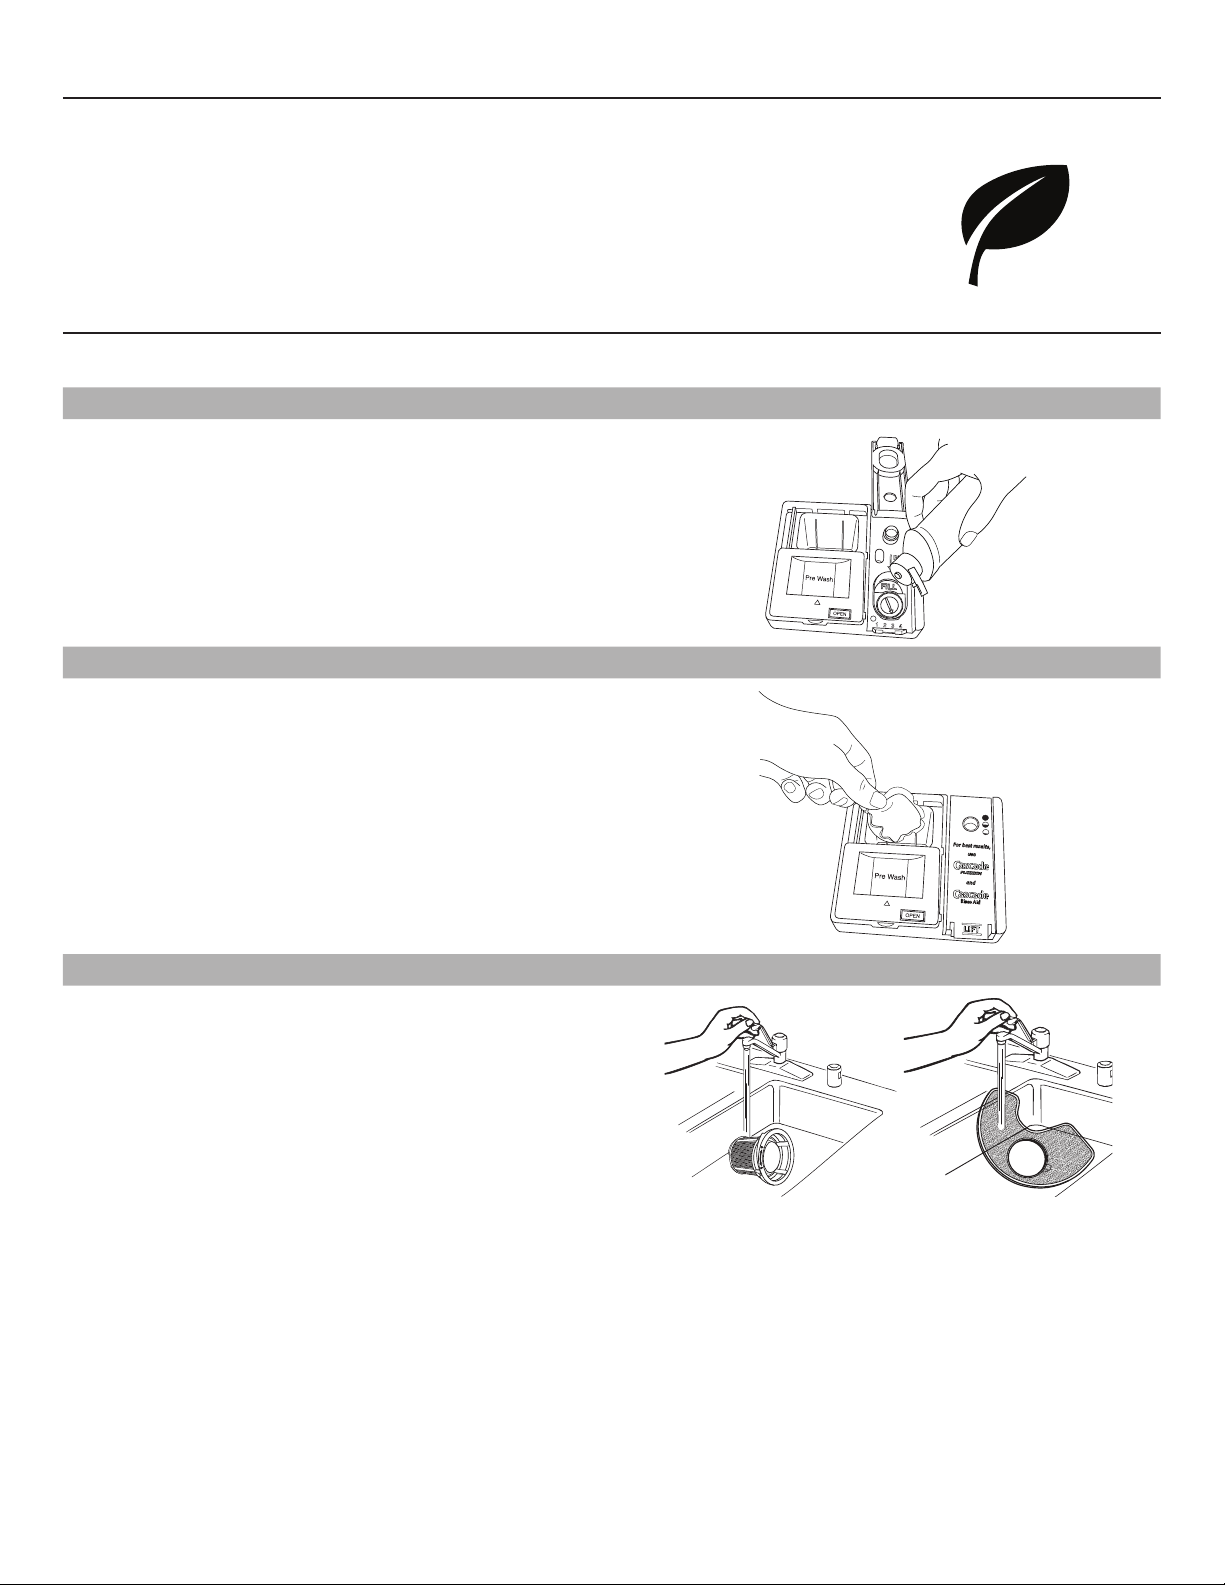
27
Qué hay de nuevo en su lavavajillas
Energía
¡Felicitaciones por haber comprado la lavavajillas con bajo consumo de agua y energía! Esta
lavavajillas limpia rociando la vajilla con agua y hace pausas para permitir que el detergente remoje
la vajilla y afloje la suciedad de los platos. Para obtener una limpieza excepcional, los ciclos se
hacen más largos debido al remojo y las pausas. Varios modelos tienen un sensor óptico de agua.
El sensor óptico de agua se usa para determinar el consumo óptimo de agua y energía para una
limpieza ideal. Las lavavajillas eficaces funcionan por más tiempo para ahorrar agua y energía, de
la misma manera que se ahorra gasolina cuando se conduce un automóvil más despacio. El primer
ciclo con sensor durará más tiempo para calibrar el sensor óptico.
Rendimiento
Agente de enjuague
El uso del agente de enjuague hará óptimo el desempeño
de lavado y secado. Esta lavavajillas ha sido diseñada
específicamente para usarse en conjunto con agente de enjuague,
para obtener un mejor desempeño de secado y controlar la
acumulación de depósitos de agua dura. Las lavavajillas con bajo
consumo de energía usan menos agua y energía, de modo que
dependen de la acción de desplazamiento del agua por obra del
agente de enjuague para asegurar un óptimo desempeño.
SLIDE
Detergente
Estados Unidos y Canadá han aprobado normas que limitan la
cantidad de fósforo (fosfatos) en los detergentes para lavavajillas
domésticas. Los principales fabricantes han reformulado su
detergente para lavavajillas de acuerdo a este cambio, lo que es
un paso más en la conciencia ecológica. Con estos cambios, se
recomienda usar pastillas y paquetes de calidad por practicidad
y para mejorar el rendimiento.
SLIDE
Sistema de filtración
Su lavavajillas cuenta con lo último en tecnología de filtración para
lavavajillas. El sistema de filtración triple minimiza los sonidos y
optimiza el ahorro de agua y energía mientras proporciona una
limpieza óptima. El mantenimiento periódico de los filtros hará
posible un rendimiento superior de limpieza. Le sugerimos limpiar
el filtro superior e inferior y enjuagarlos bajo agua del grifo por lo
menos una vez al mes.
P
U
S
H
D
O
W
N
&
T
U
R
N
L
O
C
K
U
N
L
O
C
K
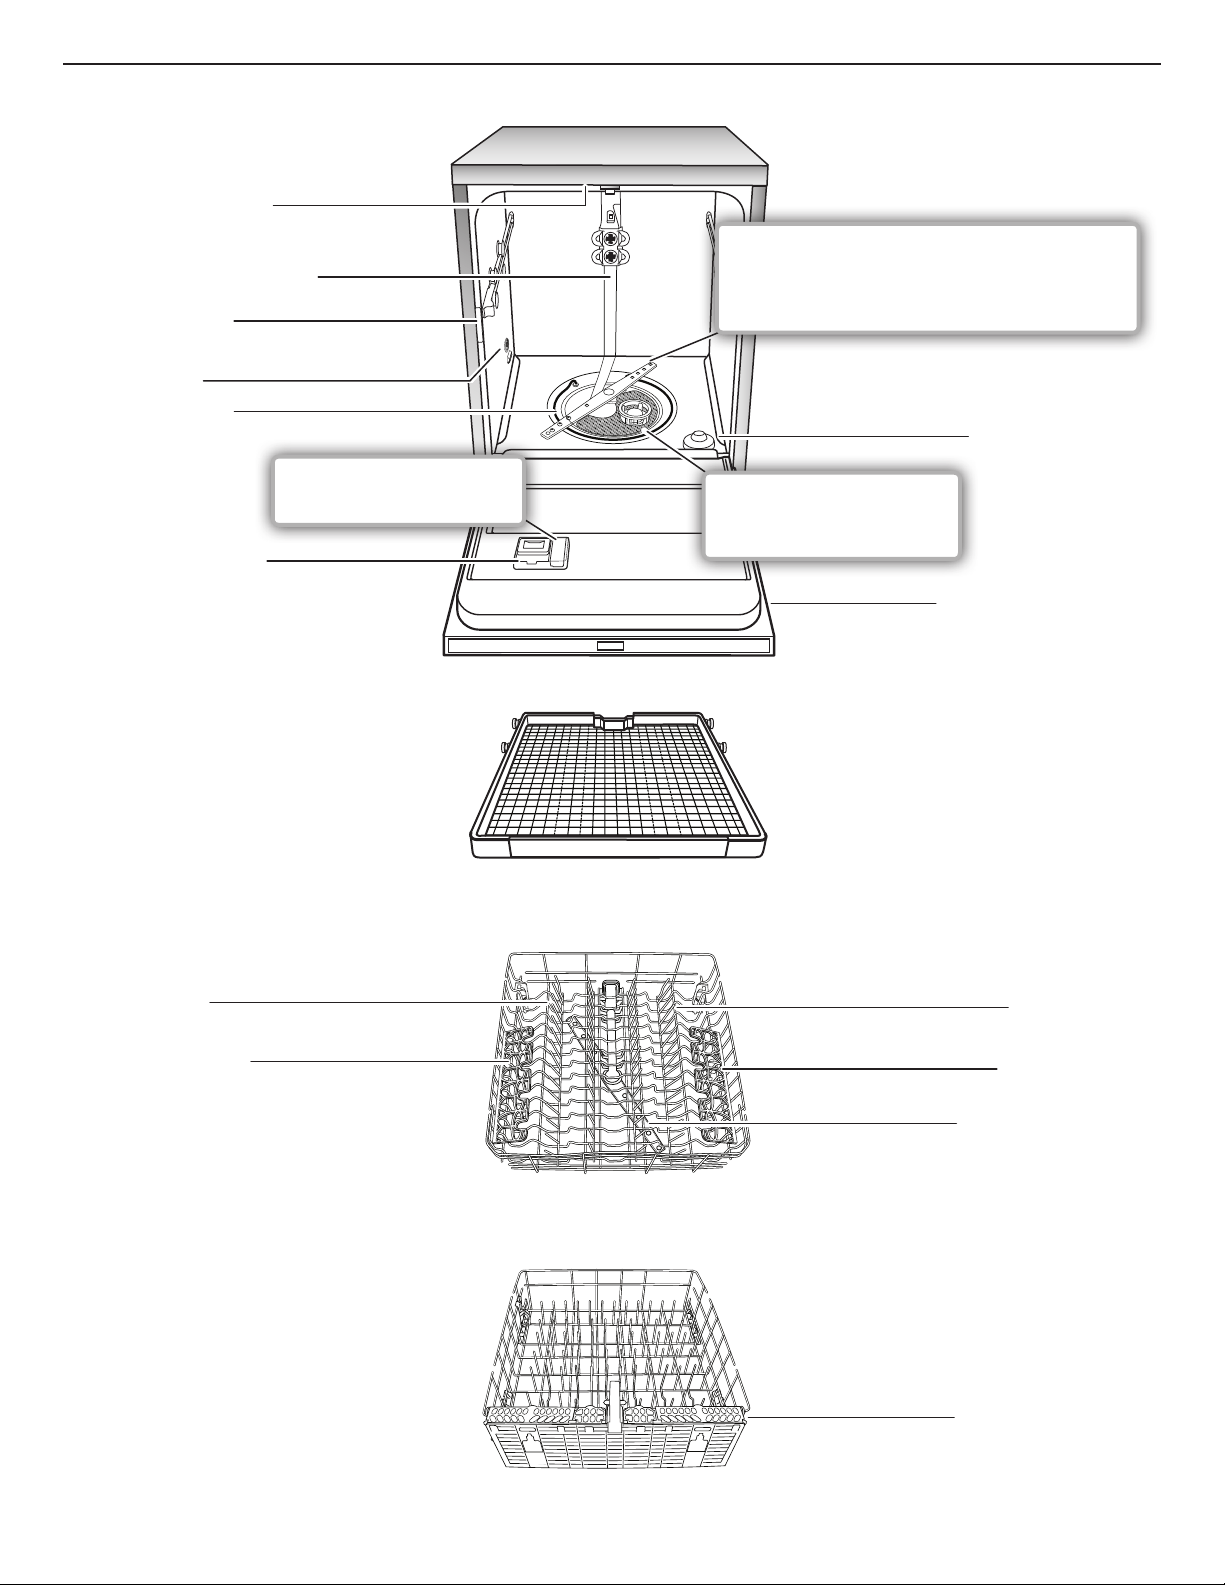
28
Piezas y características
Lavado del nivel superior
Tubo de alimentación de agua
Etiqueta de número
de modelo y de serie
Abertura de la
entrada de agua
Depósito de detergente
Elemento calentador
Puntas plegables
CANASTA INFERIOR
CANASTA SUPERIOR
Canastilla para cubiertos
Estante para tazas
Flotador de protección
de sobrellenado
Número de SAID e ID MAC
Estante para tazas
(en algunos modelos)
Puntas plegables
Brazo rociador superior
El brazo de rociado de cobertura total (en algunos
modelos) limpia con el doble de surtidores para
mayor cobertura. Una secuencia más inteligente
de patrones de rociado desde múltiples boquillas
llega a los platos a lo largo de todo el ciclo.
CANASTA DEL TERCER NIVEL
(en algunos modelos)
El depósito del agente
de enjuague reduce las
manchas y mejora el secado.
El sistema de lavado con
recursos eficientes remueve
la suciedad del agua y mejora
la acción de limpieza.
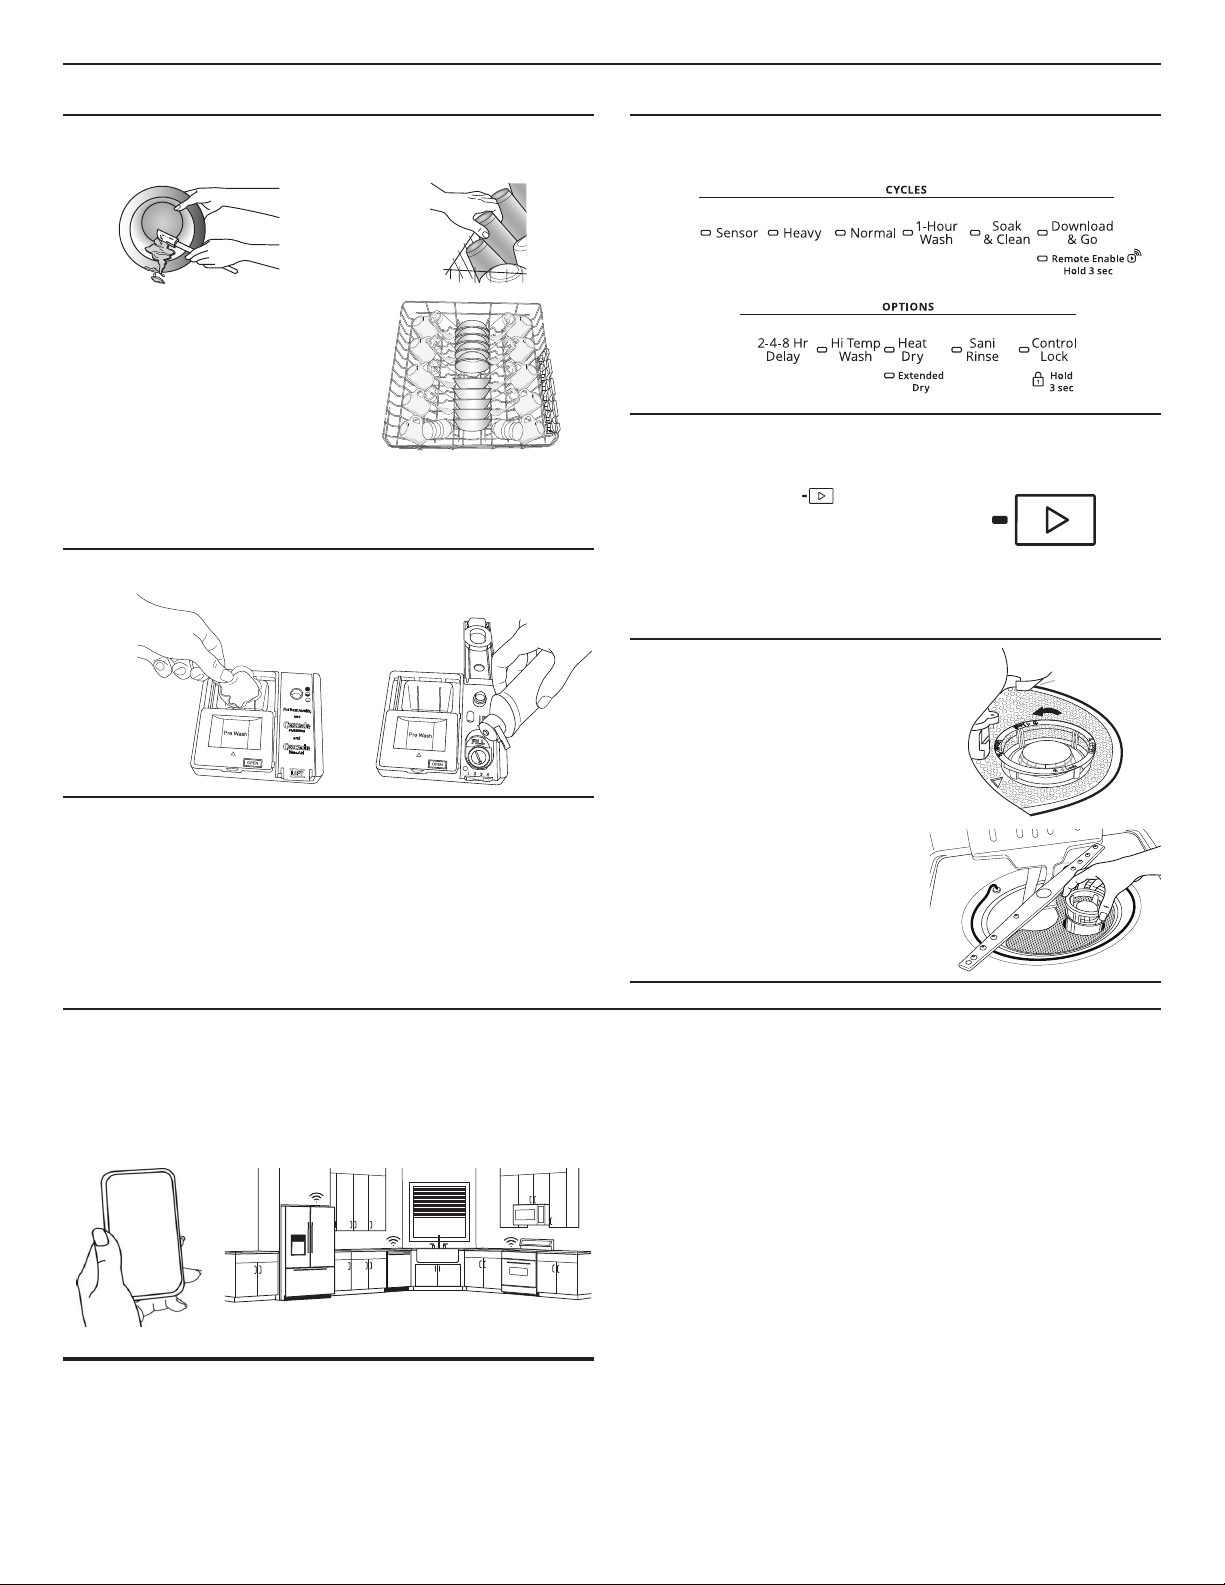
29
1
Elimine los restos grandes de alimentos y cargue
la lavavajillas.
Bote los restos de alimento
de los platos a la basura o
al recipiente de desechos
alimenticios.
Coloque los platos de
manera que el rociador
de agua pueda alcanzar
todas las superficies.
2
Agregue el detergente y el agente de enjuague.
SLIDE
SLIDE
3
Seleccione un ciclo y las opciones
(varía según el modelo).
4
Ponga la lavavajillas
en marcha.
Para comenzar y reanudar un
ciclo, presione (Inicio)
y cierre la puerta en menos
de 4 segundos. Si la puerta
no se ha cerrado en menos
de 4 segundos, el botón
LED destellará, se emitirá
un tono audible y el ciclo no
comenzará.
5
Descargue la lavavajillas
y limpie el filtro.
Consulte “Intervalos
recomendados para la
limpieza del filtro” en
la sección “Sistema de
filtración” para ver el
programa de limpieza
recomendado.
Pasos rápidos
Características de conectividad
La conectividad Wi-Fi permite que la lavavajillas inteligente se conecte a Internet e interactúe con la aplicación Whirlpool
®
de su
teléfono inteligente o su dispositivo móvil. Esta conexión le ofrece varias opciones inteligentes. Las características y las funciones
de la aplicación podrían cambiar. Las opciones descritas son las típicas y pueden cambiar. Consulte la aplicación de Whirlpool
®
para ver las características actualizadas de conectividad.
CARACTERÍSTICAS INTELIGENTES
Las características inteligentes ayudan a que su vida diaria sea
más eficiente al permitirle supervisar, controlar y mantener la
lavavajillas de forma remota.
Su lavavajillas podría tener otras características que no se
mencionan aquí. Consulte su aplicación para obtener una lista
completa de las características adicionales.
Habilitación remota
Lo que hace: Le permite enviar el control remoto de la lavavajillas
al teléfono inteligente o el dispositivo móvil a través de la
aplicación Whirlpool
®
.
Lo que hace por usted: Cuando está habilitada, permite iniciar la
lavavajillas desde cualquier lugar y, por lo tanto, manejar cuando
termina de funcionar.
Progreso del ciclo
Lo que hace: Presenta un detalle minuto a minuto del progreso.
Lo que hace por usted: Le permite conocer el tiempo restante
del ciclo del lavado desde cualquier ubicación.
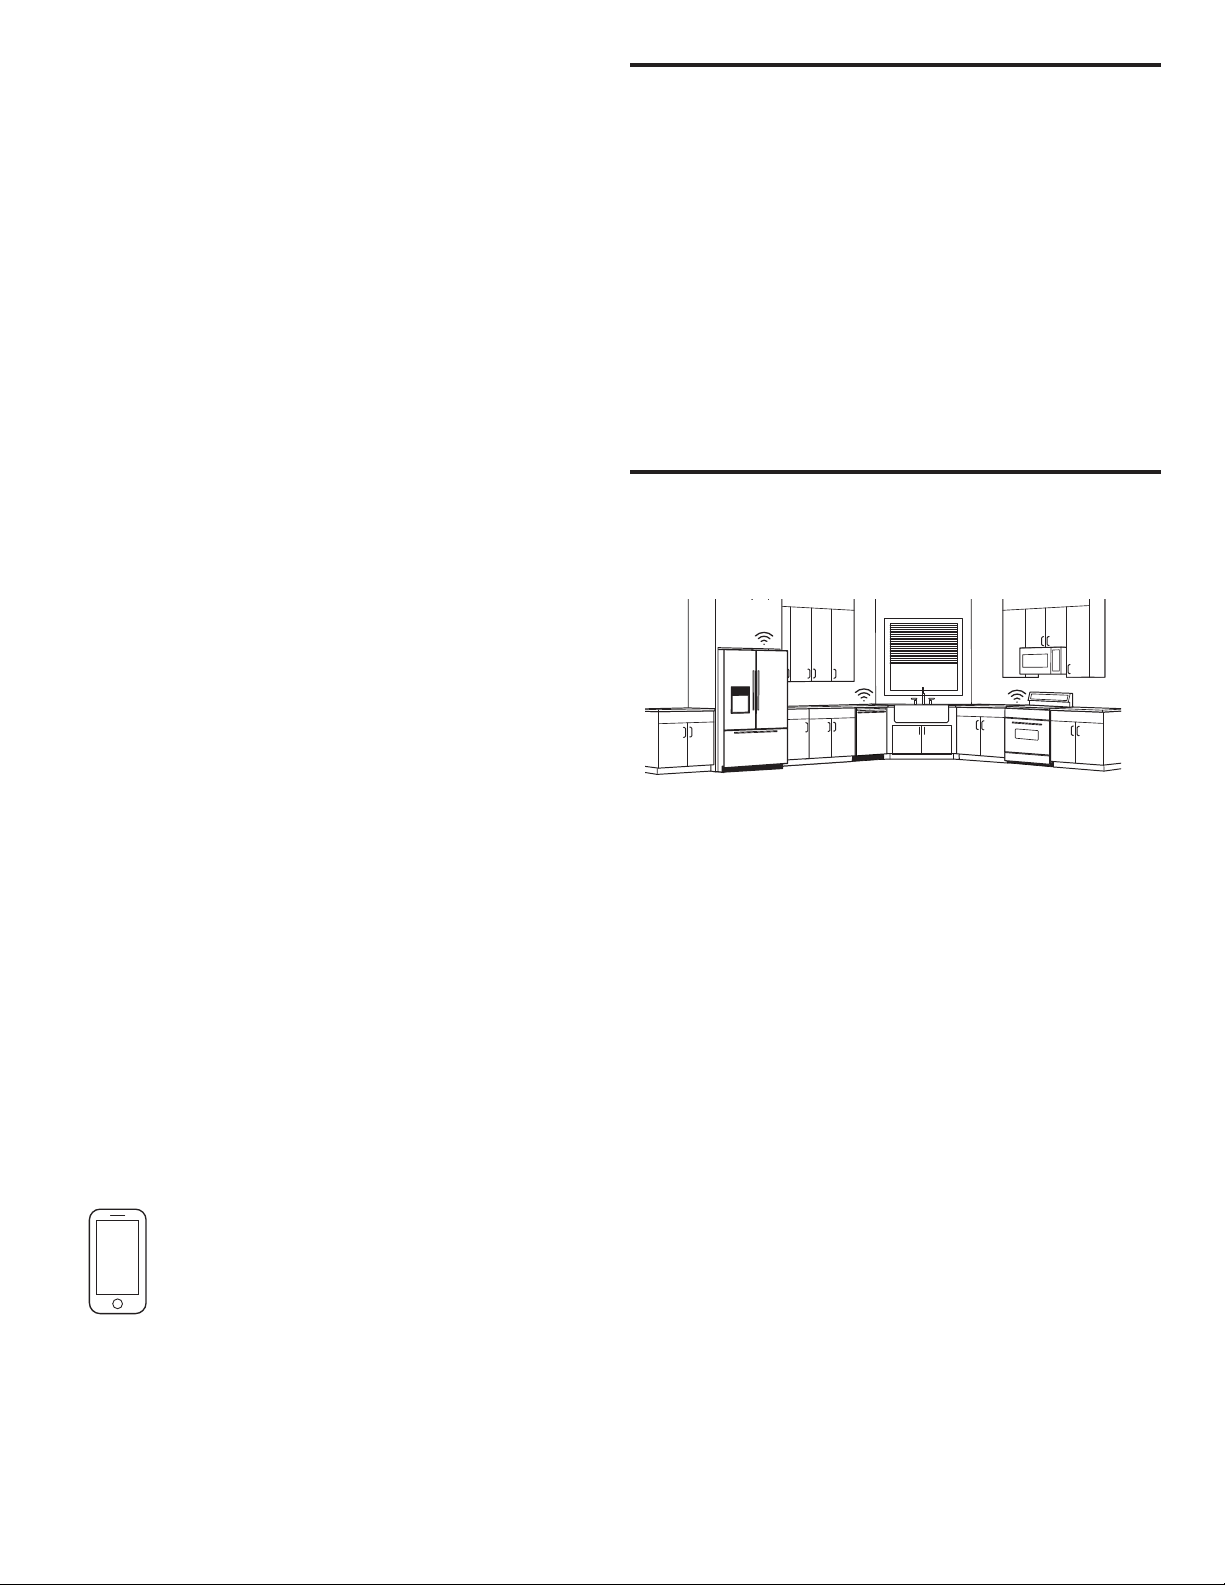
30
Notificación (opcional)
Lo que hace: La lavavajillas le enviará una notificación automática.
Lo que hace por usted: Le alerta con precisión cuando la
lavavajillas ha terminado, para que pueda descargarla y seguir
con otras cosas.
Ciclos especializados y Mi ciclo
(en algunas lavavajillas)
Lo que hace: Le permite explorar otros ciclos de lavavajillas
disponibles en la aplicación Whirlpool
®
y descargar un ciclo en la
lavavajillas con la opción Download & Go™. También puede crear
y guardar sus propios ciclos personalizados.
Lo que hace por usted: Le permite elegir los ajustes que
funcionan mejor para usted y los guarda para usarlos cuando
lo desee.
Modo silencioso
Lo que hace: Permite desactivar los tonos y los pitidos que emite
la lavavajillas.
Lo que hace por usted: Le permite usar la lavavajillas sin
molestar a otras personas de la casa.
Alertas de problemas (opcional)
Lo que hace: Envía una notificación automática si ocurre algún
desperfecto.
Lo que hace por usted: Brinda un aviso de antemano y
proporciona orientación para solucionar problemas simples
a través de videos e instrucciones paso por paso.
Si el problema es más complejo, puede enviar un correo
electrónico o llamar directamente a nuestro centro de servicio
desde la aplicación Whirlpool
®
.
Modo amistoso para el consumidor Kosher
(solo aplicación)
Lo que hace: Durante este modo los controles y luces no
funcionarán y las luces interiores se apagarán.
Lo que hace por usted: Ajusta automáticamente la lavavajillas
en observancia del Shabat.
USO INTELIGENTE DE LA ENERGÍA
(en algunas lavavajillas)
La lavavajillas inteligente puede supervisar y responder a niveles
fluctuantes de demanda de energía en la red eléctrica.
Retraso inteligente
(Optativo cuando esté disponible por parte de la compañía
de servicios básicos)
Lo que hace: Cuando la demanda de energía es alta, retrasa
el inicio de un ciclo de la lavavajillas hasta que los niveles de
demanda disminuyan. Puede salir de la opción permanentemente
o invalidar un retraso inteligente.
Lo que hace por usted: Reduce la exigencia energética del
sistema eléctrico local durante los momentos de mayor demanda.
Algunos consumidores incluso pueden encontrarse con una
cuenta de electricidad más baja.
Si necesita iniciar un ciclo de la lavavajillas de inmediato, puede
cancelar el retraso inteligente. La lavavajillas volverá al monitoreo
de energía en el ciclo siguiente.
PARA COMENZAR
Consulte la sección “Configuración de la conectividad” en las
Instrucciones para el usuario y siga las instrucciones para conectar.
Revise la aplicación Whirlpool
®
con frecuencia para ver
información y características adicionales.
Configuración de la conectividad
Consiga la aplicación y manténgase conectado
Con su dispositivo móvil, consiga la aplicación, las instrucciones de configuración de la conectividad,
los términos de uso y la política de privacidad en:
www.whirlpool.com/connect
En Canadá, visite
www.whirlpool.ca/en_CA
y haga clic en el vínculo a Whirlpool
®
Connected Appliances.
IMPORTANTE: La instalación correcta del electrodoméstico antes del uso es su responsabilidad. Asegúrese de leer y de seguir las
Instrucciones de instalación que vinieron con el electrodoméstico.
La conectividad requiere acceso a internet y crear una cuenta. Las características y las funciones de la aplicación podrían cambiar.
Es posible que apliquen tarifas para transmisión de datos. Si tiene consultas o problemas, llame a Whirlpool Corporation Connected
Appliances al número 1-866-333-4591.
Necesitará:
CONFIG-
URACIÓN
■ Un enrutador inalámbrico doméstico que admita Wi-Fi, 2,4 GHz preferiblemente con seguridad WPA2. Si no tiene
certeza de las capacidades de su enrutador, consulte las instrucciones del fabricante de su enrutador.
■ El enrutador debe estar encendido y tener una conexión de Internet activada.
■ El código SAID de 10 caracteres para su aplicación. El código SAID está impreso en una etiqueta en la aplicación
o se puede encontrar en la pantalla LCD. Consulte la Guía de usuario de la aplicación para obtener la ubicación.
Una vez instalada, inicie la aplicación. Se lo guiará a través de los pasos para configurar una cuenta de usuario y conectar su
aplicación. Si tiene consultas o problemas, llame a Whirlpool Corporation Connected Appliances al número 1-866-333-4591.
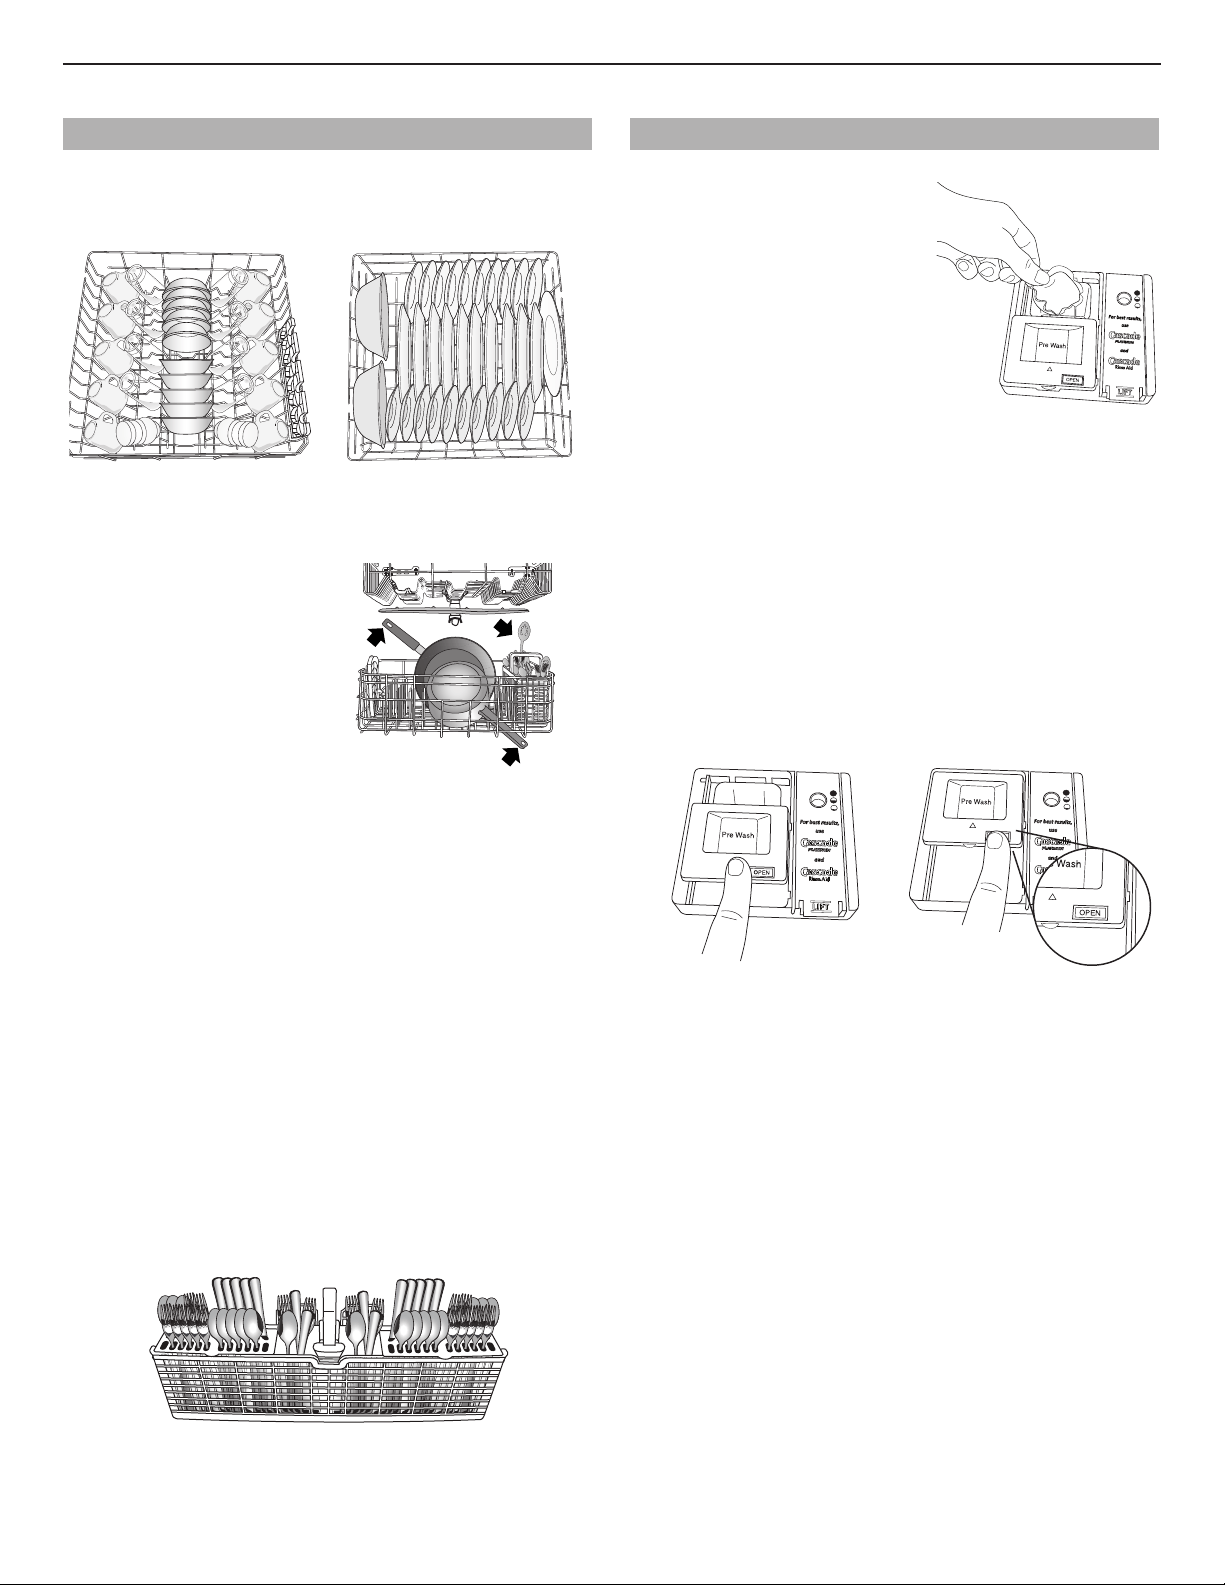
31
Uso de la lavavajillas – Operación básica
PASO 1
Prepare y cargue la lavavajillas
IMPORTANTE: Quite de los platos los restos de alimentos,
huesos, palillos y otros elementos duros. Quite las etiquetas
de los recipientes antes de lavarlos.
Canasta superior Canasta inferior
■ Verifique que no haya nada que bloquee el brazo rociador
superior o inferior.
Los artículos que están
en la canasta pueden
bloquear los brazos
rociadores.
■ Asegúrese de que cuando la puerta de la lavavajillas esté
cerrada, no haya artículos bloqueando el depósito de
detergente.
■ Los artículos muy sucios deberán cargarse con las superficies
sucias mirando hacia abajo y hacia el rociador. Esto mejorará
los resultados de limpieza y de secado.
■ Evite superponer los artículos como tazones o platos, que
pueden atrapar la comida.
■ Coloque los plásticos, los platos pequeños y los vasos en la
canasta superior. Lave sólo artículos de plástico marcados
como “lavable en la lavavajillas”.
■ Para evitar golpeteos o ruidos estrepitosos durante el
funcionamiento, cargue los platos de manera que no se
toquen entre sí. Asegúrese de que los objetos livianos estén
firmes en las canastas.
■ Cuando cargue la canastilla para utensilios, coloque siempre
los artículos filosos apuntando hacia abajo. Mezcle los
artículos en cada sección de la canastilla, algunos con la
punta hacia arriba y otros hacia abajo para evitar apilamientos.
El rociador no puede alcanzar los objetos apilados.
■ Use las ranuras en las cubiertas y los modelos de carga
sugeridos para mantener los cubiertos separados y obtener
un lavado óptimo.
PUSH
NOTA: La canastilla para cubiertos AnyWare™ se ajustará en la
puerta interior, en la parte frontal de la canasta inferior y dentro
de esta misma canasta.
PASO 2
Agregue detergente
Detergentes previamente medidos
SLIDE
Se recomienda usar pastillas y
paquetes previamente medidos
de alta calidad para mejorar el
rendimiento.
Está comprobado que las pastillas
y los paquetes de alta calidad son
más eficaces que los detergentes
en polvo, líquidos o en gel para
reducir las películas residuales
en la vajilla. Al usar pastillas
y paquetes, con el tiempo las
películas blancas comenzarán a reducirse o a eliminarse. Son
apropiados para todos los niveles de dureza y de suciedad.
Además, al usar un agente de enjuague puede minimizar la
acumulación repetida de película blanca (no todos los paquetes y
las pastillas contienen agente de enjuague). Coloque siempre los
detergentes previamente medidos en el compartimiento principal
y deslice la tapa para cerrarla.
NOTA: Siga las instrucciones del paquete cuando use otros tipos
de detergente para lavavajillas.
■ Use únicamente detergentes para lavavajillas automáticas.
Agregue el detergente justo antes de comenzar el ciclo.
■ El detergente para lavavajillas automáticas produce mejores
resultados cuando está fresco. Guarde el detergente bien
cerrado en un lugar fresco y seco.
Para cerrar la tapa Para abrir la tapa
SLIDE
SLIDE
Coloque el detergente
seleccionado en el dispensador.
Coloque el dedo, como se
muestra, y deslice la tapa para
cerrar. Presione firmemente
hasta escuchar un chasquido.
Presione OPEN (Abrir), como
se muestra para abrir la tapa.
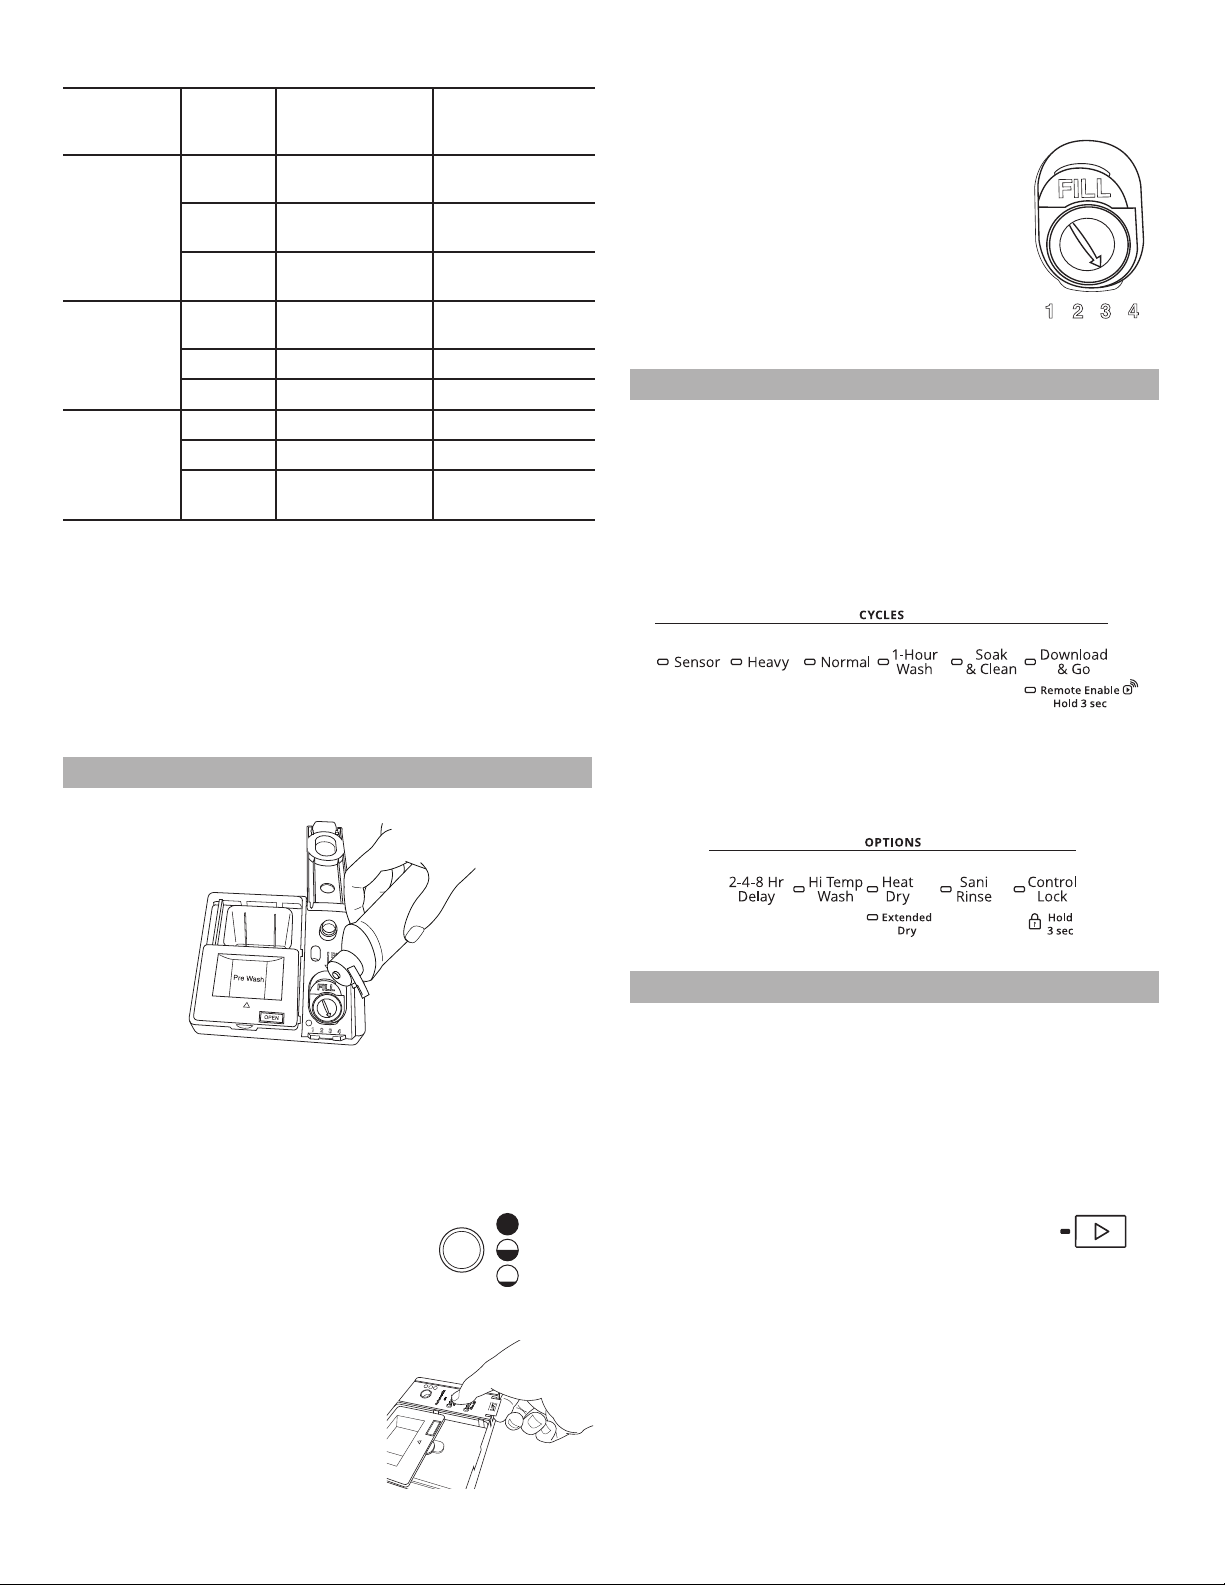
32
Polvos y geles
Dureza del
agua
Nivel de
suciedad
Compartimiento
de prelavado*
Compartimiento
de lavado
principal
Blanda
(0–4 granos
por galón
de EE.UU.)
Ligero Ninguna Línea de llenado
“Soft”
Normal Ninguna Línea de llenado
“Soft”
Intenso Lleno Línea de llenado
“Soft”
Media
(5–9 granos
por galón
de EE.UU.)
Ligero Ninguna Línea de llenado
“Soft”
Normal Lleno Lleno**
Intenso Lleno Lleno**
Dura
(10–14
granos por
galón de
EE.UU.)
Ligero Lleno Lleno**
Normal Lleno Lleno**
Intenso Lleno Lleno**
*El compartimiento de prelavado está en la parte superior
de la puerta deslizante del depósito.
**Un compartimiento de lavado principal lleno contiene
2 cucharas soperas (30 ml).
IMPORTANTE: Los residuos minerales del agua extremadamente
dura (15 granos por galón de EE.UU. o más) pueden dañar su
lavavajillas y hacer difícil que se obtengan buenos resultados.
Se recomienda usar un ablandador de agua para evitar daños y
obtener buenos resultados.
NOTA: Siga las instrucciones del paquete cuando use otros tipos
de detergente para lavavajillas.
PASO 3
Agente de enjuague
SLIDE
IMPORTANTE: Su lavavajillas está diseñada para usar un agente
de enjuague. El uso de agentes de enjuague mejora en gran
medida el secado, al permitir que el agua se escurra de la vajilla
después del último enjuague. Los agentes de enjuague también
evitan que el agua forme gotitas que pueden secarse como
manchas o rayas.
Llenado del depósito
Lleno
Agregar
El depósito tiene capacidad para
5 onzas (150 ml) de agente de enjuague.
En condiciones usuales, esta cantidad
durará de uno a tres meses.
NOTA: El indicador mostrará el nivel de
llenado correcto cuando se abra completamente la puerta.
1.
Pre Wash
OPEN
SLIDE
Para agregar agente de enjuague,
presione con cuidado con el
dedo el centro de la tapa del
depósito del agente de enjuague
mientras tira del borde hacia
arriba para abrir la tapa.
2. Vierta el agente de enjuague
en la abertura hasta que el
indicador esté lleno. No llene
en exceso.
3. Limpie todo el agente de enjuague derramado. El agente de
enjuague que se derrama puede crear espuma en exceso.
4. Después, presione con cuidado la tapa para cerrar el depósito.
Ajuste de nivel del agente de enjuague
El depósito del agente de enjuague es
regulable. Para casi todos los tipos de agua, la
selección de fábrica dará buenos resultados. Si
tiene agua dura y nota que se acumula calcio
en la vajilla, puede probar con un ajuste más
alto. Si nota espuma en la lavavajillas, use un
ajuste más bajo.
Para regular el ajuste:
Gire el regulador con la flecha hasta un número
más alto para aumentar la cantidad de agente de enjuague.
PASO 4
Seleccione un ciclo (varía según el modelo)
Las lavavajillas eficaces funcionan por más tiempo para ahorrar
agua y energía, de la misma manera que se ahorra gasolina
cuando se conduce un automóvil más despacio. Los tiempos
de los ciclos pueden aumentar o disminuir dependiendo de las
selecciones.Los tiempos estimados de los ciclos después de
la calibración se muestran en la tabla “Ciclos” de la sección
“Descripción de ciclos y opciones”.
Seleccione el ciclo deseado presionando el botón correspondiente.
Seleccione las opciones (varía según el modelo)
Consulte la tabla “Opciones” de la sección “Descripción de ciclos
y opciones”.
Para personalizar los ciclos, seleccione las opciones deseadas.
PASO 5
Inicio o reanudación de un ciclo
■ Si es necesario, deje correr agua caliente en el fregadero que
esté más cerca de su lavavajillas hasta que el agua salga
caliente. Cierre la llave del agua.
■ Para obtener resultados óptimos con el lavado de la vajilla,
el agua debe estar a 120 °F (49 °C) cuando entra en la
lavavajillas.
■ Seleccione el ciclo de lavado y opciones que
desee. Después de 4 segundos de presionar
Start/Resume debe empujar la puerta
firmemente para cerrarla. Si la puerta no se
ha cerrado en menos de 4 segundos, el LED
del botón de inicio destellará, se escuchará
un tono audible y el ciclo no comenzará.
■ Puede agregar un artículo al comienzo del ciclo. Abra la
puerta lentamente e ingrese el artículo. Presione START/
RESUME (Inicio/Reanudar) y cierre firmemente la puerta
en menos de 4 segundos. Si la puerta ha estado abierta por
más de 4 segundos, el LED destellará, se emitirá un tono y
la lavavajillas no continuará con el ciclo hasta que presione
nuevamente el botón Start/Resume.
IMPORTANTE: Si se ha abierto la puerta una vez comenzado
el ciclo (incluso durante la opción de Retraso de horas), debe
presionar Start/Resume (Inicio/Reanudar) para reanudar el ciclo.
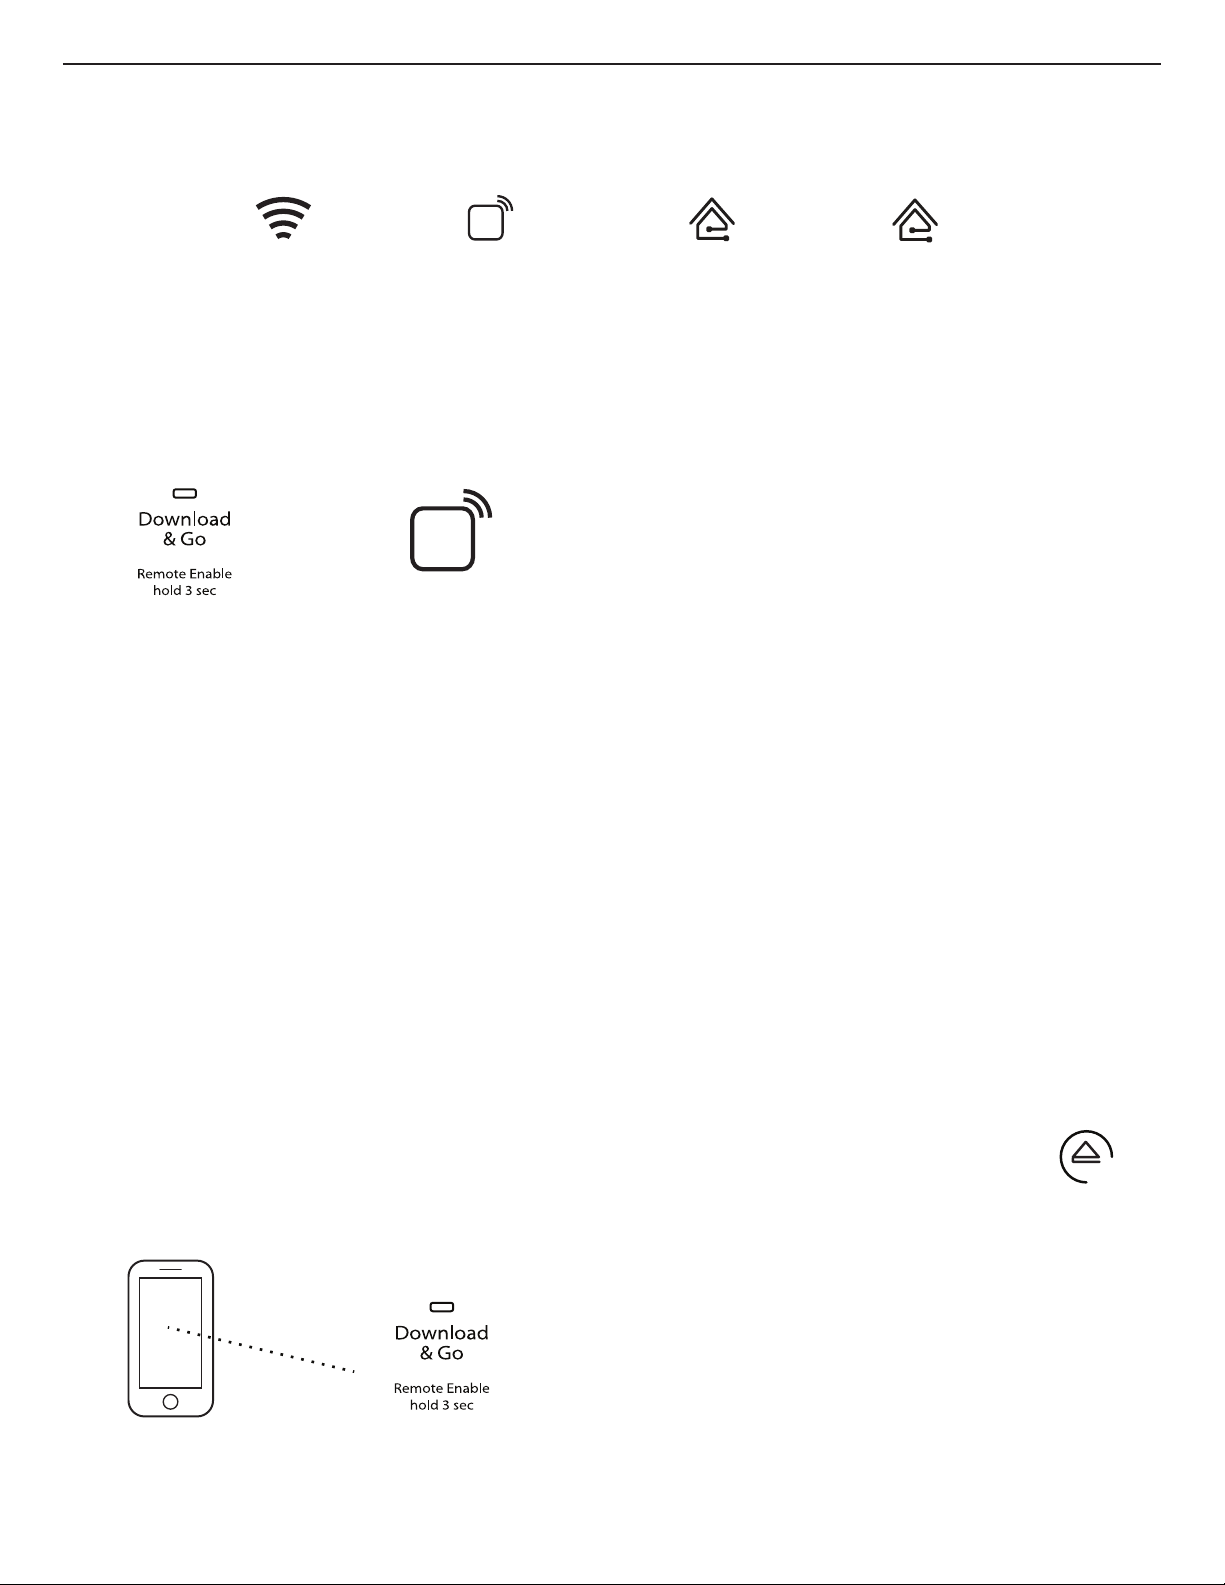
33
Uso de la lavavajillas – Operación inteligente
NOTA: Debe haber completado correctamente la sección “Configuración de la conectividad” para que las características siguientes
funcionen. Verifique que el icono de estado inalámbrico y el icono de casa ámbar o el icono de casa azul estén iluminados. Revise la
aplicación Whirlpool
®
para conocer características adicionales de la lavavajillas, incluida la Habilitación remota (B).
u
q
u
q
u
q
u
q
Icono de
inalámbrico
Icono de
habilitación remota
Icono de casa ámbar
(tasa máxima de
electricidad)
Icono de casa azul
(tasas normales
de electricidad)
Ajuste de una Habilitación remota
La habilitación remota requiere Wi-Fi y crear una cuenta. Las
características y las funciones de la aplicación pueden cambiar.
Sujeto a los términos de servicio disponibles en: www.whirlpool.
com/connect. Es posible que apliquen tarifas para transmisión
de datos. En Canadá, visite www.whirlpool.ca/en_CA y haga
clic en el vínculo a Whirlpool
®
Connected Appliances.
u
q
Habilitación remota
El modo Remote Enable (Habilitación remota) permite iniciar
la lavavajillas de forma remota desde la aplicación Whirlpool
®
.
Después de cargar la lavavajillas y seleccionar los ajustes del
ciclo, mantenga presionado DOWNLOAD & GO (Descargar
y listo) durante 3 segundos. El icono de Habilitación remota
permanecerá iluminado.
La lavavajillas comenzará el ciclo cuando reciba la orden de
inicio remoto desde la aplicación. El icono de Habilitación remota
permanecerá encendido.
NOTA: Si no hay conexión de Wi-Fi disponible, no se configurará
la Habilitación remota y el icono de Inalámbrico parpadeará
durante 2 segundos para finalmente apagarse.
CONSEJO ÚTIL: Asegúrese de que la puerta de la lavavajillas
permanezca cerrada y que el ciclo no se cambie hasta el inicio
del ciclo. Si se abre la puerta después de que se haya ajustado
una habilitación remota, esta se cancelará. Se deberá reiniciar
la habilitación remota.
Follow Cycle Progress (Seguir el progreso del ciclo)
Follow Cycle Progress (Seguir el progreso del ciclo) permite
controlar de forma remota la lavavajillas y prever cuándo finalizará
el ciclo en curso. Abra la aplicación y seleccione DISHWASHER
(Lavavajillas). El progreso del ciclo aparecerá en la aplicación.
Cómo seleccionar o cancelar la selección de notificaciones
automáticas
Las notificaciones automáticas permiten seleccionar qué
eventos se anunciarán con un mensaje de texto. Abra la
aplicación y seleccione DISHWASHER (Lavavajillas); después,
abra PREFERENCES (Preferencias). Active las notificaciones
automáticas que desee recibir.
Descarga de un Ciclo especializado o Mi ciclo
La característica Download & Go™ permite seleccionar un Ciclo
especializado o diseñar un ciclo My Cycle en la aplicación Whirlpool
®
y enviarlo a la lavavajillas. Cuando la lavavajillas recibe el ciclo, las
luces LED de Download & Go se encienden por varios minutos para
indicar que se ha recibido. Cuando desee usar este ciclo, presione
DOWNLOAD & GO para seleccionar el ciclo, como lo haría con
cualquier otro. Presione Start/Resume (Inicio/Reanudar) y cierre la
puerta en menos de 4 segundos para comenzar el ciclo.
CONSEJO ÚTIL: El ciclo se recordará para uso futuro hasta que
se descargue otro ciclo en la lavavajillas.
NOTA: Si el botón Download & Go se presiona sin que haya un
ciclo listo para seleccionar, el LED parpadeará y oirá un sonido
de “presión de tecla no válida” (si los sonidos de activación de
teclas están activados). La lavavajillas comenzará el ciclo cuando
reciba la orden de inicio remoto desde la aplicación. El icono de
Habilitación remota permanecerá encendido.
Enable Quiet Mode (Activar modo silencioso)
Enable Quiet Mode (Activar modo silencioso) permite silenciar
de forma remota los tonos de encendido de la lavavajillas, como
la señal de fin de ciclo. Abra la aplicación y seleccione QUIET
MODE (Modo Silencioso).
Issue Alerts (Emitir alertas)
Issue Alerts (Emitir alertas) permite saber a través de un mensaje
de texto si algo necesita atención y ofrece orientación sobre
qué hacer. La emisión de alertas puede desactivarse desde
la aplicación: vaya a la página Appliance Details (Detalles
del electrodoméstico), seleccione la opción Preferences
(Preferencias), desactive todas las notificaciones y haga clic
en Guardar en la esquina superior derecha.
Cómo habilitar el modo Apto para el consumidor Kosher
El modo Kosher Consumer Friendly (Apto para el consumidor
Kosher) permite configurar automáticamente la lavavajillas para
cumplimiento del descanso del Sabbath. Abra la aplicación y
seleccione DISHWASHER (Lavavajillas); después, active el modo
SABBATH. La lavavajillas seguirá funcionando en modo Sabbath
a la hora señalada todas las semanas hasta que el modo Sabbath
se desactive.
Retraso inteligente
(Opcional a través de la aplicación Whirlpool
®
y cuando la empresa de servicios públicos
local lo admita)
Durante los períodos de tasas máximas de electricidad (si
decidió usar la opción), es posible que vea el icono de retraso
inteligente. Cuando esto ocurra, su lavavajillas se retrasará según
los ajustes que seleccione para mitigar las demandas energéticas
del suministro local. La lavavajillas comenzará automáticamente
cuando disminuya la demanda energética. Puede cancelar el
retraso inteligente mediante la aplicación.
u
q
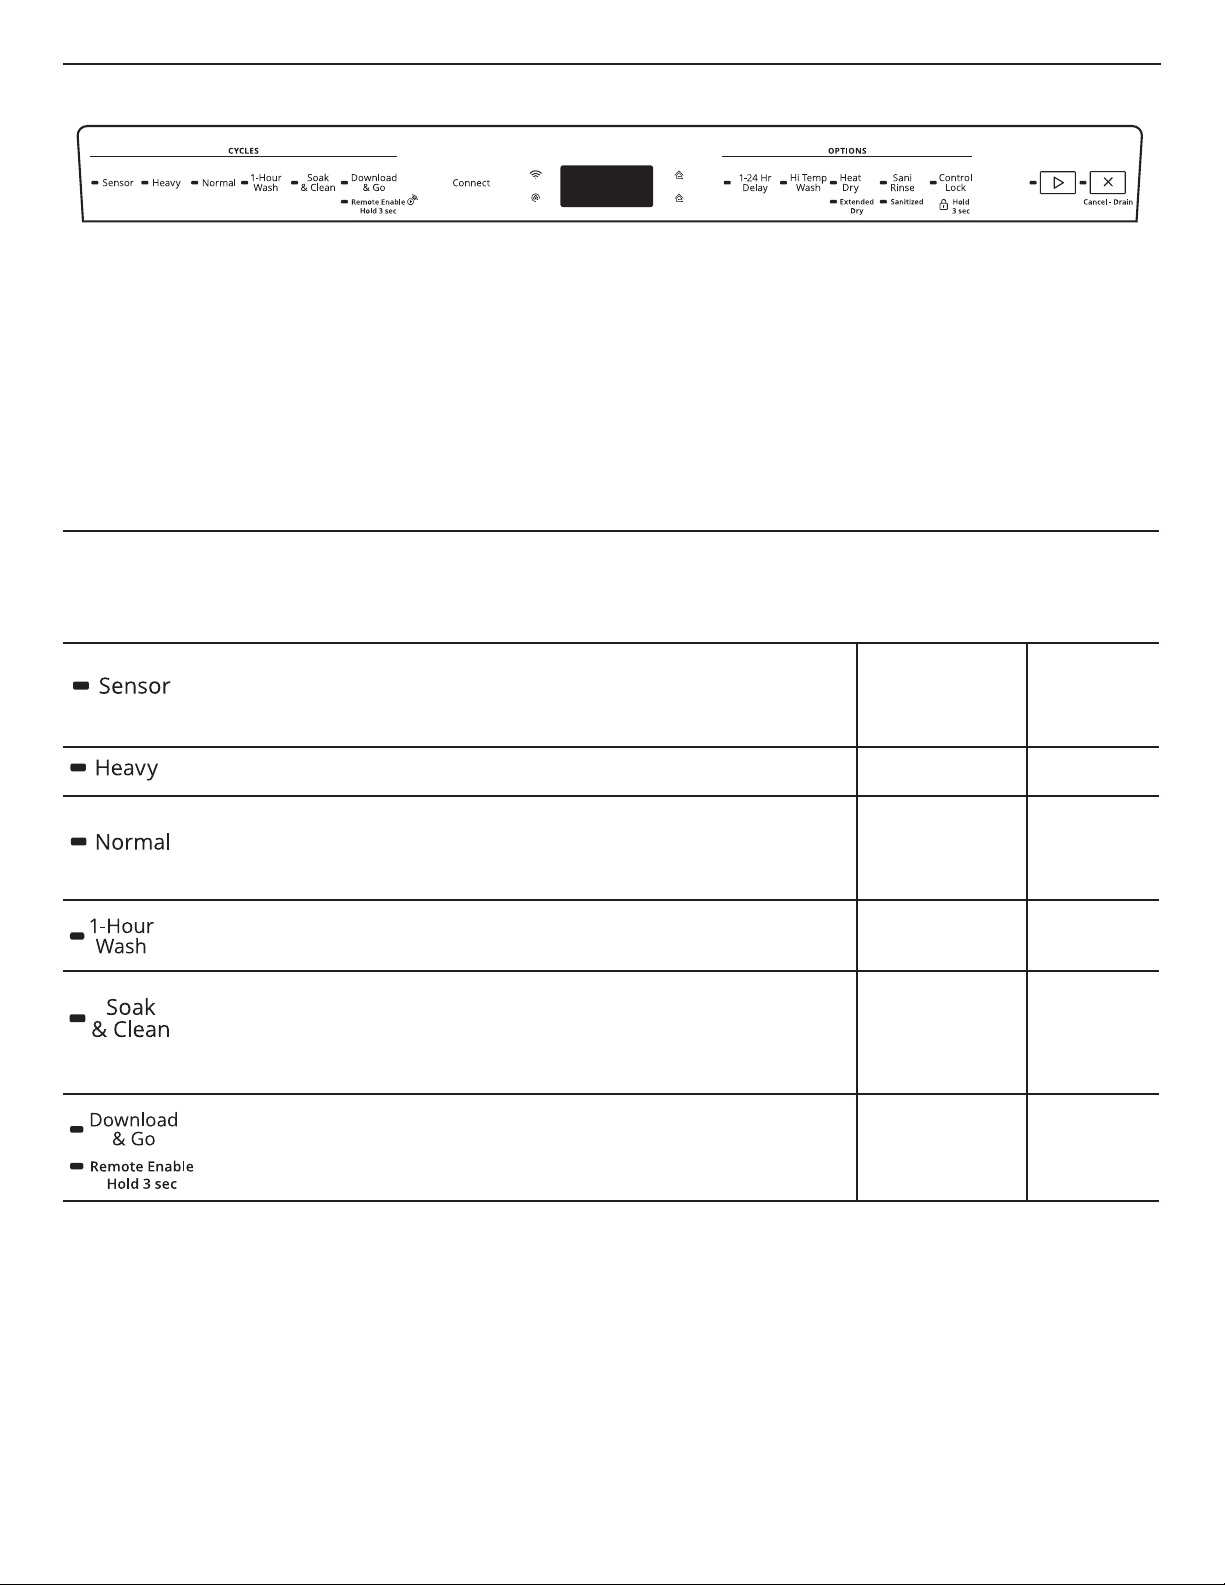
34
Descripción de ciclos y opciones
Es posible que los tiempos estimados de los ciclos incrementen o bajen según la temperatura del agua, las condiciones de suciedad,
el tamaño de la carga y las opciones seleccionadas. Usted puede personalizar su ciclo seleccionando una opción.
Vea las selecciones de opciones. Si cambia de parecer, oprima la opción otra vez para apagarla o seleccione una opción diferente.
Usted puede cambiar una opción en cualquier momento antes de que dicha opción seleccionada comience. En cada etapa del ciclo
de lavado, es posible que escuche ruidos que no estaba acostumbrado a escuchar en su lavavajillas anterior. En cada ciclo de lavado
hay una serie de pausas y rociados; esto es normal y le proveerá un rendimiento óptimo de limpieza.
SELECCIONES DE CICLO
Esta información describe varios modelos diferentes. Es posible que su lavavajillas no tenga todos los ciclos y las opciones que
se describen.
IMPORTANTE: El sensor en su lavavajillas monitorea el nivel de suciedad. El tiempo del ciclo y/o el consumo de agua pueden variar a
medida que el sensor regula el ciclo para obtener un rendimiento de lavado óptimo. Si la temperatura del agua de entrada es más baja
que la temperatura recomendada, o si la suciedad es muy profunda, el ciclo lo compensará automáticamente agregando tiempo, calor
y agua, según sea necesario.
CICLOS TIEMPO DE
LAVADO
ESTIMADO
SIN OPCIONES
(HH:MM)
CONSUMO
DE AGUA EN
GALONES
(LITROS)
Este ciclo detecta el tamaño de la carga, la cantidad de suciedad y su resistencia
para regular el ciclo para una limpieza mejorada, utilizando solamente la cantidad
de agua y de energía necesarias. El ciclo Sensor (Sensor) se selecciona
automáticamente si primero se presiona el botón Start/Resume (Inicio/
Reanudar).*
2:10 a 3:15 3,38 a 7,4
(12,8 a 28,0)
Utilice para las ollas, sartenes, cacerolas y vajillas difíciles de limpiar y muy sucias.
2:45 a 3:25 7,4 (28,1)
Este ciclo se recomienda para uso diario, regular o típico para lavar y secar
totalmente una carga completa de vajilla con suciedad normal. Los certificados
de consumo de energía del gobierno de esta lavavajillas se basaron en el ciclo
Normal (Normal) con la opción Heated Dry (Secado con calor) seleccionada
únicamente.**
2:00 a 3:10 2,4 a 7,4
(9,09 a 28)
Para conseguir resultados rápidos, 1-Hour Wash (Lavado de 1 hora) va a limpiar
los platos usando un poco más de agua y energía. Seleccione la opción Heat
Dry (Secado con calor) para proporcionar el mejor rendimiento de secado.
0:55 a 1:05 7,87 (29,8)
Este ciclo empapa en silencio los platos con un prelavado extendido que
elimina la necesidad de remojar los platos ahorrando tiempo y esfuerzo
personal. Para obtener resultados óptimos de limpieza durante el ciclo Soak &
Clean (Empapar y lavar), use detergente de prelavado. Utilice este ciclo para
cargas con grandes cantidades de alimentos endurecidos por el horneado que
sean difíciles de limpiar.
6:45 a 7:25 7,4 (28,0)
Este es un ciclo especializado que se selecciona desde la aplicación Whirlpool
®
y se descarga en la lavavajillas. La lavavajillas almacena este ciclo hasta que sea
reemplazado por la descarga de otro ciclo desde la aplicación Whirlpool
®
.
Variable Variable hasta
7,87 (29,8)
*Los certificados de consumo de energía del gobierno no se basan en este ciclo. Vea la descripción del ciclo Normal (Normal) para el
ciclo con certificados de consumo de energía del gobierno. El uso del ciclo Sensor (Sensor) puede aumentar el consumo de energía.
**Ninguna otra opción de temperatura de lavado y secado se seleccionó y no se realizaron pruebas truncadas. No se usó agente de
enjuague y no se usó detergente en el prelavado.
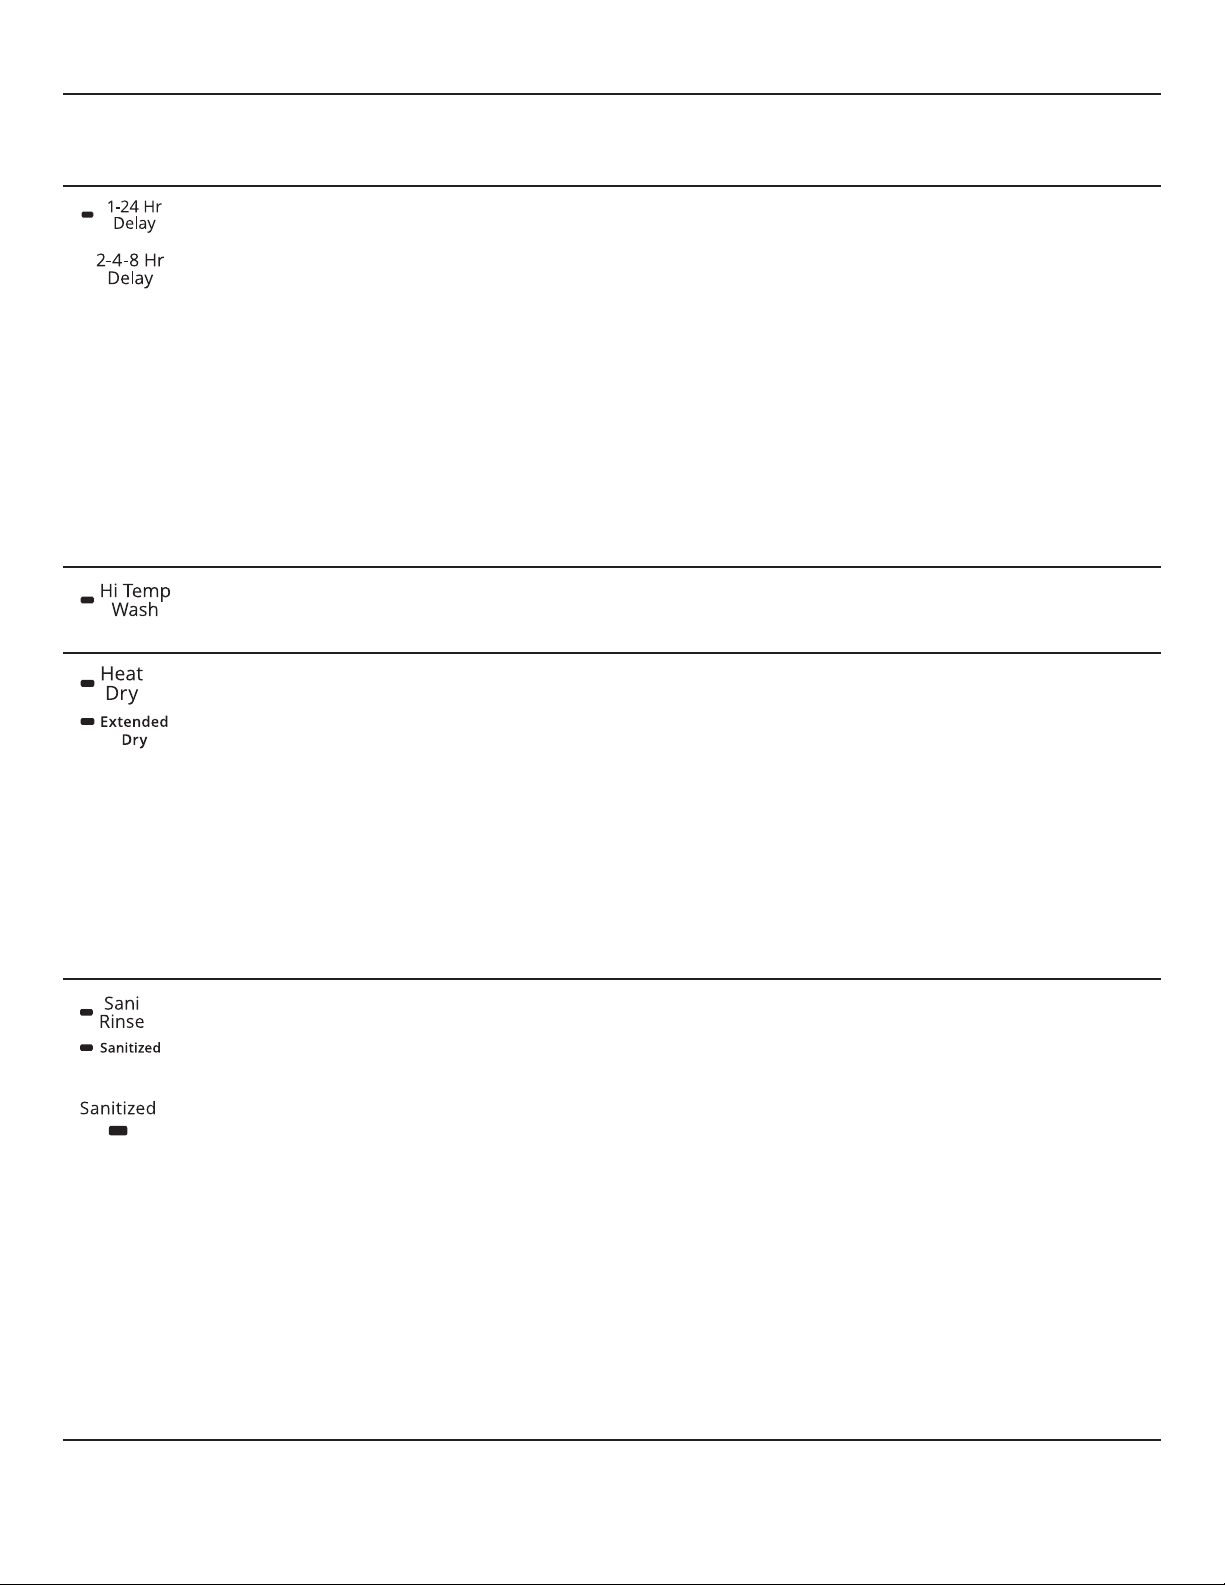
35
SELECCIONES DE OPCIONES
OPCIONES SE PUEDE
SELECCIONAR
CON
LO QUE
HACE
TIEMPO
AGREGADO
AL CICLO
AGUA
AGREGADA
EN GALONES
(LITROS)
(varía según
el modelo)
Hace funcionar la lavavajillas en un momento
más tarde. Seleccione un ciclo y opciones
de lavado. Cada vez que presione el botón
Delay (Retraso), se mostrará en pantalla
la siguiente hora de retraso disponible.
Presione START/RESUME (Inicio/Reanudar).
Cierre la puerta con firmeza.
NOTAS:
■ La lavavajillas recuerda el último retraso
que seleccionó. Para reajustar el tiempo
de retraso a uno distinto del que se
muestra en pantalla, siga presionando
el botón Delay (Retraso) hasta llegar al
tiempo de retraso deseado.
■ En cualquier momento que se abra la
puerta (como puede ser para agregar un
plato), deberá presionarse nuevamente
Start/Resume (Inicio/Reanudar) para
reanudar la cuenta regresiva del retraso.
Disponible con
cualquier ciclo
Retrasa el inicio
de un ciclo
hasta un
máximo de
24 horas.
N/A N/A
Eleva la temperatura del lavado principal
para mejorar la limpieza con cargas que
contienen suciedad rebelde de restos
quemados adheridos.
Sensor
Heavy
Normal
Soak & Clean
Aumenta la
temperatura del
lavado principal
a 135 °F (57 °C).
0:05 a 0:13 0 a 3,86
(0 a 14,6)
Seca la vajilla con calor. Use esta opción
con agente de enjuague para un mejor
rendimiento del secado. Es menos probable
que los artículos de plástico se deformen
cuando se cargan en la canasta superior.
Desactive la opción para un secado al aire.
Use Heat Dry (Secado con calor) para un
rendimiento óptimo del secado.
El secado extendido prolonga el tiempo
en que el secado con calor está activo.
Esta opción, junto con el uso de agente
de enjuague, proveerá un mejor rendimiento
del secado.
Sensor
Heavy
Normal
Soak & Clean
Usa el elemento
calentador
para acelerar
los tiempos de
secado.
La opción
Heat Dry
(Secado con
calor) se activa
de manera
predeterminada
cuando se
selecciona
cualquier ciclo,
excepto 1-Hour
Wash (Lavado
de 1 hora).
0:08 a 0:46 0
(la ubicación
del indicador
“Sanitized”
(Higienizado)
varía según
el modelo)
Higieniza sus platos y su cristalería según
la norma 184 de NSF International NSF/
ANSI para lavavajillas domésticas. Las
lavavajillas domésticas certificadas no han
sido diseñadas para los establecimientos
con licencia para alimentos. Los ciclos de
higienización fueron diseñados solo para
cumplir con los requisitos de la norma de
rendimiento NSF/ANSI 184 para eliminación
de la suciedad y eficacia de la higienización.
No existe la intención, de forma directa o
indirecta, de que todos los ciclos de una
lavavajillas con certificación NSF/ANSI 184
cumplan con la norma de rendimiento NSF/
ANSI 184 para eliminación de la suciedad
y eficacia de higienización.
Al término del ciclo, el indicador “Sanitized”
(Higienizado) se iluminará. Si su carga no
se higienizó adecuadamente, el indicador
destellará al término del ciclo. Esto puede
ocurrir si se interrumpe el ciclo, o si el agua
no pudo alcanzar la temperatura requerida.
La luz se apaga cuando usted abre y cierra
la puerta o presiona CANCEL (Cancelar).
Sensor
Heavy
Normal
Aumenta la
temperatura
del lavado
principal de
135 °F (57 °C)
y el enjuague
final de 156 °F
(69 °C).
0:05 a 1:06 0 a 3,86
(0 a 14,6)

36
OPCIONES SE PUEDE
SELECCIONAR
CON
LO QUE
HACE
TIEMPO
AGREGADO
AL CICLO
AGUA
AGREGADA
EN GALONES
(LITROS)
Evita el uso no intencionado de la lavavajillas entre los ciclos o el cambio de ciclos u opciones durante un ciclo.
Para activar el bloqueo de los controles, mantenga presionado CONTROL LOCK (Bloqueo de control) por 3 segundos.
La luz de Control Lock (Bloqueo de control) permanecerá encendida durante un tiempo corto, indicando que está
activada, y todos los botones se desactivarán. Si usted presiona cualquier botón mientras su lavavajillas está
bloqueada, la luz destella 3 veces. La puerta de la lavavajillas puede aún abrirse y cerrarse mientras los controles
están bloqueados.
Para desactivar el bloqueo de los controles, mantenga presionado CONTROL LOCK (Bloqueo de control) por 3 segundos.
La luz se apagará.
CONTROLES Y ESTADO DE LOS CICLOS
Presione para iniciar o reanudar un ciclo de lavado.
Si se abre la puerta durante un ciclo, o si se interrumpe el suministro de energía, destellará el LED de
Start/Resume (Inicio/Reanudar). El ciclo no se reanudará hasta que se presione la tecla Start/Resume
(Inicio/Reanudar) y se cierre la puerta.
NOTA: Empuje la puerta para que se cierre firmemente en 4 segundos después de oprimir Start/Resume
(Inicio/Reanudar), de lo contrario la lavavajillas no comenzará a funcionar. Si la puerta no se ha cerrado en
menos de 4 segundos, el LED de Start/Resume (Inicio/Reanudar) destellará y se emitirá un tono audible
cuando la puerta se cierre.
Presione para cancelar el ciclo de lavado.
Cierre la puerta con firmeza. La lavavajillas comienza un desagüe de 2 minutos (de ser necesario).
Deje que la lavavajillas complete el desagüe.
La pantalla
varía según el modelo
La pantalla permite seguir el progreso del ciclo de la lavavajillas.
Los modelos con pantalla numérica muestran una cuenta regresiva mientras el ciclo está activo. Si se
abre la puerta para ver esta pantalla, se debe presionar la tecla Start/Resume (Inicio/Reanudar) y cerrar
la puerta en menos de 4 segundos para reanudar el ciclo.
Los modelos sin pantalla numérica tienen indicadores que se iluminan para Washing (Lavado), Drying
(Secado), Clean (Limpieza) y Sanitized (Higienizado).
Si se selecciona la opción Sani Rinse (Enjuague sanitario), cuando el ciclo ha terminado, la luz indicadora
Sanitized (Higienizado) se ilumina. Si la lavavajillas no higienizó los platos adecuadamente, la luz destella
al término del ciclo. Esto puede ocurrir si se interrumpe el ciclo o si el agua no se pudo calentar a la
temperatura requerida. La luz se apaga cuando se abre y cierra la puerta o se presiona Cancel (Cancelar).
Una luz indicadora en la parte delantera del panel de la puerta se encenderá en azul mientras esté
lavando, rojo durante el secado y blanco cuando el ciclo termine.
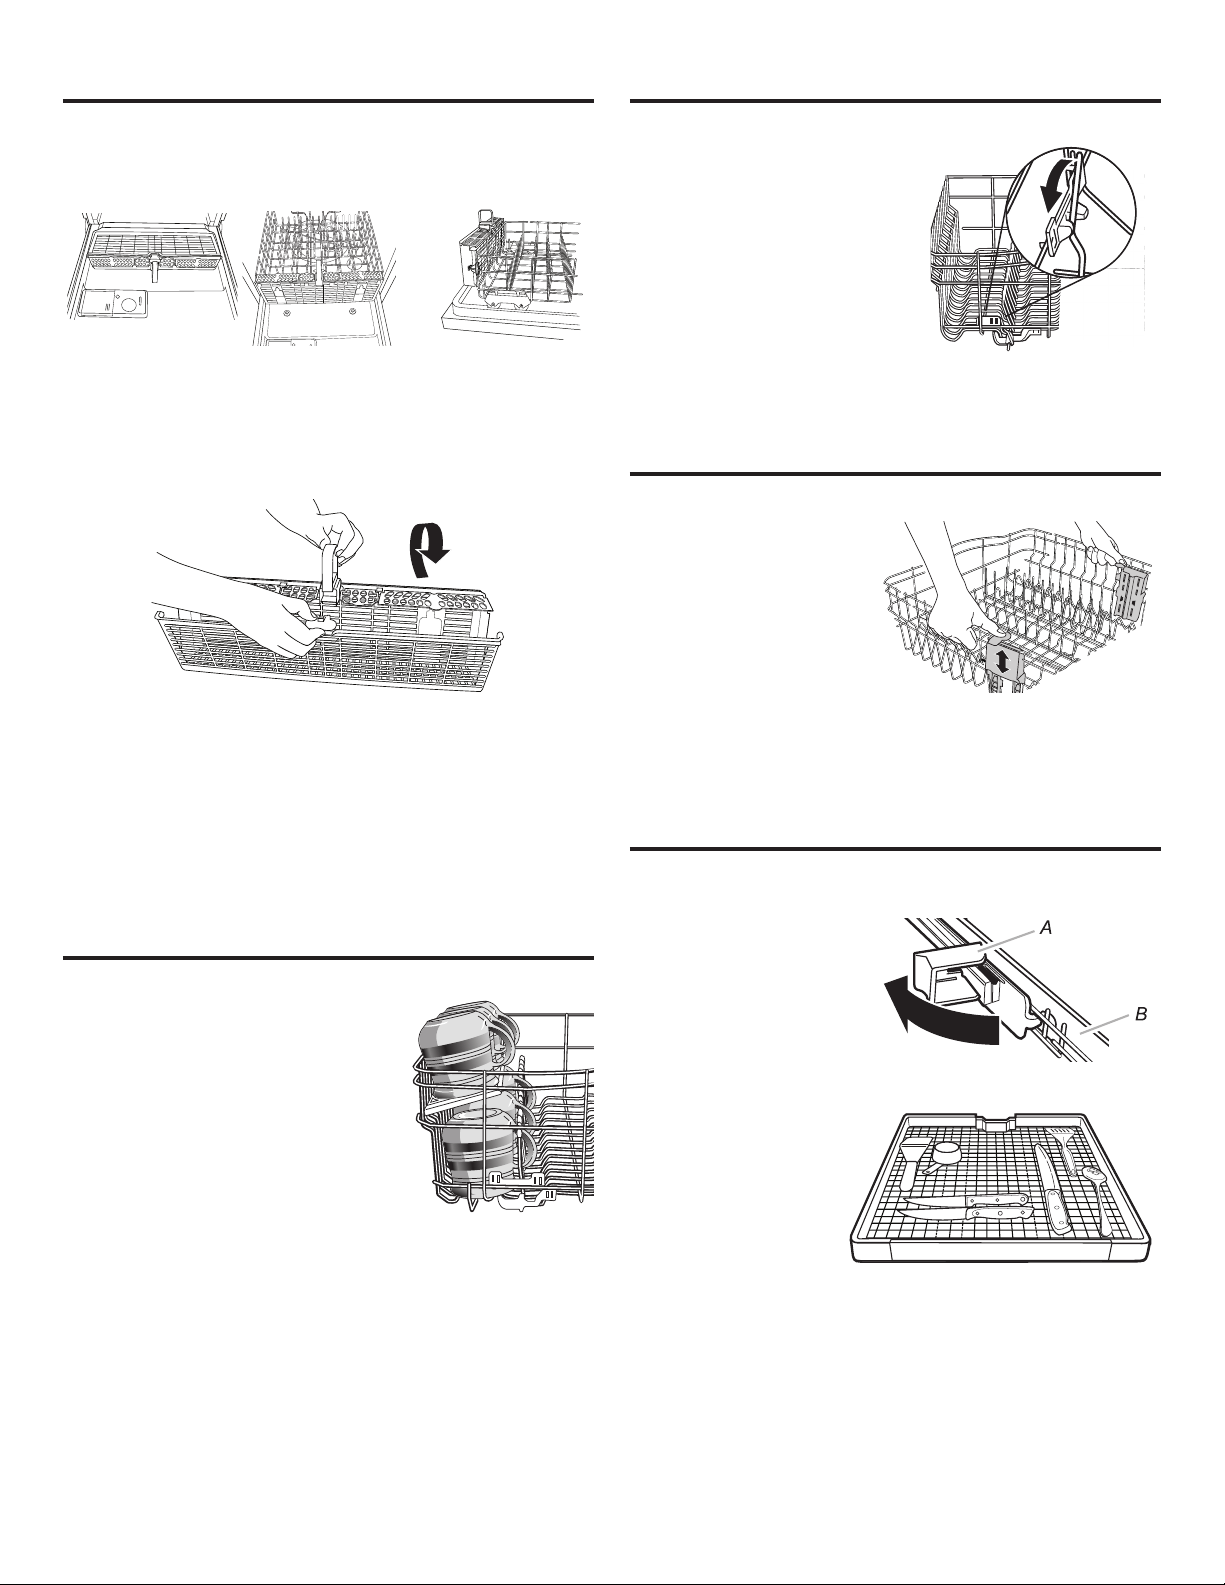
37
Características de la lavavajillas
Canastilla para cubiertos AnyWare™
La canastilla para cubiertos AnyWare™ puede colgarse
en la puerta, en la canasta inferior o colocarse en el interior
de esta última.
Posición en la puerta Posición en
la canasta
Posición lateral
en la canasta
Para abrir la canastilla de cubiertos AnyWare™:
Para desbloquearla, aferre el panel frontal, jálelo y rótelo 90°, como
se muestra. Cerciórese de que el panel frontal esté completamente
hacia arriba antes de rotarlo. Para desbloquear y rotar el panel
frontal, aférrelo como se muestra, jálelo y levántelo hacia fuera.
PUSH
NOTA: Asegúrese de que el panel frontal de la canastilla para
cubiertos esté bloqueado por completo en su lugar antes de jalar
hacia fuera la canasta inferior y de cerrar la puerta de la lavavajillas.
Para quitar la canastilla de la puerta:
1. Tome la canastilla de los cubiertos por la manija. Deslícela
hacia la parte superior de la puerta.
2. Levante la canastilla y libérela de los botones sujetadores.
Para volver a colocar la canastilla en la puerta:
1. Coloque la canastilla de los cubiertos en los botones sujetadores.
2. Deslice la canastilla hacia la parte inferior de puerta hasta que
quede asegurada en su lugar.
Estantes para tazas
Doble hacia abajo el estante adicional
en el lado izquierdo o derecho de la
canasta superior para sostener tazas,
cristalería o artículos largos adicionales,
como utensilios y espátulas. Para
obtener mejores resultados con las tazas,
sepárelas de modo que las tazas en el
estante no estén directamente encima
de las que están abajo.
Puntas plegables
La hilera de puntas a los lados
izquierdo y derecho de la canasta
superior o en la parte posterior de
la canasta inferior puede ajustarse
para acomodar diversos tamaños
de platos.
Cómo ajustar las puntas
plegables:
1. Sujete el cabo superior de la
punta que está en el sujetador
de puntas.
2. Jale con cuidado la punta hacia
fuera del sujetador.
3. Doble las puntas hacia abajo,
en dirección al centro de la
canasta.
Regulador de canasta superior EZ-2-Lift™
Se puede subir o bajar la
canasta superior para
acomodar artículos más
altos tanto en la canasta
superior como en la
inferior. Los reguladores
se encuentran a cada lado
de la canasta superior.
Para levantar la canasta:
Presione las dos palanquillas
reguladoras de la canasta y levante la canasta hasta que quede
en la posición alta y nivelada.
Para bajar la canasta:
Presione las dos palanquillas reguladoras de la canasta y deslice
la canasta hasta que quede en la posición baja y nivelada.
NOTA: La canasta superior debe estar nivelada.
Canasta del tercer nivel fácil de retirar
(en algunos modelos)
Si se requiere espacio
adicional en la canasta
superior, la canasta del
tercer nivel se puede
retirar con facilidad.
Para retirar, extienda
completamente el
estante hasta que
se detenga. Luego,
abra los topes de la
canasta a cada lado
y deslice la canasta
para retirar.
Es posible cargar
artículos con bajo
perfil, como utensilios
de servicio y cubiertos
en la canasta del
tercer nivel.
A. Tope de la guía B. Guía
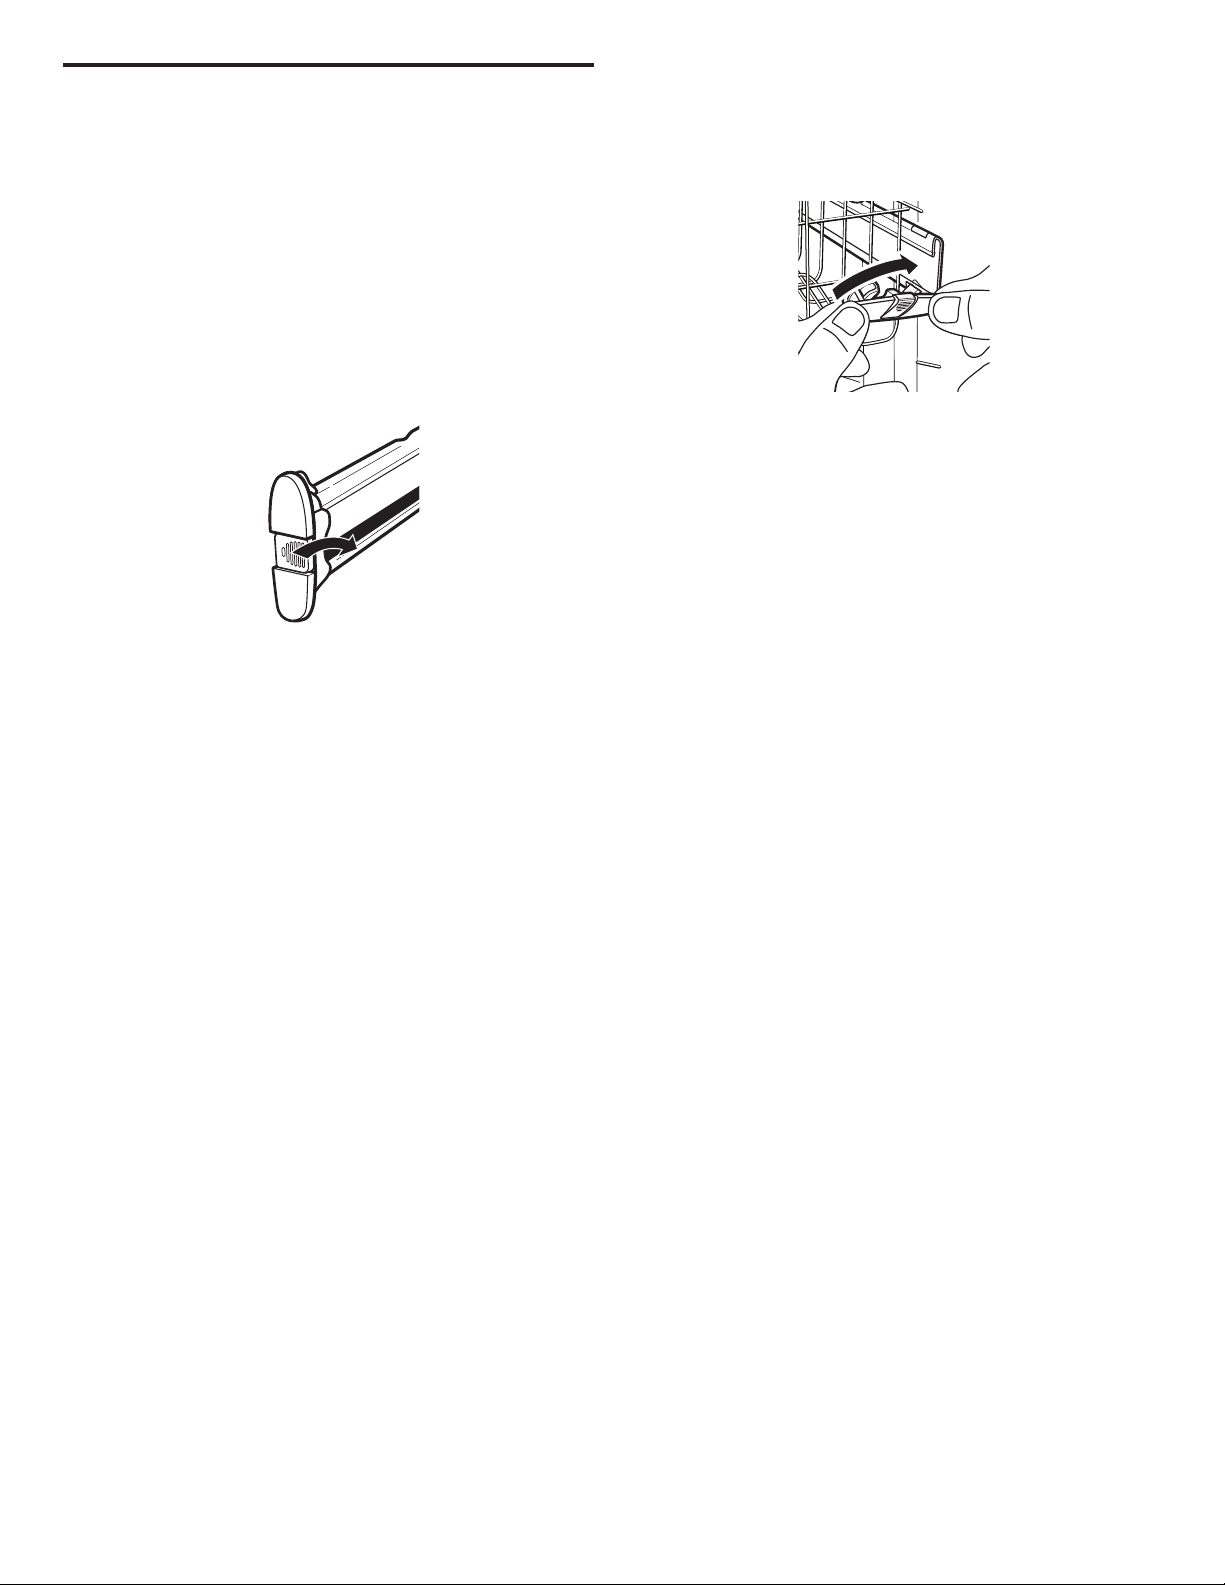
38
Canasta superior desmontable
La canasta desmontable le permite lavar objetos de mayor
tamaño en la canasta inferior, como ollas grandes, charolas
para asar y moldes para galletas.
IMPORTANTE: Quite los platos antes de retirar la canasta
superior de la lavavajillas.
Para retirar la canasta:
1. Para lograr acceso a los topes de la guía, jale la canasta
superior hacia adelante hasta que la mitad esté fuera de
la cuba.
2. Presione el reborde del tope de la guía mientras vuelca el tope
de la guía hacia el centro de la lavavajillas. Esta acción libera
una pequeña pestaña que bloquea el acceso del tope de la
guía al riel (vea Tope de la guía – Izquierda).
NOTA: Ayuda utilizar ambas manos. Ponga atención especial
en la orientación de los topes de la guía.
Tope de la guía – Izquierda
3. Con la lengüeta de retención liberada, empuje el tope de
la guía directamente hacia el riel opuesto para retirarlo.
4. Después de quitar ambos topes de la guía, jale
cuidadosamente la canasta superior para sacarla de los
rieles, deslizándola hacia usted.
5. Vuelva a colocar los topes de la guía colocando el tope de la
guía desde el riel inferior hacia la ranura inferior del riel (vea
Tope de la guía – Derecha) y gire la lengüeta inferior del tope
de la guía hasta que se ubique en su posición. Después,
presione el reborde mientras empuja el tope de la guía
directamente hacia el riel. Esta acción bloquea la lengüeta
de retención en su lugar.
Tope de la guía – Derecha
6. Pruebe el tope de la guía tirándolo hacia el riel opuesto para
garantizar que esté bloqueado en su posición.
Para volver a colocar la canasta:
1. Jale los rieles suavemente hacia delante en la lavavajillas
hasta que se detengan. Quite los topes de la guía. Vea los
pasos del 1 al 3 indicados anteriormente.
2. Coloque las ruedas posteriores a cada lado de la canasta
en el riel y deslice la canasta dentro de los rieles, pero no
empuje la canasta totalmente dentro de la cuba.
3. Inserte las ruedas frontales a cada lado de la canasta dentro
de la guía.
4. Deslice la canasta dentro de la lavavajillas.
5. Vuelva a colocar los topes de la guía. Vea los pasos del
5 y 6 indicados anteriormente.
IMPORTANTE: Asegúrese de que los topes de la guía se
encuentren bloqueados en su lugar y no se puedan quitar
con facilidad, ya que evitan que la canasta se salga de la guía.
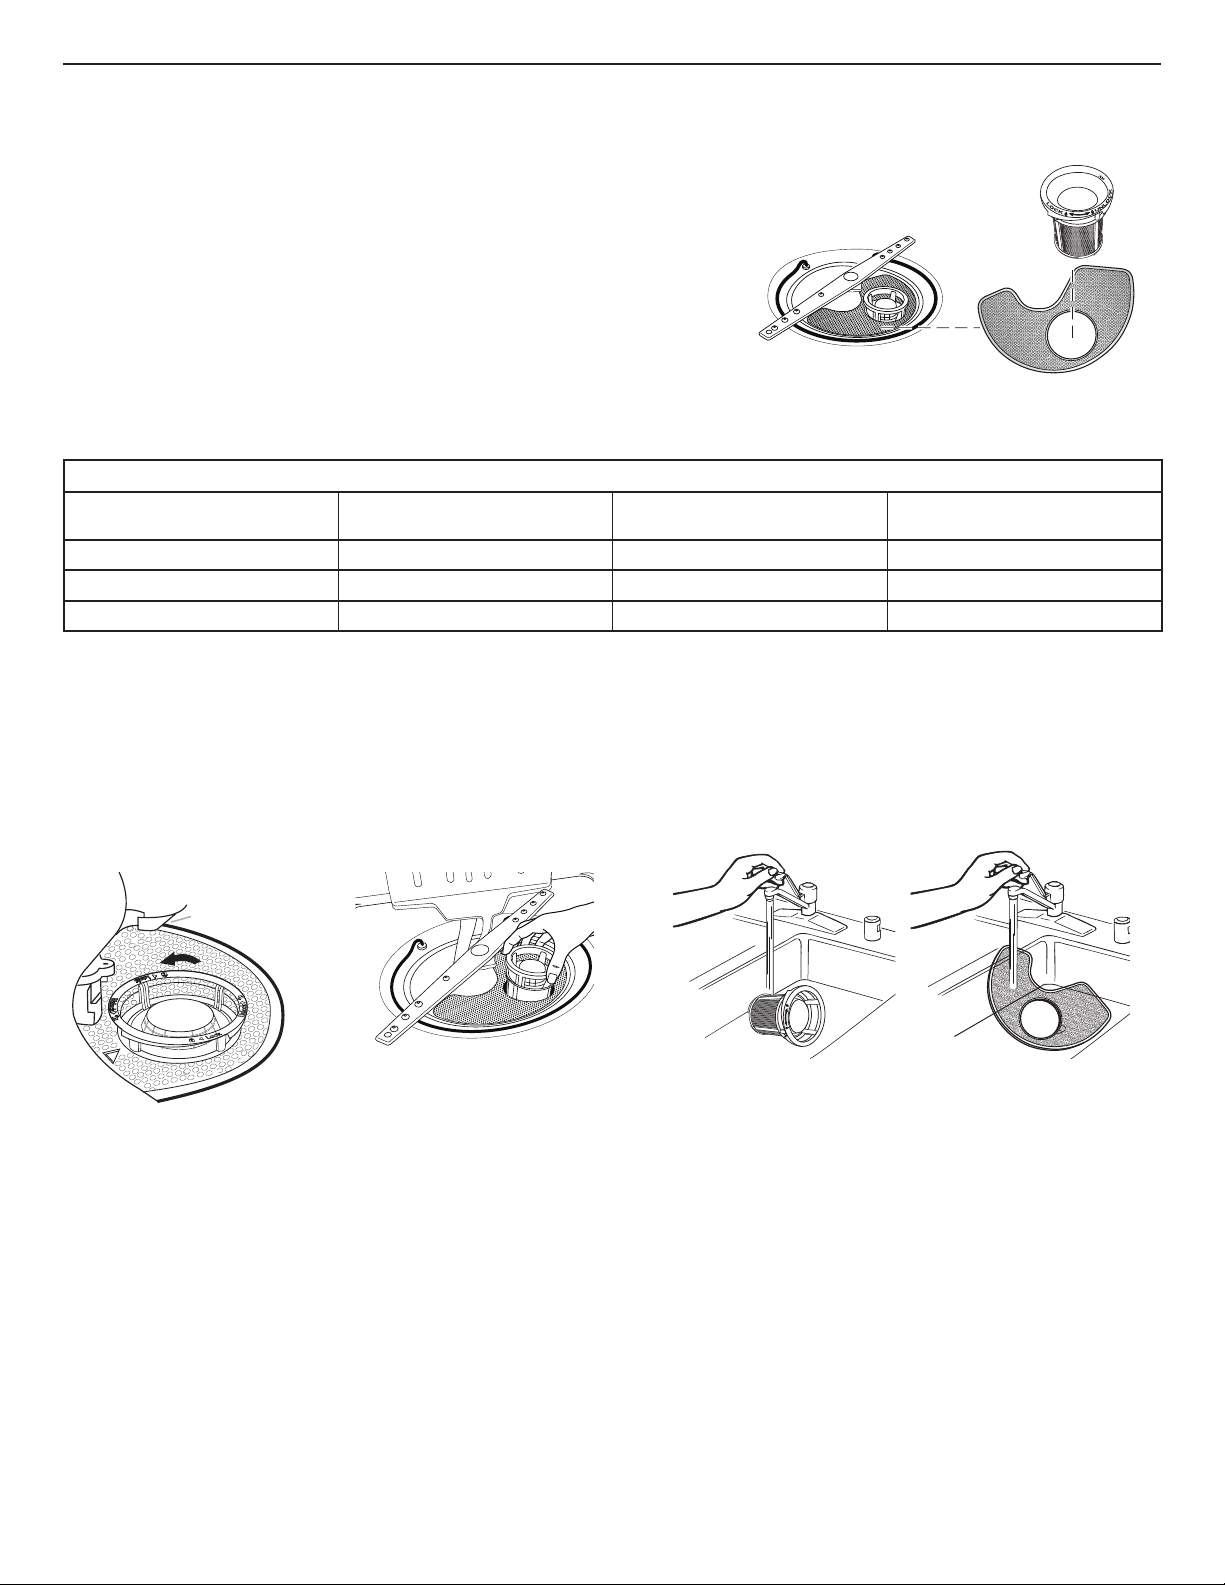
39
Sistema de filtración
Su lavavajillas cuenta con lo último en tecnología de filtración para lavavajillas. Este sistema de filtración minimiza los sonidos y optimiza
el ahorro de agua y energía mientras proporciona una limpieza superior.
El sistema de filtros consiste de 2 piezas, un ensamblaje de filtro superior y un
filtro inferior.
IMPORTANTE: Para evitar dañar la lavavajillas, no la ponga en marcha sin que
los filtros estén adecuadamente instalados. Asegúrese de que el filtro inferior esté
seguro en su lugar y que el ensamblaje del filtro superior esté trabado en su lugar.
Si el ensamblaje superior gira libremente, no está trabado en su lugar.
Es posible que sea necesario limpiar los filtros cuando:
■ Haya objetos visibles o suciedad en el ensamblaje del filtro superior.
■ Los platos se sienten arenosos al tacto.
Filtro inferior
Ensamblaje
del filtro
superior
Es muy fácil quitar los filtros y darles mantenimiento. La tabla siguiente muestra la frecuencia recomendada de limpieza.
INTERVALOS RECOMENDADOS PARA LA LIMPIEZA DEL FILTRO
Cantidad de cargas
por semana
Si solamente raspa la comida
antes de cargar*
Si usted raspa la comida y
enjuaga antes de cargar
Si usted lava antes de cargar
8–12 Cada dos meses Cada cuatro meses Una vez por año
4–7 Cada cuatro meses Una vez por año Una vez por año
1–3 Dos veces por año Una vez por año Una vez por año
*Recomendamos esta práctica porque ahorrará el agua y la energía que se habría usado para preparar la vajilla. También le permitirá
ahorrar tiempo y esfuerzo
Agua muy dura
Si tiene agua dura (más de 15 granos), limpie el filtro al menos
una vez por mes. La acumulación de residuos blancos en su
lavavajillas indica que el agua es dura. Vea la sección “Solución de
problemas” para consultar los consejos para quitar las manchas.
Instrucciones para quitar los filtros
1. Gire el ensamblaje del filtro superior 1/4 de vuelta hacia
la izquierda, levante y sáquelo.
Lengüeta de
ubicación
Para quitar el ensamblaje
del filtro superior
2. Separe el ensamblaje del filtro superior jalándolo suavemente
para separarlo.
3. Limpie los filtros como se muestra.
Instrucciones de limpieza
IMPORTANTE: No use un cepillo de alambre, estropajo para
fregar, etc., ya que pueden dañar los filtros.
Enjuague el filtro debajo del agua corriente hasta haber quitado
la mayor parte de la suciedad. En caso de suciedad difícil de
sacar o de depósitos de calcio a causa del agua dura, es posible
que deba usar un cepillo suave.
P
U
S
H
D
O
W
N
&
T
U
R
N
L
O
C
K
U
N
L
O
C
K
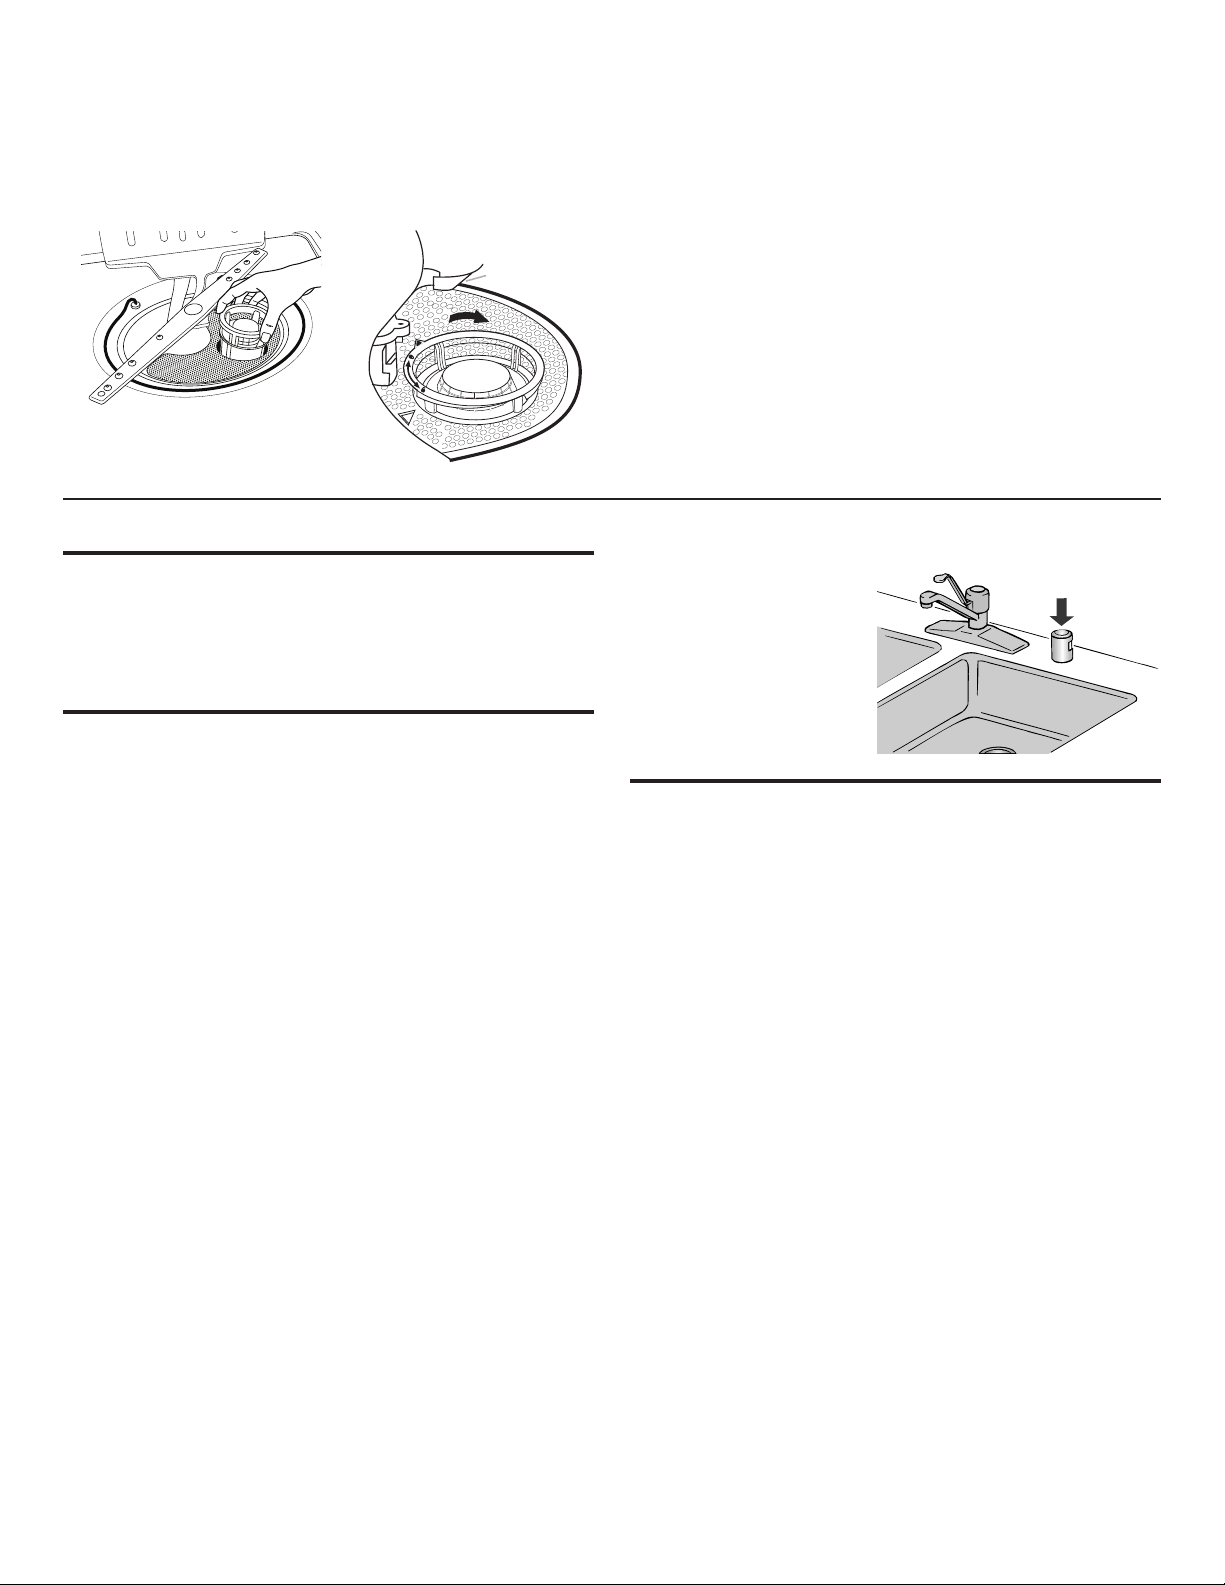
40
Instrucciones para reinstalar los filtros
1. Consulte las ilustraciones anteriores y coloque el filtro inferior
debajo de las lengüetas de ubicación en el fondo de la
lavavajillas para que la abertura redonda para el ensamblaje
del filtro superior esté alineada con la abertura redonda en el
fondo de la cuba.
2. Inserte el ensamblaje del filtro superior dentro de la abertura
circular en el filtro inferior.
Para volver a colocar el ensamblaje
del filtro superior
L
O
C
K
U
N
L
O
C
K
P
U
S
H
D
O
W
N
&
T
U
R
N
Lengüeta de
ubicación
3. Rote lentamente el filtro hacia la derecha hasta que caiga en
su lugar. Continúe rotando hasta que el filtro quede trabado
en su lugar. Si el filtro no encaja completamente (sigue
girando libremente), continúe girando el filtro hacia la derecha
hasta que caiga y quede trabado en su lugar.
NOTA: No es necesario que la flecha del ensamblaje del filtro
superior esté alineada con la flecha en el filtro inferior, siempre
y cuando el filtro quede trabado.
IMPORTANTE: Para evitar dañar la lavavajillas, no la ponga
en marcha sin que los filtros estén adecuadamente instalados.
Asegúrese de que el filtro inferior esté seguro en su lugar y que
el ensamblaje del filtro superior esté trabado en su lugar. Si el
ensamblaje del filtro superior gira libremente, no está trabado
en su lugar.
Cuidado de la lavavajillas
Limpieza externa
Limpie el exterior de la lavavajillas con un paño suave y húmedo
y un detergente suave. Si el exterior de la lavavajillas es de acero
inoxidable, se recomienda el uso de un limpiador para acero
inoxidable como el limpiador para acero inoxidable affresh
®†
.
Evite el uso de limpiadores abrasivos en el exterior de
la lavavajillas.
Limpieza y mantenimiento del interior
Muchos detergentes pueden dejar manchas blancas o un residuo
blanco en la vajilla y en el interior de la lavavajillas. Con el tiempo
este residuo se puede volver antiestético y afectar el rendimiento
de la lavavajillas. El uso de un producto de limpieza para
lavavajillas como el limpiador para lavavajillas affresh
®
puede
ayudar a remover el residuo. Se recomienda el uso mensual
del limpiador para lavavajillas affresh
®
para ayudar a mantener
la lavavajillas.
Forma de uso:
1. Si está limpiando sin platos, coloque una pastilla en el
depósito de detergente. No agregue detergente. (Si observa
una acumulación importante, puede colocar una segunda
pastilla en la parte inferior de la lavavajillas.)
2. Si está limpiando con platos, coloque una pastilla en la parte
inferior de la lavavajillas. Coloque el detergente seleccionado
en el depósito.
3. Haga funcionar un ciclo de lavado normal.
Otro método para remover el residuo blanco es usar un enjuague
con vinagre. Sin embargo, el vinagre es un ácido y usarlo con
demasiada frecuencia podría dañar la lavavajillas.
Coloque (no vierta) 2 tazas (500 ml) de vinagre blanco en
una taza medidora de vidrio o de otro material apto para
lavavajillas en la canasta inferior. Haga funcionar la lavavajillas
por un ciclo completo con una opción de secado al aire o un
secado que ahorre energía. No use detergente. El vinagre se
mezclará con el agua del lavado.
NOTA: Whirlpool recomienda el uso de pastillas o paquetes
de detergente previamente medidos de alta calidad y el uso
de agente de enjuague para la limpieza y el cuidado diario de
la lavavajillas.
†
®
affresh es una marca registrada de Whirlpool, U.S.A.
Si tiene una purga de aire
de desagüe, verifíquela y
límpiela si la lavavajillas no
está desaguando bien.
Para reducir el riesgo de daño a la propiedad durante
vacaciones o tiempo prolongado sin usar
■ Cuando no vaya a usar la lavavajillas durante los meses
de verano, cierre el suministro de agua y de energía a
la lavavajillas.
■ Asegúrese de que las líneas de suministro de agua estén
protegidas contra congelamiento. La formación de hielo en
las líneas de suministro puede aumentar la presión del agua
y dañar la lavavajillas o su hogar.
■ Los daños ocasionados por congelamiento no están
cubiertos por la garantía.
■ Cuando guarde la lavavajillas en el invierno, evite el daño
del agua y acondicione la lavavajillas para el invierno con
personal de servicio autorizado.
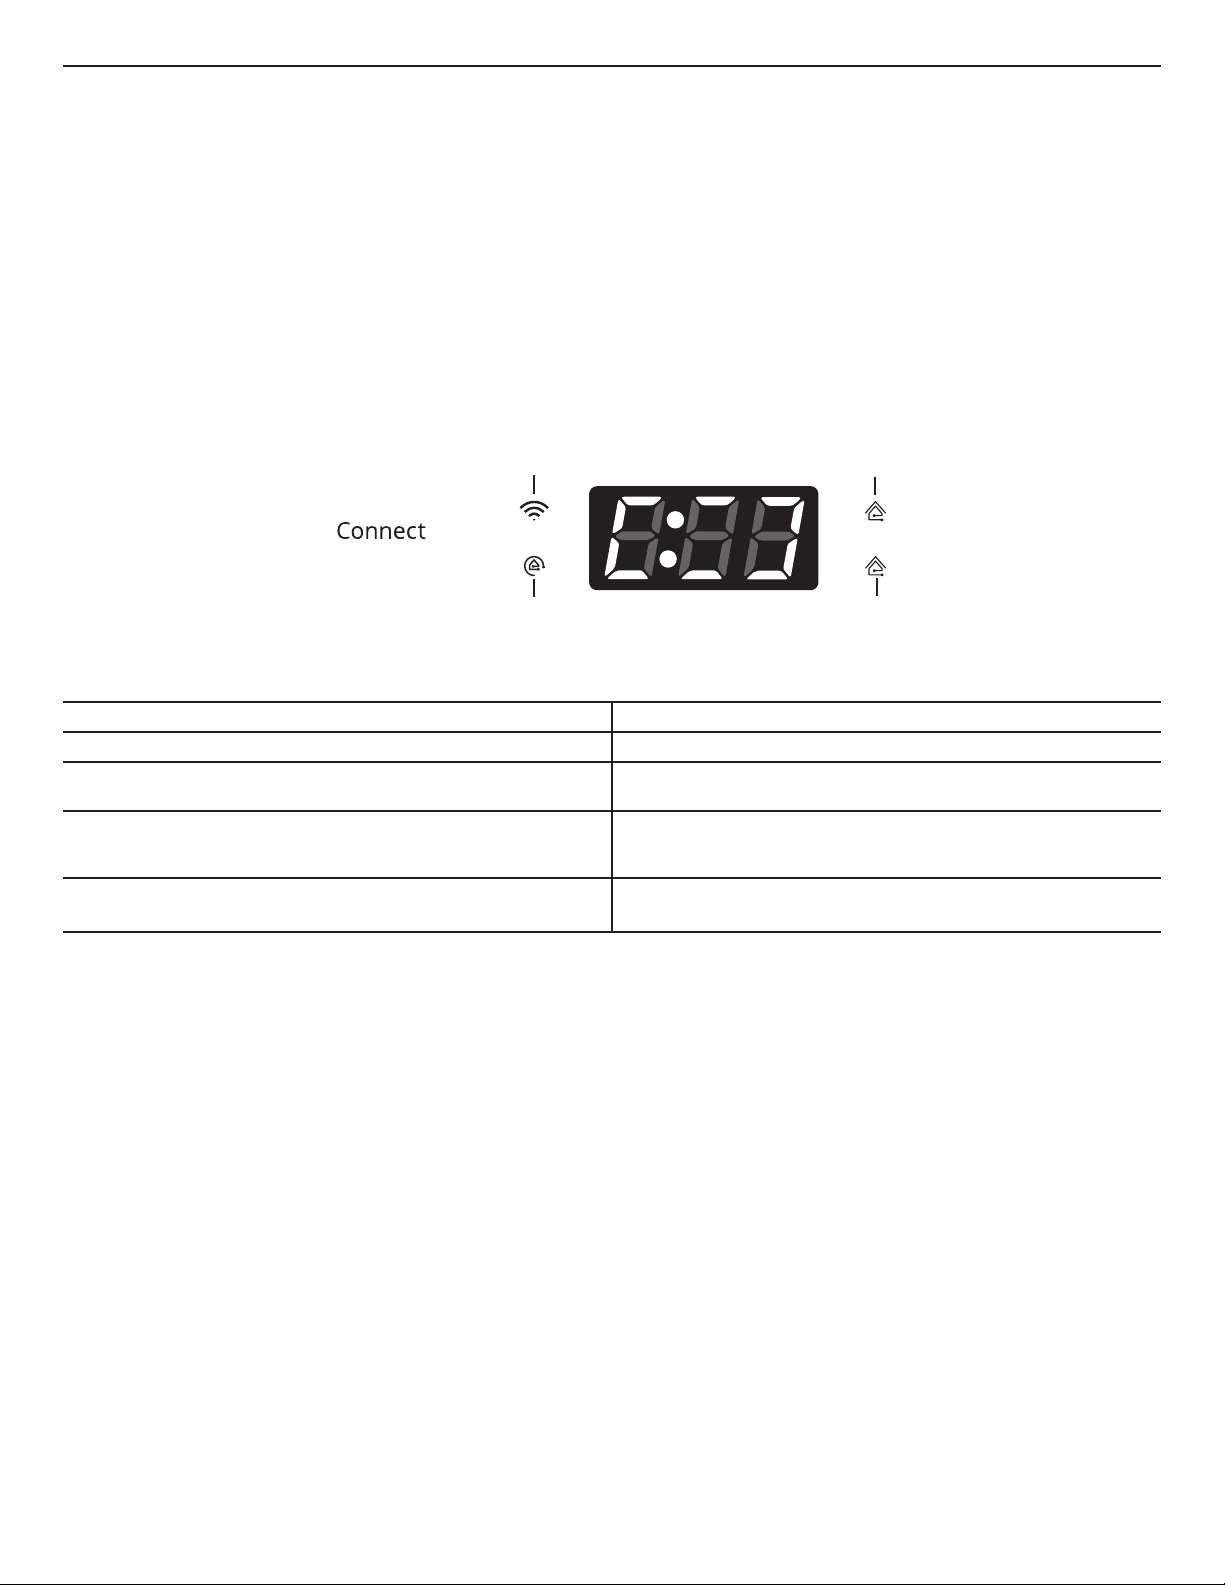
41
Solución de problemas — Conectividad
Si conectó correctamente su lavavajillas con anterioridad y experimenta dificultades, primero pruebe las soluciones que se sugieren
aquí. Si necesita más ayuda o recomendaciones para evitar una llamada al servicio técnico, consulte la sección “Configuración de la
conectividad” de este manual o comuníquese con el equipo de Connected Appliance.
En EE.UU., comuníquese con el equipo de Connected Appliance:
Visite www.whirlpool.com/connect
Llame al: 1-866-333-4591 Lunes a viernes, 8 am – 8 pm EST
Envíe un correo electrónico a: [email protected]
En Canadá, comuníquese con el equipo de Connected Appliance:
Visite: www.whirlpool.ca/en_CA y haga clic en el vínculo a
Whirlpool
®
Connected Appliances
Llame al: 1-866-333-4591 Lunes a viernes, 8 am – 8 pm EST
Envíe un correo electrónico a: [email protected]
Por correo:
Connected Appliance Team
Whirlpool Customer eXperience Center
553 Benson Road
Benton Harbor, MI 49022-2692
Por correo:
Connected Appliance Team
Whirlpool Customer eXperience Centre
200 – 6750 Century Ave.
Mississauga, Ontario L5N 0B7
Incluya en la correspondencia un número de teléfono en el que se le pueda localizar durante el día.
A
D
C
B
A. Icono de estado inalámbrico
B. Icono de habilitación remota
C. Icono de casa ámbar (tasas máximas de electricidad)
D. Icono de casa azul (tasas normales de electricidad)
ESTADO DE CONEXIÓN LUCES INDICADORAS DEL PANEL DE CONTROL
La lavavajillas no está conectada
No hay iconos encendidos.
La lavavajillas está intentando conectarse al enrutador Wi-Fi
de la casa
El icono inalámbrico está parpadeando lentamente.
La lavavajillas está conectada al enrutador Wi-Fi de la casa,
pero la aplicación Whirlpool
®
o las funciones de Smart Grid
(Red inteligente) no funcionan
El icono inalámbrico está encendido.
El icono de internet azul está parpadeando lentamente.
La lavavajillas está conectada al enrutador Wi-Fi de la casa
y la aplicación Whirlpool
®
funciona
El icono inalámbrico está encendido.
El icono de casa azul o ámbar está encendido: no está parpadeando
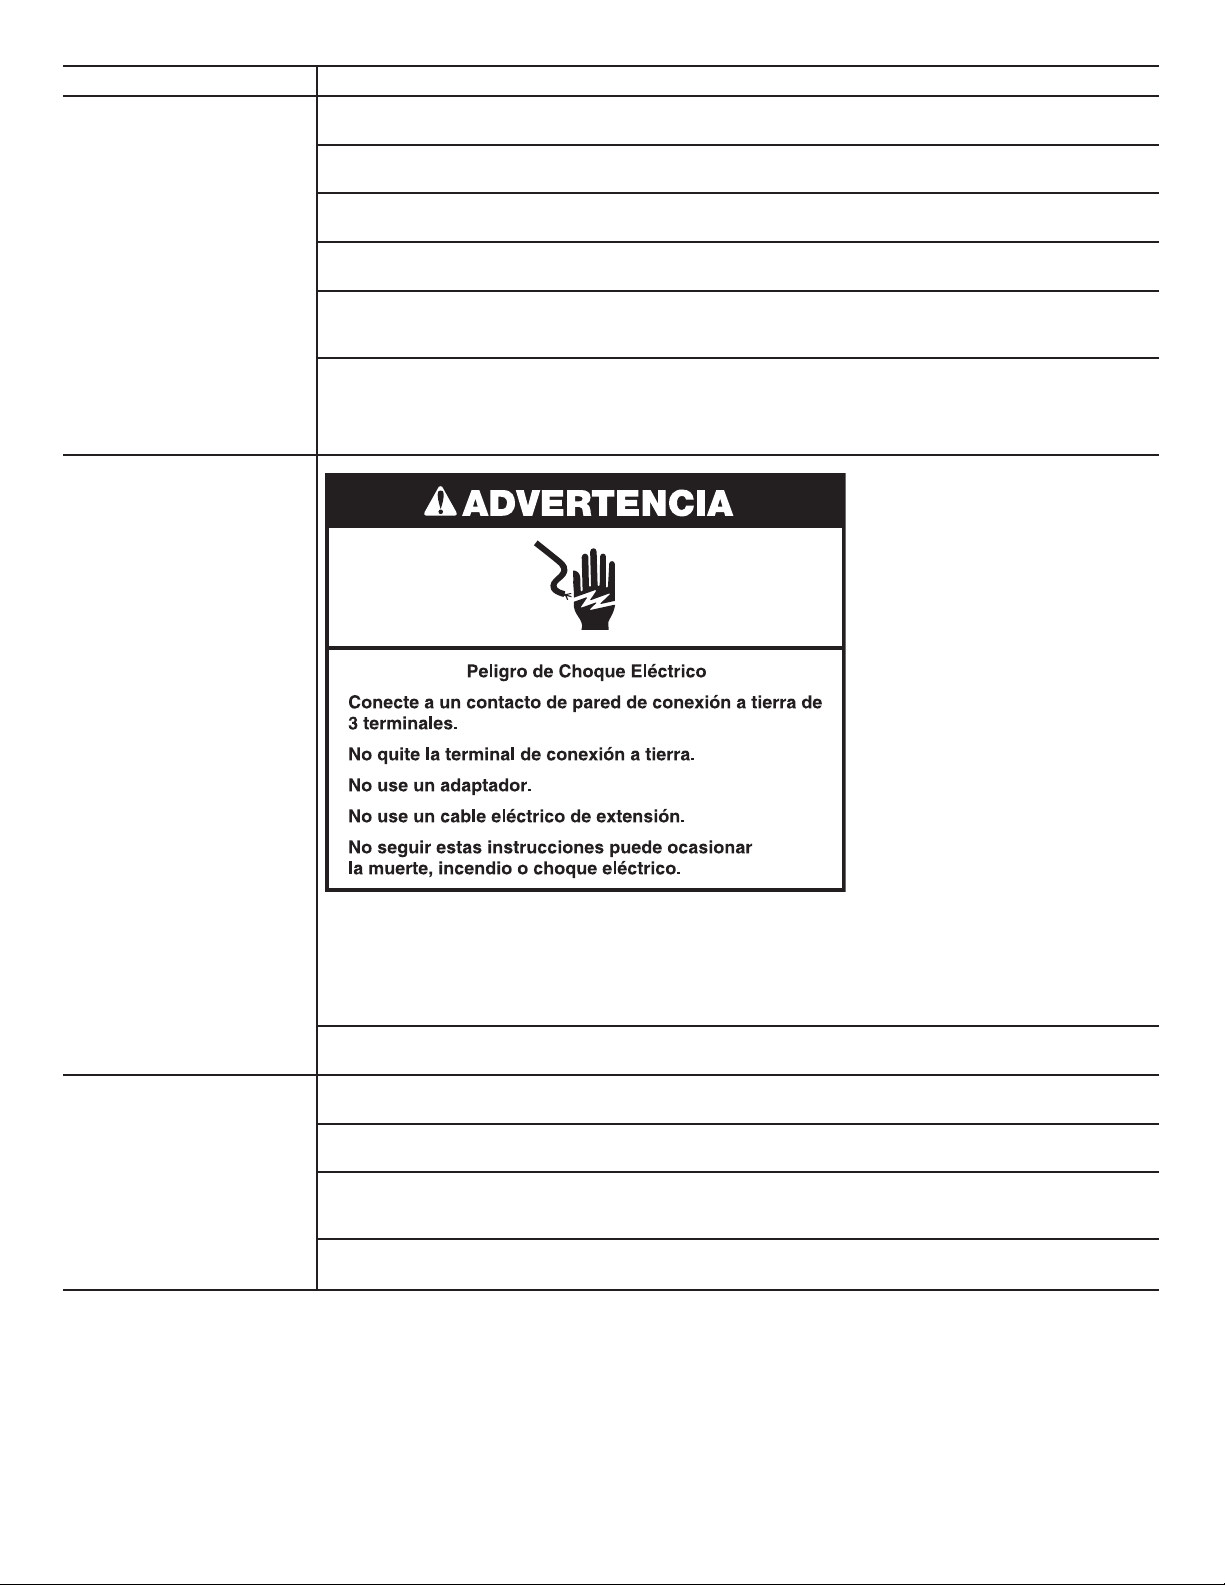
42
PROBLEMA SOLUCIÓN
LA LAVAVAJILLAS
ESTÁ CONECTADA AL
ENRUTADOR WI-FI DE
LA CASA (EL ICONO
INALÁMBRICO ESTÁ
APAGADO)
Es posible que la lavavajillas esté en modo de espera. Toque el botón POWER (Encendido) de la
lavavajillas y observe los indicadores. Todas las luces indicadoras están apagadas en el modo de espera.
Revise que la lavavajillas esté conectada al enrutador Wi-Fi de la casa. Vea la sección "Configuración
de la conectividad".
Presione y sostenga CONNECT (Conectar) por 3 segundos. El icono de estado inalámbrico debe
parpadear mientras se conecta (esto puede tardar hasta 2 minutos).
Verifique si el enrutador está conectado y funcionando con otras computadoras u otros dispositivos
en la casa (si pueden acceder a Internet). ¿Cambió el enrutador o su contraseña?
La señal puede ser débil o hay interferencia de la señal entre la lavavajillas y el enrutador. Intente
colocar el enrutador inalámbrico más cerca de la lavavajillas. Puede ser necesario instalar un
dispositivo que extienda el alcance de Wi-Fi.
Verifique la aplicación móvil para verificar que la lavavajillas no esté fuera de línea. Si está fuera de
línea, haga lo siguiente para volver a conectarla:
1. Vaya a “Preferencias” en la aplicación móvil y seleccione ELIMINAR ELECTRODOMÉSTICO.
2. Siga las instrucciones de la aplicación móvil para agregar un electrodoméstico.
EL ICONO WIRELESS
(INALÁMBRICO) NO SE
ENCIENDE DESPUÉS DE
PRESIONAR EL BOTÓN
CONNECT (CONECTAR)
Desenchufe o desconecte la electricidad de la lavavajillas durante 30 segundos y luego vuelva a
conectar. Repita el proceso de conexión a Wi-Fi. Si no logra conectarse después de varios intentos, use
las instrucciones de configuración alternativa disponibles en www.whirlpool.com/connect. En Canadá,
visite www.whirlpool.ca/en_CA y haga clic en el vínculo a Whirlpool
®
Connected Appliances.
El dispositivo puede estar conectado a una red de Wi-Fi inactiva. Verifique que la red conectada esté
funcionando adecuadamente.
Verifique que la lavavajillas opere correctamente, excepto que no se puede conectar. Llame para
solicitar servicio técnico.
LA LAVAVAJILLAS
ESTÁ CONECTADA AL
ENRUTADOR WI-FI DE
LA CASA (EL ICONO
INALÁMBRICO ESTÁ
ENCENDIDO), PERO LA
APLICACIÓN WHIRLPOOL
®
O LAS FUNCIONES
DE SMART GRID (RED
INTELIGENTE) NO
FUNCIONAN
Verifique si los iconos de casa ámbar o azul están encendidos constantemente; si no es así, toque
CONNECT (Conectar) para restablecer la conexión inalámbrica.
Es posible que la conexión a la aplicación Whirlpool
®
y el servicio Smart Grid no estén disponibles.
Verifique si el icono de casa azul está apagado o parpadeando.
Revise que la cuenta de usuario esté configurada. Consulte la sección “Configuración de la
conectividad” o la aplicación Whirlpool
®
directamente para ver instrucciones de configuración
de la cuenta y de registro de la lavavajillas.
Verifique que la lavavajillas esté vinculada con su cuenta en la aplicación.

43
Solución de problemas
Pruebe primero las soluciones sugeridas aquí. Si necesita asistencia adicional o más recomendaciones que pueden ayudarle a evitar
una llamada de servicio técnico, consulte la página de la garantía de este manual y escanee el código con su dispositivo móvil o visite
www.whirlpool.com/product_help. En Canadá, visite www.whirlpool.ca/product_help.
Contáctenos por correo con sus preguntas o dudas a la dirección que aparece a continuación:
En los EE. UU.:
Whirlpool Brand Home Appliances
Customer eXperience Center
553 Benson Road
Benton Harbor, MI 49022-2692
En Canadá:
Whirlpool Brand Home Appliances
Customer eXperience Centre
200 – 6750 Century Ave.
Mississauga, Ontario L5N 0B7
Incluya en la correspondencia un número de teléfono en el que se le pueda localizar durante el día.
PROBLEMA SOLUCIÓN
LA LAVAVAJILLAS
NO FUNCIONA
NOTA: Es normal que la lavavajillas haga pausas repetidamente durante un ciclo.
Si la luz de Start/Resume (Inicio/Reanudar) parpadea, presione Start/Resume (Inicio/Reanudar)
y cierre la puerta en menos de 4 segundos.
Cerciórese de que la puerta esté cerrada y asegurada.
■ Cerciórese de que no haya interferencia con fuentes grandes y el sistema de lavado en la parte
posterior de la lavavajillas.
■ Revise para ver si algún artículo sobresale a través de la parte inferior o posterior de la canasta.
Revise también para ver si algún artículo alto golpea la canasta superior o el brazo rociador.
Ajuste la carga según sea necesario, para cerciorarse de que la puerta esté cerrada y asegurada.
Presione Start/Resume (Inicio/Reanudar) o Cancel (Cancelar), o abra y cierre la puerta antes de
seleccionar el ciclo/opción. Los controles se deben reactivar después de un período de inactividad.
Asegúrese de que la característica Control/Lock (Control/Bloqueo) no esté activada. Si el indicador
de bloqueo de control está encendido, mantenga presionado SANI RINSE (Enjuague sanitario) por
3 segundos. El LED de bloqueo de controles se apagará y usted podrá operar los controles.
Asegúrese de haber seleccionado un ciclo. Consulte la sección “Descripción de ciclos y opciones”.
Asegúrese de que haya suministro de energía a la lavavajillas. Es posible que se haya disparado
un cortacircuitos o un fusible.
Si están destellando otras luces que no sean la de Start/Resume (Inicio/Reanudar) y la unidad no
funciona, deberá llamar para solicitar servicio técnico.
Si la pantalla numérica muestra el código “F2E2” necesitará llamar para solicitar servicio técnico.
QUEDA DETERGENTE
EN EL DEPÓSITO O LA
PASTILLA ESTÁ EN EL
FONDO DE LA CUBA
Fíjese si hay artículos tales como moldes para galletas, tablas de cortar o recipientes grandes, etc.,
que pudieran impedir que el depósito de detergente se abra como es debido.
Cerciórese de que el detergente esté fresco y sin grumos.
Asegúrese de que haya terminado el ciclo (la luz de Clean (Limpio) está encendida). Si no ha
terminado, deberá reanudar el ciclo al presionar Start/Resume (Inicio/Reanudar) y cerrar la puerta
en menos de 4 segundos.
EL CICLO FUNCIONA POR
DEMASIADO TIEMPO
NOTAS:
■ Para usar menos agua y reducir el consumo de energía, usted verá que algunos ciclos en general
funcionan hasta por 3 horas.
■ Lo mejor es fijar el calentador de agua en 120 °F (49 °C), ya que la lavavajillas demorará más
mientras calienta el agua que esté más fría.
■ Algunas opciones agregarán tiempo al ciclo. (Consulte la sección “Descripción de ciclos y
opciones”). La opción de Heat Dry (Secado con calor) agregará aproximadamente 45 minutos.
Pruebe usar el ciclo 1-Hour Wash (Lavado de 1 hora).
Antes de comenzar el ciclo, haga correr agua caliente de un grifo que esté cerca de la lavavajillas.
LA LAVAVAJILLAS NO SECA
NOTA: Los objetos de plástico y los artículos con superficies antiadherentes son difíciles de secar,
ya que tienen una superficie porosa que tiende a retener las gotas de agua. Puede ser necesario
secar con un paño de cocina.
Se necesita usar el agente de enjuague junto con la opción de Heat Dry (Secado con calor) para un
secado adecuado.
El cargar los artículos adecuadamente puede afectar el secado. (Consulte las instrucciones de carga
específicas dentro de este manual).
Los vasos y las tazas con base cóncava retienen el agua. Esta agua puede derramarse sobre otros
artículos al descargarlos.
■ Vacíe primero la canasta inferior.
■ Ubique estos artículos en el lado más inclinado de la canasta, para obtener mejores resultados.

44
PROBLEMA SOLUCIÓN
NO SE LLENA
Asegúrese de que la llave de agua a la lavavajillas esté abierta.
Verifique que el flotador esté libre de obstrucciones. Consulte la sección “Piezas y características”.
Verifique si hay espuma en la lavavajillas. Si se detecta espuma, es posible que la lavavajillas no
funcione correctamente o que no se llene de agua. Consulte “Luces destellando” en la sección
“Solución de problemas”.
QUEDA AGUA EN LA
CUBA/NO DESAGUA
Asegúrese de que haya terminado el ciclo. (La luz indicadora de Clean (Limpio) se mostrará
encendida en la pantalla.) En caso contrario, reanude el ciclo presionando Start/Resume (Inicio/
Reanudar) y cierre la puerta en menos de 4 segundos.
Si la lavavajillas está conectada a un recipiente de desechos alimenticios, asegúrese de haber
quitado el tapón del disco removible de la entrada del recipiente de desechos.
Revise si la manguera de desagüe está retorcida.
Revise si hay obstrucciones de comida en el desagüe o en el recipiente de desechos.
Revise el fusible o el cortacircuitos de la casa.
AGUA DURA
(RESIDUO BLANCO
EN EL INTERIOR DE
LA LAVAVAJILLAS O
EN LA CRISTALERÍA)
NOTA: Los residuos minerales del agua extremadamente dura pueden causar daños en su
lavavajillas y hacer difícil que se obtenga una buena limpieza. Se recomienda enérgicamente un
ablandador de agua si el agua tiene una dureza de 15 granos o más. Si no se instala un ablandador
de agua, pueden ayudar los pasos siguientes:
Use un limpiador comercial diseñado para lavavajillas, una vez por mes.
Limpie los filtros superiores e inferiores al menos una vez por mes. Vea “Instrucciones de limpieza”
en la sección “Sistema de filtración”.
Use siempre un agente de enjuague.
Siempre use tabletas o paquetes de detergente frescos y de alta calidad para obtener un mejor
rendimiento.
Use un aditivo para realzar el efecto del detergente/ablandador de agua que esté diseñado
para lavavajillas.
OLORES
NOTA: Si la lavavajillas no se usa todos los días, puede hacer funcionar un ciclo de enjuague con la
carga parcialmente llena, hasta que tenga una carga completa para lavar.
Ponga a funcionar un enjuague con vinagre en la lavavajillas, colocando 2 tazas (500 ml) de vinagre
blanco en una taza medidora de vidrio en posición vertical, en la canasta inferior. Haga funcionar un
ciclo Normal con la opción de Heat Dry (Secado con calor) apagada. No use detergente.
Es posible que la lavavajillas no esté desaguando como es debido. Vea “Queda agua en la cuba/No
desagua” en “Solución de problemas”.
RUIDOS
Se pueden escuchar periódicamente sonidos de gorgoteo a lo largo del ciclo, mientras se desagua
la lavavajillas.
Puede escucharse periódicamente el silbido normal de la válvula de agua.
Puede escucharse un sonido normal de chasquido cuando se abre el depósito de detergente durante
el ciclo y cuando se abre la puerta al final del mismo.
La instalación incorrecta afectará los niveles de ruido.
Asegúrese de que estén bien instalados los filtros.
Pueden escucharse ruidos sordos si los artículos se extienden más allá de las canastas e interfieren
con los brazos de lavado. Reacomode la vajilla y reanude el ciclo.
QUEDA SUCIEDAD DE
LOS ALIMENTOS EN
LOS PLATOS
Asegúrese de cargar correctamente la lavavajillas. Una carga indebida puede disminuir en gran
proporción el rendimiento de lavado. Consulte la sección “Uso de la lavavajillas”.
Verifique el filtro para asegurarse de que está instalado correctamente. Límpielo de ser necesario.
Vea “Instrucciones de limpieza” en la sección “Sistema de filtración” para obtener detalles.
Seleccione el ciclo y la opción adecuados para el tipo de suciedad. Puede usar el ciclo Heavy
(Intensivo) con la opción Hi Temp Wash (Lavado con temperatura alta) para las cargas más rebeldes.
Cerciórese de que la temperatura del agua de entrada sea de, por lo menos, 120 °F (49 °C).
Use la cantidad adecuada de detergente fresco. Se necesitará más detergente para las cargas con
suciedad pesada y condiciones de agua dura.
Quite los restos de comida de los platos antes de ponerlos en la lavavajillas (no los enjuague
previamente).

45
PROBLEMA SOLUCIÓN
PLATOS SUCIOS/ESPUMA
EN LA LAVAVAJILLAS/
CICLO INCOMPLETO
Si el sistema de sensor de la lavavajillas detecta espuma, es posible que la lavavajillas no funcione
correctamente o que no se llene de agua.
La espuma puede ser ocasionada por lo siguiente:
■ Uso del tipo incorrecto de detergente, como podría ser un detergente para lavar los platos
a mano, detergente para ropa o jabón de tocador.
■ No volver a colocar la tapa del depósito del agente de enjuague después de llenarlo (o de
volver a llenarlo).
■ Uso de cantidades excesivas de detergente para lavavajillas.
■ Enjuague inadecuado del detergente de platos lavados a mano antes de cargarlos en la
lavavajillas.
Llame para solicitar servicio técnico.
Si no hay agua en la máquina en cualquier momento durante un ciclo de lavado con agua caliente,
el ciclo se terminará y no se encenderá el indicador de Clean (Limpio). Vea “No se llena” en la
sección “Solución de problemas”.
NO HA HIGIENIZADO
Si la luz de higienizado está destellando, la carga NO está higienizada. Se ha interrumpido el ciclo en
el enjuague final o la temperatura del calentador de agua se ha fijado en una temperatura muy baja.
Fije el calentador de agua en 120 °F (49 °C).
DAÑOS EN LA VAJILLA
Una carga inapropiada puede hacer que los platos se desportillen o se dañen. (Consulte las
instrucciones de carga específicas dentro de este manual).
LUCES DESTELLANDO
Los indicadores destellarán cuando haya una pausa en el ciclo o cuando se haya interrumpido el
mismo abriendo la puerta. Si está destellando la luz de Start/Resume (Inicio/Reanudar), presione
Start/Resume y cierre la puerta en menos de 4 segundos.
Consulte “Inicio o reanudación de un ciclo” en la sección “Uso de la lavavajillas”.
Si está destellando la luz de Clean (Limpio) o cualquier otra luz y la lavavajillas no funciona, llame
para solicitar servicio.
VAJILLA TURBIA O CON
MANCHAS (Y SOLUCIÓN
DE AGUA DURA)
Añada o ajuste la cantidad de agente de enjuague líquido para favorecer el secado y reducir las
manchas. Consulte la sección “Detergente y agente de enjuague”.
Use la cantidad adecuada de detergente.
Confirme que se pueda quitar la turbidez remojando el artículo en vinagre blanco durante 5 minutos.
Si desaparece la turbidez, ésta se debe a agua dura. Regule la cantidad de detergente y agente de
enjuague. Consulte “Agua dura (Residuo blanco en el interior de la lavavajillas o en la cristalería)”, en
la sección “Solución de problemas”. Si no se aclara, es debido a la corrosión (vea a continuación).
Cerciórese de que la temperatura de entrada de agua esté fijada en 120 °F (49 °C).
Pruebe usar las opciones de Hi Temp Wash (Temperatura alta) y Sani Rinse (Enjuague sanitario).
Para quitar las manchas, haga correr un enjuague con vinagre en la lavavajillas.
■ Lave y enjuague la vajilla que esté afectada y cárguela en la lavavajillas. Quite todos los
objetos metálicos y cubiertos. Ponga 2 tazas (500 ml) de vinagre blanco en una taza
medidora de vidrio en la canasta inferior. Haga funcionar un ciclo Normal con la opción
de Heat Dry (Secado con calor) apagada. No se necesita detergente.
CORROSIÓN (TURBIDEZ
PERMANENTE)
Esta es una erosión de la superficie de la vajilla y puede deberse a una combinación de: agua
demasiado caliente, uso de demasiado detergentes con agua blanda o prelavado. El detergente
necesita de la suciedad de la comida para actuar. Si ha habido corrosión, la cristalería quedará
permanentemente dañada. Para evitar que continúe ocurriendo la corrosión, cambie la cantidad
de detergente de manera que coincida con la dureza del agua, deje de lavar previamente y use
opciones de calentamiento de agua solamente cuando la temperatura del agua de entrada sea
inferior a 120 °F (49 °C).
FUGAS DE AGUA
Asegúrese de que la lavavajillas esté instalada correctamente y de que esté nivelada.
La espuma puede hacer que se desborde la lavavajillas. Mida el detergente con precisión y use
solamente detergentes diseñados para usarse en una lavavajillas. Se necesita menos detergente
en agua blanda. Si continúa el exceso de espuma, pruebe otra marca de detergente.
Para evitar que se salga el agente de enjuague del depósito, cerciórese de que la tapa esté bien
sujeta y evite el sobrellenado.
SE HA DECOLORADO
LA CUBA
El alto contenido de hierro en el agua puede manchar la cuba.
Los alimentos a base de tomate pueden manchar la cuba o la vajilla. Cuando haya alimentos
que contienen tomate en grandes cantidades, deben retirarse de los platos antes de cargar.
Puede usarse un limpiador a base de cítricos para limpiar.

46
Uso de licencia de código abierto
Los siguientes enunciados se refieren a las partes de este
software con base en parte de FreeRTOS v7.0.2, http://
www.freertos.org. El uso de este software se rige por los
términos de GNU General Public License v. 2, disponible en:
http://www.gnu.org/licenses/gpl-2.0.html. Se puede obtener
una copia del código fuente por solicitud escrita del software por
nombre a opensour[email protected], junto con la dirección
para la entrega.
Los siguientes enunciados se refieren a las partes del software
con derechos de autor registrados por Eclipse Foundation, Inc.
Copyright (c) 2007, Eclipse Foundation, Inc. y sus licenciantes.
Todos los derechos reservados.
La redistribución y el uso en formas fuente y binaria, con o sin
modificación, están permitidos siempre y cuando se cumplan las
siguientes condiciones:
• Las redistribuciones de código fuente deben conservar el aviso
de derechos de autor anterior, esta lista de condiciones y la
siguiente exención de responsabilidades.
• Las redistribuciones de forma binaria deben reproducir el aviso
de derechos de autor anterior, esta lista de condiciones y la
siguiente exención de responsabilidades en la documentación
y/u otro material que se proporcione con la distribución.
• Ni el nombre de Eclipse Foundation, Inc. ni los nombres de
sus contribuyentes se pueden usar para avalar o promover
productos derivados de este software sin el permiso específico
previo por escrito.
ESTE SOFTWARE ES PROPORCIONADO POR LOS TITULARES
DE LOS DERECHOS DE AUTOR Y SUS CONTRIBUYENTES
“COMO ESTÁ” Y SE NIEGA TODA RESPONSABILIDAD
POR CUALQUIER GARANTÍA EXPLÍCITA O IMPLÍCITA,
INCLUIDAS, ENTRE OTRAS, LAS GARANTÍAS IMPLÍCITAS DE
COMERCIABILIDAD Y DE ADECUACIÓN PARA UN PROPÓSITO
EN PARTICULAR.
EN NINGÚN CASO EL PROPIETARIO DE LOS DERECHOS DE
AUTOR O LOS CONTRIBUYENTES SERÁN RESPONSABLES
POR ALGÚN DAÑO DIRECTO, INDIRECTO, INCIDENTAL,
ESPECIAL, EJEMPLAR O CONSECUENCIAL (INCLUIDOS,
ENTRE OTROS, EL APROVISIONAMIENTO DE MERCANCÍAS
O SERVICIOS SUSTITUTOS, PÉRDIDA DE USO, DATOS
O BENEFICIOS O INTERRUPCIÓN DE ACTIVIDADES
COMERCIALES) QUE SIN EMBARGO SE PRODUJERAN Y
CON BASE EN CUALQUIER TEORÍA DE RESPONSABILIDAD
CIVIL, TANTO CONTRACTUAL, DE RESPONSABILIDAD
ESTRICTA O EXTRACONTRACTUAL (INCLUIDA NEGLIGENCIA
U OTRA) QUE SURJA DE CUALQUIER MANERA DEL USO DE
ESTE SOFTWARE, INCLUSO SI SE ADVIRTIERA SOBRE LA
POSIBILIDAD DE DICHO DAÑO.
Partes de este software tienen derechos de autor registrados.
Copyright (c) Sawtooth Consulting Ltd. 2006-2015. Todos los
derechos reservados.
Partes de este software tienen derechos de autor registrados.
Copyright (c) Arrayent, Inc. 2015. Todos los derechos reservados.
Los siguientes enunciados se refieren a esas partes del software
con derechos de autor registrados por Swedish Institute of
Computer Science.
Copyright (c) 2001-2004, Swedish Institute of Computer Science.
Derechos reservados.
La redistribución y el uso en formas fuente y binaria, con o sin
modificación, están permitidos siempre y cuando se cumplan las
siguientes condiciones:
1. Las redistribuciones de código fuente deben conservar el
aviso de derechos de autor anterior, esta lista de condiciones
y la siguiente exención de responsabilidades.
2. Las redistribuciones de forma binaria deben reproducir el
aviso de derechos de autor anterior, esta lista de condiciones
y la siguiente exención de responsabilidades en la
documentación y/u otro material que se proporcione con la
distribución.
3. El nombre del autor no se puede usar para avalar o promover
productos derivados de este software sin el permiso
específico previo por escrito.
ESTE SOFTWARE ES PROPORCIONADO POR EL AUTOR
“COMO ESTÁ” Y SE NIEGA TODA RESPONSABILIDAD
POR CUALQUIER GARANTÍA EXPLÍCITA O IMPLÍCITA,
INCLUIDAS, ENTRE OTRAS, LAS GARANTÍAS IMPLÍCITAS DE
COMERCIABILIDAD Y DE ADECUACIÓN PARA UN PROPÓSITO
EN PARTICULAR. EN NINGÚN CASO EL AUTOR SERÁ
RESPONSABLE POR ALGÚN DAÑO DIRECTO, INDIRECTO,
INCIDENTAL, ESPECIAL, EJEMPLAR O CONSECUENCIAL
(INCLUIDO, ENTRE OTROS, EL APROVISIONAMIENTO DE
MERCANCÍAS O SERVICIOS SUSTITUTOS, PÉRDIDA DE USO,
DATOS O BENEFICIOS O INTERRUPCIÓN DE ACTIVIDADES
COMERCIALES) QUE SIN EMBARGO SE PRODUJERAN Y
CON BASE EN CUALQUIER TEORÍA DE RESPONSABILIDAD
CIVIL, TANTO CONTRACTUAL, DE RESPONSABILIDAD
ESTRICTA O EXTRACONTRACTUAL (INCLUIDA NEGLIGENCIA
U OTRA) QUE SURJA DE CUALQUIER MANERA DEL USO DE
ESTE SOFTWARE, INCLUSO SI SE ADVIRTIERA SOBRE LA
POSIBILIDAD DE DICHO DAÑO.
Los siguientes enunciados se refieren a las partes del software
con derechos de autor registrados por Marvell International
Ltd. Copyright (c) Marvell International Ltd. Todos los derechos
reservados.
DESCARGO DE RESPONSABILIDAD. ESTE SOFTWARE ES
PROPORCIONADO POR LOS TITULARES DE LOS DERECHOS
DE AUTOR Y SUS CONTRIBUYENTES “COMO ESTÁ” Y SE
NIEGA TODA RESPONSABILIDAD POR CUALQUIER GARANTÍA
EXPLÍCITA O IMPLÍCITA, INCLUIDAS, ENTRE OTRAS, LAS
GARANTÍAS IMPLÍCITAS DE COMERCIABILIDAD Y DE
ADECUACIÓN PARA UN PROPÓSITO EN PARTICULAR. EN
NINGÚN CASO EL PROPIETARIO DE LOS DERECHOS DE
AUTOR O LOS CONTRIBUYENTES SERÁN RESPONSABLES
POR ALGÚN DAÑO DIRECTO, INDIRECTO, INCIDENTAL,
ESPECIAL, EJEMPLAR O CONSECUENCIAL (INCLUIDOS,
ENTRE OTROS, EL APROVISIONAMIENTO DE MERCANCÍAS
O SERVICIOS SUSTITUTOS, PÉRDIDA DE USO, DATOS
O BENEFICIOS O INTERRUPCIÓN DE ACTIVIDADES
COMERCIALES) QUE SIN EMBARGO SE PRODUJERAN Y
CON BASE EN CUALQUIER TEORÍA DE RESPONSABILIDAD
CIVIL, TANTO CONTRACTUAL, DE RESPONSABILIDAD
ESTRICTA O EXTRACONTRACTUAL (INCLUIDA NEGLIGENCIA
U OTRA) QUE SURJA DE CUALQUIER MANERA DEL USO DE
ESTE SOFTWARE, INCLUSO SI SE ADVIRTIERA SOBRE LA
POSIBILIDAD DE DICHO DAÑO.

47
11/14
GARANTÍA LIMITADA DE LOS
ELECTRODOMÉSTICOS
PRINCIPALES DE
WHIRLPOOL
®
ADJUNTE SU RECIBO AQUÍ. SE REQUIERE LA PRUEBA DE
COMPRA PARA OBTENER SERVICIO BAJO LA GARANTÍA.
Tenga a mano la siguiente información cuando llame al Centro para la
eXperiencia del cliente:
■ Nombre, dirección y número de teléfono
■ Número de modelo y de serie
■ Una descripción clara y detallada del problema
■ Prueba de compra incluido el nombre y la dirección del
distribuidor o vendedor
SI NECESITA SERVICIO TÉCNICO:
1. Antes de contactarnos para obtener servicio, determine si el producto requiere reparación. Algunas consultas
pueden atenderse sin servicio técnico. Tómese unos minutos para revisar la sección de Solución de
problemas o Problemas y soluciones del Manual de uso y cuidado, escanee el código QR que se encuentra a
la derecha para acceder a los recursos adicionales o visite www.whirlpool.com/product_help.
2. Todos los servicios bajo la garantía los brindan exclusivamente Prestadores autorizados de servicio de
Whirlpool. Para EE.UU. y Canadá, dirija todas las solicitudes de servicio bajo la garantía a:
Centro para la eXperiencia del cliente de Whirlpool
En EE.UU., llame al 1-800-253-1301. En Canadá, llame al 1-800-807-6777.
Si usted se encuentra fuera de los cincuenta Estados Unidos o Canadá, póngase en contacto con su distribuidor autorizado de Whirlpool para
determinar si corresponde otra garantía.
www.whirlpool.com/product_help
GARANTÍA LIMITADA DE UN AÑO
LO QUE ESTÁ CUBIERTO LO QUE NO ESTÁ CUBIERTO
Durante un año a partir de la fecha de compra,
siempre y cuando este electrodoméstico
principal haya sido instalado, mantenido y
operado según las instrucciones adjuntas o
provistas con el producto, Whirlpool
Corporation o Whirlpool Canada LP (en lo
sucesivo denominado “Whirlpool”) se hará
cargo del costo de las piezas especificadas
de fábrica y del trabajo de reparación para
corregir defectos en los materiales o en la
mano de obra existentes en el momento de la
compra de este electrodoméstico principal o,
a su sola discreción, reemplazará el producto.
En el caso de reemplazar el producto, su
electrodoméstico estará cubierto por la
garantía por el tiempo restante del período de
garantía de la unidad original.
SU ÚNICO Y EXCLUSIVO RECURSO SEGÚN
LOS TÉRMINOS DE ESTA GARANTÍA
LIMITADA SERÁ EL DE REPARAR EL
PRODUCTO SEGÚN SE ESTIPULA EN LA
PRESENTE. El servicio deberá ser
suministrado por una compañía de servicio
designada por Whirlpool. Esta garantía
limitada es válida solamente en Estados
Unidos o en Canadá y se aplica solamente
cuando el electrodoméstico principal se use
en el país en el que se ha comprado. Esta
garantía limitada entrará en vigor a partir de la
fecha de la compra del consumidor original.
Se requiere una prueba de la fecha de compra
original para obtener servicio bajo esta
garantía limitada.
1. Uso comercial, no residencial o familiar múltiple o uso diferente del indicado en las instrucciones del
usuario, del operador o de instalación publicadas.
2. Instrucción a domicilio sobre cómo usar el producto.
3. Servicio para corregir el mantenimiento o la instalación incorrecta del producto, la instalación que
no esté de acuerdo con los códigos eléctricos o de plomería o corrección de plomería o instalación
eléctrica doméstica (por ejemplo, instalación eléctrica, fusibles o mangueras de entrada de agua del
hogar).
4. Piezas de consumo (por ejemplo, focos de luz, baterías, filtros de agua o de aire, soluciones de
conservación, etc.).
5. Defectos o daños causados por el uso de piezas o accesorios no legítimos de Whirlpool.
6. Conversión del producto de gas natural o gas L.P.
7. Daño causado por accidente, uso indebido, abuso, incendio, inundación, acto
s fortuitos o el
empleo de productos no aprobados por Whirlpool.
8. Reparaciones a piezas o sistemas para corregir el daño o los defectos del producto a causa de
reparaciones por servicio no autorizado, alteraciones o modificaciones en el electrodoméstico.
9. Daños estéticos, incluyendo rayaduras, abolladuras, desportilladuras u otro daño al acabado del
electrodoméstico a menos que el mismo sea debido a defectos en los materiales o la mano de obra
y se le informe a Whirlpool en un lapso de 30 días
.
10. Decoloración, herrumbre u oxidación de las superficies producto de entornos corrosivos o
cáusticos que incluyen, entre otras cosas, altas concentraciones de sal, humedad elevada o
exposición a productos químicos.
11. Pérdida de comida o medicamentos debido a la falla del producto.
12. Recogida o entrega. Este producto está destinado para ser reparado en su hogar.
13. Gastos de viaje o de transporte para prestar servicio en lugares remotos en los cuales no haya
disponible un técnico de servicio autorizado por Whirlpool.
14. Remoción o reinstalación de electrodomésticos en lugares inaccesibles o dispositivos empotrados
(por ejemplo, adornos, paneles decorativos, pisos, armarios, islas, mostradores, paredes, etc.) qu
e
interfieran con el servicio, la remoción o el reemplazo del producto.
15. Servicio técnico o piezas para electrodomésticos con números de serie/modelo originales
removidos, alterados o no identificados con facilidad.
El costo de la reparación o del reemplazo bajo estas circunstancias excluidas correrá por
cuenta del cliente.
EXCLUSIÓN DE GARANTÍAS IMPLÍCITAS
LAS GARANTÍAS IMPLÍCITAS, INCLUYENDO CUALQUIER GARANTÍA IMPLÍCITA DE COMERCIABILIDAD O GARANTÍA IMPLÍCITA DE CAPACIDAD
PARA UN PROPÓSITO PARTICULAR, SERÁN LIMITADAS A UN AÑO O AL PERÍODO MÁS CORTO PERMITIDO POR LEY. Algunos estados y provincias
no permiten la limitación de la duración de las garantías implícitas de comerciabilidad o capacidad, de modo que la limitación arriba indicada quizá no le
corresponda. Esta garantía le otorga derechos legales específicos y es posible que usted tenga también otros derechos que varían de un estado a otro
o de una provincia a otra.
EXCLUSIÓN DE DECLARACIONES FUERA DE LA GARANTÍA
Whirlpool no hace declaraciones acerca de la calidad, durabilidad o necesidad de servicio técnico o reparación de este electrodoméstico principal
aparte de las declaraciones incluidas en esta garantía. Si usted desea una garantía con una duración más prolongada o más completa que la garantía
limitada que se incluye con este electrodoméstico principal, deberá dirigirse a Whirlpool o a su distribuidor acerca de la compra de una garantía
extendida.
LIMITACIÓN DE RECURSOS; EXCLUSIÓN DE DAÑOS INCIDENTALES Y CONSECUENTES
SU ÚNICO Y EXCLUSIVO RECURSO SEGÚN LOS TÉRMINOS DE ESTA GARANTÍA LIMITADA SERÁ EL DE REPARAR EL PRODUCTO SEGÚN SE
ESTIPULA EN LA PRESENTE. WHIRLPOOL NO SE RESPONSABILIZARÁ POR DAÑOS INCIDENTALES O CONSECUENTES. Algunos estados y
provincias no permiten la exclusión o limitación de daños incidentales o consecuentes, de modo que estas limitaciones y exclusiones quizás no le
correspondan. Esta garantía le otorga derechos legales específicos y es posible que usted tenga también otros derechos que varían de un estado a otro
o de una provincia a otra.
W10901525A
®
/™ ©2017 Whirlpool. Usada en Canadá bajo licencia. Todos los derechos reservados. 04/17
48
INSTRUCTIONS D’UTILISATION
DU LAVE-VAISSELLE
Table des matières
SÉCURITÉ DU LAVE-VAISSELLE ............................................................................................................... 48
AVIS D’APPLICATION DE LA RÉGLEMENTATION DE LA CONNEXION
DES ÉLECTROMÉNAGERS ........................................................................................................................50
QUOI DE NEUF DANS VOTRE LAVE-VAISSELLE
.....................................................................................51
PIÈCES ET CARACTÉRISTIQUES
..............................................................................................................52
ÉTAPES RAPIDES
.......................................................................................................................................53
FONCTIONS DE CONNECTIVITÉ
...............................................................................................................53
CONFIGURATION DE LA CONNECTIVITÉ
.................................................................................................54
UTILISATION DU LAVE-VAISSELLE – OPÉRATION DE BASE
..................................................................55
UTILISATION DU LAVE-VAISSELLE – OPÉRATION INTELLIGENTE
.......................................................57
DESCRIPTIONS DES PROGRAMMES ET OPTIONS.................................................................................59
CARACTÉRISTIQUES DU LAVE-VAISSELLE
.............................................................................................62
SYSTÈME DE FILTRATION
..........................................................................................................................64
ENTRETIEN DU LAVE-VAISSELLE
.............................................................................................................65
DÉPANNAGE – CONNECTIVITÉ
.................................................................................................................66
DÉPANNAGE
................................................................................................................................................ 68
UTILISATION DE LA LICENSE DE SOURCE OUVERTE
.............................................................................71
GARANTIE
.................................................................................................................................................... 72
Nous vous REMERCIONS d’avoir acheté ce produit de haute qualité. Enregistrez votre lave-vaisselle sur www.whirlpool.com.
Au Canada, visitez notre site web www.whirlpool.ca.
Obtenez les instructions de connexion Internet, les conditions d’utilisation et la politique de confidentialité à l’adresse
www.whirlpool.com/connect. Si vous avez des problèmes ou des questions, appelez l’équipe de Whirlpool Corporation
Connected Appliances au
1 866 333-4591. Au Canada, visitez notre site web www.whirlpool.ca/fr_CA et cliquez sur le lien
Whirlpool
®
électroménager connecter.
Pour référence ultérieure, consignez par écrit les numéros de modèle et de série de votre produit. Vous les trouverez près de la porte
sur le côté droit ou gauche de l’intérieur du lave-vaisselle.
Numéro de modèle ___________________________________________ Numéro de série ___________________________________________
Sécurité du lave-vaisselle
49
IMPORTANTES INSTRUCTIONS DE SÉCURITÉ
AVERTISSEMENT : Lors de l’utilisation du lave-vaisselle, suivre les précautions élémentaires dont les suivantes :
CONSERVEZ CES INSTRUCTIONS
■
Lire la totalité des instructions avant d’utiliser le
lave-vaisselle.
■ N’utiliser le lave-vaisselle que pour laver la vaisselle.
■ Utiliser uniquement les détersifs ou agents de rinçage
recommandés pour lave-vaisselle et les garder hors de la
portée des enfants.
■ Lorsque vous chargez le lave-vaisselle :
1) Placer les objets coupants de façon qu’ils ne puissent
endommager le joint de la porte; et
2) Placer les couteaux le manche vers le haut de façon à ne
pas vous couper.
■ Ne pas laver d’articles en plastique à moins qu’ils ne soient
marqués “Peut aller au lave-vaisselle” ou l’équivalent. Si
l’article ne porte aucune indication, vérifier auprès du
fabricant.
■ Ne pas toucher l’élément chauffant pendant le
fonctionnement ou immédiatement après.
■ Ne pas faire fonctionner le lave-vaisselle si tous les
panneaux de l’enceinte ne sont pas en place.
■ Ne pas jouer avec les commandes.
■ Ne pas abuser, vous asseoir ni monter sur la porte,
le couvercle ou les paniers du lave-vaisselle.
■
Pour éviter tout risque d’accident, ne pas laisser les
enfants jouer dans ou sur le lave-vaisselle.
■
Sous certaines conditions, de l’hydrogène peut se former
dans un réseau d’eau chaude inutilisé depuis deux
semaines ou plus. L’HYDROGÈNE EST UN GAZ
EXPLOSIBLE. Si le système d’eau chaude n’a pas été
utilisé depuis un certain temps, laisser couler l’eau chaude
des robinets pendant quelques minutes avant de faire
fonctionner le lave-vaisselle. Cette mesure permettra à
l’hydrogène de s’évaporer. Ce gaz étant inflammable, ne
pas fumer ni utiliser de flamme nue pendant cette période.
■ Enlever la porte ou le couvercle du compartiment de lavage
lorsque vous remplacez ou mettez au rebut un vieux
lave-vaisselle.
INSTRUCTIONS DE MISE À LA TERRE
CONSERVEZ CES INSTRUCTIONS
■
Pour un lave-vaisselle relié à la terre, branché avec un
cordon :
Le lave-vaisselle doit être relié à la terre. En cas d'un
mauvais fonctionnement ou d'une panne, la mise à terre
réduira le risque d'un choc électrique en fournissant le moins
de résistance pour le courant électrique. Le lave-vaisselle est
équipé d'un cordon avec un conducteur pour relier les
appareils à la terre et d'une fiche de mise à la terre. La fiche
doit être branchée sur une prise appropriée, installée et reliée
à la terre conformément aux codes et règlements locaux.
AVERTISSEMENT : La connexion incorrecte du
conducteur pour relier les appareils à la terre peut causer le
risque de choc électrique. Vérifier avec un électricien
compétent ou un représentant de service si vous avez
des doutes si le lave-vaisselle est correctement relié à la
terre. Ne pas modifier la fiche fournie avec le lave-
vaisselle; si elle n'entre pas dans la prise, faire installer
une prise appropriée par un électricien compétent.
■
Pour un lave-vaisselle branché en permanence :
Le lave-vaisselle doit être branché à un système
d'installation électrique permanent en métal relié à la
terre, ou un conducteur pour relier les appareils à la terre
doit être relié avec les conducteurs du circuit et branché
à une borne pour relier les appareils à la terre ou au
cordon d'alimentation électrique avec le lave-vaisselle.
Risque de basculement
Ne pas utiliser le lave-vaisselle jusqu’à ce qu’il soit complètement installé.
Ne pas appuyer sur la porte ouverte.
Le non-respect de ces instructions peut causer des blessures graves ou des coupures.
AVERTISSEMENT

50
Avis d’application de la réglementation de la connexion des électroménagers
Déclaration de conformité de la Commission Fédérale
des Communications (FCC)
Cet appareil a été testé et déclaré conforme aux limites pour
appareils numériques de classe B, selon la section 15 des
règlements de la FCC (Federal Communications Commission).
Ces limites sont conçues dans le but d’assurer une protection
raisonnable contre des interférences nuisibles dans une installation
résidentielle. Cet appareil génère, utilise et peut émettre l’énergie
de fréquence radio et, s’il n’est pas installé ni utilisé conformément
aux instructions, peut causer des interférences nuisibles aux
communications radio. Cependant, il se peut que des interférences
se produisent dans une installation particulière. Si cet appareil
cause des interférences nuisibles à la réception radio ou télévision,
pouvant être déterminées par le fait d’allumer et d’éteindre l’appareil,
l’utilisateur est encouragé à essayer de corriger les interférences en
suivant l’un ou plusieurs des conseils suivants :
– Réorienter ou déplacer l’antenne de réception.
– Augmenter la distance séparant l’appareil du récepteur.
– Brancher l’appareil sur une prise d’alimentation différente de celle
où le récepteur est branché.
– Contacter un revendeur ou un technicien radio/télévision qualifié
pour obtenir de l’aide.
Cet appareil est conforme à la norme FCC, Partie 15. Le bon
fonctionnement de l’appareil est fonction de deux conditions :
1. Cet appareil ne doit pas produire de brouillage dommageable et
2. Cet appareil doit accepter tout brouillage radioélectrique subi,
même si le brouillage est susceptible d’en compromettre le
fonctionnement.
Tous changements ou toutes modifications n’ayant pas été
expressément approuvés par la partie responsable de la conformité
pourraient annuler l’autorité de l’utilisateur à utiliser l’appareil.
Renseignements sur l’exposition aux radiofréquences (RF)
Pour satisfaire aux exigences de la FCC et IC d’exposition pour
les appareils de transmission mobiles, cet émetteur ne devrait être
qu’utilisé ou installé dans un lieu séparant l’antenne et toutes les
personnes par 20 cm ou plus.
Pour satisfaire aux exigences de la FCC et IC de limite d’exposition
pour la population générale/incontrôlée, l’antenne utilisée avec cet
émetteur doit être installée à une distance de 20 cm ou plus de toute
personne et ne doit pas être co-utilisée ou fonctionner en même
temps qu’une autre antenne ou qu’un autre émetteur.
Déclaration de conformité d’Industrie Canada (IC)
Cet appareil satisfait aux prescriptions des documents CNR/RSS
d’Industrie Canada (utilisation sans licence). Le bon fonctionnement
de l’appareil est fonction de deux conditions :
1. Cet appareil ne doit pas produire de brouillage;
2. Cet appareil doit être compatible avec n’importe quelle
interférence, y compris des interférences susceptibles d’en
compromettre le fonctionnement.
En vertu des règlements d’Industrie Canada, cet émetteur radio
ne peut fonctionner qu’à l’aide d’une antenne d’un type et de
gain maximum (ou moins) approuvé pour l’émetteur par Industrie
Canada. Pour réduire les interférences radio potentielles pour les
autres utilisateurs, le type d’antenne et son gain doivent être choisis
de sorte que la puissance isotrope rayonnée équivalente (PIRE) ne
dépasse pas ce qui est nécessaire pour une communication réussie.
Le émetteurs radio IC : 10248A-WICHAM01 et 10248A-FLDAAM01
ont été approuvés par Industrie Canada pour fonctionner avec
les types d’antennes énumérés ci-dessous avec le gain maximal
admissible et l’impédance d’antenne requise pour chaque type
d’antenne indiqué. Les types d’antennes non inclus dans cette liste,
ayant un gain supérieur au gain maximum indiqué pour ce type, sont
strictement interdits pour une utilisation avec cet appareil.
Type d’antenne Gain admissible
maximal
d’antenne (dBi)
L’impédance
requise (OHM)
Encoche 1,2 50
Monopôle (WICHAM01
seulement)
0,5 50
Dipôle 3,0 50
F 1,60 50
Planaire F 4,2 50
Pour satisfaire aux exigences de la FCC et d’Industrie Canada sur
l’exposition aux radiations de radiodiffusion, les antennes utilisées
avec cet émetteur doivent être installées de telle sorte qu’il y ait une
distance de 20 cm ou plus séparant la source de radiation (antenne)
et toute personne en tout temps et ne doit pas être co-utilisée ou
fonctionner en même temps qu’une autre antenne ou qu’un autre
émetteur.
Responsabilités du FEO à satisfaire aux règlements de la
FCC et d’Industrie Canada.
Les modules WICHAM01/FLDAAM01 des produits sont certifiés
seulement si l’intégration par le FEO respecte les conditions
suivantes :
1. Les antennes doivent être installées de telle sorte qu’il y ait une
distance de 20 cm ou plus entre la radiation (antenne) et toutes
les personnes en tout temps.
2. L’émetteur ne doit pas être colocalisé en conjonction avec toute
autre antenne ou tout émetteur.
Aucune évaluation supplémentaire d’émission n’est requise si les
deux conditions précédentes sont respectées. Cependant, le FEO
intégrateur demeure responsable du contrôle de ses produits pour
répondre aux exigences supplémentaires concernant ce module (par
exemple, émissions d’appareils numériques, exigences périphériques
d’un ordinateur personnel, etc.).
REMARQUE IMPORTANTE : Lorsque ces conditions ne peuvent
être respectées (pour certaines configurations ou co-localisations
avec un autre émetteur), les autorisations de la FCC et d’Industrie
Canada ne sont plus considérées valides et les numéros de
certification ID et IC de la FCC ne peuvent pas être utilisés sur le
produit. Dans ces circonstances, le FEO intégrateur sera responsable
de réévaluer le produit (incluant l’émetteur) et d’obtenir une
autorisation séparée de la FCC et d’Industrie Canada.
Étiquette de produit
L’étiquette des modules WICHAM01/FLDAAM01 est munie des
numéros de certifications ID et IC de la FCC. Si les numéros de
certifications ID et IC de la FCC ne sont pas visibles lorsque le
module est installé dans un autre appareil, l’extérieur de l’appareil
dans lequel le module est installé doit aussi afficher une étiquette
de référence pour le module. Dans cette situation, le produit doit
posséder une étiquette visible contenant les renseignements
suivants :
“Contains FCC ID: A5UWICHAM01”
“Contains IC: 10248A-WICHAM01”
ou
“Contains FCC ID: A5UFLDAAM01”
“Contains IC: 10248A-FLDAAM01”
Le FEO des modules WICHAM01/FLDAAM01 ne doit utiliser que
les antennes approuvées et certifiées pour ces modules. Le FEO
intégrateur ne doit pas fournir les renseignements à l’utilisateur
final concernant l’installation et le démontage de ce module RF ou
les modifications de paramètres RF dans le guide d’utilisation du
produit final.
Le guide d’utilisation du produit doit comprendre les
renseignements suivants dans un endroit bien visible :
“Pour satisfaire aux exigences de la FCC et d’Industrie Canada sur
l’exposition aux radiations de radiodiffusion, les antennes utilisées
avec cet émetteur doivent être installées de telle sorte qu’il y ait une
distance de 20 cm ou plus séparant la source de radiation (antenne)
et toute personne en tout temps et ne doit pas être co-utilisée ou
fonctionner en même temps qu’une autre antenne ou qu’un autre
émetteur.”
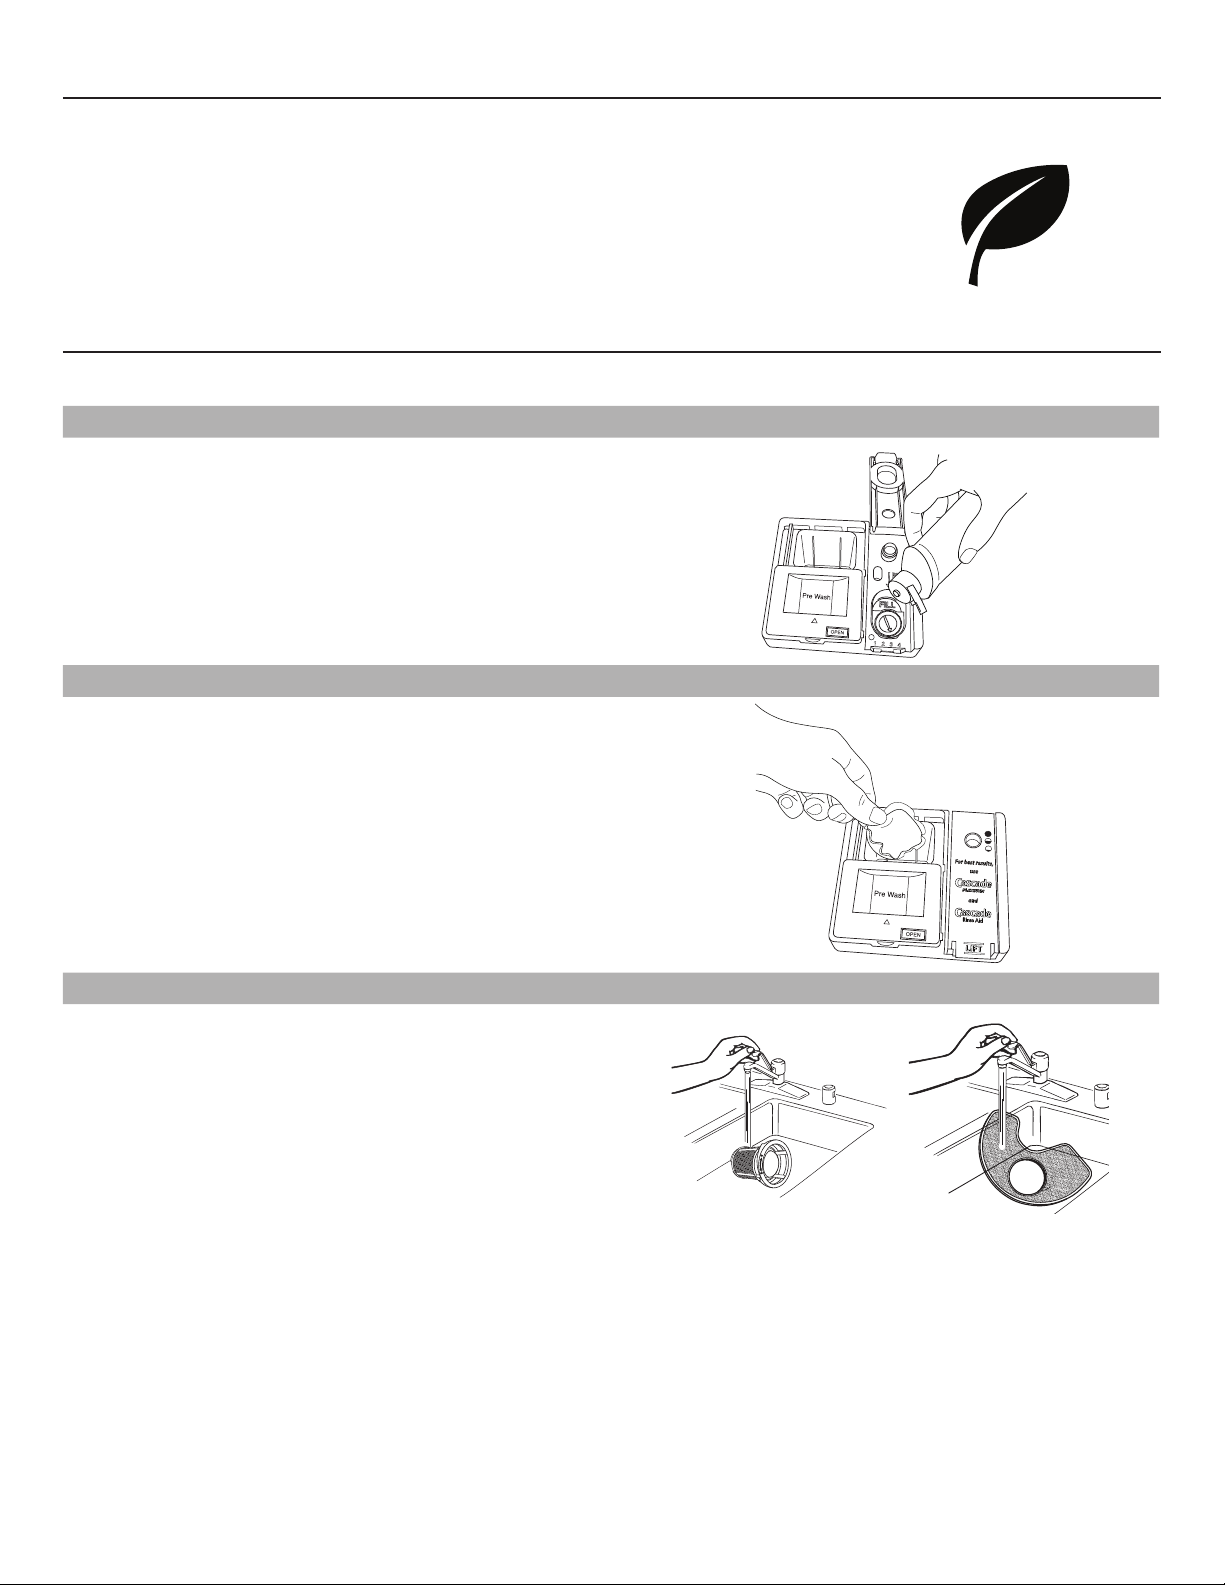
51
Quoi de neuf dans votre lave-vaisselle
Énergie
Félicitations pour l’achat de votre lave-vaisselle éconergique à faible consommation d’eau! Pour
nettoyer les articles, ce lave-vaisselle asperge la vaisselle d’eau, puis fait une pause pour permettre
au détergent d’imprégner et de dissoudre les saletés. Les périodes de trempage et de pause
prolongent la durée des programmes pour un nettoyage exceptionnel. Votre lave-vaisselle comporte
un capteur optique d’eau. Le capteur optique d’eau détermine le niveau de consommation d’eau
et d’énergie optimal pour une performance exceptionnelle. Les lave-vaisselle éconergiques
fonctionnent plus longtemps pour économiser de l’eau et de l’énergie, tout comme une vitesse de
conduite réduite permet d’économiser du carburant. Le calibrage du capteur optique entraînera
l’allongement du premier programme qui l’utilise.
Performance
Agent de rinçage
Utiliser un agent de rinçage pour une performance de lavage et de
séchage optimale. Afin d’améliorer la performance de séchage et
de limiter l’accumulation de dépôts d’eau dure, ce lave-vaisselle
est spécifiquement conçu pour être utilisé avec un agent de
rinçage. Les lave-vaisselle éconergiques consomment moins d’eau
et d’énergie. Ils dépendent donc de l’effet “nappe d’eau” d’un
agent de rinçage pour une performance optimale.
SLIDE
Détergent
Les États-Unis et le Canada ont voté une restriction limitant la
quantité de phosphore (phosphates) présent dans les détergents
domestiques pour lave-vaisselle. Suite à ce changement
concernant les détergents, les plus gros fabricants ont reformulé
leurs détergents pour lave-vaisselle, avançant ainsi encore plus
loin dans la conscience environnementale. En raison de ces
changements, nous recommandons d’employer des pastilles et
des sachets de qualité pour simplifier l’utilisation et obtenir une
meilleure performance.
SLIDE
Système de filtration
Ce lave-vaisselle est équipé de la plus récente technologie en
matière de filtration. Ce système de triple filtration minimise le
niveau sonore et optimise le niveau de consommation d’eau et
d’énergie tout en permettant un nettoyage optimal. Pour une
performance de nettoyage optimale, entretenir régulièrement
les filtres. Nous recommandons de nettoyer le filtre supérieur et
inférieur et de rincer le système sous le robinet au moins une fois
par mois.
P
U
S
H
D
O
W
N
&
T
U
R
N
L
O
C
K
U
N
L
O
C
K
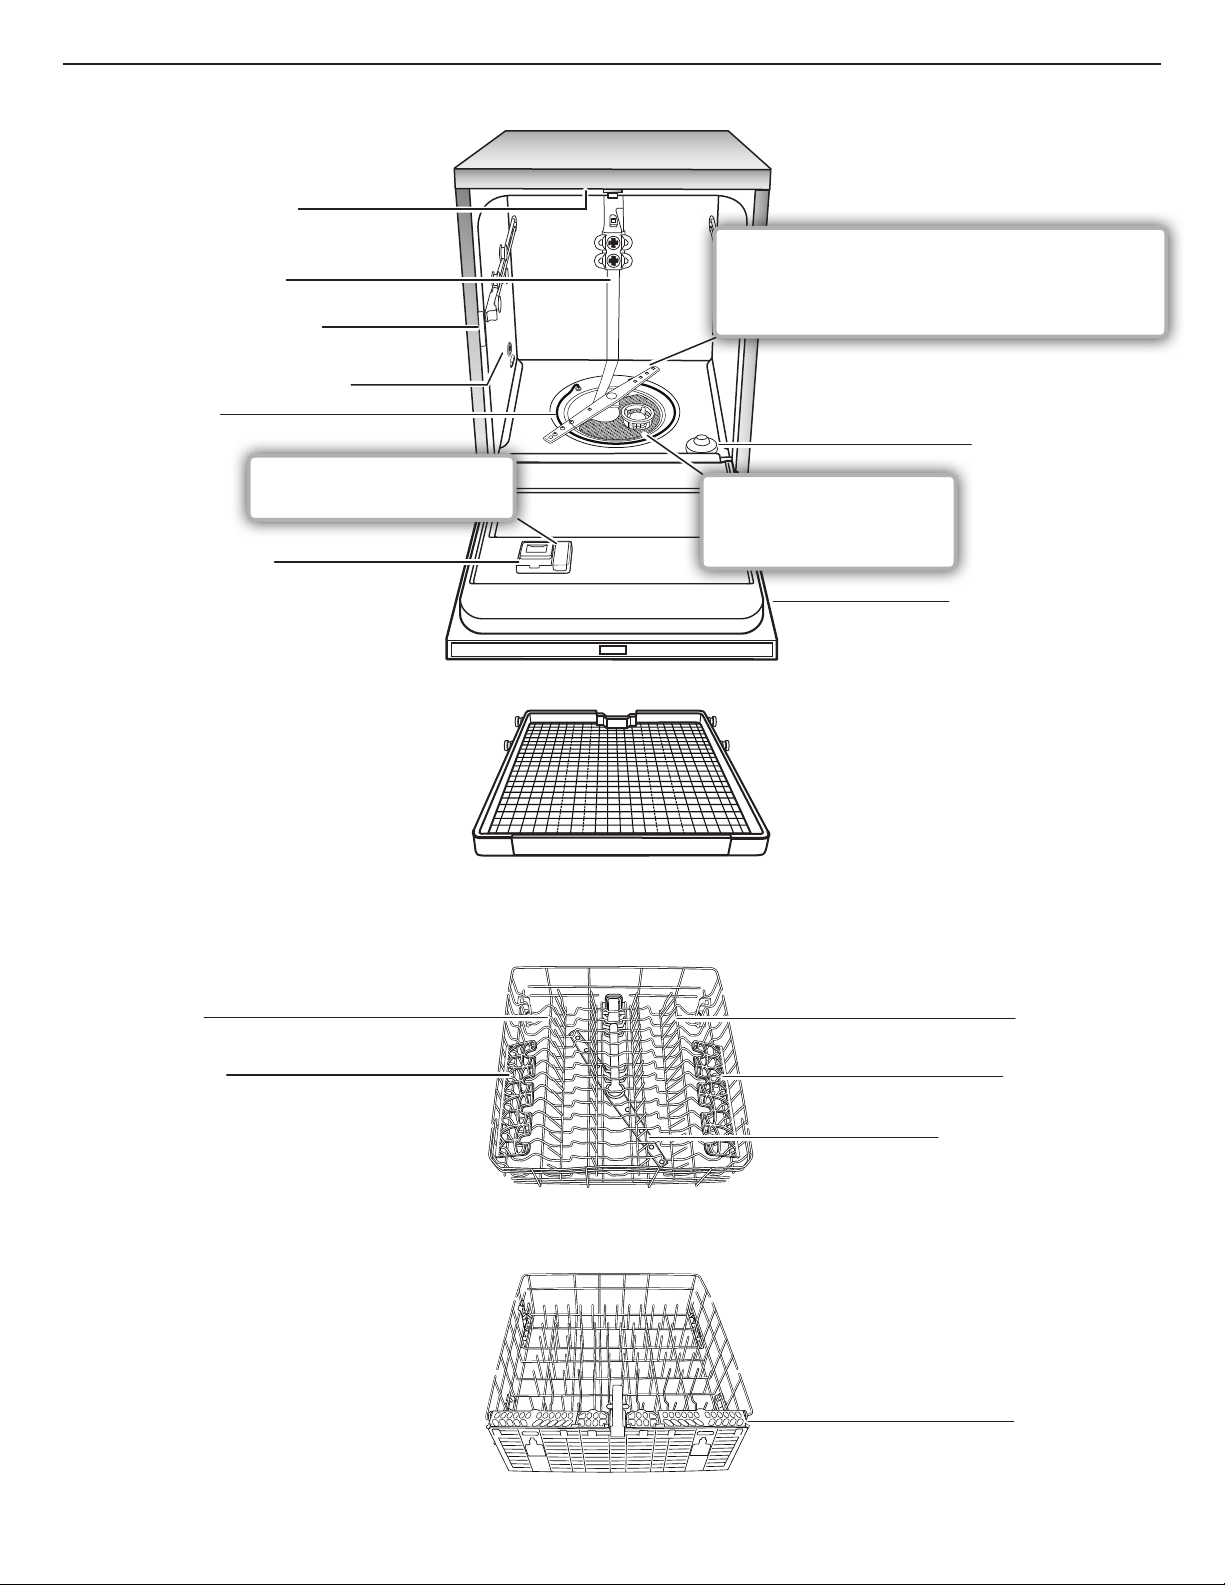
52
Pièces et caractéristiques
Lavage au niveau supérieur
Tube d’alimentation en eau
Plaque signalétique des
numéros de modèle et de série
Ouverture du tuyau d’arrivée d’eau
Distributeur de détergent
Élément chauffant
Tiges rabattables
Panier à couverts
Tablette pour tasse
Dispositif de protection
contre le débordement
PANIER INFÉRIEUR
PANIER SUPÉRIEUR
Tiges rabattables
Tablette pour tasse
(sur cetains modèles)
Bras d’aspersion supérieur
Le bras d’aspersion à couverture totale (sur certains
modèles) nettoie avec 2 fois plus de jets pour assurer
une grande couverture. Une séquence d’aspersion
plus intelligente projetée de plusieurs embouts atteint
la vaisselle pendant tout le programme.
PANIER DU TROISIÈME NIVEAU
(sur certains modèles)
Le distributeur d’agent de
rinçage réduit le risque de
taches et améliore le séchage.
Le système de lavage avec
préservation des ressources
élimine les saletés de l’eau
et améliore le nettoyage.
Numéros SAID et MAC ID

53
1
Retirer les gros morceaux d’aliments et charger
le lave-vaisselle.
Jeter les aliments en trop
dans la poubelle ou le
broyeur d’aliments.
Charger les articles
de manière à ce que
les jets d’eau atteignent
toutes les surfaces.
2
Ajouter le détergent et l’agent de rinçage.
SLIDE
SLIDE
3
Choisir un programme et des options
(varie selon le modèle).
4
Mettre en marche
le lave-vaisselle.
Pour démarrer ou poursuivre
un programme, appuyer sur
Start (mise en marche)
et fermer la porte dans les 4
secondes qui suivent. Si l’on
ne ferme pas la porte dans
les 4 secondes qui suivent, la
DEL du bouton Start clignote,
un signal sonore retentit et le
programme ne démarre pas.
5
Décharger le lave-
vaisselle et nettoyer
le filtre.
Voir “Intervalle recommandé
pour le nettoyage du filtre,”
dans la section “Système
de filtration de l’eau” pour
connaître la fréquence de
nettoyage recommandée.
Étapes rapides
Fonctions de connectivité
La connexion Wi-Fi permet au lave-vaisselle intelligent de se connecter à Internet et d’interagir avec l’application Whirlpool
®
sur votre
téléphone intelligent ou appareil mobile. Cette connexion ouvre plusieurs options intelligentes pour l’utilisateur. Les fonctions de
l’application peuvent changer. Les options décrites sont communes, mais peuvent changer. Consulter l’application Whirlpool
®
pour
connaître les plus récentes caractéristiques de connectivité.
FONCTIONS INTELLIGENTES
Les fonctions intelligentes aident à rendre la vie de tous les jours
plus simple en laissant la possibilité à l’utilisateur de surveiller,
gérer et entretenir son lave-vaisselle à distance. Votre lave-
vaisselle peut être muni de fonctions qui ne sont pas indiquées
ici. Consulter l’application pour obtenir une liste complète
des fonctions.
Activation à distance
Description : Permet d’utiliser son téléphone intelligent ou
appareil mobile comme télécommande à l’aide de l’application
Whirlpool
®
.
Avantages : Permet de gérer les temps de démarrage des
programmes du lave-vaisselle. Ainsi, l’utilisateur peut obtenir
de la vaisselle propre lorsqu’il en a besoin.
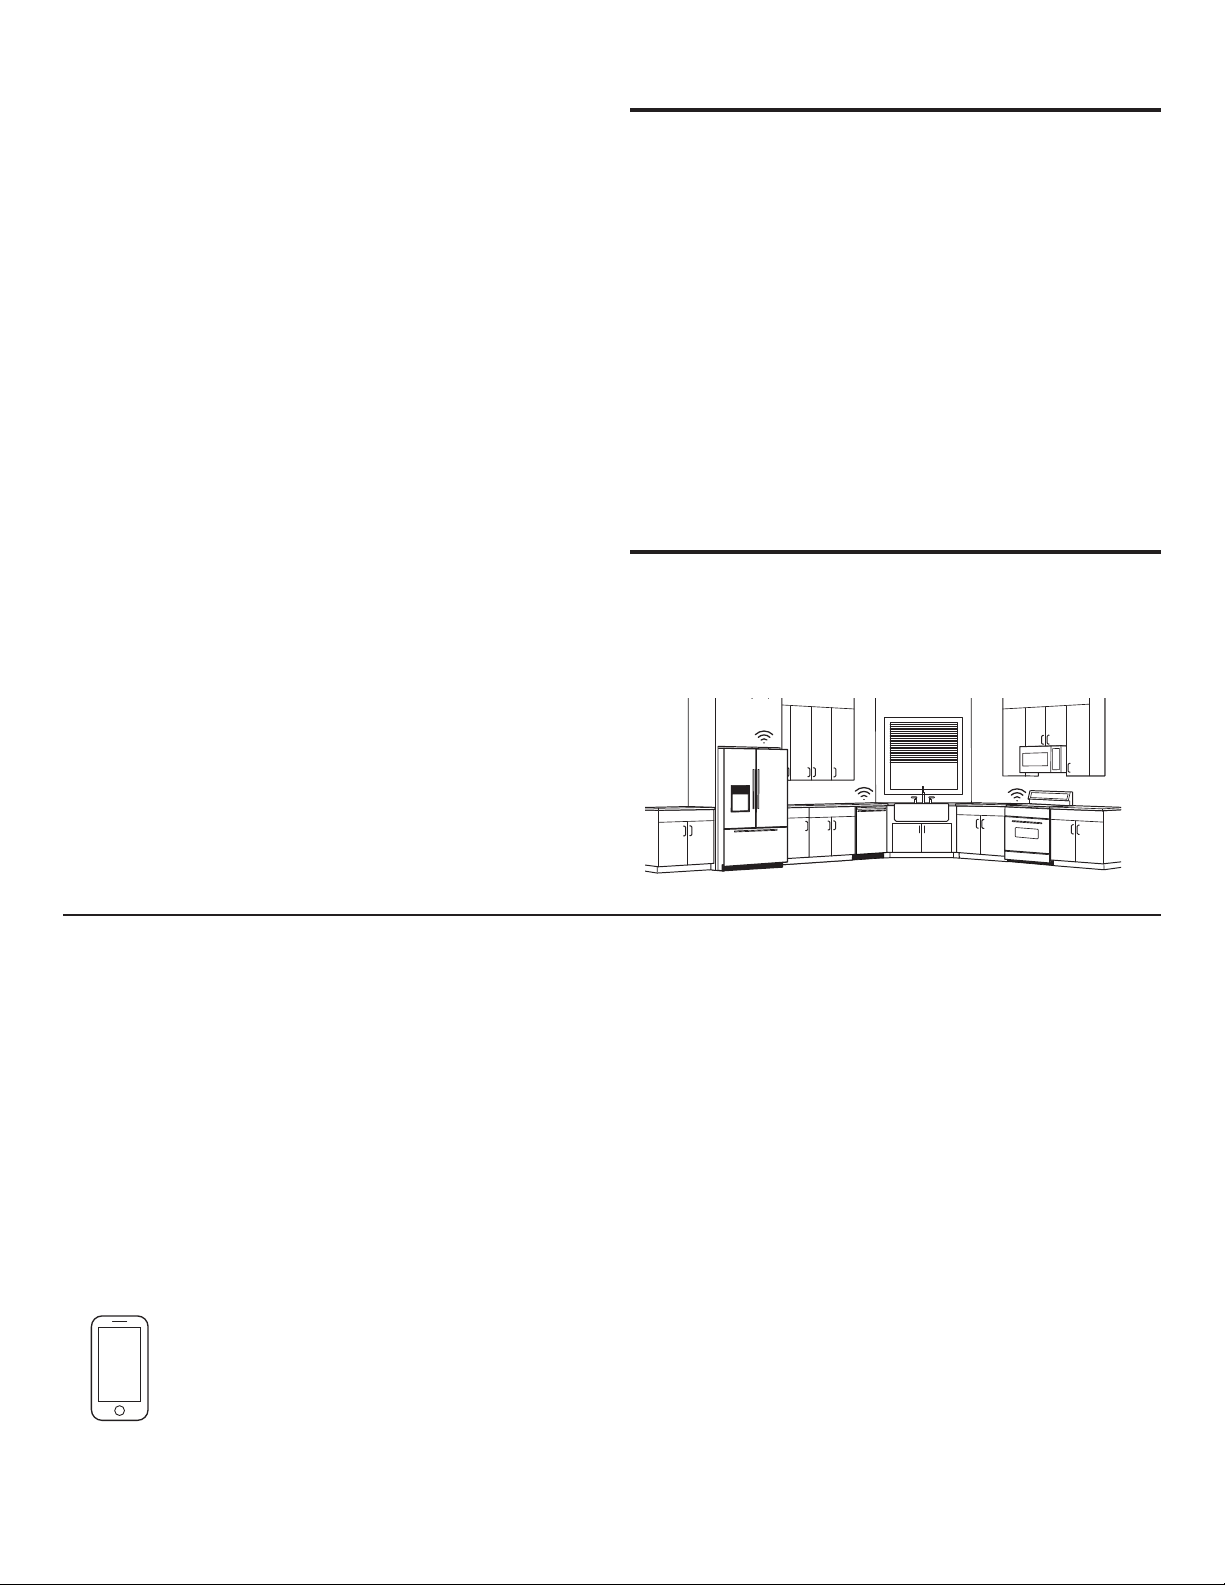
54
Progrès du programme
Description : Donne un aperçu de dernière minute du programme
en cours du lave-vaisselle.
Avantages : Permet de connaître la durée résiduelle du
programme en cours depuis n’importe où.
Notification de nettoyage (option d’adhésion)
Description : Le lave-vaisselle enverra une notification poussée.
Avantages : Avertit l’utilisateur précisément lorsque le
programme du lave-vaisselle est terminé afin de le décharger
et de s’occuper d’autres choses.
Programmes spéciaux et Mon programme
(sur certains modèles)
Description : Permet de parcourir les programmes supplémentaires
offerts pour le lave-vaisselle depuis l’application Whirlpool
®
et de
télécharger un programme sur le lave-vaisselle grâce à l’option
Download & Go™. Il est également possible de créer et d’enregistrer
ses propres programmes personnalisés.
Avantages : Permet de sélectionner les réglages qui vous
conviennent et de les sauvegarder pour les utiliser à plusieurs
reprises.
Mode Silence
Description : Permet de mettre au silence les signaux sonores
du lave-vaisselle.
Avantages : Le lave-vaisselle peut être mis en marche sans
déranger personne dans la maison.
Envoi des alertes (option d’adhésion)
Description : Une notification poussée est envoyée s’il
y a un problème.
Avantages : Avertit l’utilisateur à l’avance et lui donne des
indications sur la correction de problèmes simples grâce
à des vidéos et instructions étape par étape.
Si le problème est plus complexe, l’utilisateur peut envoyer
un courriel ou appeler le service à la clientèle depuis
l’application Whirlpool
®
.
Mode cachère facile d’utilisation
(application uniquement)
Description : Pendant ce mode, les commandes et témoins
lumineux ne fonctionnent pas et les lampes internes sont éteintes.
Avantages : Prépare le lave-vaisselle automatiquement pour
l’observance du Sabbat.
ÉCONERGÉTIQUE (sur certains modèles)
Le lave-vaisselle intelligent peut surveiller et répondre aux
changements de niveaux de demandes d’énergie du réseau
électrique.
Mise en marche différée intelligente
(option d’adhésion si disponible par l’intermédiaire
de la compagnie d’électricité locale)
Description : Lorsque la demande d’électricité est élevée, la mise
en marche différée intelligente peut retarder un programme du
lave-vaisselle jusqu’à ce que les niveaux de demande d’électricité
soient abaissés. Vous pouvez désactiver de façon permanente ou
remplacer la mise en marche différée intelligente.
Avantages : Réduit la consommation d’électricité du réseau
électrique local pendant les heures de pointe. Certains
consommateurs peuvent même voir une baisse sur leur facture
d’électricité.
S’il y a un besoin immédiat de commencer un programme de
lave-vaisselle, l’on peut remplacer une mise en marche différée.
Le lave-vaisselle retournera à la surveillance énergique au
prochain programme.
PREMIERS PAS
Se reporter à la section “Configuration de la connectivité” dans
le présent guide d’utilisation et suivre les instructions pour se
connecter.
Consulter régulièrement l’application Whirlpool
®
pour obtenir
des renseignements et des fonctions supplémentaires.
Configuration de la connectivité
Obtenez l’application et connectez-vous
À l’aide de votre appareil mobile, obtenez l’application, les instructions de configuration de la connexion,
les conditions d’utilisation et la politique de confidentialité au :
www.whirlpool.com/connect
Au Canada, visitez le
www.whirlpool.ca/fr_CA
et cliquez sur le lien Whirlpool
®
électroménager connecter
IMPORTANT : Il est de la responsabilité de l’utilisateur de bien installer l’appareil avant de l’utiliser. Bien lire et suivre le guide
d’installation qui accompagne l’appareil.
La connexion requiert un lien Internet et la création d’un compte. Les fonctions de l’application peuvent changer. Des frais de transfert
de données peuvent s’appliquer. En cas de problèmes ou pour toute question, communiquer avec l’équipe Whirlpool Corporation
Connected Appliances au 1 866 333-4591.
Il vous faudra :
MISE EN
PLACE
■ Un routeur sans fil compatible Wi-Fi à 2,4 GHz, si possible avec sécurité WPA2. Pour vérifier les capacités de votre
routeur, consulter le manuel d’instructions du fabricant du routeur.
■ Le routeur devra être en marche et connecté à Internet.
■ Le numéro SAID à 10 caractères de votre appareil. Le numéro SAID est imprimé sur une étiquette collée sur l’appareil
ou peut être affiché à l’écran DEL. Consulter le guide d’utilisation de l’appareil pour connaître l’emplacement.
Une fois installée, lancer l’application. Suiver les étapes de configuration du compte d’utilisateur et de connexion de l’appareil. En cas
de problèmes ou pour toute question, communiquer avec l’équipe Whirlpool Corporation Connected Appliances au 1 866 333-4591.
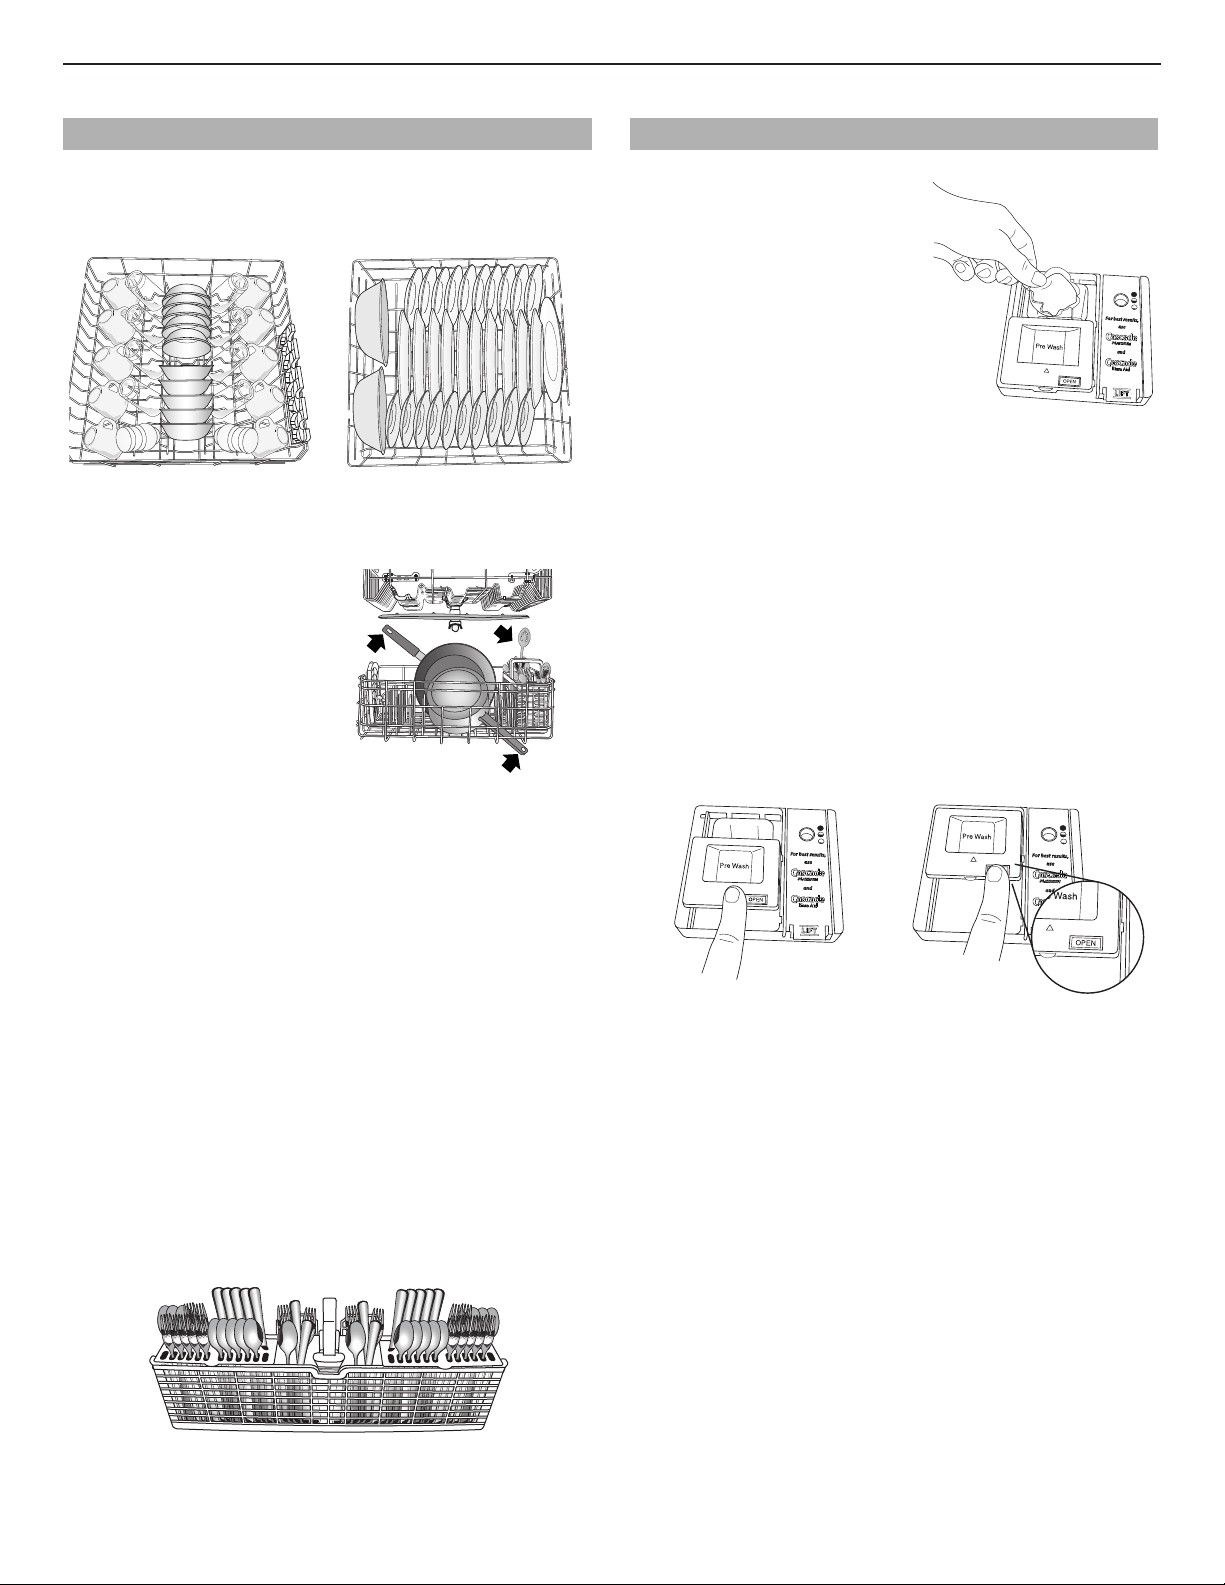
55
Utilisation du lave-vaisselle – Opération de base
ÉTAPE 1
Préparation et chargement du lave-vaisselle
IMPORTANT : Enlever de la vaisselle les restes alimentaires,
os, cure-dents et autres articles durs. Enlever les étiquettes
des récipients avant de les laver.
Panier supérieur Panier inférieur
■ S’assurer que rien n’entrave le mouvement des bras
d’aspersion inférieur ou supérieur.
Les articles du panier
peuvent entraver les
bras d’aspersion.
■ Vérifier qu’aucun article ne bloque le distributeur de détergent
lorsque la porte du lave-vaisselle est fermée.
■ Charger les articles très sales en orientant la surface sale vers
le bas et vers le jet d’aspersion. Ceci améliorera les résultats
de nettoyage et de séchage.
■ Éviter le chevauchement d’articles tels que bols ou assiettes
pouvant retenir les aliments.
■ Placer les articles de plastique, les petites assiettes et les
verres dans le panier supérieur. Ne laver des articles de
plastique au lave-vaisselle que s’ils sont identifiés comme
“ lavable au lave-vaisselle”.
■ Pour éviter les bruits de choc et d’entrechoque durant le
fonctionnement, charger les articles de manière à ce qu’ils
ne se touchent pas. S’assurer que les articles légers sont
bien retenus dans les paniers.
■ Pour le chargement des couverts, les articles pointus doivent
toujours être orientés vers le bas. Mélanger les articles dans
chaque section du panier, en orienter certains vers le haut
et d’autres vers le bas afin qu’ils ne s’imbriquent pas. Le jet
d’eau ne peut atteindre les articles imbriqués.
■ Utiliser les fentes des couvercles et les suggestions
de chargement pour séparer les couverts et obtenir
un lavage optimal.
PUSH
REMARQUE : la panier à couverts AnyWare™ peut être placé
dans l’intérieur de la porte, à l’avant du panier inférieur et à
l’intérieur du panier inférieur.
ÉTAPE 2
Ajout de détergent
Détergents prémesurés
SLIDE
Pour de meilleurs résultats, utiliser
des pastilles et des sachets
prémesurés de qualité supérieure.
Il est prouvé que les pastilles
ou sachets de qualité réduisent
plus efficacement la formation de
pellicule sur la vaisselle que les
détergents liquides, en poudre
ou en gel. Grâce à l’utilisation
régulière de pastilles et sachets,
la pellicule blanche commencera à
diminuer ou à disparaître. Ces formats conviennent parfaitement,
peu importe la dureté de l’eau et le niveau de saleté. L’utilisation
d’un agent de rinçage peut aussi contribuer à réduire la formation
de pellicule blanche (les pastilles et sachets ne contiennent
pas tous un agent de rinçage). Toujours placer les détergents
prémesurés dans le compartiment principal et faire glisser le
couvercle pour le fermer.
REMARQUE : Lors de l’utilisation d’un autre type de détergent,
procéder conformément aux instructions indiquées sur l’emballage.
■ Utiliser uniquement du détergent pour lave-vaisselle
automatique. Verser le détergent juste avant de démarrer
un programme.
■ Pour de meilleurs résultats de lavage, il est recommandé
d’utiliser un détergent à lave-vaisselle automatique frais.
Conserver le récipient du détergent bien fermé dans un
lieu sec et frais.
Fermeture du couvercle Ouverture du couvercle
SLIDE
SLIDE
Verser le détergent sélectionné
dans le distributeur. Placer
son doigt, comme illustré, et
faire glisser le couvercle pour
le fermer. Appuyer fermement
jusqu’à ce qu’un déclic se
fasse entendre.
Appuyer sur OPEN (ouverture),
comme illustré, pour ouvrir
le couvercle.
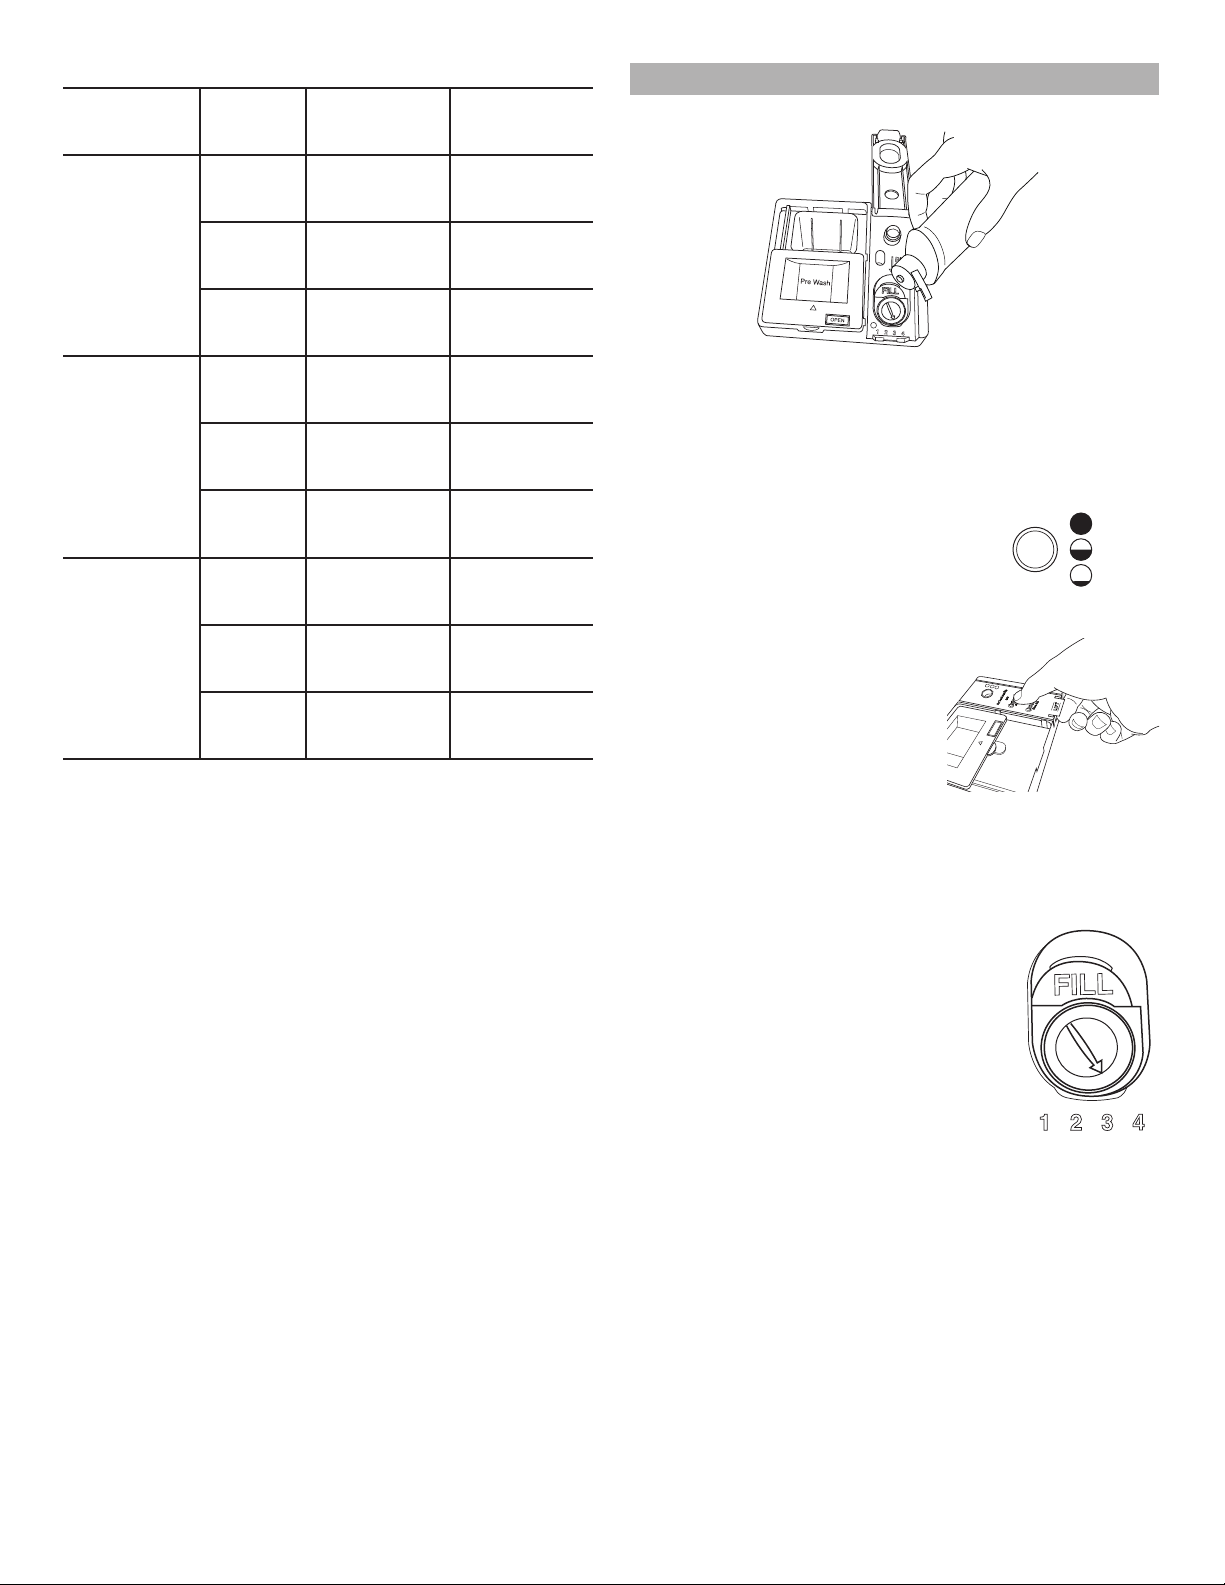
56
Produits sous forme de poudre ou de gel
Dureté de
l’eau
Niveau de
saleté
Compartiment
de prélavage*
Compartiment
de lavage
principal
Eau douce
(0 à 4 grains
par gallon
américain)
Léger Aucun Ligne de
remplissage
“Soft”
Normal Aucun Ligne de
remplissage
“Soft”
Intense Remplir à sa
pleine capacité
Ligne de
remplissage
“Soft”
Moyen
(5 à 9 grains
par gallon
américain)
Léger Aucun Ligne de
remplissage
“Soft”
Normal Remplir à sa
pleine capacité
Remplir à
sa pleine
capacité**
Intense Remplir à sa
pleine capacité
Remplir à
sa pleine
capacité**
Eau dure
(10 à 14
grains
par gallon
américain)
Léger Remplir à sa
pleine capacité
Remplir à
sa pleine
capacité**
Normal Remplir à sa
pleine capacité
Remplir à
sa pleine
capacité**
Intense Remplir à sa
pleine capacité
Remplir à
sa pleine
capacité**
*Le compartiment de prélavage est situé sur le dessus de la
porte coulissante du distributeur.
**Un compartiment de lavage principal rempli contient 2 cuillerées
à soupe (30 ml).
IMPORTANT : Les dépôts minéraux provenant d’une eau
très dure (au moins 15 grains par gallon américain) peuvent
endommager le lave-vaisselle et rendre un bon nettoyage difficile.
On recommande l’emploi d’un adoucisseur d’eau pour éviter tout
dommage et obtenir de bons résultats.
REMARQUE : Lors de l’utilisation d’un autre type de détergent,
procéder conformément aux instructions indiquées sur l’emballage.
ÉTAPE 3
Agent de rinçage
SLIDE
IMPORTANT : Le lave-vaisselle est conçu pour utiliser un agent
de rinçage. L’utilisation d’agents de rinçage améliore nettement
le séchage en permettant à l’eau de s’écouler de la vaisselle
après le rinçage final. Un agent de rinçage empêche aussi l’eau
de former des gouttelettes qui peuvent laisser des taches ou des
coulées en séchant.
Remplissage du distributeur
Plein
Ajouter
La capacité du distributeur d’agent de
rinçage est de 5 oz (150 ml). Dans la plupart
des cas, cette quantité devrait durer environ
1 à 3 mois.
REMARQUE : La jauge indique le niveau de
remplissage correct lorsque la porte est complètement ouverte.
1.
Pre Wash
OPEN
SLIDE
Pour ajouter de l’agent de rinçage,
ouvrir le distributeur d’agent de
rinçage en appuyant doucement
sur le centre du couvercle avec
le pouce, et en tirant sur le bord.
2. Verser l’agent de rinçage dans
l’ouverture jusqu’à ce que le
distributeur soit plein. Ne pas
remplir excessivement.
3. Nettoyer les éventuelles coulées d’agent de rinçage. Des
coulées d’agent de rinçage peuvent entraîner une production
excessive de mousse.
4. Fermer ensuite le distributeur en appuyant doucement sur
le couvercle.
Réglage de la quantité d’agent de rinçage
Le distributeur d’agent de rinçage est
réglable. Pour la plupart des types d’eau,
le réglage effectué à l’usine donne de bons
résultats. Si l’eau utilisée est dure et si l’on
observe des dépôts calcaires sur la vaisselle,
essayer un réglage plus élevé. Si l’on
remarque de la mousse dans le lave-vaisselle,
utiliser un réglage inférieur.
Réglage de la quantité
Tourner le régleur à flèche sur un chiffre
plus élevé pour ajouter davantage d’agent
de rinçage.
57
ÉTAPE 4
Sélectionner un programme (varie selon le modèle)
Les lave-vaisselle éconergiques fonctionnent plus longtemps
pour économiser de l’eau et de l’énergie, tout comme une
vitesse de conduite réduite permet d’économiser du carburant.
La durée des programmes peut augmenter ou diminuer en
fonction des sélections. Une estimation des durées des
programmes après calibration est énumérée dans le tableau
des “Programmes” de la section “Descriptions des programmes
et options”.
Sélectionner le programme désiré en appuyant sur un bouton
de programme.
Sélection des options (varie selon le modèle)
Consulter le tableau des “Options” de la section “Descriptions
des programmes et options”.
Il est possible de personnaliser les programmes en sélectionnant
les options désirées.
ÉTAPE 5
Démarrer ou reprendre un programme
■ Au besoin, laisser couler l’eau du robinet le plus proche
du lave-vaisselle jusqu’à ce qu’elle soit chaude. Fermer
le robinet.
■ Pour de meilleurs résultats de lavage, l’eau doit être à
120 °F (49 °C) à son entrée dans le lave-vaisselle.
■ Choisir le programme et les options de
lavage désirés. Pour utiliser de nouveau les
options et le programme du lavage
précédent, appuyer deux fois sur Start/
Resume (mise en marche/reprise). Fermer
la porte fermement dans les 4 secondes qui
suivent l'appuie sur Start/Resume. Si la
porte n'est pas fermée dans les 4 secondes
qui suivent, la DEL du bouton de mise en
marche clignote, un signal sonore retentit et
le programme ne démarre pas.
■ Il est possible d’ajouter de la vaisselle au début d’un
programme. Ouvrir lentement la porte et ajouter l’article.
Appuyer sur la touche Start/Resume et fermer la porte
fermement dans les 4 secondes. SI la porte n’est pas fermée
dans les 4 secondes qui suivent, la DEL clignote, un signal
sonore retentit et le programme ne redémarre pas, sauf si l’on
appuie de nouveau sur Start/Resume.
IMPORTANT : Si la porte est ouverte après la mise en marche
d’un programme (même pendant le fonctionnement de l’option
Delay Hours [mise en marche différée en heures]), il faudra
appuyer sur le bouton Start/Resume (mise en marche/reprise)
à nouveau.
Utilisation du lave-vaisselle – Opération intelligente
REMARQUE : Après avoir réussi la « Configuration de la connectabilité », les fonctions suivantes sont activées. Vérifier que l’icône
d’état de connexion sans fil et que l’icône Maison orange ou l’icône Maison bleue sont allumées. Vérifier l’application Whirlpool
®
pour
les fonctions de lave-vaisselle supplémentaires, y compris l’activation à distance (B).
u
q
u
q
u
q
u
q
Icône Connexion
sans fil
Icône Activation
à distance
Icône Maison orange
(tarifs d’électricité
de pointe)
Icône Maison bleue
(tarifs d’électricité
normaux)
Définir une activation à distance
Connexion Wi-Fi et création d’un compte requis. Les fonctions
de l’application peuvent changer. Assujetti aux conditions
décrites au : www.whirlpool.com/connect. Un taux de
transfert de données peut s’appliquer. Au Canada, visiter
le www.whirlpool.ca/fr_CA et cliquer sur le lien Whirlpool
®
électroménager connecter.
u
q
Activation à distance
Le mode d’activation à distance permet de mettre en marche le
lave-vaisselle à distance à partir de l’application Whirlpool
®
.
Après avoir chargé le lave-vaisselle et sélectionné les réglages
de programme, appuyer et maintenir enfoncer le bouton
DOWNLOAD & GO pendant 3 secondes. L’icône d’état
d’activation à distance sera allumée en continu.
Lorsqu’une commande de démarrage à distance est reçue de
l’application, le lave-vaisselle mettra en marche le programme.
L’icône Activation à distance restera allumée.
REMARQUE : Si aucune connexion Wi-Fi est disponible,
l’activation à distance ne sera pas définie et l’icône de connexion
sans fil clignotera pendant 2 secondes, puis s’éteindra.
CONSEIL UTILE : S’assurer que la porte du lave-vaisselle reste
fermée et que le programme n’est pas modifié avant de mettre
en marche le programme. Ouvrir la porte après qu’une Activation
à distance a été définie, annulera l’Activation à distance.
L’activation à distance devra être réinitialisée.
Progrès du programme
Le suivi du progrès du programme vous permet de surveiller à
distance le lave-vaisselle et de savoir lorsque le programme se
termine. Ouvrir l’application et sélectionner LAVE-VAISSELLE.
L’état du programme est affiché dans l’application.
Sélectionner ou désélectionner les notifications poussées
Les notifications poussées vous permettent de choisir les
événements à signaler. Ouvrir l’application et sélectionner
LAVE-VAISSELLE, puis PRÉFÉRENCES. Activer les notifications
poussées désirées.
58
Télécharger un Programme spécial ou Mon programme
La fonction Download & Go™ permet de sélectionner un
programme spécial ou l’on peut concevoir son propre programme
depuis l’application Whirlpool
®
et l’envoyer à son lave-vaisselle.
Lorsque le lave-vaisselle reçoit le programme, la DEL de
Download & Go s’allume pendant quelques minutes pour indiquer
que le programme a été reçu. Lorsque l’on souhaite utiliser ce
programme, appuyer sur DOWNLOAD & GO pour sélectionner
le programme, tout comme la sélection de n’importe quel autre
programme. Appuyer sur le bouton marche/reprise et refermer
la porte dans les 4 secondes pour lancer le programme.
CONSEIL UTILE : Le lave-vaisselle garde en mémoire ce
programme pour une utilisation ultérieure jusqu’à ce qu’un
programme différent est téléchargé sur le lave-vaisselle.
REMARQUE : Si on appuie sur le bouton Download & Go sans
qu’un programme soit prêt pour la sélection, la DEL clignote
et l’on entendra un son pour indiquer que “la commande est
invalide” (si les sons d’activation des boutons sont activés).
Lorsqu’une commande de démarrage à distance est reçue de
l’application, le lave-vaisselle mettra en marche le programme.
L’icône Activation à distance restera allumée.
Activer le mode silencieux
Activer le mode silencieux permet de désactiver des tonalités
du lave-vaisselle comme le signal de fin de programme. Ouvrir
l’application et sélectionner MODE SILENCIEUX.
Alarmes de problèmes
Les alarmes de problèmes vous envoient des messages textes
lorsqu’une situation requiert votre attention et offre des conseils
au sujet de ce qui doit être fait. Il est possible de désactiver cette
fonction à partir de l’application en accédant à la page de détails
de l’application, en sélectionnant l’option de préférence et en
fermant toutes les notifications, puis en touchant le bouton de
sauvegarde situé en haut à droite.
Active le mode cachère
Le mode cachère permet de configurer automatiquement le
lave-vaisselle pour l’observance du Sabbat. Ouvrir l’application,
sélectionner LAVE-VAISSELLE, pour activer le mode SABBAT.
Le lave-vaisselle continu de fonctionner en mode Sabbat, au
même moment chaque semaine, jusqu’à ce qu’il soit désactivé.
Mise en marche différée intelligente
(option d’adhésion par l’intermédiaire de
l’application Whirlpool
®
et lorsque pris en
charge par le fournisseur d’électricité)
Pendant les heures des tarifs d’électricité de pointe (dans le
cas d’option d’adhésion), l’icône de mise en marche différée
intelligente apparaît. Lorsque ceci a lieu, le lave-vaisselle retarde
la mise en marche selon les choix d’option d’adhésion pour aider
à réduire la consommation d’électricité pendant les heures de
pointe. Le lave-vaisselle se remet en marche automatiquement
lorsque les heures de pointe sont passées et que la demande
d’électricité est moins élevée. La mise en marche différée
intelligente peut être annulée par l’intermédiaire de l’application.
u
q
59
Description des programmes et options
Les durées maximales de lavage dépendent de la température de l’eau, du degré de saleté, de la taille de la charge de vaisselle, ainsi
que des options sélectionnées. On peut personnaliser chaque programme en sélectionnant une option.
Voir les sélections d’options. En cas de changement d’avis, appuyer sur cette option à nouveau pour la désactiver, ou sélectionner une
option différente. Il est possible de changer une option en tout temps avant que l’option choisie ne commence. À chaque étape du
programme de lavage, l’on peut entendre des bruits différents du lave-vaisselle précédent. Chaque programme effectue une série de
pauses et d’aspersions tout au long du programme de lavage - ceci est normal et permettra une performance de nettoyage optimale
SÉLECTION DU PROGRAMME
Ces renseignements s’appliquent à plusieurs modèles. Il est possible que votre lave-vaisselle ne soit pas muni de tous les programmes
et toutes les options.
IMPORTANT : Le capteur incorporé au lave-vaisselle contrôle le degré de saleté. La durée du programme et la consommation d’eau
peuvent varier selon les ajustements effectués au programme par le détecteur, afin d’assurer une performance de lavage optimale.
Si la température de l’eau d’arrivée est inférieure à celle recommandée ou que la vaisselle est très sale, le programme compense
automatiquement en allongeant la durée du programme et en augmentant la quantité d’eau et le niveau de chaleur,
au besoin.
PROGRAMMES DURÉE DE
LAVAGE
ESTIMÉE
SANS
OPTIONS
(HH:MM)
CONSOM-
MATION
D’EAU EN
GALLONS
(LITRES)
Ce programme détecte la taille de la charge, la quantité et le degré de saleté
pour adapter le programme à ces paramètres et garantir un nettoyage
amélioré en utilisant uniquement la quantité d’eau et d’énergie nécessaire.
Le programme avec capteur est automatiquement sélectionné lorsqu’on
appui sur le bouton de démarrage en premier.*
2:10 à 3:15 3,38 à 7,4
(12,8 à 28,0)
Utiliser ce programme pour les casseroles, les poêles, les cocottes et la
vaisselle ordinaire difficiles à nettoyer et très sales.
2:45 à 3:25 7,4 (28,1)
Ce programme est recommandé lors d’une utilisation quotidienne ou
régulière pour laver et sécher une pleine charge de vaisselle normalement
sale. La certification énergétique gouvernementale de ce lave-vaisselle
est basée sur le programme normal avec seulement l’option Heated Dry
(séchage avec chaleur).**
2:00 à 3:10 2,4 à 7,4
(9,09 à 28)
Pour des résultats rapides, le lavage en 1 heure nettoie la vaisselle en utilisant
légèrement plus d’eau et d’énergie. Pour obtenir une performance de séchage
optimale, sélectionner l’option Heat Dry (séchage avec chaleur).
0:55 à 1:05 7,87 (29,8)
Ce programme silencieux trempe la vaisselle lors d’un prélavage. Il ne
nécessite pas un trempage manuel préalable, pour un gain de temps et
d’efforts. Pour de meilleurs résultats de nettoyage, ajouter du détergent
de prélavage au cours du programme Soak & Clean (trempage et nettoyage).
Utiliser ce programme pour des charges comportant des taches difficiles à
nettoyer ou des résidus ayant adhéré pendant la cuisson.
6:45 à 7:25 7,4 (28,0)
L'option Download & Go™ permet de sélectionner et d'envoyer un
Programme spécial ou Mon programme de l'application Whirlpool™
directement au lave-vaisselle. Le lave-vaisselle garde en mémoire ce
programme pour une utilisation ultérieure jusqu'à ce qu'un programme
différent soit téléchargé sur le lave-vaisselle. L’affichage Durée/Statut
indique la durée résiduelle estimée du programme.
Variable 2,4 à 7,4
(9,09 à 29,8)
*La certification énergétique gouvernementale est basée sur ce programme. Consulter la description du programme normal pour utiliser
la certification énergétique gouvernementale. Utiliser le programme avec capteur peut augmenter la consommation d’énergie.
**Aucune autre option de température de lavage et de séchage n’a été sélectionné et les évaluations n’ont pas été tronquées. Aucun
agent de rinçage n’a été utilisé et aucun détergent pendant le prélavage.

60
SÉLECTION D’OPTIONS
OPTIONS PEUT ÊTRE
SÉLECTIONNÉ
AVEC
DESCRIPTION DURÉE
SUPPLÉ-
MENTAIRE
DU PRO-
GRAMME
GALLONS
D’EAU
SUPPLÉ-
MENTAIRES
(LITRES)
(varie selon
le modèle)
Diffère le fonctionnement du lave-vaisselle.
Choisir un programme de lavage et des
options. À chaque pression du bouton
Delay (mise en marche différée), le
démarrage différé suivant apparaît sur
l’afficheur. Appuyer sur Delay (mise en
marche différée). Appuyer sur START/
RESUME (mise en marche/reprise).
Bien fermer la porte.
REMARQUES :
■ Le lave-vaisselle garde en mémoire
la dernière mise en marche différée
sélectionnée. Pour réinitialiser et
changer l’heure de mise en marche
différée affichée, continuer d’appuyer
sur le bouton Delay (mise en marche
différée) jusqu’à ce que l’heure de
mise en marche différée souhaitée
soit atteinte.
■ Chaque fois que l’on ouvre la porte
(pour ajouter un plat, par exemple),
il faut rappuyer sur le bouton Start/
Resume (mise en marche/reprise) pour
que le compte à rebours reprenne.
Disponible
pour tous les
programmes
Diffère le
démarrage
d’un programme
jusqu’à 24 heures.
N.D. N.D.
Augmente la température du lavage
principal pour améliorer le nettoyage
des charges comportant des résidus
alimentaires cuits ou très adhérents.
Sensor
Heavy
Normal
Soak & Clean
Fait passer la
température du
lavage principal
à 135 °F (57 °C).
0:05 à 0:13 0 à 3,86
(0 à 14,6)
Sèche la vaisselle à l’air chaud. Cette
option, associée à un agent de rinçage,
offrira la meilleure performance de séchage.
Les articles en plastique sont moins
susceptibles de se déformer si on les place
dans le panier à vaisselle supérieur. Utiliser
Heat Dry (séchage à chaleur élevée) pour
une performance de séchage optimale,
désactiver l’option Heat Dry (séchage avec
chaleur) pour un séchage à l’air.
Heat Dry (séchage à chaleur élevée)
augmente la durée de séchage
lorsqu’activée. Cette option, jumelée à un
agent de rinçage, offre une performance de
séchage supérieure.
Sensor
Heavy
Normal
Soak & Clean
Utilise l’élément
de chauffage
pour accélérer
la durée de
séchage.
L’option Heat
Dry (séchage
avec chaleur)
est activée par
défaut lorsqu’un
programme est
sélectionné
(à l’exception
de 1-Hour
Wash [lavage
en 1 heure]).
0:08 à 0:46 0
61
OPTIONS PEUT ÊTRE
SÉLECTIONNÉ
AVEC
DESCRIPTION DURÉE
SUPPLÉ-
MENTAIRE
DU PRO-
GRAMME
GALLONS
D’EAU
SUPPLÉ-
MENTAIRES
(LITRES)
(La position
du témoin
“Assainissement”
varie selon le
modèle)
Assainit la vaisselle et la verrerie
conformément à la norme internationale
NSF/ANSI 184 pour lave-vaisselle à usage
domestique. Les lave-vaisselle à usage
domestique certifiés ne sont pas destinés
aux établissements de restauration agréés.
Seuls les programmes d’assainissement ont
été conçus pour répondre aux exigences de
la norme NSF/ANSI 184 pour l’élimination de
la saleté et l’efficacité de l’assainissement.
Tous les programmes d’un lave-vaisselle
homologué NSF/ANSI 184 n’ont pas été
conçus dans l’objectif direct ou indirect de
répondre aux exigences de la norme NSF/
ANSI 184 pour l’élimination de la saleté et
l’efficacité de l’assainissement.
À la fin du programme, le témoin
d’assainissement s’allume. Si la charge n’est
pas bien assainie, le témoin clignote à la
fin du programme. Cette situation peut se
produire si le programme a été interrompu ou
si l’eau n’a pas atteint la température requise.
Le voyant s’éteint lorsqu’on ouvre et ferme
la porte ou que l’on appuie sur CANCEL
(annulation).
Sensor
Heavy
Normal
Fait passer la
température du
lavage principal
de 135 °F (57 °C)
et celle du
rinçage final de
156 °F (69 °C).
0:05 à 1:06 0 à 3,86
(0 à 14,6)
Évite l’utilisation involontaire du lave-vaisselle entre deux programmes ou des modifications de programmes
et d’options durant un programme.
Pour activer le verrouillage, appuyer sur CONTROL LOCK (verrouillage des commandes) pendant 3 secondes.
Le témoin de verrouillage des commandes s’allume durant un court instant pour indiquer que l’option est activée
et que tous les boutons sont désactivés. Lorsqu’on appuie sur une touche alors que le lave-vaisselle est verrouillé,
le témoin lumineux clignote 3 fois. Il est toujours possible d’ouvrir/de fermer la porte du lave-vaisselle lorsque les
commandes sont verrouillées.
Pour désactiver le verrouillage, appuyer sur CONTROL LOCK (verrouillage des commandes) pendant 3 secondes.
Le témoin lumineux s’éteint.
STATUT DES COMMANDES ET PROGRAMMES
Appuyer sur cette touche pour démarrer ou poursuivre un programme de lavage.
Si l’on ouvre la porte durant un programme ou si une panne de courant se produit, la DEL Start/Resume
(mise en marche/reprise) clignote. Le programme ne reprend pas avant que l’on ait appuyé sur le bouton
Start/Resume (mise en marche/reprise) et que la porte ait été fermée.
REMARQUE : Bien fermer la porte dans un délai de 4 secondes après avoir appuyé sur Start/Resume
(mise en marche/reprise) ou le lave-vaisselle ne démarre pas. Si l’on ne ferme pas la porte dans les
4 secondes qui suivent, la DEL Start/Resume clignote et un signal sonore retentit lorsque la porte
est fermée.
Appuyer sur cette touche pour annuler le programme de lavage.
Bien fermer la porte. Le lave-vaisselle commence une vidange de 2 minutes (au besoin). Laisser le lave-
vaisselle évacuer l’eau complètement.
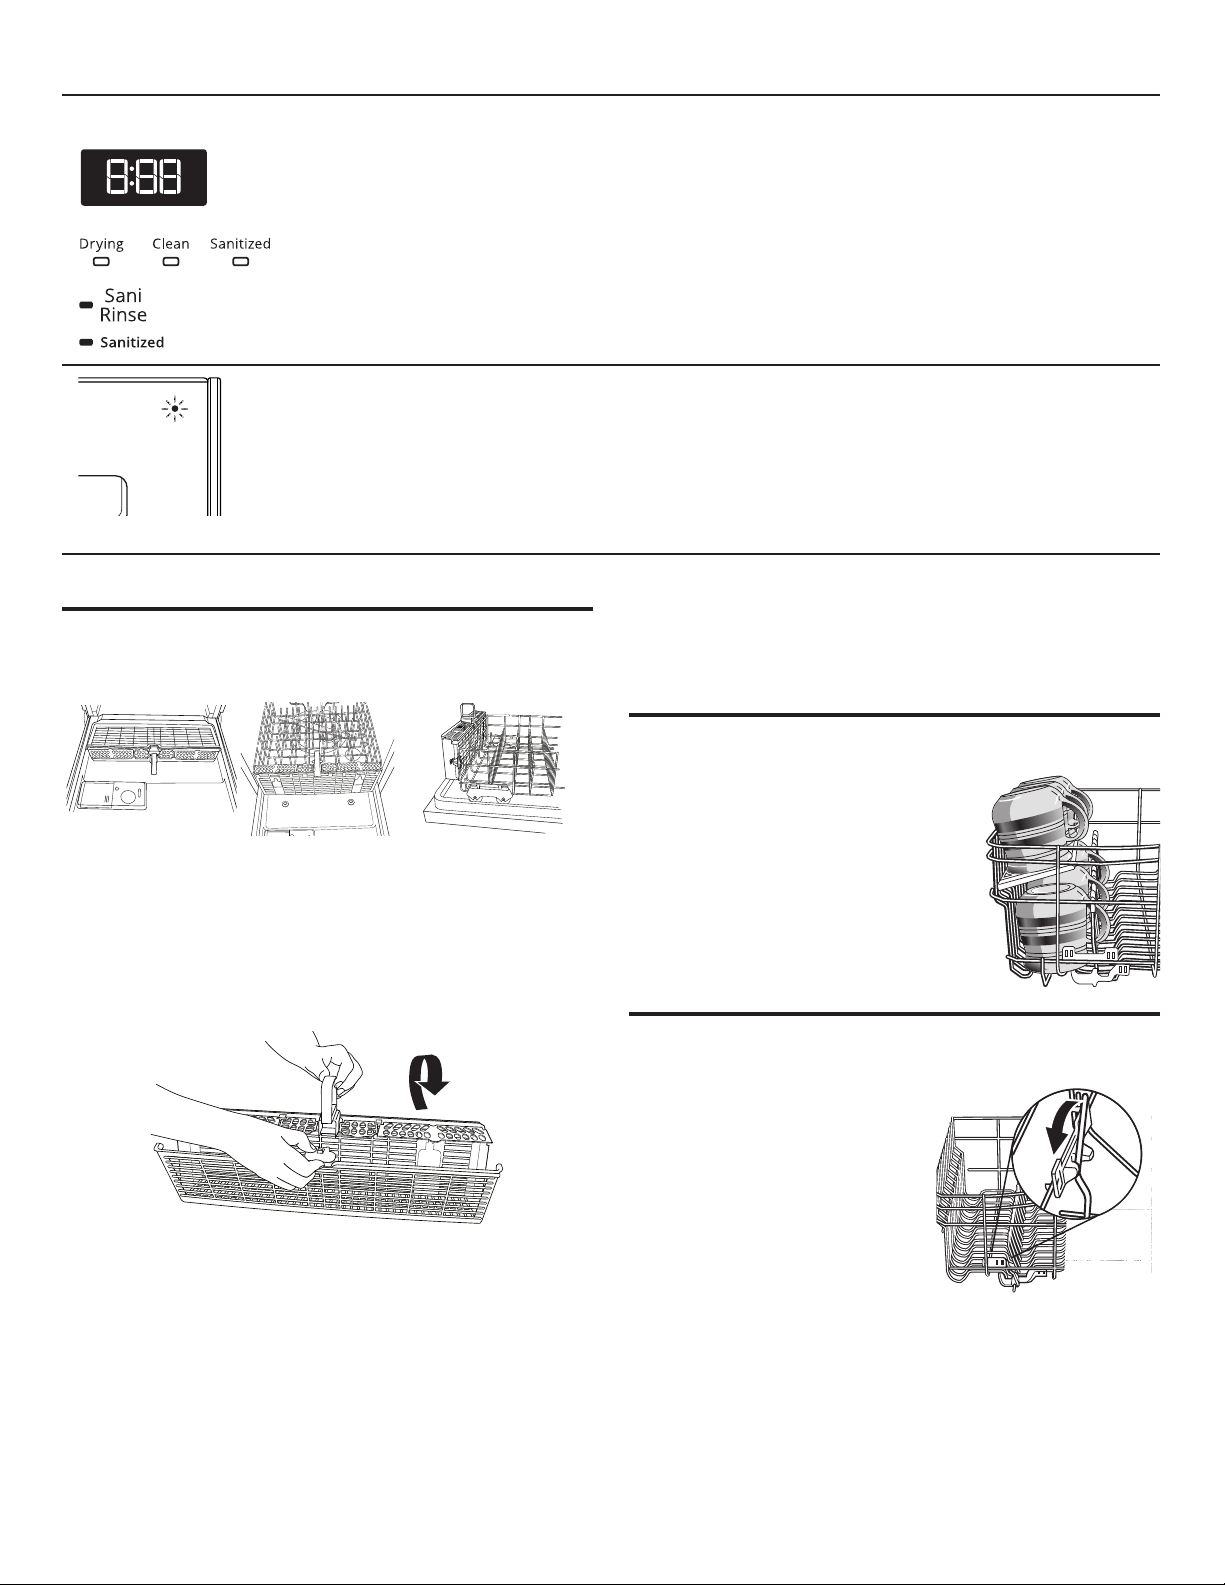
62
STATUT DES COMMANDES ET PROGRAMMES
L’affichage varie
selon le modèle.
L’affichage permet de suivre l’évolution d’un programme du lave-vaisselle.
Les modèles avec un affichage numérique comptent à rebours lorsque le programme est en marche.
Si la porte est ouverte pour permettre de voir l’affichage, il faut appuyer de nouveau sur le bouton
Start/Resume (mise en marche/reprise) dans les 4 secondes suivant la fermeture de la porte pour
reprendre le programme.
Les modèles sans affichage numérique sont munis de témoins qui s’illuminent pour indiquer le lavage,
le séchage et lorsque la vaisselle est propre et assainie.
Lorsque l’on sélectionne l’option Sani Rinse (rinçage avec assainissement), le témoin “Sanitized”
(assainissement) s’allume dès que le programme est terminé. Si le lave-vaisselle n’a pas bien assaini la
vaisselle, le témoin clignote à la fin du programme. Ceci peut se produire si le programme a été interrompu
ou si l’eau n’a pas pu être suffisamment chauffée pour atteindre la température requise. Le témoin s’éteint
lorsqu’on ouvre et ferme la porte ou que l’on appuie sur Cancel (annulation).
Un témoin lumineux situé à l’avant du panneau de porte s’allume en bleu pendant le lavage, rouge pendant
le séchage et blanc lorsque le programme est terminé.
Caractéristiques du lave-vaisselle
Panier à couverts AnyWare™
Le panier à couverts AnyWare™ peut être suspendu à la porte,
au panier inférieur ou placé à l’intérieur du panier inférieur.
Position sur la porte Position sur
le panier
Position sur le
côté du panier
Pour ouvrir le panier à couverts AnyWare™ :
Pour le déverrouiller, saisir le panneau avant, le tirer vers le haut
et le faire pivoter à 90° tel qu’illustré. S’assurer que le panneau
avant est complètement redressé avant de le faire pivoter.
Pour déverrouiller et faire pivoter le panneau avant, le saisir tel
qu’indiqué et le tirer vers le haut, puis le dégager.
PUSH
REMARQUE : Veiller à ce que la partie avant du panier à couverts
soit bien enclenchée avant de retirer du panier inférieur et avant
de fermer la porte du lave-vaisselle.
Pour sortir le panier de la porte :
1. Saisir le panier à couverts par la poignée. Le faire glisser vers
la partie supérieure de la porte.
2. Soulever le panier pour le dégager des boutons de retenue.
Pour réinstaller le panier dans la porte :
1. Fixer le panier à couverts sur les boutons de retenue.
2. Faire glisser le panier vers la partie inférieure de la porte
jusqu’à ce qu’il s’enclenche en place.
Tablettes d’appoint pour tasses
Rabattre la tablette d’appoint du côté
gauche ou droit du panier pour y placer
des tasses, verres à pied ou articles longs
supplémentaires tels que des ustensiles
et des spatules. Pour obtenir de meilleurs
résultats pour le nettoyage des tasses,
espacer les tasses sur le panier de
sorte qu'elles ne sont pas directement
au-dessus des tasses du dessous.
Tiges rabattables
La rangée de tiges de chaque
côté du panier supérieur ou à
l'arrière du panier inférieur peut
être ajustée pour faire de la place
pour divers articles de vaisselle.
Pour ajuster les tiges pliables :
1. Saisir la pointe de la tige
située sur le support de tige.
2. Pousser doucement la tige
à l’extérieur de son support.
3. Rabattre les tiges vers le
centre du panier.
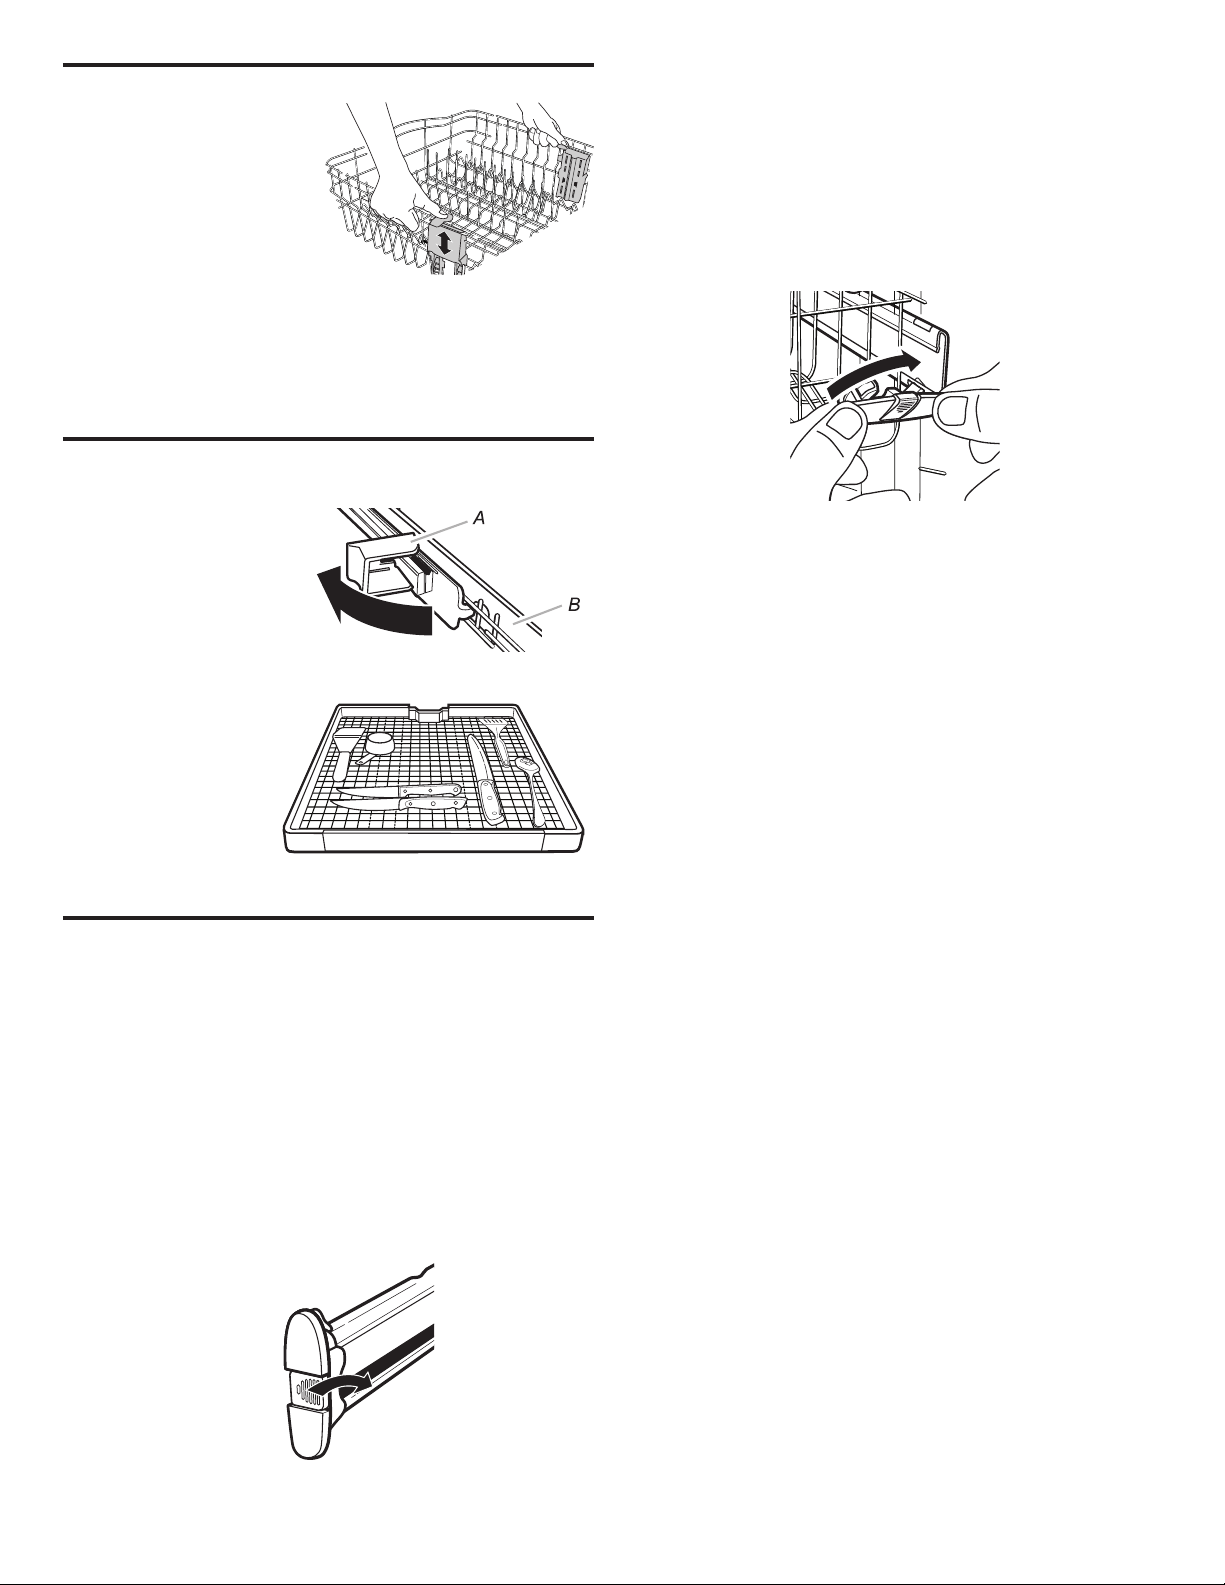
63
Régleur du panier supérieur EZ-2-Lift™
Il est possible d’élever
ou d’abaisser le panier
supérieur pour charger
de grands articles dans
le panier supérieur ou
inférieur. Des régleurs
sont situés de chaque
côté du panier supérieur.
Pour lever le panier :
Appuyer sur les deux régleurs
du panier et soulever le panier jusqu’à ce qu’il soit en position
haute et d’aplomb.
Pour abaisser le panier :
Appuyer sur les deux régleurs du panier et faire glisser le panier
jusqu’à sa position basse et d’aplomb.
REMARQUE : Le panier supérieur doit être de niveau.
Panier du troisième niveau facile à enlever
(sur certains modèles)
S’il faut plus d’espace
dans le panier
supérieur, le panier du
troisième niveau peut
être retiré facilement.
Pour le retirer, faire
coulisser le panier
complètement jusqu’à
ce qu’il s’arrête.
Ensuite, ouvrir les
crans d’arrêt de
chaque côté et faire
glisser le panier pour
le retirer.
Les petits articles
comme les ustensiles
de service et les
couverts peuvent être
placés dans le panier
du troisième niveau.
A. Butée B. Glissière
Panier supérieur amovible
Le panier supérieur amovible permet de laver des articles de plus
grande taille comme des marmites, rôtissoires et tôles à biscuits
dans le panier de niveau inférieur.
IMPORTANT : Retirer la vaisselle avant d’enlever le panier
supérieur du lave-vaisselle.
Pour retirer le panier :
1. Pour accéder aux butées de glissières, tirer le panier supérieur
vers l’avant pour l’extraire de la cuve de presque la moitié.
2. Appuyer sur le bord de la zone côtelée sur la butée de
glissière tout en penchant la butée de glissière vers le centre
du lave-vaisselle. Cette action libère une petite patte de
retenue qui verrouille la butée à la glissière (voir Butée de
glissière – gauche).
REMARQUE : Il est utile d’utiliser deux mains. Noter
particulièrement l’orientation des butées de glissière.
Butée de glissière – gauche
3. Une fois les pattes de retenue libérées, tirer tout droit sur la
butée de glissière vers la glissière opposée pour la retirer.
4. Après avoir enlevé les deux butées de glissière, retirer
soigneusement le panier supérieur des glissières en le faisant
rouler vers soi.
5. Replacer les butées de glissière à partir du dessous de la
glissière et en glissant la butée dans l’encoche inférieure de
la glissière (voir Butée de glissière – droit) et tourner la butée
de glissière en place. Appuyer ensuite sur le bord de la zone
côtelée tout en poussant tout droit la butée vers la glissière.
Cette action verrouille la patte de retenue en place.
Butée de glissière – droit
6. Tester la butée de glissière en la tirant vers la glissière
opposée pour s’assurer qu’elle est verrouillée en place.
Pour réinstaller le panier :
1. Tirer doucement les glissières du lave-vaisselle vers l’avant
jusqu’à ce qu’elles s’arrêtent. Retirer les butées de glissières.
Répéter les étapes 1 à 3 ci-dessus.
2. Placer les roulettes arrière de chaque côté du panier dans
la glissière et faire rouler le panier dans les glissières, sans
replacer le panier complètement dans la cuve.
3. Insérer les roulettes avant du panier de chaque côté du panier,
dans les glissières.
4. Faire glisser le panier pour le réinstaller dans le lave-vaisselle.
5. Replacer les butées de glissière. Répéter les étapes 5 et 6
ci-dessus.
IMPORTANT : S’assurer que les butées de glissière sont
verrouillées en place et ne peuvent pas être facilement
retirées. Elles servent à empêcher le panier de ressortir
des glissières.

64
Système de filtration
Ce lave-vaisselle est équipé de la plus récente technologie en matière de filtration. Ce système de filtration minimise le niveau
sonore et optimise la consommation d’eau et d’énergie tout en offrant une performance de nettoyage supérieure.
Le système de filtre comporte 2 parties, un filtre supérieur et un filtre inférieur.
IMPORTANT : Afin d’éviter d’endommager le lave-vaisselle, ne pas le faire
fonctionner sans que les filtres ne soient correctement installés. S’assurer que le
filtre inférieur est bien en place et que le filtre supérieur est bien emboîté. Si le filtre
supérieur tourne librement, cela signifie qu’il n’est pas bien emboîté.
Les filtres devront peut-être être nettoyés lorsque :
■ Des objets ou saletés sont visibles sur le filtre supérieur.
■ Les plats sont rugueux au toucher.
Filtre inférier
Ensemble de
filtre supéreur
Il est très facile de retirer et d’entretenir les filtres. Le tableau ci-dessous indique la fréquence de nettoyage recommandée.
INTERVALLES RECOMMANDÉS POUR LE NETTOYAGE DU FILTRE
Nombre de charges
par semaine
Si les plats sont grattés
avant le chargement*
Si les plats sont grattés et
rincés avant le chargement
Si la vaisselle est lavée
avant le chargement
8–12 Tous les deux mois Tous les quatre mois Une fois par an
4–7 Tous les quatre mois Une fois par an Une fois par an
1–3 Deux fois par an Une fois par an Une fois par an
*Nous recommandons cette méthode puisqu’elle permet d’économiser l’eau et l’énergie utilisées pour la préparation des plats.
Cela épargne également du temps et des efforts.
Eau très dure
Si l’eau du domicile est très dure (au-delà de 15 grains), nettoyer
le filtre au moins une fois par mois. L’accumulation de résidus
blancs dans le lave-vaisselle est le signe d’une eau dure.
Pour des conseils sur l’élimination des taches, voir la section
“Dépannage”.
Instructions de retrait du filtre
1. Tourner le filtre supérieur d’un quart de tour dans le sens
antihoraire et le soulever.
Patte de
positionnement
Retrait du filtre supérieur
2. Séparer le filtre supérieur en le tirant avec précaution.
3. Nettoyer les filtres tel qu’indiqué.
Instructions de nettoyage
IMPORTANT : Ne pas utiliser de brosse métallique, de tampon
à récurer, etc., car ils peuvent endommager les filtres.
Rincer le filtre sous l’eau courante jusqu’à ce que la plupart
des saletés soient éliminées. Si l’on remarque la présence
de saletés difficiles à retirer ou de dépôts de calcaire causés
par l’eau dure, l’emploi d’une brosse douce sera peut-être
nécessaire.
P
U
S
H
D
O
W
N
&
T
U
R
N
L
O
C
K
U
N
L
O
C
K
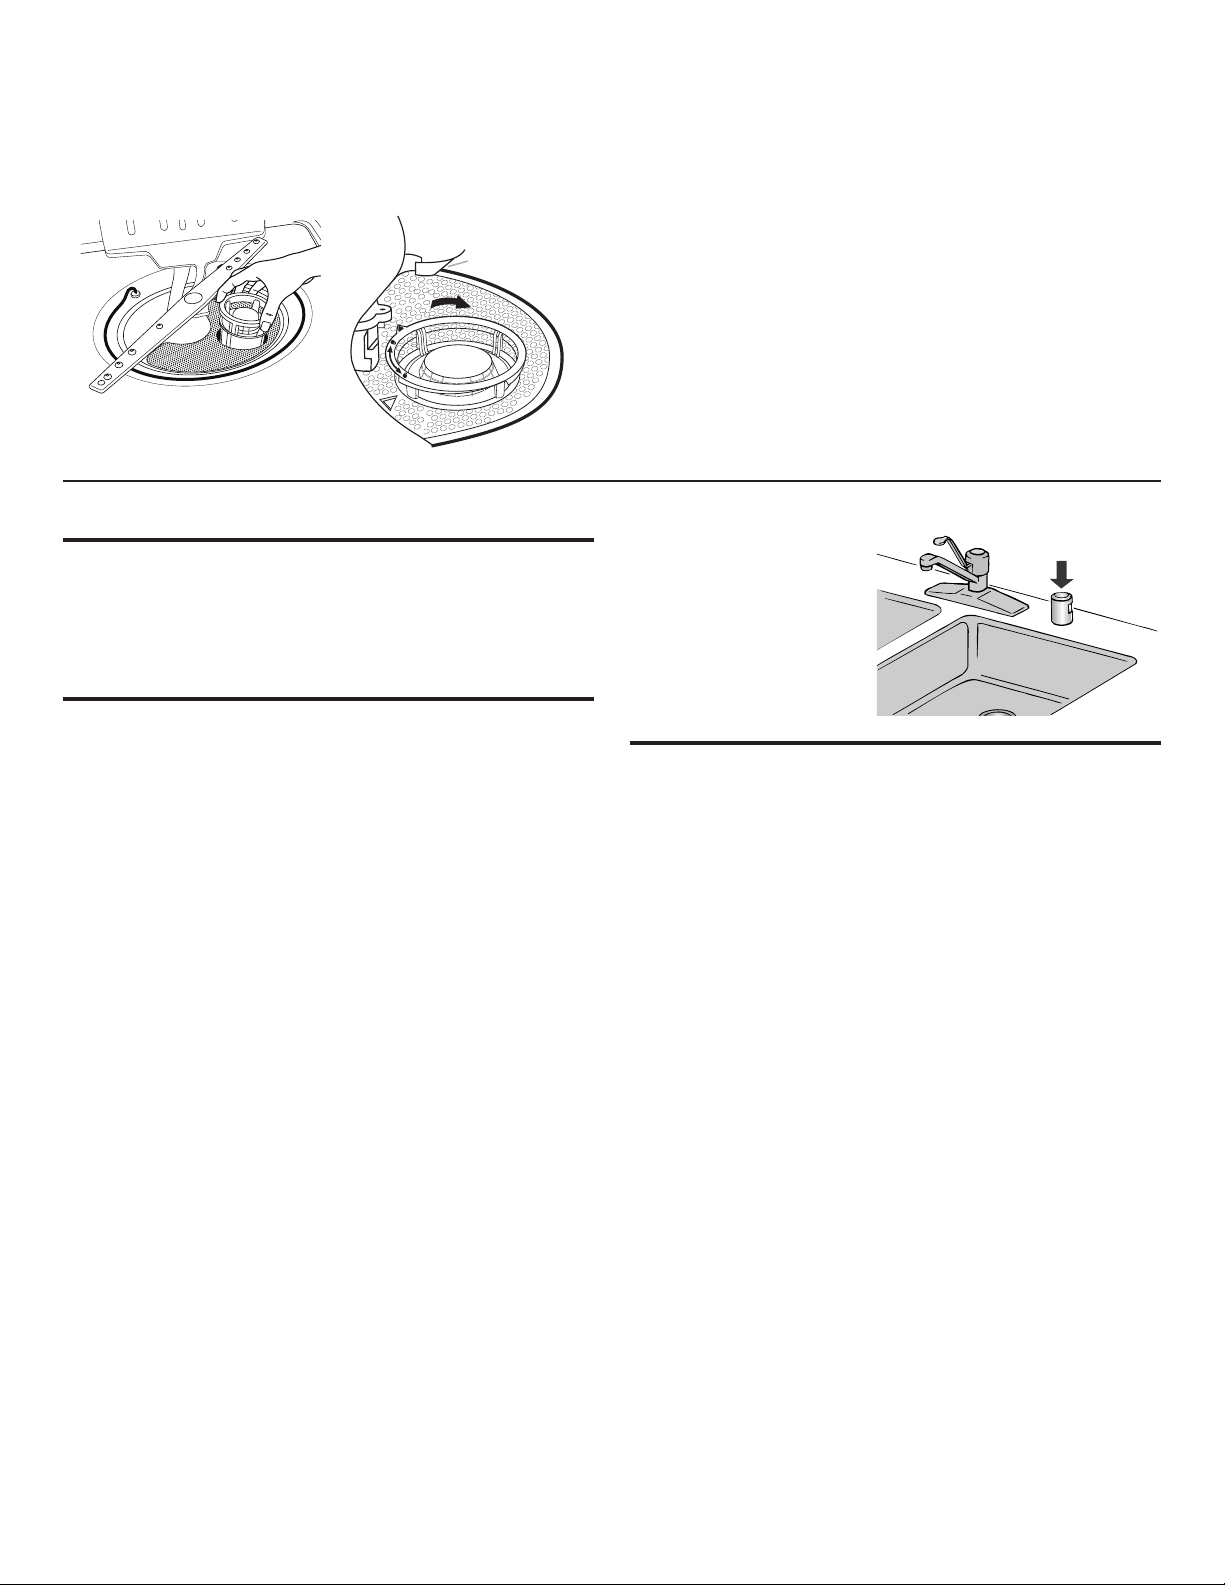
65
Instructions de réinstallation du filtre
1. En s’aidant des illustrations précédentes, placer le filtre
inférieur sous les pattes de positionnement situées au fond
du lave-vaisselle de sorte que le filtre supérieur soit aligné
avec l’ouverture circulaire du fond de la cuve.
2. Insérer le filtre supérieur dans l’ouverture circulaire du
filtre inférieur.
Réinstallation du filtre supérieur
L
O
C
K
U
N
L
O
C
K
P
U
S
H
D
O
W
N
&
T
U
R
N
Patte de
positionnement
3. Faire pivoter lentement le filtre dans le sens horaire jusqu’à
ce qu’il s’insère dans l’encastrement. Continuer à faire
pivoter le filtre jusqu’à ce qu’il s’emboîte. Si le filtre n’est
pas complètement installé (continue de tourner librement),
continuer à tourner le filtre dans le sens horaire jusqu’à ce
qu’il s’insère dans le logement et s’emboîte.
REMARQUE : Du moment que le filtre est bien emboîté,
il n’est pas nécessaire que la flèche du filtre supérieur soit
alignée avec celle du filtre inférieur.
IMPORTANT : Afin d’éviter d’endommager le lave-vaisselle, ne
pas le faire fonctionner sans que les filtres ne soient correctement
installés. S’assurer que le filtre inférieur est bien en place et que
le filtre supérieur est bien emboîté. Si le filtre supérieur tourne
librement, cela signifie qu’il n’est pas bien emboîté.
Entretien du lave-vaisselle
Nettoyage de l’extérieur
Nettoyer l’extérieur du lave-vaisselle avec un chiffon doux et
humide et un détergent doux. Si l’extérieur du lave-vaisselle
est en acier inoxydable, un nettoyant pour acier inoxydable est
recommandé, par exemple, un nettoyant pour acier inoxydable
affresh
®†
. Ne pas utiliser de produits nettoyants abrasifs sur la
surface extérieure du lave-vaisselle.
Nettoyage et entretien de l’intérieur
Plusieurs détergents peuvent laisser des taches ou résidus
blancs sur la vaisselle ou l’intérieur du lave-vaisselle. Avec le
temps, ces résidus peuvent devenir indésirables et nuire au bon
fonctionnement du lave-vaisselle. Utiliser un produit comme le
nettoyant pour lave-vaisselle affresh
®
peut aider à éliminer ces
résidus. Une utilisation mensuelle du nettoyant pour lave-vaisselle
affresh
®
est recommandé pour aider à entretenir le lave-vaisselle.
Utilisation :
1. Pour un nettoyage sans vaisselle, placer une pastille dans
le distributeur de détergent. Ne pas ajouter de détergent (si
une accumulation importante est remarquée, une deuxième
pastille peut être déposée au fond du lave-vaisselle.
2. Pour un nettoyage avec vaisselle, déposer une pastille dans le
fond du lave-vaisselle. Ajouter du détergent dans le distributeur.
3. Utiliser un programme de lavage normal.
Il est aussi possible d’effectuer un rinçage au vinaigre pour éliminer
les résidus blancs. Cependant, le vinaigre est un acide et son
utilisation trop fréquente pourrait endommager le lave-vaisselle.
Verser 2 tasses (500 ml) de vinaigre blanc dans un verre ou une
tasse à mesurer lavable au lave-vaisselle placée dans le panier
inférieur (ne pas verser le vinaigre dans le fond du lave-vaisselle).
Faire exécuter au lave-vaisselle un programme de lavage complet
avec séchage à l’air ou une option de séchage économique. Ne
pas utiliser de détergent. Le vinaigre se mélangera à l’eau de
lavage.
REMARQUE : Whirlpool recommande des pastilles ou des
sachets de détergent prémesuré de grande qualité, ainsi que
de l’agent de rinçage pour effectuer le nettoyage du lave-vaisselle
et pour une utilisation quotidienne.
†
®
affresh est une marque déposée de Whirlpool, É.-U.
Inspecter et nettoyer le
dispositif anti-refoulement,
le cas échéant, si le lave-
vaisselle ne se vidange
pas correctement.
Pour réduire le risque de dommages matériels durant
les vacances ou une période d’inutilisation prolongée
■ Si l’on n’utilise pas le lave-vaisselle pendant l’été, couper
l’arrivée d’eau et l’alimentation électrique du lave-vaisselle.
■ S’assurer que les tuyaux d’alimentation en eau sont protégés
contre le gel. La formation de glace dans les canalisations
d’arrivée d’eau peut entraîner une élévation de la pression
en eau et endommager le lave-vaisselle ou le domicile.
■ La garantie de l’appareil ne couvre pas les dommages
imputables au gel.
■ Lors du remisage du lave-vaisselle pendant l’hiver, éviter tout
dommage lié à l’eau en faisant hivériser le lave-vaisselle par
un fournisseur de services agréé.

66
Dépannage – Connectivité
Si le lave-vaisselle a déjà été connecté avec succès, mais qu’il y a des difficultés, commencer par explorer les solutions suivantes. Pour
obtenir de l’aide ou des recommandations supplémentaires pour éviter d’avoir à effectuer un appel de service, consulter la section
“Configuration de la connectabilité” de ce manuel ou communiquer avec l’équipe Connected Appliance.
Aux États-Unis, communiquer avec l’équipe Connected
Appliance :
Visiter le www.whirlpool.com/connect
Composer le : 1 866 333-4591 du lundi au vendredi de 8 h à 20 h HNE
Courriel : [email protected]
Au Canada, communiquer avec l’équipe Connected Appliance :
Visiter : www.whirlpool.ca/fr_CA et cliquer sur le lien Whirlpool
®
électroménager connecter
Composer le : 1 866 333-4591 du lundi au vendredi de 8 h à 20 h HNE
Courriel : [email protected]
Par courrier :
Équipe Connected Appliance
Whirlpool Customer eXperience Center
553 Benson Road
Benton Harbor, MI 49022-2692
Par courrier :
Équipe Connected Appliance
Whirlpool Customer eXperience Centre
200 – 6750 Century Ave.
Mississauga, Ontario L5N 0B7
Ne pas oublier d’indiquer dans votre correspondance un numéro de téléphone où l’on peut vous joindre dans la journée.
A
D
C
B
A. Icône d'état Connexion sans fil
B. Icône Activation à distance
C. Icône Maison orange (tarifs d'électricité de pointe)
D. Icône Maison bleue (tarifs d'électricité normaux)
ÉTAT DE LA CONNEXION TÉMOINS LUMINEUX DU PANNEAU DE COMMANDE
Le lave-vaisselle n’est pas connecté
Toutes les icônes sont éteintes.
Le lave-vaisselle essaie de se connecter au routeur Wi-Fi
domestique
L’icône Connexion sans fil clignote lentement.
Le lave-vaisselle est connecté au routeur Wi-Fi domestique,
mais l’application Whirlpool
®
ou la fonction de mode
Intelligent ne fonctionne pas
L’icône Connexion sans fil est allumée.
L'icône Maison bleue clignote lentement.
Le lave-vaisselle est connecté au routeur Wi-Fi domestique
et l’application Whirlpool
®
fonctionne
L’icône Connexion sans fil est allumée.
L'icône Maison bleue ou orange est allumée – ne clignote pas
67
PROBLÈME SOLUTION
LE LAVE-VAISSELLE
N’EST PAS CONNECTÉ
AU ROUTEUR WI-FI
DOMESTIQUE (ICÔNE
CONNEXION SANS
FIL FERMÉE)
Le lave-vaisselle peut être en mode Attente. Appuyer sur le bouton POWER (marche/arrêt) sur le lave-
vaisselle et observer les témoins. Toutes les lumières des témoins sont fermées pendant le mode Attente.
Vérifier que le lave-vaisselle a été connecté au routeur Wi-Fi domestique. Consulter la section
“Configuration de la connectivité”.
Appuyer sur la touche CONNECT pendant 3 secondes. L’icône d’état Connexion sans fil doit clignoter
lors de la connexion (cela peut prendre jusqu’à 2 minutes).
Vérifier si la connexion au routeur est en marche et fonctionnelle en utilisant d’autres ordinateurs
ou appareils de la maison (capables d’accéder à l'Internet). Le routeur ou le mot de passe ont-ils
été changés?
Le signal peut être faible ou il y a une interférence entre le lave-vaisselle et le routeur. Essayer de positionner
le routeur sans fil plus près du lave-vaisselle. Il pourrait être nécessaire d’installer un amplificateur Wi-Fi.
Vérifier l’application mobile pour s’assurer que le lave-vaisselle n’est pas hors ligne. S’il est hors ligne,
suivre les étapes suivantes pour le reconnecter :
1. Accéder aux préférences de l’application mobile et sélectionner SUPPRIMER L’APPAREIL.
2. Suivre les instructions de l’application mobile pour ajouter un appareil.
L'ICÔNE CONNEXION
SANS FIL NE
S'ALLUME PAS
APRÈS AVOIR APPUYÉ
SUR LE BOUTON
CONNECT
Débrancher le lave-vaisselle ou déconnecter la source de courant électrique pendant 30 secondes,
puis rétablir le courant électrique. Répéter le processus de connexion Wi-Fi. S’il n’y a toujours pas
de connexion après plusieurs tentatives, utiliser les instructions de configuration alternatives du site
www.whirlpool.com/connect. Au Canada, visiter le www.whirlpool.ca/fr_CA et cliquer sur le lien
Whirlpool
®
électroménager connecter.
Le réseau Wi-Fi auquel l’appareil est connecté peut ne pas être actif. Vérifier que le réseau Wi-Fi est
actif et fonctionne correctement.
Vérifier que le lave-vaisselle fonctionne correctement (sauf pour le problème de connexion). Appeler
pour demander une intervention de dépannage.
LE LAVE-VAISSELLE EST
CONNECTÉ AU ROUTEUR
WI-FI DOMESTIQUE
(L'ICÔNE CONNEXION
SANS FIL EST ALLUMÉE),
MAIS L’APPLICATION
WHIRLPOOL
®
OU LA
FONCTION DE MODE
INTELLIGENT NE
FONCTIONNE PAS
Vérifier si l'icône Maison bleue ou orange est allumée en continu; sinon, appuyer sur CONNECT pour
rétablir la connexion sans fil.
La connexion à l'application Whirlpool
®
et au service de mode Intelligent peut ne pas être disponible.
Vérifier si l'icône Maison bleue est éteinte ou clignotante.
Vérifier que le compte d'utilisateur est configuré. Consulter la section “Configuration de la
connectivité” ou l’application Whirlpool
®
pour connaître les instructions de configuration du
compte et d’enregistrement du lave-vaisselle.
Vérifier que le lave-vaisselle est jumelé à votre compte dans l’application.

68
PROBLÈME SOLUTION
LE LAVE-VAISSELLE
NE FONCTIONNE PAS
REMARQUE : Il est normal que le lave-vaisselle fasse des pauses répétées au cours d’un programme.
Si le témoin Start/Resume (mise en marche/reprise) clignote, appuyer sur Start/Resume et fermer la
porte dans les 4 secondes qui suivent.
Vérifier que la porte est fermée et verrouillée.
■ Vérifier que le fonctionnement du système de lavage à l’arrière du lave-vaisselle n’est pas entravé
par de grandes casseroles.
■ Vérifier si des articles dépassent du bas ou de l’arrière du panier. Vérifier aussi si des articles
de grande taille touchent au panier supérieur ou au bras d’aspersion. Ajuster le chargement si
nécessaire pour que la porte puisse se fermer et se verrouiller.
Appuyer sur Start/Resume (mise en marche/reprise) ou Cancel (annulation), ou ouvrir et fermer la
porte avant de sélectionner un programme ou une option. Les commandes doivent être réveillées
après une période d’inactivité.
S’assurer que la fonction Control/Lock (commandes/verrouillage) est désactivée. Si le témoin
de verrouillage est allumé, maintenir enfoncé le bouton SANI RINSE (assainissement) pendant
3 secondes. La DEL de verrouillage des commandes s’éteint, il est maintenant possible d’utiliser les
commandes.
Vérifier qu’un programme a été sélectionné. Consulter la section “Descriptions des programmes
et options”.
Vérifier que le lave-vaisselle est branché. Un disjoncteur ou un fusible peut s’être déclenché.
Si des témoins lumineux autres que le témoin Start/Resume (mise en marche/reprise) clignotent
et que l’appareil ne fonctionne pas, demander une intervention de dépannage.
Si l’affichage numérique indique un code “F2E2”, il faudra faire appel au service.
IL RESTE DU DÉTERGENT
DANS LE DISTRIBUTEUR
OU UNE TABLETTE AU
FOND DE LA CUVE
Vérifier que des articles comme les tôles à biscuits, les planches à découper, les grands récipients,
etc. n’empêchent pas le distributeur de détergent de s’ouvrir correctement.
Vérifier que le détergent est frais et ne contient pas de grumeau.
S’assurer que le programme est terminé (le témoin de nettoyage terminé s’illumine). Si le programme
n’est pas terminé, il faudra le faire reprendre en appuyant sur la touche Start/Resume (mise en
marche/reprise) et en fermant la porte en moins de 4 secondes.
LE PROGRAMME DURE
TROP LONGTEMPS
REMARQUE :
■ Pour utiliser moins d’eau et réduire la consommation d’énergie, il existe des programmes qui
fonctionnent en général jusqu’à 3 heures.
■ Un réglage du chauffage de l’eau à 120 °F (49 °C) est idéal. Le lave-vaisselle retardera davantage
le programme s’il doit faire chauffer une eau froide.
■ Certaines options prolongeront le programme. Consulter la section “Descriptions des
programmes et options”. L’option Heat Dry (séchage avec chauffage) ajoute environ 45 minutes.
Essayer le programme 1-Hour Wash (lavage en 1 heure).
Faire couler l’eau chaude au niveau d’un robinet proche du lave-vaisselle avant de démarrer
le programme.
LE LAVE-VAISSELLE
NE SÈCHE PAS
REMARQUE : Le plastique et les articles à revêtement anti-adhésif sont difficiles à sécher, car leur
surface est poreuse et a tendance à recueillir les gouttelettes d’eau. Un séchage au torchon peut
être nécessaire.
L’utilisation d’un agent de rinçage avec l’option Heat Dry (séchage avec chauffage) est nécessaire
pour un séchage correct.
Un bon chargement des articles peut affecter le séchage. (Consulter les instructions spécifiques de
chargement dans ce guide.)
Les verres et les tasses à fond concave retiennent l’eau. Cette eau peut éclabousser d’autres articles
lors du déchargement.
■ Décharger le panier inférieur en premier.
■ Placer ces articles sur le côté le plus incliné du panier pour obtenir de meilleurs résultats.
Dépannage
Essayer d’abord les solutions suggérées ici. Pour obtenir de l’aide ou des conseils qui permettront peut-être d’éviter une intervention
de dépannage, consulter la page de garantie de ce manuel et balayer le code QR avec votre appareil mobile ou visiter le site
www.whirlpool.com/product_help. Au Canada, visiter le www.whirlpool.ca.
Il est possible d’adresser ses commentaires ou questions par courrier à l’adresse ci-dessous :
Aux États-Unis :
Whirlpool Brand Home Appliances
Customer eXperience Center
553 Benson Road
Benton Harbor, MI 49022-2692
Au Canada :
Whirlpool Brand Home Appliances
Customer eXperience Centre
200 – 6750 Century Ave.
Mississauga, Ontario L5N 0B7
Ne pas oublier d’indiquer dans votre correspondance un numéro de téléphone où l’on peut vous joindre dans la journée.

69
PROBLÈME SOLUTION
PAS DE REMPLISSAGE
Vérifier que le robinet d’alimentation en eau du lave-vaisselle est ouvert.
Vérifier l’absence d’obstruction du flotteur. Consulter la section “Pièces et caractéristiques”.
Vérifier l’absence de mousse dans le lave-vaisselle. En cas de présence de mousse, le lave-vaisselle
peut ne pas fonctionner correctement ou ne pas se remplir d’eau. Consulter le point “Témoins
lumineux clignotants” de la section “Dépannage”.
IL RESTE DE L’EAU DANS
LA CUVE/PAS DE VIDANGE
S’assurer que le programme est terminé. (Le témoin lumineux propre s’allume). Si ce n’est pas le cas,
reprendre le programme en appuyer sur Start/Resume (mise en marche/reprise) et fermer la porte
dans les 4 secondes qui suivent.
Si le lave-vaisselle est relié à un broyeur de déchets, vérifier que le bouchon d’obturation a été retiré
de l’orifice du broyeur.
Vérifier l’absence de déformation sur le tuyau de vidange.
Vérifier l’absence d’obstructions par des aliments dans le système d’évacuation ou le broyeur.
Vérifier le fusible ou le disjoncteur du domicile.
EAU DURE
(RÉSIDU BLANC SUR
L’INTÉRIEUR DU LAVE-
VAISSELLE OU SUR
LA VERRERIE)
REMARQUE : Des dépôts minéraux d’une eau très dure peuvent endommager le lave-vaisselle et
rendre un bon nettoyage difficile. Un adoucisseur d’eau est vivement recommandé si la dureté est de
15 grains ou plus. En l’absence d’un adoucisseur d’eau, les mesures suivantes peuvent être utiles :
Utiliser un produit de nettoyage commercial conçu pour les lave-vaisselle une fois par mois.
Nettoyer le filtre supérieur et inférieur au moins une fois par mois. Consulter le point “Instructions
de nettoyage” dans la section “Système de filtration”.
Toujours utiliser un agent de rinçage.
Toujours utiliser du détergent de grande qualité pour un rendement efficace.
Utiliser un stimulant de détergent/adoucisseur d’eau conçu pour les lave-vaisselle.
ODEURS
REMARQUE : Si l’on n’utilise pas le lave-vaisselle tous les jours, on peut exécuter un programme de
rinçage avec le lave-vaisselle partiellement rempli jusqu’à ce que l’on ait une charge complète à laver.
Effectuer un rinçage au vinaigre du lave-vaisselle en mettant 2 tasses (500 ml) de vinaigre blanc dans
une tasse à mesurer placée debout dans le panier inférieur. Exécuter un programme Normal après
avoir désactivé l’option Heat Dry (séchage avec chauffage). Ne pas utiliser de détergent.
Le lave-vaisselle peut ne pas se vidanger correctement. Consulter le point “Il reste de l’eau dans la
cuve/pas de vidange” de la section “Dépannage”.
BRUYANT
Des bruits de pompage peuvent se produire régulièrement pendant le programme alors que le lave-
vaisselle se vidange.
On peut entendre régulièrement un sifflement du robinet d’eau; ceci est normal.
On peut entendre un bruit d’enclenchement lorsque le distributeur de détergent s’ouvre pendant
le programme et lorsque la porte est ouverte à la fin du programme; ceci est normal.
Une installation incorrecte affectera les niveaux de bruit.
Vérifier que les filtres sont bien installés.
On peut entendre un bruit sourd si des articles dépassent des paniers et touchent les bras
d’aspersion. Réajuster la vaisselle et reprendre le programme.
IL RESTE DES RÉSIDUS
ALIMENTAIRES SUR
LA VAISSELLE
Vérifier que le lave-vaisselle est correctement chargé. Un mauvais chargement peut réduire
considérablement la performance de lavage. Consulter la section “Utilisation du lave-vaisselle”.
Inspecter le filtre pour s’assurer qu’il est bien installé. Nettoyer au besoin. Consulter le point
“Instructions de nettoyage” dans la section “Système de filtration” pour plus de détails.
Sélectionner le programme et les options appropriés au type de saletés. Le programme Heavy
(intense) avec l’option Hi Temp Wash (lavage à température élevée) peut être utilisé pour les
charges plus difficiles à nettoyer.
Vérifier que la température de l’eau d’entrée est d’au moins 120 °F (49 °C).
Utiliser la bonne quantité de détergent frais. Un supplément de détergent est nécessaire pour les
charges très sales et en présence d’une eau dure.
Éliminer les aliments sur la vaisselle en la grattant avant de la charger (ne pas prérincer).

70
PROBLÈME SOLUTION
VAISSELLE SALE/
ACCUMULATION
DE MOUSSE DANS
LE LAVE-VAISSELLE/
PROGRAMME
NON TERMINÉ
Si le système de détection du lave-vaisselle détecte la présence de mousse, il est possible que
le lave-vaisselle ne fonctionne pas correctement ou ne se remplisse pas d’eau.
La production de mousse peut avoir été causée par :
■ L’emploi du mauvais type de détergent, comme un produit à vaisselle pour lavage manuel,
un produit de lessive ou un savon pour les mains.
■ Le fait de ne pas avoir réinstallé le couvercle du distributeur d’agent de rinçage après l’avoir
rempli d’agent de rinçage (qu’il s’agisse d’un premier remplissage ou de remplissages
subséquents).
■ L’utilisation d’une quantité excessive de détergent pour lave-vaisselle.
■ Le rinçage inadéquat du détergent se trouvant sur la vaisselle lavée à la main avant de la
charger dans le lave-vaisselle.
Appeler pour demander une intervention de dépannage.
Si aucune quantité d’eau n’est entrée dans la machine à aucun moment pendant un programme de
lavage avec chaleur, le programme s’arrête et le témoin Clean (propre) ne s’illumine pas. Consulter
le point “Pas de remplissage” de la section “Dépannage”.
PAS D’ASSAINISSEMENT
Si le témoin lumineux d’assainissement clignote, la charge n’est PAS assainie. Le programme a été
interrompu lors du rinçage final ou le réglage du dispositif de chauffage de l’eau est trop bas. Régler
le dispositif de chauffage de l’eau à 120 °F (49 °C).
VAISSELLE ENDOMMAGÉE
Un chargement incorrect peut écailler ou endommager la vaisselle. (Consulter les instructions
spécifiques de chargement dans ce guide.)
TÉMOINS LUMINEUX
CLIGNOTANTS
Si le programme est suspendu ou s’il est interrompu par l’ouverture de la porte, les témoins
clignotent. Si le témoin lumineux Start/Resume (mise en marche/reprise) clignote, appuyer sur
Start/Resume et fermer la porte dans les 4 secondes qui suivent.
Consulter le point “Mettre en marche ou redémarrer un programme” de la section “Utilisation
du lave-vaisselle”.
Si le témoin lumineux Clean (propre) ou tout autre témoin clignote et que le lave-vaisselle ne
fonctionne pas, faire un appel de service.
VAISSELLE PRÉSENTANT
DES TRACES OU DES
TACHES (ET SOLUTION
POUR L’EAU DURE)
Ajouter de l’agent de rinçage liquide ou en modifier la quantité utilisée pour obtenir un bon résultat
de séchage et réduire les traces. Consulter la section “Détergent et agent de rinçage”.
Utiliser la bonne quantité de détergent.
Vérifier que les traces ne sont pas permanentes en trempant l’article dans du vinaigre blanc pendant
5 minutes. Si les traces disparaissent, c’est qu’elles sont causées par l’eau dure. Modifier la quantité
de détergent et d’agent de rinçage. Consulter le point “Eau dure (résidus blancs sur l’intérieur du
lave-vaisselle ou sur la verrerie)” de la section “Dépannage”. Si les traces ne disparaissent pas, elles
sont causées par des attaques (voir ci-dessous).
Vérifier que la température d’eau d’entrée est réglée à 120 °F (49 °C).
Essayer d’utiliser les options Hi Temp Wash (température élevée) et Sani Rinse (rinçage
avec assainissement).
Pour éliminer les taches, effectuer un rinçage au vinaigre dans le lave-vaisselle.
■ Laver et rincer la vaisselle affectée et la charger dans le lave-vaisselle. Enlever tous les couverts
et les articles métalliques. Verser 2 tasses (500 ml) de vinaigre blanc dans une tasse à mesurer
et placer la tasse dans le panier inférieur. Exécuter un programme normal après avoir désactivé
l’option Heat Dry (séchage avec chauffage). Aucun détergent n’est nécessaire.
ATTAQUES (TRACES
PERMANENTES)
Il s’agit d’une érosion de la surface des articles en verre, elle peut être causée par une combinaison :
d’eau trop chaude, d’utilisation en trop grande quantité de détergent dans de l’eau douce ou d’un
prélavage. Le détergent a besoin de saletés d’aliments pour agir. En cas d’attaque, l’article en verre
est définitivement abîmé. Pour éviter d’autres attaques, régler la quantité de détergent selon la dureté
de l’eau, arrêter le prélavage et utiliser des options de chauffage de l’eau uniquement lorsque la
température de l’eau entrante est inférieure à 120 °F (49 °C).
FUITES D’EAU
Vérifier que le lave-vaisselle a été correctement installé et qu’il est d’aplomb.
La mousse peut faire déborder le lave-vaisselle. Mesurer précisément la quantité de détergent et
utiliser uniquement des détergents conçus pour lave-vaisselle. Une eau douce demande moins de
détergent. Essayer une autre marque de détergent si l’excès de mousse persiste.
Pour éviter les fuites d’agent de rinçage du distributeur, vérifier que le couvercle est bien fixé et éviter
de trop le remplir.
LA CUVE EST DÉCOLORÉE
Une teneur en fer importante dans l’eau peut décolorer la cuve.
Les aliments à base de tomate peuvent décolorer la cuve ou la vaisselle. Enlever les grandes
quantités d’aliments à base de tomate de la vaisselle avant le chargement.
Un produit à base d’agrumes peut être utilisé pour le nettoyage.

71
Utilisation de la licence de source ouverte
Les déclarations suivantes concernent les parties de ce logiciel
basées sur FreeRTOS v7.0.2, http://www.freertos.org.
L’utilisation de ce logiciel est assujettie aux conditions de la
licence publique générale GNU v. 2, disponible au :
http://www.gnu.org/licenses/gpl-2.0.html. Une copie du code
source peut être obtenue en effectuant une demande pour
obtenir le logiciel à [email protected] et en indiquant
l’adresse de l’expéditeur.
La déclaration suivante concerne les parties du logiciel protégées
par des droits d’auteur par Eclipse Foundation, Inc. Copyright
(c) 2007, Eclipse Foundation, Inc. et ses concédants. Tous droits
réservés.
La redistribution et l’utilisation en formats source et binaire, avec
ou sans modification, sont permises si les conditions suivantes
sont respectées :
• La redistribution du code source doit être accompagnée de la
mention de protection par droits d’auteur précédente, de cette
liste de conditions et de l’avis de non-responsabilité suivante.
• La redistribution en format binaire doit comporter la mention
de protection par droits d’auteur précédente, cette liste de
conditions et l’avis de non-responsabilité suivante dans sa
documentation ou le matériel fourni pendant la distribution.
• Ni le nom Eclipse Foundation, Inc.ou les noms de ses
collaborateurs peuvent être utilisés pour approuver ou
promouvoir les produits dérivés du logiciel sans une
autorisation écrite préalable.
CE LOGICIEL EST FOURNI PAR LES DÉTENTEURS DU DROIT
D’AUTEUR ET SES COLLABORATEURS “EN L’ÉTAT” SANS
QU’AUCUNE GARANTIE D’AUCUNE SORTE, IMPLICITE
OU EXPLICITE, N’Y SOIT RATTACHÉE Y COMPRIS, SANS
S’Y LIMITER, LES GARANTIES IMPLICITES DE QUALITÉ
MARCHANDE ET D’ADÉQUATION À UNE UTILISATION
PARTICULIÈRE. EN AUCUN CAS, LE TITULAIRE DES DROITS
D’AUTEUR OU LES COLLABORATEURS NE PEUVENT
ÊTRE TENUS RESPONSABLES D’UN QUELCONQUE
DOMMAGE DIRECT, INDIRECT, ACCESSOIRE, PARTICULIER,
EXEMPLAIRE OU CONSÉCUTIF (Y COMPRIS, MAIS SANS S’Y
LIMITER, L’ACQUISITION DE PRODUITS OU SERVICES DE
SUBSTITUTION; LA PERTE DE JOUISSANCE, DE DONNÉES OU
DE BÉNÉFICES; OU LES PERTES D’EXPLOITATION) QUELLES
QU’EN SOIENT LES CAUSES ET QUEL QUE SOIT LE TYPE
DE RESPONSABILITÉ, CONTRACTUELLE, SANS FAUTE OU
FONDÉE SUR UN DÉLIT CIVIL (Y COMPRIS PAR NÉGLIGENCE
OU POUR UNE AUTRE CAUSE) RÉSULTANT D’UNE MANIÈRE
OU D’UNE AUTRE DE L’UTILISATION DE CE LOGICIEL, MÊME
SI MENTION A ÉTÉ FAITE DE LA POSSIBILITÉ DE TELS
DOMMAGES.
Des parties de ce logiciel sont protégées par des droits d’auteur
(c) de Sawtooth Consulting Ltd. 2006-2015 tous droits réservés.
Des parties de ce logiciel sont protégées par des droits d’auteur
(c) Arrayent, Inc. 2015 tous droits réservés.
Les déclarations suivantes concernent les parties de ce logiciel
protégées par droits d’auteur de Swedish Institute of Computer
Science.
Copyright (c) 2001-2004 Swedish Institute of Computer Science.
Tous droits réservés.
La redistribution et l’utilisation en formats source et binaire, avec
ou sans modification, sont permises si les conditions suivantes
sont respectées :
1. La redistribution du code source doit être accompagnée de
la mention de protection par droits d’auteur précédente, de
cette liste de conditions et de l’avis de non-responsabilité
suivante.
2. La redistribution en format binaire doit comporter la mention
de protection par droits d’auteur précédente, cette liste de
conditions et l’avis de non-responsabilité suivante dans sa
documentation ou le matériel fourni pendant la distribution.
3. Le nom de l’auteur ne doit pas être utilisé pour approuver
ou promouvoir les produits dérivés de ce logiciel sans avoir
précédemment obtenu une autorisation écrite.
CE LOGICIEL EST FOURNI PAR L’AUTEUR “EN L’ÉTAT” SANS
QU’AUCUNE GARANTIE D’AUCUNE SORTE, IMPLICITE
OU EXPLICITE, N’Y SOIT RATTACHÉE Y COMPRIS, SANS
S’Y LIMITER, LES GARANTIES IMPLICITES DE QUALITÉ
MARCHANDE ET D’ADÉQUATION À UNE UTILISATION
PARTICULIÈRE. EN AUCUN CAS, L’AUTEUR NE PEUT ÊTRE
TENU RESPONSABLE D’UN QUELCONQUE DOMMAGE
DIRECT, INDIRECT, ACCESSOIRE, PARTICULIER,
EXEMPLAIRE OU CONSÉCUTIF (Y COMPRIS, MAIS SANS S’Y
LIMITER, L’ACQUISITION DE PRODUITS OU SERVICES DE
SUBSTITUTION; LA PERTE DE JOUISSANCE, DE DONNÉES OU
DE BÉNÉFICES; OU LES PERTES D’EXPLOITATION) QUELLES
QU’EN SOIENT LES CAUSES ET QUEL QUE SOIT LE TYPE
DE RESPONSABILITÉ, CONTRACTUELLE, SANS FAUTE OU
FONDÉE SUR UN DÉLIT CIVIL (Y COMPRIS PAR NÉGLIGENCE
OU POUR UNE AUTRE CAUSE) RÉSULTANT D’UNE MANIÈRE
OU D’UNE AUTRE DE L’UTILISATION DE CE LOGICIEL, MÊME
SI MENTION A ÉTÉ FAITE DE LA POSSIBILITÉ DE TELS
DOMMAGES.
Cette déclaration concerne les parties du logiciel sous droits
d’auteur par Marvell International Ltd. Droits d’auteur (c) Marvell
International Ltd. Tous droits réservés.
AVIS DE NON-RESPONSABILITÉ. CE LOGICIEL EST FOURNI
PAR LES DÉTENTEURS DU DROIT D’AUTEUR ET SES
COLLABORATEURS “EN L’ÉTAT” SANS QU’AUCUNE GARANTIE
D’AUCUNE SORTE, IMPLICITE OU EXPLICITE, N’Y SOIT
RATTACHÉE Y COMPRIS, SANS S’Y LIMITER, LES GARANTIES
IMPLICITES DE QUALITÉ MARCHANDE ET D’ADÉQUATION
À UNE UTILISATION PARTICULIÈRE. EN AUCUN CAS, LE
TITULAIRE DES DROITS D’AUTEUR OU LES COLLABORATEURS
NE PEUVENT ÊTRE TENUS RESPONSABLES D’UN
QUELCONQUE DOMMAGE DIRECT, INDIRECT, ACCESSOIRE,
PARTICULIER, EXEMPLAIRE OU CONSÉCUTIF (Y COMPRIS,
MAIS SANS S’Y LIMITER, L’ACQUISITION DE PRODUITS OU
SERVICES DE SUBSTITUTION; LA PERTE DE JOUISSANCE,
DE DONNÉES OU DE BÉNÉFICES; OU LES PERTES
D’EXPLOITATION) QUELLES QU’EN SOIENT LES CAUSES
ET QUEL QUE SOIT LE TYPE DE RESPONSABILITÉ,
CONTRACTUELLE, SANS FAUTE OU FONDÉE SUR UN DÉLIT
CIVIL (Y COMPRIS PAR NÉGLIGENCE OU POUR UNE AUTRE
CAUSE) RÉSULTANT D’UNE MANIÈRE OU D’UNE AUTRE DE
L’UTILISATION DE CE LOGICIEL, MÊME SI MENTION A ÉTÉ
FAITE DE LA POSSIBILITÉ DE TELS DOMMAGES.
W10901525A
®
/™ ©2017 Whirlpool. Utilisé sous licence au Canada. Tous droits réservés. 04/17
11/14
GARANTIE LIMITÉE DES
GROS APPAREILS
MÉNAGERS
WHIRLPOOL
®
ATTACHEZ ICI VOTRE REÇU DE VENTE. UNE PREUVE D’ACHAT EST
OBLIGATOIRE POUR OBTENIR L'APPLICATION DE LA GARANTIE.
Lorsque vous appelez le centre d'eXpérience de la clientèle, veuillez garder à
disposition les renseignements suivants :
■ Nom, adresse et numéro de téléphone
■ Numéros de modèle et de série
■ Une description claire et détaillée du problème rencontré
■ Une preuve d'achat incluant le nom et l'adresse du marchand ou du détaillant
SI VOUS AVEZ BESOIN DE SERVICE :
1. Avant de nous contacter pour obtenir un dépannage, veuillez déterminer si des réparations sont nécessaires pour
votre produit. Certains problèmes peuvent être résolus sans intervention de dépannage. Prenez quelques minutes
pour parcourir la section Dépannage ou Résolution de problèmes du guide d'utilisation et d'entretien, scannez le code
QR ci-contre avec votre téléphone intelligent pour accéder à des ressources supplémentaires, ou rendez-vous sur le
site http://www.whirlpool.ca.
2.
Tout service sous garantie doit être effectué exclusivement par nos fournisseurs de dépannage autorisés
Whirlpool. Aux É.-U. et au Canada, dirigez toutes vos demandes de service sous garantie au
Centre d’eXpérience de la clientèle Whirlpool
Aux É.-U., composer le 1-800-253-1301. Au Canada, composer le 1-800-807-6777.
Si vous résidez à l'extérieur du Canada et des 50 États des États-Unis, contactez votre marchand Whirlpool autorisé pour
déterminer si une autre garantie s'applique.
http://www.whirlpool.ca
GARANTIE LIMITÉE DE UN AN
CE QUI EST COUVERT CE QUI N’EST PAS COUVERT
Pendant un an à compter de la date
d’achat, lorsque ce gros appareil ménager
est installé, utilisé et entretenu
conformément aux instructions jointes à ou
fournies avec le produit, Whirlpool
Corporation ou Whirlpool Canada, LP (ci-
après désignées “Whirlpool”) décidera à sa
seule discrétion de remplacer le produit ou
de couvrir le coût des pièces spécifiées par
l’usine et de la main-d’œuvre nécessaires
pour corriger les vices de matériaux ou de
fabrication qui existaient déjà lorsque ce
gros appareil ménager a été acheté. S’il est
remplacé, l'appareil sera couvert pour la
période restant à courir de la garantie
limitée d’un an du produit d’origine.
LE SEUL ET EXCLUSIF RECOURS DU
CLIENT DANS LE CADRE DE LA
PRÉSENTE GARANTIE LIMITÉE CONSISTE
EN LA RÉPARATION PRÉVUE PAR LA
PRÉSENTE. Le service doit être fourni par
une compagnie de service désignée par
Whirlpool. Cette garantie limitée est valide
uniquement aux États-Unis ou au Canada
et s’applique exclusivement lorsque le gros
appareil ménager est utilisé dans le pays où
il a été acheté. La présente garantie limitée
est valable à compter de la date d'achat
initial par le consommateur. Une preuve de
la date d’achat initial est exigée pour obtenir
un dépannage dans le cadre de la présente
garantie limitée.
1. Usage commercial, non résidentiel ou par plusieurs familles, ou non-respect des instructions de
l'utilisateur, de l'opérateur ou des instructions d'installation.
2. Visite d'instruction à domicile pour montrer à l'utilisateur comment utiliser l'appareil.
3. Visites de service pour rectifier une installation ou un entretien fautifs du produit, une installation non
conforme aux codes d’électricité ou de plomberie, ou la rectification de l'installation électrique ou de
la plomberie du domicile (ex : câblage électrique, fusibles ou tuyaux d'arrivée d'eau du domicile).
4. Pièces consomptibles (ex : ampoules, batteries, filtres à air ou à eau, solutions de conservation, etc.).
5. Défauts ou dommage résultant de l'utilisation de pièces ou accessoires Whirlpool non authentiques.
6. Conversion de votre produit du gaz naturel ou du gaz de pétrole liquéfié.
7. Dommages causés par : accident, mésusage, abus, incendie, inondations, catastrophe naturelle ou
l'utilisation de produits non approuvés par Whirlpool.
8. Réparations aux pièces ou systèmes dans le but de rectifier un dommage ou des défauts résultant
d'une réparation, altération ou modification non autorisée faite à l'appareil.
9. Défauts d'apparence, notamment les éraflures, traces de choc, fissures ou tout autre dommage subi
par le fini de l'appareil ménager, à moins que ces dommages ne résultent de vices de matériaux ou
de fabrication et ne soient signalés à Whirlpool dans les 30 jours suivant la date d'achat.
10. Décoloration, rouille ou oxydation des surfaces résultant d'environnements caustiques ou corrosifs
incluant des concentrations élevées de sel, un haut degré d'humidité ou une exposition à des
produits chimiques (exemples non exhaustifs).
11. Perte d'aliments ou de médicaments due à la défaillance du produit.
12. Enlèvement ou livraison. Ce produit est conçu pour être réparé à l'intérieur du domicile.
13. Frais de déplacement et de transport pour le dépannage/la réparation dans une région éloignée où
une compagnie de service Whirlpool autorisée n’est pas disponible.
14. Retrait ou réinstallation d'appareils inaccessibles ou de dispositifs préinstallés (ex : garnitures,
panneaux décoratifs, plancher, meubles, îlots de cuisine, plans de travail, panneaux de gypse, etc.)
qui entravent le dépannage, le retrait ou le remplacement du produit.
15. Service et pièces pour des appareils dont les numéros de série et de modèle originaux ont été
enlevés, modifiés ou ne peuvent pas être facilement identifiés.
Le coût d’une réparation ou d’un remplacement dans le cadre de ces circonstances exclues est à
la charge du client.
CLAUSE D'EXONÉRATION DE RESPONSABILITÉ AU TITRE DES GARANTIES IMPLICITES
LES GARANTIES IMPLICITES, Y COMPRIS LES GARANTIES APPLICABLES DE QUALITÉ MARCHANDE OU D'APTITUDE À UN USAGE
PARTICULIER, SONT LIMITÉES À UN AN OU À LA PLUS COURTE PÉRIODE AUTORISÉE PAR LA LOI. Certains États et provinces ne permettent pas
de limitation sur la durée des garanties implicites de qualité marchande ou d'aptitude à un usage particulier, de sorte que la limitation ci-dessus peut ne
pas être applicable dans votre cas. Cette garantie vous confère des droits juridiques spécifiques et vous pouvez également jouir d’autres droits qui
peuvent varier d’une juridiction à l'autre.
EXONÉRATION DE RESPONSABILITÉ DANS LES DOMAINES NON COUVERTS PAR LA GARANTIE
Whirlpool décline toute responsabilité au titre de la qualité, de la durabilité ou en cas de dépannage ou de réparation nécessaire sur ce gros appareil
ménager autre que les responsabilités énoncées dans la présente garantie. Si vous souhaitez une garantie plus étendue ou plus complète que la
garantie limitée fournie avec ce gros appareil ménager, adressez-vous à Whirlpool ou à votre détaillant pour obtenir les modalités d'achat d'une garantie
étendue.
LIMITATION DES RECOURS; EXCLUSION DES DOMMAGES FORTUITS OU INDIRECTS
LE SEUL ET EXCLUSIF RECOURS DU CLIENT DANS LE CADRE DE LA PRÉSENTE GARANTIE LIMITÉE CONSISTE EN LA RÉPARATION PRÉVUE
PAR LA PRÉSENTE. WHIRLPOOL N’ASSUME AUCUNE RESPONSABILITÉ POUR LES DOMMAGES FORTUITS OU INDIRECTS. Certains États et
certaines provinces ne permettent pas l’exclusion ou la limitation des dommages fortuits ou indirects de sorte que ces limitations et exclusions peuvent
ne pas être applicables dans votre cas. Cette garantie vous confère des droits juridiques spécifiques et vous pouvez également jouir d’autres droits qui
peuvent varier d’une juridiction à l'autre.