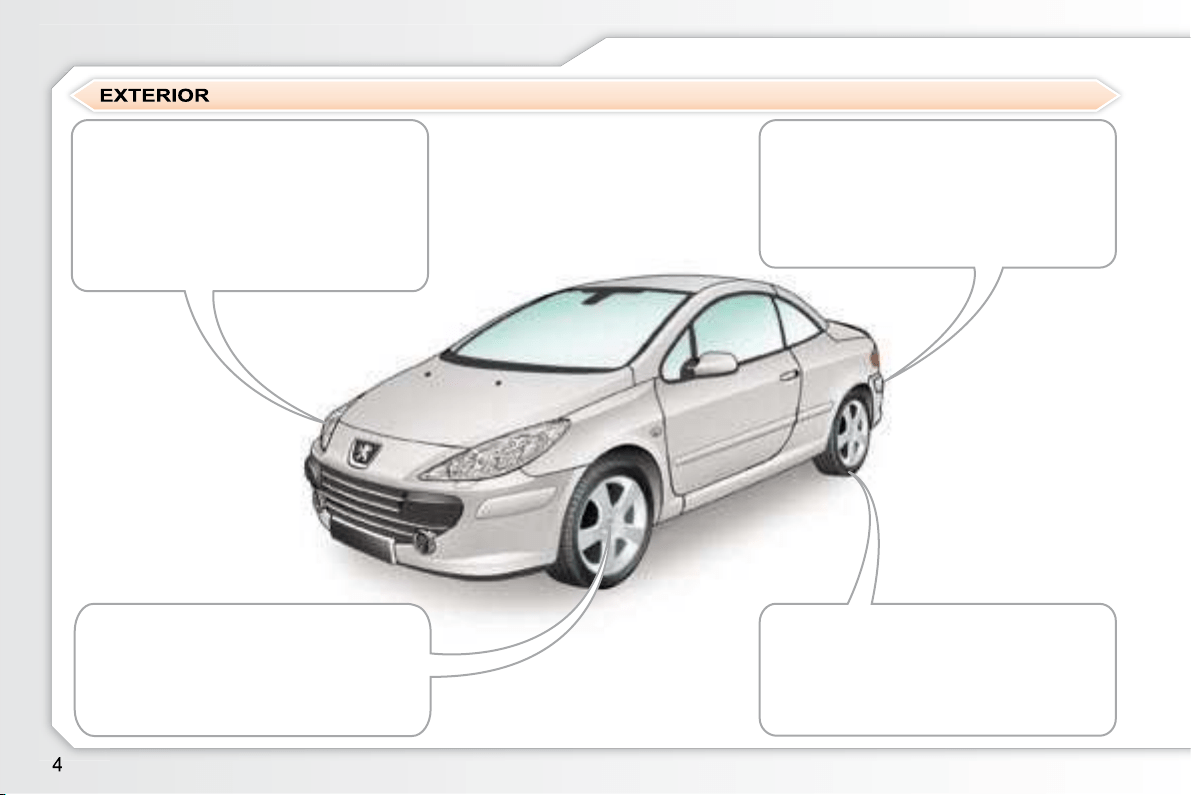
FAMILIARISATION
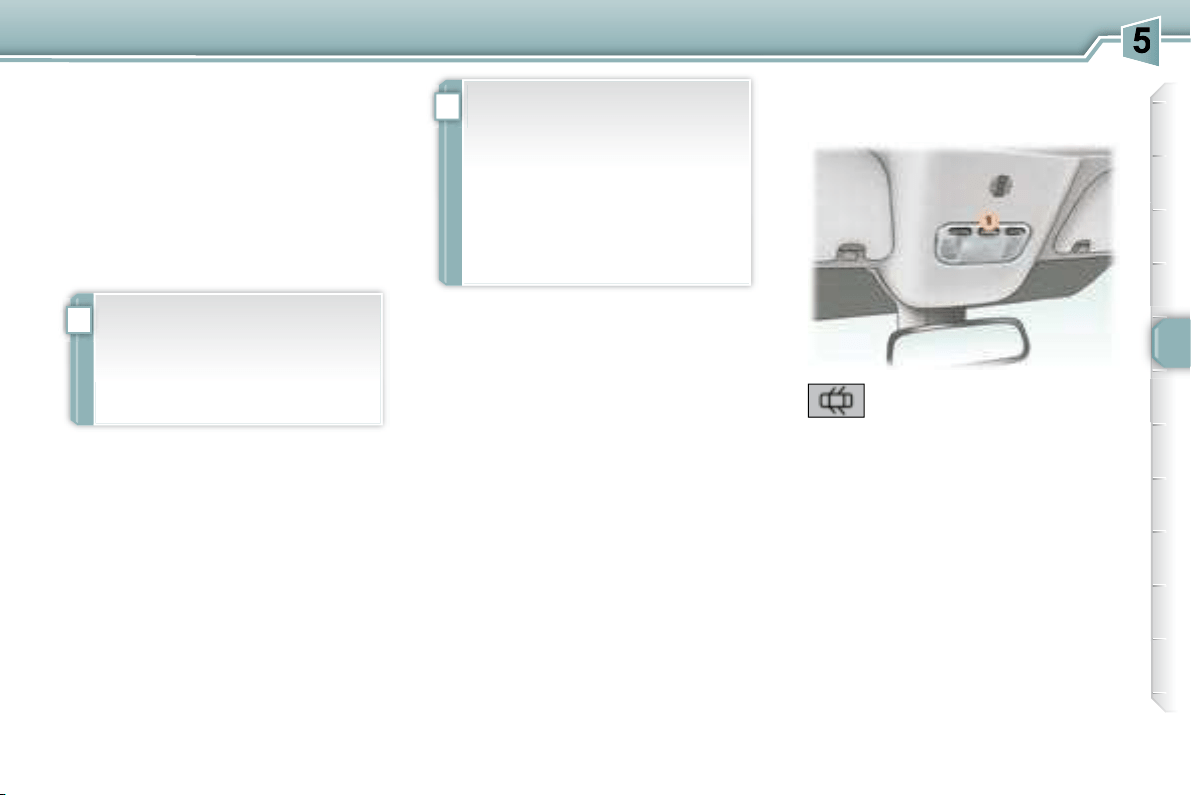
Automatic switching on of the
lights
62
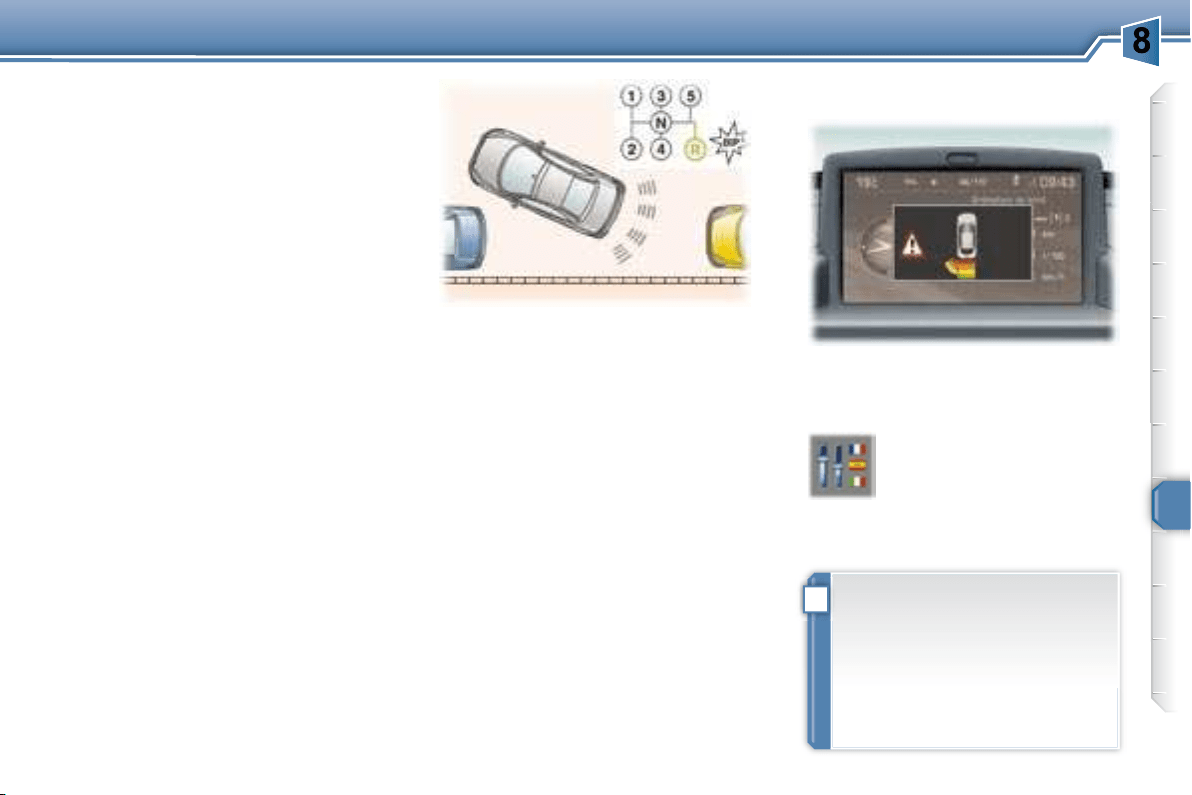
ASR and ESP systems
the directional stability of the vehicle
73
Visual and audible rear parking
assistance
you of obstacles detected behind the
vehicle.
89
Tyre under-inflation detection
71
FAMILIARISATION
Fuel tank
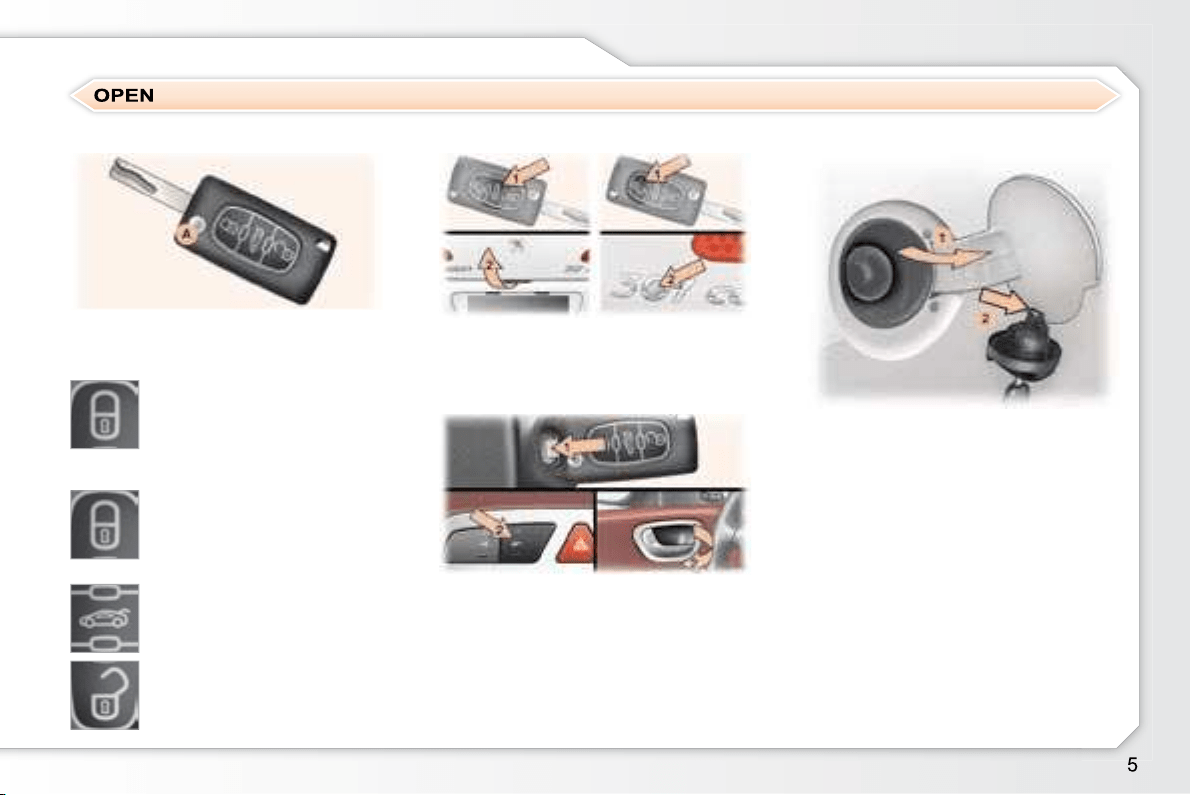
From the outside
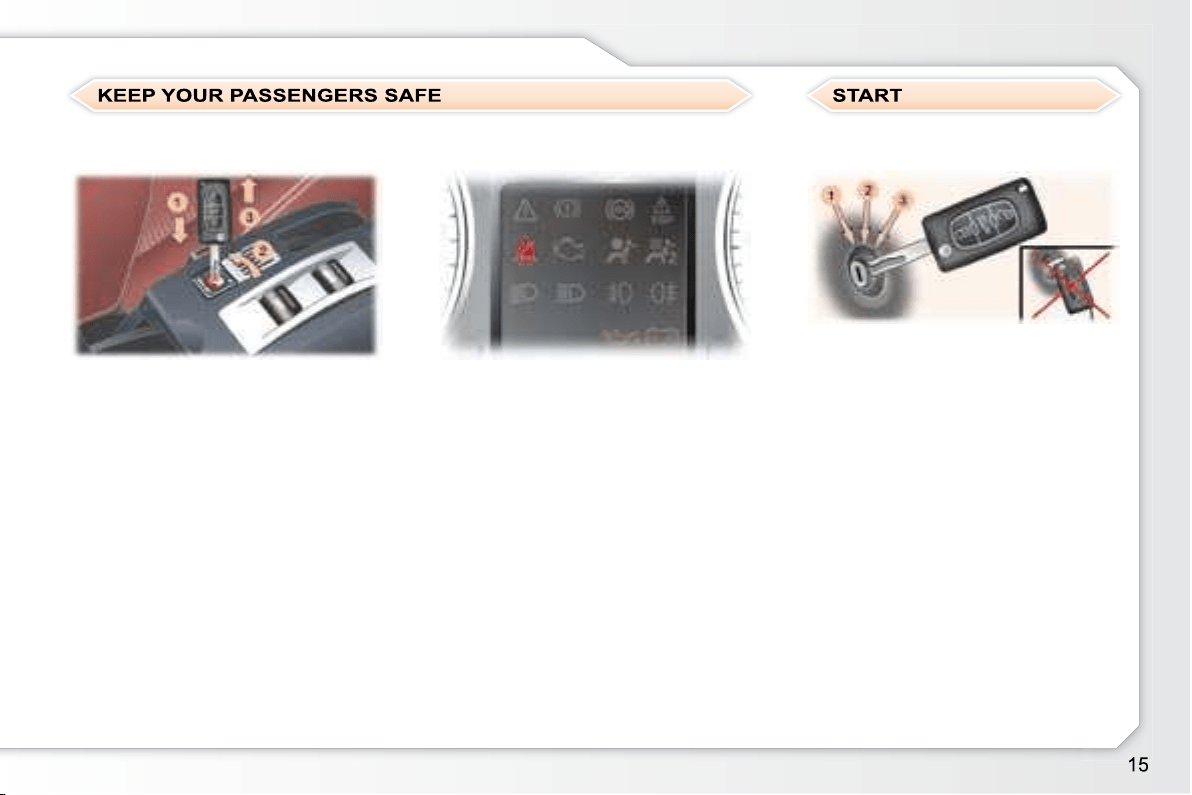
1. Unlocking of the doors and boot.
2.
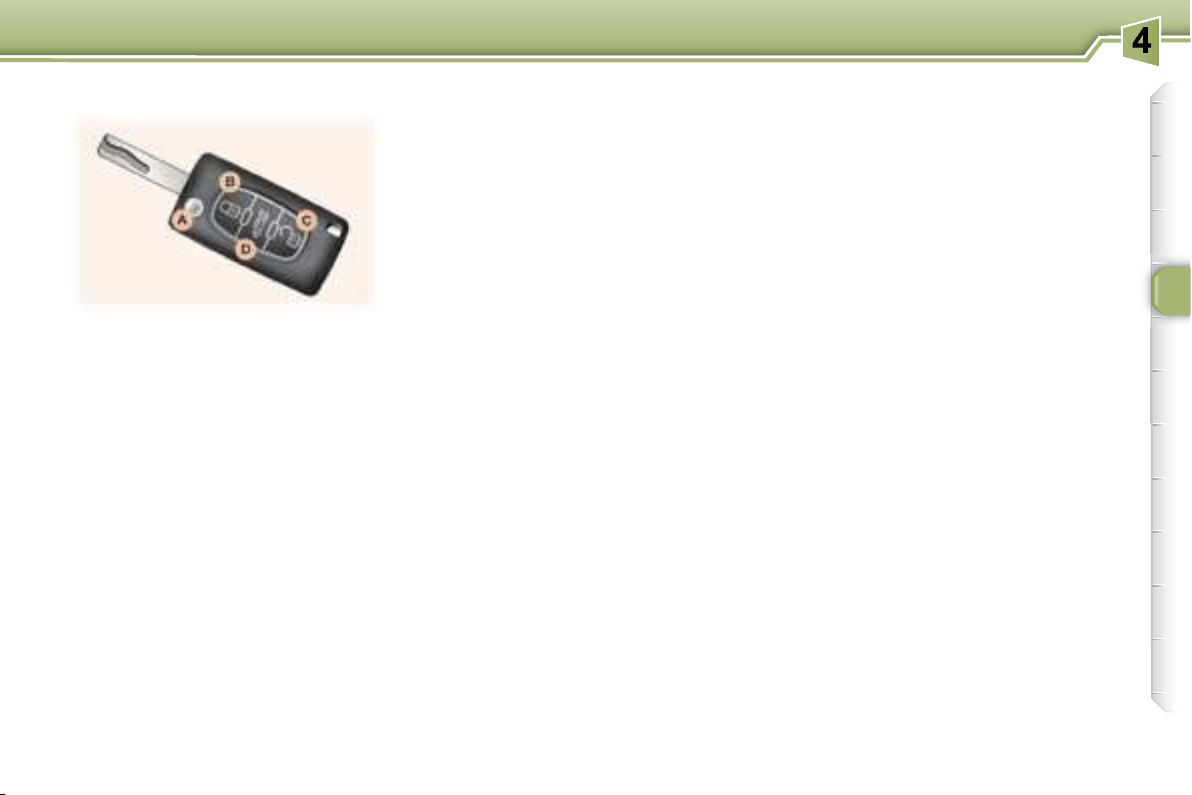
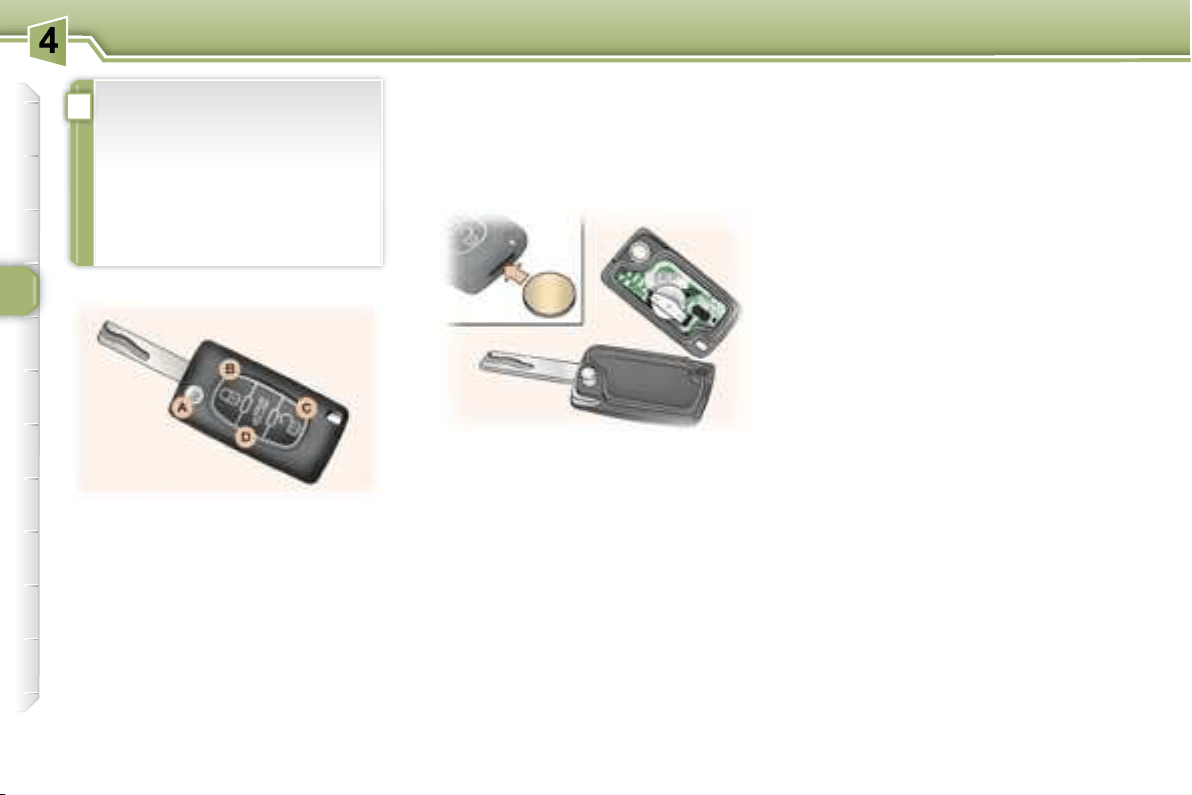
Remote control key
A. Unfolding/Folding of the key.
Boot
1.
2.
mately 60 litres.
60
Normal locking
of the direction indicators).
or
Deadlocking of the vehicle
direction indicators).
Unlocking of the vehicle
direction indicators).
51
From the inside
1.
2. Unlocking using the interior
central control or the interior
58
!
!
!
i
FAMILIARISATION
Retractable roof
Preliminary conditions
M .
(lighting of the indicator light on
the roof control button),
the roof fuse is in good condition
tion),
the movement.
You are strongly advised not
avoid any risk of automatic
seals.
Precautions to be taken before
operating the roof
Park the vehicle on level ground.
the moving rear shelf 1 , on the
boot screen 2 or on or near the
hinged covers 3 ,
boot, this must not raise the
boot screen,
gage retaining net 4 .
Ensure that the boot screen 2
is secured correctly.
Close the boot correctly.
i
!
!
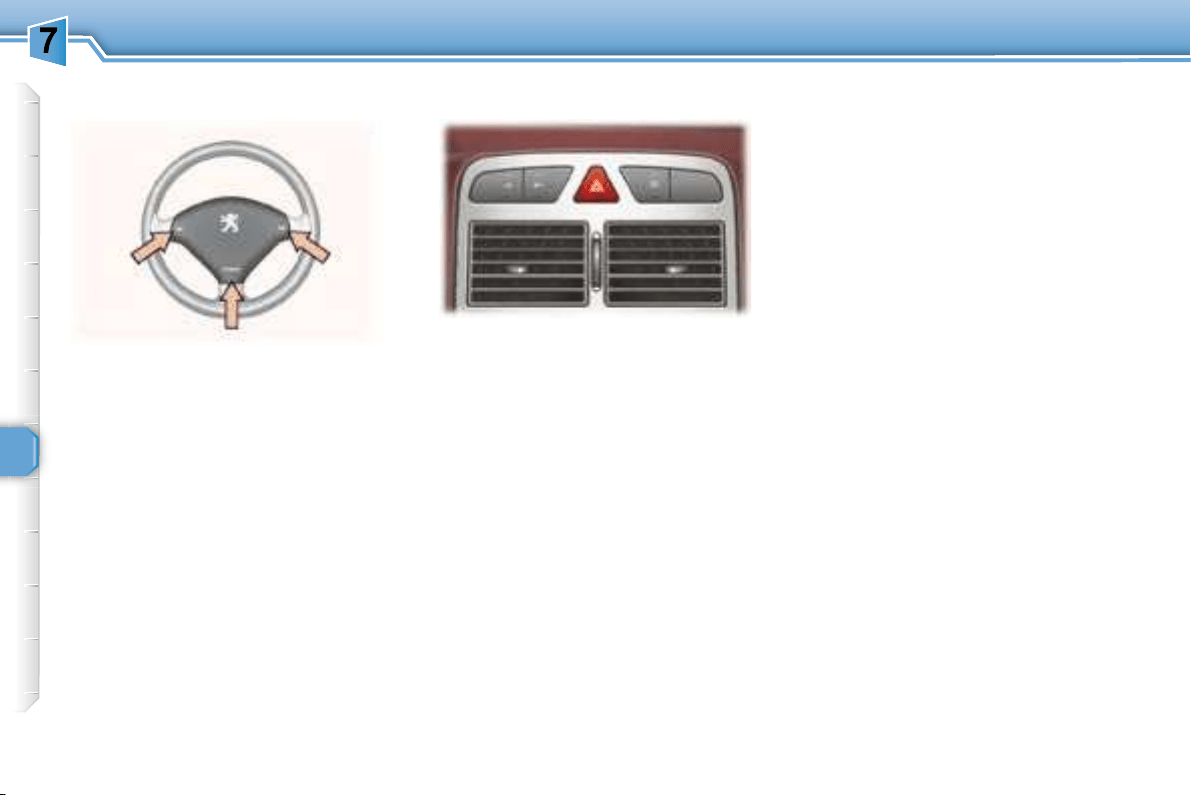
i
!
FAMILIARISATION
do not release the roof button
closed).
release the roof button and the
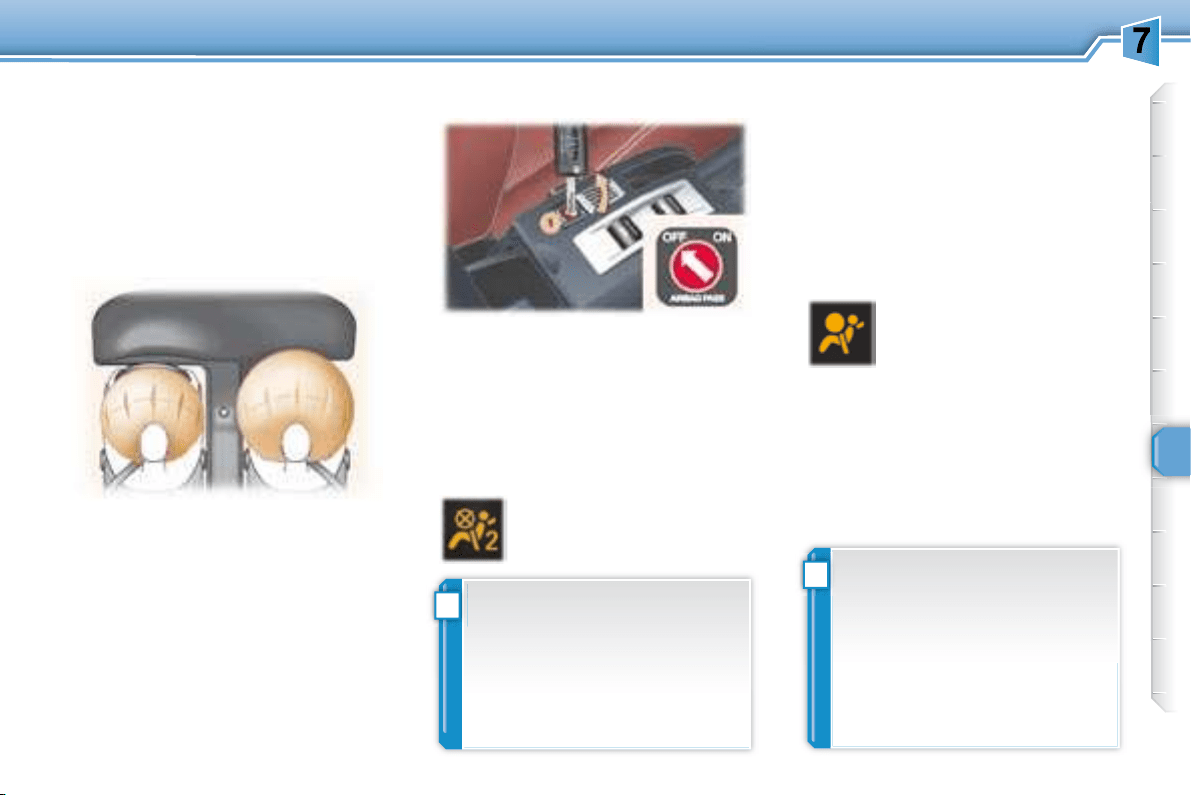
manoeuvre.
Maintenance
ting cycle at least once a month
der.
this button after the end of the
rise.
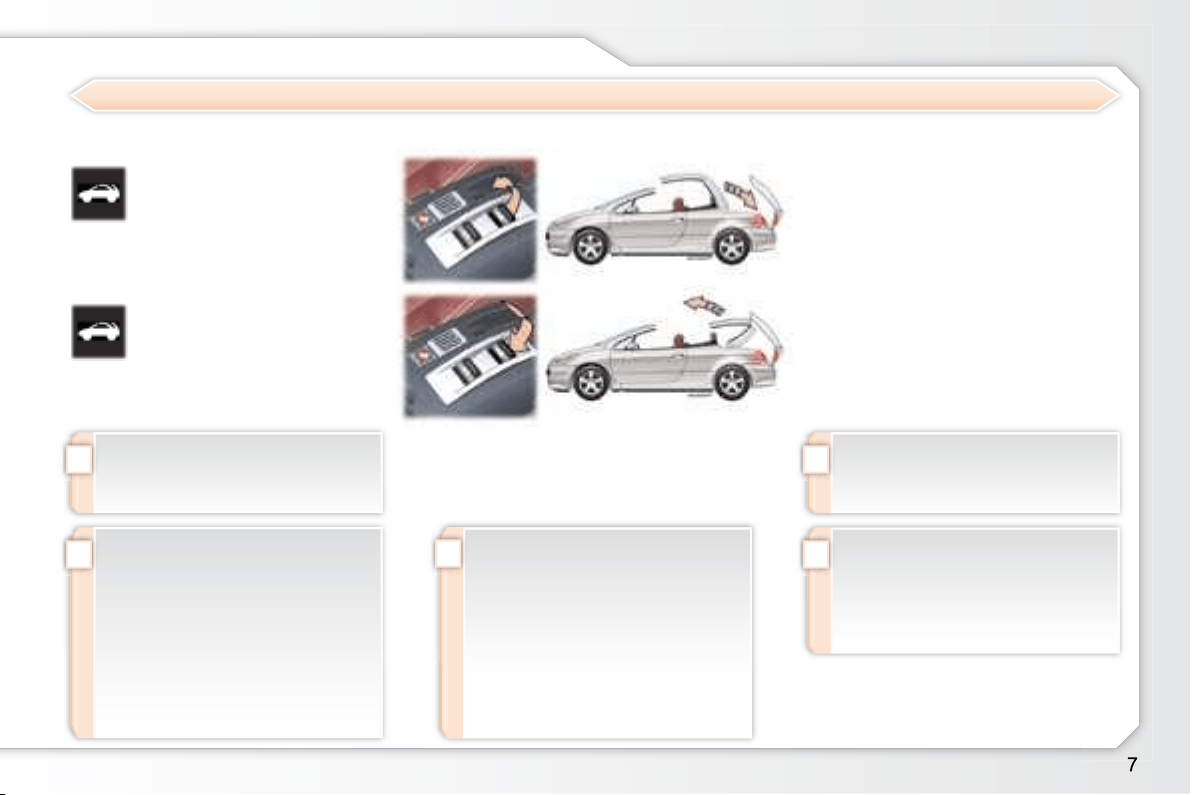
Change to "cabriolet"
roof folds into the boot, the moving
the boot closes.
the hinged covers fold, then the boot
closes.
Operating fault
function of the roof occurs,
manoeuvre again.
a PEUGEOT dealer.
the roof.
Opening the roof
Pull this button until the
manoeuvre.
Closing the roof
Push this button until the
end of the roof closing
manoeuvre.
Operating the retractable roof
and a message on the multifunction
OPEN
and a message on the multifunction
FAMILIARISATION
Dual-zone automatic air
conditioning
different comfort level for the driver and
rior climatic conditions.
38
Automatic gearbox
ving by combining a fully automatic
grammes, and a manual mode.
80
Cruise control/speed limiter
83, 85
Audio and communication
systems
RT4 123
RD4 152
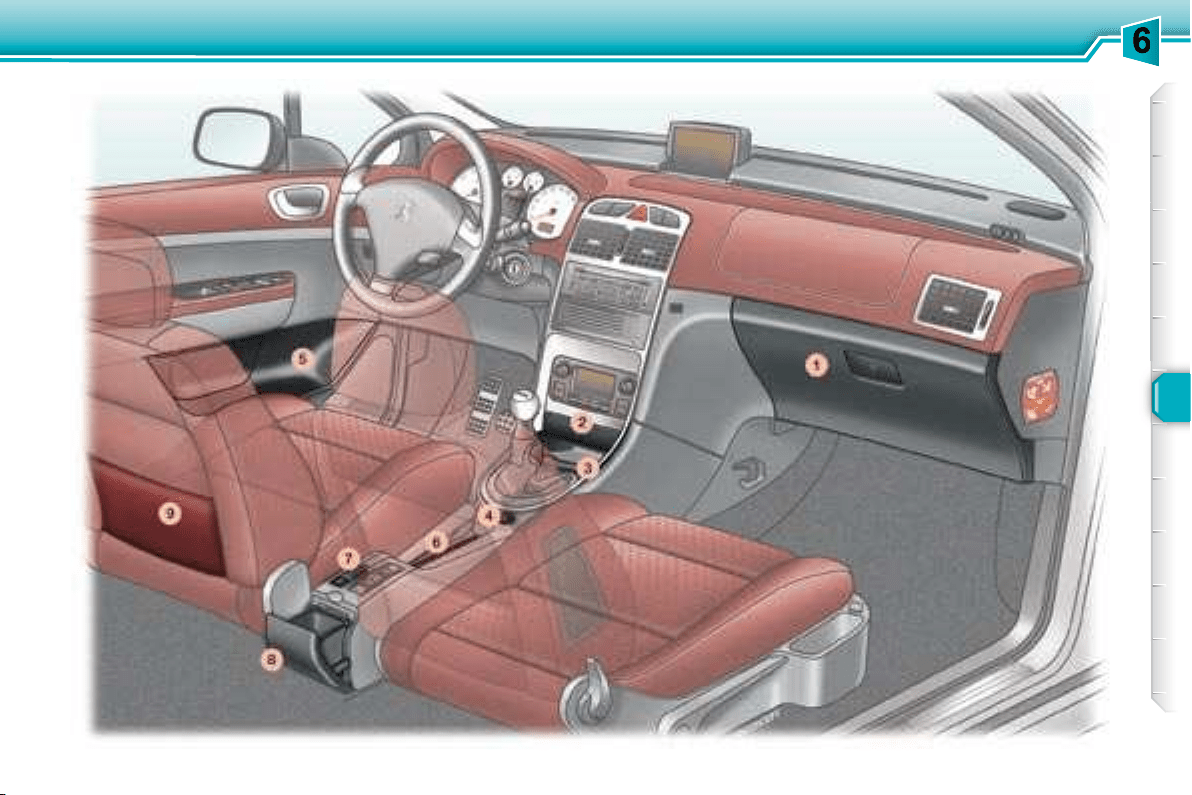
FAMILIARISATION
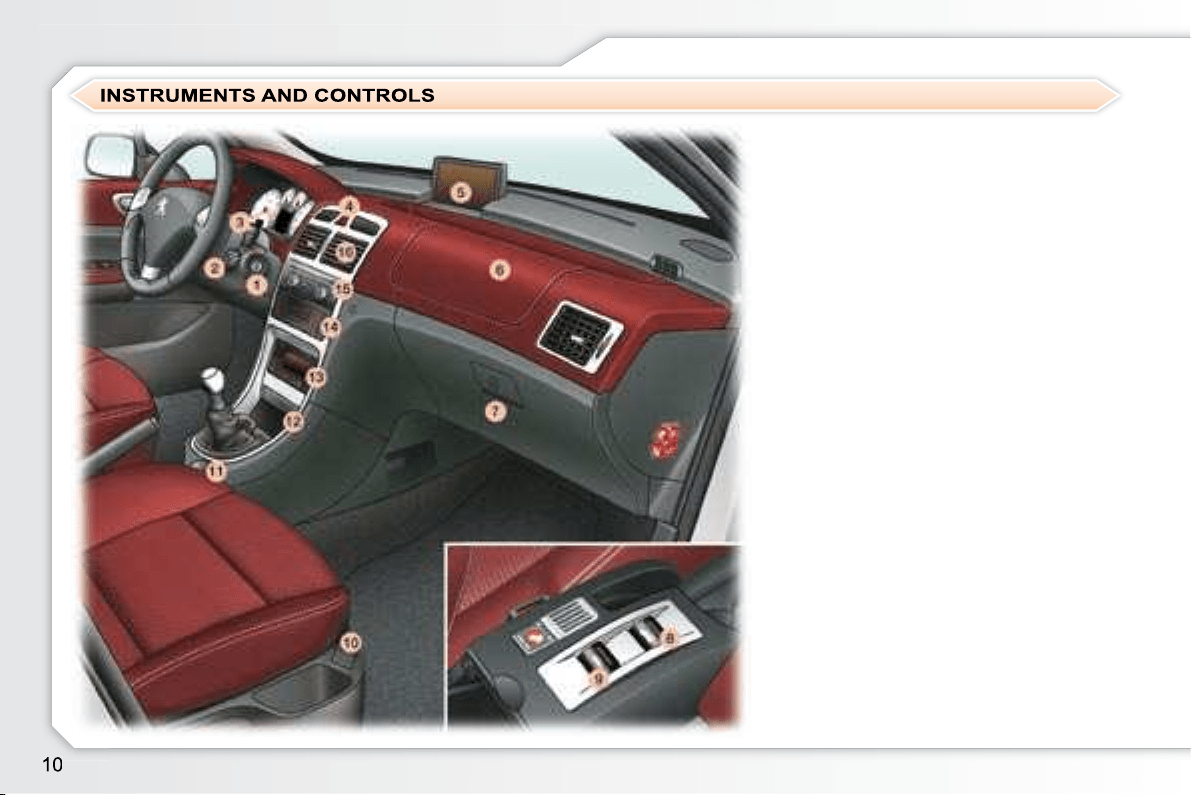
1.
2.
control.
3. Lights and direction indicators
control.
4.
5. Driver's air bag.
Horn.
6. Gear lever.
7. Handbrake.
8. Electric mirror controls.
deactivation control.
9. Bonnet release.
10. Fuse box.
11.
12.
13.
14.
15.
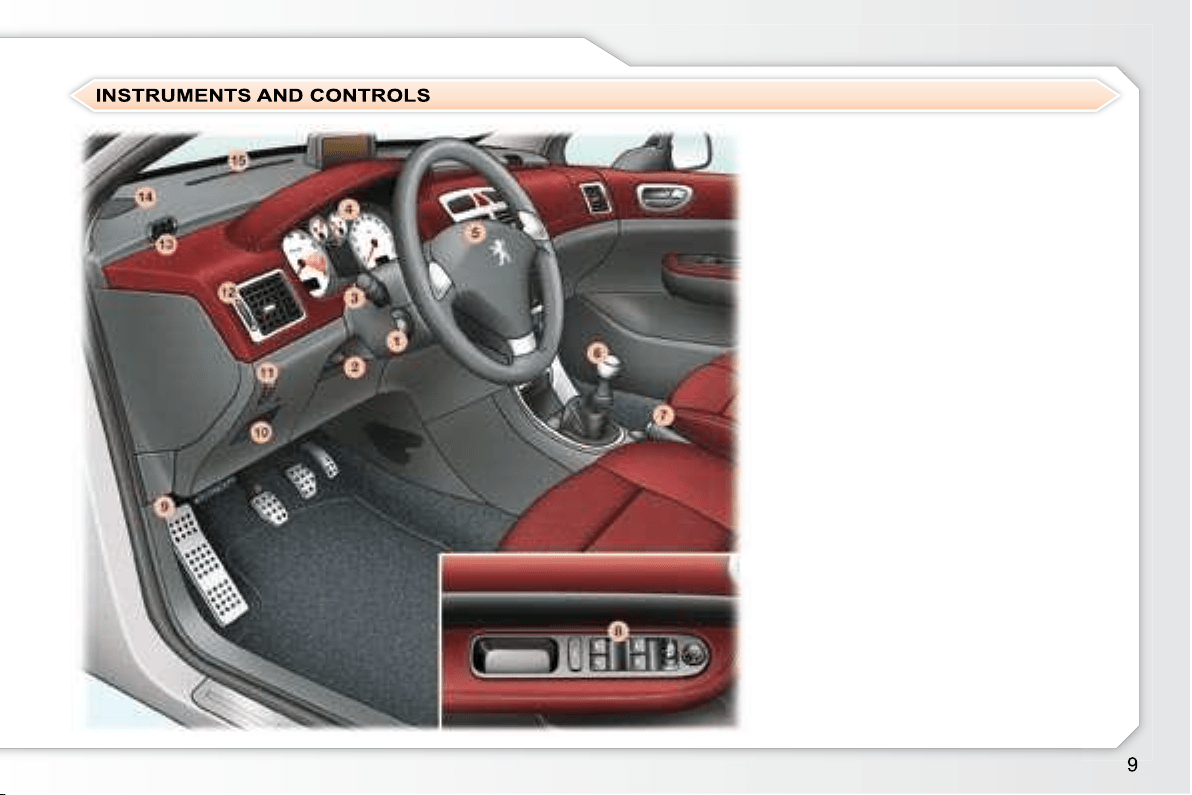
FAMILIARISATION
1. Steering lock and ignition.
2.
control.
3.
control.
4. Alarm button.
Central locking button.
Dynamic stability control
(ESP/ASR) button.
5.
6. Passenger air bag.
7. Glove box/Audio/video sockets.
8. Retractable roof control.
9.
10. Heated seat controls.
11. 12 volt socket.
12. Front ashtray.
13. Heating/Automatic air
conditioning controls.
14. CD changer.
15. Audio RD4 or RT4 GPS
16.
vents.

!
FAMILIARISATION
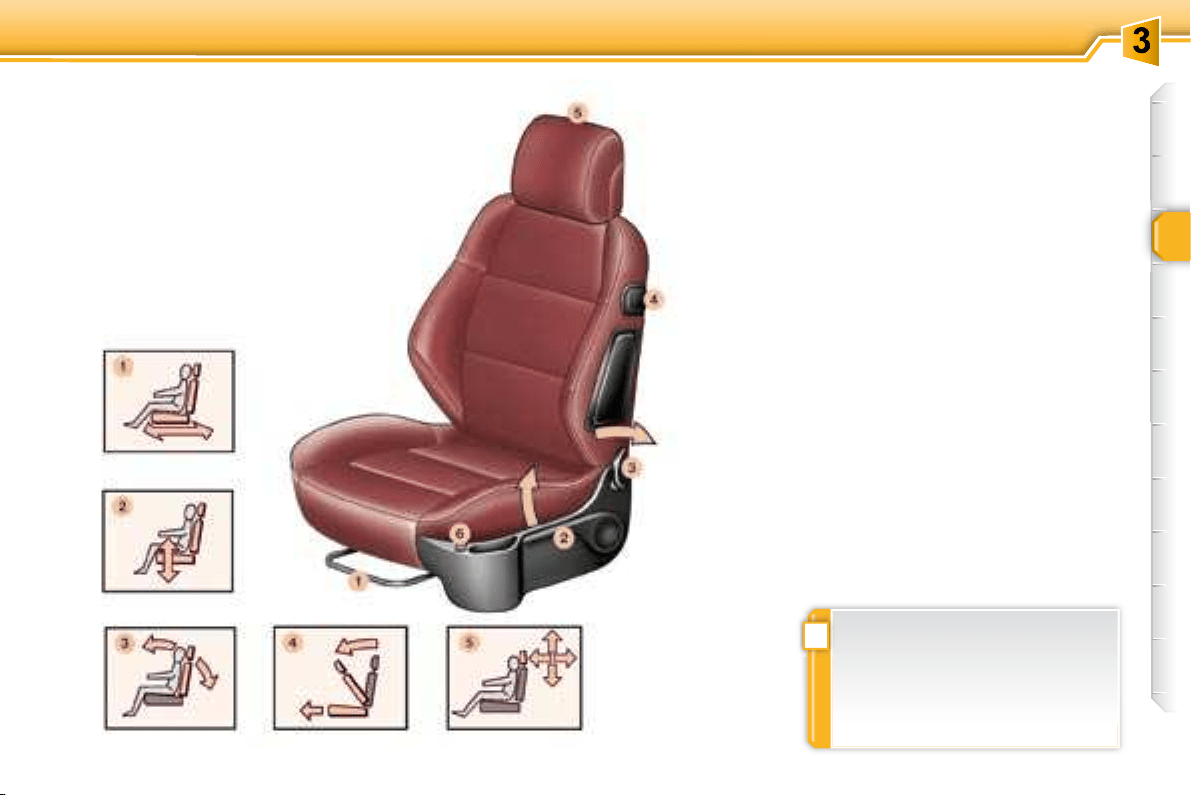
5. Head restraint height and angle
6. Heated seat control.
straints removed.
43
A
A
fully.
42
Front seat adjustment
1.
2.
3.
4. Access to rear seats.
Steering wheel adjustment
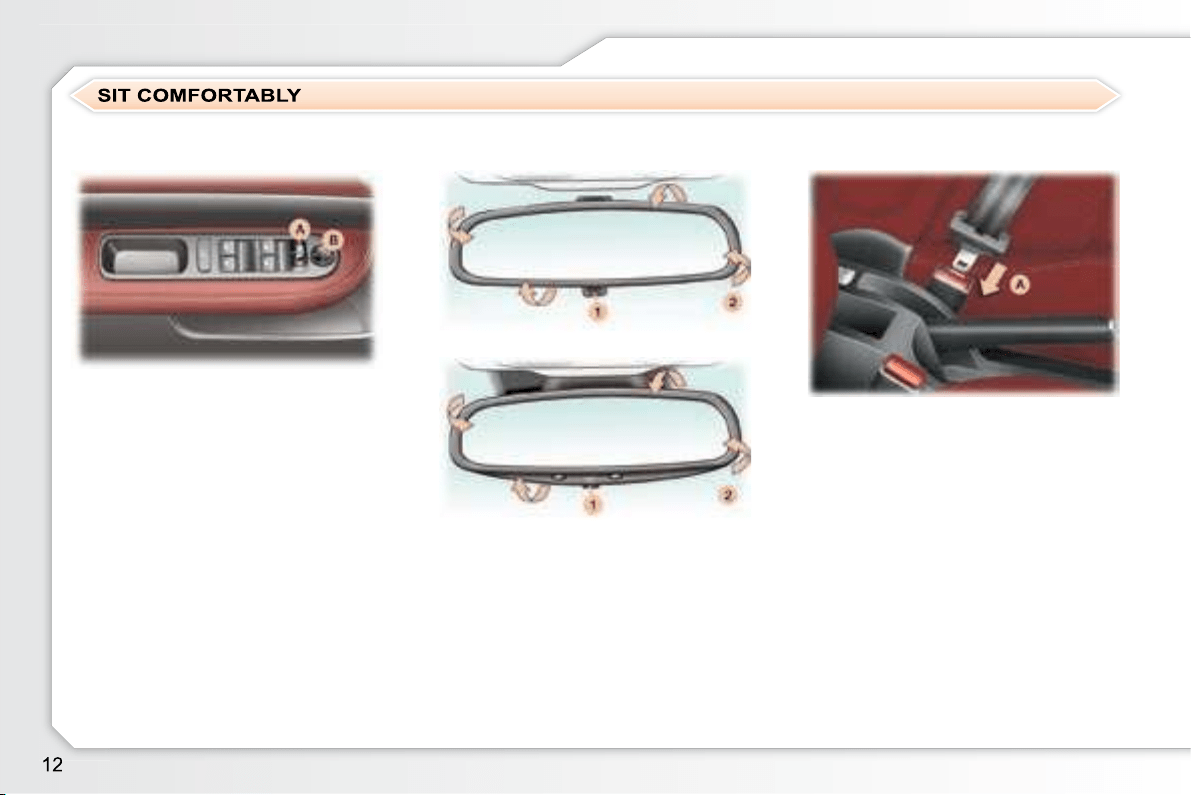
FAMILIARISATION
Interior mirror
adjustment
Front seat belts
Place the control A on the right or
on the left to select the mirror to
Move the control B
Return the control A to the central
trol A
locking the vehicle using the remote
control or the key.
41
1.
the mirror.
2. Directing of the mirror.
42
A. Fastening.
74
Electric mirror adjustment

FAMILIARISATION
Control A: windscreen wipers
2
1
I
0 Park.
AUTO
you.
Ring A: front and rear lights
Lights off.
the lights.
Side lights.
Ring B: fog lamps
61
indicator light.
Wipers
Switching on "AUTO" mode
it.
Switching off "AUTO" mode
"0" .
If the ignition has been off for more
64
Lights
FAMILIARISATION
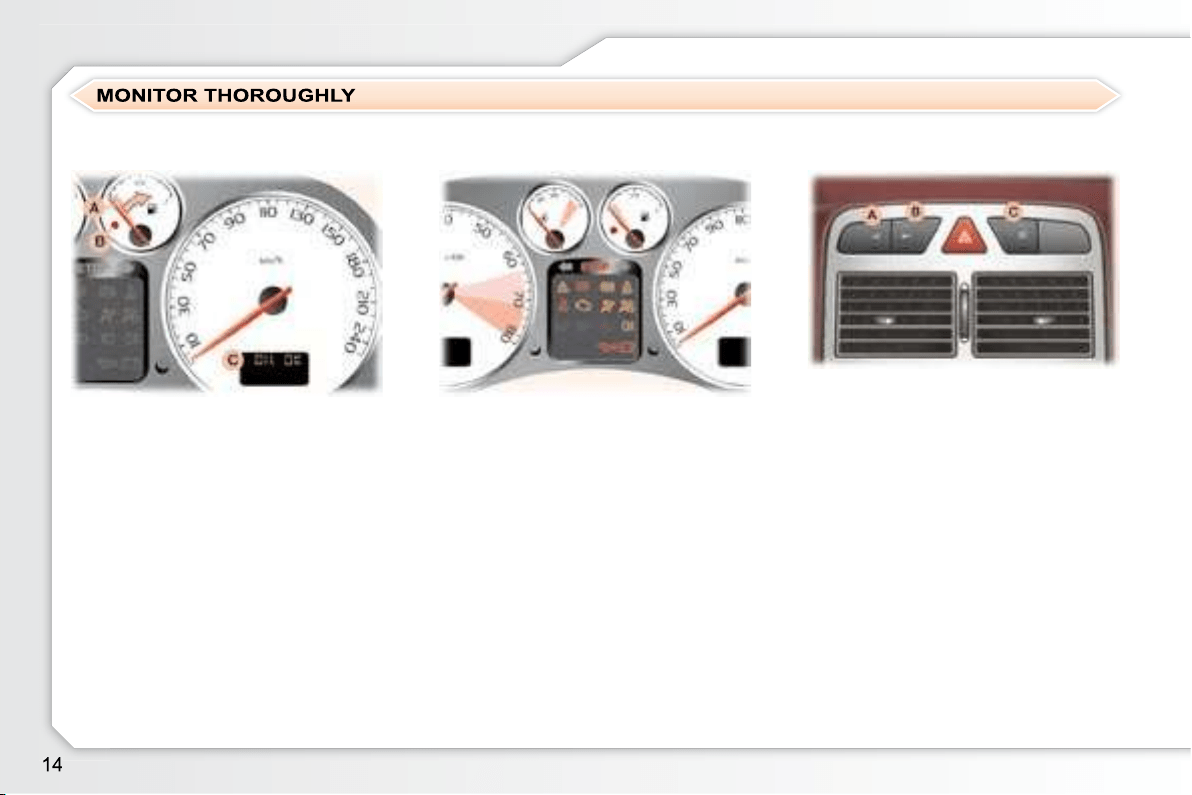
A. When the ignition is on, the
needle should indicate the level
of fuel remaining.
B. When the engine is running, the
C. When the ignition is on, the
oil level indicator should
"OIL OK"
seconds.
necessary.
18
1. When the ignition is on, the
come on.
2. When the engine is running,
20
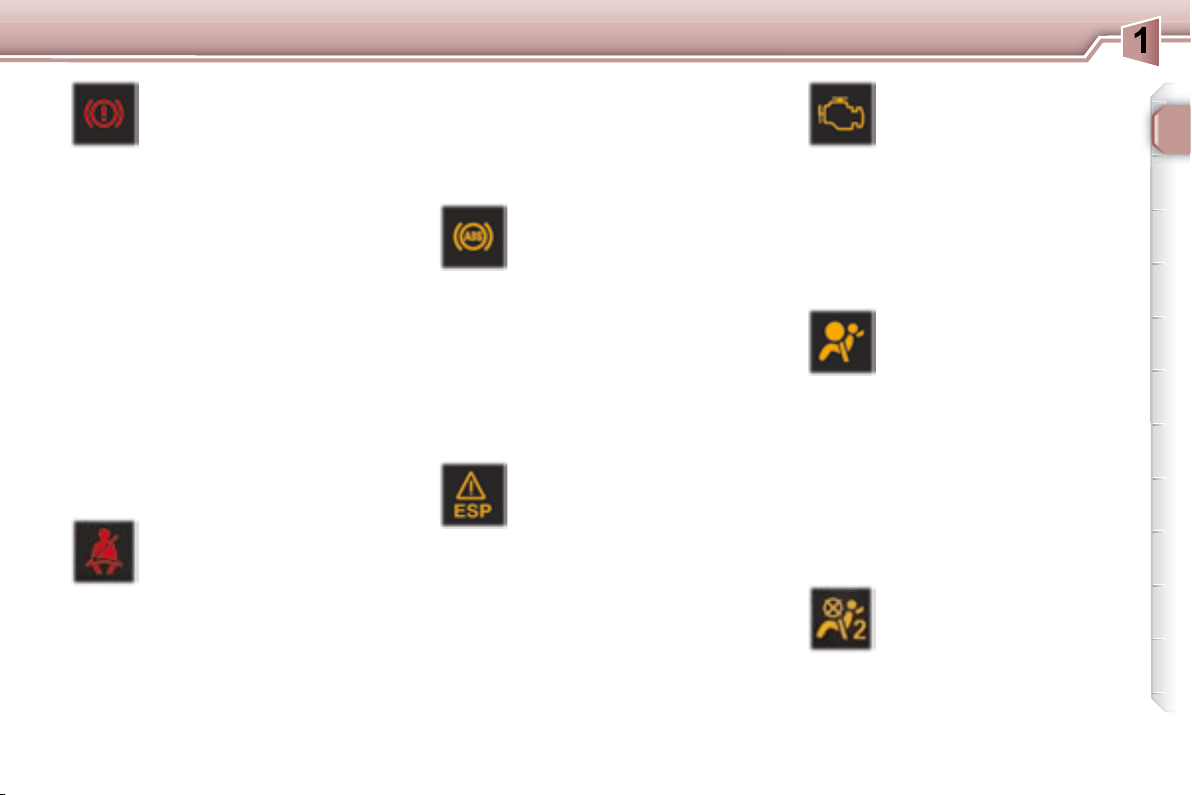
If an indicator light is on, this indicates the
A. Deactivation of the interior
54
B. Central locking.
59
C. Deactivation of the
ESP/ASR system.
73
Instrument panel Warning lights Controls bar
FAMILIARISATION
1. Insertion of the key.
2. "OFF"
child seat,
"ON"
child seat.
3.
77
A.
light comes on if the driver has not
fastened his seat belt.
B.
30 seconds.
C.
ning light comes on continuously
if the seat belt is unfastened.
D.
gnal of increasing volume.
74
Passenger's front air bag Front seat belt not fastened/
unfastened
1. Stop
2. Ignition
3. Starting
52
Ignition switch
FAMILIARISATION
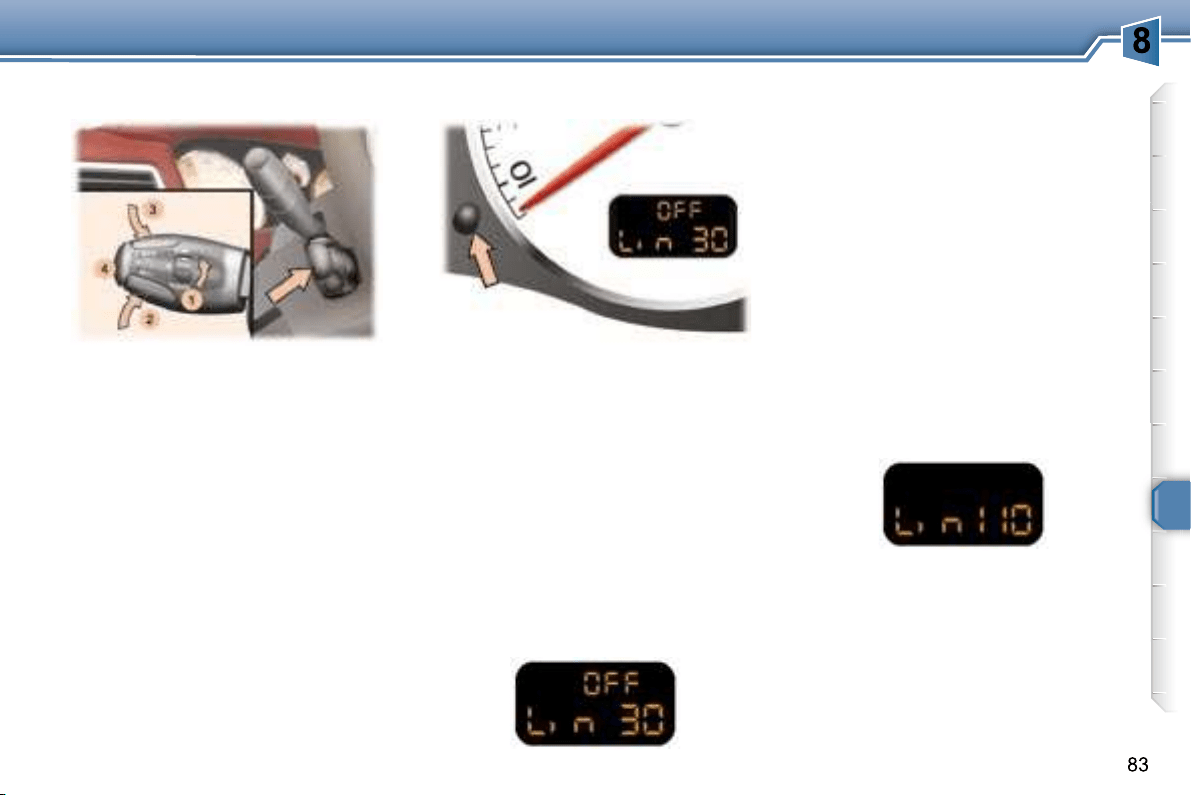
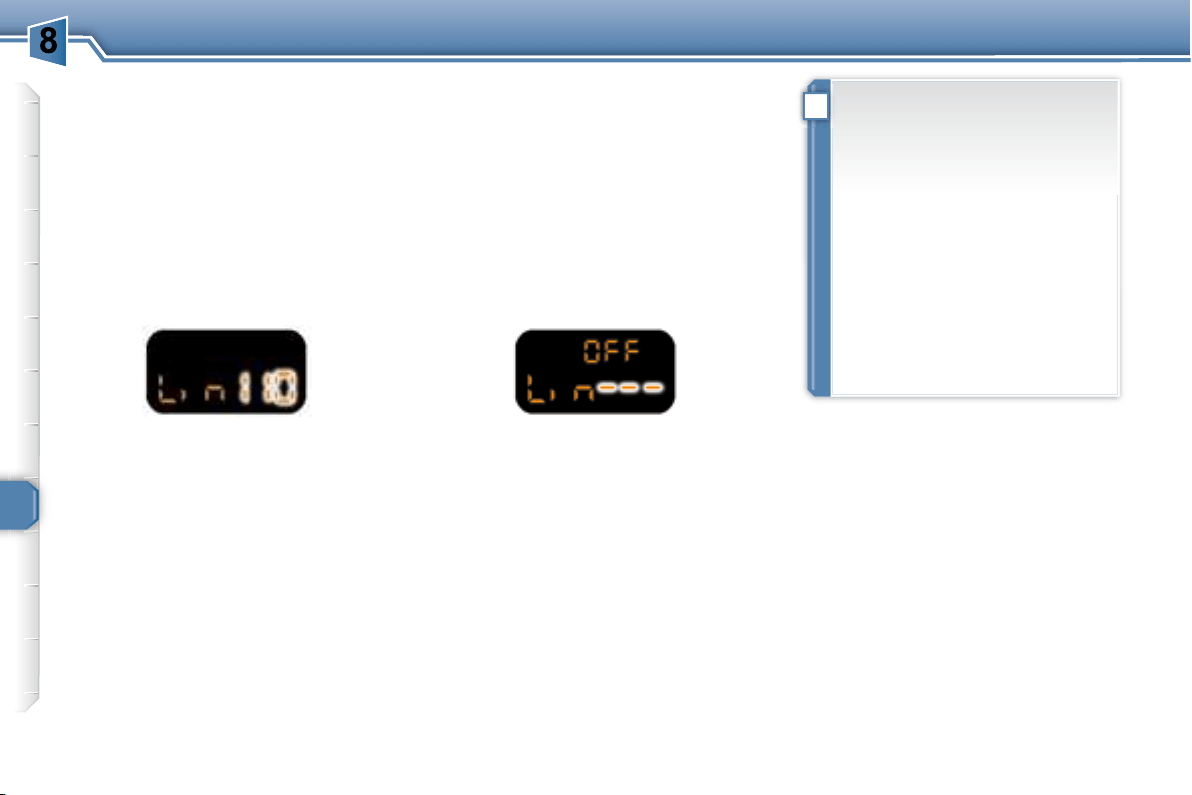
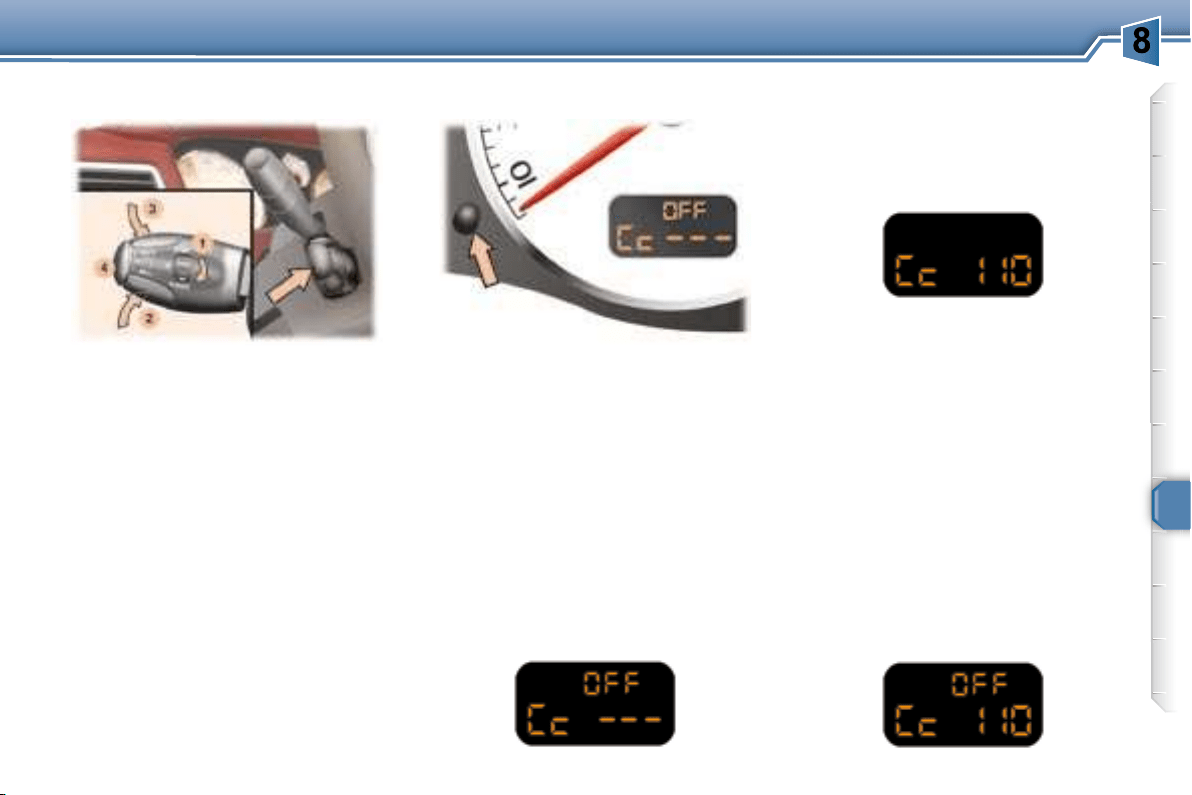
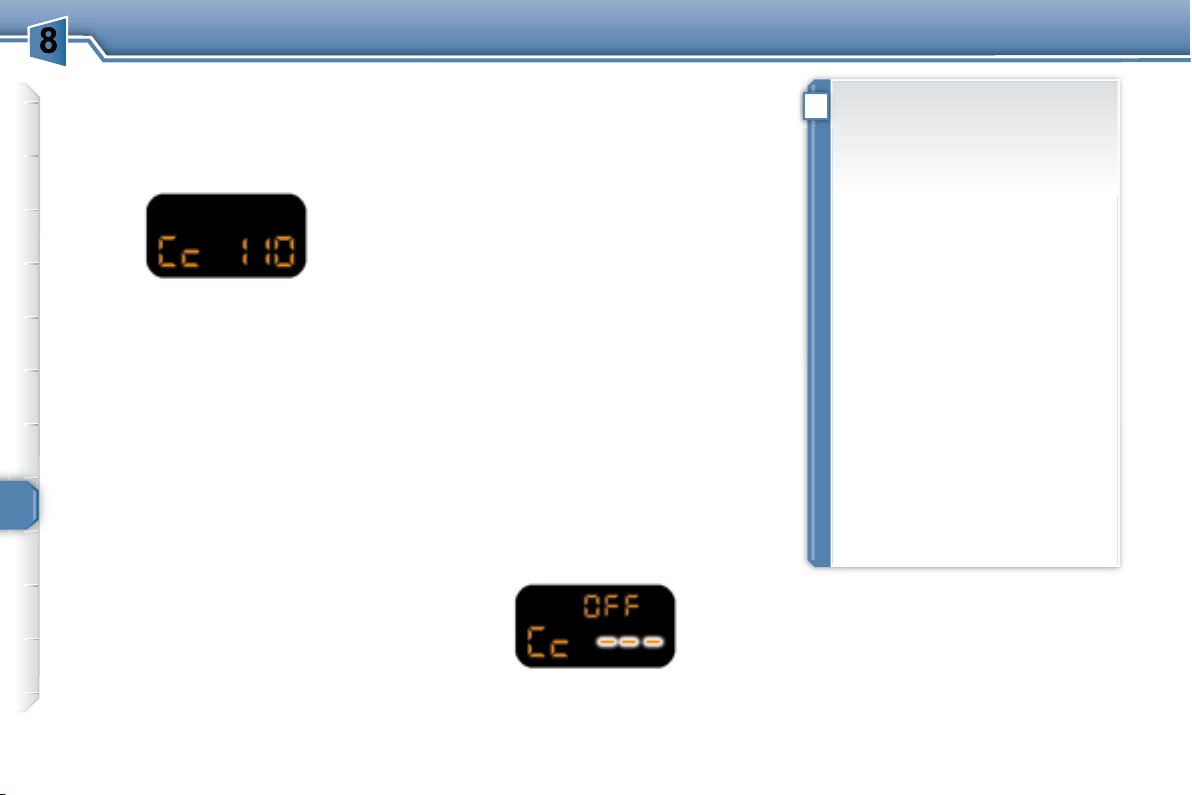
SPEED LIMITER "LIMIT"
Cruise control "CRUISE"
Display on the instrument panel
1. Cruise control mode Selection/
Off.
2.
value.
3.
value.
4. Cruise control Off/Resume.
fourth gear engaged on the manual
gearbox (second for the automatic
gearbox).
85, 87
1.
2.
value.
3.
value.
4.
gine running.
83
Cruise control
Speed limiter
FAMILIARISATION
1. Gear lever.
2. "SPORT" button.
3. "SNOW" button.
Position selection gate
Move the lever in the gate to select
screen.
A.
B. Detection.
C. Activation/Deactivation.
89
Display on the instrument panel
P: Park.
R: Reverse.
N: Neutral.
D: Drive.
M: Manual mode.
S:
:
1 2 3 4: gears engaged.
Moving off
P or N .
P or N , with your foot on the brake
pedal, release the handbrake.
R , D or M .
the vehicle moves off immediately.
Visual and audible rear
parking assistance
"PORSCHE TIPTRONIC
SYSTEM" automatic gearbox
80

18
INSTRUMENTS and CONTROLS
1.
indicator.
2. Rev counter.
3.
indicator.
4.
5. Fuel gauge.
6.
7. Service indicator, oil level
indicator, distance recorder and
8.
reset button.
9. Lighting rheostat button.
10.
indicator.
11.
12.
indicator.
13.
14.
electronic brake force distribution
15.
16. Electronic stability control
17. Driver's seat belt not fastened
18. Emission control system
19.
light.
20. Passenger air bag disarmed
indicator light * .
21.
indicator light.
22.
indicator light.
23.
24.
25.
light.
26.
light * .
27.
PETROL-DIESEL INSTRUMENT PANELS: MANUAL GEARBOX
* According to country.

19
INSTRUMENTS and CONTROLS
1.
indicator.
2.
indicator light.
3.
4.
indicator light.
5. Rev counter.
6.
indicator.
7.
8. Fuel gauge.
9.
10. Service indicator, oil level
indicator, distance recorder and
11.
reset button.
12. Lighting rheostat
button.
13.
indicator.
14. Central STOP
15.
indicator.
16.
17.
electronic brake force distribution
18.
19. Electronic stability control
20. Driver's seat belt not fastened
21.
light.
22.
23. Passenger air bag disarmed
indicator light * .
24.
indicator light.
25.
light.
26.
27.
28.
29.
PETROL INSTRUMENT PANEL DIALS: AUTOMATIC GEARBOX
* According to country.
20
INSTRUMENTS and CONTROLS
OPERATION WARNING
LIGHTS
A permanently lit warning light or
ning, indicates an operating fault
in the relevant unit. Some warning
lights may be linked to buzzers and
a message on the multifunction dis-
play. Do not ignore this warning:
contact a PEUGEOT dealer as soon
as possible.
If the Central STOP warning light
comes on when you are driving,
stop immediately where it is safe to
do so.
Central STOP
warning light
This light comes on
the engine running.
Contact a PEUGEOT dealer.
concerned.
Service warning light
This light comes on for a
If it remains on or comes
fault,
fault,
fault,
fault,
lights system fault,
ment system fault,
system fault,
level (Diesel),
remains on, contact a PEUGEOT
dealer.
may be heard under the fascia
There is a risk of damage to the
Contact a PEUGEOT dealer as
Warning:
rised.
level.
Contact a PEUGEOT dealer.
* According to country.
** According to engine.
21
INSTRUMENTS and CONTROLS
Air bags and rear, protective, pop-
up roll-over hoops warning light
an audible signal and a message on
air bags,
or
located in the rear head restraints.
Contact a PEUGEOT dealer.
Passenger air bag
disarmed indicator light *
the indicator light remains on.
es, contact a PEUGEOT dealer.
Emission control system
warning light
This comes on each time
ter the engine is started.
tion of the emission control system.
Contact a PEUGEOT dealer as soon
Anti-lock braking system
(ABS) warning light
This light comes on for a
If it remains on or comes on above
malfunction of the ABS.
Contact a PEUGEOT dealer.
Electronic stability
programme (ESP/ASR)
warning light
seconds each time the
If the light remains on or comes on
by an audible signal and a message
a PEUGEOT dealer.
When the engine is running and the
system is activated.
Handbrake, low brake
brake force distribution
fault warning light
Linked to the central STOP
has not been released correctly,
brake force distribution, if linked
Stop immediately
Contact a PEUGEOT dealer.
Seat belt unfastened/not
fastened warning light
When the ignition is
on if the driver has not fastened his
seat belt.
With the engine running and the
matically after 30 seconds.
comes on constantly,
of increasing volume. Once these
light remains on until the driver
fastens his seat belt.
* According to country.

22
INSTRUMENTS and CONTROLS
Engine oil pressure warning *
Linked to the central STOP
light.
Stop immediately
.
Contact a PEUGEOT dealer as soon
Diesel engine pre-heat
warning light
erating the starter.
Battery charge warning
light *
circuit,
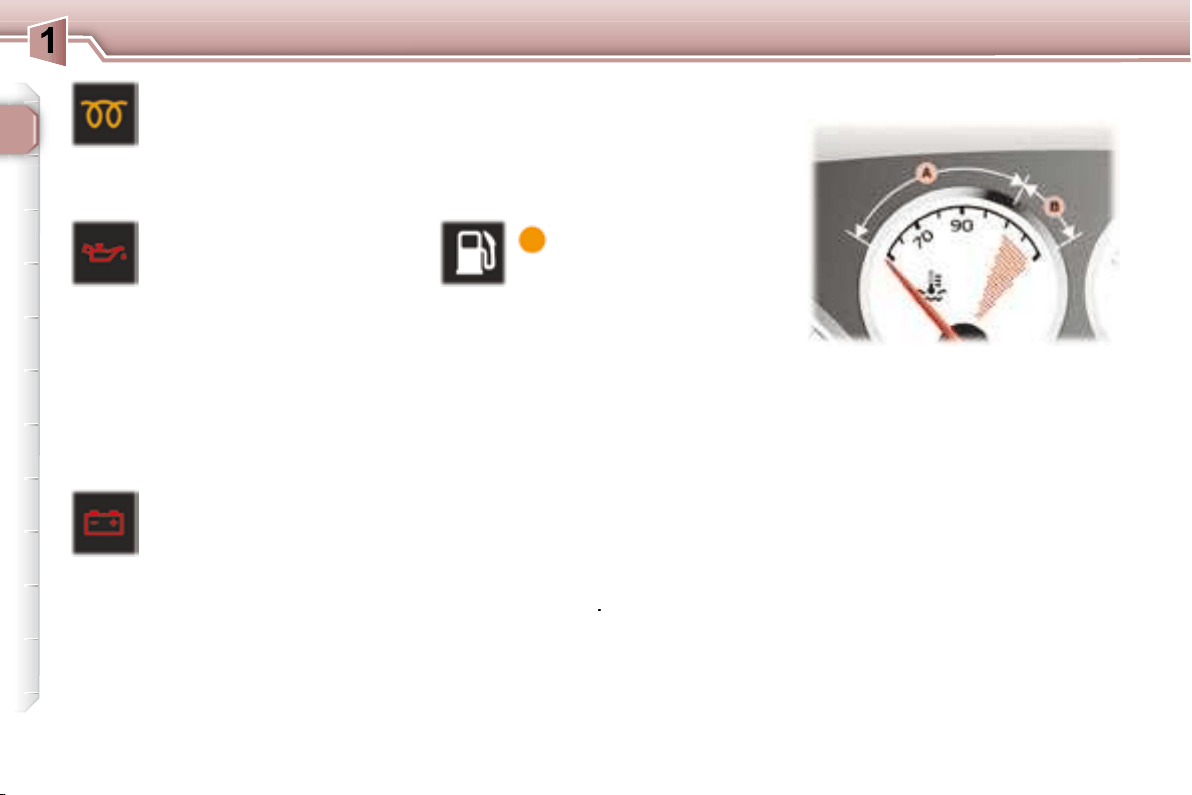
Low fuel level
warning light
This comes on for a
time the ignition is
audible signal and a message on the
Engine oil pressure
warning light *
Linked to the central STOP
Contact a PEUGEOT dealer.
When the needle is in zone A , the
When the needle is in zone B , the
STOP
You must stop immediately.
Warning:
In order to avoid any risk of scalding,
Contact a PEUGEOT dealer.
Coolant temperature indicator
* According to country.
Stop immediately.
Contact a PEUGEOT dealer as soon
22
INSTRUMENTS and CONTROLS
Engine oil pressure warning *
Linked to the central STOP
light.
Stop immediately
.
Contact a PEUGEOT dealer as soon
Diesel engine pre-heat
warning light
erating the starter.
Battery charge warning
light *
circuit,
Low fuel level
warning light
This comes on for a
time the ignition is
audible signal and a message on the
Engine oil pressure
warning light *
Linked to the central STOP
Contact a PEUGEOT dealer.
When the needle is in zone A , the
When the needle is in zone B , the
STOP
You must stop immediately.
Warning:
In order to avoid any risk of scalding,
Contact a PEUGEOT dealer.
Coolant temperature indicator
* According to country.
Stop immediately.
Contact a PEUGEOT dealer as soon
23
INSTRUMENTS and CONTROLS
maximum graduation is reached.
You must stop immediately
.
Contact a PEUGEOT dealer.
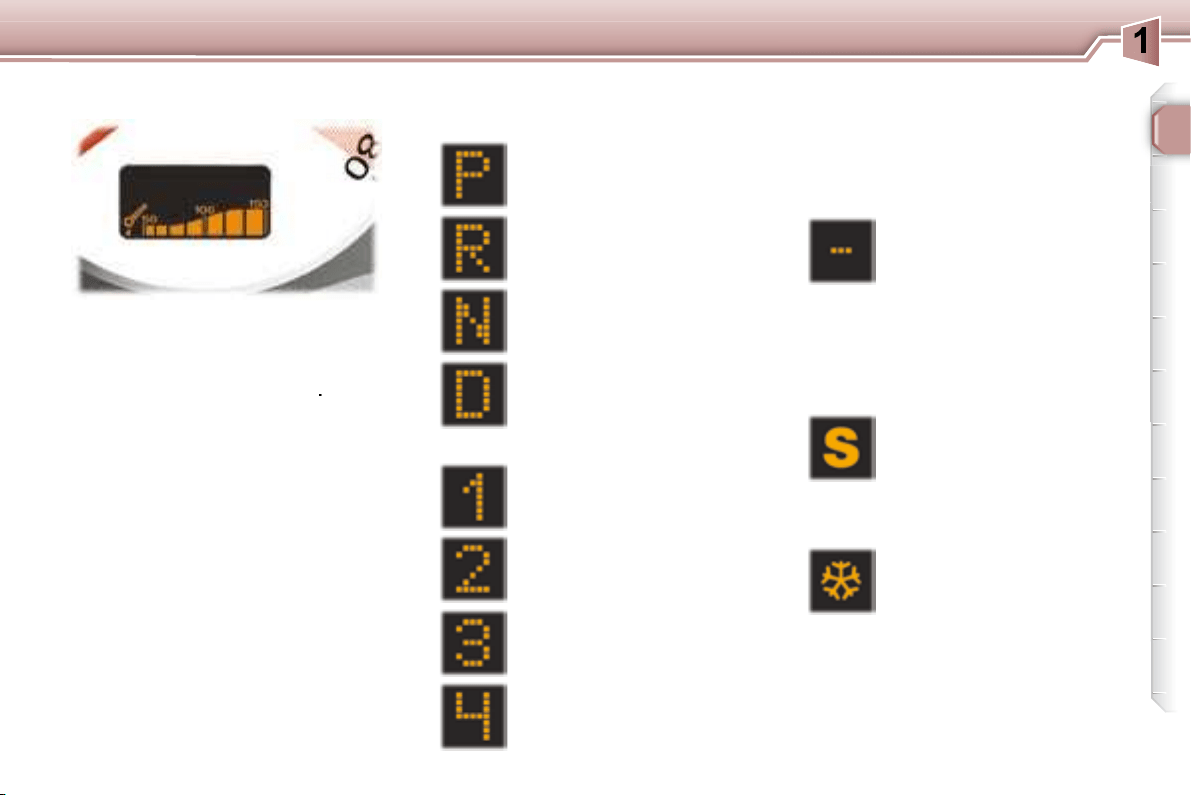
Park
Automatic gearbox lever
positions indicator
Reverse
Neutral
Drive
Manual mode:
1st gear engaged
2nd gear engaged
3rd gear engaged
4th gear engaged
tomatic gearbox "SPORT"
lected.
tomatic gearbox "SNOW"
lected.
is not engaged correctly
tions).
"SNOW" indicator light
Invalid value during manual
operation
"SPORT" indicator light
Engine oil temperature
indicator
Automatic gearbox indicator
lights
24
INSTRUMENTS and CONTROLS
Note
ing and unlocking the vehicle.
Service indicator
facturer's servicing schedule.
the last service.
Note: the distance remaining before
er's driving habits.
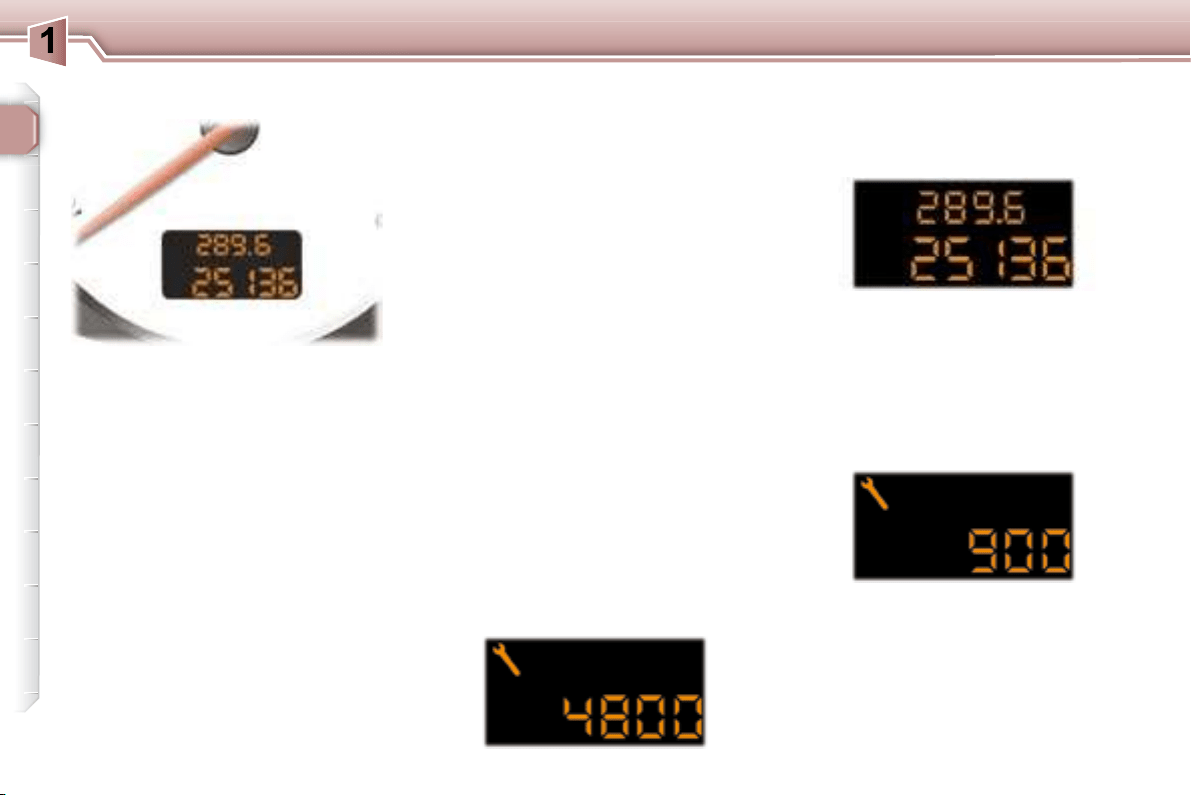
Operation
For 5 seconds after the ignition is
tres] (rounded off) remaining until the
next service.
Example: 4,800 miles/km remain
INSTRUMENT PANEL DISPLAY
The distance remaining to the
next service is less than
500 miles (1,000 km).
Example: 400 miles (900 km) remain
before the next service.
For 5 seconds after the ignition is
the spanner remains lit .
It indicates that a service must be
distance.

24
INSTRUMENTS and CONTROLS
Note
ing and unlocking the vehicle.
Service indicator
facturer's servicing schedule.
the last service.
Note: the distance remaining before
er's driving habits.
Operation
For 5 seconds after the ignition is
tres] (rounded off) remaining until the
next service.
Example: 4,800 miles/km remain
INSTRUMENT PANEL DISPLAY
The distance remaining to the
next service is less than
500 miles (1,000 km).
Example: 400 miles (900 km) remain
before the next service.
For 5 seconds after the ignition is
the spanner remains lit .
It indicates that a service must be
distance.

25
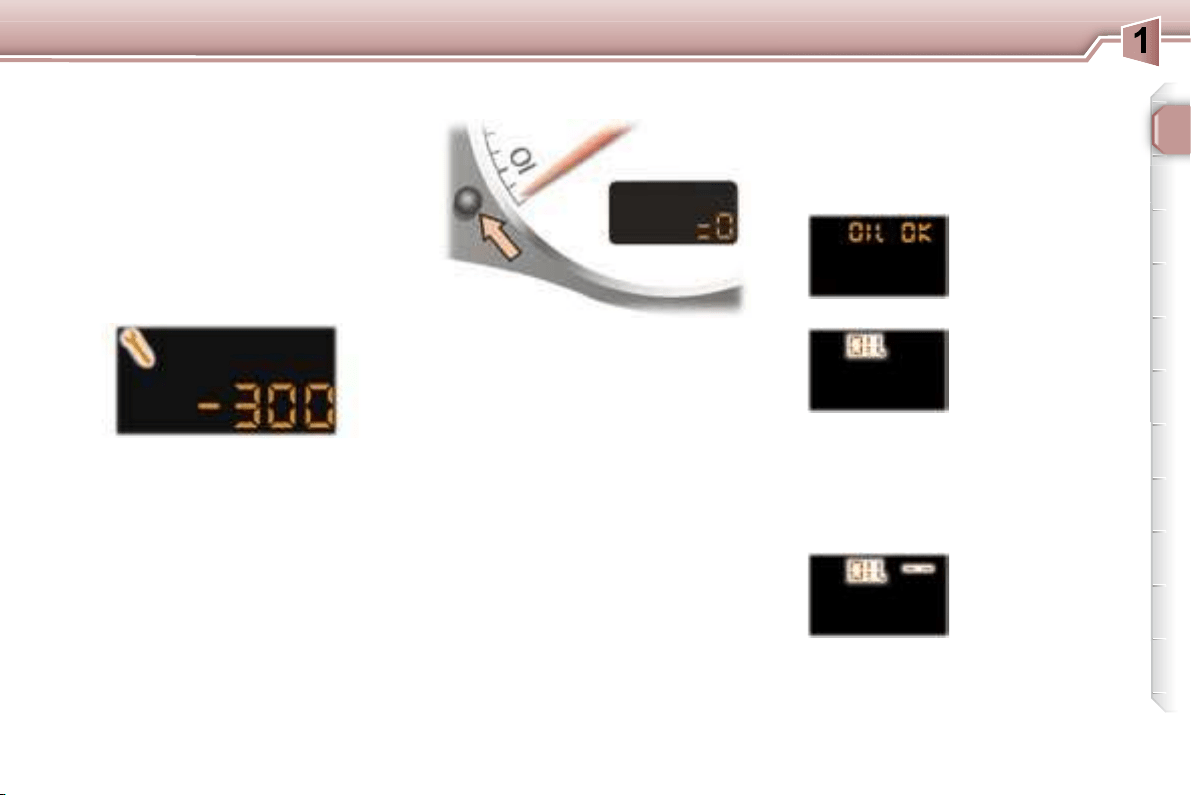
INSTRUMENTS and CONTROLS
Your PEUGEOT dealer carries out
"=0"
Important:
The service is overdue.
Example: the service is overdue by
300 miles/km, your vehicle must be
For 5 seconds after the ignition is
Engine oil level indicator
seconds, after the service information.
Oil level correct
Oil level gauge fault
Note:
since the last service.
Flashing of "OIL --"
tion of the engine
oil level gauge.
Contact a PEUGEOT dealer.
The level read will only be correct
if the vehicle is on level ground
and the engine has been off for
more than 15 minutes.
Flashing of "OIL" ,
nal and a message
engine.
Lack of oil
Service indicator zero re-set

25
INSTRUMENTS and CONTROLS
Your PEUGEOT dealer carries out
"=0"
Important:
The service is overdue.
Example: the service is overdue by
300 miles/km, your vehicle must be
For 5 seconds after the ignition is
Engine oil level indicator
seconds, after the service information.
Oil level correct
Oil level gauge fault
Note:
since the last service.
Flashing of "OIL --"
tion of the engine
oil level gauge.
Contact a PEUGEOT dealer.
The level read will only be correct
if the vehicle is on level ground
and the engine has been off for
more than 15 minutes.
Flashing of "OIL" ,
nal and a message
engine.
Lack of oil
Service indicator zero re-set

26
INSTRUMENTS and CONTROLS
to vary the intensity of the lighting of
the instruments and controls. When
the lighting reaches the minimum (or
maximum) setting, release the button
duce) the brightness.
Pressing the button enables you to
is activated.
Dipstick
There are 2 marks on the
to your engine.
A = max.
B = min.
Lighting rheostat Trip recorder zero reset
button

27
INSTRUMENTS and CONTROLS
- the current information
tab with:
Colour display
Route zero reset
Monochrome display C
wipers stalk
tabs in succession:
Data displays
The routes "1" "2"
Route "1"
"2" monthly
- the route "1" tab with:
- the route "2" tab with:
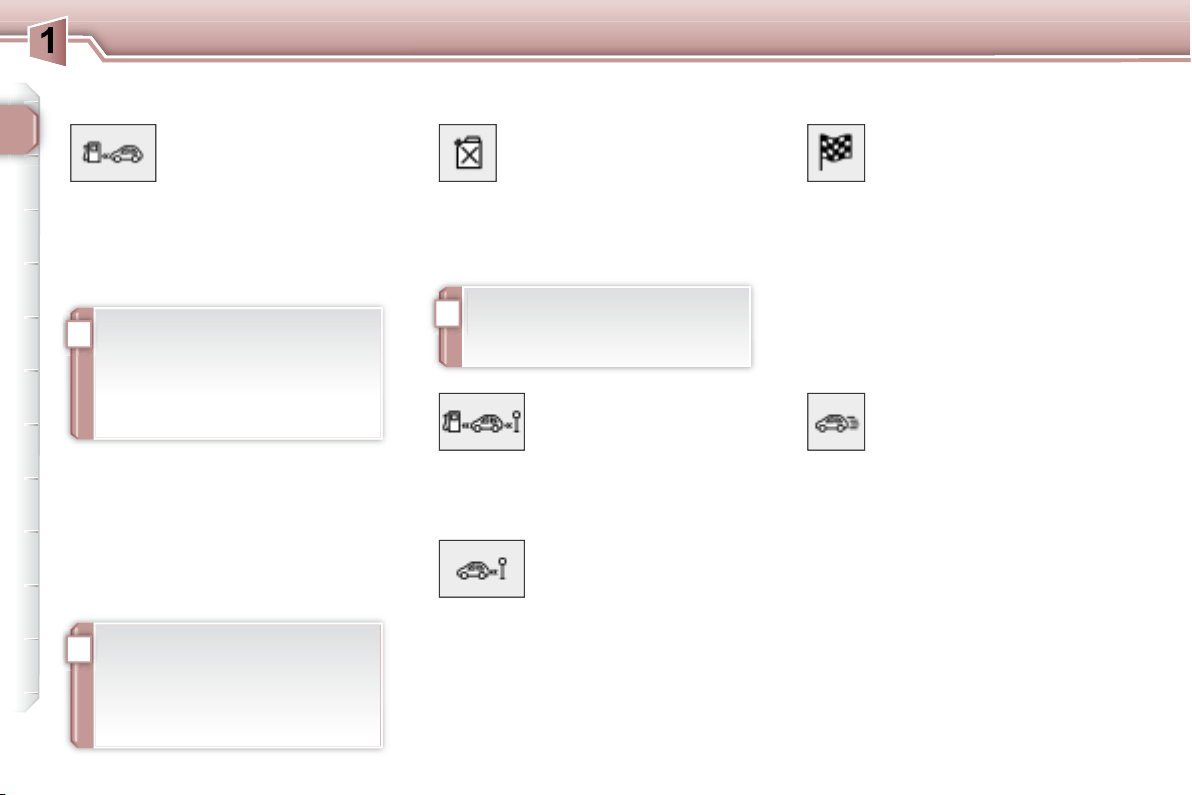
TRIP COMPUTER
i
i
!
28
INSTRUMENTS and CONTROLS
Distance remaining to be
travelled
(km or miles)
This is the distance remaining to be
is either calculated instantly by the
vated, or entered by the user.
If the distance is not entered, dashes
Average speed
set (ignition on).
Range
(km or miles)
This indicates the number of miles
the tank in relation to the average
(kilometres) travelled.
Current consumption
onds.
Average consumption
ter zero reset.
Distance travelled
(km or miles)
This indicates the distance travelled
set.
A few definitions…
ing a change of driving style or
tion.
the digits, contact a PEUGEOT
dealer.
29
INSTRUMENTS and CONTROLS
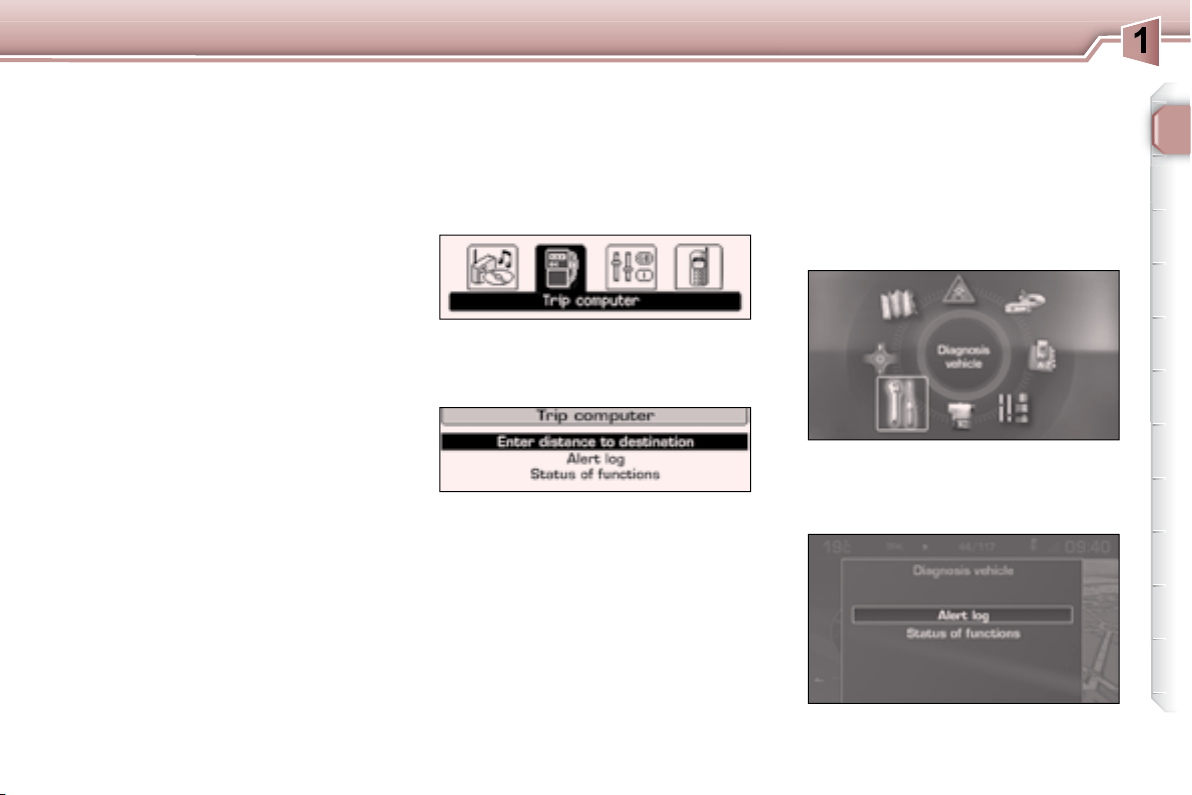
Display C
Press the "MENU" button to gain
access to the general menu.
"OK"
button to select the "Trip compu-
ter" menu.
On the "Trip computer" menu,
Warnings log
Status of the functions
the vehicle.
Enter the distance to the
destination
nal destination.
"TRIP COMPUTER" MENU
formation concerning the status of
tions...
"DIAGNOSTICS" MENU
On the "Diagnostics"
Colour display
Press the "MENU" button to gain
access to the general menu.
the "Diagnostics" menu.
30
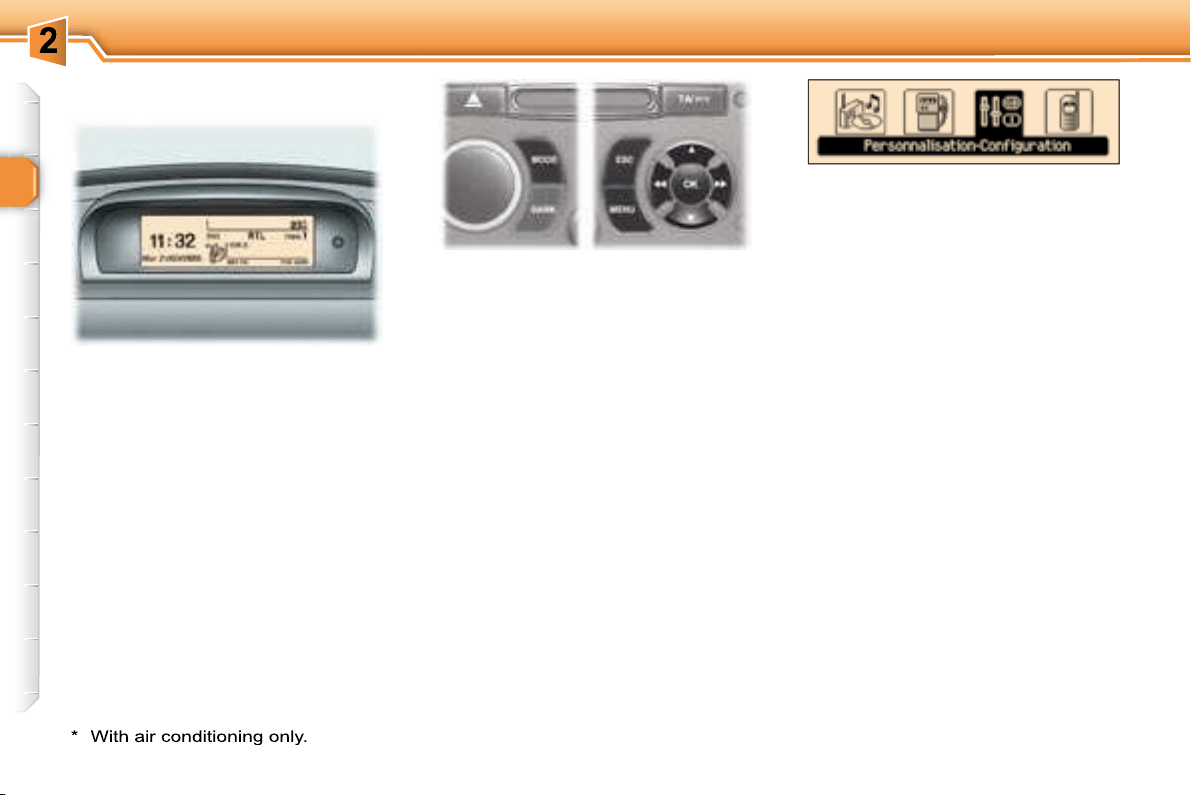
MULTIFUNCTION DISPLAYS
MONOCHROME DISPLAY C
(WITHOUT RD4 AUDIO EQUIPMENT)
P
resentation
"MENU"
menu,
to change
"ESC"
Rotation of the navigator:
of a setting,
Press on the navigator:
mation of the selection.
risk of ice),
boot, ...),
"ESC"
button,
Press the "MENU" button to access
section),
Turn the navigator to select the menu
the navigator.
Once this menu has been selected,
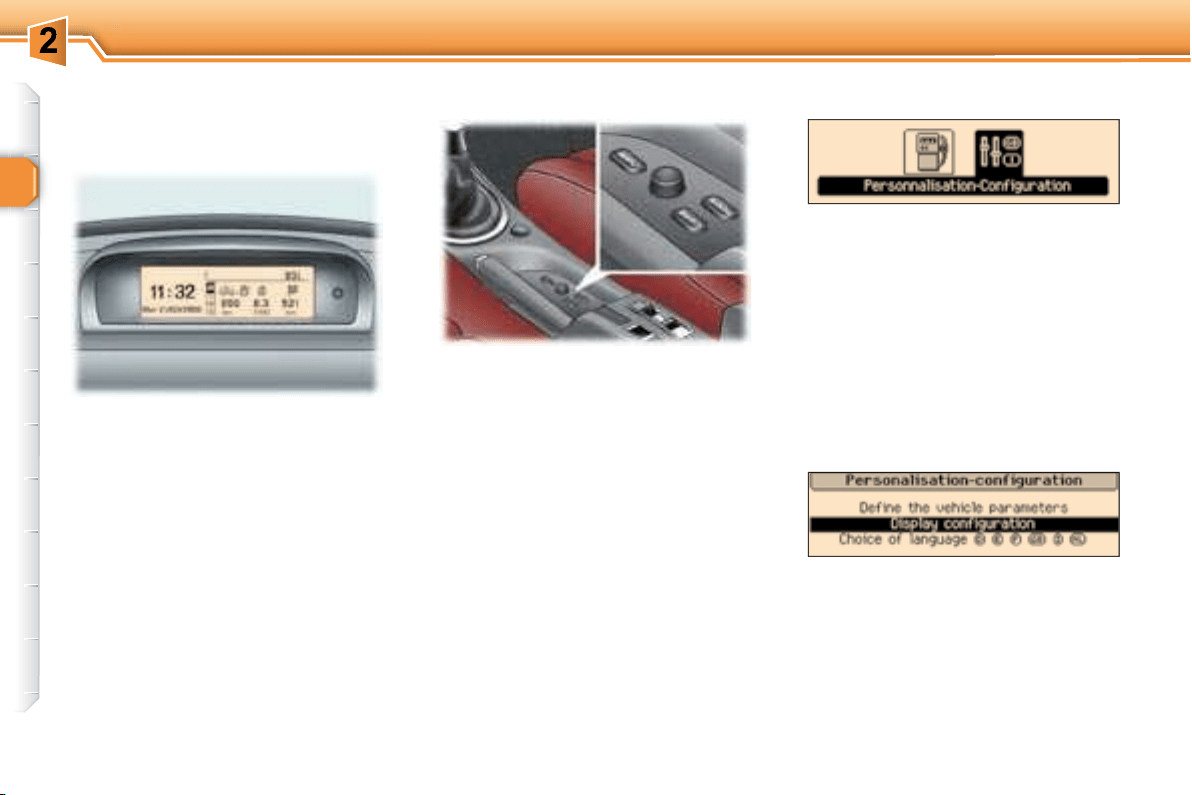
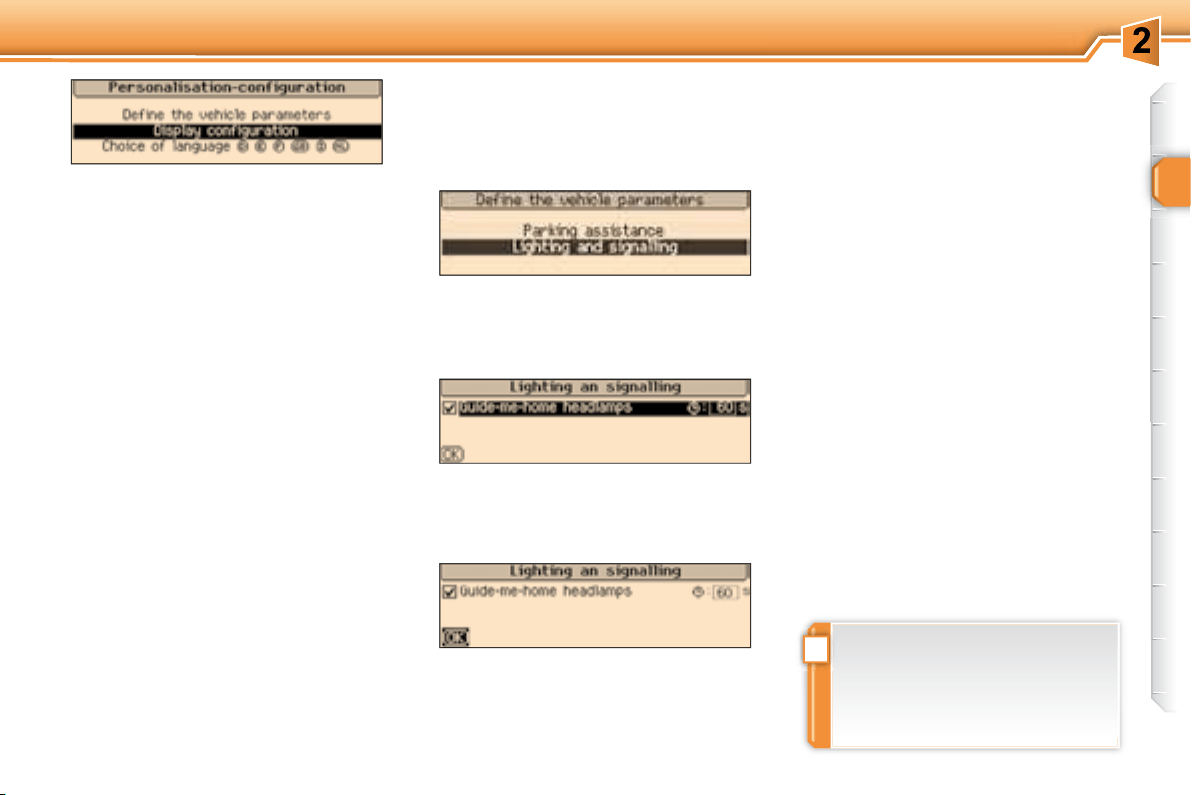
Parameter configuration General menu
"Personalisation-
Configuration" menu
!
31
MULTIFUNCTION DISPLAYS
Once this menu has been selected,
section),
Selection of the language
Once this menu has been selected,
you can change the language used
Once this menu has been selected,
Once you have selected a setting,
ue of the setting selected.
Press the navigator to record the
"ESC" key to cancel.
Example:
32
MULTIFUNCTION DISPLAYS
MONOCHROME DISPLAY C
Controls
"MENU" button to gain
access to the general menu ,
scroll through the items on the
screen,
"MODE" button to
change a setting value,
"OK"
or
"ESC"
Displays on the screen
boot, ...),
"ESC" button.
General menu
Press the "MENU" button to gain
access to the general menu
"OK"
button.
"Audio functions" menu
of the radio (RDS, REG, RadioText),
the CD or the CD changer (introscan,
For further details concerning the
"Trip computer" menu
Once this menu has been selected,
ings log, status of the functions, ...).
!
33
MULTIFUNCTION DISPLAYS
"Personalisation-
Configuration" menu
Once this menu has been selected,
Once this menu has been selected,
Example: setting of the duration of
then the "OK" button to select
then the "OK" button to select
"OK"
Once this menu has been selected,
then the "OK" button to select the
"OK"
the "ESC" button to cancel.
Selection of the language
Once this menu has been selected,
you can change the language used
"Telephone" menu
directories (calls log, services, ...)
and manage your communications
mode, ...).
34
MULTIFUNCTION DISPLAYS
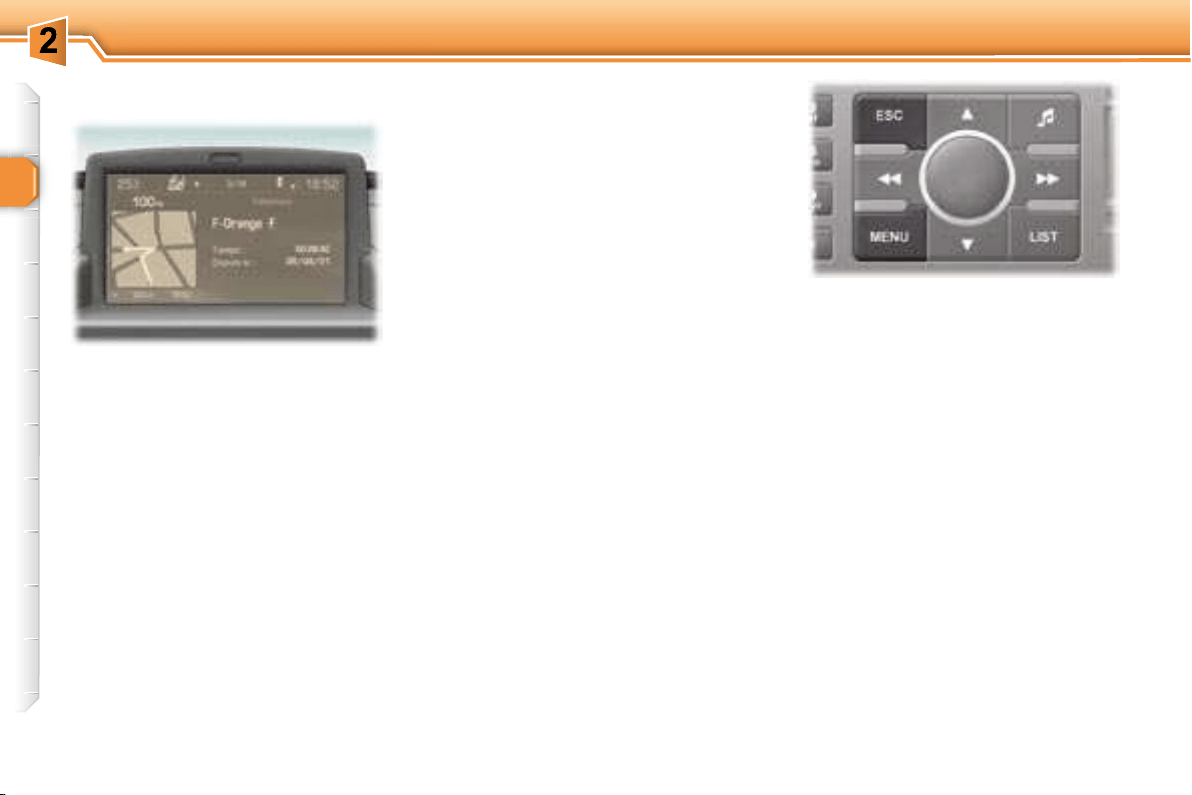
COLOUR DISPLAY
Displays on the screen
a message).
"ESC"
button.
General menu
functions,
log and status of the functions).
Controls
"MENU" button to gain
access to the general menu ,
tion,
lection,
or
"ESC"
For further details concerning these
35
MULTIFUNCTION DISPLAYS
Selection of the language
menu has been selected, you gain
mation and voice commands
Deutsch, Nederlands).
menu has been selected, you gain
minutes on GPS),
or km/l).
Sounds
(volume of the instructions and of
male),
AUX,
can activate or deactivate certain
section).
"Configuration" menu
Press the "MENU" button on the
access to the general menu .
Turn the dial to select the "Con-
Once this menu has been selected,
i
!
36
MULTIFUNCTION DISPLAYS
"Video" menu
(camcorder, digital camera, DVD
sockets, located in the glove box.
Videos can only be displayed
when stationary.
Once this menu has been selected,
deactivate the video,
contrast and the colours.
Press the "MODE" or "DARK"
ing of the video.
Press the "SOURCE"
eral times in succession to select
an audio source other than that of
the video.
Example: setting the duration of the
Turn the dial to select the "Light-
menu, then
dial.
Select the "OK"
must reinitialise and restart in
order to change the voice used
by the voice synthesiser (male
or female) or the language used
by the system.
37
COMFORT
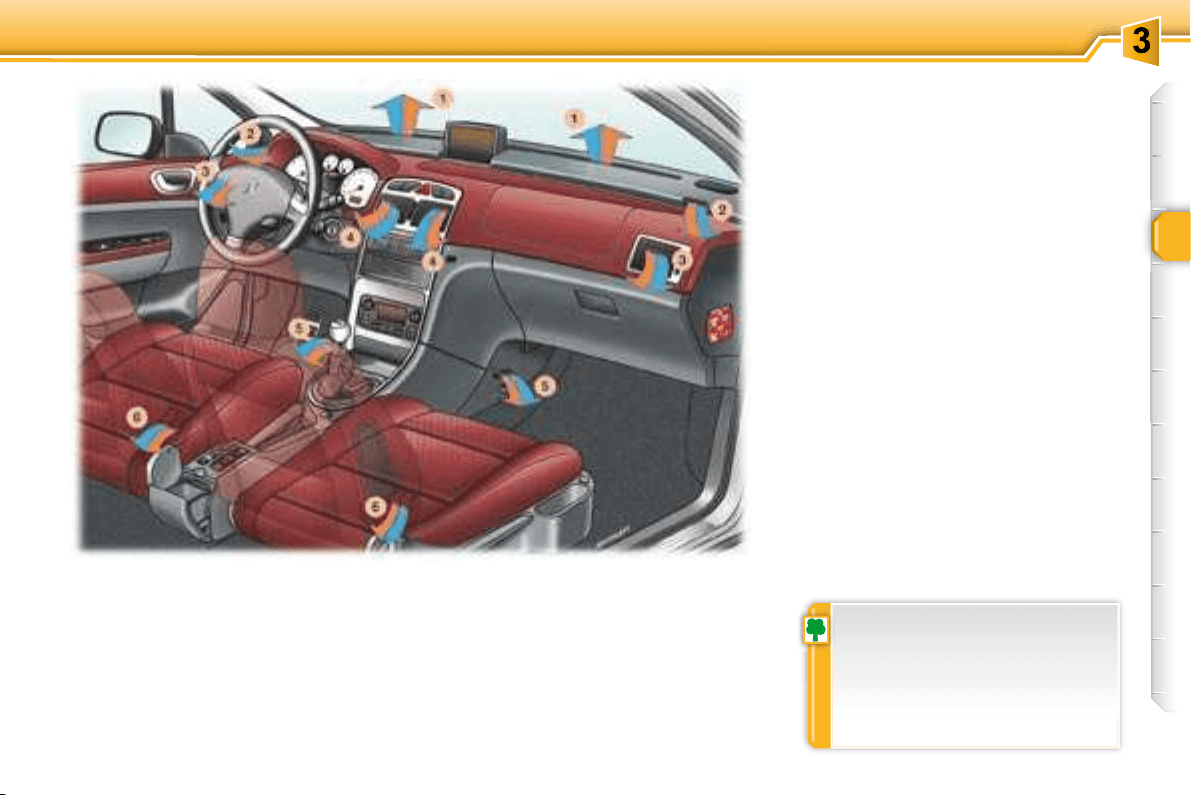
1.
demisting vents.
2.
demisting vents.
3. Side vents.
4. Centre vents.
5.
6.
exterior mirrors demisting as
essary as reducing the current
Advice on operation
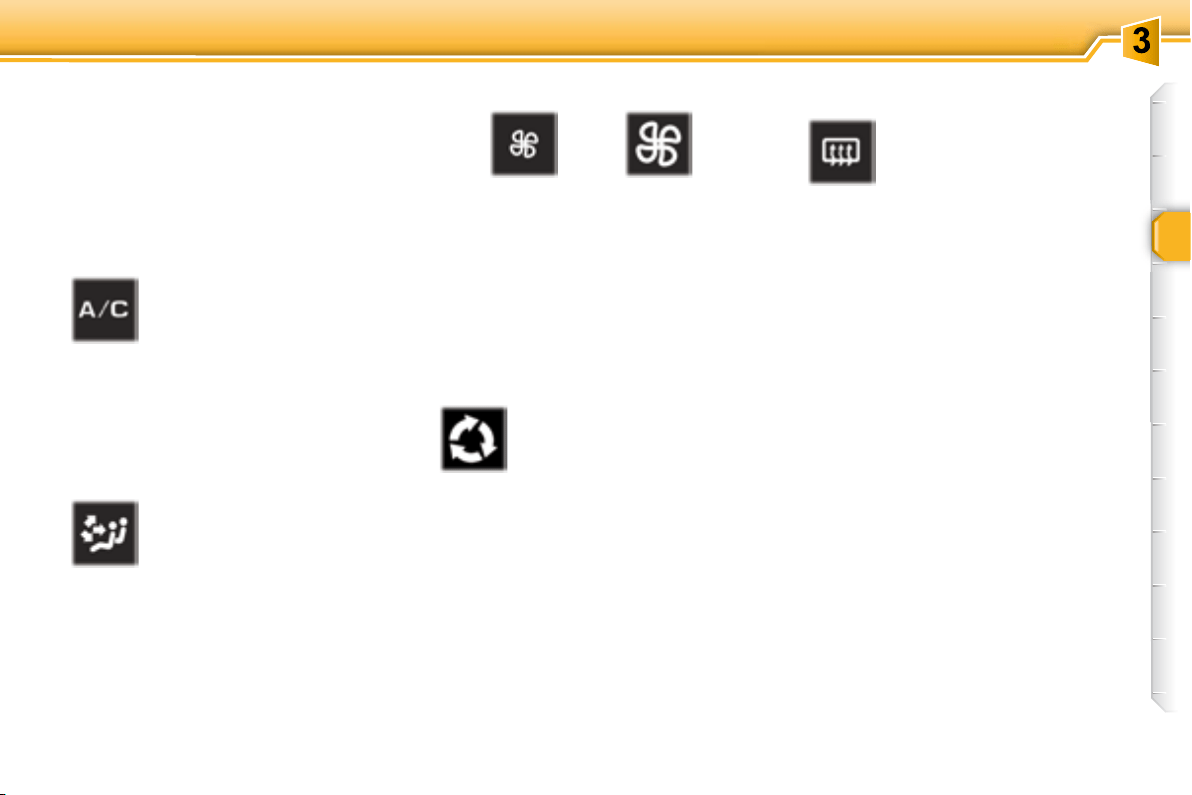
tion 0 (deactivation of the system),
of air, due to the movement of the
vehicle, can still be felt.
For even air distribution, take care
screen, the vents, the air outlets
under the front seats and the air
in the boot.
regularly. If you drive in a dusty
as often.
VENTILATION
i
38
COMFORT
Automatic operation
too great a distribution of cold air, the
gradually.
3. Passenger side setting
The driver and his front
The value indicated on the
degrees Celsius or Fahrenheit.
Turn control 2 or 3 to the left or to
increase this value.
A setting around the value 21
ference of more than 3.
For maximum cooling or heating of the
til "LO"
27 by turning until "HI"
4. Automatic visibility
programme
In these cases, select the automatic
4
dicator light comes on.
The system automatically controls
distribution of the ventilation to the
4 again
"AUTO"
"AUTO"
1. Automatic comfort programme
Press the "AUTO" button.
The "AUTO"
We recommend the use of
tribution and air recirculation, in line
ness of the system may be reduced.
2. Driver's side setting
DUAL ZONE AUTOMATIC AIR CONDITIONING
ue, there is no need to change
system corrects the difference in
39
COMFORT
Manual operation
choice from the one offered by the
system, by changing a setting. The
automatically.
Press the "AUTO" button to return to
air cooling.
mode (risk of condensation,
odour, humidity).
Press this button again as soon as
eration of the air conditioning. The
"A/C"
6. Air distribution adjustment
Press the "small fan" or "large fan"
8. Air intake/Air recirculation
9. De-icing the rear window and
the mirrors
Switching the system off
Press the "small fan" button of the
7
ing of the rear screen 9 .
cle, can still be felt.
Pressing the "large fan" button of
7 again or the AUTO
off.
culate the interior air. The
air recirculation symbol 8 is
fumes from the outside.
interior air (risk of condensation and
5. Air conditioning On/Off
terior mirrors. The button 9
indicator light comes on.
current.
Note:
the roof is stored in the boot.
i
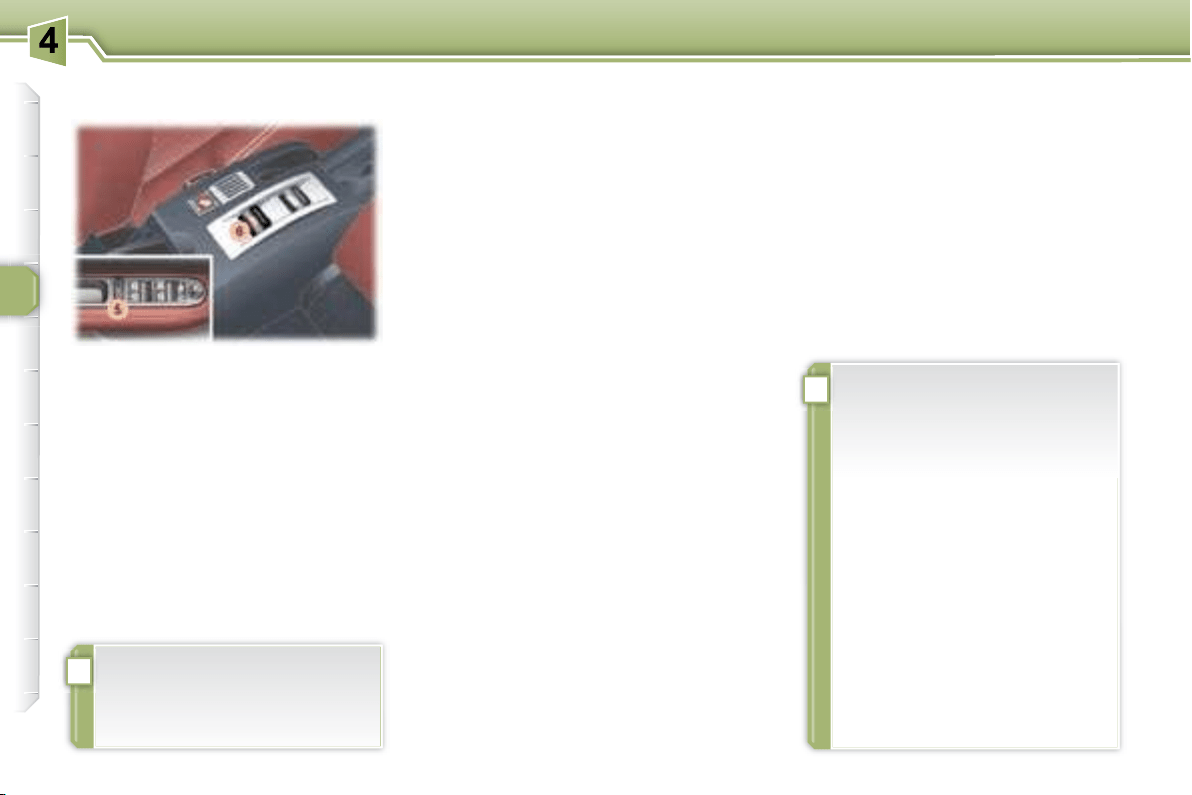
40
COMFORT
i
!
41
COMFORT
Electric exterior mirrors
Adjustment
A to the right or to
ing mirror.
Move knob B in all four directions
A
sition.
Folding
A
mote control or the key.
Unfolding
A
mote control or the key.
MIRRORS
Note: if the mirrors are folded using
A
the vehicle is unlocked using the
A
The folding and unfolding of the
vated by a PEUGEOT dealer.
The end of the driver's mirror
marked by a dotted line) in order
rors are, in reality, closer than
Therefore, this must be taken
42
COMFORT
This automatically and gradually
of the light from behind. It clears as
hicles, sunlight) decreases, ensuring
maximum visibility.
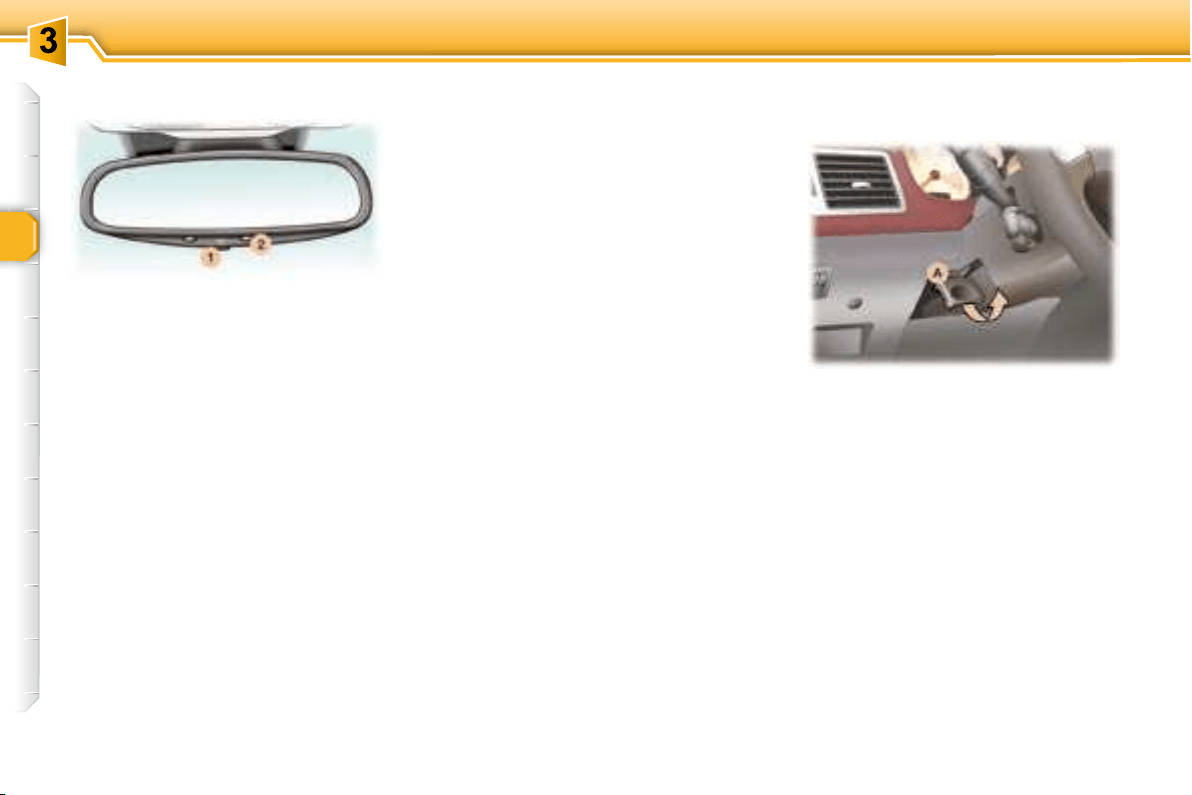
Manual interior mirror
To change from one to the other,
edge of the mirror.
Operation
1
2
2
system off. The mirror remains at
its most clear.
Special feature
To ensure maximum visibility during
gaged.
handle A .
A
fully.
STEERING WHEEL HEIGHT
AND DEPTH ADJUSTMENT
Automatic day/night interior
mirror

42
COMFORT
This automatically and gradually
of the light from behind. It clears as
hicles, sunlight) decreases, ensuring
maximum visibility.
Manual interior mirror
To change from one to the other,
edge of the mirror.
Operation
1
2
2
system off. The mirror remains at
its most clear.
Special feature
To ensure maximum visibility during
gaged.
handle A .
A
fully.
STEERING WHEEL HEIGHT
AND DEPTH ADJUSTMENT
Automatic day/night interior
mirror
!
43
COMFORT
FRONT SEATS
1. Forwards-backwards
adjustment
2. Driver's or passenger's seat
height adjustment
3. Seat back angle adjustment
4. Access to rear seats
Pull the handle to fold the seat back
Note: you can also use control 3 .
!
i
44
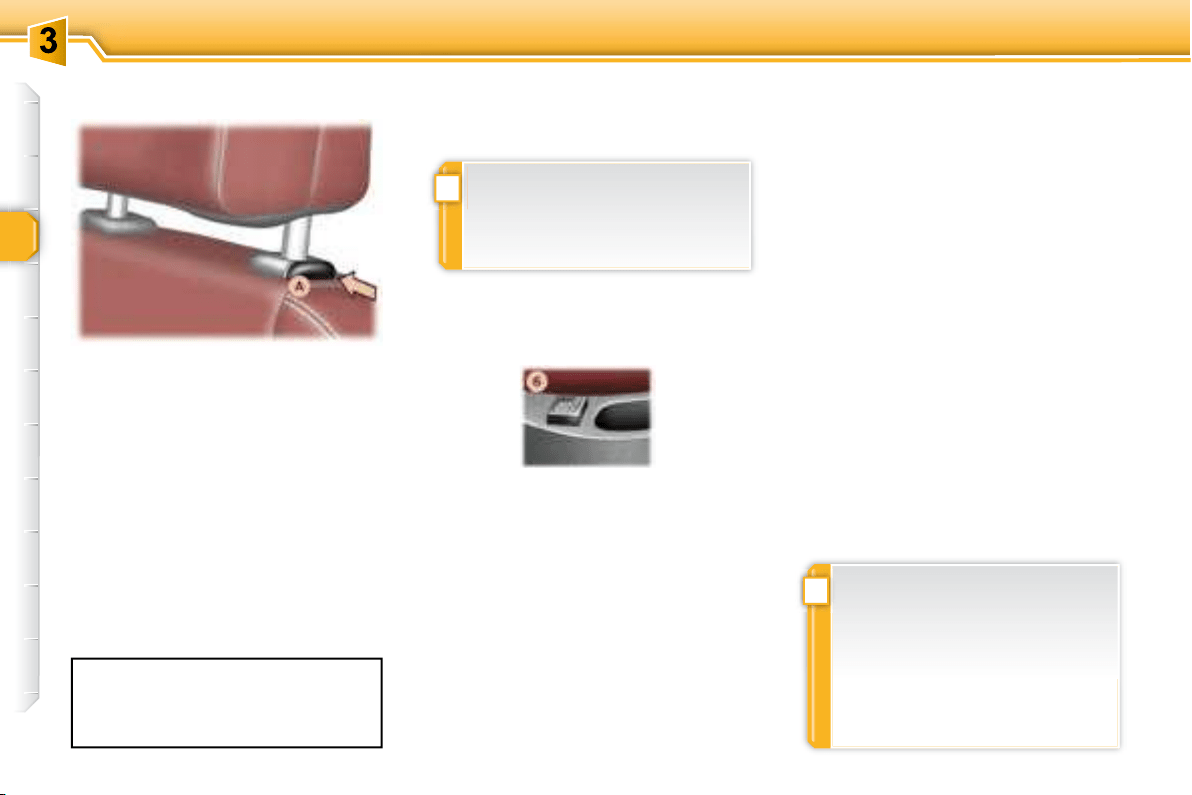
COMFORT
the lug A
sition, locate the stems of the head
restraint in the holes taking care to
lug A and the head restraint at the
same time.
REAR HEAD RESTRAINTS
are triggered if the vehicle rolls over,
tion.
6. Heated seats switch
automatically.
eration.
Note: the command for activation of
The adjustment is correct when
the upper edge of the head re-
straint is level with the top of the
head.
5. Head restraint height and angle
adjustment
the rear head restraints. Use a
your PEUGEOT dealer.
PEUGEOT dealer.

45
COMFORT
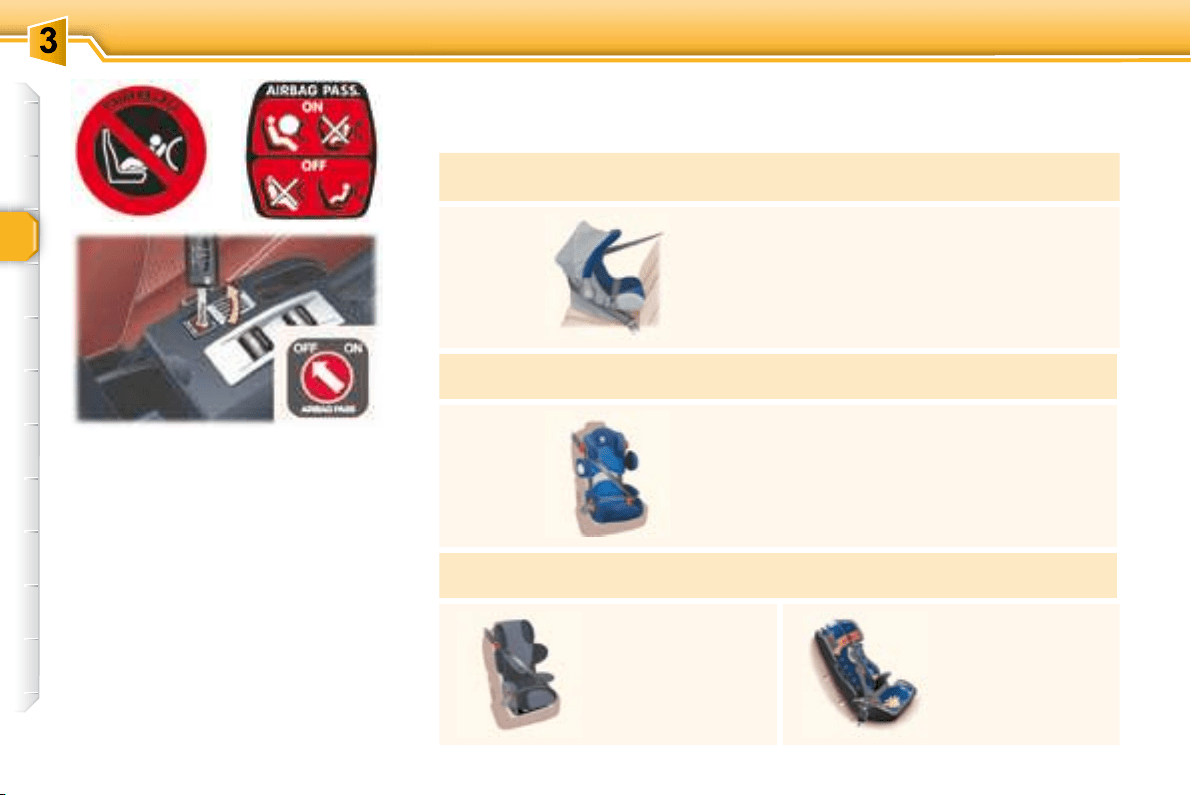
"Forwards-facing"
is installed on the front passenger
seat
INSTALLING A CHILD SEAT
USING A THREE POINT SEAT
BELT
GENERAL POINTS RELATING
TO CHILD SEATS
Intermediate longitudinal position
Consult the current legislation in
your country.
Although one of PEUGEOT's main
2003/20, all children under the
age of 12 or less than one me-
proved child seats suited to
their weight
ings * ,
statistically, the safest seats in
your vehicle for the transpor-
tation of children are the rear
seats,
a child weighing less than 9 kg
must travel in the "rearwards-
facing" position both in the
front and in the rear.
PEUGEOT recommends
dren should travel in the rear seats
"rearwards-facing"
age of 2,
"forwards-facing" over the age
of 2.
"Rearwards-facing"
is installed on the front passenger
seat
the child would risk being seri-
ously injured or killed if the air bag
46
COMFORT
Passenger air bag OFF
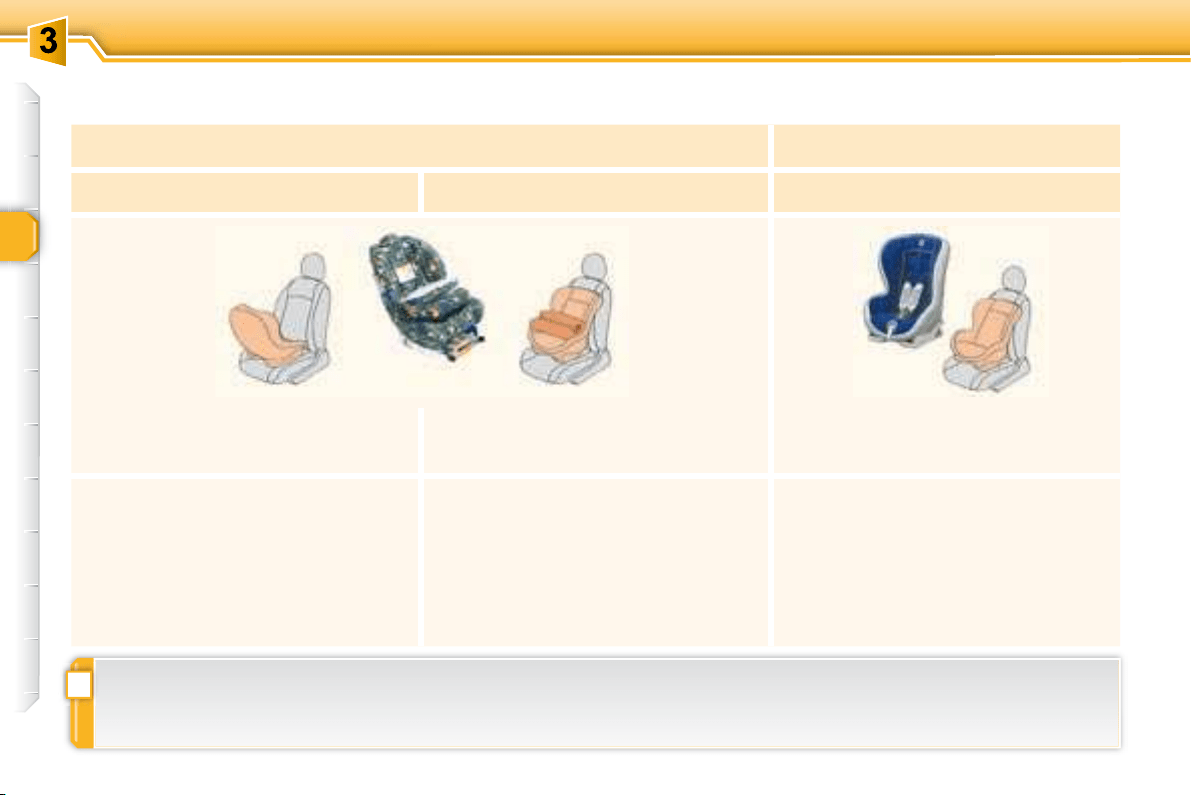
CHILD SEATS RECOMMENDED BY PEUGEOT
cured using a three point seat belt
Group 0: from birth to 10 kg
Group 0+: from birth to 13 kg
L1
Groups 1, 2 and 3: from 9 to 36 kg
L2
For the safety of young children
(from 9 to 18 kg), PEUGEOT
recommends use of the restraining
cushion.
Groups 2 and 3: from 15 to 36 kg
L3
L4
From the age
of 6 years
22 kg), the booster

46
COMFORT
Passenger air bag OFF
CHILD SEATS RECOMMENDED BY PEUGEOT
cured using a three point seat belt
Group 0: from birth to 10 kg
Group 0+: from birth to 13 kg
L1
Groups 1, 2 and 3: from 9 to 36 kg
L2
For the safety of young children
(from 9 to 18 kg), PEUGEOT
recommends use of the restraining
cushion.
Groups 2 and 3: from 15 to 36 kg
L3
L4
From the age
of 6 years
22 kg), the booster
47
COMFORT
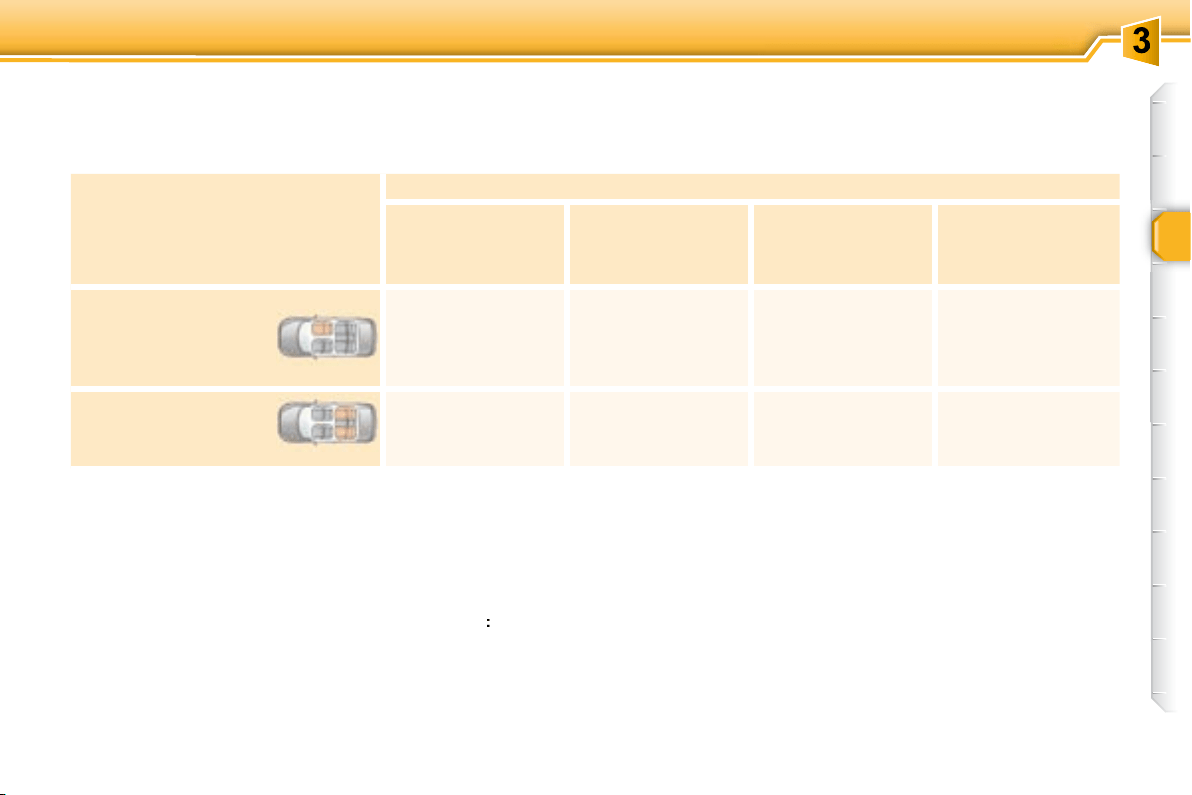
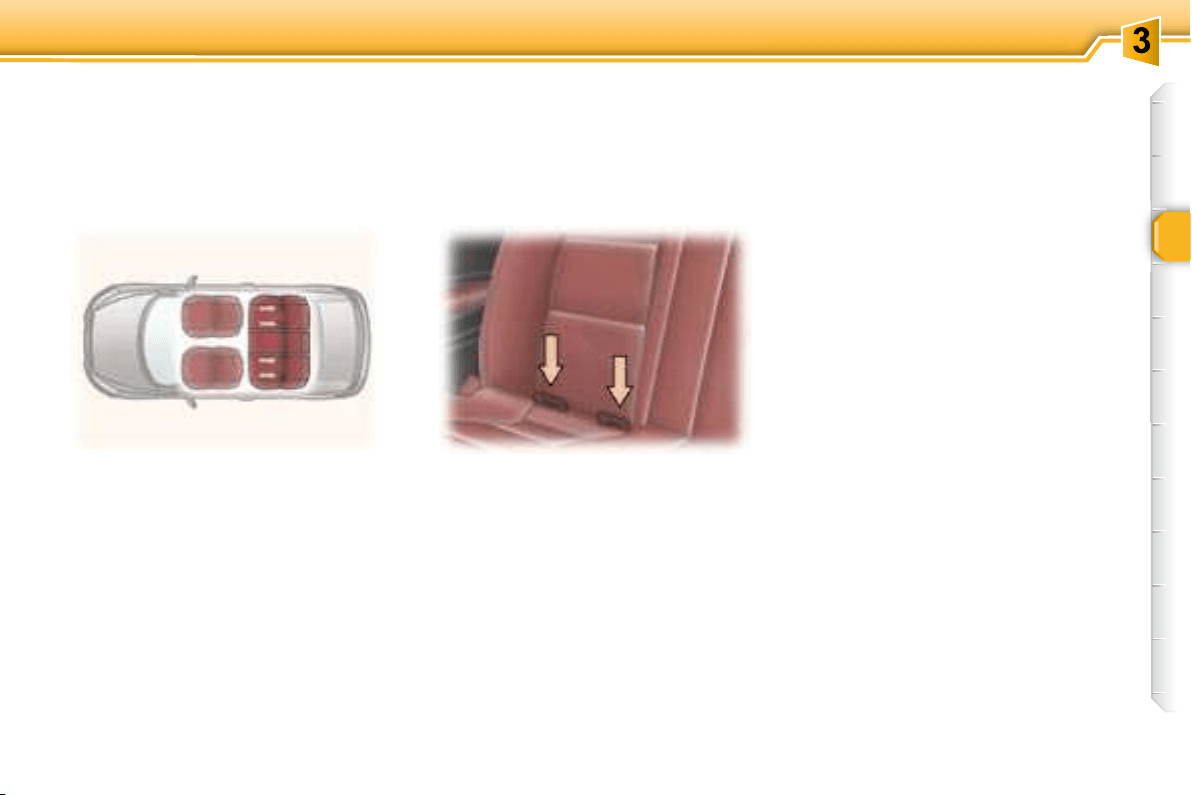
LOCATION OF CHILD SEATS SECURED USING THE SEAT BELT
U: seat suited to the installation of a
U (R)
:
idem U
cles using the seat belt.
(c) Consult the current legislation
in your country before installing
your child on this seat.
Special Notes
For the L3
For the L4
only.
Seat
Weight of the child /indicative age
Below 13 kg
9 to 18 kg
From 1 to 3 years
15 to 25 kg
From 3 to 6 years
22 to 36 kg
From 6 to 10 years
U (R) U (R) U (R) U (R)
Rear side seats U U U U
seat in the vehicle.
!
48
COMFORT
Installing a booster seat
thighs.
PEUGEOT recommends the use of
der level.
inside the vehicle.
Children under the age of 10 must
unless the rear seats are already
be used or are absent.
The incorrect installation of a child
accident.
Remember to fasten the seat belts
or the child seat harnesses keeping
the slack in relation to the child's
body to a minimum, even for short
seat and that the head restraint
does not cause any discomfort.
moved, ensure that it is stored or
49
COMFORT
the seat back and the seat cushion.
The ISOFIX child seats
easily on these rings.
"ISOFIX" MOUNTINGS
mountings.
the child seat in your vehicle.
i
50
COMFORT
ISOFIX CHILD SEATS RECOMMENDED BY PEUGEOT AND APPROVED FOR YOUR VEHICLE
ISOFIX KIDDY ISOFIX RÖMER Duo Plus
Group 0+: from birth to 13 kg Group 1: from 9 to 18 kg Group 1: from 9 to 18 kg
The body of the child seat must be in
front seat.
It is essential that the vehicle's front
the child's feet do not touch the seat
back.
51
ACCESS
locking, deadlocking and unlocking
of the vehicle, locating of the vehicle,
folding and unfolding of the exterior
boot.
Locking
Using the remote control
Press button B to lock the vehicle.
lighting of the direction indicators for
At the same time, the exterior mirrors
fold back.
The boot can only be unlocked by
ing section).
Unlocking
Press button C to unlock the vehicle.
At the same time, the exterior mirrors
unfold.
Deadlocking
This renders the exterior and interior
It also disarms the interior central
locking/unlocking button.
Using the key
Turn the key in the lock on the
driver's door to lock the vehicle.
lighting of the direction indicators for
At the same time, the exterior mirrors
fold back.
Using the remote control
Pressing button B locks the vehicle.
A second press
onds deadlocks the vehicle.
lighting of the direction indicators for
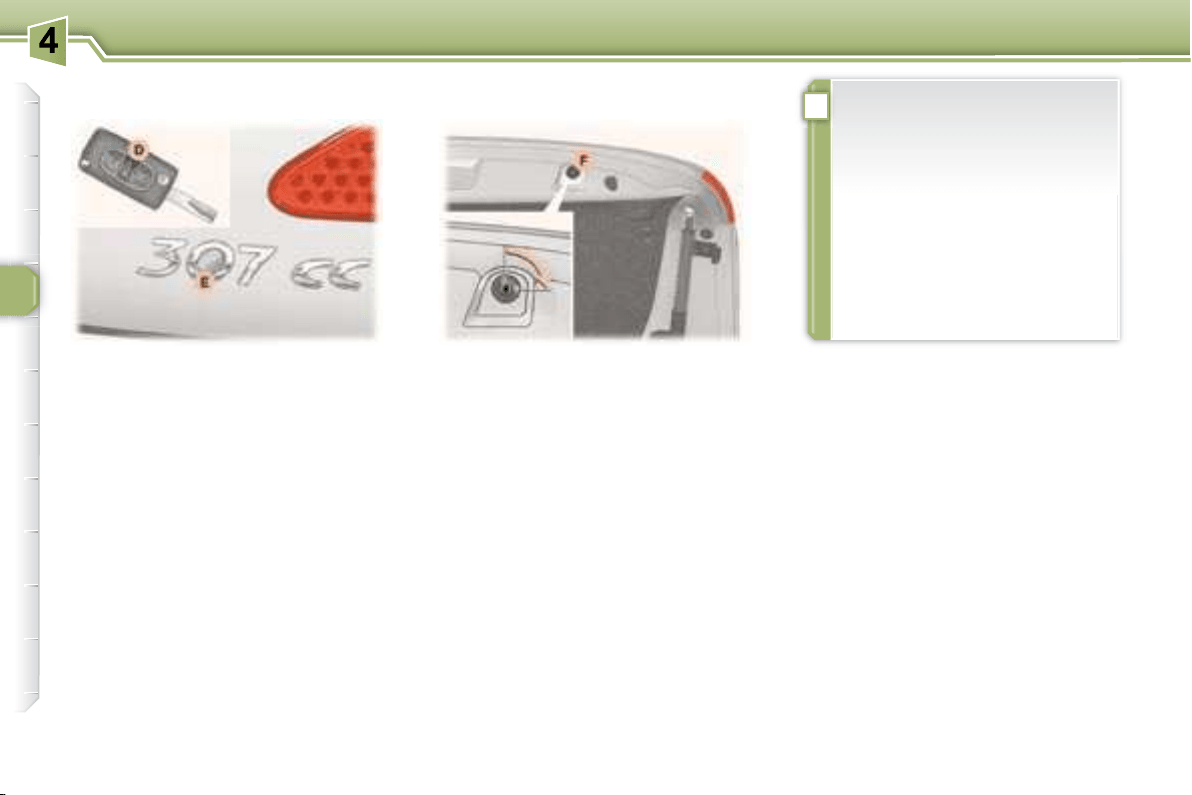
Unfolding/Folding the key
button A .
Using the key
Turn the key in the lock on the
driver's door to lock the vehicle.
lighting of the direction indicators for
Central locking/Unlocking
simultaneously,
door,
REMOTE CONTROL KEY

i
52
ACCESS
ELECTRONIC ENGINE
IMMOBILISER
This locks the engine control system
The ignition key has an electronic
If the system does not function
correctly,
start.Contact a PEUGEOT dealer as
cause a malfunction.
ing using a coin at the notch.
after the battery has been changed,
Key in ignition
er's door, if the key has been left in
the ignition.
mote control battery or in the event
of a remote control malfunction, the
remote control must be reinitialised.
Press the remote control locking
onds.
the remote control key from the
ignition lock.
again.
Locating your vehicle
To locate your vehicle, if you have
B , the courtesy lights
Press button D
This action also unlocks the doors.
Partial opening of the boot
Changing the remote control
battery
The folding and unfolding of the
mirrors can be deactivated by a
PEUGEOT dealer.
Reprogramming the remote
control

i
53
ACCESS
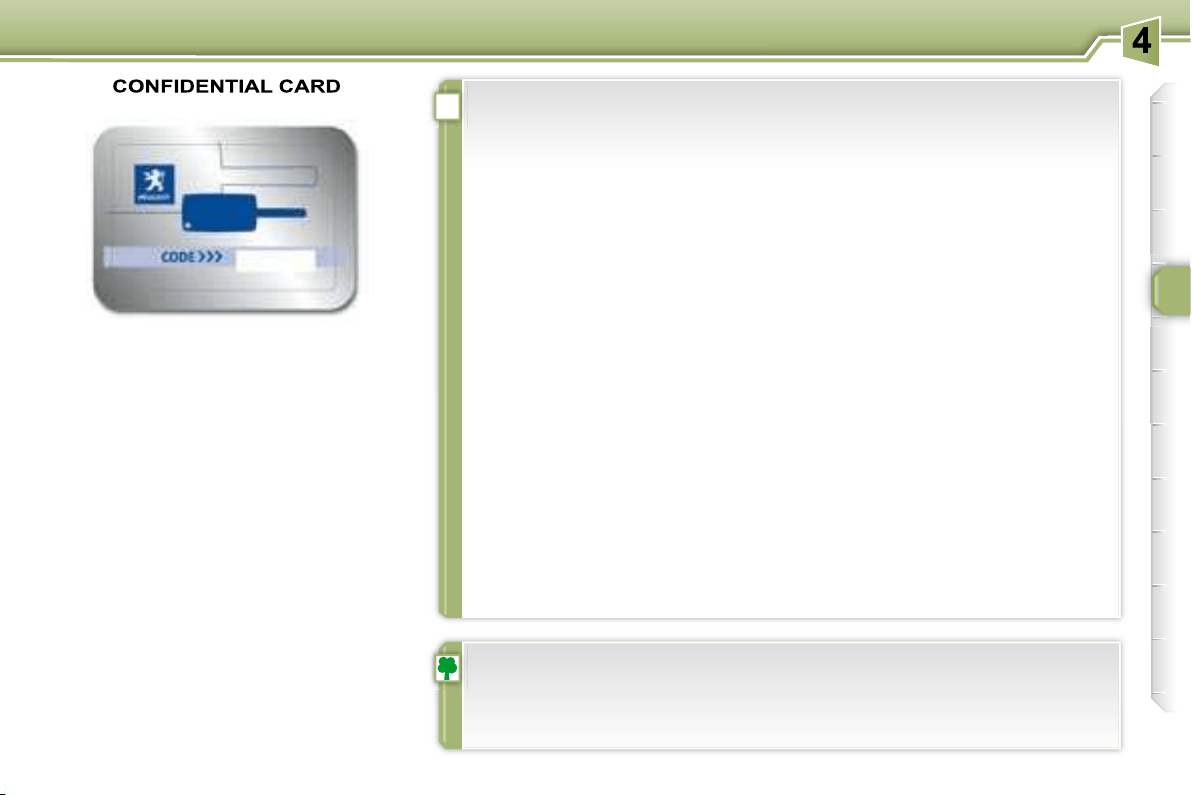
This is given to you on delivery of
tronic immobiliser system. This code
removed only if necessary.
Keep your card in a safe place,
never inside the vehicle.
Make a careful note of the number on each key. The key number is
coded on the label attached to the key.
If the keys are lost, your PEUGEOT dealer can rapidly supply you with
new keys.
The high frequency remote control is a sensitive system; do not op-
erate it while it is in your pocket as there is a possibility that it may
unlock your vehicle, without you being aware of it.
The remote control does not operate when the key is in the ignition,
even when the ignition is switched off, except for reprogramming.
Do not operate the deadlocking function if there is anyone inside the
vehicle.
Driving with the doors locked may make access to the passenger com-
As a safety precaution (with children on board), remove the ignition
key when you leave the vehicle, even for a short time.
Do not repeatedly press the button of your remote control out of range
and out of sight of your vehicle. You run the risk of stopping it from
working and the remote control would have to be reprogrammed.
When purchasing a second-hand vehicle:
have the key codes memorised by a PEUGEOT dealer, to ensure
that the keys in your possession are the only ones which can start
the vehicle.
system.
are harmful to the environment.
i
52
ACCESS
ELECTRONIC ENGINE
IMMOBILISER
This locks the engine control system
The ignition key has an electronic
If the system does not function
correctly,
start.Contact a PEUGEOT dealer as
cause a malfunction.
ing using a coin at the notch.
after the battery has been changed,
Key in ignition
er's door, if the key has been left in
the ignition.
mote control battery or in the event
of a remote control malfunction, the
remote control must be reinitialised.
Press the remote control locking
onds.
the remote control key from the
ignition lock.
again.
Locating your vehicle
To locate your vehicle, if you have
B , the courtesy lights
Press button D
This action also unlocks the doors.
Partial opening of the boot
Changing the remote control
battery
The folding and unfolding of the
mirrors can be deactivated by a
PEUGEOT dealer.
Reprogramming the remote
control

i
53
ACCESS
This is given to you on delivery of
tronic immobiliser system. This code
removed only if necessary.
Keep your card in a safe place,
never inside the vehicle.
Make a careful note of the number on each key. The key number is
coded on the label attached to the key.
If the keys are lost, your PEUGEOT dealer can rapidly supply you with
new keys.
The high frequency remote control is a sensitive system; do not op-
erate it while it is in your pocket as there is a possibility that it may
unlock your vehicle, without you being aware of it.
The remote control does not operate when the key is in the ignition,
even when the ignition is switched off, except for reprogramming.
Do not operate the deadlocking function if there is anyone inside the
vehicle.
Driving with the doors locked may make access to the passenger com-
As a safety precaution (with children on board), remove the ignition
key when you leave the vehicle, even for a short time.
Do not repeatedly press the button of your remote control out of range
and out of sight of your vehicle. You run the risk of stopping it from
working and the remote control would have to be reprogrammed.
When purchasing a second-hand vehicle:
have the key codes memorised by a PEUGEOT dealer, to ensure
that the keys in your possession are the only ones which can start
the vehicle.
system.
are harmful to the environment.
i
54
ACCESS
exterior protection: it sounds if a door,
interior protection: it sounds if
side the vehicle).
Note:
does not function if the vehicle's roof
After triggering, the alarm remains set.
button A until the indicator light is
on continuously,
Get out of the vehicle,
locking using the remote control
(button A
once a second).
In order for the alarm to be set in
carried out each time the ignition is
Setting the alarm
of the vehicle.
locking using the remote control
(button A
Note:
door lock.
Disarming
key (button A indicator light goes out).
Note: if the alarm has been triggered
To set the alarm with exterior
protection only
tion only.
Incorrect operation
button A lights for ten seconds, there
is a fault in the siren connection.
Contact a PEUGEOT dealer to have
the system checked.
Automatic activation *
minutes after the last closure of a door
or the boot.
In order to avoid accidental triggering
unlocking button on the remote control.
Failure of the remote control
is disarmed.
ALARM
If button A
locking button on the remote control,
the alarm is set, regardless of the
status of the doors or boot.
or
If the alarm has been triggered ten
enth time it becomes inactive.
55
ACCESS
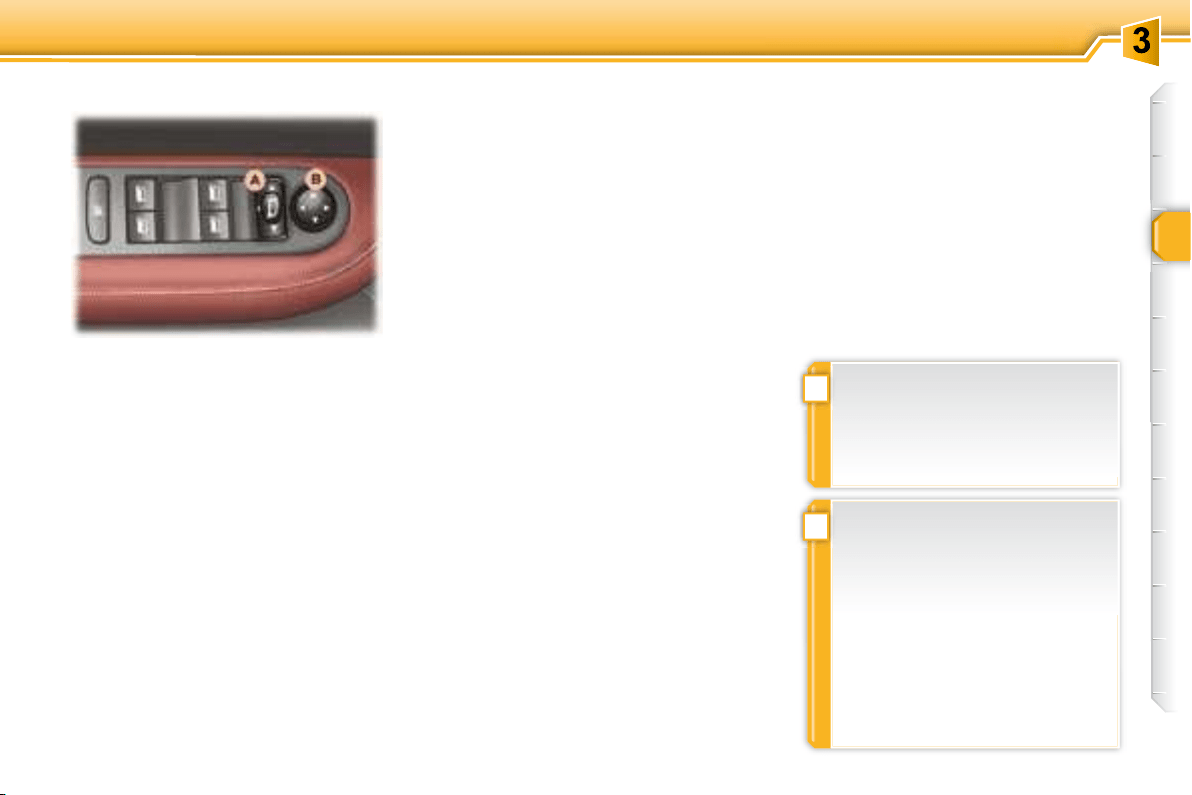
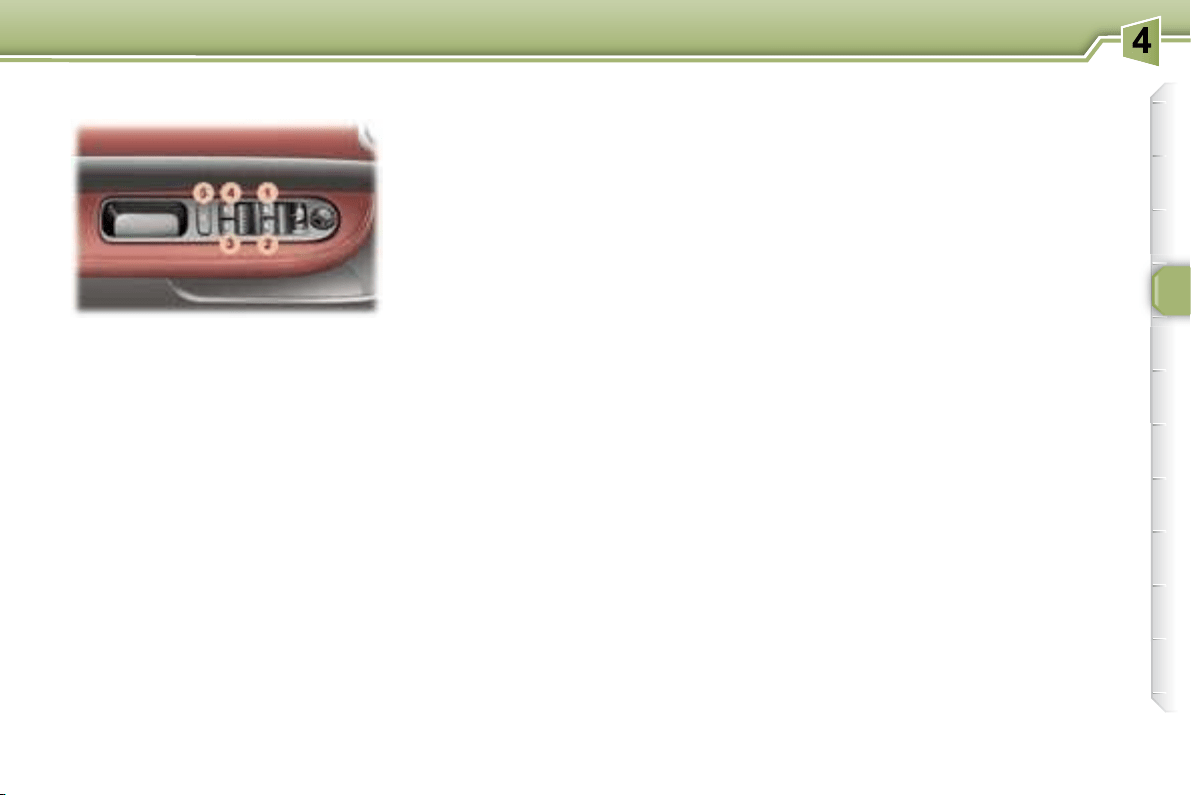
1. Driver's electric window
switch.
2. Passenger's electric window
switch.
3. Rear right electric window
switch.
4. Rear left electric window
switch.
5. Disarming of the rear electric
window switches (child lock).
Manual operation:
is released.
Front windows safety auto-
reverse
Disarming the rear window
controls
5
sition.
trols are active.
trols are disarmed.
Automatic operation:
Note:
The safety auto-reverse function
is not active during these opera-
tions.
ELECTRIC WINDOWS
Notes:
matically.
!
!
56
ACCESS
Control 6
To disarm the action of control 6 ,
control 5 .
REINITIALISING THE
ELECTRIC WINDOWS
one second after closing,
The safety auto-reverse function is
not active during these operations.
SIMULTANEOUS CONTROL
OF ALL 4 WINDOWS
cle, even for a short time.
In the event of contact during
must reverse the movement of
The driver must ensure that the
!
!
57
ACCESS
"Door open" alert
when the engine is running,
a message on the multifunction
when the vehicle is moving
audible signal, a diagram and a
locked.
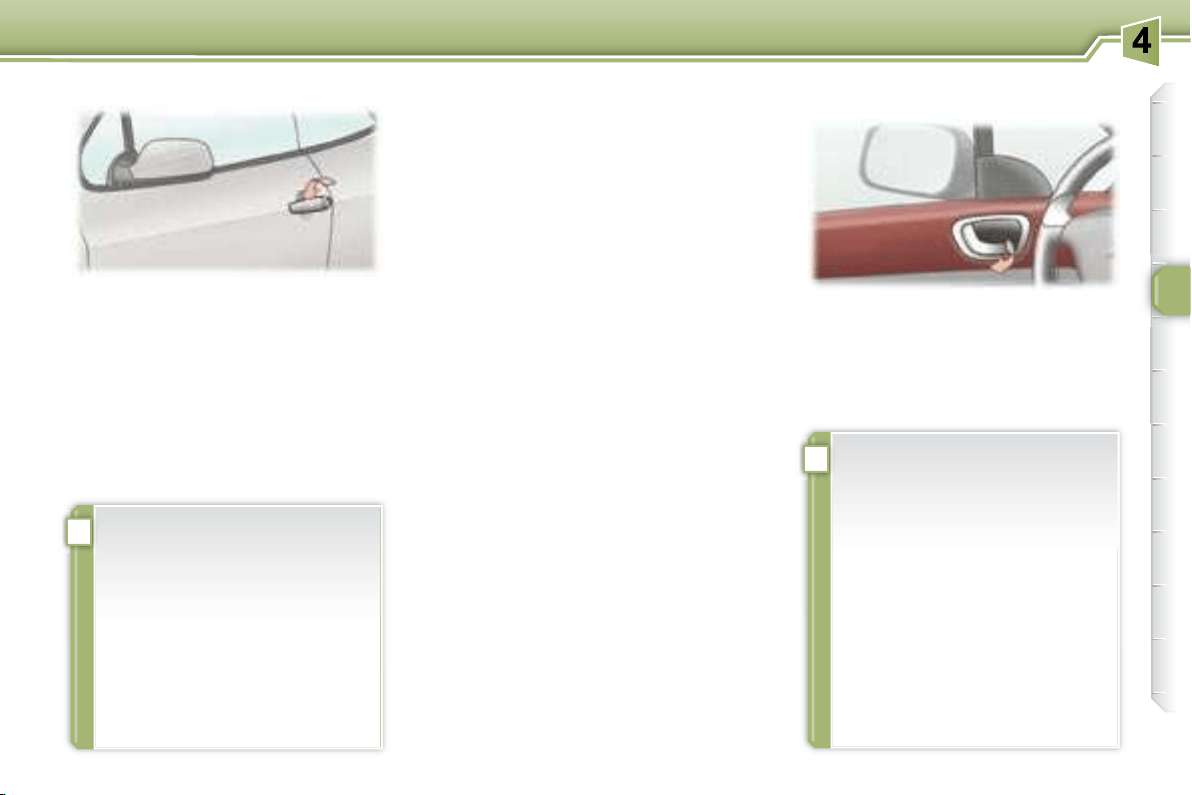
Opening the doors from outside
Note:
if you leave your hand on the handle
activate the system.
Reinitialisation of the automatic
partial opening of the door
windows
close the door,
THE DOORS
Opening the doors from inside
Before carrying out any work
which requires cutting off of
the battery, lower the windows
to make it easier to open and
close the doors.
that the door is not slammed on
closing.
Contact a PEUGEOT dealer as
When washing your vehicle:
do not forget to lock it to
avoid any risk of automat-
ic partial opening of the
windows,
avoid soaking the upper
part of the windows.
When washing your vehicle
using high pressure equip-
ment, it is advisable to keep
the end of the nozzle at least
1 metre from the windows and
door seals.
59
ACCESS
Pressing button A
The red indicator light on the button
is unlocked.
Note:
A is
or the remote control to unlock.
Automatic central locking of
the doors
(10 km/h)].
on button A momentarily unlocks the
doors.
You can activate or disarm this function.
Activation
Press and hold button A .
Disarming
Press and hold button A .
Notes
tomatic central locking and locking
from the inside do not function.
central locking of the doors is active.
Driver's door
Insert the key in the lock to lock or
unlock the door.
Passenger's door
(located on the edge of the door)
then turn an eighth of a turn to
the right.
ing section).
Boot
The boot is locked, contact a PEUGEOT
dealer.
MANUAL LOCKING/
UNLOCKING (EMERGENCY
MODE)
Locking/Unlocking from the
inside
!
58
ACCESS
Vehicle locked/deadlocked
Press button D on the remote
doors.
E can be disarmed. Turn the lock F a
the remote control.
Opening the boot
"Boot open" warning
with the engine running , you
when the vehicle is moving
Closing the boot
Use the interior grab handles to
close the boot.
both hands until it locks.
BOOT
Permanent locking
Automatic locking
central locking/unlocking button,
the key must
be in the ignition and button E
must not have been disarmed by
means of the lock F.
the boot remains locked and
button E .
In all cases, the boot can still
be unlocked by pressing but-
ton D on the remote control.
Vehicle unlocked
Press button D on the remote
E on the boot.
Note:
mote control deactivates the alarm.

59
ACCESS
Pressing button A
The red indicator light on the button
is unlocked.
Note:
A is
or the remote control to unlock.
Automatic central locking of
the doors
(10 km/h)].
on button A momentarily unlocks the
doors.
You can activate or disarm this function.
Activation
Press and hold button A .
Disarming
Press and hold button A .
Notes
tomatic central locking and locking
from the inside do not function.
central locking of the doors is active.
Driver's door
Insert the key in the lock to lock or
unlock the door.
Passenger's door
(located on the edge of the door)
then turn an eighth of a turn to
the right.
ing section).
Boot
The boot is locked, contact a PEUGEOT
dealer.
MANUAL LOCKING/
UNLOCKING (EMERGENCY
MODE)
Locking/Unlocking from the
inside
60
ACCESS
The engine must be switched off
Insert the key then turn it to the
left.
the hook located on the inside of
to use.
to malfunction.
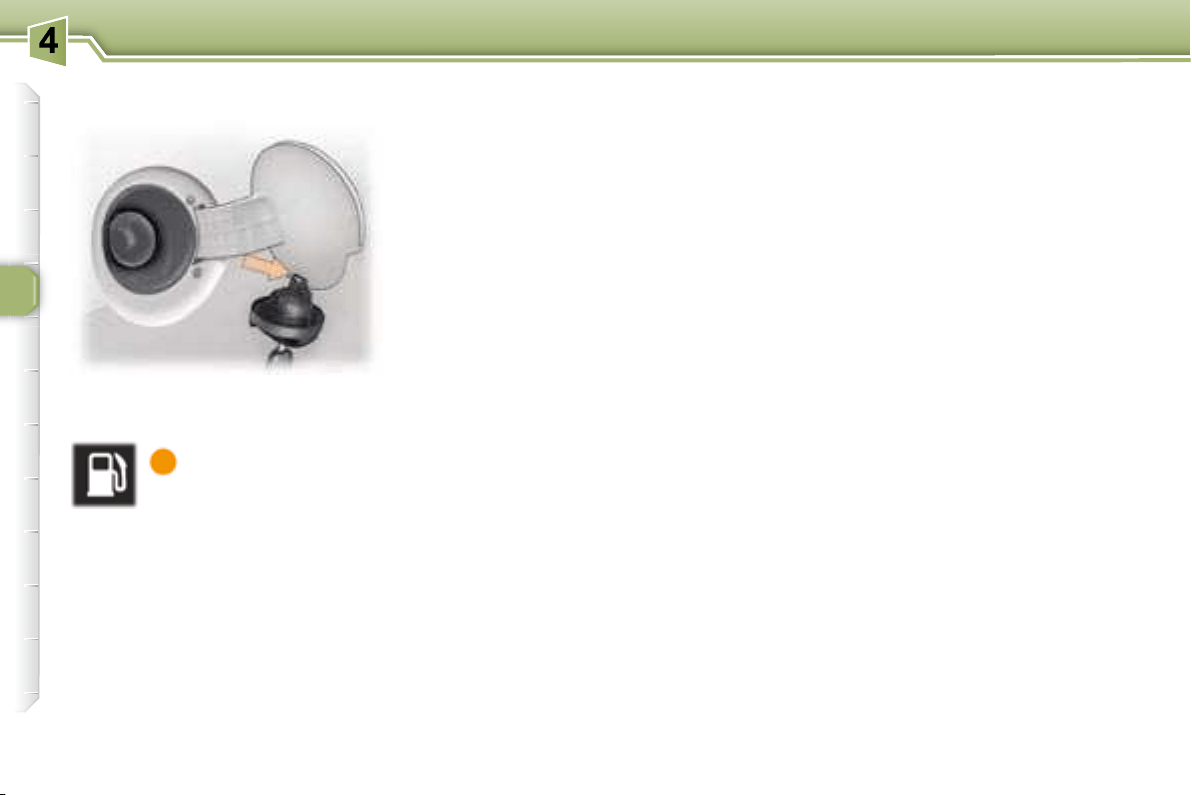
The capacity of the tank is approx-
imately 60 litres.
Low fuel level
When the minimum
fuel level in the tank
ing light comes on on
You can still drive approximately
30 miles (50 km).
Operating fault
With the ignition on, if the fuel gauge
needle remains in or returns to the
dicates a malfunction of the fuel
gauge.
Contact a PEUGEOT dealer.
FILLING WITH FUEL

i
!
61
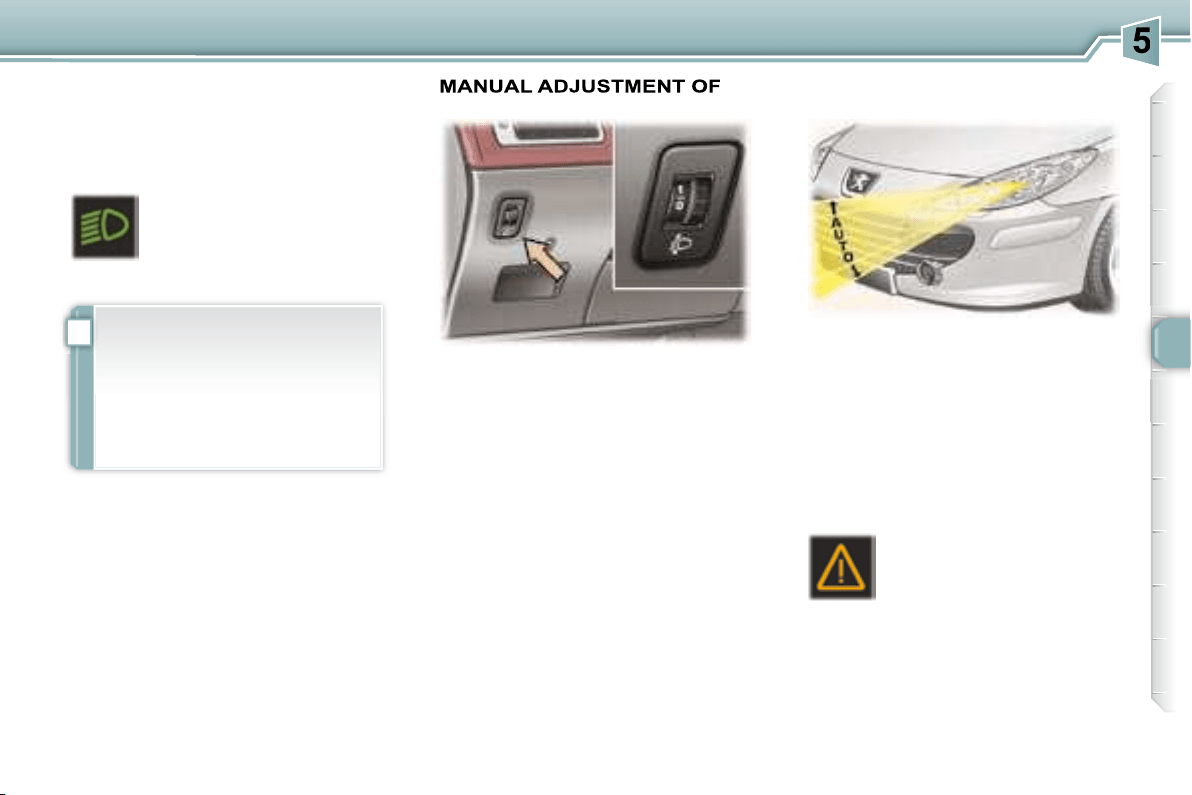
VISIBILITY
Front and rear lights (Ring A)
Place ring A
Dipped/Main beam change
Lights off
Side lights
ring)
Note:
Front fog lamps and rear fog
lamp (ring B)
Turn ring B
Lights on buzzer
have left your lights on.
day and night, the front fog
on of the lights
i
62
VISIBILITY
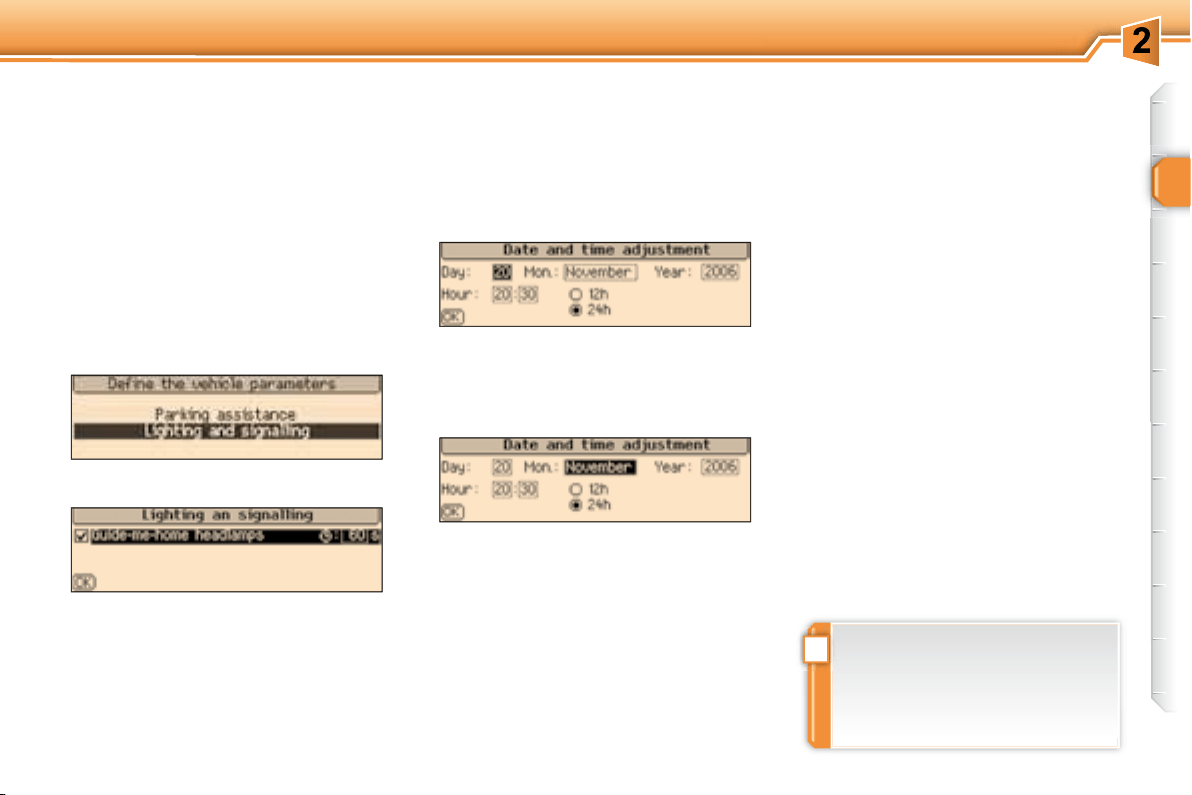
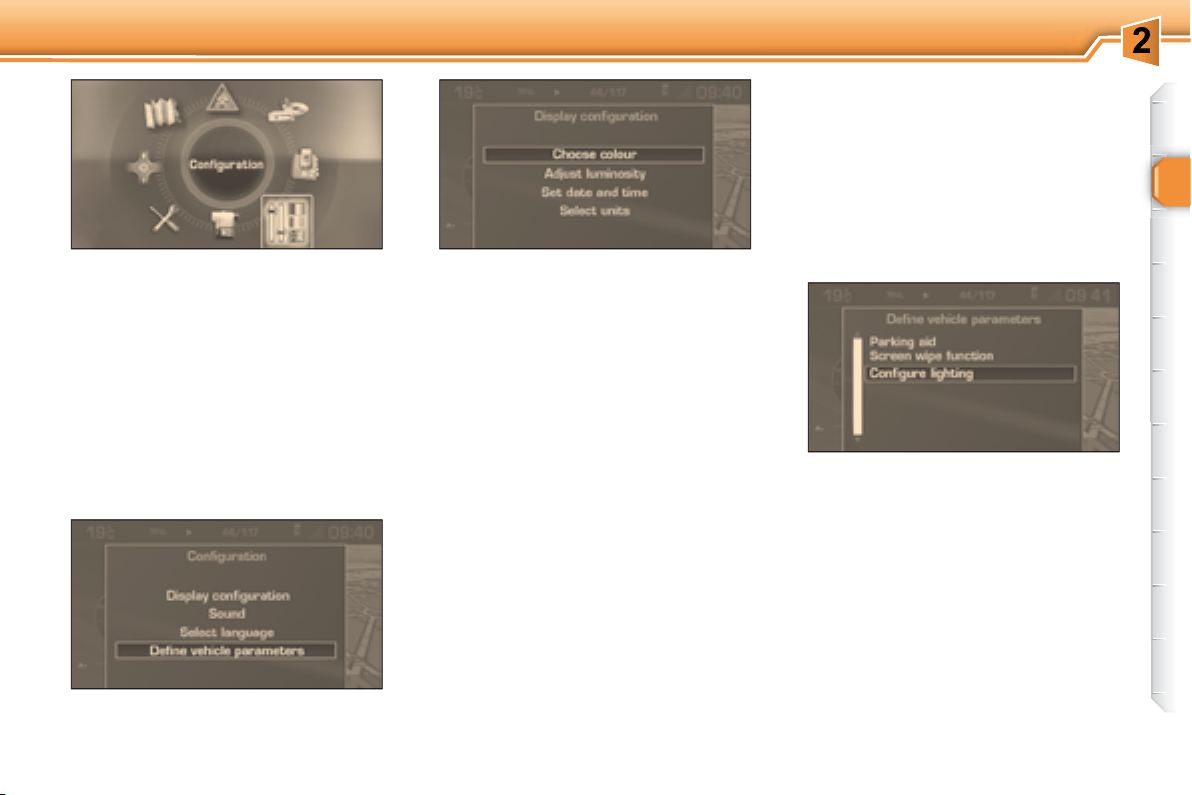
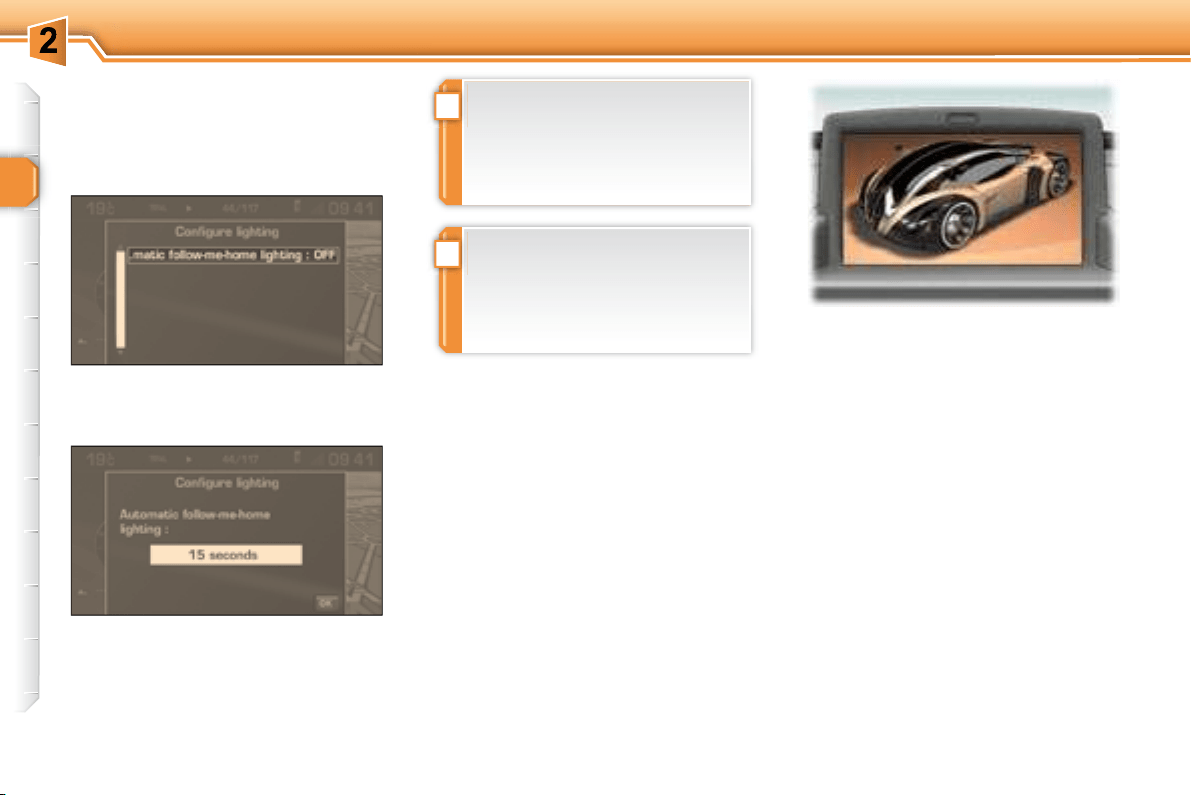
Automatic switching on of the
lights
off as soon as the light becomes
Note:
Manual "Follow-me-home" lighting
When the automatic switching on of
the lights function is deactivated , the
main on for the duration selected for the
automatic switching on of the lights
function
Left:
Right:
Note:
rection indicator, the volume of the
Automatic "Follow-me-home"
lighting
automatic
switching on of the lights function
activated
ed duration.
Activation:
get out of the vehicle and lock it.
Deactivation:
get out of the vehicle and lock it.
To deactivate or activate
tion menu.
The duration of the timed
60 seconds), via the multifunction
Cancelling:
get out of the vehicle and lock it.
Activation
Turn ring A to the "AUTO"
Deactivation
Turn ring A
than "AUTO"
If the brightness sensor does not
function correctly, the lights come
Contact a PEUGEOT dealer.
ror. It is used for the automatic

i
62
VISIBILITY
Automatic switching on of the
lights
off as soon as the light becomes
Note:
Manual "Follow-me-home" lighting
When the automatic switching on of
the lights function is deactivated , the
main on for the duration selected for the
automatic switching on of the lights
function
Left:
Right:
Note:
rection indicator, the volume of the
Automatic "Follow-me-home"
lighting
automatic
switching on of the lights function
activated
ed duration.
Activation:
get out of the vehicle and lock it.
Deactivation:
get out of the vehicle and lock it.
To deactivate or activate
tion menu.
The duration of the timed
60 seconds), via the multifunction
Cancelling:
get out of the vehicle and lock it.
Activation
Turn ring A to the "AUTO"
Deactivation
Turn ring A
than "AUTO"
If the brightness sensor does not
function correctly, the lights come
Contact a PEUGEOT dealer.
ror. It is used for the automatic
i
63
VISIBILITY
0.
-.
1.
-. Intermediate setting.
2.
loads.
-. Intermediate setting.
3.
Initial setting is position 0.
when stationary
matically corrects the height of the
a nuisance to other road users.
In cases of malfunction ,
comes on on the instrument
Do not touch the xenon bulbs. Contact
a PEUGEOT dealer.
Daytime lights *
THE HEADLAMPS
AUTOMATIC HEADLAMP
ADJUSTMENT
The instruments and controls
64
VISIBILITY
Special position of the front
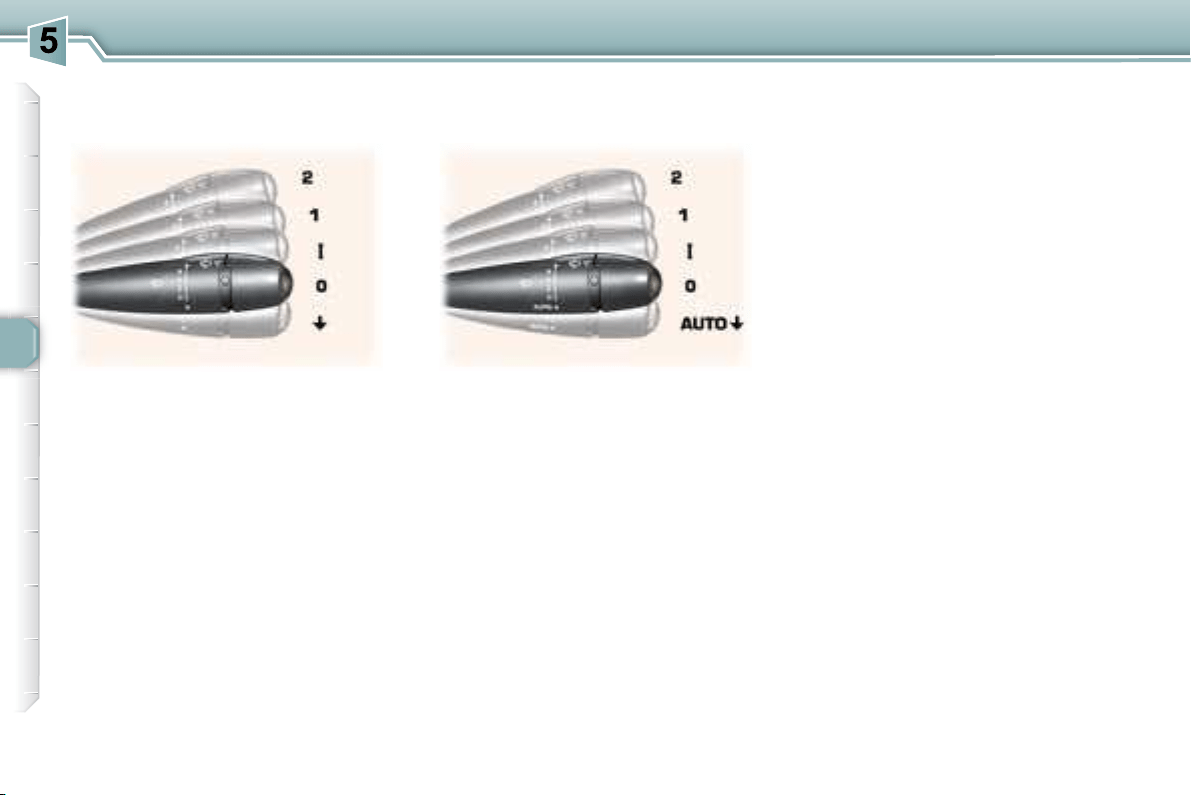
windscreen wiper
of the ignition, any action on the stalk
Windscreen and headlamp wash
if the headlamps are on.
2
1
I
0 Off.
In the I
2
1
rain).
I
0 Off.
AUTO
In the I
the vehicle.
In AUTO
WINDSCREEN WIPER STALK
Front windscreen wiper with
intermittent wipe
Front windscreen wiper with
automatic wipe

i
i
65
VISIBILITY
Automatic windscreen wipers
In AUTO
adapt
their speed to the intensity of the
rainfall .
Activation
Deactivation
I , 1 or 2 .
In the event of malfunction of the
termittent mode.
Contact a PEUGEOT dealer to have
the system checked.
ignition,
tion is used.
after the last door is closed.
COURTESY LIGHTS
1. Front courtesy light
The automatic windscreen
wipers function must be reac-
tivated if the ignition has been
switched off for more than
one minute, by pressing the
stalk downwards.
the interior mirror.
When using an automatic car

i
i
65
VISIBILITY
Automatic windscreen wipers
In AUTO
adapt
their speed to the intensity of the
rainfall .
Activation
Deactivation
I , 1 or 2 .
In the event of malfunction of the
termittent mode.
Contact a PEUGEOT dealer to have
the system checked.
ignition,
tion is used.
after the last door is closed.
COURTESY LIGHTS
1. Front courtesy light
The automatic windscreen
wipers function must be reac-
tivated if the ignition has been
switched off for more than
one minute, by pressing the
stalk downwards.
the interior mirror.
When using an automatic car
i
i
65
VISIBILITY
Automatic windscreen wipers
In AUTO
adapt
their speed to the intensity of the
rainfall .
Activation
Deactivation
I , 1 or 2 .
In the event of malfunction of the
termittent mode.
Contact a PEUGEOT dealer to have
the system checked.
ignition,
tion is used.
after the last door is closed.
COURTESY LIGHTS
1. Front courtesy light
The automatic windscreen
wipers function must be reac-
tivated if the ignition has been
switched off for more than
one minute, by pressing the
stalk downwards.
the interior mirror.
When using an automatic car

66
VISIBILITY
2. Map reading lights
Permanently off.
Permanently on.
mately 10 minutes,
30 seconds,
limit.
ignition is on (function not
available in economy mode).
3. Rear courtesy light
ignition,
tion is used.
after the last door is closed.
Permanently off.
Note: the front courtesy light (in the
67
LAYOUT
!
68
LAYOUT
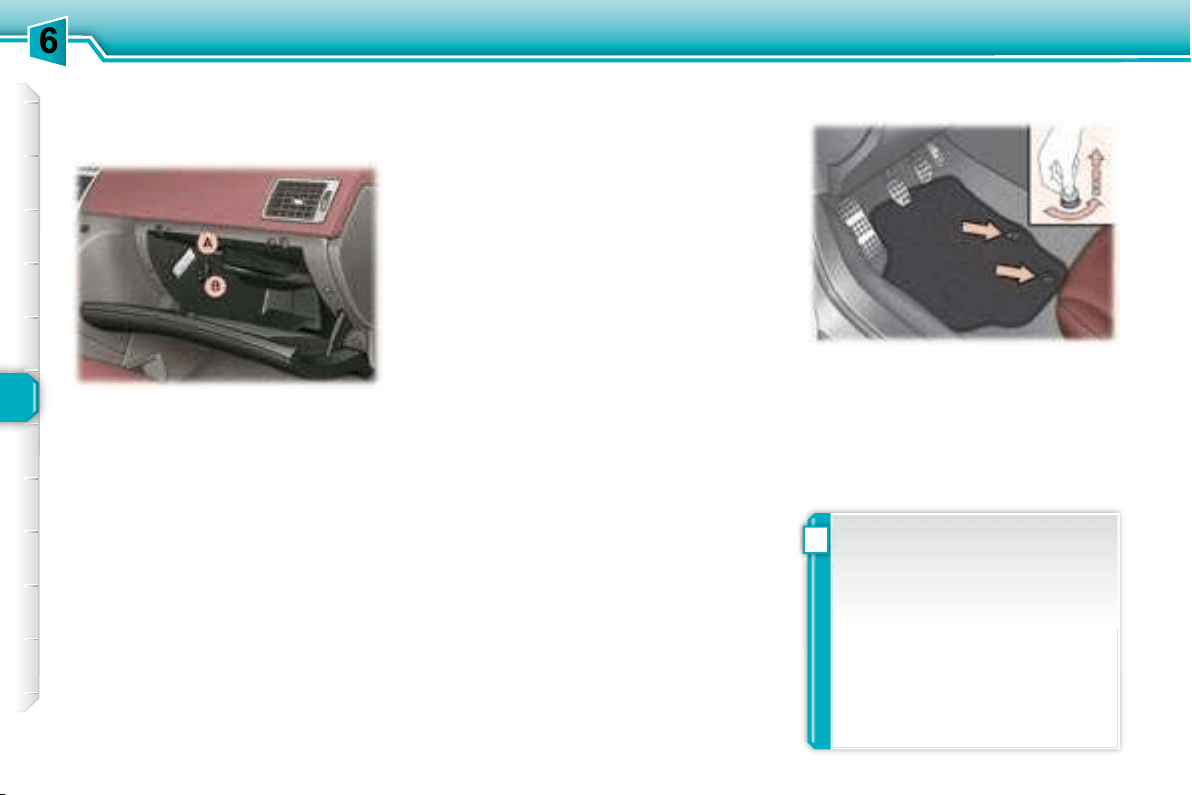
INTERIOR LAYOUT
2. Front ashtray
tab and remove the ashtray.
3. Storage
4. 12 volt socket (100 W max)
5. Door tray
6. Storage/Can holder
7. Coin storage
8. Waste container
This container must not be used as
an ashtray.
9. Front seat back pockets
1. Glove box with cooling facility
sible,
FITTING/REMOVING THE MAT
Ensure that the mat is secured
correctly.
tioned correctly.
another.
It has a ventilation nozzle that can
be closed A , distributing the same
It contains three sockets * B
country, it may be located in the boot)
tacles, tokens, etc.

!
68
LAYOUT
INTERIOR LAYOUT
2. Front ashtray
tab and remove the ashtray.
3. Storage
4. 12 volt socket (100 W max)
5. Door tray
6. Storage/Can holder
7. Coin storage
8. Waste container
This container must not be used as
an ashtray.
9. Front seat back pockets
1. Glove box with cooling facility
sible,
FITTING/REMOVING THE MAT
Ensure that the mat is secured
correctly.
tioned correctly.
another.
It has a ventilation nozzle that can
be closed A , distributing the same
It contains three sockets * B
country, it may be located in the boot)
tacles, tokens, etc.
69
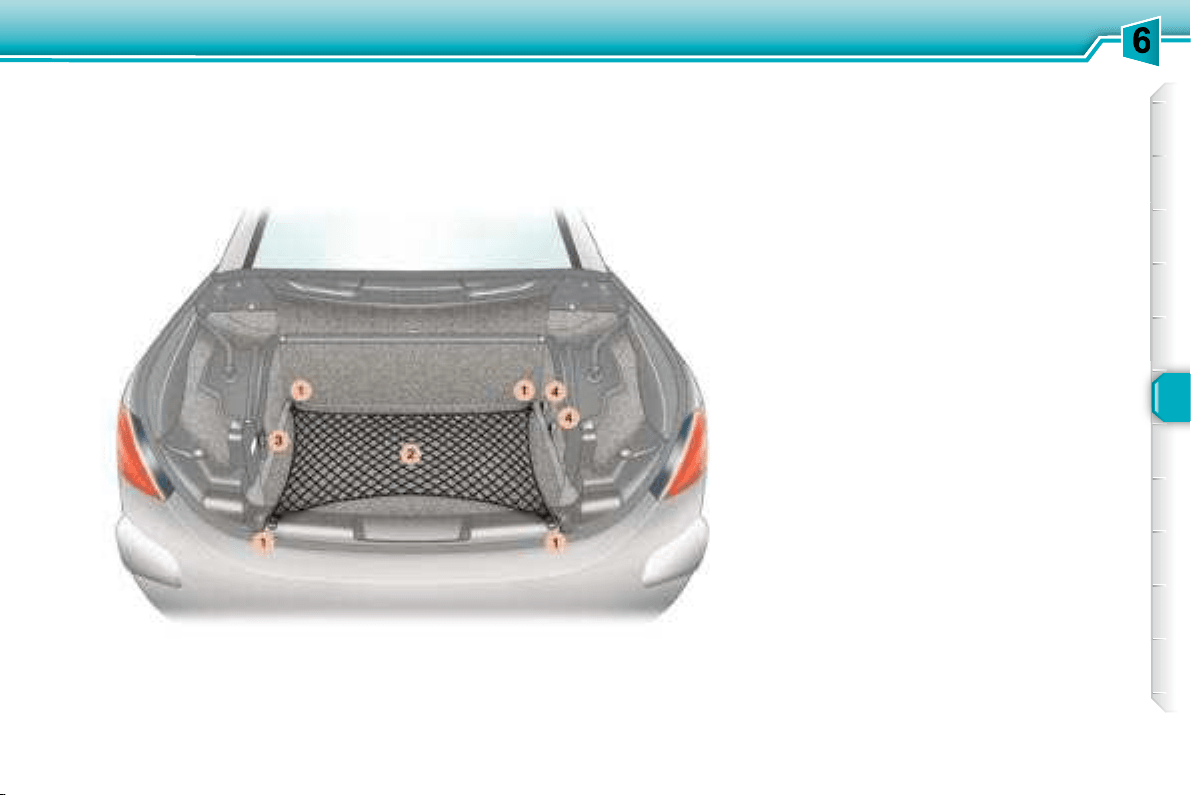
LAYOUT
BOOT LAYOUT
* According to country.
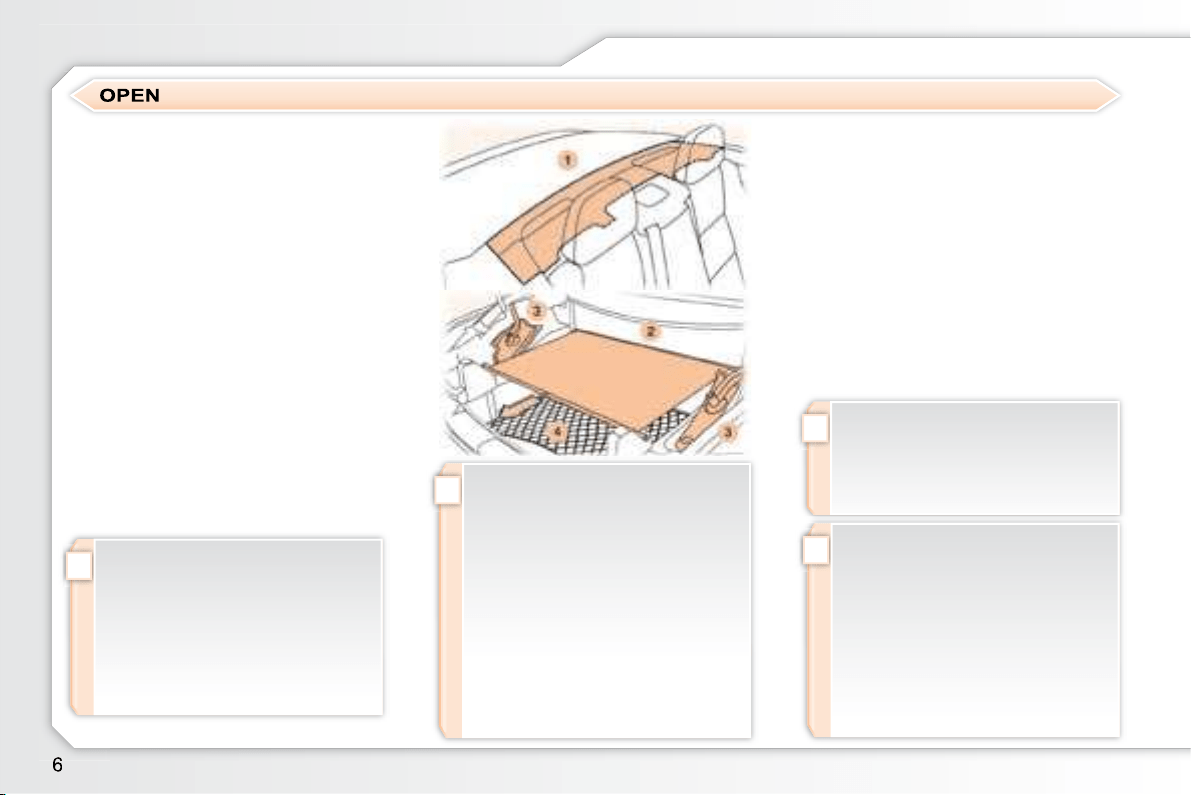
1. Stowing rings
2. Luggage retaining net
enables your luggage to be secured.
3. 12 volt socket (100 W max)
side.
sition.
4. Signalling triangle *
ing of a signalling triangle.
70
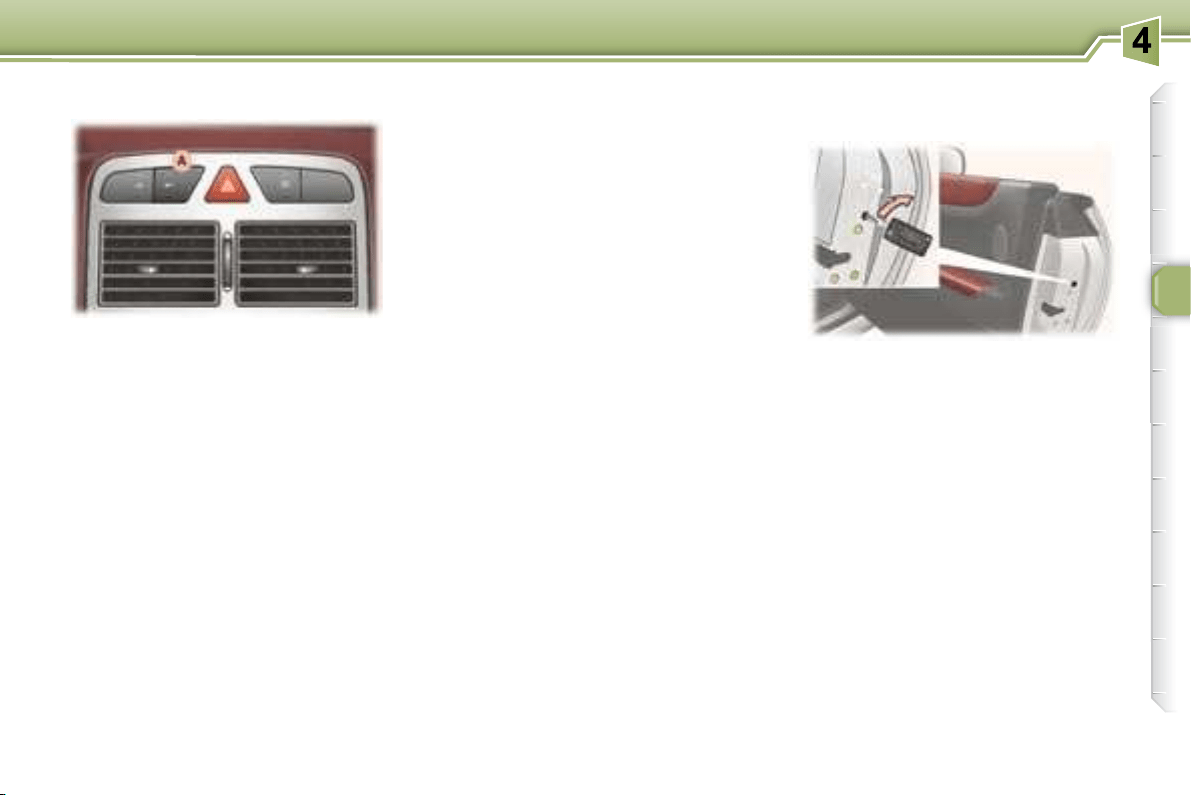
SAFETY
HAZARD WARNING LIGHTS
HORN
Automatic lighting of hazard
warning lights *
* According to country.
off.
!
71
SAFETY
(20 km/h)).
comes on on the instrument
sage on the multifunction
concerned.
Puncture
The STOP
by an audible signal and a message
and the brakes.
comes on on the instrument
sage on the multifunction
fault in the system.
Flat tyre
Sensor(s) not detected or faulty
Notes:
sensor.
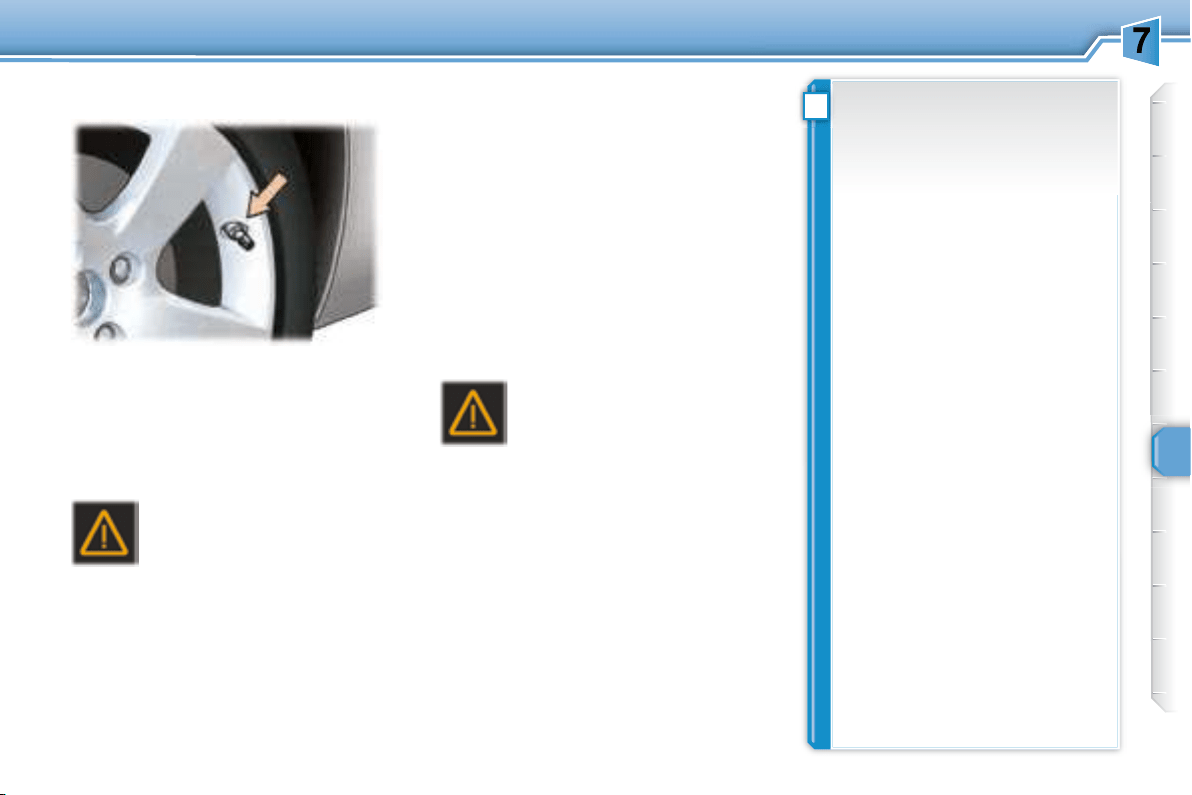
TYRE UNDER-INFLATION
DETECTION
tem must be carried out by a
PEUGEOT dealer.
have the system reinitialised by
a PEUGEOT dealer.
tion system is an aid to driving
for the driver to be vigilant or to
This system does not eliminate
sure checked regularly (see
manufacturer's label on the door
the vehicle is maintained and
driving conditions (heavy load,
checked cold, at least once a
month. Remember to check the
system.

72
SAFETY
ANTI-LOCK BRAKING
SYSTEM (ABS) AND
ELECTRONIC BRAKE FORCE
DISTRIBUTION (EBFD)
electronic brake force distribution,
vrability of your vehicle on braking,
surfaces.
Note:
and rims), make sure that these are
Stop immediately.
In both cases, consult a PEUGEOT
dealer.
ASSISTANCE SYSTEM
sage, it indicates that there
is a malfunction of the ABS,
comes on, connected to
the STOP and ABS
a buzzer and a message, it
indicates that there is a malfunction
make itself felt by slight vibrations
In emergency braking, press
pressure.

!
73
SAFETY
TRACTION CONTROL (ASR)
AND DYNAMIC STABILITY
CONTROL (ESP)
directional stability of the vehicle to
gine and the brake of one or more
be advisable to disarm the ASR and
Press the "ESP OFF"
cated on the central section of the
fascia.
Operating check
Activation of the ASR and ESP
systems
the ASR and ESP systems
are disarmed.
Reactivation
ched off.
again.
When a malfunction of the
and a message on the multifunction
Contact a PEUGEOT dealer to have
the systems checked.
When the ignition is on, the ASR and
Disarming
The ESP/ASR systems offer
courage the driver to take extra
The correct functioning of these
ommendations regarding the
dures.
tems checked by a PEUGEOT
dealer.
Operation of the ASR and ESP
systems
vated.
i
74
SAFETY
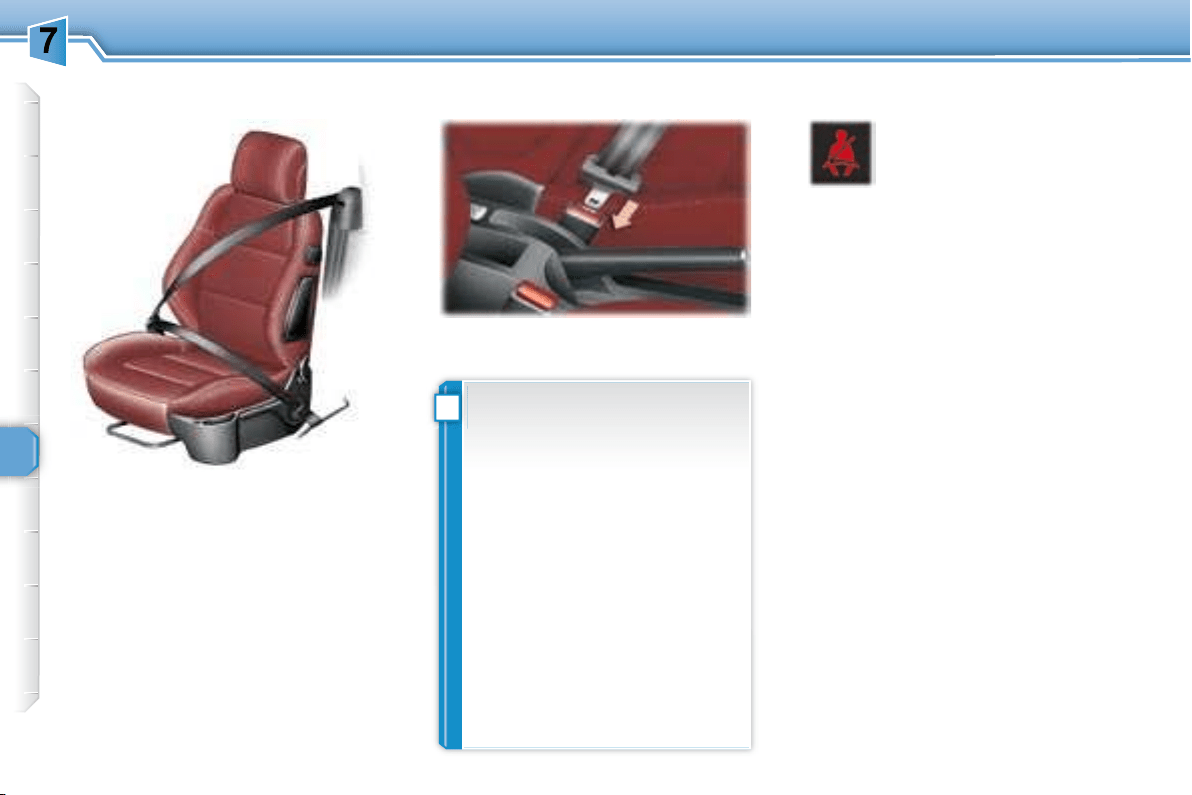
Fastening the seat belts
kle into the stalk.
Unfastening the seat belts
if the driver has not fastened
his seat belt.
With the engine running and the
off automatically after 30 seconds.
ing light comes on constantly,
dible signal of increasing volume.
mains on until the driver fastens
his seat belt.
SEAT BELTS
Press the red button on the stalk
then remove the buckle.
Seat belt unfastened/not
fastened warning light
Pre-tensioning and
force-limiting front
seat belts
Safety in the event of a frontal
sioning system instantly tightens
on.
!
!
75
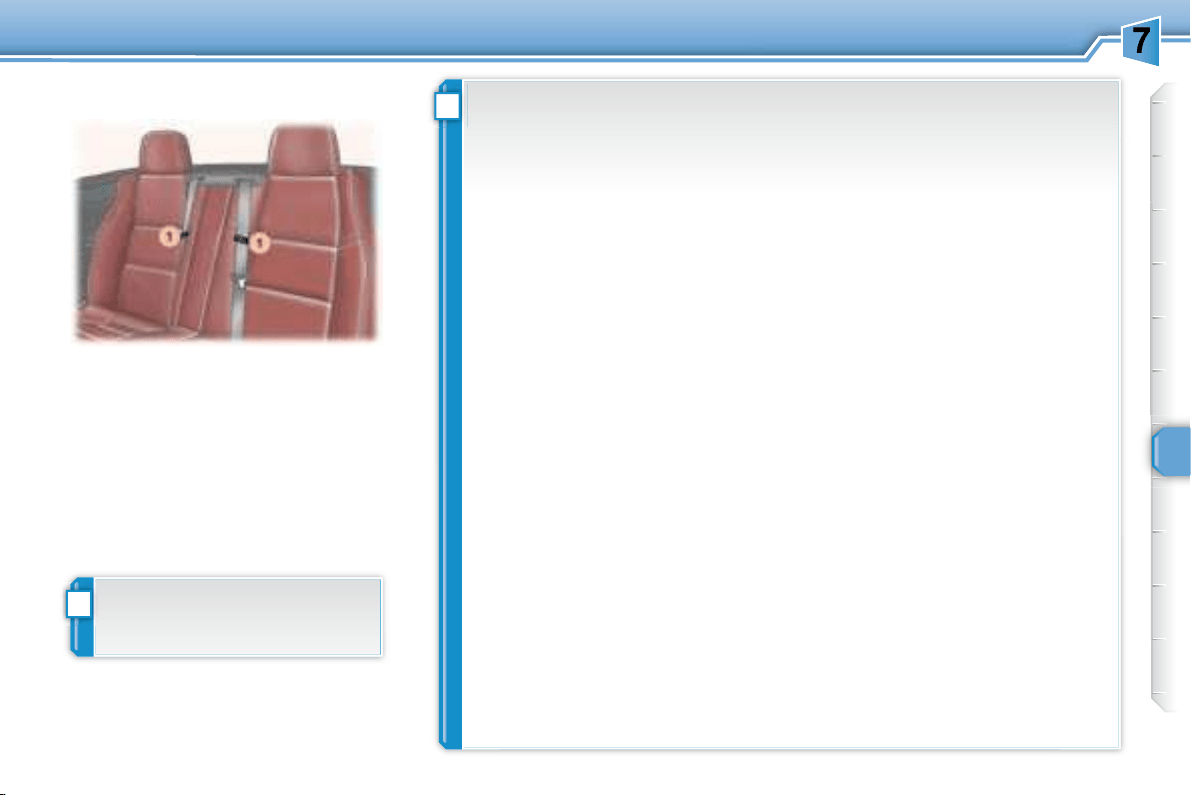
SAFETY
1 to
Rear seat belts
ing it.
out correctly.
by PEUGEOT dealers.
After folding or moving a seat or rear bench seat, ensure that the seat belt is
guides 1 before use.

!
!
i
76
SAFETY
AIR BAGS
The air bags have been designed to
in the event of violent collisions. They
limiting seat belts.
In this case, the electronic detectors
record and analyse the front and side
the vehicle,
A.
B.
less smoke and a noise, due
in the system.
This smoke is not harmful, but
The noise of the detonation
may result in a slight loss of
hearing for a short time.
Impact detection zones
Recommendations for
children
Use a suitable child seat if the
old or shorter than one metre
Never use the same seat belt to
Depending on the nature and
seriousness of the impacts ,
charge of harmless smoke and
a noise, due to the activation of
light comes on.
seat belts system checked,
PEUGEOT dealer.
The air bags do not operate
when the ignition is off.

!
!
i
76
SAFETY
AIR BAGS
The air bags have been designed to
in the event of violent collisions. They
limiting seat belts.
In this case, the electronic detectors
record and analyse the front and side
the vehicle,
A.
B.
less smoke and a noise, due
in the system.
This smoke is not harmful, but
The noise of the detonation
may result in a slight loss of
hearing for a short time.
Impact detection zones
Recommendations for
children
Use a suitable child seat if the
old or shorter than one metre
Never use the same seat belt to
Depending on the nature and
seriousness of the impacts ,
charge of harmless smoke and
a noise, due to the activation of
light comes on.
seat belts system checked,
PEUGEOT dealer.
The air bags do not operate
when the ignition is off.
!
!
77
SAFETY
Reactivation
When you remove the child seat, turn
1 to the "ON"
arm the air bag and so guarantee the
contact a PEUGEOT dealer to have
the system checked.
PEUGEOT dealer.
Operating fault
with the ignition off , insert the
1 ,
turn it to the "OFF"
To guarantee the safety of your
ger seat.
Deactivation
Contact a PEUGEOT dealer.
box.
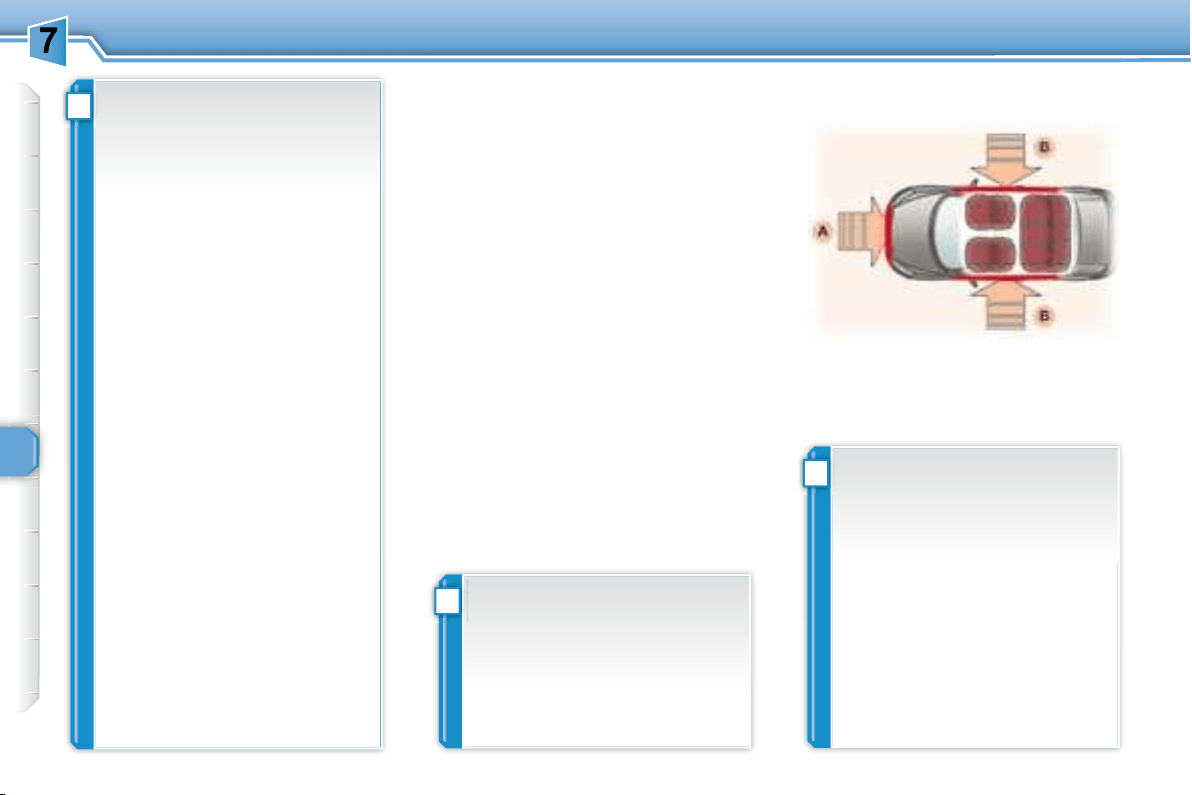
A
gitudinal centreline of the vehicle on
the front to the rear of the vehicle.
movement.
Front air bags
Activation
armed.

!
79
SAFETY
After an accident or if the vehicle has been stolen or broken into, have the air bag systems checked.
dealer.
Side air bags
Front air bags
For the air bags to be fully effective, observe the following safety rules:
!
78
SAFETY
Side air bags
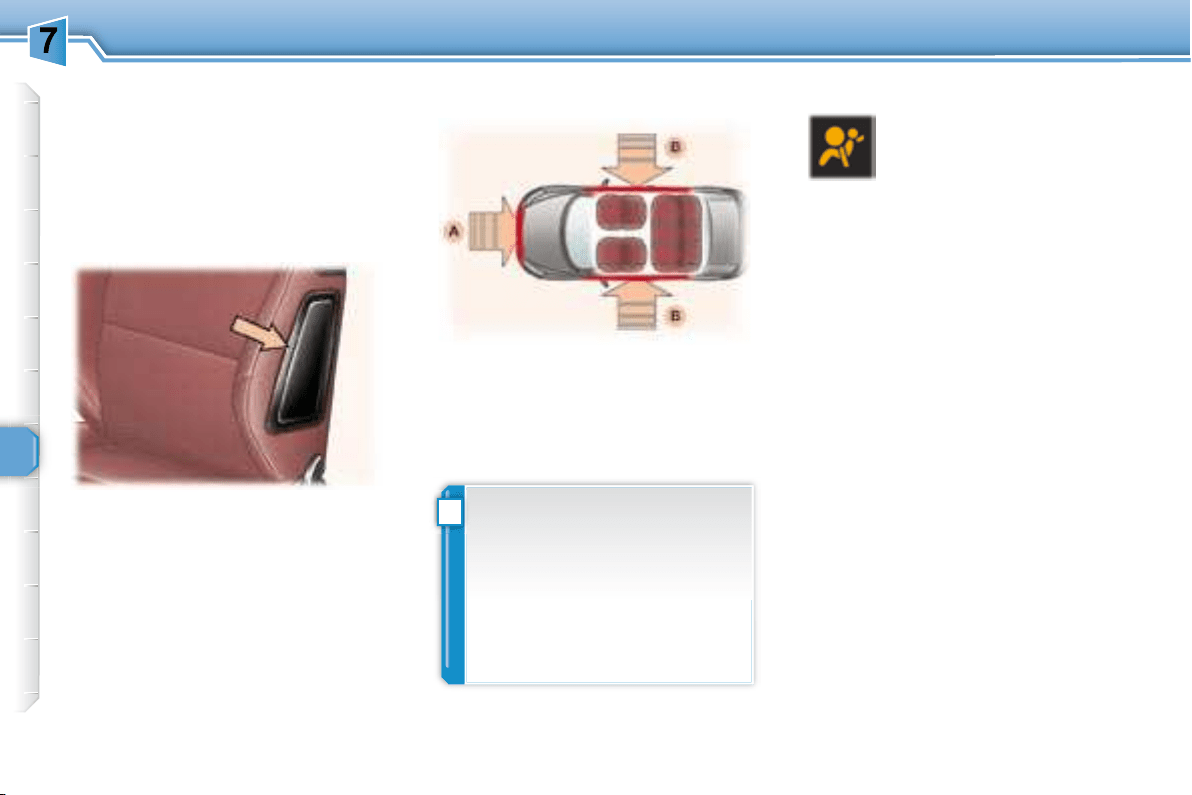
It is triggered unilaterally in the event
B ,
treline of the vehicle on a horizontal
Activation
in the front seat back frame, on the
door side.
A.
B.
or if the vehicle rolls over, the
air bag may not be triggered.
The air bag is not triggered in
lision.
Impact detection zones Operating fault
signal and a message on
contact a PEUGEOT dealer to have
the system checked. The air bags
may no longer be triggered in the

!
79
SAFETY
After an accident or if the vehicle has been stolen or broken into, have the air bag systems checked.
dealer.
Side air bags
Front air bags
For the air bags to be fully effective, observe the following safety rules:
!
!
i
76
SAFETY
AIR BAGS
The air bags have been designed to
in the event of violent collisions. They
limiting seat belts.
In this case, the electronic detectors
record and analyse the front and side
the vehicle,
A.
B.
less smoke and a noise, due
in the system.
This smoke is not harmful, but
The noise of the detonation
may result in a slight loss of
hearing for a short time.
Impact detection zones
Recommendations for
children
Use a suitable child seat if the
old or shorter than one metre
Never use the same seat belt to
Depending on the nature and
seriousness of the impacts ,
charge of harmless smoke and
a noise, due to the activation of
light comes on.
seat belts system checked,
PEUGEOT dealer.
The air bags do not operate
when the ignition is off.
!
80
DRIVING
HANDBRAKE
Applying
Pull the handbrake to immobilise
your vehicle.
When the vehicle is being
driven, illumination of this
STOP
handbrake is still on or has not been
Releasing
button to release the handbrake.
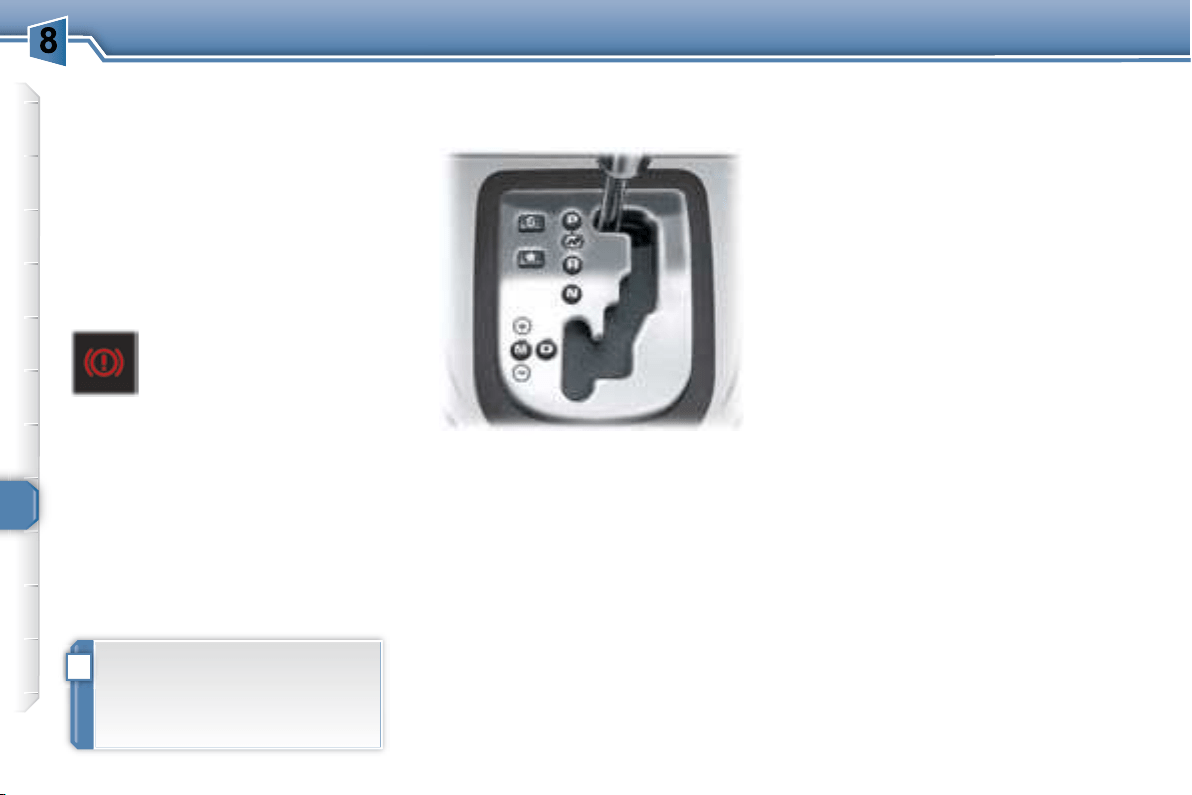
automatic gearbox
of integral automatic
hanced by a sport and a snow
gramme, or manual gear changing .
P immobilise the vehicle or
start the engine
on or off.
R to reverse (select this
engine at idle).
Nto start the engine and to
park
Note: N is engaged
D to accelerate.
Dfor driving in automatic mode
.
M
S
Gear selection gate
Move the lever in the gate to
Starting the engine
P or N in the gate.
Turn the ignition key to the
Starting
audible signal and a message on the
"PORSCHE TIPTRONIC
SYSTEM" AUTOMATIC
GEARBOX

!
80
DRIVING
HANDBRAKE
Applying
Pull the handbrake to immobilise
your vehicle.
When the vehicle is being
driven, illumination of this
STOP
handbrake is still on or has not been
Releasing
button to release the handbrake.
automatic gearbox
of integral automatic
hanced by a sport and a snow
gramme, or manual gear changing .
P immobilise the vehicle or
start the engine
on or off.
R to reverse (select this
engine at idle).
Nto start the engine and to
park
Note: N is engaged
D to accelerate.
Dfor driving in automatic mode
.
M
S
Gear selection gate
Move the lever in the gate to
Starting the engine
P or N in the gate.
Turn the ignition key to the
Starting
audible signal and a message on the
"PORSCHE TIPTRONIC
SYSTEM" AUTOMATIC
GEARBOX

!
i
!
81
DRIVING
Moving off
With the engine running, to move off
P
it is essential to press the brake
pedal,
release the handbrake,
R , D or M , then
moves off immediately.
N .
Sport and snow programmes
Sport programme
Press button S once the engine
has been started.
The gearbox automatically favours
acceleration.
Snow programme
Press button once the engine
has been started.
Note:
Press button S or again to
are in.
Automatic operation
Automatic changing of the four
D in the gate.
the gear in relation to the style of
vehicle load.
or maintain the gear selected until
change to a higher gear for reasons
of safety.
When the engine is at idle,
R ,
D or M is selected the vehicle
For this reason, do not leave
children unsupervised inside
the vehicle, with the engine
running .
P ,
an audible signal is heard and
the lever to P
N
the vehicle is moving.
P or R
unless the vehicle is stationary.
P .

!
82
DRIVING
Manual operation
Manual
M in the gate,
+ sign to
change to a higher gear,
- sign to
D
tion M (driving in manual mode) at
any time.
Invalid value during manual
operation
Notes
rarily in automatic mode.
When the vehicle is stationary or
tomatically selects gear M1 .
Programme S
Operating abnormality
P to
R and from N to R
any damage to the gearbox).
restrictions.
Contact a PEUGEOT dealer as soon
is not engaged correctly
tions).
P
Above all, do not force the lever
as there is a risk of damage to
the automatic gearbox.
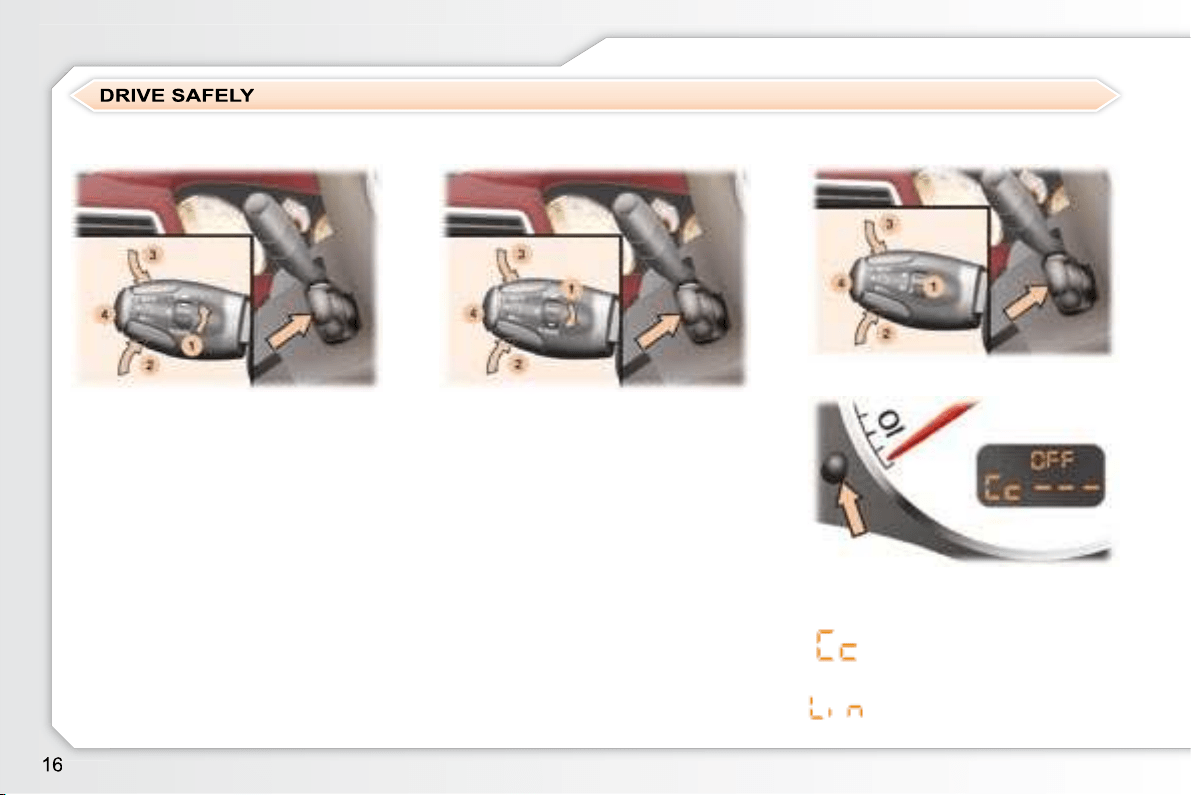
DRIVING
less of any action on the brake and
The operating actions must be
carried out:
when stationary, with the engine
running
,
or
with the vehicle moving.
the distance recorders.
Storing a speed
vating the limiter.
Press buttons 2 and 3
Selecting the function
Place the dial 1 in the LIMIT
tion. The limiter is not yet active.
Activating/deactivating the limiter
Pressing button 4 once activates the
activates it.
SPEED LIMITER *
Instrument panel display
* According to country.
!
84
DRIVING
Note:
To reactivate the limiter, release the
Switching the function off
Place dial 10
Operating fault
In the event of a limiter malfunction,
Contact a PEUGEOT dealer to have
the system checked.
Exceeding the programmed
speed
Pressing the accelerator in order to
beyond the point of
resistance .
the vehicle from exceeding the
the driver.
tioned correctly.
another.
85
DRIVING
It enables the vehicle to maintain a
driver.
tion D , or in at least second gear in
When the cruise control function
recorders.
returns to the cruise control function.
First activation/memorising a
reference speed
As soon as you reach the chosen
2 or 3
Selecting the function
1 in the CRUISE
Note:
Cancelling the cruise control
Press button 4 or the brake or
* According to country.
CRUISE CONTROL *
Instrument panel display

!
86
DRIVING
Cancelling the memorised
reference speed
ignition, the system no longer
Reactivating the cruise control
trol, press button 4
Changing the memorised
reference speed
3
(1 km/h).
2 or 3 .
Switching the function off
Place dial 10
the system off.
Operating fault
2
(1 km/h).
Contact a PEUGEOT dealer to have
the system checked.
When changing the memorised
Do not use the cruise control on
the vehicle from exceeding the
In any event, the cruise control
the driver.
tioned correctly.
another.

87
DRIVING
First activation/memorising a
reference speed
As soon as you reach the chosen
2 or 3
It enables the vehicle to maintain a
driver.
tion D or at least second gear must
mode.
When the cruise control function
recorder.
returns to the cruise control function.
Selecting the function
1 in the ON
The cruise control is not yet active
Note:
Cancelling the cruise control
Press button 4 or the brake or
* According to country.
CRUISE CONTROL *
Instrument panel display
!
88
DRIVING
Reactivating the cruise control
trol, press button 4
Cancelling the memorised
reference speed
off, the system no longer stores
Changing the memorised
reference speed
3
(1 km/h).
2 or 3 .
Switching the function off
Place dial 1 in the OFF
Operating fault
2
(1 km/h).
Contact a PEUGEOT dealer to have
the system checked.
When changing the memorised
Do not use the cruise control on
.
the vehicle from exceeding the
In any event, the cruise control
the driver.
tioned correctly.
another.
!
89
DRIVING
VISUAL AND AUDIBLE REAR
PARKING ASSISTANCE
.
detected on the right,
ed on the left,
on the right and on the left if an
obstacle is detected in the centre.
of the vehicle and the obstacle is less
metres, the audible signal becomes
Change to neutral, the system is
again inactive.
Activation/Deactivation
ed or deactivated from the
vation of the system are memorised
Switching the system off
reverse gear is engaged, the
.
Contact a PEUGEOT dealer.
vehicle, tree, gate, etc.) behind the
of the manoeuvre, but may no longer
close to it.
Note:
PEUGEOT).
gear is engaged, an audible signal
sors may be dirty.
Activation
The system is activated as soon as
reverse gear is engaged.
91
CHECKS
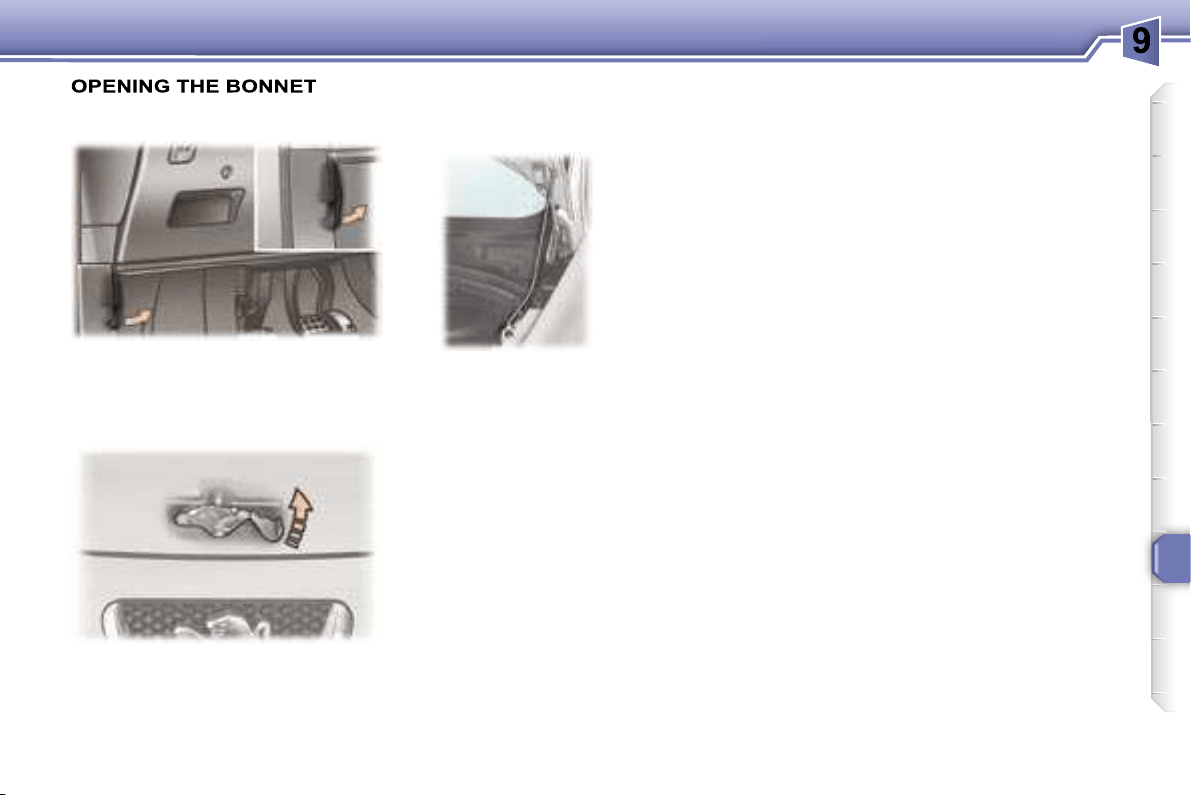
Lift the catch and raise the bonnet.
Bonnet strut
RUNNING OUT OF FUEL
(DIESEL)
2 litre 16V HDI engine
litres of diesel,
gine starts.
From inside
under the fascia to the right.
From outside
Secure the strut
to hold the bonnet
Before closing the
strut in its housing.
To close
the end of its travel.
locked.
92
CHECKS
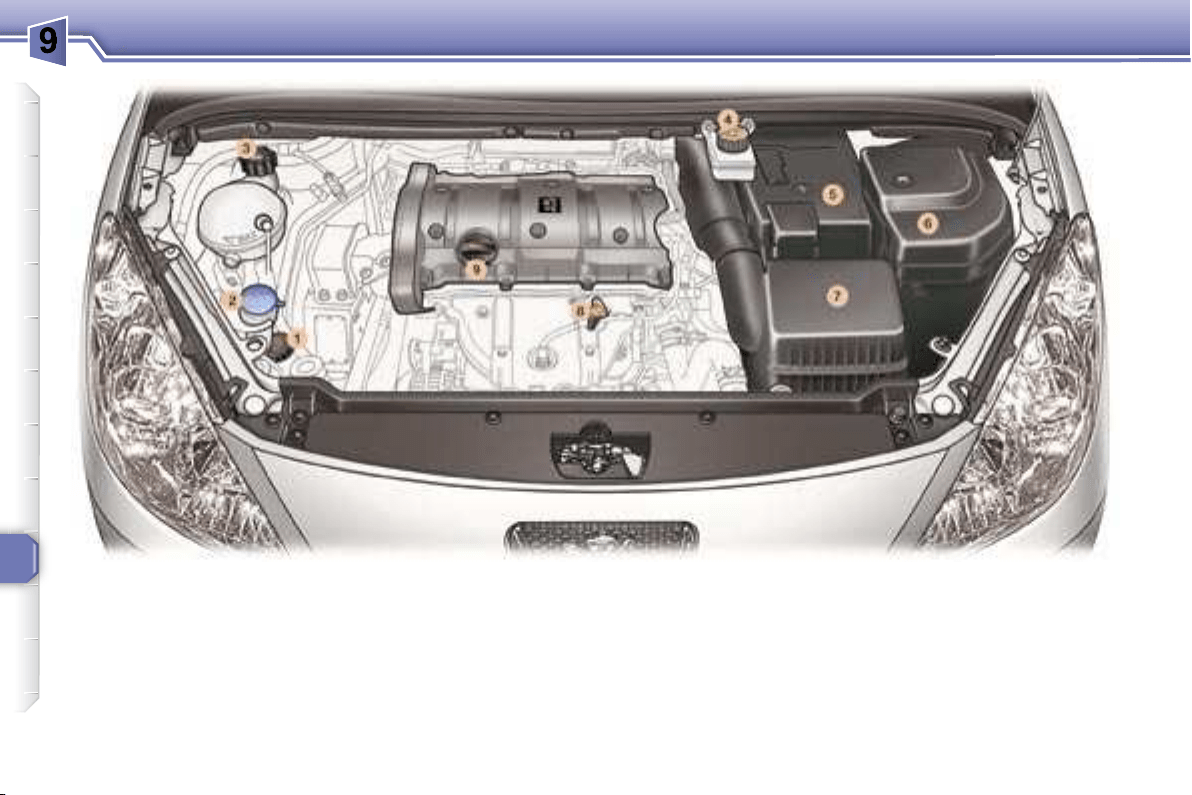
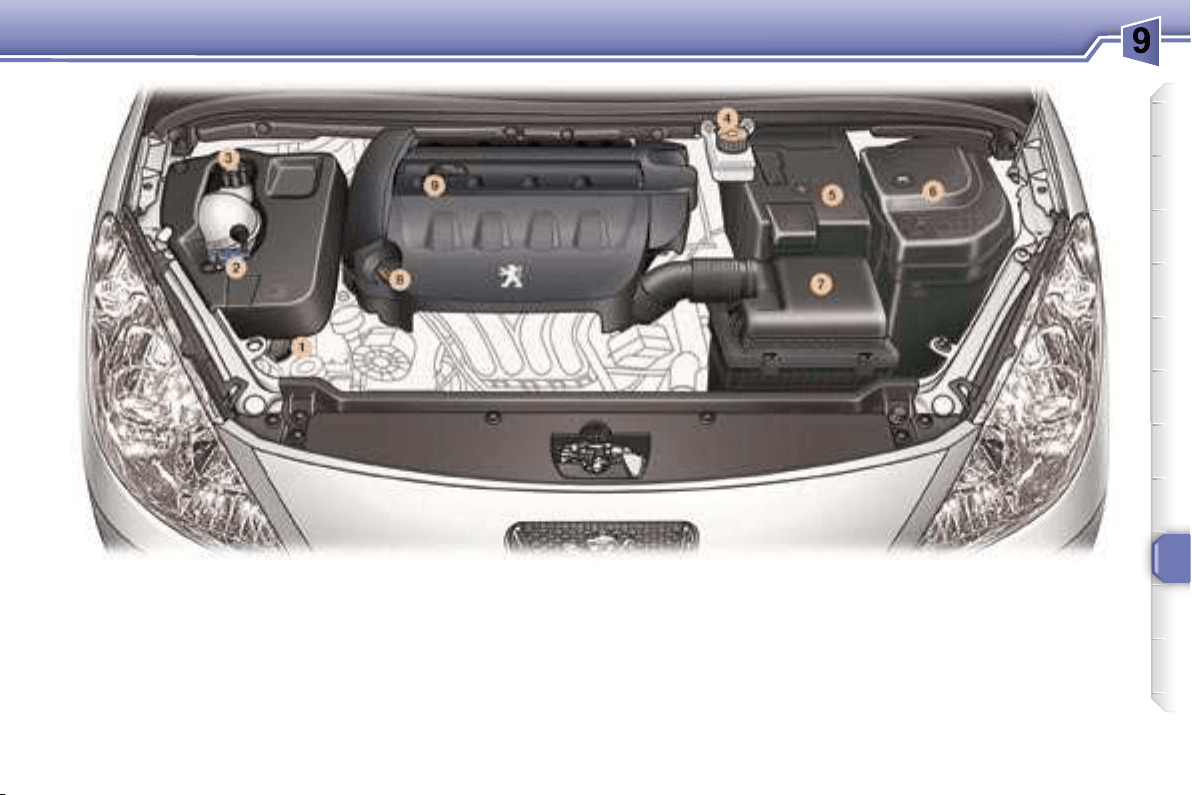
1.
2.
reservoir.
3. Coolant reservoir.
4.
5. Battery.
6. Fuse box.
7.
8.
9. Engine oil reservoir.
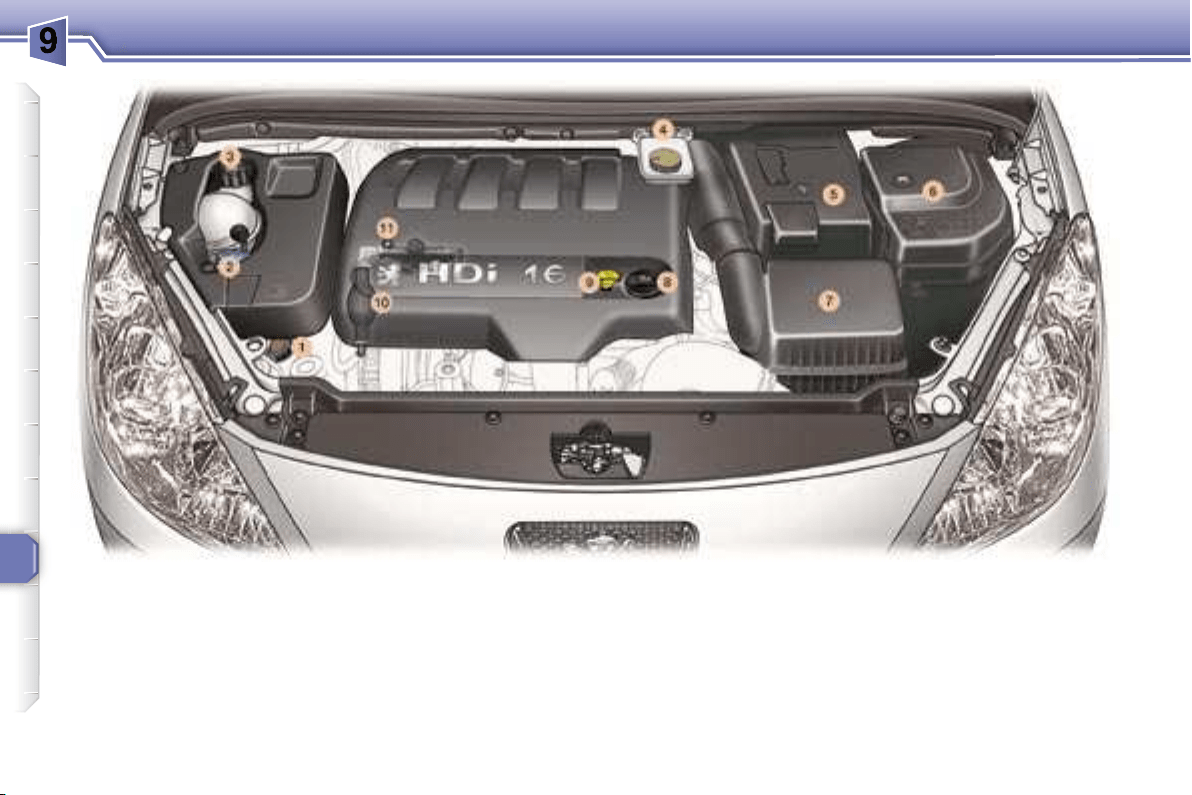
1.6 LITRE 16V PETROL ENGINE
93
CHECKS
1.
2.
reservoir.
3. Coolant reservoir.
4.
5. Battery.
6. Fuse box.
7.
8.
9. Engine oil reservoir.
2 LITRE 16V PETROL ENGINE
94
CHECKS
2 LITRE 16V TURBO DIESEL HDI ENGINE (136 BHP)
1.
2.
reservoir.
3. Coolant reservoir.
4.
5. Battery.
6. Fuse box.
7.
8. Engine oil reservoir.
9.
10.
11.
95
CHECKS
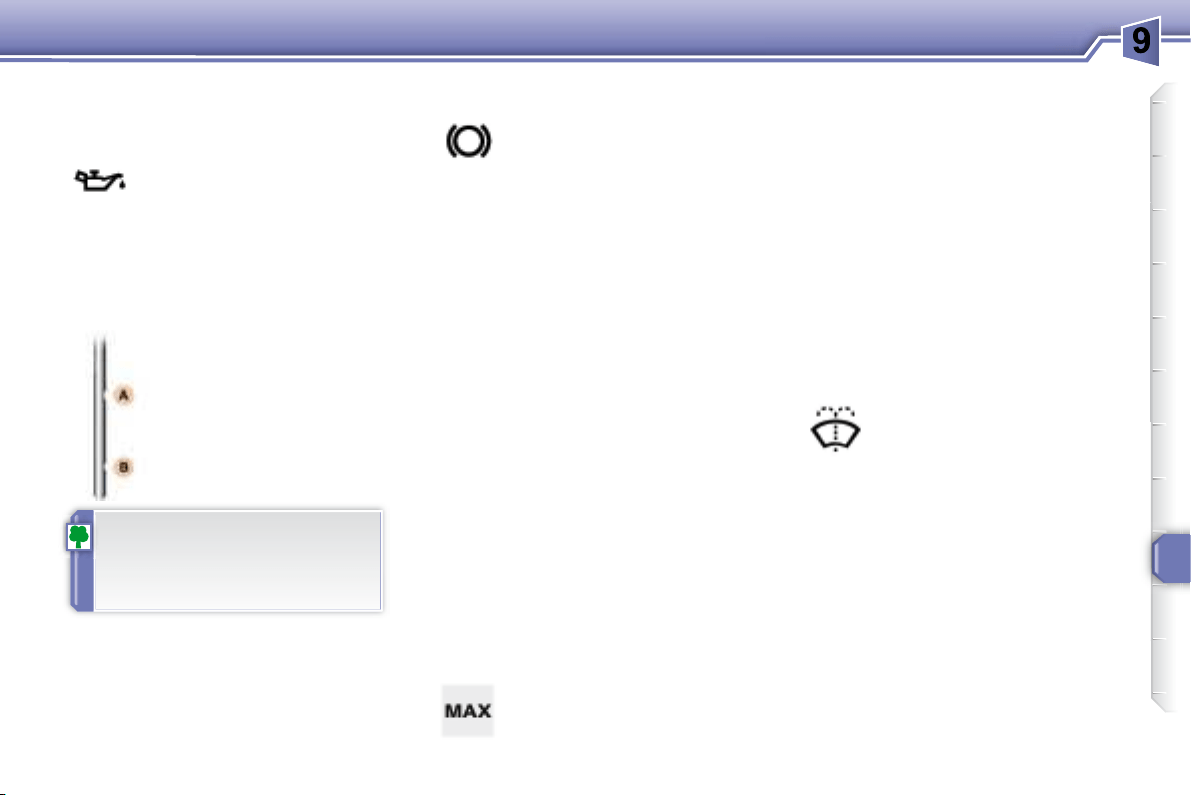
CHECKING THE LEVELS
A = maximum
B = minimum
Oil change
According to the information given in
the servicing booklet.
Power steering reservoir
Remove the style trim * (see §
mark and close to the MAX. mark.
Dipstick
Cooling system
manufacturer.
can operate after the vehicle has
stopped, even when the engine is
cold.
In addition, as the cooling system is
Windscreen and headlamp
wash level
Diesel additive level (Diesel
with particle emission filter)
diesel additive level.
Contact a PEUGEOT dealer as soon
Brake fluid level
Viscosity selection
In all cases, the oil selected must
ments.
Oil level
Note: the coolant does not need to
be changed.
above the MIN mark and
close to the MAX mark.
ried out according to the
manufacturer's servicing
schedule.
standards.
Check the level regularly
(1 000 km).
engine cold, using the oil level gauge
stick.
mended by PEUGEOT.
To maintain the reliability of
engines and emission control
systems, the use of additives in
* According to engine.
i
i
!
96
CHECKS
CHECKS
Where the handbrake travel
Have the system checked by a PEUGEOT
dealer.
Air filter and passenger
compartment filter
Particle emission filter (Diesel)
schedule, by a PEUGEOT dealer.
on the style of driving, in
distances.
Disc and drum wear status
status of the surfaces of the discs and
drums, contact a PEUGEOT dealer.
Oil filter Used products
very corrosive.
Note:
at the exhaust on acceleration. This
has no effect on the behaviour of the
vehicle or on the environment.
Battery
your battery checked by a
PEUGEOT dealer.
If you
drive in dusty conditions,
change them twice as of-
ten.
Brake pads
Handbrake
servicing schedule.
Manual gearbox
change. Have the level checked
facturer's servicing schedule.
or onto the ground.
It may be necessary to check
To check the main levels and
certain components, in accordance
with the manufacturer's servicing
schedule, refer to the pages
of the servicing booklet which
correspond to your vehicle's
engine.
teristics.
ment is strictly prohibited .

i
i
!
96
CHECKS
CHECKS
Where the handbrake travel
Have the system checked by a PEUGEOT
dealer.
Air filter and passenger
compartment filter
Particle emission filter (Diesel)
schedule, by a PEUGEOT dealer.
on the style of driving, in
distances.
Disc and drum wear status
status of the surfaces of the discs and
drums, contact a PEUGEOT dealer.
Oil filter Used products
very corrosive.
Note:
at the exhaust on acceleration. This
has no effect on the behaviour of the
vehicle or on the environment.
Battery
your battery checked by a
PEUGEOT dealer.
If you
drive in dusty conditions,
change them twice as of-
ten.
Brake pads
Handbrake
servicing schedule.
Manual gearbox
change. Have the level checked
facturer's servicing schedule.
or onto the ground.
It may be necessary to check
To check the main levels and
certain components, in accordance
with the manufacturer's servicing
schedule, refer to the pages
of the servicing booklet which
correspond to your vehicle's
engine.
teristics.
ment is strictly prohibited .
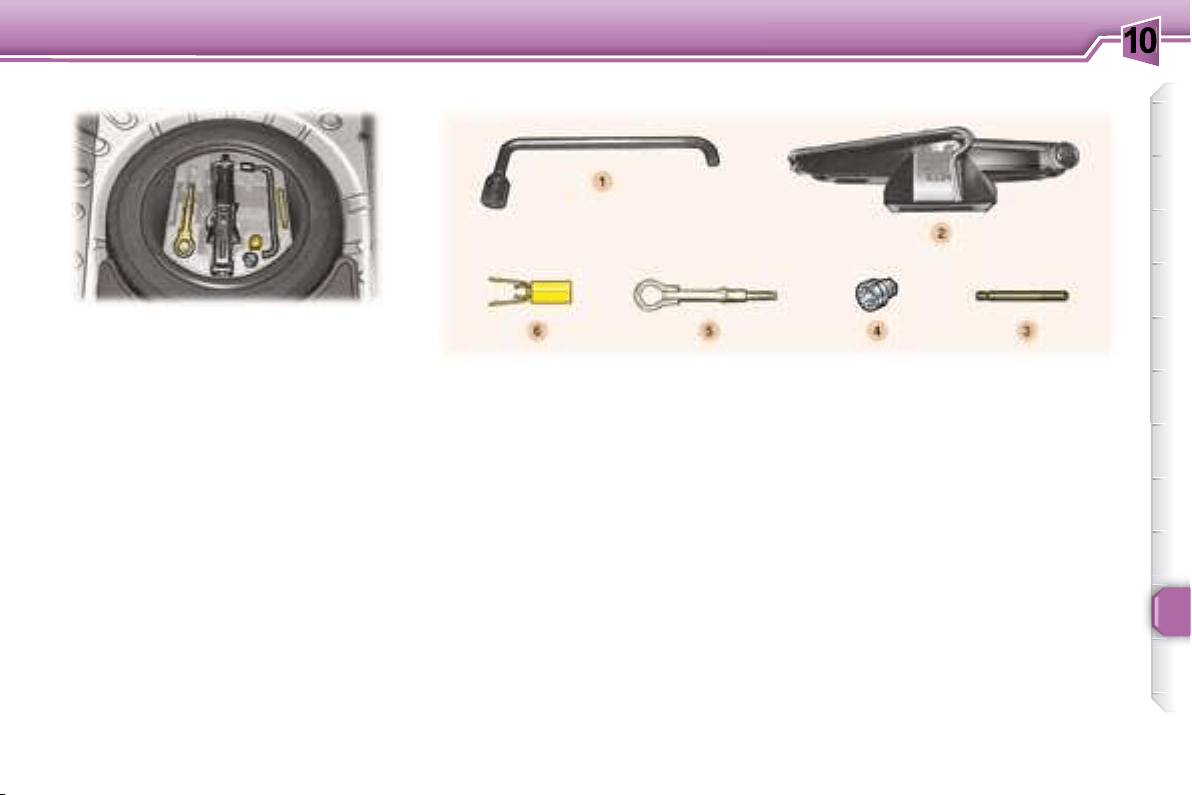
10
97
PRACTICAL INFORMATION
Access to the spare wheel and
the jack in the boot
sition.
Detach the luggage retaining net.
Lift the boot mat using the handle.
Tools
1. Wheelbrace.
2.
3. Centralising tool.
4.
5.
6.
A diagram on the holder indicates the
location of the tools.
Parking the vehicle
ground.
P for the
automatic gearbox).
CHANGING A WHEEL
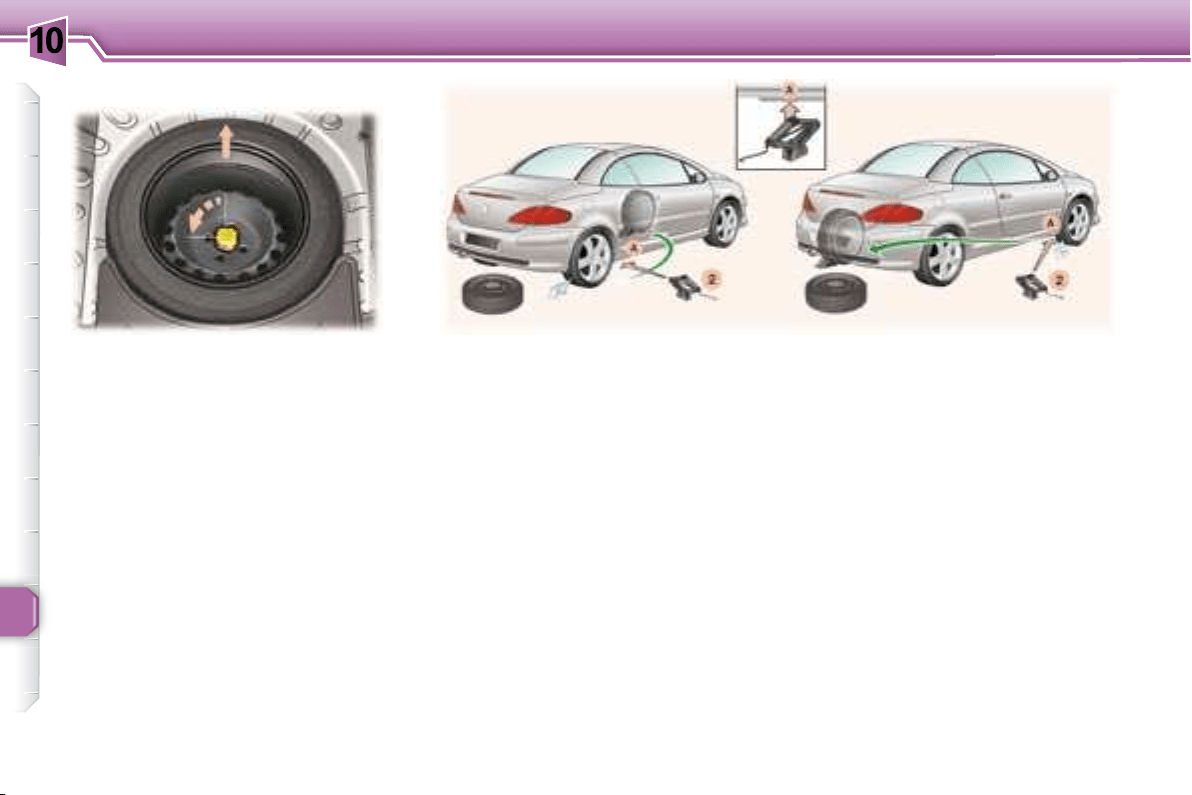
10
98
PRACTICAL INFORMATION
Extracting the wheel
Removing the wheel
the one to be changed.
Remove the trim, using the
1
2
A
changed.
2 until its base
sure that the centre line of the
A used.
Fitting a wheel
tralising tool 3 to assist you.
move the centralising tool.
Partly tighten the bolts using the
1 .
2 and remove it.
Fully tighten the bolts using the
1 .
Raise the vehicle.
you from the rear.
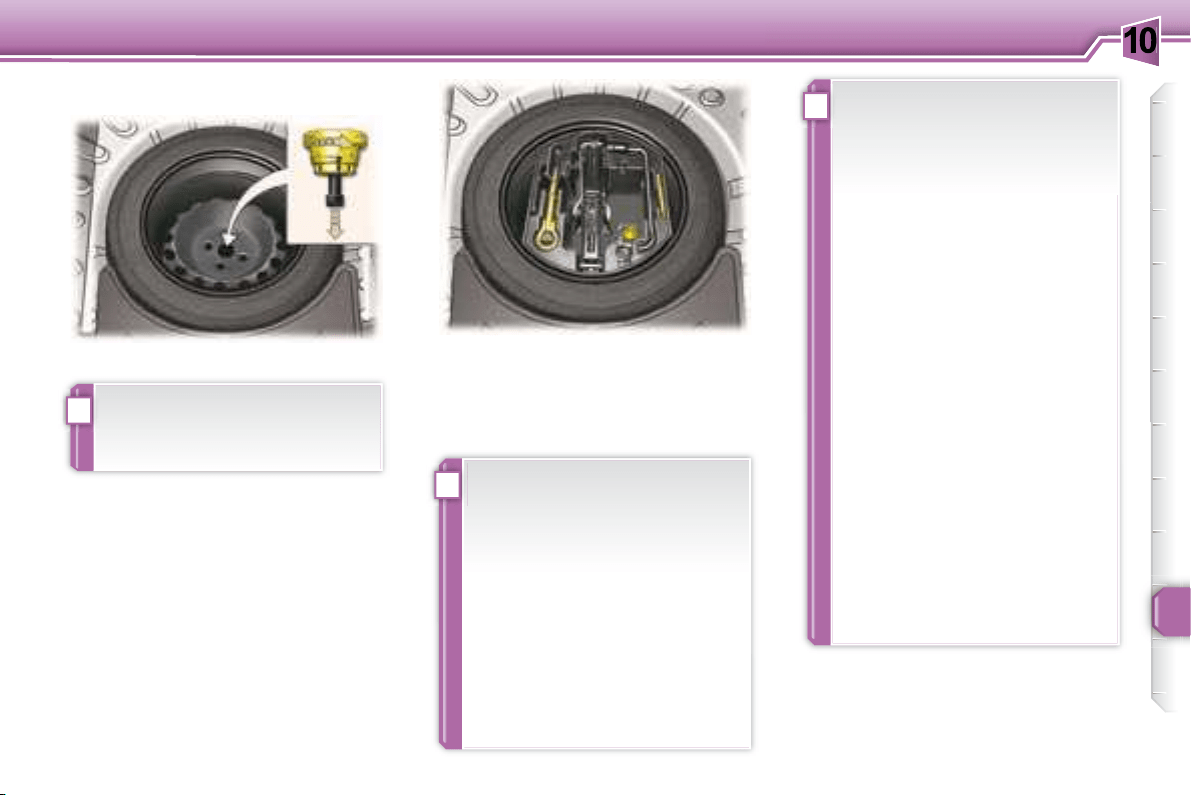
10
i
!
!
99
PRACTICAL INFORMATION
Putting the wheel back in
place
Tighten the central bolt fully until it
Put the tool holder back in the
ty section.
After changing the wheel:
checked by a PEUGEOT
Recommendations when
using the temporary spare
wheel *
50 mph
(80 km/h) ,
indicated on the label.
For your safety, always
change the wheel:
ground,
P
tomatic gearbox),
Never go underneath a vehi-
cle that is supported only by
a jack (use a ramp).
* According to model and country.
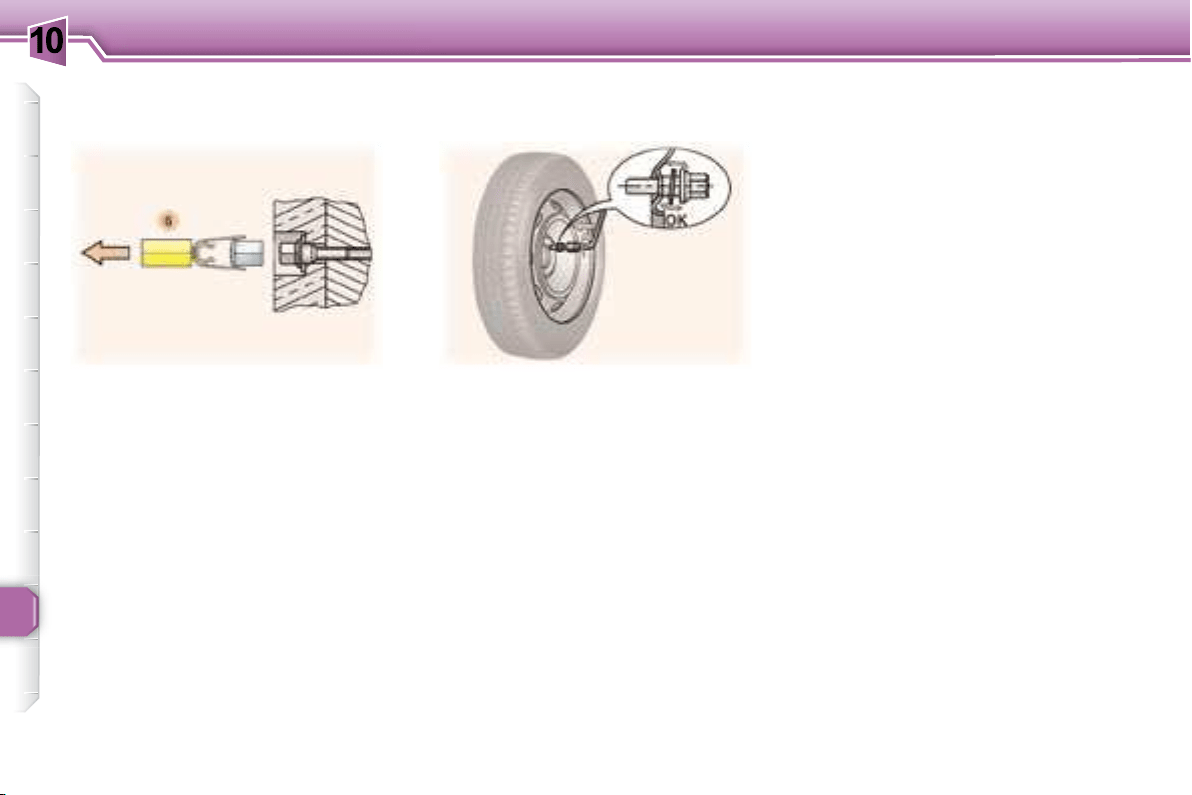
10
100
PRACTICAL INFORMATION
chrome trims.
6 to remove the
trims before slackening the bolts.
nor-
mal
of each bolt.
Anti-theft bolts
you on delivery of your vehicle along
Make a careful note of the code
number engraved on the head of the
PEUGEOT dealer.
Fitting snow tyres
es-
sential
from your PEUGEOT dealer.
Special features of alloy wheels
Bolt covers Fitting the spare wheel
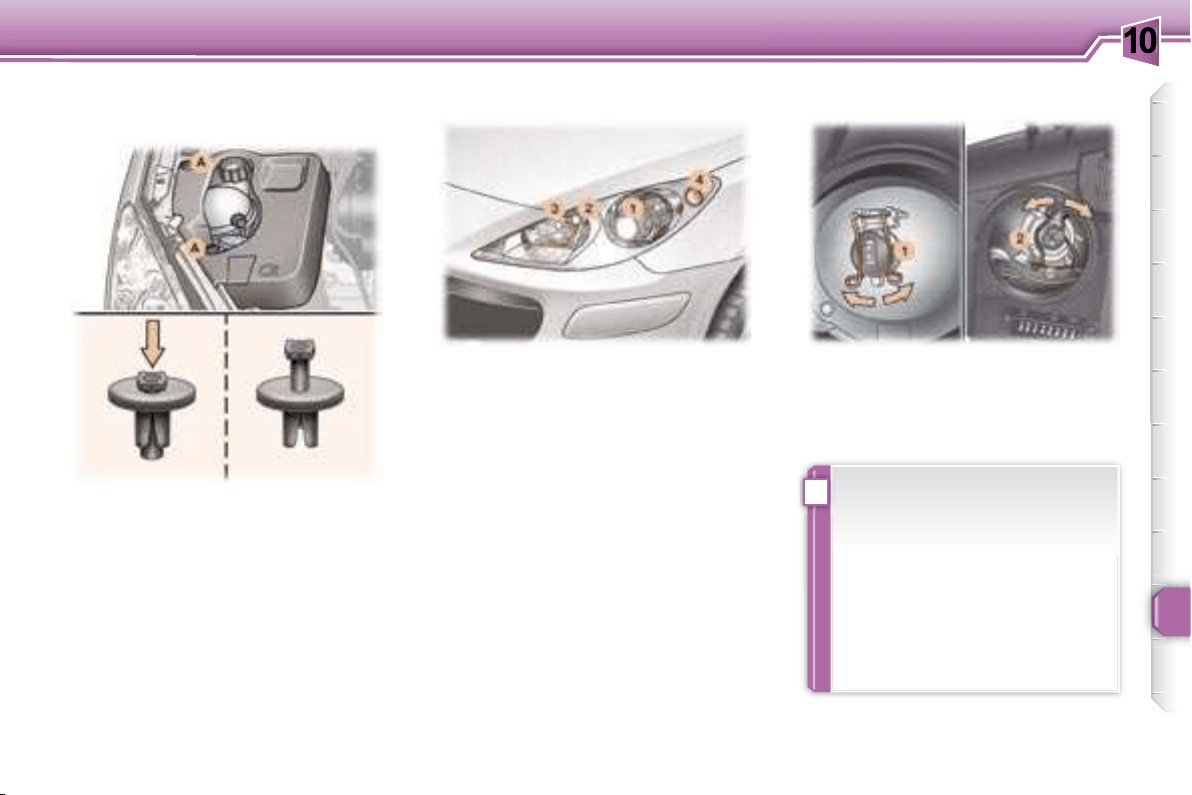
10
i
101
PRACTICAL INFORMATION
stud A ,
A
ing on it.
1. Dipped beam headlamps
(H1-55 W or xenon bulb).
WARNING: RISK OF ELECTROCU-
TION
Xenon bulbs must be changed by a
PEUGEOT dealer.
2. Main beam headlamps
(H7-55 W).
Disconnect the connector.
Press the end of each securing
sitioned correctly and the securing
Reconnect the connector.
CHANGING A BULB
Front lights
tective coating. Do not clean
them with a dry or abrasive
cloth, nor with a detergent or
solvent product.
* According to engine.

10
i
102
PRACTICAL INFORMATION
release it.
These can be obtained from a PEUGEOT
dealer.
3 Side lights (W 5 W).
Disconnect the connector.
Remove the bulb and change it.
4. Direction indicators
(PY 21 W amber).
a turn and remove it.
Change the bulb.
Note
conden-
sation inside the headlamp glass is
normal
Contact a PEUGEOT dealer to have
these bulbs changed.
5. Fog lamps (H11-55 W).
Integrated direction indicator side
repeaters.
Amber coloured bulbs, such as
the direction indicators, must be
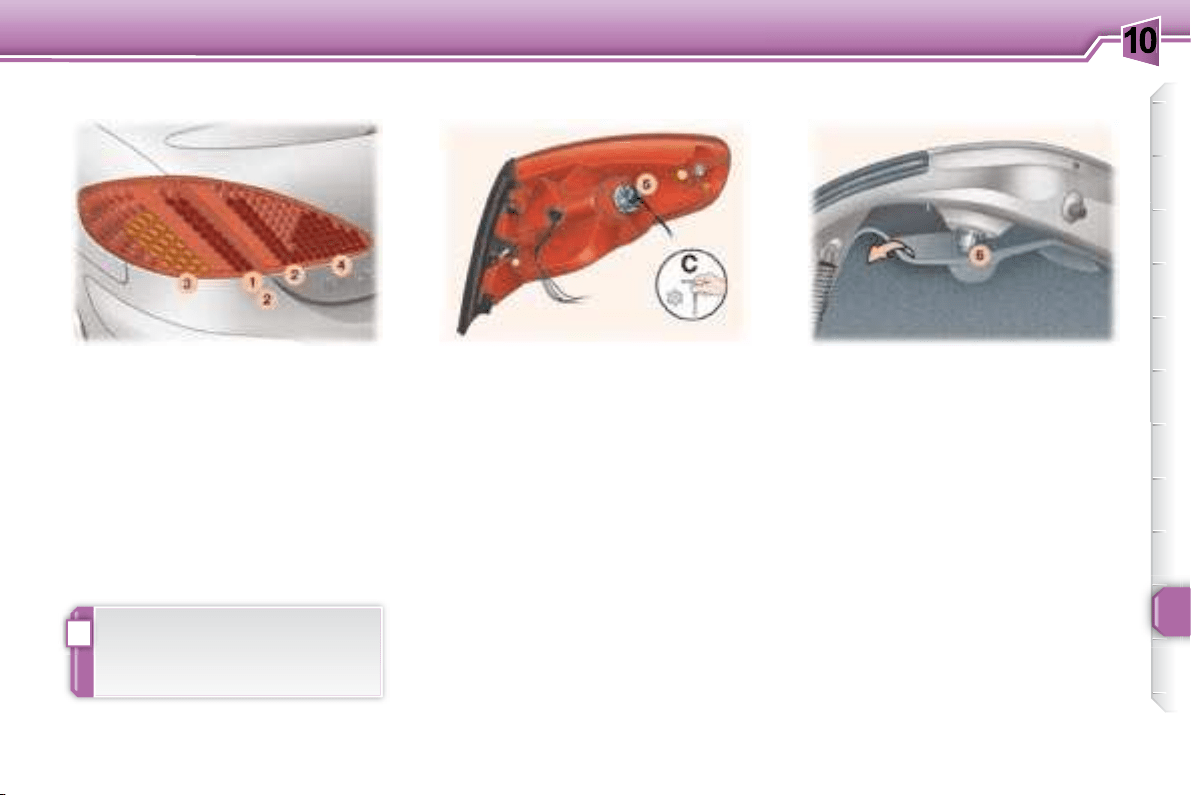
10
!
103
PRACTICAL INFORMATION
cess the bulb holder 6 .
ter of a turn.
Remove the bulb holder.
Change the faulty bulb.
Note:
sition the bulb holder correctly.
1. Brake lights (diodes).
2. Side lights (diodes).
3. Direction indicators (P 21 W).
4.
Reversing light (P 21 W), right side.
Fog lamp (P 21 W), left side.
the light (use the 20 Torx
TM
tor of tool C
the boot.
Remove the light.
5
ter of a turn.
Remove the bulb holder.
Change the faulty bulb.
Note:
sition the bulb holder and the light
correctly.
Rear lights Direction indicators Reversing light/fog lamp
be carried out by a PEUGEOT
dealer.
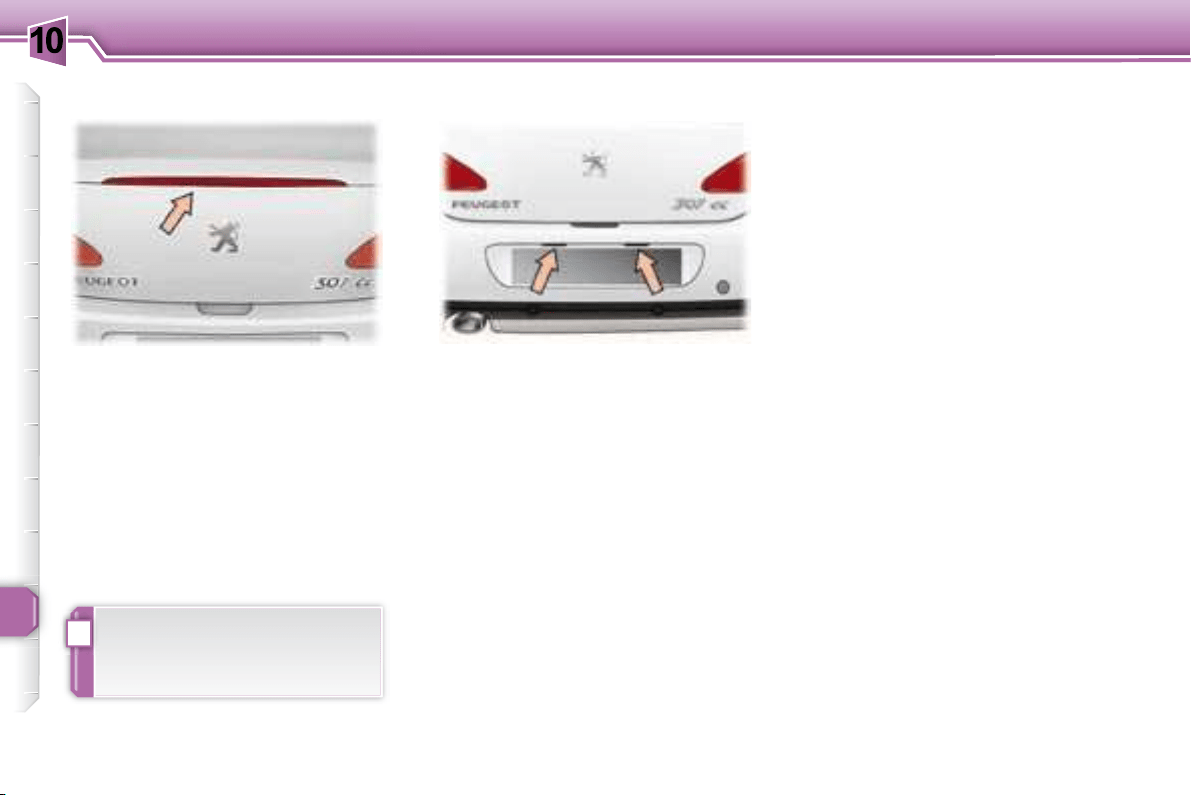
10
!
104
PRACTICAL INFORMATION
of the external holes of the lens.
Remove the lens.
Change the faulty bulb.
Third brake light (diodes) Number plate lights (W 5 W)
be carried out by a PEUGEOT
dealer.

10
105
PRACTICAL INFORMATION
CHANGING A FUSE
hand side).
Correct Incorrect
Replacing a fuse
on the fuse box.
of the same rating (same colour).
inside of the fascia fuse box cover,
Fascia fuses
Fuse N° Rating Functions
F36 20 A
F39 20 A
F40 30 A
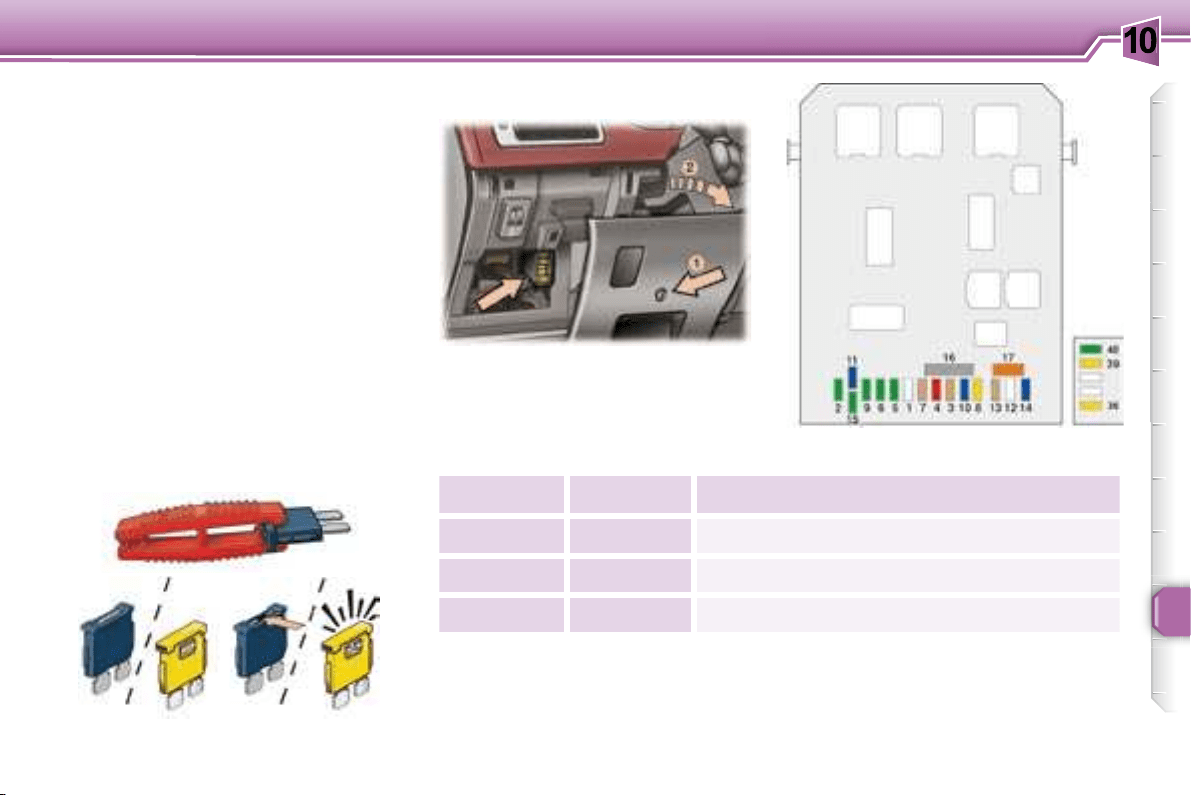
10
105
PRACTICAL INFORMATION
CHANGING A FUSE
hand side).
Correct Incorrect
Replacing a fuse
on the fuse box.
of the same rating (same colour).
inside of the fascia fuse box cover,
Fascia fuses
Fuse N° Rating Functions
F36 20 A
F39 20 A
F40 30 A

10
106
PRACTICAL INFORMATION
Fuse N° Rating Functions
F1 - Not used.
F2 30 A Locking and deadlocking.
F3 5 A
F4 10 A
F5 30 A
F6 30 A
F7 5 A
F8 20 A
F9 30 A 12 V front socket, 12 V rear socket.
F10 15 A
F11 15 A
F12 15 A
F13 5 A
F14 15 A
F15 30 A
F16 - PARC shunt.
F17 40 A Heated rear screen.
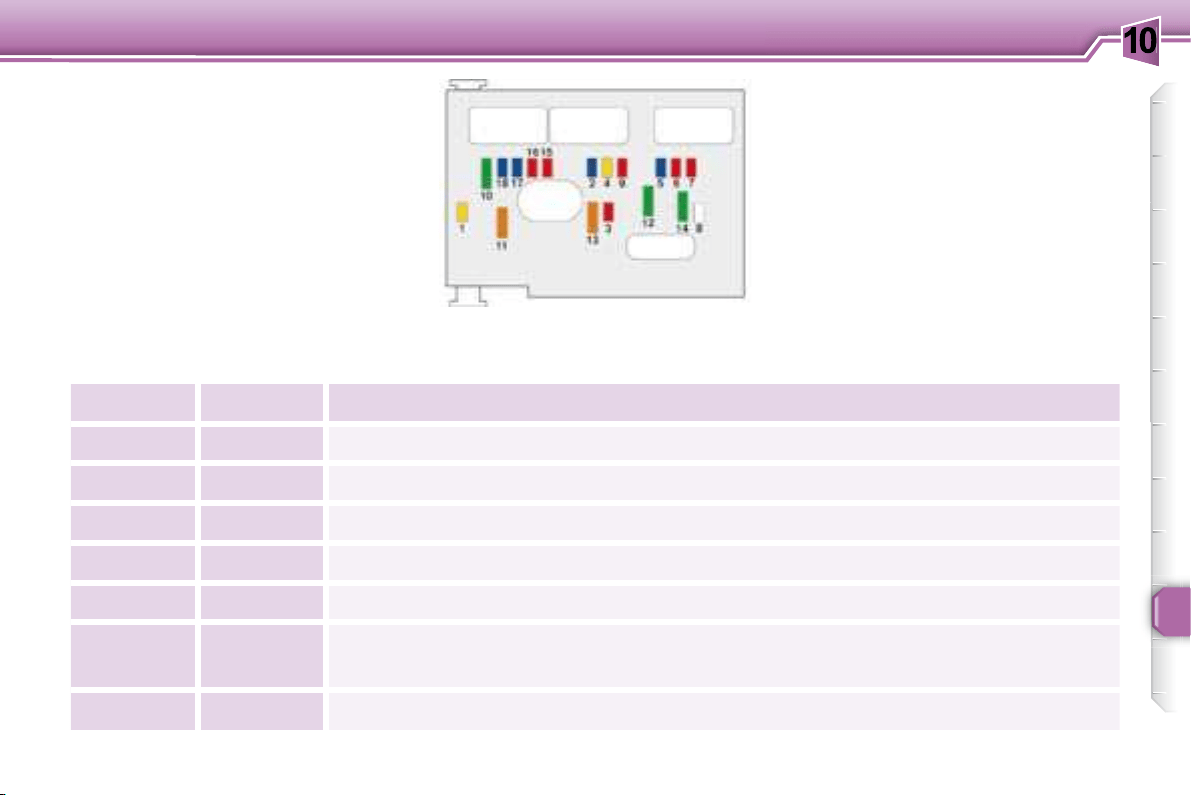
10
107
PRACTICAL INFORMATION
Engine compartment fuses
To access the fuses located in the
carefully to guarantee the sealing of
the fuse box.
Fuse N° Rating Functions
F1 20 A Fan assembly relay control, engine control unit control.
F2 15 A Horn.
F3 10 A
F4 20 A
F5 15 A
F6 10 A
F7 10 A

10
108
PRACTICAL INFORMATION
Fuse N° Rating Functions
F8 25 A Starter control.
F9 10 A
F10 30 A
Engine management actuators (ignition coil, solenoid valves, oxygen sensors, control units,
F11 40 A
F12 30 A
F13 40 A
F14 30 A
F15 10 A
F16 10 A
F17 15 A
F18 15 A
10
!
109
PRACTICAL INFORMATION
Fuse N° Rating Functions
MF1 *
30 A 200 W fan unit.
50 A 400 W and 460 W fan unit.
MF2 * 30 A
MF3 * 30 A ABS/ESP solenoid valves.
MF4 * 80 A
MF5 * 80 A
MF6 * 80 A
MF8 * 70 A
dealer.
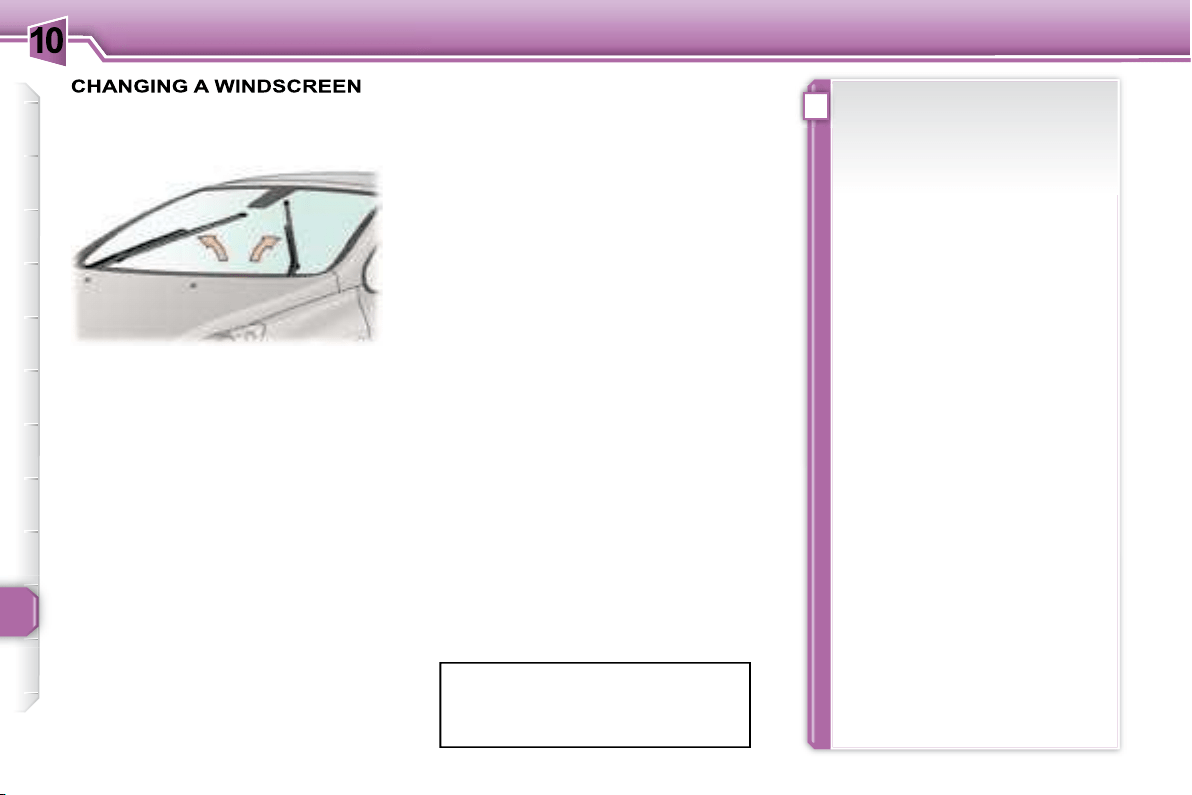
10
!
110
PRACTICAL INFORMATION
Special front windscreen
wiper position
Changing a wiper blade
blade and remove it.
the arm.
Note:
To return the windscreen wipers to
their normal position, switch on the
ignition and operate the wiper stalk.
BATTERY
To charge the battery using a
battery charger:
facturer,
them and clean them,
It is advisable to disconnect the
battery if the vehicle is not to be
used for a period of more than
one month.
To start the vehicle from
another battery:
ies,
minal of the slave battery,
idle, then disconnect the cables.
WIPER BLADE
Never disconnect a terminal
able roof and the doors before
disconnecting the battery. If the
battery, they must be reinitialised
After every reconnection of the
contact a PEUGEOT dealer.
battery, the remote control key
tion system must be reinitialised

10
i
!
111
PRACTICAL INFORMATION
ECONOMY MODE FUNCTION
the battery.
Once the thirty minutes are over, a
tomatically next time the vehicle is
driven.
In order to resume the use of these
functions immediately, the engine
must be started and left to run for a
thirty minutes.
LOAD REDUCTION
FUNCTION
When driving, certain functions (air
conditioning, heated rear screen,
ing on the level of battery charge.
tomatic, once the battery charge is
Note: at the risk of discharging the
battery, the functions that have been
manually.
The batteries contain harmful
acid and lead. They must be
regulations and must never be
Take used remote control and
Note:
gine from starting.
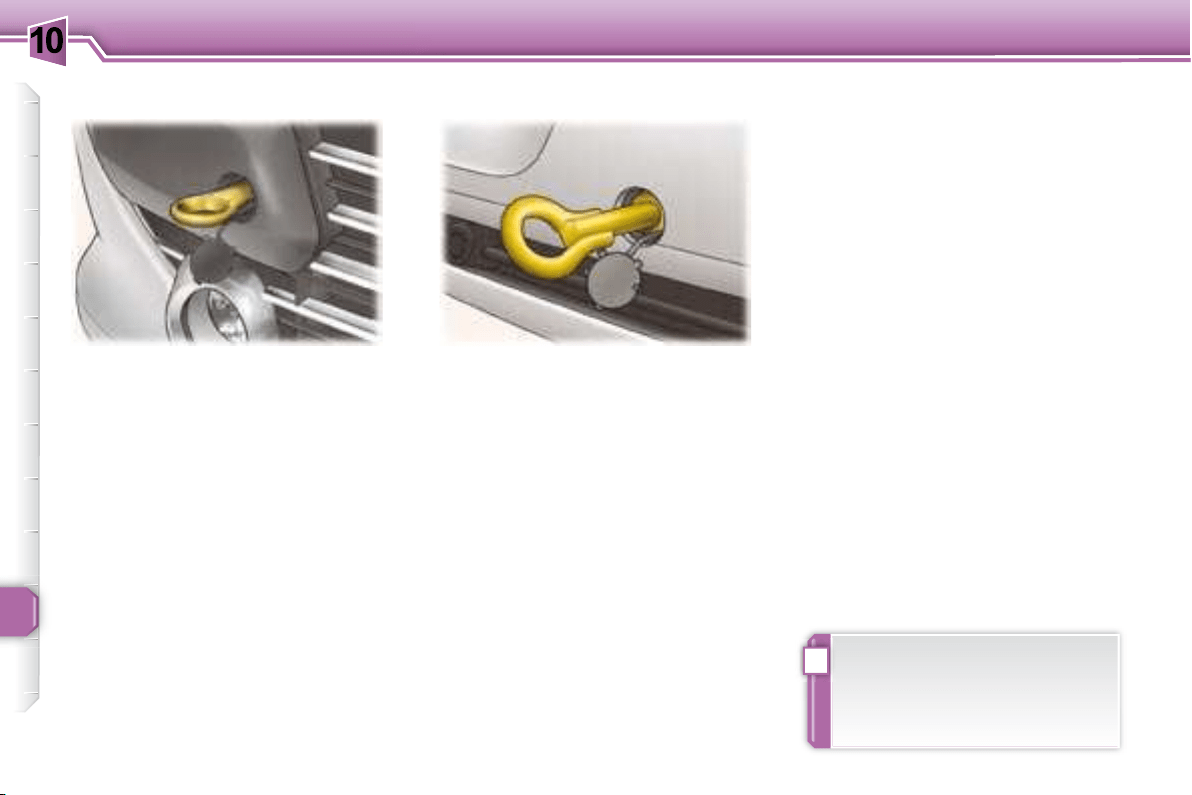
10
!
112
PRACTICAL INFORMATION
Without lifting
(4 wheels on the ground)
From the rear:
a coin,
Special features of the
automatic gearbox
N ,
tance of 30 miles (50 km).
TOWING YOUR VEHICLE
Lifting (2 wheels only on the
ground)
From the front:
or steering assistance.

10
113
PRACTICAL INFORMATION
Driving advice
Distribution of loads:
Distribute the load in the trailer so
that the heaviest items are as close
Cooling:
As the fan is electrically controlled,
Tyres:
Braking:
tance.
Lights:
check the electrical signalling on the
trailer.
Side wind:
CARAVAN, A BOAT, ETC.
trailer.
We recommend the use of original
nesses that have been tested and
dealer.
at the rear of the vehicle in accordance
careful.
Above 1 000 metres, the maximum
and so on for every 1 000 metres of
altitude.
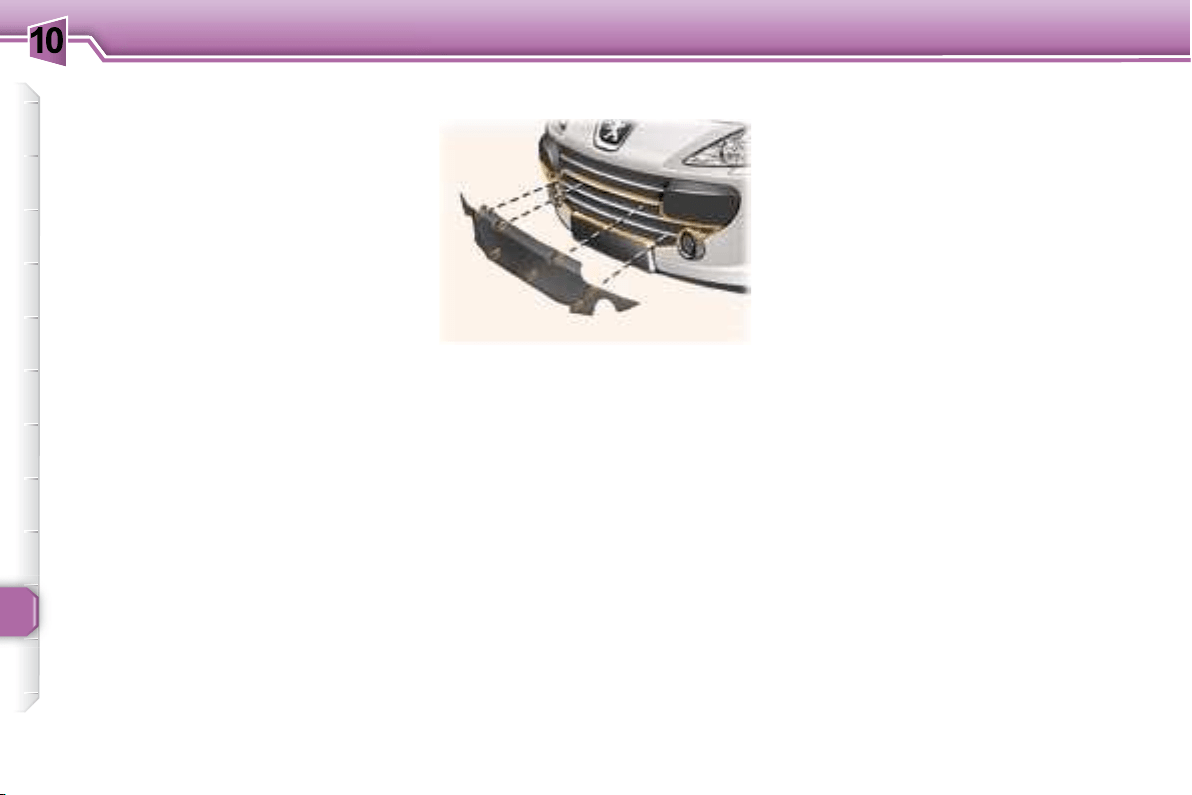
10
114
PRACTICAL INFORMATION
BOOT LUGGAGE CARRIER *
A boot luggage carrier is available
from your PEUGEOT dealer.
ceal the third brake light.
mendations.
* Available as an accessory.
VERY COLD CLIMATE SCREEN *
* According to country.
When the snow has cleared (tem-
perature above 10 °C), remove the
very cold climate screen.
FITTING
REMOVAL
10
!
i
115
PRACTICAL INFORMATION
ACCESSORIES FOR YOUR
307 CC
mended by PEUGEOT and original
recommendation.
your PEUGEOT vehicle.
"Touring":
restraint, mats, boot tray,
anti-swirl net .
boot
luggage carrier , child seats
and booster cushions, CD storage.
"Universal":
terior and exterior cleaning
"Protection":
vehicle tracking system,
chains.
"In-Car Technology":
free kits, satellite navigation
"Styling":
alloy wheels
Note:
and secured correctly,
ommended by PEUGEOT may
result in a failure of your vehicle's
electronic system.
ing. You are advised to contact
sories.
available in the vehicle.

11
116
TECHNICAL DATA
ENGINES AND GEARBOXES
MODELS:
Model codes: 3B...
NFUC RFJC RFJF
PETROL ENGINES
1.6 litre 16V
110 bhp
2 litre 16V
143 bhp
3
) 1 587 1 997
Bore x stroke (mm) 78.5 x 82 85 x 88
80/110 103/143
5 800 6 000
147 200
4 000 4 000
Fuel Unleaded Unleaded
Catalytic converter Yes Yes
GEARBOX
Manual
Manual
Automatic
OIL CAPACITIES (in litres)
3.25 5
2 1.9

11
117
TECHNICAL DATA
ENGINES AND GEARBOXES
MODELS:
Model codes: 3B...
RHRH
DIESEL ENGINES 2 litre Turbo HDI 16V 136 bhp
3
) 1 997
Bore x stroke (mm) 85 x 88
100
4 000
320
2 000
Fuel Diesel
Catalytic converter Yes
Yes
GEARBOX
Manual
OIL CAPACITIES (in litres)
5.25
2.4

11
118
TECHNICAL DATA
CONSUMPTION In accordance with EC Directive 80/1268 (as amended)
Engine Gearbox
Model
codes 3B...
Urban driving
(mpg
(litres/100 km)
Inter-urban
(mpg
(litres/100 km)
Mixed (mpg
(litres/100 km)
Emission of
CO
2
by
weight
(g/km)
1.6 litre 16V Manual NFUC 10.2 6.2 7.6 178
2 litres 16V 143 ch Manual RFJC 11.3 6.2 8.1 192
2 litres 16V 143 ch Automatic RFJF 12.2 6.3 8.4 199
2 l. Turbo HDI 16V Manual RHRH 7.7 5.1 6 159

11
119
TECHNICAL DATA
Petrol engines 1.6 litre 16V 2 litres 16V 143 bhp
Gearbox Manual Manual Automatic
Model codes: 3B... NFUC RFJC RFJF
1 528 1 543 1 573
• Payload 322 337 327
•
1 850 1 880 1 900
2 900 3 200 3 200
2 900 3 200 3 200
•
1 050 1 320 1 300
1 050 1 320 1 300
•
GTW)
1 200 1 320 1 300
• Unbraked trailer 750 750 750
60 60 60
WEIGHTS AND TOWING LOADS (IN KG)

11
120
TECHNICAL DATA
Diesel engines 2 litre Turbo HDI 16V
Gearbox Manual
Model codes: 3B… RHRH
1 653
• Payload 297
1 950
3 450
3 450
•
1 500
1 500
GTW)
1 500
• Unbraked trailer 750
60
WEIGHTS AND TOWING LOADS (IN KG)

11
121
TECHNICAL DATA
DIMENSIONS (IN MM)
11
!
122
TECHNICAL DATA
THE IDENTIFICATION FEATURES OF YOUR 307 CC
D. Tyres and paint colour
reference.
The label D
the manufacturer,
A. Manufacturer's plate.
B. Serial number on the
bodywork.
C. Serial number on the fascia.
least once a month.
tion.
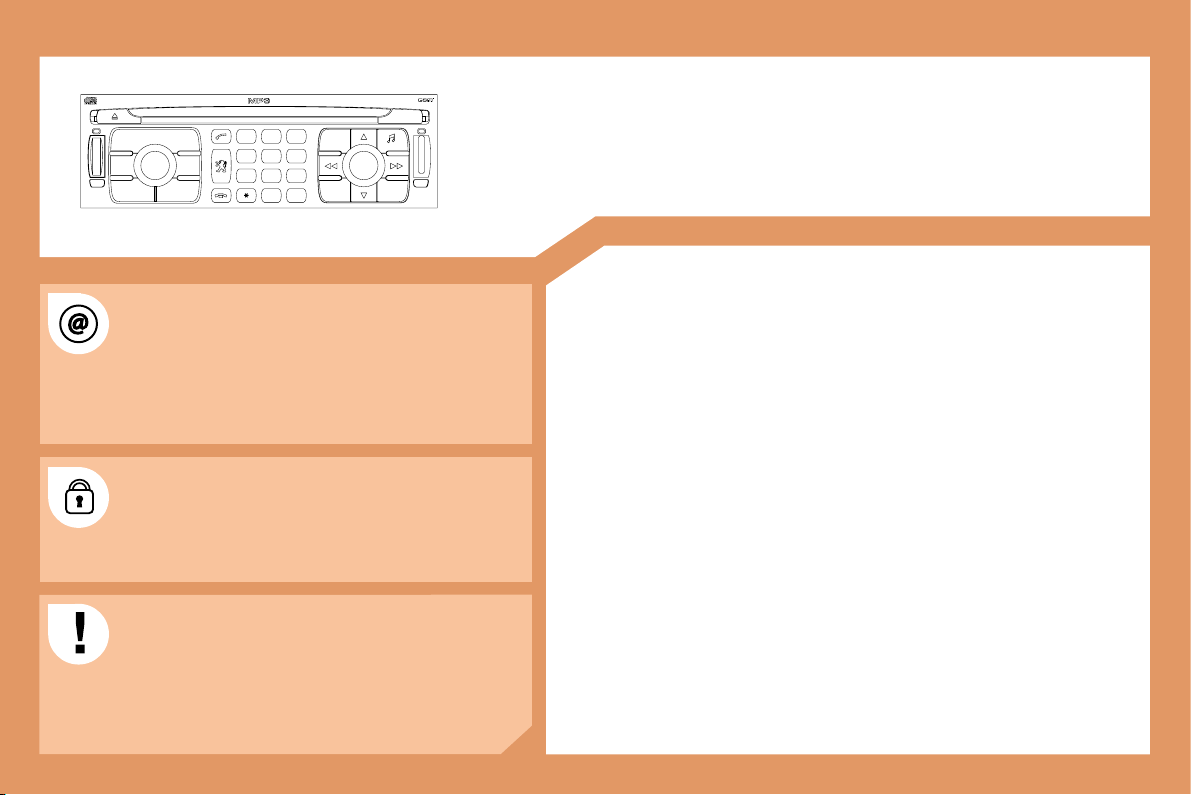
123
S
O
S
SOURCE
MODE BAND
ESC
2
abc
5
jkl
8
tuv
3
def
6
mno
9
wxyz
1
4
ghi
7
pqrs
0 #
MENU LIST
TA PTYDARK
The SERVICE BOX internet site provides additional
animated information on the RT4.
It can be consulted at the following address:
http://public.servicebox.peugeot.com
Simple registration permits access and free consultation of
the handbook.
The RT4 GPS audio/telephone is coded in such a
way that it will only operate in your vehicle. If it is to be
installed in another vehicle, contact your PEUGEOT
For safety reasons, it is imperative that the driver carries
out operations which require prolonged attention while
the vehicle is stationary.
When the engine is switched off and to prevent
discharging of the battery, the RT4 GPS audio/telephone
may switch off after a few minutes.
RT4
MULTIMEDIA AUDIO EQUIPMENT/TELEPHONE
JUKEBOX FUNCTION (10 GB)/GPS (EUROPE)
CONTENTS
01 First steps pg. 124
02 General menu pg. 125
03 GPS pg. 126
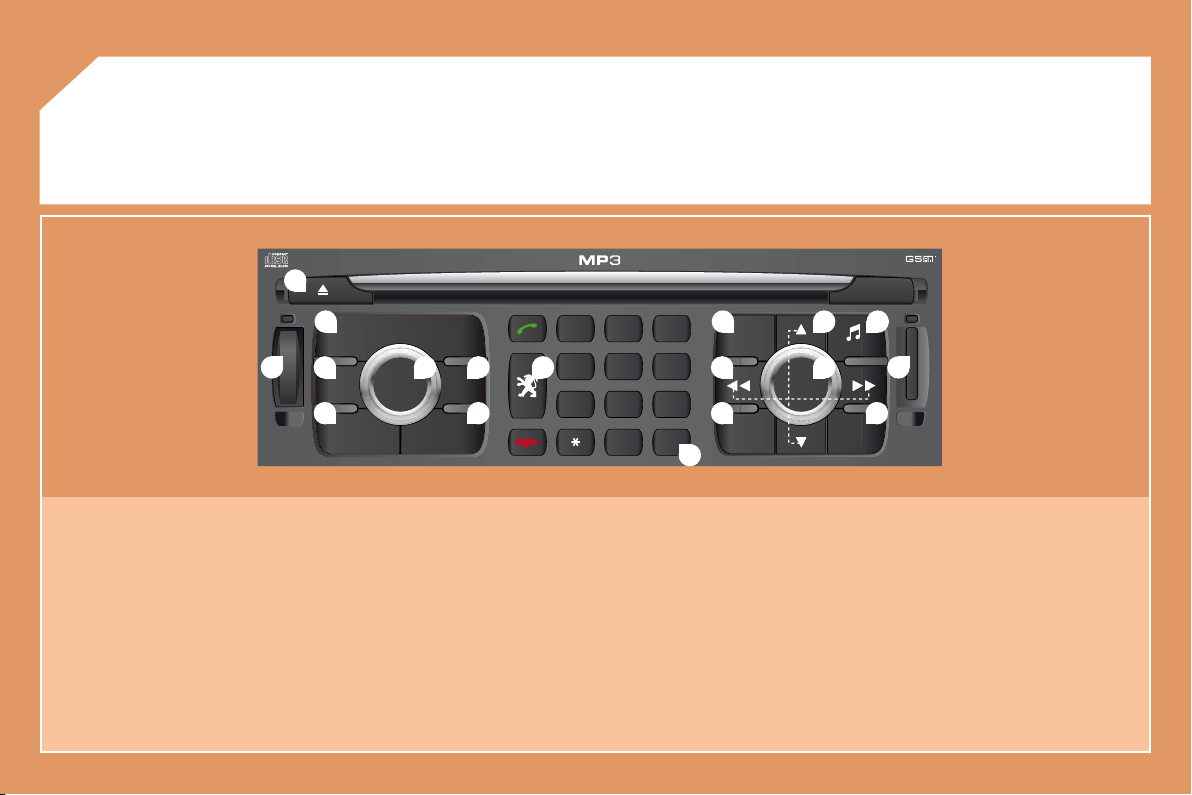
124
S
O
S
SOURCE
MODE BAND
ESC
2
abc
5
jkl
8
tuv
3
def
6
mno
9
wxyz
1
4
ghi
7
pqrs
0 #
MENU LIST
TA PTY
DARK
2
1
5
3 4
8
9
10 15
11 17
1812
16
14
76
13
01
1. Ejection of the CD.
2. Selection of the source: radio, Jukebox, CD, CD changer
Long press: CD copy to hard disc.
3. Long press on the SOS button: emergency call.
4. Selection of the display on the screen from the modes:
TRIP, TEL, NAV and AUDIO.
5.
Long press: reinitialisation of the RT4 GPS audio/telephone.
6. On/Off and Volume adjustment.
7. Selection of the wavebands FM1, FM2, FMast, AM.
8.
mode.
9. Access to the "PEUGEOT" services menu.
10. Cancellation of the current operation.
Long press: return to the current application.
11. Automatic search for a lower/higher frequency.
Selection of the previous/next CD, MP3 or Jukebox track.
12. Displaying of the general menu.
13. Keypad for entering descriptions by successive presses.
14. Selection of the previous/next CD.
Selection of the previous/next MP3/Jukebox directory.
15. Audio option adjustments: front/rear, left/right balance,
loudness, sound ambiences.
16.
17. SIM card slot.
18. Displaying of the list of local radio stations, of the tracks on
the CD or of the MP3/Jukebox directories.
Long press: updating of the local radio stations.
FIRST STEPS
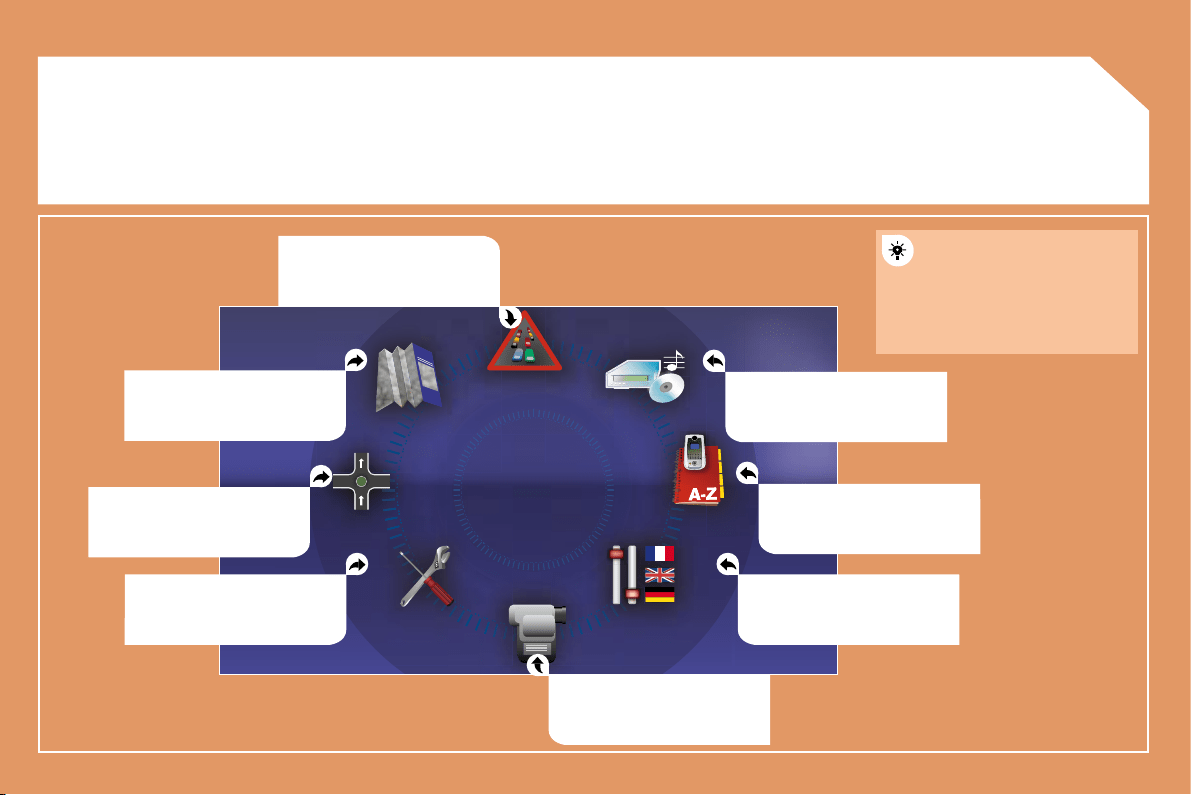
125
02GENERAL MENU
MAP: orientation, details,
display.
AUDIO FUNCTIONS: radio,
CD, Jukebox, options.
For maintenance of the
display, the use of a
soft, non-abrasive cloth
recommended without any
additional product.
TELEMATIC: telephone,
directory, SMS.
CONFIGURATION: vehicle,
display, time, languages,
parameters.
VIDEO: activation, parameters.
VEHICLE DIAGNOSTICS:
warnings log, status of the
functions.
NAVIGATION GUIDANCE:
GPS, stages, options.
TRAFFIC INFORMATION:
TMC information, messages.
126
MENU
ESC
LIST
MENU
ESC
MENU LIST
ESC
MENU LIST
ESC
MENU LIST
ESC
MENU LIST
1
2
3
5
7
4
6
8
ESC
MENU LIST
ESC
MENU LIST
ESC
MENU LIST
03
GPS
SELECTING A DESTINATION
Press the MENU button.
Turn the dial and select the
NAVIGATION GUIDANCE function.
Turn the dial and select the
DESTINATION CHOICE function.
Turn the dial and select the
ENTER AN ADDRESS function.
When the country has been selected,
turn the dial and select the TOWN
function.
TOWN
ENTER AN ADDRESS
DESTINATION CHOICE
RT4 chapter.
127
9
11
12
14
10
13
ESC
MENU LIST
2
abc
5
jkl
8
tuv
3
def
6
mno
9
wxyz
1
4
ghi
r
7
pq s
0 #
ESC
MENU LIST
ESC
MENU LIST
ESC
MENU LIST
ESC
MENU LIST
Turn the dial and select the letters of
time by pressing the dial.
Select OK and press the dial to
To speed up the process, the POST CODE can be
entered instead of the name of the town.
Use the alphanumeric keypad to enter the letters and
digits and "*" to correct.
Select OK on the
ENTER AN ADDRESS page.
Repeat steps 8 to 12 for the ROAD and N° functions.
OK
OK
Select the STORE function to record the address entered in a
STORE
PARIS
POI
128
ESC
LIST
MENU
ESC
MENU LIST
ESC
MENU LIST
ESC
MENU LIST
ESC
MENU LIST
MENU
1
2
3
4
5
6
7
8
ESC
MENU LIST
ESC
MENU LIST
ESC
MENU LIST
03
GUIDANCE OPTIONS
GPS
The route chosen by the RT4 GPS audio/telephone depends directly on the guidance options.
Changing these options may completely change the route.
Press the MENU button.
Turn the dial and select the
NAVIGATION GUIDANCE function.
Turn the dial and select the
GUIDANCE OPTIONS function.
Turn the dial and select the
DEFINE CALCULATION CRITERIA
function.
GUIDANCE OPTIONS DISTANCE/TIME
DEFINE CALCULATION CRITERIA
Turn the dial and select, for example,
the DISTANCE/TIME function.
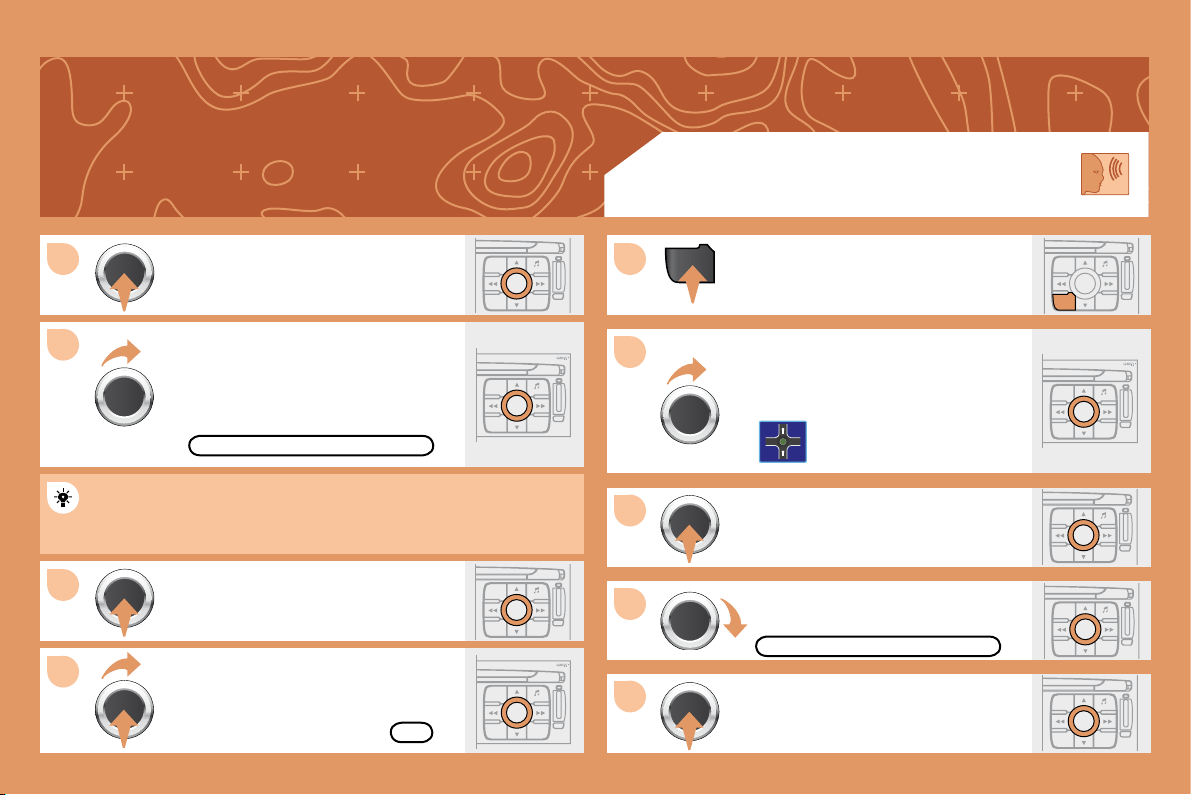
129
ESC
MENU LIST
ESC
MENU LIST
MENU
9
10
11
12
1
2
3
4
5
ESC
LIST
MENU
ESC
MENU LIST
ESC
MENU LIST
ESC
MENU LIST
ESC
MENU LIST
ESC
MENU LIST
ESC
MENU LIST
Turn the dial and select the
TRAFFIC INFO function if it is not
ticked.
Select OK and press the dial to
TRAFFIC INFO
diversions will be suggested.
OK
GUIDANCE SPEECH SYNTHESIS
Press the MENU button.
Turn the dial and select the
NAVIGATION GUIDANCE function.
GUIDANCE OPTIONS
Turn the dial and select the
GUIDANCE OPTIONS function.
130
ESC
LIST
MENU
ESC
MENU LIST
ESC
MENU LIST
MENU
6
8
1
2
3
4
ESC
MENU LIST
ESC
MENU LIST
S
O
S
SOURCE
MODE BAND
T PTA YDARK
ESC
MENU LIST
7
ESC
MENU LIST
03
Press the MENU button.
Turn the dial and select the
MAP function.
Turn the dial and select the
MAP DETAILS function.
Permits selection of the services
which can be seen on the map
ACTIONS ON THE MAP
MAP DETAILS
During the announcements, the volume of each
GUIDANCE SPEECH
SYNTHESIS
Select the
ADJUST SPEECH SYNTHESIS
GPS
ADJUST SPEECH SYNTHESIS
DEACTIVATE
Select the DEACTIVATE function and
OK
Select OK and press the dial to
131
ESC
MENU LIST
MENU
ESC
MENU LIST
ESC
LIST
MENU
ESC
MENU LIST
ESC
MENU LIST
1
2
3
4
5
6
7
ESC
MENU LIST
ESC
MENU LIST
03
For improved visibility, beyond the scale of 10km, the map automatically switches to North Orientation.
Turn the dial and select the MAP
function.
Press the MENU button.
Turn the dial and select the 3D VIEW
tab.
Select OK and press the dial to
Turn the dial and select the
MAP ORIENTATION function.
3D VIEW
GPS
MAP ORIENTATION
3D VIEW
OK
132
ESC
MENU LIST
MENU
ESC
MENU LIST
ESC
LIST
MENU
1
2
3
4
5
6
7
ESC
MENU LIST
03
ESC
MENU LIST
ESC
MENU LIST
ESC
MENU LIST
Press the MENU button.
Turn the dial and select the MAP
function.
Turn the dial and select the
MAP IN WINDOW or
FULL SCREEN MAP tab.
Select OK and press the dial to
Turn the dial and select the
DISPLAY MAP function.
DISPLAYING THE MAP IN A WINDOW
OR IN FULL SCREEN MODE
GPS
DISPLAY MAP
FULL SCREEN MAP
OK
MAP IN WINDOW
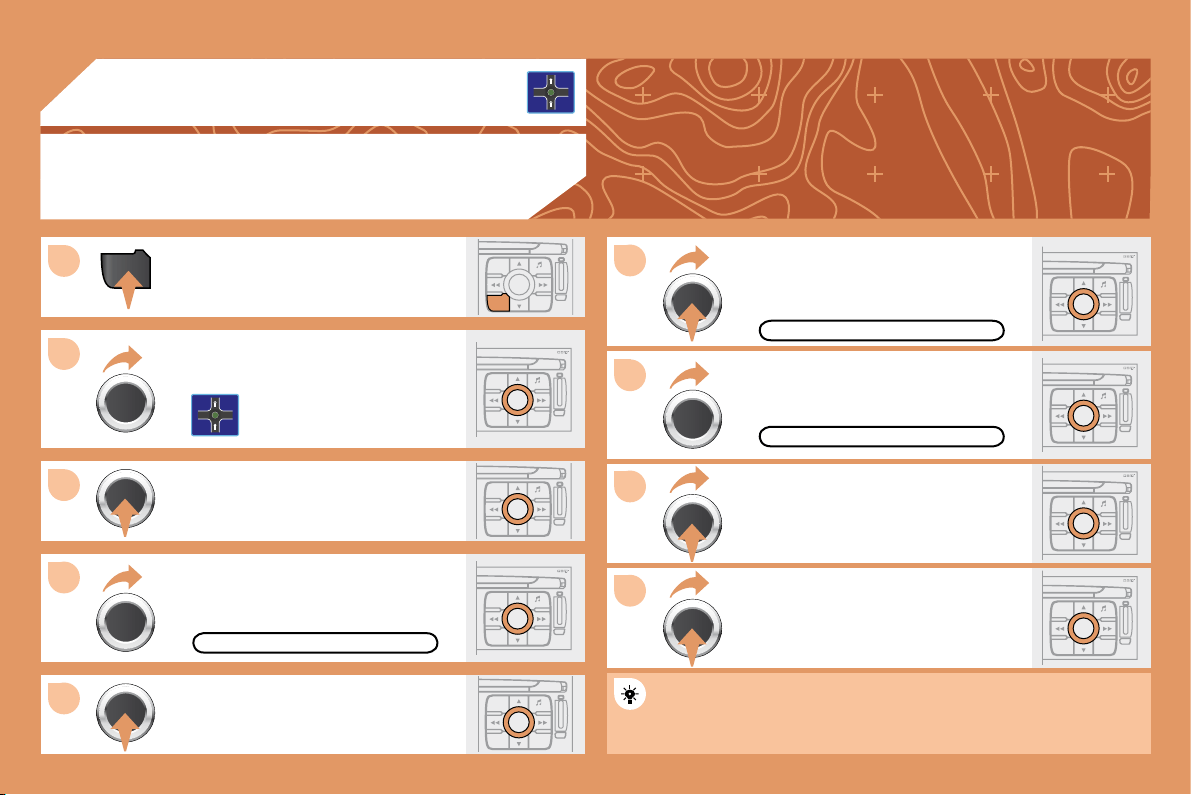
133
ESC
LIST
MENU
MENU
1
ESC
MENU LIST
2
3
4
5
ESC
MENU LIST
9
ESC
MENU LIST
8
ESC
MENU LIST
7
ESC
MENU LIST
6
ESC
MENU LIST
ESC
MENU LIST
ESC
MENU LIST
03
ADDING A STAGE
During guidance, press the MENU
button.
Turn the dial and select the
NAVIGATION GUIDANCE function.
Turn the dial and select the
JOURNEY LEGS AND ROUTE
function.
JOURNEY LEGS AND ROUTE
Select OK and press the dial to
When the new address has been
entered, select OK and press the dial
Enter for example a new address.
Select the ADD A STAGE function
The stage must be completed or deleted before the guidance can
continue to the next destination.
Otherwise, the RT4 GPS audio/telephone will always guide you
back to the previous stage.
ENTER AN ADDRESS
ADD A STAGE
GPS

134
ESC
LIST
MENU
MENU
1
ESC
MENU LIST
2
3
ESC
MENU LIST
4
5
ESC
MENU LIST
6
7
ESC
MENU LIST
8
ESC
MENU LIST
ESC
MENU LIST
ESC
MENU LIST
04
ACTIVATING THE FILTER ON THE ROUTE
Press the MENU button.
Turn the dial and select the
TRAFFIC INFORMATION function.
FILTER TRAFFIC INFORMATION
Turn the dial and select the
FILTER TRAFFIC INFORMATION
function.
selection.
GEOGRAPHIC FILTER
Select the GEOGRAPHIC FILTER
Turn the dial and select the
ON THE ROUTE tab.
OK
TRAFFIC INFORMATION
Select OK and press the dial to
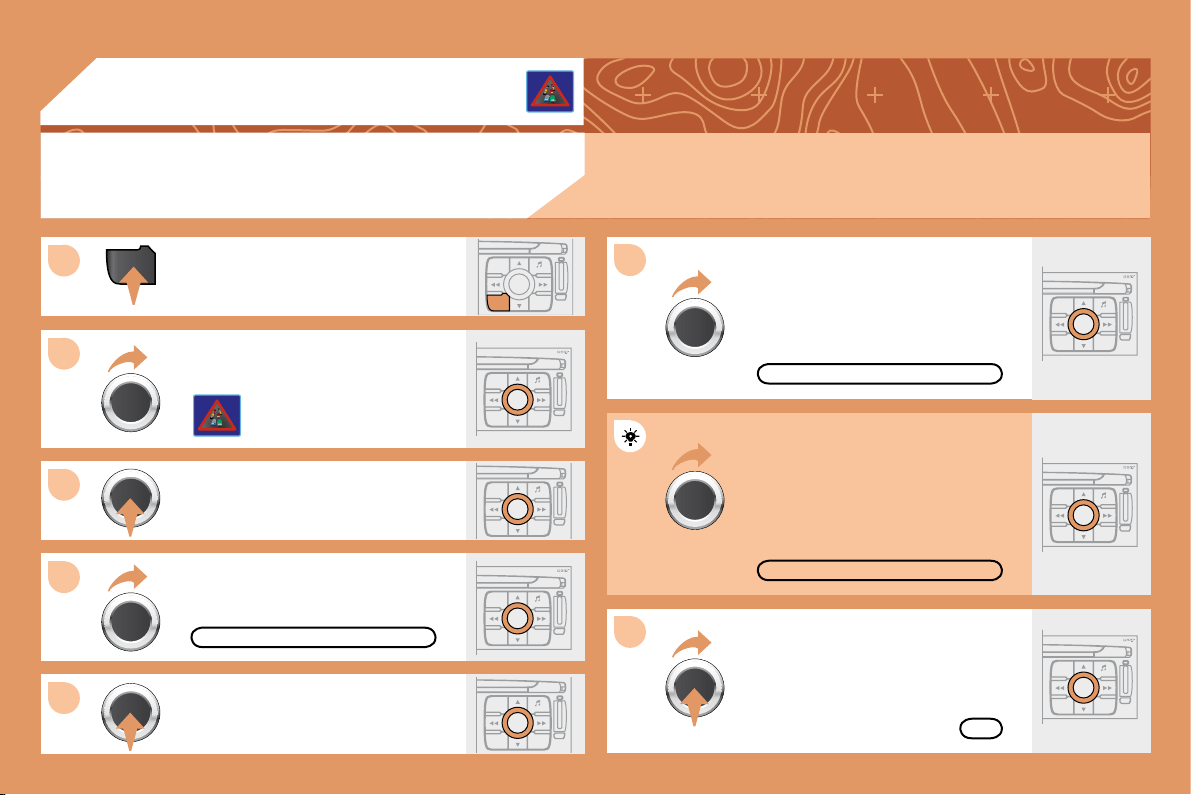
135
ESC
LIST
MENU
MENU
1
ESC
MENU LIST
2
3
4
6
5
ESC
MENU LIST
ESC
MENU LIST
7
ESC
MENU LIST
ESC
MENU LIST
ESC
MENU LIST
ESC
MENU LIST
04
Press the MENU button.
READ MESSAGES
NEW MESSAGE DISPLAY
OK
CONFIGURING THE TMC MESSAGE
ANNOUNCEMENTS
Turn the dial and select the
TRAFFIC INFORMATION function.
Turn the dial and select the
CONFIGURE MESSAGE
ANNOUNCEMENT function.
Select the READ MESSAGES tab.
be read by the voice synthesiser.
Select the
NEW MESSAGE DISPLAY tab.
displayed when guidance is not
active.
TRAFFIC INFORMATION
Select OK and press the dial to
CONFIGURE MESSAGE ANNOUNCEMENT
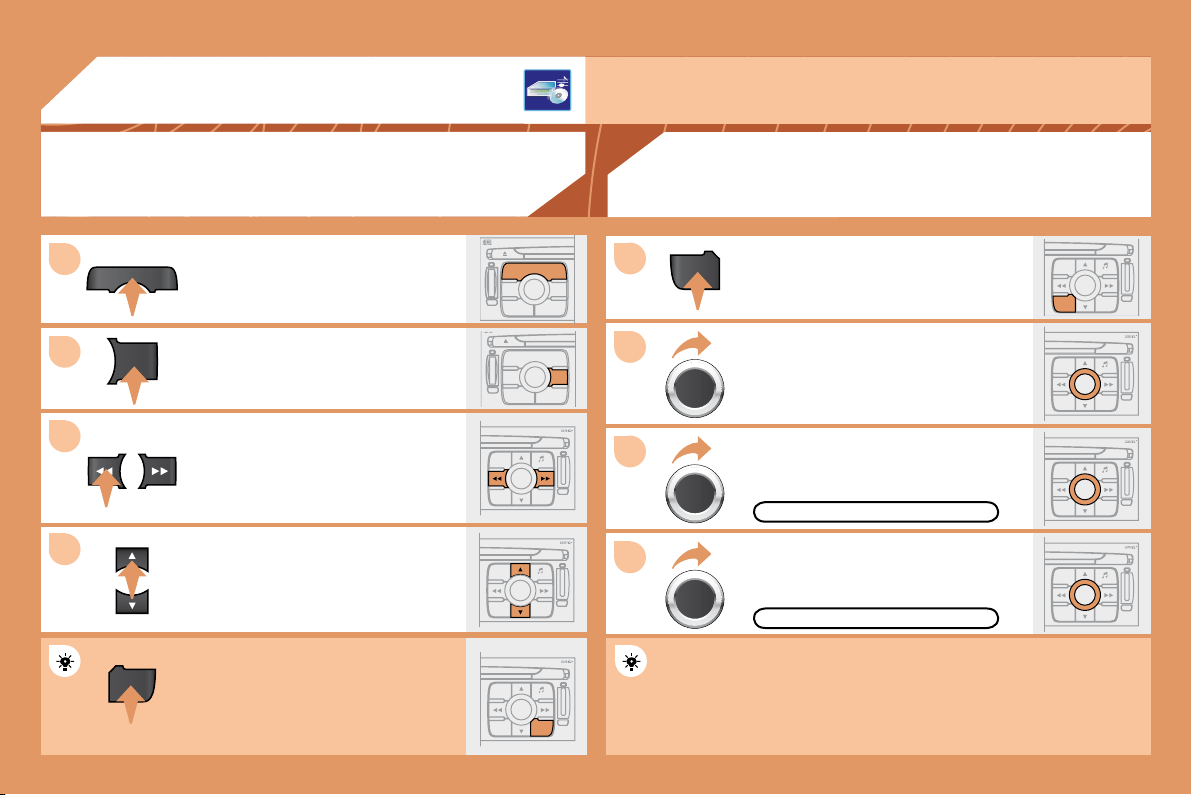
136
1
2
3
4
S
O
S
SOURCE
MODE BAND
T
PTA YDARK
SOURCE
S
O
S
SOURCE
MODE BAND
T
PTA YDARK
BAND
SOURCE
BAND
ESC
MENU LISTLIST
ESC
LIST
MENU
MENU
ESC
MENU LIST
ESC
MENU LIST
ESC
MENU LIST
1
2
3
4
LIST
ESC
MENU LIST
ESC
MENU LIST
05 AUDIO/VIDEO
RADIO
SELECTING A STATION
Press the SOURCE button several
times in succession and select the
RADIO.
Press the BAND button to select a
waveband: FM1, FM2, FMast, AM.
carry out an automatic search of the
radio stations.
Press one of the buttons to carry out a
manual search of the radio stations.
Press the LIST button to display
the list of stations received locally
To update this list, press for more than
two seconds.
including in RDS mode. This is a normal effect of the way in which radio waves are transmitted and does
not indicate any failure of the audio equipment.
RDS
Select ACTIVATE FREQUENCY
RDS appears on the display.
Select the RADIO PREFERENCES
function then press OK.
Select AUDIO FUNCTIONS then
press OK.
Press the MENU button.
The RDS, if displayed, enables you to continue listening to the
same station by means of frequency following. However, in certain
conditions, this RDS station is not followed throughout the country
as radio stations do not cover 100 % of the territory. This explains
the loss of reception of the station during a journey.
RADIO PREFERENCES
ACTIVATE FREQUENCY FOLLOWING (RDS)

137
S
O
S
SOURCE
MODE BAND
T PTA YDARK
SOURCE
ESC
MENU LIST
LIST
SOURCE
LIST
S
O
S
SOURCE
MODE BAND
ESC
2
abc
5
jkl
8
tuv
3
def
6
mno
9
wxyz
1
4
ghi
7
pqrs
0 #
MENU LIST
TA PTYDARK
1
2
05
AUDIO/VIDEO
MP3 CD
The MP3 format, an abbreviation of MPEG 1.2 & 2.5 Audio Layer 3,
is an audio compression standard which permits the recording of
In order to be able to play a recorded CDR or CDRW, when recording
it is preferable to select standards ISO 9660 level 1.2 or Joliet.
If the disc is recorded in another format, it may not be played
correctly.
It is recommended that the same recording standard is always used
for optimum sound quality.
In the particular case of a multi-session CD, the Joliet standard is
recommended.
".mp3" with a sampling rate of 22.05 KHz or 44.1 KHz. No other type
problems.
CD
Insert circular compact discs only. Some anti-pirating
systems, on original discs or CDs copied using
a personal recorder, may generate malfunctions
regardless of the quality of the original player.
Insert an audio CD or an MP3 compilation in the player,
play begins automatically.
If the player already contains a disc,
press the SOURCE button several
times in succession and select CD to
listen to it.
Press one of the buttons to select a
track on the CD.
Press the LIST button to display
the list of tracks on the CD or of the
directories of the MP3 compilation.
The playing and displaying of an MP3 compilation may depend on
the recording programme and/or the parameter settings used. We
recommend use of the ISO 9660 recording standard.
INFORMATION AND ADVICE PLAYING A CD OR AN MP3 COMPILATION
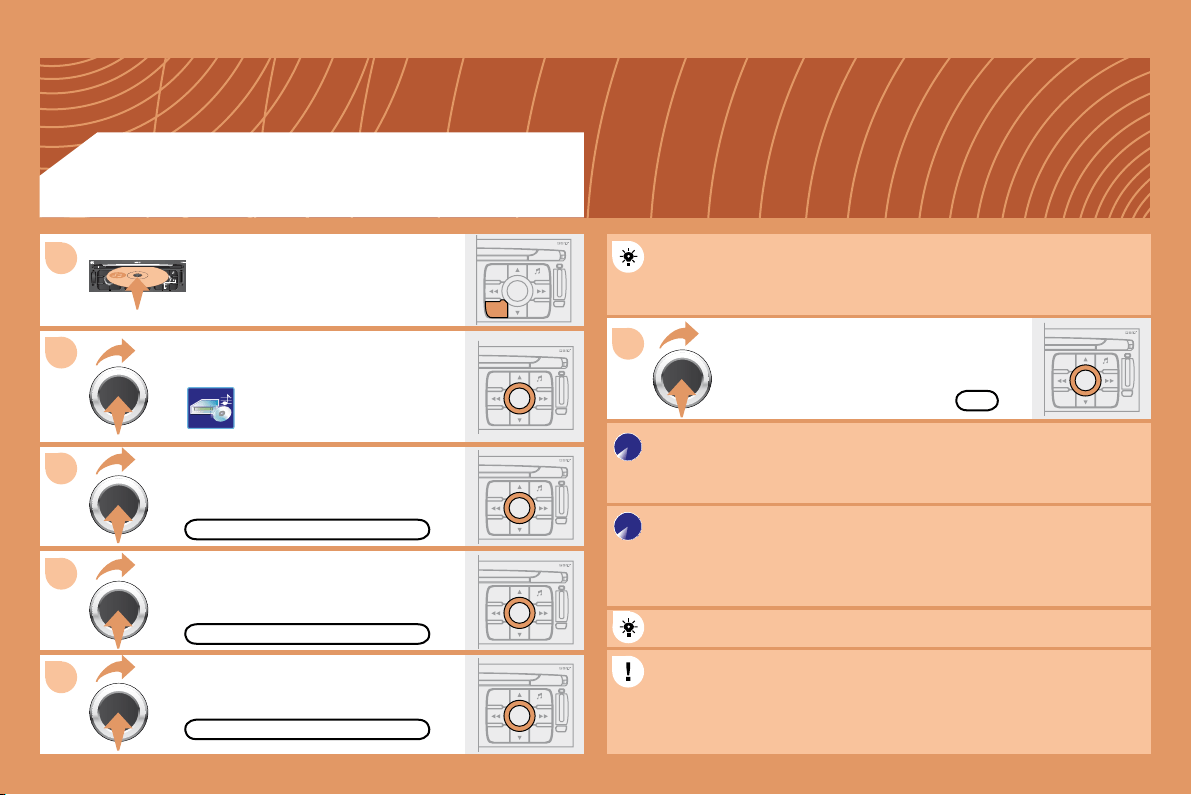
138
2
3
S
O
S
SOURCE
MODE BAND
ESC
2
abc
5
jkl
8
tuv
3
def
6
mno
9
wxyz
1
4
ghi
7
pqrs
0 #
MENU LIST
TA PTYDARK
ESC
LIST
MENU
ESC
MENU LIST
6
ESC
MENU LIST
ESC
MENU LIST
ESC
MENU LIST
4
ESC
MENU LIST
5
1
COPY CD TO JUKEBOX
COMPLETE CD
CREATE ALBUM
OK
Select COPY CD TO JUKEBOX and
Select COMPLETE CD to copy
the entire CD and press the dial to
Select CREATE ALBUM and press
The AUTO CREATION tab automatically copies the CD by default
into an album of the type "album n°...".
The audio or MP3 CD is copied onto the hard disc. Copying may
take approximately 20 minutes depending on the duration of the CD.
During this copying phase, it is not possible to listen to the albums
previously recorded on the hard disc or the CDs.
Select the letters one by one and select
If it is not an MP3 CD, the Jukebox automatically compresses
the CD in MP3 format. The compression may take approximately
20 minutes depending on the duration of the CD. During this
compression phase, it is possible to listen to the CD or to albums
previously recorded on the hard disc.
A long press on the SOURCE button starts the copying of the CD.
When copying an MP3 CD, the Jukebox only retains the last album
have already been transferred onto the jukebox hard disc.
Select AUDIO FUNCTIONS and press
Insert a CD or an MP3 compilation
and press the MENU button.
JUKEBOX FUNCTION
COPYING A CD ONTO THE HARD DISC

139
ESC
MENU LIST
ESC
MENU LIST
6
7
5
ESC
LIST
MENU
MENU
ESC
MENU LIST
2
3
4
1
ESC
MENU LIST
ESC
MENU LIST
ESC
MENU LIST
ESC
MENU LIST
JUKEBOX
RENAME
JUKEBOX MANAGEMENT
RENAMING AN ALBUM
Press the MENU button.
Select AUDIO FUNCTIONS and
Select the JUKEBOX function and
Select the JUKEBOX MANAGEMENT
Select the album to be renamed and
Select the RENAME tab and press the
Turn the dial and select the letters of
each time by pressing the dial.
Use the alphanumeric keypad to enter the letters of the album title
one by one.
JUKEBOX FUNCTION
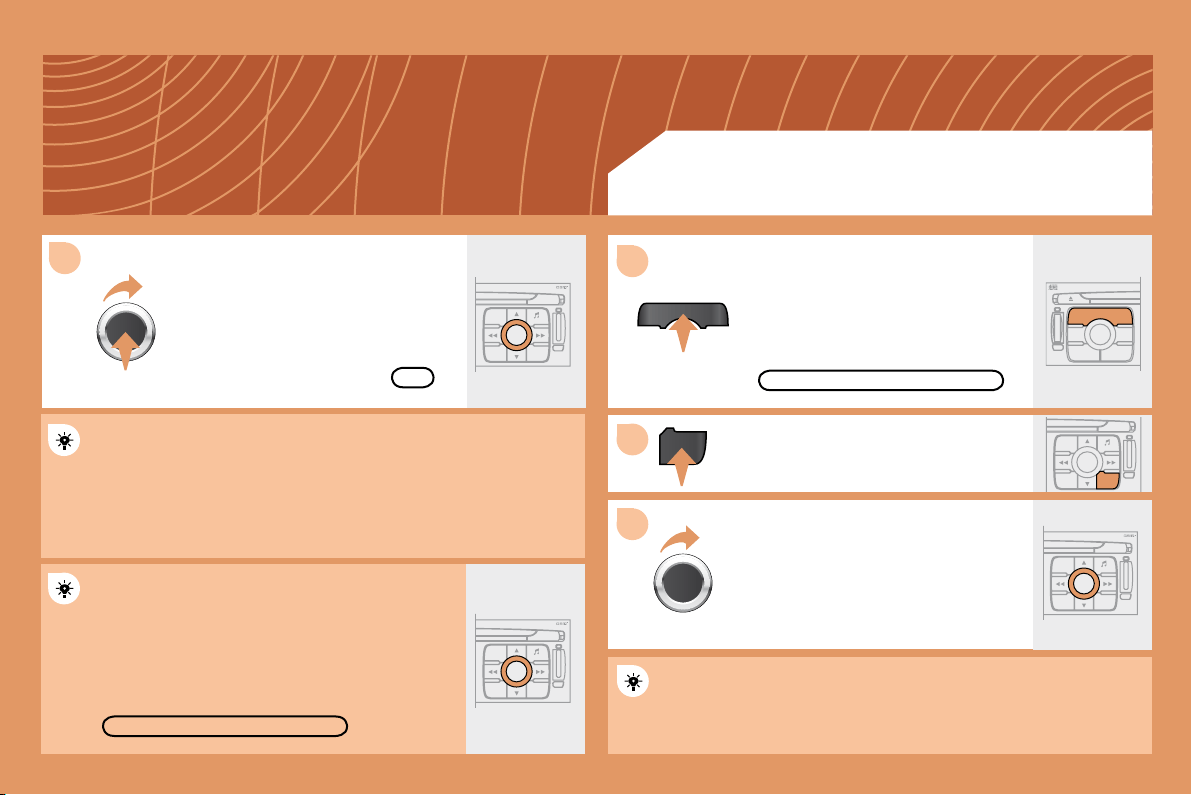
140
8
SOURCE
2
ESC
MENU LIST
LIST
ESC
MENU LIST
S
O
S
SOURCE
MODE BAND
T PTA YDARK
SOURCE
ESC
MENU LIST
LIST
ESC
MENU LIST
1
3
DELETE
OK
Press the SOURCE button several
times in succession and select the
JUKEBOX function.
Press the LIST button.
JUKEBOX
Select OK and press the dial to
To rename the tracks of an album, follow the same procedure,
selecting the tracks to be renamed.
Use the ESC button to exit from the list of tracks.
Select the DELETE function to delete an album or a
track from the Jukebox.
JUKEBOX FUNCTION
LISTENING TO THE JUKEBOX
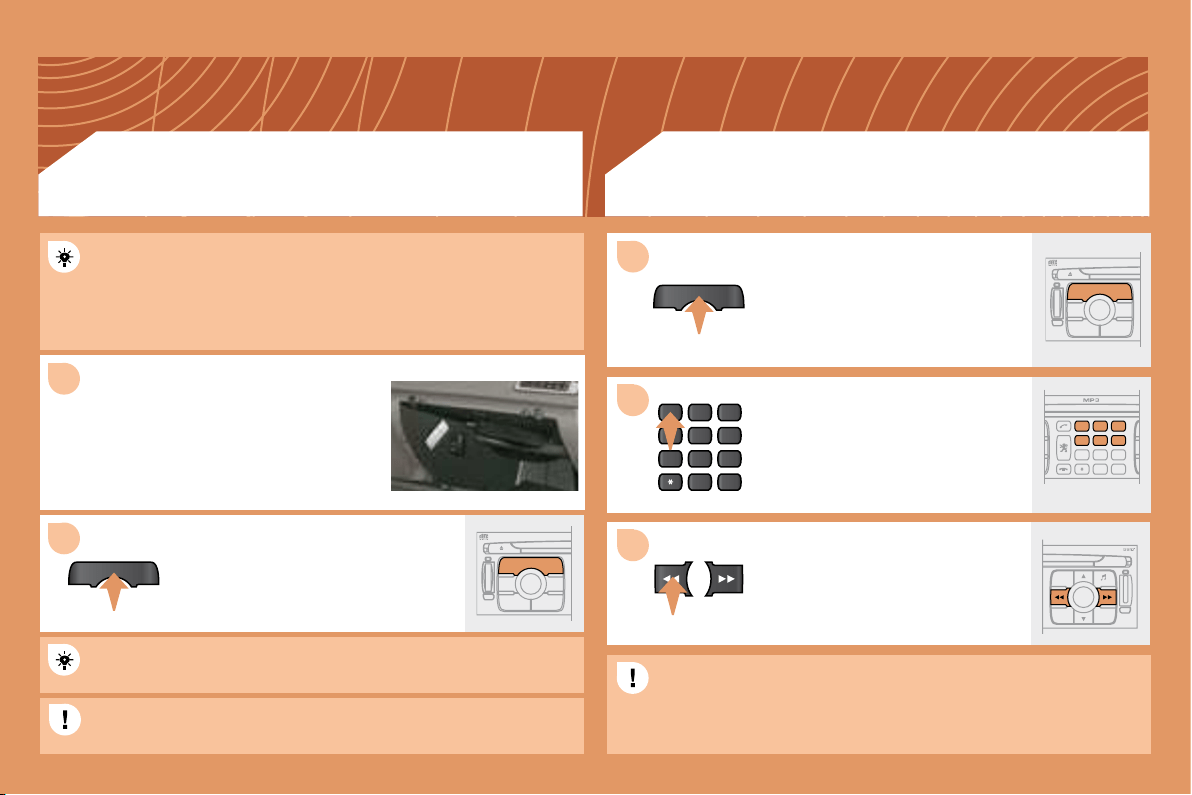
141
1
SOURCE
2
S
O
S
SOURCE
MODE BAND
T
PT
A
Y
DARK
SOURCE
2
abc
5
jkl
8
tuv
3
def
6
mno
9
wxyz
1
4
ghi
7
pqrs
0 #
2
abc
5
jkl
8
tuv
3
def
6
mno
9
wxyz
1
4
ghi
r
7
pq s
0 #
S
O
S
SOURCE
MODE BAND
T
PT
A
Y
DARK
SOURCE
SOURCE
ESC
MENU LIST
1
3
2
Press the MENU button then select the CONFIGURATION function,
then SOUNDS, then ACTIVATE AUXILIARY SOURCE to activate
the auxiliary input of the RT4 GPS audio/telephone.
Connect the portable equipment
the glove box using a JACK/RCA audio
cable.
Press the SOURCE button several
times in succession and select AUX.
Insert one or more CDs in the
changer.
Press the SOURCE button several
times in succession and select CD
CHANGER.
Press one of the buttons on the
alphanumeric keypad to select the
corresponding CD.
Press one of the buttons to select a
track on the CD.
The displaying and management of the commands takes place via
the portable equipment.
input.
changer.
USING THE AUXILIARY INPUT (AUX)
JACK/RCA AUDIO CABLE NOT SUPPLIED
CD CHANGER
PLAYING A CD (NOT MP3 COMPATIBLE)
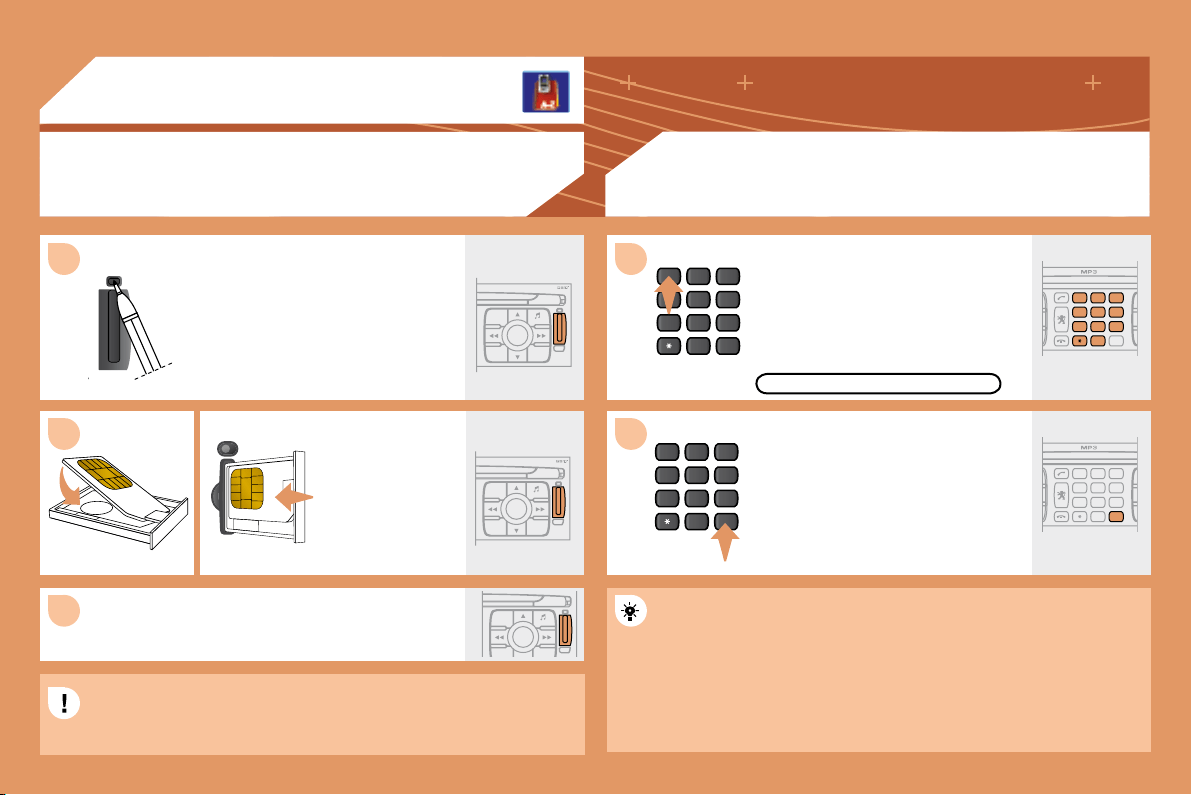
142
2
abc
5
jkl
8
tuv
3
def
6
mno
9
wxyz
1
4
ghi
7
pqrs
0 #
ESC
MENU LIST
ESC
MENU LIST
ESC
MENU LIST
2
abc
5
jkl
8
tuv
3
def
6
mno
9
wxyz
1
4
ghi
7
pqrs
0 #
2
abc
5
jkl
8
tuv
3
def
6
mno
9
wxyz
1
4
ghi
r
7
pq s
0
#
2
abc
5
jkl
8
tuv
3
def
6
mno
9
wxyz
1
4
ghi
r
7
pq s
0
#
1
2
3
1
2
06
TELEPHONE
INSTALLING YOUR SIM CARD
ENTERING THE PIN CODE
Access the slot by pressing the button
using the tip of a pen.
Install the SIM card
in the holder and
then insert it in the
slot.
To remove the SIM card, repeat step 1.
Your SIM card must be installed and removed with the RT4 GPS
audio/telephone switched off and the ignition off.
Enter the PIN code on the keypad.
button #.
PIN CODE
When entering your PIN code, tick the STORE PIN tab to gain
access to the telephone without having to enter this code when it is
used subsequently.
(NOT SUPPLIED)
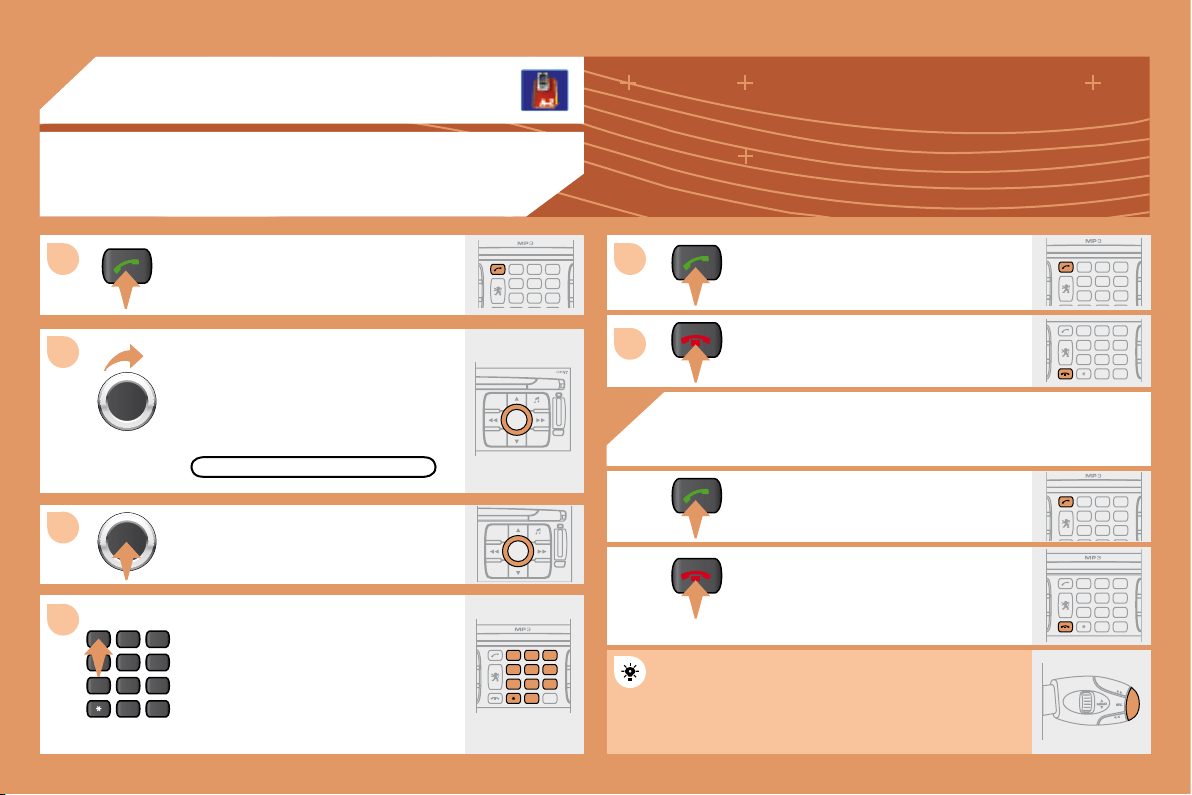
143
2
abc
5
jkl
8
tuv
3
def
6
mno
9
wxyz
1
4
ghi
7
pqrs
0 #
ESC
MENU LIST
ESC
MENU LIST
2
abc
5
jkl
8
tuv
3
def
6
mno
9
wxyz
1
4
ghi
r
7
pq s
0
#
2
abc
5
jkl
8
tuv
3
def
6
mno
9
wxyz
1
4
ghi
r
7
pq s
2
abc
5
jkl
8
tuv
3
def
6
mno
9
wxyz
1
4
ghi
r
7
pq s
0 #
1
2
3
4
5
6
2
abc
5
jkl
8
tuv
3
def
6
mno
9
wxyz
1
4
ghi
r
7
pq s
2
abc
5
jkl
8
tuv
3
def
6
mno
9
wxyz
1
4
ghi
r
7
pq s
2
abc
5
jkl
8
tuv
3
def
6
mno
9
wxyz
1
4
ghi
r
7
pq s
0 #
06
TELEPHONE
CALLING A CONTACT
Turn the dial and select the DIAL
function.
Press the PICK UP button to display
the superimposed telephone menu.
Dial the telephone number of your
contact using the alphanumeric
keypad.
Press the PICK UP button to call the
number dialled.
Press the HANG UP button to end
the call.
ACCEPTING OR REFUSING A CALL
Press the PICK UP button to accept
a call.
Press the HANG UP button to refuse
a call.
DIAL
Press the end of the steering wheel stalk for more
than 2 seconds to access the telephone menu:
calls log, directory, voice mailbox.
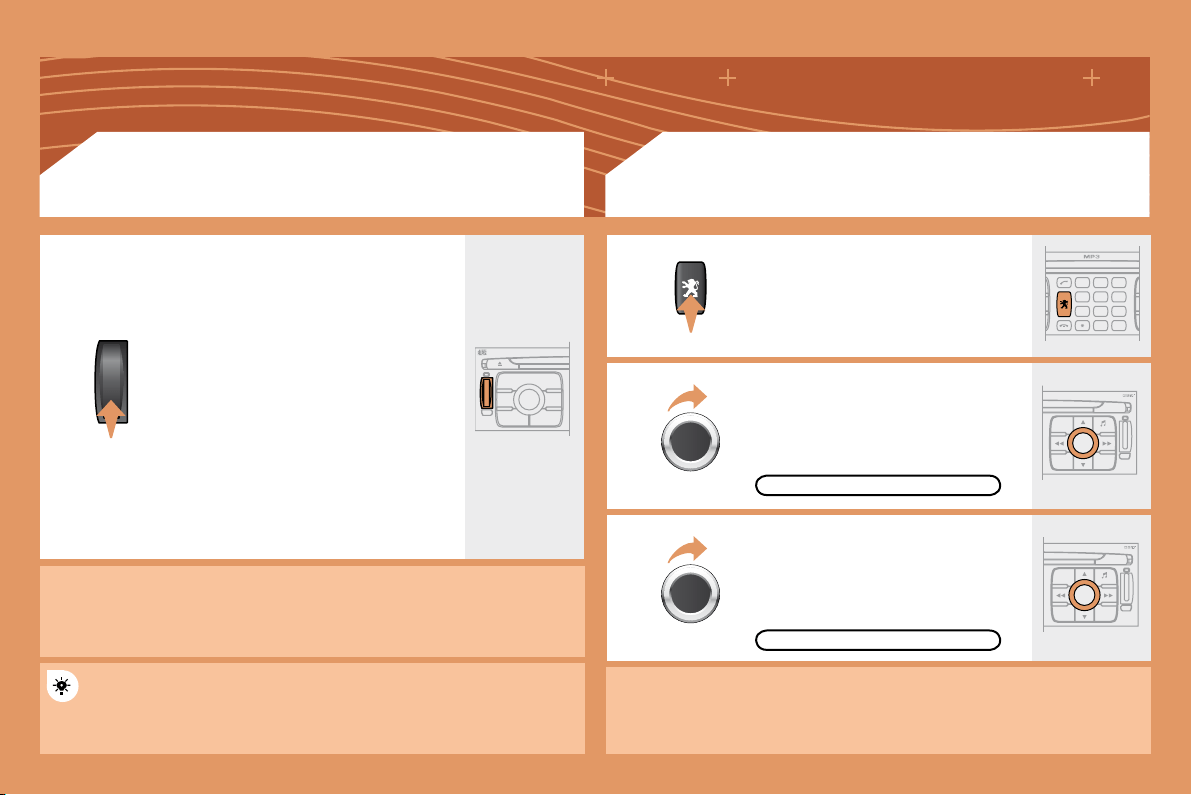
144
S
O
S
S
O
S
SOURCE
MODE BAND
T
PT
A
Y
DARK
2
abc
5
jkl
8
tuv
3
def
6
mno
9
wxyz
1
4
ghi
r
7
pq s
0 #
ESC
MENU LIST
ESC
MENU LIST
EMERGENCY CALL
In an emergency, press the
SOS button until an audible signal
is heard and a CONFIRMATION/
CANCELLATION screen is displayed
A call is made to the emergency
In certain countries*, this emergency
call is made directly by the PEUGEOT
Emergency team which locates the
vehicle and alerts the appropriate
emergency services as quickly as
possible.
PEUGEOT ASSISTANCE
CUSTOMER CONTACT CENTRE
When the PEUGEOT Emergency contract has been signed, it
is recommended that an initial call is made to the PEUGEOT
Emergency team.
CONSULTING THE SERVICES
Press the LION button to gain access
to the PEUGEOT services*.
Select
CUSTOMER CONTACT CENTRE
to request any information about the
PEUGEOT marque.
Select PEUGEOT ASSISTANCE to
make a breakdown assistance call.
* These services and options are subject to conditions and availability.
* On condition that the PEUGEOT Emergency contract has been signed.
This is free and of unlimited duration. Contact a PEUGEOT dealer.
145
07
RADIO: selection of the previous stored station.
MP3/JUKEBOX: selection of the previous directory.
CD CHANGER: selection of the previous CD.
Selection of the previous item on a menu.
RADIO: selection of the next stored station.
MP3/JUKEBOX: selection of the next directory.
CD CHANGER: selection of the next CD.
Selection of the next item on a menu.
RADIO: automatic search for a higher frequency.
CD/MP3/JUKEBOX/CD CHANGER: selection of the
next track.
CD/CD CHANGER: continuous press: fast forwards
play.
RADIO: automatic search for a lower frequency.
CD/MP3/JUKEBOX/CD CHANGER: selection of the
previous track.
CD/CD CHANGER: continuous press: fast backwards
play.
- Change of sound source.
- Pick up/Hang up the telephone.
- Press for more than 2 seconds:
access to the telephone menu.
Volume increase.
Volume decrease.
STEERING WHEEL CONTROLS
Mute: by pressing the volume
increase and decrease
buttons simultaneously.
The sound is restored by
pressing one of the two
volume buttons.
146
MENU
ESC
LIST
MENU
2
1
Press the end of the lights stalk to start the voice
recognition.
Say the words one by one and wait for the audible
The list which follows is exhaustive.
To display the list of available voice commands, press
the end of the lights stalk to start the voice recognition,
then say HELP or WHAT CAN I SAY.
For the same operation, press and
hold the MENU button and select the
function VOICE COMMANDS LIST.
VOICE COMMANDS LIST
LEVEL 1
display
call
changer
guide to
CD player/jukebox
navigation
radio
SMS/message
telephone
LEVEL 2
audio
guidance
navigation
trip computer
telephone
description
disc number
previous/next disc
random play
list
track number
previous/next track
repeat
scan
description
display
read
random play
list
track number
previous/next track
scan
stop/resume
directory
show
zoom out/in
autostore
list
memory
previous/next
display
read
voice mailbox
last number
voice message service
directory
LEVEL 3
1 … 20
1 ... 20
previous/next
repeat
destination
description
vehicle
1 … 6
description
VOICE COMMANDS
DISPLAYING THE LIST AND USING THEM
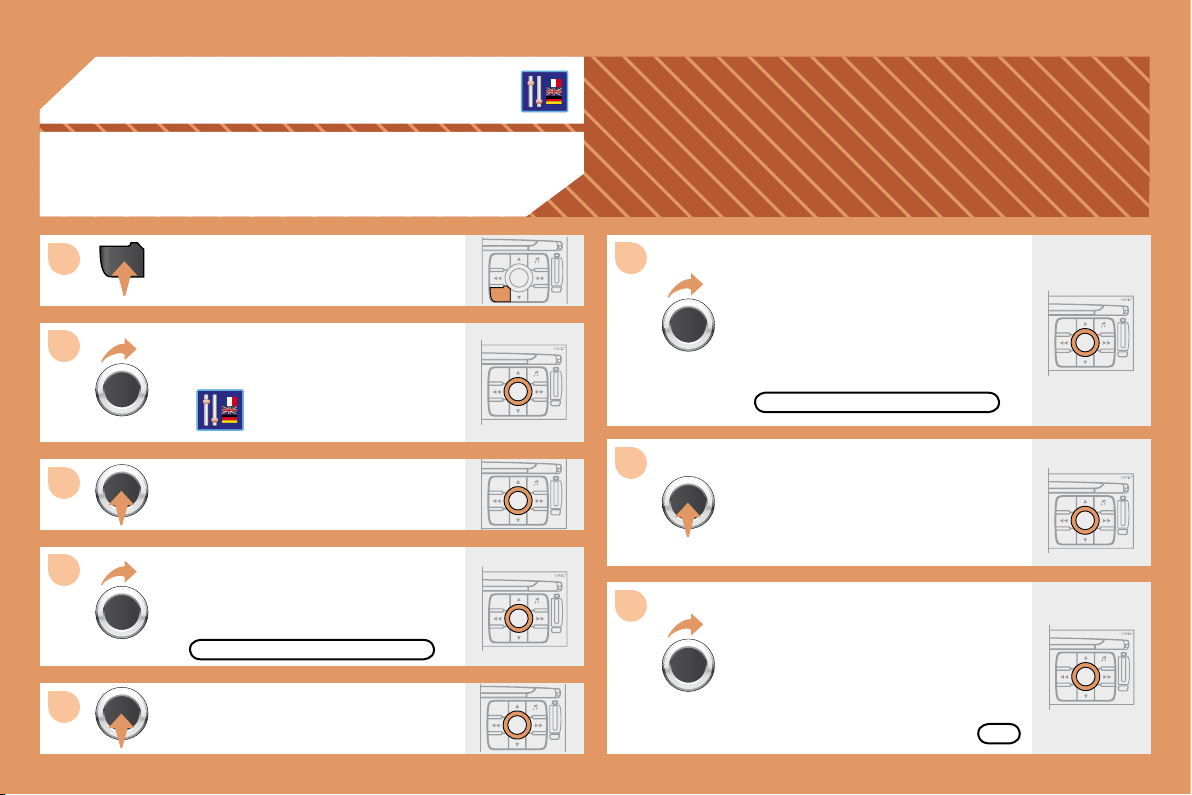
147
ESC
LIST
MENU
ESC
MENU LIST
ESC
MENU LIST
ESC
MENU LIST
ESC
MENU LIST
MENU
ESC
MENU LIST
ESC
MENU LIST
1
2
3
4
5
6
7
8
ESC
MENU LIST
08
CONFIGURATION
ADJUSTING THE DATE AND TIME
Press the MENU button.
Turn the dial and select the
CONFIGURATION function.
Turn the dial and select the
DISPLAY CONFIGURATION function.
Adjust the parameters one by one
select the OK tab on the display then
DISPLAY CONFIGURATION
ADJUST THE DATE AND TIME
OK
Turn the dial and select the
ADJUST THE DATE AND TIME
function.
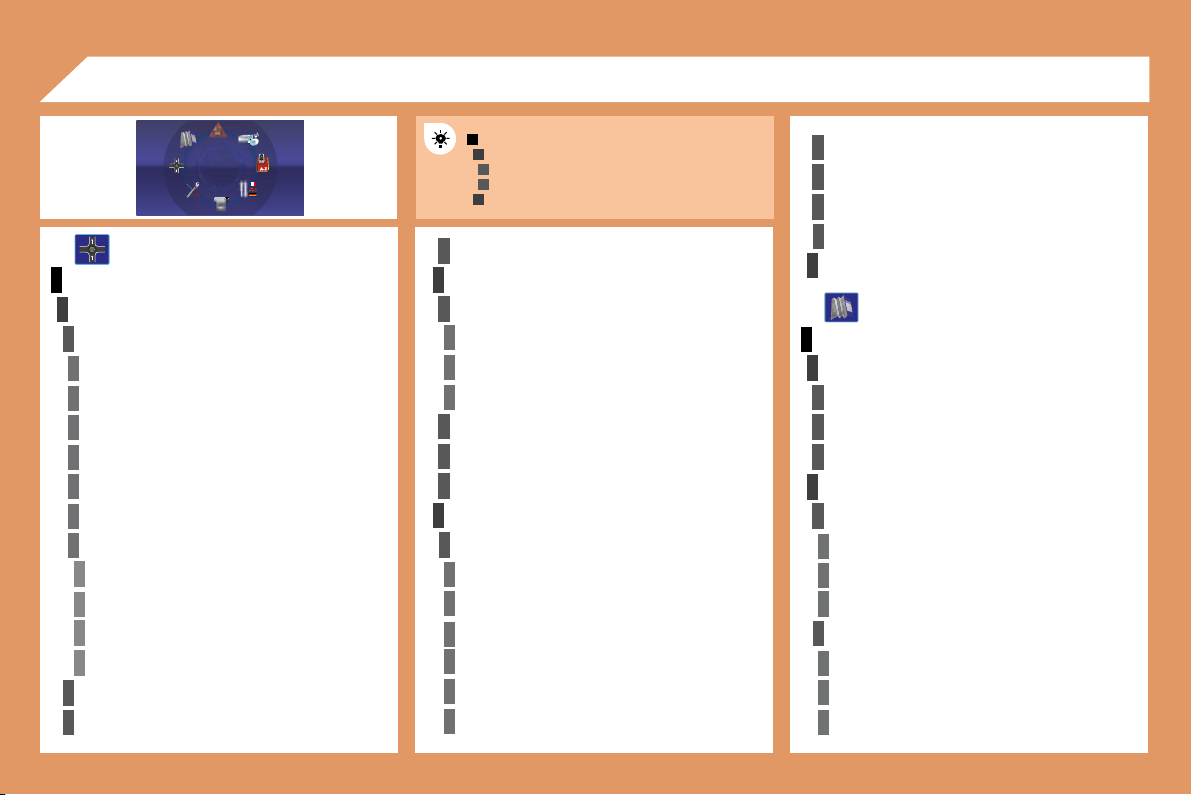
148
1
2
3
3
2
1
4
4
2
3
4
3
1
2
3
3
3
4
4
4
4
4
4
4
5
5
5
5
3
4
4
4
3
3
3
2
3
4
4
4
4
4
4
2
2
3
3
3
3
3
2
3
3
3
4
4
4
09
MAIN FUNCTION
DISPLAY FLOW CHARTS
STOP/RESUME GUIDANCE
MAP
SELECT DESTINATION
enter an address
country:
town:
road:
N°/_:
curr. loc
Archive
POI
near
on the route
around current place
search by name
GP
CHOICE A
CHOICE B...
GUIDANCE OPTIONS
fastest
shortest
distance/time
with tolls
with ferry
JOURNEY LEGS AND ROUTE
add a stage
enter an address
directory
previous destinations
MAP ORIENTATION
MAP DETAILS
town halls, town centre
universities, colleges
hospitals
hotels
restaurants
vineyards
149
4
4
4
4
4
4
4
4
3
4
4
4
4
3
3
4
4
1
2
3
4
4
4
3
4
4
4
4
4
1
2
3
3
3
3
3
3
3
3
2
3
2
2
3
3
3
3
2
2
4
4
2
4
4
3
3
4
4
4
3
3
2 2
business centres
supermarkets, shopping
tourism
culture and museums
casinos and nightlife
cinemas and theatres
shows and exhibitions
sports centres
golf courses
skating rinks, bowling alleys
winter sports resorts
parks, gardens
theme parks
airports, ports
stations, bus stations
vehicle rental
lay-bys, car parks
service stations, garages
DISPLAY MAP
CONFIGURE MESSAGE ANNOUNCEMENT
read messages
TRAFFIC INFORMATION
AUDIO FUNCTIONS
MOVE THE MAP
READ MESSAGES
FILTER TRAFFIC INFORMATION
around the vehicle
around location
on the route
road closure
size limit
road condition
weather and visibility
parking
public transport
demonstrations
SELECT TMC STATION
manual TMC
RADIO FAVOURITES
STOP THE COPY
COPY CD TO JUKEBOX
CD
150
4
3
4
5
5
5
5
4
4
4
3
4
3
4
4
3
3
3
3
2
5
5
1
2
3
4
3
3
3
3
3
2
3
3
3
2
4
4
2
4
3
4
4
4
3
4
4
3
3
4
4
4
4
4
4
5
5
5
5
2
3
5
5
5
3
TELEMATICS
DIRECTORY
select a directory
name directory
select starting directory
exchange by infrared
send all records
send one record
receive by infrared
exchange with SIM card
send all records to SIM
send one record to SIM
JUKEBOX
PLAYLIST MANAGEMENT
CALL
dial
customer contact centre
PEUGEOT assistance
messages received
TEXT MESSAGES (SMS)
TELEPHONE FUNCTIONS
network search mode
automatic mode
manual mode
networks available
zero reset
activate/deactivate
save PIN number
modify PIN code
display my number
ring options
for voice calls
151
1
2
3
3
3
3
2
3
3
4
4
1
3
2
3
1
2
3
3
2
2
2
1
2
2
2
1
1
1
MENU
4
3
2
2
3
3
6
text message ring
* The parameters vary according to vehicle
CONFIGURATION
VIDEO
VEHICLE DIAGNOSTICS
Press the MENU button for more
than 2 seconds to gain access to the
VOICE COMMANDS LIST
Press the Music button several
times in succession to access the
following settings.
AUTO VOLUME CORRECTION
SELECT LANGUAGE
Each audio source (Radio, CD, MP3,
separate settings.
DISPLAY CONFIGURATION
set date and time
SOUND
guidance instructions volume
other message volume
select female/male voice
DEFINE VEHICLE PARAMETERS*
RESET TYRE PRESS. DETEC. SYS.*
ACTIVATE VIDEO MODE
VIDEO PARAMETERS
ALERT LOG
STATUS OF FUNCTIONS*
AUDIO/TELEPHONE DIAGNOSTICS
GPS COVERAGE
UNIT BACKUP POWER
UNIT DESCRIPTION
NAVIGATION DEMONSTRATION
SERVICES CONFIGURATION
MUSICAL AMBIENCE
BASS
TREBLE
LOUDNESS CORRECTION
Flow chart version 7.0

163
The table below groups together the answers to the most frequently asked questions concerning the RD4 audio equipment and the RT4 audio/telephone.
QUESTION
SOLUTION
RESPONSE
There is a difference in
sound quality between
the different audio
sources (radio, CD, CD
Check that the audio settings (Volume, Bass,
the sources listened to. It is advisable to set
the AUDIO functions (Bass, Treble, Front-Rear
position, select the musical ambience "None"
and set the loudness correction to the "Active"
position in CD mode or to the "Inactive" position
in radio mode.
For optimum sound quality, the audio settings (Volume, Bass, Treble,
which may result in audible differences when changing source
The CD is ejected
automatically or is not
played by the player.
- Check that the CD is inserted in the player the
right way up.
- Check the condition of the CD: the CD cannot
be played if it is too damaged.
- Check the content in the case of a recorded
CD: consult the advice in the Audio section.
- The audio equipment's CD player does not
play DVDs.
- Due to inadequate quality, certain recorded
CDs will not be played by the audio system.
- The CD changer does not play MP3 CDs.
The CD is inserted upside down, is unplayable, does not contain any audio
data or contains an audio format which the player cannot play.
The CD is protected by an anti-pirating protection system which is not
recognised by the audio equipment.
FREQUENTLY ASKED QUESTIONS
The CD player sound
is poor.
The CD used is scratched or of poor quality. Insert good quality CDs and store them in
suitable conditions.
Set the treble or bass level to 0, without selecting
an ambience.

164
QUESTION SOLUTIONRESPONSE
The stored stations do
not function (no sound,
An incorrect waveband is selected. Press the BAND AST button to return to the
stations are stored.
information.
information.
The quality of reception
of the radio station
listened to gradually
deteriorates or the
stored stations do
not function (no
sound, 87.5 Mhz is
The vehicle is too far from the transmitter used by the station listened to or
there is no transmitter in the geographical area through which the vehicle
is travelling.
reception, including in RDS mode.
The aerial is absent or has been damaged (for example when going
Activate the RDS function to enable the system
to check whether there is a more powerful
transmitter in the geographical area.
This phenomenon is normal and does not
indicate a failure of the audio equipment.
Have the aerial checked by a PEUGEOT dealer.
Sound cut-outs of 1
to 2 seconds in radio
mode.
During this brief sound cut-out, the RDS searches for any frequency
permitting better reception of the station.
Deactivate the RDS function if the phenomenon
is too frequent and always on the same route.
With the engine off,
the audio equipment
switches off after a few
minutes of use.
When the engine is switched off, the audio equipment operating time
depends on the battery charge.
The switch-off is normal: the audio equipment switches to economy mode
and switches off to prevent discharging of the vehicle's battery.
Start the vehicle's engine to increase the battery
charge.
The message "the audio
system is overheated"
appears on the display.
Switch the audio system off for a few minutes to
allow the system to cool.
In order to protect the installation if the surrounding temperature is too
high, the audio equipment switches to an automatic thermal protection
mode leading to a reduction of the volume or stopping of the playing of
the CD.

165
QUESTION
SOLUTION
RESPONSE
The TRAFFIC INFO
box is ticked. However,
along the route are not
indicated in real time.
On starting, it is several minutes before the system begins to receive the
The time taken to
calculate a route
sometimes seems
longer than usual.
This phenomenon is normal. The system is
The performance of the system may slow down temporarily if a CD is
being copied onto the Jukebox at the same time as a route is being
calculated.
Wait until the CD has been copied or stop the
copying before starting the guidance function.
Does the emergency call
function work without a
SIM card?
No, European regulations impose the presence of a SIM card in order to
make an emergency call.
Insert a valid SIM card in the slot on the RT4 GPS
audio/telephone.
My SIM card is not
recognised.
The RT4 accepts 3.3 V SIM cards, the old 5 V and 1.8 V SIM cards are not
recognised.
Contact your telephone operator.
After changing a wheel,
the system loses its
location.
The RT4 GPS audio/telephone uses the wheel rotation information to
suddenly, the system recalculates the location. For approximately ten
minutes, this recalculation may affect the quality of the locating function.
Wait until the system has completed its
recalculation.
The table below groups together the answers to the most frequently asked questions concerning the RT4 audio/telephone.
The location on the
map is incorrect or
inaccurate.
The altitude is not
displayed.
On starting, the initialisation of the GPS may take up to 3 minutes to
receive more than 3 satellites correctly.
Wait until the system has started up completely.
Check that there is a GPS coverage of at least
3 satellites (long press on the MENU button, then
select AUDIO/TELEPHONE DIAGNOSTICS, then
the conditions of reception of the GPS signal may vary.
This phenomenon is normal. The system is
dependent on the conditions of reception of the
GPS signal.
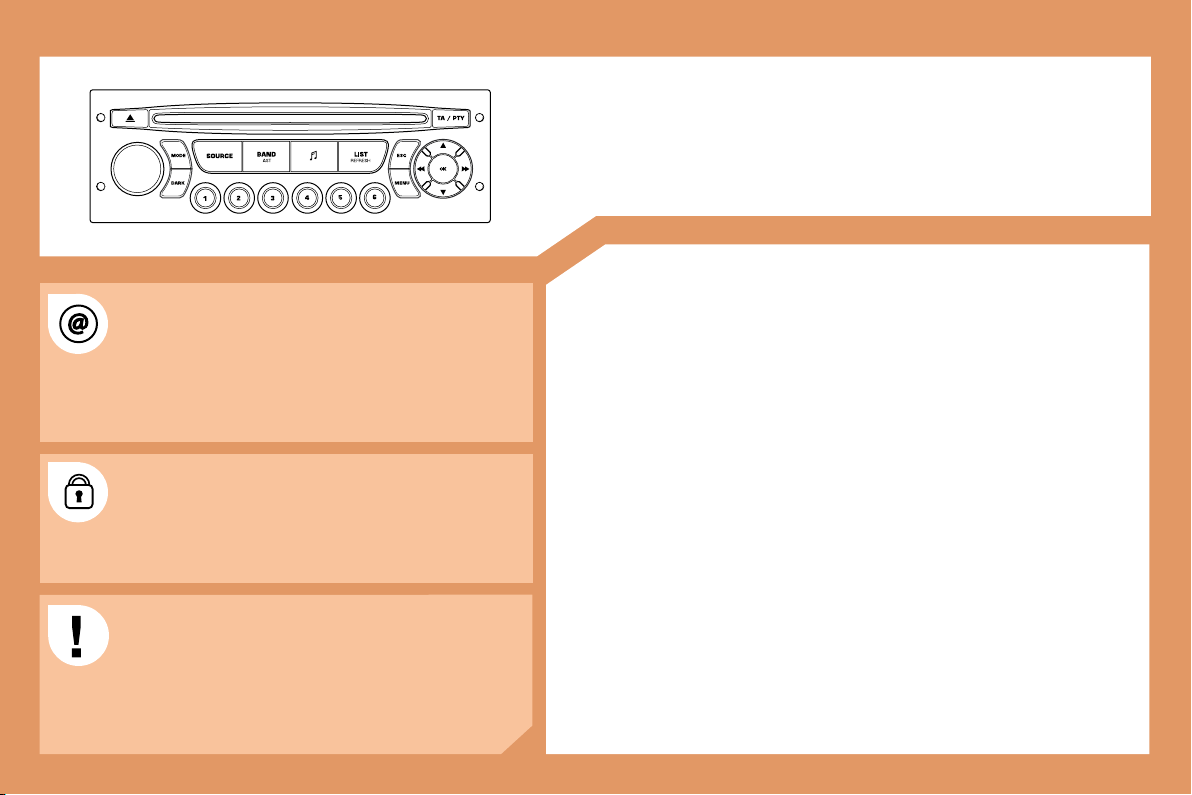
152
RD4
CONTENTS
01 First steps pg. 153
02 General menu pg. 154
The SERVICE BOX internet site provides additional
animated information on the RD4.
It can be consulted at the following address:
http://public.servicebox.peugeot.com
Simple registration permits access and free consultation
of the handbook.
The RD4 audio equipment is coded in such a way that
it will only operate in your vehicle. If it is to be installed
in another vehicle, contact your PEUGEOT dealer for
For safety reasons, the driver must carry out operations
which require prolonged attention while the vehicle is
stationary.
When the engine is off, and in order to prevent
discharging of the battery, the RD4 audio equipment may
switch off after a few minutes.
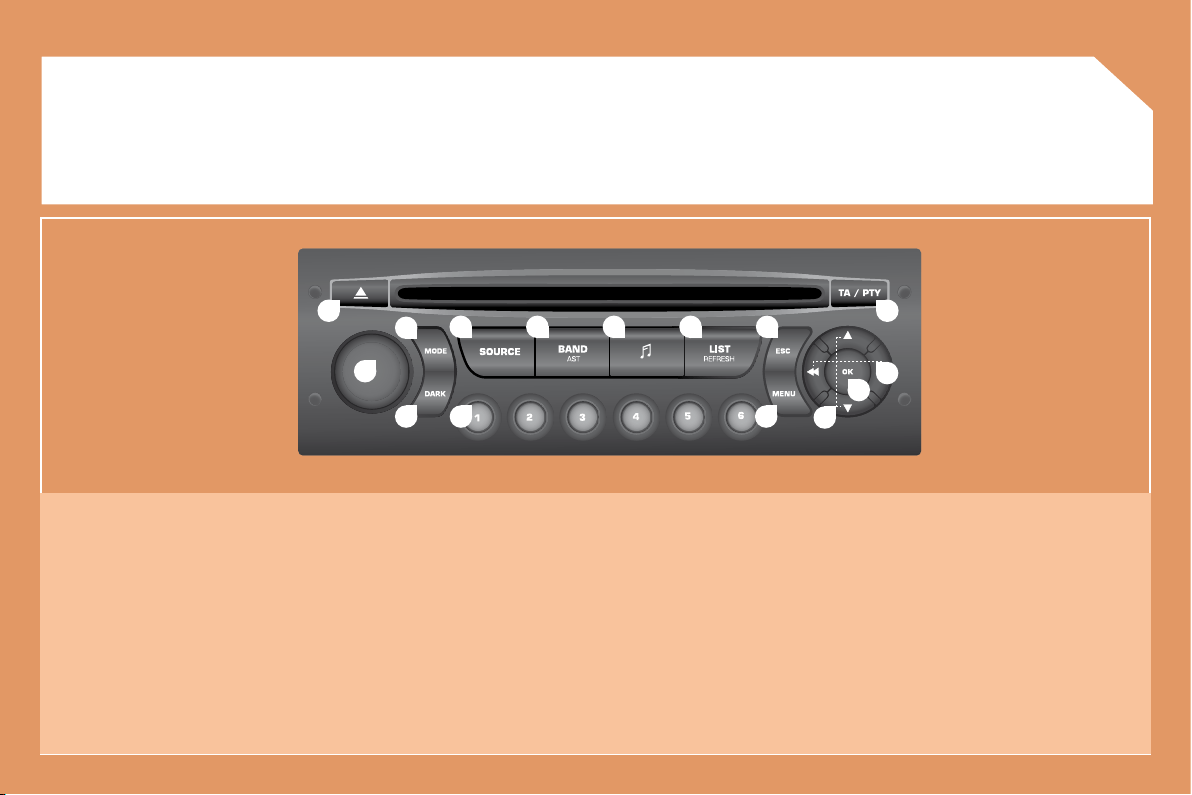
153
1
2
10
11
12
131415
3
4 5 6 7 8
9
12
01
FIRST STEPS
1. On/Off and volume adjustment.
2. CD eject.
3. Selection of the screen display mode.
4. Selection of the source: radio, CD and CD changer.
5. Selection of the FM1, FM2, FMast and AM wavebands.
6. Setting the audio options: front/rear balance, left/right
balance, loudness, sound ambiences.
7. Displaying of the list of local stations, of the tracks on the
CD or of the MP3 directories.
8. Abandon current operation.
9.
mode.
10.
11. Automatic search for a lower/higher frequency.
Selection of previous/next CD or MP3 track.
12. Selection of a lower/higher radio frequency.
Selection of the previous/next CD.
Selection of the previous/next MP3 directory.
13. Displaying of the general menu.
14. Buttons 1 to 6:
Selection of a stored radio station.
Selection of a CD in the CD changer.
Long press: storing of a station.
15. The DARK button changes the display on the screen to
improve driving comfort at night.
1st press: lighting of the top banner only.
2nd press: black screen display.
3rd press: return to the standard display.
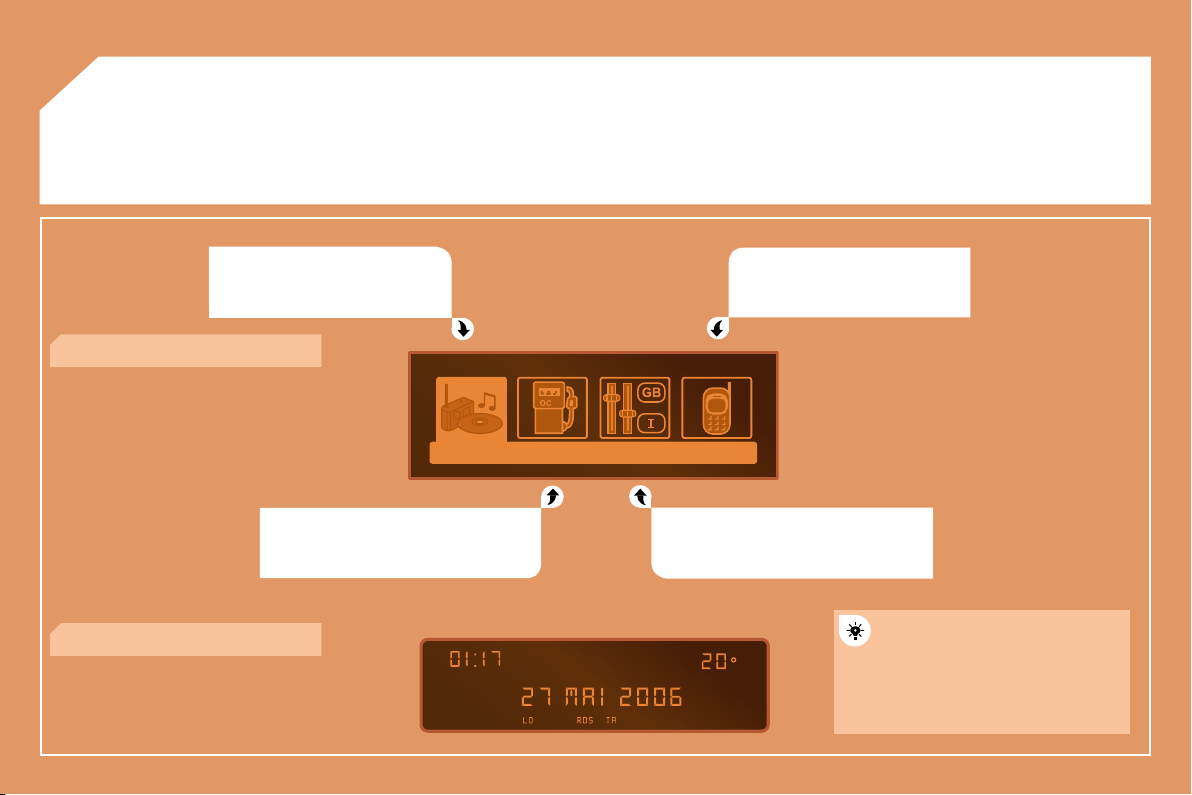
154
02
GENERAL MENU
AUDIO FUNCTIONS: radio, CD,
options.
TRIP COMPUTER: distance entering,
warnings, status of functions.
TELEPHONE: hands-free kit,
matching, management of a
communication.
PERSONALISATION-CONFIGURATION:
vehicle parameters, display, languages.
> MONOCHROME DISPLAY C
> MONOCHROME DISPLAY A
For a detailed global view of the
menus available, refer to the
this RD4 chapter.
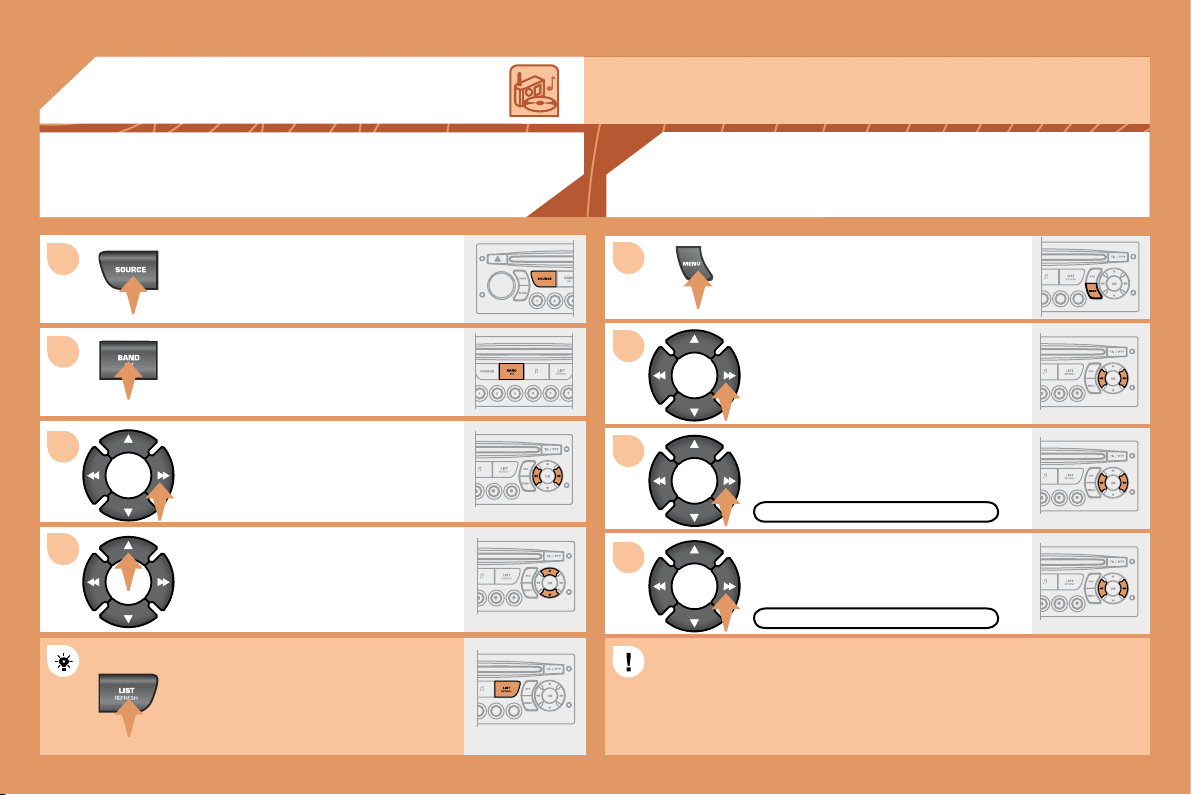
155
1
2
3
4
2
4
3
1
03
AUDIO
RADIO
SELECTING A STATION
Press the SOURCE button several
times in succession and select the
radio.
Press the BAND AST button to select
a waveband: FM1, FM2, FMast, AM.
carry out an automatic search of the
radio stations.
Press one of the buttons to carry out a
manual search of the radio stations.
Press the LIST REFRESH button to
display the list of stations received
To update this list, press for more than
two seconds.
Select ACTIVATE FREQUENCY
RDS appears on the display.
Select the FM WAVEBAND
PREFERENCES function then press
OK.
Select AUDIO FUNCTIONS then
press OK.
Press the MENU button.
FM WAVEBAND PREFERENCES
ACTIVATE FREQUENCY FOLLOWING (RDS)
in RDS mode. This is a normal effect of the way in which radio waves are transmitted and does not
indicate any failure of the audio equipment.
RDS
The RDS, if displayed, enables you to continue listening to the
same station by means of frequency following. However, in certain
conditions, this RDS station is not followed throughout the country
as radio stations do not cover 100 % of the territory. This explains
the loss of reception of the station during a journey.

156
1
2
3
1
2
Insert the CDs in the changer one by
one.
Press the SOURCE button several
times in succession and select
CD CHANGER.
Press one of the buttons on the
numeric keypad to select the
corresponding CD.
Press one of the buttons to select a
track on the CD.
Press and hold one of the buttons for
fast forwards or backwards play.
Insert circular compact discs only.
Some anti-pirating systems, on original discs or CDs
copied using a personal recorder, may cause faults
player.
Without pressing the EJECT button, insert a CD in the
player, play begins automatically.
To play a disc which has already been
inserted, press the SOURCE button
several times in succession and
select CD.
Press one of the buttons to select a
track on the CD.
Press the LIST REFRESH button to
display the list of tracks on the CD.
CD CHANGER
PLAYING A CD (NOT MP3 COMPATIBLE)
CD
PLAYING A CD
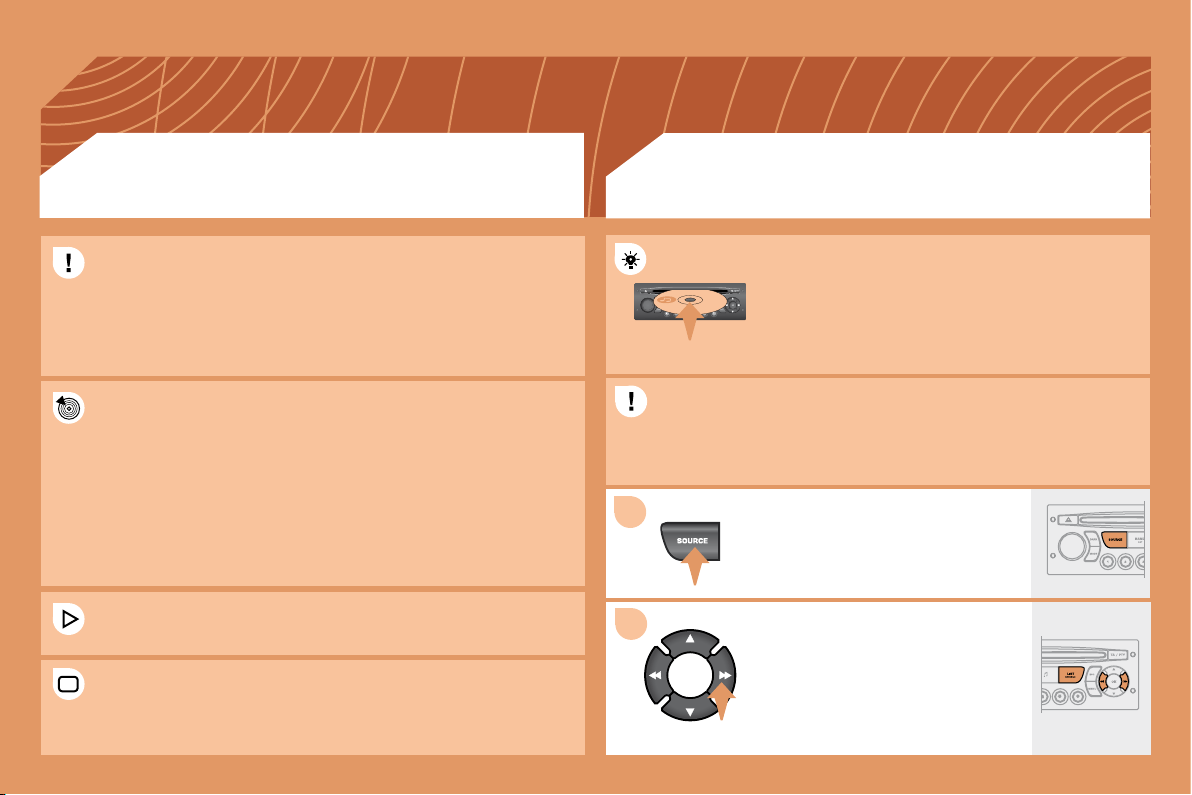
157
1
2
Insert an MP3 compilation in the player.
The audio equipment searches for all of the music
tracks, which may take anything between a few
seconds and several tens of seconds, before play
begins.
over 8 directory levels. However, it is advisable to keep to a limit of
two levels to reduce the access time before the CD is played.
The MP3 format, an abbreviation of MPEG 1.2 & 2.5 Audio Layer 3,
is an audio compression standard which permits the recording of
The playing and displaying of an MP3 compilation may depend on
the recording programme and/or the parameters used.
In order to be able to play a recorded CDR or CDRW, when recording
select standards ISO 9660 level 1.2 or Joliet.
If the disc is recorded in another format, it may not be played
correctly.
It is recommended that the same recording standard is always used
for an individual disc, with as low a speed as possible for optimum
sound quality.
In the particular case of a multi-session CD, the Joliet standard is
recommended.
problems.
To play a disc which has already been
inserted, press the SOURCE button
several times in succession and
select CD.
Press one of the buttons to select a
track on the CD.
Press the LIST REFRESH button to
display the list of directories of the
MP3 compilation.
MP3 CD
INFORMATION AND ADVICE
CD
PLAYING AN MP3 COMPILATION
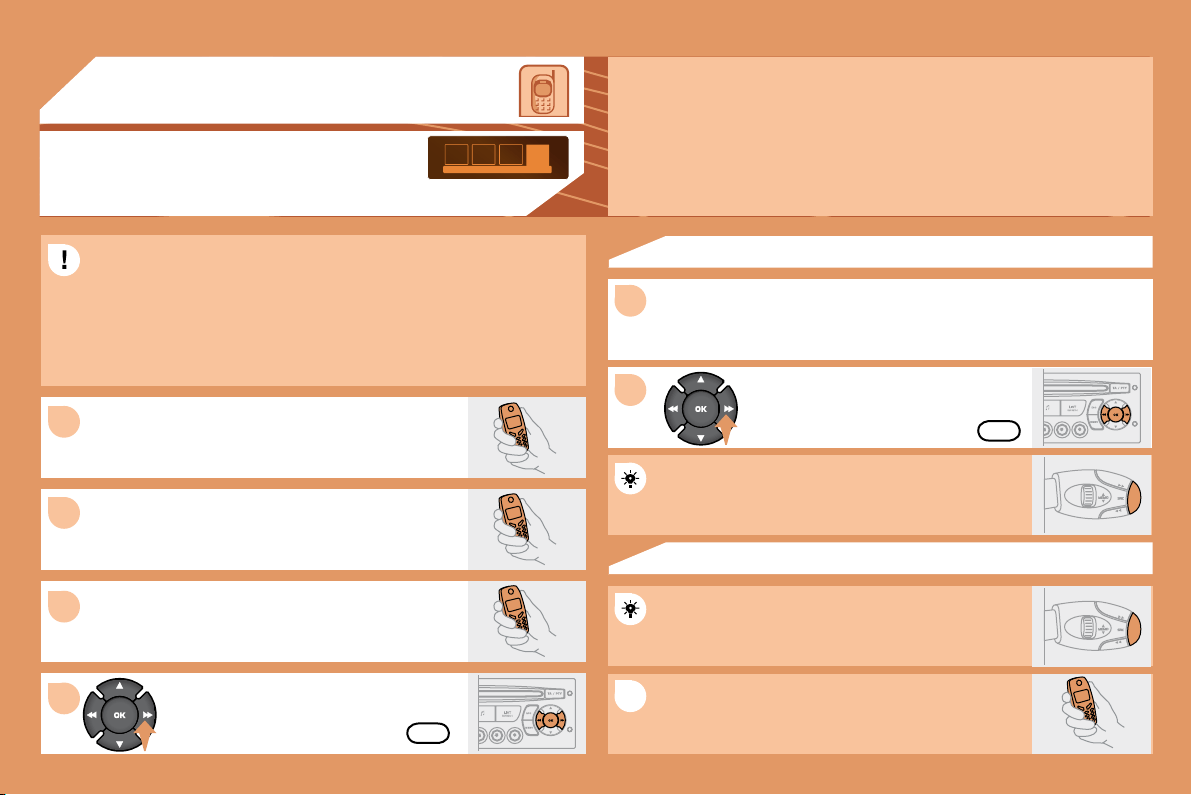
158
1
2
3
1
2
4
1
04
For safety reasons and because they require prolonged attention on
the part of the driver, the operations for matching of the Bluetooth
mobile telephone with the RD4 hands-free kit must be carried out
with the vehicle stationary and the ignition on.
Select the accessory which corresponds to the
display appears on the multifunction display.
Activate the telephone's Bluetooth function and
carry out a search of the Bluetooth accessories
present for the telephone.
Select the YES tab on the display using
Depending on the telephone, you may be asked
to enter this code before the superimposed
YES
YES
The services offered by the hands-free kit depend on the network, the SIM card and the compatibility
of the Bluetooth equipment used.
A list of mobile telephones which offer the best range of services is available from the network.
Contact a PEUGEOT dealer.
RECEIVING A CALL
An incoming call is announced by a ring and a superimposed display
on the multifunction display.
Select the YES tab on the display
pressing OK.
Press the end of the steering wheel stalk to accept
the call.
Press the end of the steering wheel stalk for more
than two seconds to access your directory.
To dial a number, use the keypad on your
telephone.
MAKING A CALL
MATCHING A TELEPHONE
DISPLAY C
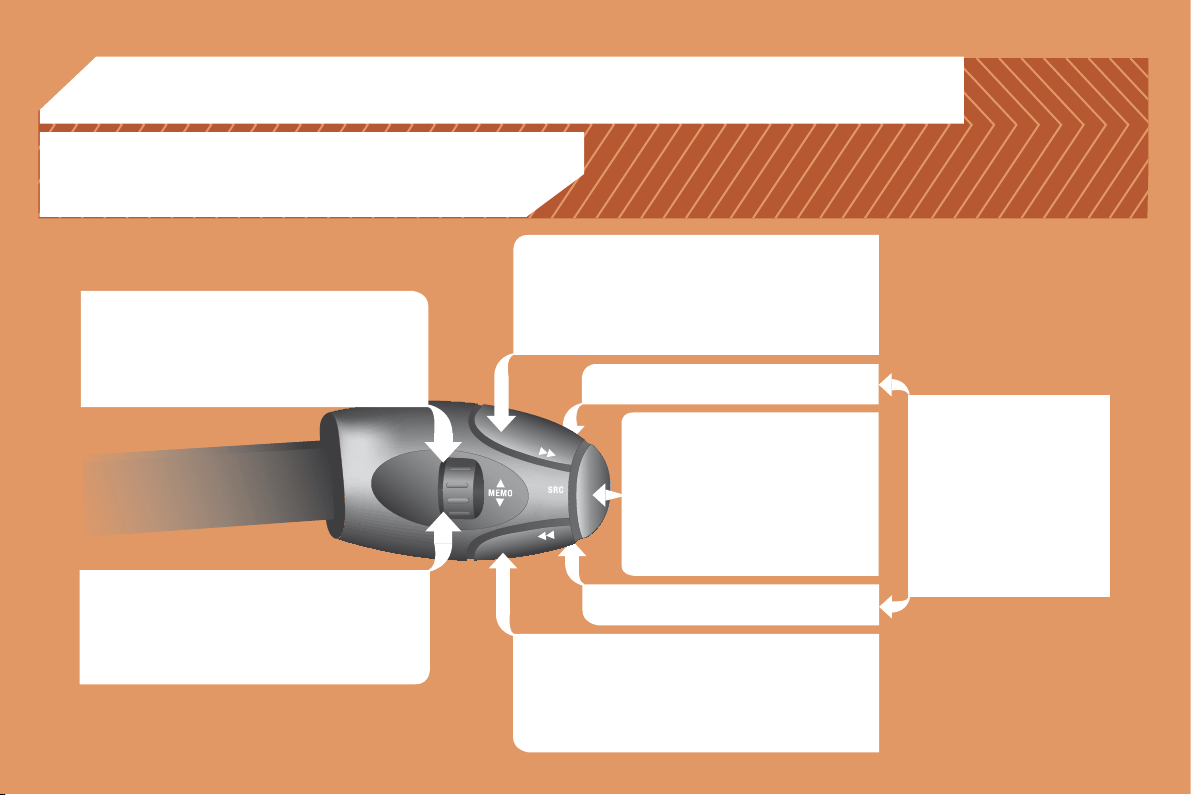
159
05
RADIO: selection of the next stored station.
CD CHANGER: selection of the next CD.
Selection of the next item on a menu.
RADIO: selection of the previous stored station.
CD CHANGER: selection of the previous CD.
Selection of the previous item on a menu.
RADIO: automatic search for a higher frequency.
CD/CD CHANGER/MP3: selection of the next track.
CD/CD CHANGER: continuous press: fast forwards
play.
RADIO: automatic search for a lower frequency.
CD/CD CHANGER/MP3: selection of the previous
track.
CD/CD CHANGER: continuous press: fast backwards
play.
Selection of the next item.
Selection of the previous item.
Volume decrease.
Mute: by pressing
the volume increase
and decrease buttons
simultaneously.
The sound is restored by
pressing one of the two
volume buttons.
Volume increase.
- Change of sound source.
- Pick up/Hang up the telephone.
- Press for more than 2 seconds:
access to the telephone menu.
STEERING WHEEL CONTROLS
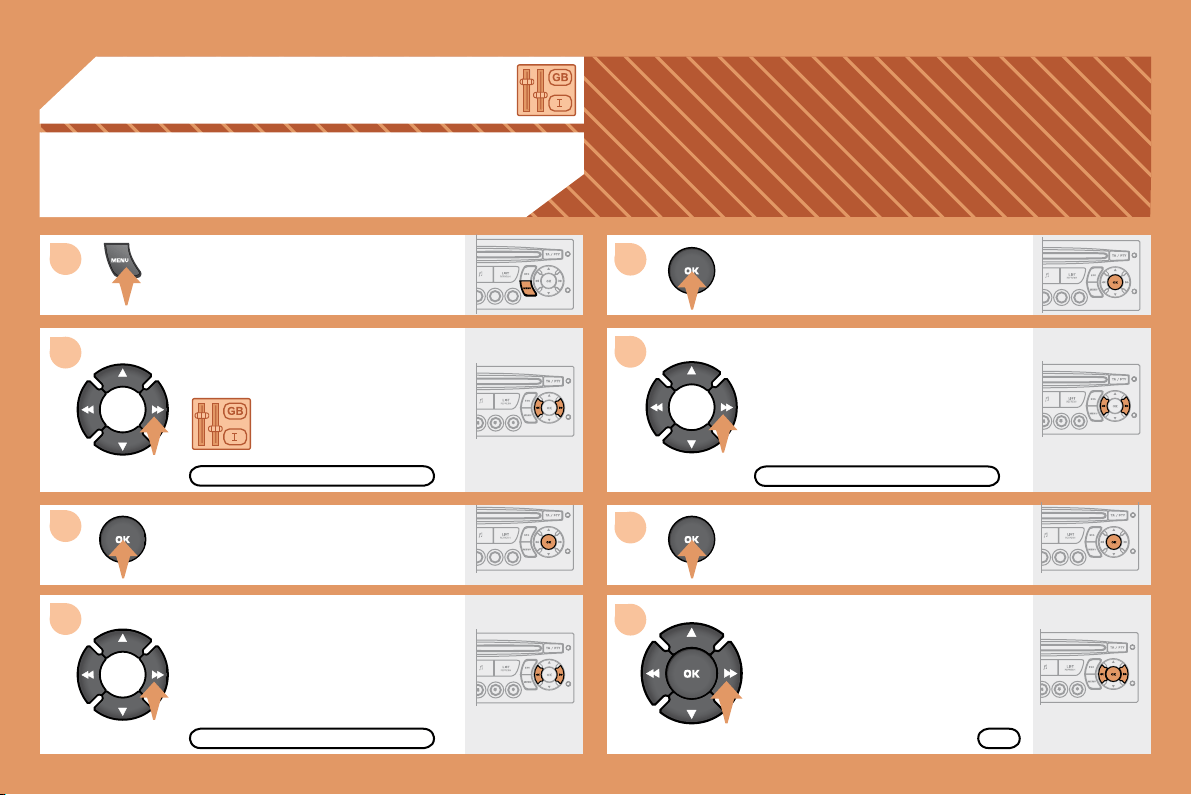
160
5
6
7
8
1
2
3
4
06
CONFIGURATION
Press the MENU button.
Using the arrows, select
the PERSONALISATION
CONFIGURATION function.
Using the arrows, select the
DISPLAY CONFIGURATION function.
Using the arrows, select the
ADJUST DATE AND TIME function.
Adjust the parameters one by one
Next select the OK tab on the display
DISPLAY CONFIGURATION
ADJUST DATE AND TIME
OK
PERSONALISATION CONFIGURATION
ADJUSTING THE DATE AND TIME
DISPLAY C
161
1
2
3
3
2
3
3
2
3
3
2
3
3
2
3
3
1
2
3
3
2
3
3
1
2
3
3
1
2
2
2
2
2
2
1
2
2
2
2
2
2
2
2
1
2
2
1
2
3
2
3
2
3
3
2
3
3
07
REV WIPE ACT
UNITS
ABANDON/CONSULT LIST OF FAULTS
LANGUAGES
FRANCAIS
ITALIANO
NEDERLANDS
PORTUGUES
DEUTSCH
ENGLISH
ESPANOL
DISPLAY ADJUST
YEAR
MONTH
DAY
HOUR
MINUTES
12 H/24 H MODE
MAIN FUNCTION
A
* The parameters vary according to vehicle.
REG MODE
RDS SEARCH
CHOICE A
CHOICE B...
INTROSCAN
CD REPEAT
AUTO LIGHTS
GUIDE LAMPS
PARKING ASSIST
OPTIONS
VEHICLE CONFIG*
RANDOM PLAY
162
1
1
2
3
4
3
4
3
4
2
3
4
3
4
2
3
4
2
4
4
3
4
4
4
3
4
4
1
2
3
2
3
3
2
2
1
2
3
3
3
4
4
4
2
3
4
3
4
3
4
2
3
3
3
4
07
STATUS OF FUNCTIONS*
AUDIO FUNCTIONS
* The parameters vary according to vehicle
WARNING LOG
TRIP COMPUTER
FM BAND PREFERENCES
activate/deactivate
activate/deactivate
activate/deactivate
AUDIO CD PREFERENCES
activate/deactivate
activate/deactivate
ENTER DISTANCE TO DESTINATION
DEFINE THE VEHICLE PARAMETERS*
CHOICE OF LANGUAGE
TELEPHONE
CONSULTING DIRECTORIES**
customer contact centre
breakdown call
emergency call
DISPLAY CONFIGURATION
normal video
inverse video
day/month/year adjustment
hour/minute adjustment
choice of 12 h/24 h mode
l/100 km - mpg - km/l
°Celsius/°Fahrenheit
** According to compatibility of Bluetooth telephone
and service contract.
MANAGEMENT OF A COMMUNICATION
activate/deactivate
CONFIGURATION
list of matches
list of matches
list of mobiles