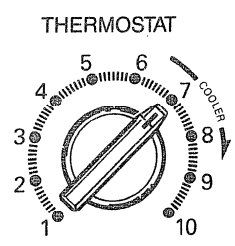
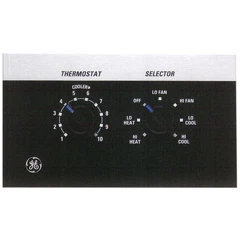
When you turn this control to the desired setting, the thermostats will automatically control the temperature of the indoor air.
The higher the number selected, the cooler the indoor air will be.
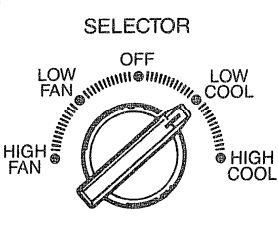
Selector Switch
OFF turns air conditioner off.
HIGH FAN provides high fen speed operation without cooling or heating.
LOW FAN provides low fan speed operation without cooling
LOW COOL provides cooling with low fan speed operation.
HIGH COOL provides cooling with high fan speed operation.
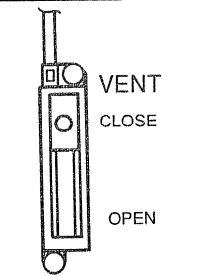
Ventilation Control
When this control is set at CLOSE, only the air inside the room can be circulated and conditioned. When it’s in the OPEN position, some indoor air can be exhausted from the room.
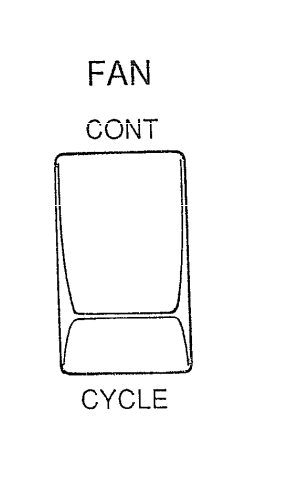
Fan Switch
The Fan Switch, located behind the front grille, is set at CONTINUOUS at the factory to provide continuous fan operation in cool mode. See how to remove the front grille on page 6.
If you want the fen to cycle on and off with the compressor, set the Fan Switch at CYCLE.
For Normal Cooling
1. Set Selector Switch at HIGH COOL.
2. Set Thermostat Control at desired number (usually the midpoint is a good starting position). If room temperature is not satisfactory after a reasonable time, set the temperature control at a higher number for a cooler room or at a lower number for a warmer room.
For Maximum Cooling
1. Set Selector Switch at HIGH COOL.
2. Set Thermostat Control at 10.
3. Set Ventilation Control at CLOSE position.
4. Shift Fan Switch to CONTINUOUS.
For Quieter Operation
1. Set Selector Switch at LOW COOL,
2. Set Thermostat Control at desired number.
3. Set Ventilation Control at CLOSE position.
4. Shift Fan Switch to desired position—C ONTINU QUS or CYCLE.
For Nighttime Operation
During the cooler evening hours, it is recommended that you set the Selector Switch at LOW COOL for very quiet operation and the Thermostat Control at mid-range (5 or 6).
When the Thermostat Control is set on 9 or 10 and the Fan is set on low speed, moisture may freeze on the coils and prevent the unit from cooling. If this happens, set the Fan at high speed and set the Thermostat Control to a lower number.
For Extreme Temperatures
For greatest economy and best performance, we suggest you always set the Selector Switch at HIGH COOL in extremely hot weather.
For air circulation and filtering without cooling
Set Selector Switch at HIGH FAN or LOW FAN.
For Ventilation
Whether controls are set for cooling or fan only operation, setting the Ventilation Control at OPEN lets room air be exhausted to the outside.
This is helpful in removing stale air, smoke or odors from the room, and permits outdoor air to enter through normal openings in the house. However, cooling effectiveness is reduced when this control is set at OPEN, so we suggest you don’t -keep it there long—especially in hot, humid weather.
TO Adjust Air Direction
Up - and - down air direction:
Adjust louvers with your fingertips to direct discharged air up, down or straight ahead.
Side-to-side air direction:
Remove the front grille. Adjust louvers with your fingertips to direct discharged air to the left, to the right or straight ahead. Replace grille.
Energy-Saving Tips
Keep the air filter clean. (See instructions on page 6.)
For most efficient cooling, keep vent in closed position except when you want to exhaust air, smoke or odors from the room.
Don’t let the room get too hot or too cold. Whenever possible, turn the unit on before the room heats up or cools down.
Keep windows and doors closed. Conditioned air escapes when they’re open.
Keep furnace floor registers and cold air returns closed. Conditioned air can easily escape through them.
Don’t block front of unit when it is operating. Curtains or drapes blocking it will restrict air flow.
It’s best to operate your air conditioner at high speed during extremely hot or cold weather.
Keep outdoor condenser coil clean. (See page 6.)
Turn air conditioner off before vacations or extended absences from home.
Care and Cleaning
USER MAINTENANCE INSTRUCTIONS
Turn air conditioner off and remove the plug from the wall outlet before cleaning.
Grille & Cabinet
Wipe both sides of grille with a clean cloth lightly dampened with mild liquid dishwashing detergent, or clean with a vacuum cleaner brush. Be careful not to force the movable louvers out of position.
Other areas behind the grille may be wiped or vacuumed, taking care not to damage the coil fins.
wash cabinet with mild soap or detergent and lukewarm water. Never use strong chemicals, solvents or bleaching agents.
Condenser Colls
These coils on the weather side of the unit should be checked periodically and cleaned if clogged with dirt or soot from the atmosphere. If extremely soiled, they may need to be steam cleaned, a service available through your GE service outlet.
Air Filter
The air filter behind the front grille should be checked and cleaned at least every 30 days or as often as it needs cleaning.
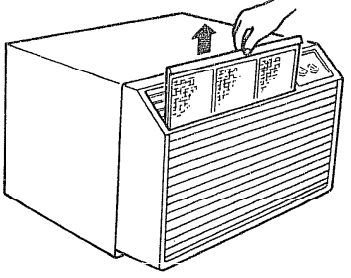
To remove the filter:
Grasp the tab at the air outlet on the front grille and pull it straight up.
Clean the filter with a vacuum cleaner to remove light dust. Wash the filter in lukewarm, soapy water and rinse in clear water to remove sticky dust.
When replacing the filter, be sure the word FRONT is facing you as you slide the filter back into place.
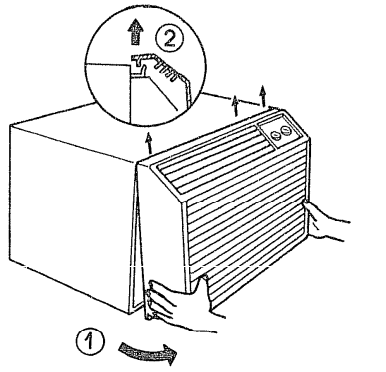
Front Grille Removal
The front grille can be removed for more thorough cleaning or to make the model and serial numbers accessible.
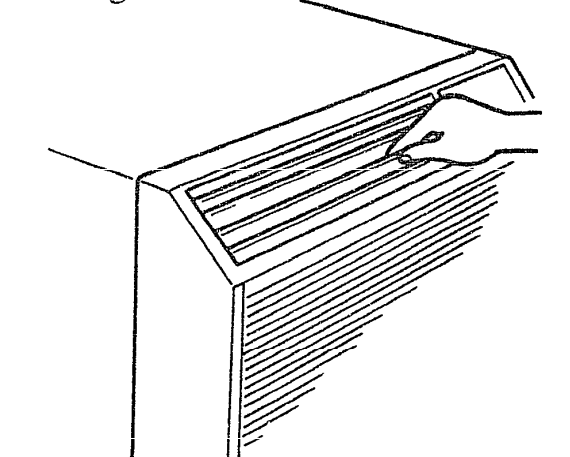
To remove the front grille
1. Grasp the bottom of the grille and swing it toward you about 4 inches.
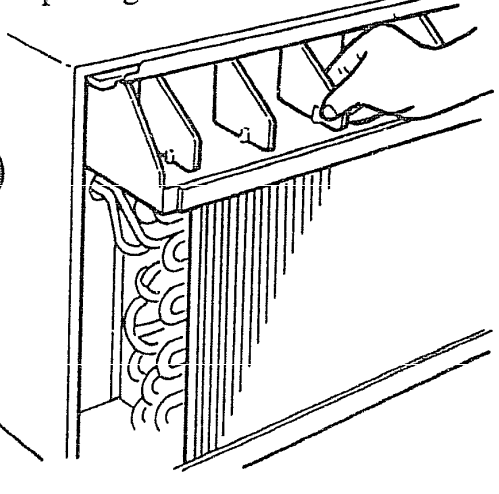
2. Slide the grille upward to free the three tabs at the top of the grille from slots in the top of the chassis.
To replace the grille, hook top of grille onto top of chassis and push bottom of grille in until it snaps into place.
Use This Problem Solver
PROBLEM
POSSIBLE CAUSE AND REMEDY
AIR CONDITIONER DOES NOT OPERATE
Not plugged in. Plug may have been bumped loose by vacuum cleaner or furniture.
If plugged in, fuse could have blown or circuit breaker may have been tripped.
AIR CONDITIONER “DOES NOT COOL AS IT SHOULD”
Curtains, blinds or furniture blocking front of air conditioner will restrict air flow.
Thermostat Control may not be set high or low enough. Also, when Fan Switch is at CYCLE, the temperature in the room will vary more than when it’s at CONTINUOUS. Turn knob to another number. Highest setting should provide maximum cooling.
Air filter dirty, should be cleaned at least every 30 days. See instructions on page 6.
Room may have been very hot when air conditioner was first turned on. Allow time for it to cool down.
Cold air may be escaping through open furnace floor registers and cold air returns, s Ventilation Control may be set at OPEN, allowing outside air to enter room,
Cooling coils have iced up. To melt ice, set the Fan at high speed and the Thermostats Control to a lower number.
OPERATING ' SOUNDS
Thermostat click, a metallic sound, may be heard when compressor cycles on and off. This is normal.
Fan cycles on and off with compressor when Fan Switch behind front grille is at CYCLE and Selector Switch is in cool or heat position. Otherwise, fan runs continuously when air conditioner is on
WATER DRIPPING OUTSIDE
Excess water may overflow in extremely hot and humid weather. This is normal.
WATER DRIPPING INSIDE
Air conditioner must be installed level or tilted slightly to the outside for proper water disposal.
WATER IN BASE PAN (ON OUTDOOR SIDE)
This is normal for a short period in areas with little humidity; normal for a longer period in very humid areas. Moisture removed from indoor air drains to rear of cabinet where it is picked up by a fan and thrown against the outdoor condenser coil.
Series: J Series Additionally, the document applies to other GE - General Electric models: AJ806L, AJ808L, AJ810L, AJX09D, AJA12D, AJX06L, AJX08A, AJM10A, AJM10D