
www.lg.com
*MFL70343402*
AAA
43UK63*
43UK62*
43UK60*
a
X 2
(M4 X L16)
X 4
(M4 X L16)
49/50/55UK63*
49/55UK62*
49/50/55UK60*
b
X 6
(M4 X L20)
65UK63*
60/65UK62*
60/65UK60*
43UK63*
43UK62*
43UK60*
49/50/55/65UK63*
49/55/60/65UK62*
49/50/55/60/65UK60*
ENGLISH
Easy Setup Guide
Please read this manual carefully before operating your set and retain it for future reference.
ESPAÑOL
GuíaRápidadeCon�guración
Lea atentamente este manual antes de poner en marcha el equipo y consérvelo para futuras
consultas.
FRANÇAIS
Guide de configuration rapide
Avant d’utiliser l’appareil, veuillez lire attentivement ce manuel et le conserver pour
pouvoir vous y reporter ultérieurement.
ENGLISH Read Safety and Reference.
ESPAÑOL Leer Seguridad y Consultas.
FRANÇAIS Lisez Sécurité et références.
(1901-REV04 )
Printed in Korea
43UK6300PUE 55UK6300BUB 65UK6200PUA
43UK6300BUB 65UK6300PUE 43UK6090PUA
49UK6300PUE 65UK6300BUB 49UK6090PUA
49UK6300BUB 43UK6200PUA 50UK6090PUA
50UK6300PUE 49UK6200PUA 55UK6090PUA
50UK6300BUB 55UK6200PUA 60UK6090PUA
55UK6300PUE 60UK6200PUA 65UK6090PUA

A
A
B
B
B
B
51 42 3
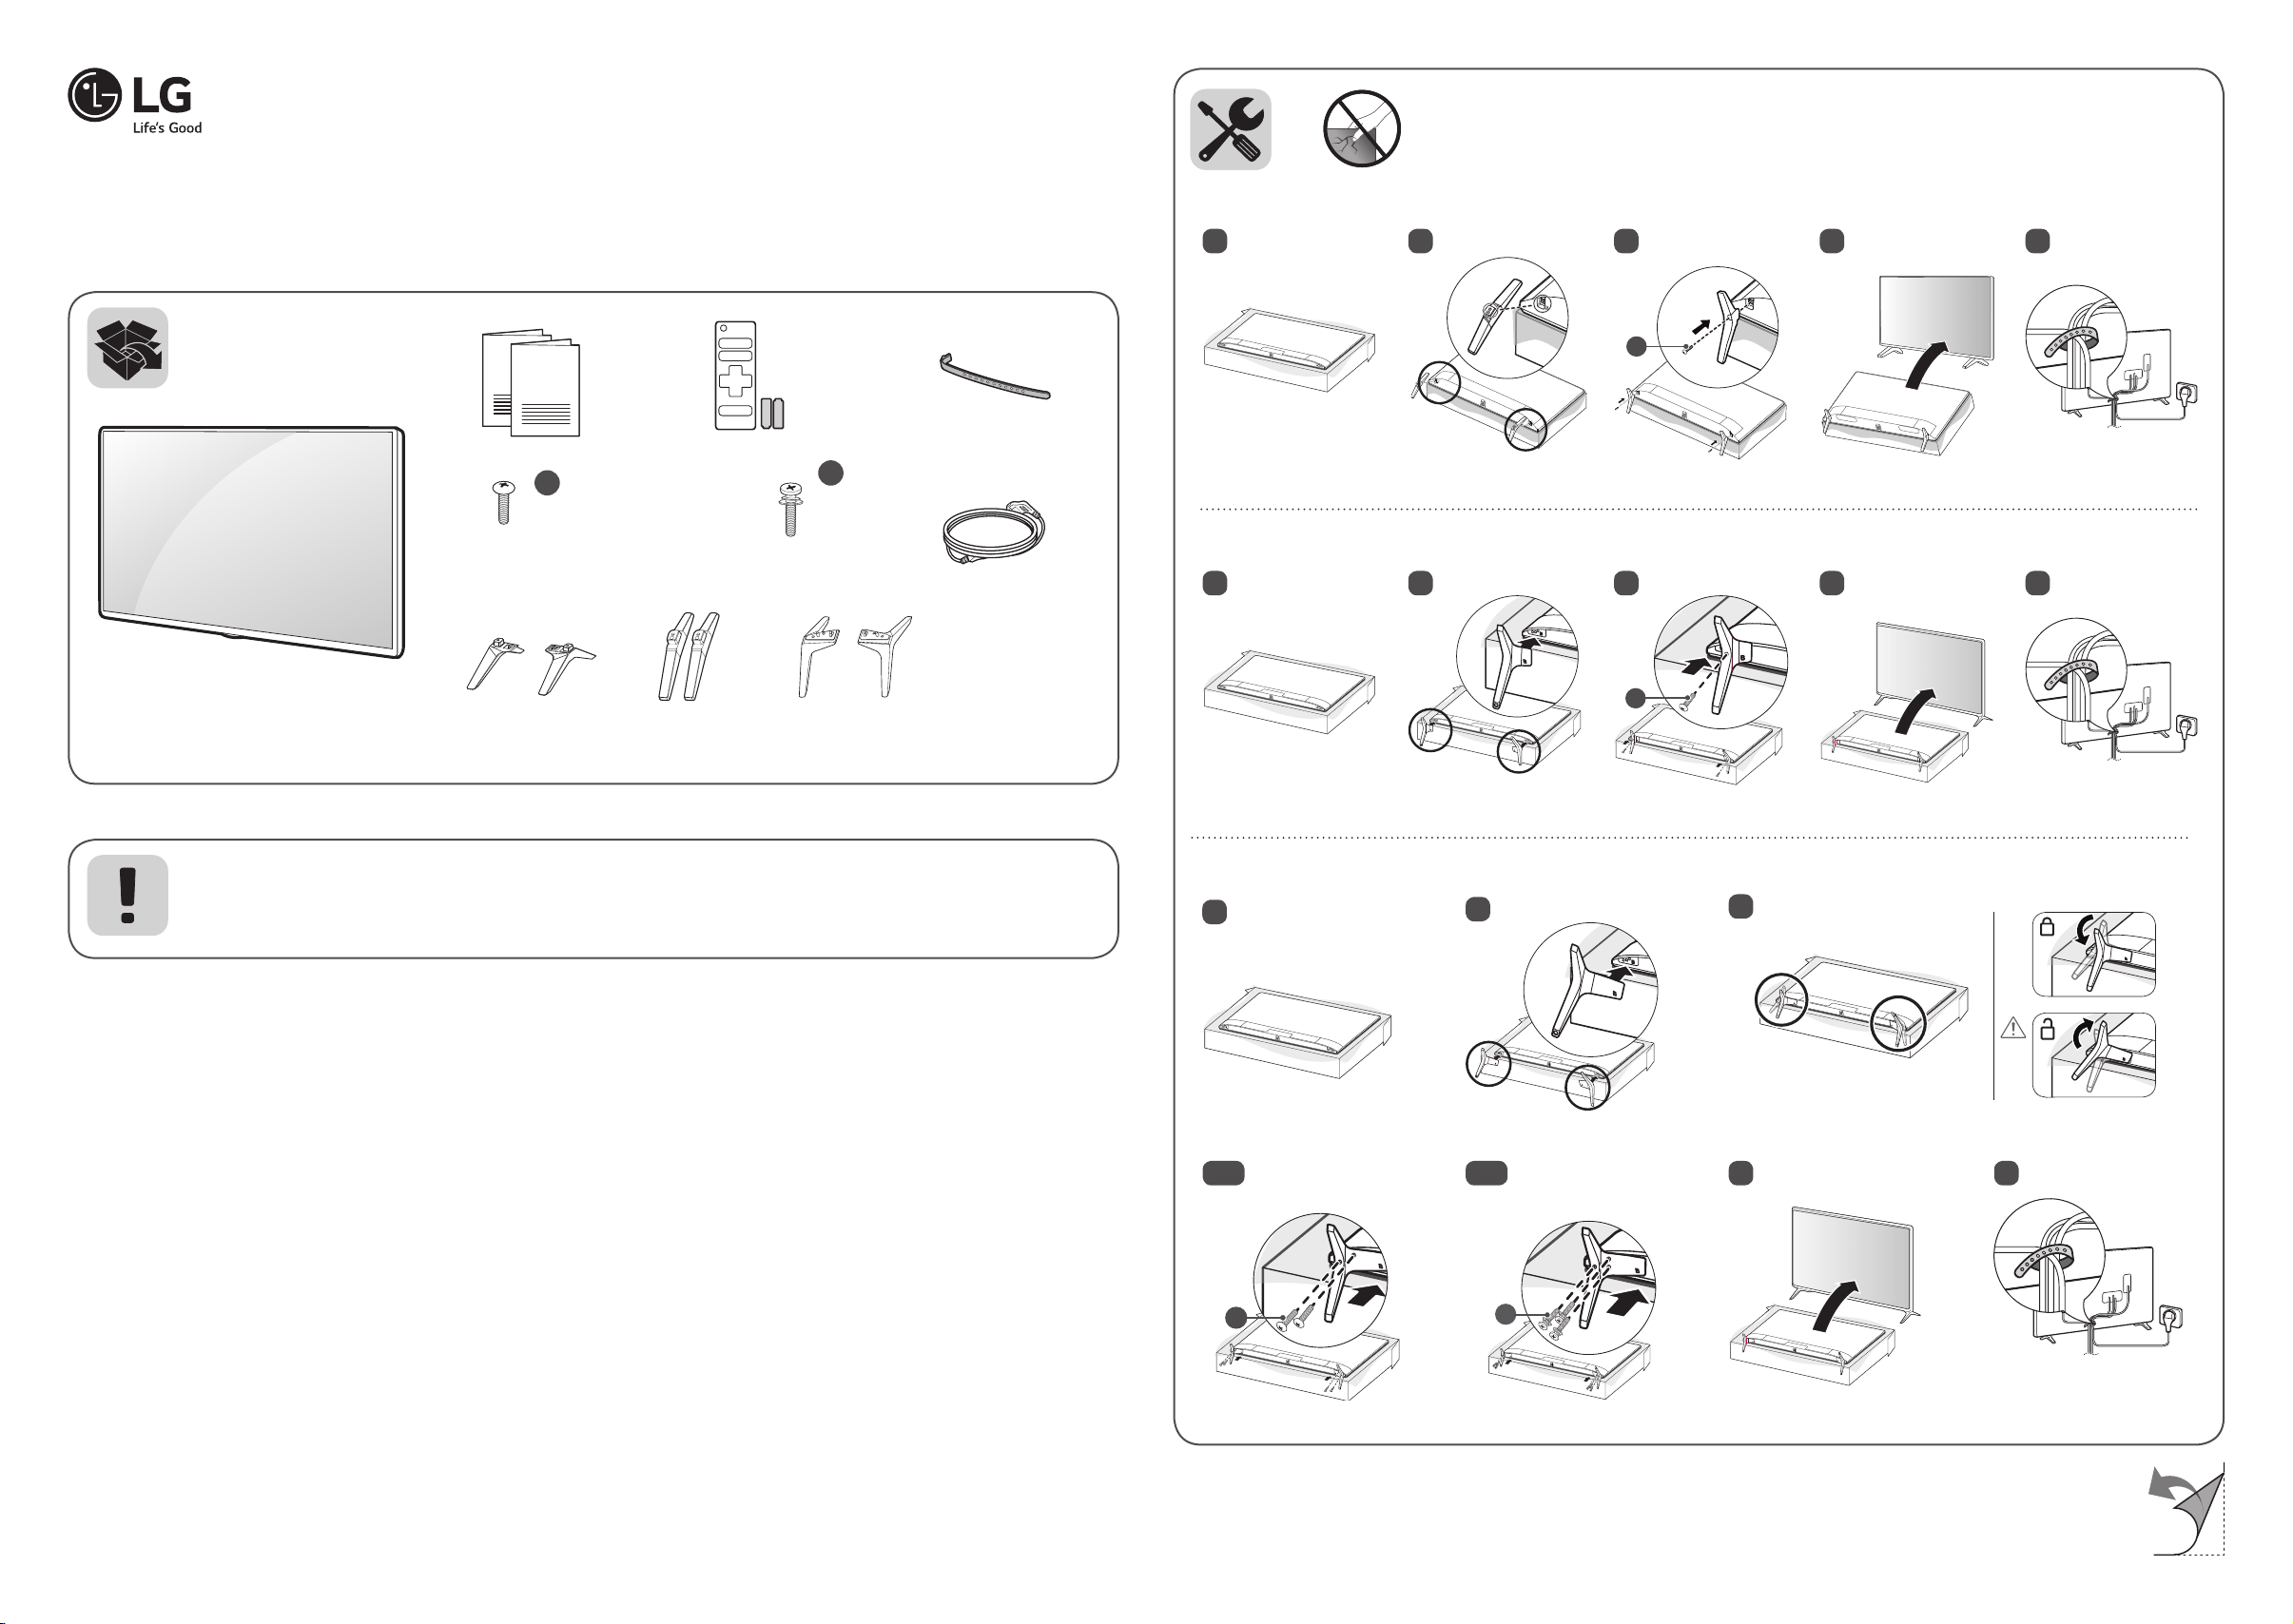
43UK62*, 43UK60*
A
B
51 42
B
A
B
A
B
3
A
a
1
2
B
A
B
A
B
43UK63*
49/50/55/65UK63*, 49/55/60/65UK62*, 49/50/55/60/65UK60*
3
A
B
B
B
4-A
B
A
B
a
49/50/55UK63*, 49/55UK62*
49/50/55UK60*
4-B
65UK63*, 60/65UK62*
60/65UK60*
B
A
B
b
65
B
A
a
VIDEO L/MONO AUDIO R
VIDEO/Y P
B
P
R
L/MONO AUDIO R
VIDEO/Y P
B
P
R
L/MONO AUDIO R
VIDEO AUDIO
ENGLISH
Easy TV Connect Guide (Animation)
ESPAÑOL
Guía Rápida de Conexión del
televisor
(Sólo en Inglés)
FRANÇAIS
Guidesimpli�épourlaconnexion
du téléviseur
(Offert en anglais seulement)
www.lg.com/us/support
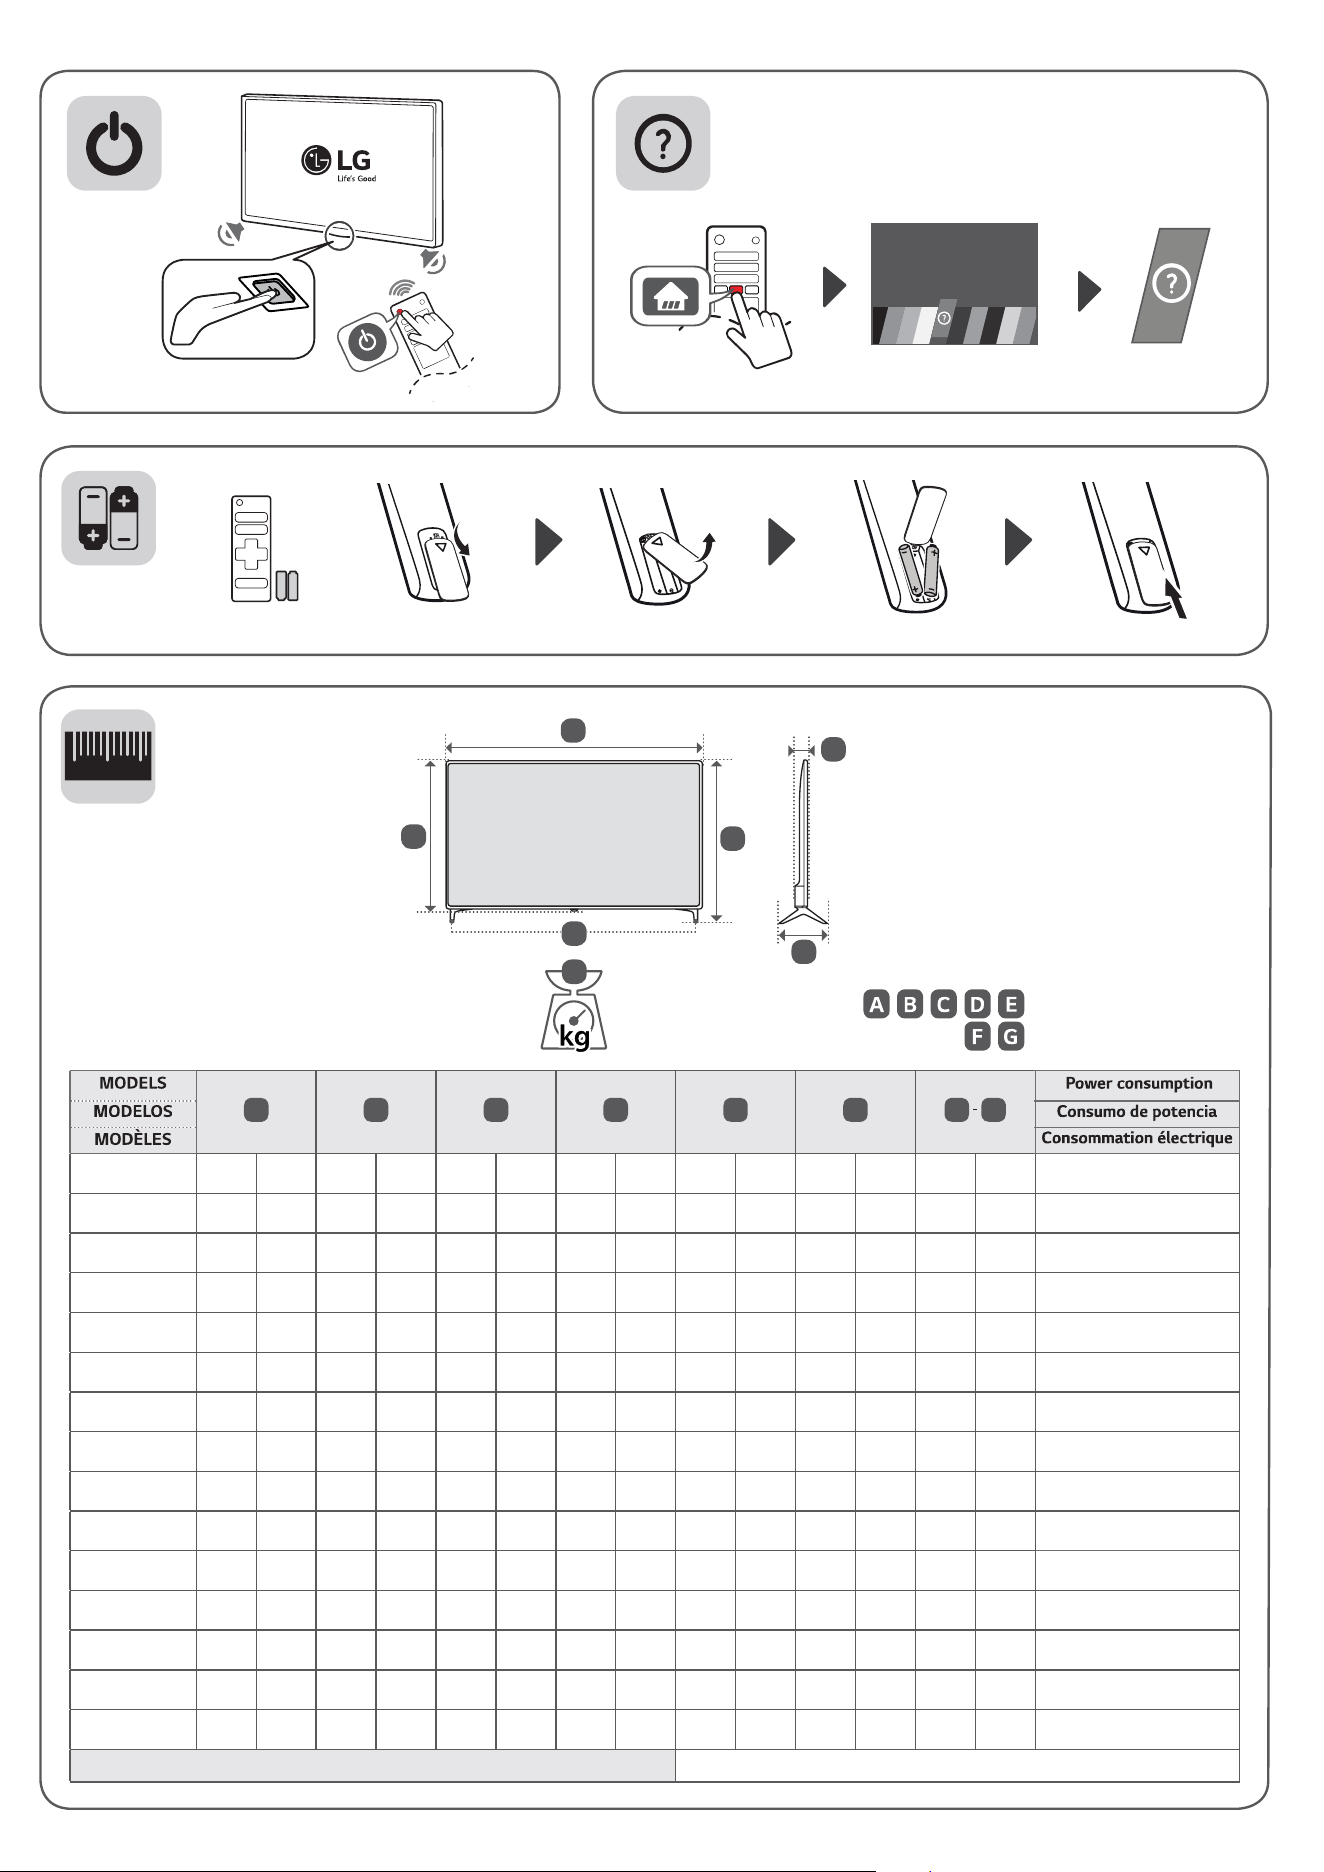
1
2
0
A
B C D E F F
G
43UK6300PUE
43UK6300BUB
977
(38.4)
977
(38,4)
629
(24.7)
629
(24,7)
216
(8.5)
216
(8,5)
575
(22.6)
575
(22,6)
80.8
(3.1)
80,8
(3,1)
8.4
(18.5)
8,4
(18,5)
8.3
(18.2)
8,3
(18,2)
95 W
49UK6300PUE
49UK6300BUB
1,110
(43.7)
1 110
(43,7)
709
(27.9)
709
(27,9)
231
(9)
231
(9)
650
(25.5)
650
(25,5)
81.1
(3.1)
81,1
(3,1)
11.3
(24.9)
11,3
(24,9)
11.1
(24.4)
11,1
(24,4)
120 W
50UK6300PUE
50UK6300BUB
1,133
(44.6)
1 133
(44,6)
723
(28.4)
723
(28,4)
231
(9)
231
(9)
663
(26.1)
663
(26,1)
87.9
(3.4)
87,9
(3,4)
10.8
(23.8)
10,8
(23,8)
10.6
(23.3)
10,6
(23,3)
130 W
55UK6300PUE
55UK6300BUB
1,247
(49)
1 247
(49)
785
(30.9)
785
(30,9)
231
(9)
231
(9)
729
(28.7)
729
(28,7)
88.6
(3.4)
88,6
(3,4)
13.9
(30.6)
13,9
(30,6)
13.7
(30.2)
13,7
(30,2)
135 W
65UK6300PUE
65UK6300BUB
1,468
(57.7)
1 468
(57,7)
917
(36.1)
917
(36,1)
269
(10.5)
269
(10,5)
854
(33.6)
854
(33,6)
89.9
(3.5)
89,9
(3,5)
21.4
(47.1)
21,4
(47,1)
21.0
(46.2)
21,0
(46,2)
190 W
43UK6200PUA
975
(38.3)
975
(38,3)
615
(24.2)
615
(24,2)
188
(7.4)
188
(7,4)
574
(22.5)
574
(22,5)
80.3
(3.1)
80,3
(3,1)
8.4
(18.5)
8,4
(18,5)
8.3
(18.2)
8,3
(18,2)
95 W
49UK6200PUA
1,108
(43.6)
1 108
(43,6)
705
(27.7)
705
(27,7)
235
(9.2)
235
(9,2)
649
(25.5)
649
(25,5)
79.5
(3.1)
79,5
(3,1)
11.0
(24.2)
11,0
(24,2)
10.9
(24)
10,9
(24)
120 W
55UK6200PUA
1,247
(49)
1 247
(49)
783
(30.8)
783
(30,8)
235
(9.2)
235
(9,2)
728
(28.6)
728
(28,6)
88.3
(3.4)
88,3
(3,4)
13.3
(29.3)
13,3
(29,3)
13.2
(29.1)
13,2
(29,1)
135 W
60UK6200PUA
60UK6090PUA
1,368
(53.8)
1 368
(53,8)
857
(33.7)
857
(33,7)
255
(10)
255
(10)
796
(31.3)
796
(31,3)
89.1
(3.5)
89,1
(3,5)
19.6
(43.2)
19,6
(43,2)
19.4
(42.7)
19,4
(42,7)
205 W
65UK6200PUA
1,468
(57.7)
1 468
(57,7)
913
(35.9)
913
(35,9)
255
(10)
255
(10)
854
(33.6)
854
(33,6)
89.9
(3.5)
89,9
(3,5)
21.2
(46.7)
21,2
(46,7)
21.0
(46.2)
21,0
(46,2)
165 W
43UK6090PUA
977
(38.4)
977
(38,4)
615
(24.2)
615
(24,2)
187
(7.3)
187
(7,3)
575
(22.6)
575
(22,6)
80.8
(3.1)
80,8
(3,1)
8.4
(18.5)
8,4
(18,5)
8.3
(18.2)
8,3
(18,2)
95 W
49UK6090PUA
1,110
(43.7)
1 110
(43,7)
705
(27.7)
705
(27,7)
235
(9.2)
235
(9,2)
650
(25.5)
650
(25,5)
81.1
(3.1)
81,1
(3,1)
11.3
(24.9)
11,3
(24,9)
11.1
(24.4)
11,1
(24,4)
120 W
50UK6090PUA
1,133
(44.6)
1 133
(44,6)
716
(28.1)
716
(28,1)
235
(9.2)
235
(9,2)
663
(26.1)
663
(26,1)
87.9
(3.4)
87,9
(3,4)
10.8
(23.8)
10,8
(23,8)
10.7
(23.5)
10,7
(23,5)
130 W
55UK6090PUA
1,247
(49)
1 247
(49)
780
(30.7)
780
(30,7)
235
(9.2)
235
(9,2)
729
(28.7)
729
(28,7)
88.6
(3.4)
88,6
(3,4)
13.8
(30.4)
13,8
(30,4)
13.7
(30.2)
13,7
(30,2)
135 W
65UK6090PUA
1,468
(57.7)
1 468
(57,7)
913
(35.9)
913
(35,9)
255
(10)
255
(10)
854
(33.6)
854
(33,6)
89.9
(3.5)
89,9
(3,5)
21.2
(46.7)
21,2
(46,7)
21.0
(46.2)
21,0
(46,2)
190 W
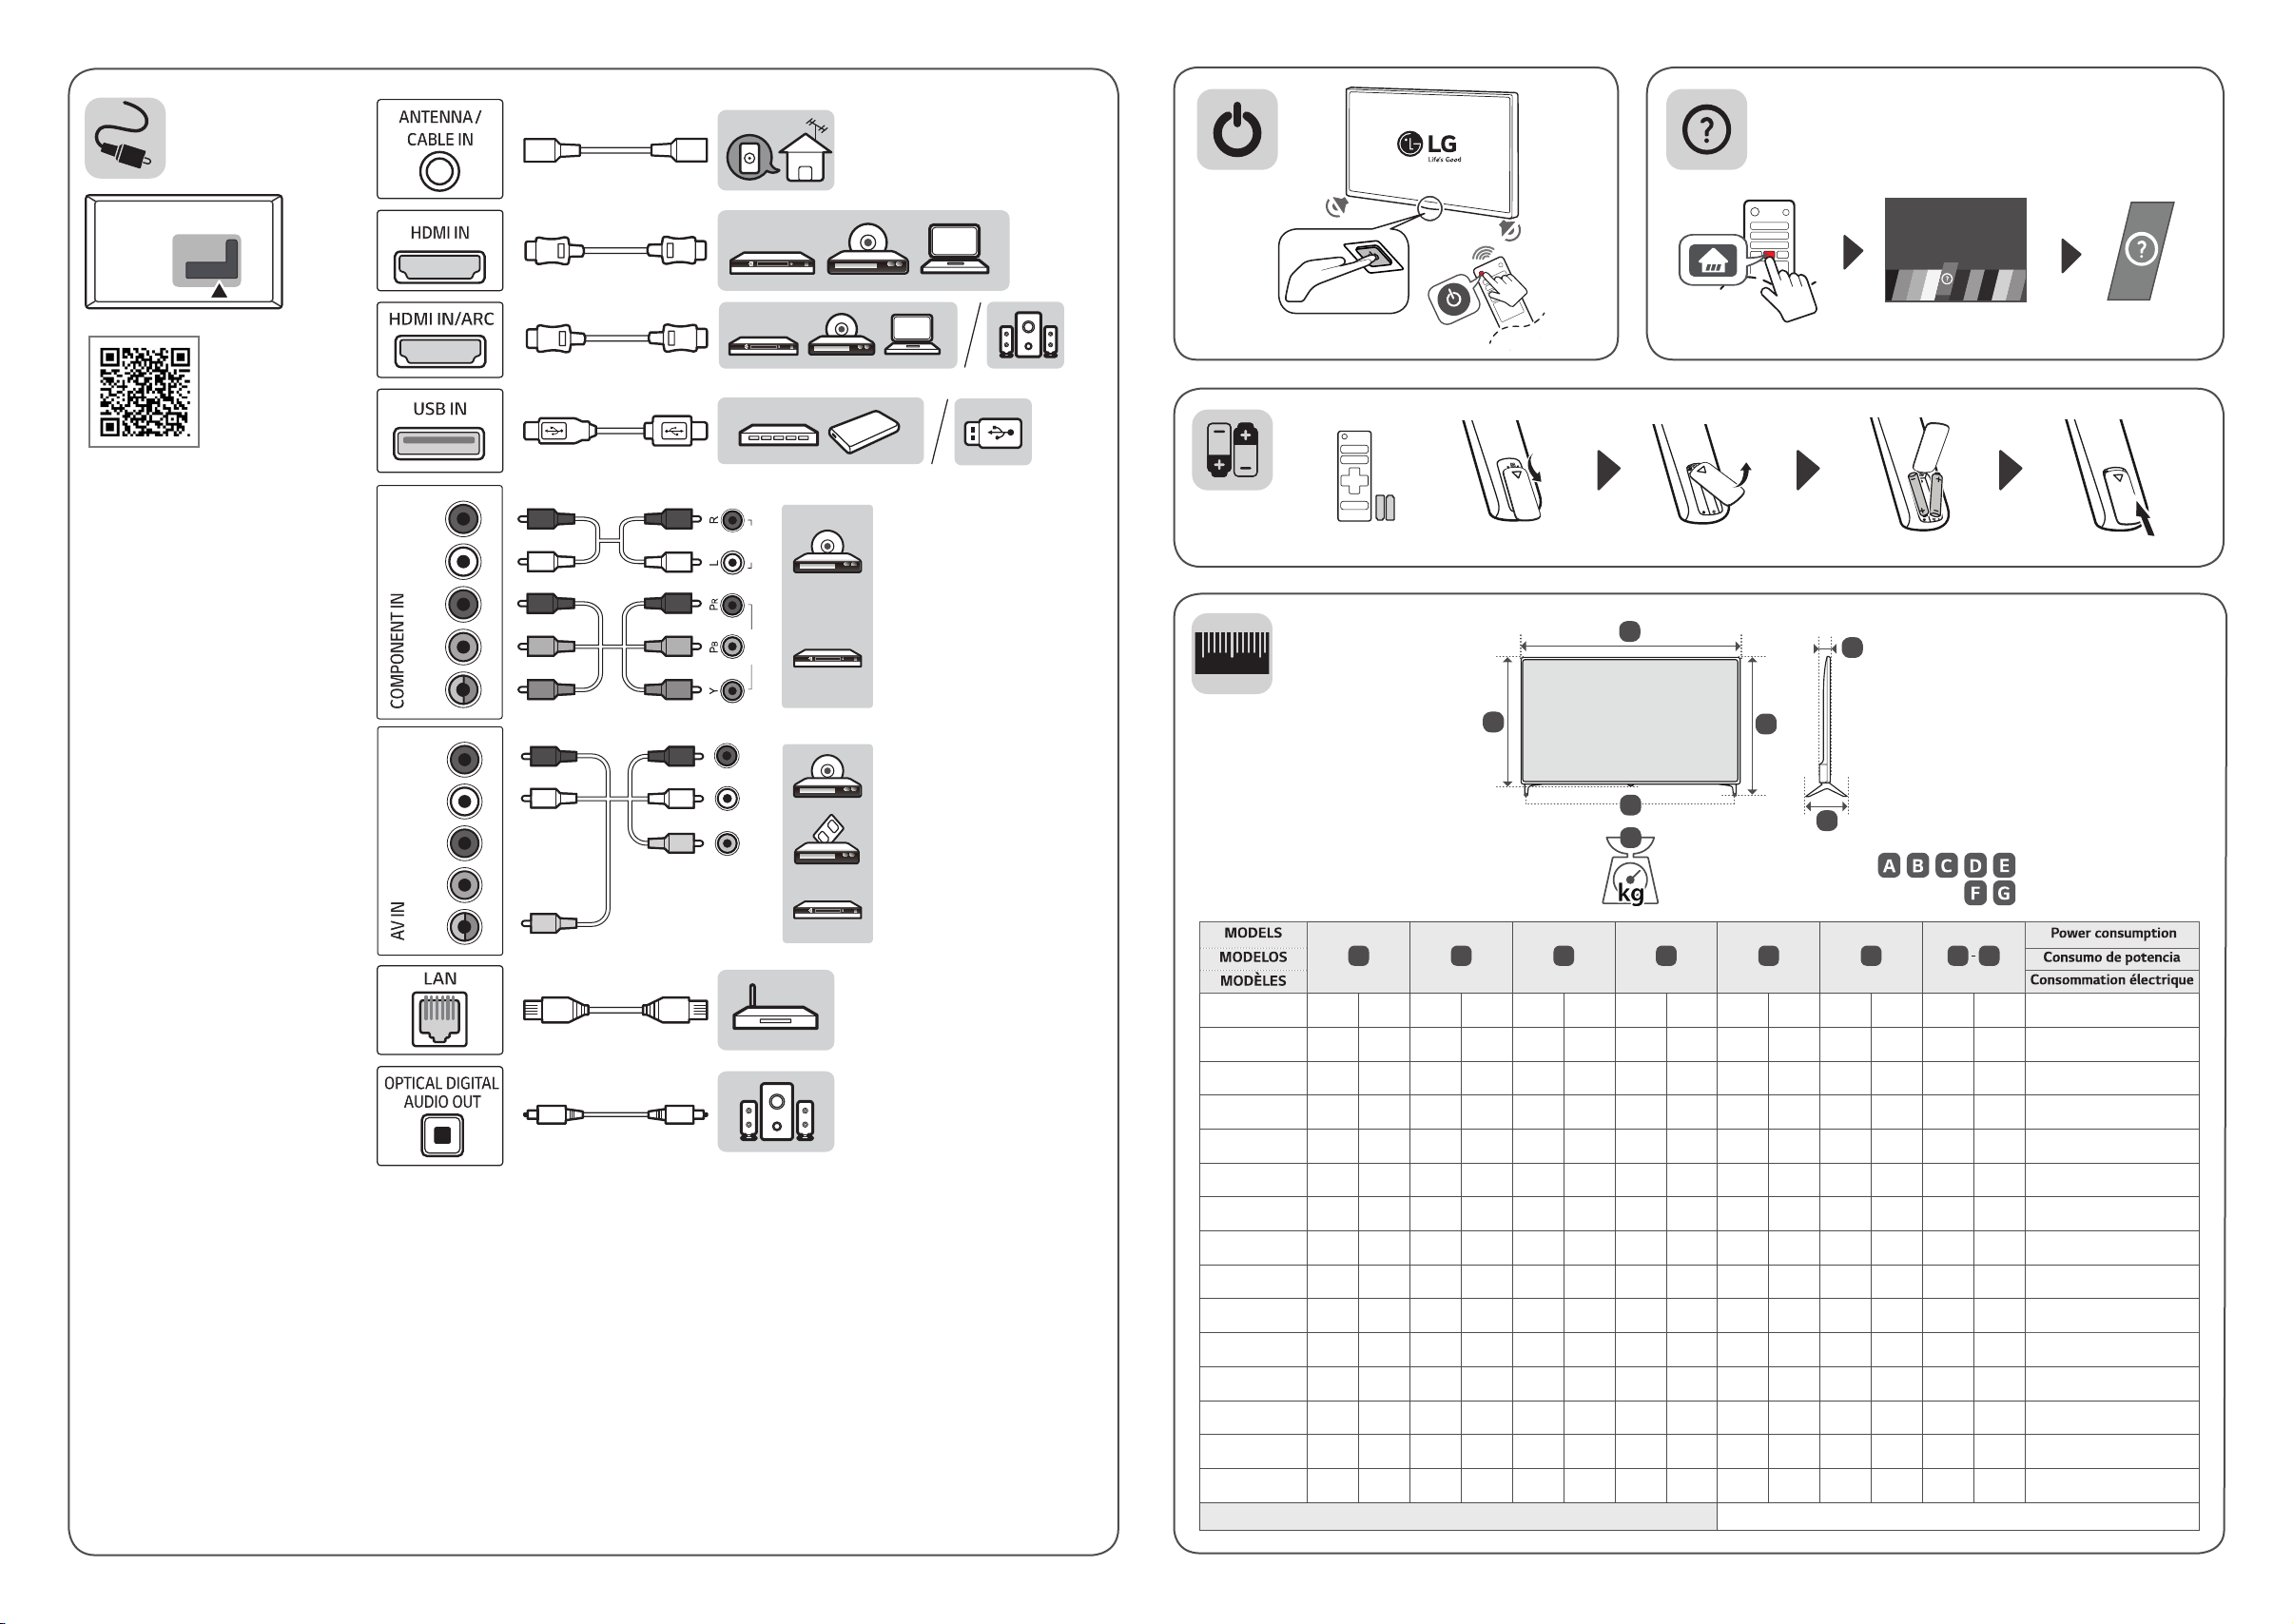
Power requirement / Alimentación requerida / Alimentation
AC 100-240 V ~ 50 / 60 Hz
D
B
E
C
A
F
G
, , , ,
: mm (inches / pulgadas / po)
,
: kg (lbs / libras / lb)
Please read this manual carefully before operating your TV and
retain it for future reference.
Safety and Reference
OWNER’S MANUAL
LED TV*
* LG LED TV applies LCD screen with LED backlights.
www.lg.com
Copyright
ⓒ
2018 LG Electronics Inc. All Rights Reserved.
*MFL70340102*
(1807-REV04)
Printed in Korea
65SK9500PUA
55SK9500PUA
65SK9550PUA
65SK9000PUA
55SK9000PUA
65SK8550PUA
55SK8550PUA
75SK8070PUA
75SK8050PUA
75SK8070AUB
65SK8000AUB
55SK8000AUB
65SK8000PUA
55SK8000PUA
49SK8000PUA
65SK8050PUA
55SK8050PUA
49SK8050PUA
65UK7700AUB
65UK7700PUD
55UK7700AUB
55UK7700PUD
49UK7700AUB
49UK7700PUD
65UK7500PUA
55UK7500PUA
49UK7500PUA
86UK6570PUB
75UK6570PUB
75UK6570PUA
86UK6570AUA
75UK6570AUA
70UK6570PUB
70UK6550PUA
70UK6570AUB
65UK6500AUA
55UK6500AUA
50UK6500AUA
43UK6500AUA
65UK6550PUB
55UK6550PUB
50UK6550PUB
43UK6550PUB
65UK6300PUE
55UK6300PUE
50UK6300PUE
49UK6300PUE
43UK6300PUE
65UK6300BUB
65UK6350PUC
55UK6300BUB
55UK6350PUC
50UK6300BUB
49UK6300BUB
49UK6350PUC
43UK6300BUB
75UK6270PUB
65UK6200PUA
43UK6350PUC
60UK6200PUA
60UK6250PUB
55UK6200PUA
55UK6250PUB
49UK6200PUA
49UK6250PUB
43UK6200PUA
43UK6250PUB
32LK610BPUA
49LK5750PUA
43LK5750PUA
86UK6570PUA
32LK610BBUA
49LK5700PUA
49LK5700BUA
43LK5700PUA
43LK5700BUA
50UK6350PUC
75UK6190PUB
70UK6190PUB
65UK6090PUA
60UK6090PUA
55UK6090PUA
50UK6090PUA
49UK6090PUA
43UK6090PUA
86UK7570PUB
2
ENGLISH
Important Safety Instruction
ENGLISH
3
Warning! Safety Instructions
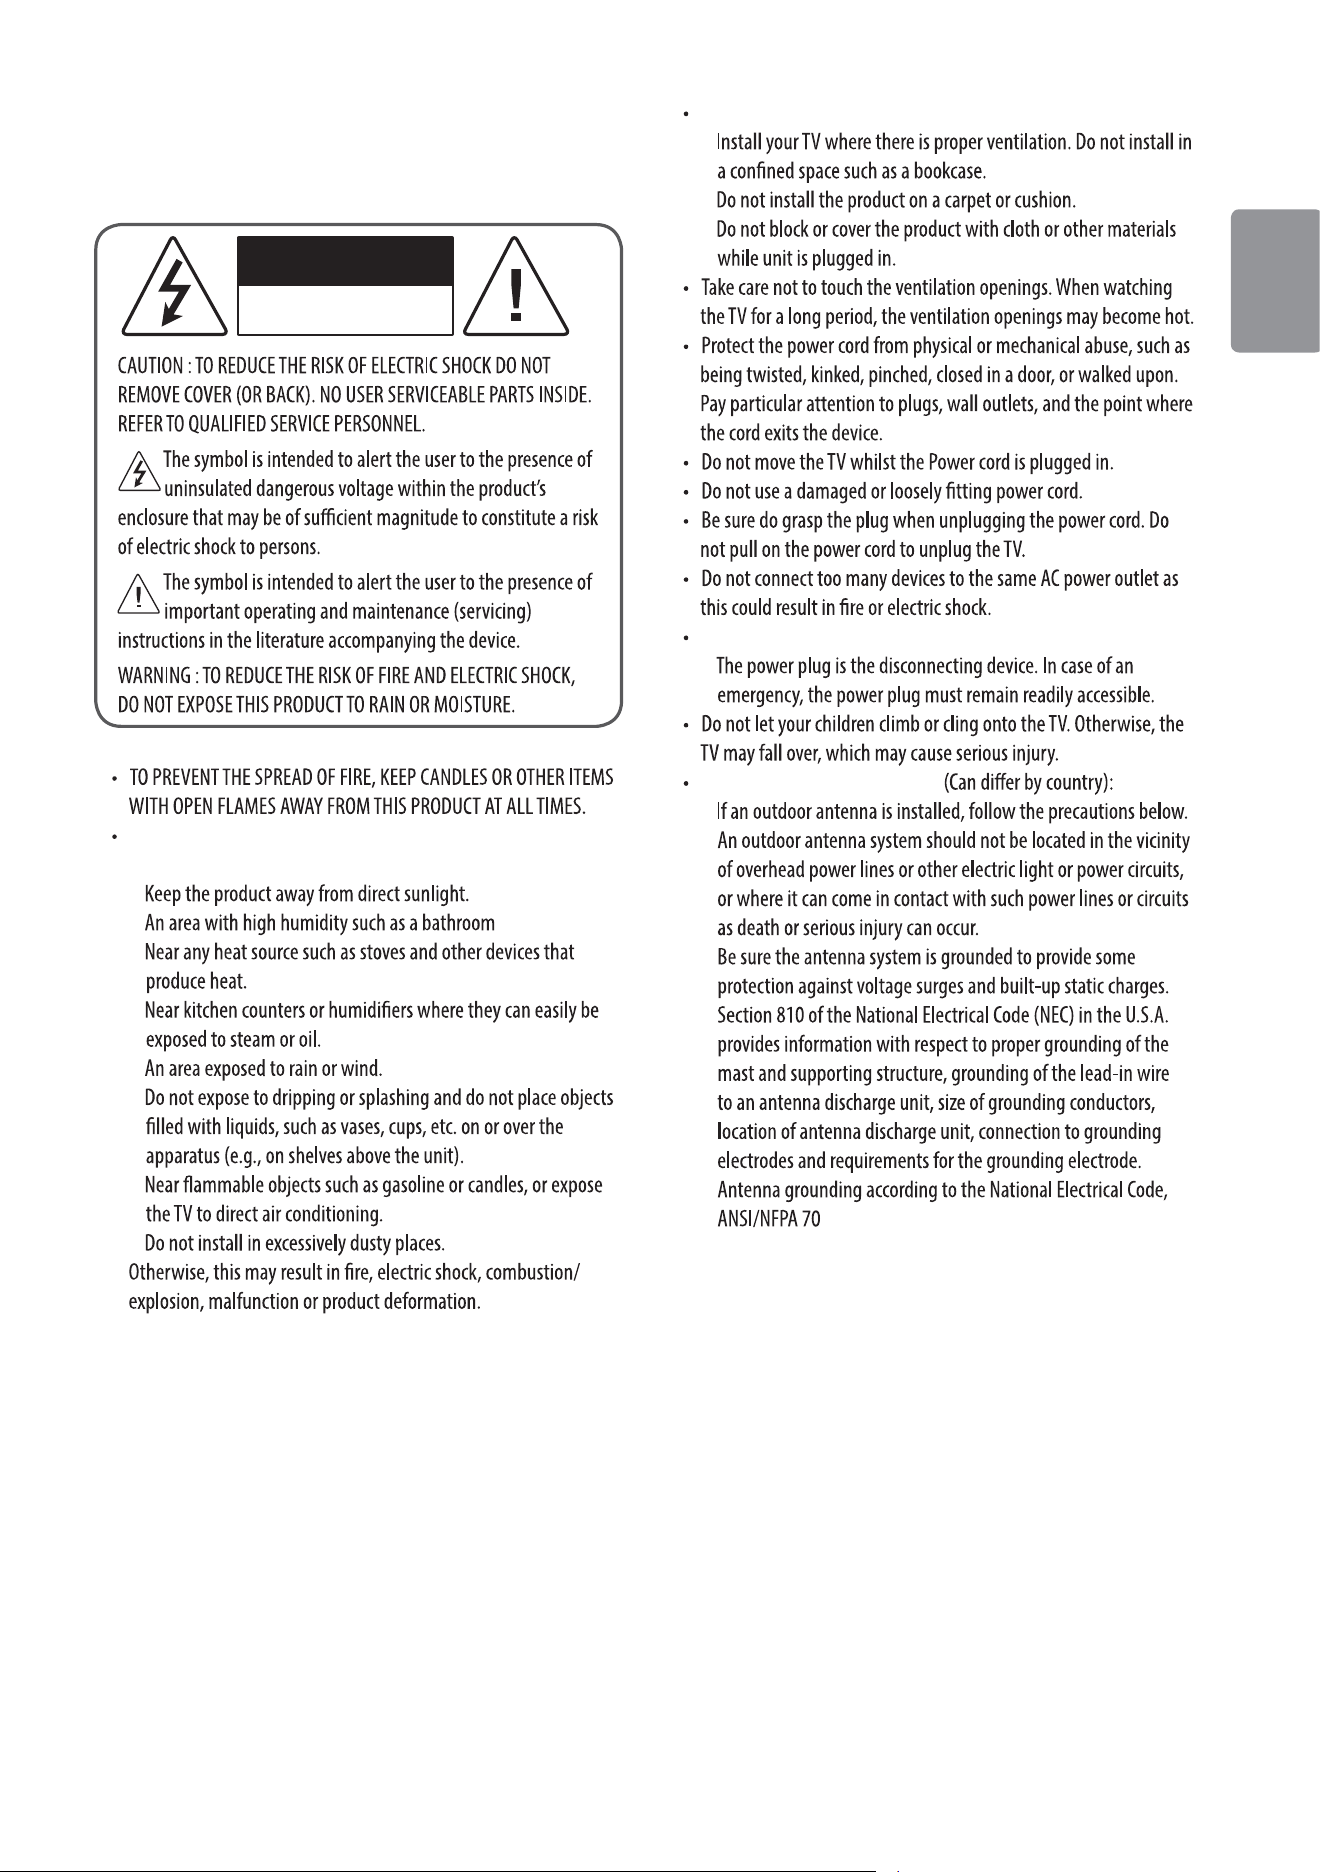
CAUTION
RISK OF ELECTRIC SHOCK
DO NOT OPEN
Do not place the TV and/or remote control in the following
environments:
-
-
-
-
-
-
-
-
Ventilation
-
-
-
Disconnecting the Device from the Main Power
-
Outdoor Antenna Grounding
-
4
ENGLISH
Grounding
-
If any of the following occur, unplug the product
immediately and contact your local customer service.
-
-
-
-
Batteries
-
-
Moving
-
Cleaning
-
ENGLISH
5
Preparing
-
-
A
B
A
B
<
=
<
=
-
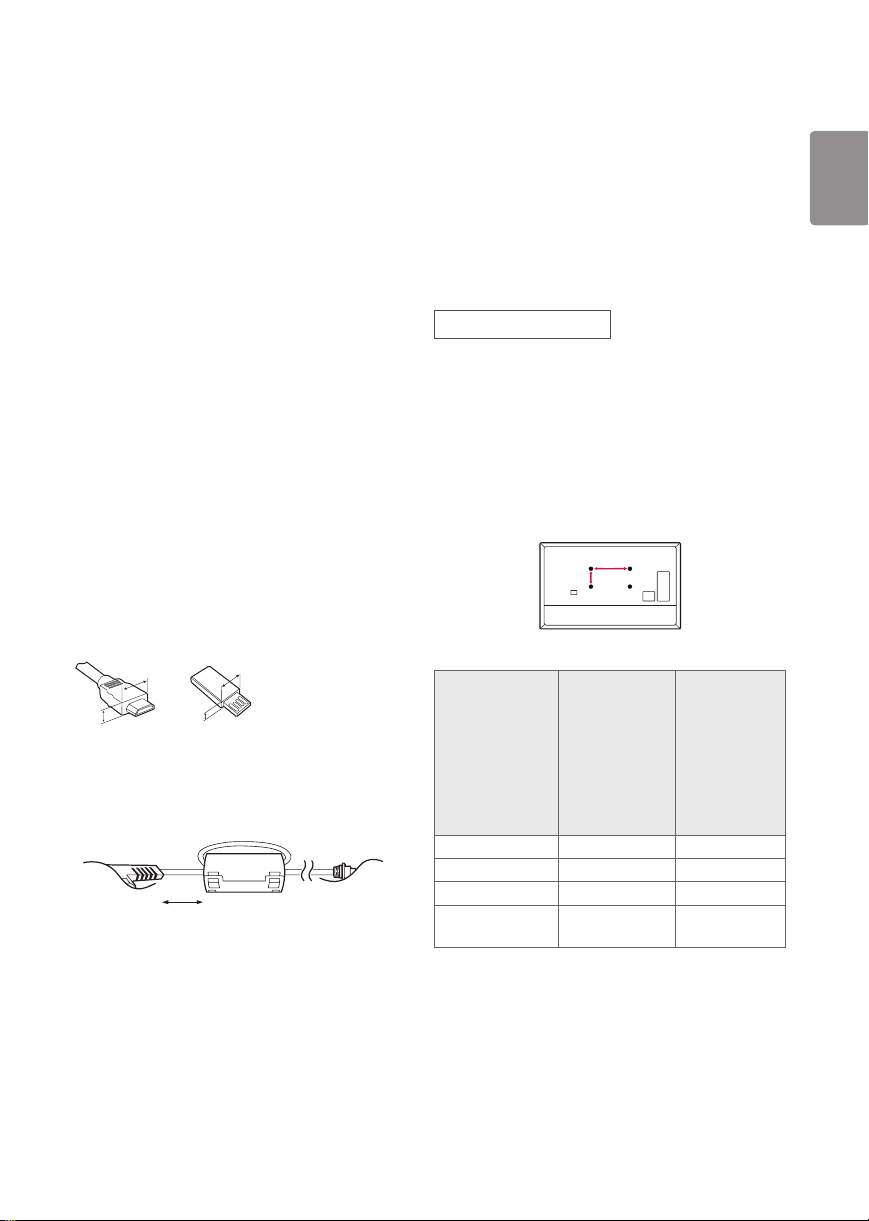
Optional Extras
Magic Remote Control
AN-MR18BA
Wall Mounting Bracket
A
B
Model
49SK80*
49UK77*
49UK75*
43/50UK65*
43/50UK63*
43UK62*
32LK61*
43LK57*
43/50UK60*
55SK80*
55UK77*
55UK75*
55UK65*
49/55UK63*
49/55UK62*
49LK57*
49/55UK60*
VESA (A x B) (mm)
Standard screw
Number of screws
Wall mount bracket
(optional)

6
ENGLISH
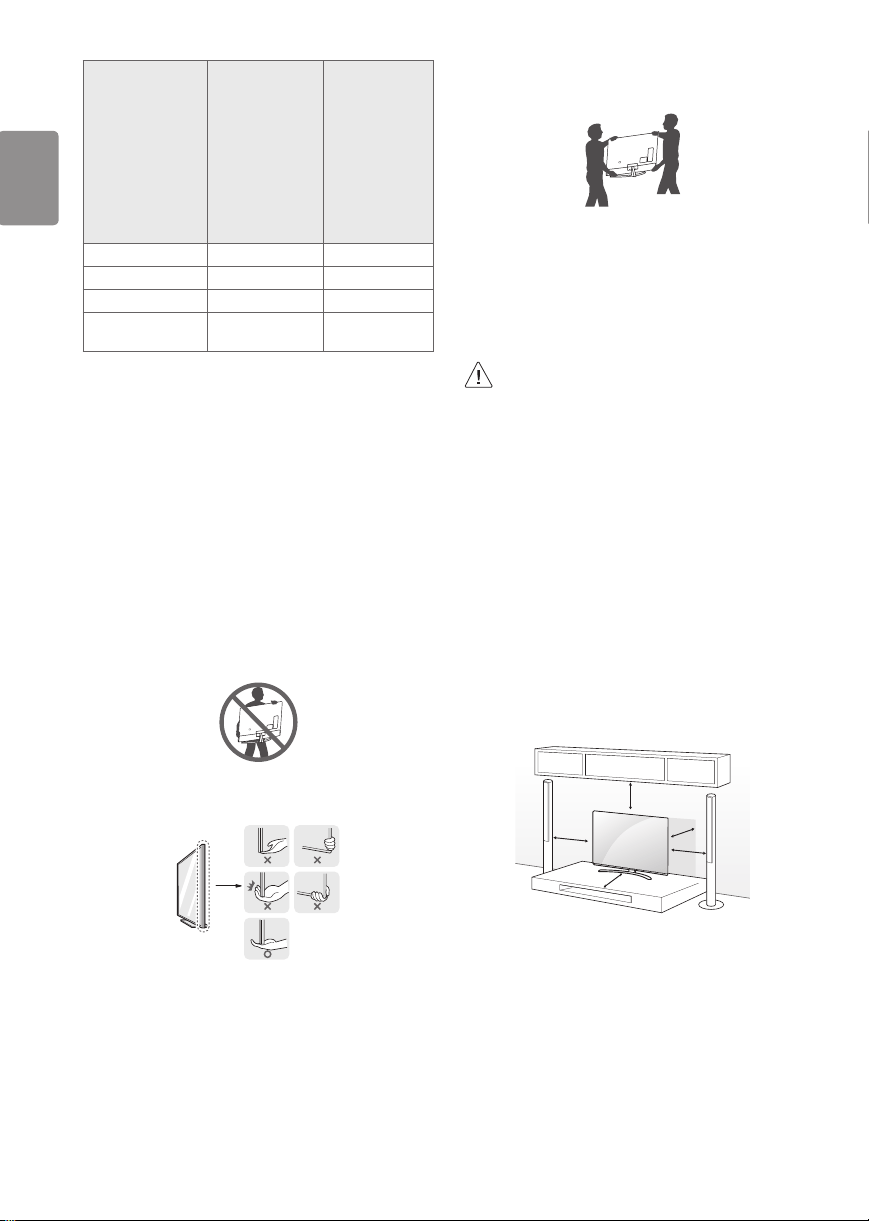
Model
55/65SK95*
55/65SK90*
55/65SK85*
65SK80*
65UK77*
65UK75*
65UK65*
65UK63*
60/65UK62*
60/65UK60*
75SK80*
70/75/86UK65*
75UK62*
70/75UK61*
86UK75*
VESA (A x B) (mm)
Standard screw
Number of screws
Wall mount bracket
(optional)
Lifting and moving the TV
Mounting on the Table
ENGLISH
7
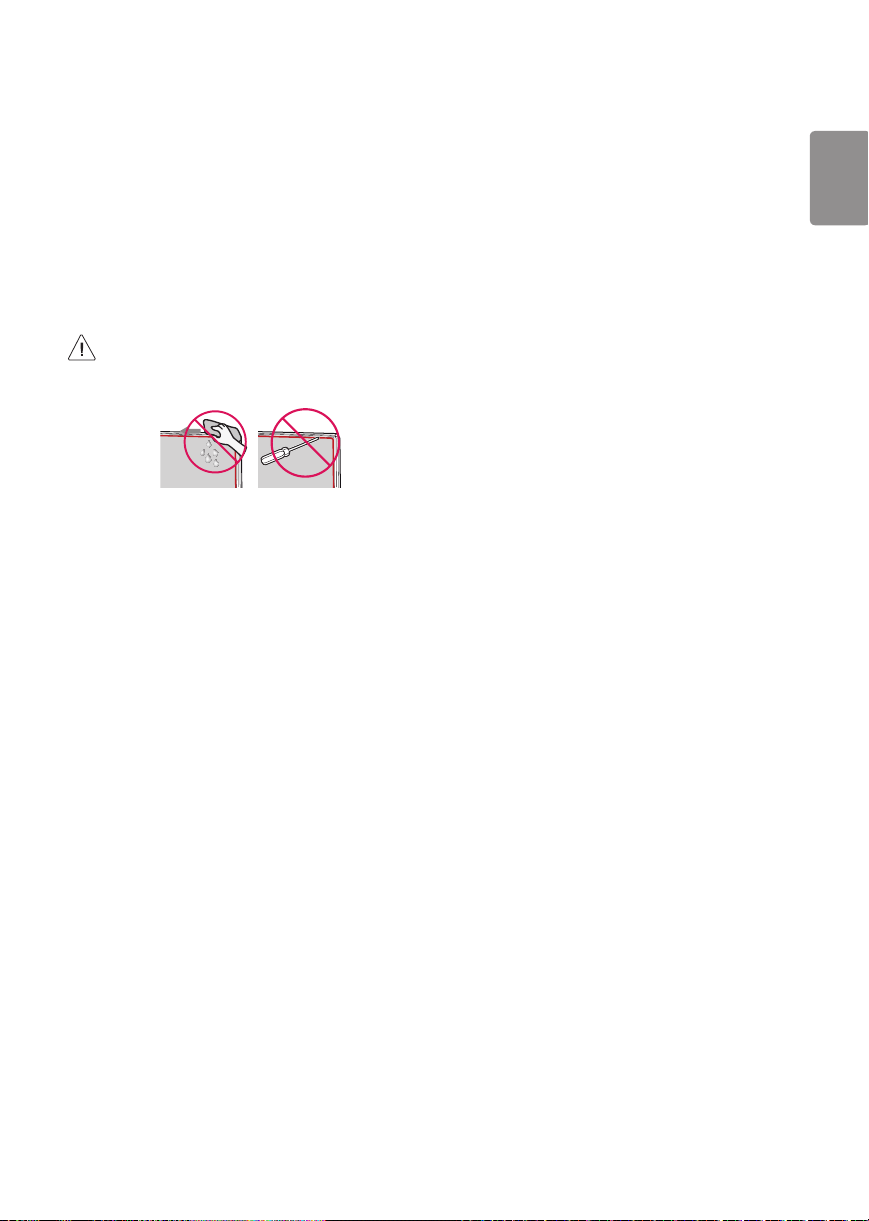
Securing TV to the Wall
Mounting to the Wall

8
ENGLISH
Connections
Antenna/Cable
Other connections
HDMI
ENGLISH
9
( ) Picture Additional Settings
HDMI ULTRA HD Deep Color
-
-
HDMI ULTRA HD Deep Color
-
External Devices
Remote RS-232C setup
www.lg.com
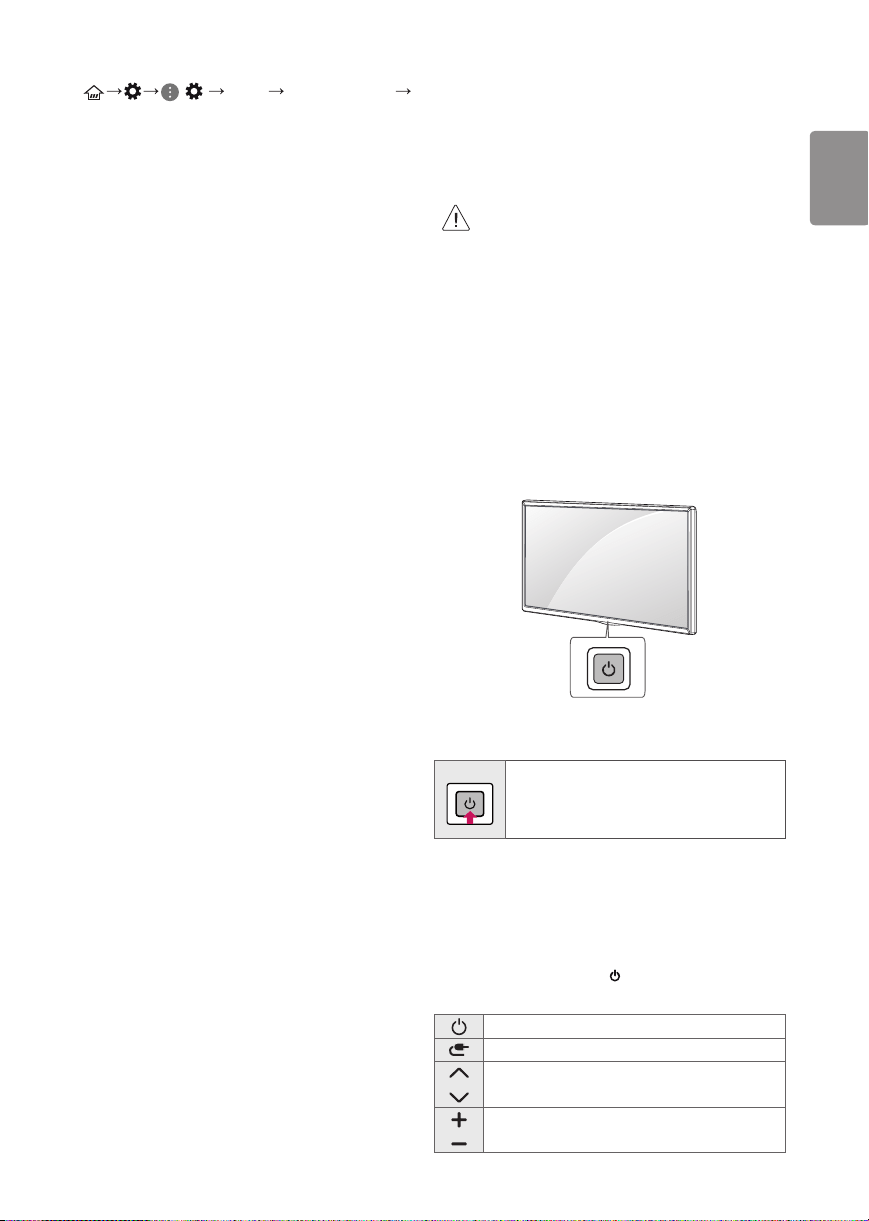
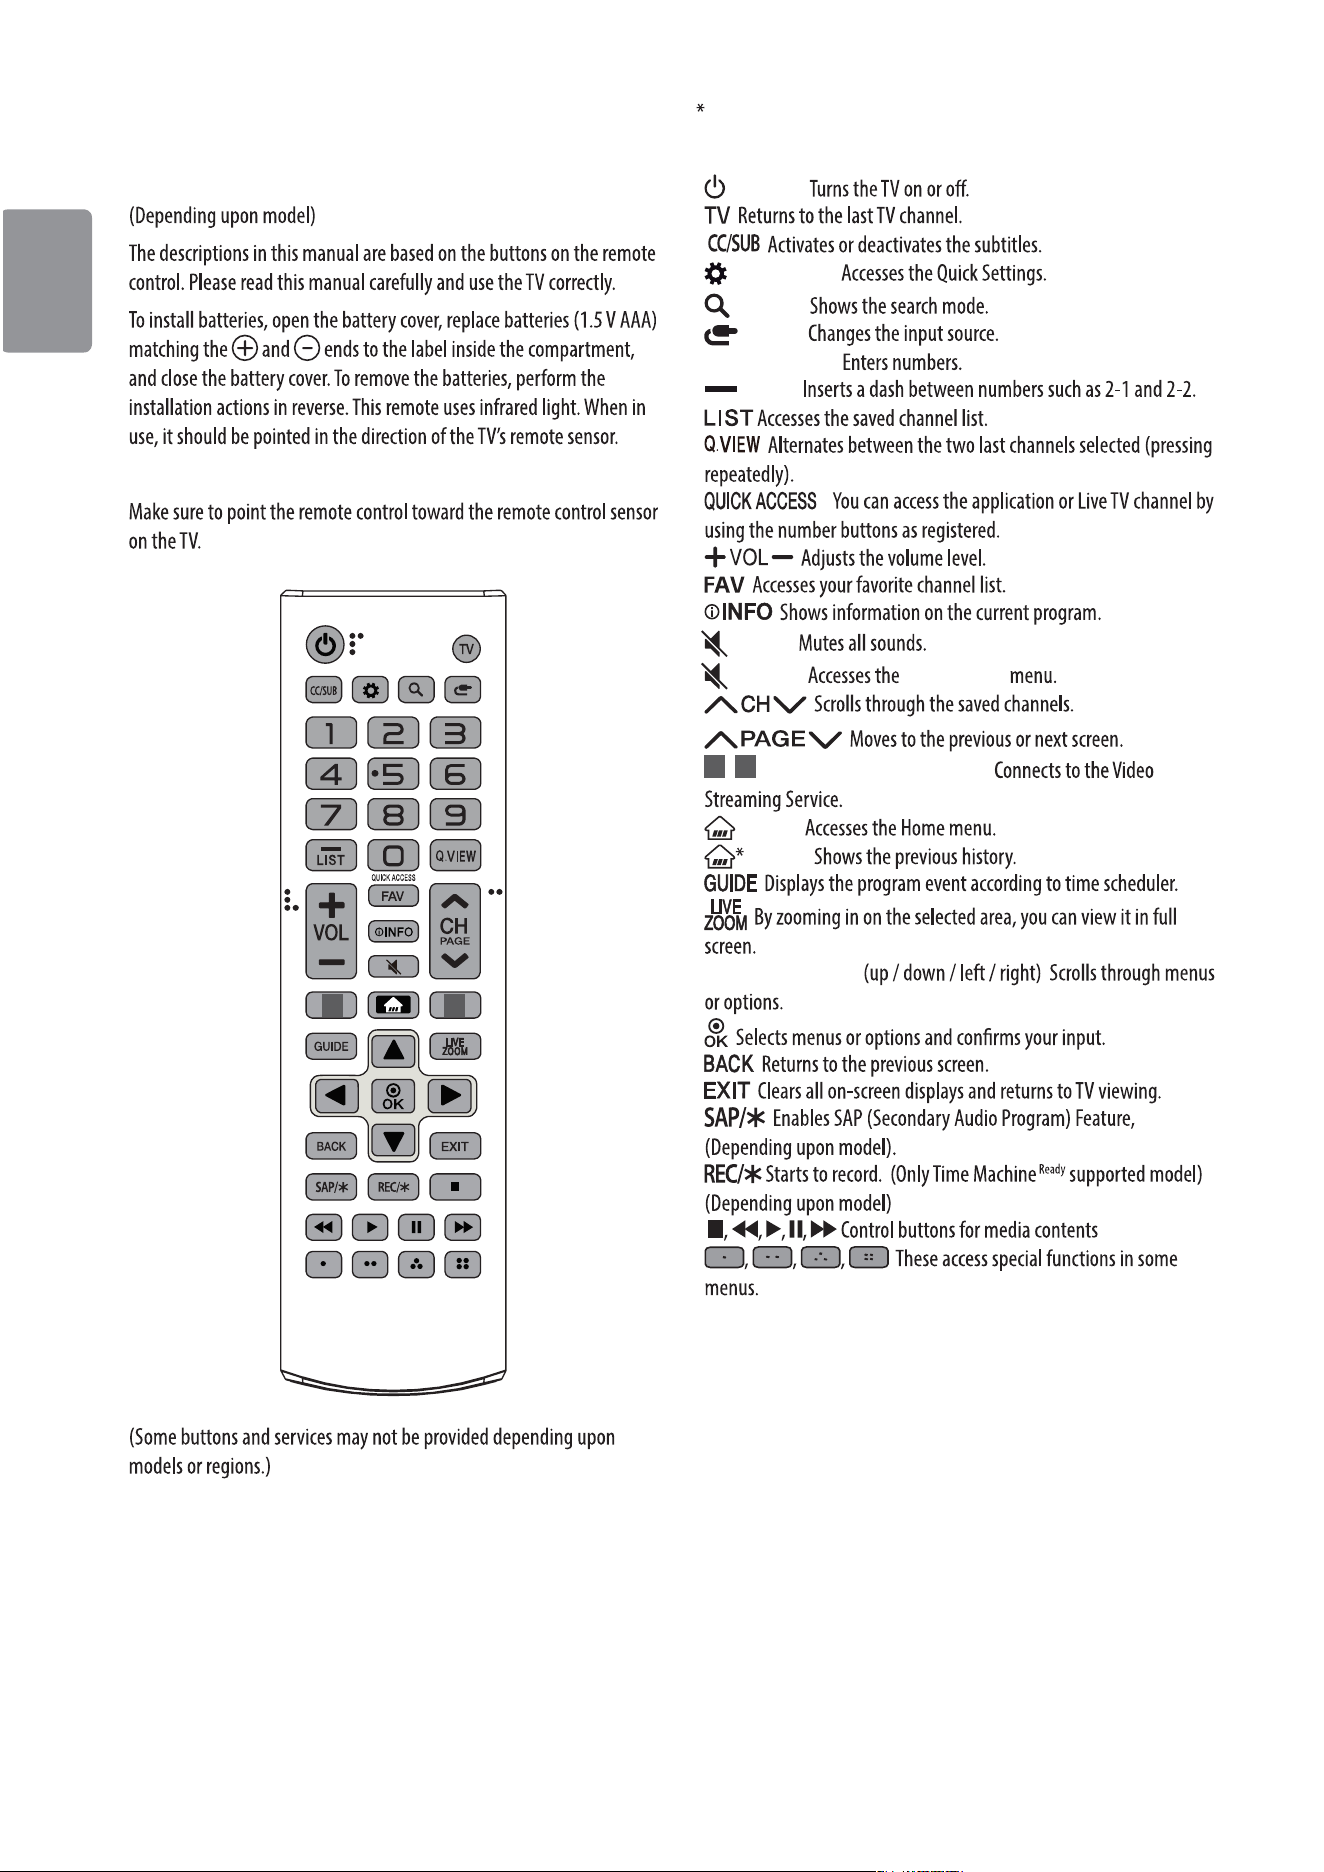
Using Button
Basic functions
Adjusting the menu
10
ENGLISH
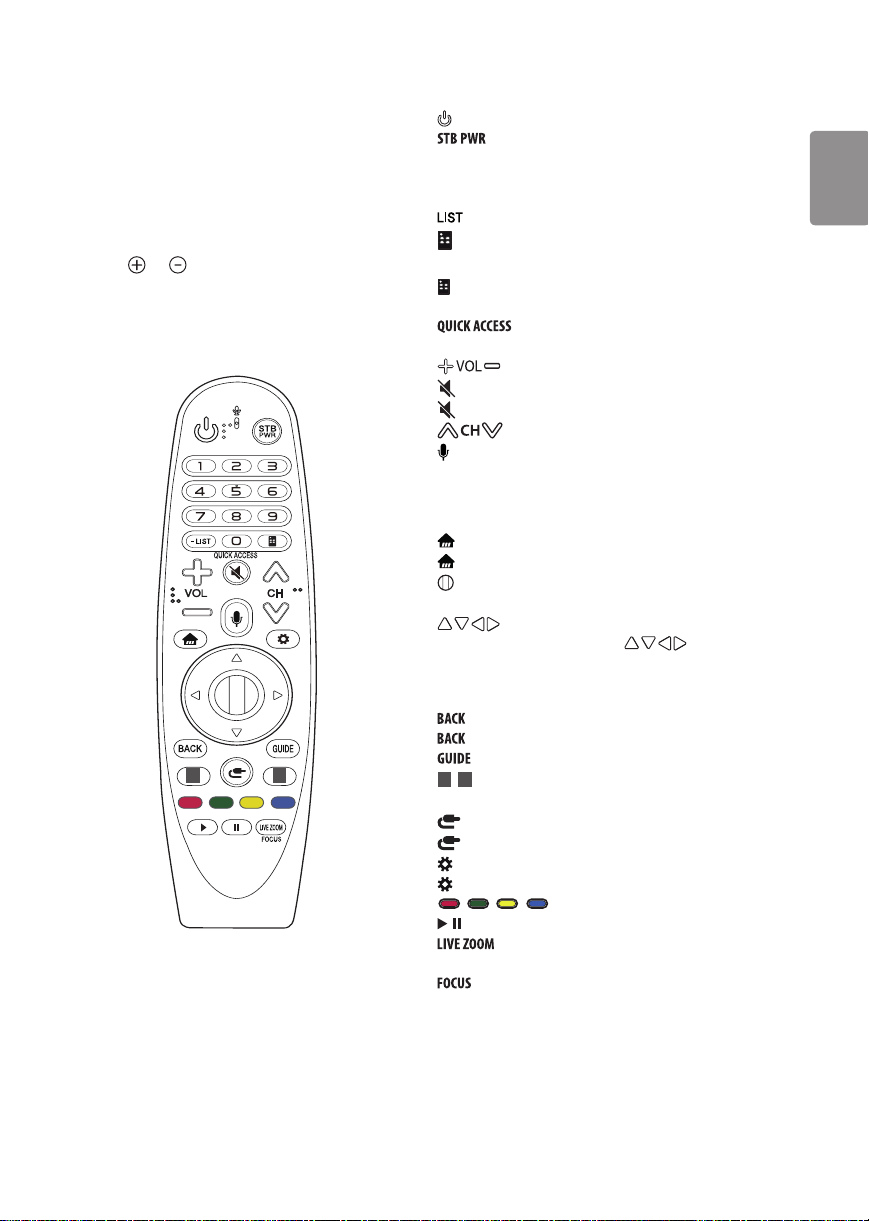
Using Remote Control
1 2
To use the button, press and hold for more than 3 seconds.
(POWER)
(Q. Settings)
(Search)
(Input)
Number button
(Dash)
*
(MUTE)
* (MUTE) Accessibility
1
,
2
Streaming Service buttons
(Home)
(Home)
Navigation button
ENGLISH
11
Using Magic Remote Control
1 2
To use the button, press and hold for more than 3 seconds.
(POWER)
Number buttons
- (Dash)
(Screen Remote)
-
* (Screen Remote)
*
(MUTE)
* (MUTE) Accessibility
(Voice recognition)
(HOME)
(HOME)
Wheel (OK)
(up/down/left/right)
*
1
,
2
Streaming Service buttons
(INPUT)
* (INPUT)
(Q. Settings)
* (Q. Settings) All Settings

12
ENGLISH
Registering Magic Remote Control
How to register the Magic Remote Control
Wheel (OK)
How to deregister the Magic Remote Control
(HOME)
Troubleshooting
Abnormal Display

ENGLISH
13
Generated Sound
Cracking noise
lectrical circuit humming/panel buzzing
14
ENGLISH
Specications
Broadcasting Specifications
Television system
Program coverage
(Band)
External antenna
impedance
Wireless module (LGSBWAC72) Specifications

ENGLISH
15
Wireless module (LGSWFAC81) Specifications
Wireless module(LGSWFAC71) Specifications
Environment condition
Operating Temperature
Operating Humidity
Storage Temperature
Storage Humidity

16
ENGLISH
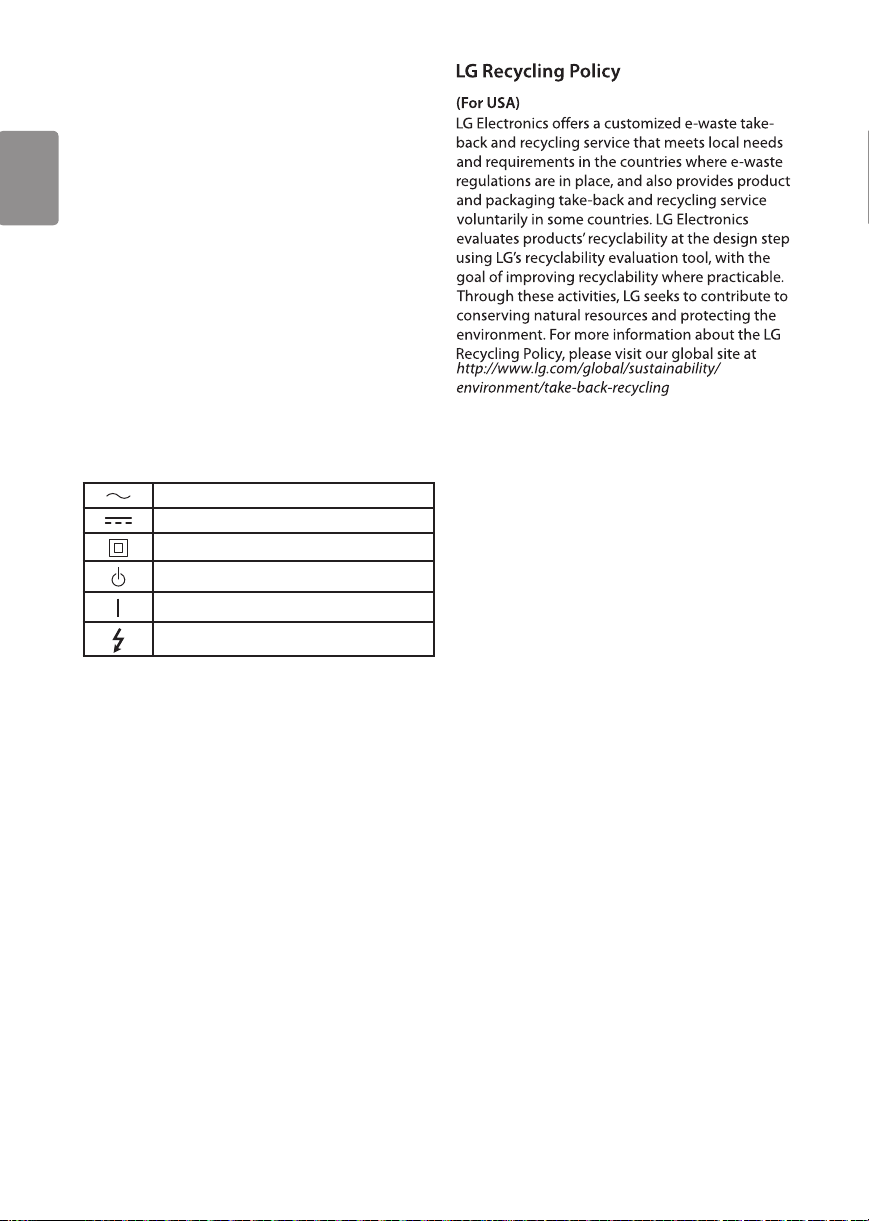
Regulatory
FCC NOTICE
-
-
-
-
FCC Radio Frequency Interference
Requirements (for UNII devices)
Open Source Software
Notice Information
Licenses

ENGLISH
17
FCC RF Radiation Exposure
Statement
Industry Canada Statement
IC Radiation Exposure Statement
NOTE
RSS-247 Requirement
NOTE TO CABLE/TV INSTALLER
18
ENGLISH
WARNING!
Symbols
THE CONSUMER ELECTRONICS INDUSTRY CARES
TUNE IN TO SAFETY
ALWAYS
ALWAYS
NEVER
NEVER
ALWAYS
ALWAYS
WALL OR CEILING MOUNT YOUR TELEVISION
ALWAYS
ALWAYS
ALWAYS
ALWAYS
MOVING AN OLDER TELEVISION TO A NEW PLACE IN
YOUR HOME
ALWAYS
NEVER
ALWAYS
CHILD SAFETY:
PROPER TELEVISION PLACEMENT MATTERS
CE.org/safety
The model and serial numbers of the TV are located on
the back and on one side of the TV. Record them below
should you ever need service.
MODEL
Serial NO.
LG Customer Information Center
For inquires or comments, visit www.lg.com or
call;
1-800-243-0000 USA, Consumer User
1-888-865-3026 USA, Commercial User
1-888-542-2623 CANADA
Register your product Online!
www.lg.com
Declaration of Conformity
Trade Name: LG
Responsible Party: LG Electronics Inc.
Address: 1000 Sylvan Ave. Englewood Cliffs NJ 07632
U.S.A
TEL: 201-266-2534
OWNER’S MANUAL
EXTERNAL CONTROL
DEVICE SETUP
Please read this manual carefully before operating the set and retain it for
future reference.
www.lg.com

2
ENG
ENGLISH
2
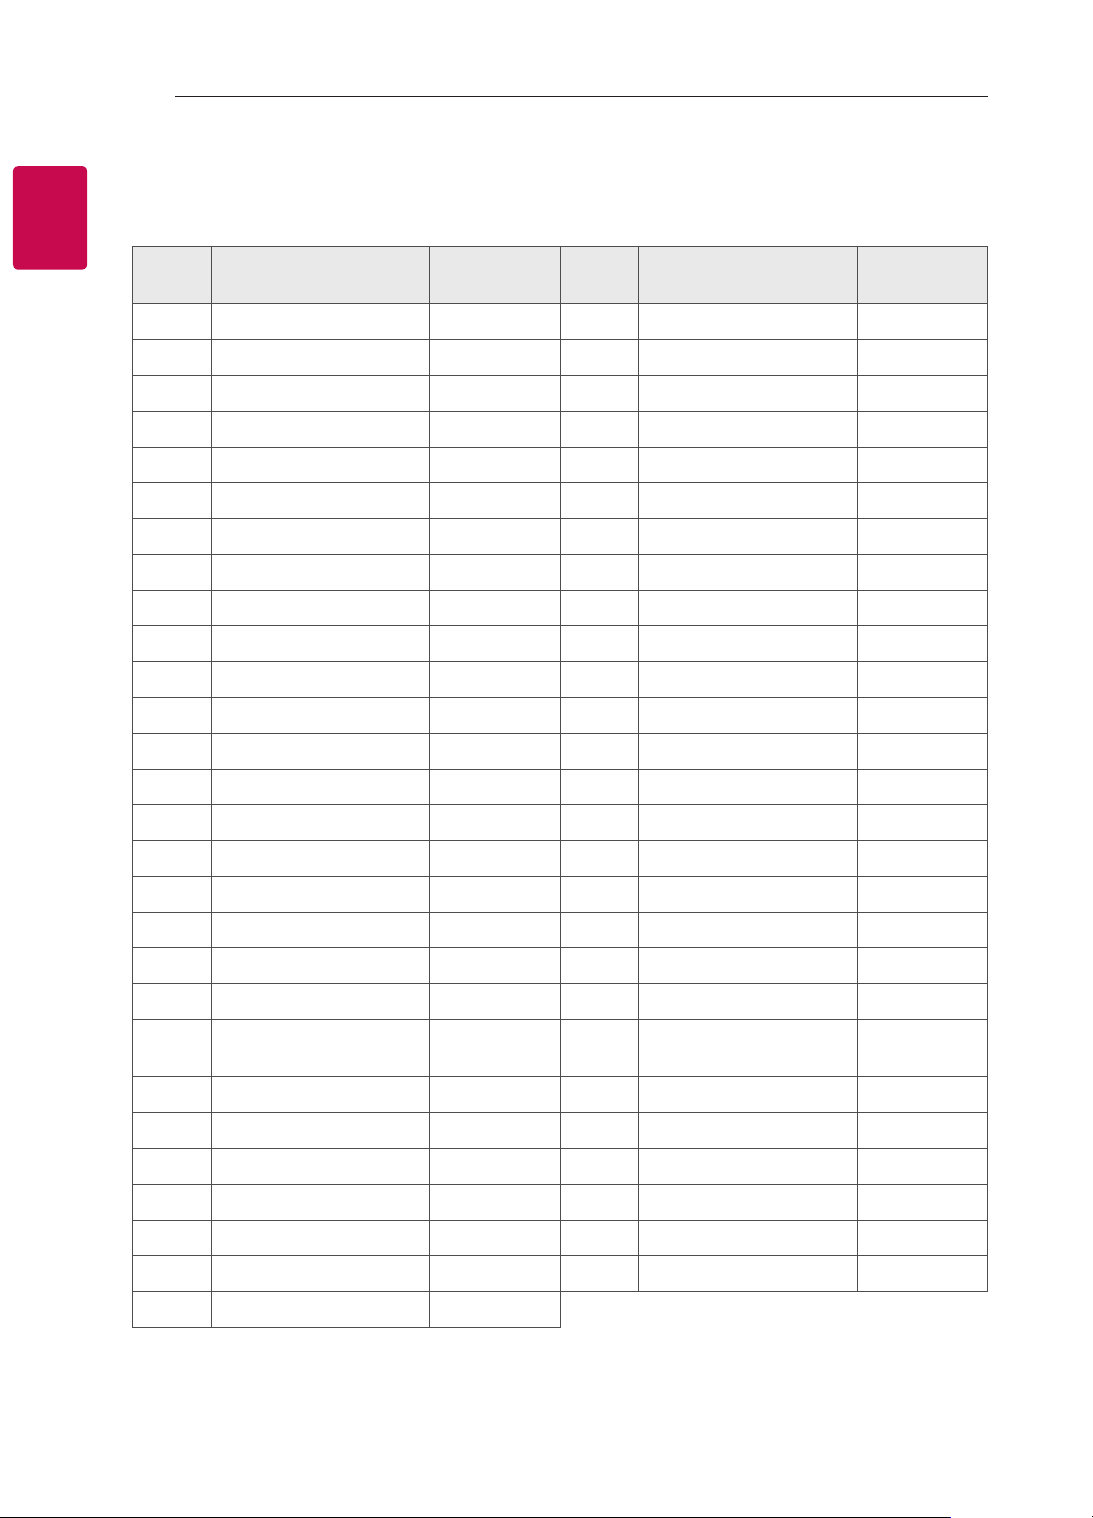
KEY CODES
KEY CODES
• This feature is not available for all models.
Code
(Hexa)
Function Note
Code
(Hexa)
Function Note
00 CH +, PR + R/C Button 53 List R/C Button
01 CH -, PR - R/C Button 5B Exit R/C Button
02 Volume + R/C Button 60 PIP(AD) R/C Button
03 Volume - R/C Button 61 Blue R/C Button
06 > (Arrow Key / Right Key) R/C Button 63 Yellow R/C Button
07 < (Arrow Key / Left Key) R/C Button 71 Green R/C Button
08 Power R/C Button 72 Red R/C Button
09 Mute R/C Button 79 Ratio / Aspect Ratio R/C Button
0B Input R/C Button 91 AD (Audio Description) R/C Button
0E SLEEP R/C Button 9E LIVE MENU R/C Button
0F TV, TV/RAD R/C Button 7A User Guide R/C Button
10 - 19 * Number Key 0 - 9 R/C Button 7C Smart / Home R/C Button
1A Q.View / Flashback R/C Button 7E SIMPLINK R/C Button
1E FAV (Favorite Channel) R/C Button 8E ►►(Forward) R/C Button
20 Text (Teletext) R/C Button 8F ◄◄(Rewind) R/C Button
21 T. Opt (Teletext Option) R/C Button AA Info R/C Button
28 Return (BACK) R/C Button AB Program Guide R/C Button
30 AV (Audio / Video) Mode R/C Button B0 ►(Play) R/C Button
39 Caption/Subtitle R/C Button B1
ꕗ
(Stop / File List) R/C Button
40 Λ
(Arrow Key / Cursor Up)
R/C Button B5 RECENT R/C Button
41
V (Arrow Key / Cursor
Down)
R/C Button BA
ꕘ
(Freeze / Slow Play /
Pause)
R/C Button
42 My Apps R/C Button BB Soccer R/C Button
43 Menu / Settings R/C Button BD
ꔄ
(REC) R/C Button
44 OK / Enter R/C Button DC 3D R/C Button
45 Q.Menu R/C Button 99 AutoConfig R/C Button
4C List, - (ATSC Only) R/C Button 9F App / * R/C Button
4D PICTURE R/C Button 9B TV / PC R/C Button
52 SOUND R/C Button
* Key code 4C (0x4C) is available on ATSC/ISDB models which use major/minor channel.
(For South Korea, Japan, North America, Latin America except Colombia models)

3
ENG
ENGLISH
3
EXTERNAL CONTROL DEVICE SETUP
EXTERNAL CONTROL DEVICE SETUP
• Image shown may differ from your TV.
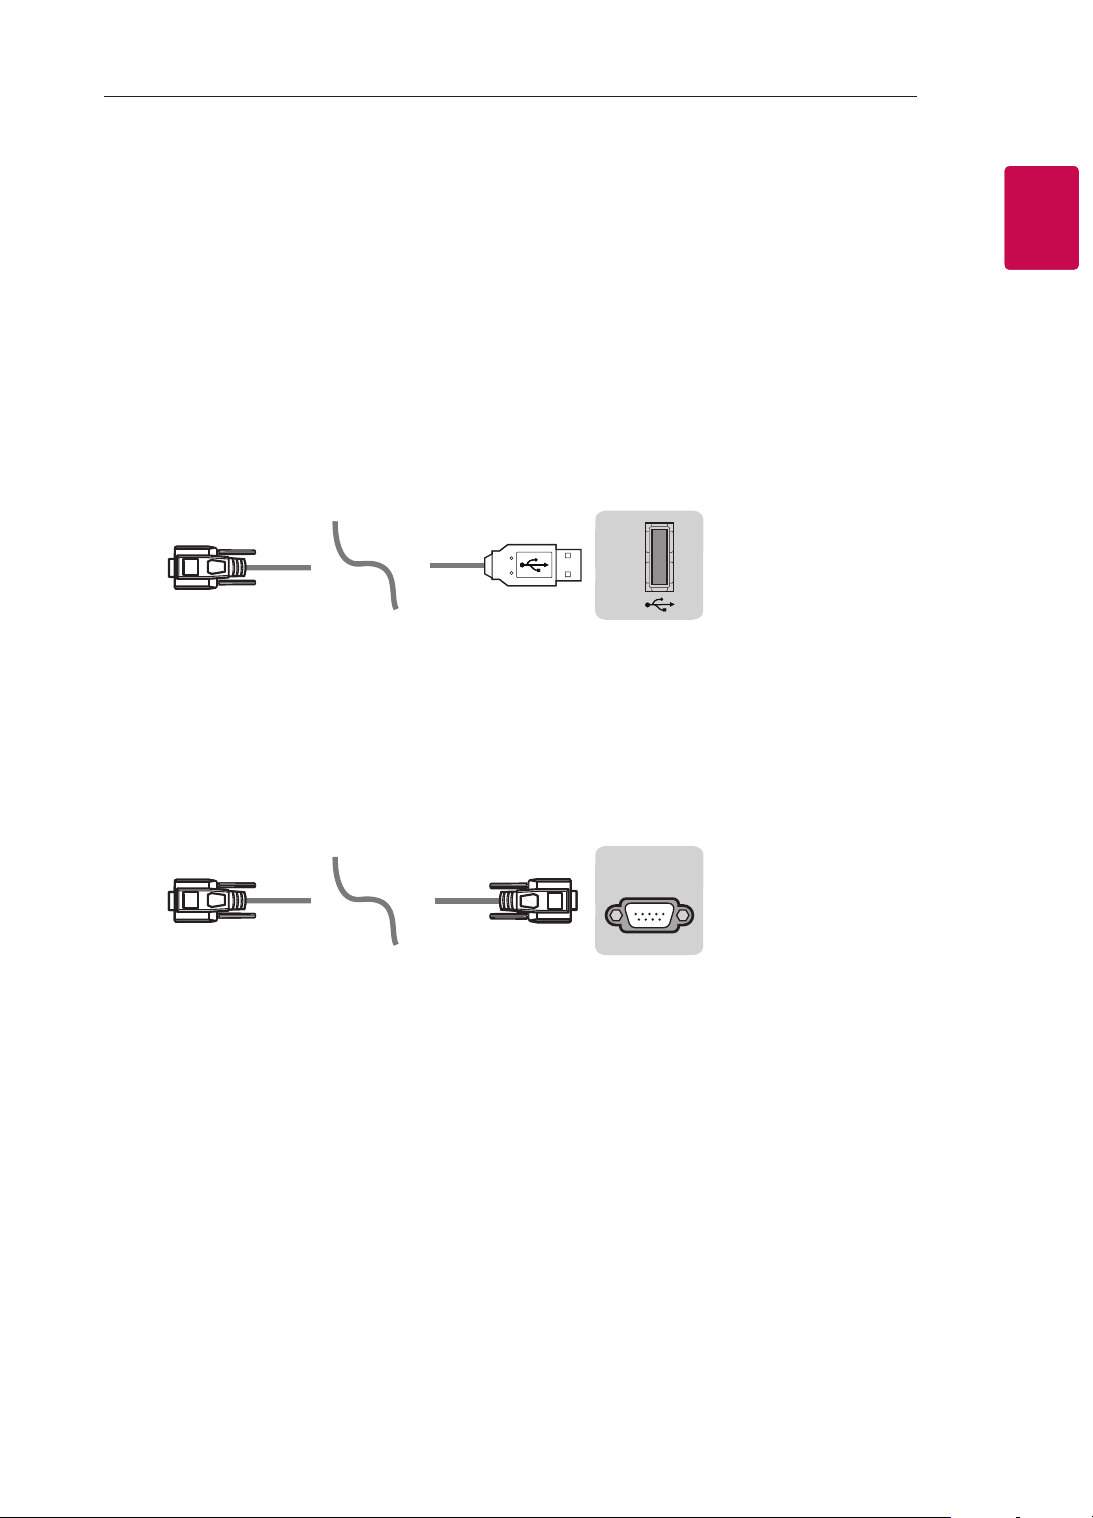
Connect the USB to Serial converter/RS-232C input jack to an external control device (such as a computer
or an A/V control system) to control the product’s functions externally.
Note: The type of control port on the TV can be different between model series.
* Please be advised that not all models support this type of connectivity.
* Cable is not provided.
USB to Serial converter with USB Cable
USB Type
USB IN
(TV)
(PC)
• LGTV supports PL2303 chip-based (Vendor ID : 0x0557, Product ID : 0x2008) USB to serial converter
which is not made nor provided by LG.
• It can be purchased from computer stores that carry accessories for IT support professionals.
RS-232C With RS232C Cable
DE9 (D-Sub 9pin) Type
• You need to purchase the RS-232C (DE9, D-Sub 9pin female-to-female type) to RS-232C cable required
for the connection between the PC and the TV, which is specified in the manual.
(PC)
RS-232C IN
(CONTROL & SERVICE)
(TV)
The connection interface may differ from your TV.

4
ENG
ENGLISH
4
EXTERNAL CONTROL DEVICE SETUP
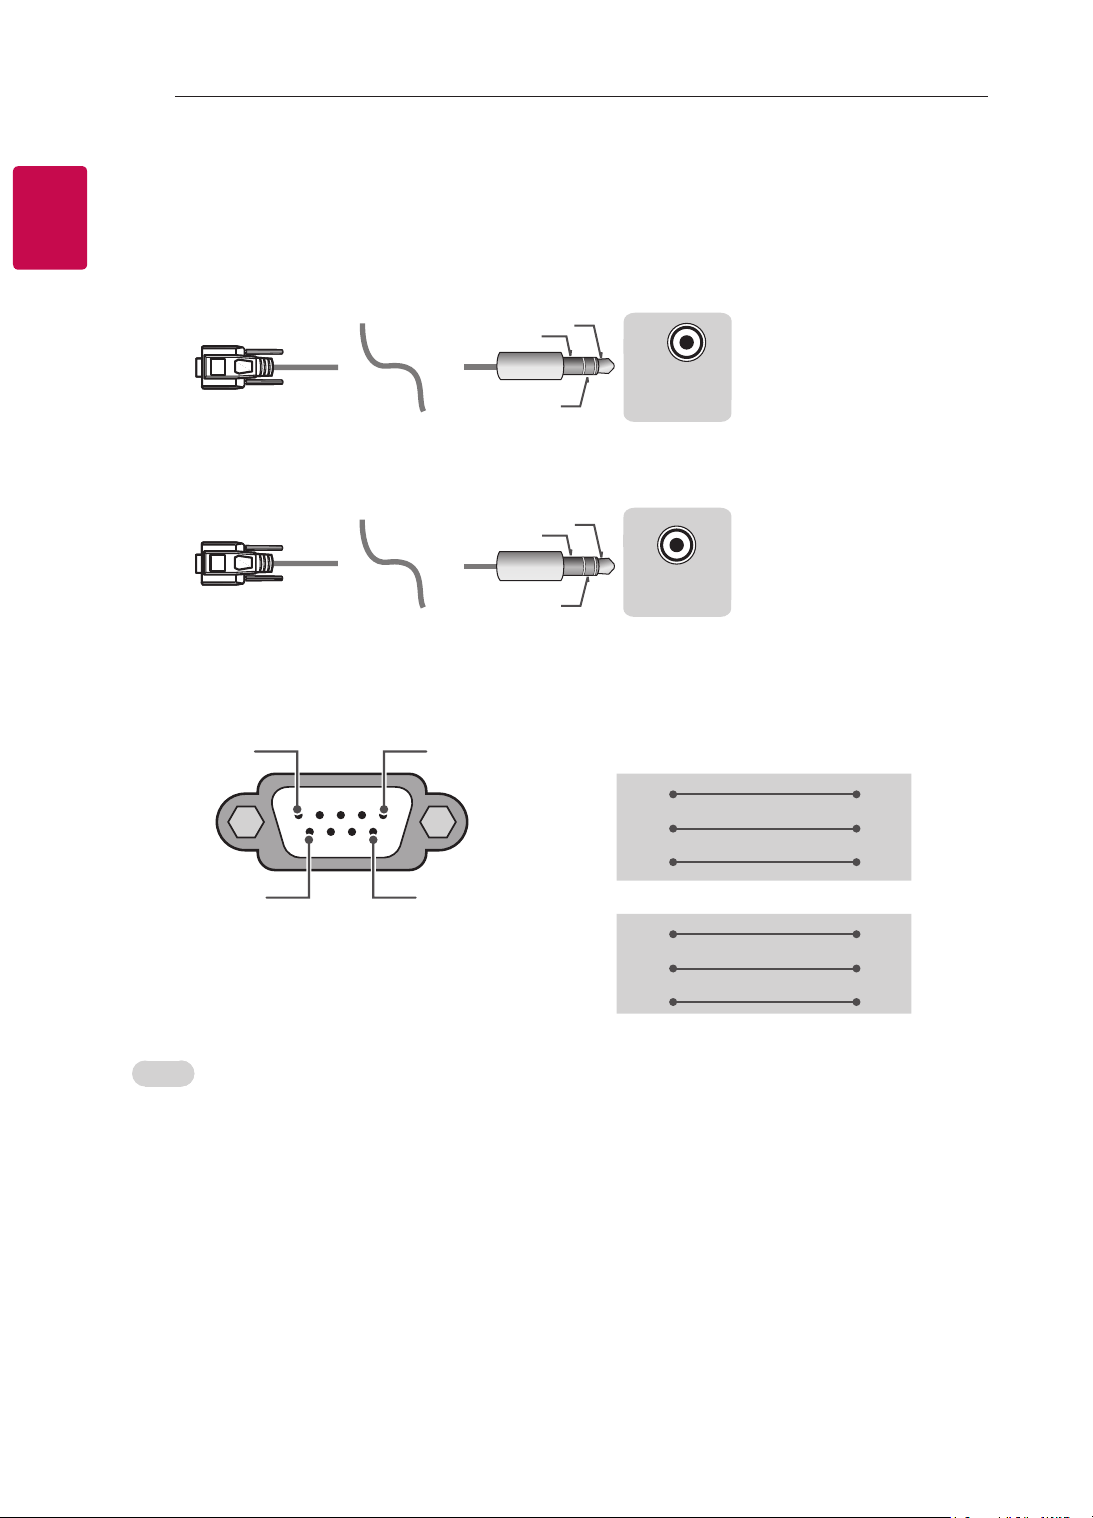
Phone jack Type
• You need to purchase the phone-jack to RS-232 cable required for the connection between the PC and
the TV, which is specified in the manual.
* For other models, connect to the USB port.
* The connection interface may differ from your TV.
(TV)(PC)
SERVICE ONLY
1
3
2
- or
(TV)
(PC
)
RS-232C IN
(CONTROL & SERVICE)
1
3
2
Customer Computer RS-232C configurations
3-Wire Configurations(Not standard)
1
6
5
9
PC TV
RXD 2 2 TXD
TXD 3 1 RXD
GND 5 3 GND
OR
RXD 3 2 TXD
TXD 2 1 RXD
GND 5 3 GND
D-Sub 9 Phone
RS-232C
(Serial port)
Set ID
For Set ID number, see "Real Data Mapping" on p.6
1. Press SETTINGS to access the main menus.
2. Press the Navigation buttons to scroll to (*General→AboutthisTVorOPTION) and press OK.
3. Press the Navigation buttons to scroll to SET ID and press OK.
4. Scroll left or right to select a set ID number and select CLOSE. The adjustment range is 1-99.
5. When you are finished, press EXIT.
* (Depending on model)
5
ENG
ENGLISH
5
EXTERNAL CONTROL DEVICE SETUP
Communication Parameters
• Baud rate : 9600 bps (UART)
• Data length : 8 bits
• Parity : None
• Stop bit : 1 bit
• Communication code : ASCII code
• Use a crossed (reverse) cable.
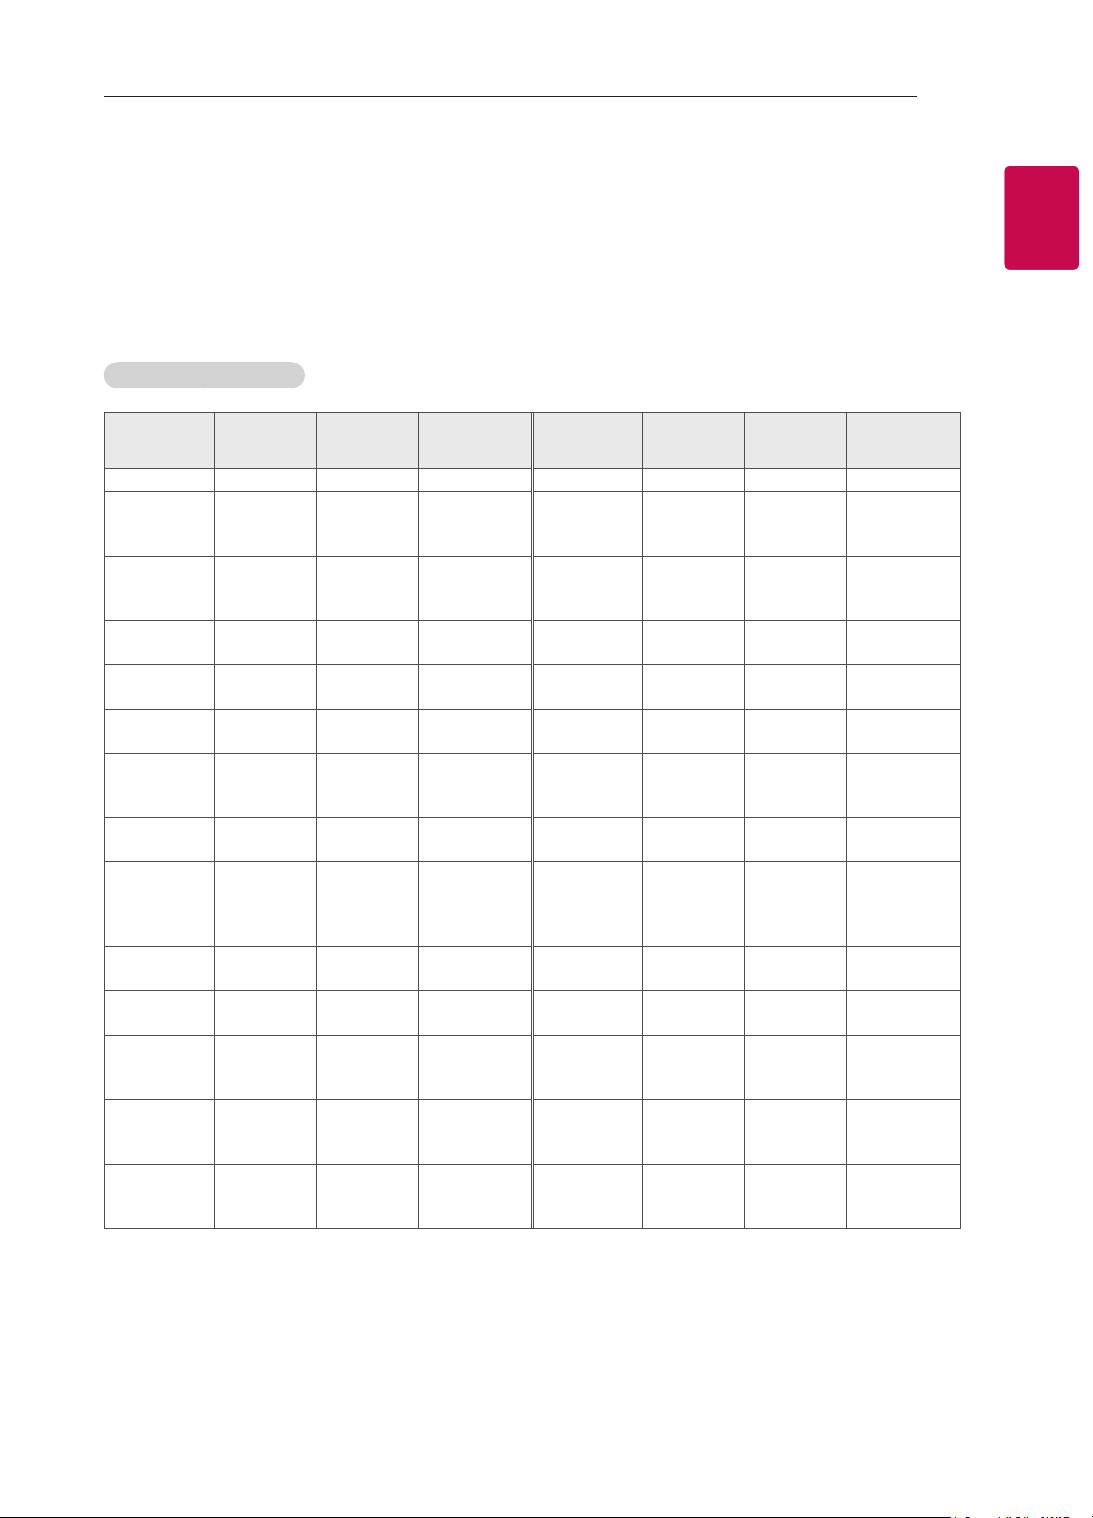
Command reference list
(Depending on model)
COMMAND1 COMMAND2
DATA
(Hexadecimal)
COMMAND1 COMMAND2
DATA
(Hexadecimal)
01. Power* k a 00 to 01 15. Balance k t 00 to 64
02. Aspect
Ratio
k c (p.7)
16. Color
(Colour)
Temperature
x u 00 to 64
03. Screen
Mute
k d (p.7)
17. ISM
Method (Only
Plasma TV)
j p (p.8)
04. Volume
Mute
k e 00 to 01 18. Equalizer j v (p.8)
05. Volume
Control
k f 00 to 64
19. Energy
Saving
j q 00 to 05
06. Contrast k g 00 to 64
20. Tune
Command
m a (p.9)
07.
Brightness
k h 00 to 64
21. Channel
(Programme)
Add/Del(Skip)
m b 00 to 01
08. Color/
Colour
k i 00 to 64 22. Key m c Key Codes
09. Tint k j 00 to 64
23. Control
Backlight,
Control Panel
Light
m g 00 to 64
10.
Sharpness
k k 00 to 32
24. Input
select (Main)
x b (p.11)
11. OSD
Select
k l 00 to 01
25. 3D (Only
3D models)
x t (p.11)
12. Remote
Control Lock
Mode
k m 00 to 01
26. Extended
3D (Only 3D
models)
x v (p.12)
13. Treble k r 00 to 64
27. Auto
Configure
j u (p.12)
14. Bass k s 00 to 64
* Note: During playing or recording media, all commands except Power (ka) and Key (mc) are not
executed and treated as NG.
With RS232C cable, TV can communicate "ka command" in power-on or power-off status. but with
USB-to-Serial converter cable, the command works only if TV is on.

6
ENG
ENGLISH
6
EXTERNAL CONTROL DEVICE SETUP
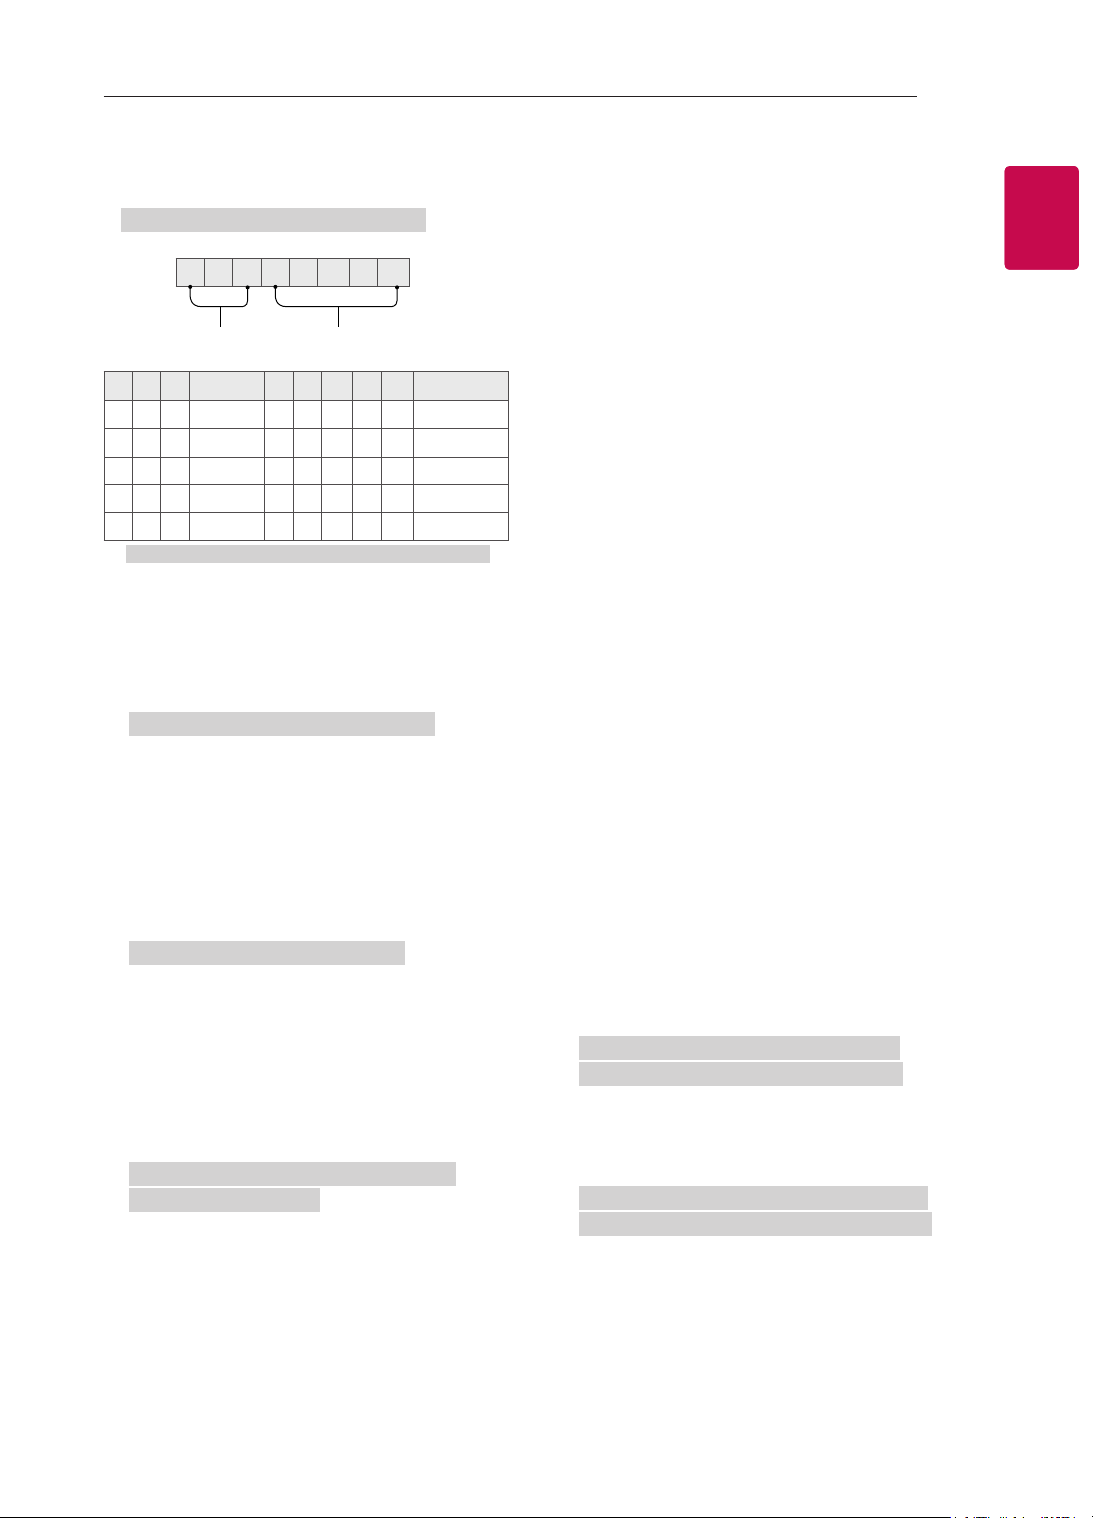
Transmission / Receiving Protocol
Transmission
[Command1][Command2][ ][Set ID][ ][Data][Cr]
[Command 1] : First command to control the TV. (j, k, m or x)
[Command 2] : Second command to control the TV.
[Set ID] : You can adjust the [Set ID] to choose desired monitor ID number in option menu.
Adjustment range in TV is 1 to 99. If [Set ID] value is selected to ‘0’, every connected set
can be controlled.
* [Set ID] is indicated as decimal (1 to 99) on menu and as Hexadecimal (0x00 to 0x63) on
transmission/receiving protocol.
[DATA] : To transmit command data (hexadecimal). Transmit ‘FF’ data to read status of command.
[Cr] : Carriage Return - ASCII code ‘0x0D’
[ ] : Space – ASCII code ‘0x20’
OK Acknowledgement
[Command2][ ][Set ID][ ][OK][Data][x]
* The set transmits ACK (acknowledgement) based on this format when receiving normal data. At this time,
if the data is data read mode, it indicates present status data. If the data is data write mode, it returns the
data of the PC computer.
Error Acknowledgement
[Command2][ ][Set ID][ ][NG][Data][x]
* The set transmits ACK (acknowledgement) based on this format when receiving abnormal data from
non-viable functions or communication errors.
Data 00: Illegal Code
Real data mapping (Hexadecimal
b
Decimal)
* When you enter the [data] in hexadecimal, refer to following conversion table.
* Channel Tune (ma) Command uses two-byte hexadecimal value([data]) to select channel number.
00 : Step 0 32 : Step 50 (Set ID 50) FE : Step 254
01 : Step 1 (Set ID 1) 33 : Step 51 (Set ID 51) FF : Step 255
... ... ...
0A : Step 10 (Set ID 10) 63 : Step 99 (Set ID 99) 01 00 : Step 256
... ... ...
0F : Step 15 (Set ID 15) C7 : Step 199 27 0E : Step 9998
10 : Step 16 (Set ID 16) C8 : Step 200 27 0F : Step 9999
... ... ...

7
ENG
ENGLISH
7
EXTERNAL CONTROL DEVICE SETUP
* Commands may work differently depending on model and signal.
01. Power (Command: k a)
► To control Power *On or Off of the set.
Transmission[k][a][ ][Set ID][ ][Data][Cr]
Data 00 : Power Off 01 : *Power On
Ack [a][ ][Set ID][ ][OK/NG][Data][x]
► To Show TV is Power On or *Off
Transmission [k][a][ ][Set ID][ ][FF][Cr]
Ack [a][ ][Set ID][ ][OK][Data][x]
* Similarly, if other functions transmit ‘FF’ data
based on this format, Acknowledgement feedback
presents status about each function.
02. Aspect Ratio (Command: k c)
(Main Picture Size)
► To adjust the screen format. (Main picture format)
You can also adjust the screen format using the
Aspect Ratio in the Q.MENU. or PICTURE menu.
Transmission [k][c][ ][Set ID][ ][Data][Cr]
Data 01 : Normal screen
(4:3)
02 : Wide screen
(16:9)
04 : Zoom
05 : Zoom 2
(Latin America
except Colombia
Only)
06 : Set by Program/
Original
07 : 14:9
(Europe, Colombia, Mid-East,
Asia except South Korea and
Japan)
09 : * Just Scan
0B : Full Wide
(Europe, Colombia, Mid-
East, Asia except South
Korea and Japan)
10 to 1F : Cinema Zoom 1 to 16
0c : 21:9 (Depending on model)
Ack [c][ ][Set ID][ ][OK/NG][Data][x]
* Using the PC input, you select either 16:9 or 4:3
screen aspect ratio.
* In DTV/HDMI/Component mode (high-definition),
Just Scan is available.
* Full wide mode may work differently based on
model and is supported for DTV fully, and ATV,
AV partially.
03. Screen Mute (Command: k d)
► To select screen mute on/off.
Transmission [k][d][ ][Set ID][ ][Data][Cr]
Data 00 : Screen mute off (Picture on)
Video mute off
01 : Screen mute on (Picture off)
10 : Video mute on
Ack [d][ ][Set ID][ ][OK/NG][Data][x]
* In case of video mute on only, TV will display On
Screen Display(OSD). But, in case of Screen mute
on, TV will not display OSD.
04. Volume Mute (Command: k e)
► To control volume mute on/off.
You can also adjust mute using the MUTE button
on remote control.
Transmission [k][e][ ][Set ID][ ][Data][Cr]
Data 00 : Volume mute on (Volume off)
01 : Volume mute off (Volume on)
Ack [e][ ][Set ID][ ][OK/NG][Data][x]
05. Volume Control (Command: k f)
► To adjust volume.
You can also adjust volume with the volume
buttons on remote control.
Transmission [k][f][ ][Set ID][ ][Data][Cr]
Data Min : 00 to Max : 64
Ack [f][ ][Set ID][ ][OK/NG][Data][x]
06. Contrast (Command: k g)
► To adjust screen contrast.
You can also adjust contrast in the PICTURE
menu.
Transmission [k][g][ ][Set ID][ ][Data][Cr]
Data Min : 00 to Max : 64
Ack [g][ ][Set ID][ ][OK/NG][Data][x]
07. Brightness (Command: k h)
► To adjust screen brightness.
You can also adjust brightness in the PICTURE
menu.
Transmission [k][h][ ][Set ID][ ][Data][Cr]
Data Min : 00 to Max : 64
Ack [h][ ][Set ID][ ][OK/NG][Data][x]
8
ENG
ENGLISH
8
EXTERNAL CONTROL DEVICE SETUP
08. Color/Colour (Command: k i)
► To adjust the screen Color(Colour).
You can also adjust colour in the PICTURE menu.
Transmission [k][i][ ][Set ID][ ][Data][Cr]
Data Min : 00 to Max : 64
Ack [i][ ][Set ID][ ][OK/NG][Data][x]
09. Tint (Command: k j)
► To adjust the screen tint.
You can also adjust tint in the PICTURE menu.
Transmission [k][j][ ][Set ID][ ][Data][Cr]
Data Red : 00 to Green : 64
Ack [j][ ][Set ID][ ][OK/NG][Data][x]
10. Sharpness (Command: k k)
► To adjust the screen sharpness.
You can also adjust sharpness in the PICTURE
menu.
Transmission [k][k][ ][Set ID][ ][Data][Cr]
Data Min : 00 to Max : 32
Ack [k][ ][Set ID][ ][OK/NG][Data][x]
11. OSD Select (Command: k l)
► To select OSD (On Screen Display) on/off when
controlling remotely.
Transmission [k][l][ ][Set ID][ ][Data][Cr]
Data 00 : OSD off 01 : OSD on
Ack [l][ ][Set ID][ ][OK/NG][Data][x]
12. Remote control lock mode (Command: k m)
► To lock the front panel controls on the monitor and
remote control.
Transmission [k][m][ ][Set ID][ ][Data][Cr]
Data 00 : Lock off 01 : Lock on
Ack [m][ ][Set ID][ ][OK/NG][Data][x]
* If you are not using the remote control, use this
mode.
When main power is off & on (plug-off and plug-in,
after 20 - 30 seconds), external control lock is
released.
* In the standby mode (DC off by off timer or ‘ka’,
‘mc’ command), and if key lock is on, TV will not
turn on by power on key of IR & Local Key.
13. Treble (Command: k r)
► To adjust treble.
You can also adjust in the AUDIO menu.
Transmission [k][r][ ][Set ID][ ][Data][Cr]
Data Min : 00 to Max : 64
Ack [r][ ][Set ID][ ][OK/NG][Data][x]
* (Depending on model)
14. Bass (Command: k s)
► To adjust Bass.
You can also adjust in the AUDIO menu.
Transmission [k][s][ ][Set ID][ ][Data][Cr]
Data Min : 00 to Max : 64
Ack [s][ ][Set ID][ ][OK/NG][Data][x]
* (Depending on model)
15. Balance (Command: k t)
► To adjust balance.
You can also adjust balance in the AUDIO menu.
Transmission [k][t][ ][Set ID][ ][Data][Cr]
Data Min : 00 to Max : 64
Ack [t][ ][Set ID][ ][OK/NG][Data][x]
16. Color(Colour) Temperature (Command: x u)
► To adjust colour temperature. You can also adjust
Color(Colour) Temperature in the PICTURE menu.
Transmission [x][u][ ][Set ID][ ][Data][Cr]
Data Min : 00 to Max : 64
Ack [u][ ][Set ID][ ][OK/NG][Data][x]
17. ISM Method (Command: j p) (Only Plasma TV)
► To control the ISM method. You can also adjust
ISM Method in OPTION menu.
Transmission [j][p][ ][Set ID][ ][Data][Cr]
Data Min : 02: Orbiter
08: Normal
20: Color(Colour) Wash
Ack [p][ ][Set ID][ ][OK/NG][Data][x]

9
ENG
ENGLISH
9
EXTERNAL CONTROL DEVICE SETUP
18. Equalizer (Command : j v)
► Adjust EQ of the set.
Transmission [j][v][ ][Set ID][ ][Data][Cr]
0 0 0 0 0 0 0 0
MSB
Frequency Data
LSB
7 6 5
Frequency
4 3 2 1 0 Step
0 0 0
1st Band
0 0 0 0 0
0(decimal)
0 0 1
2nd Band
0 0 0 0 1
1(decimal)
0 1 0
3rd Band
... ... ... ... ...
...
0 1 1
4th Band
1 0 0 1 1
19(decimal)
1 0 0
5th Band
1 0 1 0 1
20(decimal)
Acknowledgement [v][ ][Set ID][ ][OK/NG][Data][x]
* It depends on model, and can adjust when sound
mode is EQ adjustable value.
19. Energy Saving (Command: j q)
► To reduce the power consumption of the TV. You
can also adjust Energy Saving in PICTURE menu.
Transmission [j][q][ ][Set ID][ ][Data][Cr]
Data
00 : Off
01 : Minimum
02 : Medium
03 : Maximum
04 : Auto (For LCD TV / LED TV) /
Intelligent sensor (For PDP TV)
05 : Screen off
* (Depending on model)
Ack [q][ ][Set ID][ ][OK/NG][Data][x]
20. Tune Command (Command: m a)
* This command may work differently depending on
model and signal.
• For Europe, Mid-East, Colombia, Asia except
South Korea and Japan Model
► Select channel to following physical number.
Transmission [m][a][ ][Set ID][ ][Data 00][ ]
[Data 01][ ][Data 02][Cr]
* Analog Antenna/Cable
[Data 00][Data 01] Channel Data
Data 00 : High byte channel data
Data 01 : Low byte channel data
- 00 00 ~ 00 C7 (Decimal : 0 ~ 199)
Data 02 : Input Source (Analog)
- 00 : Antenna TV (ATV)
- 80 : Cable TV (CATV)
* Digital Antenna/Cable/Satellite
[Data 00][Data 01]: Channel Data
Data 00 : High Channel data
Data 01 : Low Channel data
- 00 00 ~ 27 0F (Decimal: 0 ~ 9999)
Data 02 : Input Source (Digital)
- 10 : Antenna TV (DTV)
- 20 : Antenna Radio (Radio)
- 40 : Satellite TV (SDTV)
- 50 : Satellite Radio (S-Radio)
- 90 : Cable TV (CADTV)
- a0 : Cable Radio (CA-Radio)
* Tune Command Examples:
1. Tune to the Analog antenna (PAL) Channel 10.
Set ID = All = 00
Data 00 & 01 = Channel Data is 10 = 00 0a
Data 02 = Analog Antenna TV = 00
Result = ma 00 00 0a 00
2. Tune to the digital antenna (DVB-T) Channel 01.
Set ID = All = 00
Data 00 & 01 = Channel Data is 1 = 00 01
Data 02 = Digital Antenna TV = 10
Result = ma 00 00 01 10
3. Tune to the satellite (DVB-S) Channel 1000.
Set ID = All = 00
Data 00 & 01 = Channel Data is 1000 = 03 E8
Data 02 = Digital Satellite TV = 40
Result = ma 00 03 E8 40
Ack [a][ ][Set ID][ ][OK][Data 00][Data 01]
[Data 02][x][a][ ][Set ID][ ][NG][Data 00][x]
• For South Korea, North/Latin America except
Colombia Model
► To tune channel to following physical/major/minor
number.
Transmission [m][a][ ][0][ ][Data00][ ][Data01]
[ ][Data02][ ][Data03][ ][Data04][ ][Data05][Cr]
Digital channels have a Physical, Major, and Minor
channel number. The Physical number is the actual
digital channel number, the Major is the number that
the channel should be mapped to, and the Minor is
the sub-channel. Since the ATSC tuner automatically
maps the channel from the Major / Minor number,
the Physical number is not required when sending a
command in Digital.

10
ENG
ENGLISH
10
EXTERNAL CONTROL DEVICE SETUP
* Analog Antenna/Cable
Data 00 : Physical Channel Number
- Antenna (ATV) : 02~45 (Decimal: 2 ~ 69)
- Cable (CATV) : 01, 0E~7D (Decimal : 1, 14~125)
[Data 01 ~ 04]: Major/Minor Channel Number
Data 01 & 02: xx (Don't care)
Data 03 & 04: xx (Don't care)
Data 05: Input Source (Analog)
- 00 : Antenna TV (ATV)
- 01 : Cable TV (CATV)
* Digital Antenna/Cable
Data 00 : xx (Don't care)
[Data 01][Data 02]: Major Channel Number
Data 01 : High byte Channel Data
Data 02 : Low byte Channel Data
- 00 01 ~ 27 0F (Decimal: 1 ~ 9999)
[Data 03][Data 04]: Minor Channel Number
Data 03 : High byte Channel Data
Data 04 : Low byte Channel Data
Data 05 : Input Source (Digital)
- 02 : Antenna TV (DTV) – Use Physical Channel
Number
- 06 : Cable TV (CADTV) – Use Physical Channel
Number
- 22 : Antenna TV (DTV) – Don’t Use Physical
Channel Number
- 26 : Cable TV (CADTV) - Don’t Use Physical
Channel Number
- 46 : Cable TV (CADTV) – Use Physical/Major
Channel Number Only (One Part Channel)
- 66 : Cable TV (CADTV) – Use Major Channel
Number Only (One Part Channel)
- 0b : Cable DTV Plus – Use Physical Channel
Number
- 2b : Cable DTV Plus – Don’t Use Physical
Channel Number
- 4b : Cable DTV Plus – Use Physical/Major
Channel Number Only (One Part Channel)
- 6b : Cable DTV Plus – Use Major Channel
Number Only (One Part Channel)
Two bytes are available for each major and minor
channel data, but usually the low byte is used alone
(high byte is 0).
* Tune Command Examples:
1. Tune to the Analog cable (NTSC) channel 35.
Set ID = All = 00
Data 00 = Channel Data is 35 = 23
Data 01 & 02 = No Major = 00 00
Data 03 & 04 = No Minor = 00 00
Data 05 = Analog Cable TV = 01
Total = ma 00 23 00 00 00 00 01
2. Tune to the digital antenna (ATSC) channel 30-3.
Set ID = All = 00
Data 00 = Don’t know Physical = 00
Data 01 & 02 = Major is 30 = 00 1E
Data 03 & 04 = Minor is 3 = 00 03
Data 05 = Digital Antenna TV = 22
Total = ma 00 00 00 1E 00 03 22
Ack [a][ ][Set ID][ ][OK][Data 00][Data 01]
[Data 02][Data 03][Data 04][Data 05]
[x][a][ ][Set ID][ ][NG][Data 00][x]
• For Japan Model
► To tune channel to following physical/major/minor
number.
Transmission [m][a][ ][0][ ][Data00][ ][Data01]
[ ][Data02][ ][Data03][ ][Data04][ ][Data05][Cr]
* Digital Antenna/Satellite
Data 00: xx (Don't care)
[Data 01][Data 02]: Major Channel Number
Data 01: High byte Channel Data
Data 02: Low byte Channel Data
- 00 01 ~ 27 0F (Decimal: 1 ~ 9999)
[Data 03][Data 04]: Minor/Branch Channel Number
(Don’t care in Satellite)
Data 03: High byte Channel Data
Data 04: Low byte Channel Data
Data 05 : Input Source (Digital/Satellite for Japan)
- 02 : Antenna TV (DTV)
- 42 : Antenna TV (DTV) – Use Physical/Major
Channel Number Only (One Part Channel)
- 62 : Antenna TV (DTV) – Use Major Channel
Number Only (One Part Channel)
- 07 : BS (Broadcasting Satellite)
- 08 : CS1 (Communication Satellite 1)
- 09 : CS2 (Communication Satellite 2)
* Tune Command Examples:
1
Tune to the digital antenna (ISDB-T) channel 17-1
.
Set ID = All = 00
Data 00 = Don’t know Physical = 00
Data 01 & 02 = Major is 17 = 00 11
Data 03 & 04 = Minor/Branch is 1 = 00 01
Data 05 = Digital Antenna TV = 02
Total = ma 00 00 00 11 00 01 02

11
ENG
ENGLISH
11
EXTERNAL CONTROL DEVICE SETUP
2. Tune to the BS (ISDB-BS) channel 30.
Set ID = All = 00
Data 00 = Don’t know Physical = 00
Data 01 & 02 = Major is 30 = 00 1E
Data 03 & 04 = Don’t Care = 00 00
Data 05 =
Digital
BS TV = 07
Total = ma 00 00 00 1E 00 00 07
* This feature is varied based on the model.
Ack [a][ ][Set ID][ ][OK][Data 00][Data 01]
[Data 02][Data 03][Data 04][Data 05]
[x][a][ ][Set ID][ ][NG][Data 00][x]
21. Channel(Programme) Add/Del(Skip)
(Command: m b)
► To skip current channel(programme) for next time.
Transmission [m][b][ ][Set ID][ ][Data][Cr]
Data 00 : Del(ATSC,ISDB)/Skip(DVB) 01 : Add
Ack [b][ ][Set ID][ ][OK/NG][Data][x]
* Set the saved channel status to del(ATSC, ISDB)/
skip(DVB) or add.
22. Key (Command: m c)
► To send IR remote key code.
Transmission [m][c][ ][Set ID][ ][Data][Cr]
Data Key code - p.2.
Ack [c][ ][Set ID][ ][OK/NG][Data][x]
23. Control Backlight (Command: m g)
• For LCD TV / LED TV
► To control the backlight.
Transmission [m][g][ ][Set ID][ ][Data][Cr]
Data Min : 00 to Max : 64
Ack [g][ ][Set ID][ ][OK/NG][Data][x]
Control Panel Light (Command: m g)
• For Plasma TV
► To control the panel light.
Transmission [m][g][ ][Set ID][ ][Data][Cr]
Data Min : 00 to Max : 64
Ack [g][ ][Set ID][ ][OK/NG][Data][x]
24. Input select (Command: x b)
(Main Picture Input)
► To select input source for main picture.
Transmission [x][b][ ][Set ID][ ][Data][Cr]
Data
00 : DTV
02 : Satellite DTV
ISDB-BS (Japan)
03 : ISDB-CS1 (Japan)
04 : ISDB-CS2 (Japan)
11 : CATV
01 : CADTV
10 : ATV
20 : AV or AV1 21 : AV2
40 : Component1
60 : RGB
41 : Component2
90 : HDMI1
92 : HDMI3
91 : HDMI2
93 : HDMI4
Ack [b][ ][Set ID][ ][OK/NG][Data][x]
* This function depends on model and signal.
25. 3D(Command: x t) (only 3D models)
(Depending on model)
► To change 3D mode for TV.
Transmission [x][t][ ][Set ID][ ][Data 00][ ][Data 01]
[ ][Data 02][ ][Data 03][Cr]
* (Depending on model)
Data Structure
[Data 00] 00 : 3D On
01 : 3D Off
02 : 3D to 2D
03 : 2D to 3D
[Data 01] 00 : Top and Bottom
01 : Side by Side
02 : Check Board
03 : Frame Sequential
04 : Column interleaving
05 : Row interleaving
[Data 02] 00 : Right to Left
01 : Left to Right
[Data 03] 3D Effect(3D Depth): Min : 00 - Max : 14
(*transmit by Hexadecimal code)
12
ENG
ENGLISH
12
EXTERNAL CONTROL DEVICE SETUP
* [Data 02], [Data 03] functions depend on model
and signal.
* If [Data 00] is 00 (3D On), [Data 03] has no
meaning.
* If [Data 00] is 01 (3D off) or 02 (3D to 2D), [Data
01], [Data 02] and [Data 03] have no meaning.
* If [Data 00] is 03 (2D to 3D), [Data 01] and
[Data 02] have no meaning.
* If [Data 00] is 00 (3D On) or 03 (2D to 3D), [Data
03] works when 3D Mode (Genre) is manual only.
* All 3D pattern options ([Data 01]) may not be
available according to broadcasting/video signal.
[Data 00] [Data 01] [Data 02] [Data 03]
00 O O O
01 X X X
02 X X X
03 X O O
X : don’t care
Ack [t][ ][Set ID][ ][OK][Data00][Data01][Data02]
[Data03][x]
[t][ ][Set ID][ ][NG][Data00][x]
26. Extended 3D(Command: x v) (only 3D models)
(Depending on model)
► To change 3D option for TV.
Transmission [x][v][ ][Set ID][ ][Data 00][ ]
[Data 01][Cr]
[Data 00] 3D option
00 : 3D Picture Correction
01 : 3D Depth (3D Mode is Manual Only)
02 : 3D Viewpoint
06 : 3D Color Correction
07 : 3D Sound Zooming
08 : Normal Image View
09 : 3D Mode (Genre)
[Data 01] It has own range for each 3D option
determined by [Data 00].
1) When [Data 00] is 00
00 : Right to Left
01 : Left to Right
2) When [Data 00] is 01, 02
Data Min: 0 - Max: 14 (*transmit by Hexadecimal
code)
Data value range(0 - 20) converts Viewpoint range
(-10 - +10) automatically (Depending on model)
* This option works when 3D Mode (Genre) is manual
only.
3) When [Data 00] is 06, 07
00 : Off
01 : On
4) When [Data 00] is 08
00 : Revert to 3D video from 3D-to-2D
converted 2D video
01 : Change 3D video to 2D video, except
2D-to-3D video
* If conversion condition doesn’t meet, command is
treated as NG.
5) When [Data 00] is 09
00 : Standard
02 : Cinema
04 : Manual
01 : Sport
03 : Extreme
05 : Auto
Ack [v][ ][Set ID][ ][OK][Data00][Data01][x]
[v][ ][Set ID][ ][NG][Data00][x]
27. Auto Configure (Command: j u)
(Depending on model)
► To adjust picture position and minimize image
shaking automatically. It works only in RGB (PC)
mode.
Transmission [j][u][ ][Set ID][ ][Data][Cr]
Data 01 : To set Auto Configure
Ack [u][ ][Set ID][ ][OK/NG][Data][x]

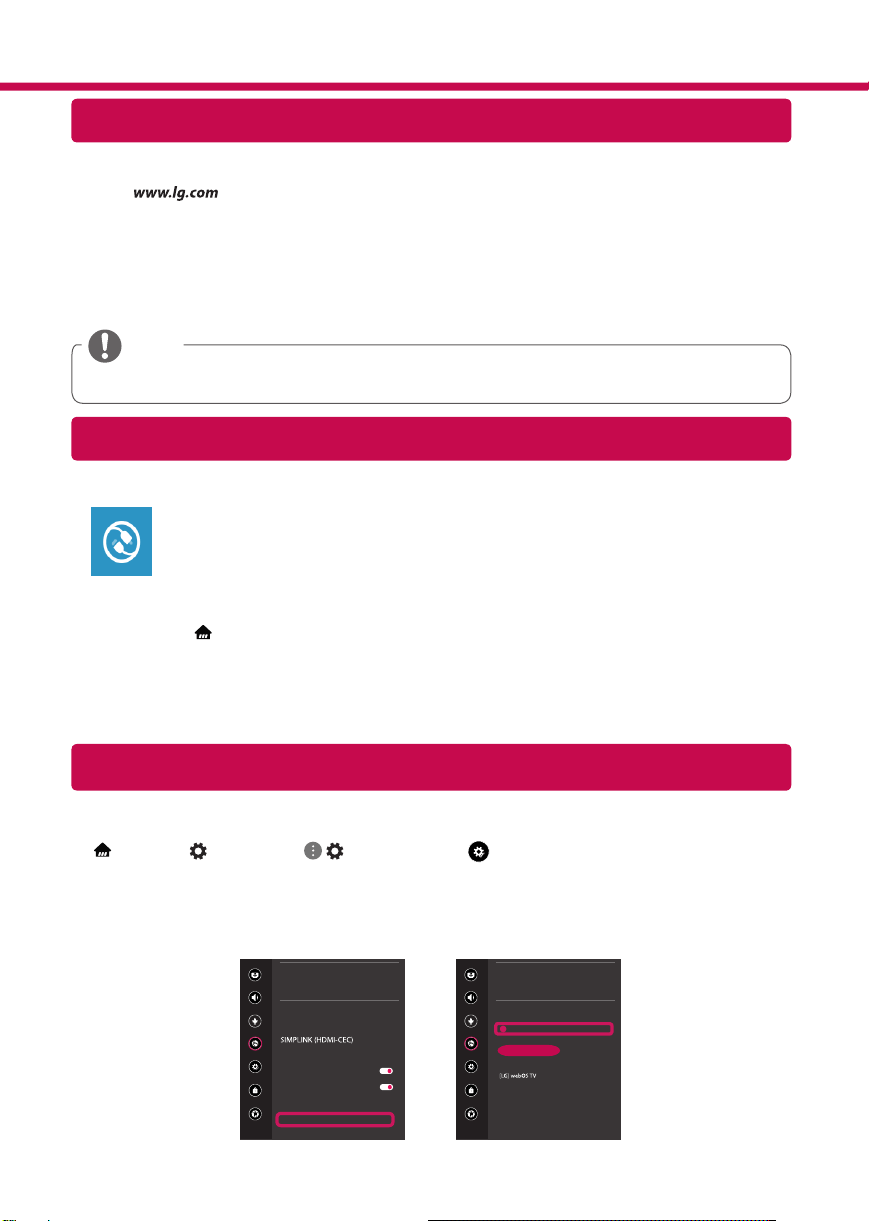
Network Settings
1 Press the (Home) button on the remote to
access the Home menu. Point the (Settings)
icon and select by pressing the Wheel (OK)
button on the remote.
2 Point the
( )
(All Settings)
icon and select
by pressing the Wheel (OK) button on the
remote.
All Settings
(
)
3 Select the Network
→
Wired Connection
(Ethernet) or Wi-Fi Connection.
Picture
NETWORK
TV Name
Wired Connection (Ethernet)
Not Connected
Wi-Fi Connection
Not Connected
Wi-Fi Direct
Sound
Channels
Network
General
Safety
Accessibility
4 The device automatically tries to connect to the
network available (wired network first).
When you select the Wi-Fi Connection, the
network list available is displayed. Choose the
network you wish to use.
Picture
WI-FI CONNECTION
Network /
Sound
Channels
Network
General
Safety
Accessibility
ꔐ
Add a Hidden Wireless Network
Connect via WPS PBC
Connect via WPS PIN
Advanced Wi-Fi Settings
For wireless AP (Router) that have the
symbol, you need to enter the security key.
5 If the connection is successful, the "Connected
to Internet" is displayed.
Picture
NETWORK
TV Name
Wired Connection (Ethernet)
Not Connected
Wi-Fi Connection
Connected to Internet
Wi-Fi Direct
Sound
Channels
Network
General
Safety
Accessibility
You can check the status of connection in
Advanced Wi-Fi settings.
Picture
WI-FI CONNECTION
Network /
Sound
Channels
Network
General
Safety
Accessibility
ꔐ
Add a Hidden Wireless Network
Connect via WPS PBC
Connect via WPS PIN
Advanced Wi-Fi Settings
* Image shown may differ from your TV.
* Image shown on a PC or mobile phone may vary depending on the OS(Operating System).
* App icon positions may vary on the platform, depending upon the software version.
SMART TV Quick Setup Guide
www.lg.com
Troubleshooting Network Problems
1 Press the (Home) button on the remote to
access the Home menu. Point the (Settings)
icon and select by pressing the Wheel (OK)
button on the remote.
2 Point the ( ) (All Settings) icon and select
by pressing the Wheel (OK) button on the
remote.
All Settings
(
)
3 Select the Network
→
Wired Connection
(Ethernet) or Wi-Fi Connection
→
Advanced
Wi-Fi Settings.
Picture
NETWORK
TV Name
Wired Connection (Ethernet)
Not Connected
Wi-Fi Connection
Not Connected
Wi-Fi Direct
Sound
Channels
Network
General
Safety
Accessibility
Picture
WI-FI CONNECTION
Network /
Sound
Channels
Network
General
Safety
Accessibility
ꔐ
Add a Hidden Wireless Network
Connect via WPS PBC
Connect via WPS PIN
Advanced Wi-Fi Settings
Follow the instructions below that match to your
network status.
Check the TV or the AP (Router).
When X appears next to TV:
1
Check the connection status of the TV, AP
(Router) and cable modem.
2
Power off and power on in the following order;
(1st) the cable modem, wait for the cable
modem to reset, (2nd) the AP (Router), wait for
the AP (Router) to reset and (3rd) the TV.
3
If you are using a static IP, enter the IP directly.
4
Contact internet service provider or AP (Router)
manufacturer.
Check the AP (Router) or consult your Internet
service provider.
When X appears next to Gateway:
1
Unplug the power cord of the AP (Router) or
cable modem, wait 5 seconds. Reapply power.
2
Initialize (Reset) the AP (Router) or cable
modem.
3
Contact Internet service provider or AP (Router)
manufacturer.
When X appears next to DNS:
1
Unplug the power cord of the AP (Router) or
cable modem, wait 5 seconds. Reapply power.
2
After the cable modem or AP (Router) has
initialized (Reset), try to reconnect.
3
Check that the MAC address of the TV/AP
(Router) is registered with your Internet service
provider. (The MAC address displayed on the
right pane of the network status window
should be registered with your Internet service
provider.)
4
Check the AP (Router) manufacturer’s website
to make sure your router has the latest firmware
version installed.
SmartShare PC SW Installing & Setting
1 Install the SmartShare PC SW programme on your PC.
2 Go to . Then, select your region.
3 Select Support.
4 Select Software & Drivers. Then, select SmartShare.
5 Download the SmartShare PC SW and install it on your PC. You can run the program when installation is
complete.
NOTE
y
Smartshare service is only available if TV and other devices are connected via a single AP (Router).
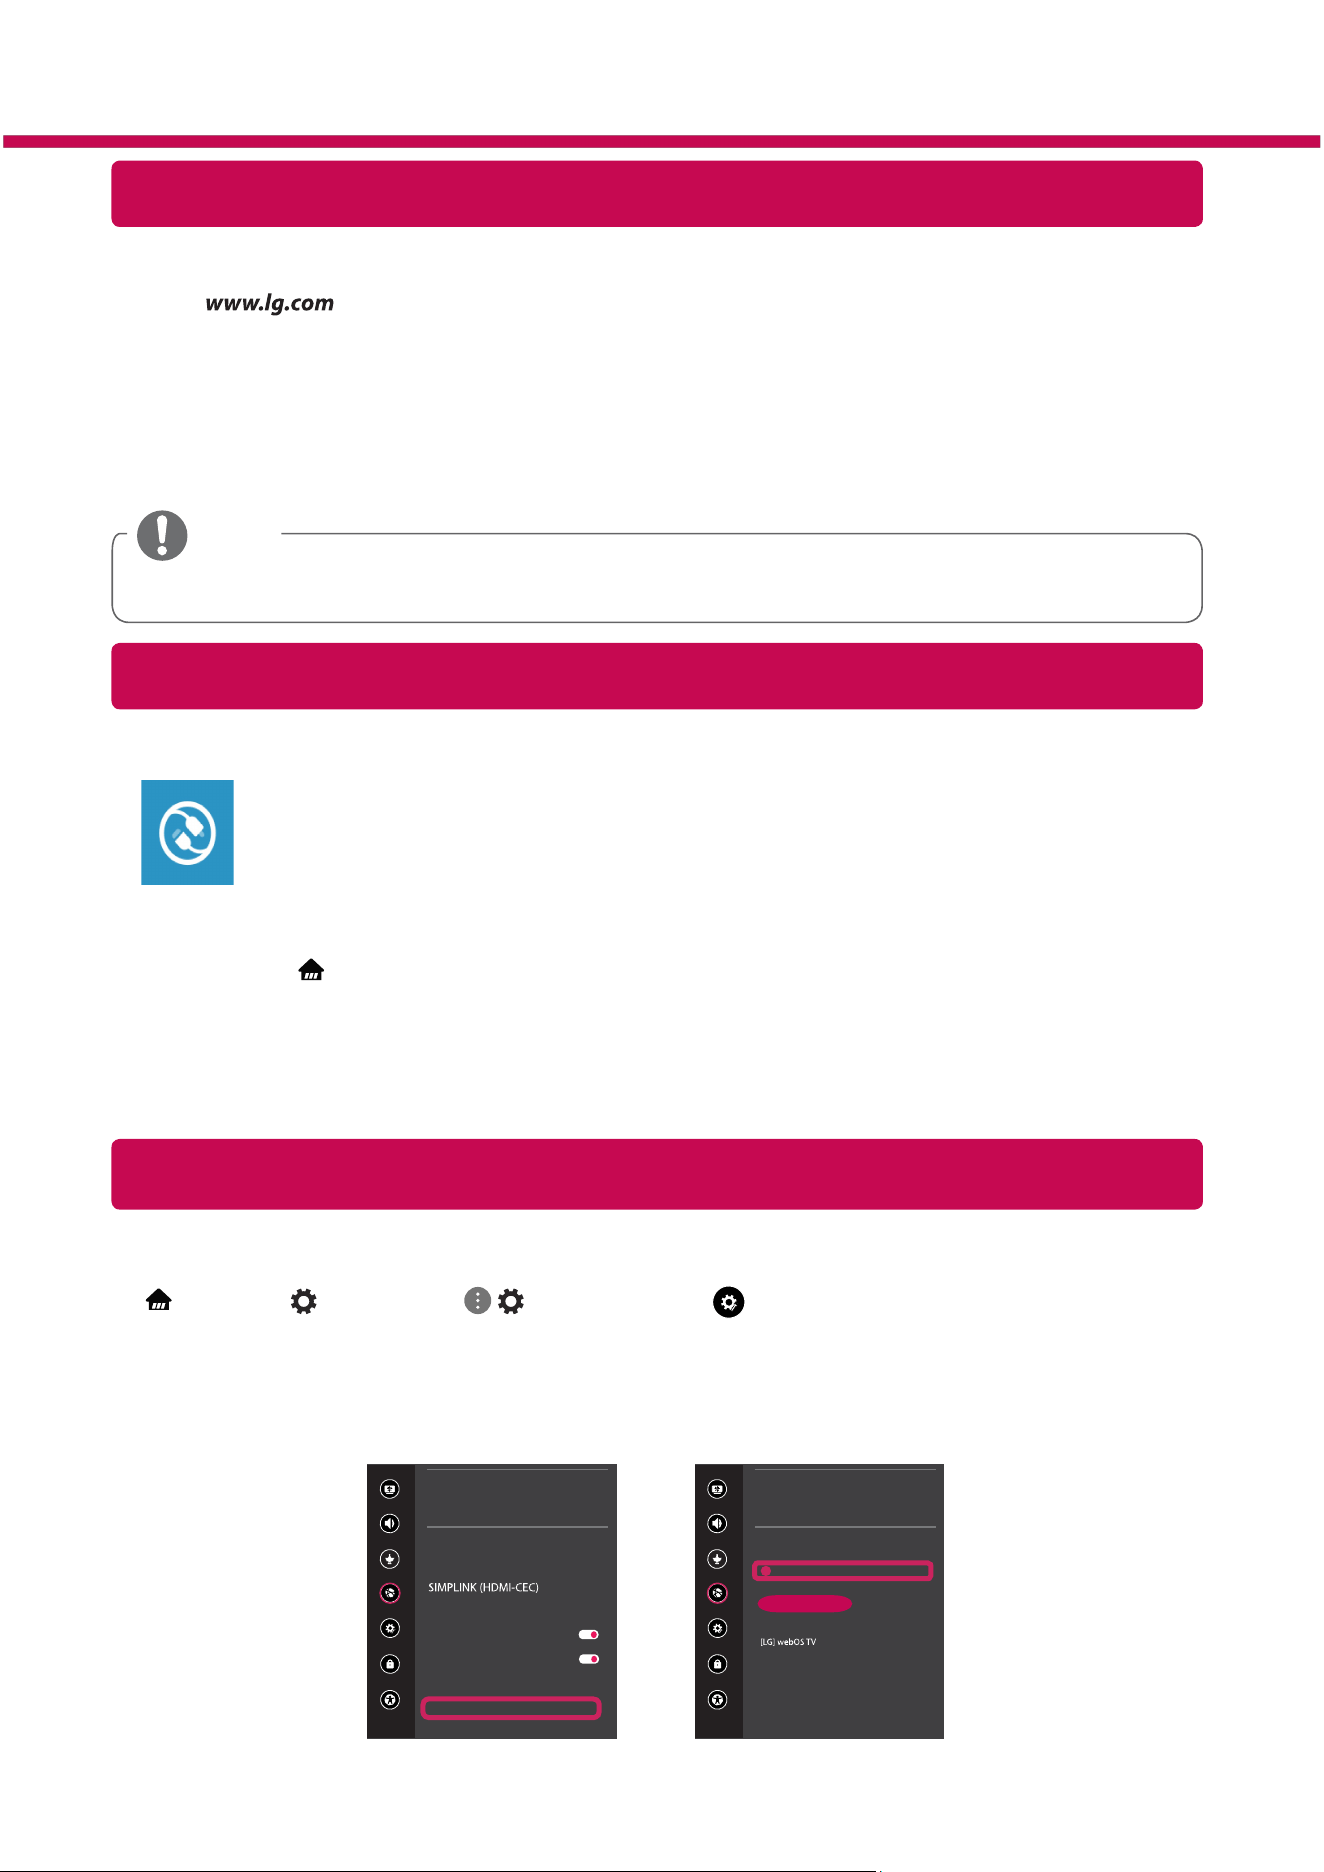
SmartShare Connection to Smartphone
Updating the TV Firmware
* If the TV is turned on for the first time after it was shipped from the factory, initialization of the TV may
take a few minutes.
1 (Home)
→
(Settings)
→
( )
(All Settings)
→
General
→
About This TV
→
CHECK FOR
UPDATES
2 After checking the version of the software, update it.
If you check the "Allow Automatic Updates", you can update the software automatically.
Picture
GENERAL
Sound
Channels
Network
General
Safety
Accessibility
Eco Mode
Mobile TV On
LG Wireless Keyboard
Settings Help
No Signal Image
Reset to Initial Settings
About This TV
User Agreements
Picture
ABOUT THIS TV
General /
Sound
Channels
Network
General
Safety
Accessibility
Software Version xx.xx.xx
ꔐ
Allow Automatic Updates
TV Information
User Guide
Open Source Software Notice
Set ID : 1
CHECK FOR UPDATES
1 Check that Wi-Fi is enabled on your smartphone. To use SmartShare, both devices must
on the same local network.
2 Install/run the app for sharing content on your smartphone (It's called LG TV Plus on LG
phones).
3 Enable your smartphone to share content files with other devices.
4 Open Device Connector application.
(Home)
→
Device Connector
→
Smartphone
→
CONTENT SHARE.
5 Select the file type you want to play (movie, audio or photo).
6 Select a movie, music or photo file to play on the TV.
7 Play the media file to view and enjoy it on your TV.
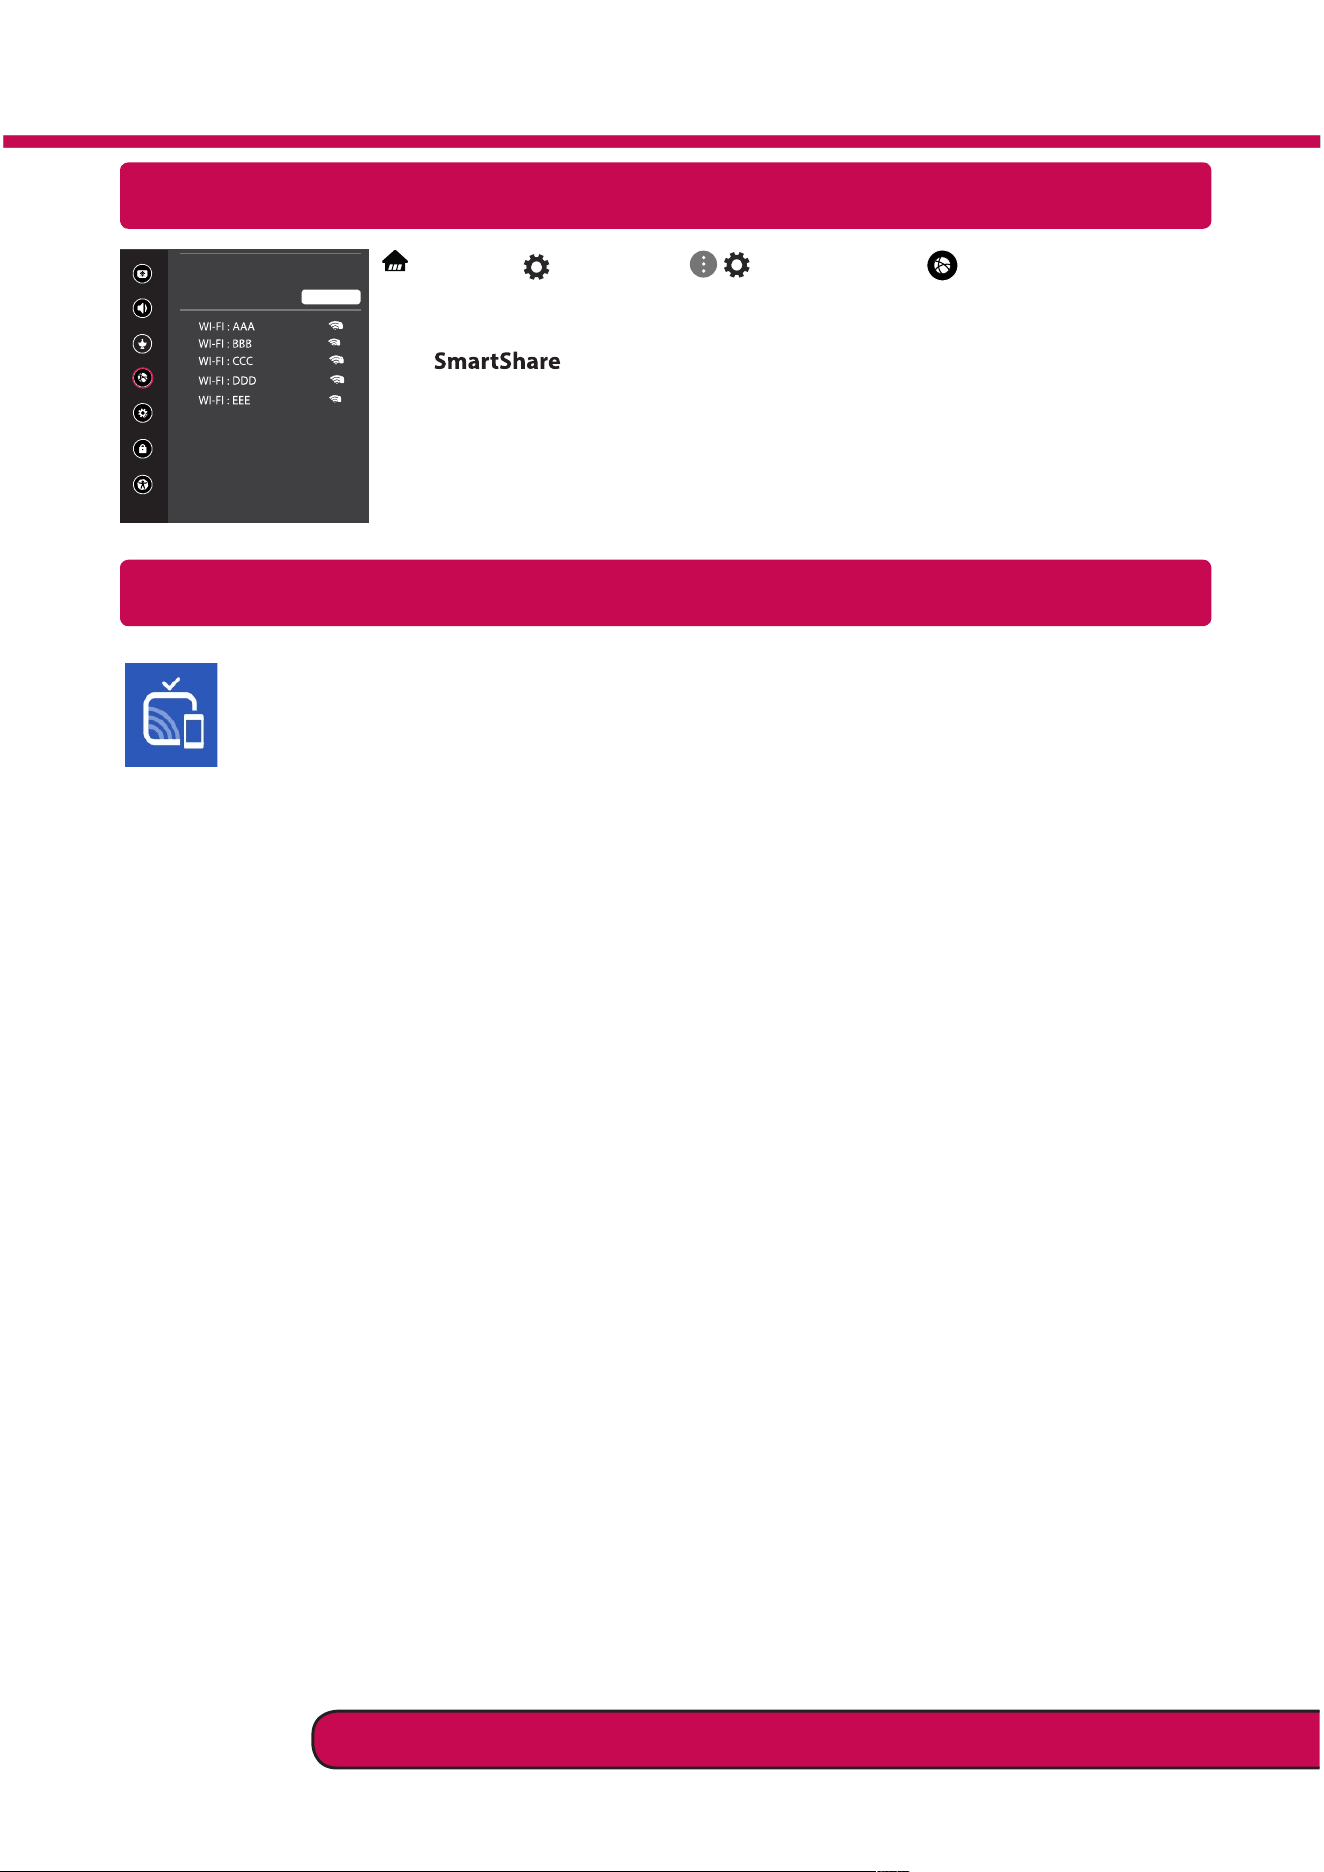
Miracast Setting
Wi-Fi Direct Setting
(Home)
→
(Settings)
→
( ) (All Settings)
→
Network
→
Wi-Fi Direct
If a local network is not available, you can connect a portable device directly to the TV
using Wi-Fi Direct.
With , you can share files or screens of devices connected to Wi-Fi Direct.
1 When you open Wi-Fi Direct menu, a list of available devices appears.
2 When you are prompted to request connection, select Yes. Wi-Fi Direct is now
connected to your TV.
* You can only use devices that support Wi-Fi Direct.
Please call LG Customer Service if you experience any problems.
Miracast allows a portable device to send video and sound securely to the TV wirelessly.
1 Miracast should be set to "ON" on your portable device.
2 When your TV is detected, select the device on your portable device.
When connection is completed, the device screen appears on the TV screen.
Picture
WI-FI Direct
Network /
Sound
Channels
Network
General
Safety
Accessibility
ꔐ
REFRESH LIST