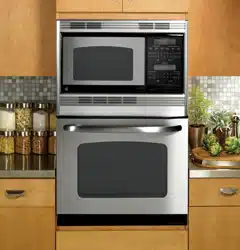
Documents: Go to download!
User Manual
- User Manual - (English, Spanish)
- Installation - (English)
- Quick Specs - (English)
- Operating Instructions
- Care and Cleaning
- Troubleshooting Tips
Table of contents
User manual Microwave Cooking Center
Operating Instructions
Using the microwave oven controls.
Throughout this manual, features and appearance may vary from your model. Your model may have one of the following controls.

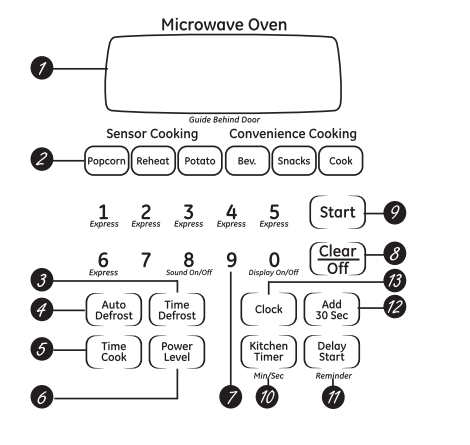
Microwave Oven Control Features and Settings
1. Display
-
Displays the time during cooking functions, the power level being used, the Auto Codes, the Auto Defrost food weights, the cooking mode and instructions
-
NOTE: The time on the microwave display is shown in minutes and seconds (1:30 is one minute, 30 seconds). On the lower oven, time is shown in hours and minutes (1:30 is one minute, 30 seconds).
2. Auto Sensor and Convenience Controls
-
The top row of pads lists specific items you may choose to heat or cook.
-
Popcorn: Use to pop popcorn.
-
Reheat: Use when foods need a quick warm up.
-
Potato: Use when cooking whole potatoes.
-
Beverage: Use to heat a cup of coffee or other beverage.
-
Snacks: Use to warm a variety of snack foods.
-
Cook: Use to automatically set the cooking times and power levels for a variety of foods.
3. Time defrost: Use Time Defrost for most other foods.
4. Auto Defrost: Use Auto Defrost for meat, poultry and fish.
5. Time Cook: Allows you to microwave for any time up to 99 minutes and 59 seconds.
6. Power Level: Press to choose the power level you want to set. Watch the display while pressing this pad to select the power level you want to set. You will also see a defrost level. This setting will allow you to choose your own defrost power level by using the number pads.
7. Number Pads: After pressing a function pad, press the number pads to set the exact amount of time you want to cook. For example, if you press the 1, 2 and 5 pads, you have set 1 minute and 25 seconds.
8. Clear/Off: Pressing the Clear/Off pad cancels all microwave cooking functions. It does not cancel the Kitchen Timer.
9. Start: After all selections are made, press this pad to start the oven. The Start pad must be pressed to turn on any function.
10. Kitchen Timer Min/Sec
-
Press to set the timer up to 99 minutes and 59 seconds. Press the number pads to set the time. Press the Kitchen Timer Min/Sec pad again to start. Press the Kitchen Timer Min/Sec pad twice to clear the display
-
Does not turn on microwave energy.
11. Delay Start :Allows you to set the microwave to delay cooking up to 12 hours.
12. Add 30 Sec: Each time you press this pad the set time is increased 30 seconds.
13. Clock: Press this pad before setting the clock.
Changing the microwave power level: The power level may be entered or changed immediately after entering the feature time for Time Cook, Time Defrost or Express Cook. The power level may also be changed during time countdown.

To change the power level…
- Press the Time Cook pad or the Time Defrost pad.
- Enter cooking or defrosting time.
- Press the Power Level pad.
- Select desired power level 1–10.
- Press the Start pad.
Variable power levels add flexibility to microwave cooking. The power levels on the microwave oven can be compared to the surface units on a range. Each power level gives you microwave energy a certain percent of the time.
- Power level 7 is microwave energy 70% of the time.
- Power level 3 is energy 30% of the time.
- Most cooking will be done on High (power level 10) which gives you 100% power. Power level 10 will cook faster but food may need more frequent stirring, rotating or turning over.
A lower setting will cook more evenly and need less stirring or rotating of the food. Some foods may have better flavor, texture or appearance if one of the lower settings is used. Use a lower power level when cooking foods that have a tendency to boil over, such as scalloped potatoes.
Rest periods (when the microwave energy cycles off) give time for the food to “equalize” or transfer heat to the inside of the food. An example of this is shown with power level 3- the defrost cycle. If microwave energy did not cycle off, the outside of the food would cook before the inside was defrosted.
Here are some examples of uses for various power levels:
- High 10: Fish, bacon, vegetables, boiling liquids.
- Med-High 7: Gentle cooking of meat and poultry; baking casseroles and reheating.
- Medium 5: Slow cooking and tenderizing for stews and less tender cuts of meat.
- Low 2 or 3: Defrosting; simmering; delicate sauces.
- Warm 1: Keeping food warm; softening butter.
Using the timed microwave features

Time Cook I
Allows you to microwave for any time up to 99 minutes and 59 seconds.
Power level 10 (High) is automatically set, but you may change it for more flexibility.
- Press the Time Cook pad.
- Enter cooking time. For example, press 1, 5, 0 and 0 for 15 minutes.
- Change power level if you don’t want full power. (Press the Power Level pad. Select a desired power level 1–10.)
- Press the Start pad.
You may open the door during Time Cook to check the food. Close the door and press the Start pad to resume cooking
Time Cook II
Lets you change power levels automatically during cooking. Here’s how to do it:
- Press the Time Cook pad.
- Enter cooking time.
- Change power level if you don’t want full power. (Press the Power Level pad. Select a desired power level 1–10.)
- Press the Time Cook pad again.
- Enter the second cook time.
- Change the power level if you don’t want full power. (Press the Power Level pad. Select a desired power level 1–10.)
- Press the Start pad.
At the end of Time Cook I, Time Cook II counts down.
Express Cook

- This is a quick way to set cooking time for 1-6 minutes
- Press one of the Express pads (from 1 to 6 ) for 1 to 6 minutes of cooking at power level 10. For example, press the 2 pad for 2 minutes of cooking time.
- The power level can be changed as time is counting down. Press the Power Level pad and enter 1–10.
Add 30 Seconds: You can use the feature two ways

- It will add 30 seconds to the time counting down each time the pad is pressed.
- It can be used as a quick way to set 30 seconds of cooking time. No need to press the Start pad; the oven will start immediately
A dull thumping noise may be heard during defrosting. This is normal when oven is not operating at High power.

At one half of selected defrosting time, the oven signals TURN. At this time, turn food over and break apart or rearrange pieces more even defrosting. Shield any warm areas with small pieces of foil
Time Defrost
Allows you to defrost for a selected length of time. See the Defosting Gud for suggested times. (Auto Defrost explained in the About the auto feature section.)
- Press the Time Defrost pad twice.
- Enter defrosting time.
- Press the Start pad.
- Turn food over when the oven signals.
- Press the Start pad.
Power level is automatically set at 3, but can be changed. You can defrost small items quickly by raising the power level after entering the time. Power level 7 cuts the total defrosting time in about half; power level 10 cuts the total time to approximately 1/3. However, food will need more frequent attention than usual.
Defrosting Tips
- Foods frozen in paper or plastic can be defrosted in the package. Closed packages should be slit, pierced or vented AFTER food has partially defrosted. Plastic storage containers should be partially uncovered.
- Family-size, prepackaged frozen dinners can be defrosted and microwaved. If the food is in a foil container, transfer it to a microwavesafe dish.
- Foods that spoil easily should not be allowed to sit out for more than one hour after defrosting. Room temperature promotes the growth of harmful bacteria.
- For more even defrosting of larger foods, such as roasts, use Auto Defrost. Be sure large meats are completely defrosted before cooking.
- When defrosted, food should be cool but softened in all areas. If still slightly icy, return to the microwave very briefly, or let it stand a few minutes.
Using the microwave sensor cooking features.
The Sensor Features detect the increasing humidity released during cooking. The oven automatically adjusts the cooking time to various types and amounts of food.
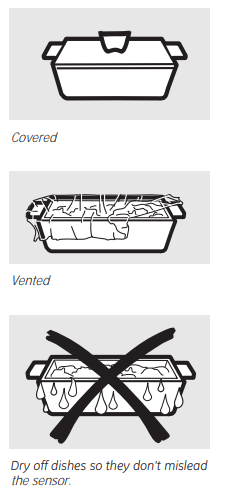
Sensor Cooking
- The proper containers and covers are essential for best sensor cooking.
- Always use microwave-safe containers and cover them with lids or vented plastic wrap. Never use tight sealing plastic containers - they can prevent steam from escaping and cause food to overcook.
- Be sure the outside of the cooking containers and the inside of the microwave oven are dry before placing food in the oven. Beads of moisture turning into steam can mislead the sensor.
Popcorn

Use only with prepackaged microwave popcorn weighing 1.75 to 3.5 ounces.
To use the Popcorn feature:
- Follow package instructions, using Time Cook if the package is less than 1.75 ounces or larger than 3.5 ounces. Place the package of popcorn in the center of the microwave.
- Press the Popcorn pad. The oven starts immediately.
If you open the door while POP is displayed, ERROR will appear. Close the door, press the Clear/Off pad and begin again.
How to Adjust the Popcorn Program to Provide a Shorter or Longer Cook Time:
- If you find that the brand of popcorn you use underpops or overcooks consistently, you can add or subtract 20–30 seconds to the automatic popping time.
- To add time: After pressing the Popcorn pad, press the 9 pad immediately after the oven starts for an extra 20 seconds. Press the 9 pad again to add another 10 seconds (total 30 seconds additional time).
- To subtract time: After pressing the Popcorn pad, press the 1 pad immediately after the oven starts for 20 seconds less cooking time. Press the 1 pad again to reduce cooking time another 10 seconds (total 30 seconds less time)
Reheat

The Reheat feature reheats single servings of previously cooked foods or a plate of leftovers.
- Place covered food in the oven. Press the Reheat pad. The oven starts immediately.
- The oven signals when steam is sensed and the time remaining begins counting down.
Do not open the oven door until time is counting down. If the door is opened, close it and press the Start pad immediately
After removing food from the oven. stir. if possible. to even out the temperature. If the food is not hot enough. use Time Cook to reheat for more time. Reheated foods may have wide variations in temperature. Some areas may be extremely hot enough, use Time Cook to refeat for more time. Reheated foods may have wide variations in temperature. Some areas may be extremely hot.
Some foods not recommended for use with Reheat - it is best to use Time Cook for these foods:
- Bread products.
- Foods that must be reheated uncovered.
- Foods that need to be stirred or rotated.
- Foods calling for a dry look or crisp surface after reheating
How to Change the Automatic Settings:
- To reduce time by 10%: Press the 1 pad after the feature pad.
- To add 10% to cooking time: Press the 9 pad after the feature pad.
Potato
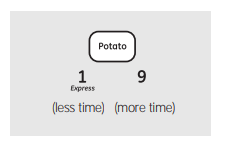
The Potato feature cooks 1/2–2 lbs. of potatoes.
- Pierce skin with fork and place potatoes on the turntable. If cooking three or more potatoes, arrange in a star pattern.
- Press the Potato pad. The oven starts immediately. The oven signals when steam is sensed and the time remaining begins counting down.
Do not open the oven door until time is counting down. If the door is opened, close it and press the Start pad immediately.
If food is not done enough, use Time Cook to cook for more time.
Using the microwave convenience cooking features.
Drinks heated with the Beverage feature may be very hot. Remove the container with care.
Beverage

Press the Beverage pad to heat a cup of coffee or other beverage.
Snacks

The Snacks feature automatically sets the microwaving times and power levels to warm a
variety of snacks food
- Press the Snacks pad.
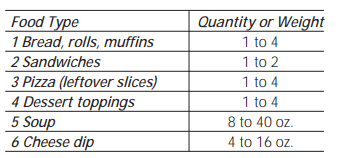
- Select snack type 1–6 (see the Snacks Guide).
- Enter the number of items or the food weight in ounces.
- Press the Start pad.
Hint: You can press and hold the Snacks pad during cooking to display the remaining microwaving time.
Snacks Guide
Cook

The Cook feature automatically sets the cooking times and power levels for a variety of foods.
- Press the Cook pad.
- Select food type 1–9 (see the Cook Guide below).
- Enter weight in ounces.
- Press the Start pad.
Hint: Press and hold the Cook pad during cooking to display the remaining cook time.
Cook Guide
- Canned Vegetables: 4 to 20 oz. Use microwave-safe casserole or bowl. Cover with lid or vented plastic wrap.
- Frozen Vegetables: 4 to 16 oz. Use microwave-safe casserole or bowl. Follow package instructions for adding water. Cover with lid or vented plastic wrap.
- Fresh Vegetables: 4 to 16 oz. Use microwave-safe casserole or bowl. Add 2 tablespoons water for each serving. Cover with lid or vented plastic wrap.
- Potatoes: 8 to 40 oz. Pierce skin with fork. Place potatoes on the turntable.
- Fish: 4 to 16 oz. Use oblong, square or round dish. Cover with vented plastic wrap.
- Chicken Pieces: 4 to 40 oz. Use oblong, square or round dish. Cover with vented plastic wrap or wax paper.
- Ground Meat (beef, pork, turkey): 8 to 48 oz. Use round casserole dish. Crumble meat into dish. Cover with lid (beef, pork, turkey) or vented plastic wrap.
- Bacon: 2 to 10 oz. Layer strips on a plate, 4 to a layer. Cover each layer with a paper towel.
- Pizza (frozen, microwaveable): 4 to 16 oz. Follow package instructions to prepare pizza for microwaving.
Using the microwave auto feature.
The Defrost Auto/Time feature gives you two ways to defrost frozen foods. Press Auto Defrost once for Auto Defrost or twice for Time Defrost.

Auto Defrost
Use Auto Defrost for meat, poultry and fish up to 6 pounds. Use Time Defrost for most other frozen foods.
Auto Defrost automatically sets the defrosting times and power levels to give even defrosting results for meats, poultry and fish.
- Press the Auto Defrost pad once.
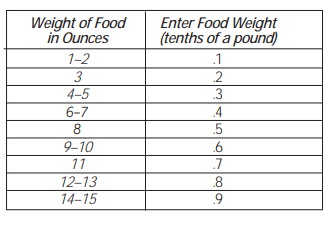
- Using the Conversion Guide at right, enter food weight. For example, press pads 1 and 2 for 1.2 pounds (1 pound, 3 ounces).
- Press Start.
Time Defrost is explained in the Using the timed microwave features section.
- Remove meat from package and place on microwave-safe dish.
- Twice during defrost, the oven signals TURN. At each TURN signal, turn the food over. Remove defrosted meat or shield warm areas with small pieces of foil.
- After defrosting, most meats need to stand 5 minutes to complete defrosting. Large roasts should stand for about 30 minutes.
Conversion Guide: If the weight of food is stated in pounds and ounces, the ounces must be converted to tenths (.1) of a pound.
Using the other microwave features.
Cooking Complete Reminder: To remind you that you have food in the oven, the oven will beep once a minute until you either open the oven door or press the Clear/Off pad.
Clock
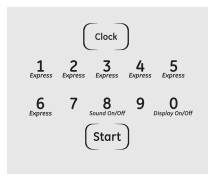
Press to enter the time of day or to check the time of day while microwaving
- Press the Clock pad.
- Enter time of day.
- Press the Start pad or the Clock pad.
Display On/Off

To turn the clock display on or off, press and hold the 0 pad for about 3 seconds. The Display On/Off feature cannot be used while a cooking feature is in use.
Delay Start

Delay Start allows you to set the microwave to delay cooking up to 12 hours
- Press the Delay Start pad.
- Enter the time you want the oven to start. (Be sure the microwave clock shows the correct time of day.)
- Select your desired cooking program.
- Press the Start pad.
The Delay Start time will be displayed. The oven will automatically start at the delayed time.
The time of day may be displayed by pressing the Clock pad.
NOTE: You cannot use Delay Start with Popcorn or Reheat.
Sound On/Off

To turn the beeper sound on or off, press and hold the 8 pad for about 3 seconds.
Child Lockout

- You may lock the control panel to prevent the microwave from being accidentally started or used by children.
- To lock or unlock the controls, press and hold the Clear/Off pad for about 3 seconds
- When the control panel is locked, an L will be displayed to the extreme right.
Kitchen Timer

Kitchen Timer operates as a minute timer and can be used at any time, even when the oven is operating.
How to use as a minute timer:
- Press the Kitchen Timer Min/Sec pad.
- Enter time you want to count down.
- Press the Kitchen Timer Min/Sec pad.
When time is up, the oven will signal. To turn off the timer signal, press the Kitchen Timer Min/ Sec pad.
NOTE: The timer indicator will be lit while the timer is operating.
To cancel the timer during the countdown, press the Kitchen Timer Min/Sec pad.
Reminder

The Reminder feature can be used like an alarm clock and can be used at any time, even when the oven is operating. The Reminder time can be set up to 12 hours later.
- Press the Delay Start pad.
- Enter the time you want the oven to remind you. (Be sure the microwave clock shows the correct time of day.)
- Press the Start pad. When Reminder signal occurs, press the Delay Start pad to turn it off. The Reminder time may be displayed by pressing the Delay Start pad.
NOTE: REM will remain on the display to show that the Reminder is set until the Reminder time
is reached and the door is opened or Clear/ Off is pressed.
Using the lower oven controls.
Throughout this manual, features and appearance may vary from your model. Your model may have one of the following controls.
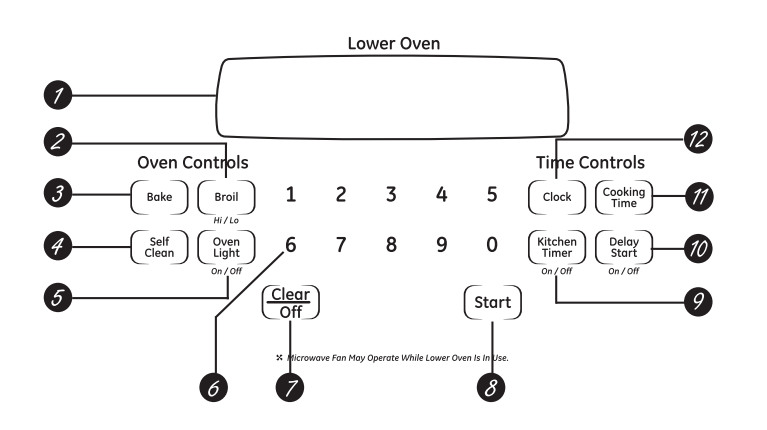

Lower oven control, clock and timer features and Settings
1. Display
- Shows the time of day, oven temperature, whether the oven is in the bake, broil or selfcleaning mode and the times set for the timer or automatic oven operations.
- NOTE: The time on the lower oven display is shown in hours and minutes (1:30 is one hour, 30 minutes). On the microwave oven, time is shown in minutes and seconds (1:30 is one minute, 30 seconds).
- If “F– and a number or letter” flash in the display and the oven control signals, this indicates a function error code. Press the Clear/Off pad. Allow the oven to cool for one hour. Put the oven back into operation. If the function error code repeats, disconnect the power to the oven and call for service.
- If your oven was set for a timed oven operation and a power outage occurred, the clock and all programmed functions must be reset.
- The time of day (may be incorrect) will flash in the display when the there has been a power outage.
2. Broil Hi/Lo Pad
- Press to select the broil function.
3. Bake Pad
- Press to select the bake function.
4. Self clean Pad
- Press to select the self-cleaning function. See the Using the self-cleaning lower oven section.
5. Oven Light Pad
- Press to turn the oven light on or off
6. Number Pads
- Use to set any function requiring numbers such as the time of day on the clock, the timer, the oven temperature, the start time and length of operation for timed baking and self-cleaning.
7. Clear / Off Pad
- Press to cancel ALL oven operations except the clock and timer.
8. Start Pad
- Must be pressed to start any cooking or cleaning function.
9. Kitchen Timer On/Off Pad
- Press to select the timer feature.
10. Delay Start Pad
- Use along with Cooking Time or Self Clean pads to set the oven to start and stop automatically at a time you set.
11. Cooking Time Pad
- Press and then press the number pads to set the amount of time you want your food to cook. The oven will shut off automatically when the cooking time has run out, unless the Cook and Hold feature was set.
12. Clock Pad
- Press before setting the clock.
Using the lower oven.
To avoid possible burns, place the racks in the desired position before you turn the oven on.
Before you begin…

- The racks have stop-locks, so that when placed correctly on the supports, they will stop before coming completely out, and will not tilt.
- When placing and removing cookware, pull the rack out to the bump on the rack support.
- To remove a rack, pull it toward you, tilt the front end up and pull it out.
- To replace, place the end of the rack (stoplocks) on the support, tilt up the front and push the rack in.
- NOTE: The oven has 7 rack positions.
- CAUTION: Never place cooking utensils or any other items on the oven floor. There is a heating element beneath the oven floor. Placing items on the oven floor may cause the oven to overheat, resulting in damage to the oven and risk of damage or fire to cabinets
How to Set the Oven for Baking or Roasting

- Press the Bake pad.
- Press the number pads to set the desired temperature.
- Press the Start pad.
- Check food for doneness at minimum time on recipe. Cook longer if necessary.
- Press the Clear/Off pad when cooking is complete.

Preheating and Pan Placement

30” Ovens
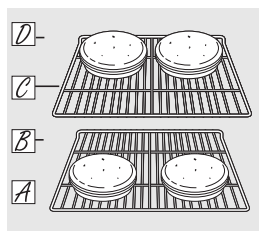
27” Ovens
- Preheat the oven if the recipe calls for it. Preheating is necessary for good results when baking cakes, cookies, pastry and breads.
- To preheat, set the oven at the correct temperature. The control will beep when the oven is preheated and the display will show your set temperature. This may take approximately 10-15 minutes.
- Baking and roasting results will be better if the rack is positioned so that food is centered in the oven cavity as much as possible. Follow package directions on prepackaged and frozen foods for pan placement.
- Pans should not touch each other or the walls of the oven. Leave approximately 1-1/2” from the oven walls. If you need to use two racks, stagger the pans so one is not directly above the other.
- For 27” Ovens: If baking four cake layers at the same time, place two layers on rack A and two layers on rack C.
- For 30” Ovens: If baking four cake layers at the same time, place two layers on rack B and two layers on rack D.
- Stagger pans on the rack so one is not directly above the other
Aluminum Foil and Oven Liners
- CAUTION: Do not use any type of foil or oven liner to cover the oven bottom.These items can trap heat or melt. resulting in damage to the product and risk of shock. smoke or fire. Damage from improper use of these items is not covered by the product warranty.
- Foil may be used to catch spills by placing a sheet on a lower rack, several inches below the food. Do not use more foil than necessary and never entirely cover an oven rack with aluminum foil. Keep foil at least 1-1/2” from oven walls to prevent poor heat circulation.
How to Set the Oven for Broiling

Close the door. Always broil with the door closed.
If your oven is connected to 208 Volts, rare steaks may be broiled by preheating the broiler and positioning the oven rack one position higher
Close the door. Always broil with the door closed.
- Place the meat or fish on a broiler grid in a broiler pan.
- Follow suggested rack positions in the Broiling Guide.
- Press the Broil Hi/Lo pad once for HI Broil.To change to LO Broil, press the Broil Hi/ Lo pad again.
- Press the Start pad.
- When broiling is finished, press the Clear/ Off pad.
Broiling Guide
The size, weight, thickness, starting temperature and your preference of doneness will affect broiling times. This guide is based on meats at refrigerator temperature
 The U.S. Department of Agriculture says “Rare beef is popular. but you should know that cooking it to only 140°F means some food poisoning organisms may survive.” (Source: Safe Food Book. Your Kitchen Guide. USDA Rev. June 1985.)
Preheat the broiler for 2 minutes to improve performance

Using the lower oven clock and timer.
To Set the Clock

Make sure the clock is set to the correct time of day
The clock must be set to the correct time of day for the automatic oven timing functions to work properly. The time of day cannot be changed during a timed baking or self-cleaning cycle
- Press the Clock pad.
- Press the number pads.
- Press the Start pad until the time of day shows in the display
To Set the Timer

The timer is a minute timer only.
The timer does not control oven operations. The maximum setting on the timer is 9 hours and 59 minutes
- Press the Kitchen Timer On/Off pad.
- Press the number pads until the amount of time you want shows in the display. For example, to set 2 hours and 45 minutes, press 2, 4 and 5 in that order. Maximum time that can be entered in minutes is 59. Cooking times more than 59 minutes should be changed to hours and minutes. For example, enter 90 minutes as 1 hr. 30 minutes. If you make a mistake, press the Kitchen Timer On/Off pad and begin again.
- Press the Start pad. After pressing the Start pad, SET disappears; this tells you the time is counting down, although the display does not change until one minute has passed. Seconds will not be shown in the display until the last minute is counting down.
- When the timer reaches :00, the control will beep 3 times followed by one beep every 6 seconds until the Kitchen Timer On/Off pad is pressed.
The 6-second tone can be canceled by following the steps in the Special features of your lower oven control section under Tones at the End of a Timed Cycle.
To Reset the Timer
- If the display is still showing the time remaining, you may change it by pressing the Kitchen Timer On/Off pad, then press the number pads until the time you want appears in the display.
- If the remaining time is not in the display (clock, delay start or cooking time are in the display), recall the remaining time by pressing the Kitchen Timer On/Off pad and then pressing the number pads to enter the new time you want.
To Cancel the Timer
- Press the Kitchen Timer On/Off pad twice.
Using the lower oven timed baking and roasting features.
NOTE: Foods that spoil easily-such as milk, eggs, fish, stuffings, poultry and pork-should not be allowed to sit for more than 1 hour before or after cooking. Room temperature promotes the growth of harmful bacteria. Be sure that the oven light is off because heat from the bulb will speed harmful bacteria growth.
How to Set an Immediate Start and Automatic Stop
The oven will turn on immediately and cook for a selected length of time. At the end of the cooking time. the oven will turn off automatically.
Make sure the clock shows the correct time of day.
- Press the Bake pad.
- Using the number pads, enter the desired temperature.
- Press the Cooking Time pad. NOTE: If your recipe required preheating, you may need to add additional time to the length of the cooking time.
- Using the number pads, enter the desired baking time. Maximum time that can be entered in minutes is 59. Cooking times more than 59 minutes should be changed to hours and minutes. For example, enter 90 minutes as 1 hr. 30 minutes. The oven temperature and the cooking time that you entered will be displayed.
- Press the Start pad.
The display shows the oven temperature that you set and the cooking time countdown. The display starts changing once the temperature reaches 100°F.
The oven will continue to cook for the programmed amount of time, then shut off automatically, unless the Cook and Hold feature was set. See the Special features of your lower oven control section.
Press the Clear/Off pad to clear the display
How to Set a Delayed Start and Automatic Stop

You can set the oven control to delay-start the oven, cook for a specific length of time and then turn off automatically.
Make sure the clock shows the correct time of day.
- Press the Bake pad.
- Using the number pads, enter the desired temperature.
- Press the Cooking Time pad. NOTE: If your recipe required preheating, you may need to add additional time to the length of the cooking time.
- Using the number pads, enter the desired baking time. Maximum time that can be entered in minutes is 59. Cooking times more than 59 minutes should be changed to hours and minutes. For example, enter 90 minutes as 1 hr. 30 minutes. The oven temperature and the cooking time that you entered will be displayed.
- Press the Delay Start pad.
- Using the number pads, enter the time of day you want the oven to turn on and start cooking.
- Press the Start pad.
NOTE: An attention tone will sound if you are using timed baking and do not press the Start pad after entering the baking temperature.
If you would like to check the times you have set, press the Delay Start pad to check the start time you have set or press the Cooking Time pad to check the length of cooking time you have set.
When the oven turns on at the time of day you have set, the display will show the changing temperature (starting at 100°F) and the cooking time countdown. The display starts changing once the temperature reaches 100°F.
The oven will continue to cook for the programmed amount of time, then shut off automatically, unless the Cook and Hold feature was set. See the Special features of your lower oven control section.
Press the Clear/Off pad to clear the display.
Adjust the lower oven thermostat—Do it yourself!
You may find that your new oven cooks differently than the one it replaced. Use your new oven for a few weeks to become more familiar with it. If you still think your new oven is too hot or too cold, you can adjust the thermostat yourself.
Do not use thermometers, such as those found in grocery stores, to check the temperature setting of your oven. These thermometers may vary 20-40 degrees.
NOTE: This adjustment will only affect baking and roasting temperatures; it does not affect broiling or self-cleaning temperatures. The adjustment will be retained in memory after a power failure.
To Adjust the Thermostat

- Press the Bake and Broil Hi/Lo pads at the same time for 3 seconds until the display shows SF.
- Press the Bake pad. A two digit number shows in the display. Press Bake once to decrease (-) the oven temperature, or twice to increase (+).
- The oven temperature can be adjusted up to (+) 35°F hotter or (-) 35°F cooler. Press the number pads the same way you read them. For example, to change the oven temperature 15°F, press 1 and 5.
- When you have made the adjustment, press the Start pad to go back to the time of day display. Use your oven as you would normally.
The type of margarine will affect baking performance!
- Most recipes for baking have been developed using high-fat products such as butter or margarine (80% fat). If you decrease the fat, the recipe may not give the same results as with a higher-fat product.
- Recipe failure can result if cakes, pies,pastries,cookies or candies are made with low-fat spreads. The lower the fat content of a spread product, the more noticeable these differences become.
- Federal standards require products labeled “margarine” to contain at least 80% fat by weight. Low-fat spreads, on the other hand, contain less fat and more water. The high moisture content of these spreads affect the texture and flavor of baked goods. For best results with your old favorite recipes, use margarine, butter or stick spreads containing at least 70% vegetable oil.
Using the self-cleaning lower oven
The oven door must be closed and all controls must be set correctly for the cycle to work properly
Before a Clean Cycle
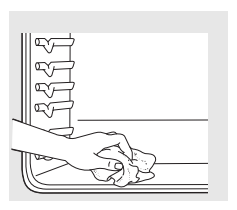
Wipe up heavy soil on the oven bottom.
- WARNING: Never place cooking utensils or any other items on the oven floor. There is a heating element beneath the oven floor. Placing items on the oven floor may cause the oven to overheat, resulting in damage to the oven and risk of damage or fire to cabinets.
- We recommend venting your kitchen with an open window or using a ventilation fan or hood during the first self-clean cycle.
- Remove any broiler pan, broiler grid, all cookware and any aluminum foil from the oven.
- The oven racks can be self-cleaned, but they will darken, lose their luster and become hard to slide.
- Do not use abrasives or oven cleaners. Clean the top, sides and outside of the oven door with soap and water.
- Make sure the oven light bulb cover (on some models) is in place and the oven light is off.
- IMPORTANT: The health of some birds is extremely sensitive to the fumes given off during the self-cleaning cycle of any oven. Move birds to another well ventilated room.
How to Set the Oven for Cleaning

- Press the Self Clean pad.
- Using the number pads, enter the desired clean time, if a time other than 4 hours is needed. Clean cycle time is normally 4 hours. You can change the clean time to any time between 3 hours and 5 hours, depending on how dirty your oven is.
- Press the Start pad.
The door locks automatically. The display will show the clean time remaining. It will not be possible to open the oven door until the temperature drops below the lock temperature and the LOCKED or LOCKED DOOR light goes off.
When the LOCKED or LOCKED DOOR light goes off, you will be able to open the door.
- The word LOCKED or LOCKED DOOR will flash and the oven control will signal if you set the clean cycle and forget to close the oven door.
- To stop a clean cycle, press the Clear/Off pad. When the LOCKED or LOCKED DOOR light goes off, indicating the oven has cooled below the locking temperature, you will be able to open the door.
How to Delay the Start of Cleaning (available on JKP86 models only)

- Press the Self Clean pad.
- Using the number pads, enter the desired clean time.
- Press the Delay Start pad. The earliest start time you can set will appear in the display.
- Using the number pads, enter the time of day you want the clean cycle to start.
- Press the Start pad.
The door locks automatically. The display will show the start time. It will not be possible to open the oven door until the temperature drops below the lock temperature and the LOCKED or LOCKED DOOR light goes off.
When the LOCKED or LOCKED DOOR light goes off, you will be able to open the door.
After a Clean Cycle
You may notice some white ash in the oven. Wipe it up with a damp cloth after the oven cools.
If white spots remain, remove them with a soap-filled steel wool pad and rinse thoroughly with a vinegar and water mixture.
These deposits are usually a salt residue that cannot be removed by the clean cycle.
If the oven is not clean after one clean cycle, repeat the cycle
- You cannot set the oven for cooking until the oven is cool enough for the door to unlock.
- While the oven is self-cleaning, you can press the Clock pad to display the time of day. To return to the clean countdown, press the Cooking Time pad.
- If the racks become hard to slide, apply a small amount of vegetable oil or cooking oil to a paper towel and wipe the edges of the racks with the paper towel.
Special features of your lower oven control.
Your new touch pad control has additional features that you may choose to use. The following are the features and how you may activate them.
The special feature modes can only be activated while the display is showing the time of day. They remain in the control's memory until the steps are repeated.
When the display shows your choice, press the Start pad. The special features will remain in memory after a power failure.
12-Hour Shutoff

With this feature. should you forget and leave the oven on. the control will automatically turn off the oven after 12 hours during baking functions or after 3 hours during a broil function.
If you wish to turn OFF this feature. follow the steps below.
- Press the Bake and Broil Hi/Lo pads at the same time for 3 seconds until the display shows SF.
- Press the Delay Start pad until no shdn (no shutoff) appears in the display.
- Press the Start pad to activate the no shutoff and leave the control set in this special features mode
Fahrenheit or Centigrade Temperature Selection

Your oven control is set to use the Fahrenheit temperature selections, but you may change this to use the Centigrade selections.
- Press the Bake and Broil Hi/Lo pads at the same time for 3 seconds until the display shows SF.
- Press the Broil Hi/Lo pad. The display will show F (Fahrenheit).
- Press the Broil Hi/Lo pad again. The display will show C (Centigrade).
- Press the Start pad.
Control Lockout

Your control will allow you to lock down the touch pads so they cannot be activated when pressed
- Press the Bake and Broil Hi/Lo pads at the same time for 3 seconds until the display shows SF.
- Press the Self Clean pad. The display will show LOC OFF. Press the Self Clean pad again. The display will show LOC ON.
- Press the Start pad to activate the control lockout feature and leave the control set in this special features mode.
When this feature is on and the touch pads are pressed, the display will show LOC.
To unlock the control, repeat steps 1 and 2. Press the Start pad when the display shows
See other models: GTE18ISHDRSS AHK40LKG1 HTX21GASK0WW GTS18GTHLRWW ZDP486NRP6SS
LOC OFF.
NOTE: The control lockout mode will not affect the Clock, Kitchen Timer On/Off and Oven Light touch pads.
Tones at the End of a Timed Cycle

At the end of a timed cycle. 3 short beeps will sound followed by one beep every 6 seconds until the Clear/Off pad is pressed. This continuous 6-second beep may be canceled.
To cancel the 6-second beep:
- Press the Bake and Broil Hi/Lo pads at the same time for 3 seconds until the display shows SF.
- Press the Kitchen Timer On/Off pad. The display shows CON BEEP (continuous beep). Press the Kitchen Timer On/Off pad again. The display shows BEEP. (This cancels the one beep every 6 seconds.)
- Press the Start pad.
12-Hour, 24-Hour or Clock Blackout

Your control is set to use a 12-hour clock.
If you would prefer to have a 24-hour military time clock or black out the clock display, follow the steps below
- Press the Bake and Broil Hi/Lo pads at the same time for 3 seconds until the display shows SF.
- Press the Clock pad once. The display will show 12 hr. If this is the choice you want, press the Start pad.
Press the Clock pad again to change to the 24-hour military time clock. The display will show 24 hr. If this is the choice you want, press the Start pad.
Press the Clock pad again to black out the clock display. The display will show OFF. If this is the choice you want, press the Start pad.
NOTE: If the clock is in the black - out mode, you will not be able to use the Delay Start function
Cook and Hold

Your new control has a cook and hold feature that keeps cooked foods warm for up to 3 hours after Timed Baking or Roasting is finished.
NOTE: This feature can only be programmed to work with Timed Baking or Roasting. (See the Using the lower oven timed baking and roasting features section) After Timed Baking or Roasting has automatically stopped. the programmed Cook and Hold will automatically start.
To activate this feature for use after Timed Baking or Roasting, follow the steps below
- Press the Bake and Broil Hi/Lo pads at the same time for 3 seconds until the display shows SF.
- Press the Cooking Time pad. The display will show Hld OFF. Press the Cooking Time pad again to activate the feature. The display will show Hld ON.
- Press the Start pad to activate the cook and hold feature and leave the control set in this special features mode.
Using the Sabbath Feature. (Designed for use on the Jewish Sabbath and Holidays.) (on some models)
The Sabbath feature can be used for baking/roasting only. It cannot be used for broiling, self-cleaning or Delay Start cooking.
NOTE: The oven light comes on automatically (on some models) when the door is opened and goes off when the door is closed. The bulb may be removed. See the Oven Light Replacement section. On models with a light switch on the control panel. the oven light may be turned on and left on.
How to Set Sabbath Feature for Regular Baking/Roasting

NOTE: To understand how the oven control works, practice using regular baking (non-sabbath ) before entering Sabbath mode.
Make sure the clock shows the correct time of day.
- Press and hold both the Bake and Broil Hi/Lo pads, at the same time, until the display shows SF. NOTE: If bake or broil appears in the display, the Bake and Broil Hi/Lo pads were not pressed at the same time. Press the Clear/Off pad and begin again.
- Tap the Delay Start pad until Sabbath appears in the display
- Press the Start pad and
 will appear in the display.
 - Press the Bake pad. No signal will be given.
- Press the number pads in order to set the desired temperature. No signal or temperature will be given.
- Press the Start pad.
- After a random delay period of approximately 30 seconds to 1 minute,
 will appear in the display indicating that the oven is baking/roasting. If
  does not appear in the display, start again at step 4.
To adjust the oven temperature, press the Bake pad and enter the new temperature using the number pads
Press the Start pad.
NOTE: The Clear/Off and Cooking Time pads are active during the Sabbath feature.
How to Set Sabbath Feature for Timed Baking/Roasting – Immediate Start and Automatic Stop

NOTE: To understand how the oven control works, practice using regular (non-Sabbath) Immediate Start and Automatic Stop before entering the Sabbath mode.
Make sure the clock shows the correct time of day.
- Press and hold both the Bake and Broil Hi/Lo pads, at the same time, until the display shows SF. NOTE: If bake or broil appears in the display, the Bake and Broil Hi/Lo pads were not pressed at the same time. Press the Clear/Off pad and begin again.
- Tap the Delay Start pad until SAb bAtH appears in the display.
- Press the Start pad and
 will appear in the display
 - Press the Cooking Time pad.
- Press the number pads to set the desired length of cooking time between 1 minute and 9 hours and 99 minutes. The cooking time that you entered will be displayed.
- Press the Start pad.
- Press the Bake pad. No signal will be given.
- Press the number pads in order to set the desired temperature. No signal or temperature will be given
- Press the Start pad.
- After a random delay period of approximately 30 seconds to 1 minute,
 will appear in the display indicating that the oven is baking/roasting. If
  does not appear in the display, start again at step 7.
To adjust the oven temperature, press the Bake pad and enter the new temperature using the number pads.
Press the Start pad.
When cooking is finished, the display will change from  to
to  and 0:00 will appear, indicating that the oven has turned OFF but is still set in Sabbath. Remove the cooked food.
How to Exit the Sabbath Feature
- Press the Clear/Off pad
- If the oven is cooking, wait for a random delay period of approximately 30 seconds to 1 minute, until only
 is in the display.
 - Press and hold both the Bake and Broil Hi/Lo pads, at the same time, until the display shows SF.
- Tap the Delay Start pad until 12 shdn or no shdn appears in the display. 12 shdn indicates that the oven will automatically turn off after 12 hours. no shdn indicates that the oven will not automatically turn off.
- Press the Start pad.
NOTE: If a power outage occurred while the oven was in Sabbath mode, the oven will automatically turn off and the oven control must be reset.
Care and Cleaning
Care and cleaning of the cooking center.
WARNING: Be sure electrical power is off and all surfaces are cool before cleaning any part of the cooking center.
How to Remove Protective Shipping Film and Packaging Tape
- Carefully grasp a corner of the protective shipping film with your fingers and slowly peel it from the appliance surface. Do not use any sharp items to remove the film. Remove all of the film before using the appliance for the first time.
- To assure no damage is done to the finish of the product, the safest way to remove the adhesive from packaging tape on new appliances is an application of a household liquid dishwashing detergent. Apply with a soft cloth and allow to soak.
- NOTE: The adhesive must be removed from all parts. It cannot be removed if it is baked on.
Microwave Oven
Do not use a commercial oven cleaner on any part of microwave oven
Removable Turntable and Turntable Support
- To prevent breakage, do not place the turntable into water just after cooking. Wash it carefully in warm, sudsy water or in the dishwasher.
- The turntable and support can be broken if dropped. Remember, do not operate the microwave oven without the turntable and support in place.
- To replace the support, place its center post in the hole. Turn the support around until it seats into place.
Inside
- Keep the microwave oven clean and sweetsmelling. Opening the oven door a few minutes after cooking helps air out the interior. An occasional thorough wiping with a solution of baking soda and water keeps the interior fresh.
- Spills and spatters are easy to remove from walls and floor if they are wiped up soon after the food is removed. Some spatters wipe up with a paper towel, some may require a damp cloth. Remove greasy spatters with a sudsy cloth, then rinse and dry.
- Do not clean with metal scouring pads. Pieces can break off the pad, causing electrical shock.
- Wipe up spatters on the window on the inside of the door daily. When the window is soiled, wash it with a damp cloth. Rinse thoroughly and dry.
- Wipe metal and plastic parts on the inside of the door frequently. Use a damp cloth to remove all soil.
- Do not use abrasives, such as cleaning powders or steel and plastic pads. They may mar the surface.
Outside
- Clean the outside of the microwave oven with soap and a damp cloth, then rinse with a damp cloth and dry. Wipe the window clean with a damp cloth. Chrome is best wiped with a damp cloth and then with a dry towel.
Door Surface
- When cleaning surfaces of door and oven that come together on closing the door, use only mild, non-abrasive soaps or detergents applied with a sponge or soft cloth.
Lift-Off Oven Door
The door is very heavy. Be careful when removing and lifting the door.
Do not lift the door by the handdle.
To remove the door:

- Fully open the door.
- Pull the hinge locks down toward the door frame, to the unlocked position. A tool, such as a small flat-blade screwdriver, may be required.
- Firmly grasp both sides of the door at the top.
- Close door to the door removal position (see illustration).
- Lift door up and out until the hinge arm is clear of the slot.
To replace the door:
- Firmly grasp both sides of the door at the top.

- With the door at the same angle as the removal position, seat the indentation of the hinge arm into the bottom edge of the hinge slot. The notch in the hinge arm must be fully seated into the bottom of the slot.
- Fully open the door. If the door will not fully open, the indentation is not seated correctly in the bottom edge of the slot.
- Push the hinge locks up against the front frame of the oven cavity, to the locked position.

- Close the oven door.
To clean the inside of the door:
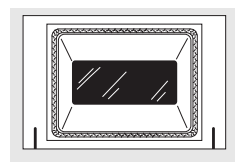
Do not rub or clean the door gasket— it has an extremely low resistance to abrasion.
If you notice the gasket becoming worn. frayed or damaged in any way or if it has become displaced on the door. you should have it replaced.
- Because the area inside the gasket is cleaned during the self-clean cycle, you do not need to clean this by hand.
- The area outside the gasket and the door liner can be cleaned with a soap-filled or plastic scouring pad, hot water and detergent. Rinse well with a vinegar and water solution.
To clean the outside of the door:
- Use soap and water to thoroughly clean the top, sides and front of the oven door. Rinse well. You may also use a glass cleaner to clean the glass on the outside of the door. Do not let water drip into the vent openings.
- If any stain on the door vent trim is persistent, use a soft abrasive cleaner and a sponge-scrubber for best results.
- Spillage of marinades, fruit juices, tomato sauces and basting materials containing acids may cause discoloration and should be wiped up immediately. When surface is cool, clean and rinse.
- Do not use oven cleaners, cleaning powders or harsh abrasives on the outside of the door.
WARNING: SHOCK OR BURN HAZARD: Before replacing oven light bulb. disconnect the electrical
Dower to the oven at the main fuse or circuit breaker panel. Failure to do so may result in electric shock or burn.
CAUTION: BURN HAZARD: The glass cover and bulb should be removed when cool. Touching hot glass with bare hands or a damp cloth can cause burns.
Oven Light Replacement

To remove:
- Turn the glass cover counterclockwise 1/4 turn until the tabs of the glass cover clear the grooves of the socket. Wearing latex gloves may offer a better grip.
- Using gloves or a dry cloth, remove the bulb by pulling it straight out.
To replace:
- Use a new 120/130-volt halogen bulb, not to exceed 50 watts. Replace the bulb with the same type of bulb that was removed. Your model will have one of the two types shown on the left. To determine the correct replacement bulb, check the bulb terminals. Bulbs with 2 straight pin terminals are G6.35 bulbs. Bulbs with 2 looped terminals are G9 bulbs. (Do not interchange.) Be sure the replacement bulb is rated 120 volts or 130 volts (NOT 12 volts).
- Using gloves or a dry cloth, remove the bulb from its packaging. Do not touch the bulb with bare fingers. Oil from skin will damage the bulb and shorten its life.
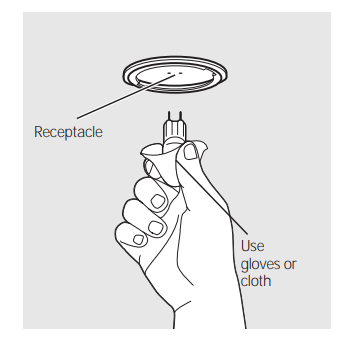
- Push the bulb straight into the receptacle all the way.
- Place the tabs of the glass cover into the grooves of the socket. Turn the glass cover clockwise 1/4 turn. For improved lighting inside the oven, clean the glass cover frequently using a wet cloth. This should be done when the oven is completely cool.
- Reconnect electrical power to the oven.
Lower Oven Light Bulb (on some models)
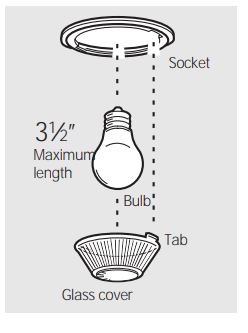
- To remove: Turn the glass cover counterclockwise 1/4 turn until the tabs of the glass cover clear the grooves of the socket. Remove the bulb.
- To replace: Put in a new 40-watt appliance bulb. Place the tabs of the glass cover into the grooves of the socket. Turn the glass cover clockwise 1/4 turn.
NOTES:
- A 40-watt appliance bulb is smaller than a standard 40-watt household bulb.
- Install and tighten the cover clockwise.
- Reconnect electrical power to the oven.
- For improved lighting inside the oven, clean the glass cover frequently using a wet cloth. This should be done when the oven is completely cool.
Oven Racks (lower oven)

NOTE: The oven racks may be cleaned in the self-cleaning oven. However. the racks will darken in color. lose their luster and become hard to slide if cleaned during the self-cleaning cycle.
- Clean the oven racks with an abrasive cleanser or steel wool. After cleaning, rinse the racks with clean water and dry with a clean cloth.
- To make the racks slide more easily, apply a small amount of vegetable oil or cooking oil to a paper towel and wipe the edges of the oven racks with the paper towel.
Control Panel
- It’s a good idea to wipe the control panel after each use. Clean with mild soap and water or vinegar and water, rinse with clean water and polish dry with a soft cloth. When cleaning, the control panel should be at room temperature and not in direct sunlight.
- Do not use abrasive cleansers, strong liquid cleansers, plastic scouring pads or oven cleansers on the control pannel-they will damage the finish. A 50/50 solution of vinegar and hot water works well.
Troubleshooting Tips
Before You Call For Service…
Troubleshooting Tips Save time and money! Review the charts on the following pages first and you may not need to call for service.
1. Control panel on microwave oven will not operate
You forgot to press the Start pad
- Press the Start pad.
Door not securely closed.
- Make sure the microwave oven door is closed.
Another function was pressed.
- Press the Clear/Off pad twice to cancel it and begin again.'
The Clear/Off pad was pressed accidentally.
- Begin again.
Oven controls improperly set.
- While using Time Defrost, numbers not entered after pressing the Auto Defrost pad.
2. “SENSOR ERROR” appears in the microwave oven display
During a sensor function the microwave oven door was opened too soon.
- The microwave oven door should not be opened before the time begins to count down in the display.
3. Microwave oven light does not work
Light bulb is loose or defective.
- Call for service
4. Foods overcooked or undercooked in the microwave oven
Varying density and amount of foods being cooked.
- Varying density and amount sometimes require more cooking time.
Food not turned or stirred as called for in the recipe.
- Turn or stir food and begin again.
Too many dishes in the oven at the same time.
- Do not overload your microwave oven.
Food not thoroughly defrosted.
- See the Using the microwave sensor controls section
Improper cookware or coverings being used.
- See the Microwave safe cookware section of the Important Safety Instructions section.
Humidity or moisture in the oven will lessen the Sensor cooking time
- Make sure the inside of the oven and the outside of the containers are dry.
Food not allowed to stand.
- Some standing time is recommended for certain vegetables cooked with the Sensor Controls
5. Clock and timer do not work or display goes blank
A fuse in your home may be blown or the circuit breaker tripped.
- Replace the fuse or reset the circuit breaker.
Controls improperly set.
- See the Using the clock and lower oven timer section for the lower oven clock.
- See the Display On/ Off section for the microwave oven clock
The clock is in the black-out mode.
- See the Special features of your lower oven control section for the lower oven clock.
- See the Display On/ Off section for the microwave oven clock
Troubleshooting Tips
1. "F- and a number or letter” flash in the lower oven display
You have a function error code.
- Press the Clear/Off pad. Allow the oven to cool for one hour. Put the oven back into operation.
If the function code repeats.
- Disconnect all power to the cooking center for at least 30 seconds and then reconnect power. If the function error code repeats, call for service.
2. Display flashes
Power failure.
- Reset the lower oven clock.
3. Unable to get the lower oven display to show “SF”
Oven control pads were not pressed properly.
- The Bake and Broil Hi/Lo pads must be pressed at the same time and held for 3 seconds.
4. Lower oven temperature too hot or too cold
Oven thermostat needs adjustment.
- See the Adjust the lower oven thermostat—Do it yourself! section
5. Lower oven will not work
A fuse in your home may be blown or the circuit breaker tripped.
- Replace the fuse or reset the circuit breaker
Oven controls improperly set.
- See the Using the lower oven section.
6. Lower oven control signals after entering cooking time or delay start
You forgot to enter a bake temperature or cleaning time.
- Press the Bake pad and desired temperature or the Self-Clean pad and desired clean time.
7. Food does not bake or roast properly in the lower oven
Oven controls improperly set.
- See the Using the lower oven section.
Rack position is incorrect or the rack is not level.
- See the Using the lower oven section.
Oven thermostat needs adjustment.
- See the Adjust the lower oven thermostat—Do it yourself! section.
8. Food does not broil properly in the lower oven
Oven door is open.
- Close the door. This model is designed for closed door broiling only. Always broil with the door closed.
Oven controls improperly set.
- Make sure you press the Broil Hi/Lo pad.
Improper rack position being used.
- See the Broiling Guide.
Cookware not suited for broiling.
- For best results, use a pan designed for broiling
In some areas the power (voltage) may be low.
- Preheat the broil element for 10 minutes.
- Broil for the longest period of time recommended in the Broiling Guide.
9. Lower oven light does not work
Light bulb is loose or defective.
- Tighten or replace the bulb
Pad operating light is broken.
- Call for service.
10. Lower oven will not self-clean
Oven controls improperly set.
- See the Using the self-cleaning lower oven section.
The oven temperature is too high to set a self-clean operation.
- Allow the oven to cool and reset the controls.
11. “Crackling” or “popping” sound in the lower oven
This is the sound of the metal heating and cooling during both the cooking and cleaning functions.
- This is normal.
12. Excessive smoking in the lower oven during a clean cycle
Excessive soil.
- Press the Clear/Off pad. Open the windows to rid the room of smoke. Wait until the LOCKED or LOCKED DOOR light goes off. Wipe up the excess soil and reset the clean cycle.
13. Lower oven door will not open after a clean cycle
Oven too hot.
- Allow the oven to cool below locking temperature.
14. Lower oven not clean after a clean cycle
Oven controls improperly set.
- See the Using the self-cleaning lower oven section.
Oven was heavily soiled.
- Clean up heavy spillovers before starting the clean cycle. Heavily soiled ovens may need to self-clean again or for a longer period of time.
15. “LOCKED” or “LOCKED DOOR” flashes in the lower oven display
The self-clean cycle has been selected but the door is not closed.
- Close the oven door.
16. “LOCKED” or “LOCKED DOOR” light is on when you want to cook in the lower oven
The oven door is locked because the temperature inside the oven has not dropped below the locking temperature.
- Press the Clear/Off pad. Allow the oven to cool.
17. Power outage, clock flashes
Power outage or surge.
- Reset the clock. If the oven was in use, you must reset it by pressing the Clear/Off pad, setting the clock and resetting any cooking function.
18. “Burning” or “oily” odor emitting from oven vent when using the lower oven
This is normal in a new oven and will disappear in time.
- To speed the process, set a self-clean cycle for a minimum of 3 hours. See the Using the self-cleaning lower oven section
19. Strong odor in the lower oven
An odor from the insulation around the inside of the oven is normal for the first few times the oven is used.
- This is temporary.
20. Fan noise when using the lower oven
A cooling fan may automatically turn on.
- This is normal. The cooling fan will turn on to cool internal parts. It may run for up to 1-1/2 hours in 30” models and up to 2 hours in 27” models after the oven is turned off.
