
1
ISTRUZIONI PER L'INSTALLAZIONE E L’USO
INSTRUCTIONS FOR INSTALLATION AND USE
INSTRUCTIONS POUR L'INSTALLATION ET L’UTILISATION
MONTAGE- UND GEBRAUCHSANWEISUNG
INSTRUCCIONES PARA INSTALACIÓN Y USO
INSTRUÇÕES DE INSTALAÇÃO Y UTILIZAÇÃO
AANWIJZING VOOR GEBRUIK EN INSTALLATIE

2

3
ITALIANO
DESCRIZIONE
La cappa puo’ essere installata in versione filtrante o in versione aspirante. Versione filtrante (Fig. 1): la cappa aspira
l’aria della cucina impregnata di fumi e di odori, depurandola attraverso i filtri anti-grasso ed i filtri carbone per poi
re-immetterla pulita nella stanza. Per una costante efficienza, è necessario sostituire periodicamente i filtri al carbone.
I filtri al carbone non sono in dotazione. Versione aspirante (Fig. 2): la cappa aspira l’aria della cucina impregnata
di fumi e di odori facendola passare attraverso i filtri anti-grasso, poi la espelle all’esterno attraverso un condotto
di scarico. In questa versione non è necessario utilizzare i filtri al carbone.
Decidete sin dall’inizio il tipo di installazione (filtrante o aspirante). Per una maggiore efficienza, consigliamo di installare
la cappa in versione aspirante (se possibile).
INSTALLAZIONE
ATTENZIONE: si consiglia di affidare le operazione di installazione a personale specializzato.
INSTALLAZIONE IN VERSIONE ASPIRANTE:
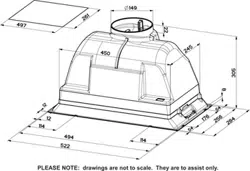
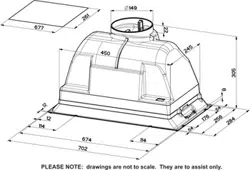
1. Prima del fissaggio è necessario predisporre il condotto per lo scarico dell’aria all’esterno. Utilizzare un condotto
di scarico che abbia: – lunghezza minima indispensabile; – minor numero possibile di curve (angolo massimo della
curva:90°); – materiale approvato normativamente (a seconda dello Stato); – lato interno piú liscio possibile.
Si consiglia inoltre di evitare cambiamenti drastici di sezione del tubo. Si consiglia di utlilizzare un tubo di diametro
150 mm (Fig. 5). Per lo scarico dell’aria all’esterno, seguire tutte le altre indicazioni riportate nel foglio “Avvertenze”.
2. Predisponete un’adeguata alimentazione elettrica. Per il collegamento elettrico, seguite tutte le altre indicazioni
riportate nel foglio “Avvertenze”.
3. Togliere i filtri antigrasso (Fig. 4) spostando il fermo (B) e ruotando il filtro verso l’esterno.
4. Praticare sul fondo del pensile l'apertura necessaria ad accogliere l'apparecchio (Fig. 5). Il piano inferiore del
pensile deve avere uno spessore compreso tra 15 e 18 mm.
5. Verificare che le alette di fissaggio al pensile (Fig.6) siano posizionate ad una altezza adeguata allo spessore
del fondo del pensile. Nel caso tale distanza risulti inferiore allo spessore aumentarla svitando le 2 viti
corrispondenti all’interno dell’apparecchio.
6. Collegare il condotto per lo scarico dell’aria con la bocca uscita aria della cappa; utilizzare un tubo flessibile e
bloccarlo alla bocca uscita aria della cappa con una fascetta metallica (tubo e fascetta non sono in dotazione).
Effettuate il collegamento elettrico.
7. Rimontare la griglia metallica e/o i filtri antigrasso.
8. SMONTAGGIO DELL’APPARECCHIO.
Rimuovere i filtri antigrasso (Fig. 4). Durante le operazioni seguenti sostenere sempre l’apparecchio. Svitare le
2 viti poste all’interno dell’apparecchio (Fig. 6); spostare le 2 linguette verso l’interno dell’apparecchio utilizzando
gli appositi intagli (Fig.7); estrarre l’apparecchio dalla sua sede.
INSTALLAZIONE IN VERSIONE FILTRANTE:
Procedere con l’installazione facendo riferimento alle istruzioni per la versione aspirante (vedi punti 2, 3, 4, 5), poi
proseguire con le istruzioni qui sotto riportate.
Collegare un tubo flessibile alla bocca uscita aria della cappa, tale che convogli l’aria fino alla sommità del pensile;
bloccare il tubo con una fascetta metallica (tubo e fascetta non sono in dotazione). Effettuate il collegamento elettrico.
Verificate se i filtri carbone sono già installati; eventualmente procedete montandoli come segue: poggiate il filtro
carbone sul gruppo motore facendo coincidere i perni; ruotate il filtro carbone fino a che si blocca (Fig.8).
Rimontare i filtri antigrasso.
FUNZIONAMENTO
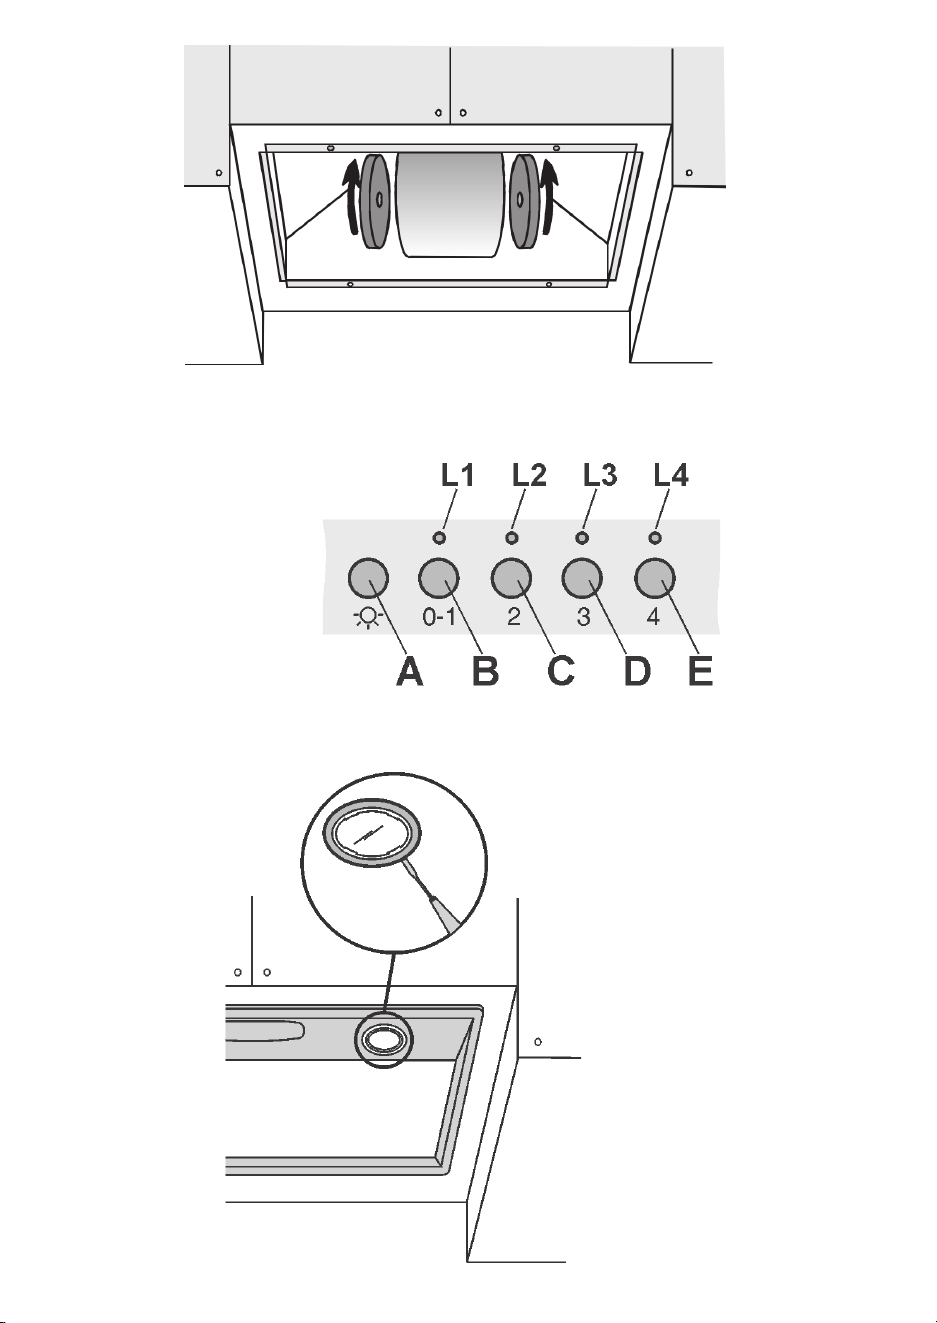
Comandi Fig. 9:
A) ON/OFF lampade. Questo tasto si utilizza anche per la funzione allarme filtri antigrasso e filtri carbone.
Allarme filtri: Dopo 30h di funzionamento del motore, si accende il led L1 ROSSO e resta acceso per 30" (è il momento
di pulire i filtri antigrasso).
Dopo 120h di funzionamento del motore, si accende il led L1 ROSSO per 30" lampeggiando (è il momento di sostituire
i filtri carbone se la cappa ne è dotata). L’allarme fitri si evidenzia SOLO a motore FERMO. L’allarme filtri si annulla (reset
del contatore ORE) tenendo premuto il tasto A per 2".
B) Pigiando il tasto B si accende il motore alla prima velocità. La velocità viene evidenziata dal Led L1 VERDE acceso.
Tenendolo premuto per 2" si spegne il motore. Pigiandolo con un solo colpo, a led acceso, si attiva la funzione timer (motore
acceso per 5’), evidenziata dal led lampeggiante. Per togliere la funzione timer pigiare ancora con un solo colpo.
C) Pigiando il tasto C si accende il motore in seconda velocità. La velocità viene evidenziata dal Led L2 VERDE acceso.
Pigiandolo con un solo colpo, a led acceso, si attiva la funzione timer (motore acceso per 5’), evidenziata dal led
lampeggiante. Per togliere la funzione timer pigiare ancora con un solo colpo.
D) Pigiando il tasto D si accende il motore in terza velocità. La velocità viene evidenziata dal Led L3 VERDE acceso.
Pigiandolo con un solo colpo, a led acceso, si attiva la funzione timer (motore acceso per 5’), evidenziata dal led

4
lampeggiante. Per togliere la funzione timer pigiare ancora con un solo colpo.
E) Pigiando il tasto E si accende il motore in quarta velocità. La velocità viene evidenziata dal Led L4 VERDE acceso.
Pigiandolo con un solo colpo, a led acceso, si attiva la funzione timer (motore acceso per 5’), evidenziata dal led
lampeggiante. Per togliere la funzione timer pigiare ancora con un solo colpo.
Una cura particolare va rivolta ai filtri antigrasso che devono essere puliti periodicamente, quando compare l’allarme
filtri antigrasso, mediamente ogni 2 mesi. Per istruzioni sull’Allarme filtri, fare riferimento al paragrafo Comandi.
Togliere i filtri antigrasso: in corrispondenza della maniglia, spingere il fermo verso l'interno e tirare il filtro verso il
basso (Fig. 4). Lavateli con un normale prodotto neutro in commercio poi sciacquare abbondantemente e asciugare.
Il lavaggio puo’ essere effettuato in lavastoviglie avendo cura di non mettere i filtri a contatto con stoviglie sporche
o con stoviglie in argento. Rimontare i filtri antigrasso.
Sostituzione filtri carbone (Fig. 8): Nel caso d'uso dell'apparecchio in versione filtrante, sarà necessario sostituire
i filtri al carbone periodicamente, quando compare l’allarme filtri carbone, mediamente ogni 6 mesi. Per istruzioni
sull’Allarme filtri, fare riferimento al paragrafo Comandi. Per accedere ai filtri carbone rotondi, togliere i filtri antigrasso,
sganciare i filtri al carbone dal gruppo motore tramite rotazione.
Illuminazione (Fig. 10): Per sostituire il faretto led far leva sulle apposite fessure. Sostituire con lampade dello
stesso tipo.

5
ENGLISH
DESCRIPTION
The hood may be installed in the filtering or the ducting version. Filtering version (Fig. 1): The hood aspirates the kitchen
air saturated with fumes and odours, purifies it through the grease filters and charcoal filters and returns clean air into
the room. For constant efficiency, the charcoal filters must be replaced periodically. The charcoal filters are not supplied.
Ducting version (Fig. 2): The hood aspirates the kitchen air saturated with fumes and odours, passes it through the
grease filters and expels it to the outside through an outlet pipe. With this version the charcoal filters are not required.
Decide from the outset on the type of installation (filtering or ducting). For greater efficiency, we recommend you install
the hood in the ducting version (if possible).
INSTALLATION
ATTENTION: The appliance should be installed by a qualified operator.
INSTALLATION IN DUCTING VERSION:
1. Before fixing, the disposal duct for air evacuation to the outside must be installed. Use an disposal duct with:
– minimum indispensable length; – minimum possible bends (maximum angle of bend: 90°); – certified material
(according to the State); – an as smooth as possible inside. It is also advisable to avoid any drastic changes
in pipe cross-section. We recommend using a 150 mm diameter pipe for the model shown in Figure 3. For air
evacuation to the outside, follow all the other instructions given on the “Warnings” sheet.
2. Prepare a suitable power supply. For the electrical connection, follow all the other instructions on the “Warnings”
sheet.
3. Remove the grease filters (Fig. 4): remove the filter/s by moving fastener (B).
4. Cut a hole in the bottom of the pensile cupboard in order to settle the appliance (Fig. 5). The pensile cupboard
bottom hob must be between 15 and 18 mm thick.
5. Check that the fixing tabs (Fig. 6) to the wall unit are positioned at a height suited to the thickness of the bottom
of the wall unit. If this distance is less than the thickness, increase it by unscrewing the 2 corresponding screws
inside the hood.
6. Connect the disposal duct to the air evacuation pipe of the hood. Use a flexible pipe and lock it to the air evacuation
pipe of the hood with a metal hose clamp (pipe and clamp are not provided). Make the electrical connections.
7. Refit the metal grid and/or the grease filters.
8. DEVICE DISASSEMBLY.
Remove the grease flilters (Fig. 4). During the following operations always sustain the device. Tighten the two
screws inside the device (Fig. 6); move the 2 tangs toward the devce inside using the right carvings (Fig.
7); extract the device from its side.
INSTALLATION IN FILTERING VERSION:
Proceed with installation, making reference to the instructions for the extraction version (see points 2, 3, 4, 5), and
then follow the instructions below.
Connect the hose to the hood air outlet so the air is conveyed to the top of the wall unit; secure the hose with a metal
clamp (hose and clamp are not provided). Make power connections.
Check whether the charcoal filters have already been fitted. If necessary, proceed to fit these as follows: rest the
charcoal filter on the motor unit by making the pins coincide; turn the charcoal filter until this is fast (Fig. 8).
Refit the metal grid and/or grease filters.
OPERATION
Controls shown in Fig. 9:
A) ON/OFF - lamps. This button is also used for the alarm function of the anti-grease and charcoal filters.
Filter alarm: After 30h of motor operation, the L1 RED LED comes ON and remains ON for 30" (the grease filters have
to be cleaned). After 120h of motor operation, the L1 RED LED comes ON and flashes for 30" (the charcoal filters have
to be changed if the hood is so equipped). The Filter Alarm is ONLY given with the motor is OFF. The Filter Alarm is
cancelled (HOUR meter reset) by holding down button A for 2".
B) Press button B to start the motor at Speed 1. The speed is shown by the L1 GREEN LED coming ON. When held
down for 2", the motor switches off. A single pressure on the button when the LED is ON activates the timer function
(motor ON for 5'), shown by the flashing LED. To cancel the timer function, press the button again ONCE.
C) Press button C to start the motor at Speed 2. The speed is shown by the L2 GREEN LED coming ON.
A single pressure on the button when the led is on activates the timer function (motor on for 5'), shown by the flashing
led. To cancel the timer function, press the button again ONCE.
D) Press button D to start the motor at Speed 3. The speed is shown by the L3 GREEN LED coming ON. A single pressure
on the button when the led is on activates the timer function (motor on for 5'), shown by the flashing led.
To cancel the timer function, press the button again ONCE.
E) Press button E to start the il motor at Speed 4. The speed is shown by the L4 GREEN LED coming ON. A single pressure
on the button when the led is on activates the timer function (motor on for 5'), shown by the flashing led. To cancel the

6
timer function, press the button again ONCE.
Replacing the grease filters: special attention must be given to the grease filters which must be periodically cleaned
and must be cleaned periodically every two months, whenever the grease filter alarm trips. For instructions of the
filter Alarm, refer to the Controls paragraph. Remove the grease filters in correspondence with the handle, push the
stop inward and pull the filter downwards (Fig. 4). Wash them with a normal neutral product in commerce, then rinse
abundantly and dry. The washing can be carried out in the dishwasher making sure not to let the filters make contact
with dirty or silver dishes. Remount the grease filters.
Replacing the charcoal filters (Fig. 8): for filtering hoods, the charcoal filters must be replaced, on the average
once every 6 months, when the charcoal filter alarm trips. For instructions on the filter Alarm, refer to the Controls
paragraph. To get to the round filters, take off the anti-grease filters pushing the catch upwards in correspondence
to the handle; remove the charcoal filters from the motor block making them rotate.
Lighting (Fig. 10): To change the led lamp levering from the proper slots. Replace with bulbs of the same type.

7
FRANCAIS
DESCRIPTION
Cette hotte peut être installée en version recyclage ou en version aspirante. Version Recyclage (Fig. 1) : votre hotte
aspire l’air de la cuisine imprégné de fumée et d’odeurs, en l’épurant à travers les filtres à graisse ainsi qu’à travers
les filtres à charbon pour le renvoyer dans la pièce, propre. Afin que votre hotte soit efficace d’une façon constante,
il est nécessaire de remplacer les filtres à charbon périodiquement. Les filtres à charbon ne sont pas fournis. Version
aspirante (Fig. 2) : votre hotte aspire l’air de la cuisine imprégnée de fumée et d’odeurs, en le faisant passer à travers
les filtres à graisse, puis en expulsant à l’extérieur à travers un tuyau d’évacuation. Dans cette version l’emploi de
filtres à charbon n’est pas nécessaire.
Vous devez décider dès le début quel type d’installation vous souhaitez (recyclage ou aspirante). Afin d’avoir une
hotte au rendement optimal, nous vous conseillsons d’installer une hotte version aspirante (si cela est possible).
INSTALLATION
ATTENTION: Il est conseillé de confier les opérations d’installation à des spécialistes.
INSTALLATION VERSION ASPIRANTE :
1. Avant de commencer l’installation, il est nécessaire de prévoir le tuyau pour l’évacuation de l’air vers l’extérieur.
Employez un tuyau d’évacuation qui ait : - la longueur minimale indispensable ; - le moins de coudes et de raccords
possibles (angle maximum des coudes : 90°) ; - qui soit fait d’une matière approuvée par les normes en vigueur
(suivant l’Etat) ; - sa surface intérieure la plus lisse possible. Nous vous conseillons aussi d’éviter les
changements brusques de section du tuyau. Il est conseillé d’utiliser un tuyau ayant un diamètre de 150 mm
pour le modèle représenté sur la Figure 3. Pour l’évacuation de l’air vers l’extérieur, suivez toutes les autres
indications données à la page “Attention”.
2. Prévoyez une alimentation électrique adéquate. Pour le raccordement électrique, suivez toutes les autres
indications qui sont données par la page “Attention”.
3. Enlevez les filtres à graisse (Fig. 4): enlevez les filtres en déplaçant le blocage (B).
4. Faites le trou nécessaire afin d’insérer l’appareil (Fig. 5). La base inférieure du meuble doit avoir une épaisseur
comprise entre 15 et 18 mm.
5. Contrôler que les ailettes de fixation (Fig. 6) au meuble suspendu sont placées à une hauteur appropriée à
l’épaisseur du bas de ce dernier. Si cette distance est inférieure à l’épaisseur, il faut l’augmenter en dévissant
les 2 vis correspondantes à l’intérieur de l’appareil.
6. Raccordez le conduit pour l’évacuation de l’air à la bouche de sortie de l’air de la hotte; utilisez un tuyau souple
et bloquez-le sur la bouche de sortie de l’air de la hotte à l’aide d’un collier métallique (le tuyau et le collier ne
sont pas fournis). Faites le raccordement électrique.
7. Remontez la grille métallique et/ou les filtres à graisse.
8. DEMONTAGE DE L’APPAREIL.
Retirer le ou les filtres à graisse (Fig. 4). Pendant les opérations suivantes veuillez toujours soutenir l’appareil.
Dévisser les deux vis situées à l’intérieur de l’appareil (Fig. 6); déplacer les 2 languettes vers l’intérieur de l’appareil
en utilisant les entailles appropriées (Fig.7); extraire l’appareil de son emplacement.
INSTALLATION VERSION RECYCLAGE :
Effectuez l’installation en suivant les instructions pour la version aspirante (voir point 2, 3, 4, 5), puis continuez en
suivant les instructions figurant ci-dessous.
Raccordez un flexible à l’ouverture de sortie d’air de la hotte de manière à acheminer l’air jusqu’en haut du meuble
suspendu; bloquez le flexible avec une bande métallique (flexible et bande ne sont pas fournis). Effectuez le
branchement électrique.
Contrôlez si les filtres à charbon sont déjà installés; le cas échéant montez-les comme suit: posez le filtre à charbon
sur le groupe moteur en faisant coïncider les goujons; tournez le filtre à charbon jusqu’à ce qu’il se bloque (Fig. 8).
Remonter la grille métallique et/ou les filtres à graisse.
FONCTIONNEMENT
Commandes de la Fig. 9:
A) ON/OFF lampes. Cette touche s’utilise également pour la fonction alarme filtres à graisse et filtres à charbon.
Alarme filtres : Après 30h de fonctionnement du moteur, un témoin lumineux L1 ROUGE s’allume et reste allumé
pendant 30" (c’est le moment de nettoyer les filtres à graisse). Après 120h de fonctionnement du moteur, un témoin
lumineux L1 ROUGE s’allume et reste allumé pendant 30" (c’est le moment de remplacer les filtres à charbon si la
hotte en est équipée). L’alarme des filtres s’active UNIQUEMENT avec le moteur ARRETE. L’alarme des filtres
s’annule (remise à zéro du compteur HORAIRE) en maintenant la touche A enfoncée pendant 2".
B) Appuyer sur la touche B pour actionner le moteur à la première vitesse. La vitesse est signalée par le témoin
lumineux L1 VERT allumé. En la maintenant enfoncée pendant 2" le moteur s’arrête. En appuyant une seule fois,
avec le témoin lumineux allumé, on active la fonction timer (moteur actionné pendant 5') signalée par le témoin lumineux
qui clignote. Pour désactiver la fonction timer appuyer encore une seule fois.

8
C) Appuyer sur la touche C pour actionner le moteur en deuxième vitesse. La vitesse est signalée par le témoin lumineux
L2 VERT allumé. En appuyant une seule fois, avec le témoin lumineux allumé, on active la fonction timer (moteur
actionné pendant 5') signalée par le témoin lumineux qui clignote. Pour désactiver la fonction timer appuyer encore
une seule fois.
D) Appuyer sur la touche D pour actionner le moteur en troisième vitesse. La vitesse est signalée par le témoin lumineux
L3 VERT allumé. En appuyant une seule fois, avec le témoin lumineux allumé, on active la fonction timer (moteur
actionné pendant 5') signalée par le témoin lumineux qui clignote. Pour désactiver la fonction timer appuyer encore
une seule fois.
E) Appuyer sur la touche E pour actionner le moteur en quatrième vitesse. La vitesse est signalée par le témoin lumineux
L4 VERT allumé. En appuyant une seule fois, avec le témoin lumineux allumé, on active la fonction timer (moteur
actionné pendant 5') signalée par le témoin lumineux qui clignote. Pour désactiver la fonction timer appuyer encore
une seule fois.
Remplacement des filtres à graisse: les filtres antigraisse nécessitent un entretien régulier et il faut donc les nettoyer
périodiquement, quand intervient l’alarme des filtres à charbon, en moyenne tous les deux mois. Pour les instructions,
concernant l’alarme des filtres, voir le paragraphe des Commandes. Démontez les filtres antigraisse: à l’aide de
la poignée, pousser l’arrêt vers l’intérieur et tirer les filtres vers le bas (Fig. 4).Lavez-les avec avec un nettoyant
ménager du commerce puis rincer abondamment et sécher. Ce nettoyage peut etre effectué dans un lave-vaisselle
en prenant soin de ne pas mettre les filtres en contact avec de la vaisselle sale ou avec des couverts en argent.
Remontez les filtres antigraisse.
Remplacement des filtres à charbon (Fig. 8): Si l’on utilise l’appareil en version recyclage, il faut remplacer périodiquement
les filtres à charbon, quand intervient l’alarme des filtres à charbon, en moyenne tous les 6 mois. Pour les instructions,
concernant l’alarme des filtres, voir le paragraphe des Commandes. Pour atteindre les filtres à charbon ronds, enlevez
les filtres à graisse en poussant l’arrêt vers le haut en correspondance avec le poignée; décrocher les filtres au charbon
du groupe moteur en les faisant pivoter.
Eclairage (Fig. 10): Pour remplacer les lampes à led, s’appuyer sur les slots. Remplacer les lampes à led du même type.

9
DEUTSCH
BESCHREIBUNG
Die Haube kann als Umluftversion oder als Abluftversion installiert werden. Umluftversion (Abb. 1): die Haube saugt
die mit Rauch und Gerüchen gesättigte Luft an und reinigt sie durch die Fett- und die Kohlefilter. Danach wird die
saubere Luft wieder in den Raum geleitet. Um die gleichmäßige Wirksamkeit der Kohlefilter zu erhalten, müssen sie
regelmäßig ausgetauscht werden. Die Kohlefilter werden nicht mitgeliefert. Abluftversion (Abb. 2): die Haube saugt
die mit Rauch und Gerüchen gesättigte Luft an, leitet sie durch die Fettfilter und gibt sie über ein Abführungsrohr
nach außen ab. Diese Version benötigt keine Kohlefilter.
Entscheiden Sie sich von Anfang an für einen Installationstyp (Umluft oder Abluft). Um eine größere Wirkung zu
erzielen, empfehlen wir die Installation einer Haube in Abluftversion (falls möglich).
INSTALLATION
ACHTUNG: Es wird empfohlen, die Montage von Fachkräften durchführen zu lassen.
INSTALLATION DER ABLUFTVERSION:
1. Vor der Befestigung muss das Rohr zur Abführung der Luft nach außen angebracht werden. Ein Abführungsrohr
verwenden, das folgende Eigenschaften besitzt: - erforderliche Mindestlänge; - so wenig Kurven wie möglich
(maximale Kurvenkrümmung: 90°); - zulässiges Material (Landesnormen); - Innenseite so glatt wie möglich. Es
wird außerdem empfohlen, starke Wechsel des Rohrdurchmessers zu vermeiden. Es empfiehlt sich für die in
Abbildung 3 gezeigte Modell hingegen mit Durchmesser 150 mm zu wählen. Für die Luftabführung nach außen
alle weiteren Angaben im Blatt “Hinweise” befolgen.
2. Für eine angemessene Stromversorgung sorgen. Für den Elektroanschluss beachten Sie alle Angaben im Blatt
“Hinweis”.
3. Metallgitter (Abb. 4): Den oder die Filter durch Entfernen der Klammern (B).
4. Vor der Montage des Geräts muß in der Hängeschrankunterseite ein dem Gerät entsprechender Ausschnitt
vorgenommen werden (Abb. 5). Die untere Etage des Hängeschranks muss eine Stärke von 15 bis 18 mm
aufweisen.
5. Überprüfen, dass die Befestigungsflügel (Abb. 6) zum Festmachen am Hängeschranks in einer angemessenen
Höhe im Verhältnis zur Dicke des Hängeschrankbodens positioniert sind. Sollte dieser Abstand geringer sein als
die Dicke, muss er erhöht werden, indem die beiden hierfür vorgesehenen Schrauben im Innern des Geräts
gelockert werden.
6. Das Luftabführungsrohr an die Austrittsöffnung der Haube anschließen; dazu einen Schlauch verwenden und
ihn an der Luftaustrittsöffnung der Haube mit einer Metallschelle befestigen (Schlauch und Schelle werden nicht
mitgeliefert). Über das Versorgungskabel die Stromversorgung der Haube herstellen.
7. Metallgitter und/oder Antifettfilter wieder anbringen.
8. ABMONTIEREN DES GERÄTES.
Entfernen Sie die Fettfilter (Abb. 4). Während der folgenden Arbeiten immer das Gerät abstützen. Die zwei
Schrauben im Geräteinneren (Abb. 6) lockern, die beiden Zungen in Richtung Geräteinneres über die vorgesehenen
Einschnitte verschieben (Abb. 7) und das Gerät herausnehmen.
INSTALLATION UMLUFTVERSION:
Installation unter Beachtung der Anleitung für die Abluftversion (siehe Punkte 2, 3, 4, 5) vornehmen und anschließend
die hier aufgeführten Anweisungen befolgen.
Schlauch an die Abluftaustrittsöffnung der Haube anschließen, damit die Abluft bis zur Oberseite des Hängeschrankes
geleitet wird; Schlauch mit einem Metallband befestigen (Schlauch und Metallband sind nicht im Lieferumfang
enthalten). Elektroanschluss vornehmen.
Kontrollieren Sie, ob die Kohlefilter bereits installiert sind. Montieren Sie diese ggf. wie nachstehend erläutert: Kohlefilter
auf die Motorgruppe auflegen und dabei die Stifte in Übereinstimmung bringen; Kohlefilter bis zur Befestigung drehen
(Abb. 8). Metallgitter und/oder Antifettfilter wieder anbringen.
FUNKTIONSWEISE
Je nach Version ist das Gerät mit folgenden Bedienung ausgestattet:
Bedienung gemäß Abb. 9: A) Lampen EIN/AUS. Diese Taste wird auch für die Fett- und Kohlenfilter-Alarmfunktion
verwendet
Filteralarm: Nach 30 Motorbetriebsstunden schaltet sich die ROTE LED L1 ein und bleibt eingeschaltet (es ist Zeit,
die Fettfilter zu reinigen). Nach 120 Motorbetriebsstunden schaltet sich die ROTE LED L1 ein und blinkt (es ist Zeit,
die Kohlenfilter auszutauschen, falls die Haube hiermit ausgestattet ist). Der Filteralarm wird NUR bei STEHENDEM
Motor angezeigt. Zur Rückstellung des Filteralarms (Rückstellung des STUNDEN-Zählers) ist die Taste A 2 Sekunden
lang gedrückt zu halten. B) Bei Drücken der Taste B schaltet sich der Motor auf der ersten Geschwindigkeitsstufe
ein. Die Geschwindigkeit wird von der eingeschalteten GRÜNEN LED L1 angezeigt. Wenn die Taste für 2 Sekunden
gedrückt gehalten wird, schaltet sich der Motor aus. Bei einmaligem Drücken der Taste bei eingeschalteter LED wird

10
die Timerfunktion aktiviert (Motor bleibt 5 Sekunden eingeschaltet), was durch die blinkende LED angezeigt wird. Zur
Aufhebung der Timerfunktion ist die Taste erneut einmal zu drücken. C) Bei Drücken der Taste C schaltet sich der
Motor auf der zweiten Geschwindigkeitsstufe ein. Die Geschwindigkeit wird von der eingeschalteten GRÜNEN LED
L2 angezeigt. Bei einmaligem Drücken der Taste bei eingeschalteter LED wird die Timerfunktion aktiviert (Motor bleibt
5 Sekunden eingeschaltet), was durch die blinkende LED angezeigt wird. Zur Aufhebung der Timerfunktion ist die Taste
erneut einmal zu drücken. D) Bei Drücken der Taste D schaltet sich der Motor auf der dritten Geschwindigkeitsstufe
ein. Die Geschwindigkeit wird von der eingeschalteten GRÜNEN LED L3 angezeigt. Bei einmaligem Drücken der Taste
bei eingeschalteter LED wird die Timerfunktion aktiviert (Motor bleibt 5 Sekunden eingeschaltet), was durch die
blinkende LED angezeigt wird. Zur Aufhebung der Timerfunktion ist die Taste erneut einmal zu drücken. E) Bei Drücken
der Taste E schaltet sich der Motor auf der vierten Geschwindigkeitsstufe ein. Die Geschwindigkeit wird von der
eingeschalteten GRÜNEN LED L4 angezeigt. Bei einmaligem Drücken der Taste bei eingeschalteter LED wird die
Timerfunktion aktiviert (Motor bleibt 5 Sekunden eingeschaltet), was durch die blinkende LED angezeigt wird. Zur
Aufhebung der Timerfunktion ist die Taste erneut einmal zu drücken.
ACHTUNG : BEI BETÄTIGUNG DER
TIMERFUNKTION SCHALTET SICH DER MOTOR NACH 5 MINUTEN AUTOMATISCH
AUS.
ACHTUNG : LEUCHTET DIE ROTE LED AUF, SOLLTEN DI FETTFILTER GEREINIGT ODER DIE KOHLENFILTER
AUSGEWECHSELT WERDEN.
Besondere Aufmerksamkeit sollte der Fettfilter die regelmäßig gereinigt werden müssen bezahlt werden angezeigt, wenn
der Alarm-Fettfilter, in der Regel alle zwei Monate. Anweisungen auf dem Filter finden Sie in der Absatz-Befehle. Entfernen
Sie die Fettfilter: am Handgriff, drücken Sie den Riegel nach innen und ziehen Sie den Filter nach unten (Abb. 4). Waschen
Sie sie mit einem normalen neutralen Produkt auf dem Markt dann abspülen und trocknen. Das Waschen kann “in die
Spülmaschine gestellt werden, dabei nicht zu den Filtern in Kontakt mit schmutzigem Geschirr oder Silber Begriffe setzen.
Ersetzen Sie die Fettfilter.
Ersatz Aktivkohlefilter (Abb. 8): Bei Verwendung des Filters Version, müssen Sie regelmäßig ersetzen die
Kohlefilter, Aktivkohlefilter, wenn Sie die Warnung, in der Regel sehen alle sechs Monate. Anweisungen auf dem
Filter finden Sie in der Absatz-Befehle. Zum Zugriff auf die Runde Aktivkohlefilter, Fettfilter entfernen, lassen Sie
die Aktivkohlefilter aus dem Motor durch eine Drehung.
Beleuchtung (Abb. 10): Zum Austausch der LED-Scheinwerfer auf die Schlitze zu bauen. Ersetzen durch dieselbe
Art von Lampe.

11
ESPAÑOL
DESCRIPCIÓN
La campana puede ser instalada en versión filtrante o en versión aspirante. Versión filtrante (Fig. 1): la campana
aspira el aire de la cocina impregnado de humos y de olores depurándolo a través de filtros antigrasa y filtros al carbón
para luego introducirlo de nuevo limpio en la habitación. Para mayor eficacia, es necesario sustituir periódicamente
los filtros al carbón. Los filtros al carbón no vienen adjuntos. Versión aspirante (Fig. 2): la campana aspira el aire
de la cocina impregnado de humos y de olores haciéndolo pasar a través de los filtros antigrasa, después lo expulsa
hacia el exterior a través del conducto de descarga. En esta versión no es necesario utilizar los filtros al carbón.
Decida desde el principio el tipo de instalación ( filtrante o aspirante). Para una mayor eficacia, aconsejamos que
se instale la campana en versión aspirante (si es posible).
INSTALACIÓN
CUIDADO: Le aconsejamos que lo haga instalar a personal especializado.
INSTALACION EN VERSION ASPIRANTE:
1. Antes de sujetar la campana es necesario colocar el conducto para la descarga de aire al exterior. Utilice un
conducto de descarga que tenga : - longitud mínima indispensable: – el menor número posible de curvas (ángulo
máximo de la curva: 90°); – material de acuerdo con la normativa vigente (de cada país); – parte interna lo más
lisa posible. Se aconseja además evitar cambios drásticos de sección del tubo. Se aconseja utilizar un tubo
de 150 mm de diámetro para el modelo representado en la Figura 3. Para la descarga del aire hacia el exterior,
siga todas las demás indicaciones que aparecen en el folio “Advertencia”.
2. Realice con anterioridad una adecuada instalación eléctrica. Para la instalación eléctrica siga todas la indicaciones
que aparecen en el capítulo “Advertencia”.
3. Quitar los filtros antigrasa (Fig. 4). Quitar el o los filtros desplazando el retén (B) y girando el filtro hacia afuera.
4. Realice en el fondo del armario de pared la abertura necesaria para acoger el aparato (Fig. 5). El plano inferior
del armario de pared debe tener un grosor de entre 15 y 18 mm.
5. Verifique que las aletas de fijación al armario de pared (Fig. 6) estén colocadas a una altura adecuada para el
grosor del fondo del armario de pared. Si dicha distancia es inferior al grosor, auméntela desenroscando los 2
tornillos correspondientes en el interior del aparato.
6. Conectar el conducto de evacuación del aire con la salida del aire de la campana. Utilizar un tubo flexible, trabándolo
en la boca de salida del aire de la campana mediante una abrazadera metálica (el tubo y la abrazadera no están
incluidos en el equipamiento). Efectuar la conexión eléctrica.
7. Volver a montar la rejilla metálica y/o los filtros antigrasa.
8. DESMONTAJE DEL APARATO
Retire los filtro antigrasa (Fig. 4). Durante las siguientes operaciones, sostenga siempre el aparato. Desenrosque
los 2 tornillos situados en el interior del aparato (Fig. 6); mueva las 2 lengüetas hacia el interior del aparato utilizando
las muescas previstas (Fig. 7); extraiga el aparato de su alojamiento.
INSTALACION EN VERSION FILTRANTE:
Proceder a la instalación tomando como referencia las instrucciones para la versión aspirante (puntos 2, 3, 4, 5),
luego proseguir con las siguientes instrucciones.
Conectar un tubo flexible a la boca de salida de aire de la campana de manera que conduzca el aire hasta la parte
superior del mueble de pared; ajustar el tubo con una abrazadera metálica (el tubo y la abrazadera no están incluidos
en el equipamiento). Efectuar la conexión eléctrica.
Controlar si ya han sido instalados los filtros de carbón, si no es así, montarlos de la siguiente manera: Apoyar el
filtro de carbón sobre el grupo motor haciendo coincidir los pernos, girar el filtro de carbón hasta que se trabe (Fig. 8).
Volver a montar la rejilla metálica y/o los filtros antigrasa.
FUNCIONAMIENTO
Mandos de la Fig. 9:
A) ON/OFF lámparas. Esta tecla se utiliza también para la función alarma filtros antigrasa y filtros de carbón.
Alarma de filtros: Tras 30h de funcionamiento del motor, se enciende el led L1 ROJO y queda encendido (es el
momento de limpiar los filtros antigrasa). Tras 120h de funcionamiento del motor, se enciende el led L1 ROJO
parpadeando (es el momento de sustituir los filtros de carbón si la campana los tiene). La alarma filtros destaca SÓLO
cuando el motor está PARADO. La alarma filtros se anula (reset del contador HORAS) teniendo pulsada la tecla A
durante 2".
B) Pulsando la tecla B se enciende el motor a la primera velocidad. La velocidad la destaca el Led L1 VERDE encendido.
Manteniéndolo pulsado durante 2" se apaga el motor. Pulsando con un toque sólo, con el led encendido, se activa
la función timer (motor encendido durante 5'), destacada por el led parpadeando. Para quitar la función timer pulsar
una vez más con un toque sólo. C) Pulsando la tecla C se enciende el motor a la segunda velocidad. La velocidad
la destaca el Led L2 VERDE encendido. Pulsando con un toque sólo, con el led encendido, se activa la función timer
(motor encendido durante 5'), destacada por el led parpadeando. Para quitar la función timer pulsar una vez más con

12
un toque sólo. D) Pulsando la tecla D se enciende el motor a la tercera velocidad. La velocidad la destaca el Led
L3 VERDE encendido. Pulsando con un toque sólo, con el led encendido, se activa la función timer (motor encendido
durante 5'), destacada por el led parpadeando. Para quitar la función timer pulsar una vez más con un toque sólo.
E) Pulsando la tecla E se enciende el motor a la cuarta velocidad. La velocidad la destaca el Led L4 VERDE encendido.
Pulsando con un toque sólo, con el led encendido, se activa la función timer (motor encendido durante 5'), destacada
por el led parpadeando. Para quitar la función timer pulsar una vez más con un toque sólo.
ATENCIÓN : ACCIONANDO LA FUNCIÓN
TIMER, EL MOTOR SE APAGARÁ LUEGO DE 5 MINUTOS.
ATENCIÓN : CUANDO EL LED ROJO SE ENCIENDE . INDICA QUE DEBEN LIMPIARSE LOS FILTROS ANTIGRASA
O SUSTITUIR LOS FILTROS AL CARBÓN.
Se debe prestar especial atención a los filtros antigrasa que debe ser limpiado periódicamente aparece cuando la alarma
de los filtros de grasa, por lo general cada dos meses. Para obtener instrucciones sobre el filtro, se refieren a los comandos
de párrafo. Retire los filtros de grasa: en la manija, empuje el pestillo hacia adentro y tire del filtro hacia abajo (Fig. 4).
Lávelos con un producto neutro normal en el mercado luego enjuague y seque. El lavado puede ‘hacerse en el lavavajillas,
teniendo cuidado de no poner los filtros en contacto con los platos sucios o artículos de plata. Vuelva a colocar los filtros
antigrasa.
Cambio de los filtros de carbón (Fig. 8): Si se usa el aparato en versión filtrante, habrá que cambiar periódicamente los
filtros de carbón, cuando vea la advertencia, por lo general cada seis meses. Para obtener instrucciones sobre el filtro,
se refieren a los comandos de párrafo. Para acceder a los filtros de carbón redondos, los filtros de grasa quitar,
suelte los filtros de carbono del motor a través de la rotación.
Iluminación (Fig. 10): para cambiar las lámparas LED, haciendo palanca sobre las hendiduras apropiadas.
Sustitúyalas con lámparas del mismo tipo.

13
PORTUGUÊS
DESCRIÇÃO
O aparelho pode ser instalado na versão filtrante ou na versão aspirante. Versão filtrante (Fig. 1): o exaustor aspira
o ar impregnado de fumos e cheiros da cozinha, depurando-o através dos filtros anti-gordura e dos filtros de carvão,
e depois reintroduz o ar purificado no ambiente. Para que a sua eficiência seja constante, é necessário substituir
os filtros de carvão periodicamente. Os filtros de carvão não são entregue. Versão aspirante (Fig. 2): o exaustor
aspira o ar impregnado de fumos e cheiros da cozinha, fazendo-o passar através dos filtros anti-gordura, e depois
expele-o para o exterior através de uma conduta de descarga. Nesta versão não é necessário utilizar os filtros de
carvão.
Decidir, inicialmente, o tipo de instalação desejada (filtrante ou aspirante). Para maior eficiência, aconselhamos que
o exaustor seja instalado na versão aspirante (se possível).
INSTALAÇÃO
ATENÇÃO: sugerimos que chamem pessoal especializado para realizar as operações de instalação.
INSTALAÇÃO NA VERSÃO ASPIRANTE:
1. Antes da fixação é necessário preparar a conduta para evacuação de ar no exterior. Utilizar uma conduta de
descarga que tenha: - o comprimento mínimo indispensável; - o menor número de curvas possível (ângulo máximo
da curva:90°); - material aprovado pelos regulamentos de lei existentes (de acordo com o Estado); - o lado de
dentro o mais liso possível. Aconselha-se ainda evitar mudanças drásticas de secção de tubo. Aconselha-se
a utilização de um tubo de 150 mm de diâmetro para o modelo representado na Figura 3. Para a evacuação de
ar no exterior, seguir todas as indicações dadas na folha “Advertências”.
2. Predispor uma alimentação eléctrica adequada. Para a ligação eléctrica seguir todas as indicações dadas na folha
de “Advertências”.
3. Desmontar o filtro antigordura (Fig. 4): desmontar o filtro, deslocando a lingueta de fixação (B) e rodando o filtro
para fora.
4. Efectuar na base do armário suspenso a abertura necessária para colocar o aparelho (Fig. 5). O plano inferior
do armário de parede deve ter uma espessura entre 15 e 18 mm.
5. Verificar que as aletas de fixação ao armário (Fig. 6) estão posicionadas a uma altura adequada à espessura
da base do armário. Caso esta distância resulte inferior à espessura poderá ser aumentada desaparafusando
os 2 parafusos correspondentes no interior do aparelho.
6. Ligar a conduta para evacuação do ar à boca de saída de ar do exaustor; utilizar um tubo flexível e fixá-lo à
boca de saída de ar com uma braçadeira metálica (o tubo e a braçadeira não são fornecidos com aparelho).
Efectuar a ligação elétrica.
7. Montar de novo a grelha metálica e/ou os filtros antigordura.
8. DESMONTAGEM DO APARELHO.
Remover o filtro anti-gordura (Fig. 4). Durante as seguintes operações sustentar sempre o aparelho.
Desaparafusar os 2 parafusos situados no interior do aparelho (Fig. 6); deslocar as 2 linguetas para o interior
do aparelho utilizando os encaixes para o efeito (Fig. 7); extrair o aparelho do seu alojamento.
INSTALAÇÃO NA VERSÃO FILTRANTE:
Prosseguir com a instalação consultando as instruções para a versão aspirante (ver pontos 2, 3, 4, 5) e depois continuar
seguindo as instruções que damos abaixo.
Ligar um tubo flexível à boca de saída de ar do exaustor, que possa transportar o ar até ao cimo da prateleira ou
do armário suspenso; fixar o tubo com uma braçadeira metálica (tubo e braçadeira não fazem parte dos acessórios
fornecidos com o aparelho). Fazer a ligação eléctrica.
Verificar se os filtros de carvão já estão instalados; se for necessário montá-los da seguinte maneira: colocar o filtro
de carvão apoiado em cima do grupo do motor, fazendo com que os pinos coincidam; rodar o filtro de carvão até
ele se fixar (Fig. 8). Montar de novo a grelha metálica e/ou os filtros antigordura.
FUNCIONAMENTO
Comandos da Fig. 9:
A) ON/OFF lâmpadas. Esta tecla utiliza-se também para a função de alarme dos filtros anti-gordura e filtros de carvão.
Alarme dos filtros: Após 30h de funcionamento do motor, o led L1 VERMELHO acende-se e permanece ligado
(é o momento de limpar os filtros anti-gordura). Após 120h de funcionamento do motor, o led L1 VERMELHO acende-
se intermitentemente (é o momento de substituir os filtros de carvão, se a campânula os possuir). O alarme dos
filtros activa-se APENAS com o motor DESLIGADO. O alarme dos filtros desactiva-se (reset do contador de HORAS)
pressionando a tecla A durante 2". B) Pressionando a tecla B liga-se o motor na primeira velocidade. A velocidade
é evidenciada através do Led L1 VERDE ligado. Mantendo-o premido por 2", desliga-se o motor. Pressionando-o com
um só toque, com o led ligado, activa-se a função timer (motor ligado durante 5'), evidenciada pelo led intermitente.
Para eliminar a função timer pressionar novamente com um só toque. C) Pressionando a tecla C liga-se o motor na
segunda velocidade. A velocidade é evidenciada através do Led L2 VERDE ligado. Pressionando-o com um só toque,

14
com o led ligado, activa-se a função timer (motor ligado durante 5'), evidenciada pelo led intermitente. Para eliminar
a função timer pressionar novamente com um só toque. D) Pressionando a tecla D liga-se o motor na terceira
velocidade. A velocidade é evidenciada através do Led L3 VERDE ligado. Pressionando-o com um só toque, com
o led ligado, activa-se a função timer (motor ligado durante 5'), evidenciada pelo led intermitente. Para eliminar a
função timer pressionar novamente com um só toque. E) Pressionando a tecla E liga-se o motor na quarta velocidade.
A velocidade é evidenciada através do Led L4 VERDE ligado. Pressionando-o com um só toque, com o led ligado,
activa-se a função timer (motor ligado durante 5'), evidenciada pelo led intermitente. Para eliminar a função timer
pressionar novamente com um só toque.
ATENÇÃO : ACCIONANDO A FUNÇÃO
TIMER, O MOTOR APÓS 5 MINUTOS APAGA-SE.
ATENÇÃO : QUANDO SE ACENDE O LED VERMELHO É O MOMENTO DE LIMPAR OS FILTROS ANTI-GORDURA
OU DE SUBSTITUIR OS FILTROS DE CARVÃO.
Especial atenção deve ser dada à filtros de gordura que deve ser limpo periodicamente aparece quando o alarme
filtros de gordura, geralmente de dois em dois meses. Para obter instruções sobre o filtro, referem-se aos
comandos de parágrafo. Remover os filtros: ao nível do punho, empurre a trava para dentro e puxar o filtro para
baixo (Fig. 4). Lave-os com um produto neutro normalmente no mercado, em seguida, enxaguar e secar. A
lavagem pode ‘ser feito na máquina de lavar louça, tomar cuidado para não colocar os filtros em contato com
pratos sujos ou objectos de prata. Substituir os filtros de gordura.
Substituição de filtros de carvão (Fig. 8): No caso de uso da versão de filtro, você precisará substituir
periodicamente os filtros de carvão, filtros de carvão, quando você vê o aviso, normalmente a cada seis meses.
Para obter instruções sobre o filtro, referem-se aos comandos de parágrafo. Para acessar os filtros de carvão
redondos, filtros de gordura retirar, os filtros de carvão do motor através de rotação.
Iluminação (Fig. 11): Para substituir os holofotes LED para alavancar as ranhuras. Substitua com o mesmo tipo
de lâmpada.

15
NEDERLANDS
BESCHRIJVING
De afzuigkap kan in de filter- en in de afzuigversie geïnstalleerd worden. Filterversie (Afb. 1): de afzuigkap zuigt
de met verbrandingsgassen en onaangename luchtjes doordrongen kooklucht af en zuivert de lucht via de vetfilters
en de koolstoffilters waarna de schone lucht weer in de ruimte geblazen wordt. Om ervoor te zorgen dat de werking
voortdurend doeltreffend is moeten de koolstoffilters regelmatig vervangen worden. De koolstoffilters zijn niet
bijgeleverd. Afzuigversie (Afb. 2): de afzuigkap zuigt de met verbrandingsgassen en onaangename luchtjes
doordrongen kooklucht af en zorgt ervoor dat de lucht door de vetfilters gaat en vervolgens via een afvoerpijp
rechtstreeks naar buiten geleid wordt.Bij deze versie is de toepassing van koolstoffilters niet nodig.
Bepaal vanaf het begin het type installatie (filter- of afzuigversie).Voor een grotere doeltreffendheid adviseren wij
u om (indien mogelijk) de afzuigkap in de afzuigversie te installeren.
INSTALLATIE
LET OP: De installatie kan het beste overgelaten worden aan vakmensen.
INSTALLATIE IN DE AFZUIGVERSIE:
1. Alvorens de afzuigkap te bevestigen moet u eerst de pijp voor de luchtafvoer naar buiten in orde maken. Gebruik
een afvoerpijp die de volgende eigenschappen heeft: - minimum benodigde lengte; - zo min mogelijk bochten
(maximaal toegestane hoek van de bochten: 90°); - materiaal dat goedgekeurd is volgens de voorschriften
(afhankelijk van het land); - binnenkant zo glad mogelijk. Er wordt bovendien geadviseerd om drastische
veranderingen van de doorsnede van de pijp te vermijden. Het wordt geadviseerd een pijp te gebruiken met een
diameter van 150 mm voor het model op afbeelding 3. Om de lucht naar buiten af te voeren moet u alle andere
aanwijzingen die op het blad “Opgelet” staan opvolgen.
2. Zorg voor geschikte elektrische voeding. Om de elektrische aansluiting tot stand te brengen moet u alle andere
aanwijzingen die op het blad “Opgelet” staan opvolgen.
3. Verwijder het metalen vetfilters (Afb. 4): verwijder het filter/de filters door de vergrendeling (B) te verplaatsen
en het filter naar buiten te draaien.
4. Maak in de bodem van het hangend kastje de opening waarin de kap geplaatst moet worden (Afb. 5).Het onderste
vlak van het kastje moet een dikte van tussen de 15 en 18 mm hebben.
5. Controleer of de bevestigingslipjes (Afb. 6) van de bovenkast goed geplaatst zijn op een hoogte die gepast is
aan de bodemdikte van de kast. Ingeval de afstand kleiner mocht zijn dan de dikte, dan wordt de afstand vergroot
door de 2 overeenkomstige schroeven aan de binnenkant van het apparaat losgedraaid.
6. Verbind de luchtafvoerpijp met de luchtafvoeropening van de kap; gebruik een buigzame slang en zet deze aan
de luchtuitgang van de afzuigkap vast met een metalen bandje (slang en bandje worden niet bijgeleverd). De
elektrische aansluiting uitvoeren.
7. Mionteer het metalen rooster en/of de vetfilters weer terug.
8. DEMONTAGE VAN HET APPARAAT.
Verwijder de vetfilter (Abf. 4). Ondersteun het apparaat altijd tijdens de volgende handelingen. Draai de 2
schroeven aan de binnenkant van het apparaat los (Afb. 6). Verplaats de 2 lipjes in binnenwaartse richting van
het apparaat met gebruik van de daarvoor bestemde inkepingen (Afb. 7). Trek het apparaat uit de zitting.
INSTALLATIE IN DE FILTERVERSIE:
Verricht de installatie volgens de instructies voor de afzuigversie (zie punt 2, 3, 4, 5), en ga daarna verder met de
onderstaande instructies.
Sluit een buigzame slang aan op de luchtuitgangsopening van de wasemkap, zodat hij de lucht tot de bovenkant van
het bovenkastje voert; zet de pijp vast met een metalen band (pijp en en band worden niet meegeleverd). Breng de
elektrische aansluiting tot stand.
Controleer of de koolstoffilters al geplaatst zijn; monteer hen eventueel als volgt: leg het koolstoffilter op de
motorgroep, zodanig dat de pennen samenvallen; draai het koolstoffilter totdat het geblokkeerd wordt (Afb. 8).
Plaats het metalen filter en/of de vetfilters weer terug.
WERKING
Bedieningselementen van Afb. 9: A) ON/OFF lampen. Deze toets wordt ook gebruikt voor de functie alarm vetfilter
en koolstoffilter.
Filteralarm: Na 30 uren werking van de motor, licht de RODE led L1 ROSSO op en blijft branden (de vetfilter moet
worden gereinigd). Na 120 uren werking van de motor, knippert de RODE led L1 (de koolstoffilter moet worden
vervangen, voor zover de afzuigkap hiervan voorzien is). Het filteralarm is ALLEEN merkbaar wanneer de motor UIT
is. Het filteralarm wordt teruggesteld (reset URENTELLER) door de toets A gedurende 2" ingedrukt te houden. B)
Door de toets B in te drukken, start de motor op de eerste snelheid. De snelheid wordt aangegeven door de brandende
GROENE Led L1. Als hij 2" ingedrukt gehouden wordt, stopt de motor. Wanneer er één keer op wordt gedrukt, met
brandende led, treedt de timerfunctie in werking (motor aan gedurende 5'), wat wordt aangegeven door de knipperende
led. Om de timerfunctie uit te schakelen, nogmaals drukken. C) Door de toets C in te drukken, start de motor op

16
de tweede snelheid. De snelheid wordt aangegeven door de brandende GROENE Led L2. Wanneer er één keer op
wordt gedrukt, met brandende led, treedt de timerfunctie in werking (motor aan gedurende 5'), wat wordt aangegeven
door de knipperende led. Om de timerfunctie uit te schakelen, nogmaals drukken. D) Door de toets D in te drukken,
start de motor op de derde snelheid. De snelheid wordt aangegeven door de brandende GROENE Led L3. Wanneer
er één keer op wordt gedrukt, met brandende led, treedt de timerfunctie in werking (motor aan gedurende 5'), wat wordt
aangegeven door de knipperende led. Om de timerfunctie uit te schakelen, nogmaals drukken. E) Door op de toets
E te drukken, start de motor op de vierde snelheid. De snelheid wordt aangegeven door de brandende GROENE Led
L4. Wanneer er één keer op wordt gedrukt, met brandende led, treedt de timerfunctie in werking (motor aan gedurende
5'), wat wordt aangegeven door de knipperende led. Om de timerfunctie uit te schakelen, nogmaals drukken.
LET OP : DOOR DE
TIMERFUNCTIE TE ACTIVEREN ZAL DE MOTOR NA 5 MINUTEN UITGESCHAKELD WORDEN.
LET OP : WANNEER DE RODE LED GAAT BRANDEN IS HET TIJD OM DE ANTIVETFILTERS TE REINIGEN OF
DE KOOLSTOFFILTERS TE VERVANGEN.
Bijzondere aandacht moet worden besteed aan de vetfilters die regelmatig moeten worden schoongemaakt
verschijnt wanneer het alarm vetfilters, meestal om de twee maanden. Voor instructies over het filter, wordt
verwezen naar de paragraaf commando’s. Verwijder de vetfilters: aan het handvat, druk de vergrendeling naar
binnen en trek het filter naar beneden (Afb. 4). Was ze met een neutraal product op de markt afspoelen en
afdrogen. Het wassen kan ‘worden gemaakt in de vaatwasser, en zorg ervoor dat de filters in contact gebracht met
vuile vaat of zilver. Vervang de vetfilters.
Vervanging van de koolstoffilters (Abf. 8): In het geval van gebruik van het filter-versie, moet u aan om
periodiek vervanging van de koolstoffilters, koolstoffilters wanneer u de waarschuwing, meestal zie elke zes
maanden. Voor instructies over het filter, wordt verwezen naar de paragraaf commando’s. Toegang tot de ronde
koolstoffilters, vetfilters te verwijderen, de koolstoffilters van de motor door rotatie release.
Verlichting (Abf. 11): De led lampen als hefboom voor de slots te vervangen. Vervangen met lampen van hetzelfde
type.
17
12
3
4
B
18
6
496-676
261
(±1mm)
(±1mm)
5
7
19
10
9
8

20
04308300