Gas Range User Manual
OVEN CONTROLS
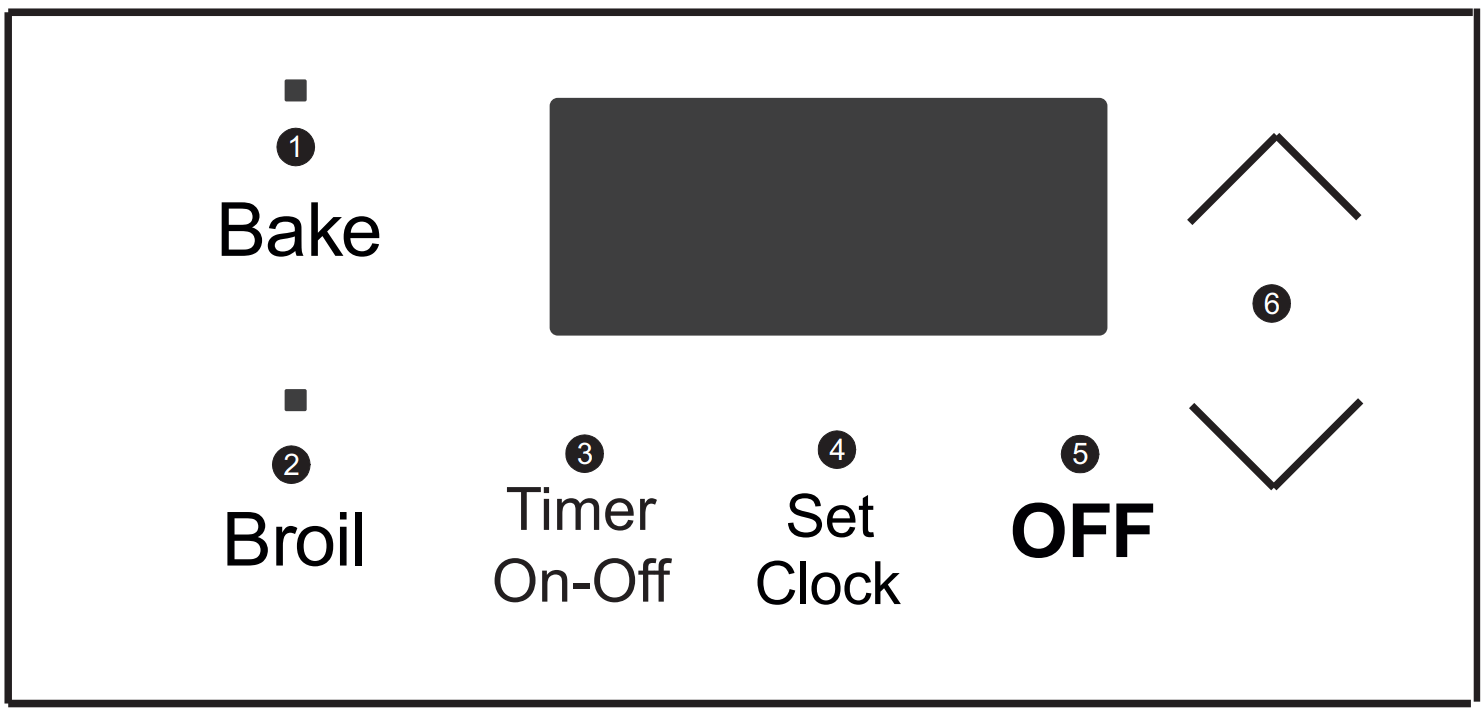
- Bake - Use to select for all baking.
- Broil - Use to select the broil feature. When broil is active the indicator light above the broil key will glow.
- Timer On-Off - Use to set or cancel the minute timer. The minute timer does not start or stop cooking.
- Set Clock - Use with up or down arrows to set the time of day.
- OFF - Use to stop or to clear any feature previously entered except time of day and minute timer. Press OFF to stop cooking.
- Up and Down arrow keys - Use with the feature or function pads to set oven temperature or to adjust the clock or minute timer.
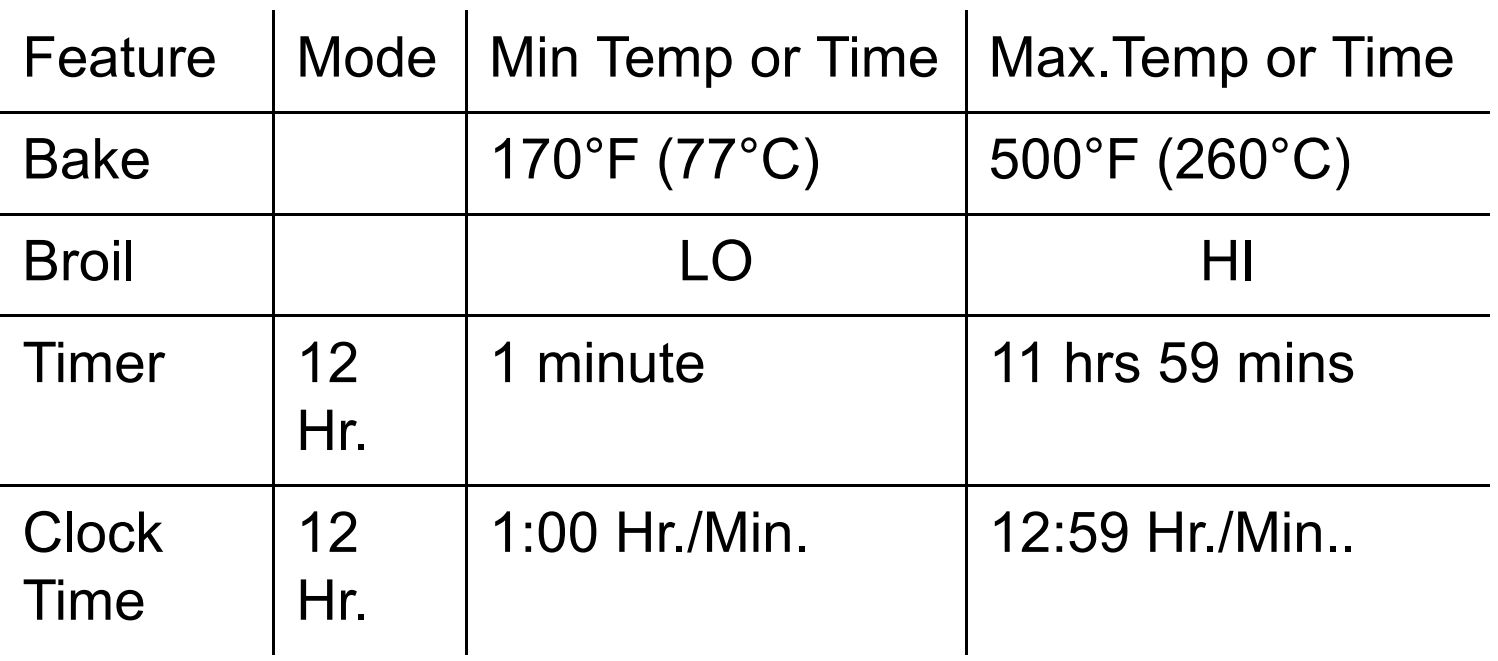
Minimum and Maximum Settings
SETTING
Setting the Clock
When the appliance is first plugged in or when the power supply to the appliance has been interrupted, the display will flash 12:00. It is recommended to always set the clock for the correct time of day before using the appliance.
To set the clock:
- Press Set Clock once (do not hold clock key down).
- Within 5 seconds, press and hold
 or
or  until the correct time of day appears in the display and release. The clock will accept the change in a few seconds..
NOTE The clock cannot be changed when the oven is set for cooking.
Temperature display (Fahrenheit/Celsius)
The electronic oven control is set to operate in Fahrenheit (°F) at the factory. The oven may be programmed for any temperature from 170°F to 500°F (77°C to 260°C).
To change the temperature to Celsius (°C) or from °C to °F:
- Press Broil until F or C appears in the display.
- Press or to change °F to °C or °C to °F. To accept the change, wait 6 seconds until the oven control provides an acceptance beep.
- The display will return to the time of day.
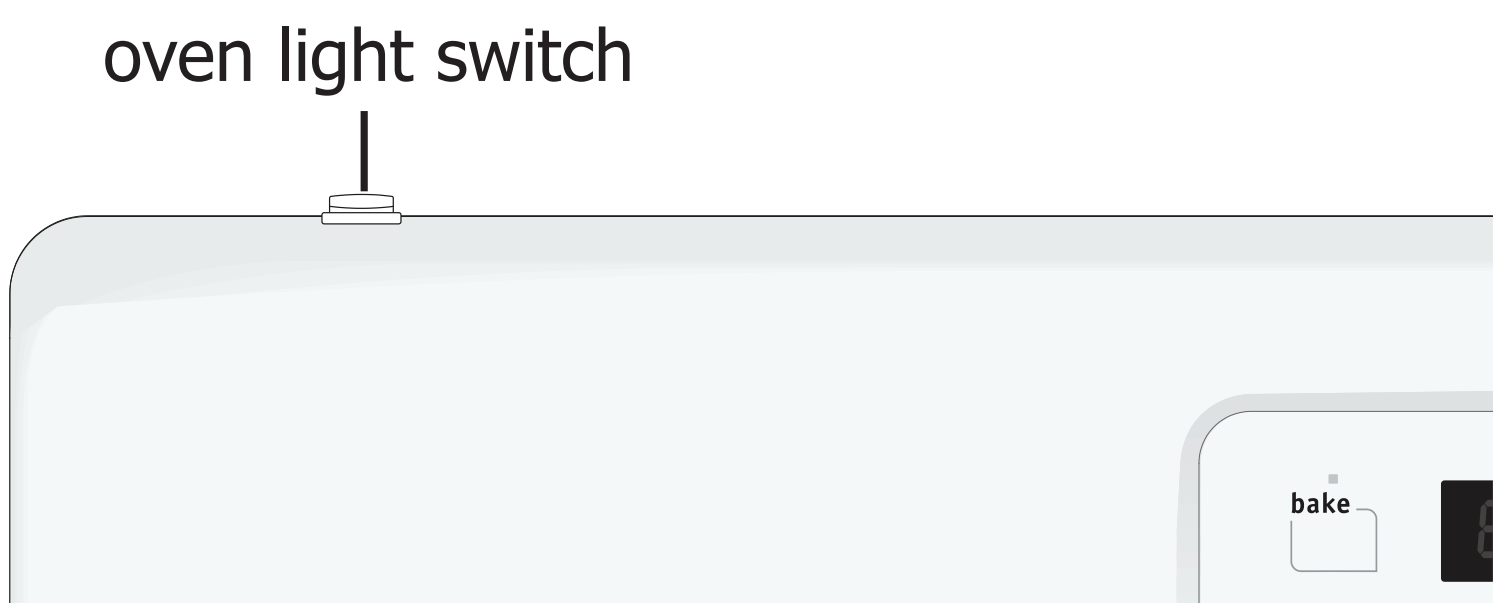
Operating oven light
The interior oven light will automatically turn ON when the oven door is opened. Press the oven light switch located on the upper left control panel to turn the interior oven light ON and OFF whenever the oven door is closed.
Setting the minute timer
- Press Timer on-off.
- Press to increase time in one-minute increments.
- Press and hold to increase time in 10-minute increments. The timer can be set for any amount of time from 1 minute to 11 hours and 59 minutes.
- NOTE If is pressed first, the timer will advance to 11 hours and 59 minutes.
- NOTE If
- Press and hold
- When the diesired timer setting is reached, release the arrow key. The timer will start counting down within a few seconds.
- When the set time ends, the timer will beep three times and will continue to beep three times every minute until Timer on-off is pressed.
NOTE The minute timer will not start or stop the cooking process. The minute timer can be used alone or while using any of the other oven features. If another feature is active when the minute timer is active, the minute timer will show in the display. To view information about other active features, press the key for that feature.
To change the timer while it is in use:
While the timer is active and shows in the display, press and hold or to increase or decrease the time remaining.
To cancel the minute timer before the set time has run out:
1. Press Timer on-off once.
Setting Bake
Bake cooks with heat that rises from the oven bottom. The heat and air circulate naturally in the oven. The oven indicator light above the BAKE key will remain on until oven is preheated. During baking the oven indicator light will turn on and off as the oven cycles to maintain set temperature. Follow baking recommendations for best results.
The oven can be programmed to bake at any temperature from 170°F to 500°F (77°C to 260°C). The factory preset automatic bake temperature is 350°F (177°C).
For best bake results:
- Fully preheat the oven before baking items like cookies, cakes, biscuits, and breads.
- Use rack position 3 when baking most items on a single oven rack.
- When baking a layer cake using a single oven rack, use rack position 4.
- When baking using two oven racks, position cookware to allow at least 2 inches (5 cm) of space between cookware for proper air circulation.
- For best results when baking layer cakes using 2 oven racks, place bakeware on rack positions 3 and 6 See Figure 13.
- Dark or dull bakeware absorbs more heat than shiny bakeware, resulting in dark or overbrowned foods. It may be necessary to reduce oven temperature or cook time to prevent overbrowning of some foods.
- Dark pans are recommended for pies; shiny pans are recommended for cakes, cookies, and muffins
- Do not open oven door often. Opening the door will reduce the temperature in the oven and may increase cook time.
- Do not leave oven light on while baking.
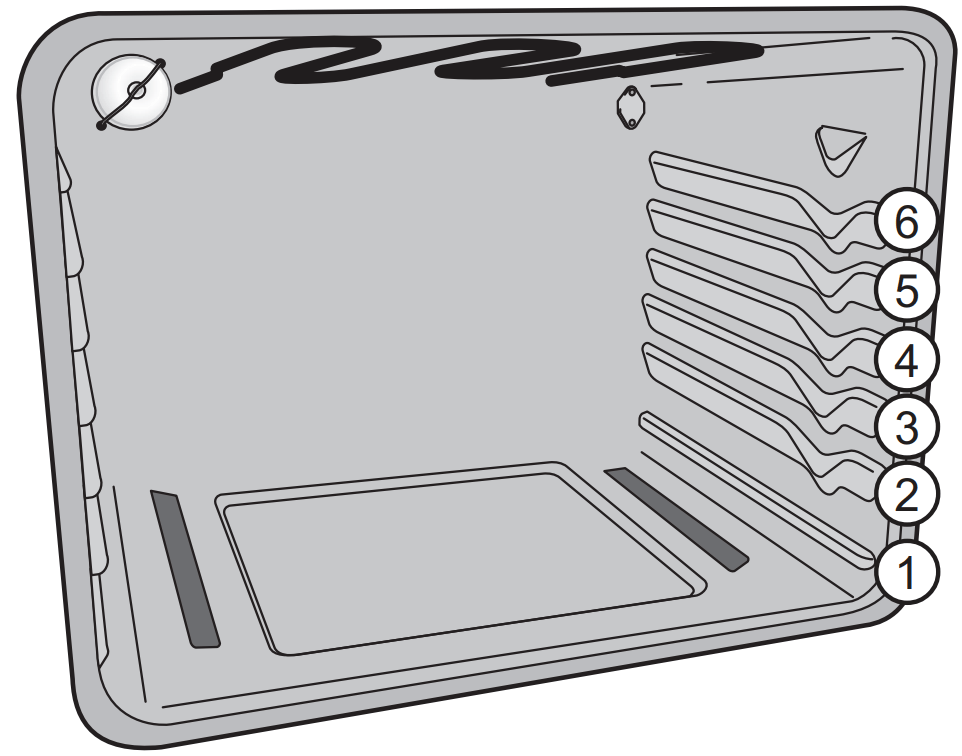
Figure 13: Rack positions

Figure 14: Pan spacing recommendations
To set Bake:
- Press Bake. — — — appears in the display.
- Within 5 seconds, press or The display will show 350°F (177°C). The temperature can then be adjusted in 5°F (1°C) increments.
- When a key is released, the oven will begin heating to the selected temperature. When the oven reaches the set temperature, the preheat indicator light will turn off and the control will beep three times.
- To cancel the baking function, press OFF.
To change oven temperature after Bake has started:
- Press Bake.
- Press or to to increase or decrease to a new temperature. The oven indicator light on the electronic display will turn on and off when using the bake feature and during preheat. This is normal and indicates that the oven is cycling to maintain the selected baking temperature. To cancel baking press OFF.
Setting Broil
Setting Broil Use the broil feature to cook meats that require direct exposure to radiant heat for optimum browning results. Broiling will produce some smoke. If smoke is excessive, place food further away from the element. Watch food to prevent burning. When broiling always remember to arrange the oven racks while oven is still cool. This unit has an electric broil feature.
WARNING Should an oven fire occur, close the oven door and turn the oven off. If the fire continues, use a Class B/C fire extinguisher. Do not put water or flour on the fire. Flour may be explosive.
CAUTION Always use oven mitts. Oven racks will become very hot which can cause burns.
Broiling tips:
- If using broil pan and insert, place insert on broil pan. Place on oven rack, preheat on broil HI for 5 minutes before placing food on insert. Broil with the oven door closed.
- Always use the broiler pan with the insert when broiling. It allows the dripping grease to be kept away from the high heat of the broil element. Do not use the pan without the insert.
- Always pull the rack out to the stop position before turning or removing food.
- Do not cover the broil pan insert with aluminum foil. The exposed grease could catch fire. Do not use a roasting rack when broiling.
To set broil:
- Arrange the oven rack while oven is still cool.
- Press broil. The display will show — —.
- Press for HI broil or for LO broil. Most foods may be broiled at the HI broil setting.
- For optimum results, preheat pan using Broil HI for 5 minutes before placing food on pan.
- Boil with the oven door closed.
- Broil on one side until food is browned. Turn and broil food on the other side.
When broiling is finished press OFF.
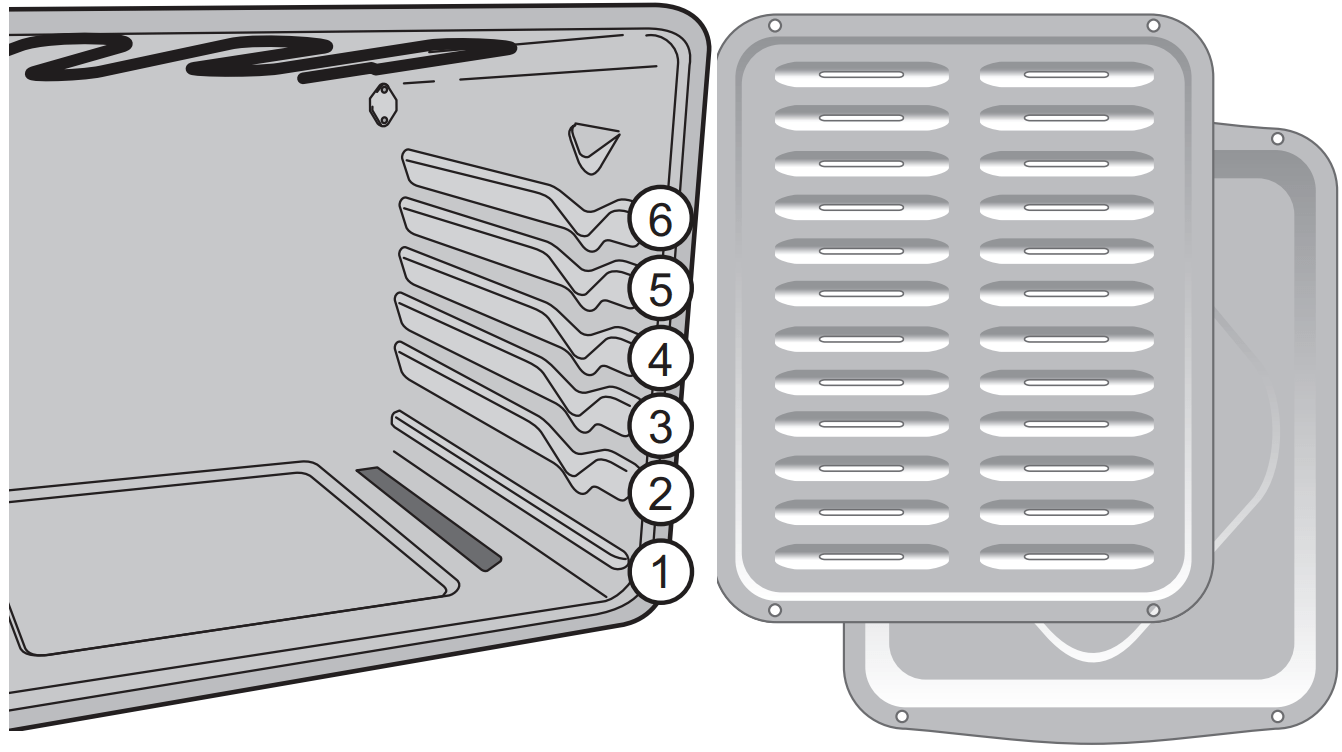
Figure 15: Rack positions (L) Broil pan and insert (R)
NOTE If a broil pan and insert are not supplied with your appliance you may order one from frigidaire.com.
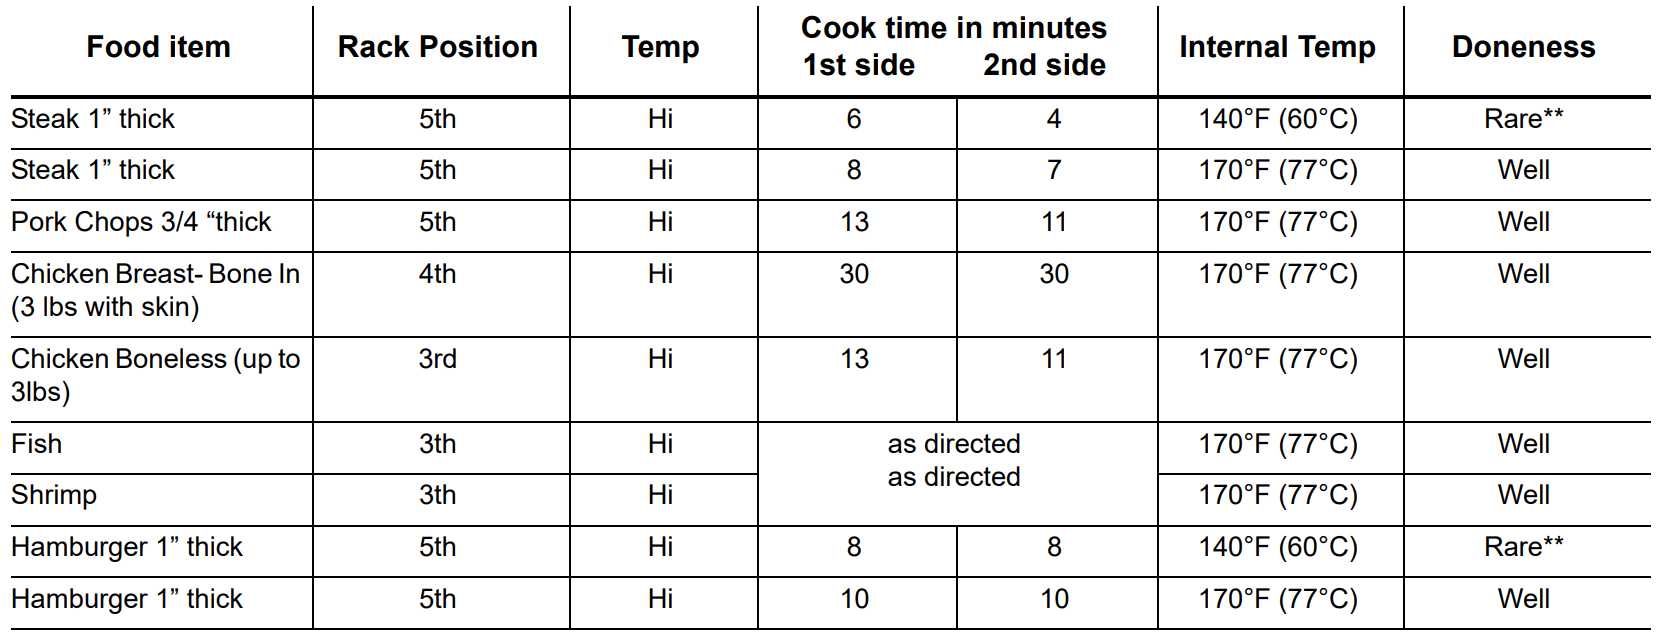
Table 1: Suggested broil settings for electric ovens
Adjusting the oven temperature
Your appliance has been factory calibrated and tested to ensure an accurate baking temperature. For the first few uses, follow your recipe times and temperature recommendations carefully. If you think the oven is cooking too hot or too cool for your recipe times, you can adjust the control so the oven cooks hotter or cooler than the temperature displayed.
Do not use oven thermometers such as those found in grocery stores to check the temperature settings inside your oven. These oven thermometers may vary as much as 20 to 40 degrees from actual temperatures.
To adjust oven temperature:
- Press and hold the Bake key and release when the display shows the factory temperature setting of 00. If the oven temperature has been previously adjusted from the factory setting, the last adjusted value will appear in the display instead.
- The temperature can now be adjusted up +35°F (+19 °C), in 5°F increments with each press of the key.
- When lowering the oven temperature using the key, minus sign (-) will appear before the number to indicate that the oven will be cooler by the displayed amount of degrees.
- To accept the change, wait for the oven control to provide an acceptance beep.
NOTE
Oven temperature adjustments made will not affect the Broil temperatures.
If the display is set for Celsius, adjustments made will be in 1°C increments each press of arrow keys.
If at any time during the process of adjusting the oven temperature feature you decide not to make the change, press the OFF key once before the acceptance beep.
CARE AND CLEANING
Remove spills and any heavy soiling as soon as possible.
Regular cleaning will reduce the difficulty of major cleaning later.
CAUTION
- Before cleaning any part of the appliance, be sure all controls are turned off and the appliance is cool.
- If ammonia or appliance cleaners are used, they must be removed and the appliance must be thoroughly rinsed before operating. Follow manufacturer's instructions and provide adequate ventilation.
| Surface Type | Recommendation |
|---|---|
| Aluminum and vinyl | Using a soft cloth, clean with mild dish detergent and water. Rinse with clean water, dry and polish with a soft, clean cloth. |
Painted and plastic control knobs Painted body parts Painted decorative trims | Using a soft cloth, clean with mild dish detergent and water or a 50/50 solution of vinegar and water. Rinse with clean water, dry and polish with a soft, clean cloth. Glass cleaners may be used, but do not apply directly to surface; spray onto cloth and wipe. |
| Control panel | Using a soft cloth, clean with mild dish detergent and water or a 50/50 solution of vinegar and water. Do not spray liquids directly on the oven control and display area. Do not use large amounts of water on the control panel - excess water on the control area may cause damage to the appliance. Do not use other liquid cleaners, abrasive cleaners, scouring pads, or paper towels - they will damage the finish. |
| Control knobs | Using a soft cloth, clean with mild dish detergent and water or a 50/50 solution of vinegar and water. To remove control knobs: turn to the OFF position, grasp firmly, and pull off the shaft. To replace knobs after cleaning, line up the OFF markings and push the knobs into place. |
| Stainless Steel | Using a soft cloth, clean with mild dish detergent and water or a 50/50 solution of vinegar and water. Rinse with clean water, dry with a soft clean cloth. Do not use cleaners containing abrasives, chlorides, chlorine, or ammonia. |
Smudge Proof™ Stainless Steel Black Stainless Steel | Using a soft cloth, clean with mild dish detergent and water or a 50/50 solution of vinegar and water. Rinse with clean water, dry with a soft clean cloth. Do not use appliance cleaner, stainless steel cleaner, or cleaner containing abrasives, chlorides, chlorine, or ammonia. These cleaners may damage the finish. |
Porcelain-enameled broiler pan and insert Porcelain door liner Porcelain body parts | Rinse with clean water and a damp cloth. Scrub gently with a soapy, non-abrasive scouring pad to remove most spots. Rinse with a 50/50 solution of clean water and ammonia. If necessary, cover difficult spots with an ammonia-soaked paper towel for 30 to 40 minutes. Rinse and wipe dry with a clean cloth. Remove all cleaners or future heating could damage the porcelain. Do not allow food spills with a high sugar or acid content (milk, tomatoes, sauerkraut, fruit juices or pie filling) to remain on porcelain surfaces. These spills may cause a dull spot even after cleaning. |
| Manual clean oven interior | The oven interior is porcelain coated and safe to clean using oven cleaners. Always follow manufacturer's instructions for cleaners. After cleaning, remove any oven cleaner or the porcelain may become damaged during future heating. Do not spray oven cleaner on any electrical controls or switches. Do not spray or allow oven cleaner to build up on the oven temperature sensing probe. Do not spray cleaner on oven door trim, door gasket, plastic drawer glides, handles or any exterior surfaces of the appliance. Ammonia must be rinsed before operating the oven. Provide adequate ventilation |
| Oven door | Use mild dish detergent and water or a 50/50 solution of vinegar and water to clean the top, sides, and front of the oven door. Rinse well. Glass cleaner may be used on the outside glass of the door. Ceramic smoothtop cleaner or polish may be used on the interior door glass. Do not immerse the door in water. Do not spray or allow water or cleaners to enter the door vents. Do not use oven cleaners, cleaning powders, or any harsh abrasive cleaning materials on the outside of the oven door. Do not clean the oven door gasket. The oven door gasket is made of a woven material which is essential for a good seal. Do not rub, damage, or remove this gasket |
Gas cooktop surface grates Gas cooktop burner caps | Use a non-abrasive plastic scrubbing pad and mild abrasive cleanser. Do not allow food spills with a high sugar or acid content (milk, tomatoes, sauerkraut, fruit juices or pie filling) to remain on the burner grates or burner caps. These spills may cause a dull spot even after cleaning. Clean these spills as soon as surfaces are cool. Thoroughly dry immediately following cleaning. |
Aluminum Foil and Utensils
WARNING Never cover any slots, holes, or passages in the oven bottom or cover an entire oven rack with materials such as aluminum foil. Doing so blocks air flow through the oven and may cause carbon monoxide poisoning. Aluminum foil linings may trap heat, causing a fire hazard.
WARNING Protective Liners — Do not use aluminum foil to line the oven bottom. Only use aluminum foil as recommended in this manual. Improper installation of these liners may result in risk of electric shock, or fire.
Cleaning the sealed burners
IMPORTANT
- Aluminum foil - Use of aluminum foil on a hot cooktop can damage the cooktop. Do not use thin aluminum cooking utensils or allow aluminum foil to touch the surface burners under any circumstances.
- Aluminum utensils - The melting point of aluminum is much lower than that of other metals. Care must be taken when aluminum pots or pans are used on the cooktop. If aluminum pans are allowed to boil dry when using the cooktop, the utensil will be damaged or destroyed.
To avoid possible burns, do not attempt cleaning before turning off all surface burners and allowing them to cool.
Any additions, changes, or conversions required in order for this appliance to satisfactorily meet the application needs must be made by an authorized qualified Agency. Routinely clean the cooktop. Wipe with a clean, damp cloth and wipe dry to avoid scratches. Keeping the surface burner head ports and slots clean will prevent improper ignition and an uneven flame
To clean recessed and contoured areas of cooktop:
- If a spill occurs on or in the recessed or contoured areas, blot up spill with an absorbent cloth.
- Rinse with a clean, damp cloth and wipe dry.
CAUTION
- To avoid possible burns do not attempt to operate the surface burners without the burner caps.
- Do not use spray oven cleaner on the cooktop.
To clean burner heads:
1. Remove the burner cap from the burner head (see Figure 18). Clean the cap with hot soapy water and dry thoroughly.
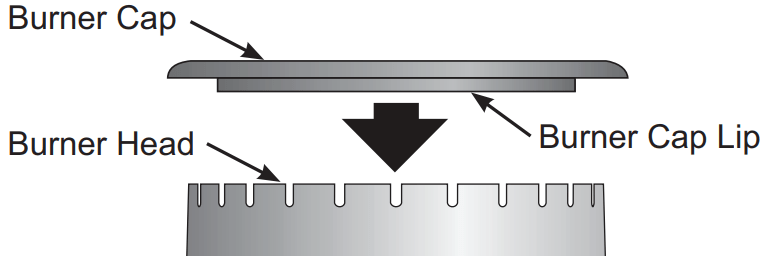
Figure 18: Burner Cap
2. For burned-on and dried spills, apply hot soapy water to the burner head. Allow time for the soils to soften.
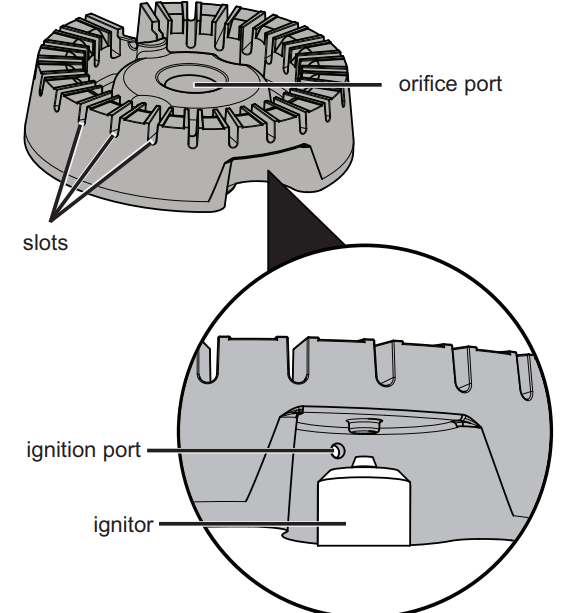
Figure 19: Sealed burner components
3. Use a toothbrush to clean all over the burner head (see Figure 19).
4. Use the toothbrush to clean the slots and holes in the burner (see Figure 19).
5. Use a needle or fine wire to clean out the ignition port see Figure 19).
6. Wipe the burner head clean with a soft, clean cloth, sponge, or scratch-free cleaning pad.
7. Before using the cooktop again, make sure the burner caps are properly placed and seated on the burner heads. When placed correctly, the burner cap is centered on the burner head and will click into place on the burner head. You can wiggle the cap to test placement, it should not move off the burner head.
Important notes:
- The surface burner heads are secured to the cooktop and must be cleaned in place on the cooktop.
- Always keep the surface burner caps in place whenever a surface burner is in use.
- When replacing the burner caps, be sure the burner caps are seated firmly on top of the burner heads.
- For proper flow of gas and ignition of burners do not allow spills, food, cleaning agents, or any other material to enter the gas orifice port opening.
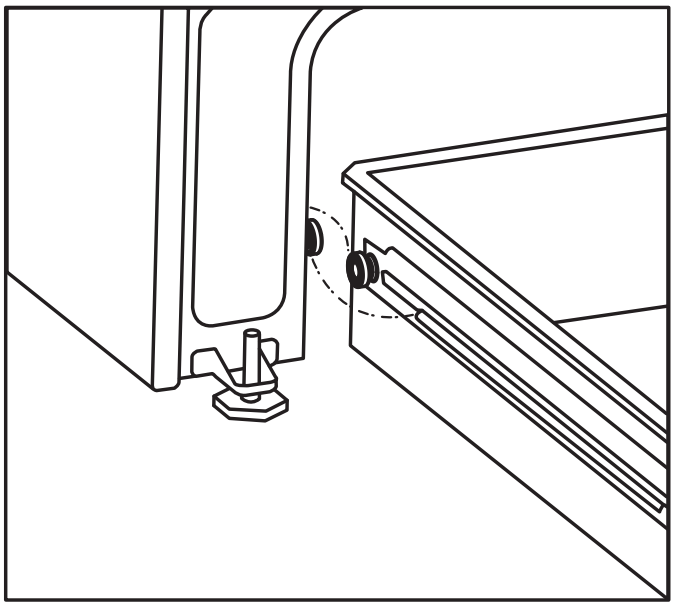
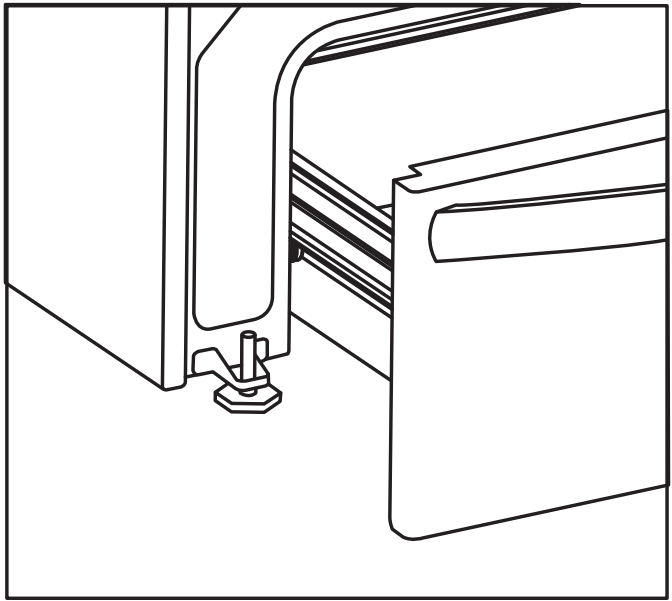
Remove and replace storage drawer
Use the storage drawer for storing cooking utensils. The drawer can be removed to facilitate cleaning under the range. Use care when handling the drawer
Replacing Oven Light
CAUTION Be sure the oven is unplugged and all parts are cool before replacing the oven light
The oven light is located at the rear of the oven cavity and is covered with a glass shield held by a wire holder. The glass shield protects the light bulb and must be in place whenever the oven is in use.
Replacing the oven interior light bulb:
- The interior oven light is located at the rear of the oven cavity (Figure 20). Turn electrical power off at the main source or unplug the appliance.
- Replace the bulb with a new appliance bulb.
- Turn the power back on again at the main source (or plug the appliance back in).
- Be sure to reset the time of day on the clock.
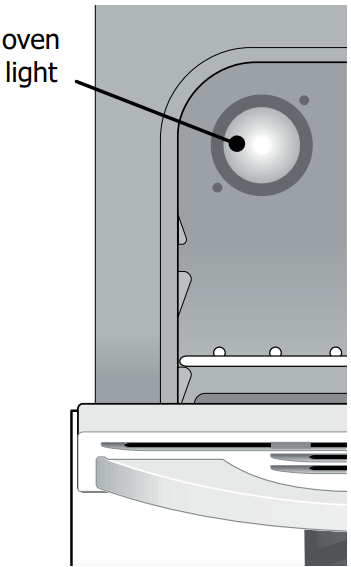
Figure 20: Oven light
Removing and Replacing the Oven Door
CAUTION The door is heavy. For safe, temporary storage, lay the door flat with the inside of the door facing down.
To remove the oven door:
1. Open oven door completely (horizontal with floor (See Figure 21)
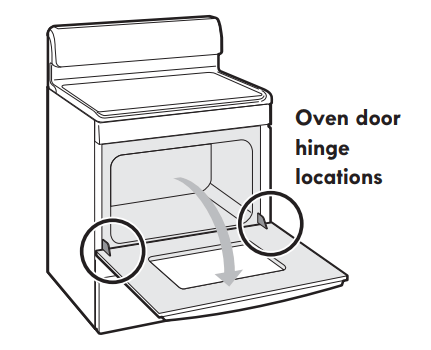
Figure 21: Door hinge location
2 Pull the door hinge locks on both left and right door hinges down from the oven frame completely towards the oven door (See Figure 22). A tool such as a small flat-blade screwdriver may be required
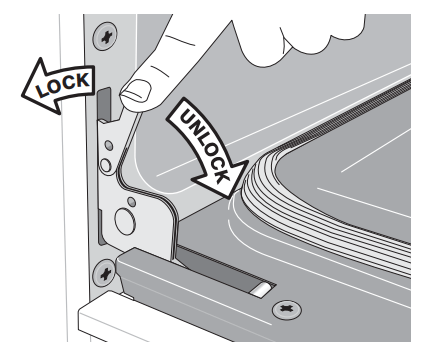
Figure 22: Door hinge locks
3. Firmly grasp both sides of oven door along the door sides. Do not use the oven door handle (See Figure 23).
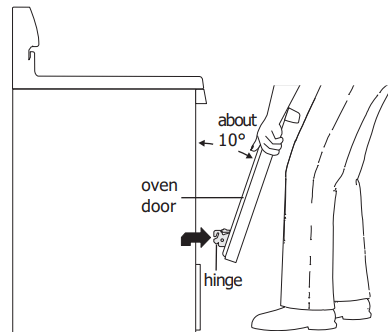
Figure 23: Holding door for removal
4. Close the door to approximately 10 degrees from the door frame (See Figure 23).
5. Lift the oven door hinge arms over the roller pins located on each side of the oven frame (See Figure 24).
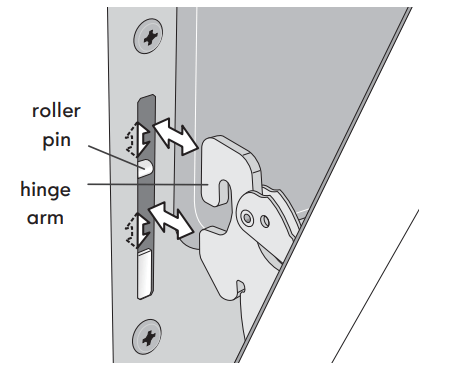
Figure 24: Replacement and location of hinge arm and roller pin
To replace oven door:
- Firmly grasp both sides of oven door along the door sides. Do not use the oven door handle (See Figure 23).
- Holding the oven door at the same angle as the removal position, seat the hook of the hinge arm over the roller pins located on each side of the oven door frame (See Figure 23 and Figure 24). The hook of the hinge arms must be fully seated onto the roller pins.
- Fully open the oven door, horizontal with floor (See Figure 21).
- Push the door hinge locks up towards and into the oven frame on both left and right oven door hinges to the locked position (See Figure 22).
- Close the oven door.
IMPORTANT Special door care instructions - Most oven doors contain glass that can break. Do not hit the glass with pots, pans, or any other object. Scratching, hitting, jarring, or stressing the glass may weaken its structure, causing an increased risk of breakage at a later time. Do not close the oven door until all of the oven racks are fully in place.
TROUBLESHOOTING
Oven Baking
| Baking Problems | Causes | Corrections |
|---|---|---|
Cookies and biscuits burn on the bottom.
|
|
|
Cakes too dark on top or bottom
|
|
|
Cakes not done in center
|
|
|
Cakes not level.
|
|
|
Foods not done when cooking time is over.
|
|
|


Solutions to Common Problems:
| Problem | Solution |
|---|---|
| Entire appliance does not operate. | Appliance not connected. Make sure power cord is plugged properly into outlet. Check your fuse box or breaker box to make sure the circuit is active.
|
| Oven Problems | |
| Poor baking results |
Center food in the oven and space pans to allow air to circulate. Allow the oven to preheat to the set temperature before placing food in the oven. Try adjusting the recipe's recommended temperature or baking time. |
| Flames inside oven or smoking from oven vent. | Excessive spillovers in oven. For example, this will happen for pie spillovers or large amounts of grease left on the oven bottom. Wipe up excessive spillovers before starting oven. |
| Oven smokes excessively when broiling. |
|
| Oven control panel beeps and displays any F or E code error. | Oven control has detected a fault or error condition. To clear the error, press the OFF key on the control panel. Once the error code is cleared, try the bake or broil function. If the F or E code error repeats, turn off the power to appliance, wait 5 minutes, and then repower the appliance. Set the clock with correct time of day. Try the bake or broil function again. If the fault recurs, press the OFF key to clear. |
| Oven portion of appliance does not operate. |
|
| Surface burners do not ignite. |
|
| Surface burner flame uneven or only part way around burner cap. |
|
| Surface burner flame is too high. |
|
| Surface burner flame is orange. | Dust particles in main gas line. Allow the burner to operate a few minutes until flame turns blue. In coastal areas, a slightly orange flame is unavoidable due to salt content in the air. Incorrect L.P. conversion. |
| Other Problems | |
| Appliance is not level. |
|
| Cannot move appliance easily. Appliance must be accessible for service. |
|
| Oven light does not work. | Be sure the oven light is secure in the socket. |