Not all features and cycles are available on all models.
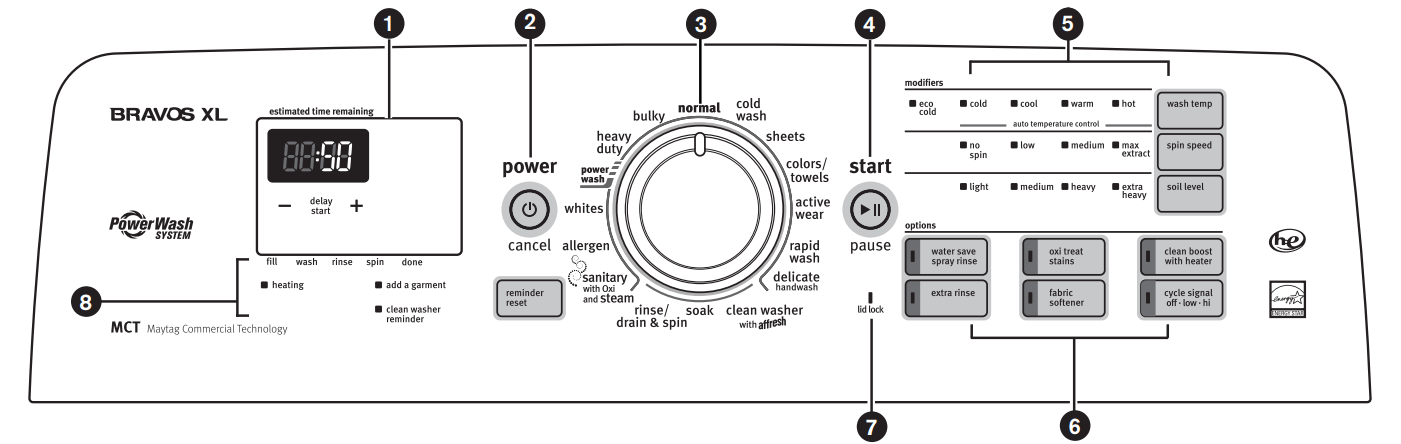
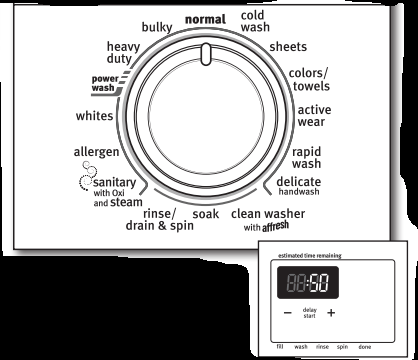
1. ESTIMATED TIME REMAINING DISPLAY
The Estimated Time Remaining display shows the time required for the cycle to complete. Factors such as load size and water pressure may affect the time shown in the display. Tightly packed, unbalanced loads, or excessive suds may cause the washer to adjust the cycle time, as well.
2. POWER/CANCEL BUTTON
Press to turn the washer ON or OFF.
3. WASH CYCLE KNOB
Use the Wash Cycle knob to select available cycles on your washer. Turn the knob to select a cycle for your laundry load. See “Cycle Guide” for detailed descriptions of cycles.
4. START/PAUSE BUTTON
Press to start the selected cycle. Be sure all desired Modifiers and Options have been selected. Press START/PAUSE once to unlock the lid and add a garment. Press START/PAUSE again to complete the cycle from where it was stopped. The lid must be closed for the washer to start.
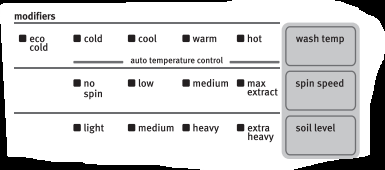
5. CYCLE MODIFIERS
Modifiers allow you to further customize your cycles and save energy. Not all cycles, options, and modifiers are available on all models.
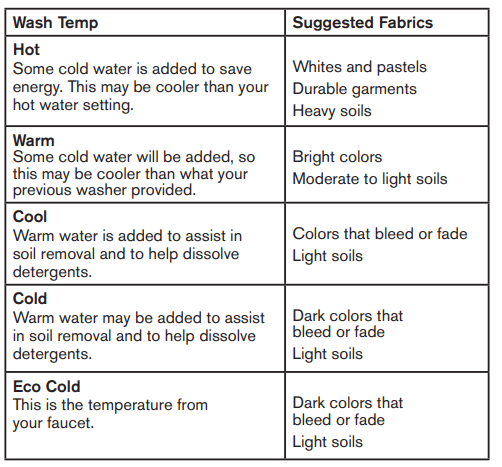
WASH TEMP
Select a water temperature based on the type of load you are washing. Use the warmest wash water suitable for fabrics. Follow garment label instructions.
All cycles use cold rinses. Cold rinses may help with wrinkling and save energy.
NOTE: In wash water temperatures colder than 60°F (15.6°C), detergents do not dissolve well. Soils may be difficult to remove.
SPIN SPEED
This washer automatically selects the spin speed based on the cycle selected. The preset speeds can be changed. Not all spin speeds are available with all cycles.
Faster spin speeds mean shorter dry times, but may increase wrinkling in your load.
Slower spin speeds mean less wrinkling, but will leave your load more damp.
SOIL LEVEL
Soil Level (wash time) is preset for each wash cycle. As you press Soil Level, the cycle time (minutes) will increase or decrease in the Estimated Time Remaining display and a different wash time will appear.
For most loads, use the Soil Level that is preset with the cycle you have chosen. For heavily soiled and sturdy fabrics, press SOIL LEVEL to select more wash time, if needed. For lightly soiled and delicate fabrics, press SOIL LEVEL to select less wash time, if needed. Lower Soil Level settings will help reduce tangling and wrinkling.
6. CYCLE OPTIONS
When you select a cycle, its default options will light up. Not all cycles, options, and modifiers are available on all models.
WATER SAVE SPRAY RINSE
Use this option to save water by using a spray rinse instead of a deep water rinse. This option is the default setting on some cycles, and selectable on other cycles. When using fabric softener, always select the FABRIC SOFTENER button, or select EXTRA RINSE; both of these options will dispense fabric softener in a deep rinse.
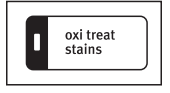
OXI TREAT STAINS
Use this option to boost cleaning performance with Oxi products. This washer is designed to dispense laundry boosters such as oxygenated stain treaters and color-safe bleach at the correct time in the cycle for best cleaning performance, using the liquid chlorine bleach dispenser. Do not use laundry boosters and chlorine bleach in the same cycle.
CLEAN BOOST WITH HEATER
The Clean Boost with Heater option helps to ensure better soil and stain removal. Clean Boost uses a heater within the washer to maintain the selected temperature setting throughout the wash period. This option will add some additional time to the cycle based on which temperature is selected. It is a preset cycle setting on the Sanitary and Power Wash cycles. Clean Boost with Heater may be selected as an option with other cycles.
EXTRA RINSE
This option can be used to automatically add a second rinse to most cycles.
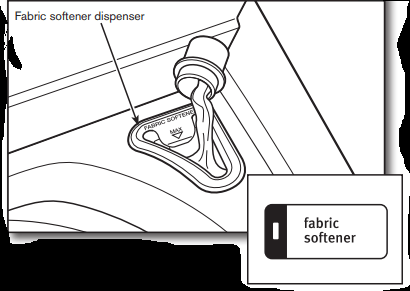
FABRIC SOFTENER
This option must be selected if using fabric softener during a cycle. It ensures that fabric softener is added at the correct time in the rinse for even distribution.
CYCLE SIGNAL
Use this option to adjust volume of the signal that sounds at end of cycle. You may select Hi, Low, or Off (no indicator lit). A louder signal is helpful in removing items as soon as cycle is complete.
You may also add or remove options for each cycle. Not all options can be used with all cycles, and some are preset to work with certain cycles.
To turn Button Sounds either Off or On:
Button Sounds can be turned off or on by holding down the Cycle Signal button for 5 seconds. The washer will make a single short beep/tone when complete. This function can be completed at any time during the washer’s operation, but not in STANDBY.
When the Button Sounds function is set to Off:
Invalid key selection tones (3 short beeps/tones) will still remain active, but will sound at the “SOFT” volume level.
All Valid key selection tones (1 short beep/tone) are disabled including Power/Cancel and End of Cycle signal, as well as the chime that is produced when turning the cycle knob past NORMAL.
NOTE: The chosen setting will remain in effect through a power loss.
7. LID LOCK INDICATOR
This light indicates that the lid is locked and cannot be opened. If you need to open the lid, press START/PAUSE. The lid will unlock once the washer movement has stopped. This may take several minutes if the load was spinning at high speed. Press START/PAUSE again to restart the cycle.
8. CYCLE STATUS LIGHT INDICATORS
The Cycle Status Lights show the progress of a cycle. At each stage of the process, you may notice sounds or pauses that are different from traditional washers.
DELAY
This indicator will light if you use the + or – buttons to delay the start of your cycle. To use this feature, see “Select Cycle” in the “Starting Your Washer” section.
FILL
When the Start/Pause button is pressed, the washer will add a small amount of water to the load, then pause for a few seconds. The lid will then lock and the washer will continue to fill.
WASH
You will hear the motor and washplate moving the load. It is normal for some of the load to be above the water line. Low-water cleaning means concentrated cleaning. Rather than diluting detergent as done in an agitator-style washer, this washer delivers the detergent directly to the soils. The motor sounds may change at different stages in the cycle. The wash time is determined by the selected Soil Level.
RINSE
You will hear sounds similar to the wash cycle as the washer rinses and moves the load. You may hear the motor turning on briefly to move the basket while filling. Fabric softener will be added if the Fabric Softener option was selected. Some cycles use spray rinsing.
SPIN
The washer spins the load at increasing speeds for proper water removal, based on the selected cycle and spin speed.
DONE
Once the cycle is complete, this light will come on. Remove the load promptly for best results.
HEATING
This light may come on during the wash portion of the cycle, as the washer slowly spins the load while adjusting the water temperature.
ADD A GARMENT
You may place additional clothing in the wash when the Add a Garment indicator is lit without sacrificing wash performance. Press START/PAUSE once. The Lid Lock light will turn off. Open the washer lid, add garments, and close the lid. Press START/PAUSE to restart.
CLEAN WASHER REMINDER
The Clean Washer Reminder indicator lights after 30 wash cycles without a clean washer cycle. See the “Washer Care” section to run the clean washer cycle, or you can press REMINDER RESET button to manually reset clean washer cycle counter.
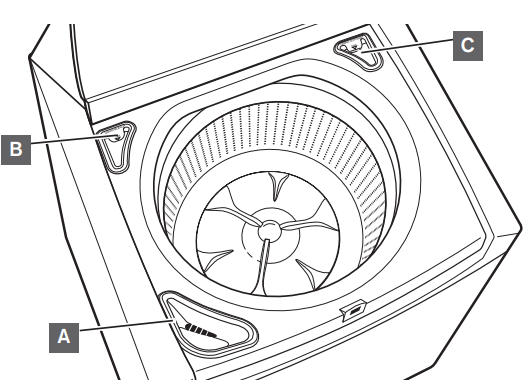
DISPENSERS
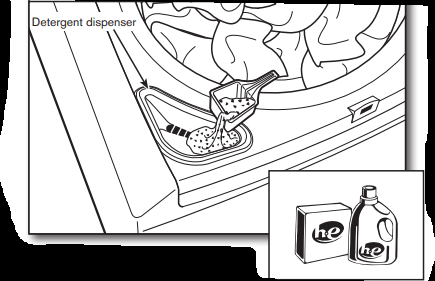
A High Efficiency “HE” detergent dispenser
Add liquid or powdered HE detergent product to this dispenser for your main wash cycle.
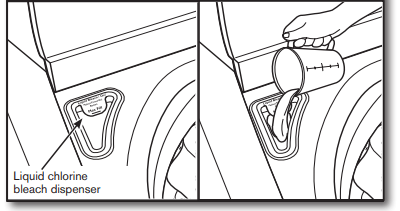
B Liquid chlorine bleach dispenser
This dispenser holds up to 3/4 cup (180 mL) liquid chlorine bleach. The bleach will be automatically diluted and dispensed at the optimum time during the wash cycle. This dispenser cannot dilute powdered bleach. Use the liquid chlorine bleach dispenser for liquid chlorine bleach, color-safe bleach, or Oxi product laundry boosters. If using an Oxi product, be sure to select the Oxi Treat Stains button. Do not use Oxi products in the same cycle as liquid chlorine bleach
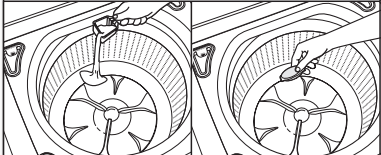
C. Liquid fabric softener compartment
Pour measured liquid fabric softener into the liquid fabric softener dispenser, if desired. It will dispense automatically at the optimum time when the Fabric Softener option is selected.
Use only liquid fabric softener in this dispenser.
Do not overfill. Do not dilute. The dispenser holds 3 oz (94 mL), or a capful of fabric softener. A B Use only High Efficiency (HE) detergent.
Fabric softener is dispensed in a deep rinse when the Fabric Softener option is selected. If Extra Rinse is selected, the fabric softener will be dispensed during the final rinse.
Do not use fabric softener dispensing balls in this washer. Dispensing balls will not operate correctly with this washer.
Do not spill or drip any fabric softener onto the clothes.
At the end of the cycle, a small amount of water may be left in the dispenser. This is normal.
USING YOUR WASHER
1 Sort and prepare your laundry
Empty pockets. Loose change, buttons, or any small object can pass under the washplate and become trapped, causing unexpected sounds.
Sort garments by recommended cycle, water temperature, and colorfastness.
Separate heavily soiled garments from lightly soiled.
Separate delicate garments from sturdy fabrics.
Do not dry garments if stains remain after washing; heat can set stains into fabric.
Treat stains promptly.
Close zippers, fasten hooks, tie strings and sashes. Remove non-washable trim and ornaments.
Mend rips and tears to avoid further damage to garments during washing.
Helpful Tips:
When washing water-proof or water-resistant items, load evenly. See “Cycle Guide” for tips and more information on using the Bulky cycle.
Use mesh bags to help avoid tangling when washing delicate or small items.
Turn knits inside out to avoid pilling. Separate lint-takers from lint-givers. Synthetics, knits, and corduroy fabrics will pick up lint from towels, rugs, and chenille fabrics.
NOTE: Always read and follow fabric care labels instructions to avoid damage to your garments.
2 Add laundry products, if desired
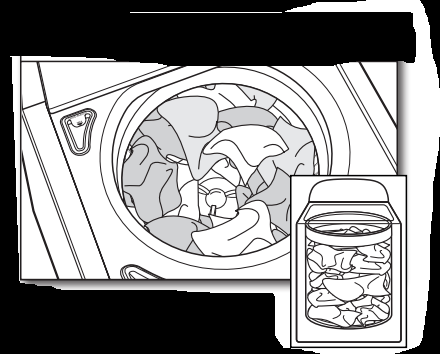
Add a measured amount of detergent or single-dose laundry packet into the basket. If using Oxi-type boosters, color-safe bleach, or fabric softener crystals, add to the bottom of the washer basket before adding clothes.
NOTE: Follow the manufacturer’s instructions to determine the amount of landry products to use
3. Load laundry into washer
For best performance, it is recommended to load garments in loose heaps evenly around the washplate. Try mixing different-sized garments to reduce tangling.
IMPORTANT: Garments need to move freely for best cleaning and to reduce wrinkling and tangling.
4 Add HE detergent to dispenser
Add a measured amount of HE detergent into detergent dispenser.
IMPORTANT: Use only High Efficiency detergents. The package will be marked “HE” or “High Efficiency.” Low-water washing creates excessive sudsing with a regular non-HE detergent. Using regular detergent will likely result in longer cycle times and reduced rinsing performance. It may also result in component failures and noticeable mold or mildew. HE detergents are made to produce the right amount of suds for the best performance. Follow the manufacturer’s instructions to determine the amount of detergent to use.
HELPFUL TIP: See “Washer Maintenance” for information on recommended method of cleaning washer dispensers.
5 Add liquid chlorine bleach or Oxi product to dispenser
Do not overfill, dilute, or use more than 3/4 cup (180 mL). Do not use color-safe bleach or Oxi products in the same cycle with liquid chlorine bleach. For maximum soil and stain removal, you may use the liquid chlorine bleach dispenser for liquid chlorine bleach, color-safe bleach, or Oxi product laundry boosters.
IMPORTANT: If using an Oxi product, be sure to select the Oxi Treat Stains button. Use the liquid chlorine bleach dispenser for Oxi products.
6 Add liquid fabric softener to dispenser
Pour a measured amount of liquid fabric softener into dispenser; always follow manufacturer’s directions for correct amount of fabric softener based on your load size. Then select Fabric Softener option.
IMPORTANT: Fabric Softener option must be selected to ensure proper distribution at correct time in cycle. Do not overfill or dilute. Overfilling dispenser will cause fabric softener to immediately dispense into washer. If Extra Rinse option is selected, fabric softener will be dispensed in the last rinse.
NOTE: Do not use liquid fabric softener dispenser balls in this washer. They will not dispense correctly.
7 TPress POWER/CANCEL to turn on washer
8 Select CYCLE
Turn cycle knob to choose your wash cycle. Estimated Time Remaining will light up with a cycle time. You may notice time adjusting during the cycle. This is normal.
If you do not want to begin a cycle immediately, you may choose DELAY START option.
To choose a delay time:
Press POWER/CANCEL.
Select the desired Cycle, Modifiers, and Options. Delay Start is not valid for Rinse/Drain & Spin cycle.
Press + (plus) DELAY START. 1H (one hour) will be displayed in the time display window. The indicator light for Delay will glow.
For a longer delay time, press DELAY START + (plus). For a shorter delay time, press DELAY START – (minus). The Start Time will increase or decrease by 1-hour steps.
Press START/PAUSE. The countdown in hours and minutes to the wash cycle will show in the time display window and the indicator light will begin to flash.
NOTE: The Start/Pause indicator light will not flash when Delay Start is chosen. You must press START/PAUSE to initiate a countdown for the cycle to begin. The cycle selections and modifiers are lit during the Delay Start time.
To cancel delaying a cycle:
Press POWER/CANCEL once to cancel Delay Start or press START/PAUSE to cancel the countdown and start the cycle.
IMPORTANT: When delaying a cycle, use liquid HE detergent only in the dispenser. Powdered detergents may absorb moisture from a previous cycle and clump before the wash cycle begins.
9 Select cycle modifiers
Once you select a cycle, the default settings for that cycle will be lit. Press the Modifier buttons to change the Wash Temp, Spin Speed, and Soil Level, if desired. Not all settings are available with all cycles.
NOTE: Always read and follow fabric care labels instructions to avoid damage to your garments.
10 Select cycle options
Select any other cycle options you may wish to add, if not previously set. Some cycles will automatically add certain options such as Clean Boost. These may be turned off, if desired.
NOTE: Not all options are available with all cycles.
11 Press START/PAUSE to begin wash cycle
Press the START/PAUSE button to start the wash cycle. When the cycle has finished, the end of cycle signal will sound (if set). Promptly remove garments when cycle is done to avoid odor, reduce wrinkling, and rusting of metal hooks, zippers, and snaps. If lid is left open for more than 10 minutes the water will pump out.
WASHER MAINTENANCE
WATER INLET HOSES
Replace inlet hoses after five years of use to reduce the risk of hose failure. Periodically inspect and replace inlet hoses if bulges, kinks, cuts, wear, or leaks are found.
When replacing your inlet hoses:
Mark the date of replacement on the label with a permanent marker.
Check that the old washers are not stuck on the washer inlet valves.
Use new washers in the new inlet hoses to ensure a proper seal.
WASHER CARE
Recommendations to Help Keep Your Washer Clean and Performing at Its Best
Always use High Efficiency (HE) detergents and follow the HE detergent manufacturer’s instructions regarding the amount of HE detergent to use. Never use more than the recommended amount because that may increase the rate at which detergent and soil residue accumulate inside your washer which, in turn, may result in undesirable odor.
Use warm or hot water washes sometimes (not exclusively cold water washes) because they do a better job of controlling the rate at which soils and detergent accumulate.
Always leave the washer door slightly ajar between uses to help dry out the washer and avoid the buildup of odor-causing residue.
Cleaning Your Front Loading Washer
Read these instructions completely before beginning the routine cleaning processes recommended below. This washer maintenance procedure should be performed, at a minimum, once per month or every 30 wash cycles, whichever occurs sooner, to control the rate at which soils and detergent may otherwise accumulate in your washer.
Cleaning the Inside of the Washer
To keep your washer odor-free, follow the usage instructions provided above, and use this recommended monthly cleaning procedure:
Clean Washer Cycle
This washer has a special cycle that uses higher water volumes in combination with affresh® Washer Cleaner or liquid chlorine bleach to clean the inside of the washer.
Begin procedure
1. affresh® Washer Cleaner Cycle Procedure (Recommended for Best Performance):
a. Open the washer lid and remove any clothing or items.
b. Place an affresh® Washer Cleaner tablet in the bottom of the washer basket.
c. Do not place an affresh® Washer Cleaner tablet in the detergent dispenser.
d. Do not add any detergent or other chemical to the washer when following this procedure.
e. Close the washer lid.
f. Select the CLEAN WASHER cycle.
g. Press the START/PAUSE button to begin the cycle. The Clean Washer Cycle Operation is described below.
NOTE: For best results, do not interrupt cycle. If cycle must be interrupted, press POWER/CANCEL. (For models with no Power/Cancel button, press and hold START/PAUSE for three seconds). After the Clean Washer cycle has stopped, run a Rinse/Drain & Spin cycle to rinse cleaner from washer.
2. Chlorine Bleach Procedure (Alternative):
a. Open the washer lid and remove any clothing or items.
b. Add 1 cup (236 mL) of liquid chlorine bleach to the bleach compartment.
NOTE: Use of more liquid chlorine bleach than is recommended above could cause washer damage over time.
c. Close the washer lid.
d. Do not add any detergent or other chemical to the washer when following this procedure.
e. Select the CLEAN WASHER cycle.
f. Press the START/PAUSE button to begin the cycle. The Clean Washer Cycle Operation is described below.
NOTE: For best results, do not interrupt cycle. If cycle must be interrupted, press POWER/CANCEL. (For models with no Power/Cancel button, press and hold START/PAUSE for three seconds). After the Clean Washer cycle has stopped, run a Rinse/Drain & Spin cycle to rinse cleaner from washer.
Description of Clean Washer Cycle Operation:
This cycle will fill to a water level higher than in normal wash cycles to provide rinsing at a level above the water line for normal wash cycle.
During this cycle, there will be some agitation and spinning to increase the removal of soils.
After this cycle is complete, leave the lid open to allow for better ventilation and drying of the washer interior.
Cleaning the Dispensers
After a period of using your washer, you may find some residue buildup in the washer’s dispensers. To remove residue from the dispensers, wipe them with a damp cloth and towel dry. Do not attempt to remove the dispensers or trim for cleaning. The dispensers and trim are not removable. If your model has a dispenser drawer, however, remove the drawer and clean it before or after you run the Clean Washer cycle. Use an all-purpose surface cleaner, if needed.
Cleaning the Outside of the Washer
Use a soft, damp cloth or sponge to wipe away any spills. Use only mild soaps or cleaners when cleaning external washer surfaces.
IMPORTANT: To avoid damaging the washer’s finish, do not use abrasive products.
NON-USE AND VACATION CARE
Operate your washer only when you are home. If moving or not using your washer for a period of time, follow these steps:
1. Unplug or disconnect power to washer.
2. Turn off water supply to washer to avoid flooding due to water pressure surges.
WINTER STORAGE CARE
IMPORTANT: To avoid damage, install and store washer where it will not freeze. Because some water may stay in hoses, freezing can damage washer. If storing or moving during freezing weather, winterize your washer.
To winterize washer:
1. Shut off both water faucets, then disconnect and drain water inlet hoses.
2. Put 1 qt. (1 L) of R.V.-type antifreeze in basket and run washer on RINSE/DRAIN & SPIN cycle for about 30 seconds to mix antifreeze and remaining water.
3. Unplug washer or disconnect power.
TRANSPORTING YOUR WASHER
1. Shut off both water faucets. Disconnect and drain water inlet hoses.
2. If washer will be moved during freezing weather, follow “Winter Storage Care” directions before moving.
3. Disconnect drain hose from drain system and from back of washer.
4. Unplug power cord.
5. Place inlet hoses and drain hose inside washer drum.
6. Drape power cord and drain hose over the console and secure with masking tape.
7. Place foam packing ring from original shipping materials back inside washer. If you do not have packing ring, place heavy blankets or towels into basket opening. Close lid and place tape over lid and down front of washer. Keep lid taped until washer is placed in new location.
REINSTALLING/USING WASHER AGAIN
To reinstall washer after non-use, vacation, winter storage, or moving:
1. Refer to Installation Instructions to locate, level, and connect washer.
2. Before using again, run washer through the following recommended procedure:
To use washer again:
1. Flush water pipes and hoses. Reconnect water inlet hoses. Turn on both water faucets.
2. Plug in washer or reconnect power.
3. Run washer through Heavy Duty cycle to clean washer and remove antifreeze, if used. Use only HE detergent. Use half the manufacturer’s recommended amount for a medium-size load.
TROUBLESHOOTING
Vibration or Off-Balance
Vibration, rocking, or “walking”
Feet may not be in contact with the floor and locked.
Front and rear feet must be in firm contact with floor, and washer must be level to operate properly. Jam nuts must be tight against the bottom of the cabinet.
Washer may not be level.
Check floor for flexing or sagging. If flooring is uneven, a 3/4" (19 mm) piece of plywood under your washer will reduce sound. Do not install washer on a raised wooden platform.
See “Level the Washer” in Installation Instructions.
Vibration during spinning or washer stopped with uL error code flashing
Load could be unbalanced
Load garments in loose heaps evenly around the washplate. Do not load garments directly over the center of the washplate. Adding wet items to washer or adding more water to basket could unbalance washer.
Avoid washing single items. Balance a single item such as a rug or jacket with a few extra items. If the uL error code is flashing, redistribute the load, close the lid, and press START/PAUSE.
Use Bulky cycle for oversized, non-absorbent items such as comforters or poly-filled jackets. Other items are not appropriate for Bulky cycle. See “Cycle Guide.”
Item or load not suitable for selected cycle. See “Cycle Guide” and “Using Your Washer.”
Noises
Clicking or metallic noises
Objects caught in washer drain system.
Empty pockets before washing. Loose items such as coins could fall between washer drum and tub or may block pump. It may be necessary to call for service to remove items.
It is normal to hear metal items on clothing such as metal snaps, buckles, or zippers touch against the stainless steel drum.
Gurgling or humming
Washer may be draining water.
t is normal to hear the pump making a continuous humming sound with periodic gurgling or surging as final amounts of water are removed during the Drain & Spin cycles.
Water Leaks
Check the following for proper installation
Washer not level.
Water may splash off basket if washer is not level.
Fill hoses not attached tightly.
Tighten fill-hose connection.
Fill hose washers.
Properly seat all four fill-hose flat washers.
Drain hose connection.
Pull drain hose from washer cabinet and properly secure it to drainpipe or laundry tub.
Do not place tape over drain opening.
Check household plumbing for leaks or clogged sink or drain.
Water can back up out of a clogged sink or drainpipe. Check all household plumbing for leaks (laundry tubs, drain pipe, water pipes, and faucets.)
Washer not loaded as recommended.
An unbalanced load can cause basket to be out of alignment and cause water to splash off tub. See “Using Your Washer” for loading instructions.
Washer Not Performing As Expected
Not enough water in washer
Load not completely covered in water.
This is normal operation for an HE low-water washer. The load will not be completely under water. The washer senses load sizes and adds correct amount of water for optimal cleaning. See “What’s New under the Lid.” IMPORTANT: Do not add more water to washer. The added water lifts the load off the washplate, resulting in less cleaning.
Washer won’t run or fill; washer stops working
Check for proper water supply.
Both hoses must be attached and have water flowing to the inlet valve.
Both hot and cold water faucets must be turned on.
Check that inlet valve screens have not become clogged.
Check for any kinks in inlet hoses, which can restrict water flow.
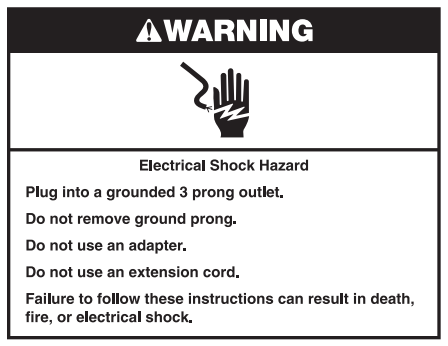
Check proper electrical supply.
Plug power cord into a grounded 3 prong outlet.
Do not use an extension cord.
Ensure there is power to outlet.
Do not plug into a GFCI (Ground Fault Circuit Interrupter).
Check electrical source or call an electrician to check if voltage is low.
Reset a tripped circuit breaker. Replace any blown fuses.
NOTE: If problems continue, contact an electrician.
Normal washer operation.
Lid must be closed for washer to run.
Washer will pause during certain phases of cycle. Do not interrupt cycle.
Washer may be stopped to reduce suds
Washer may be tightly packed..
Remove several items, rearrange load evenly around the washplate. Do not load garments directly over the center of the wash plate. Close lid and press START/PAUSE.
Add only 1 or 2 additional garments after washer has started.
Do not add more water to the washer.
Not using HE detergent or using too much HE detergent.
Only use HE detergent. Suds from regular detergents can slow or stop the washer. Always measure detergent, following manufacturer’s directions based on your load requirements.
To remove suds, cancel cycle. Select DRAIN & SPIN with EXTRA RINSE. Touch START. Do not add more detergent.
Washer not draining/ spinning; loads are still wet
Small items may have been caught in pump or between basket and tub, which can slow draining.
Empty pockets and use garment bags for small items.
Using cycles with a lower spin speed.
Cycles with lower spin speeds remove less water than cycles with high spin speeds. Use the recommended cycle/speed spin for your garment.
Washer may be tightly packed or unbalanced.
Tightly packed loads may not allow the washer to spin correctly, leaving the load wetter than normal. Evenly arrange the wet load for balanced spinning. Select RINSE/DRAIN & SPIN to remove excess water. See “Using Your Washer” for loading recommendations.
Check plumbing for correct drain hose installation.
Drain hose extends into standpipe farther than 4.5" (114 mm). Check drain hose for proper installation. Use drain hose form and securely attach to drainpipe or tub. Do not tape over drain opening. Lower drain hose if the end is higher than 96" (2.4 m) above the floor. Remove any clogs from drain hose.
Not using HE detergent or using too much HE detergent.
Suds from regular detergent or using too much detergent can slow or stop draining or spinning. Use only HE detergent. Always measure and follow detergent directions for your load. To remove extra suds, select RINSE/DRAIN & SPIN. Do not add detergent.
Incorrect or wrong wash or rinse temperatures
Check for proper water supply.
Make sure hot and cold inlet hoses are not reversed.
Both hoses must be attached to both washer and faucet, and have both hot and cold water flowing to inlet valve.
Check that inlet valve screens are not clogged.
Remove any kinks in hoses.
Energy-saving controlled wash temperatures.
ENERGY STAR® qualified washers use cooler wash and rinse water temperatures than traditional top-load washers. This includes cooler hot and warm washes
Load not rinsed
Check for proper water supply.
Make sure hot and cold inlet hoses are not reversed.
Both hoses must be attached and have water flowing to the inlet valves.
Both hot and cold water faucets must be on.
Inlet valve screens on washer may be clogged.
Remove any kinks in the inlet hoses.
Not using HE detergent or using too much HE detergent.
The suds from non-HE detergent can cause the washer to operate incorrectly.
Use only HE detergent. Be sure to measure correctly.
Always measure detergent and follow detergent directions based on load size and soil level.
Washer may be tightly packed.
The washer is less efficient at rinsing when load is tightly packed.
Load garments in loose heaps evenly around the washplate. Do not load garments directly over the center of the washplate.
Use cycle designed for the fabrics being washed.
Add only 1 or 2 additional garments after washer has started.
Fabric softener option not selected.
When using fabric softener, be sure the Fabric Softener option is selected.
Sand, pet hair, lint, etc. on load after washing
Heavy sand, pet hair, lint, and detergent or bleach residues may require additional rinsing.
Add an Extra Rinse to the selected cycle.
Load is tangling
Washer not loaded as recommended.
Load garments in loose heaps evenly around the washplate. Do not load garments directly over the center of the washplate.
Reduce tangling by mixing types of load items. Use the recommended cycle for the type of garments being washed
. Wash action and/or spin speed too fast for load.
Select a cycle with a slower wash action and slower spin speed. Note that items will be wetter than when using a higher speed spin.
Not cleaning or removing stains
Load not completely covered in water.
This is normal operation for an HE low-water washer. The load will not be completely under water. The washer senses load sizes and adds correct amount of water for optimal cleaning. See “What’s New under the Lid.”
Added more water to washer.
Do not add additional water to washer. Additional water lifts the laundry off the washplate, resulting in less cleaning.
Washer not loaded as recommended.
Load garments in loose heaps evenly around the washplate. Do not load garments directly over the center of the washplate.
Add only 1 or 2 additional garments after washer has started.
Not using HE detergent or using too much HE detergent.
The suds from regular detergent can prevent washer from operating correctly.
Use only HE detergent. Be sure to measure correctly.
Always measure detergent and follow detergent directions based on load size and soil level.
Not using correct cycle for fabric type.
Use a higher soil level cycle option and warmer wash temperature to improve cleaning.
If using Rapid Wash cycle, wash only a few items.
Use Power Wash, Whites, or Heavy Duty cycle for tough cleaning.
See the “Cycle Guide” to match your load with the best cycle.
Not using dispensers.
Use dispensers to avoid chlorine bleach and fabric softener staining.
Load dispensers before starting a cycle.
Avoid overfilling.
Do not add products directly onto load.
Not washing like colors together.
Wash like colors together and remove promptly after the cycle is complete to avoid dye transfer
Odors
Not using HE detergent or using too much HE detergent.
Use only HE detergent. Be sure to measure correctly.
Always follow the manufacturer’s directions.
See the “Washer Care” section.
Clean washer maintenance not done as recommended.
Run the Clean Washer with affresh® cycle after every 30 washes. See “Washer Care” in “Washer Maintenance.”
Unload washer as soon as cycle is complete
Fabric damage
Sharp items were in pockets during wash cycle.
Empty pockets, zip zippers, and snap or hook fasteners before washing to avoid snags and tears.
Strings and straps could have tangled.
Tie all strings and straps before starting wash load.
Items may have been damaged before washing.
Mend rips and broken threads in seams before washing.
Fabric damage can occur if washer is tightly packed.
Load garments in loose heaps evenly around the washplate. Do not load garments directly over the center of the washplate.
Use cycle designed for the fabrics being washed.
Add only 1 or 2 additional garments after washer has started.
Garment care instructions may not have been followed.
Always read and follow garment manufacturer’s care label instructions. See the “Cycle Guide” to match your load with the best cycle.
Liquid chlorine bleach may have been added incorrectly.
Do not pour liquid chlorine bleach directly onto load. Wipe up bleach spills.
Undiluted bleach will damage fabrics. Do not use more than recommended by manufacturer.
Do not place load items on top of bleach dispenser when loading and unloading washer.
Incorrect dispenser operation
Clogged dispensers or laundry products dispensing too soon.
Do not overfill dispenser. Overfilling causes immediate dispensing.
It is normal for small amounts of water to be remain in dispenser at the end of the cycle.
Homes with low water pressure may result in residual powder in the dispenser. To avoid, select a warmer wash temperature if possible, depending on your load.
Liquid chlorine bleach not used in dispenser or Oxi Treat Stains option not selected. Use liquid chlorine bleach only in the liquid chlorine bleach dispenser.
You may only place Oxi products directly in the liquid chlorine bleach dispener. If using Oxi products, be sure to select OXI TREAT STAINS option. Do not use both liquid chlorine bleach and Oxi product in the same load.
Single-dose laundry packet not dissolving
Adding laundry packet incorrectly.
Be sure laundry packet is added to washer drum before adding clothes. Do not add packet to dispenser. Follow the manufacturer’s instructions to avoid damage to your garments.
Error Code Appears in Display
If you experience
Possible Causes
Solution
oL (overloaded) appears in display
Load too large
If an overload is detected, the washer will drain any water and detergent in the washer. Remove several items and add HE detergent. Close lid and press START/PAUSE
uL (unbalanced load) appears in display
Load not balanced. The washer is running a load-balance correction routine.
Allow the washer to continue. If the dial is flashing and the washer has stopped, redistribute the load, close the lid, and press START/ PAUSE.
LF (too long to fill) appears in display
Washer taking too long to fill. Drain extends more than 4.5" (114 mm) into standpipe.
into standpipe. Check plumbing for correct drain hose installation. Use drain hose form and attach securely to drainpipe or tub. Do not tape over drain opening. See Installation Instructions
Ld (too long to drain water) appears in display
Washer taking too long to drain water. Drain extends more than 4.5" (114 mm) into standpipe
Check plumbing for correct drain hose installation. Use drain hose form and attach securely to drainpipe or tub. Do not tape over drain opening. See Installation Instructions.
Lower drain hose if the end is higher than 96" (2.4 m) above the floor. Remove any clogs from drain hose. See Installation Instructions.
HC (Hot and Cold hoses reversed) appears in display
Hot and cold inlet hoses have been installed incorrectly
This code will appear at the end of the wash cycle to indicate that cold water hose is connected to the hot water inlet and hot water hose is connected to the cold water inlet.
Sd (Excess suds) appears in display
Excessive suds in washer. Washer is running a suds reduction routine.
Allow the washer to continue. Use only HE detergent. Always measure detergent, and base detergent quantity on load size. Follow detergent manufacturer’s instructions. If the dial is flashing, reselect your desired cycle using a cold wash temperature, and press START/PAUSE. Do not add detergent.
dL (Lid cannot lock) appears in display
An item in the load may be keeping the lid from locking.
Check for items directly under the lid.
lid (Lid opened) appears in display
Washer lid left open.
Close the lid to clear the display. If the lid is left open for more than 10 minutes, the cycle will reset and water in the washer will drain.
F## code (F-type error code) appears in display
System error code.
Press START/PAUSE once to clear the code. Then press START/PAUSE again to restart washer. If code appears again, call for service.
Fd (Factory Default)
Washer sets back to factory default.
To return all options and modifiers to Factory Default, press POWER/CANCEL, select RINSE/DRAIN & SPIN cycle, and then press EXTRA RINSE, FABRIC SOFTENER, EXTRA RINSE, FABRIC SOFTENER within 5 seconds. When done correctly, the display shows “Fd” for 3 seconds and then unit returns to Standby Mode.