Documents: Go to download!
User Manual
- User Manual - (English, French, Spanish)
- Installation - (English)
- Spec Sheet - (English)
- Getting to know the appliance
- Before using the appliance for the first time
- Microwave
- Convection
- Broil
- Automatic programs
- Sensor cooking
- Kitchen timer
- Panel Lock
- Automatic Shutoff
- Cleaning and Maintenance
- Troubleshooting
Table of contents
User manual Oven
Getting to know the appliance
Parts
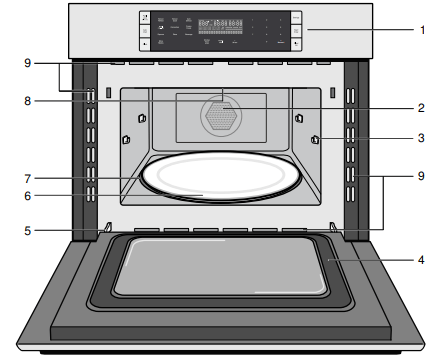
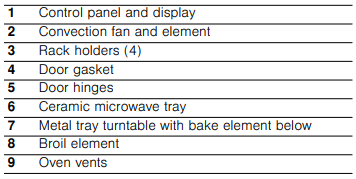
Oven Vents
The oven vents are located around the sides of the oven cavity. Warm air may be released from the top and bottom vents before, during and after cooking. It is normal to see steam escaping from these vents, and condensation may collect in this area. This area may be warm when the oven is in use. Do not block any vents, since they are important for air circulation.
Cooling Fan
The cooling fan runs during all cooking modes. The fan can be heard when it is running, and warm air may be felt as it is released from the oven vents. The fan may also run after the oven is off.
Convection Fan
The convection fan operates during all convection modes. When the oven is operating in a convection mode, the fan turns off automatically when the door is opened.
Oven light
The oven light turns off to save energy after one minute with the door open. To turn the light back on, close the door and open it again.
Control panel

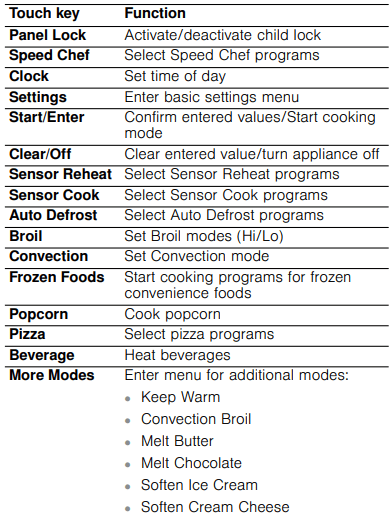
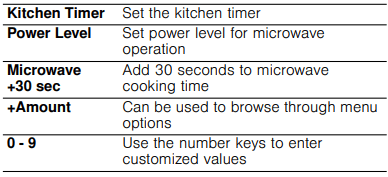
Touch keys
You can activate a function by briefly touching the corresponding touch key. Each time you touch a key a short beep will sound. A long beep will tell you that you have made an invalid input.
Display elements
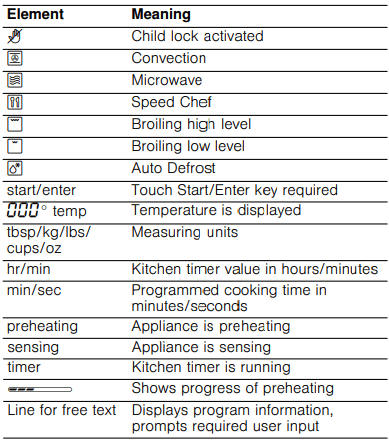
The display gives you information on the current settings of your appliance. Blinking display elements indicate that an input is required.
Before using the appliance for the first time
- Appliance must be properly installed by a qualified technician before use.
- Remove all packing materials from inside and outside the oven.
- While cool, wipe with a clean, damp cloth and dry.
- There may be a slight odor from your new appliance; this is normal and will disappear after a short time.
- Optimum cooking results depend on proper cookware being used.
- Read and understand all safety precautions and Use and Care Manual information.
Execute the following sections prior to operating:
Setting the clock
Once the appliance has been properly connected,  will be displayed as the time of day. To set the correct time, proceed as follows:
1. Touch Clock.
2. Enter the correct time using the number keys. Example: To set the clock to 12:41 type in 1 2 4 1.
3. Touch Start/Enter to confirm.
The clock will also be displayed when your appliance is turned off. Please refer to the chapter “Basic Settings” on how to hide the clock.
Heating up the appliance
To remove the new oven smell, heat up the appliance when it is empty and closed. One hour with Convection at 350° F (180 °C) is ideal. Ensure that no packaging remnants have been left in the oven cavity.
- Touch Convection
- Enter the numbers 3 5 0 with the number keys.
- Touch Start/Enter.
The oven light turns on and the appliance starts heating.
Cleaning accessories
Before using accessories for the first time, thoroughly clean them with hot soapy water and a soft dish cloth.
Applying the program label
Apply the included program label in the desired language to the side of the oven cavity, as idicated on the leaflet that carries the program label.
Microwave
Microwave power levels
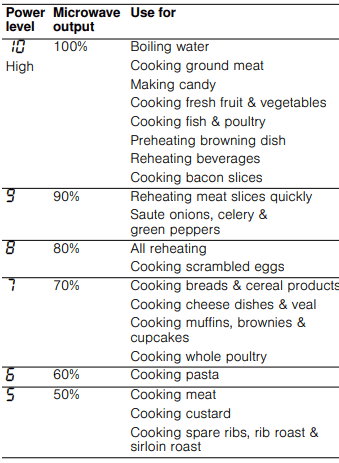
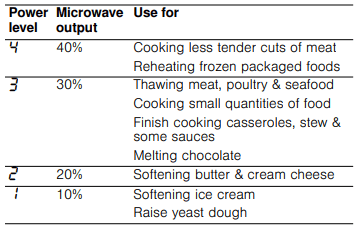
You can select from 10 different microwave power levels. If you do not set a power level, the microwave will automatically operate at the highest power level 10. The table below provides suggested power levels for various types of food that can be prepared in the microwave.
Setting the microwave
The appliance must be turned off.
1. Enter the desired cook time with the number keys. The timer display will fill in from right to left.
Example: To set a microwave time of 20 minutes and 30 seconds, enter the numbers 2 0 3 0.
The microwave symbol  lights up and start/enter is blinking on the display.

2. You can start microwave operation with the default power level 10 by touching Start/Enter, -or - you can set a different power level. Touch Power Level.  and start/enter are blinking in the upper left section of the display.

3. Enter the desired power level using the number keys. The entered power level and start/enter are blinking.
4. Touch Start/Enter to start microwave operation. The microwave timer will start to count down.
You can step up the microwave timer at any time during operation by touching +30 sec.
The appliance turns off and a beep sounds once the microwave time has run out. The appliance turns off and the clock is displayed.
Change power level
You can change the power level at any time during microwave operation.
1. Touch Power Level. The display shows POWER LEVEL  .
.
2. Enter the desired power level with the number keys. The entered power level and start/enter are blinking.
3. Touch Start/Enter. Microwave operation continues with the new power level.
Opening appliance door during operation
Opening the appliance door during operation will interrupt the current mode. Close the appliance door and then touch Start/Enter to resume operation.
+ 30 sec
Use the +30 sec key to quick start your microwave at the highest power level. You can touch the key repeatedly to increase the microwave time in steps of 30 seconds.
Touching this key during microwave operation will add 30 seconds to the remaining microwave time.
Cancel operation
Touch Clear/Off to cancel the active oven mode. The appliance turns off and the clock is displayed.
The cooling fans may continue to run for awhile and then switch off automatically
Suggestions for best results
To help you achieve the best possible results from your microwave oven, read the following suggestions below:
Storage temperature
Foods taken from the freezer or refrigerator take longer to cook.
Size
Small pieces of food cook faster than large ones. Pieces similar in size and shape will cook more evenly when cooked together. For more even results, reduce the power levels when cooking large pieces of food.
Natural moisture
Very moist foods cook more evenly because microwave energy heats water molecules very efficiently.
Stirring
Stir foods such as casseroles and vegetable from the outside to the center to distribute the heat more evenly. This will allow the food to cook faster. (Constant stirring is not necessary.)
Turning
Turn over foods such as pork chops, roasts or whole cauliflower halfway through the cook time. This will help to expose all sides equally to microwave energy.
Placing food
Place delicate areas of food items, such as asparagus tips, toward the center of the turntable tray.
Arranging food
Arrange unevenly shaped foods, such as chicken pieces or salmon, with the thicker or meatier parts toward the outside of the turntable tray.
Letting food stand
After removing the food from the microwave, cover the food with foil or a casserole lid and let it stand to finish cooking. This will help the food finish cooking in the center and avoids overcooking the outer edges. The length of stand time depends on the density and surface area of the food items.
Wrapping foods
Sandwiches and many other food types containing pre-baked bread should be wrapped in paper towels or wax paper prior to placing in the microwave to help prevent the food items from drying out while heating.
Convection
Convection cooking circulates hot air through the oven cavity with a fan. The constantly moving air surrounds the food to heat the outer portion quickly, creating even browning and sealed-in flavor by the constant motion of hot air over the food surfaces.
You can set a temperature range from 200 to 450° F (100 to 230°C).
Notes
- Use the Speed Chef mode for cooking with microwave and conventional heat combined. You can not combine these two modes manually.
- For best cooking results always use the wire rack with Convection mode.
Setting Convection mode
The appliance must be turned off.
1. Touch Convection. The convection symbol  : lights up. start/enter and the default temperature 325°F (160°C) are blinking on the display. The time of day will be permanently displayed during convection cooking.

2. Change the temperature using the number keys and touch Start/Enter. The appliance starts preheating.
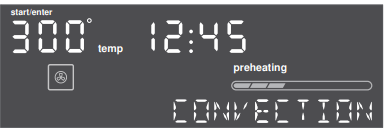
The set temperature is reached once the preheat bar has filled up completely and five beeps sounds.
To change the temperature during operation, touch Convection. The temperature and start/enter begin to flash. Type in the new temperature using the number keys and confirm with Start/Enter.
Opening appliance door during operation
Opening the appliance door during operation will interrupt the current mode. When you close the appliance door, operation will be resumed.
Cancel operation
Touch Clear/Off to cancel the active oven mode. The appliance turns off and the clock is displayed.
The cooling fans may continue to run for awhile and then switch off automatically.
Broil
The Broil feature uses intense heat radiated from the upper element.
You can set two intensity levels:
- Broil high

- Broil low

Setting Broil mode
The appliance must turned off.
1. Touch Broil. The Broil mode is set to high.  and start/enter are blinking, the Broil high symbol
  will be displayed. The time of day will be permanently displayed in Broil mode.
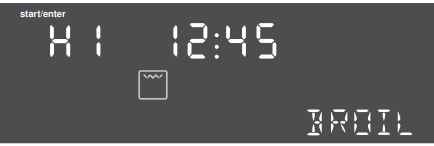
2. Touch Broil again or use the +Amount key, to change to Broil low mode.  and the broil low symbol
  will light up on the display.
3. Touch Start/Enter to start operation.
You can alternate between Broil high and Broil low during operation by touching either Broil or +Amount.
Note: Always use a broil pan when cooking in Broil mode (see optional accessories).
Opening appliance door during operation
Opening the appliance door during operation will interrupt the current mode. When you close the appliance door, operation will be resumed.
Cancel operation
Touch Clear/Off to cancel the active oven mode. The appliance turns off and the clock is displayed.
The cooling fans may continue to run for awhile and then switch off automatically.
Automatic programs
The automatic programs let you prepare food in a fast and simple way using Microwave and conventional heat. Select the program and enter the values prompted on the display, the automatic program selects the optimum setting for you.
Speed Chef
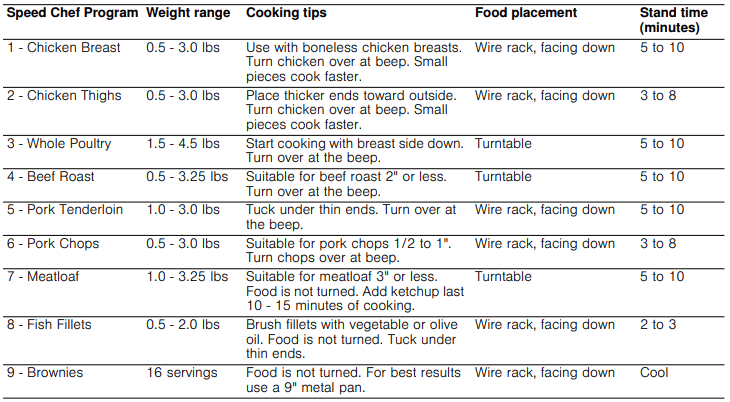
With Speed Chef you can select from nine different foods. You only have to enter the weight and Speed Chef calculates the fastest cooktime for best results.
See program label on the left side of the oven cavity for available Speed Chef programs.
Note: Only use ovenware that is suited for both microwave and conventional cooking.
Setting Speed Chef
The appliance must be turned off.
Example: Set Speed Chef for Beef Roast.
1. Touch Speed Chef. The Speed Chef symbol  lights up and the display shows SELECT FOOD
  .
.
2. Select the desired food from the label at the oven cavity. For Beef Roast touch the number key 4. -orTouch Speed Chef or +Amount repeatedly to scroll through all Speed Chef modes. When Beef Roast ist displayed  is blinking and the selected food item is shown on the display.
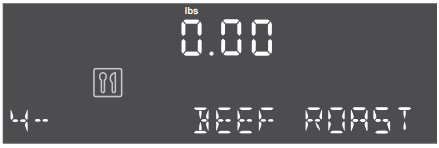
3. Enter the weight of the food you want to cook using the number keys. For example, to enter 3 lbs type 3 0 0. The weight and start/enter are blinking.
4. Touch Start/Enter.
Speed Chef will set the appropriate cook time and start counting down.
During cooking a beep will sound and “Turn food over” is shown in the display. Open door and turn food over. Return food to the microwave and touch Start/ Enter.

Once the cook time has run out a beep will sound. The appliance turns off and the clock is displayed.
Opening appliance door during operation
Opening the appliance door during operation will interrupt the current mode. Close the appliance door and then touch Start/Enter to resume operation.
Cancel operation
Touch Clear/Off to cancel the active oven mode. The appliance turns off and the clock is displayed.
The cooling fans may continue to run for awhile and then switch off automatically.
Speed Chef Programs
Place the food in a dish that is suitably sized for the amount of food you want to cook. Use cookware that is suited for both microwave and conventional cooking.
Notes
- For meat pieces enter total weight of all the pieces.
- Use a meat thermometer to check meat temperatures after stand time.
- Place food on countertop and cover with foil during stand time.
Auto Defrost
With the Auto Defrost feature you can defrost three different types of food by entering the weight. The ideal defrost time will be calculated by the program.
Ovenware for defrosting
Place the food in a microwaveable shallow dish, such as a glass casserole dish or glass plate, but do not cover.
Stand time
The defrosted food should be left to stand for an additional 10 to 30 minutes until it reaches an even temperature. Large pieces of meat require a longer standing time than smaller pieces. Flat pieces of meat and items made from ground meat should be separated from each other before leaving to stand.
After this time, you can continue to prepare the food, even thought thick pieces of meat may still be frozen in the middle.
Setting Auto Defrost
The appliance must be turned off.
Example: Set Auto Defrost for Ground Meat.
1. Take the food out of the packaging and weigh it, then place it in a suitable dish on the ceramic tray.
2. Touch Auto Defrost.
The Auto Defrost symbol  lights up and the display shows SELECT FOOD
  .
.
3. Select the desired program from the label at the oven cavity. For Ground Meat touch the number key 1.
-or-
Touch Auto Defrost or +Amount repeatedly to scroll through all Auto Defrost modes.
 is blinking and the food item is shown on the display.

4. Enter the weight of the food you want to defrost using the number keys. For example, to enter 2 lbs type 2 0 0. The weight and start/enter are blinking.
5. Touch Start/Enter. Auto Defrost will set the appropriate defrosting time and start counting down.
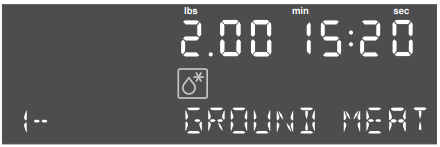
Once the defrost time has elapsed a beep will sound. The appliance turns off and the clock is displayed.
Note: A beep sounds during defrosting for all foods to turn food over or separate pieces.
Opening appliance door during operation
Opening the appliance door during operation will interrupt the current mode. Close the appliance door and then touch Start/Enter to resume operation.
Cancel operation
Touch Clear/Off to cancel the active oven mode. The appliance turns off and the clock is displayed.
The cooling fans may continue to run for awhile and then switch off automatically.
Auto Defrost programs

Tips for defrosting
- Always enter the weight in lbs when using the defrost by weight feature (0.1 to 6.0 lbs).
- Use the defrost mode for raw food items only.
- Defrosting gives best results when food to be thawed is a minimum of 0° F (taken directly from a freezer). If the food has been stored in a refrigerator-freezer that does not maintain a temperature of 5° F or below, always program a lower food weight or lower cook time to prevent cooking the food.
- If the frozen food is stored outside the freezer for up to 20 minutes, enter a reduced cook time or weight.
- The shape of the package will alter the defrosting time. Shallow rectangular food packets defrost more quickly than a deep frozen block of food.
- Separate pieces as they begin to defrost. Separated frozen pieces of food defrost better.
- Shield warm areas of food with small pieces of aluminum foil, if they start to heat up.
- Use small pieces of aluminum foil to shield food items like chicken wings, leg tips and fish tails.
- Do not allow aluminum foil to touch the oven cavity when defrosting.
Frozen Foods
Use the Frozen Foods feature to prepare frozen convenience foods, like chicken nuggets, french fries, fish sticks, using bottom heat and Convection.
Place the food you want to cook directly on the metal tray turntable.
You can set a temperature range from 200 to 450° F (100 to 230°C).
Setting Frozen Foods
The appliance must be turned off.
1. Touch Frozen Foods. The symbol for bottom heat and Convection ; lights up. The default temperature 425° and start/enter are blinking and the display shows BAKE ON METAL TRAY.
2. You can change the temperature by using the number keys. You can enter a temperature between 200 and 450° F (100 - 230°C).
3. Touch Start/Enter. The appliance starts preheating. The set temperature, the preheat bar and the oven mode FROZEN FOODS are displayed. The time of day will be permanently displayed.

The set temperature is reached once the preheat bar has filled up completely and a beep sounds. Place food in the preheated oven on the metal tray in a single layer. To change the temperature during operation, touch Frozen Food. Type in the new temperature using the number keys and confirm with Start/Enter.
Opening appliance door during operation
Opening the appliance door during operation will interrupt the current mode. When you close the appliance door, operation will be resumed.
Cancel operation
Touch Clear/Off to cancel the active oven mode. The appliance turns off and the clock is displayed.
The cooling fans may continue to run for awhile and then switch off automatically.
Sensor cooking
You can select two sensor cooking modes. Sensor cooking allows you to cook many of your favorite foods without selecting cooking times and power levels. The microwave oven automatically determines the required cooking time for each food item.
For best results for cooking by sensor, follow these recommendations:
- Food cooked with the sensor system should start from normal storage temperature.
- Turntable tray, ceramic tray and outside of container should be dry.
- Foods should always be covered loosely with microwavable plastic wrap, wax paper or lid.
- Do not open the door or touch Clear/Off key during sensing time. When sensing time is over, the oven beeps once and the remaining cooking time will appear in the display. At this time you can open the door to stir, turn or rearrange the food.
Sensor Reheat The Sensor Reheat feature lets you reheat dinner plates or casseroles (8-12 oz.) for your cooking convenience. Setting Sensor Reheat
1. Touch Sensor Reheat. The microwave symbol Ý lights up and SENSOR REHEAT is displayed.
2. Touch Start/Enter. sensing is displayed. The microwave operates during sensing.
3. When sensing is complete, a beep will sound and the calculated cook time will start to count down.
Note: Do not open the door during the sensing process, or the program will be cancelled.
Once the calculated cook time is displayed, you can open the door to stir, turn or rearrange the food. Touch Start/Enter to resume operation.
When sensor reheat is finished, a beep will sound and the appliance turns off.
Notes
- Cover with vented plastic wrap or wax paper.
- Reheat food on a microwaveable dinner plate.
Kitchen timer
The kitchen timer can be used when the appliance is turned off, or while a cooking mode is active.
You can set the kitchen timer value in hours and minutes. The last minute of the set time will count down in seconds.
Setting the kitchen timer
1. Touch Kitchen Timer once.
 is blinking.
2. Enter the desired time using the number keys. Example: To set the kitchen timer to 3 hours and 5 minutes, enter 3 0 5.
3. Touch Start/Enter or Kitchen Timer.
The kitchen timer starts counting down. timer lights up in the display
Note: The kitchen timer continues to run if a cooking mode is selected. Depending on the cooking mode, the kitchen timer may not be visible, but it continues to count down and will show again when the cooking mode finishes.
Time has elapsed
Once the set time has elapsed, TIMER END may appear in the display and an alarm tone beeps every 10 seconds. After 2 minutes the alarm tone stops.
To stop the beep manually, touch Kitchen Timer, or open the appliance door.
Canceling the kitchen timer
To clear the kitchen timer, touch Kitchen Timer once.
Panel Lock
You can use the panel lock to prevent children from accidentally turning the appliance on.
The panel lock feature is also very useful when cleaning the control panel. The lock will prevent accidental programming when wiping the control panel clean.
To activate the panel lock:
Touch and hold Panel Lock for 3 seconds. The panel lock symbol  and PANEL LOCKED will appear in the display and a double beep sounds.
To deactivate the panel lock:
Touch and hold Panel Lock for 3 seconds. The panel lock symbol  will disappear and PANEL is UNLOCKED is displayed.
Automatic Shutoff
Your appliance features an automatic shutoff function. Automatic shutoff is activated when the appliance has been heating for an extended period of time.
The time when automatic shutoff is activated depends on the selected operating mode.

Cleaning and Maintenance
Cleaning Guide
- For best performance and for safety reasons, keep the oven clean inside and outside. Take special care to keep the inner door panel and oven front frame free of food and grease build–up.
- Never use abrasive scouring powder or pads on the microwave. Wipe the microwave oven inside and out with a soft cloth and warm (not hot) mild detergent solution. Then rinse and wipe completely dry.
- Wipe spatters immediately with a wet paper towel, especially after cooking greasy foods like chicken or bacon.
- Clean your microwave oven weekly or more often, if needed.
- Never operate the microwave oven without food in the oven cavity, unless pre-heating with Convection, Pizza, Frozen Foods and Keep Warm mode; this can damage the magnetron tube or ceramic tray. You may wish to leave a cup of water standing inside the oven when it is not in use to prevent damage if the oven is accidentally turned on.
Part | Recommendations |
| Oven cavity | Keep inside (cavity) of the oven clean. Food particles and spilled liquids can stick to the oven walls, causing the oven to work less efficiently. Wipe up spills immediately. Use a damp, clean cloth and mild soap. DO NOT use harsh detergents or abrasive cleaners. To help loosen baked–on food particles or liquids, heat 2 cups of water (add the juice of 1 lemon if you desire to keep the oven fresh smelling) in a 4 cup measuring glass at High power for 5 minutes or until boiling. Let stand in oven cavity for 1 or 2 minutes. For baked-on grease spatters, wash with hot, soapy water, rinse and dry. |
| Wire rack | Wash with soapy water. Rinse thoroughly and dry, or gently rub with cleansing powder or soap-filled pads as directed. The wire rack can also be washed in the dishwasher. |
| Metal turntable tray | Remove metal turntable tray from the oven when cleaning the oven cavity and tray. Wash the metal turntable tray in warm sudsy water or in the dishwasher. |
| Ceramic tray | Clean with warm, soapy water or in the dishwasher. |
| Door seal | Wipe with damp cloth. |
| Door glass | Wash with soap and water or glass cleaner. Apply Fantastik® or Formula 409® to a clean sponge or paper towel and wipe clean. Avoid using powder cleaning agents, steel wool pads and oven cleaners. If steam accumulates inside or outside the oven door, wipe with a soft cloth. Steam can accumulate when operating the oven in high humidity and in no way indicates microwave leakage. |
| Painted surfaces | Clean with hot soapy water or apply Fantastik® or Formula 409® to a clean sponge or paper towel and wipe clean. Avoid using powder cleaning agents, steel wool pads and oven cleaners. |
| Stainless steel surfaces/ exterior surfaces | Always wipe or rub in the direction of the grain. Clean with a soapy sponge, then rinse and dry, or wipe with Fantastik® or Formula 409® spray on a paper towel. Protect and polish with Stainless Steel Magic® and a soft cloth. Remove water spots with a cloth dampened with white vinegar. |
| Plastic & Controls | When cool, clean with soapy water, rinse and dry. |
| Printed areas (words & numbers) | Do not use abrasive cleaners or petroleum based solvents. |
Troubleshooting
If you encounter a problem, it often will merely be something minor. Before you call customer service, consider the suggestions and instructions below:
Problem | Suggestion |
| Neither the microwave’s display nor oven operates. | Properly insert the plug into a grounded power outlet. Reset the household circuit breaker or replace any blown fuses. |
| The oven display works, but the oven will not operate. | Make sure the oven door is closed securely and completely. Check to see if packing material or other materials are stuck to the door seal. Check for damage to the oven door. Press the Clear/Off key twice and attempt to re–enter cooking instructions. |
| The power goes off before the cook time has elapsed. | Reset the clock and any cooking instructions. Reset the household circuit breaker or replace any blown fuses. Press the Clear/Off key twice and attempt to re–enter cooking instructions. |
The microwave power level switches from power level  to power level to power level  . . | If the oven is set to cook for more than 30 minutes at 100% power level, it will automatically reduce the power to a 80% power level after 30 minutes to avoid overcooking. |
| You see sparks or arcing. | Remove any metallic utensils, cookware or metal ties from the oven cavity. If using aluminum foil, use only narrow strips and allow at least one inch between the foil and the interior oven walls |
| The turntable makes noises or sticks. | Clean the underside of the metal tray turntable, and the oven cavity bottom. Make sure the metal tray turntable is positioned correctly. |
| Using your microwave causes TV or radio interference. | This is similar to the interference caused by other small appliances, such as hair dryers. Move your microwave further away from other appliances, like your TV or radio. |
| The display shows error message E-xx | A malfunction has occurred. Note any error codes that may appear on the display. Disconnect the appliance from the power supply by switching off the fuse in the fuse box and call a qualified after-sales service technician. |
| The display shows error messageE-11 | The touch keys do not operate properly. This may be due to condensation on keypad. Clean the control panel with a dry cloth. Disconnect the appliance from the power supply by switching off the fuse in the fuse box and switch it back on after 10 seconds. |
See other models: HBL57M52UC HMV3053U HMB5061 HMD8053UC HMV5053U
