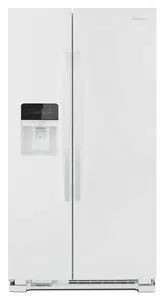
Gather the required tools and parts and read all instructions before starting installation. Save these instructions for future reference. NOTE: Before moving your product into your home, measure the doorway of your home to see whether you need to remove the refrigerator and freezer doors. If door removal is necessary, see the instructions below.
IMPORTANT: Before you begin, unplug refrigerator or disconnect power. Remove food, the ice storage bin (on some models), and any adjustable door or utility bins from doors.
TOOLS NEEDED: Bubble level; flat-blade screwdriver; 5/16” and 11/16” wrench; 1/4”, 3/8”, and 5/16” hex-head socket wrenches, TORX T30† screwdriver, Phillips screwdriver tip #2 with 4” long as minimum
Doors & Hinges Removal
Unplug your refrigerator or disconnect power.
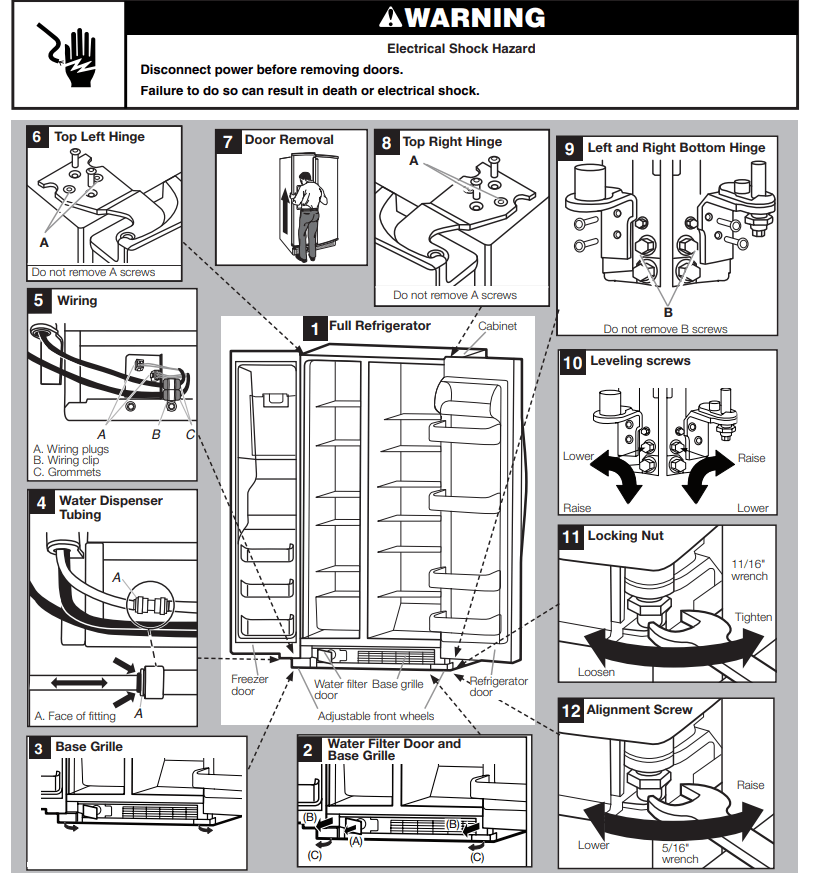
Fully open both doors. See graphic 1.
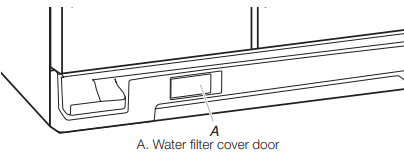
If your model has water dispensing, please open the water filter door by pulling it toward you (A). See graphic 2.
Use a Phillips screwdriver tip #2 to remove the screws of the base grille (B). See graphic 2.
To dislodge the base grille pull it up strongly toward you from one side then from other side (C). See graphic 2.
To remove the base grille completely, pass it underneath the refrigerator door. See graphic 3.
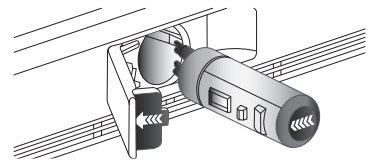
If your model has water dispensing in the door, disconnect the water dispenser tubing located below the freezer door.
Press the blue outer ring against the face of fitting and pull the dispenser tubing free. See graphic 4.
NOTE: Keep the water tubing connector attached to the tube that runs underneath the freezer. The door cannot be removed if the connector is still attached to the tube that runs through the door hinge.
8. If your model has water dispensing in the door, disconnect the wiring located below the freezer door. See graphic 5.
Remove the wiring clip and the bracket wire using a 1/4" hexagonal head socket wrench.
Disconnect the wiring plugs from the bracket wire.
9. Close the freezer door and use a TORX T30 screwdriver to remove the top hinge completely. See graphic 6. IMPORTANT: Do not remove either screw A. Hold the door while hinge is being removed.
10. Lift the freezer door straight up off from the bottom hinge. See graphic 7. The water dispenser tubing and wiring will remain attached to the freezer door.
NOTE: This may require two people, one to lift the door and another to feed the water tubing and wiring into the bottom hinge pin.
IMPORTANT: Rest the door on its side on a soft, clean surface, such as a towel, blanket, or piece of cardboard. This will help to avoid scratching or damaging the door, water tubing, and wiring.
11. Close the refrigerator door and use a TORX T30 screwdriver to remove completely the top hinge. See graphic 8.
IMPORTANT: Do not remove either screw A. Hold the door while the hinge is being removed.
12. Lift the refrigerator door straight up off from the bottom hinge. See graphic 7.
IMPORTANT: Rest the door on its side on a soft, clean surface, such as a towel, blanket, or piece of cardboard. This will help to avoid scratching or damaging the door.
If your refrigerator passes through the doorway now, then go directly to the “Reinstalling Doors & Hinges” section located in this manual.
If your refrigerator without doors does not pass through the doorway, follow the instruction below:
13. Remove one or both hinges using a 5/16" nut driver tool. See graphic 9.
IMPORTANT: Do not remove either screw B.
Reinstalling Door and Hinges
Reinstall both bottom hinges using a 5/16" nut driver to tighten screws. See graphic 9.
If your model has water dispensing in the door:
Lift the freezer door enough to feed the water dispenser tubing and wiring through the bottom hinge pin. See graphic 7.
NOTE: This may require two people, one to lift the door and the other to feed the water tubing and wiring into the bottom hinge pin.
Insert the freezer door into the bottom hinge pin.
IMPORTANT: Hold the door while hinge is being installed.
3. Close the freezer door to align and reinstall the top hinge.
Use a TORX T30 screwdriver to tighten the screws. See graphic 8.
IMPORTANT: Provide additional support for the door while top hinge is being re installed. Do not depend on the door magnets to secure the door to the cabinet.
4. If your model has water dispensing in the door, connect the water dispenser tubing. For the connection, push the tubing into the dispenser tubing until black mark touches the face of fitting. See graphic 4.
5. Reinstall the wiring clip & bracket wire to the cabinet using a 1/4" hexagonal head socket wrench. See graphic 5.
6. Connect the wiring plugs from the bracket wire. See graphic 5.
7. Lift the refrigerator door enough to insert the door into the bottom hinge pin. See graphic 7.
IMPORTANT: Hold the door while hinge is being installed.
8. Close the refrigerator door to align and reinstall the top hinge. Use a TORX T30 screwdriver to tighten the screws. See graphic 6.
IMPORTANT: Provide additional support for the door while top hinge is being reinstalled. Do not depend on the door magnets to secure the door to the cabinet.
Leveling and Door Closing
Your refrigerator has two front adjustable wheels. See graphic 1. These are used to level the refrigerator under uneven floor conditions or allow the doors to close more easily. Please follow the instructions below:
Use a Bubble level to check levelness of floor where the rear side of the refrigerator will rest. If the refrigerator is not leveled, adjust or add the shim on flooring to create a leveled floor for the rear side wheels. A leveled rear side prevents the refrigerator cabinet from forming a twist.
Place the refrigerator into its final location in the kitchen and open both doors.
Fully open both doors. See graphic 1.
If your model has water dispensing in the door, please open the water filter door by pulling it toward you (A). See graphic 2.
Using a Phillips screwdriver tip #2, remove the screws of the base grille(B). See graphic 2.
To dislodge the base grille pull it up strongly toward you from one side then from other side (C). See graphic 2.
To remove the base grille completely, pass it underneath the refrigerator door. See graphic 3.
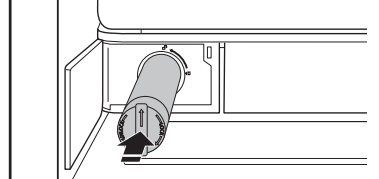
Use a 3/8" nut driver to turn the leveling screws located in both sides of the refrigerator. See graphic 10.
Raise the wheels while one person pushes on the refrigerator to lift from front side. Use the bubble level on top of the refrigerator or on its side to level refrigerator. Check bubble level and at the same time observe the gaps and squareness to the adjacent cabinets, furniture or trim. If adjacent furnishings are not level, it may not be possible to achieve even gaps when product is level.
Close both doors and check that they close as easily as you like. If not, turn both screws to the right to raise the refrigerator by tilting it more to the back until the doors close as easily as you like.
Check and make sure that the technician sheet is placed in the base grille cavity before assembling the base grille into the cabinet.
Reinstall the left side of the base grille first, and then the right side. See graphic 3. You may insert the water dispenser tubing and wiring into base grille cavity below the left bottom hinge.
Attach the base grille by pushing it into the cabinet clips. See graphic 2.
Using Phillips screwdriver, reinstall the screw to fix the base grill.
Door Alignment
The refrigerator doors are designed to be slightly misaligned vertically when the refrigerator is empty. If the doors are uneven after food has been placed, please follow the next instructions:
Close both the doors.
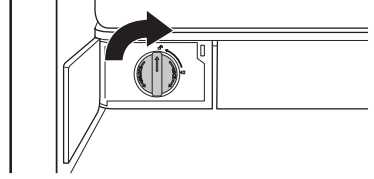
Use an 11/16" open-ended wrench tool to loosen the locking nut of refrigerator lower hinge . See graphic 11. Accommodate the wrench tool so that it fits in the space.
Use a 5/16" open-ended wrench tool to turn the alignment screw. See graphic 12. Depending on how the refrigerator door is misaligned in relation to the freezer door, you must turn the screw to the right to raise or to the left to lower the refrigerator door until both doors have been aligned vertically.
Tighten the 11/16" locking nut with the wrench tool again.
Reattach the base grille if it was dislodged.
Handle Installation and Removal
PARTS INCLUDED: Door handles (2)
To Install the Handles:
Remove the handles, which are packed inside the refrigerator.
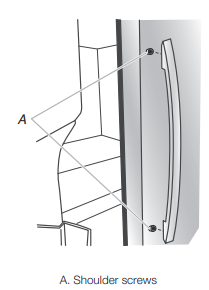
Open the freezer door. On the refrigerator door, place the handle on the shoulder screws.
Firmly push the handle toward the door until the handle base is flush against the door.
While holding the handle, push downward until the handle rests firmly on the shoulder screw.
Open the refrigerator door and close the freezer door. Repeat steps 2 through 4 to install the other handle onto the freezer door.
To Remove the Handles:
While holding the handle, push upward until the handle is released from the shoulder screw.
Gently pull the handle away from the door.
If necessary, use a Phillips screwdriver to remove the shoulder screws from the door.
Water Supply Requirements
Gather the required tools and parts before starting installation. Read and follow the instructions provided with any tools listed here.
TOOLS NEEDED:
Flat-blade screwdriver
7/16" and 1/2" open-end or two adjustable wrenches
1/4" nut driver
1/4" drill bit
Cordless drill
NOTE: Your refrigerator dealer has a kit available with a 1/4" (6.35 mm) saddle-type shut-off valve, a union, and copper tubing. Before purchasing, make sure a saddle-type valve complies with your local plumbing codes. Do not use a piercingtype or 3/16" (4.76 mm) saddle valve which reduces water flow and clogs more easily.
Water Pressure
A cold water supply with water pressure of between 30 and 120 psi (207 and 827 kPa) is required to operate the water dispenser and ice maker. If you have questions about your water pressure, call a licensed, qualified plumber.
If your refrigerator has a water dispenser: After installation is complete, use the water dispenser to check the water pressure.
With the water filter removed, dispense 1 cup (237 mL) of water. If 1 cup of water is dispensed in 8 seconds or less, the water pressure to the refrigerator meets the minimum requirement.
If it takes longer than 8 seconds to dispense 1 cup (237 mL) of water, the water pressure to the refrigerator is lower than recommended. See the “Troubleshooting” section for suggestions.
Reverse Osmosis Water Supply
IMPORTANT: The pressure of the water supply coming out of a reverse osmosis system going to the water inlet valve of the refrigerator needs to be between 30 and 120 psi (207 and 827 kPa).
If a reverse osmosis water filtration system is connected to your cold water supply, the water pressure to the reverse osmosis system needs to be a minimum of 40 to 60 psi (276 to 414 kPa). If the water pressure to the reverse osmosis system is less than 40 to 60 psi (276 to 414 kPa):
Check to see whether the sediment filter in the reverse osmosis system is blocked. Replace the filter if necessary.
Allow the storage tank on the reverse osmosis system to refill after heavy usage.
If your refrigerator has a water filter, it may further reduce the water pressure when used in conjunction with a reverse osmosis system. Remove the water filter. See the “Water Filtration System” section.
If you have questions about your water pressure, call a licensed, qualified plumber.
Connect Water Supply
Connect to Water Line
IMPORTANT: If you turn the refrigerator on before the water line is connected, turn the ice maker off.
Style 1 (Recommended)
Unplug refrigerator or disconnect power.
Turn off main water supply. Turn on nearest faucet long enough to clear line of water.
Use a quarter-turn shut-off valve or the equivalent, served by a 1/2" copper household supply line. NOTE: To allow sufficient water flow to the refrigerator, a minimum 1/2" size copper household supply line is recommended.
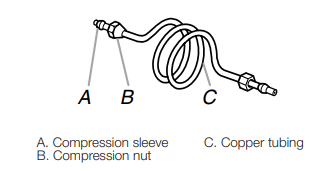
Now you are ready to connect the copper tubing to the shut-off valve. Use 1/4" (6.35 mm) OD soft copper tubing to connect the shut-off valve and the refrigerator.
Ensure that you have the proper length needed for the job. Be sure both ends of the copper tubing are cut square.
Slip compression sleeve and compression nut onto copper tubing as shown. Insert end of tubing into outlet end squarely as far as it will go. Screw compression nut onto outlet end with adjustable wrench. Do not overtighten.
5. Place the free end of the tubing into a container or sink, and turn on main water supply to flush out tubing until water is clear. Turn off shut-off valve on the water pipe.
NOTE: Always drain the water line before making the final connection to the inlet of the water valve to avoid possible water valve malfunction.
6. Bend the copper tubing to meet the water line inlet, which is located on the back of the refrigerator cabinet as shown. Leave a coil of copper tubing to allow the refrigerator to be pulled out of the cabinet or away from the wall for service.
Style 2
Unplug refrigerator or disconnect power.
Turn off main water supply. Turn on nearest faucet long enough to clear line of water.
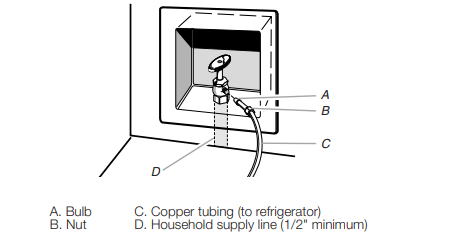
Locate a 1/2" (12.7 mm) to 1¼" (31.8 mm) vertical cold water pipe near the refrigerator.
Determine the length of copper tubing you need. Measure from the connection on the lower rear corner of refrigerator to the water pipe. Add 7 ft (2.1 m) to allow for cleaning. Use 1/4" (6.35 mm) O.D. (outside diameter) copper tubing. Be sure both ends of copper tubing are cut square.
Using a cordless drill, drill a 1/4" (6.35 mm) hole in the cold water pipe you have selected.
Fasten the shut-off valve to the cold water pipe with the pipe clamp. Be sure the outlet end is solidly in the 1/4" (6.35 mm) drilled hole in the water pipe and that the washer is under the pipe clamp. Tighten the packing nut. Tighten the pipe clamp screws slowly and evenly so the washer makes a watertight seal. Do not overtighten, or you could crush the copper tubing.
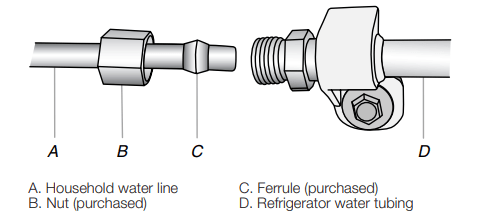
Slip the compression sleeve and compression nut on the copper tubing as shown. Insert the end of the tubing into the outlet end squarely as far as it will go. Screw the compression nut onto the outlet end with adjustable wrench. Do not overtighten.
Place the free end of the tubing in a container or sink, and turn on the main water supply. Flush the tubing until water is clear. Turn off the shut-off valve on the water pipe. Coil the copper tubing.
Connect to Refrigerator
Style 1
Unplug refrigerator or disconnect power.
Remove and discard the short, black plastic part from the end of the water line inlet.
Thread the nut onto the end of the tubing. Tighten the nut by hand. Then tighten it with a wrench two more turns. Do not overtighten.
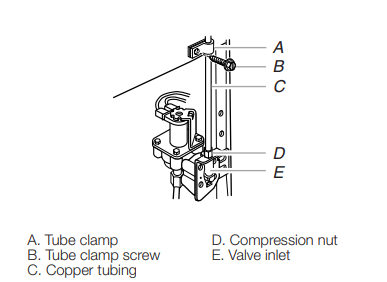
Install the water supply tube clamp around the water supply line to reduce strain on the coupling.
Turn shut-off valve on.
Check for leaks. Tighten any connections (including connections at the valve) or nuts that leak.
Style 2
Unplug refrigerator or disconnect power.
Remove and discard the plastic part that is attached to the inlet of the water valve.
Attach the copper tube to the valve inlet using a compression nut and sleeve as shown. Tighten the compression nut. Do not overtighten.
Use the tube clamp on the back of the refrigerator to secure the tubing to the refrigerator as shown. This will help avoid damage to the tubing when the refrigerator is pushed back against the wall.
Turn shut-off valve on.
Check for leaks. Tighten any connections (including connections at the valve) or nuts that leak.
On some models, the ice maker is equipped with a builtin water strainer. If your water conditions require a second water strainer, install it in the 1/4" (6.35 mm) water line at either tube connection. Obtain a water strainer from your nearest appliance dealer.
Style 3
Unplug refrigerator or disconnect power.
Remove and discard the black nylon plug from the gray water tube on the rear of the refrigerator.
If the gray water tube supplied with the refrigerator is not long enough, a 1/4" x 1/4" (6.35 mm x 6.35 mm) coupling is needed in order to connect the water tubing to an existing household water line. Thread the provided nut onto the coupling on the end of the copper tubing. NOTE: Tighten the nut by hand. Then tighten it with a wrench two more turns. Do not overtighten.
Turn shut-off valve on.
Check for leaks. Tighten any nuts or connections (including connections at the valve) that leak.
Complete the Installation
Plug into a grounded 3 prong outlet.
Flush the water system. See “Water and Ice Dispensers” in the User Instructions or User Guide.
NOTE: Allow 24 hours to produce the first batch of ice. Allow 72 hours to completely fill the ice container.
Water Filtration System
Water Filter Status Light (on some models)
The filter status light will help you know when to change your water filter. This is located in the refrigerator control panel.
The light will turn red. This tells you that it is time to change the filter.
It is recommended that you replace the filter when the status light turns red or water flow to your water dispenser or ice maker decreases noticeably.
NOTE: The filter should be replaced at least every 6 months depending on your water quality and usage.
Resetting the Filter Status
The rest button is located on the control panel in the refrigerator compartment. To reset the status light after changing the filter, press TEMP SETTING within 3 seconds. The status light will change from red to off when the system is reset.
Changing the Water Filter
Style 1
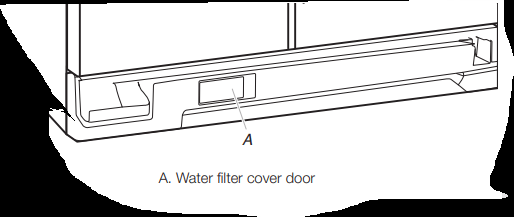
Locate the water filter cover door in the base grille, and pull open the filter door. The filter will be released and then be ejected as the door is opened.
When the door is completely open, pull the filter straight out.
Take the new filter out of its packaging and remove the covers from the O-rings. Be sure the O-rings are still in place after the covers are removed.
With the arrow pointing to the left (toward the filter cover door’s hinge), align the new filter with the filter housing and slide into place. The filter cover door will automatically begin to close as the new filter is inserted.
Close the filter cover door completely in order to snap the filter into place. You may need to press hard.
Flush the water system. See “Water and Ice Dispensers” in the User Instructions or User Guide.
Style 2
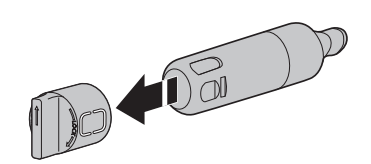
Locate the water filter cover door in the base grille, and pull open the filter door.
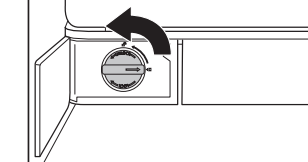
2. Twist the water filter and turn 90° counterclockwise to unlock.
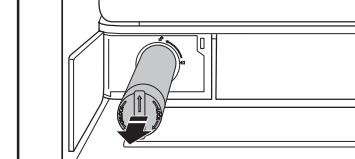
3. Pull the filter out of the housing.
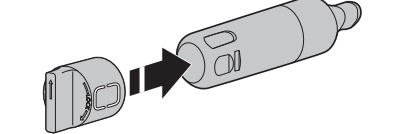
4. Remove the water filter cap from the water filter.
5. Install the water filter cap onto the new filter. Be sure to align the arrows so the grooves in the filter align with ribs in the filter cap.
6. Insert the filter into the housing.
7. Twist the water filter and turn 90° clockwise until it locks into place and the arrows are aligned.
8. Push the water filter door closed.
REFRIGERATOR CARE
Cleaning
Both the refrigerator and freezer sections defrost automatically. However, clean both sections about once a month to avoid buildup of odors. Wipe up spills immediately.
IMPORTANT: Because air circulates between both sections, any odors formed in one section will transfer to the other. You must thoroughly clean both sections to eliminate odors. To avoid odor transfer and drying out of food, wrap or cover foods tightly.
To Clean Your Refrigerator:
NOTE: Do not use abrasive or harsh cleaners such as window sprays, scouring cleansers, flammable fluids, cleaning waxes, concentrated detergents, bleaches or cleansers containing petroleum products on plastic parts, interior and door liners or gaskets. Do not use paper towels, scouring pads, or other harsh cleaning tools.
Unplug refrigerator or disconnect power.
Hand wash, rinse, and dry removable parts and interior surfaces thoroughly. Use a clean sponge or soft cloth and a mild detergent in warm water.
Wash stainless steel and painted metal exteriors with a clean sponge or soft cloth and a mild detergent in warm water.
There is no need for routine condenser cleaning in normal home operating environments. If the environment is particularly greasy or dusty, or there is significant pet traffic in the home, the condenser should be cleaned every two to three months to ensure maximum efficiency. If you need to clean the condenser:
Remove the base grille. See the “Door Removal” instructions, either in the User Instructions or the Installation Instructions and Owner’s Manual, or in the separate instruction sheet provided with your refrigerator.
Use a vacuum cleaner with a soft brush to clean the grille, the open areas behind the grille and the front surface area of the condenser.
Replace the base grille when finished.
5. Plug in refrigerator or reconnect power.
Lights
IMPORTANT: The lighting system in this appliance may consist of:
Sealed LED modules
LED Bulbs
Incandescent Bulbs
Or a combination of the above.
If a Sealed LED Module(s) do not illuminate when the refrigerator and/or freezer door is opened, call whirlpool service for technical support. (See User Guide). See “Warranty” for contact information.
IF a LED Bulb or incandescent bulb does not turn ON when the refrigerator and/or freezer door is opened, replace with a bulb recommended by Whirlpool and following the next procedure:
Unplug refrigerator or disconnect power.
Remove light cover (in some models). NOTE: To clean the light cover, follow the instructions in REFRIGERATOR CARE section.
Remove light bulb and replace with one of the same size, shape and wattage, recommended by Whirlpool.
Reinstall light cover (in some models).
Plug in refrigerator or reconnect power.
NOTE: Not all appliance bulbs will fit your refrigerator. Be sure to replace the bulb with one of the same size and shape. On some models, the interior lights require a 40 W bulb max.
Vacation and Moving Care
Vacations
If You Choose to Leave Refrigerator On While You Are Away:
Use up any perishables and freeze other items.
If your refrigerator has an automatic ice maker and is connected to the household water supply, turn off the water supply to the refrigerator. Property damage can occur if the water supply is not turned off.
If you have an automatic ice maker, turn off the ice maker. NOTE: Depending on your model, raise the wire shut-off arm to Off (up) position or press the switch to Off (right).
Empty the ice bin.
If You Choose to Turn Refrigerator Off Before You Leave:
Remove all food from the refrigerator.
If your refrigerator has an automatic ice maker:
Turn off the water supply to the ice maker at least one day ahead of time.
When the last load of ice drops, raise the wire shut-off arm to the Off (up) position or move the switch to the Off (right) setting.
3. Unplug refrigerator.
4. Clean, wipe, and dry thoroughly.
5. Tape rubber or wood blocks to the tops of both doors to prop them open far enough for air to get in. This stops odor and mold from building up.
Moving
When you are moving your refrigerator to a new home, follow these steps to prepare it for the move.
1. If your refrigerator has an automatic ice maker:
Turn off the water supply to the ice maker at least one day ahead of time
Disconnect the water line from the back of the refrigerator.
When the last load of ice drops, raise the wire shut-off arm to the Off (up) position or move the switch to the Off (right) setting.
2. Remove all food from the refrigerator and pack all frozen food in dry ice. 3. Empty the ice bin. 4. Unplug refrigerator. 5. Clean, wipe, and dry thoroughly. 6. Take out all removable parts, wrap them well, and tape them together so they don’t shift and rattle during the move. 7. Depending on the model, raise the front of the refrigerator so it rolls more easily or screw in the leveling legs so they don’t scrape the floor. See the “Adjust the Doors” or “Door Removal, Leveling, and Alignment” section. 8. Tape the doors closed and tape the power cord to the back of the refrigerator.
When you get to your new home, put everything back and refer to these Installation Instructions for preparation instructions. Also, if your refrigerator has an automatic ice maker, remember to reconnect the water supply to the refrigerator.
TROUBLESHOOTING
First try the solutions suggested here or visit our website to possibly avoid the cost of a service call.
Refrigerator will not operate
Not connected to an electrical supply - Plug the power cord into a grounded 3 prong outlet. Do not use an extension cord.
No power to the electrical outlet - Plug in a lamp to see if the outlet is working.
Household fuse has blown or circuit breaker has tripped - Replace the fuse or reset the circuit breaker. If the problem continues, contact a licensed electrician.
New installation - Following installation, allow 24 hours for the refrigerator and freezer to cool completely.
NOTE: Adjusting the temperature control(s) to the coldest setting will not cool either compartment (refrigerator or freezer) more quickly.
Motor seems to run too much
Your new refrigerator has an energy-efficient motor - The refrigerator may run longer than you’re used to because the compressor and fans operate at lower speeds that are more energy-efficient. This is normal.
NOTE: Your refrigerator may run even longer if the room is warm, a large load of food is added, the doors are opened often, or if a door has been left open.
GENERAL OPERATION
Possible Causes and/or Recommended Solutions
Refrigerator seems noisy
The compressor in your new refrigerator regulates temperature more efficiently and uses less energy than older models. During various stages of operation, you may hear normal operating sounds that are unfamiliar.
The following noises are normal:
Buzzing/Clicking - Heard when the water valve opens and closes to dispense water or fill the ice maker. If the refrigerator is connected to a water line, this is normal. If the refrigerator is not connected to a water line, turn off the ice maker.
Cracking/Crashing - Heard when ice is ejected from the ice maker mold.
Popping - Heard when the inside walls contract/expand, especially during initial cool down.
Pulsating/Whirring - Heard when the fans/compressor adjust to optimize performance during normal operation.
Rattling - Heard when water passes through the water line, or due to the flow of refrigerant. Rattling may also come from items placed on top of the refrigerator.
Water running or gurgling - Heard when ice melts during the defrost cycle and water runs into the drain pan.
Sizzling - Heard when water drips onto the heater during the defrost cycle.
Temperature is too warm
New installation - Following installation, allow 24 hours for the refrigerator and freezer to cool completely.
NOTE: Adjusting the temperature control(s) to the coldest setting will not cool either compartment (refrigerator or freezer) more quickly.
Doors are opened often or not closed completely - This allows warm air to enter the refrigerator. Minimize door openings, keep the doors fully closed, and make sure both doors are properly sealed.
Air vents are blocked - Remove items that are immediately in front of the vents.
Large amount of warm food recently added - Allow several hours for the refrigerator to return to its normal temperature.
Controls are not set correctly for the surrounding conditions - Adjust the controls to a colder setting. Check the temperature again in 24 hours.
Temperature is too cold
Controls are not set correctly for the surrounding conditions - Adjust the controls to a warmer setting. Check the temperature again in 24 hours.
Top refrigerator shelf is colder than lower shelves - On some models, air from the freezer enters the refrigerator compartment through vents near the top refrigerator shelf. As a result, the top shelf can be slightly colder than lower shelves.
Air vents are blocked - Remove items that are immediately in front of the vents.
Interior moisture buildup
NOTE: Some moisture buildup is normal. Clean with a soft dry cloth.
Room is humid - A humid environment contributes to moisture buildup. Use the refrigerator only in an indoor location, with as little humidity as possible
Doors are opened often or not closed completely - This allows humid air to enter the refrigerator. Minimize door openings, keep the doors fully closed, and make sure both doors are properly sealed.
Interior lights do not work
Doors have been open for an extended period of time - Close the doors to reset the lights.
Light bulb is loose in the socket or has burned out - On models with incandescent interior light bulbs, tighten or replace the bulb. See the “Lights” section.
NOTE: On models with LED lights, call for assistance or service if the interior lights do not illuminate when either door is opened. See the Warranty for contact information.
Dispenser lights do not work (on some models)
Dispenser light is turned off - On some models, if the dispenser light is set to Off, the light will turn on only when a dispenser pad/lever is pressed. If you want the dispenser light to stay on continuously, select a different setting. See the “Water and Ice Dispensers” section.
Dispenser light is set to Auto or Night Light - On some models, if the dispenser light is set to Auto or Night Light, make sure the dispenser light sensor is not blocked. See the “Water and Ice Dispensers” section.
NOTE: On models with LED lights, call for assistance or service if the dispenser lights do not operate correctly. See the Warranty for contact information.
User interface not responding
Pressing user interface too fast - Wait 10 seconds before pressing any key.
User interface in Lock Mode - Press and hold LOCK for 3 seconds to exit Lock Mode
Doors are difficult to open
Gaskets are dirty or sticky - Clean the gaskets and contact surfaces with mild soap and warm water. Rinse and dry with a soft cloth.
Doors will not close completely
Door is blocked open - Move food packages away from the door. Make sure all bins and shelves are in their correct positions. Make sure all packaging materials have been removed.
Doors appear to be uneven
Doors need to be aligned, or refrigerator needs to be leveled - See the leveling and door alignment instructions.
Refrigerator rocks and is not stable
Refrigerator is not level - To stabilize the refrigerator, remove the base grille and lower the leveling feet until they touch the floor. See the leveling and door alignment instructions.
Ice maker is not producing ice, not producing enough ice, or producing small/hollow ice
Refrigerator is not connected to a water supply, or the water supply shut-off valve is not fully turned on - Connect the refrigerator to a water supply and make sure the water shut-off valve is fully open.
Kink in the water source line - A kink in the water line can reduce water flow, resulting in decreased ice production, small ice cubes, and/or hollow or irregularly-shaped ice. Straighten the water line.
Ice maker is not turned on - Turn on the ice maker. See the “Ice Maker and Storage Bin” section.
New installation - After connecting the refrigerator to a water source, flush the water system. (See the “Water and Ice Dispensers” section.) Wait 24 hours for ice production to begin. Wait 72 hours for full ice production. Discard the first three batches of ice produced.
Large amount of ice was recently removed - Allow sufficient time for the ice maker to produce more ice.
Ice is jammed in the ice maker ejector arm - Remove ice from the ejector arm using a plastic utensil.
Inadequate water pressure - Verify that the household has adequate water pressure. See the “Water Supply Requirements” section.
Water filter is installed incorrectly - Make sure the filter is properly installed. See the “Water Filtration System” section.
A reverse osmosis water filtration system is connected to your cold water supply - This can decrease water pressure. See the “Water Supply Requirements” section. NOTE: If questions remain regarding water pressure, contact a licensed, qualified plumber.
ICE AND WATER
Possible Causes and/or Recommended Solutions
Ice dispenser will not operate properly
Doors not closed completely - Make sure both doors are firmly closed. (On some models, only the freezer door must be closed in order to operate the dispenser.)
New installation - After connecting the refrigerator to a water source, flush the water system. (See the “Water and Ice Dispensers” section.) Wait 24 hours for ice production to begin. Wait 72 hours for full ice production. Discard the first three batches of ice produced.
Ice maker is not turned on, or ice bin is not installed correctly - Turn on the ice maker and make sure the ice storage bin is firmly in position. See the “Ice Maker and Storage Bin” section.
Ice is clogged or frozen together in the ice storage bin, or ice is blocking the ice delivery chute - Remove or separate the clogged ice, using a plastic utensil if necessary. Clean the ice delivery chute and the bottom of the ice storage bin using a warm damp cloth, then dry both thoroughly. To avoid clogging and to maintain a fresh supply of ice, empty the storage bin and clean both the storage bin and the delivery chute every 2 weeks.
Wrong ice has been added to the storage bin - Use only ice cubes produced by the current ice maker.
Dispenser is locked - Unlock the dispenser. See the “Water and Ice Dispensers” section.
Ice dispenser jams while dispensing crushed ice - For models with the ice storage bin on the door, temporarily switch from crushed ice to cubed ice to clear the jam.
Dispenser pad/lever has been pressed too long - Ice will automatically stop dispensing. Wait a few minutes for the dispenser to reset, then resume dispensing. Take large amounts of ice directly from the ice bin, not through the dispenser.
Water pressure to the home is not at or above 30 psi (207 kPa) - The water pressure to the home affects the flow from the dispenser. See the “Water Supply Requirements” section.
Water filter is clogged or incorrectly installed - Replace filter or reinstall it correctly. See the “Water Filtration System” section.
Ice or water has an off-taste, odor, or gray color
New plumbing connections - New plumbing connections can result in off-flavored or discolored ice or water. This problem should go away over time.
Ice has been stored too long - Discard the ice and wash the ice bin. Allow 24 hours for the ice maker to produce new ice.
Odor has transferred from food - Use airtight moisture-proof packaging to store food.
Use of non-recommended water supply line - Odors and tastes can transfer from certain materials used in non-recommended water supply lines. Use only a recommended water supply line. See the “Water Supply Requirements” section.
There are minerals (such as sulfur) in the water - A water filter may need to be installed in order to remove the minerals.
Water filter was recently installed or replaced - Gray or dark discoloration in ice or water indicates that the water filtration system needs additional flushing. See the “Water and Ice Dispensers” section.
Water dispenser will not operate properly
Doors not closed completely - Make sure both doors are firmly closed. (On some models, only the freezer door must be closed in order to operate the dispenser.)
Refrigerator is not connected to a water supply, or the water supply shut-off valve is not turned on - Connect the refrigerator to a water supply and make sure the water shut-off valve is fully open.
Kink in the water source line - A kink in the water line can reduce water flow to the dispenser. Straighten the water line.
Water pressure to the home is not at or above 30 psi (207 kPa) - The water pressure to the home affects the flow from the dispenser. See the “Water Supply Requirements” section.
New installation - After connecting the refrigerator to a water source, flush the water system. See the “Water and Ice Dispensers” section.
Dispenser is locked - Unlock the dispenser. See the “Water and Ice Dispensers” section.
Water filter is clogged or incorrectly installed - Replace filter or reinstall it correctly. See the “Water Filtration System” section.
A reverse osmosis water filtration system is connected to your cold water supply - This can decrease water pressure. See the “Water Supply Requirements” section.
If questions remain regarding water pressure, contact a licensed, qualified plumber.
ICE AND WATER
Possible Causes and/or Recommended Solutions
Water is leaking or dripping from the dispenser
NOTE: After dispensing, a few additional drops of water are normal.
Glass was not held under the dispenser long enough - Hold the glass under the dispenser for 2 to 3 seconds after releasing the dispenser pad/lever.
New installation, or water filter was recently installed or replaced - Air in the water lines causes the water dispenser to drip. Flush the water system to remove the air in the water lines. See the “Water and Ice Dispensers” section.
Residual ice in the dispenser chute is melting - Make sure the ice chute is free of ice shavings or pieces.
Water is leaking from the back of the refrigerator
Water line connections are not fully tightened - Make sure all connections are firmly tightened. See the “Connect Water Supply” section.
Water from the dispenser is not cool enough (on some
models)
NOTE: Water from the dispenser is chilled to 50°F (10°C).
New installation - Allow 24 hours after installation for the water supply to cool completely.
Recently dispensed a large amount of water - Allow 24 hours for the new water supply to cool completely.
Water has not been recently dispensed - The first glass of water may not be cool. Discard the first glass of water dispensed.
Refrigerator is not connected to a cold water pipe - Make sure the refrigerator is connected to a cold water pipe. See the “Water Supply Requirements” section.