Insert mains plug. Turn the tap on. Open the washer dryer door. Select the washing/ drying programme Max. load in display panel.
If required, change the programme default settings and/or select additional functions. Sort the laundry. Load the laundry
Open the detergent drawer. Dose detergent according to the dosing recommendation. ~ Page 16 Close the washer dryer door. Select Start/ Reload.
End of the programme. Set programme selector to Off. Open the door and remove the laundry. Turn off the tap. (for models without Aqua-Stop)
Getting to know your appliance
Washer dryer
1. Hot air outlet
2. Operating/display panel
3. Door with handle
3a. Open the door
3b. Close the door
4. Service flap and cool air inlet
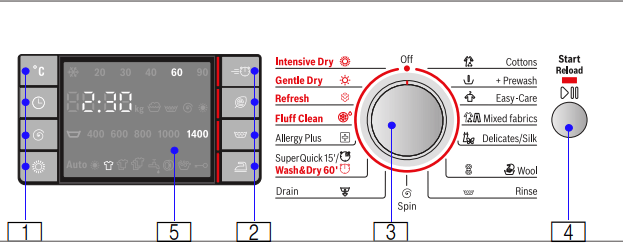
Control panel
Change the default settings for the selected programme and select additional functions:
1. Select buttons °C (Temperature), (Finish in) time, (Spin speed) and (Drying) for changing default settings ~ Page 24
2. Select buttons (speedPerfect), (ecoPerfect), (Rinse plus) and (Less iron) for additional functions ~ Page 26
3. Select a programme. Can be rotated in either direction. To switch off the washer dryer, set programme selector to Off.
4. Start programme. Select the Start/ Reload button to start, interrupt (e.g. reload the laundry) and cancel the programme ~ Page 18
5. Display panel for settings and information
Display panel
Displays for the programme
* Depends on selected programmes/additional functions.
Laundry
Preparing laundry for washing
Sorting laundry according to:
Sort your laundry according to the care instructions and manufacturer's information on the care labels, depending on:
Type of fabric/fibre
Colour
Note: Laundry may discolour. Wash white and coloured items separately. Wash new coloured items separately the first time you wash them.
Soiling
– Light: do not prewash; if necessary select the (speedPerfect) additional function.
– Normal: Select programme with prewash. If required, pretreat stains.
– Heavy: Load less washing. Select programme with prewash. If required, pretreat stains.
– Stains: Remove/pretreat stains while they are fresh. First dab with soapy water; do not rub. Then wash the items of laundry with the appropriate programme. Stubborn or dried-in stains can sometimes only be removed by washing several times.
Care label specifications:
Suitable for normal washing process;
e.g. Cottons programme N A gentle washing process is required;
e.g. Easy-Care programme O An especially gentle washing process is required; e.g. Delicates/Silk programme
Suitable for washing by hand; e.g.Wool program
Do not machine wash.
Protecting your laundry and washer dryer:
Caution!
Damage to the appliance/textiles
Foreign objects (e.g. coins, paper clips, needles, nails) may damage the washing or components of the washer dryer.
The following instructions must be observed when preparing your laundry:
Always follow the manufacturer's instructions when dosing all detergents, cleaning aids, care products and cleaning agents.
Do not exceed maximum load. Overfilling will impair the washing result.
Keep detergents and agents for the pretreatment of laundry (e.g. stain remover, prewash sprays, etc.) away from the surfaces of the washer dryer. Using a damp cloth, immediately remove any fine spray residue and other residue or droplets.
Empty any pockets. Remove any foreign objects.
Remove metal parts (paper clips, etc.).
Trousers, knitwear and knitted textiles, e.g. jersey garments, T-shirts or sweatshirts, should be turned inside out.
Ensure that underwired bras are machine-washable.
Wash delicates in a net or bag (tights, underwired bras, ect).
Close zips, button up covers.
Brush sand out of pockets and collars.
Remove curtain fittings or include in the net/bag.
Preparing laundry for drying
Note: To ensure an even drying result, sort the laundry according to the:
Type of fabric
Drying programme
Care symbols which are indicated on the care labels.
Only dry laundry which is labelled “dryer-proof” or which has the following care symbols:
= Dry at normal temperature (Intensive Dry)
= Dry at low temperature (Gentle Dry)
The following textiles must not be dried:
= care symbol “Do not dry”
Wool or textiles containing wool.
Delicates (silk, synthetic curtains).
Textiles which contain foam rubber or similar materials.
Textiles which were treated with flammable liquids, e.g. with stain remover, petroleum ether, thinners. Risk of explosion!
Textiles which still contain hairspray or similar substances.
Notes
Before drying, hand-washed textiles must be spun at the appropriate spin speed.
Before drying, spin at the optimum speed. A spin speed of more than rpm is recommended for cotton, more than 800 rpm for easycare textiles.
Do not iron washing immediately after drying. It is recommended to roll the washing up first to distribute residual moisture evenly.
To ensure a good drying performance, quilts, terry cloths and other large textiles should be dried separately. Do not dry more than four terry cloths (or 3 kg).
Do not exceed maximum load.
Operating the appliance
Preparing the washer dryer
The washer dryer was tested before delivery. To remove residual water from the test procedure, the first wash cycle should be run without laundry using the Fluff clean programme. Before washing/drying for the first time
Notes
Never switch on a damaged washer dryer!
Inform your customer service!
Insert mains plug.
Turn the tap on. The end of the drying programme is followed by an automatic fluff cleaning cycle. The tap must be turned on even when selecting a drying programme.
Open the door.
Notes
Always provide good ventilation in the room where the washer dryer is located so that air produced during the drying phase can be evacuated.
Always keep the inlets and outlets for the cooling air clear.
Selecting the programme/ Switching on the appliance
Note: If you have activated the childproof lock, you must deactivate it before you can set a programme.
Select the required programme with the programme selector. Can be rotated in either direction.
The washer dryer is switched on.
The following figures are indicated continuously on the display panel for the selected programme:
the programme duration (when door is closed),
the preset temperature,
the preset spin speed and
the maximum load (when door is opened),
.........
Adjusting the washing programme
You can use the displayed default settings or adjust the selected programme optimally to the laundry items by changing the default settings or selecting additional functions. The selectable settings and additional functions depend on selected washing/ drying programme.
Overview of programmes
Changing default settings for a washing programme, e. g. washing temperature:
Touch the °C (Temperature) button to set desired washing temperature
Changing the additional functions for a washing programme, e.g. select (SpeedPerfect) :
Touch the (SpeedPerfect) button; the indicator light comes on and the additional function is selected. To deselect the additional function, touch the (SpeedPerfect) button again, and the indicator light goes off.
Adjusting the drying programme
Note: If an individual drying programme or washing and drying without interruption is selected, you can change the default settings for the drying programme if required. Overview of programmes
Changing the default settings for a drying programme:
Touch the (Drying) button to set the desired drying mode or drying time (only for an individual drying programme).
Note: After changing the default settings for the drying programme, the programme duration may change.
Loading the laundry
Warning
Danger of death!
Laundry items pretreated with solventbased detergents, e.g. stain remover/ petroleum ether, may cause an explosion if loaded into the washer dryer.
Thoroughly rinse laundry items by hand before washing.
Notes
Mix large and small items. Laundry items of different sizes distribute themselves better during the spin cycle. Individual laundry items may cause an unbalanced load.
Observe the indicated maximum load. Overfilling adversely affects the washing result and promotes creasing.
Unfold presorted laundry items and place in the drum.
Ensure that no laundry items are trapped between the door and rubber seal.
3. Close the door.
Note: The indicator light on the Start/ Reload button flashes and the default settings for the programme appear continuously on the display panel. Changes may be made to the default settings.
Dosing and adding detergent and care product
Caution!
Damage to the appliance
Detergents and agents for the pretreatment of laundry (e.g. stain remover, prewash sprays, etc.) may damage the surfaces of the washer dryer.
Keep these agents away from the surfaces of the washer dryer. Using a damp cloth, immediately remove any fine spray residue and other residue/ droplets.
Dosing
Dose the detergents and care products according to:
water hardness (ask your water supply company),
the manufacturer’s specifications on the packaging,
the amount of laundry,
soiling.
Filling the dispensers
1. Pull out the detergent drawer.
Warning
Eye / skin irritation!
If the detergent drawer is opened while the appliance is running, detergent/care product may run out. Carefully open the drawer.
If detergent/care product comes into contact with eyes or skin, rinse thoroughly.
If accidentally swallowed, seek medical advice.
2. Pour in detergent and/or cleaning product.
Dispenser I Detergent for prewash.
Dispenser Softener, starch. Do not exceed the maximum load.
Dispenser II Detergent for main wash, water softener, bleach, stain remover.
Dispenser A For dosing liquid detergent.
Notes
Always follow the manufacturer's instructions when dosing all detergents, cleaning aids, care products and cleaning agents.
Dilute viscous fabric softener and fabric conditioner with water.
This will prevent blockages.
Be careful when opening the detergent drawer while the appliance is running.
If an individual drying programme is selected, please do not add detergent and/or care product in the appliance.
Measuring aid* for liquid detergent
*depending on the model
Position the measuring aid for measuring the correct amount of liquid detergent:
Pull out the detergent drawer. Press down the insert and fully remove the drawer.
Slide the measuring aid forwards, fold it down and click it into place.
Reinsert the drawer.
Note: Do not use the measuring aid for gel detergents and washing powder, or for programmes with prewash or when " Finish in" time is selected.
For models without a measuring aid, pour the liquid detergent into the appropriate dispenser and place it in the drum.
Starting the programme
Touch the Start/Reload button. The indicator lamp is lit and the programme starts.
Note: If you want to secure the programme to prevent it from being adjusted inadvertently, select the childproof lock.
The display panel shows the Finished in time while the programme is running or the programme duration and the programme progress symbols when the washing programme has started.
Display panel ~ Page 10
After washing/drying
Open the door and remove the laundry.
Turn the programme selector to Off. The appliance is switched off.
Turn off the tap.
Not required for Aqua-Stop models.
Notes
Do not leave any items of laundry in the drum. In the next wash they may shrink or discolour another item.
Remove any foreign objects from the drum and the rubber seal – risk of rust.
Leave the detergent drawer and door open so that residual water can evaporate.
Always remove the laundry.
Always wait until the programme ends, as the appliance could still be locked. Then switch the appliance on and wait for the unlocking device.
When the display panel has gone out at the end of the programme, energy-saving mode is active. To activate, select any button.
Selecting additional functions
You can select your desired additional le functions by touching the respective buttons.
(SpeedPerfect)
1. For a shorter wash time with a comparable washing result to the standard programme.
Note: Do not exceed maximum load. Overview of programmes
(EcoPerfect)
2: Energy-optimised washing by reducing the temperature while achieving a consistent washing result.
Note: The washing temperature is lower than the selected temperature. For special hygiene requirements, the Allergy+ programme is recommended.
(Rinse plus)
3. Additional rinse cycle. For areas with very soft water or for an even better rinsing result.
(Less iron)
4. Special spin sequence with subsequent fluffing. Gentle final spin – residual moisture in the laundry increased slightly
Setting the signal
1. Activate setting mode for the signal volume
2.a Set the volume for the button signals (depending on model)
2.b Selecting the volume for the information signals
Cleaning and maintenance
Warning
Risk of electric shock!
Danger of death if live parts are touched.
Switch off the appliance and disconnect at the mains plug.
Warning
Risk of poisoning!
Solvent-based cleaning agents, e.g. petroleum ether, in the washer dryer may cause toxic vapours.
Do not use solvent-based cleaning agents.
Caution!
Damage to the appliance
Solvent-based cleaning agents, e.g. petroleum ether, may damage the surfaces and components of the washer dryer.
Do not use solvent-based cleaning agents.
Appliance housing/control panel
Remove the detergent residue immediately.
Wipe the housing and the control panel with a soft, damp cloth.
Do not use abrasive cloths, sponges or detergents (stainless steel cleaner).
Do not clean the appliance with a water jet.
Drum
Use chlorine-free cleaning agents, do not use steel wool.
1. Turn the tap off to prevent more water from flowing in and to ensure
2. Turn the programme selector to Off. Pull out the mains plug.
3. Open the service flap.
4. Take the drainage hose out of the holder.
5. Remove the cover flap, draining the washing water into a suitable container. Press on the cover flap and insert the drainage hose into the holder. Note: Residual water may run out.
6. Carefully unscrew the pump cover. Clean the interior, pump cover thread and pump housing (the fan impeller in the detergent-solution pump must be able to rotate).
7. Reinsert and screw on the pump cover. Handle should be vertical.
+
8. Close the service flap. If required, engage the disengaged service flap beforehand. Note: To prevent unused detergent from flowing into the outlet during the next wash: Pour 1 litre of water into dispenser II and start the Spin or Drain
Descaling
Not required if detergent dosed correctly. However, if this does occur, follow the instructions of the descaling agent manufacturer. Suitable descalers can be purchased on our website or from customer service.
Cleaning the detergent dispenser
If it contains detergent or fabric softener residue:
Pull out the detergent drawer. Depress the insert and remove the drawer completely.
Take out insert: using your finger, press insert upwards.
Clean the detergent dispenser and insert with water and a brush and dry.
Attach the insert and lock into position (push the cylinder onto the guide pin).
Insert detergent drawer.
Note: Leave the detergent drawer open so that residual water can evaporate.
Drain pump blocked :
Warning
Risk of scalding!
Washing water is hot when washing at high temperatures. You may be scalded if you touch the hot washing water. Allow the washing water to cool down.
that it is drained via the detergent solution pump.
Drainage hose on the siphon blocked
1. Turn the programme selector to Off. Pull out the mains plug.
2. Loosen hose clip, carefully remove drainage hose. Residual water may run out.
3. Clean drainage hose and siphon spigot.
4. Re-attach the drainage hose and secure the connection point with the hose clip.
Filter in the water inlet hose blocked
Warning
Danger of death!
Do not immerse the Aqua-Stop safety device in water (it contains an electric valve).
First, reduce the water pressure in the supply hose:
Turn off the tap.
Select any programme (except Spin or Drain ).
Select Start/Reload . Allow the programme to run for approx. 40 s.
Turn the programme selector to Off. Pull out the mains plug.
Clean the filter on the tap: Disconnect the hose from the water tap. Clean the filter with a small brush.
6. Clean the filter on the back of the appliance: Remove the hose from the rear of the appliance. Take out the filter with pliers and clean it.
7. Connect the hose and check for leaks.
Air filter blocked
1. Turn the programme selector to Off. Pull out the mains plug.
2. Open and remove the service flap.
3. Take out the air filter.
4. Rinse fluff off the air filter using a brush under running water.
5. Re-insert the air filter.
6. Re-insert and close the service flap.
Faults and what to do about them
Emergency release, e.g. if a a power failure occurs
The programme continues running when the power supply is restored. If the washing is still to be removed, the door can be opened as described below:
Caution!
Water damage
Leaking water may cause damage. Do not open the door if you can still see water through the glass.
1. Turn the programme selector to Off. Pull out the mains plug.
2. Drain the detergent solution.
3. Pull down emergency release with a tool and release. Door can then be opened.
Information on the display panel
Display
Cause/Remedy
A:01
Close the door immediately because of the rising water level. If an interruption occurs, A:01 and OPEn are displayed alternately.
A:02
The door is locked for safety reasons (water level and/or temperature too high).
■ Washing programme: In pause mode A:02 and PAUS are displayed alternately. If you have to open the door, wait until the temperature has dropped slightly or pump out the water (select e.g. Spin or Drain ).
■ Drying programme: If you have to open the door, wait until the temperature has dropped slightly or set the drying programme to 15 min to cool down the laundry.
If A:02 is frequently displayed at the end of the drying programme:
■ Clean the air filter. ~ Page 30
■ Run the Fluff Clean (cold) programme without laundry.
A:03
Door cannot be locked/unlocked due to high temperature. Leave the washer dryer switched on for about 1 min. The washer dryer can then be locked/ unlocked again.
hot
The door cannot be opened after the drying programme due to the high temperature. The cooling process continues until the display disappears, after which the door can be opened.
■ Flashes (no water supply): Tap turned on? Water inlet filter blocked? Clean the water inlet filter. ~ Page 29 Water hose kinked or blocked?
■ Lights up (low water pressure): For information only. This will not affect the programme progress. The programme duration is extended.
E:18
Drain pump blocked; clean the drain pump. Clean the drainage hose on the siphon.
■ Hold down button (Drying) for 3 seconds to delete the display.
■ Clean the air filter. ~ Page 30
■ Run the Fluff Clean (cold) programme without laundry.
LO kg, HI kg
Laundry amount information. On when drying phase finished. LO kg: Signals a small load for drying, HI kg: Signals a very high load for drying.
Other displays
Turn the programme selector to Off. The appliance is switched off. Wait 5 s and switch on again. If the display is indicated again, call customer service.
Faults and what to do about them
Faults
Cause/Remedy
Water is running out.
■ Correctly attach/replace drainage hose.
■ Tighten screw-fitting on the supply hose.
Water not flowing in. Detergent not dispensed.
■ Start/Reload not selected?
■ Tap not open?
■ Filter blocked? Clean the filter~ Page 29
■ Supply hose kinked or jammed?
The washing machine door cannot be opened.
■ Safety function active. Stop programme?
■ (Rinse stop = without final drain/spin) selected?
■ Can be opened with emergency lock release only? ~ Page 30
■ Childproof lock active? Deactivate.
Programme does not start.
■ Start/Reload or (Finish in) selected?
■ Door closed?
■ Childproof lock active? Deactivate.
Detergent solution is not drained.
■ (Rinse stop = without final drain/spin) selected?
■ Clean the drain pump. ~ Page 28
■ Clean outlet pipe and/or drainage hose.
Water not visible in the drum.
Not a fault – water below the visible area.
Spin result not satisfactory. Laundry wet/too damp.
■ Not a fault – unbalanced load detection system has stopped the spin cycle, washing unevenly distributed. Distribute small and large items of washing in the drum.
■ Too low speed selected?
Spin cycle activated several times.
Not a fault – unbalanced load detection system adjusts imbalance.
Residual water in the dispenser for care product.
■ Not a fault – effect of the care product not impaired.
■ If required, remove the insert. Clean the detergent drawer and re-insert it.
Compartment is not rinsed out completely.
Remove the insert. Clean the detergent drawer and reinsert it.
Odour formation in the washer dryer.
■ Run the Fluff Clean 90°C programme without laundry.
■ Use standard detergent.
Status display flashes. Foam may come out of the detergent drawer.
Too much detergent used?
■ Mix 1 tablespoon of fabric softener with ½ litre of water and pour into dispenser II. (Not for outdoor, sports and down-filled textiles!)
■ Reduce detergent dosage for the next wash cycle.
■ Use commercially available low foam detergent and care products which are suitable for washer dryers.
Excessive noise, vibrations and “wandering” during the spin cycle.
■ Appliance aligned? Align the appliance. ~ Page 42
■ Select Rinse or brush items when the laundry is dry.
Spin noise during the drying phase.
This is an innovative process known as thermal spinning used to reduce energy consumption during the drying phase.
Different coloured fluff from the previous drying cycle is deposited on the laundry during the subsequent wash cycle.
Run the Fluff Clean (cold) programme without laundry to remove fluff which has collected in the washer drum during the drying phase.
Water inlet noise during the drying phase, the tap symbol flashes during the drying phase.
The washer dryer runs a self-cleaning cycle to remove fluff which was deposited by the laundry during the drying phase. This requires a little water. Therefore, the tap must be turned on even during the drying phase.
Drying duration extended.
■ According to the air cooling principle, a higher ambient temperature will result in poor drying performance, so the drying time will be extended. Ensure good ventilation to allow surplus heat to escape.
■ Air filter blocked? Clean the air filter~ Page 30
■ Run the Fluff Clean (cold) programme to remove fluff which has collected in the washer drum during the drying phase.
Drying programme does not start.
■ Drying programme not selected? Overview of programmes
■ Door not closed properly?
■ Pump blocked? Clean the drain pump~ Page 28
The drying result is not satisfactory (laundry is not dry enough).
■ Excessively high ambient temperature (above 30 °C) or inadequate ventilation in the room in which the washer dryer is situated. Ensure adequate ventilation to allow surplus heat to escape.
■ The laundry has not been spun well enough before drying. Always set the highest selectable spin speed for the particular washing programme.
■ Washer dryer overloaded: Observe the recommendations for the maximum load in the programme table and on the load display. Do not overload the washer dryer, as the maximum load for the drying phase is less than the maximum load for the wash cycle. Unload the washer dryer after washing with the maximum load and divide the laundry into two drying cycles.
■ The power supply voltage is too low (below 200 V) – provide a suitable power supply.
■ Air filter blocked? Clean the air filter~ Page 30
■ Thick multilayered textiles or textiles with thick fillings dry easily on the surface, but not inside. This equalisation process may take longer. For these types of textiles, select the timed drying programmes.
When the door is opened, you will notice that a small amount of water drips onto the dried laundry.
■ The drying time is reduced for a smaller load. Some residual moisture may remain in the dryer system. If the door is opened quickly, a suction effect is generated which causes the moisture to drip out of the dryer system.
■ Open the door slowly. Avoid wrenching the door open.
If a fault cannot be rectified (switching the machine on and off) or a repair is required:
■ Set the programme selector to Off and pull out the mains plug.

-843628.png)
-252638.png) Open the washer dryer door.
Open the washer dryer door. -288868.png)
-125972.png)
-897814.png) End of the programme.
End of the programme. -177588.png)
-24468.png) (Finish in) time,
(Finish in) time, -287763.png) (Spin speed) and
(Spin speed) and -604307.png) (Drying) for changing default settings ~ Page 24
(Drying) for changing default settings ~ Page 24-183104.png) (speedPerfect),
(speedPerfect), -55563.png) (ecoPerfect),
(ecoPerfect), -548387.png) (Rinse plus) and
(Rinse plus) and -16921.png) (Less iron) for additional functions ~ Page 26
(Less iron) for additional functions ~ Page 26-794234.png) button to start, interrupt (e.g. reload the laundry) and cancel the programme ~ Page 18
button to start, interrupt (e.g. reload the laundry) and cancel the programme ~ Page 18-962335.png)
-404544.png)
-896243.png)
-867660.png)
-241552.png) Suitable for normal washing process;
Suitable for normal washing process;-21763.png) e.g. Cottons programme N A gentle washing process is required;
e.g. Cottons programme N A gentle washing process is required;-776301.png) e.g. Easy-Care programme O An especially gentle washing process is required; e.g. Delicates/Silk programme
e.g. Easy-Care programme O An especially gentle washing process is required; e.g. Delicates/Silk programme-150105.png) Suitable for washing by hand; e.g.
Suitable for washing by hand; e.g.-217188.png) Do not machine wash.
Do not machine wash.-194342.png)
-897928.png) = Dry at normal temperature (Intensive Dry)
= Dry at normal temperature (Intensive Dry)-27983.png) = Dry at low temperature (Gentle Dry)
= Dry at low temperature (Gentle Dry)-580082.png) = care symbol “Do not dry”
= care symbol “Do not dry” programme. Before washing/drying for the first time
-370696.png)
-244217.png)
-659051.png)
-671424.png)
-19348.png)
-661737.png)
-42353.png)
-741631.png)
-451386.png) Softener, starch. Do not exceed the maximum load.
Softener, starch. Do not exceed the maximum load.-928435.png)
-258066.png)
-839208.png)
-898551.png)
-350226.png) programme is recommended.
programme is recommended.-680492.png) (Rinse plus)
(Rinse plus)-630769.png)
-290234.png)
-897999.png)
-916589.png)
-9342.png) +
+-811295.png)
-253575.png)
-914257.png)
-527801.png)
-150863.png)
-22267.png)
-641234.png)
-141983.png)
-555354.png) (cold) programme without laundry.
(cold) programme without laundry.-69968.png)
-96859.png)
-393647.png) 90°C programme without laundry.
90°C programme without laundry.-788321.png) flashes. Foam may come out of the detergent drawer.
flashes. Foam may come out of the detergent drawer.