Your microwave oven has an inbuilt clock. When power is supplied, “:0”, “88:88” or “12:00” is automatically displayed on the display.
Please set the current time. The time can be displayed in either the 24-hour or 12-hour notation. You must set the clock:
When you first install your microwave oven
After a power failure
Do not forget to reset the clock when you switch to and from summer and winter time.
Auto energy saving function
If you do not select any function when the appliance is in the middle of setting or operating with temporary stop condition, the function is canceled and the clock will be displayed after 25 minutes.
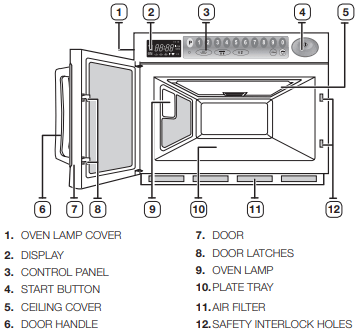
Oven Lamp will be turned off after 5 minutes with door open condition.
1. To display the time in the...
Then press ‘+20sec’
24-hour notation
Once
12-hour notation
Twice
2. Use NUMBER PADS button to enter the current time. You must press at least three numbers to set the clock. If the current time is 5:00 enter, 5,0,0.
3. When the right time is displayed, press the START BUTTON to start the clock. The clock sets by itself within 10 seconds.
If you don’t want to setting the time, press the CANCEL PAD before starting your cooking.
If you want to change or reset the time setting, plug your oven again.
COOKING/REHEATING
One-stage cooking
Make sure the oven is plugged into a properly earthed electrical outlet and “ON” appears in the display window.
Open the door(The oven lamp will be turned on.).
Put the food into a suitable container, place it in the centre of the oven and then close the door securely (The oven lamp will go off.).
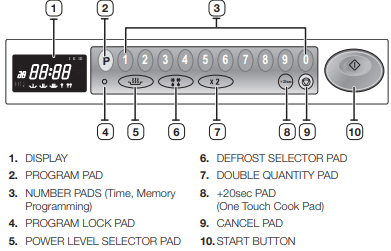
1. Select the desired power level by pressing the Power Level Selector pad.
Result: The selected power level will be displayed in the display window.
2. Set the desired heating time by pressing the NUMBER pads.
Result : The selected time is displayed in the display window.
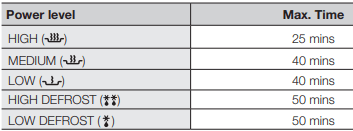
The maximum time according to each cooking power level can be referred to in the title “Power Levels ans Time Variations” on page 7. The NUMBER pads will not operate or respond when you press a cooking time exceeding the maximum value. It is not possible to set a cooking time for longer than the maximum time allowed on the chosen program. It is advisable to press CANCEL and to enter a new power level and cooking time.
3. Press the button.
Result: The oven lamp and cooling fan will be turned on. Heating will start. The time on digital display will count down.
When all time is elapsed, the end of cycle Beep Tone will sound 4 times and all heating will stop.
The oven lamp will go off. For 1 min, the cooling fan will keep working in order to cool down the interior parts. During the time, the fan will not stop even when you open the door. 1 min later it will stop. Food may be removed from oven whilst the fan is still running.
During the time, the fan will not stop even when you open the door. 1 min later it will stop and “ON” appears again. Food may be removed from oven whilst the fan is still running.
4. Open the door and take the food out. Close the door. The oven lamp will go off.
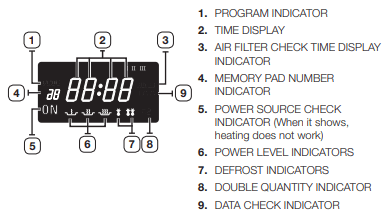
Whilst in a heating cycle, one press on () pad stops the oven. At this time, the Power Check Indicator “ON” starts blinking and goes off when the () pad or () button is pressed again.
You can restart it by pressing the () button or a second press on () pad will cancel the selected program. While NOT in a heating cycle, one tap on () pad cancels the selected program.
You can press +20sec pad one or more times in order to add the cooking time by 20 seconds. But you can not exceed the maximum time per power level allowed for power level selected.
When you first plug in the power cord, the oven beeps once and all the indicators show for 5 sec in the display window.
When heating cycle is completed and you open the door, the oven lamp automatically turns on and goes off 5 min later.
When you open the door whilst in a heating cycle, the oven stops operating and the oven lamp automatically turns on for 5 min and goes off 5 min later. If you leave the oven door open for more than 1 min, the oven beeps once every minute and after 5 min the power source check indicator ‘ON’ appears in the display window.
Multi-stage cooking
1. Select the desired power level by pressing the POWER LEVEL Selector pad or DEFROST pad.
Result : The selected power level will be displayed in the display window.
2. Set the desired heating time by pressing the NUMBER pads.
Result: The selected time is displayed in the display window.
The maximum time according to each cooking power level can be referred to in the title “Power Levels ans Time Variations” on page 7. The NUMBER pads will not operate or respond when you press a cooking time exceeding the maximum value. It is not possible to set a cooking time for longer than the maximum time allowed on the chosen program. It is advisable to press CANCEL and to enter a new power level and cooking time.
3. Repeat steps 1 and 2 for II or III stage memory programming.
4. Press the button.
Result : The oven lamp and cooling fan will be turned on. The oven will automatically start heating according to pre-programed cooking time and power level.(I stage g II stage g III stage). The time on digital display will count down.
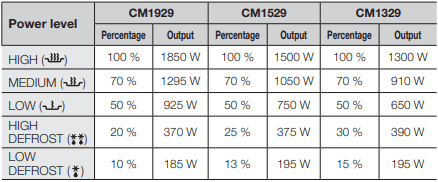
POWER LEVELS AND TIME VARIATIONS
The power level function enables you to adapt the amount of energy dissipated and thus the time required to cook or reheat your food, according to its type and quantity. You can choose between the power levels below.
The cooking times given in recipes and in this booklet correspond to the specific power level indicated.
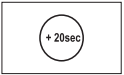
USING +20SEC PAD
This is a ONE TOUCH COOK pad.
By touching the pad once, you can start heating instantly.
You can increase the cooking time by pressing the +20sec pad while heating is being done.
A cooking time increases by 20 seconds at each press on +20sec pad.
But it can not exceed the maximum time.
Like traditional cooking, you may find that, depending on the food’s characteristics or your tastes, you have to adjust the cooking times slightly.
You can:
Check how cooking is progressing at any time simply by
opening the door
Close the door
Increase the remaining cooking time.
Before operating the oven, times can be increased/ decreased using either the time pads or +20sec button During the operating, time may only be added by using the +20sec button.
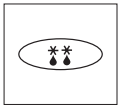
USING THE DEFROST FEATURE
The Defrost feature enables you to defrost meat, poultry or fish.
Only use containers that are microwave-safe.
Open the door. Place the frozen food in the centre of the plate tray. Close the door
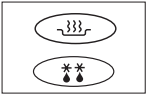
1. Press the Defrost selector pad to set DEFROST HIGH () or DEFROST LOW () as you wish.
Result : The DEFROST indicator appears in the display.
2. Press the NUMBER pads to set the defrosting time. (Max. 50 min)
3. Press the button.
Result : Defrosting begins.
It is not possible to set a defrosting time for longer than 50min. The defrost indicator will flash and it is advisable to press CANCEL () and enter a new defrost level and time.
When the oven was operating for longer than 25 min under Defrosting cycle, you can NOT change the power level from Defrosting to Heating(Cooking/Reheating) mode.
One-stage
1. Hold down PROGRAM LOCK (O) and then press PROGRAM (P) pad. Hold together for 2 sec.
Be sure to press the pads firmly.
Result: PROG indicator appears in the digital display.
2. Press appropriate NUMBER pad for the desired memory number
Result: Selected memory program code appears below the PROGRAM indicator.
3. Select power level by pressing the POWER LEVEL pad or DEFROST pad.
Result : Default power level HIGH appears in the display at first press of the POWER LEVEL pad.
Press the POWER LEVEL pad or DEFROST pad one or more times until you get the desired power level.
4. Press NUMBER pads to set the cooking time.
The maximum time according to each cooking power level can be referred to in the title “Power Levels and Time Variations” on page 7. The NUMBER pads will not operate or respond when you press a cooking time exceeding the maximum value.
It is not possible to set a cooking time for longer than the maximum time allowed on the chosen program. It is advisable to press CANCEL and to enter a new power level and cooking time.
5. Hold down PROGRAM LOCK (O) and then press PROGRAM (P) pad. Hold together for 2 sec once again.
Result : PROG indicator and memory number indicator blink 3 times in the digital display with a beep sound. And then the display goes blank.
Caution: Be sure to press the pads firmly in the right position.
6. When you want to program more, repeat the procedures above again.
Memory programs are available up to 30 items.
Make sure the unit is properly programmed.
After programming is finished, all you have to do for memory cooking is to press the NUMBER pad. Then the selected memory program automatically starts cooking.
DOUBLE QUANTITY PAD PROGRAMMING
1. Hold down () and then press () pad. Hold together for 2 seconds.
2. Select desired program code by using NUMBER pads.
3. Press NUMBER pads to set the magnification factor within the range from 1.00 to 9.99.
Default factor is 1.65 preset from the manufacturer for increasing the cooking time.
Make sure that you set a correct factor between 1.00 and 9.99 for each memory code number.
4. Press () button.
Press pad to exit the programming mode.
Though you can successfully set a double quantity factor whose setting might result in excess of the maximum time allowed for each power level, the oven does not operate exceeding the maximum time.
ERROR CODES
Error Items
Code
Error Beep
Cause
Remedy
Power frequency Error (50/60Hz)
E1
-
Power frequency is other than 50 Hz.
Unplug the power cord plug and check if the power frequency is 50 Hz.
Plug the power cord in 50 Hz power source and see If “E1” appears. If the error code is displayed again even after the correct power source is provided, contact the nearest service centre.
HVT-I Power Error
E41
One long beep for 2 sec
The circuitry inside the oven is not working correctly
Unplug the power cord and wait for 10 seconds.
Plug the power cord in again and check if the error code “E41” appears again. If the symptom persists, contact the nearest service centre.
HVT-II Power Error
E42
One long beep for 2 sec
The circuitry inside the oven is not working correctly
Unplug the power cord and wait for 10 seconds.
Plug the power cord in again and check if the error code “E42” appears again. If the symptom persists, contact the nearest service centre.
EEPROM Error
E5
One long beep for 2 sec
Memory IC (EEPROM IC) is not working correctly. In this case, other features except for memory function work properly. (You can operate the oven manually)
Press CANCEL pad one or more times and try to start a memory heating. If the error code “E5” persists, contact your nearest service centre.
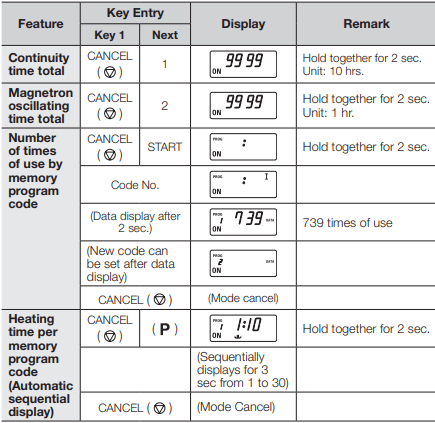
HIDDEN KEYS
Note: Press Key 1 and then the next one. Hold for 2 secs.
CARE OF YOUR MICROWAVE OVEN
Cleaning the Microwave Oven
1. Unplug the oven from the electrical socket before cleaning.
2. Clean the inside of the oven. Wipe up all spills with a damp cloth. Kitchen detergent solution may be used if the oven gets too dirty. Do not use harsh detergents or abrasives.
If food remnant or spilled liquids stick to the oven walls, or between door seal and door surface, they will absorb microwaves possibly resulting in arcing or sparks.
3. Clean the outside of the oven with soap and water, then dry with a soft cloth.
Caution: Make sure that water does not get into the back ventilation or control panel opening.
4. When you clean the window of the door, be sure to use a soft cloth after washing with very mild soap and water. Do not use window cleaner as the front door can be scratched by harsh soap or cleaners.
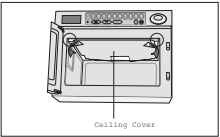
CLEANING THE CEILING COVER
1. Hold side stoppers of ceiling cover with both hands and pull them in and down. Then take the ceiling cover out of the oven cavity.
2. Rinse ceiling cover in soapy water or Food Sanitizer Solution.
3. Be sure to replace the ceiling cover before using the oven.
CAUTION : Ceiling cover must be in place securely when you use the oven. When you removed the Ceiling Cover for the purpose of cleaning, be sure to be extremely careful about the exposed inside components on the top of the oven cavity. If any of them are deformed, abnormal symptom can happen such as arcing or sparks during operation. In case of such problem, contact the nearest after-sales service centre.
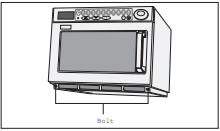
CLEANING THE AIR FILTER
Clean the Air Filter regularly according to the following instructions. The oven may have problems when the Air Filter becomes clogged with dust.
1. Remove the bolt at both ends of the Air Filter.
2. Lift the Air Filter off the post carefully.
3. Wash this filter in warm soapy water.
4. Be sure to replace the Air Filter before using the oven.
If the Air Filter becomes clogged with debris, this will cause an overheating problem on the oven.
If the want to change the air filter clean time, refer to “Programming Air Filter Clean Time” in page 15.
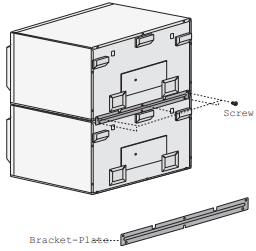
INSTALLATION INSTRUCTIONS FOR STACKING
Important
Disconnect the power cord from the wall socket before attempting installation.
For stacking installation, you must use the “bracket plate” which is enclosed with this unit.
The maximum stacking height is two units.
Stacking the two units is limited to the following models.
CAUTION: Be sure the oven cavity is empty.
Installation
Stack two units together.
Remove 6 screws as shown in the figure.
Place the Bracket-plate to join the two units.
Attach and tighten 6 screws as shown in the figure here.
Ensure the top oven is at a safe and workable height.
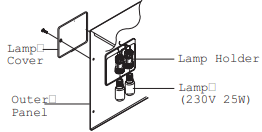
REPLACEMENT OF LAMP
Important
1. Remove a screw securing the lamp cover.
You don’t need to remove outer panel to replace lamp.
2. Remove the lamp by rotating it clockwise.
3. Replace with a new lamp by rotating it counter-clockwise.
CLEANING YOUR MICROWAVE OVEN
The following parts of your microwave oven should be cleaned regularly to prevent grease and food particles from building up:
Inside and outside surfaces
Door and door seals
Plate tray
ALWAYS ensure that the door seals are clean and the door closes properly.
Failure to maintain the oven in a clean condition could lead to deterioration of the surface that could adversely affect the of the appliance and possibly result in a hazardous situation.
1. Clean the outside surfaces with a soft cloth and warm, soapy water. Rinse and dry.
2. Remove any splashes or stains on the inside surfaces or on the roller ring with a soapy cloth. Rinse and dry.
3. To loosen hardened food particles and remove smells, place a cup of diluted lemon juice on the turntable and heat for ten minutes at maximum power.
DO NOT spill water in the vents.
NEVER use any abrasive products or chemical solvents.
Take particular care when cleaning the door seals to ensure that no particles:
Accumulate
Prevent the door from closing correctly
Clean the microwave oven cavity right after each use with a mild detergent solution, but let the microwave oven cool down before cleaning in order to avoid injury
 Do not forget to reset the clock when you switch to and from summer and winter time.


 button.

 ) pad stops the oven. At this time, the Power Check Indicator “ON” starts blinking and goes off when the (
 ) button is pressed again.

 ) or DEFROST LOW (
 ) as you wish.


 ) and enter a new defrost level and time.
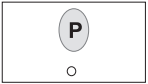


 ) pad. Hold together for 2 seconds.