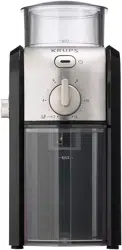
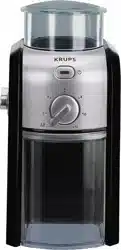
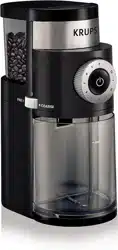
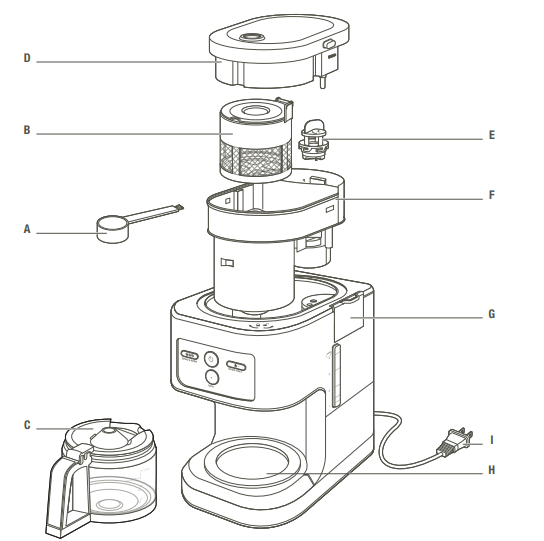
A SCOOP WITH BRUSH B FILTER C CARAFE D TOP COVER E UPPER BURR (GRINDER) F GRIND N BREW BASKET G WATER TANK COVER H KEEP WARM PLATE I POWERCORD SET
CLEAN THE COFFEE MAKER BEFORE FIRST USE
Before using your coffee maker for the first time, run a brew cycle without coffee to rinse.
Fill the water tank with water.
Place the carafe on the keep warm plate.
Start the cycle by pushing the “ON” button. The indicator light turns on. Then push to run hot water through the coffee maker. Push button to turn unit off.
BREWING COFFEE
ADD WATER AND COFFEE
1. Fill the water tank with cold water to the desired water level. (fig. 1)
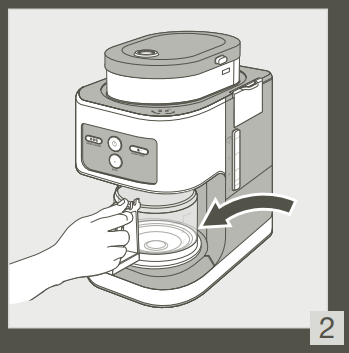
2. Place your carafe in the center of the heating plate. (fig.2) Note: Do not exceed the 4-cup line when brewing into carafe. Doing so could cause carafe to overflow. There must be a minimum of 2 cups of water in the water tank to begin the brew cycle.
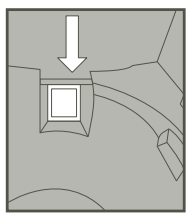
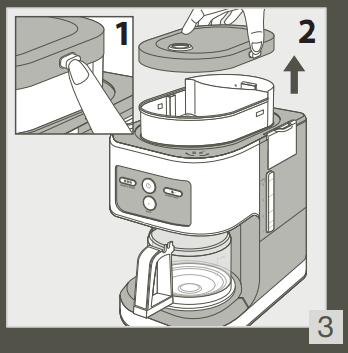
3. Open the top cover by pressing the release button and lifting. (fig.3)
FOR WHOLE BEAN COFFEE:
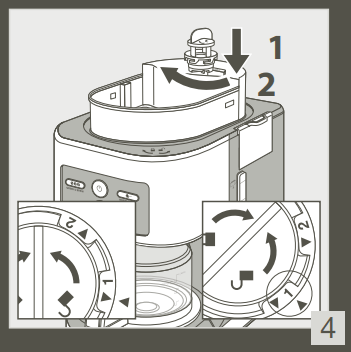
4. Changing Grind Size - Adjust the fineness of the ground coffee by aligning the removable upper burr to the markings “1” or “2”. The grind setting is useful when you change coffee type or if you would like a stronger or weaker coffee. (fig.4) "1" for fine grinding (stronger coffee), "2" for coarse grinding (lighter coffee).
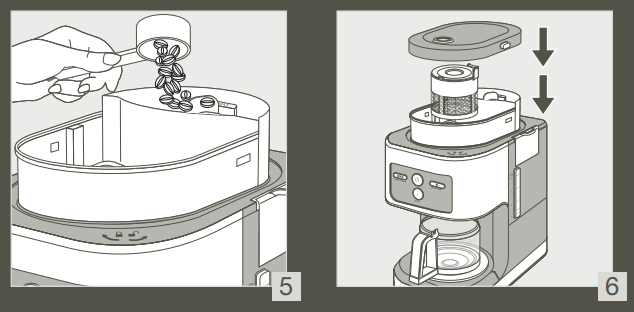
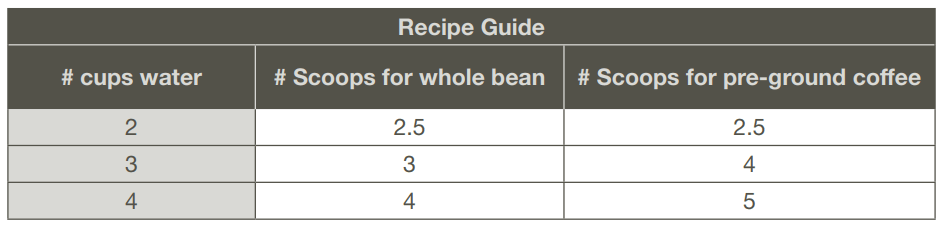
Add the desired amount of whole coffee beans to the whole bean container, (fig.5) then replace the top cover. (fig.6) We recommend using the provided scoop to measure coffee. Refer to the recipe guide for additional customization information.
Note: Provided scoop can be stored by inserting into the slot on the back left of the coffee maker Note: It’s normal to have few coffee beans left in the grind & brew basket after finishing every grinding cycle.
FOR PRE-GROUND COFFEE:
5. Add the desired amount of ground coffee directly into the filter, then replace the top cover. We recommend using the provided scoop to measure coffee. Refer to the recipe guide below for additional customization information:
Use the provided KRUPS scoop. (one scoop is ~ 7-9 grams coffee)
One coffee cup = 5 fl oz. or 150ml brewed coffee.
For stronger or lighter flavor, +/- scoops of coffee.
The cup markings on the water tank correlate to the water lines on the carafe and hold a greater amount of water than the corresponding coffee lines on the carafe as some water is absorbed by the coffee grinds during the brewing process.
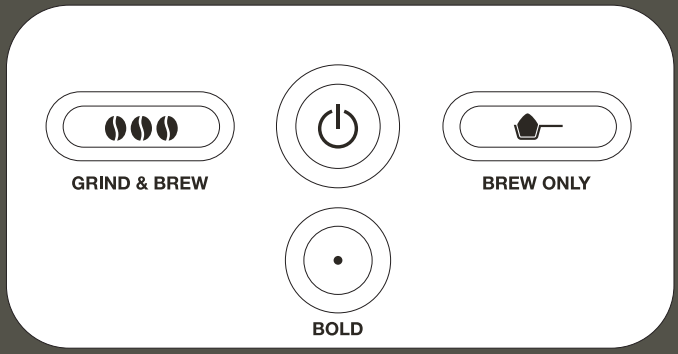
The bold button can be selected anytime while brewing, its light will go on when activated. The BOLD setting will produce stronger coffee.
TO BREW COFFEE INTO YOUR CARAFE
WARNING:
During the 30mins keep warm period, DO NOT pour water into water tank because the heating plate is still on. You can turn off your coffee maker at any time by pressing the button to turn off the heater completely. Wait several minutes after the machine stops before brewing next coffee.
Important
It is normal for there to be a small amount of coffee grounds in your cup. This is due to using a stainless steel permanent filter.
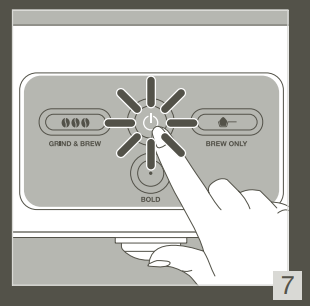
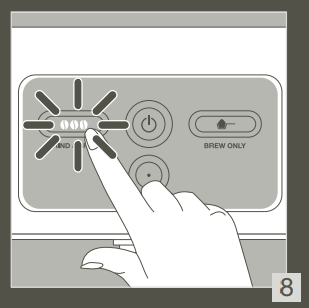
Press the button to turn on the coffee maker. (fig.7) When the appliance is ON, and will flash for user selection.
1. Select to brew whole coffee beans or Press to brew with ground coffee. Your infused coffee flows into your carafe. (fig. 8)
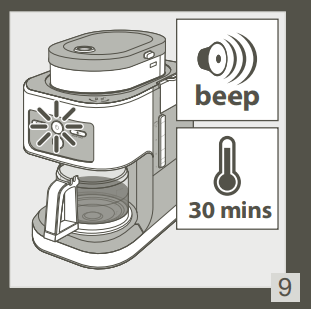
2. When brew cycle is complete, there is a beep sound, the appliance will go to keep warm mode for 30 minutes and will automatically shut off. During KEEP WARM mode, ON/ OFF light will remain ON until the KEEP WARM MODE ends. (fig.9)
Note: We recommend you cool down the appliance for 20 minutes after every grinding cycle
5. To manually turn off your coffee maker, press the button.
AUTOMATIC OFF
To save energy, your coffee maker will turn itself off automatically about 30 minutes after the end of the coffee brewing cycle (more precisely, about 30 minutes after there is no more water in the tank). The indicator light for the on/off will remain on until the coffee maker turns off. Over this 30-minute period, your coffee is kept warm and at the proper temperature.
IMPORTANT: When keeping warm, the heating plate is on and at a high temperature.
CLEANING THE COFFEE MAKER BETWEEN BREW CYCLES
1. Discard used ground coffee from the filter. Rinse the filter basket and filter.
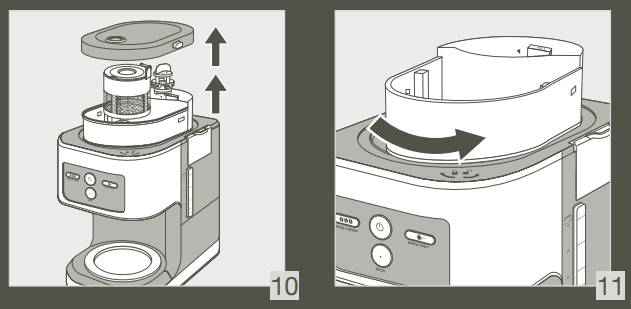
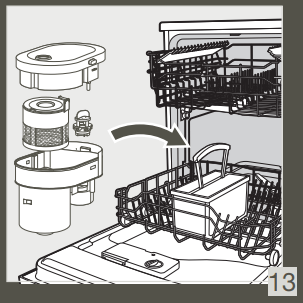
2. Wash grind & brew basket, top cover, removable flat burr, and filter in warm, soapy water and dry thoroughly. You may also wash all removable parts in a dishwasher. (fig.10-13)
Note: For safety, the coffee maker turns off when the lid is removed. As a result, the keep warm plate will be turned off at this point.
FULL CLEANING
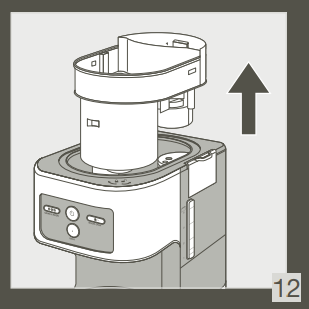
When needed, this coffee maker is designed to allow all parts in contact with coffee to be removed. To remove parts for cleaning:
Press and hold the coffee machine lid to remove.
Remove stainless steel permanent coffee filter after it has cooled.
Turn upper burr of the grinder counter clock-wise to unlock and remove.
Turn the brewing chamber counter clock-wise to dislodge and remove.
Handwash all parts with warm water or place in upper rack of dishwasher machine.
Note, we recommend thoroughly remove any build-up of coffee grinds that have formed around the grinding burrs and coffee grinds chute after each use.
WARNING:
Do not clean the appliance when it is hot.
Clean it with a damp cloth.
Never immerse the appliance, its power cord, or its socket in water or any other liquid.
DESCALING
Descale your coffee maker about every 40 cycles.
You can use:
Either a descaling packet and follow manufacturer instruction, or:
2 large cups of white vinegar.
Pour the solution into the water tank (without coffee).
Press "Brew only" button, start the brewing cycle (without coffee).
Let the solution of one cup pour into the carafe, then turn the coffee maker off.
Leave the solution still for an hour.
Restart the brewing to complete the cycle.
To rinse the machine, run 2 cycles with water but no coffee.
Repeat the operation if necessary.
The guarantee excludes coffee makers that do not work or work poorly due to lack of descaling.
Note: when the coffee cycle gets longer, it’s time to descale.
TROUBLESHOOTING
Questions
Likely causes
Corrective actions
I poured water into the tank and immediately water flowed through the carafe.
The machine is still on KEEP WARM MODE.
Turn off machine by pushing and unplug. Let machine cool for 10min.
The coffee grinder is having trouble grinding.
The shoot that allows grounds to flow from the grinder to the filter basket is clogged.
Remove the grind and brew basket and upper burr to clean the area around and under the lower burr.
IMPORTANT SAFEGUARDS
When using electrical appliances, basic safety precautions should always be followed to reduce the risk of fire, electric shock, and/or injury to persons including the following:
Read all instructions before using.
Do not touch hot surfaces. Use handles or knobs.
To protect against electric shock do not immerse cord, plugs or coffee maker in water or other liquid. Close supervision is necessary when any appliance is used by or near children.
Unplug from outlet when the appliance is not in use, and before cleaning. Allow to cool before putting on or taking off parts, and before cleaning the appliance.
Do not operate any appliance with a damaged cord or plug or after the appliance malfunctions, or has been damaged in any manner. Return the appliance to the nearest authorized service facility for examination, repair or adjustment.
The use of attachments not recommended or sold by the manufacturer may cause fire, electric shock or injury.
Do not use outdoors.
Do not let cord hang over edge of table or counter, or touch hot surfaces.
Do not place on or near a hot gas or electric burner, or in a heated oven.
To disconnect, turn any control to “off”, then remove plug from wall outlet.
Do not use the appliance for other than intended use.
The coffee carafe is designed for use with this appliance. It must never be used on a range top.
Do not place a hot carafe on a wet or cold surface.
Do not use a cracked carafe or a carafe having a loose or weakened handle.
Do not clean carafe with cleansers, steel wool pads, or other abrasive materials.
Scalding may occur if the lid is removed during the brewing cycles.
Avoid contacting moving parts.
Check hopper for presence of foreign objects before using.
This appliance has a polarized plug (one blade is wider than the other). To reduce the risk of electric shock, this plug is intended to fit into a polarized outlet only one way. If the plug does not fit fully into the outlet, reverse the plug. If it still does not fit, contact a qualified electrician. Do not attempt to modify the plug in any way.
SAVE THESE INSTRUCTIONS
SHORT CORD INSTRUCTIONS
A. A short power cord or a detachable power cord is provided to reduce the risks of becoming entangled in or tripping over a longer cord accidentally.
B. Longer detachable power cords or extension cords are available and may be used if care is exercised in their use.
C. If a long detachable power cord or an extension cord is used:
The marked electrical rating of the detachable power cord or extension cord should be at least as great as the electrical rating of the appliance.
If the appliance is of the grounded type, the extension cord should be a grounding type 3-wire cord.
The longer cord should be arranged so that it will not drape over the counter where it can be pulled by children or tripped over accidentally. The appliance may have a polarized plug (one blade is wider than the other). To reduce the risk of electric shock, this plug is intended to fit into a polarized outlet only one way. If the plug does not fit fully into the outlet, reverse the plug. If it still does not fit, contact a qualified electrician. Do not attempt to modify the plug in anyway.
ADDITIONAL SAFETY INSTRUCTIONS
Your appliance is designed for domestic use only.
It is not intended to be used in the following applications, and the guarantee will not apply for: staff kitchen areas in shops, offices and other working environments, farm houses, in hotels, motels and other residential type environments, and bed and breakfast type environments.
This appliance is not designed to be used by children and people without knowledge or experience with the product, unless they are supervised or given prior instructions concerning the use of the appliance by someone responsible for their safety.
Burns can occur from touching hot plate, hot water or steam. Exercise caution.
All machines are subject to stringent quality control. Practical tests using machines taken at random are conducted and this may explain any slight marks or coffee residue showing prior to use.
Do not pour liquids other than water and descaling solutions specified in this manual into the water tank.
Protect the machine against humidity and freezing.
Do not pour water into the appliance if it is still hot.
Always place your coffee maker on a flat, stable, heat resistant work surface away from water splashes and any external sources of heat.
Never place your carafe or your insulated pot in a microwave oven, in a dishwasher or on a stove top.
Do not use the carafe without the lid.
In the interest of improving products, KRUPS reserves the right to change specifications without prior notice.
This appliance is not intended for use by persons (including children) with reduced physical, sensory or mental capabilities, or lack of experience and knowledge, unless they have been given supervision or instruction concerning use of the appliance by a person responsible for their safety.
Children should be supervised to ensure that they do not play with the appliance.
The coffee maker shall not be placed in a cabinet when in use.
Cleaning and user maintenance shall not be made by children without supervision.
Q: Unfortunately, after having this coffee maker for little more than a year, I can no longer use it. The left button on the top black lid will no longer release. It is pushed all the way in and will not loosen. I can pry up the lid a little bit from the right but not from the left. Consequently, I can no longer use this coffee maker at all. Doesn't seem right since it really had very light usage over the last year. I sent an email to the manufacturer but it looks like the contact form on their website isn't working correctly and I'm not at all sure the their form went through and was correctly submitted. Reply
Q: Why all of a sudden the water will not brew I used whole beans and it been working great. Today I made it and the water will not go. I check the beans grind and it did grind . So I put the brew on only and it only made half the amount of coffee. What is wrong. Thanks so much I love the machine Reply
Q: What are the dimensions of the above model? Reply
 button. The indicator light turns on. Then push
  to run hot water through the coffee maker. Push
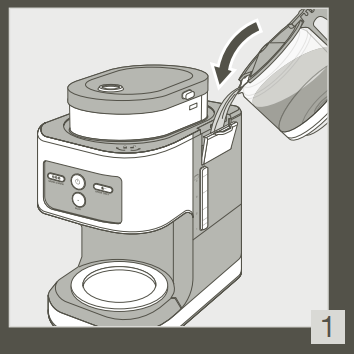

 button can be selected anytime while brewing, its light will go on when activated. The BOLD setting will produce stronger coffee.
 and
and