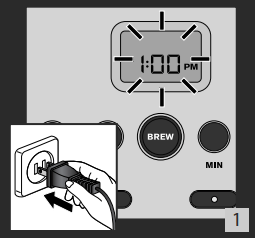
1. - When you plug in the coffee maker for the first time, "1:00 pm" will start flashing on the display. Fig. 1. Set the time by pressing the H button (n) to set the hour and the MIN button (o) to set the minutes. The time will appear on the display. It will be automatically set after 5 seconds or by pressing the BREW button (l).
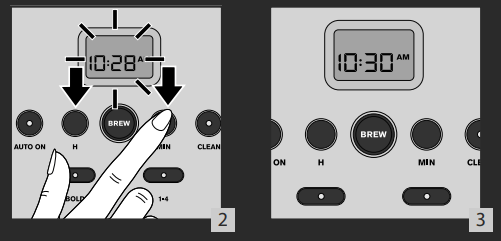
2. - You can also set or change the time at any other time. Set the time by pressing the H button (n) to set the hour and the MIN button (o) to set the minutes. The time will appear on the display. Figs. 2and3. It will be automatically set after 5 seconds or by pressing the BREW button.
NB: Your clock is now set and will continue to show the time, even when your machine is in standby mode. If the machine is unplugged or there is a power failure, the clock will revert to 1:00 pm. Repeat the steps above to reset the clock.
BEFORE FIRST USE
Remove stickers from your coffee maker.
Before using your coffee maker for the first time, run a cycle without coffee to rinse the circuit. Fill the water tank to the maximum level and start a cycle by pressing the BREW button (l).
IMPORTANT : Your machine has been designed to work with cold or water at room temperature only
MAKING COFFEE
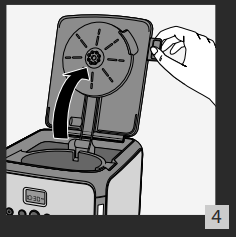
Open the coffee maker lid (b). Fig. 4.
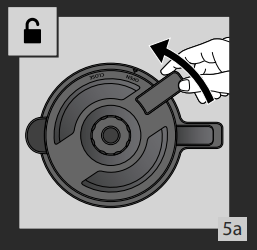
Open the lid of the thermal carafe by twisting the lid so that the arrow and the word 'OPEN' are aligned. Fig. 5a.
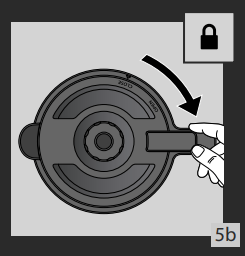
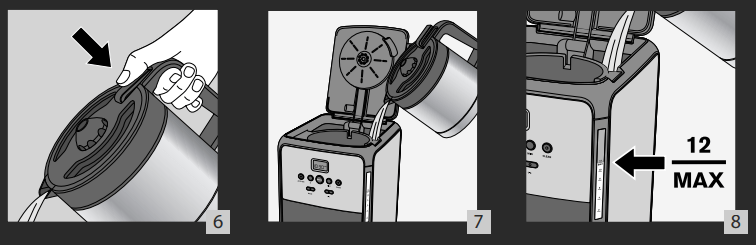
Fill the thermal carafe (g) with cold or warm water and close the lid by aligning the arrow with the word 'OPEN', then by twisting the lid so the arrow is aligned with the word 'CLOSE'. Fig. 5b. Pour water into the water reservoir by pressing the lever on the lid of the thermal carafe so the water starts flowing. Figs 6 and 7. The number of cups is shown by the water level indicator. Do not exceed 12 cups. Fig. 8.
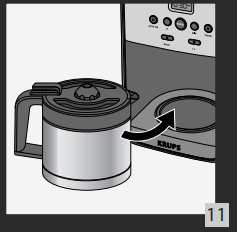
Place the thermal carafe (g) with its closed lid onto the base (i) making sure that it is properly positioned so as to activate the coffee pouring mechanism. Fig. 11.
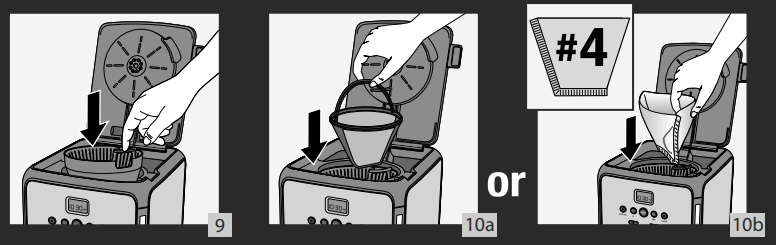
Make sure that the filter holder (j) is inserted. Fig. 9. Insert the permanent filter (k) Fig. 10a or a #4 paper filter into the filter holder (j). If using a paper filter, make sure it is fully opened and properly positioned in the filter holder. Fig. 10b.
We recommend removing the filter holder with the filter before adding the ground coffee. If you accidentally pour ground coffee into the water tank, do not start the cycle. Clean the tank, otherwise the coffee may block the water circuit.
Add 1 KRUPS spoon (v) of ground coffee per cup. Do not exceed 12 spoons (2 ounces). Fig. 12.
Close the lid (b).
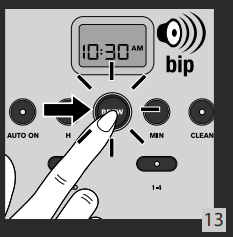
Press the BREW button (l). The BREW button light will come on to show that the coffee maker has started the brew cycle. The machine will beep once. Fig. 13.
At the end, your machine will beep 3 times and the BREW button (l) will turn off. Your coffee maker will stop automatically a maximum of 5 minutes after the brewing cycle ends, i.e. 5 minutes after the reservoir is completely empty.
Remove the thermal carafe from the coffee maker so that the coffee is kept hot in the best conditions possible.
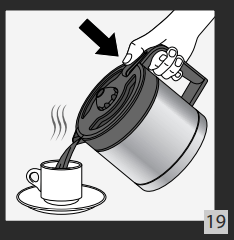
In order to pour coffee from the thermal carafe, press the lever on the lid. Fig. 19.
This thermal carafe can keep your coffee hot for up to 4 hours.
NB:
- The amount of coffee in the thermal carafe at the end of the cycle is less than the amount of water poured into the tank because about 10% is absorbed by the ground coffee and the filter.
- There is an overflow hole on the back of the water tank. If you add too much water, it will leak out of this hole.
- To ensure maximum heat retention, rinse the thermal carafe with hot water before use and close the lid by twisting it clockwise.
- Clean the permanent filter between each use or use a new paper filter.
CAUTION:
- To avoid any overflow, the thermal carafe must be properly positioned on the base of the coffee maker, otherwise it could cause hot water or hot coffee to overflow.
- The coffee maker becomes very hot during the brew cycle. Please handle with care.
OTHER FEATURES
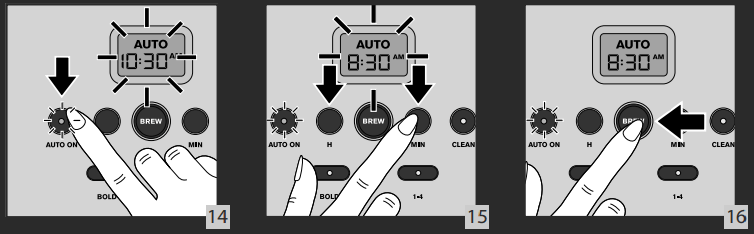
6a – AUTO START FUNCTION
Programming the auto-start settings.
Your appliance is equipped with auto-start program.
Check whether the clock is set to the right time. If not, follow the instructions in the SETTING THE CLOCK section.
Press the AUTO ON (m) button. The AUTO icon will appear on the display. Figs 14-15-16.
Set the time by pressing the H button (n) to set the hour and the MIN button (o) to set the minutes. Set the program by pressing BREW (l).
Starting a auto-on function when time has already been set.
- See the section MAKING COFFEE.
- Press AUTO ON, then press BREW (l)
To cancel the auto-start function, press twice the AUTO ON button or press the BREW button.
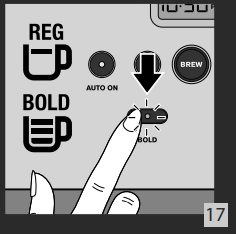
6b – REGULAR OR BOLD
The BOLD function increases the cycle time for stronger coffee.
Press the BOLD (p) button to select the strength of your coffee. Fig. 17.
The BOLD button lights up (p).
The function is stored in the memory for subsequent cycles.
To cancel the BOLD function, press the BOLD button again.
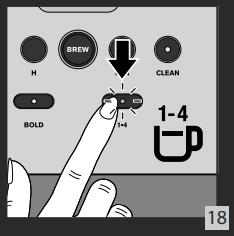
6c – 1 - 4 CUPS
This function is specially designed for making small volumes of coffee, i.e. between 2 and 4 cups. It makes it easier to extract optimal aroma and flavor.
To activate this function, press the 1 - 4 cups button (q) before starting the cycle. Fig. 18.
The 1 - 4 CUPS button lights up.
To cancel the 1 - 4 cups function, press the 1 - 4 CUPS button again.
CLEANING
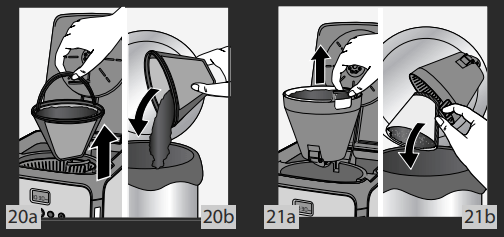
To remove the used coffee grounds, remove the filter and the filter holder from the coffee maker. Figs 20a. and 21a.
Throw the coffee grounds and filter paper in the garbage. Figs 20b. and 21b.
Do not clean the machine if it is still hot.
Wash the removable filter holder and the permanent filter in warm soapy water.
Handle the thermal carafe with care: add a small amount of dish detergent and some water and stir gently. Use a soft brush to remove any stains. Use a non-abrasive sponge.
If the carafe is very stained, fill it with boiling water. Add a dishwasher tablet and let it soak for about an hour. Then rinse thoroughly.
Do not clean the carafe in a dishwasher and do not immerse it in water.
CAUTION: Do not place the thermal carafe in the microwave.
Do not put parts of the coffee maker into the dishwasher.
Clean the coffee maker with a damp cloth or sponge. Never use abrasive or strong products on any part of the coffee maker.
To clean the stainless steel parts of your coffee maker, dampen a soft cloth or sponge with warm water. Wipe carefully with a dry cloth.
For difficult stains, use a cloth with white vinegar.
Do not immerse the appliance in water or under the tap
DESCALING
Why descale?
- Limestone forms naturally in your coffee maker. Descaling preserves the coffee maker and ensures it will last longer and provide quality coffee over time. Limestone can permanently affect the machine's performance. Malfunctions associated with scaling will not be covered by the warranty if the product is returned.
When to descale?
- When your machine needs descaling, the CLEAN button (r) light will come on.
- The descaling frequency depends on the hardness of the water and the number of brew cycles. If you notice the following signs: longer cycle time, excessive steaming, more noise at the end of the cycle, stopping midcycle, this means your machine is scaled.
- Your coffee maker should be descaled around once a month depending on the hardness of the water.
- If your machine needs descaling, the CLEAN button (r) light will flash 3 times at the end of the cycle.
NB: If you press the BREW button (l) while the CLEAN button (r) light is on, the descaling cycle will start instead of the brew cycle.
How to descale your KRUPS coffee maker
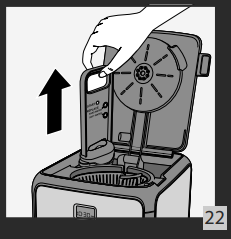
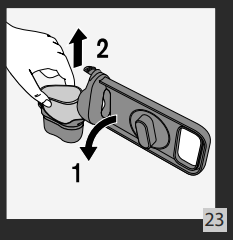
Remove the filter cartridge (t). Figs 22 and 23.
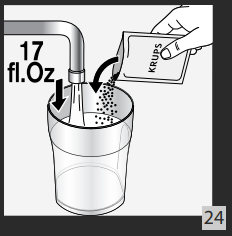
Use the KRUPS® descaling solution or 17 fl. oz of white vinegar diluted in 17 fl.oz of cold or water at room temperature or 1.5 oz of citric acid diluted in 17 fl. oz until complete dissolution of crystals. Fig. 24.
Pour the solution into the water tank (without coffee). Fig. 25.
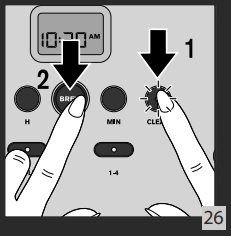
Press the CLEAN button (r) followed by the BREW button (l) to start the descaling cycle. Fig. 26.
The cycle lasts for 30 min.
Wait until the end of the cycle.
If the water tank is not empty, please launch another descaling cycle by pressing CLEAN button (r).
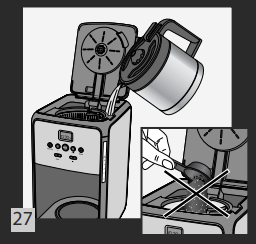
To rinse the machine, run 2 full 12 cups cycles with water but without coffee. Fig. 27.
Repeat if necessary
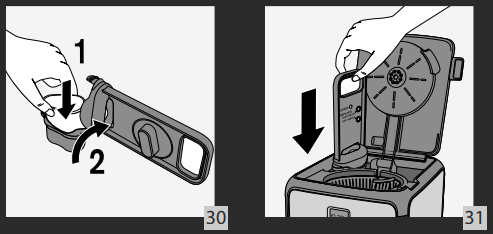
Put the filter cartridge back. Figs 30 and 31.
The warranty does not cover coffee makers that do not work, or do so poorly, due to lack of descaling.
Filter cartridge
Your machine can filter water using a DuoFilter: a double action filter (reduces chlorine and scaling) formulated with active plant ingredients. This DuoFilter allows you to enjoy the subtle aromas of your coffee and reduces the descaling frequency.
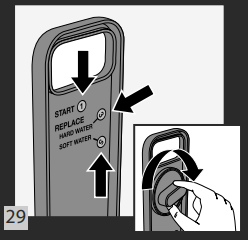
NB: There is a rotary indicator on the top of the water filter holder that shows when you should replace your DuoFilter.
Select the number of the month when you replace the filter. The month when you should change your filter depending on the hardness of the water will then be indicated. Fig. 29.
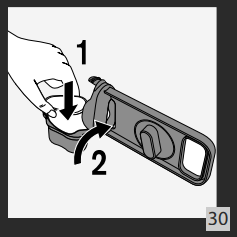
To change the filter, remove the filter cartridge from the tank. Fig. 30.
Open it by pulling the bottom part and change the filter. Figs 30 and 31.
IMPORTANT:
The DuoFilter must only be used with water.
Your coffee machine will still work if the water filter is not installed.
If you have not used your coffee machine for over a month, rinse the DuoFilter in running water.
We do not recommend leaving the same DuoFilter in your machine for over 5 months.
The duo filter can cause the water to flow slow, excess steam, high noise lever. The filter may need to be replace
TROUBLESHOOTING
PROBLEM
SOLUTION
The coffee does not brew or the appliance does not turn on.
Make sure the appliance is well connected to a working outlet and that it is in the "ON" position.
The water tank is empty.
There is a power outage.
Unplug the machine, then plug it back in.
The clock should be reprogrammed after a power outage.
The automatic stop feature has turned off the appliance. Turn off the appliance and then turn it back on to make more coffee. For more information, please consult the "Making Coffee" section.
The appliance seems to leak.
Make sure the water tank has not been filled beyond the maximum limit.
Brewing takes a long time.
It may be time to descale the appliance.
Several minerals can accumulate in the coffee maker's circuitry. Regular descaling of the machine is recommended. This may need to be done more often depending on the hardness of your water. For more information, please consult the "Descaling" section.
CAUTION: do not take the appliance apart.
The filter holder overflows or the coffee flows too slowly
The coffee maker needs cleaning.
There is too much coffee. We recommend using one measuring spoon or one soup spoon of ground coffee per cup.
The ground coffee is too fine (e.g., ground coffee for espresso won't work in a drip coffee maker).
There is ground coffee lodged between the paper filter and the filter holder.
The paper filter is not opened properly or is not well placed.
Rinse the filter holder before inserting the paper filter so it will adhere to the damp walls of the filter basket.
Be sure you have not inserted a paper filter at the same time as the permanent filter.
There is more than one paper filter in the filter holder.
Make sure the filter holder is pushed down all the way.
The coffee tastes bad.
Clean the coffee maker.
The ground coffee is not right for your coffee maker.
The proportion of coffee and water is not sufficient. Adjust to suit your taste.
The quality and freshness of the coffee is not the best.
The water is of poor quality
The coffee does not flow.
See if there is water in the water tank.
The coffee flow system may be obstructed. You may clean it simply by rinsing with water.
The time is not correct (there is a time difference).
The timer is synchronized and depends on your electrical network. If there is a time difference, we recommend that you program the time once a week to be sure it is correct.
Stoppage during a cycle, machine stops whereas there is still water in the water tank.
This means your machine is scaled.
It is highly recommended to perform descaling of your machine every month, depending on the hardness of the water.
For more information, please consult the ”Descaling” section.
If your appliance does not always work properly, call customer service in your country.