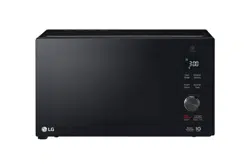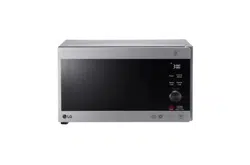

OWNER’S MANUAL
MICROWAVE OVEN
Please read this owner’s manual thoroughly before operating.
(optional, please check model specification)
MS426
****
MFL69621103_05
www.lg.com
Copyright © 2016 - 2017 LG Electronics Inc. All Rights Reserved
CONTENTS
CONTENTS
8
BEFORE USE
8
Unpacking & Installing
10
Control Panel
10
Display Icon Meanings
11
Setting Clock
11
Quick Start
11
More/Less
11
Energy Saving
12
HOW TO USE
12
Manual Cooking
12
Microwave Power Levels
13
Child Lock
13
Reheat
14
Reheat Menu Instructions
15
Soften
15
Soften Menu Instructions
16
Melt
16
Melt Menu Instructions
17
Yogurt
17
Yogurt Menu Instructions
18
Keep Warm
18
Sensor
Cook
18
Sensor Cook Menu Instructions
21
Inverter Defrost
21
Inverter Defrost Menu Instructions
How the Microwave Function Works
Microwaves are a form of energy similar to radio,
television waves, and ordinary daylight. Normally,
microwaves spread outwards as they travel through the
This oven, however, has a magnetron that is designed
to make use of the energy in microwaves. Electricity,
supplied to the magnetron tube, is used to create
microwave energy.
These microwaves enter the cooking area through
openings inside the oven. A tray is located inside the
oven. Microwaves cannot pass through metal walls
of the oven, but they can penetrate such materials as
glass, porcelain and paper, the materials out of which
microwave-safe cooking dishes are constructed.
Microwaves do not heat cookware, though cooking
vessels will eventually get hot from the heat generated
by the food.
Your Microwave oven, is one of the safest
of all home appliances. When the door
is opened, the oven automatically stops
producing microwaves. Microwave energy
is converted completely to heat when it
enters food, leaving no “left over” energy
to harm you when you eat your food.
A very safe appliance
3
IMPORTANT SAFETY INSTRUCTIONS
23
FOOD CHARACTERISTICS &
MICROWAVE COOKING
25
TO CLEAN YOUR OVEN
25
USING THE SMART DIAGNOSIS™
FUNCTION
26
QUESTION & ANSWERS
27
TECHNICAL SPECIFICATIONS
22
MICROWAVE-SAFE UTENSILS
cause death or serious injury.
or safety risk such as fire, causing burns
Doing so can cause an explosion.
Doing so can cause serious injury and damage.
cause sparks and fire.
plants, soil, pets or any other living matter inside it.) The
with reduced
cooking.
N
ever heat baby bottles with the lid or teat still fitted.
Children must not be allowed to
or any part of the
for
oven must only be used for heating or cooking food.
be burnt.
oven.
mode (for ovens with Combination function)
will be
•
B
e careful when handling the container.
M
icrowave heating of beverages can result in delayed eruptive boiling,
therefore care must be taken when handing the container.
-
his model doesn't provide a temperature probe.
T
must not be used
trays and racks
(for ovens fitted with these functions)
them
Not doing so could cause them to burst or rupture.
liquid and may even cause a fire.
Not doing so could cause
leak from the container
Only connect the supply lead plug to an earthed power outlet socket that has the same rating and
This product is intended for domestic household applications only and not for commercial use.
It must not be used in mobile applications.
specification requirement of the oven.
I
f you are unsure about your outlet socket earth connection,
it should be checked by an electrical contractor.
N
ever cut of the earth pin of the power plug.
damage or electric shock.
power connection in the event of any occurrence,
B
ed and breakfast type environments.
F
arm houses;
B
y clients in hotels, motels and other residential environments;
S
36
When the symbol is used, It means that the surfaces are liable to get hot during use.
Caution, hot surface
A
lways install the oven according to the installation requirements that are outlined in this manual.
F
or
refer to the
Do not use any steam cleaners to clean the oven.
37
D
o not place an object (a book, a box, ect.) on the product.
T
he product may overheat or catch fire or the
object may fall, causing injury to persons.
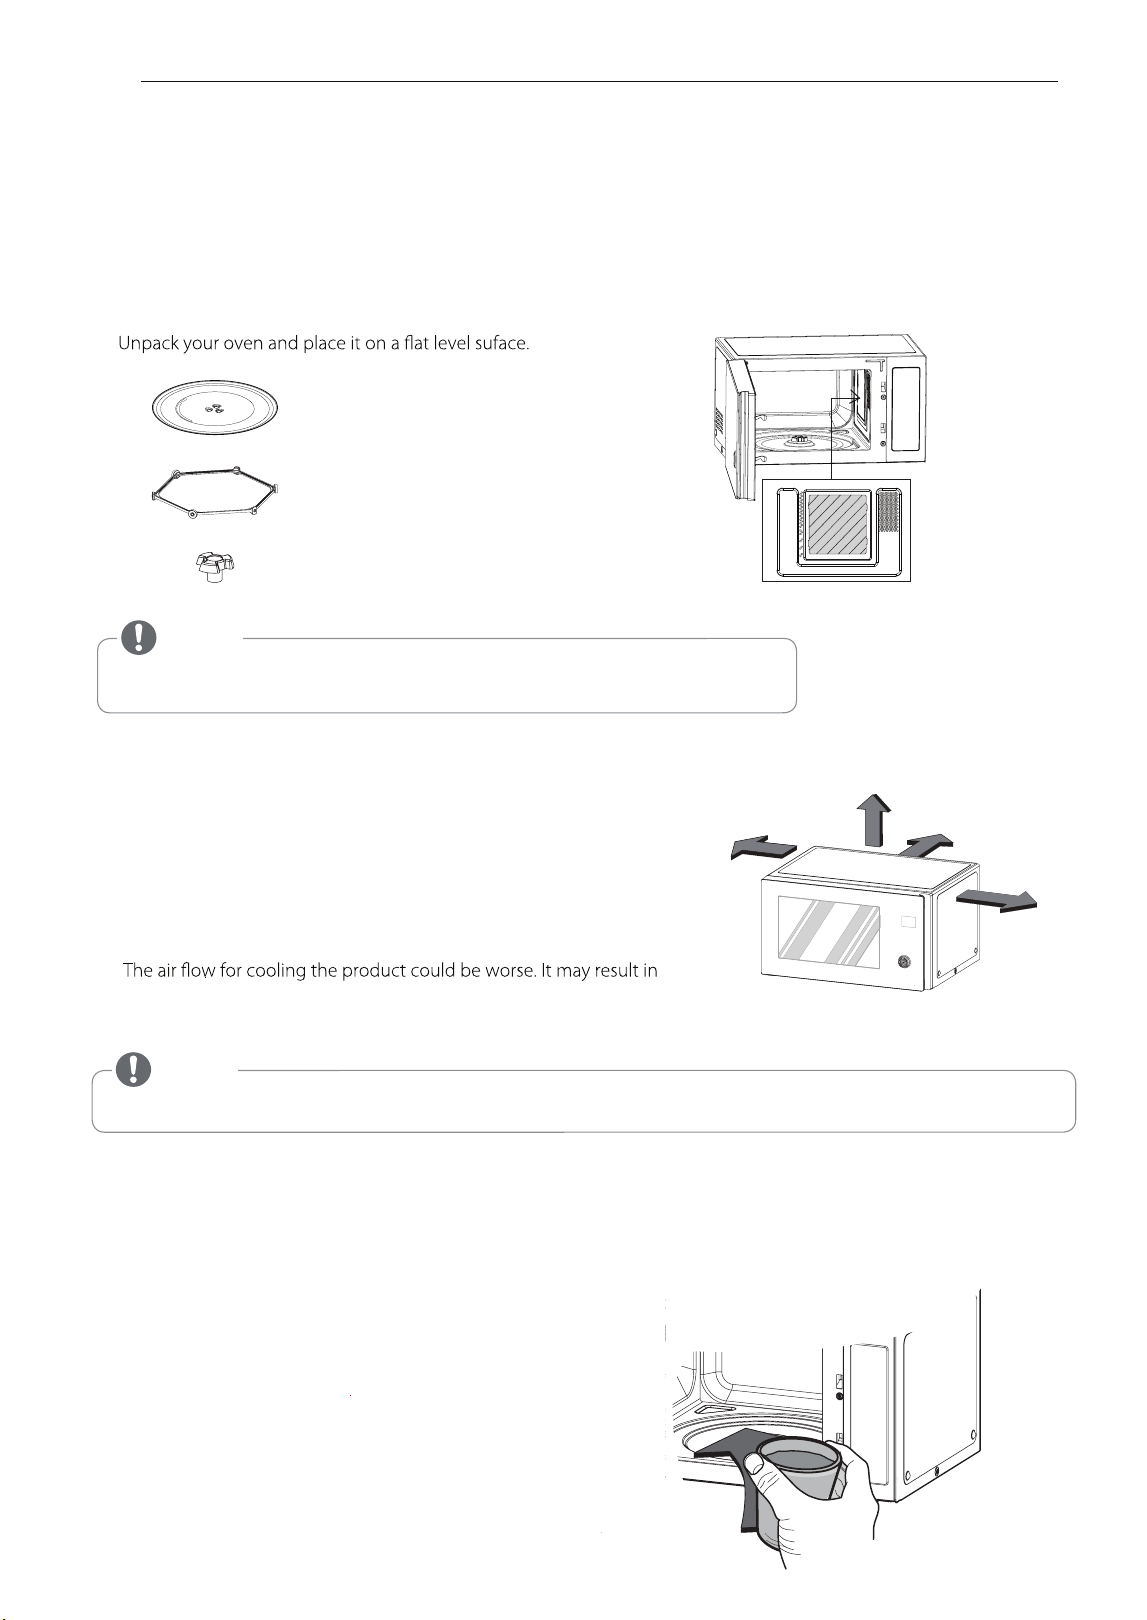
UNPACKING & INSTALLING
BEFORE USE
By following the basic steps on these two pages you will be able to quickly check that your oven is operating correctly.
Please pay particular attention to the guidelines on where to install your oven. When unpacking your oven make sure
you remove all accessories and packing materials. Check to make sure that your oven has not been damaged during
shipping.
1
2
the edge of the surface to prevent tipping.
An exhaust outlet is located on the bottom and side of the oven.
Blocking the outlet can damage the oven.
If you use the microwave oven in an enclosed space or cupboard,
lower performance and reduced service life. If possible, please use the
microwave oven in the counter top condition.
NOTE
•
THIS OVEN SHOULD NOT BE USED FOR COMMERCIAL CATERING PURPOSES. DO NOT USE THIS OVEN IN A BUILT IN APPLICATION.
3 Plug your oven into a standard household socket. Make sure your oven is the only appliance connected to the socket.
If your oven does not operate properly, unplug it from the electrical socket and then plug it back in.
4
Fill a microwave safe container with 300 ml (1/2 pint) of water.
Place on the glass tray and close the oven door.
If you have any doubts about what type of container to use
please refer to Microwave-safe utensils.
Open your oven door by pulling the door handle. Place the rotating ring inside the oven and place the glass tray on top.
5
GLASS TRAY
ROTATING RING
TURNTABLE SHAFT
8
BEFORE USE
Mica Sheet
Mica Sheet
*Do Not Remove
Mica Sheet
10 cm
5 cm
15 cm
10 cm
NOTE
•
Do not remove the cavity Mica Sheet (silver plate) inside of oven.
The Mica Sheet is there to protect the microwave components from food spatters.
rear ventilation. The front of the oven should be at least 8 cm from
Place the oven on the level location of your choice with more
than 85cm height but make sure there is at least 15 cm of space
on the top and 10 cm at the left & right for proper and 5 cm at the
6
Press the STOP button, and press the
START
button
one time to start 30 seconds of cooking time.
7 The DISPLAY will count down from 30 seconds.
When it reaches 0 it will chime briefly. Open the oven door
and test the temperature of the water.
If your oven is operating the water should be warm.
Be careful when removing the container as it may be hot.
YOUR OVEN IS NOW INSTALLED
8
consumption in o
The contents of feeding bottles and baby food jars must be stirred or shaken and the temperature checked before
rder to avoid burns.
9
Button recognition may be hampered in the following circumstances:
• Only the outside area of the button is pressed.
•
10
NOTE
Do not use rubber gloves or disposable gloves.
When wiping the touch control panel with a wet towel, remove moisture from the touch
The setting of the cooking time should be shorter than common microwave ovens (700 W, 800 W) due to
the relatively high output power of the product. Excessive heating with the product may cause moisture on the door.
BEFORE USE
9
DIAL (MORE / LESS)
• Choose the cooking menu.
• Set cooking time and weight.
• While cooking with auto and manual function, you
can increase or decrease the cooking time at any
point by turning the dial (except defrost mode
• Clears all functions and set entries except time of day.
).
STOP
START
• The quick start feature allows you to set 30 second
•Press this button to start cooking or resume cooking
if the door was opened or the STOP button was
pressed once.
intervals of HIGH power cooking with each press of
the START button.
Part
POWER
See page 12 “Timed Cooking”
INVERTER DEFROST
See page 21 “Inverter Defrost”
SENSOR COOK
See page 18 “Sensor Cook”
INVERTER COOK
See page 13 “Reheat”
Inverter cook allows you to cook most of your
favorite food by selecting the food type and
the weight of the food.
See page 15 “Soften”
See page 16 “Melt”
See page 17 “Yogurt”
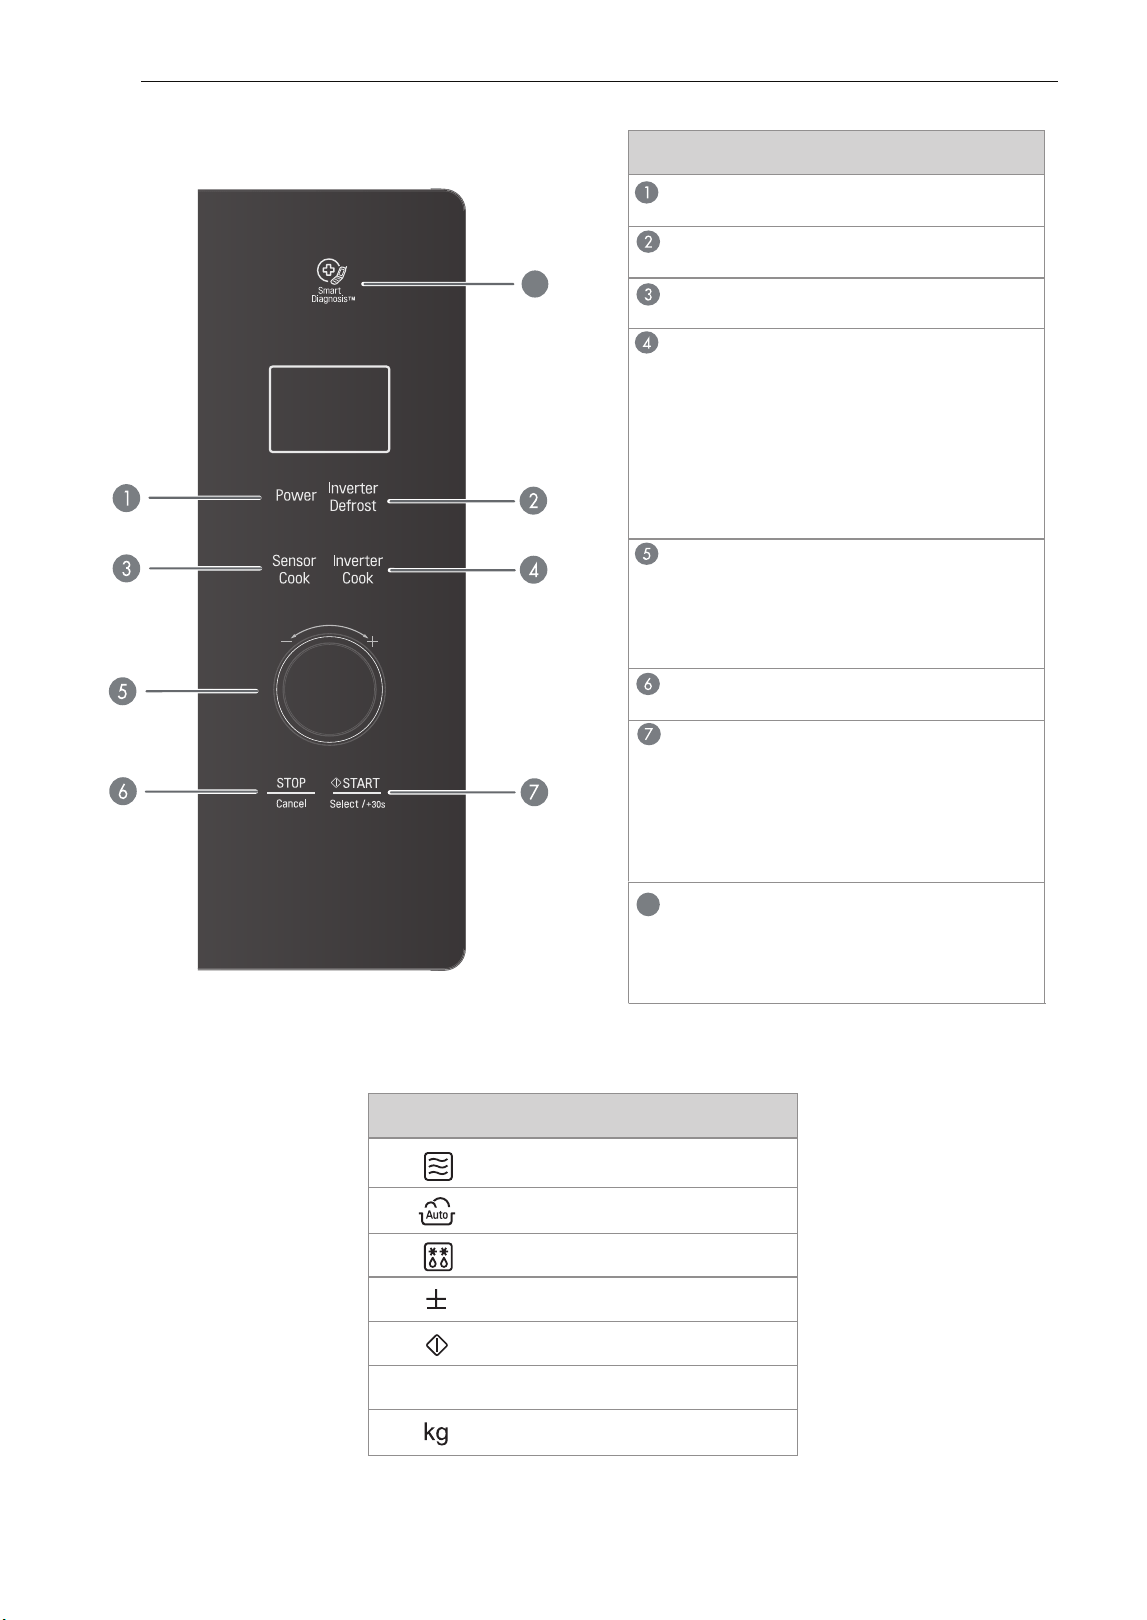
CONTROL PANEL
DISPLAY ICON MEANINGS
See page 18 “Keep Warm”
Icon
Shows when the Microwave function is in
operation.
Shows when the Inverter Cook/Sensor Cook
function is in operation.
Shows when the Inverter Defrost function
is in operation.
Shows in the display when More/Less time
can be set.
Shows when the Cooking power level
should be set.
Shows when Cooking can be started by
pressing the START button.
Shows when the food weight should
be set.
P-10~HI
10
BEFORE USE
SMART DIAGNOSIS
Hold the mouthpiece of a phone up to this icon
when directed to by service centre personnel, to
help diagnose problems with the microwave oven
when calling for service.
8
8
MORE/LESS
By turning the d
ial
, manual cook settings can be
adjusted to cook food for a longer or shorter time.
Turning the dial will increase 10 seconds or decrease
10 seconds to the cooking time each time. The max
cooking time possible in the manual cook mode will
The QUICK START feature allows you to set 30
seconds intervals of HIGH power cooking with
each touch of the START button.
Example: Set 2 minutes of cooking on high
power
Select 2 minutes
on
high power.
Press the START button four times
The oven will start before you have
finished the fourth press.
During QUICK START cooking, you can extend
the cooking time up to 99 minutes 59 seconds by
repeatedly pressing the START button.
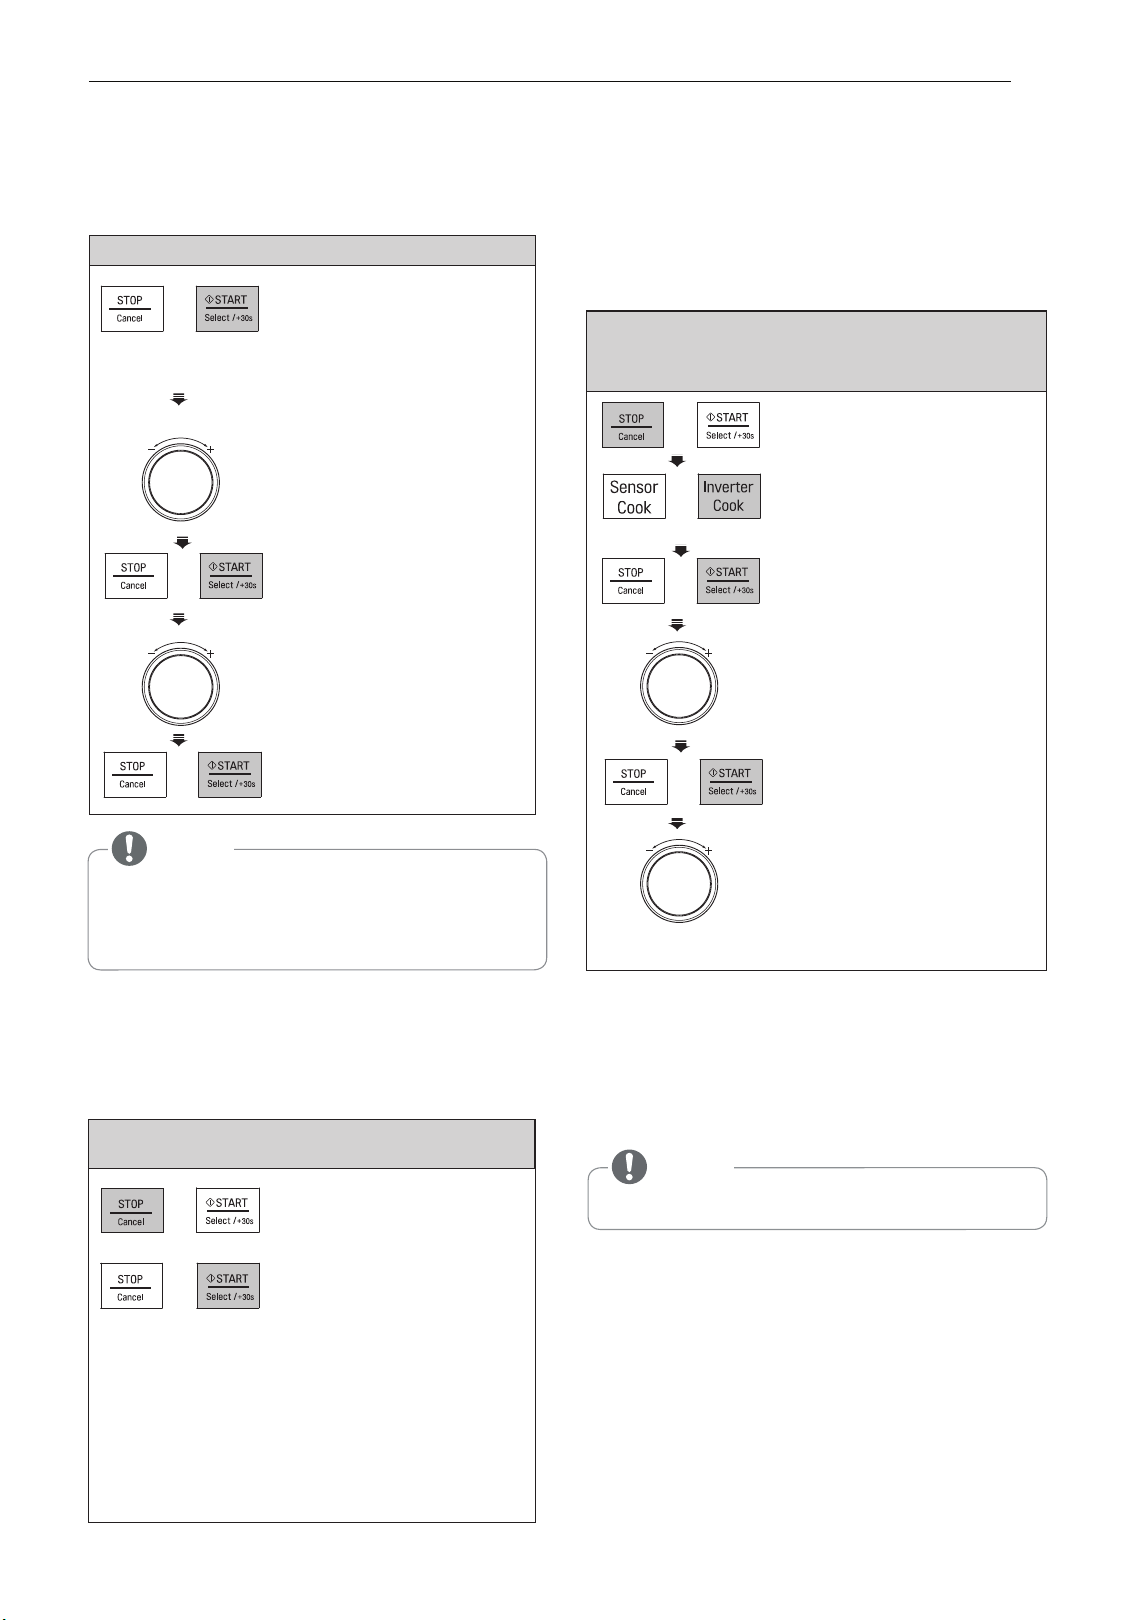
QUICK START
1. Press STOP.
2. Press Inverter Cook
once. ‘1’ will show in the
display.
3. Press START.
‘1-1’ will show in
the display.
4
.
Turn the DIAL until
display shows ‘1-3’.
5
.
Press START.
6
.
Turn the DIAL.
The cooking time will
increase or decrease
by 10 seconds.
Example: To set 11:11
1. Press START to confirm
the 12Hr clock display.
(If you wish to have a
24Hr clock display,
simply turn the DIAL to
select ’24H’ before
following next steps)
2. Turn the DIAL until display
3. Press START.
4. Turn the DIAL to change
the minutes until the
display shows ‘11:11’.
5. Press
1.
2.
START.
shows ’11:’.
SETTING CLOCK
When your oven is plugged in for the first time or
when power resumes after a power interruption,
the numbers in the display reset to
'
12H
'.
be 99 minutes 59 seconds.
ENERGY SAVING
Energy saving means to save energy by turning off
the display. This feature only operates when the
Microwave Oven is in standby and the display will
go out.
Press STOP.
Example: To adjust the Inverter Cook
(ex. Dinner Plate 1 Serve) cooking time for
a longer time, or for a shorter time
NOTE
• When using clock mode, the display will remain on.
BEFORE USE
11
NOTE
•
•
If you don’t want to use clock mode,
Press STOP button, after plugging in your oven.
If you want to set the clock again or change options,
you will need to unplug the power cord and reconnect.
MICROWAVE POWER LEVELS
Your microwave oven is equipped with 10 power
levels to give you maximum flexibility and control
over cooking. The adjacent table will give you
some idea of which foods are prepared at each of
the various power levels.
• The adjacent chart shows the power level settings
for your oven.
MICROWAVE POWER LEVEL CHART
HOW TO USE
MANUAL COOKING
(timed cooking)
This function allows you to cook food for a
desired time. There are
10 power levels available.
The example below shows how to set 90% power
for the desired time.
Example: To cook food on 90% Power
for 5 minutes 30 seconds
When cooking is complete, a chime will sound. The
word End shows in the display window. 'End' remains
in the display and the chime will sound every minute
until the door is opened, or any button is pressed.
If you do not select the power level, the oven
will operate at power HIGH. To set HI-POWER
cooking, skip step 2 above.
1. Press STOP.
2. Press Power twice,
Display shows 'P-90'.
(1st time P-HI appears
in the display. This is to tell
you that the oven is set on
100% power unless a
different power setting
is chosen.)
3. Turn the DIAL until display
shows ‘5:30’.
4. Press START.
NOTE
•
12
HOW TO USE
Power
Level
Use
* Boiling water.
* Browning ground beef.
* Making candy.
*
Cooking poultry pieces, fish, & vegetables.
* Cooking tender cuts of meat.
* Reheating rice, pasta, & vegetables.
* Reheating prepared foods quickly.
* Reheating sandwiches.
* Cooking egg, milk and cheese dishes.
* Cooking cakes and breads.
* Melting chocolate.
* Cooking veal.
* Cooking whole fish.
* Cooking puddings and custard.
* Reheating Quiche: about 7~8 minutes
for 600 g.
* Cooking ham, whole poultry and lamb.
* Cooking rib roast and sirloin tip.
* Thawing meat, poultry and seafood.
* Cooking less tender cuts of meat.
* Cooking pork chops and roast.
* Taking chill out of fruit.
* Softening butter.
*
Keeping casseroles and main dishes warm.
(100 %)
P-HI
1200 W
1080 W
960 W
840 W
720 W
600 W
480 W
360 W
240 W
120 W
P-90
P-80
P-70
P-60
P-50
P-40
P-30
P-20
P-10
* Softening butter and cream cheese.
1. Press STOP.
2. Press
Inverter Cook
once.
‘1’ will show in the display.
3. Press START.
4.
Turn the DIAL until display
shows ‘1-7’.
5. Press START.
6.
Turn the DIAL until display
shows ‘0.2 kg’.
7. Press START.
CHILD LOCK
This is a unique safety feature that prevents
If the CHILD LOCK was already set and you
unwanted oven operations. Once the CHILD
touch another key pad, the word Loc shows in
LOCK is set, no cooking can take place.
the display. You can cancel the CHILD LOCK
according to below procedure.
To set the child lock
1.
Press STOP.
Press and hold
2. Press and hold
STOP
until 'Loc'
STOP until 'Loc' disappears
in the display.
appears in the display
and a chime is heard.
If the time of day was already set, the time of day
will appear on the display window after 1 second.
After the CHILD LOCK is turned off, the oven
will operate normally.
REHEAT
Your oven’s menu has been preprogrammed to automatically reheat food. Select one of the Reheat menus
and then select the weight of the food. The microwave will then reheat the contents appropriately after the
START button is pressed as in step 7 below.
Example: To reheat 0.2 kg Rice, simply follow
the step below
‘1-1’ will show in the
display.
‘0.1 kg’ will show in the
display.
Example: To set the CHILD LOCK
Example: To cancel the CHILD LOCK
HOW TO USE
13

14
HOW TO USE
REHEAT MENU INSTRUCTIONS
Weight
Initial
Code
Menu
Instructions
Utensil
Limit
Temperature
1-1
Beverage 1 - 2 cups Room
1. Place food in a microwave-safe cup.
Microwave-
(1 cup /
2. Place food in the oven. Choose the menu and
safe cup
200 ml)
weight, press START.
1-2
Refrigerated
Casserole 0.25 - 1.0 kg
1. Place food in a microwave-safe bowl.
Microwave-
(25
0 g /
Cover with plastic wrap and vent. Or vented lid.
safe bowl
1 serving)
2. Place food in the oven. Choose the menu and
weight, press START.
3. After cooking, stand covered for 3 minutes.
1. Place food (0.4 - 0.5 kg of meat, chicken,
1-3
Dinner Plate
1
Refrigerated
Microwave-
mashed potato, vegetable etc.) on a
safe dish
microwave-safe dish. Cover with plastic wrap
and vent. Or vented lid.
2. Place food in the oven. Choose the menu,
press START.
3. After cooking, stand covered for 3 minutes.
1-4
Muffin 1 - 4 Frozen
1. Place food on a microwave-safe dish.
Microwave-
(75 - 80 g /
2. Place food in the oven. Choose the menu and
safe dish
1 muffin)
weight, press START.
1-5
Pie
0.2 - 0.6 kg
Refrigerated
1. Cut leftover pie into serving size pieces.
Microwave-
(150 - 200 g
2.
.hsid efas-evaworcim a no doof ecalP
safe dish
3. Place food in the oven. Choose the menu and
/ piece)
weight, press START.
1-6
Pizza
0.2 - 0.5 kg
Refrigerated
1. Place food on a microwave-safe dish.
Microwave-
2. Place food in the oven. Choose the menu and
safe dish
weight, press START.
1-7
Rice
Refrigerated
1. Place food in a microwave-safe bowl.
0.1 - 0.3 kg
Microwave-
Cover with plastic wrap and vent. Or vented lid.
safe bowl
2. Place food in the oven. Choose the menu and
weight, press START.
3. After cooking, stand covered for 3 minutes.
1-8
Soup 0.25 - 1.0 kg
Room
1. Place food in a microwave-safe bowl.
Microwave-
(250
g /
Cover with plastic wrap and vent. Or vented lid.
safe bowl
1 serving)
2. Place food in the oven. Choose the menu and
weight, press START.
3. After cooking, stand covered for 3 minutes.
*Note: Plastic wrap should not touch the food during covering
SOFTEN
The oven uses low power to soften foods (butter,
cream
cheese and ice cream) S
ee the following table.
Example: To soften 0.2 kg Cream Cheese
SOFTEN MENU INSTRUCTIONS
Weight
Initial
Code
Menu
Instructions
Utensil
Limit
Temperature
2-1
Butter
1 - 3
(100 - 150 g /
each)
Refrigerated
1. Unwrap and place food
on a microwave-safe dish.
Microwave-
2. Place food in the oven. Choose the menu and weight,
safe dish
press START.
3. Butter will be at room temperature and ready for use
in a recipe.
2-2
Cream
0.1 ~ 0.3 kg
Refrigerated
1. Unwrap and place on a microwave-safe dish.
Microwave-
Cheese
2. Place food in the oven. Choose the menu and weight,
safe dish
press START.
3.Cream cheese will be at room temperature and ready
for use in a recipe.
2-3
Ice
2 or 4 cups
Frozen
1. Remove lid and cover.
Cream
2. Place food in the oven. Choose the menu and weight,
press START.
,
3. Ice cream will be soft enough to make scooping easier.
1. Press STOP.
2.
Press Inverter Cook twice.
‘2’ will show in the display.
3. Press START.
4.
Turn the DIAL until display
shows ‘2-2’.
5. Press START.
6.
Turn the DIAL until display
shows ‘0.2 kg’.
7. Press START.
‘2-1’ will show in the
display.
‘0.1 kg’ will show in the
display.
HOW TO USE
15
MELT
MELT MENU INSTRUCTIONS
The oven uses low power to melt foods (butter, cheese and chocolate). See the following table.
Weight
Initial
Instructions
Limit
Temperature
Code
Menu
Utensil
Butter
1 - 3
(100 - 150 g
/ each)
Refrigerated
1. Place food in a microwave-safe bowl.
2. Place food in the oven. Choose the menu and weight,
press START.
3. After cooking, stir to complete melting.
Cheese
0.2 ~ 0.4 kg
Refrigerated
1. Use processed cheese food only. Unwrap and cut into
Microwave-
cubes.
safe bowl
2. Place food in a microwave-safe bowl.
3. Place food in the oven. Choose the menu and weight,
press START.
4. After cooking, stir to complete melting.
Chocolate
0.1 ~ 0.3 kg
Room
1. Chocolate chips or squares of baking chocolate may be
Microwave-
used.
safe bowl
2. Unwrap and place in a microwave-safe bowl.
3. Place food in the oven. Choose the menu and weight,
press START.
4. After cooking, stir to complete melting.
3-1
3-2
3-3
Microwave-
safe bowl
2.
Press Inverter Cook three
times.
‘3’ will show in the
display.
1. Press STOP.
3. Press START.
4.
Turn the DIAL until display
shows ‘3-3’.
5. Press START.
6.
Turn the DIAL until display
shows ‘0.2 kg’.
7. Press START.
Example: To melt 0.2 kg Chocolate
‘3-1’ will show in the
display.
‘0.1 kg’ will show in the
display.
16
HOW TO USE
Weight
Initial
Instructions
Limit
Temperature
Code
Menu
Utensil
Lukewarm
4
Microwave-
safe bowl
Yogurt
1. Thoroughly wash the proper sized microwave-safe
bowl with hot water.
2. Pour 500 ml milk into the bowl.
3. Heat it about 1 minutes 30 seconds - 2 minutes
30 seconds on high microwave power until 40 - 50 °C
temperature.
4. Add 100 ml yogurt into the bowl and stir well.
5. Cover with plastic wrap or lid and place food in the
oven. Choose the menu, press START.
6. After proofing, stand in the refrigerator for about
5
hours.
7. Stir in jam, sugar or fruits to taste.
Note:
The following types of milk and yogurt may be used :
Thoroughly wash all utensils with hot water and dry
before proofing yogurt.
Make sure that the milk is lukewarm(40 - 50 °C)
before proofing.
Don’t shake or mix yogurt during proofing as this will
affect the firmness of the yogurt.
If the amount of ingredients are greater than
suggested, increase the proofing time.
500 ml pasteurized whole milk
100 g natural plain yogurt
0.6 kg
Example: To make 0.6 kg Yogurt
1.
Press STOP.
2.
Press Inverter Cook four
times .
‘4’ will show in the
display.
3.
Press
START.
Ingredients
Do not use
Milk
2 %, 1 % or
fat-free milk
High calcium milk
Soy milk
Leftover milk
Expired milk
Do use
Milk
Pasteurized
whole milk
Yogurt
Natural
plain
yogurt
Yogurt
Leftover
yogurt
Expired
yogurt
•
•
•
•
•
•
• • •
•
•
•
•
•
‘5h00 ’ will show in the
display.
YOGURT
This feature allows you to make yogurt by pressing the Inverter Cook button.
YOGURT MENU INSTRUCTIONS
HOW TO USE
17
KEEP WARM
The Keep Warm function will keep hot food that has just been cooked at serving temperature.
Use microwave-safe utensils.
1. Press STOP .
2. Press
Inverter Cook
five
times.
‘5’ will show in the
display.
3. Press START .
‘1h30’ will show in the
display.
Example: To keep food warm for 90minutes
Notes :
Crisp foods (pastry, pies, turnovers, etc)
should be uncovered during keep warm.
Moist foods should be covered with plastic
wrap or microwave-safe lid.
The amount of keep warm food is suitable
for 1-3 servings. It should also be noted that
moist food will become dryer the longer it is
Kept Warm.
SENSOR COOK
Your oven’s menu has been preprogrammed to automatically
cook food. Select one of the Sensor Cook
menus and then press START to allow the microwave to cook your selection. Then let your microwave
oven cook your selections.
Example: To reheat 0.4 kg Fresh Vegetable,
simply follow the step below
1. Press STOP.
2. Press
Sensor Cook
once,
‘1’ will show in the
display.
SENSOR COOK MENU INSTRUCTIONS
Weight
Initial
Code
Menu
Instructions
Ute
nsil
Limit
Temperature
1 Bacon
4 thin
rashers
Refrigerated
Microwave-
safe dish
safe bowl
1. Place food on paper towels on a microwave-safe dish.
1. Combine cream of mushroom soup, tuna and milk in
a microwave- safe bowl. Add boiled noodles and stir
thoroughly. Cover with plastic wrap and vent. Or vented lid.
2. Place food in the oven. Choose the menu and weight,
press START.
3. After cooking, stand covered for 3 minutes.
2 Casserole
1 - 4
Room
Microwave-
Tuna & Noodle
2. Place food in the oven, choose the menu,
press START.
Cover with paper towels.
Serving 1 2 3 4
Noodles(Pasta), boiled 140 g 280 g 420 g 560 g
Cream of mushroom soup 140 g 280 g 420 g 560 g
Can or equivalent,
Starkist chunk light tuna,
in spring water, drained
60 g 120 g 180 g 240 g
Milk 125 m l 250 ml 375 m l 500 m l
4. Press START.
3.
Turn the DIAL until display
shows ‘3’.
18
HOW TO USE
Plastic wrap should not touch the food during heating.
Fresh
Vegetables
0.2 - 0.8 kg
0.2 - 0.8 kg
1. Prepare vegetables(carrots, broccoli, cauliflower,
1. Place steak, flour and all other ingredients in
a microwave-safe bowl. Cover with plastic wrap
and vent. Or vented lid.
2. Place food in the oven. Choose the menu and
press START.
3. After cooking, stand covered for 3 minutes.
Beef Stroganoff
Microwave-
zucchini, beans, peas).
safe bowl
2. Cut vegetables into even size pieces. Wash the
1. Remove all packaging.
2. Place food on a microwave-safe dish.
3. Place food in the oven. Choose the menu and
press START.
vegetables and place food in a microwave- safe
bowl.
3. Add amount of water according to the quantity
(0.2 - 0.4 kg: 2 tablespoons, 0.5 - 0.8 kg:
4 tablespoons). Cover with plastic wrap and vent.
Or vented lid.
4. Place food in the oven. Choose the menu
and weight, press START.
5. After cooking, stir and stand covered for 3
minutes.
4
3
Frozen
1. Prepare frozen vegetables(carrots, broccoli,
Microwave-
safe bowl
Vegetables
cauliflower, zucchini, beans, peas).
2. Place food in a microwave-safe bowl.
3. Add amount of water according to the quantity(
0.2 - 0.4 kg: 2 tablespoons, 0.5 - 0.8 kg:
4
Or vented lid.
tablespoons). Cover with plastic wrap and vent.
4. Place food in the oven. Choose the menu
and weight, press START.
5. After cooking, stir and stand covered for 3
minutes.
5
Weight
Code
Menu
Instructions
Ute
nsil
Limit
Initial
Temperature
Room
Frozen
0.2 - 1.0 kg
(180 - 220
g / each)
Jacket
Potatoes
1. Wash potatoes and dry with a paper towel.
2. Pierce each potato 8 times with a fork.
3. Place food on a paper towel in the oven.
Choose the menu and weight, press START.
4. After cooking, stand for 3 minutes.
Paper towel
6
Room
0.2 - 0.8 kg
(150 - 200
g / piece)
Frozen
Microwave-
safe dish
Meat Pie
Frozen
Serving 1 2 3 4
Rump steak, cubed 250 g 500 g 750 g 1000 g
Plain flour 2 Tbsp 1/4 cup 1/2 cup 1/2 cup
Small onion, finely chopped 1/2 1 1 1
Tomato puree 2 tsp 1 Tbsp 1 1/2 Tbsp 2 Tbsp
Beef stock 125 ml 200 ml 250 ml 375 ml
Red wine 60 ml 60 ml 60 ml 60 ml
Mushroom , sliced 25 g 50 g 75 g 100 g
Sour cream 75 ml 150 ml 200 ml 300 ml
Salt and pepper to taste
HOW TO USE
19
Weight
Code
Menu
Instructions
Ute
nsil
Limit
Initial
Temperature
1. Add all ingredients in a deep and large
microwave-safe bowl and mix well.
Cover with plastic wrap and vent.
Ingredients for rice
Ingredients for pasta
2. Place food in the oven. Choose the menu and
weight, press START.
3. After cooking, stir and stand covered for 5 - 10
minutes if needed.
1. Add rice, melted butter and onion in a deep and
large microwave-safe bowl(3 L) and mix well.
Pour boiling chicken stock or water and add salt.
Cover with plastic wrap and vent.
2. Place food in the oven. Choose the menu and
weight, press START.
3. After cooking, Rinse pasta with cold water.
1. Place pasta and boiling water with salt in a deep
and large microwave-safe bowl(3 L).
Cover with plastic wrap and vent.
2. Place the bowl in the oven. Choose the menu,
press START.
3. After cooking, stir and stand covered for 5 - 10
minutes if needed.
Risotto
1.2 kg
Microwave-
Room
safe bowl
8
Rice/Pasta
0.1 - 0.3 kg
Microwave-
Room
safe bowl
7
Rice 100 g 200 g 300 g
Butter, melted 30 g 40 g 50 g
Onion, grated 50 g 75 g 100 g
Chicken stock or water 250 ml 500 ml 750 ml
Salt To taste
Pasta 100 g 200 g 300 g
Water 400 ml 800 ml 1000 ml
Salt To taste
Ingredients
200 g risotto rice
1 1/2 cups water or stock
1/2 cup milk
200 g raw beef , chopped
2 eggs
1 onion, chopped
50 g frozenlevels green peas
100 g grated cheese
Salt and pepper to taste
20
HOW TO USE
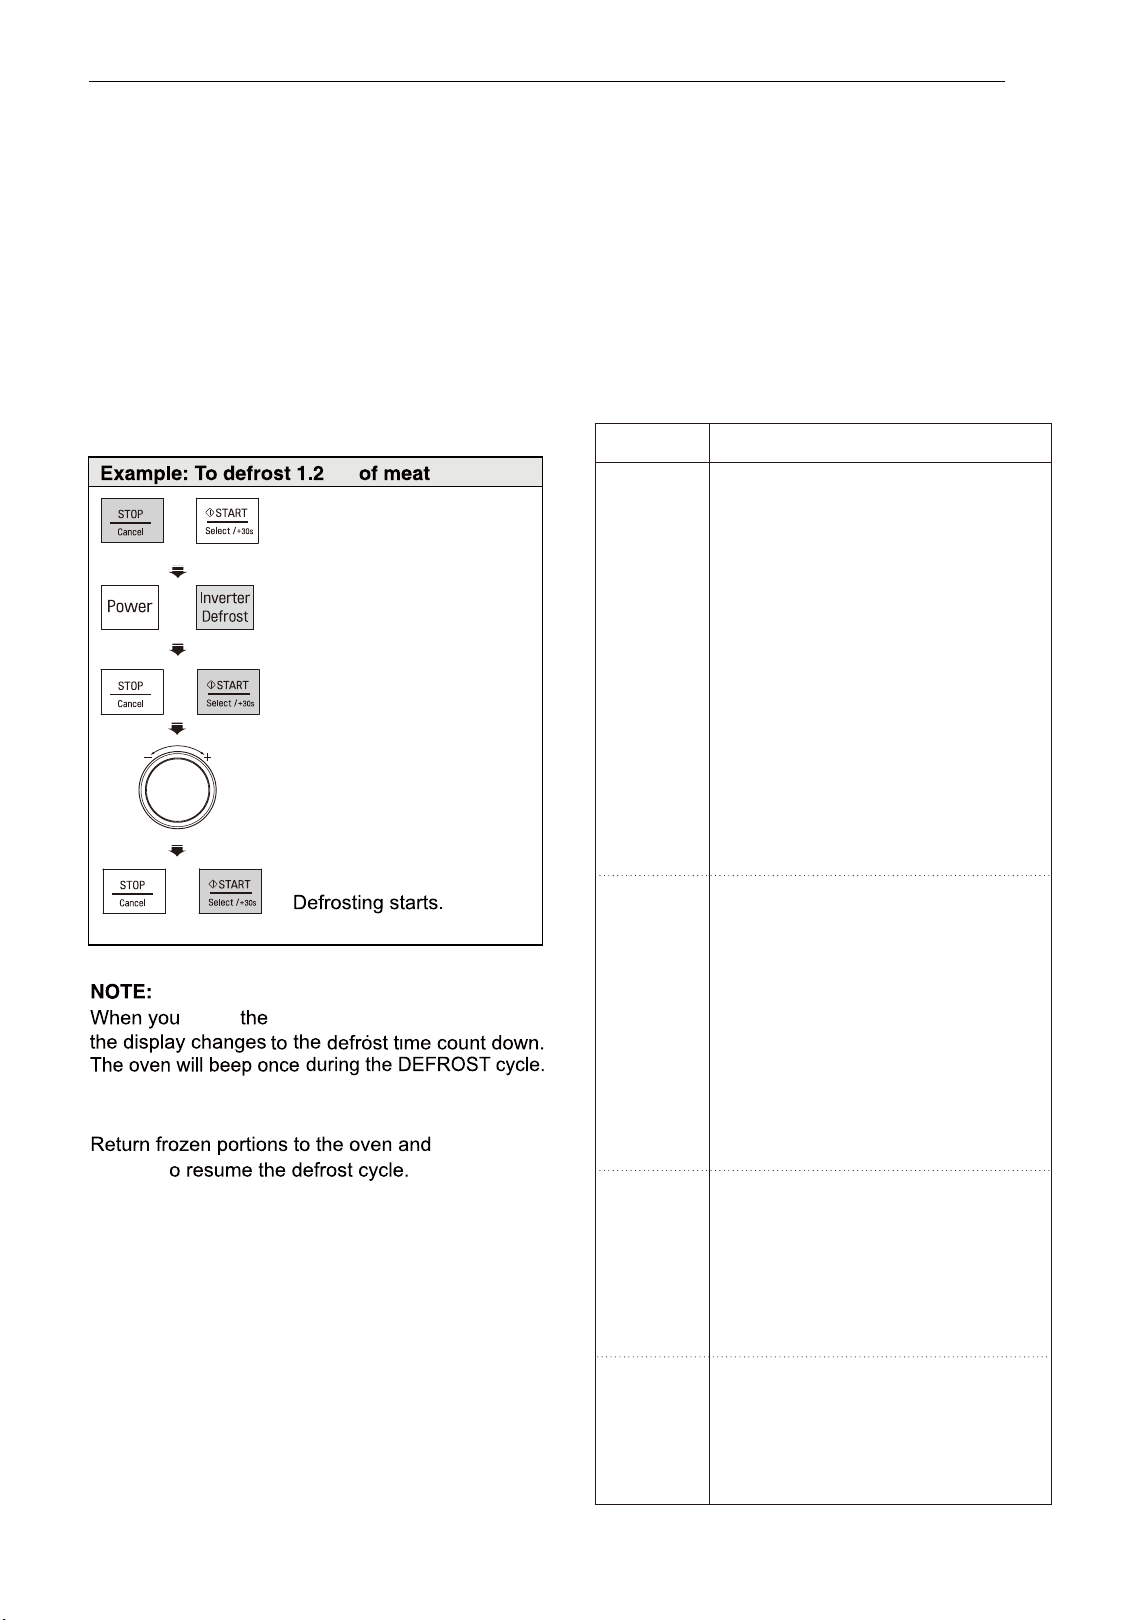
INVERTER
DEFROST
Four defrost sequences are preset in the oven.
The INVERTER DEFROST feature provides you
with the best defrosting method for frozen foods.
The cooking guide will show you which defrost
• Place foods in a shallow container or in a
microwave roasting dish to catch the drippings.
• Food should still be somewhat icy in the center
when removed from the oven.
sequence is recommended for the food you are
defrosting.
For added convenience, the INVERTER DEFROST
includes a built-in beep alert that reminds
you to check, turn over, separate, or rearrange
to get the best defrost results. Four different
defrosting levels are provided.
(MEAT /POULTRY / FISH / BREAD)
kg
1.
Press STOP.
2.
Press Inverter Defrost
once.
‘dEF1’ will show in the display.
4. Turn theDIAL until display
shows ‘1.2 kg’ .
3.
Press START.
5.
Press
START .
INVERTER DEFROST
MENU INSTRUCTIONS
Category
Food to be Defrosted
Beef
Ground beef, Round steak,
Cubes for stew, Tenderloin steak,
Pot roast, Rib roast, Rump roast,
Chuck roast, Hamburger patty
Remove any defrosted portion of
ground beef at the beeps.
MEAT
Lamb
)dEF1 (
Chops, Rolled roast
Pork
0.1-4.0 kg
Chops
, Hot dogs,
Spareribs, Country-style ribs.
Rolled roast, Sausage
Veal
Cutlets (0.5 kg, 20 mm thick)
Turn food over at beep.
After defrosting, let stand for 5 - 15
minutes.
POULTRY
)2dEF (
0.1-4.0 kg
FISH
)3dEF (
0.1-4.0 kg
BREAD
)4dEF (
0.1-0.5 kg
Sliced bread, Buns, Baguette, etc.
Separate slices and place between
paper towel or flat plate.
Turn food over at beep.
After defrosting, let stand for
1 - 2 minutes.
Fish
Fillets, Whole Steaks
Shellfish
Crab meat, Lobster tails, Shrimp,
Scallops
Turn food over at beep.
Seperate portions if needed.
After defrosting, let stand for 5 - 10
minutes.
‘0.1 kg
’
will show in
the display.
START
START
t
•
Remove fish, shellfish, meat,
• The length of defrosting time varies according to
how solidly the food is frozen.
• The shape of the package affects how quickly
food will defrost. Shallow packages will defrost
more quickly than a deep block.
• Depending on the shape of the food can be
defrosted more or less.
and poultry from
its original wrapping paper or plastic package.
Otherwise, the wrap will hold steam and juice
close to the foods, which can cause the outer
surface of the foods to cook.
press
At the beep, open the door and remove any portions
that have thawed and turn.
press
button,
HOW TO USE
21
Poultry
Whole, Cut-up, Breast (boneless).
Rinse chicken cavity with tap
water and let stand for 60 minutes
for better performance.
Cornish Hens
Whole
Turkey
Breast
Turn food over at beep.
After defrosting, rinse with cold water
after 30 minutes, let stand for 60 minutes.
MICROWAVE-SAFE
UTENSILS
22
MICROWAVE-SAFE UTENSILS
test. Do not heat dinner plates that use any painted on decorative as they will arc if the paint has metallic
content.
23
FOOD CHARACTERISTICS & MICROWAVE COOKING
FOOD CHARACTERISTICS & MICROWAVE COOKING
24
oven especially if the foil passes too closely to the walls of
the oven during rotation.
STOP
TO CLEAN YOUR OVEN
25
times and may even damage the oven.
Steam or
condensation build up inside the door is normal if foods are heated for a long period on higher power levels. this
is not a malfunction. the condensation will eventually evaporate. Try covering the food or vary the heating levels
and time to reduce any condensation forming in the door, this may also occur
Disconnect the mains plug from the power outlet before cleaning the oven to eliminate the possibility of electric shock.
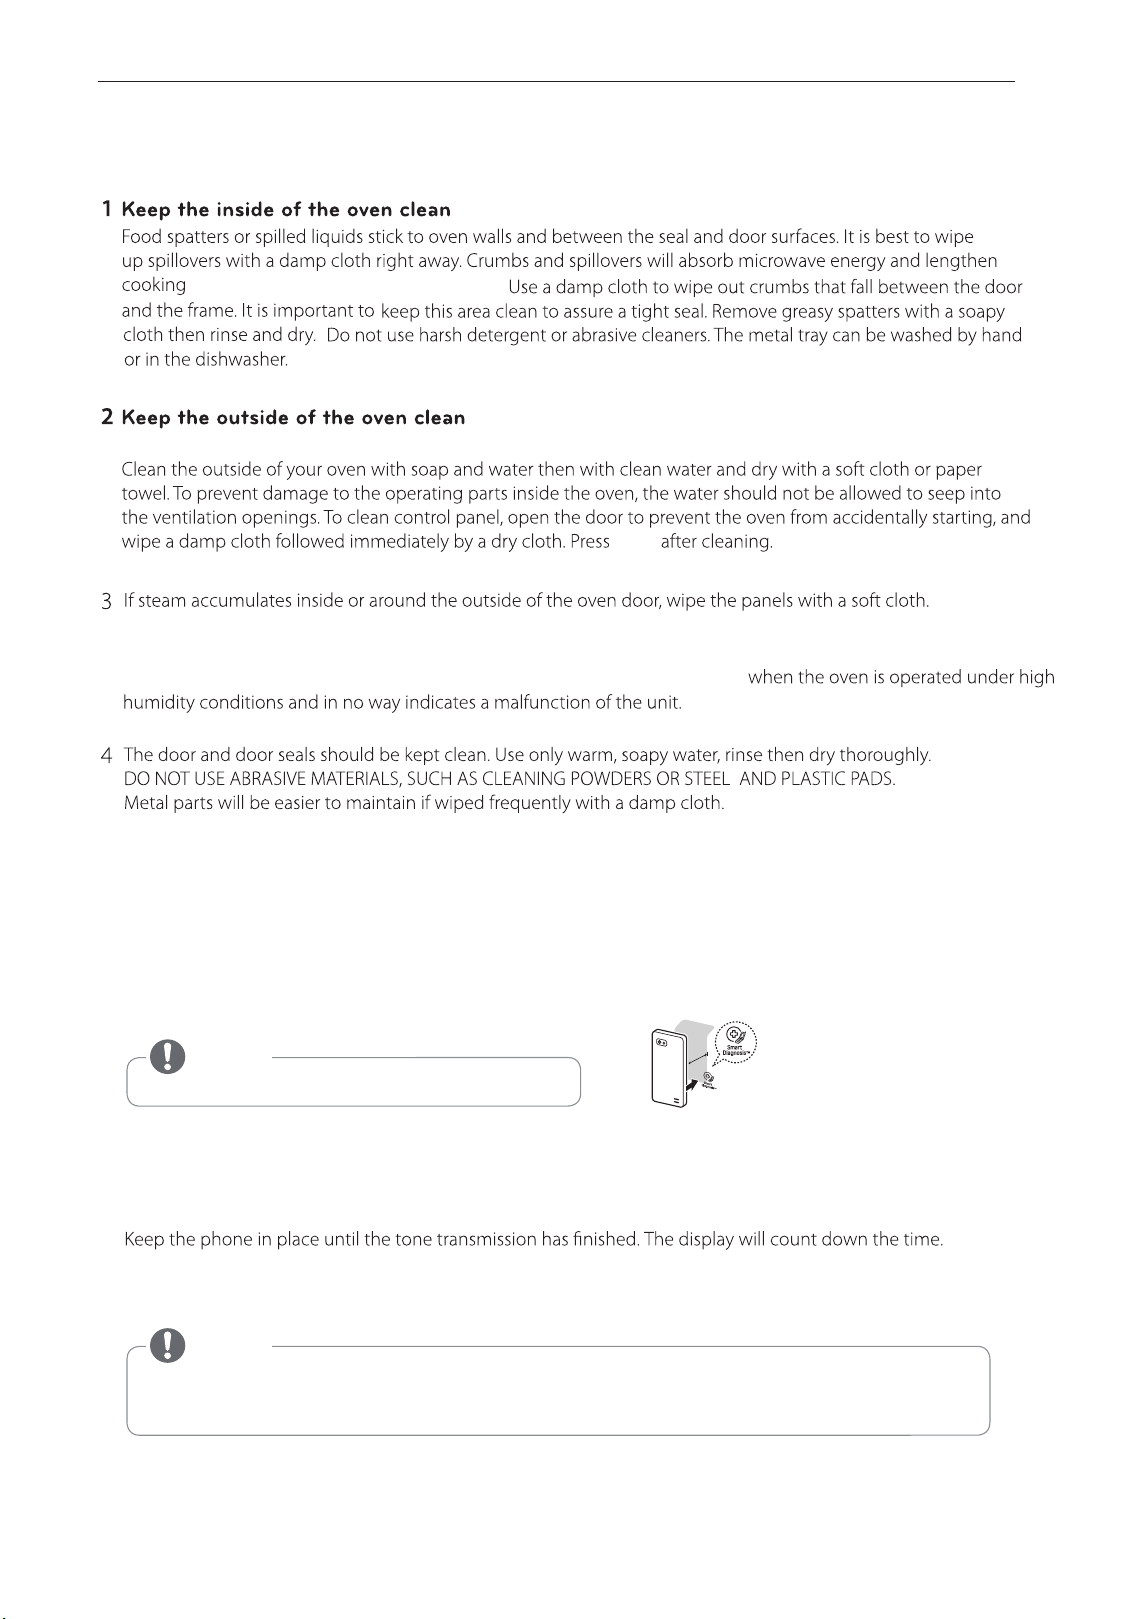
USING THE SMART DIAGNOSIS™ FUNCTION
Use this function if you need an accurate diagnosis by an LG Electronics service centre when the product malfunctions
or fails. Use this function only to contact the service representative, not during normal operation.
1.
When instructed to do so by the call centre, hold the mouthpiece of your phone over the Smart Diagnosis™ logo on
the controller.
•
Do not touch any other buttons.
2. With the door closed, press and continue to hold the STOP/Cancel button for 3 seconds so that 'Loc' appears
on the display. Continue to hold the STOP/Cancel button for a further 5 seconds until '5' appears in the display.
(so, the STOP/Cancel button will need to be held for 8 seconds continuously).
A tone will then emit from behind the Smart Diagnosis symbol.
3.
4.
Once the countdown is over and the tones have stopped, resume your conversation with the call center agent,
who will then be able to assist you in using the information transmitted for analysis.
•
For best results, do not move the phone while the tones are being transmitted.
•
If the call center agent is not able to get an accurate recording of the data, you may be asked to try again.
NOTE
NOTE
Max
10 mm
TO CLEAN YOUR OVEN / USING THE SMART DIAGNOSIS™ FUNCTION
After cooking is complete, the fan may operate to cool the oven.
The display will show 'Cool'. If you open the door or press once
STOP before the cooking time is complete, the remaining
cooking time will show on the display. This is not a malfunction.
When operating the microwave oven, If you use a product such as radio, TV, wireless LAN, Bluetooth, medical equipment,
wireless equipment etc. Using the same frequency as the microwave oven, the product may receive interference from
these products. This interference does not indicate a problem of the microwave or the product and is not a malfunction.
Therefore, it is safe to use. However, medical equipment may receive interference as well, so use caution when using
medical equipment near the product.
26
'Cool' appears on the display and the cooling
fan continues to run after the cooking or
heating time is over.

TECHNICAL SPECIFICATIONS
27
TECHNICAL SPECIFICATIONS
MS426
****
Power Input 230-240 V~ 50 Hz
Microwave Output Power.
Max. 1200 W* (IEC60705 rating standard)
Microwave Frequency
2450 MHz
Oven Cavity Dimension
395 mm(W) X 262 mm(H) X 406 mm(D)
MS426
Outside Dimension
****
544 mm(W) X 308 mm(H) X 441 mm(D)
Power Consumption
Microwave
1350 W
Net Weight 11.5 kg
Shipping Weight 15.0 kg
Microwave Frequency : 2450 MHz +/- 50 MHz (Group 2 / Class B) **
Group 2 equipment: group 2 contains all ISM RF equipment in which radio-frequency energy in the frequency
range 9 kHz to 400 GHz is intentionally generated and used or only used, in the form of electromagnetic
radiation, inductive and /or capacitive coupling, for the treatment of material or inspection/analysis purposes.
Class B equipment is equipment suitable for use in domestic dwellings and domestic dwellings directly
connected to a low voltage power supply network which supplies buildings used for domestic purposes.
You can download an owner's manual at http://www.lg.com
* When operating at 100%, 90%, and 80% power levels for prolonged periods, the output power will
be reduced gradually to help prevent the unit from electrically overheating.

Printed in China
LG Electronics Australia 2 Wonderland Drive Eastern Creek NSW 2766 (ABN : 98 064 531 264)
FOR CUSTOMER SERVICE PLEASE CONTACT LG Service on
1300 LG CARE (1300 54 2273) AUSTRALIA or
0800 LG CARE (0800 54 2273) NEW ZEALAND
www.lg.com