LIQUID CRYSTAL TELEVISION
OPERATION MANUAL
Please choose your favorite page from the content.
If you want to close the operation manual, press the EXIT
button.
Also, if you want to return to the previously displayed
page, press the
(Back) button.
(For LC-70UH30U) (For UH30U model)
ENGLISH | FRANÇAIS | ESPAÑOL
>>

1. Part Names
1-1. TV
1-2. Remote Control Unit
1-4. Touchpad Remote Control Unit (For
UH30U model)
2. How to select the TV Mode
2-1. Using the Remote Control Unit
2-2. Using the Touchpad Remote
Control Unit (For UH30U model)
2-5. HOME screen
2-6. Settings
Google Cast devices
2-7. Channels
2-8. Discover
2-9. Devices
2-10. TV Setup
3. TV Setup Operation
3-1. Introduction
3-2. Picture
3-24. Audio
3-31. General
4. Devices Operation
4-1. Video In
4-4. Audio Out
5. Direct Button Operation
5-1. Changing Channels
5-2. Changing Volume
5-3. MUTE
5-4. FLASHBACK
5-5. NETFLIX
5-6. AUDIO
5-7. Sleep Timer
5-8. Closed Captions and Digital Closed
Captions
5-10. VIEW MODE
5-13. Remote Control Panel
6. Enjoying Photo/Music/Video Playback
6-1. Preparation
6-2. Selecting the Folders to Play Back
6-4. Playing Back Files on a USB
Memory Device/SD Memory
Card/Home Network Server
6-10. Playing Back Files from a Portable
Device
7. Using LINK Operation
7-1. Presetting Remote Control Function
7-4. Operating the Connected
Equipment
7-5. Controlling HDMI Equipment Using
LINK Operation
7-7. Using a Smartphone with the TV
8. Using a PC
8-1. Setting Audio Input
8-2. Control of the TV
8-8. PC Compatibility Chart
9. Using the Internet
9-1. Connecting to the Internet
9-2. Using Keyboard and Mouse
9-3. Notes
10. Appendix
10-1. Troubleshooting
10-3. Troubleshooting - Error Message
10-4. Information on the Software
License for This Product
11. Trademarks
12. Specifications
12-1. TV
12-6. Wireless LAN
13. Dimensional Drawings
13-1. LC-80UH30U
13-2. LC-70UH30U
13-3. LC-80UE30U
13-4. LC-70UE30U / LC-70UC30U
13-5. LC-60UE30U
Contents
ENGContents
ENGLISH | FRANÇAIS | ESPAÑOL
>><<

IMPORTANT INFORMATION
IMPORTANT:
WARNING: TOREDUCETHERISKOFFIREORELECTRIC
SHOCK,DONOTEXPOSETHISPRODUCTTO
RAINORMOISTURE.
CAUTION
RISKOFELECTRICSHOCK
DONOTOPEN
CAUTION:TOREDUCETHERISKOFELECTRICSHOCK,
DONOTREMOVECOVER(ORBACK).
NOUSERSERVICEABLE
REFERSERVICINGTOQUALIFIEDSERVICE
PERSONNEL.
CAUTION: TOPREVENTELECTRICSHOCK,MATCHWIDEBLADEOFPLUGTOWIDE
SLOT,FULLYINSERT.
WARNING: FCCRegulationsstatethatanyunauthorizedchangesormodificationstothis
equipmentnotexpresslyapprovedbythemanufacturercouldvoidtheuser'sauthority
tooperatethisequipment.
CAUTION: ThisproductsatisfiesFCCregulationswhenshieldedcablesandconnectorsareusedto
connecttheunittootherequipment.Topreventelectromagneticinterferencewithelectric
appliancessuchasradiosandtelevisions,useshieldedcablesandconnectors
forconnections.
Thelightningflashwitharrowhead
symbol,withinanequilateral
triangle,isintendedtoalertthe
usertothepresenceof
uninsulated"dangerousvoltage"
withintheproduct'senclosurethat
maybeofsufficientmagnitudeto
constituteariskofelectricshock
topersons.
Theexclamationpointwithina
triangleisintendedtoalertthe
usertothepresenceofimportant
operatingandmaintenance
(servicing)instructionsinthe
literatureaccompanyingthe
product.
DECLARATIONOFCONFORMITY:
SHARPLIQUIDCRYSTALTELEVISION,MODELLC80UH30U/LC70UH30U/LC80UE30U/
LC70UE30U/LC60UE30U/LC70UC30U
ThisdevicecomplieswithPart15oftheFCCRules.Operationissubjecttothefollowingtwo
conditions:
(1)Thisdevicemaynotcauseharmfulinterference,and(2)thisdevicemustacceptanyinterference
received,includinginterferencethatmaycauseundesiredoperation.
RESPONSIBLEPARTY:
SHARPELECTRONICSCORPORATION
1SharpPlaza,Suite1,Mahwah,NJ074951123
TEL:1800BESHARP
ForBusinessCustomers:URLhttp://www.sharpusa.com
INFORMATION:
ThisequipmenthasbeentestedandfoundtocomplywiththelimitsforaClassBdigitaldevice,
pursuanttoPart15oftheFCCRules.Theselimitsaredesignedtoprovidereasonableprotection
againstharmfulinterferenceinaresidentialinstallation.Thisequipmentgenerates,usesandcan
radiateradiofrequencyenergyand,ifnotinstalledandusedinaccordancewiththeinstructions,may
causeharmfulinterferencetoradiocommunications.However,thereisnoguaranteethatinterference
willnotoccurinaparticularinstallation.Ifthisequipmentdoescauseharmfulinterferencetoradio
ortelevisionreception,whichcanbedeterminedbyturningtheequipmentoffandon,theuseris
encouragedtotrytocorrecttheinterferencebyoneormoreofthefollowingmeasures:
—
Reorientorrelocatethereceivingantenna.
—
Increasetheseparationbetweentheequipmentandreceiver.
—
—
Consultthedealeroranexperiencedradio/TVtechnicianforhelp.
Connecttheequipmentintoanoutletonacircuitdifferentfromthattowhichthereceiverisconnected.
Toaidreportingincaseoflossortheft,pleaserecordthe
TV’smodelandserialnumbersinthespaceprovided.
ThenumbersarelocatedattherearandleftsideoftheTV.
PARTSINSIDE.
ENGImportant1
ENGLISH | FRANÇAIS | ESPAÑOL
>><<
IMPORTANT INFORMATION
FCCComplianceStatement
Thisdevicecomplieswithpart15oftheFCCRules.Operationissubjecttothefollowingtwoconditions:
(1)Thisdevicemaynotcauseharmfulinterference,and(2)thisdevicemustacceptanyinterference
received,includinginterferencethatmaycauseundesiredoperation.
WirelessRadio
ForproductavailableintheUSA/Canadamarket,onlychannel1–11canbeoperated.Selectionof
otherchannelsisnotpossible.Thisdeviceisgoingtobeoperatedin5.15–5.25GHzfrequencyrange,
itisrestrictedinindoorenvironmentonly.
Important:Anychangesormodificationsnotexpresslyapprovedbythepartyresponsiblefor
compliancecouldvoidtheuser’sauthoritytooperatetheequipment.
FCCRadiationExposureStatement:ThisequipmentcomplieswithFCCradiationexposurelimitsset
forthforanuncontrolledenvironment.Thisequipmentshouldbeinstalledandoperatedwithminimum
distance20cmbetweentheradiator&yourbody.
IndustryCanadaStatement
ThisClassBdigitalapparatuscomplieswithCANICES003(B)/NMB3(B)
WirelessRadio
ForproductavailableintheUSA/Canadamarket,onlychannel1–11canbeoperated.Selectionof
otherchannelsisnotpossible.
Thedevicecouldautomaticallydiscontinuetransmissionincaseofabsenceofinformationtotransmit,
oroperationalfailure.
Notethatthisisnotintendedtoprohibittransmissionofcontrolorsignalinginformationortheuseof
repetitivecodeswhererequiredbythetechnology.
Important:Anychangesormodificationsnotexpresslyapprovedbythepartyresponsiblefor
compliancecouldvoidtheuser’sauthoritytooperatetheequipment.
ICRadiationExposureStatement:ThisdevicecomplieswithICRSS210rules;Operationissubject
tothefollowingtwoconditions:
(1)Thisdevicemaynotcauseharmfulinterference,and(2)thisdevicemustacceptinterference
recieved,includinginterferencethatmaycauseundesiredoperation.
"NotetoCATVsysteminstaller:ThisreminderisprovidedtocalltheCATVsysteminstaller'sattention
toArticle820oftheNationalElectricalCodethatprovidesguidelinesforpropergroundingand,in
particular,specifiesthatthecablegroundshallbeconnectedtothegroundingsystemofthebuilding,
asclosetothepointofcableentryaspractical."
ENGImportant2
ENGLISH | FRANÇAIS | ESPAÑOL
>><<
IMPORTANT INFORMATION
IMPORTANTSAFETYINSTRUCTIONS
DEARSHARPCUSTOMER IMPORTANTSAFETYINSTRUCTIONS
•
GROUND
CLAMP
ELECTRIC
SERVICE
EQUIPMENT
•
•
•
•
•
•
•
•
•
•
•
Electricityisusedtoperformmanyusefulfunctions,butitcanalsocausepersonalinjuriesand
propertydamageifimproperlyhandled.Thisproducthasbeenengineeredandmanufacturedwith
thehighestpriorityonsafety.However,improperusecanresultinelectricshockand/orfire.Inorder
topreventpotentialdanger,pleaseobservethefollowinginstructionswheninstalling,operating
andcleaningtheproduct.ToensureyoursafetyandprolongtheservicelifeofyourLiquidCrystal
Television,pleasereadthefollowingprecautionscarefullybeforeusingtheproduct.
1) Readtheseinstructions.
2) Keeptheseinstructions.
3) Heedallwarnings.
4) Followallinstructions.
5) Donotusethisapparatusnearwater.
6) Cleanonlywithdrycloth.
7) Donotblockanyventilationopenings.Installinaccordancewiththemanufacturer'sinstructions.
8) Donotinstallnearanyheatsourcessuchasradiators,heatregisters,stoves,orotherapparatus
(includingamplifiers)thatproduceheat.
9)
Donotdefeatthesafetypurposeofthepolarizedorgroundingtypeplug.Apolarizedplughastwo
bladeswithonewiderthantheother.Agroundingtypeplughastwobladesandathirdgrounding
prong.Thewidebladeorthethirdprongareprovidedforyoursafety.Iftheprovidedplugdoesnotfit
intoyouroutlet,consultanelectricianforreplacementoftheobsoleteoutlet.
10) Protectthepowercordfrombeingwalkedonorpinchedparticularlyatplugs,convenience
receptacles,andthepointwheretheyexitfromtheapparatus.
11) Onlyuseattachments/accessoriesspecifiedbythemanufacturer.
12) Useonlywiththecart,stand,tripod,bracket,ortablespecifiedbythemanufacturer,
orsoldwiththeapparatus.Whenacartisused,usecautionwhenmovingthecart/
apparatuscombinationtoavoidinjuryfromtipover.
13) Unplugthisapparatusduringlightningstormsorwhenunusedforlongperiodsof
time.
14) Referallservicingtoqualifiedservicepersonnel.Servicingisrequiredwhentheapparatushas
beendamagedinanyway,suchaspowersupplycordorplugisdamaged,liquidhasbeen
spilledorobjectshavefallenintotheapparatus,theapparatushasbeenexposedtorainor
moisture,doesnotoperatenormally,orhasbeendropped.
AdditionalSafetyInformation
15)
PowerSources—Thisproductshouldbeoperatedonlyfromthetypeofpowersourceindicated
onthemarkinglabel.Ifyouarenotsureofthetypeofpowersupplytoyourhome,consultyour
productdealerorlocalpowercompany.Forproductsintendedtooperatefrombatterypower,or
othersources,refertotheoperatinginstructions.
16) Overloading—Donotoverloadwalloutlets,extensioncords,orintegralconveniencereceptacles
asthiscanresultinariskoffireorelectricshock.
17) ObjectandLiquidEntry—Neverpushobjectsofanykindintothisproductthroughopeningsas
theymaytouchdangerousvoltagepointsorshortoutpartsthatcouldresultinafireorelectric
shock.Neverspillliquidofanykindontheproduct.
18) DamageRequiringService—Unplugthisproductfromthewalloutletandreferservicingto
qualifiedservicepersonnelunderthefollowingconditions:
a) WhentheACcordorplugisdamaged,
b) Ifliquidhasbeenspilled,orobjectshavefallenintotheproduct,
c) Iftheproducthasbeenexposedtorainorwater,
d)
Iftheproductdoesnotoperatenormallybyfollowingtheoperatinginstructions.
Adjustonlythosecontrolsthatarecoveredbytheoperatinginstructionsasanimproperadjustment
ofothercontrolsmayresultindamageandwilloftenrequireextensiveworkbyaqualifiedtechnician
torestoretheproducttoitsnormaloperation,
e) Iftheproducthasbeendroppedordamagedinanyway,and
f) Whentheproductexhibitsadistinctchangeinperformancethisindicatesaneedfor
service.
19) ReplacementParts—Whenreplacementpartsarerequired,besuretheservicetechnicianhas
usedreplacementpartsspecifiedbythemanufacturerorhavethesamecharacteristicsasthe
20) SafetyCheck—Uponcompletionofanyserviceorrepairstothisproduct,asktheservice
techniciantoperformsafetycheckstodeterminethattheproductisinproperoperating
condition.
21) Wallorceilingmounting—Whenmountingtheproductonawallorceiling,besuretoinstallthe
productaccordingtothemethodrecommendedbythemanufacturer.
•
•
•
•
•
•
•
•
•
•
•
• Topreventfireorshockhazard,donotplacetheACcordundertheTVsetorotherheavyitems.
Topreventfire,neverplaceanytypeofcandleorflamesonthetoporneartheTVset.
PowerLines—Anoutsideantennasystemshouldnotbelocatedinthevicinityofoverheadpower
linesorotherelectriclightorpowercircuits,orwhereitcanfallintosuchpowerlinesorcircuits.
Wheninstallinganoutsideantennasystem,extremecareshouldbetakentokeepfromtouching
suchpowerlinesorcircuitsascontactwiththemmightbefatal.
Lightning—Foraddedprotectionforthistelevisionequipmentduringalightningstorm,orwhenitis
leftunattendedandunusedforlongperiodsoftime,unplugitfromthewalloutletanddisconnectthe
antenna.Thiswillpreventdamagetotheequipmentduetolightningandpowerlinesurges.
TheLiquidCrystalpanelisaveryhightechnologyproductwith8,294,400pixels,givingyoufine
picturedetails.Occasionally,afewnonactivepixelsmayappearonthescreenasafixedpointof
blue,greenorred.Pleasenotethatthisdoesnotaffecttheperformanceofyourproduct.
Heat—Theproductshouldbesituatedawayfromheatsourcessuchasradiators,heatregisters,
stoves,orotherproducts(includingamplifiers)thatproduceheat.
Thefrontpanelusedinthisproductismadeofglass.Therefore,itcanbreakwhentheproductis
droppedorappliedwithimpact.Becarefulnottobeinjuredbybrokenglasspiecesincasethepanel
breaks.
Ventilation—Theventsandotheropeningsinthecabinetaredesignedforventilation.Donotcover
orblocktheseventsandopeningssinceinsufficientventilationcancauseoverheatingand/orshorten
thelifeoftheproduct.Donotplacetheproductonabed,sofa,rugorothersimilarsurface,since
theycanblockventilationopenings.Thisproductisnotdesignedforbuiltininstallation;donotplace
theproductinanenclosedplacesuchasabookcaseorrack,unlessproperventilationisprovidedor
themanufacturer'sinstructionsarefollowed.
Selectingthelocation—Selectaplacewithnodirectsunlightandgoodventilation.
Stand—Donotplacetheproductonanunstablecart,stand,tripodortable.Placingtheproducton
anunstablebasecancausetheproducttofall,resultinginseriouspersonalinjuriesaswellasdamage
totheproduct.Useonlyacart,stand,tripod,bracketortablerecommendedbythemanufactureror
soldwiththeproduct.Whenmountingtheproductonawall,besuretofollowthemanufacturer's
instructions.Useonlythemountinghardwarerecommendedbythemanufacturer.
WaterandMoisture—Donotusethisproductnearwaterforexample,nearabathtub,washbowl,
kitchensink,orlaundrytub;inawetbasement;ornearaswimmingpool;andthelike.
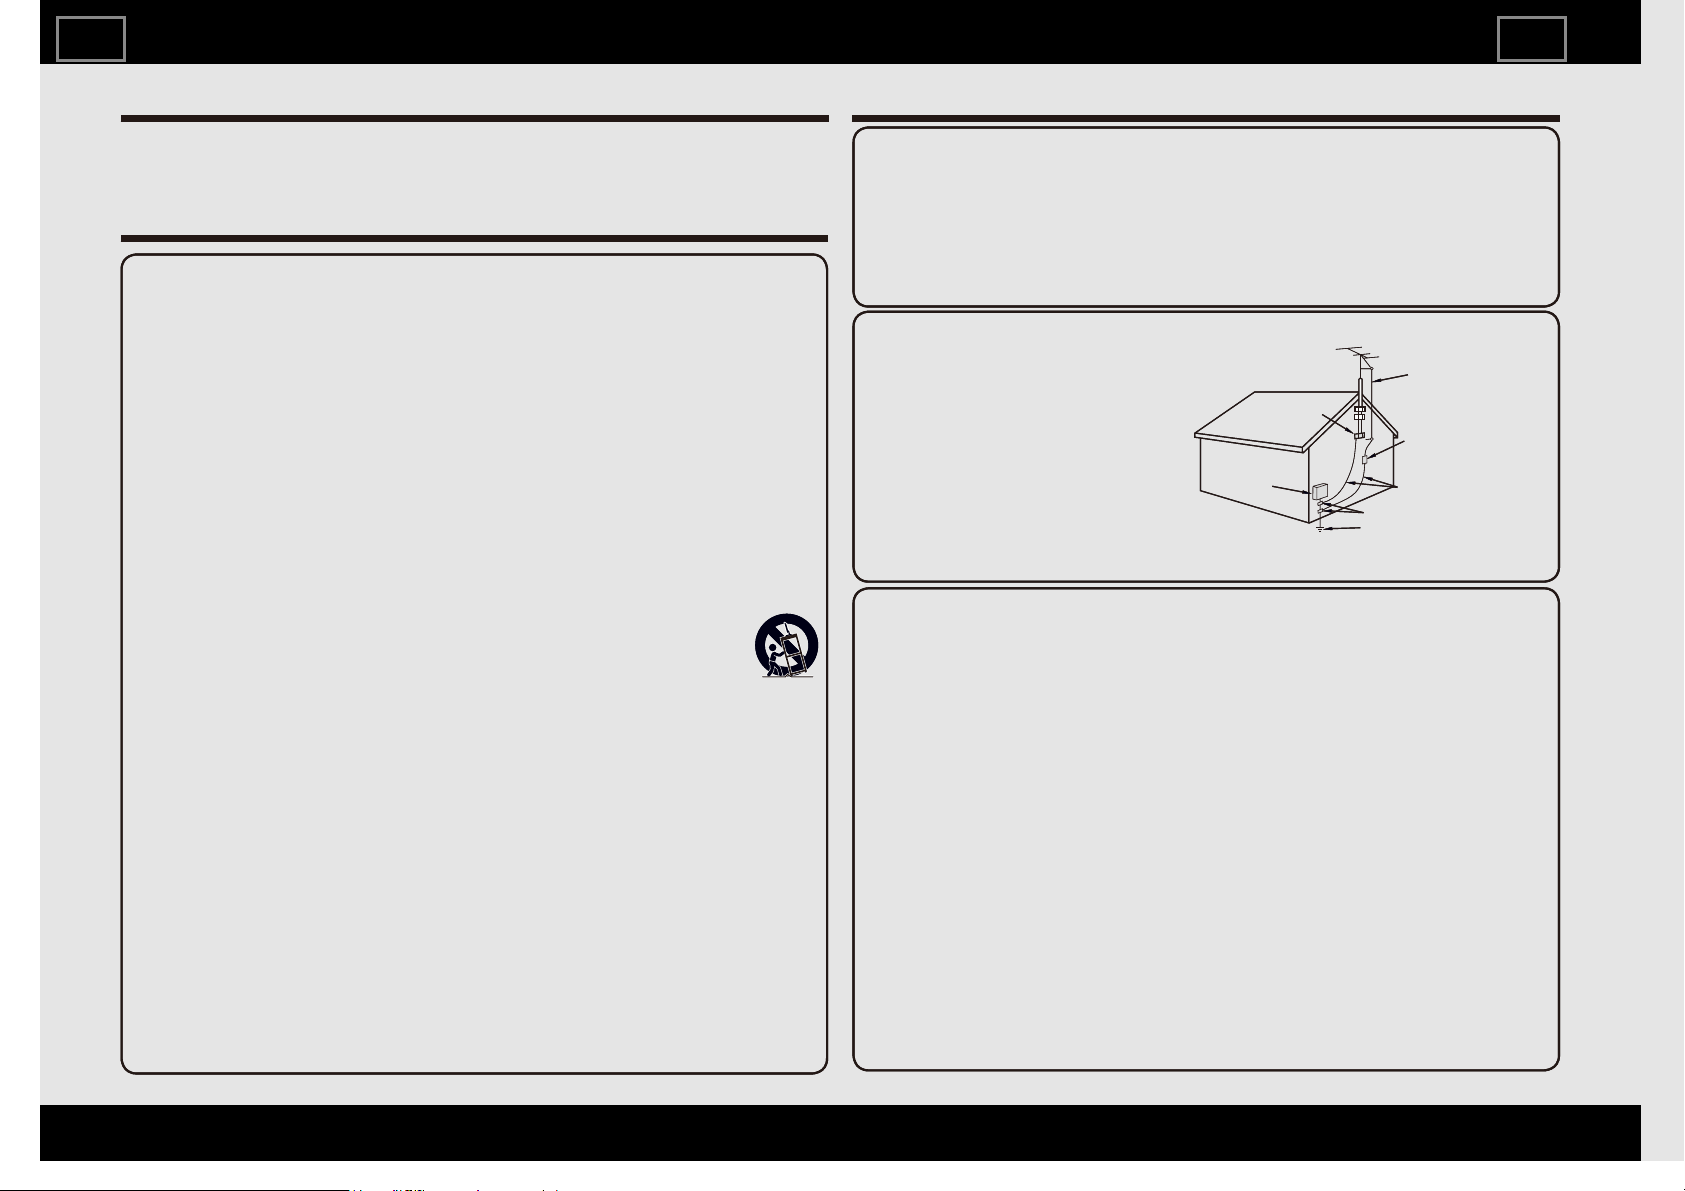
OutdoorAntennaGrounding—Ifanoutside
antennaisconnectedtothetelevision
equipment,besuretheantennasystemis
groundedsoastoprovidesomeprotection
againstvoltagesurgesandbuiltupstatic
charges.
Article810oftheNationalElectricalCode,
ANSI/NFPA70,providesinformationwith
regardtopropergroundingofthemastand
supportingstructure,groundingofthelead
inwiretoanantennadischargeunit,sizeof
groundingconductors,locationofantenna
dischargeunit,connectiontogrounding
electrodes,andrequirementsforthe
groundingelectrode.
EXAMPLEOFANTENNAGROUNDINGASPER
NATIONALELECTRICALCODE,ANSI/NFPA70
ANTENNALEAD
INWIRE
ANTENNA
DISCHARGEUNIT
(NECSECTION81020)
GROUNDINGCONDUCTORS
(NECSECTION81021)
GROUNDCLAMPS
POWERSERVICEGROUNDING
ELECTRODESYSTEM
(NECART250)
NEC—NATIONALELECTRICALCODE
ThankyouforyourpurchaseoftheSharpLiquidCrystalTelevision.Toensuresafetyandmany
yearsoftroublefreeoperationofyourproduct,pleasereadtheImportantSafetyInstructions
carefullybeforeusingthisproduct.
originalpart.Unauthorizedsubstitutionsmayresultinfire,electricshock,orotherhazards.
ENGImportant3
ENGLISH | FRANÇAIS | ESPAÑOL
>><<
IMPORTANT INFORMATION
IMPORTANTSAFETYINSTRUCTIONS
•
•
•
•
•
•
Caringforthefrontpanel
•
•
•
•
•
•
• Donotdisplayastillpictureforalongtime,asthiscouldcauseanafterimagetoremain.
• Topreventfireorshockhazard,donotexposethisproducttodrippingorsplashing.
Noobjectsfilledwithliquids,suchasvases,shouldbeplacedontheproduct.
• Donotinsertforeignobjectsintotheproduct.Insertingobjectsintheairventsorother
openingsmayresultinfireorelectricshock.Exercisespecialcautionwhenusingthe
productaroundchildren.
PrecautionswhentransportingtheTV
DonotinstalltheTVinalocationinwhichitwillbesubjectto
waterdropssuchasunderneathanairconditioningunitorin
thevicinityofahumidifier
•
THECONSUMERELECTRONICSINDUSTRYCARES
•
•
• ALWAYSfollowthemanufacturer’srecommendationsforthesafe
installationofyourtelevision.
ALWAYSreadandfollowallinstructionsforproperuseofyourtelevision.
NEVERallowchildrentoclimbonorplayonthetelevisionorthefurnitureon
whichthetelevisionisplaced.
NEVERplacethetelevisiononfurniturethatcaneasilybeusedassteps,
suchasachestofdrawers.
ALWAYSinstallthetelevisionwhereitcannotbepushed,pulledoveror
knockeddown.
ALWAYSroutecordsandcablesconnectedtothetelevisionsothatthey
cannotbetrippedover,pulledorgrabbed.
•
•
•
•
•
WALLORCEILINGMOUNTYOURTELEVISION
• ALWAYScontactyourretaileraboutprofessionalinstallationifyouhaveany
doubtsaboutyourabilitytosafelymountyourtelevision.
ALWAYSuseamountthathasbeenrecommendedbythetelevision
manufacturerandhasasafetycertificationbyanindependentlaboratory
(suchasUL,CSA,ETL).
ALWAYSfollowallinstructionssuppliedbythetelevisionandmount
manufacturers.
ALWAYSmakesurethatthewallorceilingwhereyouaremountingthe
televisionisappropriate.
Somemountsarenotdesignedtobemountedtowallsandceilingswithsteel
studsorcinderblockconstruction.Ifyouareunsure,contactaprofessional
installer.
Televisionscanbeheavy.Aminimumoftwopeopleisrequiredforawallor
ceilingmountinstallation.
•
•
•
•
•
ManynewtelevisionbuyersmovetheirolderCRTtelevisionsintoa
secondaryroomafterthepurchaseofaflatpaneltelevision.Specialcare
shouldbemadeintheplacementofolderCRTtelevisions.
ALWAYSplaceyourolderCRTtelevisiononfurniturethatissturdyand
appropriateforitssizeandweight.
NEVERplaceyourolderCRTtelevisiononadresserwherechildrenmaybe
temptedtousethedrawerstoclimb.
ALWAYSmakesureyourolderCRTtelevisiondoesnothangovertheedge
ofyourfurniture.
•
•
•
CE.org/safetyCE.org/safety
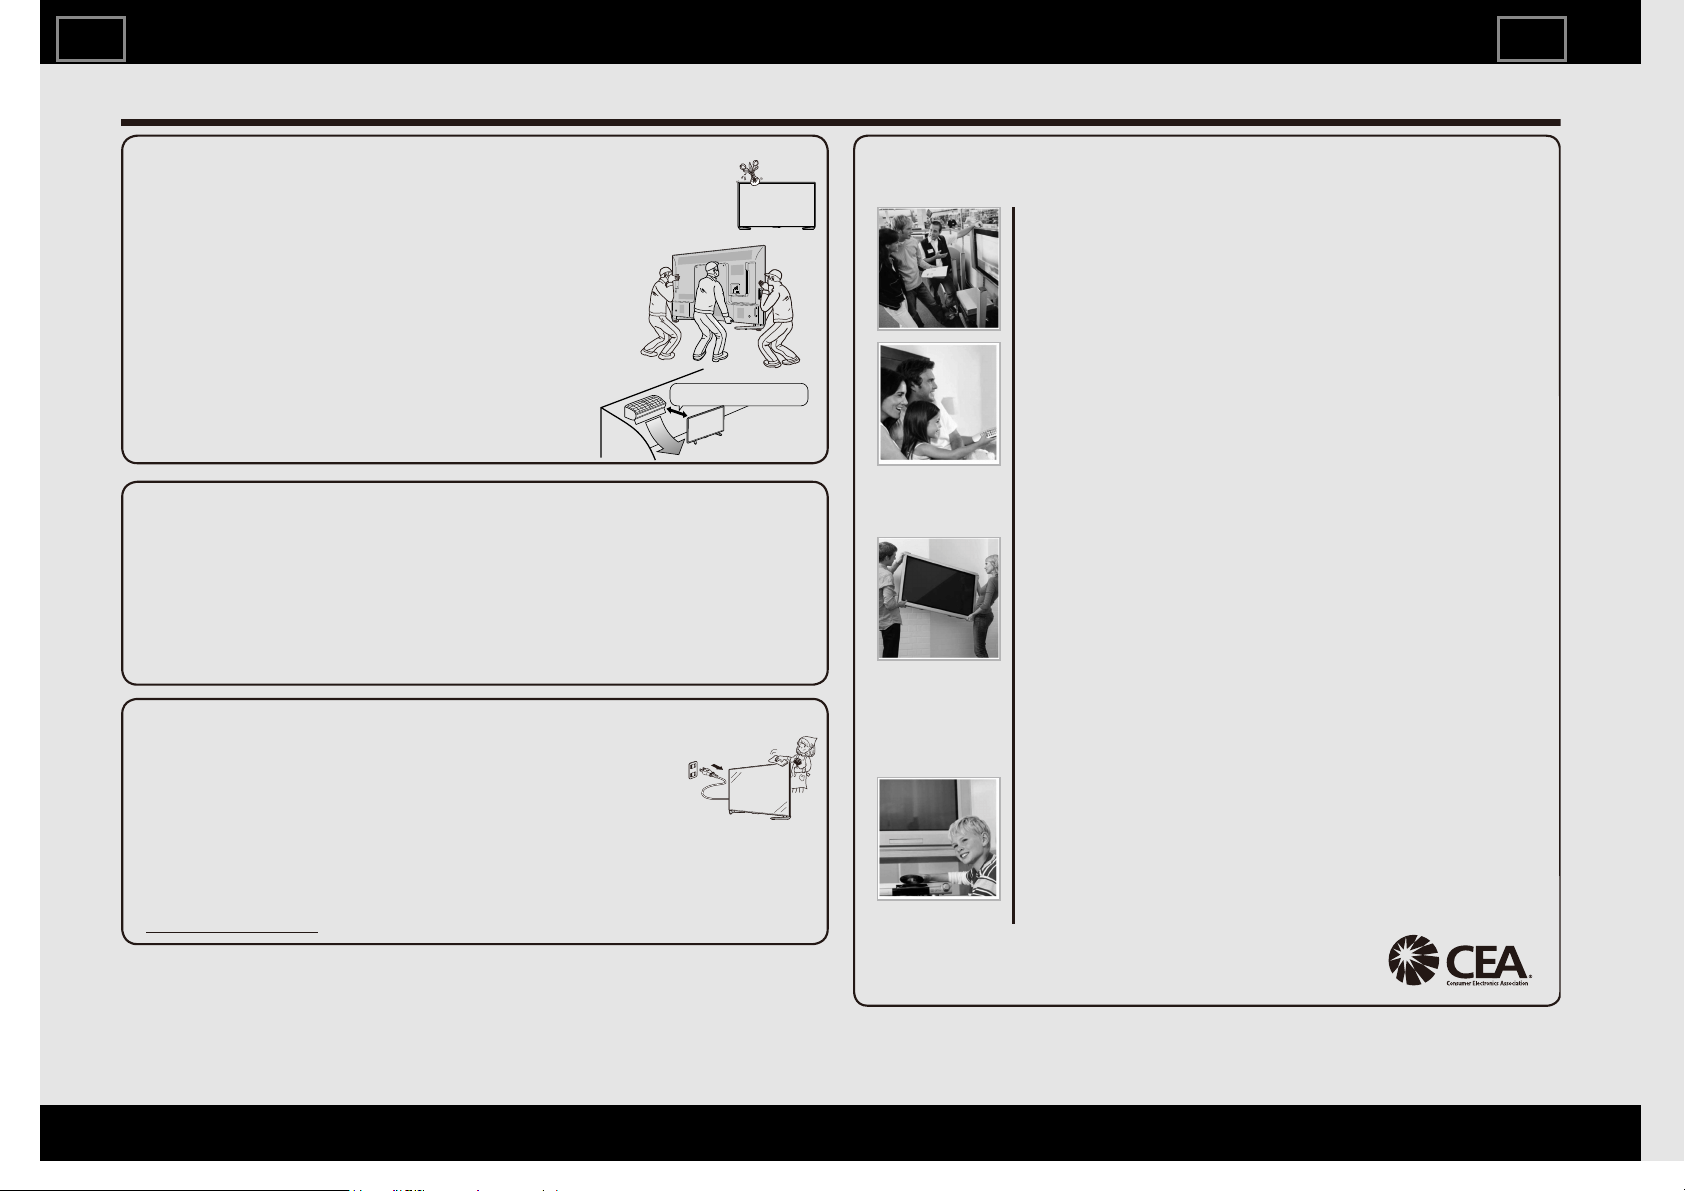
WhentransportingtheTV,nevercarryitbyholdingorotherwiseputting
pressureontothedisplay.BesuretoalwayscarrytheTVbytwopeople
(80inchmodels:threepeople)holdingitwithtwohands.
• WaterdropsfallingontotheTVandwaterenteringinsideitmay
resultinfire,electricshock,ormalfunctions.
WerecommendthatyouinstalltheTVatleast3.3ft(1m)away
fromtheoutletofanairconditioner.
Caringforthecabinet
Useasoftcloth(cotton,flannel,etc.)andgentlywipethesurfaceofthecabinet.
Usingachemicalcloth(wet/drysheettypecloth,etc.)maydeformthecomponentsofthemainunit
cabinetorcausecracking.
Wipingwithahardclothorusingstrongforcemayscratchthesurfaceofthecabinet.
Ifthecabinetisverydirty,wipewithasoftcloth(cotton,flannel,etc.)soakedinneutraldetergent
dilutedwithwaterandthoroughlywrungout,andthenwipewithasoftdrycloth.
Avoidusingbenzene,thinner,andothersolvents,asthesemaydeformthecabinetandcausethe
painttopeeloff.
Donotapplyinsecticidesorothervolatileliquids.
Also,donotallowthecabinettoremainincontactwithrubberorvinylproductsforalongperiodof
time.Plasticizersinsidetheplasticmaycausethecabinettodeformandcausethepainttopeeloff.
TurnoffthemainpowerandunplugtheACcordfromthewalloutletbeforehandling.
Gentlywipethesurfaceofthefrontpanelwithasoftcloth(cotton,flannel,etc.).
Toprotectthefrontpanel,donotuseadirtycloth,liquidcleaners,orachemical
cloth(wet/drysheettypecloth,etc.).Thismaydamagethesurfaceofthefront
panel.
Wipingwithahardclothorusingstrongforcemayscratchthesurfaceofthefront
panel.
Useasoftdampclothtogentlywipethefrontpanelwhenitisreallydirty.(Itmayscratchthesurface
ofthefrontpanelwhenwipedstrongly.)
Ifthefrontpanelisdusty,useanantistaticbrush,whichiscommerciallyavailable,tocleanit.
Toavoidscratchingtheframeorscreen,pleaseuseasoft,lintfreeclothforcleaning.Approved
cleaningclothsareavailabledirectlyfromSharpinsingle(00ZLCDCLOTH)ortriple
(00ZLCDCLOTH3)packs.Call1800BESHARPforordering,orVISIT
http://www.sharpusa.com
CHILDSAFETY:
PROPERTELEVISIONPLACEMENTMATTERS
Manufacturers,retailersandtherestoftheconsumerelectronicsindustryare
committedtomakinghomeentertainmentsafeandenjoyable.
Asyouenjoyyourtelevision,pleasenotethatalltelevisions–newandold
mustbesupportedonproperstandsorinstalledaccordingtothe
manufacturer’srecommendations.Televisionsthatareinappropriately
situatedondressers,bookcases,shelves,desks,speakers,chests,carts,
etc.,mayfallover,resultingininjury.
TUNEINTOSAFETY
MOVINGANOLDERTELEVISIONTOANEWPLACEINYOURHOME
Morethan3.3ft(1m).
ENGImportant4
ENGLISH | FRANÇAIS | ESPAÑOL
>><<

IMPORTANT INFORMATION
WirelessLAN
IMPORTANTSAFETYINSTRUCTIONS
ThisTVhasreceivedthefollowingcertifications.
WiFiCERTIFIED™(certificationprogramfromtheWiFiAlliance®)
WiFiProtectedSetup™(certificationprogramfromtheWiFiAlliance®)
FCC
Thisdevicecomplieswithpart15oftheFCCRules.Operationissubjecttothefollowingtwoconditions:
(1)Thisdevicemaynotcauseharmfulinterference,and(2)thisdevicemustacceptanyinterferencereceived,
includinginterferencethatmaycauseundesiredoperation.Changesormodificationsnotexpresslyapproved
bythepartyresponsibleforcompliancecouldvoidtheuser’sauthoritytooperatetheequipment.Tocomply
withtheFCCRFexposurecompliancerequirements,thisdeviceanditsantennamustnotbecolocatedor
operatedinconjunctionwithanyotherantennaortransmitter.
Thedevicefortheband51505250MHzisonlyforindoorusagetoreducepotentialforharmfulinterference
tocochannelmobilesatellitesystems;
Themaximumantennagainpermitted(fordevicesinthebands52505350MHzand54705725MHz)to
complywiththee.i.r.p.limit;andHighpowerradarsareallocatedasprimaryusers(meaningtheyhave
priority)ofthebands52505350MHzand56505850MHzandtheseradarscouldcauseinterferenceand/or
damagetoLELANdevices.
ENGImportant5
ENGLISH | FRANÇAIS | ESPAÑOL
>><<

IMPORTANT INFORMATION
IMPORTANTSAFETYINSTRUCTIONS
Bluetooth
NotesonRadioWaveCertificationintheU.S.A.andCanada
"Thistransmittermustnotbecolocatedoroperatedinconjunctionwithanyotherantennaortransmitter."
FCC/INDUSTRYCANADANOTICE
FCCCAUTION
ChangesormodificationsnotexpresslyapprovedbyHosidenresponsibleforcompliancecouldvoidthe
user'sauthoritytooperatetheequipment.
Thisdevicecomplieswithpart15oftheFCCRules.Operationissubjecttothefollowingtwoconditions:
(1)Thisdevicemaynotcauseharmfulinterference,and(2)thisdevicemustacceptanyinterference
received,includinginterferencethatmaycauseundesiredoperation.
ThisdevicecomplieswithPart15ofFCCRulesandIndustryCanadalicenseexemptRSSstandard(s).
Operationissubjecttothefollowingtwoconditions:(1)thisdevicemaynotcauseinterference,and
(2)thisdevicemustacceptanyinterference,includinginterferencethatmaycauseundesired
operationofthisdevice.
ThisequipmentcomplieswithFCC/ICradiationexposurelimitssetforthforanuncontrolled
environmentandmeetstheFCCradiofrequency(RF)ExposureGuidelinesinSupplementCtoOET65
andRSS102oftheICradiofrequency(RF)Exprosurerules.Thisequipmenthasverylowlevelsof
RFenergythataredeemedtocomplywithouttestingofspecificabsorptionratio(SAR).
Note:ThisequipmenthasbeentestedandfoundtocomplywiththelimitsforaClassBdigitaldevice,
pursuanttoPart15oftheFCCRules.Theselimitsaredesignedtoprovidereasonableprotectionagainst
harmfulinterferenceinaresidentialinstallation.Thisequipmentgenerates,usesandcanradiateradio
frequencyenergyand,ifnotinstalledandusedinaccordancewiththeinstructions,maycauseharmful
interferencetoradiocommunications.However,thereisnoguaranteethatinterferencewillnotoccurin
aparticularinstallation.Ifthisequipmentdoescauseharmfulinterferencetoradioortelevision
reception,whichcanbedeterminedbyturningtheequipmentoffandon,theuserisencouragedtotryto
correcttheinterferencebyoneormoreofthefollowingmeasures:
Reorientorrelocatethereceivingantenna.
Increasetheseparationbetweentheequipmentandreceiver.
Connecttheequipmentintoanoutletonacircuitdifferentfromthattowhichthereceiverisconnected.
Consultthedealeroranexperiencedradio/TVtechnicianforhelp.
ThisClassBdigitalapparatuscomplieswithCanadianICES003
Leprésentappareilestconformeauxlaprtie15desrèglesdelaFCCetCNRd'IndustrieCanadaapplicables
auxappareilsradioexemptsdelicence.L'exploitationestautoriséeauxdeuxconditionssuivantes:
(1)l'appareilnedoitpasproduiredebrouillage,et(2)l'uitilisateurdel'appareildoitacceptertout
brouillageradioélectriquesubi,mêmesilebrouillageestsusceptibled'encompromettrelefonctionnement.
Cetéquipementestconformeauxlimitesd'expositionauxrayonnementsénoncéespourunenvironnement
noncontrôléetrespectelesrègleslesradioélectriques(RF)delaFCClignesdirectricesd'exposition
dansleSupplémentCàOET65etd'expositionauxfréquencesradioélectriques(RF)CNR102del'IC.
CetéquipementémetuneénergieRFtrèsfaiblequiestconsidéréeconformesansévaluationdudébit
d'absorptionspécifique(DAS).
CetappareilnumériquedelaclasseBestconformeàlanormeNMB3duCanada.
ENGImportant6
ENGLISH | FRANÇAIS | ESPAÑOL
>><<
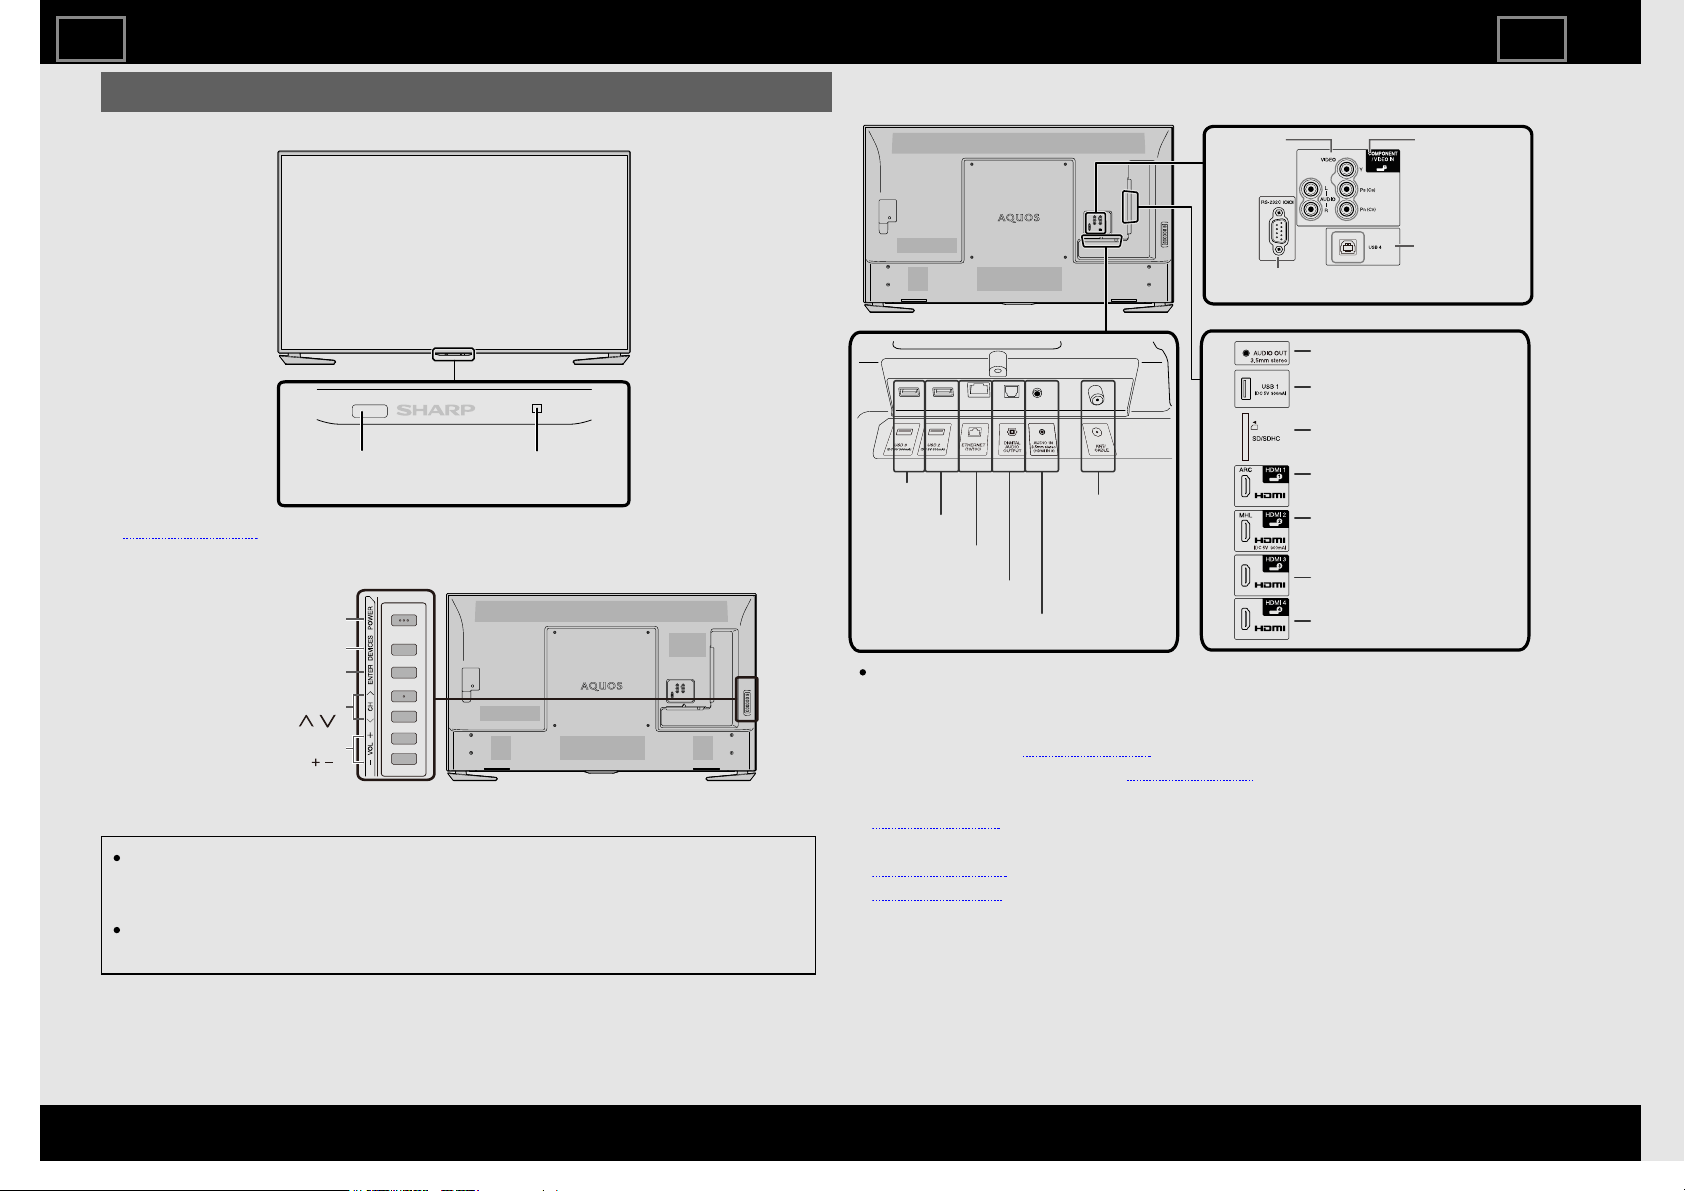
TV
(Front)
Remotecontrolsensor
LightSensor*1
POWER
indicator
*1 See page 3-4.
(Side)
POWERbutton
DEVICESbutton
ENTERbutton
Channelbuttons
Volumebuttons
(CH / )
(VOL / )
The illustrations and on-screen displays in this operation manual are
for explanation purposes and may vary slightly from the actual
operations.
The drawings used throughout this manual are based on the LC-
60UE30U model.
(Rear)
*1
*1
HDMIIN3 terminal*2
HDMIIN4 terminal
HDMIIN1 terminal*3
AUDIOOUT terminal
HDMIIN2 terminal
MHL:MobileHighDefinition
Link*4
SDcardslot*6
RS232C
terminal
USB4 terminal
USBconnector
type"B".
(Notforcustomers)
VIDEOIN
terminal*5
COMPONENTIN
terminals*5
Antenna/
Cablein
DIGITALAUDIO
OUTterminal
USB2
terminal
USB3
terminal
ETHERNET
terminal
AUDIOIN terminal
(sharedforPCINandHDMIIN3)*2
USB1 terminal
HDMI IN 1, 2, 3 and 4 terminals are all capable of receiving 4K60P
4:4:4 signals.
To receive 4K60P 4:4:4 signals, on the Devices menu, set the HDMI
type to "Full". (See page 4-1)
*1 See the Setup Guide. And see page 7-5 for external equipment
connection.
*2 See page 8-1 for details on the Audio Select function.
*3 Use HDMI IN 1 to connect ARC-compatible equipment.
*4 See page 7-7.
*5 See page 4-3 for details on the Component/Video select function.
*6 For UH30U model only.
Part Names
ENG11
ENGLISH | FRANÇAIS | ESPAÑOL
>><<
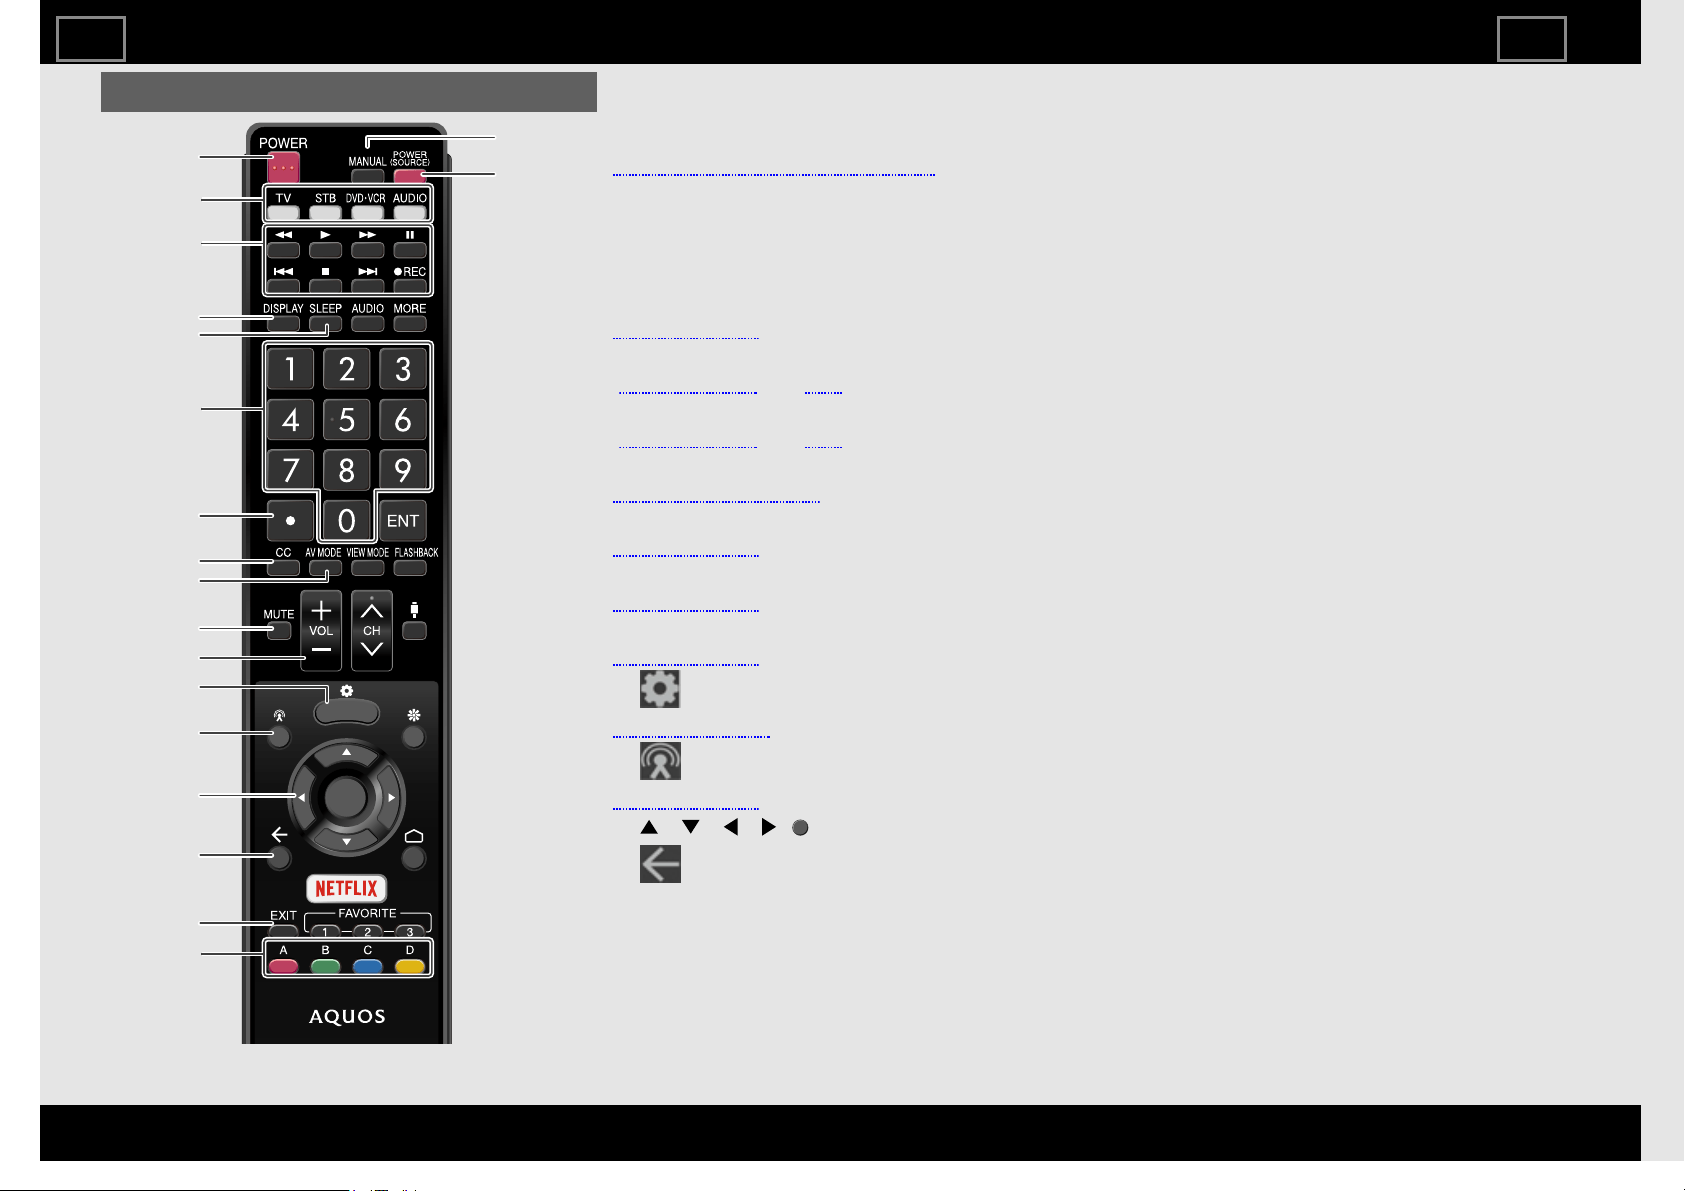
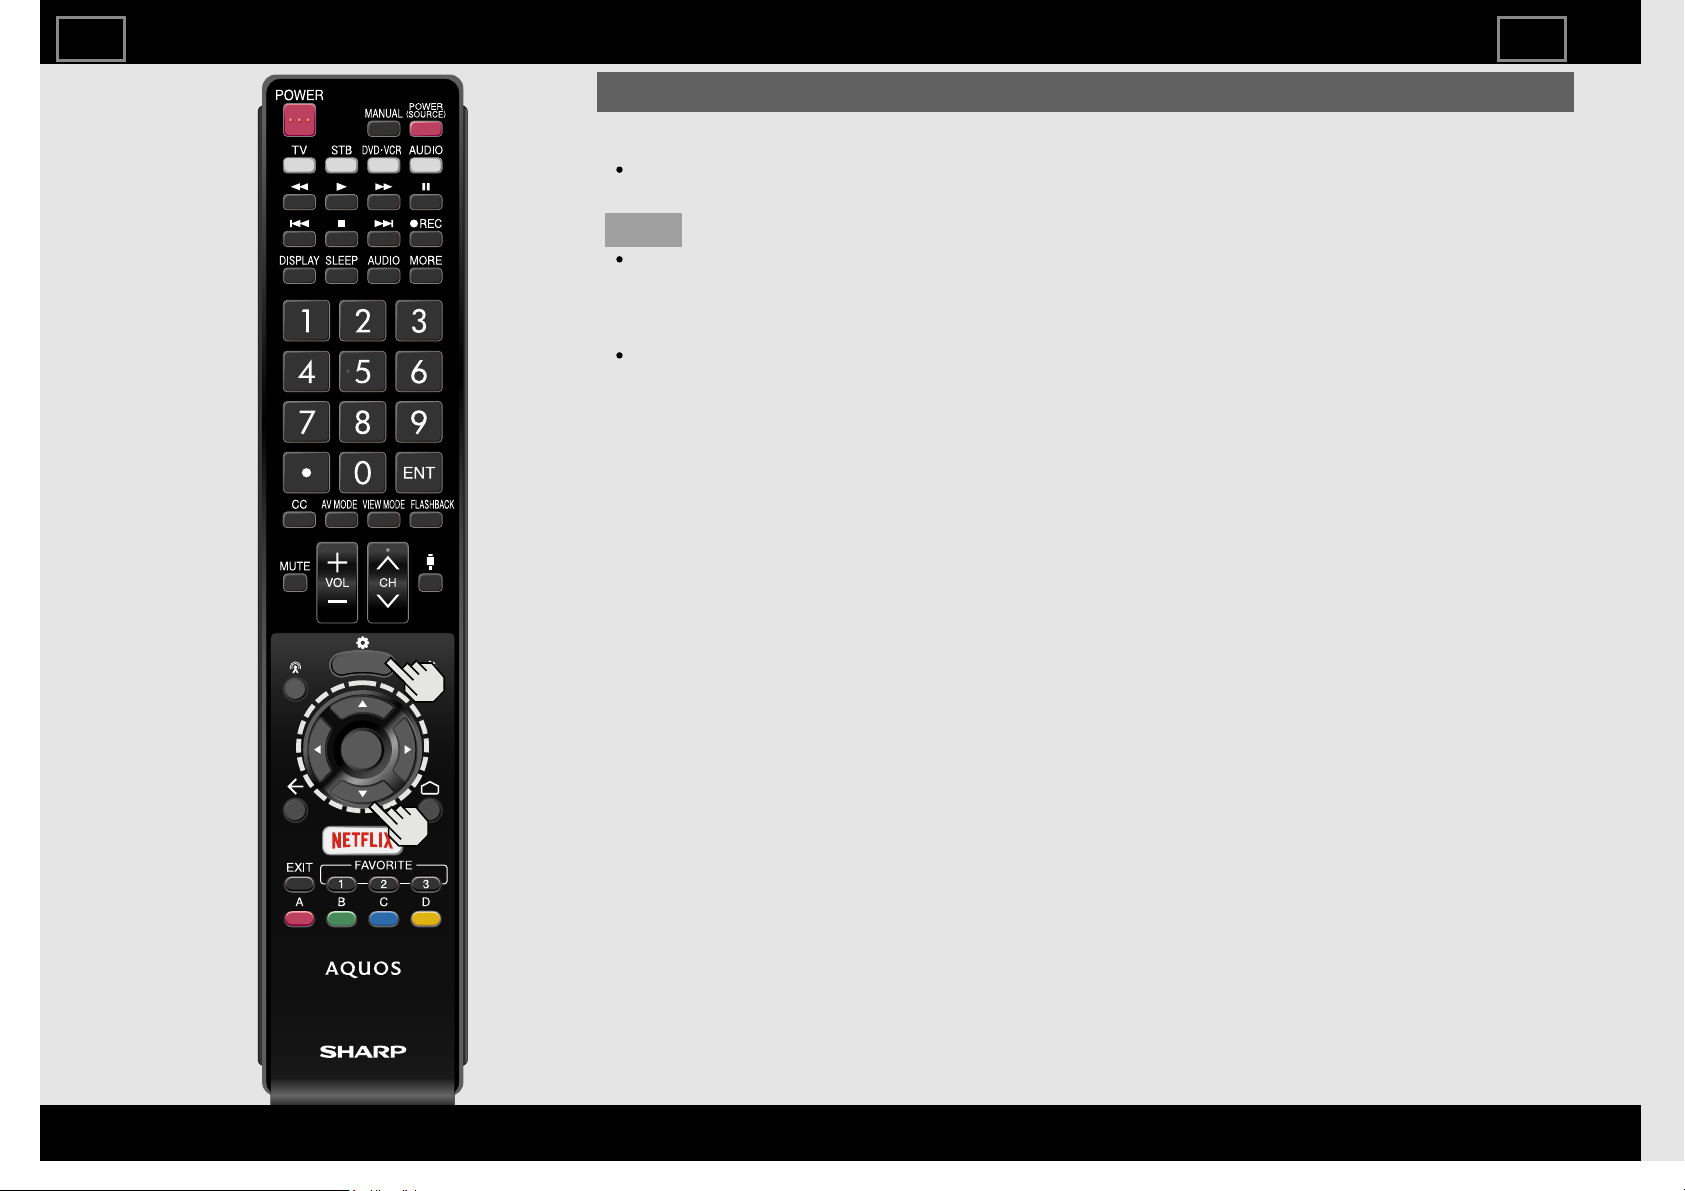
Remote Control Unit
1 POWER: Switch the TV power on or enter standby.
2 TV, STB, DVD•VCR, AUDIO: Switches the remote control for TV, STB, BD, DVD, VCR and
AUDIO operation.
(See pages 7-1 to 7-4 for details.)
* To enter the code registration mode, you need to press an appropriate button (STB,
DVD•VCR or AUDIO) and MANUAL at the same time.
3 External equipment operational buttons: Operate the external equipment.
4 DISPLAY: Display the channel information.
5 SLEEP: Set the sleep timer.
(See page 5-7.)
6 0-9: Set the channel.
(See pages 5-1 and 7-4.)
7 • (DOT): Set the channel.
(See pages 5-1 and 7-4.)
8 CC: Display captions from a closed-caption source.
(See page 5-8 to 5-9)
9 AV MODE: Select an audio or video setting.
(See page 3-2.)
10 MUTE: Mute the sound.
(See page 5-3.)
11 VOL+/-: Set the volume.
(See page 5-2.)
12 (TV Setup): Display the TV Setup screen.
(See page 2-10.)
13 (Channels): Display the Channels screen.
(See page 2-7.)
14 / / / , (ENTER): Select a desired item on the screen.
15 (Back): Return to the previous screen.
16 EXIT: Turn off the menu screen and application.
17 A, B, C, D: The colored buttons are correspondingly used to select the colored items on the
screen.
18 MANUAL: Display the operation manual.
19 POWER (SOURCE): Turns the power of the external equipment on and off.
Part Names
1
19
18
4
7
10
13
15
16
11
14
8
5
9
12
2
17
3
6
ENG12
ENGLISH | FRANÇAIS | ESPAÑOL
>><<

Remote Control Unit (Continue)
20 MORE: Display the Remote Control Panel.
(See page 5-13.)
21 AUDIO: Selects the MTS/SAP or the audio mode during multichannel audio broadcasts.
(See page 5-6.)
22 ENT: Jumps to a channel after selecting with the 0-9 buttons.
23 FLASHBACK: Return to the previous channels, HDMI IN 1 through 4, or video/Component
input mode.
(See page 5-4.)
24 VIEW MODE: Select the screen size.
(See pages 5-10 to 5-12.)
25 (Devices):Display the Devices screen.
Select a TV input source.
(See page 2-9.)
26 CH / : Select the channel.
(See page 5-1.)
27 (Discover): Display the Discover screen.
(See page 2-8.)
28 (HOME): Display the HOME screen.
(See page 2-1 and 2-5.)
29 NETFLIX: Display the NETFLIX screen.
If you press the NETFLIX button when the TV is turned off, the TV turns on and the NETFLIX
screen is displayed.
(See page 5-5.)
30 FAVORITE 1, 2, 3: You can assign your favorite channels to these buttons.
(See page 3-36.)
Part Names
2020
21
22
23
24
25
26
27
28
29
30
ENG13
ENGLISH | FRANÇAIS | ESPAÑOL
>><<
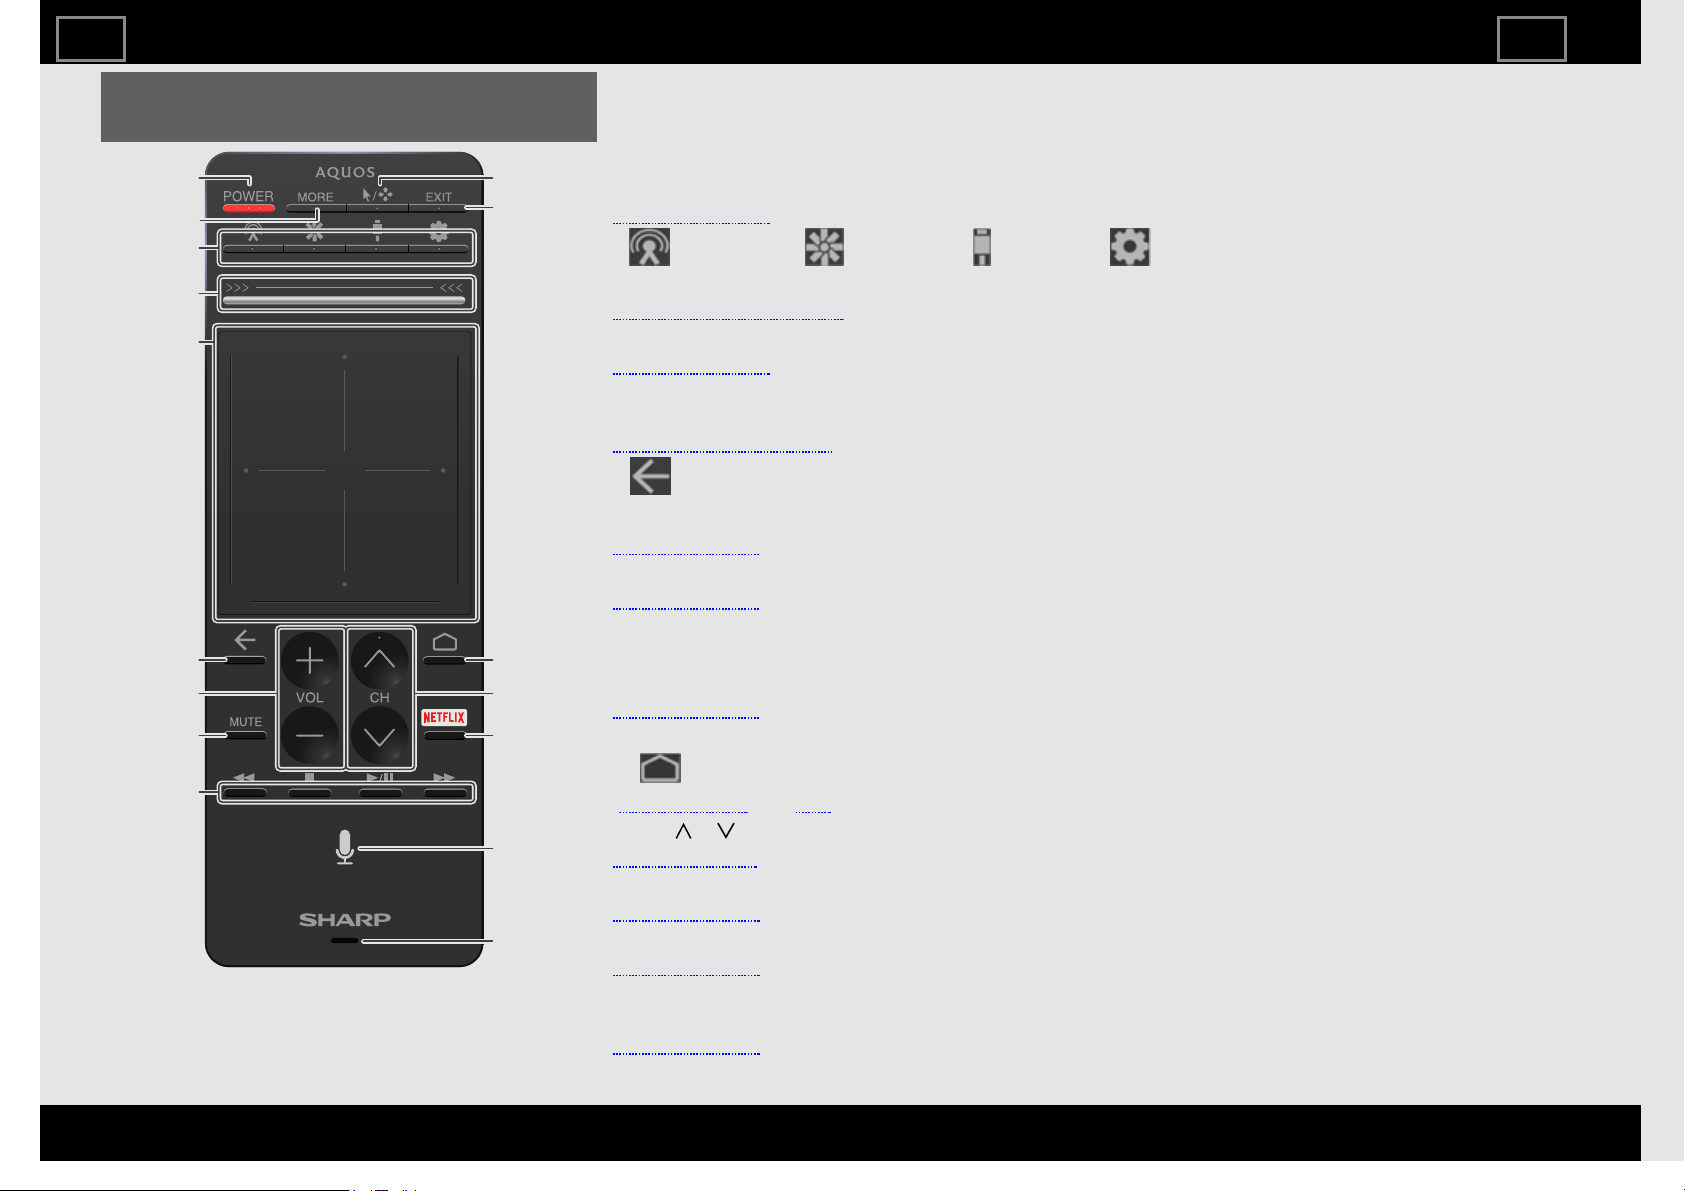
Touchpad Remote Control Unit
(For UH30U model)
1 Power: Switch the TV power on or enter standby.
Infrared rays are only used when you press the POWER button and NETFLIX button on the
Touchpad Remote Control Unit, so you only have to point the unit at the remote control
sensor when you press this button.
2 MORE: Display the Remote Control Panel.
(See page 5-13.)
3 (Channels) / (Discover) / (Devices) / (TV Setup): Display the
Channels/Discover/Devices/TV Setup screen.
(See pages 2-7 to 2-10.)
4 Slide bar: Can be used to display the Channels/Discover/Devices/TV Setup screen.
(See pages 2-2.)
5 Touchpad: In Mouse mode, touch this to perform operations. In Flick mode, flick your finger
up, down, left, or right to move the focus.
(See pages 2-3 to 2-4.)
6 (Back): Return to the previous screen.
7 VOL+/-: Set the volume.
(See page 5-2.)
8 MUTE: Mute the sound.
(See page 5-3.)
9 External equipment operational buttons: Operate the external equipment.
10 Mouse/Flick mode switch button: Switch the touchpad between Mouse mode and Flick
mode.
(See page 2-2.)
11 EXIT: Turn off the menu screen and application.
12 (HOME): Display the HOME screen.
(See page 2-1 and 2-5.)
13 CH / : Select the channel.
(See page 5-1.)
14 NETFLIX: Display the NETFLIX screen.
(See page 5-5.)
15 Voice: Start a Voice search.
(See page 2-4.)
16 Microphone: Used in Voice searches and apps. When you are using the microphone, do not
cover this part with your hand.
(See page 2-4.)
Part Names
1
2
3
15
14
13
11
10
16
9
4
6
8
12
7
5
ENG14
ENGLISH | FRANÇAIS | ESPAÑOL
>><<

Using the Remote Control Unit
The main TV modes can be displayed by pressing the (Channels), (Discover), (Devices), and (TV Setup) buttons on the remote control
unit.
How to select the TV Mode
HOME screen
Press (HOME) to display the HOME screen.
You can access Search, Recommended, Apps, Games, Inputs,
and Settings. See page 2-5 for details.
Example
Devices
Press (Devices) again to
display the Devices full
screen.
Press (Devices) to display
the Devices peek screen.
See page 2-9 and 4-1 to 4-6 for details of Devices.
TV Setup
Press (TV Setup) again
to display the TV Setup full
screen.
Press (TV Setup) to
display the TV Setup peek
screen.
See page 2-10 and 3-1 to 3-45 for details of TV Setup.
Discover
Channels
NOTE
Pressing the button again when a mode's full screen is
displayed will cause the screen to return to the current
broadcast.
If a mode is started while viewing the Apps screen, the
screen will return to the channel or external input viewed
immediately before the mode was started.
To show the Apps screen again, repeat the operation from
the beginning.
Press (Discover) to
display the Discover peek
screen.
Press (Discover) again to
display the Disciver full
screen.
See page 2-8 for details of Discover.
Press (Channels) to
display the Channels peek
screen.
Press (Channels) again
to display the Channels full
screen.
See page 2-7 for details of Channels.
ENG21
ENGLISH | FRANÇAIS | ESPAÑOL
>><<
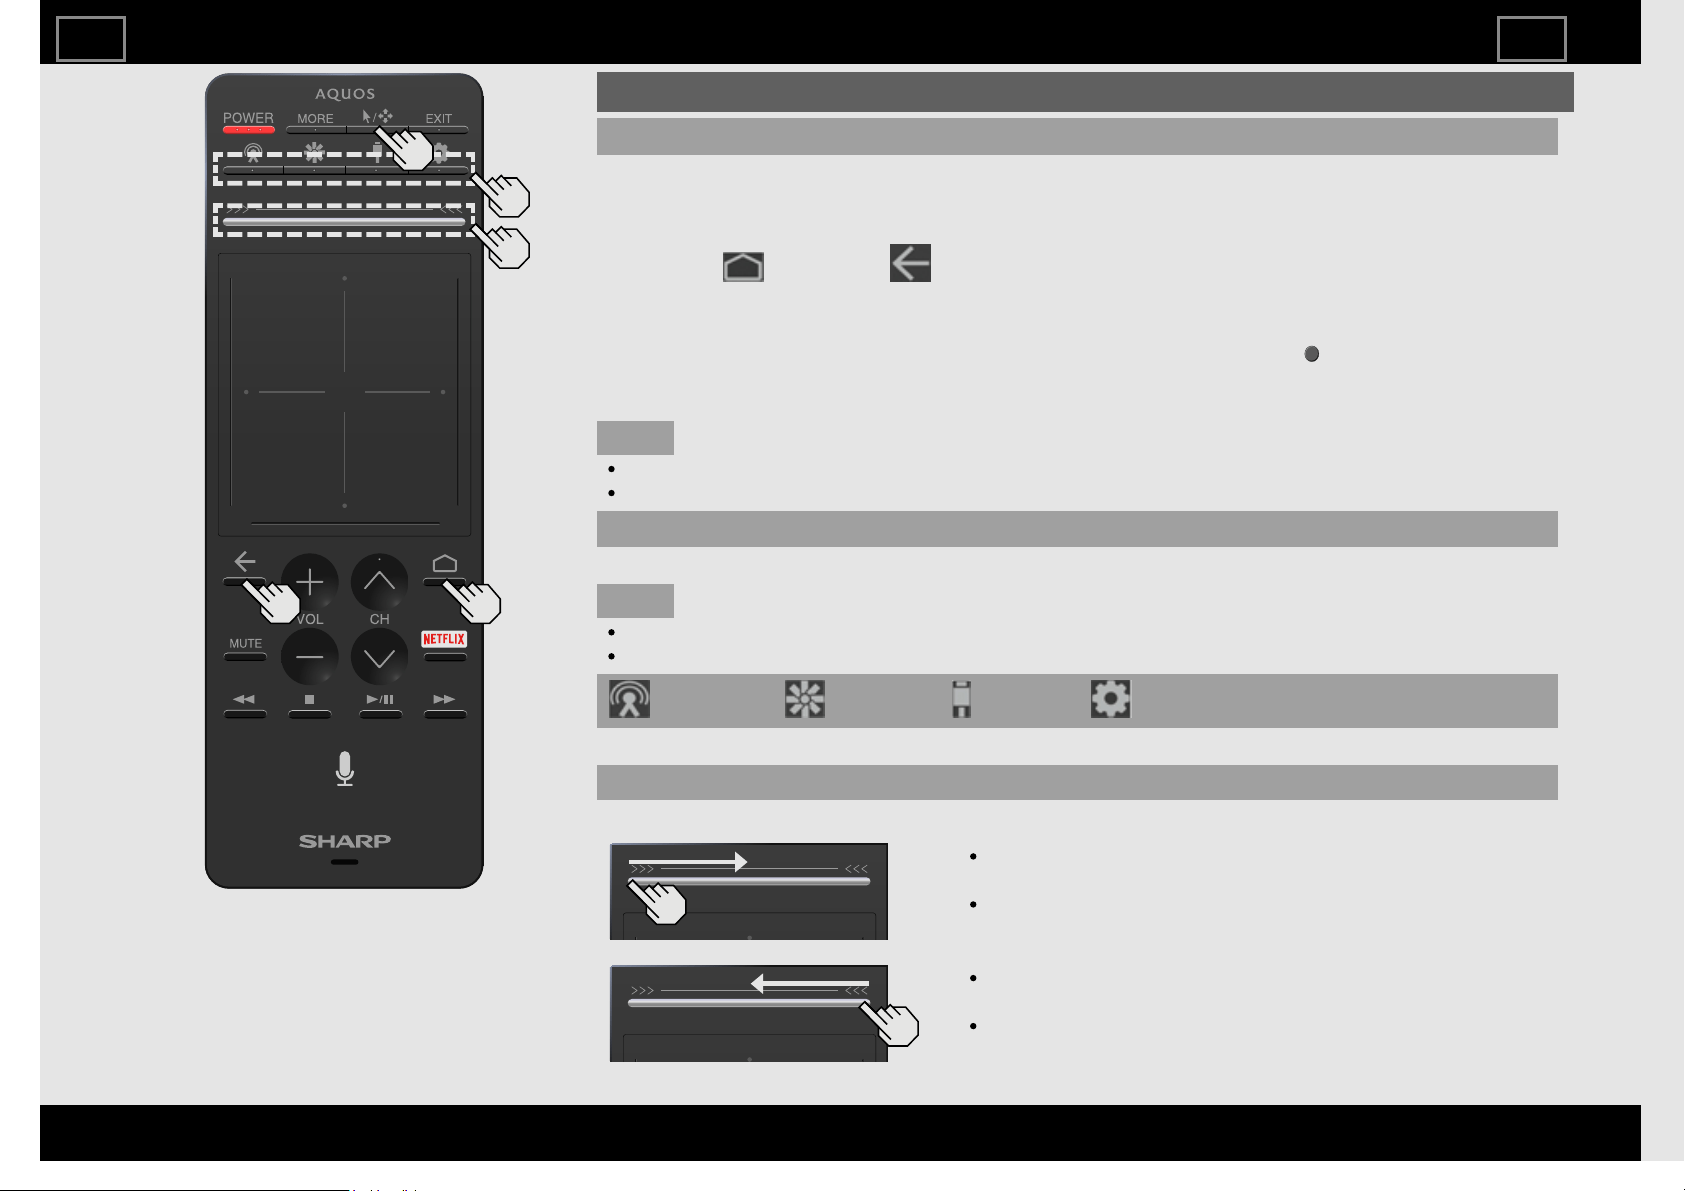
Using the Touchpad Remote Control Unit (For UH30U model)
Preparation
Before using the Touchpad Remote Control Unit, you have to follow the procedure shown below
to pair the unit with the TV.
1 Select "HOME" > "Settings" > "Remote & accessories" > "Add accessory".
2 Press the (HOME) and (Back) buttons on the Touchpad Remote Control Unit at the
same time for 5 seconds.
About 20 seconds later, "SHARP Remote control device" is shown on TV screen.
3 Select "SHARP Remote control device" on TV screen, and then press (ENTER) on the IR
Remote Control.
About 5-10 seconds later, PAIRED is shown. Preparation is complete.
NOTE
In preparation 3, if COULDN'T PAIR is shown, please try "preparation 1-3" again.
Pairing success/failure may be influenced by the surrounding wireless/RF environment.
Mouse/Flick mode switch button
Switch the touchpad between Mouse mode and Flick mode.
NOTE
The default is Flick mode.
Some apps may not function in Mouse mode. If an app does not function, switch to Flick mode.
(Channels) / (Discover) / (Devices) / (TV Setup)
Display the Channels/Discover/Devices/TV Setup screen.
Slide bar
You can slide to display the Channels/Discover/Devices/TV Setup screen.
Slide from the left edge to the center to display the
Devices or TV Setup peek screen.
Slide from the left edge to the right edge to display
the Devices or TV Setup full screen.
Slide from the right edge to the center to display the
Channels or Discover peek screen.
Slide from the right edge to the left edge to display
the Channels or Discover full screen.
How to select the TV Mode
ENG22
ENGLISH | FRANÇAIS | ESPAÑOL
>><<
How to select the TV Mode
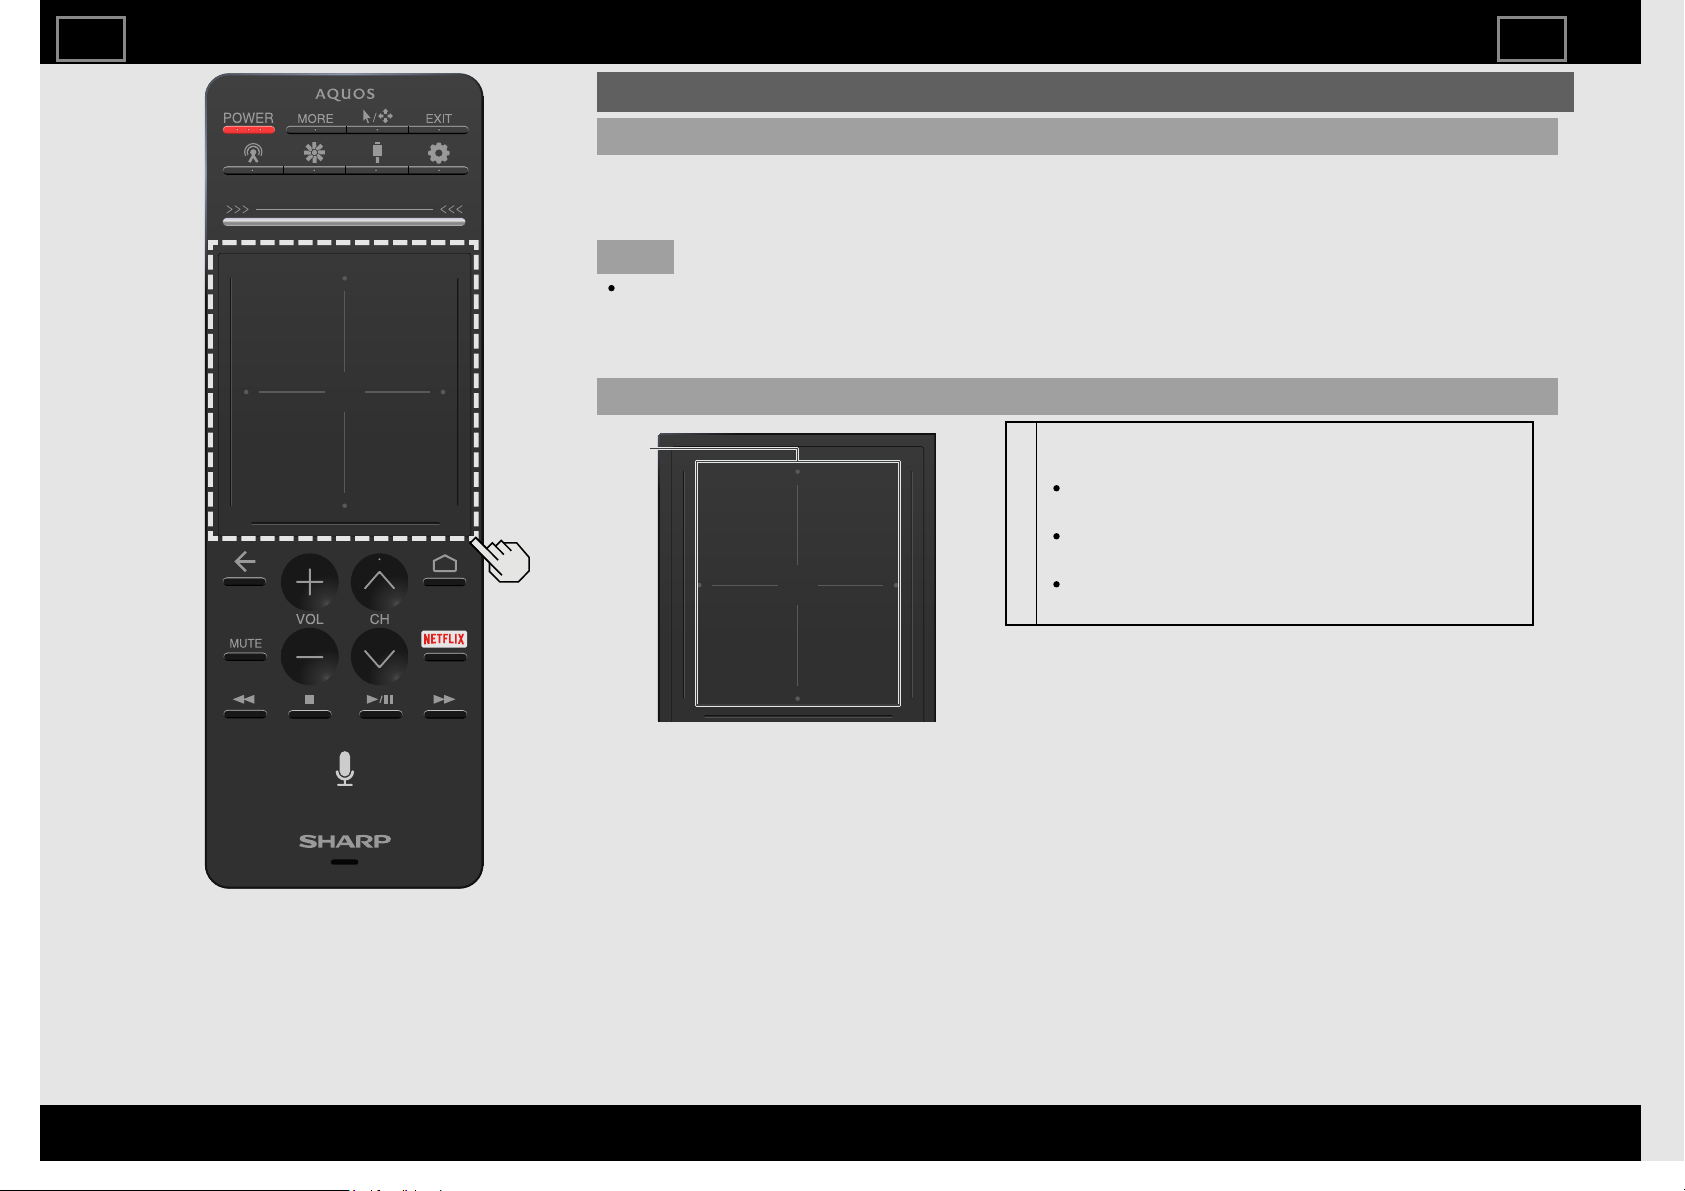
Using the Touchpad Remote Control Unit (Continue) (For UH30U model)
Touchpad
Switch between Mouse mode and Flick mode when using the touchpad.
Use the Mouse/Flick mode switch button to switch between Mouse mode and Flick mode.
The following operations can be performed in Flick mode and Mouse mode.
NOTE
If you perform no operations on the touchpad remote control unit for 1 minute or longer, it will
enter Sleep mode. You can return the touchpad remote control unit from Sleep mode by
pressing the center of the touchpad. However, it will take the touchpad remote control unit 2
to 3 seconds to return from Sleep mode.
Flick mode
a
a
Press the touchpad or slide your fingers across
it to operate the TV.
Slide one finger horizontally or vertically:
Move the focus.
Press a "•" mark with a finger: Move up, down,
left, or right.
Press the center with a finger: Confirm a
selection.
ENG23
ENGLISH | FRANÇAIS | ESPAÑOL
>><<
How to select the TV Mode
Using the Touchpad Remote Control Unit (Continue) (For UH30U model)
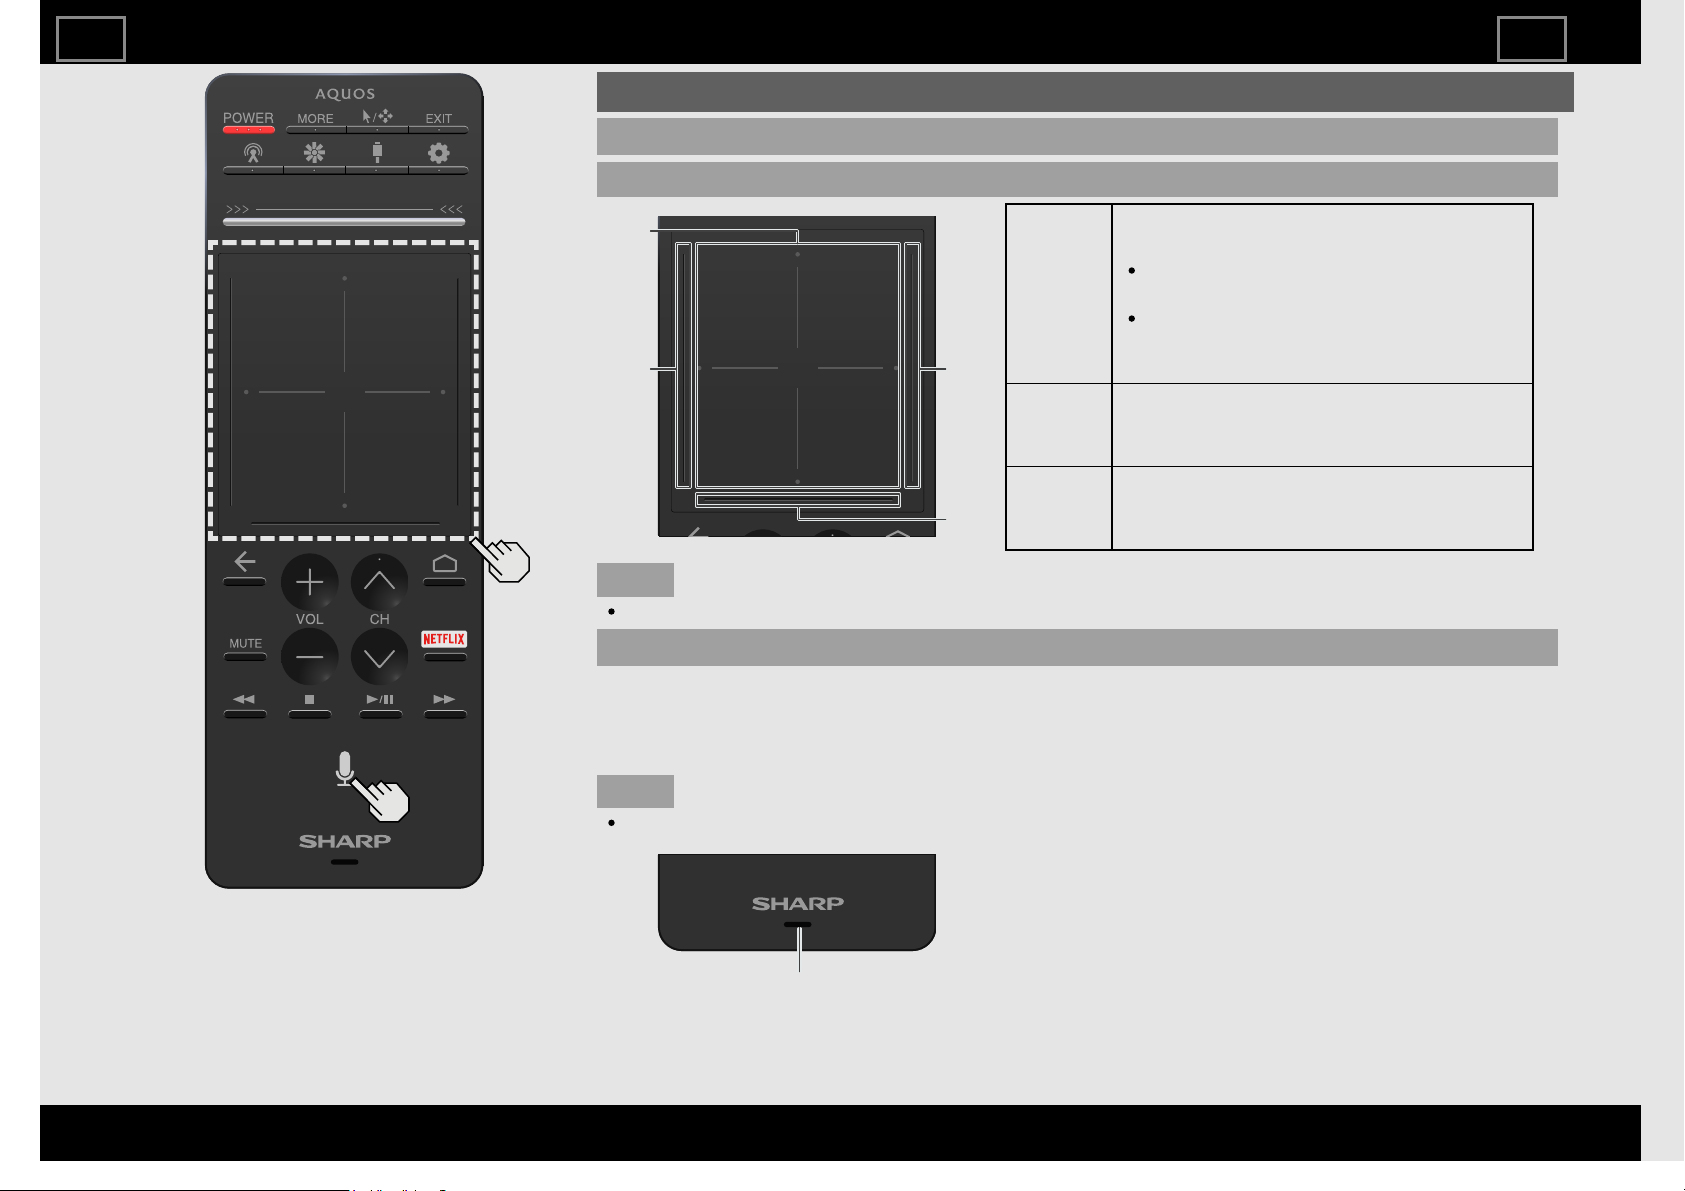
Touchpad
Mouse mode
NOTE
If the AC plug is disconnected, the touchpad remote control unit will return to Flick mode.
Voice
Start a Voice search.
Speak the word that you want to search for into the microphone at the bottom of the remote
control.
When you are using the microphone, do not cover this part with your hand.
NOTE
The Voice search may not start depending on the status of the TV.
a
b c
d
a
You can perform the following
operations.
Move one finger: Perform the same
movement as moving a mouse.
Click (press the touchpad): Perform
the same operation as clicking a
mouse.
b/c
Scroll bars
Can be used to scroll vertically through
screens.
d
Scroll bar
Can be used to scroll horizontally
through screens.
Microphone
ENG24
ENGLISH | FRANÇAIS | ESPAÑOL
>><<
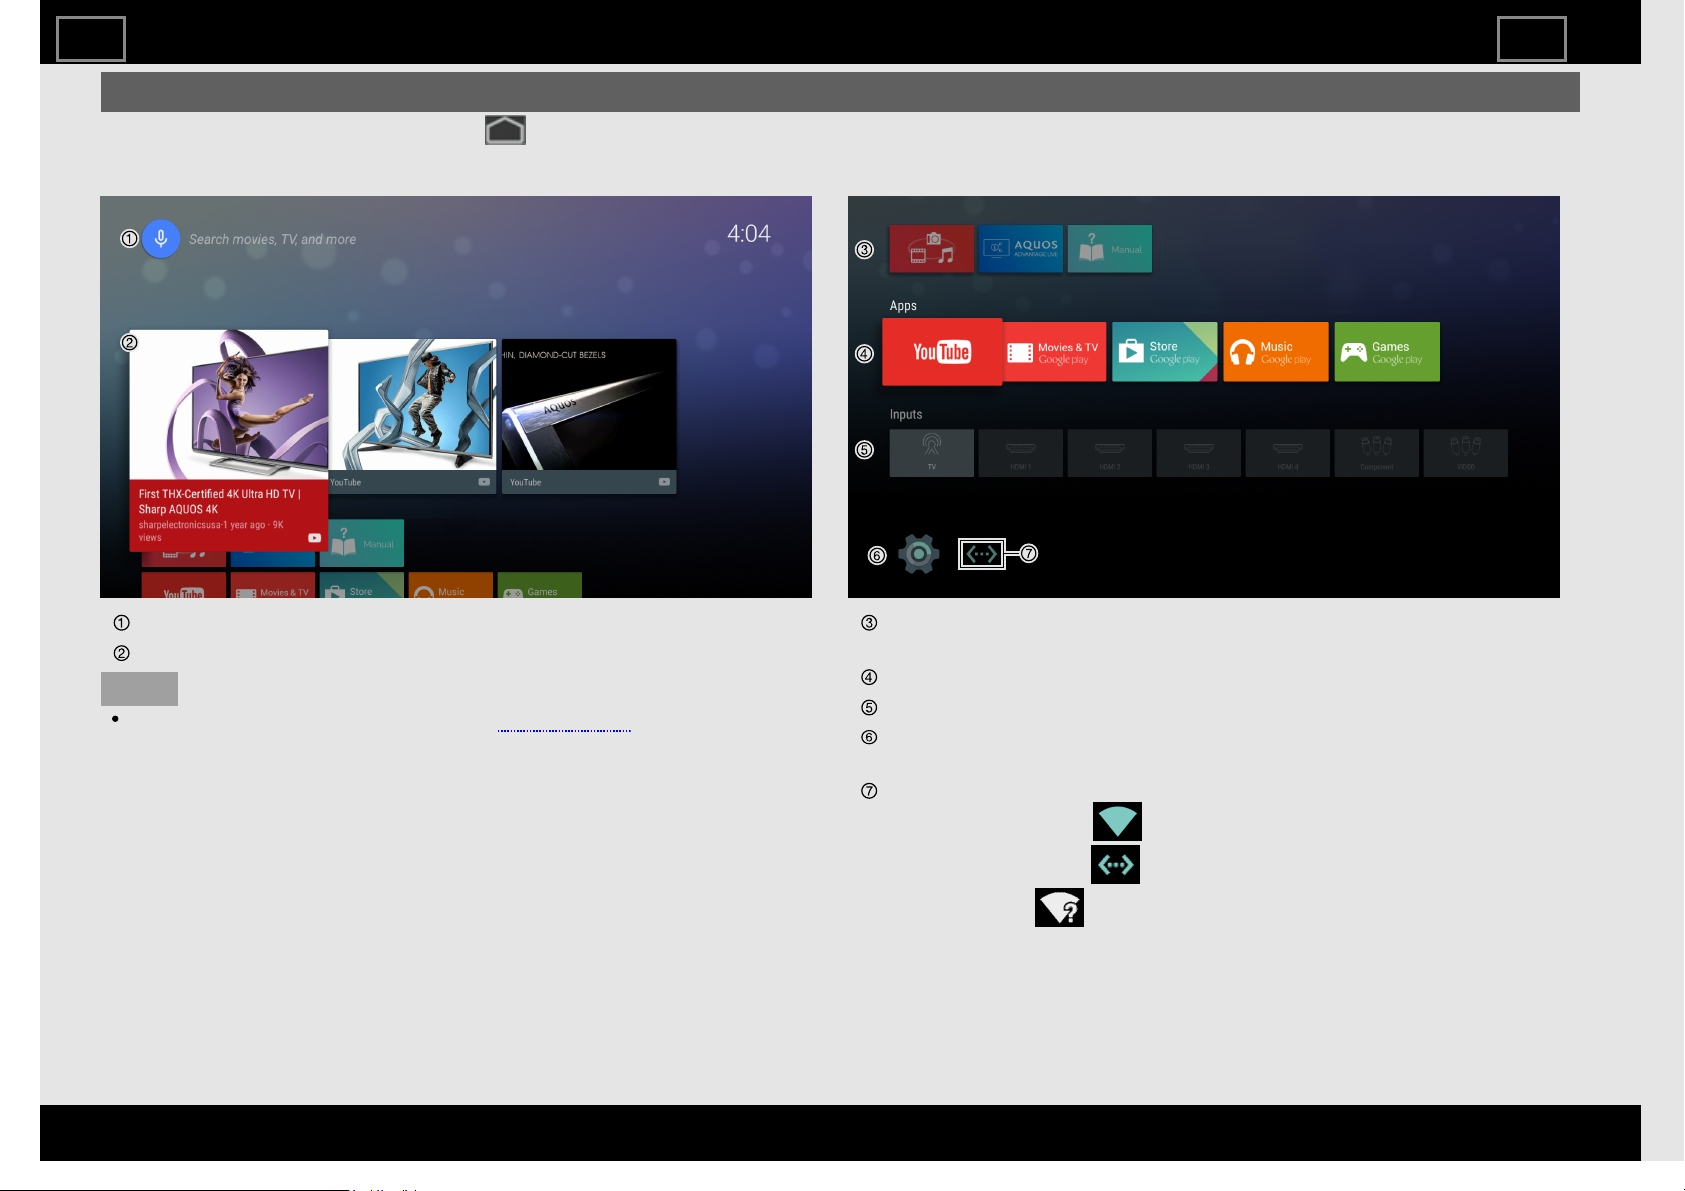
HOME screen
To display the HOME screen, press the (HOME) button on the
remote control unit.
Example
Start a Search.
The recommended contents will be displayed.
NOTE
When you are using the microphone, see page 2-4.
Example
The icons for applications installed on the TV are shown here. Also
shown here is an icon for the built-in operation manual.
Added applications are displayed here.
Switch the input.
Various Android™ settings can be configured here.
For details on the settings, see the next page.
The network connection status is displayed.
Wireless connection:
Ethernet connection:
No connection:
How to select the TV Mode
ENG25
ENGLISH | FRANÇAIS | ESPAÑOL
>><<
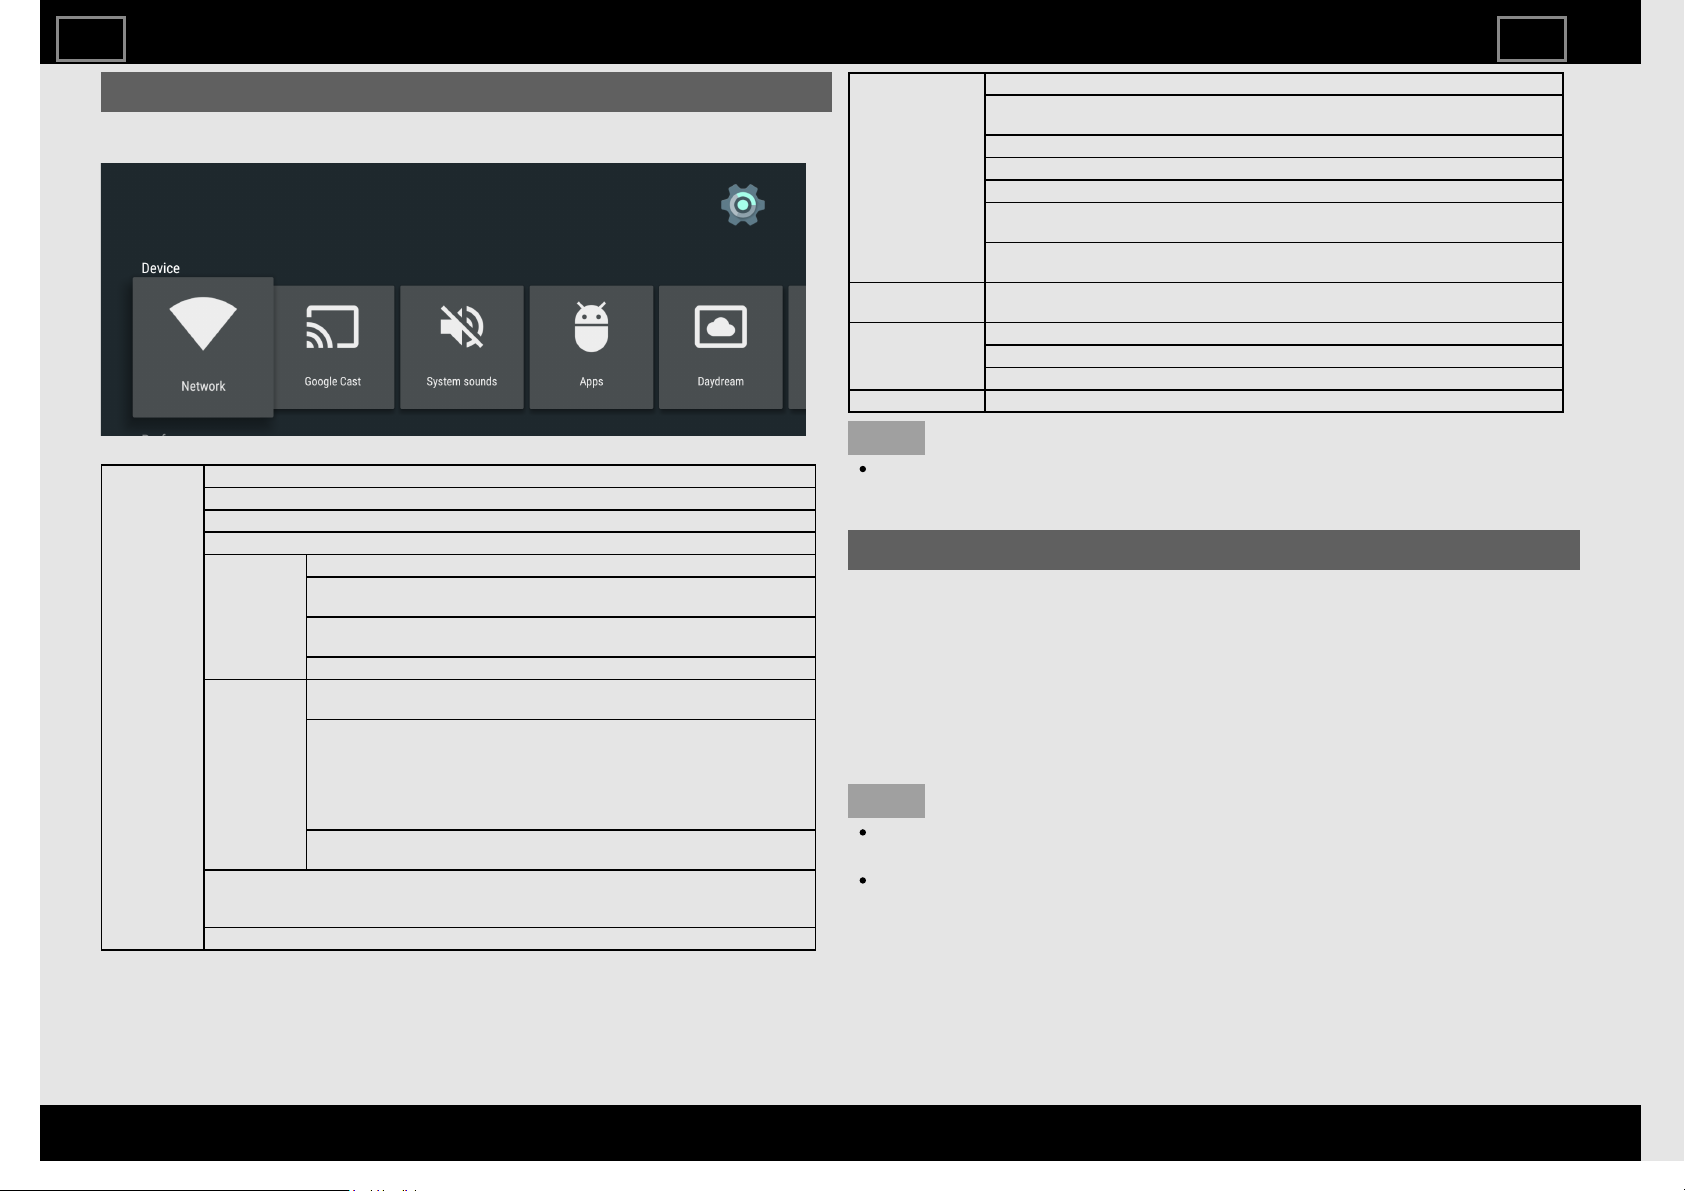
Settings
Various Android settings can be configured from Settings on the HOME
screen. The follow settings can be configured.
Device Network: Configure the WiFi and Ethernet settings.
Google Cast: Configure various Google Cast™ settings.
System sounds:Switch System Sounds On/Off for HOME screen.
Apps: View a list of applications.
Daydream Daydream: Configure the Daydream (screensaver) settings.
When to daydream: Set how many minutes from now to start the
Daydream.
No operation OFF: The TV automatically shuts down if no
operation is performed.
Start now: Start the Daydream immediately.
Control Power Indicator Light: When this function is set to "On", the LED
on the front of the TV turns on.
Power Control
【ECO1】Standard: Optimizes power reduction based upon video
content.
【ECO2】Advanced: Optimizes power reduction based upon
video content and engages Light Sensor.
Off: This function does not work.
Wake on LAN/MHL: Enable the TV to be started by a signal over a
LAN or MHL from another device.
Storage & Reset: View the memory usage status or perform a reset.
When you perform a reset, the TV will be returned to the factory preset values,
and the Google™ Accounts will also be deleted.
About: Check for system updates and view various information.
Preference Date & time: Set the date and time.
Language: You can select a language. Select from among 3 languages.
(English, French and Spanish)
Keyboard: Switch the keyboard setting.
Search: Switch the Search function setting.
Speech: Switch the Voice search setting.
Inputs: Change the label for an input terminal, and switch between HDMI
CEC control settings.
Accessibility: Configure Caption, Talkback, and SwitchAccess settings.
Some of the Caption settings may not be applied.
Remote &
accessories
Add accessory: Pair a Bluetooth device.
Personal Location: Configure the location settings.
Security & Restrictions: Configure the security and restriction settings.
Add account: Add an account.
TV Setup Jump to TV Setup: Configure various TV Setup.
NOTE
The menu may be different depending on when you purchased the
TV.
Google Cast devices
When you connect a device such as a Google Cast-compatible
smartphone or tablet to this TV, you can enjoy video and audio from the
device on the TV's large screen and speakers.
1 Configure the settings from "HOME" > "Settings" > "Device" > "Google
Cast".
2 Enable the Google Cast function on the Google Cast-compatible
device and connect to the TV.
(The TV screen changes according to the behavior of the device)
NOTE
When the TV is turned off or the connection is ended on the device,
you must connect the device again.
For details about the operation of the Google Cast-compatible
device, check the manual for that device.
How to select the TV Mode
ENG26
ENGLISH | FRANÇAIS | ESPAÑOL
>><<
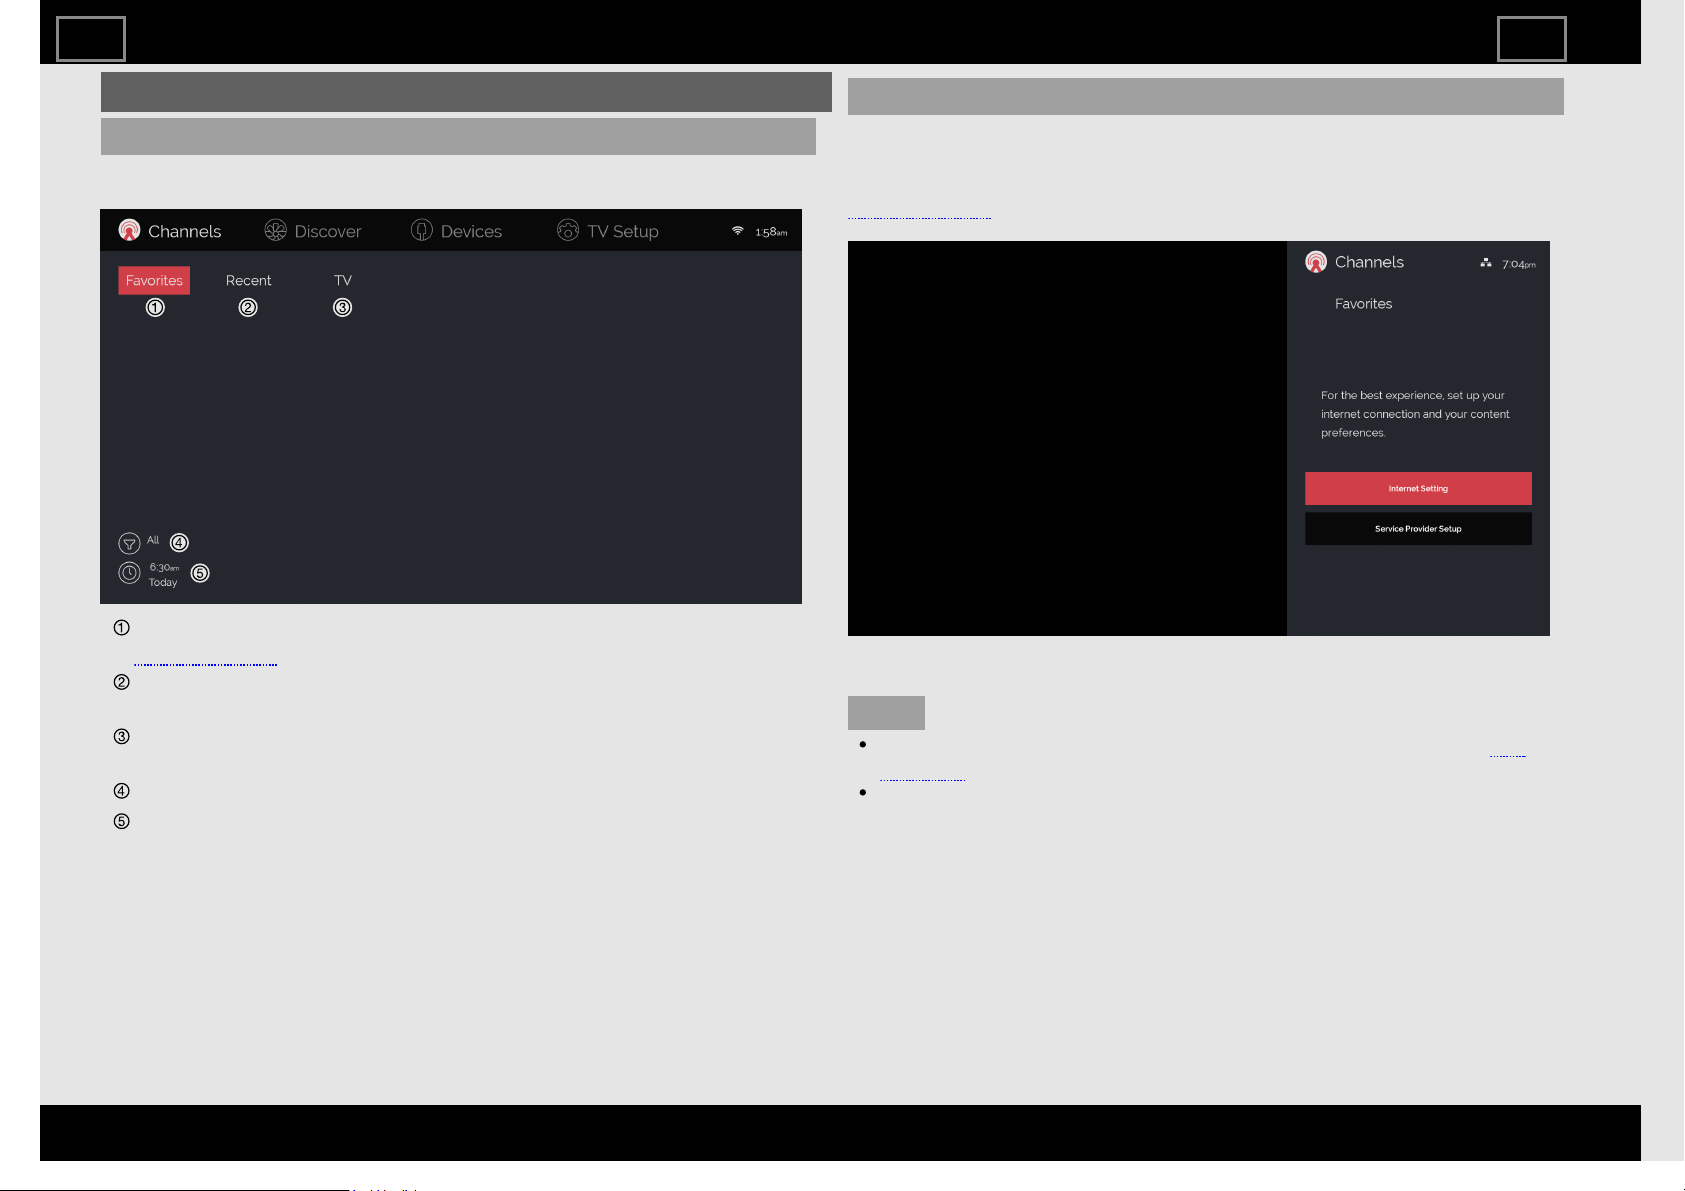
Channels
Full screen view
The applications and the channels will be displayed on the Channels full
screen.
Displays the applications and the channels registered as Favorites.
See page 3-36 for how to register a Favorite.
Displays the channels and applications most recently selected from
the Channels menu.
Displays programs currently being broadcast that match a selected
genre or day/time for all channels.
Allows genre settings to be configured.
Allows a day/time to be selected.
Peek screen view
The applications and the programs currently being broadcast by
stations registered to the FAVORITE buttons on the remote control unit
will be displayed on the Channels peek screen.
See page 3-36 for how to assign the FAVORITE buttons on the remote
control unit.
NOTE
To display the Channels in the full screen or as a peek screen, see
page 2-1.
Changing from a full screen view to another mode is possible.
How to select the TV Mode
ENG27
ENGLISH | FRANÇAIS | ESPAÑOL
>><<
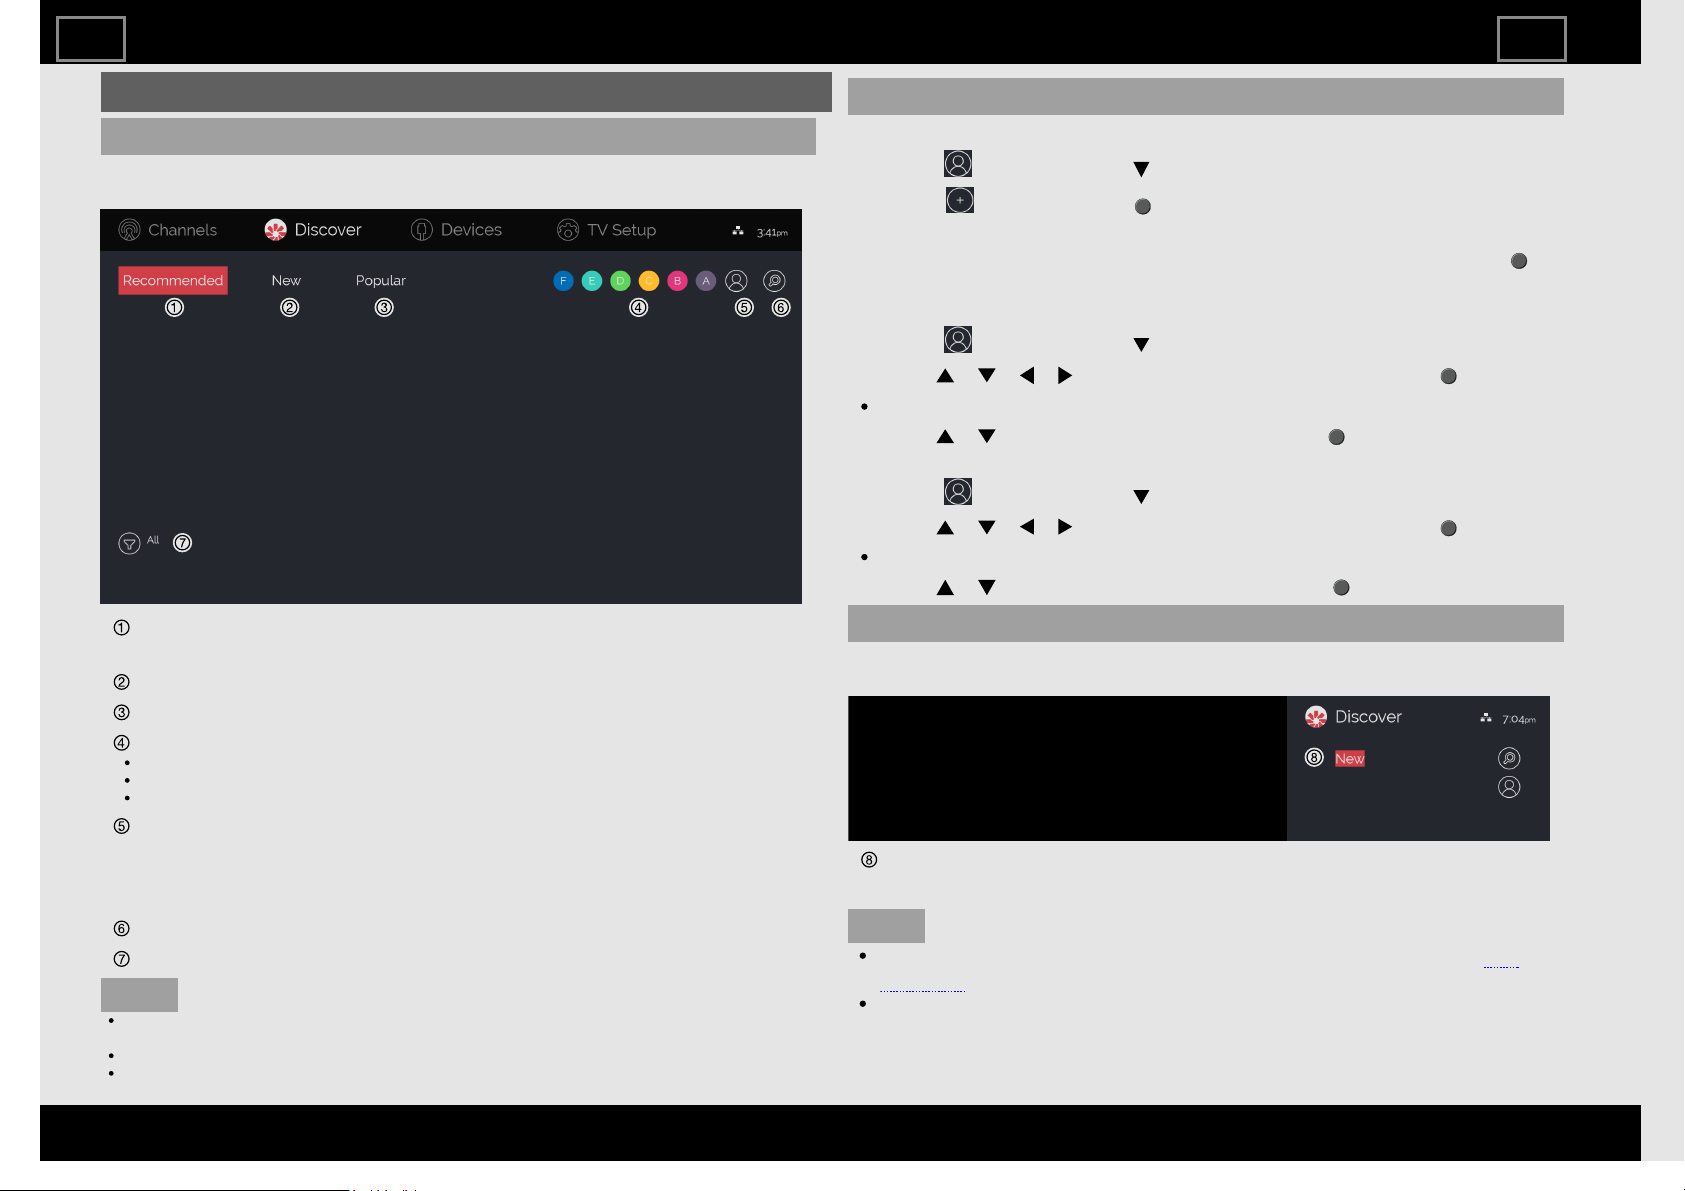
Discover
Full screen view
Recommended content and new content is displayed on the full screen
of the Discover mode.
Displays content recommended according to the currently logged in
user.
Displays new recommended content.
Displays popular recommended content.
Account mark of the logged in user
The mark is displayed in the color set when the account was made.
The characters are the initials of the name.
Up to six people can be logged in at the same time.
Displays the user login screen for Recommended and the setting
screen for adding a new account.
See the next explanation for details on logging in and account
creation.
Allows for content searching.
Allows genre settings to be configured.
NOTE
If the accounts of six individuals have already been registered, you will have to delete an
existing account.
If you move away from the TV, we recommend that you log out.
You will automatically be logged out when you turn the TV off.
Account creation
Follow the procedure shown below to create an account.
1 Select , and then press .
2 Select , and then press (ENTER) to display the Add account
screen.
3 Enter the required information, select Complete, and then press
(ENTER).
Logging in
1 Select , and then press .
2 Press / / / to select an account, and then press (ENTER).
If you set a PIN code during account creation, enter the PIN code.
3 Press / to select "Log In", and then press (ENTER).
Account deletion
1 Select , and then press .
2 Press / / / to select an account, and then press (ENTER).
If you are logged in, log out.
3 Press / to select "Delete", and then press (ENTER).
Peek screen view
The content for the Recommended, New, and Popular tabs can be
switched and displayed in the Discover peek screen.
Drop down to switch between tabs.
NOTE
To display the Discover in the full screen or as a peek screen, see
page 2-1.
Changing from a full screen view to another mode is possible.
How to select the TV Mode
ENG28
ENGLISH | FRANÇAIS | ESPAÑOL
>><<
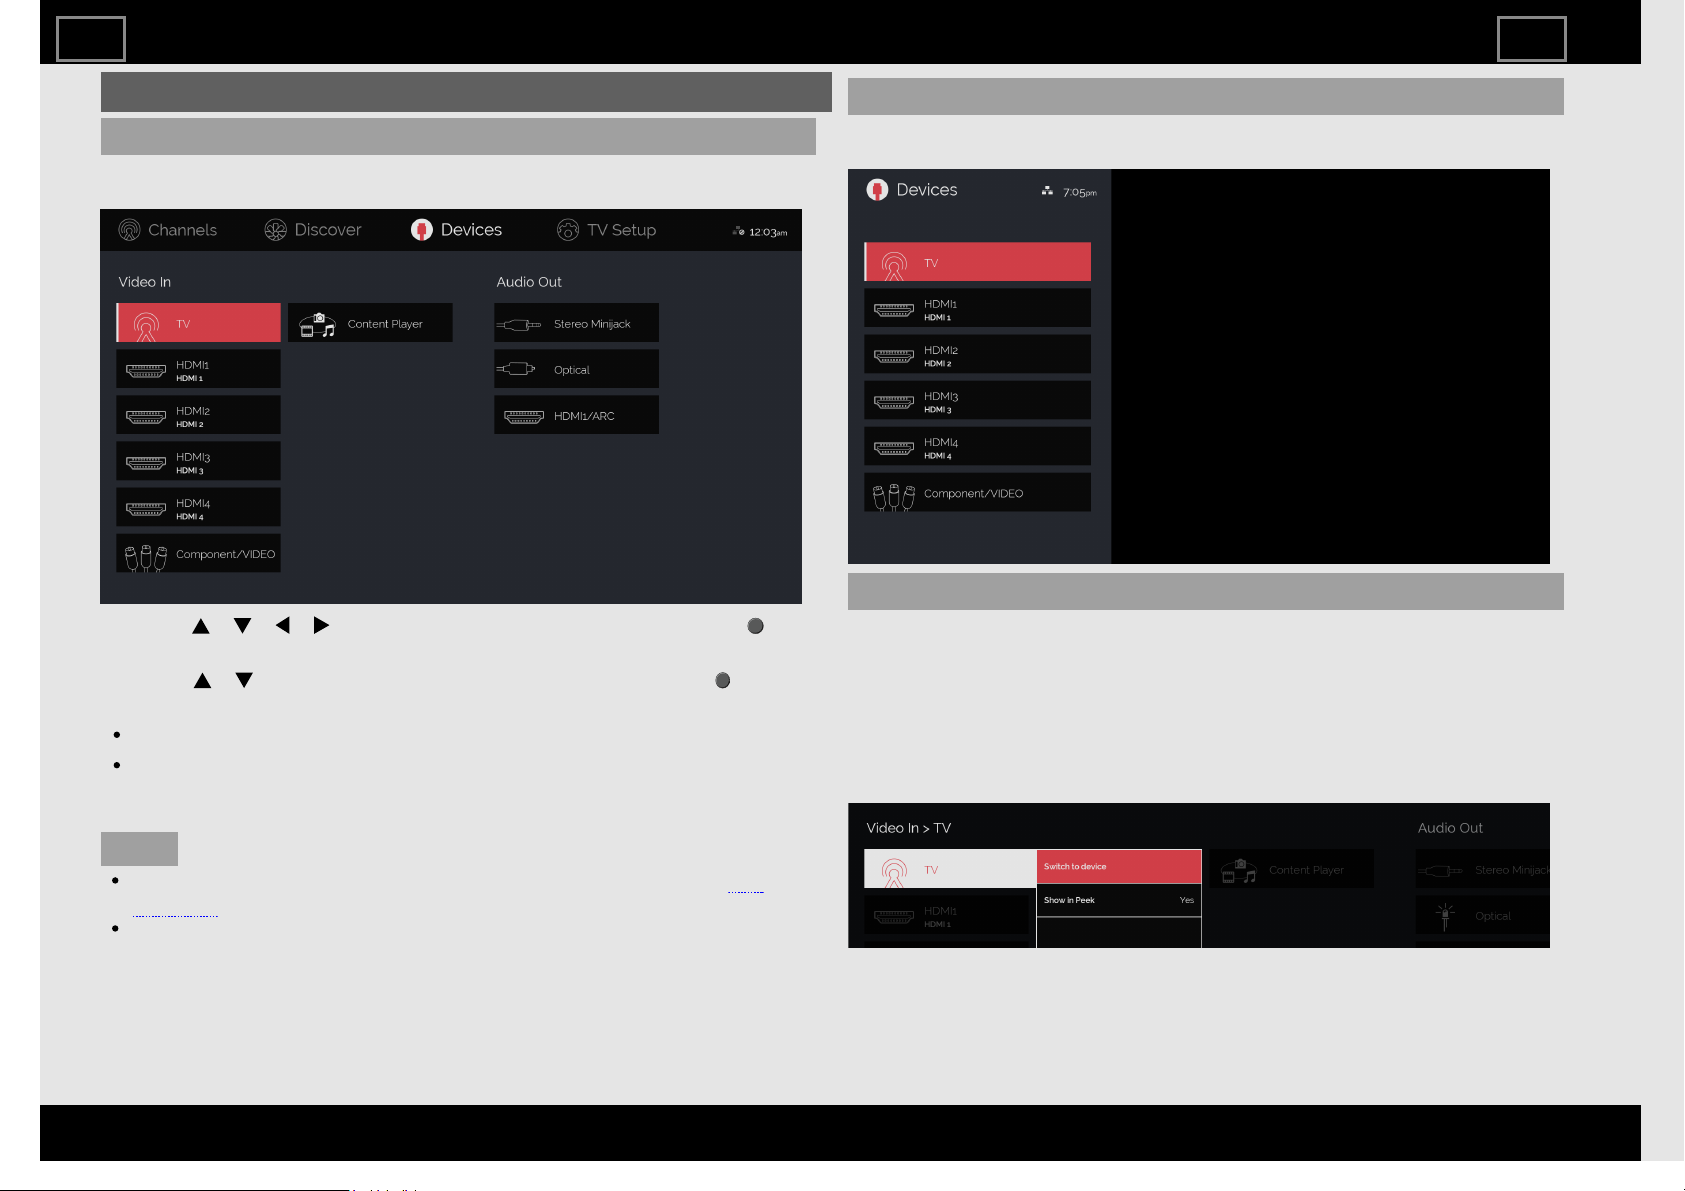
Devices
Full screen view
Switching between connected devices is possible on the Devices full
screen.
1. Press / / / to select the input source, and then press
(ENTER).
2. Press / to select the "Switch to Device", and the press
(ENTER).
An image from the selected source automatically displays.
If the target input is not connected, you will be able to switch to the
input, but the correct video and audio will not be output. Be sure to
connect the equipment beforehand.
NOTE
To display the Devices in the full screen or as a peek screen, see
page 2-1.
Changing from a full screen view to another mode is possible.
Peek screen view
The most commonly used input devices can be shown on the Devices
peek screen.
Peek screen configuration
It is possible to configure which input devices to display on the peek
screen.
Six devices are set by default.
To add a different device, first delete a current device, and then add the
device.
1 Select the device in Devices full screen and open the Devices menu.
2 Set "Show in Peek" to "Yes".
How to select the TV Mode
ENG29
ENGLISH | FRANÇAIS | ESPAÑOL
>><<
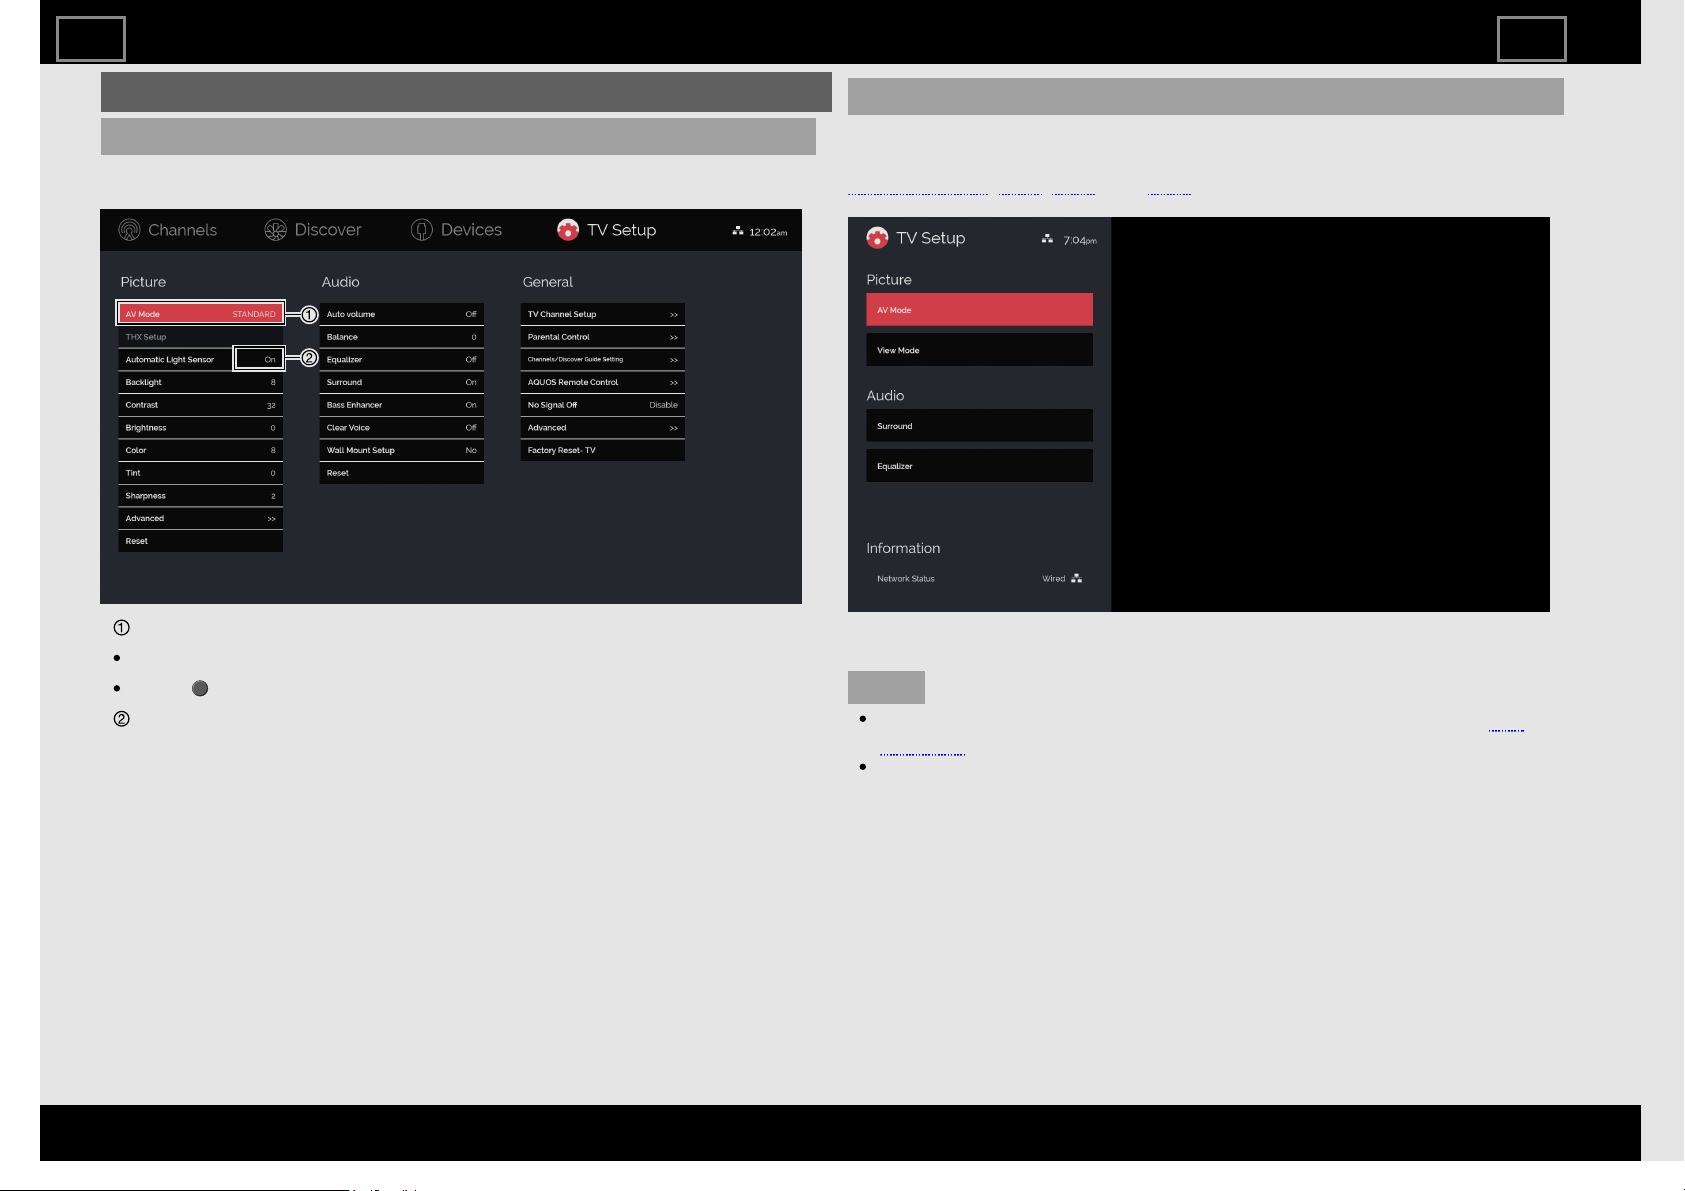
TV Setup
Full screen view
All menus for Picture, Audio, and General can be configured on the TV
Setup full screen.
Item displayed in red
This indicates the item currently selected.
Press (ENTER) to go to the adjustment screen for this item.
This indicates the current setting for the item.
Peek screen view
The AV Mode, View Mode, Surround, and Equalizer menus can be
configured on the TV Setup peek screen.
See pages 3-2, 3-26, 3-27, and 5-10 for details on the settings for each
menu.
NOTE
To display the TV Setup in the full screen or as a peek screen, see
page 2-1.
Changing from a full screen view to another mode is possible.
How to select the TV Mode
ENG210
ENGLISH | FRANÇAIS | ESPAÑOL
>><<
About Menu Items
Some menu items may not be displayed
depending on the selected input source.
NOTE
The screens in the operation manual are
for explanation purposes (some are
enlarged, others cropped) and may vary
slightly from the actual screens.
The order of explanations for each menu
item in the following pages is not
necessarily in accordance with the
alignment of the items on the screen.
Introduction
TV Setup Operation
ENG31
ENGLISH | FRANÇAIS | ESPAÑOL
>><<
Example
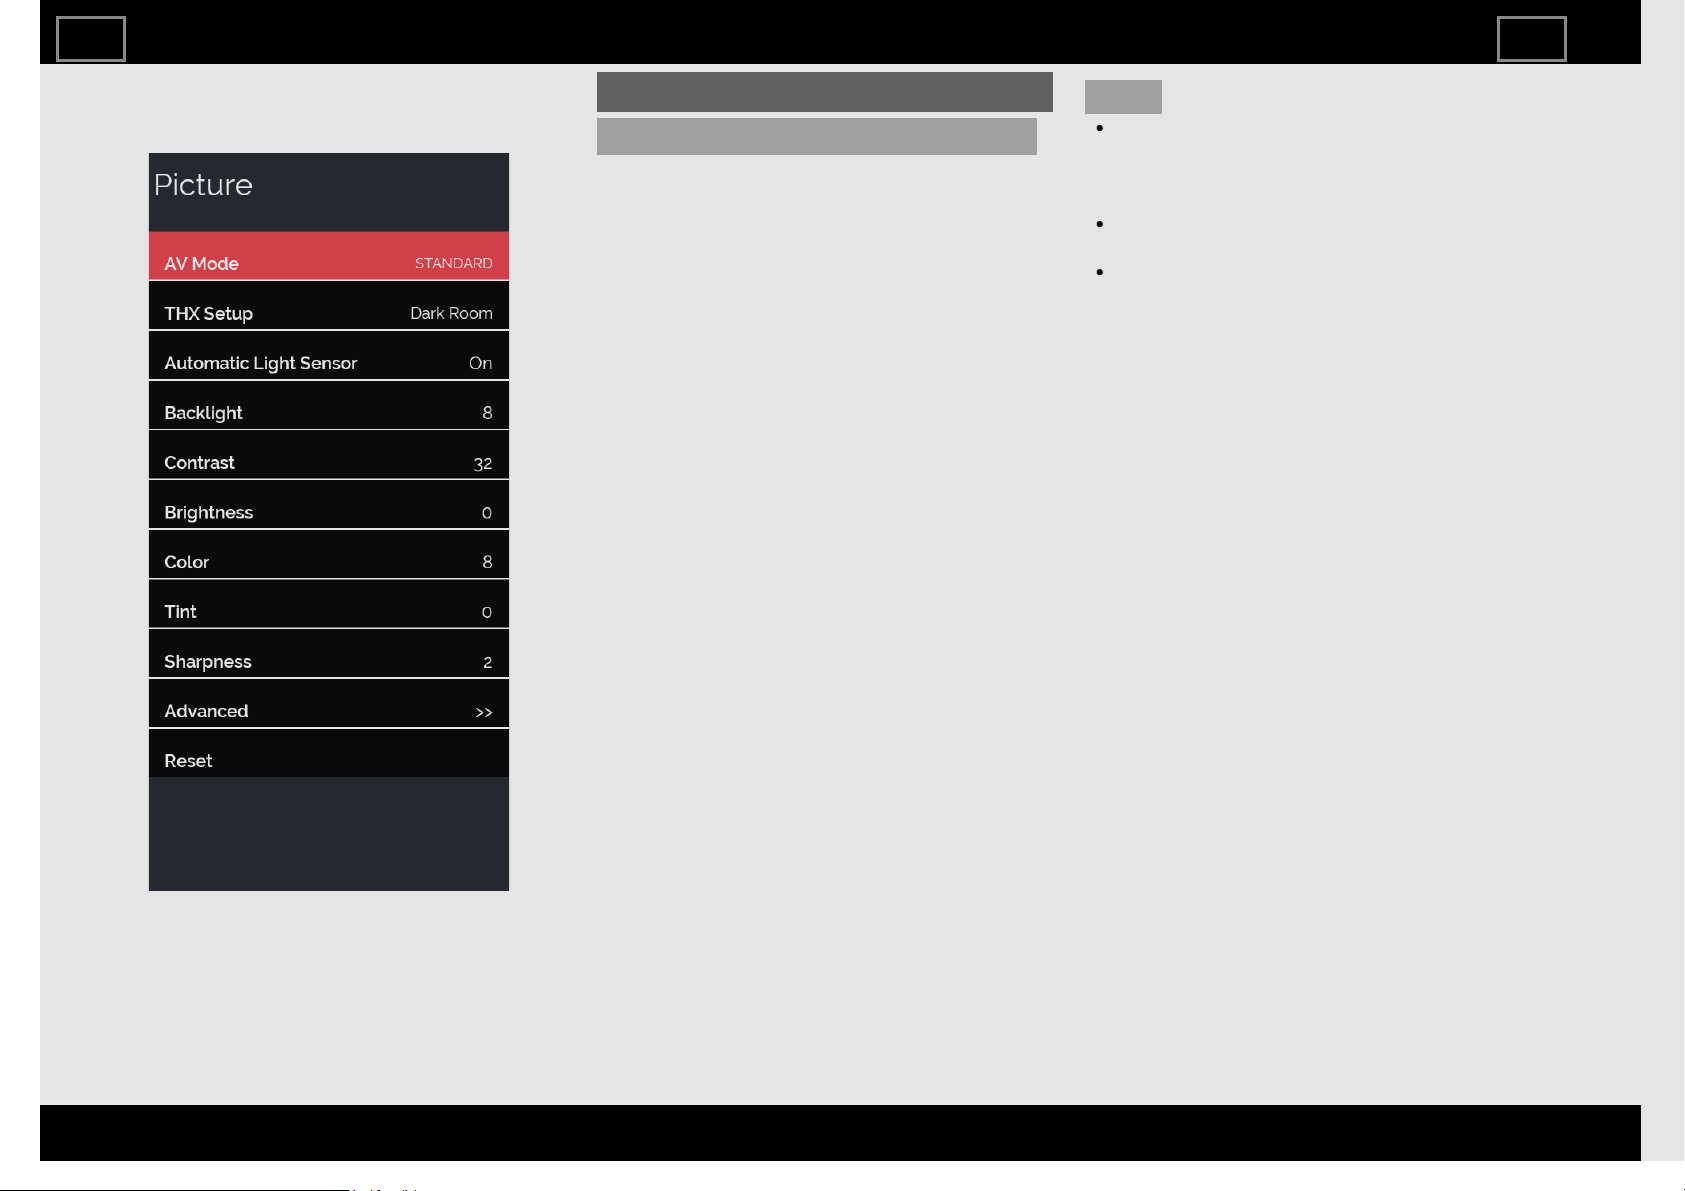
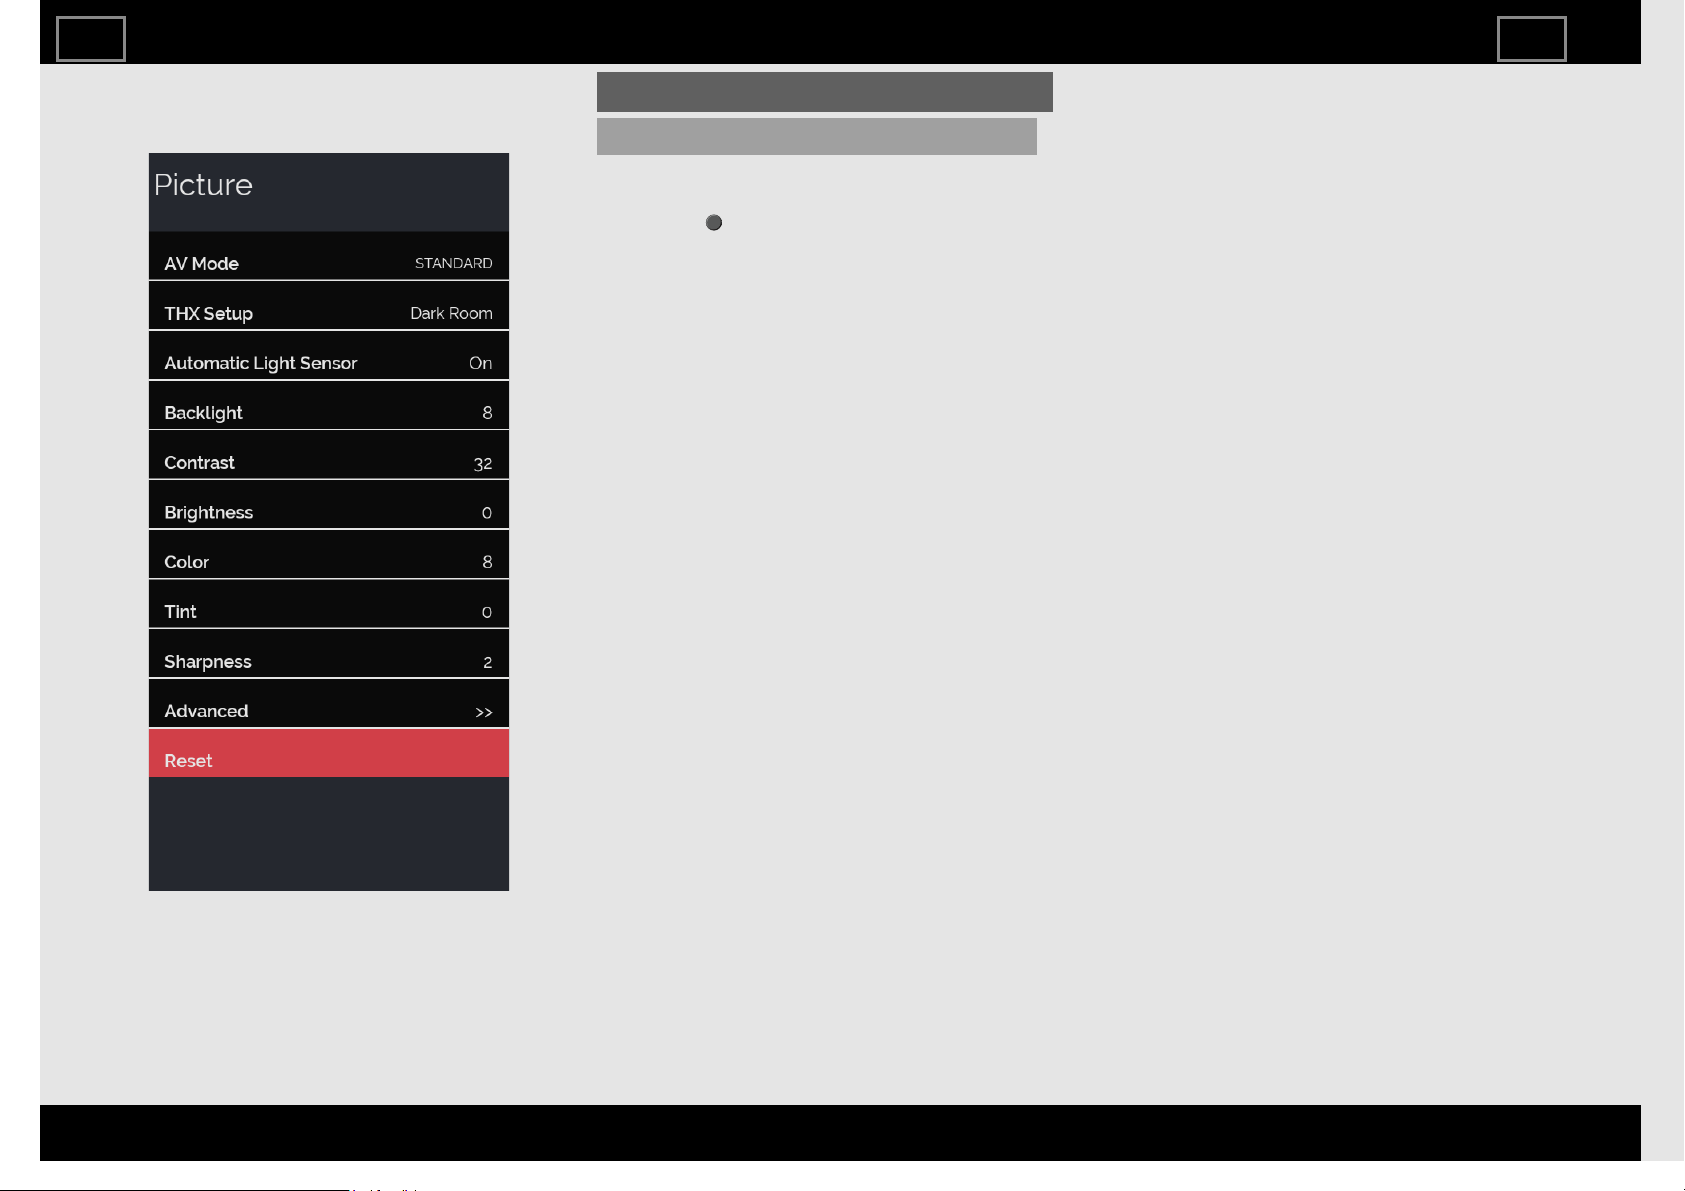
Picture
AV MODE (Changing Pic.Quality)
AV MODE gives you several viewing options
to choose from to best match the
surrounding environment of the TV, which
can vary due to factors like room brightness,
type of program watched or the type of
device connected.
You can use USER Mode to create
customized settings for each TV input.
These settings will be automatically saved
on each input for convenience.
STANDARD: For a highly defined image in a
normal lighting.
MOVIE: For a movie.
MOVIE THX: Changes the image quality so
that it conforms to the THX display
standard.
(For LC-70UH30U only.)
GAME: Lowers image brightness for easier
viewing.
PC: For PC.
USER:Allows the user to customize
settings as desired.
DYNAMIC:For a clear-cut image
emphasizing high contrast, useful for
sports viewing.
DYNAMIC (Fixed): Changes the image and
sound settings to the factory preset
values. No adjustments are allowed.
NOTE
You can select a different AV MODE item
for each input mode. (For example,
select STANDARD for TV input and
DYNAMIC for COMPONENT.)
When you play games, "GAME" is
recommended for AV MODE.
You can select AV MODE by pressing AV
MODE on the remote control unit.
TV Setup Operation
ENG32
ENGLISH | FRANÇAIS | ESPAÑOL
>><<
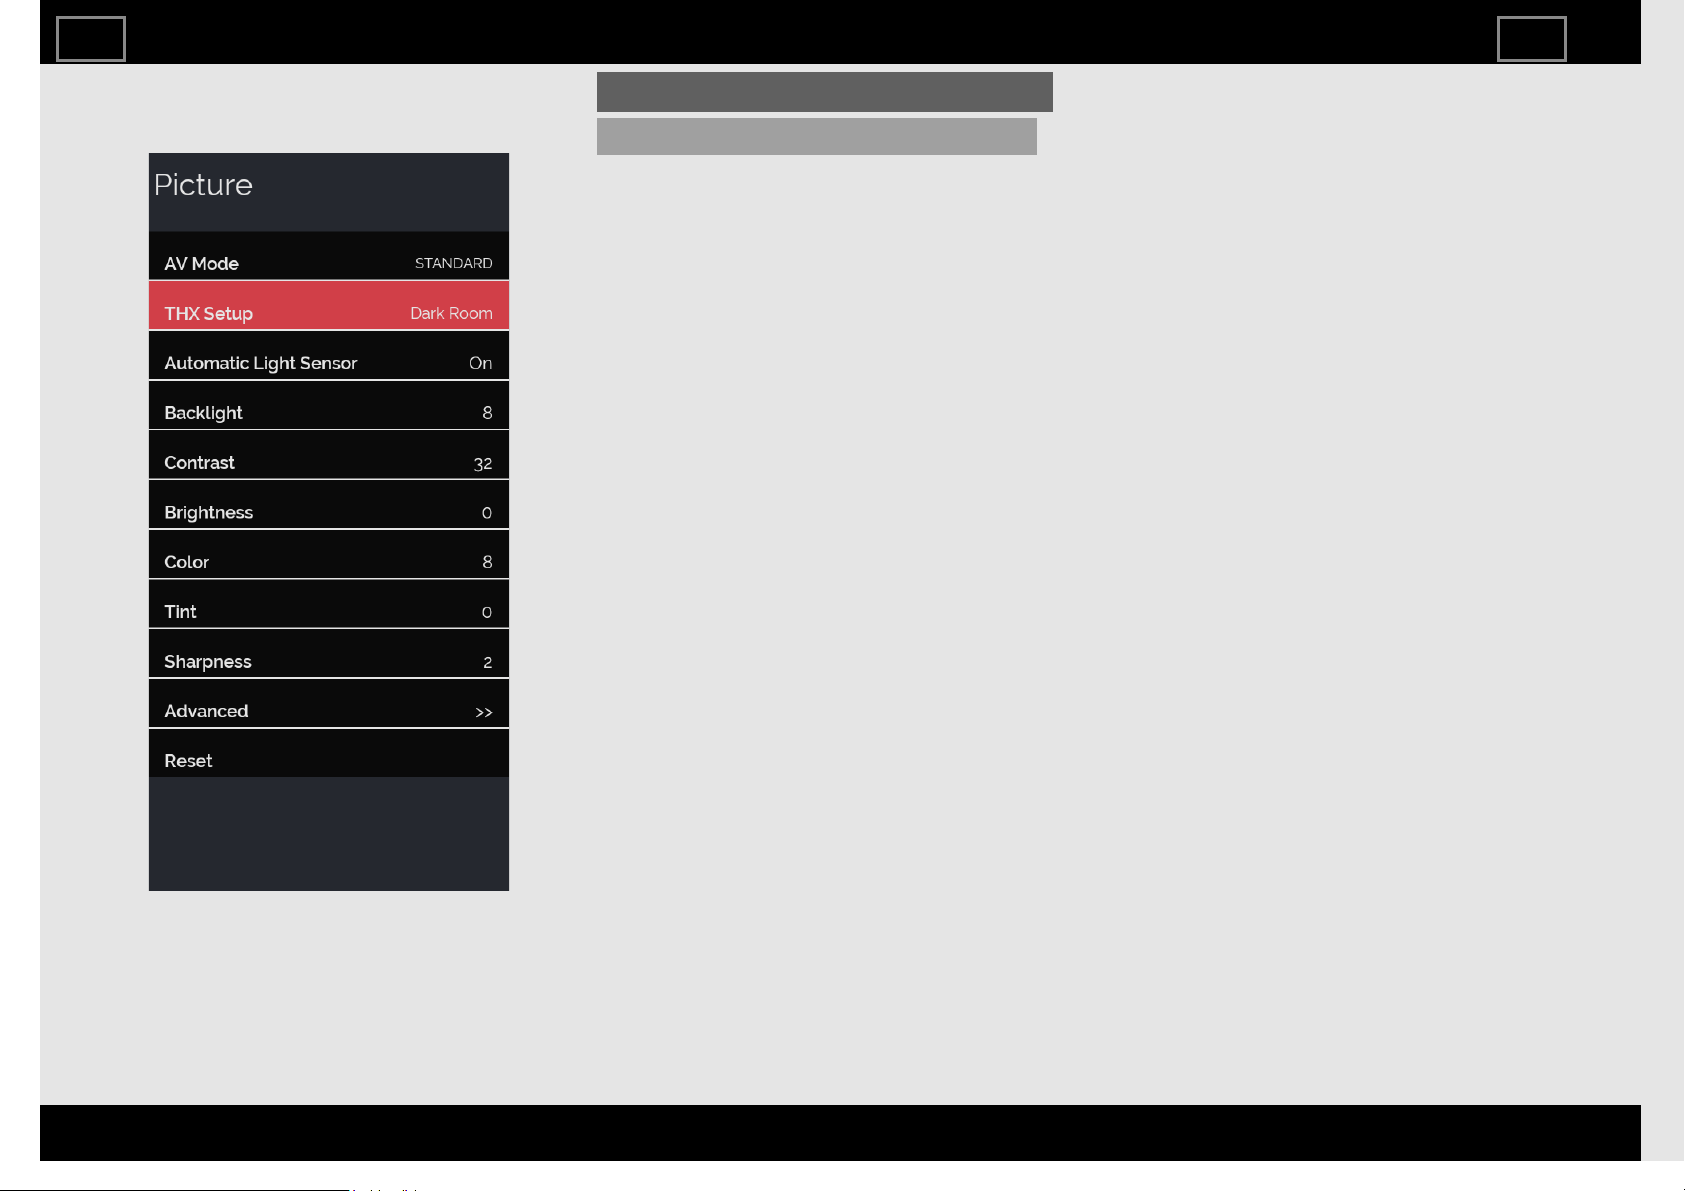
Example
Picture (Continue)
THX Setup (For LC-70UH30U only)
Adjust the picture to room illumination or
ambient brightness. This function is
available only when AV MODE is set to
"MOVIE THX".
Bright room: Select this item for a bright
room.
Dark room: Select this item for a dark
room.
TV Setup Operation
ENG33
ENGLISH | FRANÇAIS | ESPAÑOL
>><<

Example
Picture (Continue)
Automatic Light Sensor (Light Sensor)
Automatically adjusts the brightness of the
screen.
Off: The brightness is fixed at the value set
in "Backlight".
On: Automatically adjusts.
NOTE
When set to "On", the Light Sensor
senses the surrounding light and
automatically adjusts the backlight
brightness. Make sure nothing obstructs
the Light Sensor, which could affect its
ability to sense surrounding light.
TV Setup Operation
ENG34
ENGLISH | FRANÇAIS | ESPAÑOL
>><<
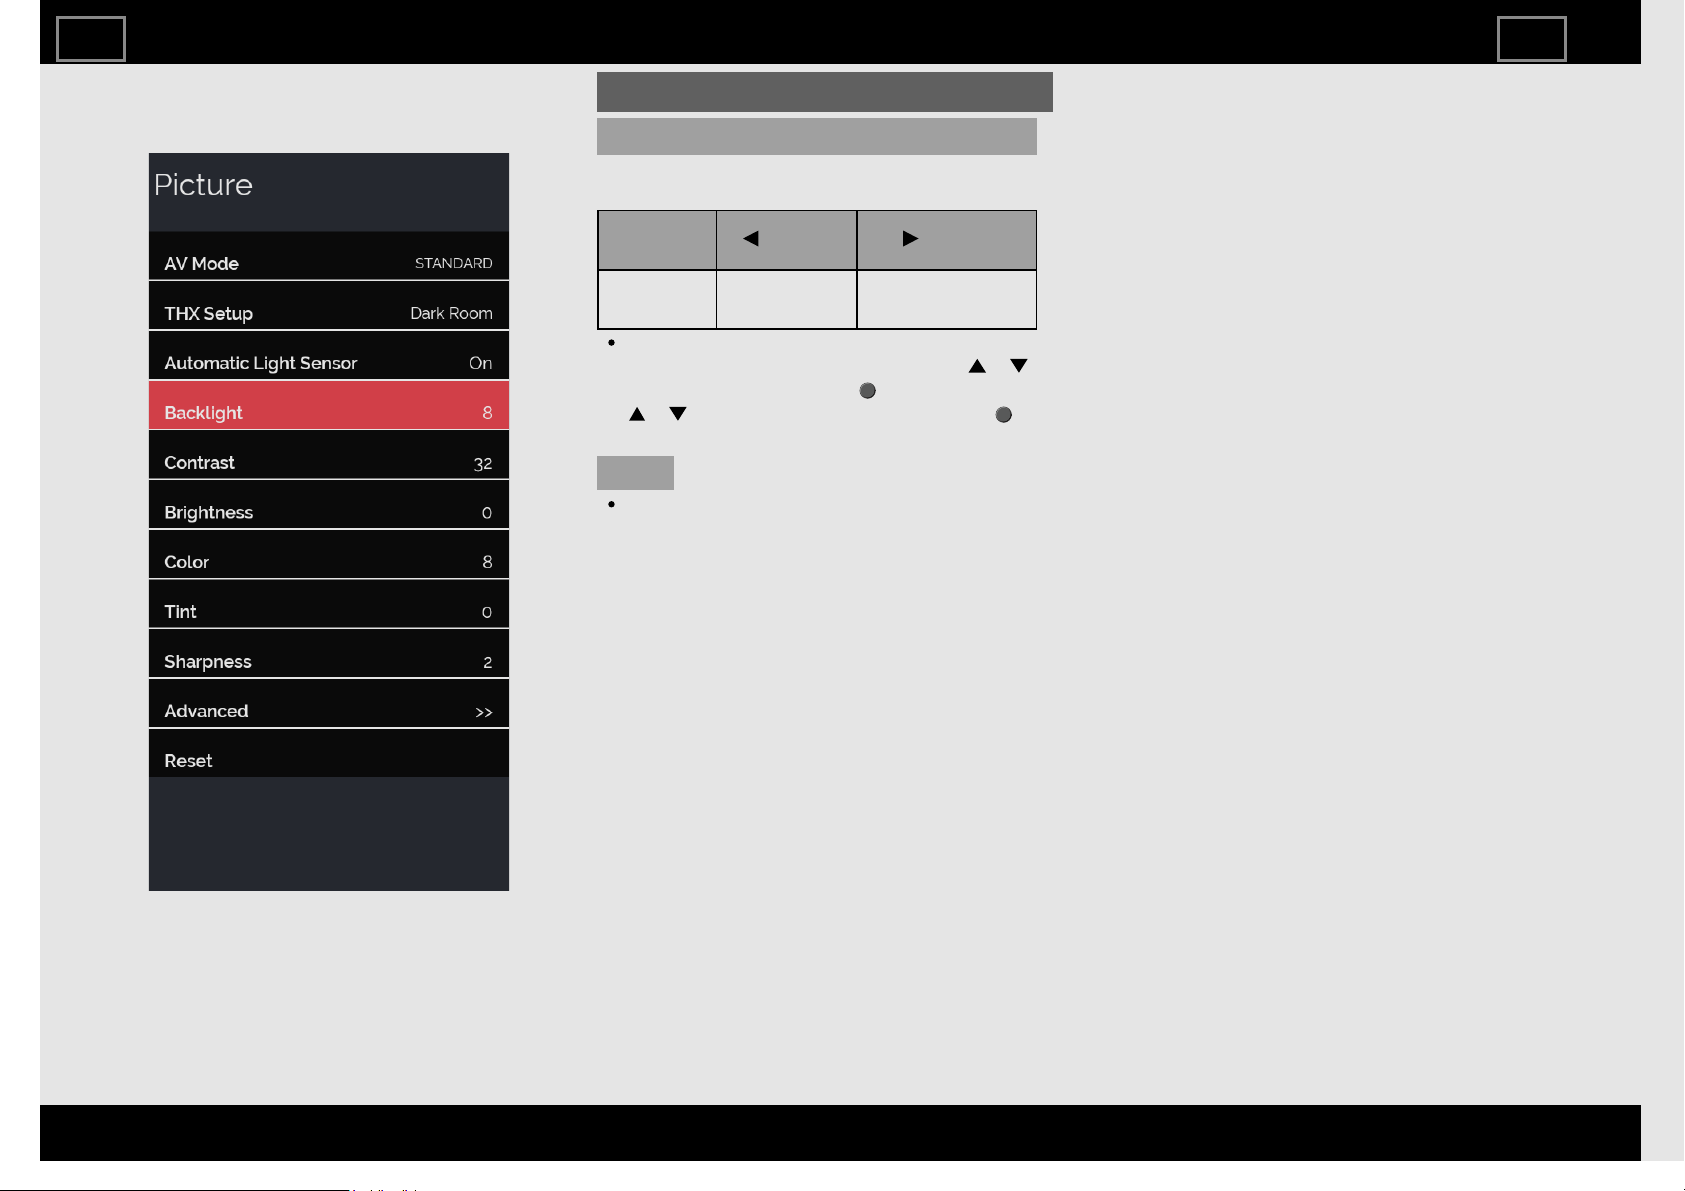
Example
Picture (Continue)
Backlight
Adjusts the picture to your preference with
the following picture settings.
Selected
item
button button
Backlight The screen
dims
The screen
brightens
For resetting all Picture adjustment items
to the factory preset values, press /
to select "Reset", press (ENTER), press
/ to select "Yes", and then press
(ENTER)
NOTE
"Backlight" is not available when you set
Automatic Light Sensor to "On".
TV Setup Operation
ENG35
ENGLISH | FRANÇAIS | ESPAÑOL
>><<
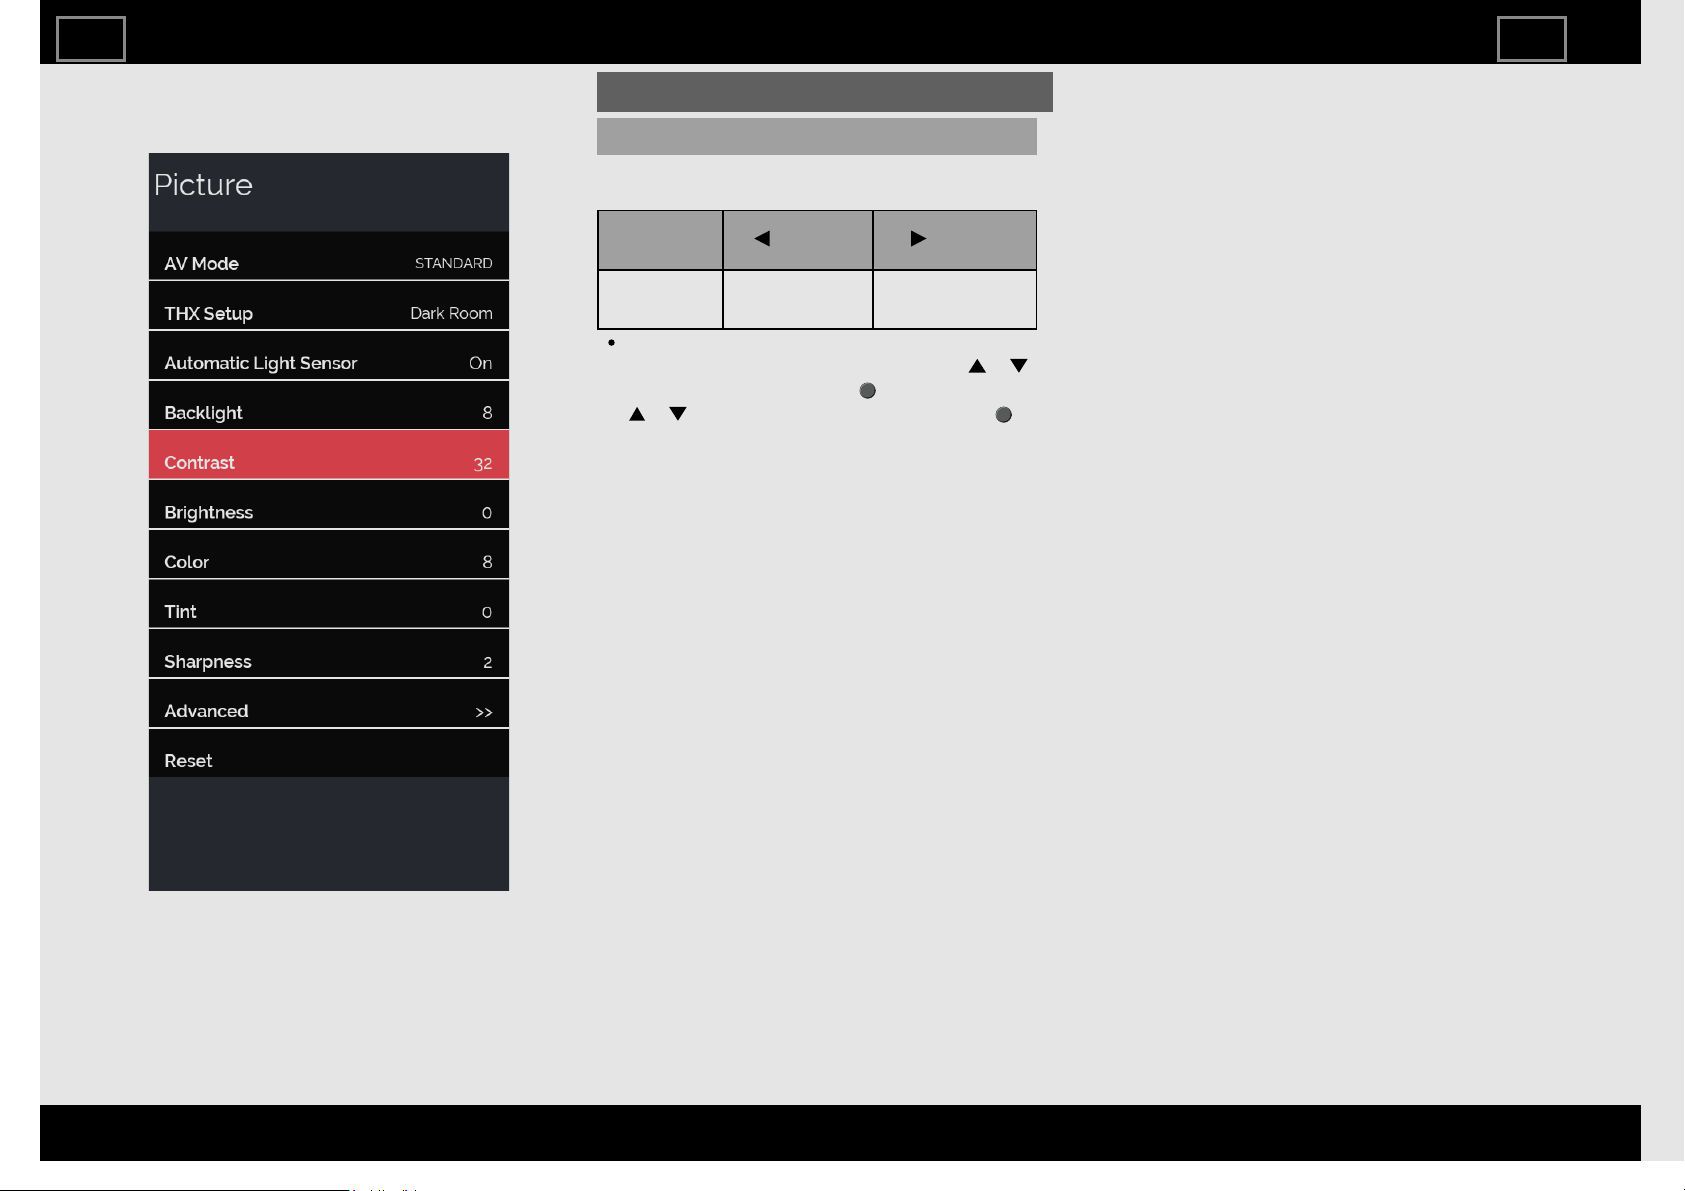
Example
Picture (Continue)
Contrast
Adjusts the picture to your preference with
the following picture settings.
Selected
item
button button
Contrast For less
contrast
For more
contrast
For resetting all Picture adjustment items
to the factory preset values, press /
to select "Reset", press (ENTER), press
/ to select "Yes", and then press
(ENTER)
TV Setup Operation
ENG36
ENGLISH | FRANÇAIS | ESPAÑOL
>><<
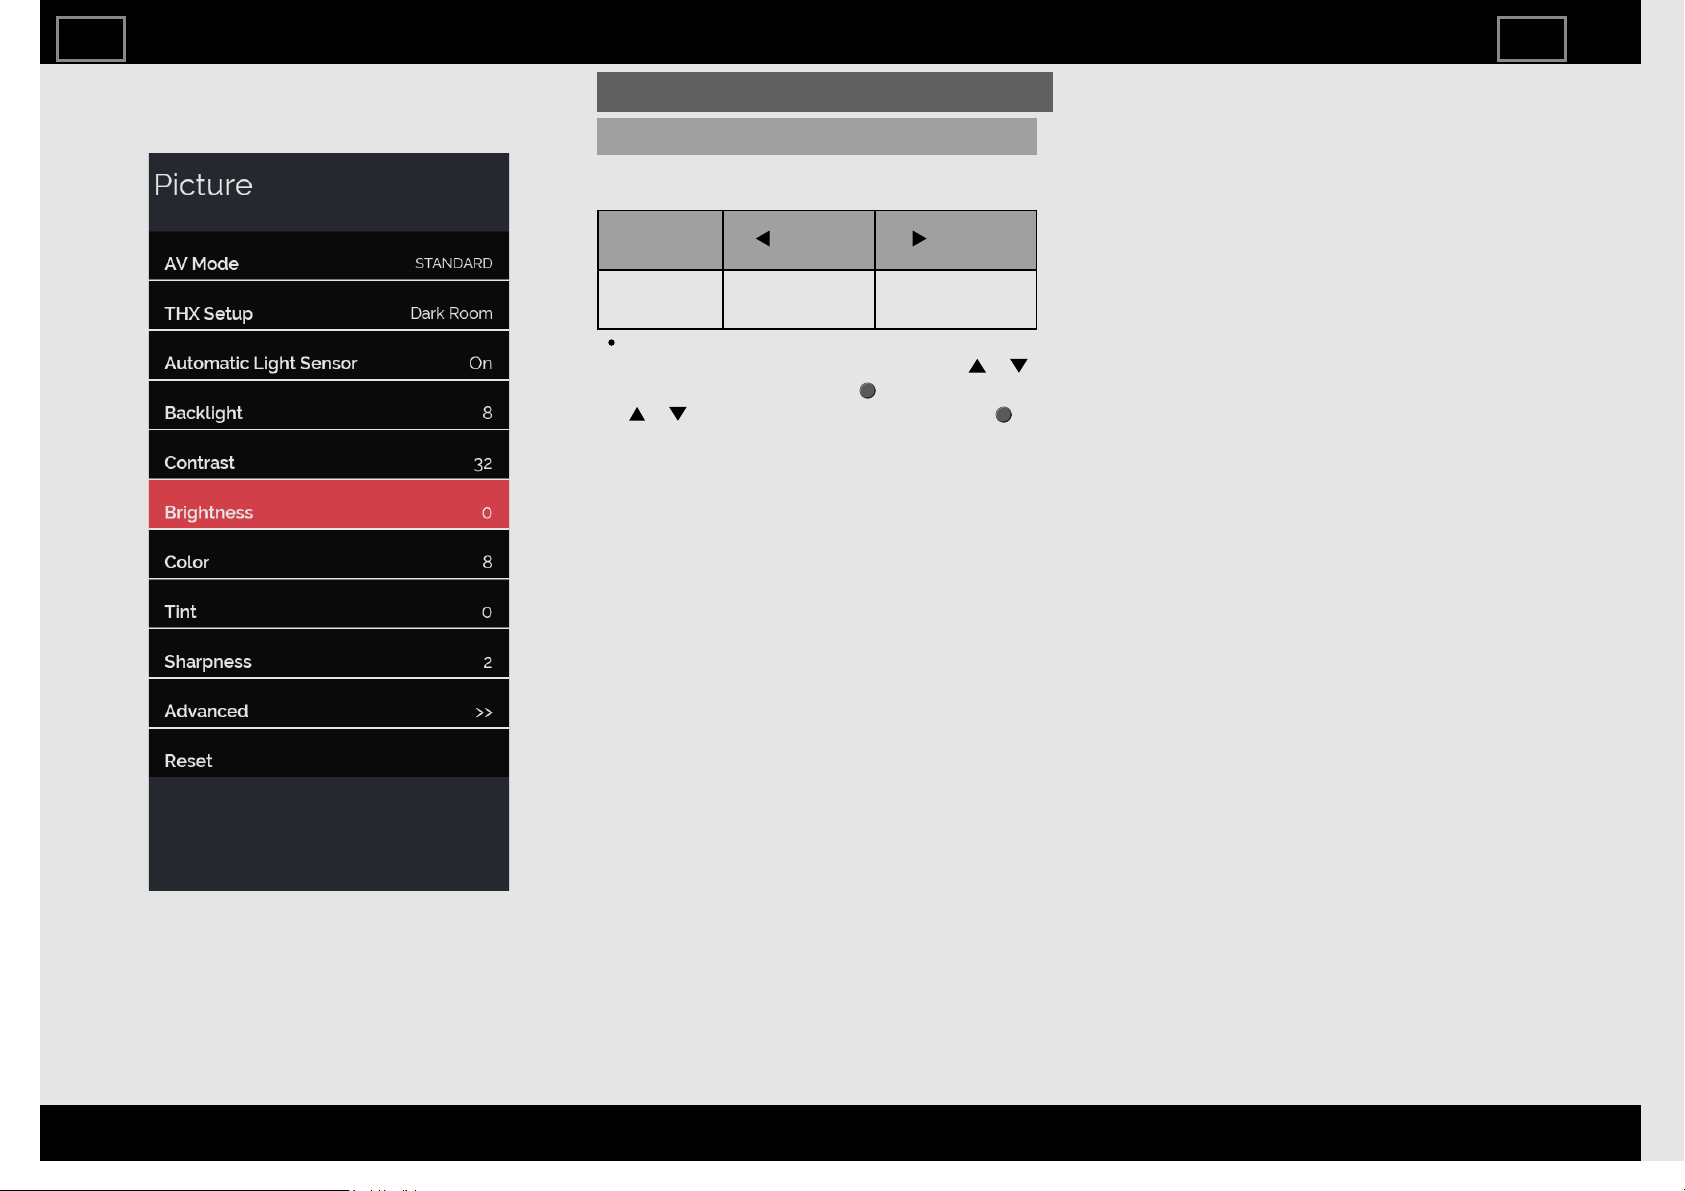
Example
Picture (Continue)
Brightness
Adjusts the picture to your preference with
the following picture settings.
Selected
item
button button
Brightness For less
brightness
For more
brightness
For resetting all Picture adjustment items
to the factory preset values, press /
to select "Reset", press (ENTER), press
/ to select "Yes", and then press
(ENTER)
TV Setup Operation
ENG37
ENGLISH | FRANÇAIS | ESPAÑOL
>><<
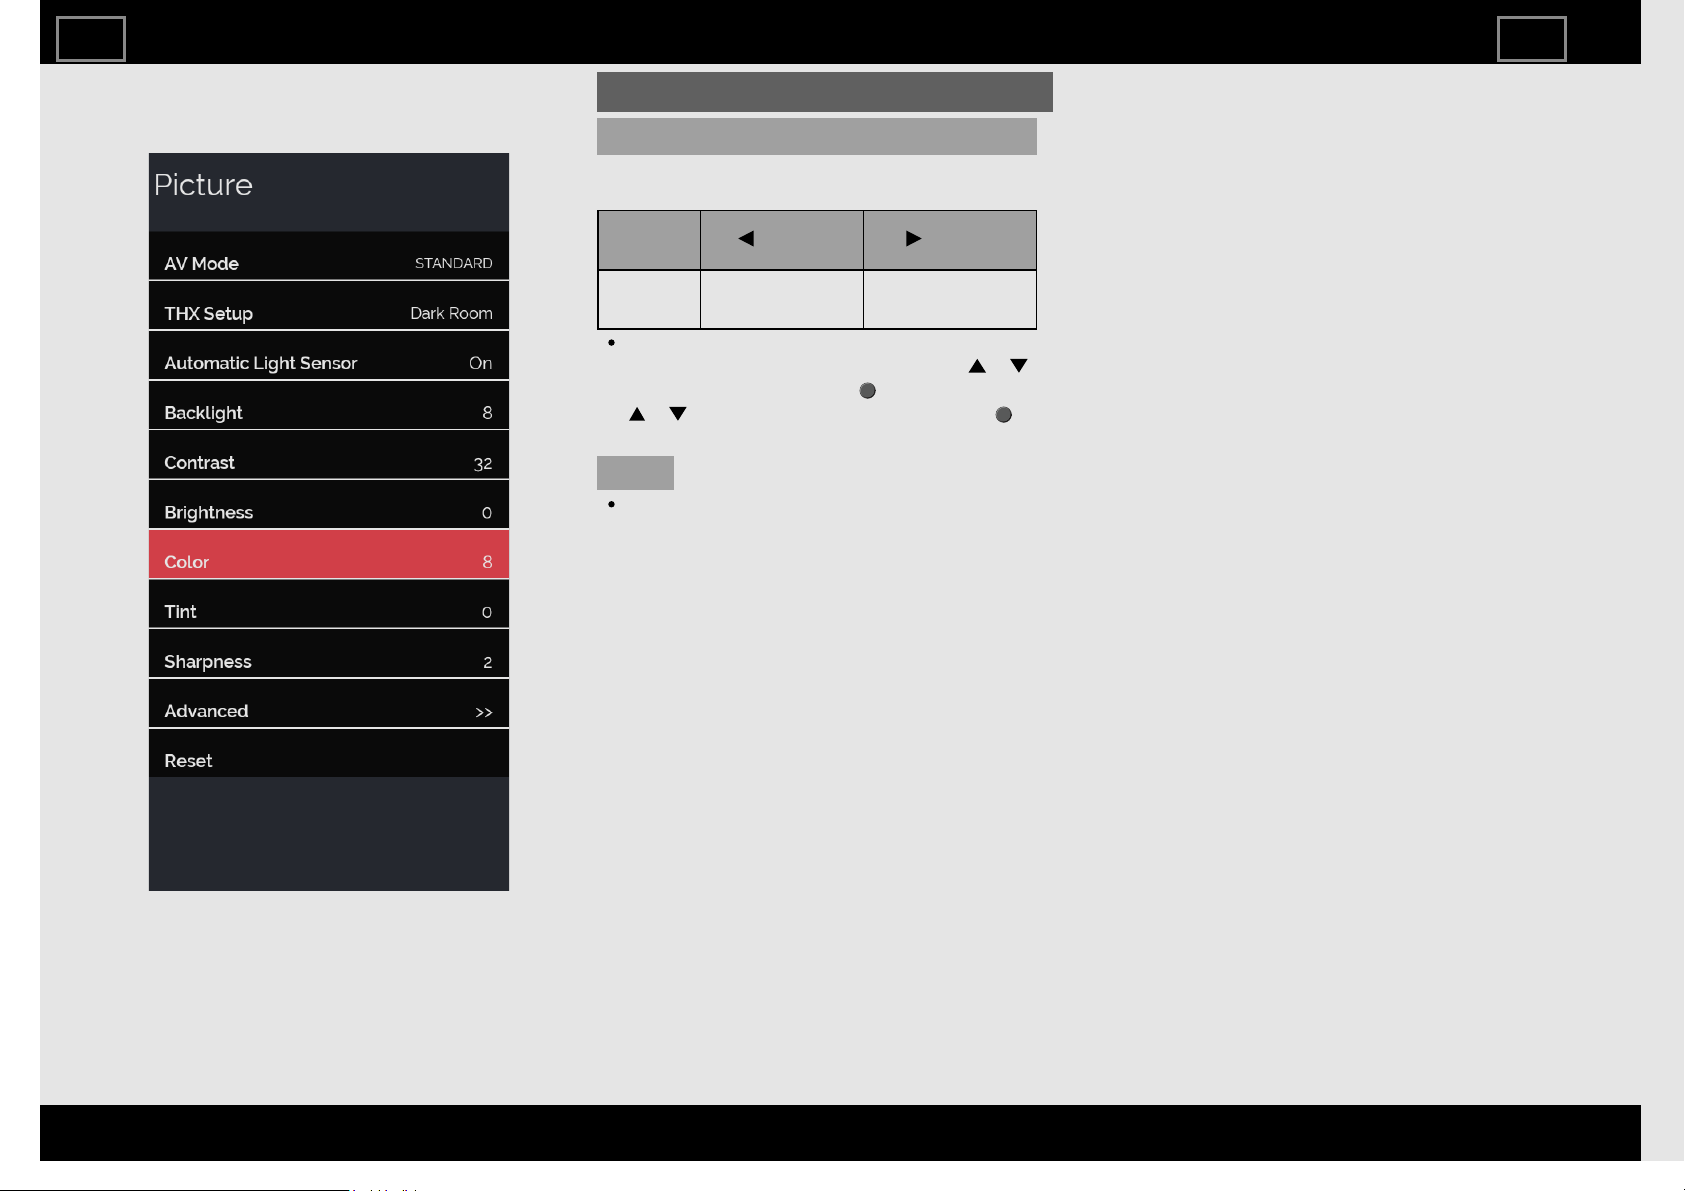
Example
Picture (Continue)
Color
Adjusts the picture to your preference with
the following picture settings.
Selected
item
button button
Color For less color
intensity
For more color
intensity
For resetting all Picture adjustment items
to the factory preset values, press /
to select "Reset", press (ENTER), press
/ to select "Yes", and then press
(ENTER)
NOTE
"Color" is not available when you set AV
MODE to "PC".
TV Setup Operation
ENG38
ENGLISH | FRANÇAIS | ESPAÑOL
>><<
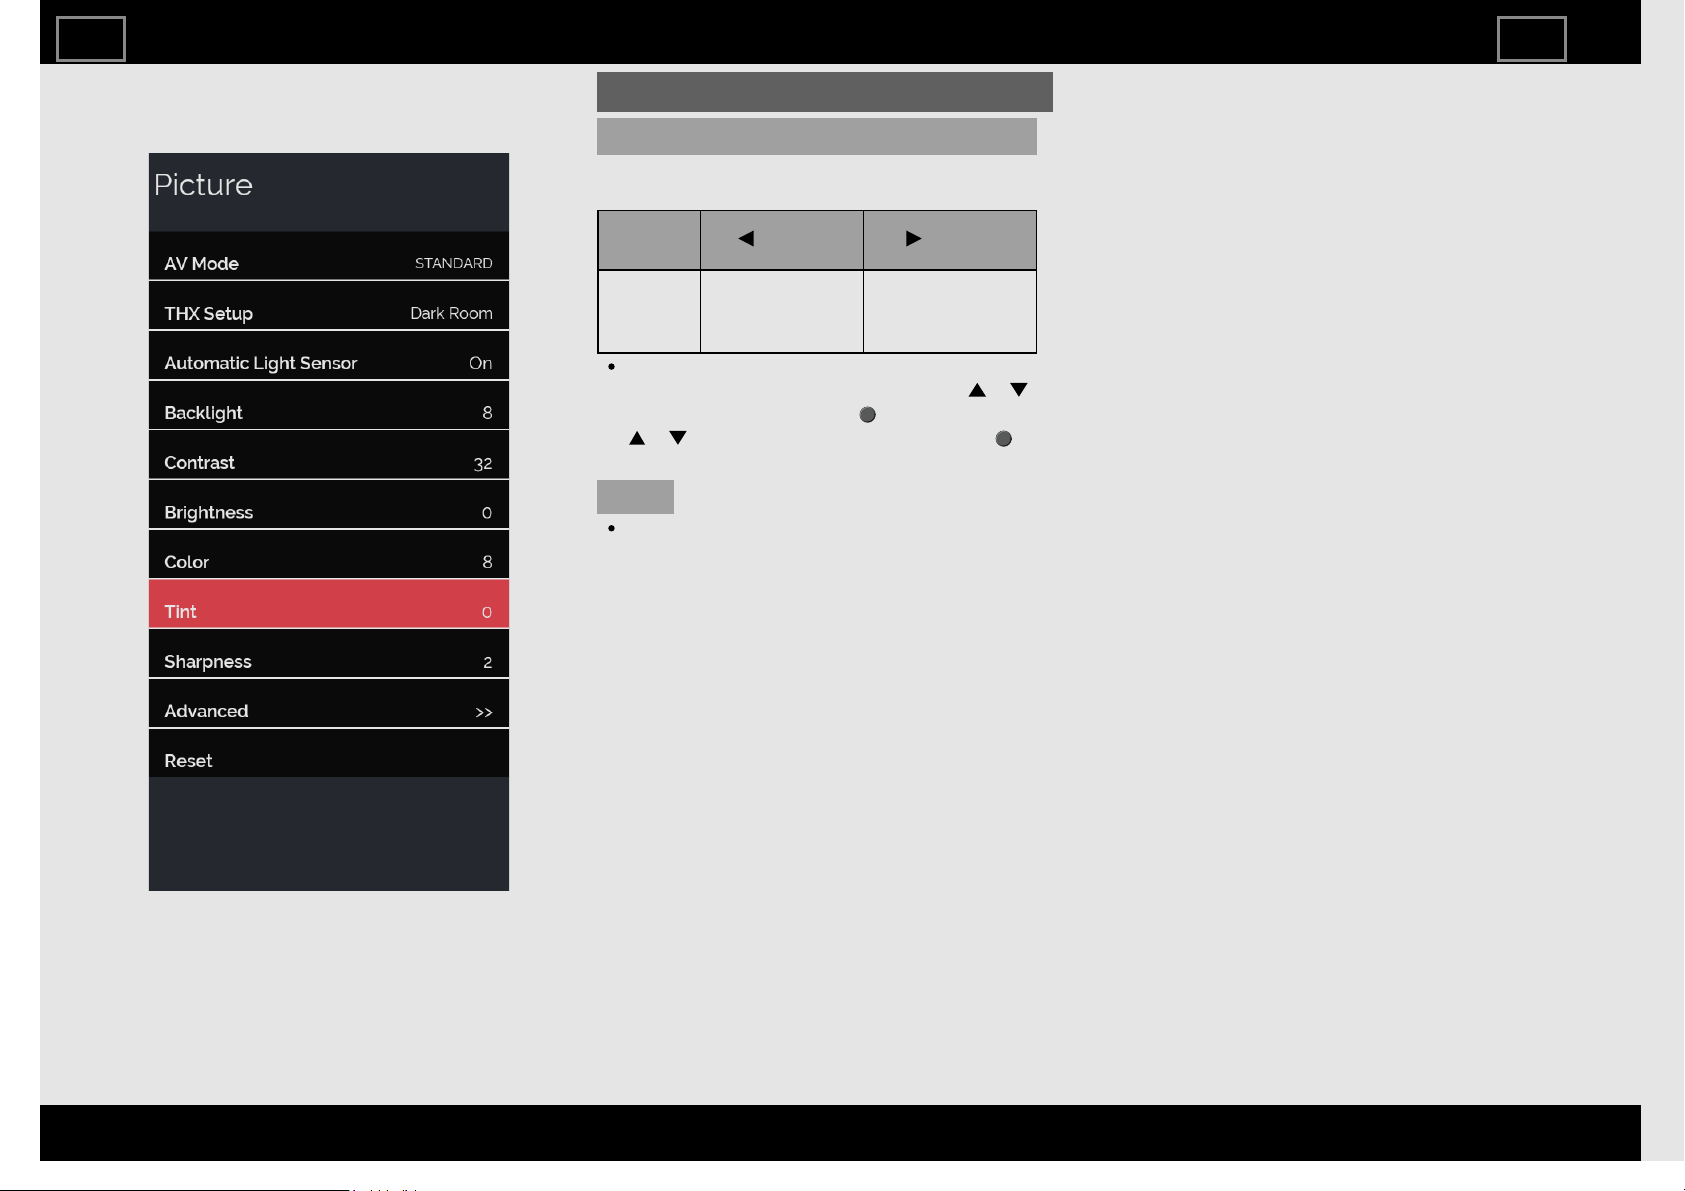
Example
Picture (Continue)
Tint
Adjusts the picture to your preference with
the following picture settings.
Selected
item
button button
Tint Skin tones
become
reddish
Skin tones
become
greenish
For resetting all Picture adjustment items
to the factory preset values, press /
to select "Reset", press (ENTER), press
/ to select "Yes", and then press
(ENTER)
NOTE
"Tint" is not available when you set AV
MODE to "PC".
TV Setup Operation
ENG39
ENGLISH | FRANÇAIS | ESPAÑOL
>><<
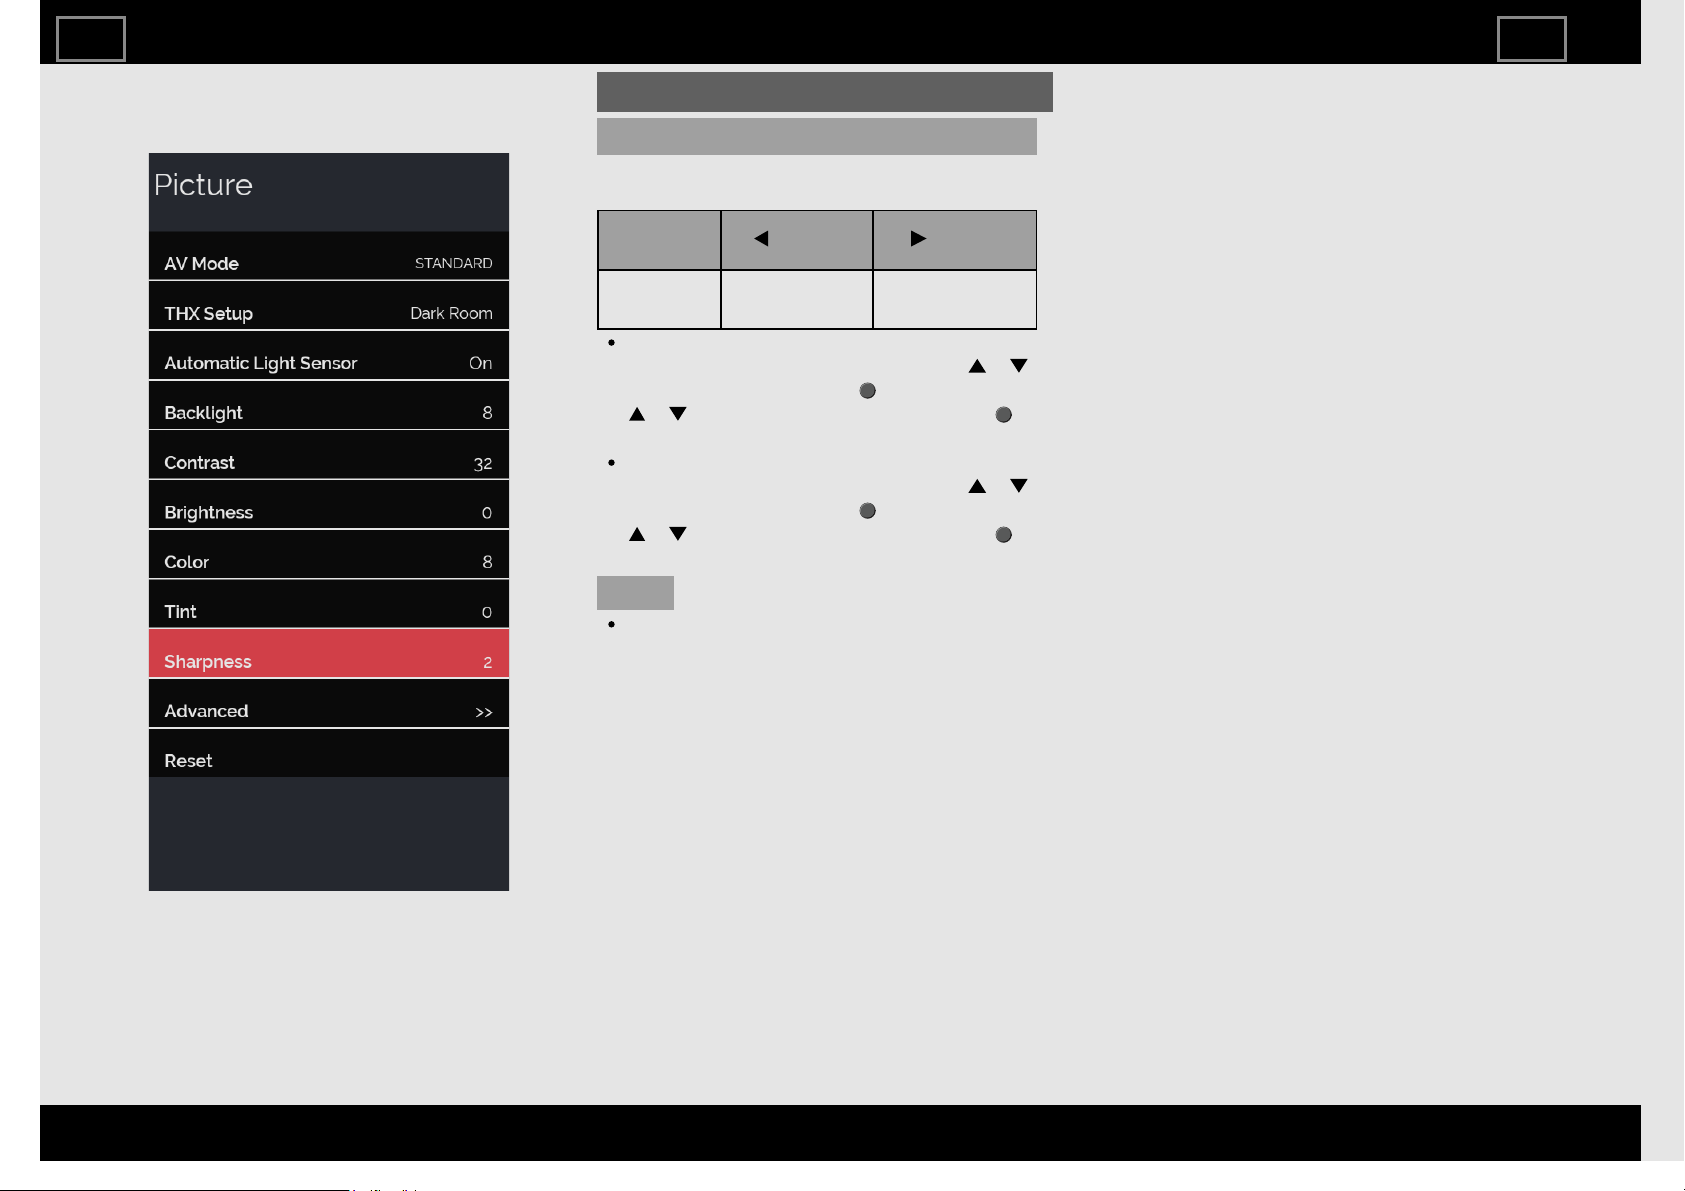
Example
Picture (Continue)
Sharpness
Adjusts the picture to your preference with
the following picture settings.
Selected
item
button button
Sharpness For less
sharpness
For more
sharpness
For resetting all Picture adjustment items
to the factory preset values, press /
to select "Reset", press (ENTER), press
/ to select "Yes", and then press
(ENTER)
For resetting all Picture adjustment items
to the factory preset values, press /
to select "Reset", press (ENTER), press
/ to select "Yes", and then press
(ENTER)
NOTE
"Sharpness" is not available when you set
AV MODE to "PC".
TV Setup Operation
ENG310
ENGLISH | FRANÇAIS | ESPAÑOL
>><<
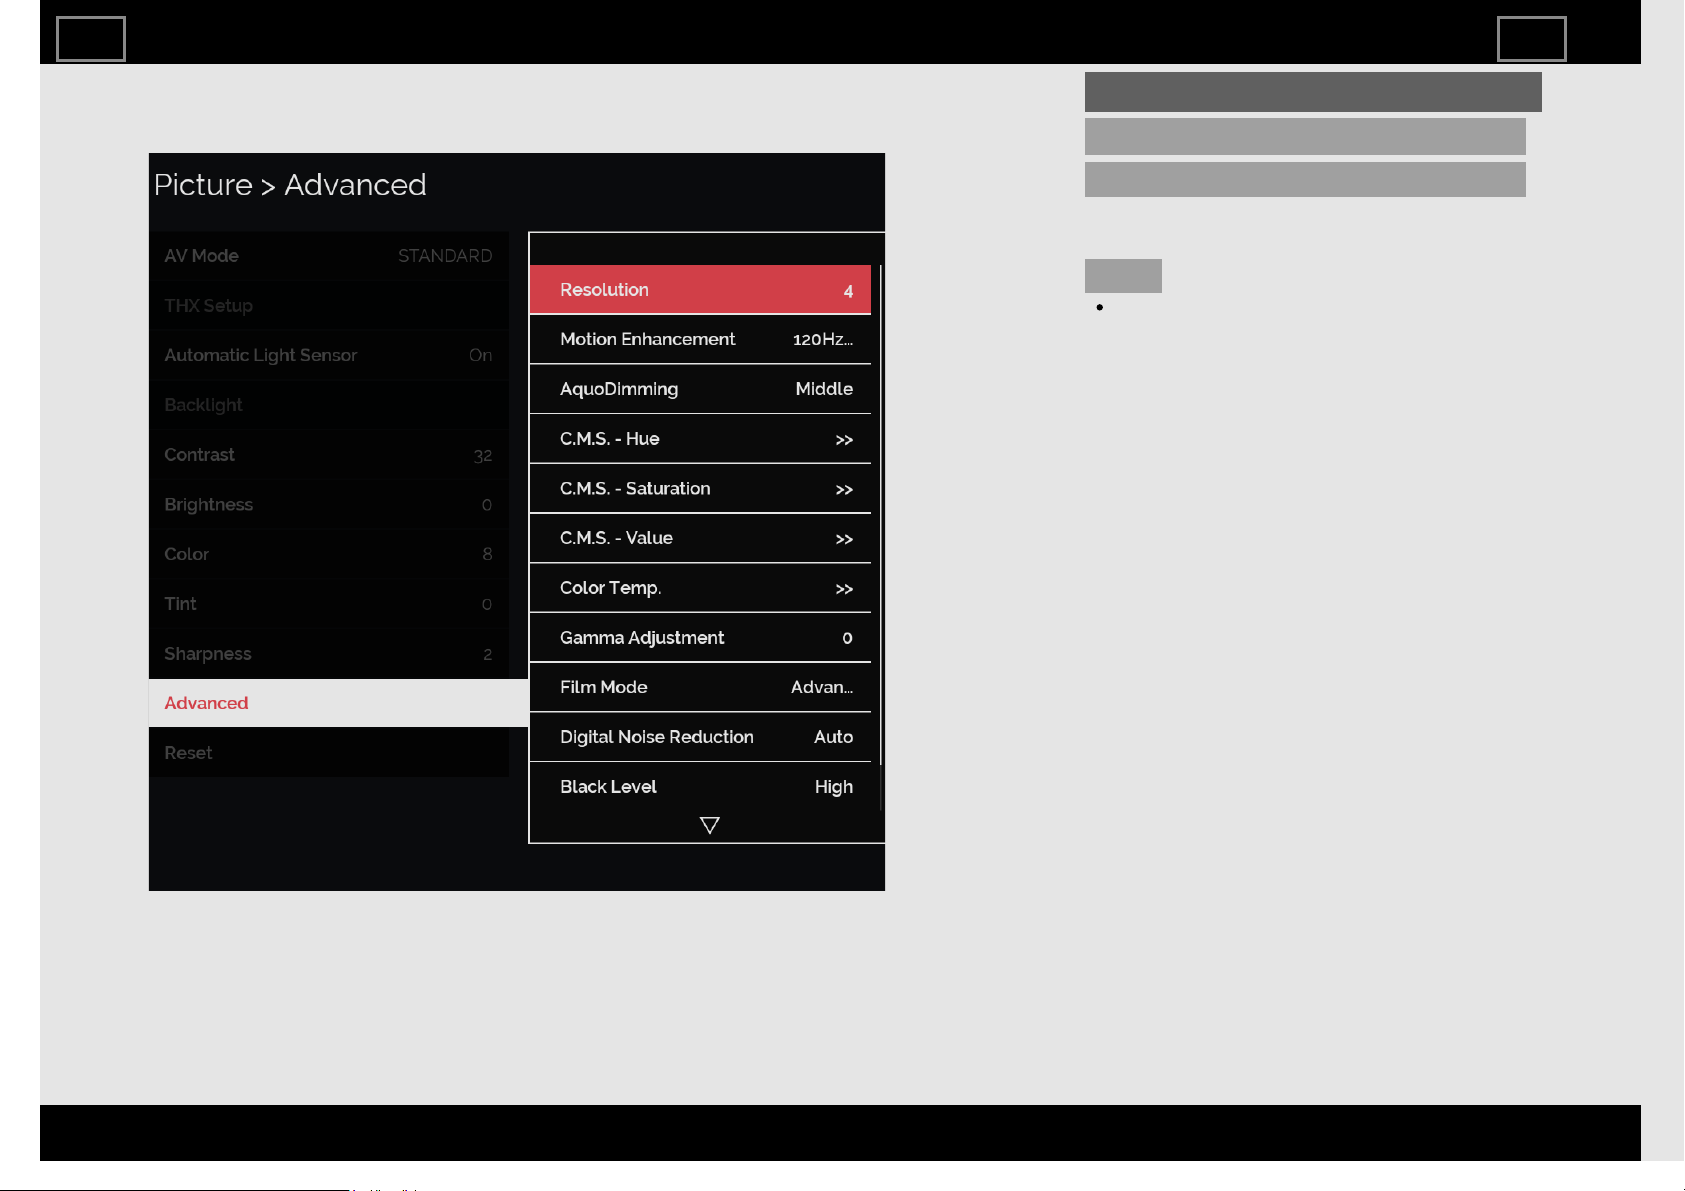
Example
Picture (Continue)
Advanced
Resolution
The fineness can be adjusted in the range of
0 to +10.
NOTE
"Resolution" is not available when you set
AV MODE to "PC".
TV Setup Operation
ENG311
ENGLISH | FRANÇAIS | ESPAÑOL
>><<
Example
Picture (Continue)
Advanced
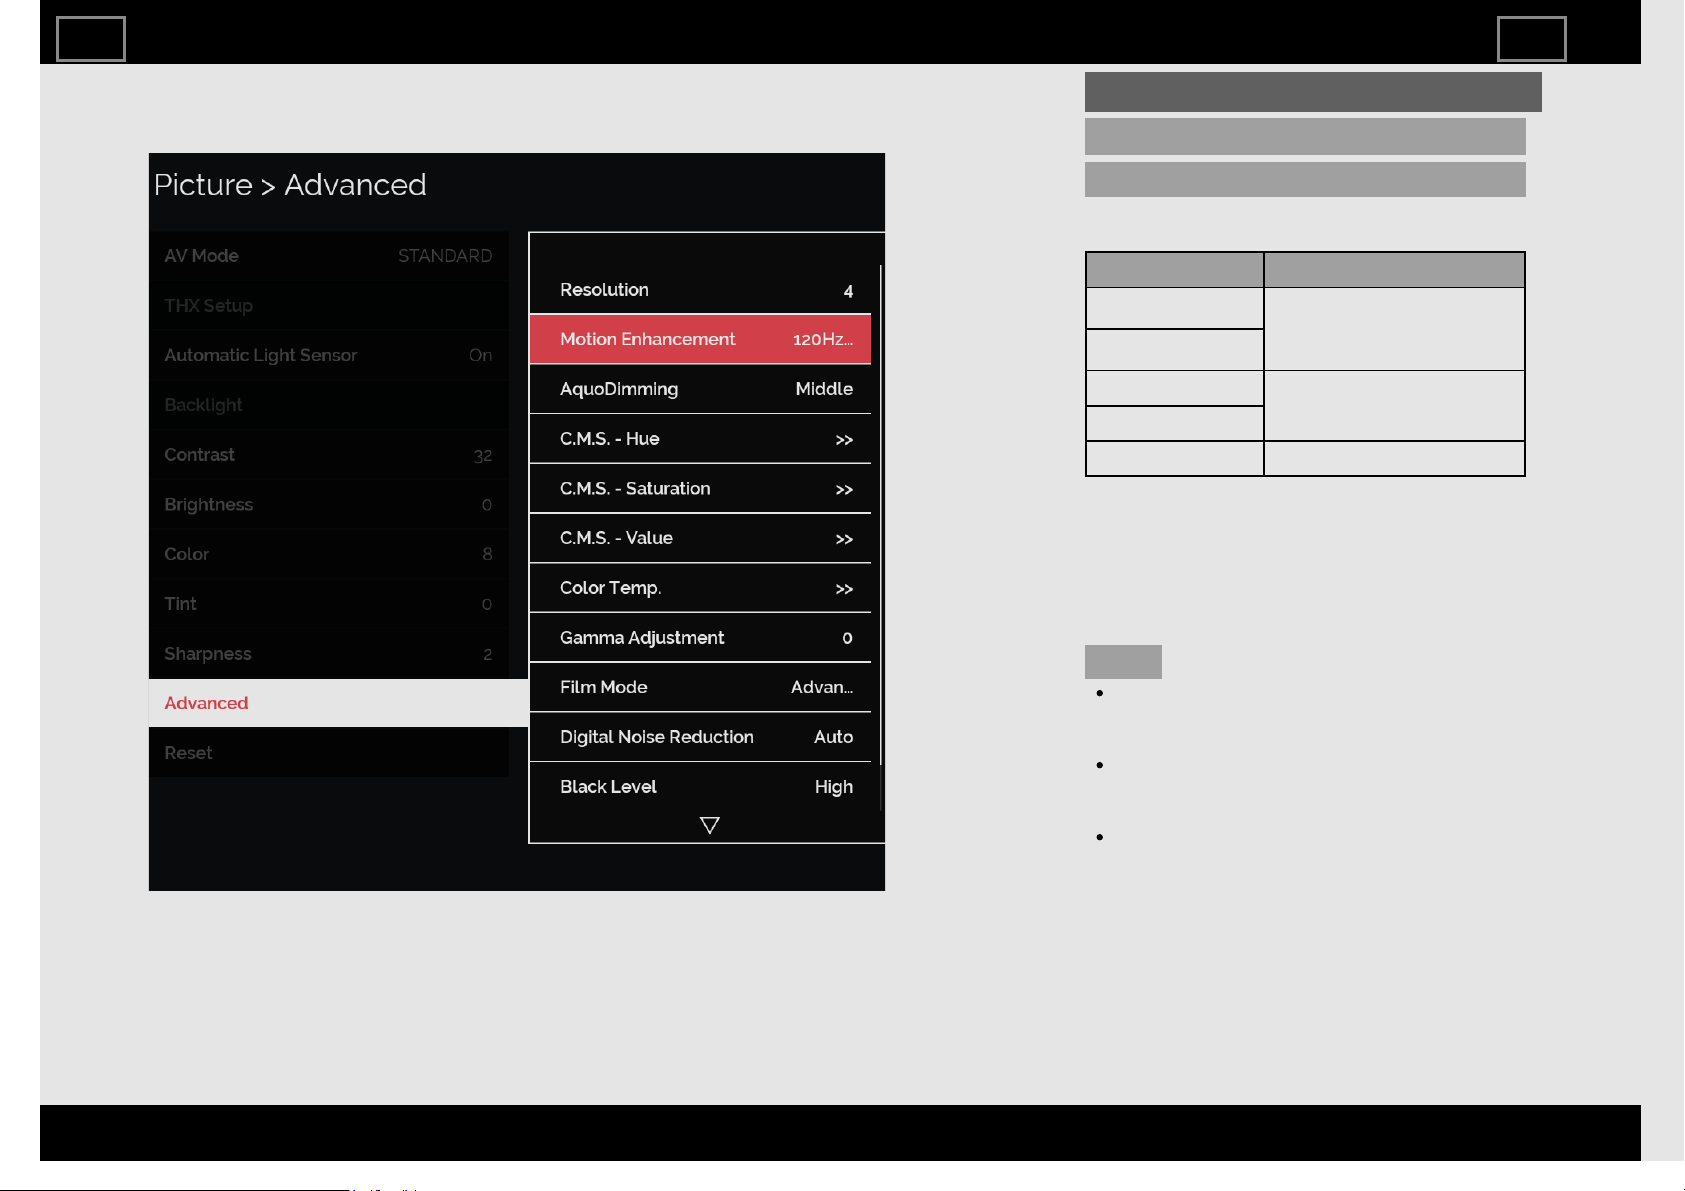
Motion Enhancement
Use Motion Enhancement to view fast-
action video more clearly.
Selected item Description
AquoMotion960 Turn the LED backlight
on or off for 120Hz drive
display.
AquoMotion480
120Hz High For obtaining a clearer
image.
120Hz Low
Off Original image.
■UH30U model
AquoMotion960/ 120Hz High/ 120Hz Low/
Off
■UE30U and UC30U model
AquoMotion480/ 120Hz High/ 120Hz Low/
Off
NOTE
"Motion Enhancement" may cause image
noise. If this occurs, turn the function
"Off".
When AV MODE is set to "GAME" or "PC",
or PC format is being input, "Motion
Enhancement" is not available.
When Film Mode is set to "Standard",
”Motion Enhancement" is not available.
TV Setup Operation
ENG312
ENGLISH | FRANÇAIS | ESPAÑOL
>><<
Example
Picture (Continue)
Advanced
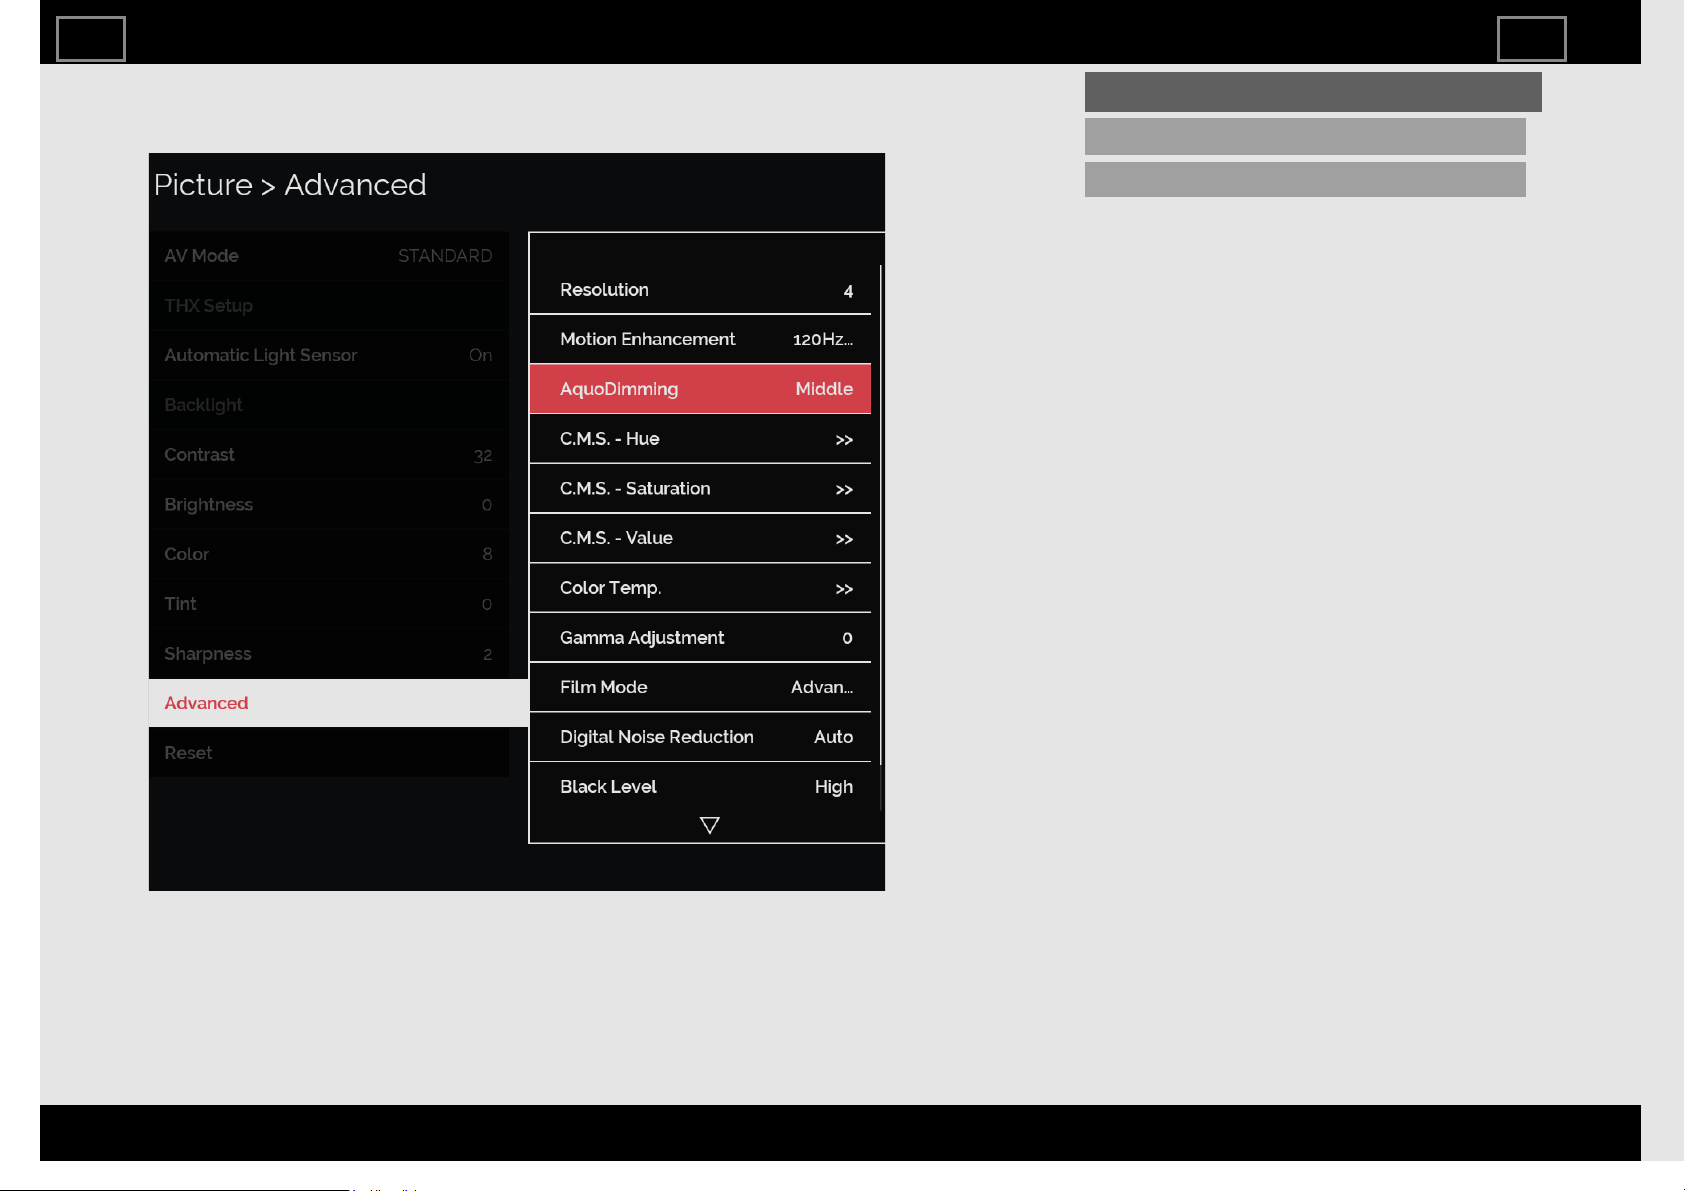
AquoDimming
Fine brightness control can be used to
adjust the contrast between the light and
shadow of the image.
High/Middle/Low/Off
TV Setup Operation
ENG313
ENGLISH | FRANÇAIS | ESPAÑOL
>><<
Example
Picture (Continue)
Advanced
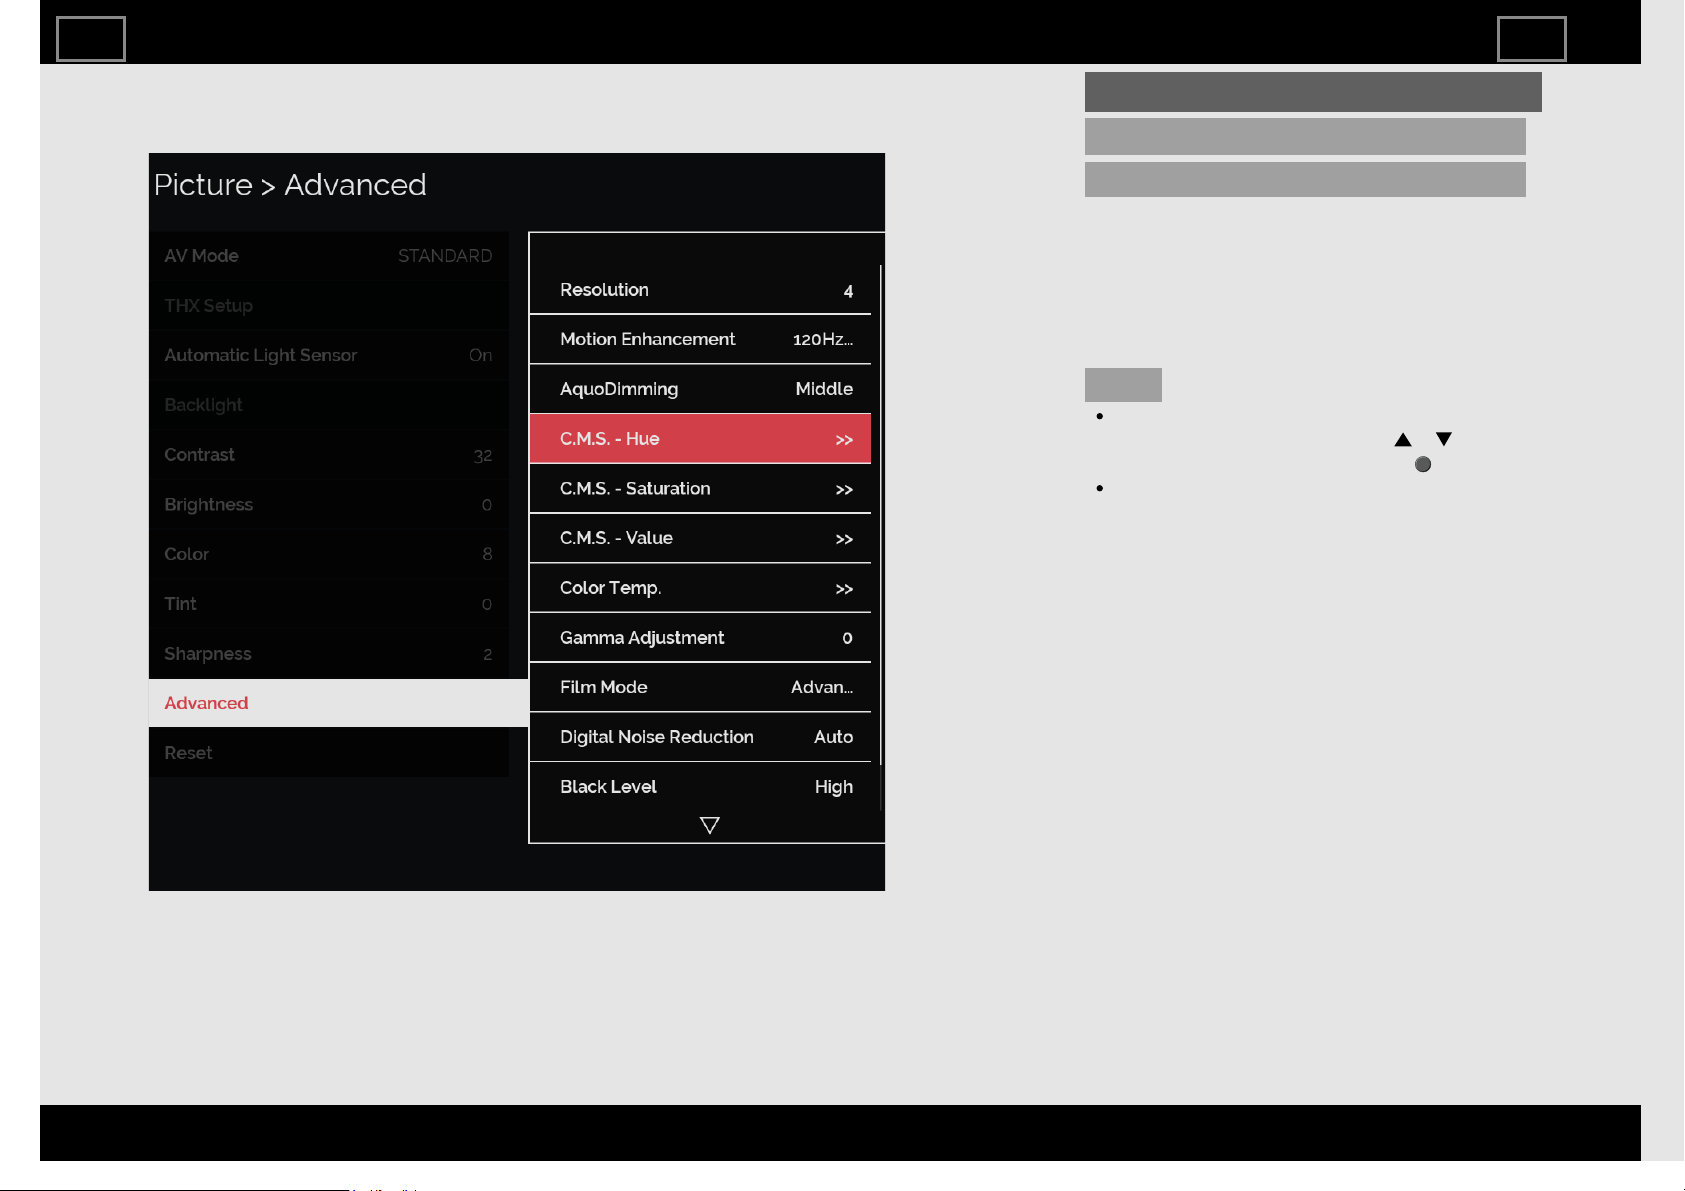
C.M.S. (Color Management System)
Color tone is managed using the six-color
adjustment setting.
C.M.S.-Hue: This is a standard to adjust the
color either more reddish or more bluish
in tone.
A lower value makes the image darker.
NOTE
For resetting all adjustment items to the
factory preset values, press / to
select "Reset", and then press (ENTER).
"C.M.S.-Hue" is not available when you
set AV MODE to "PC".
TV Setup Operation
ENG314
ENGLISH | FRANÇAIS | ESPAÑOL
>><<
Example
Picture (Continue)
Advanced
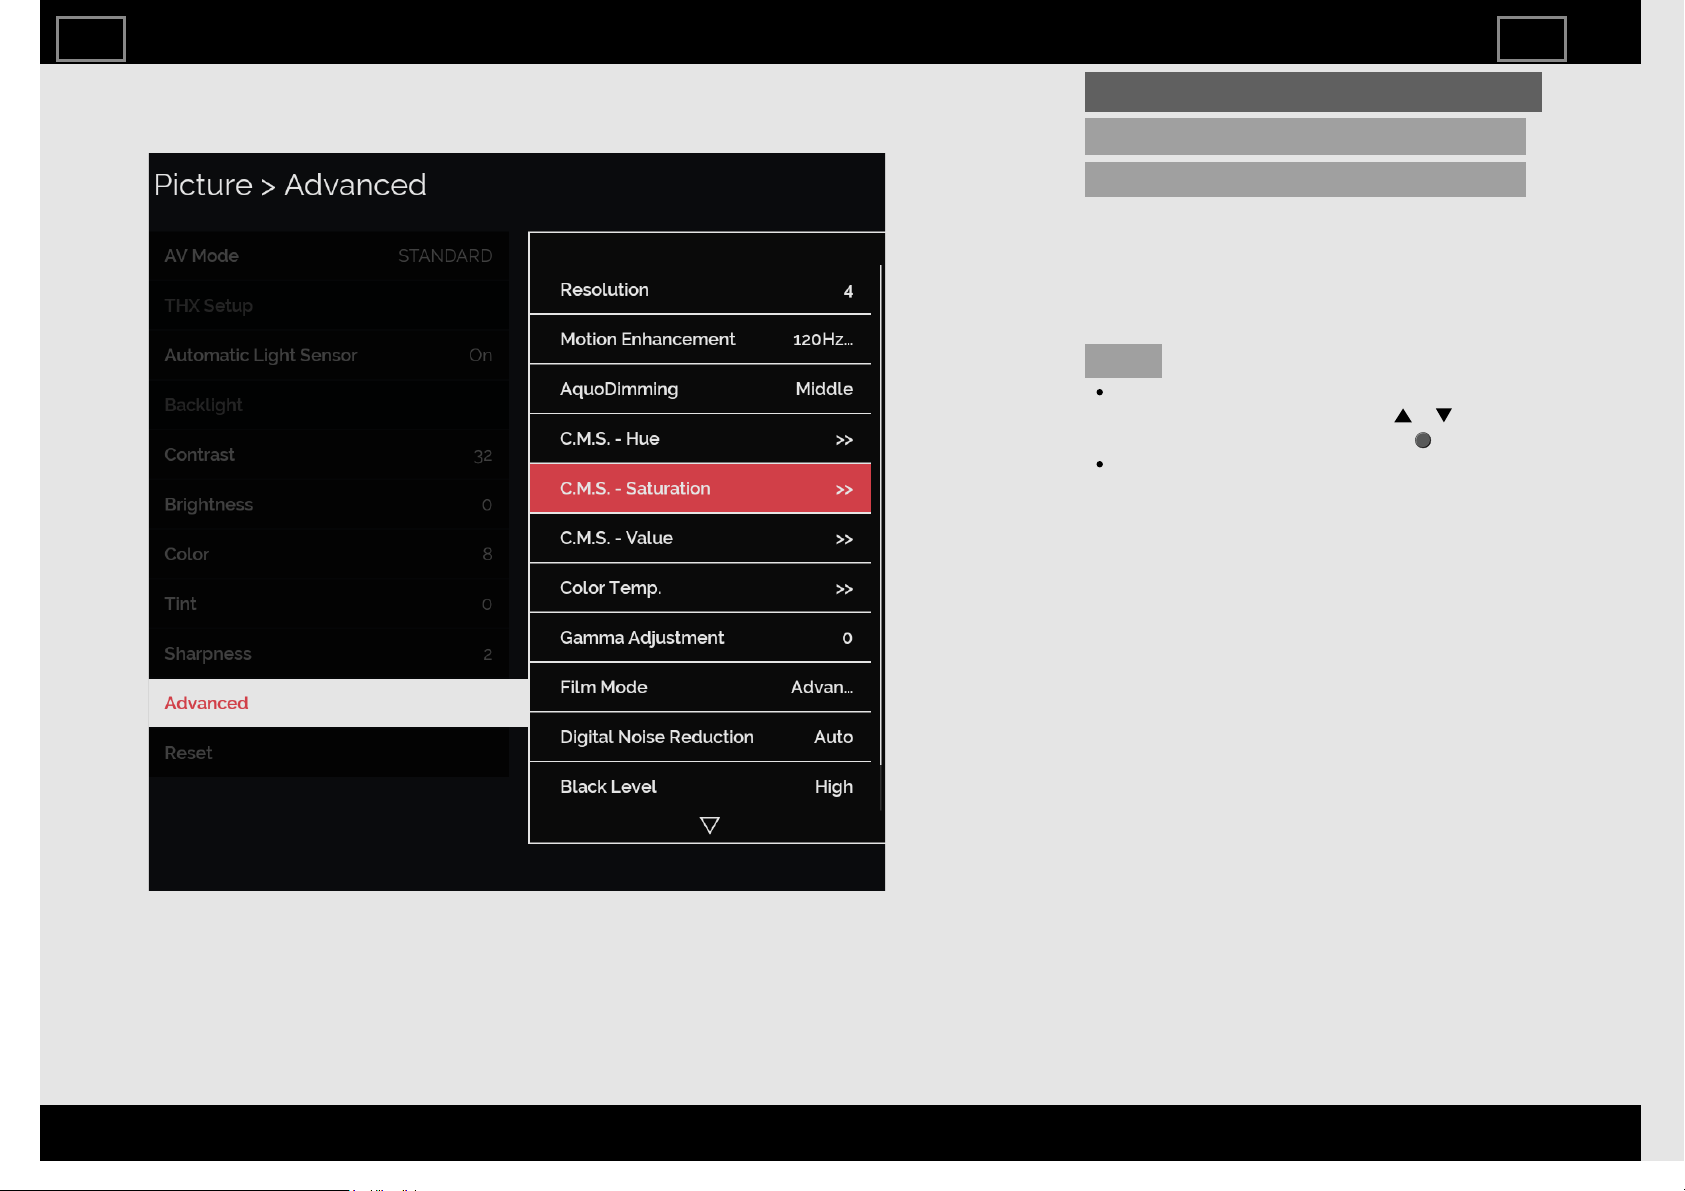
C.M.S. (Color Management System)
Color tone is managed using the six-color
adjustment setting.
C.M.S.-Saturation: Increases or decreases
the saturation of a selected color.
A lower value makes the image darker.
NOTE
For resetting all adjustment items to the
factory preset values, press / to
select "Reset", and then press (ENTER).
"C.M.S.-Saturation" is not available when
you set AV MODE to "PC".
TV Setup Operation
ENG315
ENGLISH | FRANÇAIS | ESPAÑOL
>><<

Example
Picture (Continue)
Advanced
C.M.S. (Color Management System)
Color tone is managed using the six-color
adjustment setting.
C.M.S.-Value: A higher value makes the
image brighter.
A lower value makes the image darker.
NOTE
For resetting all adjustment items to the
factory preset values, press / to
select "Reset", and then press (ENTER).
"C.M.S.-Value" is not available when you
set AV MODE to "PC".
TV Setup Operation
ENG316
ENGLISH | FRANÇAIS | ESPAÑOL
>><<
Example
Picture (Continue)
Advanced
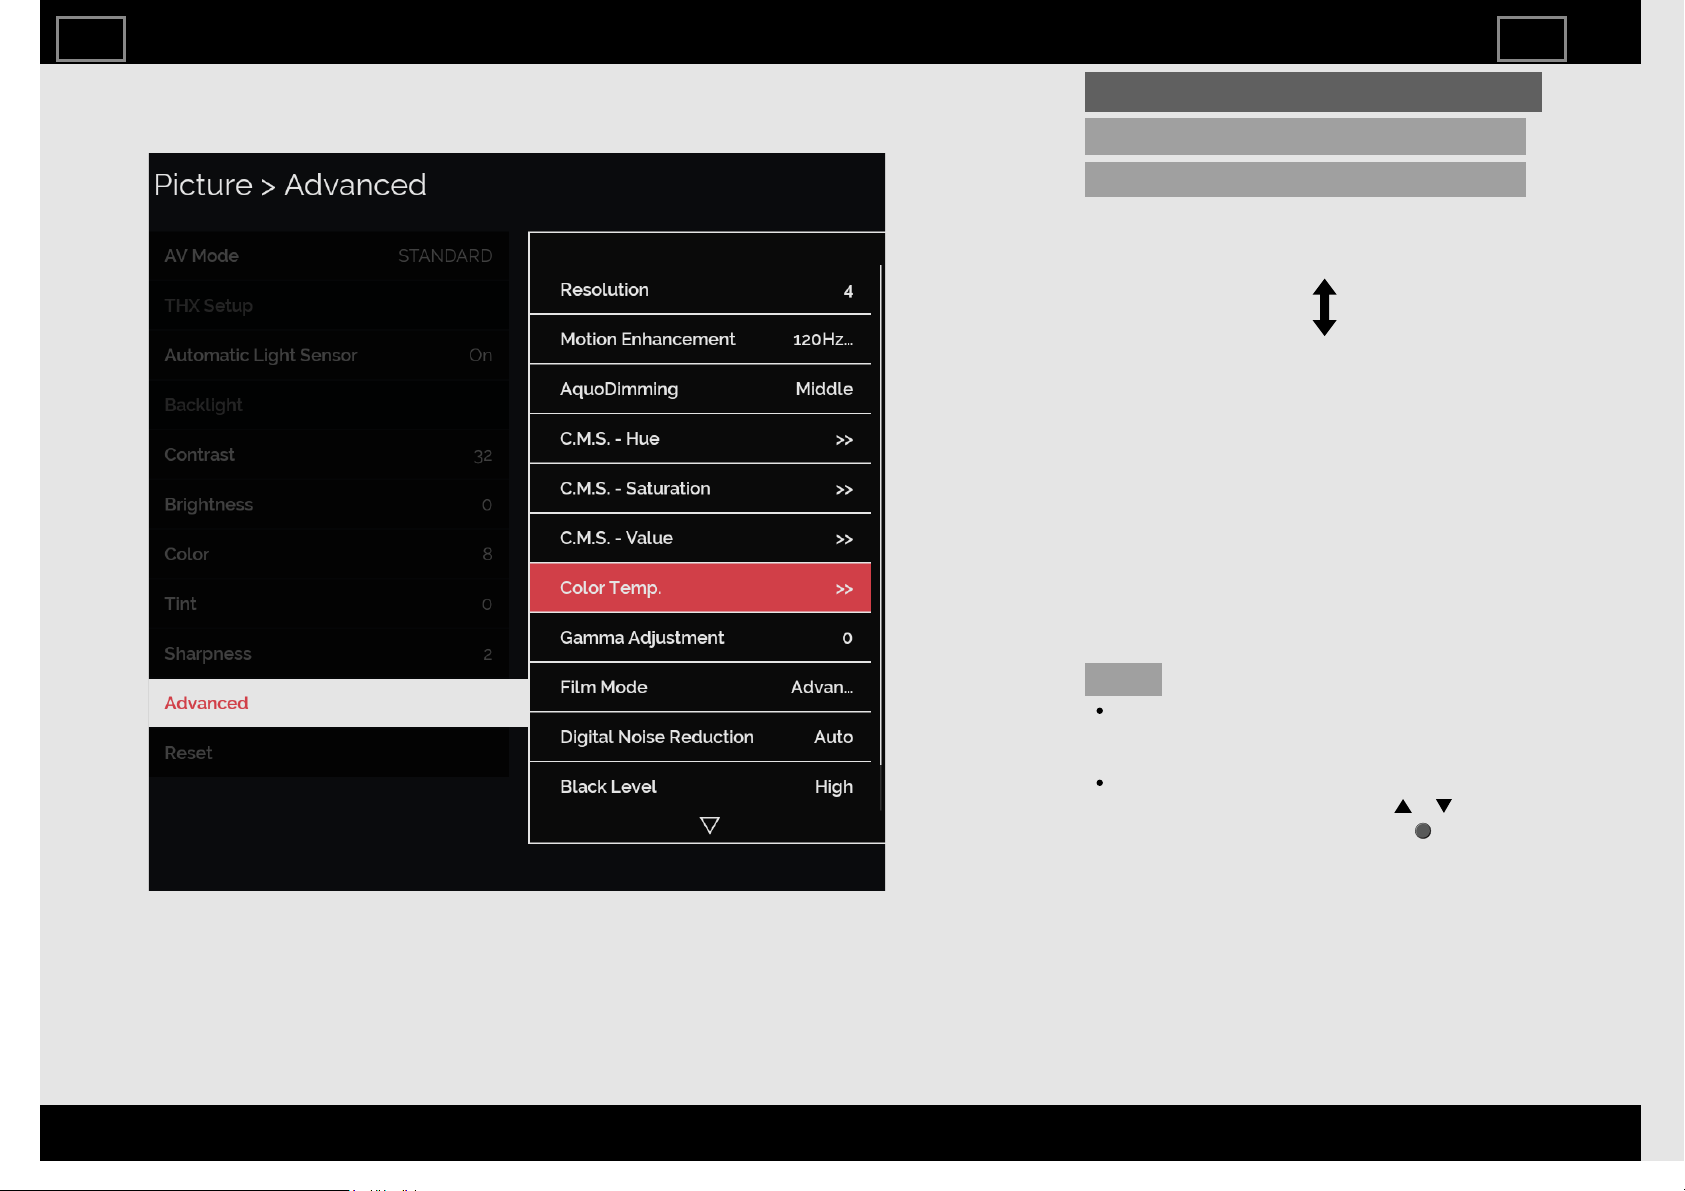
Color Temp. (Color Temperature)
For a better white balance, use color
temperature correction.
High: White with bluish tone
Mid-High:
Middle:
Mid-Low:
Low: White with reddish tone
White balance can be adjusted between a
maximum of +30 and a minimum of -30 for
each color temperature.
R Gain/G Gain/B Gain
Fine tuning the color temperature
You can adjust the "10 Point Setting" setting.
Adjust the set color temperature from +1 to
+10.
White balance can be adjusted between a
maximum of +30 and a minimum of -30 for
each color temperature.
NOTE
When "10 Point Setting" is set to "10", you
can adjust the white balance between
-30 and 0.
For resetting all adjustment items to the
factory preset values, press / to
select "Reset", and then press (ENTER).
TV Setup Operation
ENG317
ENGLISH | FRANÇAIS | ESPAÑOL
>><<
Example
Picture (Continue)
Advanced
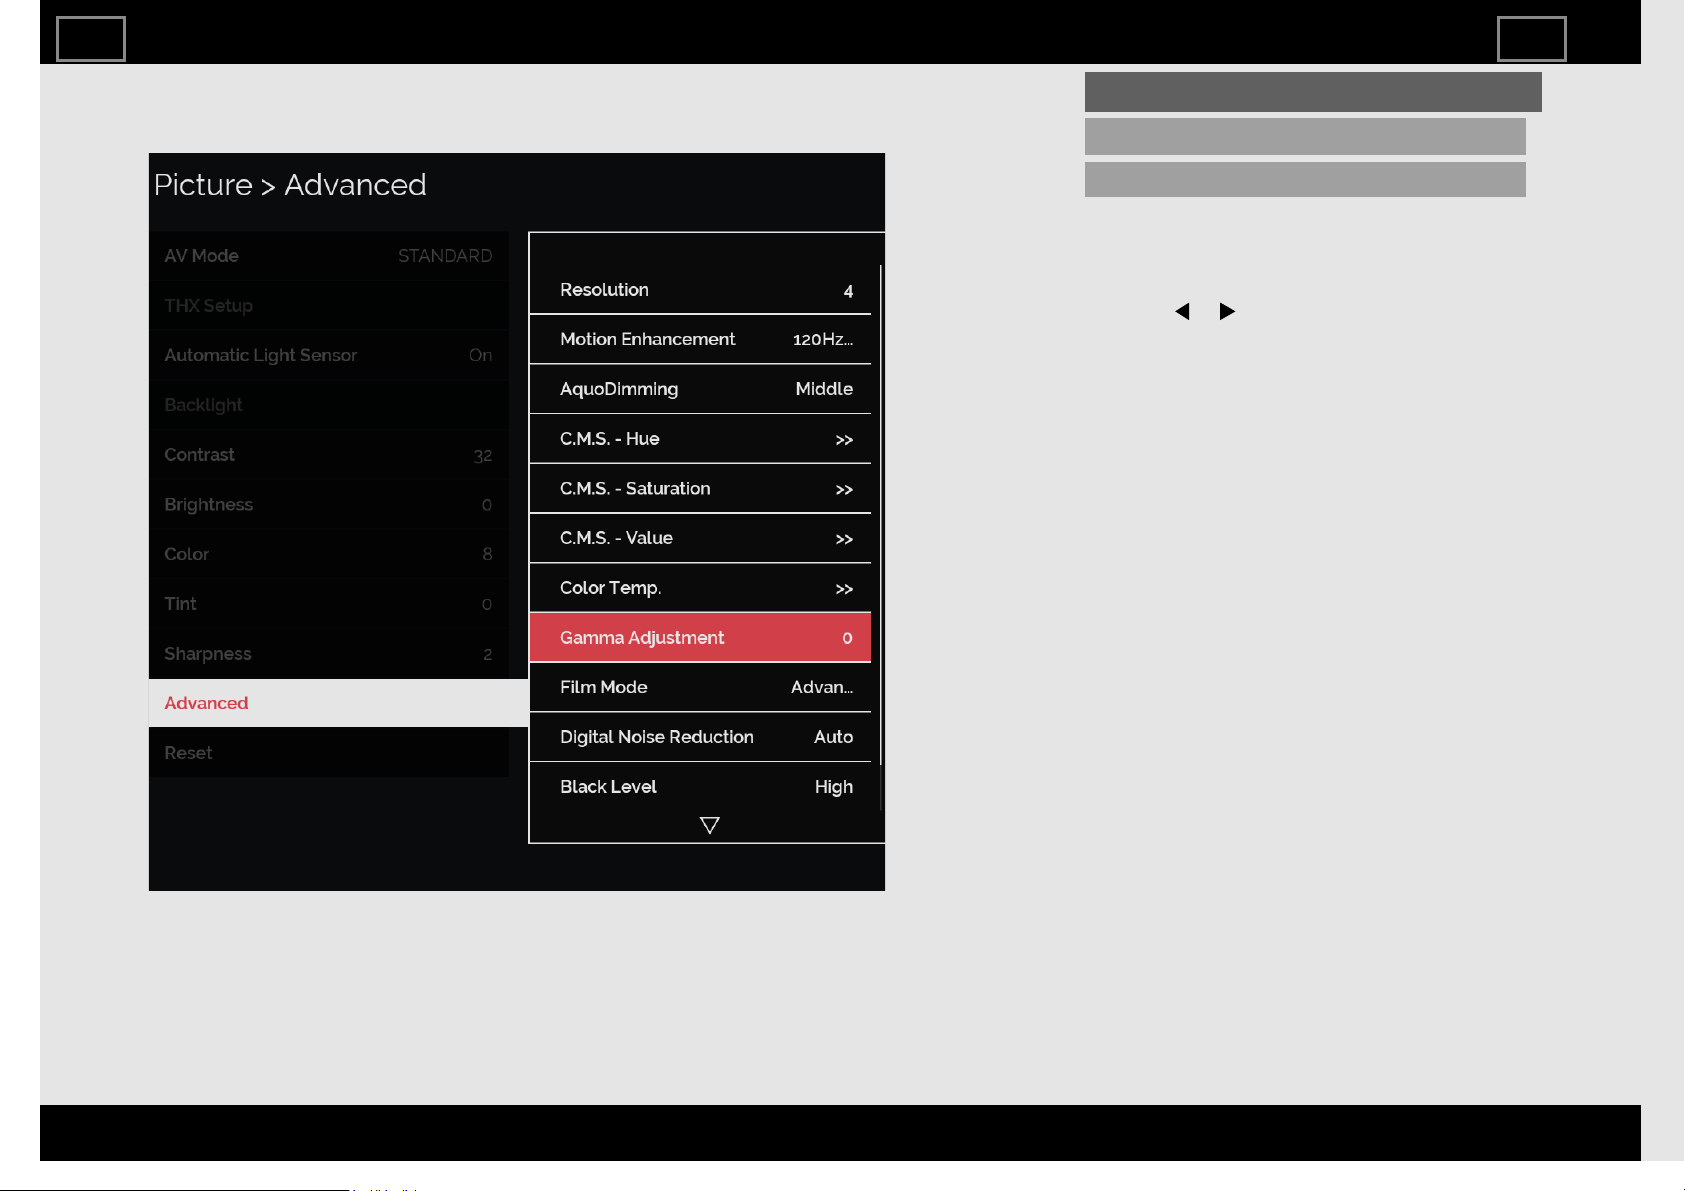
Gamma Adjustment
Adjusts the differences of picture tones
between bright parts and dark parts. The
adjustment range of the gamma can be set
to a maximum of +3 and a minimum of -3 by
pressing or .
TV Setup Operation
ENG318
ENGLISH | FRANÇAIS | ESPAÑOL
>><<
Example
Picture (Continue)
Advanced
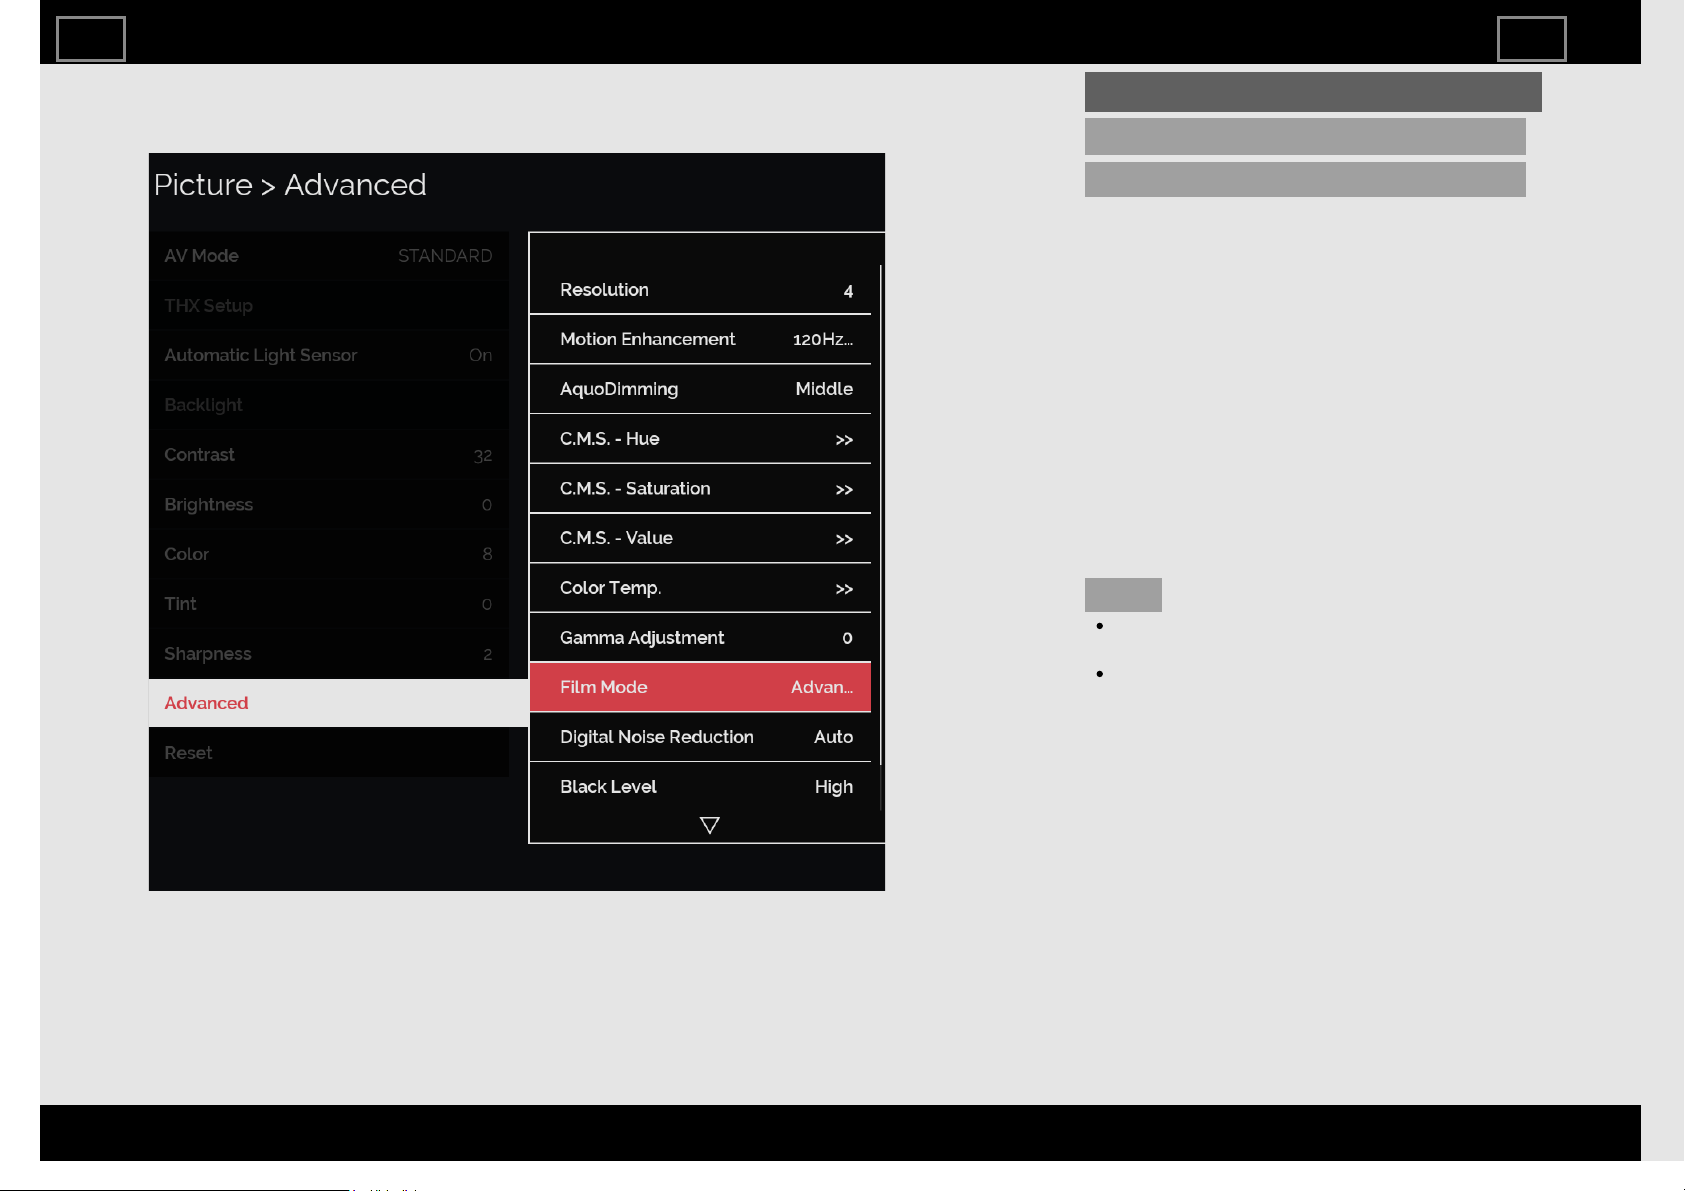
Film Mode (3:2 pull-down)
This function provides high-quality playback
of images originally encoded at 24
frames/second, such as films.
Advanced High: Provides smoother image
motion while ensuring high-quality
playback.
Advanced Mid: Adjusts effect to reduce
judder at a level above "Advanced Low".
Advanced Low: Adjusts effect to reduce
judder from film contents.
Standard: Plays back images with equal
display time for each frame, reproducing
movie theater experience.
Off: Normal viewing mode.
NOTE
"Film Mode" does not function depending
on input signal type.
"Film Mode" does not function when you
set AV MODE to "GAME" or "PC".
TV Setup Operation
ENG319
ENGLISH | FRANÇAIS | ESPAÑOL
>><<

Example
Picture (Continue)
Advanced
Digital Noise Reduction
Produces a clearer video image.
Auto: Automatically adjusts the level of
noise reduction.
High/Middle/Low: You can select a
desired level for viewing a clearer video
image.
Off: No adjustment.
NOTE
"Digital Noise Reduction" is not available
when you set AV MODE to "PC" or PC
format is being input.
TV Setup Operation
ENG320
ENGLISH | FRANÇAIS | ESPAÑOL
>><<
Example
Picture (Continue)
Advanced
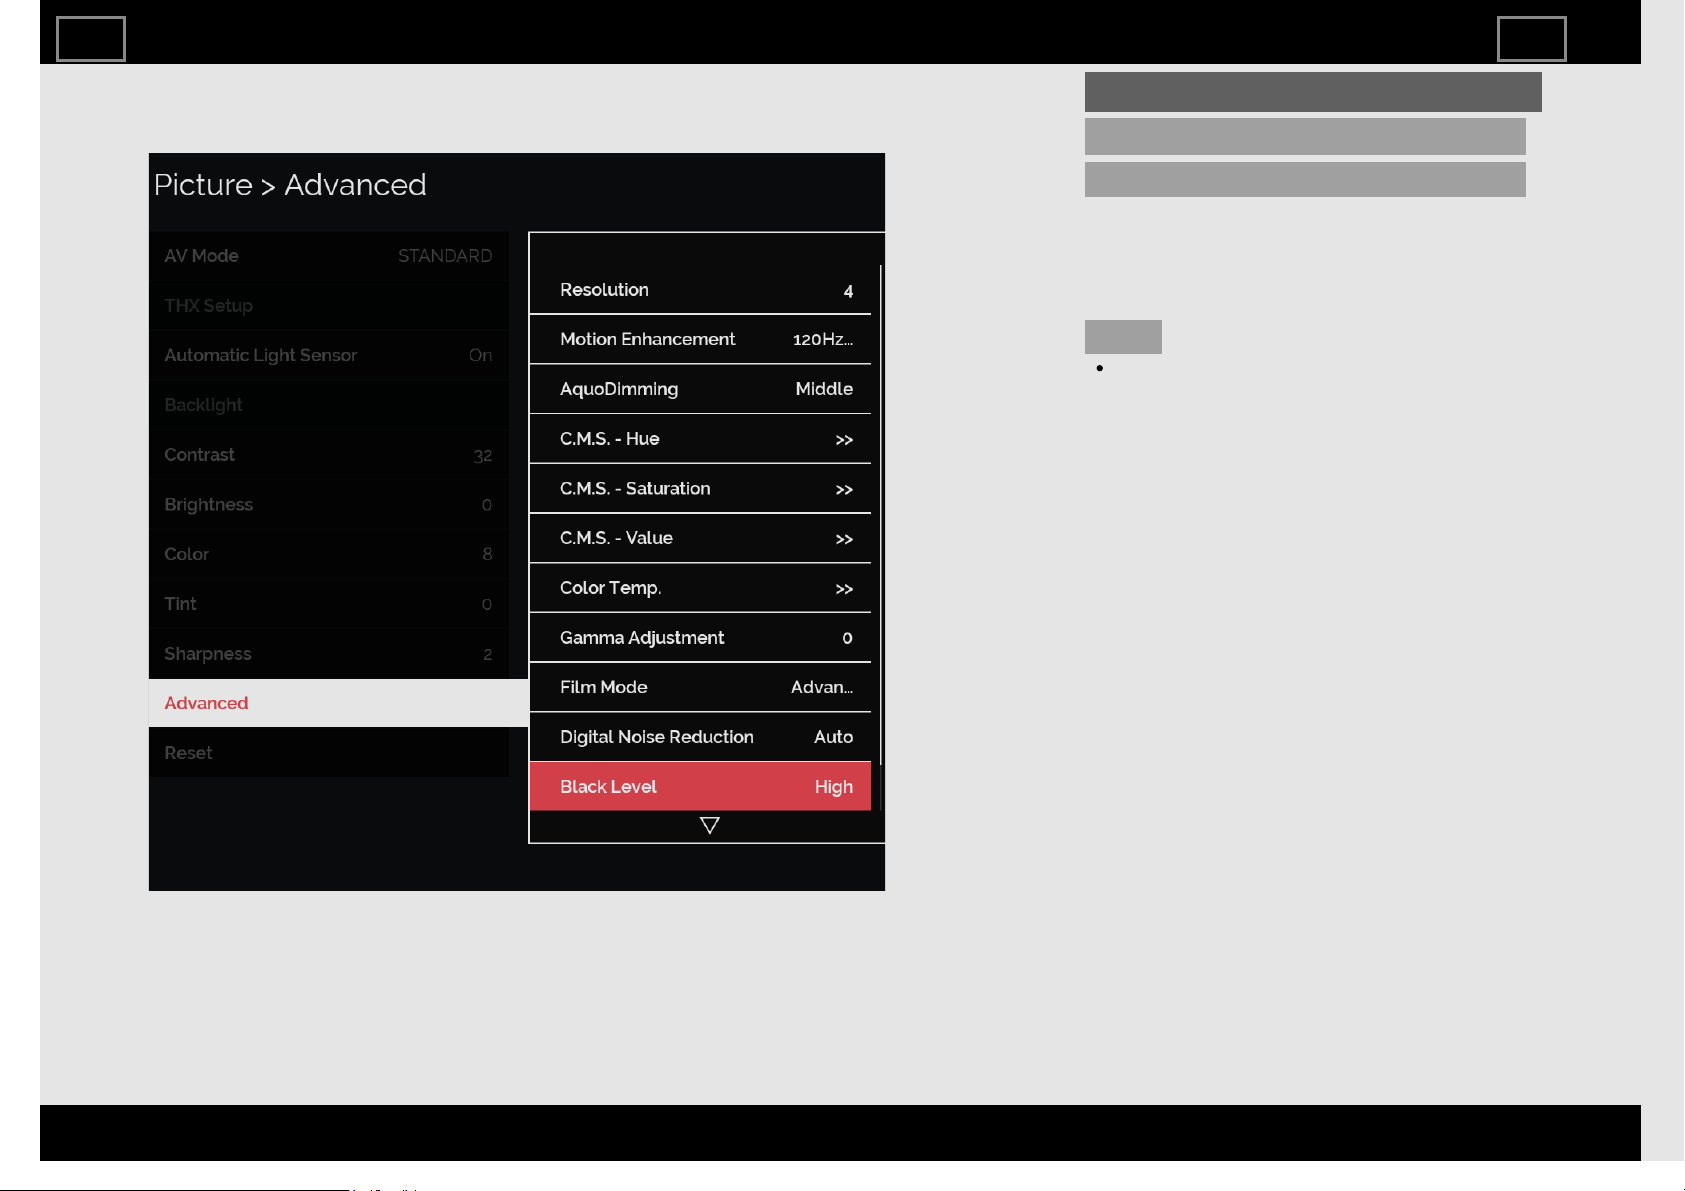
Black Level
Adjusts on-screen black level to your
preferred level.
High: The black level gets brighter.
Low: The black level gets darker.
NOTE
"Black Level" is available for input signal
from Composite Video and analog
broadcasts (air and cable).
TV Setup Operation
ENG321
ENGLISH | FRANÇAIS | ESPAÑOL
>><<

Example
Picture (Continue)
Advanced
Active Contrast
Automatically adjusts the image contrast
according to the scene.
Advanced: Produces higher contrast image
in any scene.
Standard: Produces high contrast image in
bright scene.
Off: No adjustment.
NOTE
"Active Contrast" is not available when
you set AV MODE to "PC".
TV Setup Operation
ENG322
ENGLISH | FRANÇAIS | ESPAÑOL
>><<
Example
Picture (Continue)
Reset
Returns Picture Settings to their factory
preset values. To reset, select "YES" and
then press (ENTER).
TV Setup Operation
ENG323
ENGLISH | FRANÇAIS | ESPAÑOL
>><<
Example
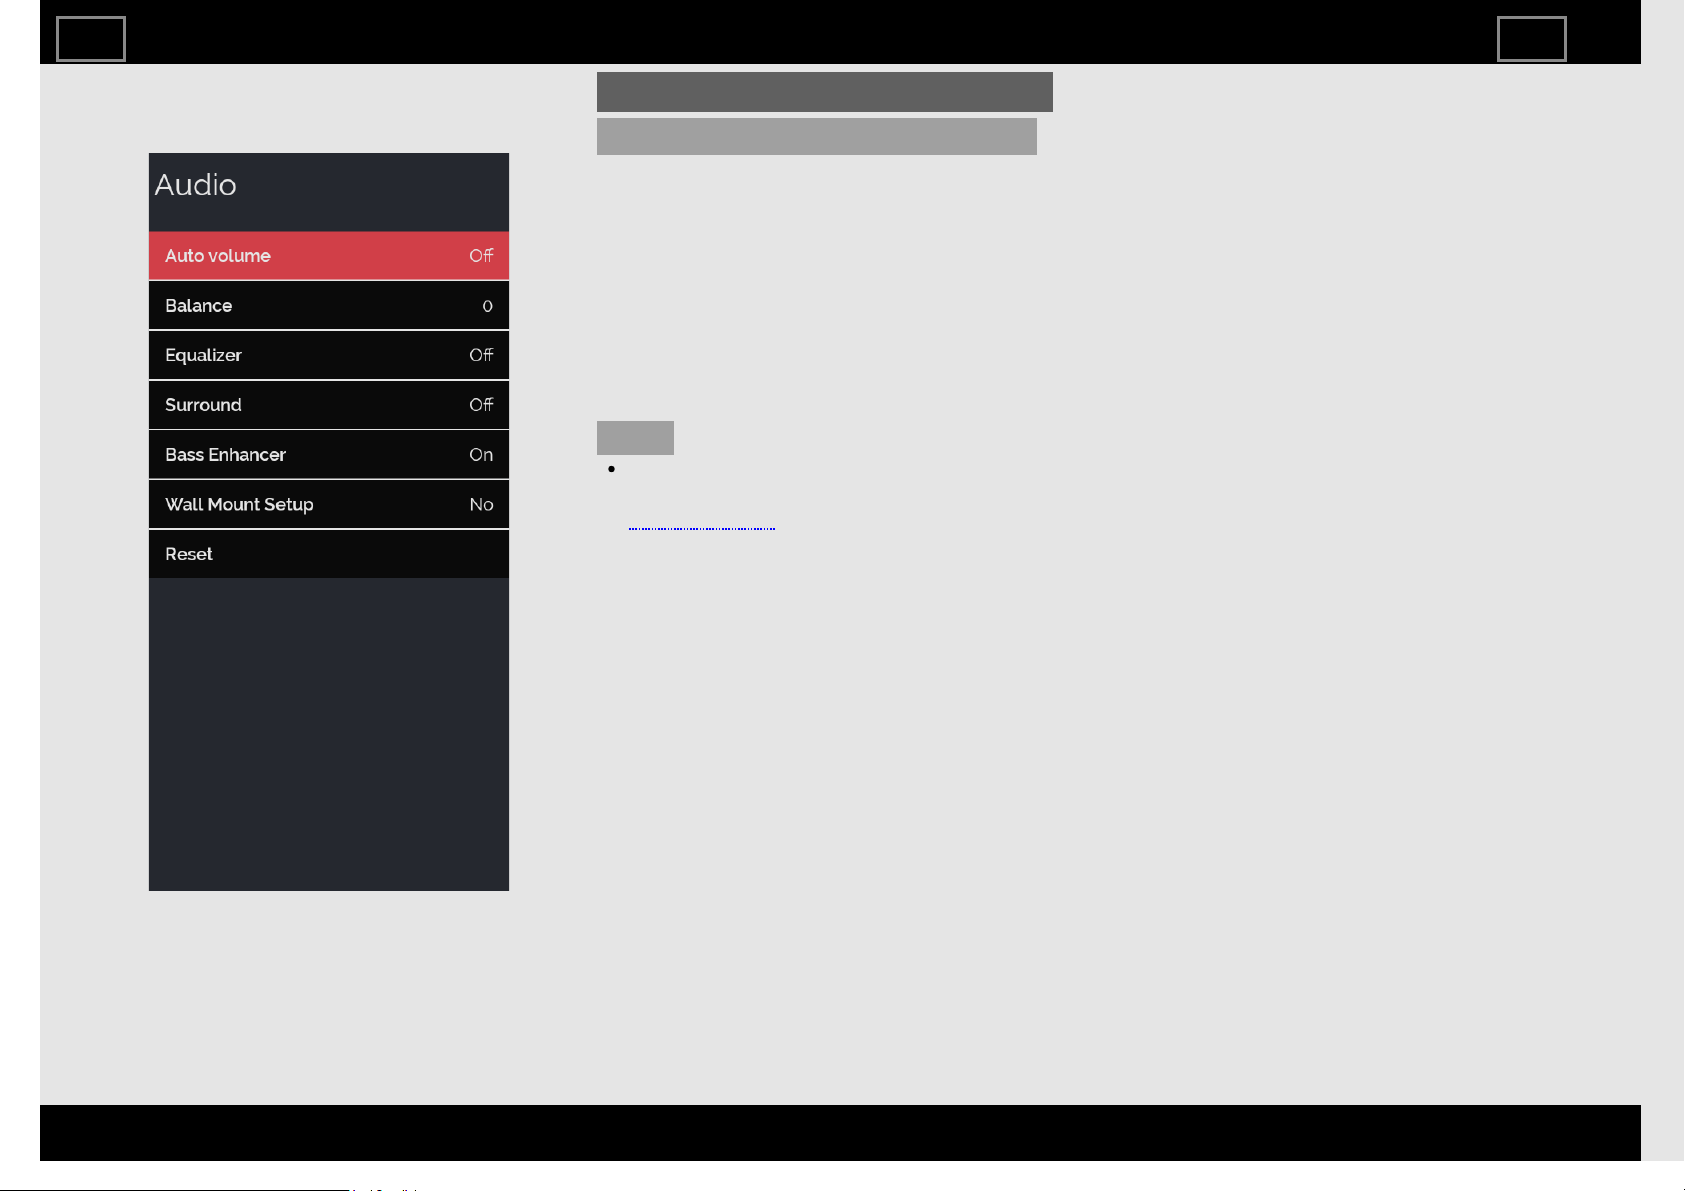
Audio
Auto volume
Different sound sources sometimes do not
have the same loudness level, such as a
program and its commercial breaks, The
Automatic Volume Control(Auto Volume)
reduces this problem by equalizing.
ON: Reduces the loudness gaps among
different sound source. The result is
automatically adjusted according to the
sound sources.
OFF: No adjustment.
NOTE
The Audio menu is grayed out when
"Output Select" is set to "Variable".
(See page 4-4.)
TV Setup Operation
ENG324
ENGLISH | FRANÇAIS | ESPAÑOL
>><<
Example
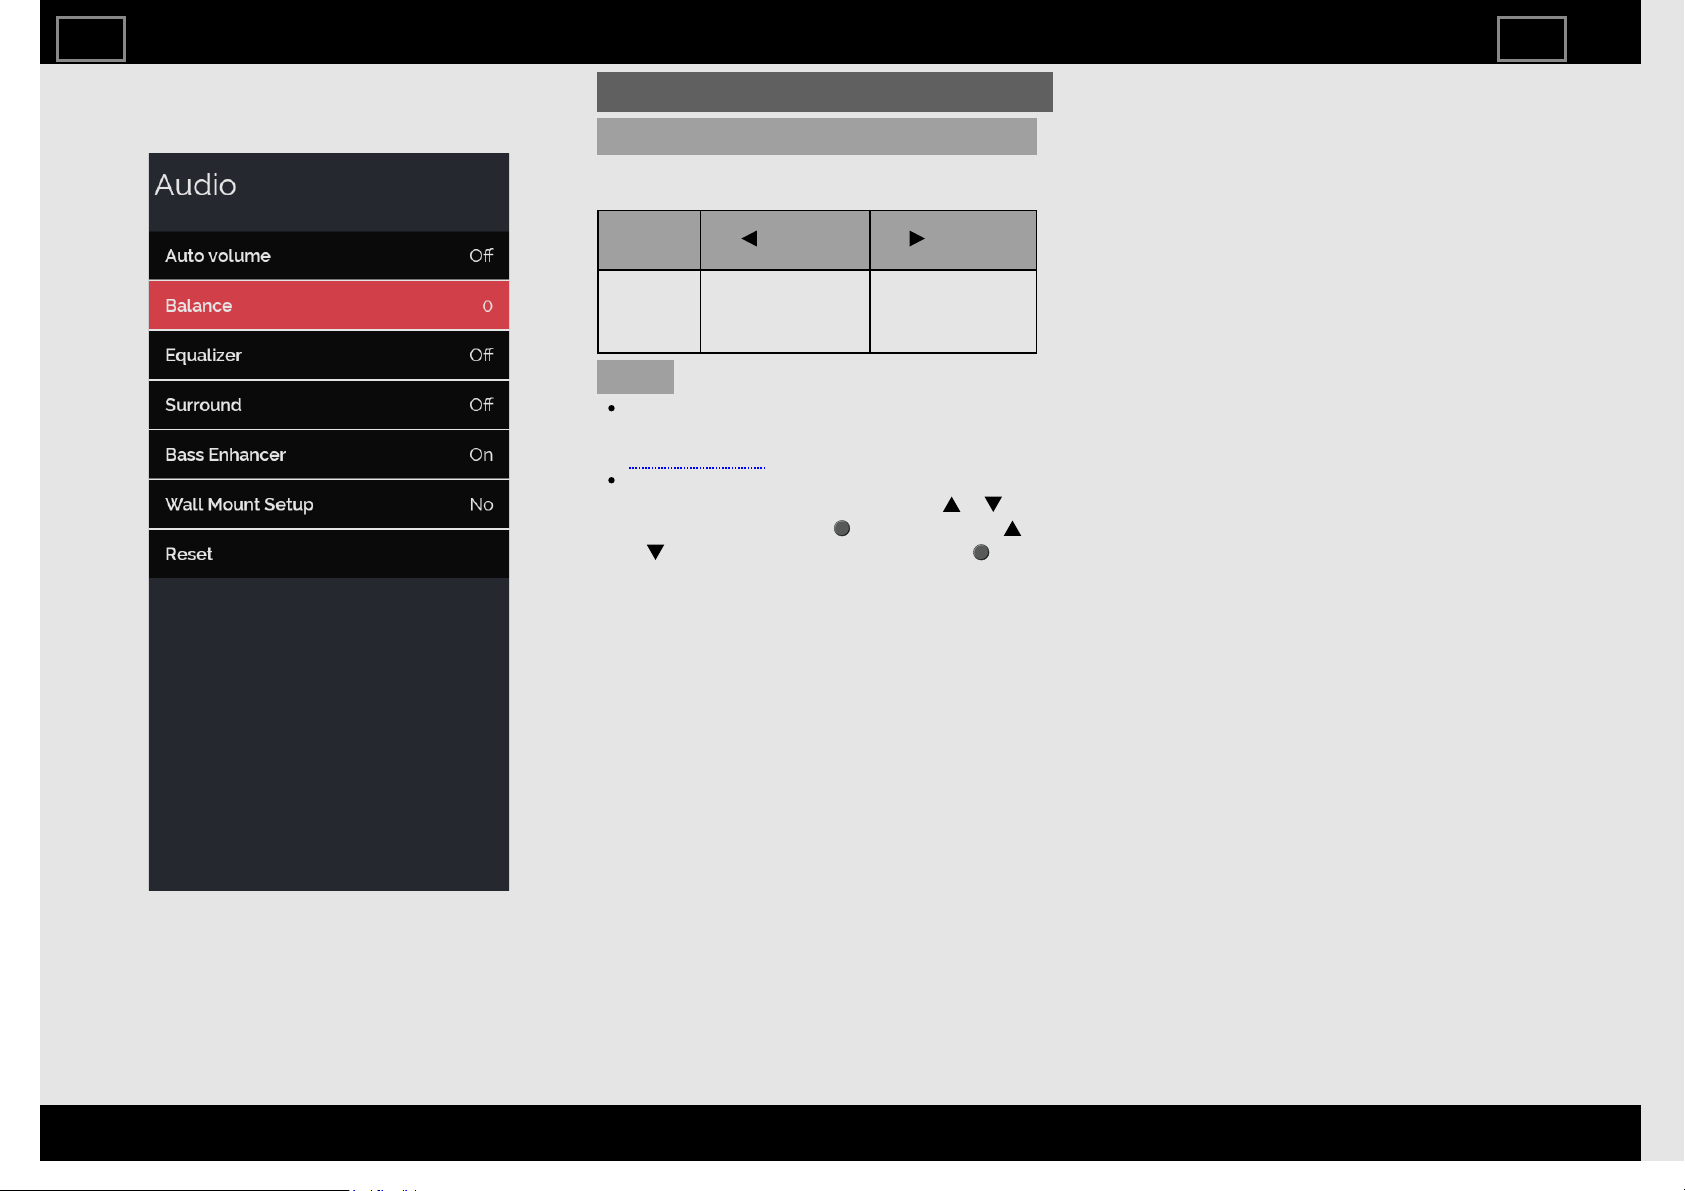
Audio (Continue)
Balance
You can adjust the sound quality to your
preference with the following settings.
Selected
item
button button
Balance Decrease
audio from the
right speaker
Decrease
audio from the
left speaker
NOTE
The Audio menu is grayed out when
"Output Select" is set to "Variable".
(See page 4-4.)
For resetting Audio adjustment items to
the factory preset values, press / to
select "Reset", press (ENTER), press
/ to select "Yes", and then press
(ENTER).
TV Setup Operation
ENG325
ENGLISH | FRANÇAIS | ESPAÑOL
>><<
Example
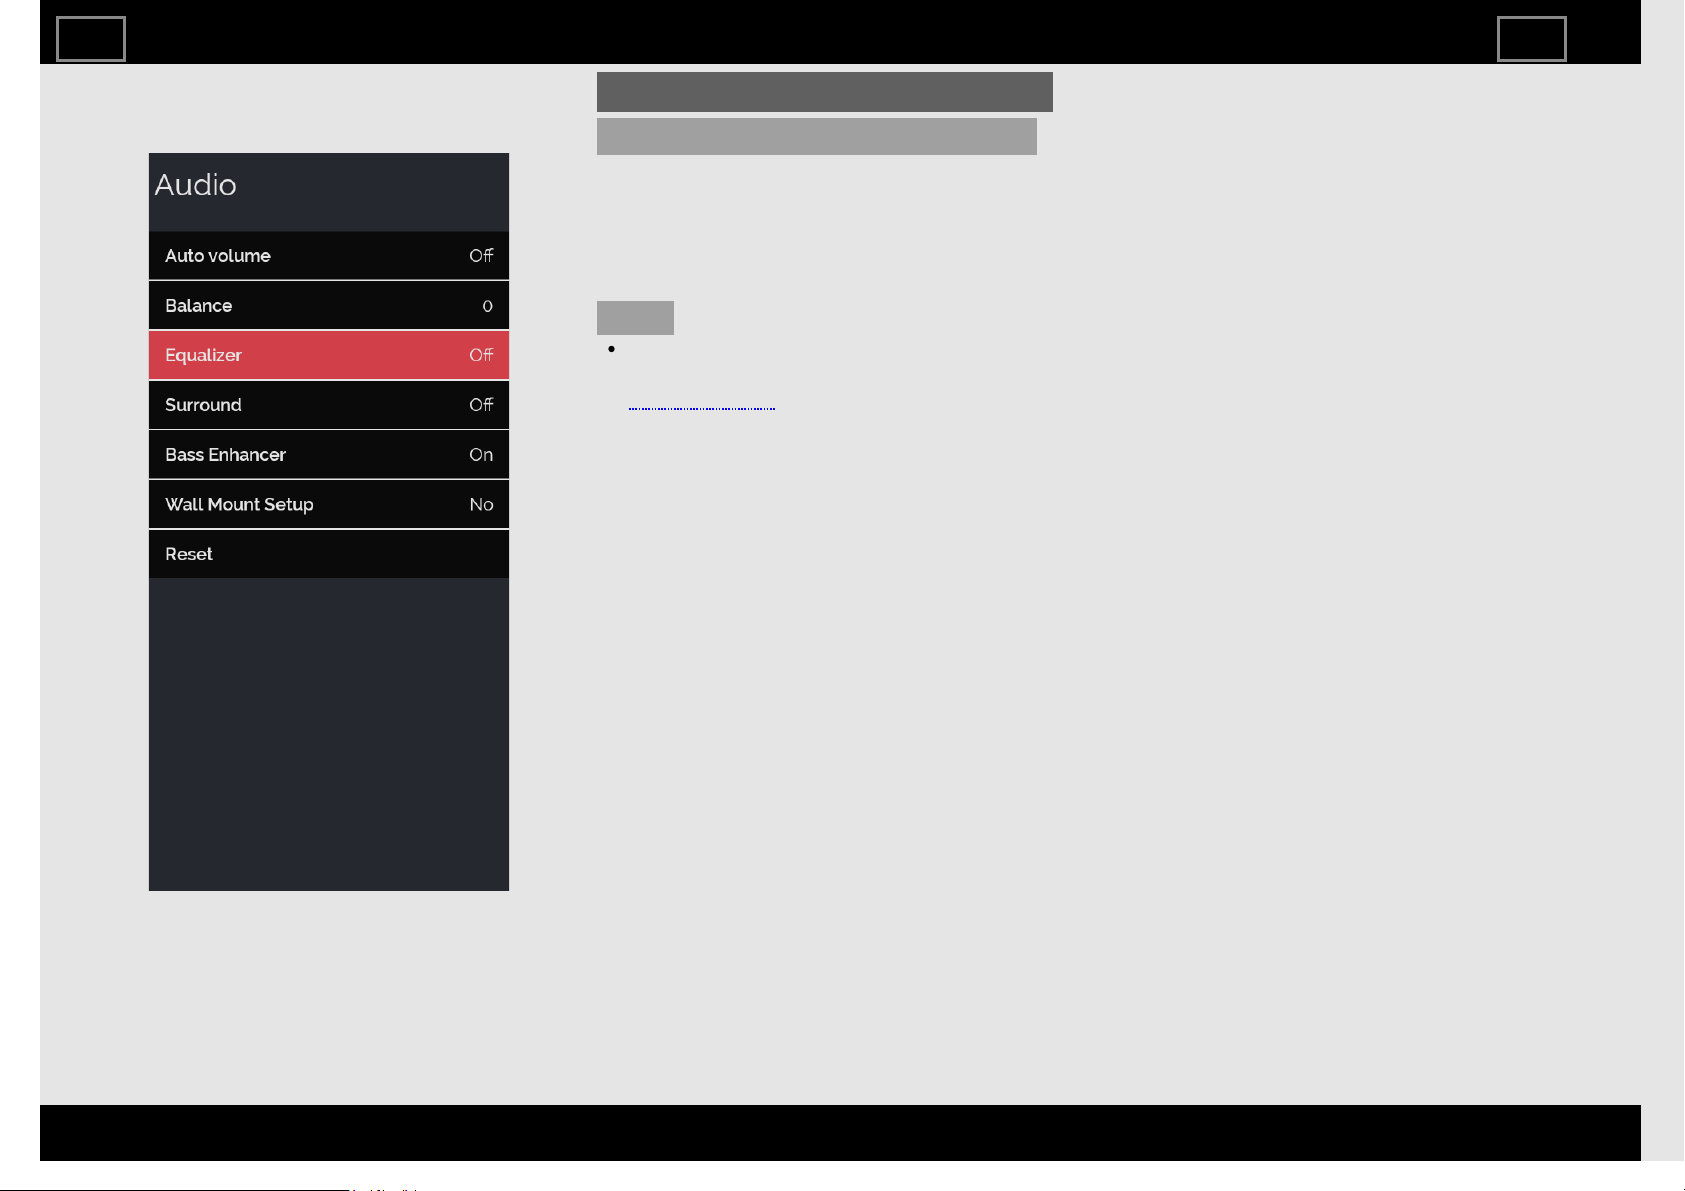
Audio (Continue)
Equalizer
This function allows you to change the
sound quality.
Select from the following available settings.
Rock/Pop/Live/Dance/Techno/Classic/
Soft/Off
NOTE
The Audio menu is grayed out when
"Output Select" is set to "Variable".
(See page 4-4.)
TV Setup Operation
ENG326
ENGLISH | FRANÇAIS | ESPAÑOL
>><<
Example
Audio (Continue)
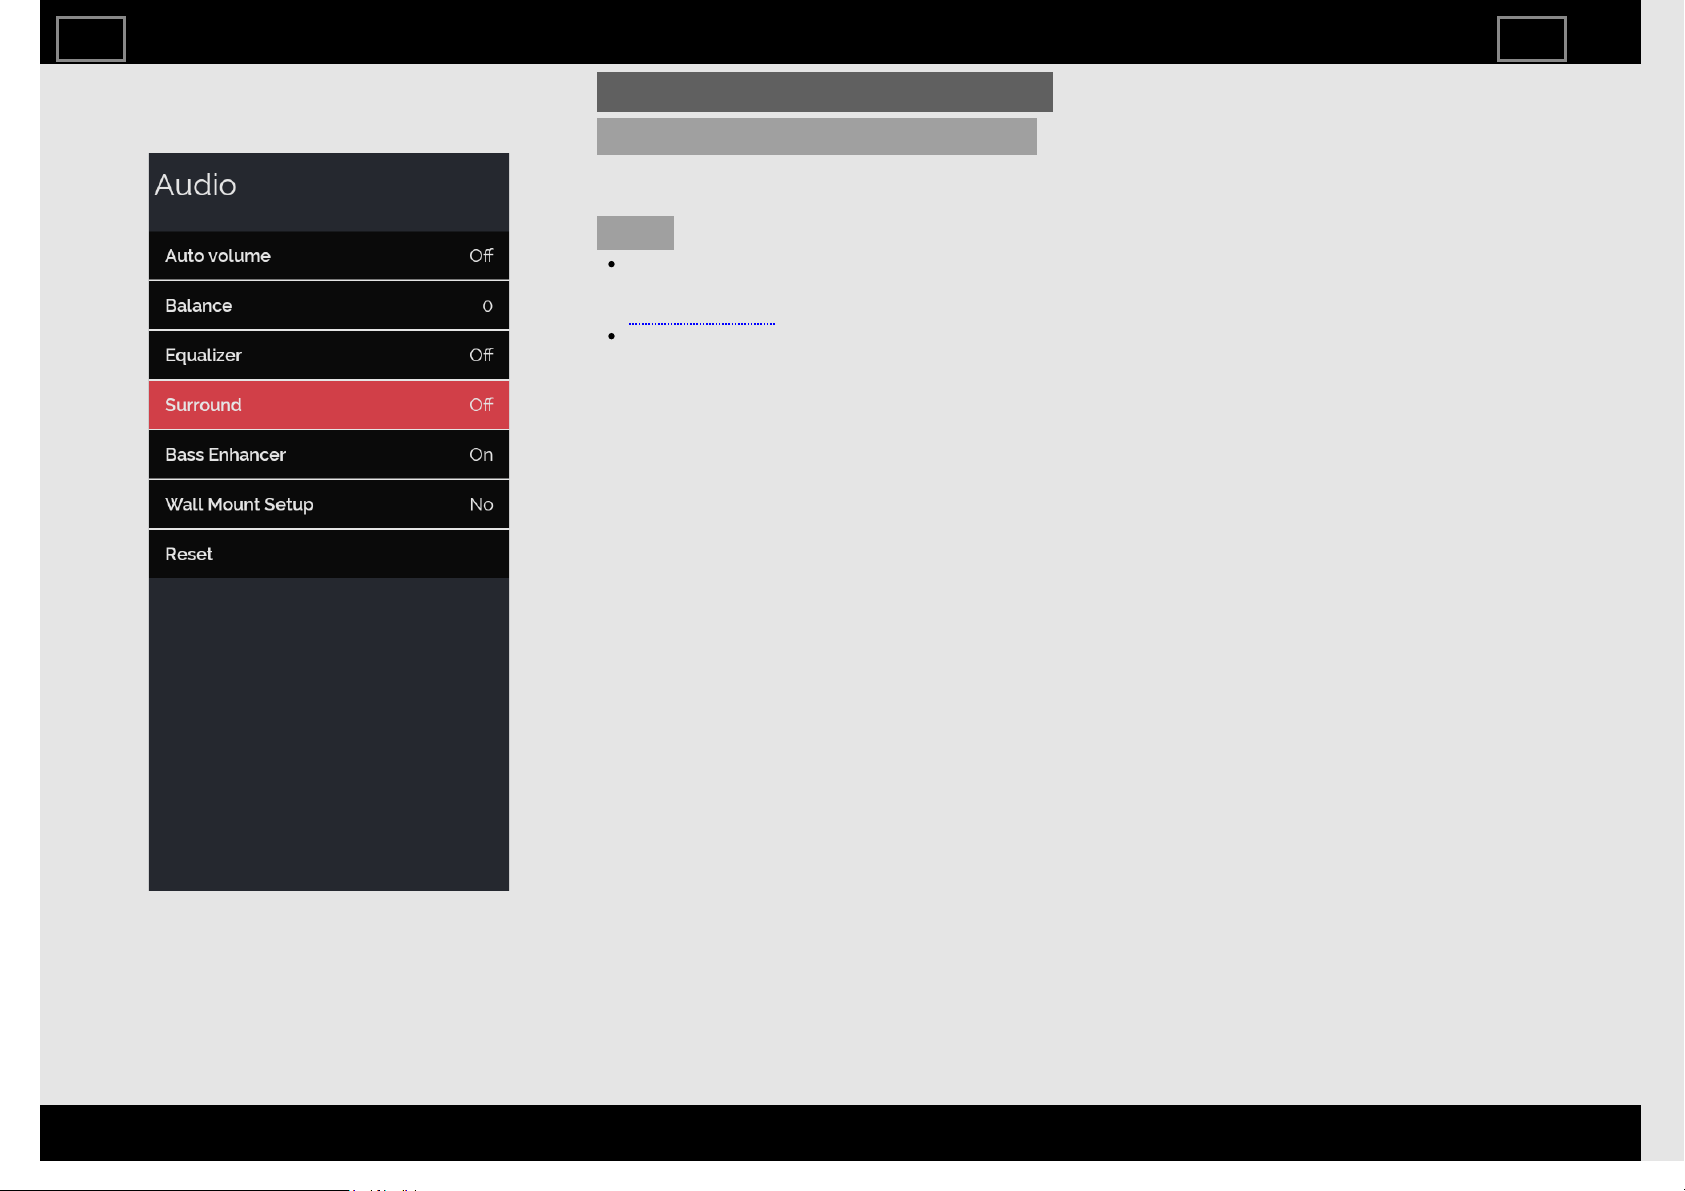
Surround
The surround function produces Surround
effect from the speakers.
NOTE
The Audio menu is grayed out when
"Output Select" is set to "Variable".
(See page 4-4.)
For some discs, setup may be required
on your BD/DVD player. In this case,
please refer to the operation manual of
your BD/DVD player.
TV Setup Operation
ENG327
ENGLISH | FRANÇAIS | ESPAÑOL
>><<
Example
Audio (Continue)
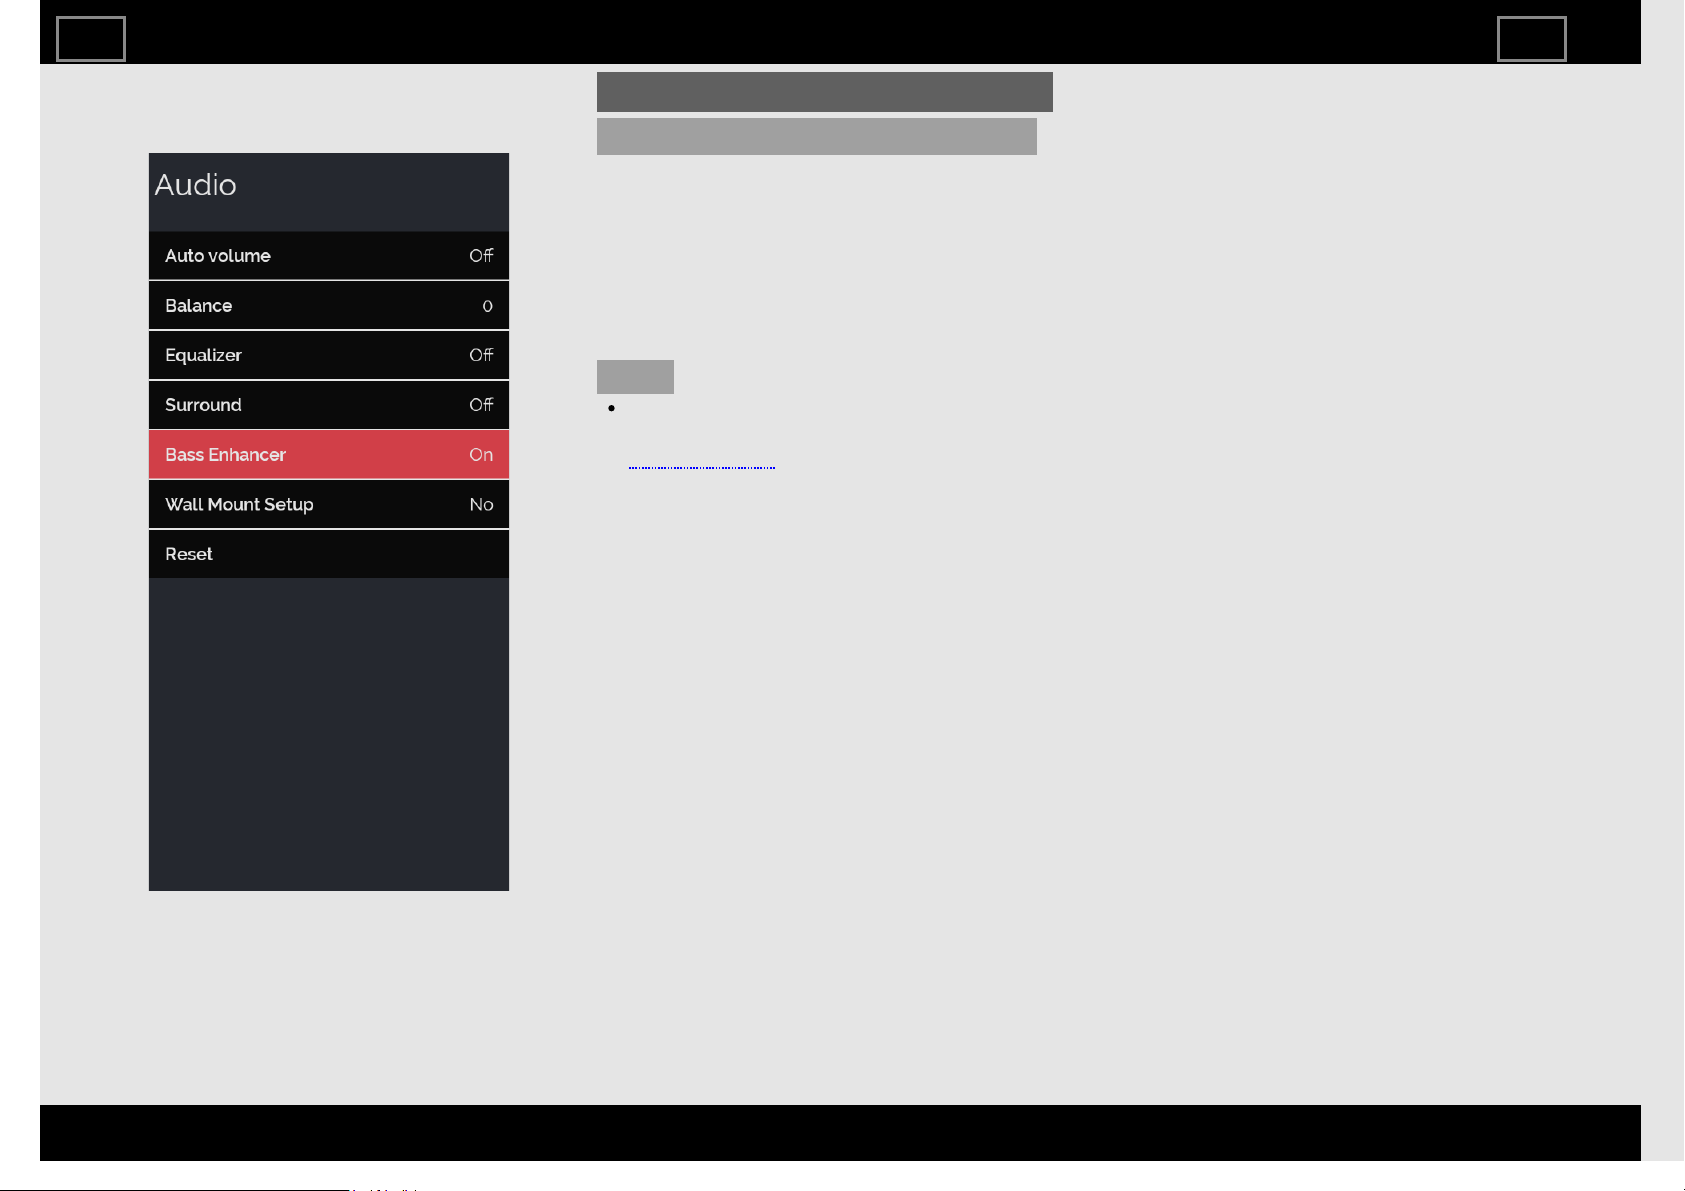
Bass Enhancer
This function improves the sound quality.
The low range will be extended and the
sounds in the medium and high ranges,
which have been lost due to the data being
compressed, will be restored.
This setting is effective when playing back
audio through a wireless interface such as
when using Bluetooth playback.
NOTE
The Audio menu is grayed out when
"Output Select" is set to "Variable".
(See page 4-4.)
TV Setup Operation
ENG328
ENGLISH | FRANÇAIS | ESPAÑOL
>><<
Example
Audio (Continue)
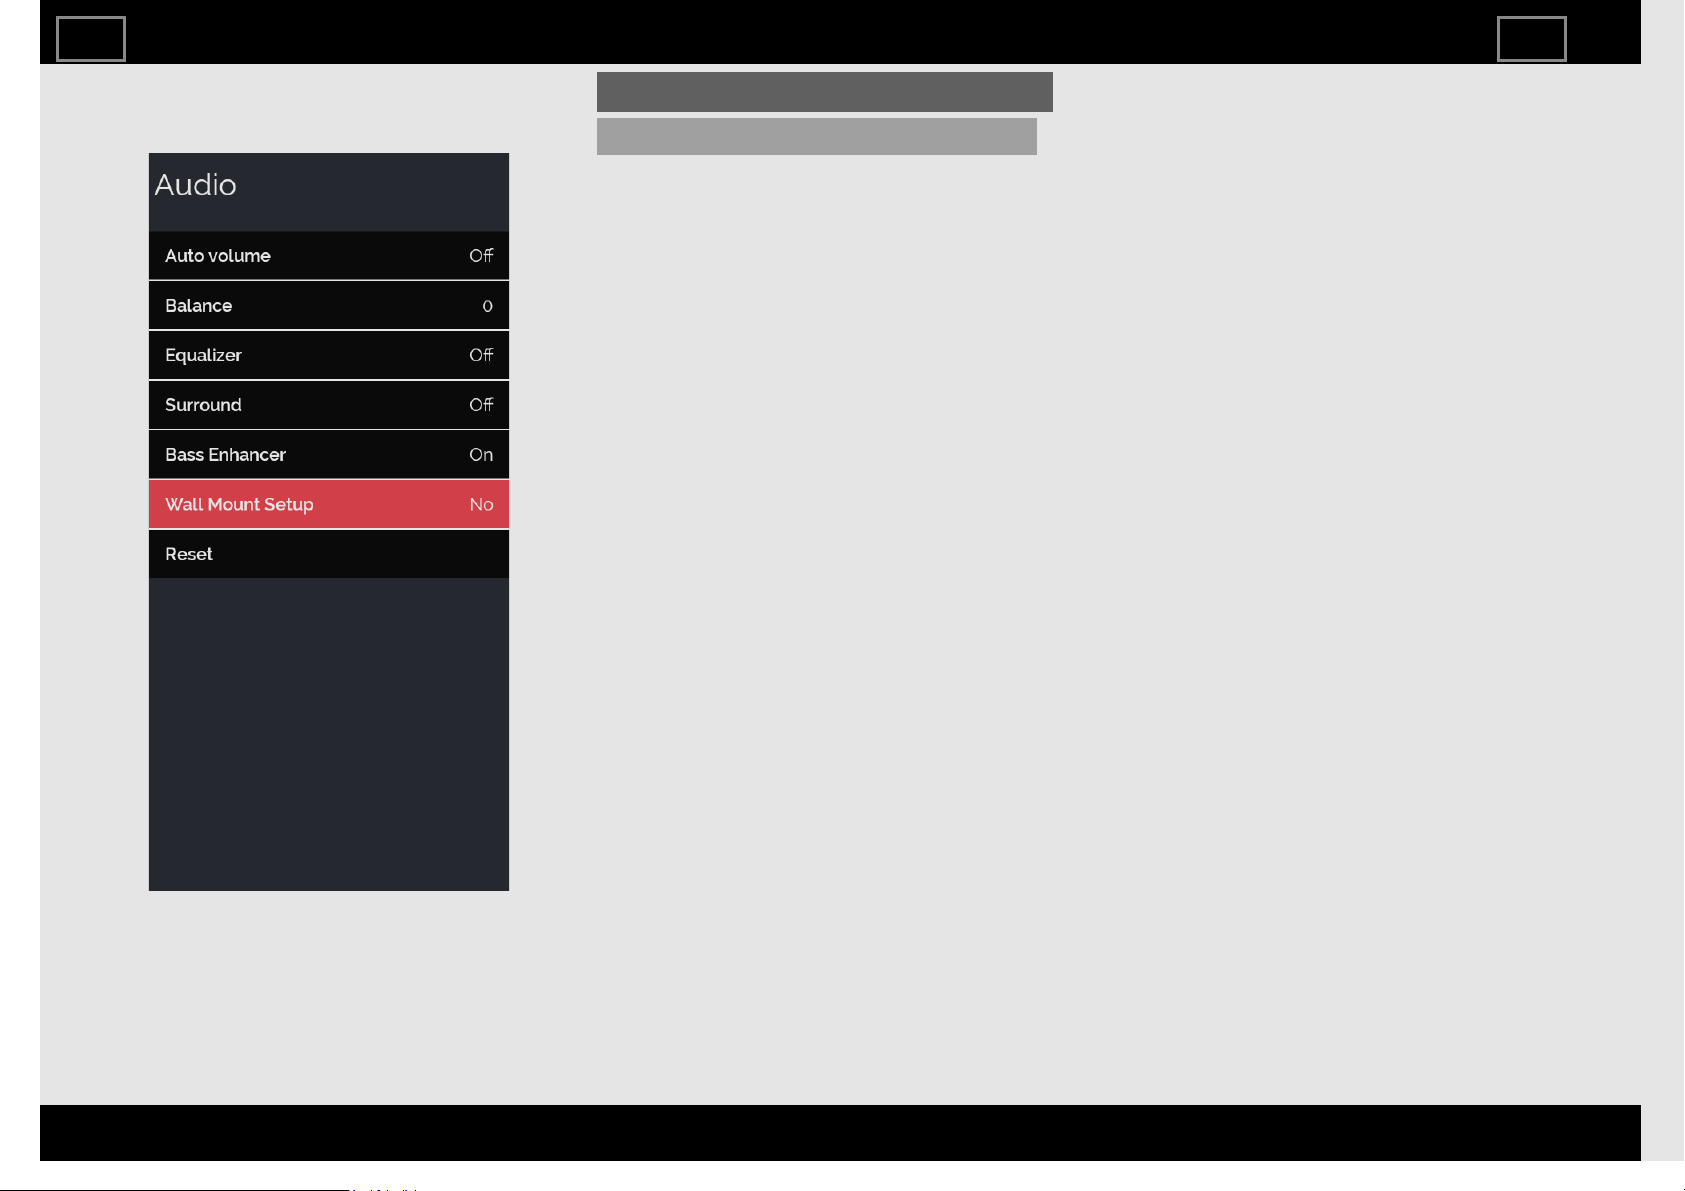
Wall Mount Setup
This selects the optimal audio for the
program you are currently watching even
when the TV is mounted to a wall.
TV Setup Operation
ENG329
ENGLISH | FRANÇAIS | ESPAÑOL
>><<
Example
Audio (Continue)
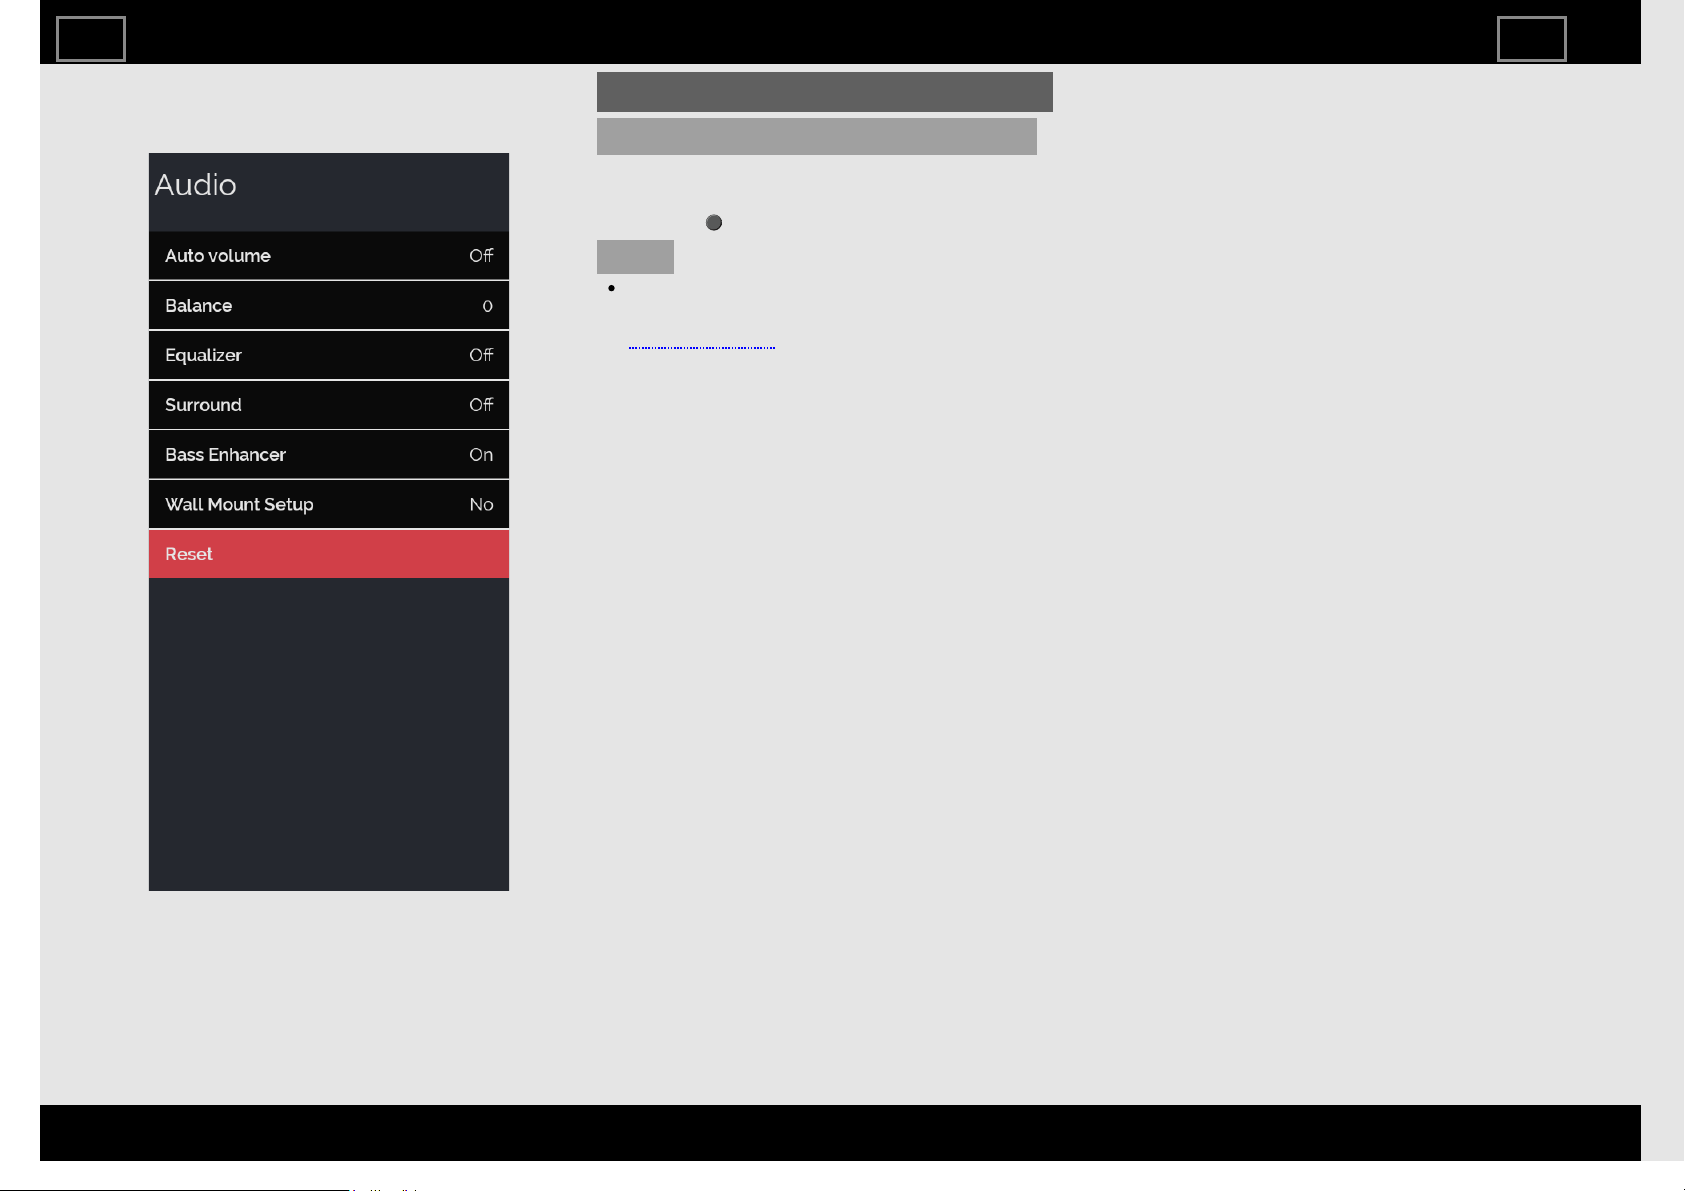
Reset
Returns Audio Settings to their factory
preset values. To reset, select "YES" and
then press (ENTER).
NOTE
The Audio menu is grayed out when
"Output Select" is set to "Variable".
(See page 4-4.)
TV Setup Operation
ENG330
ENGLISH | FRANÇAIS | ESPAÑOL
>><<
Example
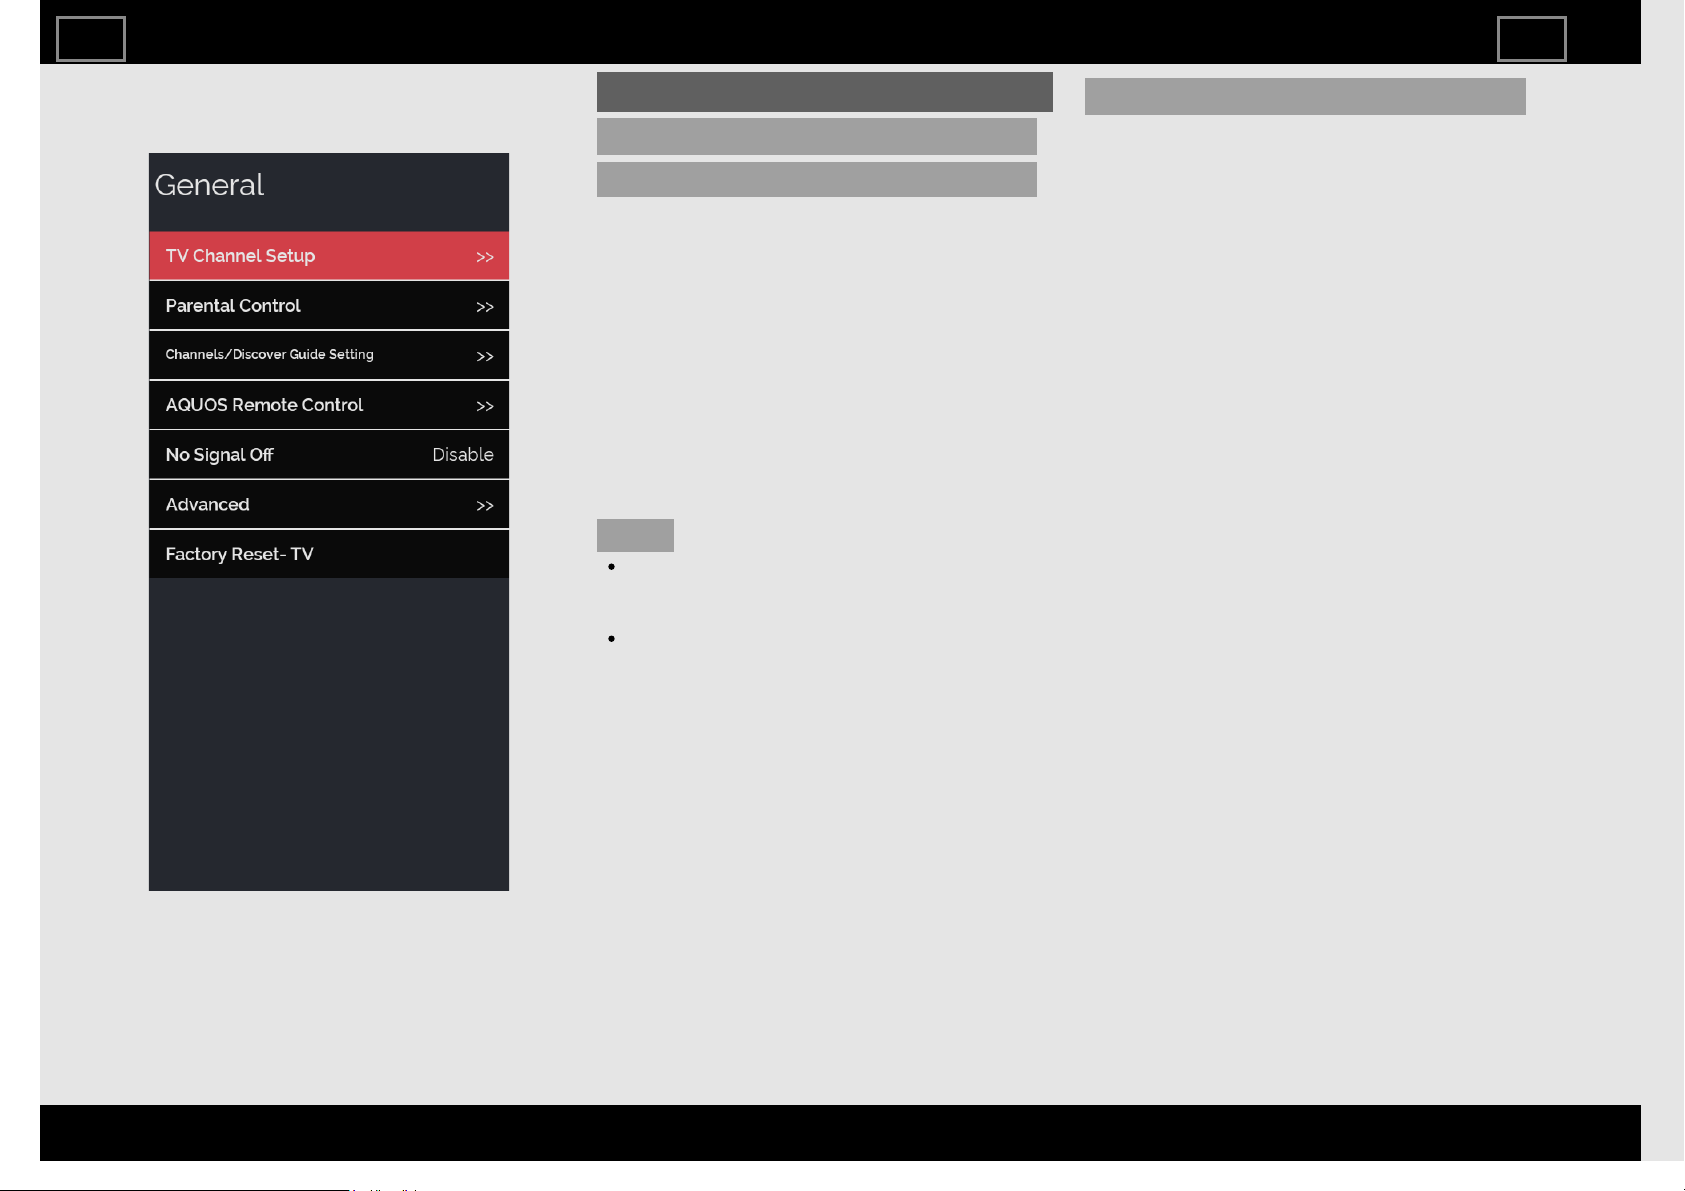
General
TV Channel Setup
CH Setup
If Initial Installation does not memorize all
the channels in your region, follow the
instructions below to manually memorize
the channels.
Air/Cable: Make sure what kind of
connection is made with your TV when
selecting "Air" or "Cable".
CH Search: Channel auto search makes the
TV look for all channels viewable in the
set area.
CH Memory: You can select the channels
to skip.
NOTE
If no channel is found, confirm the type of
connection made with your TV and try
channel search again.
This function will not be selectable from
the menu if you do not first configure
your secret number. (Default: 1234)
Antenna Setup-DIGITAL
In order to receive digital air broadcasts, you
need a digital broadcast antenna. You can
confirm the antenna configuration through
the "Antenna Setup-DIGITAL" screen. If
necessary, adjust the direction of the
antenna to obtain the maximum signal
strength.
Signal Strength: The signal strength of
DIGITAL channel is displayed. The signal
information is based on the current
channel.
TV Setup Operation
ENG331
ENGLISH | FRANÇAIS | ESPAÑOL
>><<
Example
General (Continue)
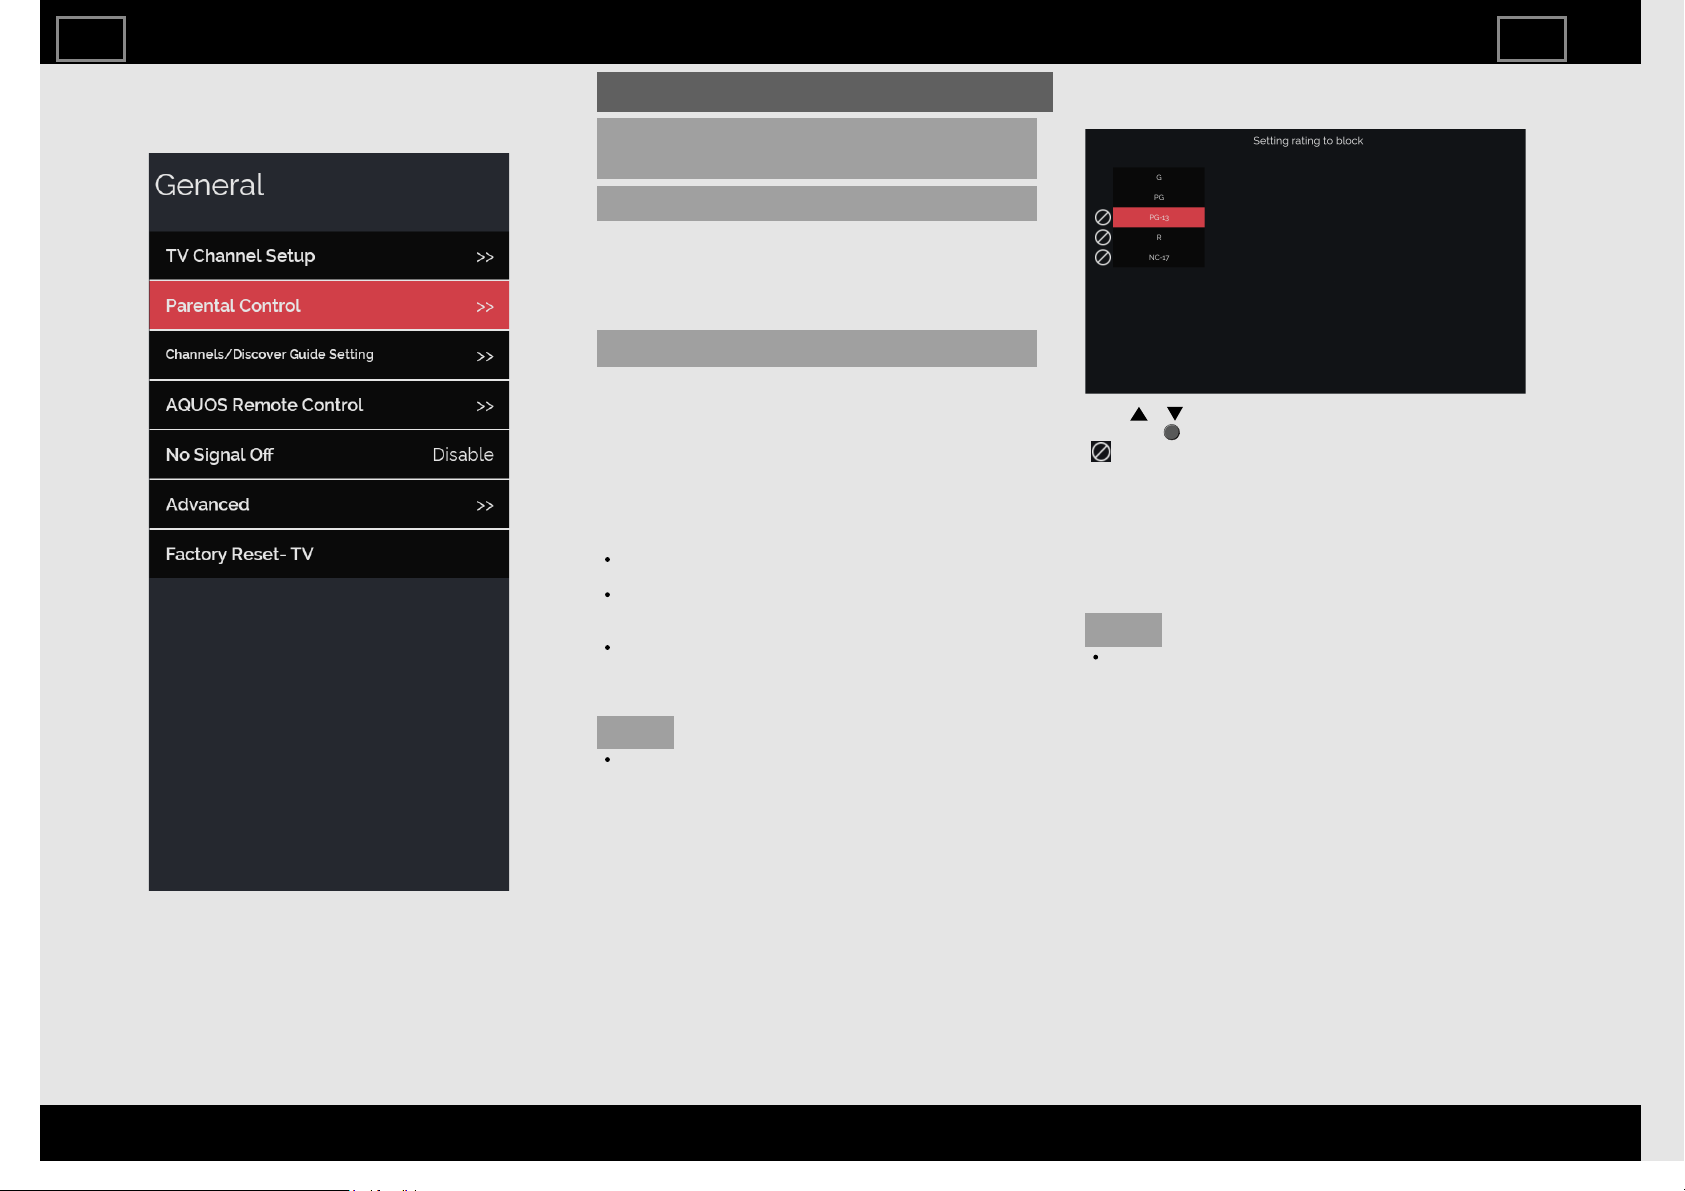
Parental Control
(Parental Control Setting)
Parental Control
Used to enable or disable the parental
control function. This function will not be
selectable from the menu if you do not first
configure your secret number.(Default: 1234)
Rating (US/CA)
V-CHIP
V-CHIP is an electronic filtering device built into your TV.
This tool gives parents a great degree of control over
broadcasts accessed by their children. It allows parents
to select programs judged suitable for child viewing
while blocking ones judged not suitable. It does so
automatically once you activate the V-CHIP feature in
your TV. "V-Chip" will not be selectable from the menu if
you do not first configure your secret number.
The U.S. has two rating systems for viewing content:
TV Parental Guidelines and movie ratings.
The TV Parental Guidelines work in conjunction with
the V-CHIP to help parents screen out inappropriate
television shows from their children.
Movie ratings are used for original movies rated by the
Motion Picture Association of America (MPAA) as
watched on cable TV and not edited for television. The
V-CHIP can also be set to block MPAA-rated movies.
NOTE
The setting automatically enters "Block" for any ratings
below your selection.
MPAA
Example
Press / to adjust the item to your desired position ,
and press (ENTER).
" " indicates the item is blocked.
G: General audiences. All ages admitted.
PG: Parental guidance suggested. Some material may not
be suitable for children.
PG-13: Parents strongly cautioned. Some material may be
inappropriate for children under 13.
R: Restricted. Under 17 requires accompanying parent or
adult guardian (age varies in some jurisdictions).
NC-17: No one 17 and under admitted.
NOTE
Voluntary movie rating system only uses an age-based
rating.
TV Setup Operation
ENG332
ENGLISH | FRANÇAIS | ESPAÑOL
>><<
Example
General (Continue)
Parental Control
(Parental Control Setting)
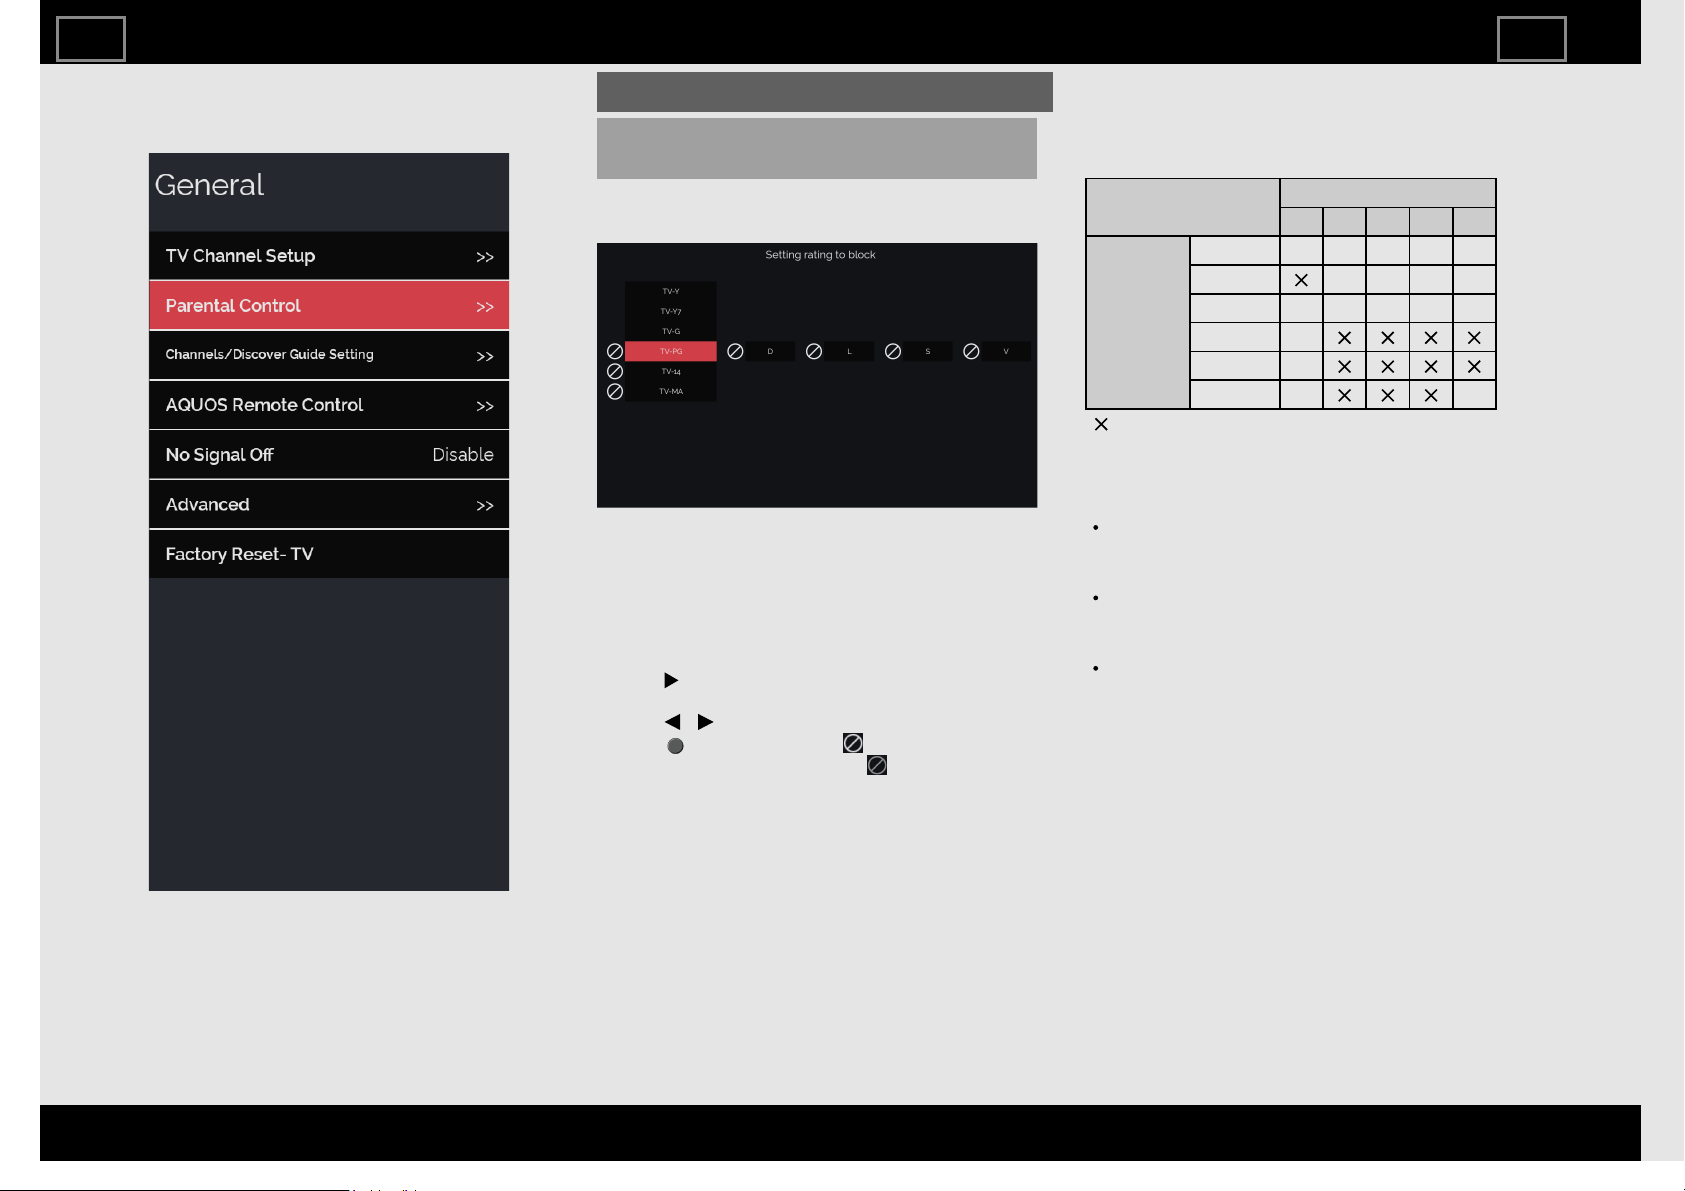
TV Guidelines
Example
Suggested age
TV-Y: All children.
TV-Y7: Directed to older children.
TV-G: General audience.
TV-PG: Parental Guidance suggested.
TV-14: Parents strongly cautioned.
TV-MA: Mature audience only.
When setting an individual content-based rating item:
1 Press to access content items without blocking the
currently selected age-based rating item.
2 Press / to select an individual item, and then
press (ENTER) to block it (" " is added to the
content-based rating item, and " " is added to the
age-based rating item).
3 Repeat the same steps for the other items.
Content
FV: Fantasy violence.
V: Violence.
S: Sexual situation.
L: Adult language.
D: Sexually suggestive dialog.
Rating
Content
FV V S L D
Suggested
age
TV-Y
TV-Y7
TV-G
TV-PG
TV-14
TV-MA
: Content rating can be set.
When you unblock a content item, also unblock the
main rating item.
Canadian Rating Systems (Canadian English ratings and
Canadian French ratings)
The TV rating systems in Canada are based on the
Canadian Radio-Television and Telecommunications
Commission (CRTC) policy on violence in television
programming.
While violence is the most important content element
to be rated, the structure developed takes into
consideration other program content like language,
nudity, sexuality and mature themes.
When setting the V-CHIP on the Canadian system you
can choose either the Canadian English ratings or the
Canadian French ratings.
TV Setup Operation
ENG333
ENGLISH | FRANÇAIS | ESPAÑOL
>><<

Example
General (Continue)
Parental Control
(Parental Control Setting)
Can.English Ratings
E: Exempt: Includes news, sports, documentaries and
other information programming; talk shows, music
videos, and variety programming.
C: Children: Intended for younger children under the age
of 8 years. Pays careful attention to themes that could
threaten their sense of security and well-being.
C8+: Children over 8 years old: Contains no portrayal of
violence as the preferred, acceptable, or only way to
resolve conflict; nor encourage children to imitate
dangerous acts which they may see on the screen.
G: General: Considered acceptable for all age groups.
Appropriate viewing for the entire family, contains
very little violence, physical, verbal or emotional.
PG: Parental Guidance: Intended for a general audience,
but may not be suitable for younger children (under
the age of 8) because it could contain controversial
themes or issues.
14+: Over 14 years: Could contain themes where violence
is one of the dominant elements of the storyline, but it
must be integral to the development of plot or
character. Language usage could be profane and
nudity present within the context of the theme.
18+: Adults: Intended for viewers 18 years and older and
might contain depictions of violence, which while
related to the development of plot, character or
themes, are intended for adult viewing. Could contain
graphic language and portrayals of sex and nudity.
Can.French Ratings
E: Exempt programming.
G: General: All ages and children, contains minimal
direct violence, but may be integrated into the plot in
a humorous or unrealistic manner.
8ans+: General but inadvisable for young children: May
be viewed by a wide public audience, but could
contain scenes disturbing to children under 8 who
cannot distinguish between imaginary and real
situations.
Recommended for viewing with parent.
13ans+: Over 13 years: Could contain scenes of frequent
violent scenes and therefore recommended for
viewing with parent.
16ans+: Over 16 years: Could contain frequent violent
scenes and intense violence.
18ans+: Over 18 years: Only for adult viewing. Could
contain frequent violent scenes and extreme violence.
How to temporarily release the V-CHIP BLOCK
When the V-CHIP BLOCK is working and censors a
broadcast, "V-CHIP HAS BEEN ACTIVATED." displays.
1 Press (ENTER) while the V-CHIP is working, and then
the secret number setting menu displays.
2 Input the 4-digit secret number by using software
keyboard. At this time V-CHIP BLOCK temporarily
releases.
Rating (Other)
This is used in countries other than the United States and
Canada.
TV Setup Operation
ENG334
ENGLISH | FRANÇAIS | ESPAÑOL
>><<
Example
General (Continue)
Parental Control
(Parental Control Setting)
IMPORTANT:
Two conditions must be met to enable the V-Chip
(see pages 3-32 to 3-34 and 3-40):
1. Secret No. is registered.
2. V-Chip/V-Chip (DTV Only) settings have been made.
The "V-Chip (DTV Only)" will only be selectable
when a new rating system can be downloaded via
digital broadcasting in the U.S.
Reactivating the temporarily released V-CHIP BLOCK
You can reactivate the temporarily released V-CHIP
BLOCK as shown below.
Switch off the TV power.
TV Setup Operation
ENG335
ENGLISH | FRANÇAIS | ESPAÑOL
>><<

Example
General (Continue)
Channels/Discover Guide Setting
Service Provider Setup
Allows you to configure provider settings.
Favorite Channel Setting
This function allows you to program favorite
channels or applications, in different
categories.
By configuring your favorite channels or
applications, you can easily check the
programs being broadcasted on your
favorite channels and easily open
applications.
To register your favorite channel or
application:
Select the desired channel or application
from the TV or App list and press (ENTER).
A checkmark will be displayed on the
channels and applications registered as
favorites.
To delete your favorite channel or
application:
Select the registered favorite channel or
application you want to delete from the TV
or App list and press (ENTER).
Saving favorite applications:
You can also assign favorite applications to
the FAVORITE 1, 2 and 3 buttons on the
remote control unit.
Favorite applications assigned to , , and
on the Favorite Channel Setting screen are
assigned to the FAVORITE 1, 2 and 3 buttons
on the remote control unit.
NOTE
Only assign applications to the FAVORITE
1, 2 and 3 buttons on the remote control
unit.
When TV tuner channels (AIR/CATV) are
assigned to the FAVORITE 1, 2 and 3
buttons on the remote control unit or to
other favorite channels, you will not be
able to call these channels.
Search History Reset
Resets the search history.
This clears the default search history.
User account search history will not be
affected.
Recent Tab Reset
Resets the history for the selected channel.
TV Setup Operation
ENG336
ENGLISH | FRANÇAIS | ESPAÑOL
>><<

Example
General (Continue)
AQUOS Remote Control
Set this function when operating the TV
from equipment connected by LAN or
wireless LAN.
(See page 8-2.)
TV Setup Operation
ENG337
ENGLISH | FRANÇAIS | ESPAÑOL
>><<
Example
General (Continue)
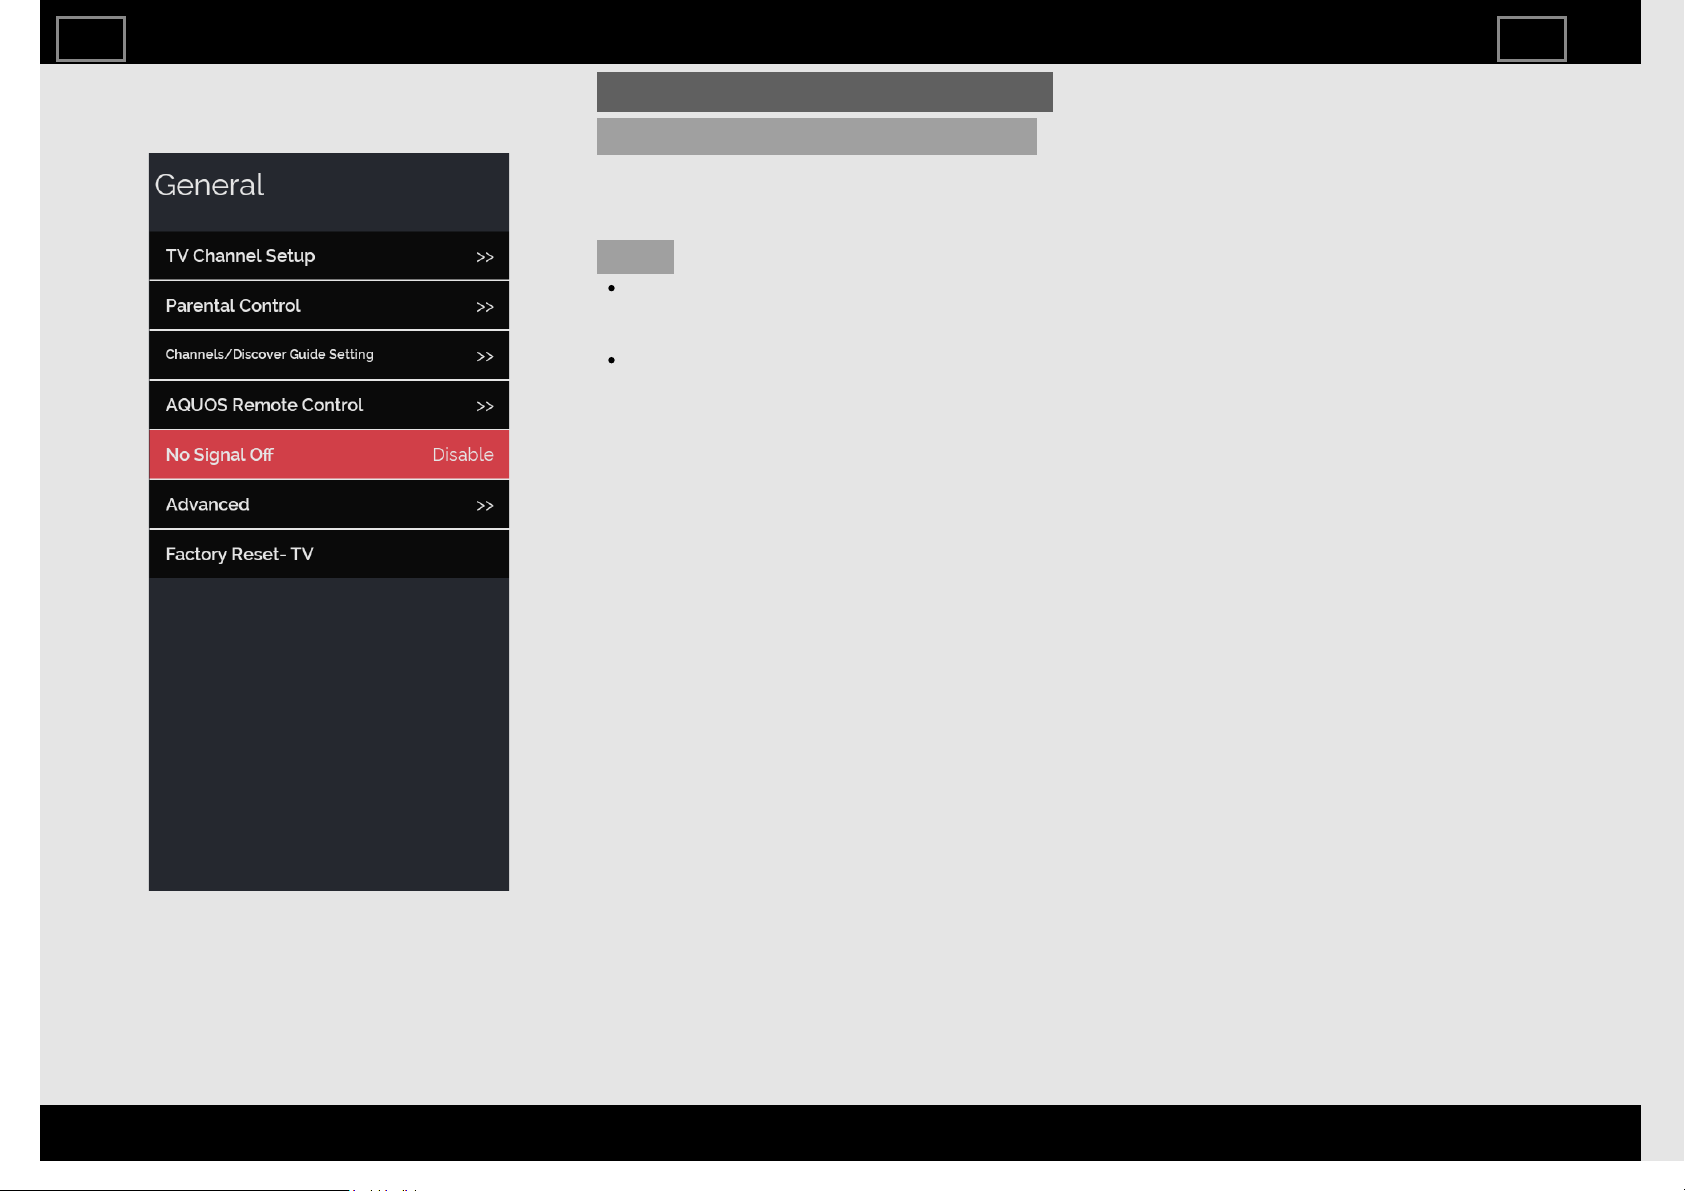
No Signal Off
When this function is enabled, the TV
automatically shuts down if no signal is
received for more than 15 minutes.
NOTE
When it is 5 minutes before the power
shuts down, the remaining time will start
to keep appearing every minute.
When a TV program finishes, this
function may not operate.
TV Setup Operation
ENG338
ENGLISH | FRANÇAIS | ESPAÑOL
>><<
Example
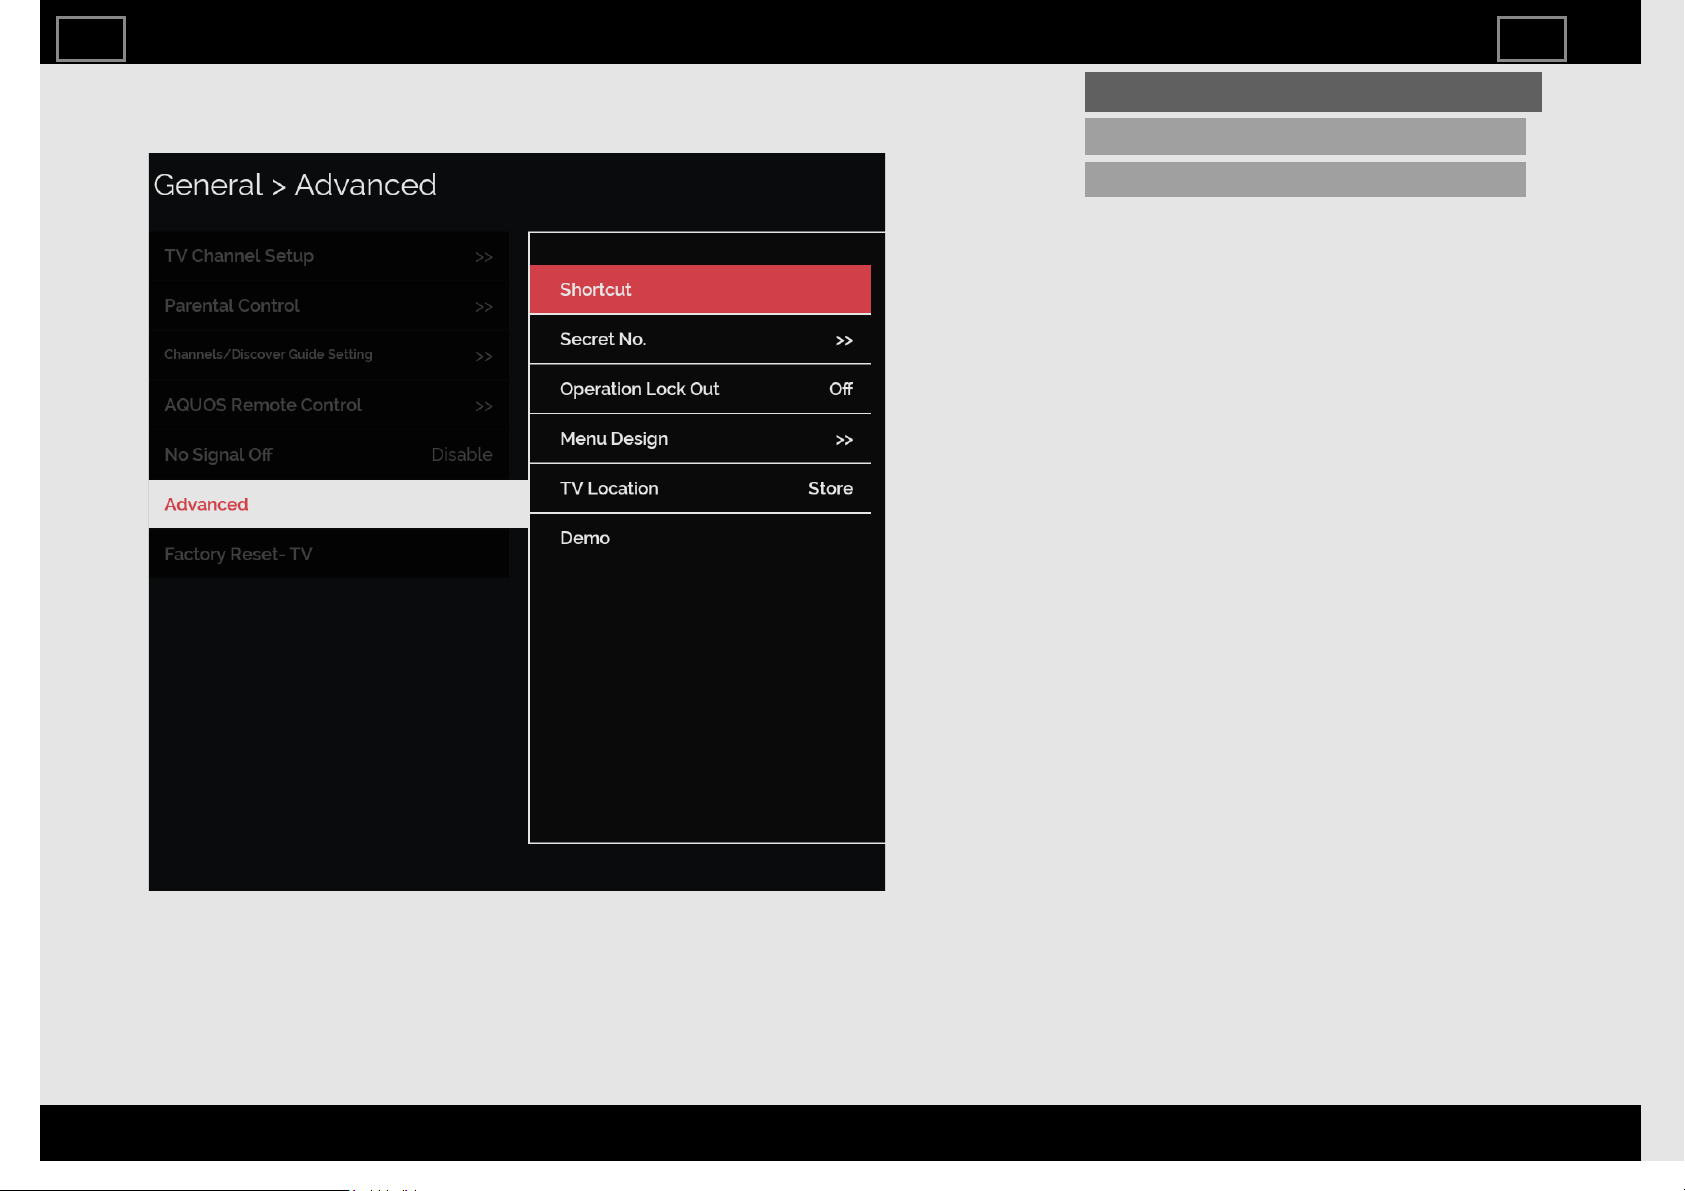
General (Continue)
Advanced
Shortcut
Stop Recording
You can stop the recording on the LINK-
compatible equipment connected to the TV.
TV Setup Operation
ENG339
ENGLISH | FRANÇAIS | ESPAÑOL
>><<
Example
General (Continue)
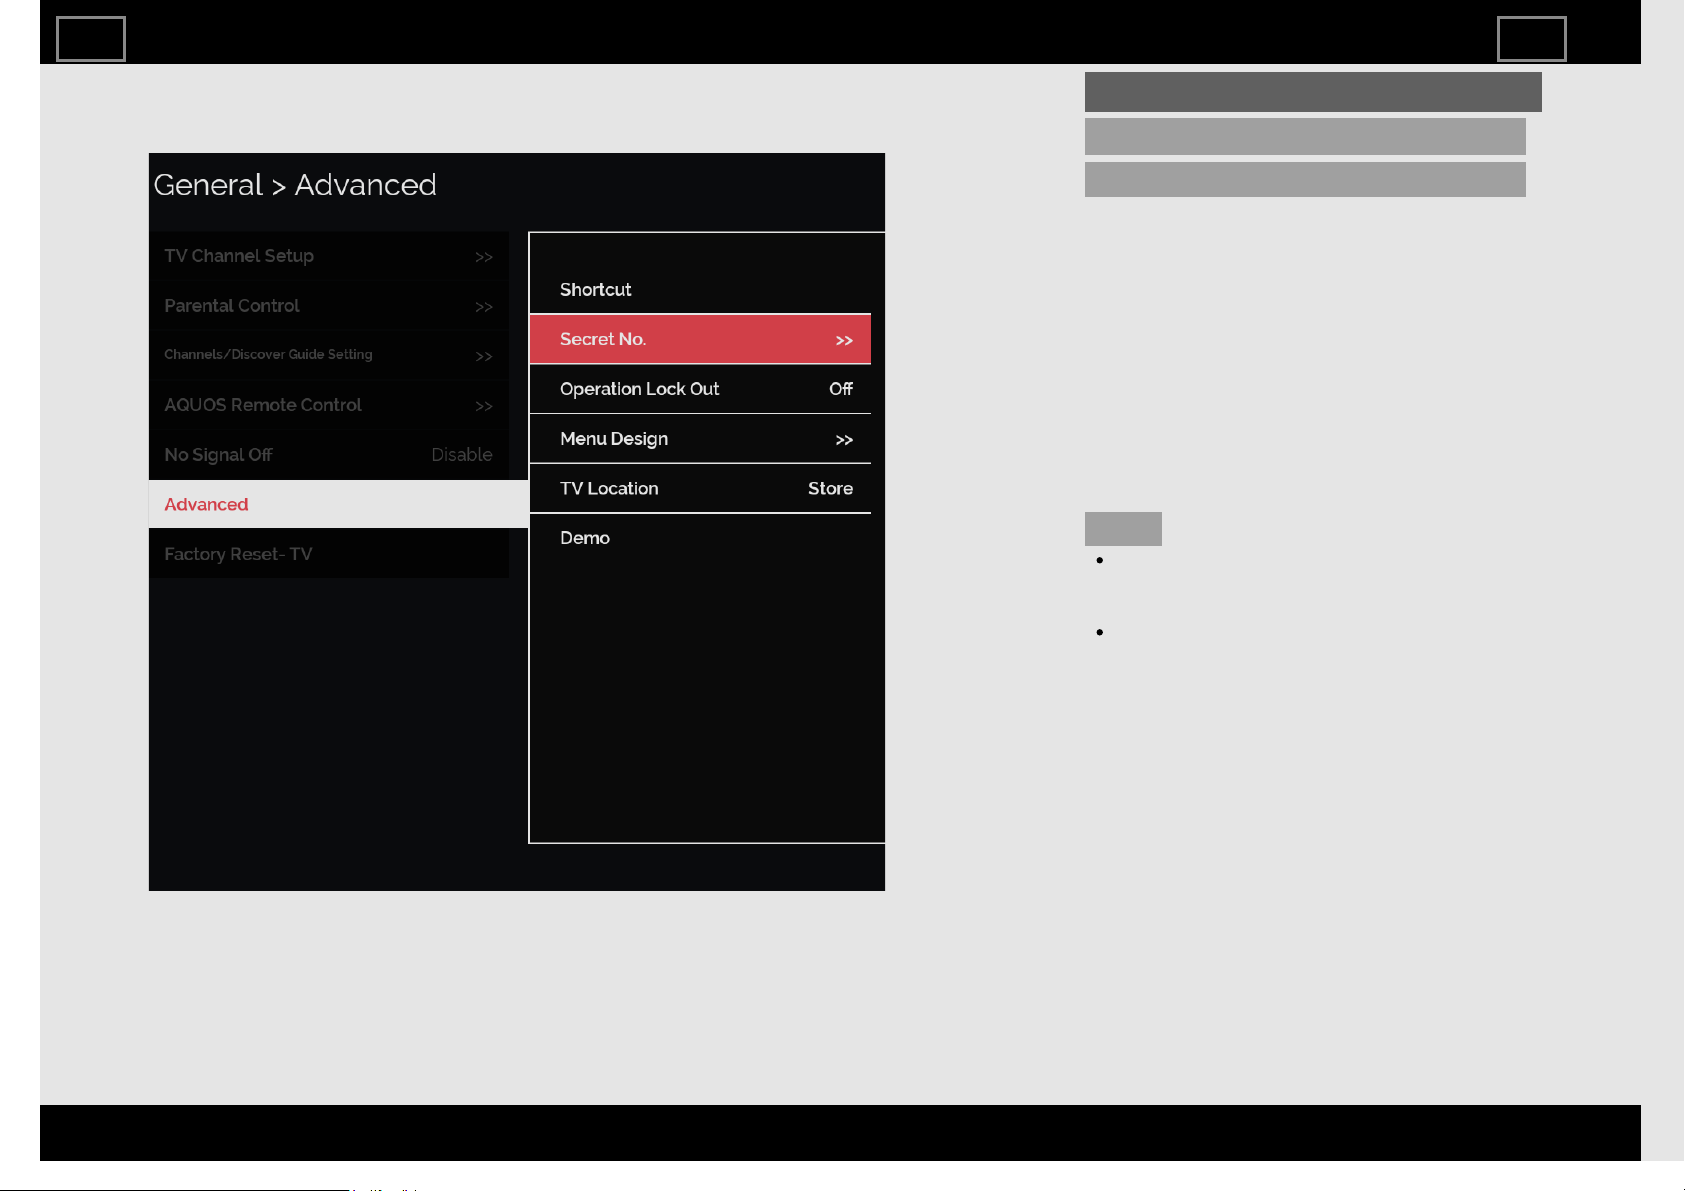
Advanced
Secret No.
Allows you to use a secret number to
protect certain settings from being
accidentally changed.
Input Secret No.:
Input the Secret No. currently set. (Default:
1234)
Setting Secret No.
You can set and change the secret number
by using 0-9.
Yes: Change or sets the Secret No.
No: The previous screen will be displayed.
NOTE
As a precautionary measure, make a note
of your secret number and keep it in a
familiar place.
The TV Channel Setup and Parental
Control will not be selectable from the
menu if you do not first configure your
secret number.
TV Setup Operation
ENG340
ENGLISH | FRANÇAIS | ESPAÑOL
>><<
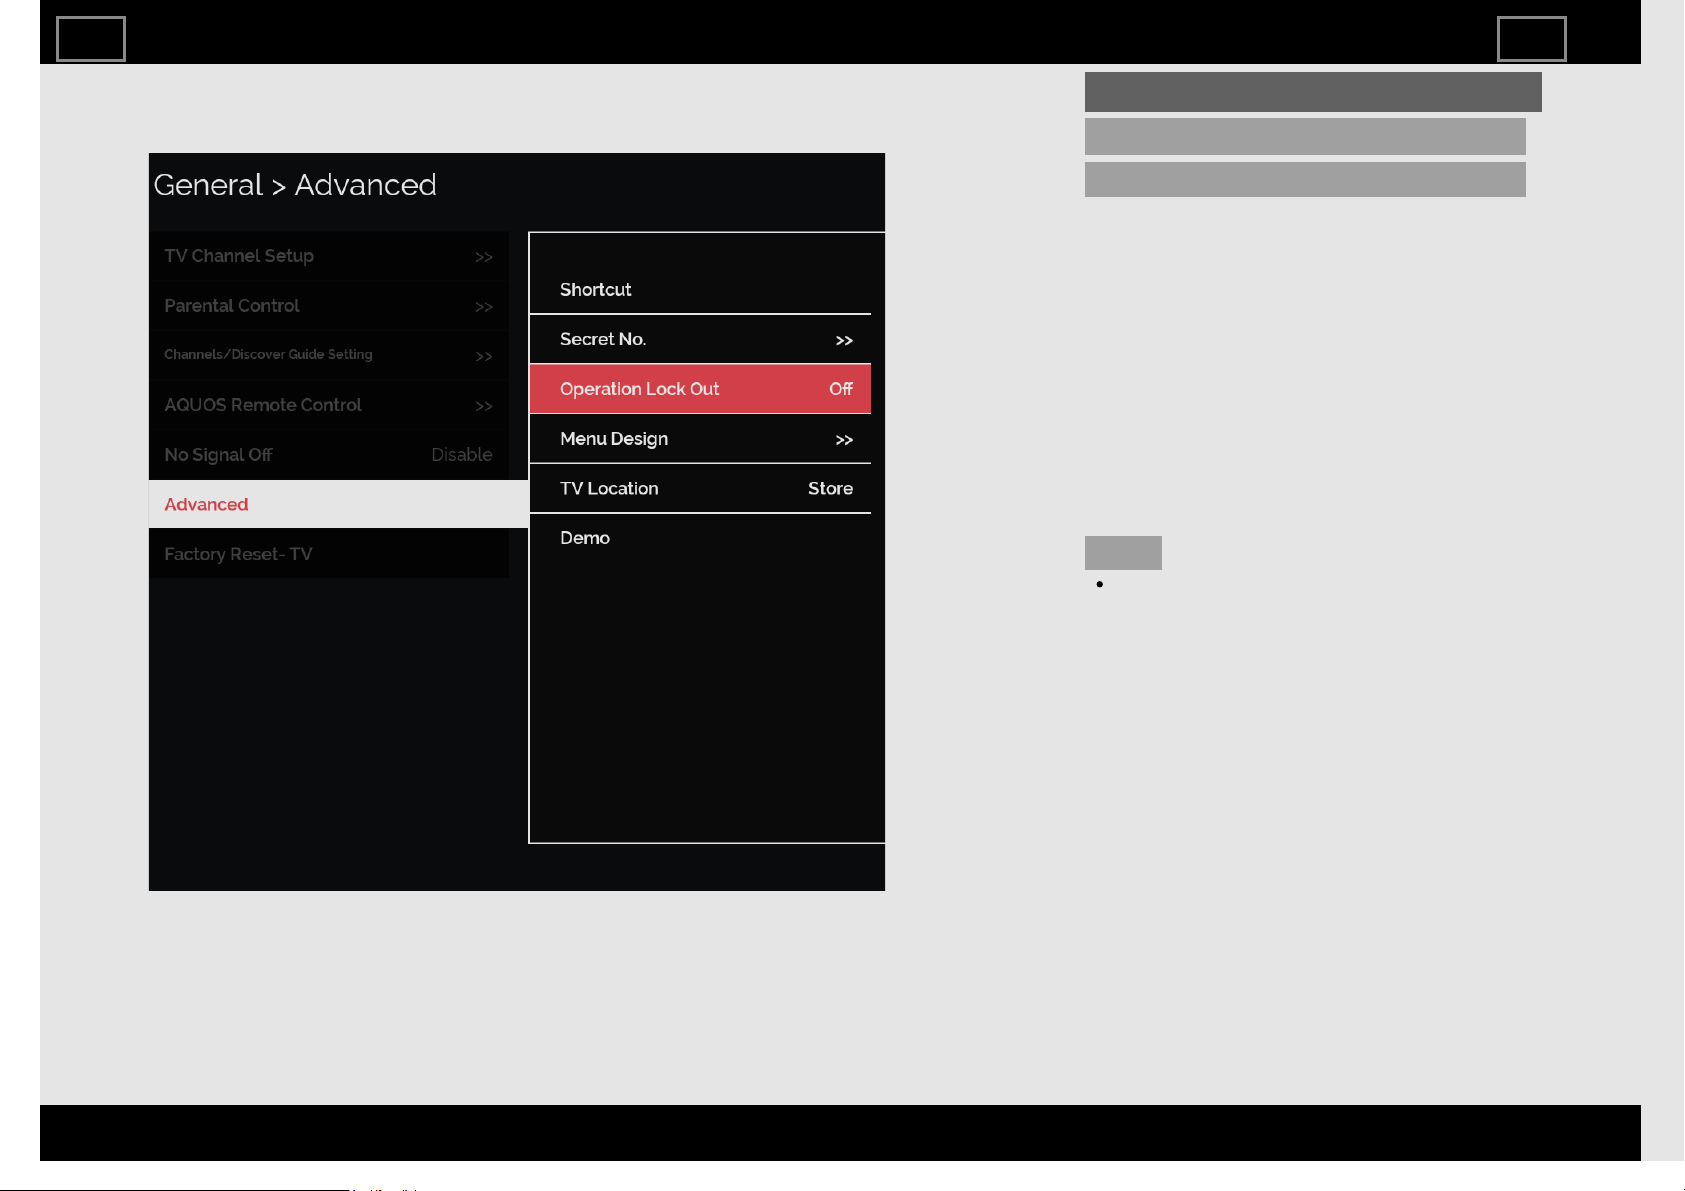
Example
General (Continue)
Advanced
Operation Lock Out
This function locks the operation buttons on
the TV and the remote control.
Off: No adjustment.
RC Control Lock: All buttons on the remote
control are locked.
Button Control Lock: All buttons on the TV,
except POWER, are locked.
When "RC Control Lock" or "Button Control
Lock" is selected, a confirmation screen
appears.
Yes: Locks the operation buttons.
No: No adjustment.
NOTE
To unlock the buttons on the remote
control by using the control panel of the
TV.
(See the Setup Gude.)
TV Setup Operation
ENG341
ENGLISH | FRANÇAIS | ESPAÑOL
>><<

Example
General (Continue)
Advanced
Menu Design
Color Scheme
This function allows you to change the color
to your liking.
TV Setup Operation
ENG342
ENGLISH | FRANÇAIS | ESPAÑOL
>><<

Example
General (Continue)
Advanced
TV Location
Select "Home" or "Store" for the location
where you plan to install the TV.
NOTE
Normally set "TV Location" to "HOME".
If you set "TV Location" to "Store", you
will not be able to use some menus.
When using the "Demo" menu, set "TV
Location" to "Store".
TV Setup Operation
ENG343
ENGLISH | FRANÇAIS | ESPAÑOL
>><<
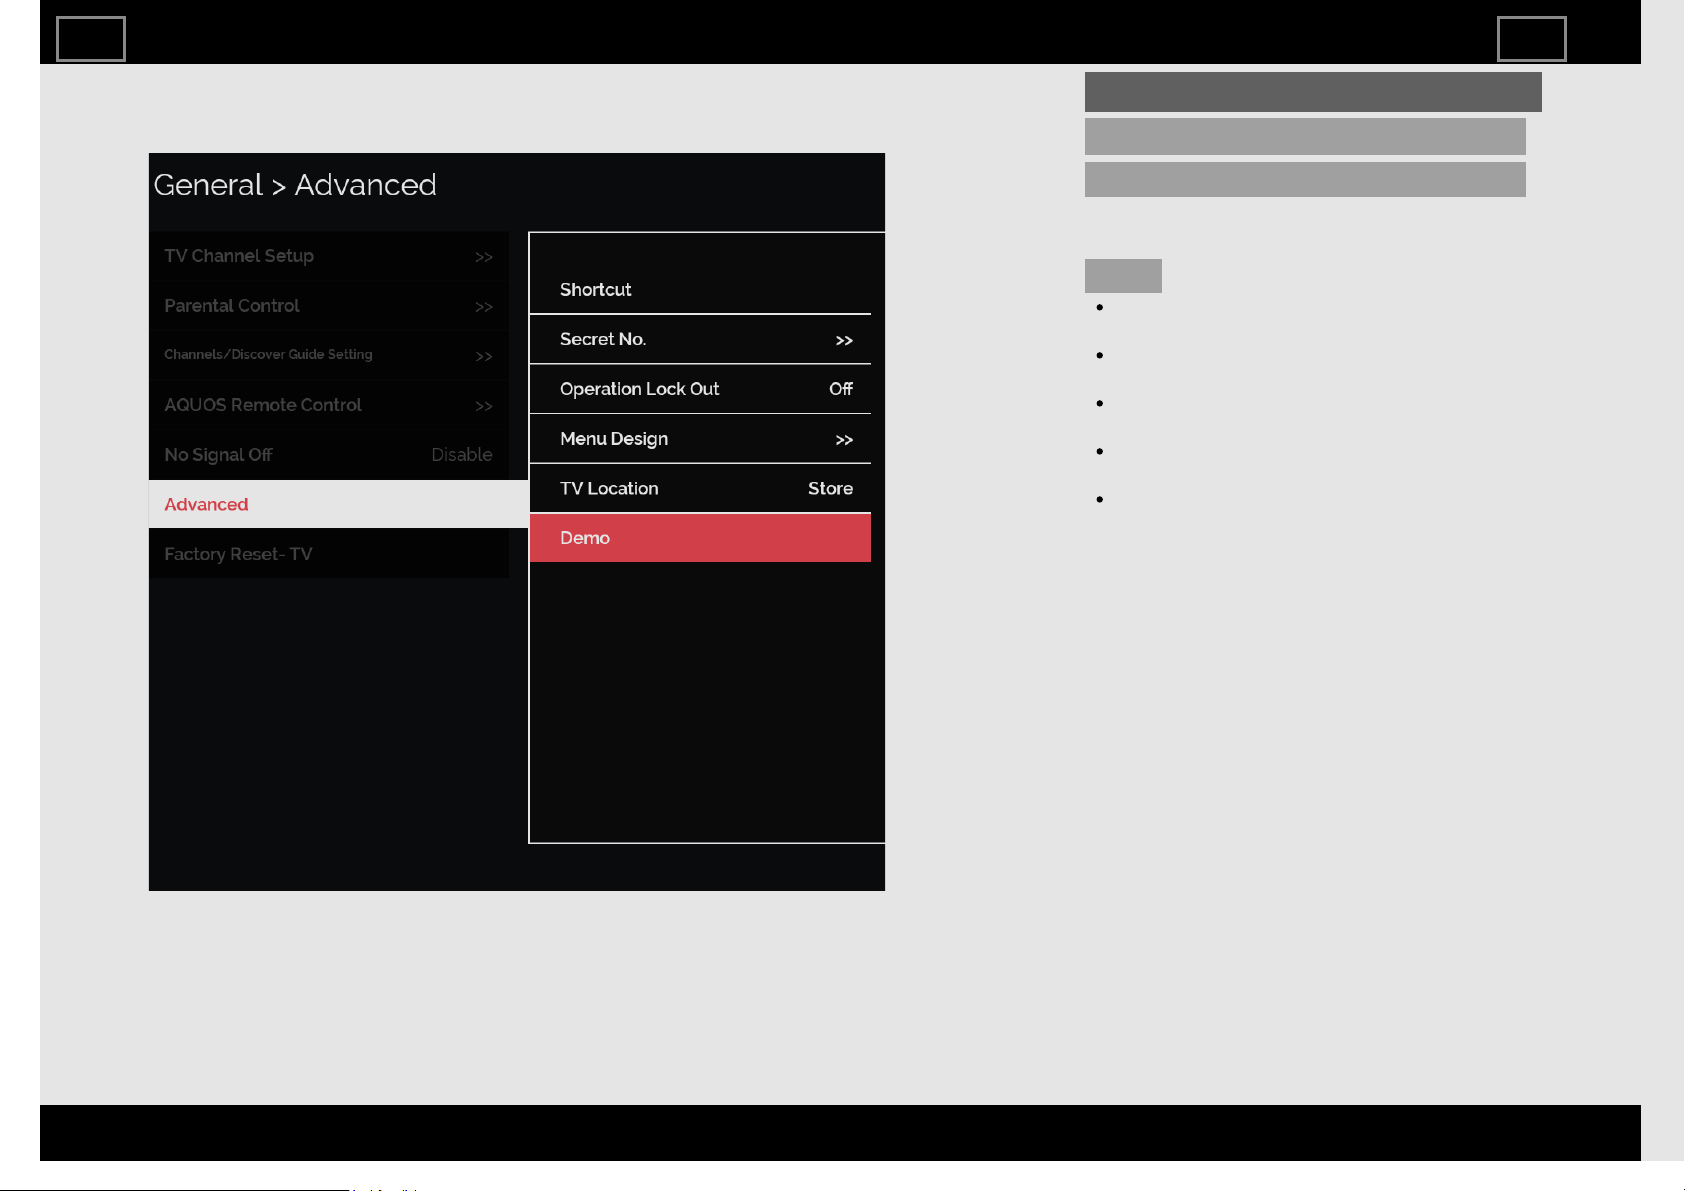
Example
General (Continue)
Advanced
Demo
You can select the image from several types
of demo mode.
NOTE
What kinds of setting item are available
depends on the model of your TV.
This function will be canceled when you
press EXIT on the remote control unit.
"Demo" may not be selected depending
on input signal type or application status.
"Demo" may be automatically canceled
depending on input signal type.
When using the "Demo" menu, set "TV
Location" to "Store".
TV Setup Operation
ENG344
ENGLISH | FRANÇAIS | ESPAÑOL
>><<
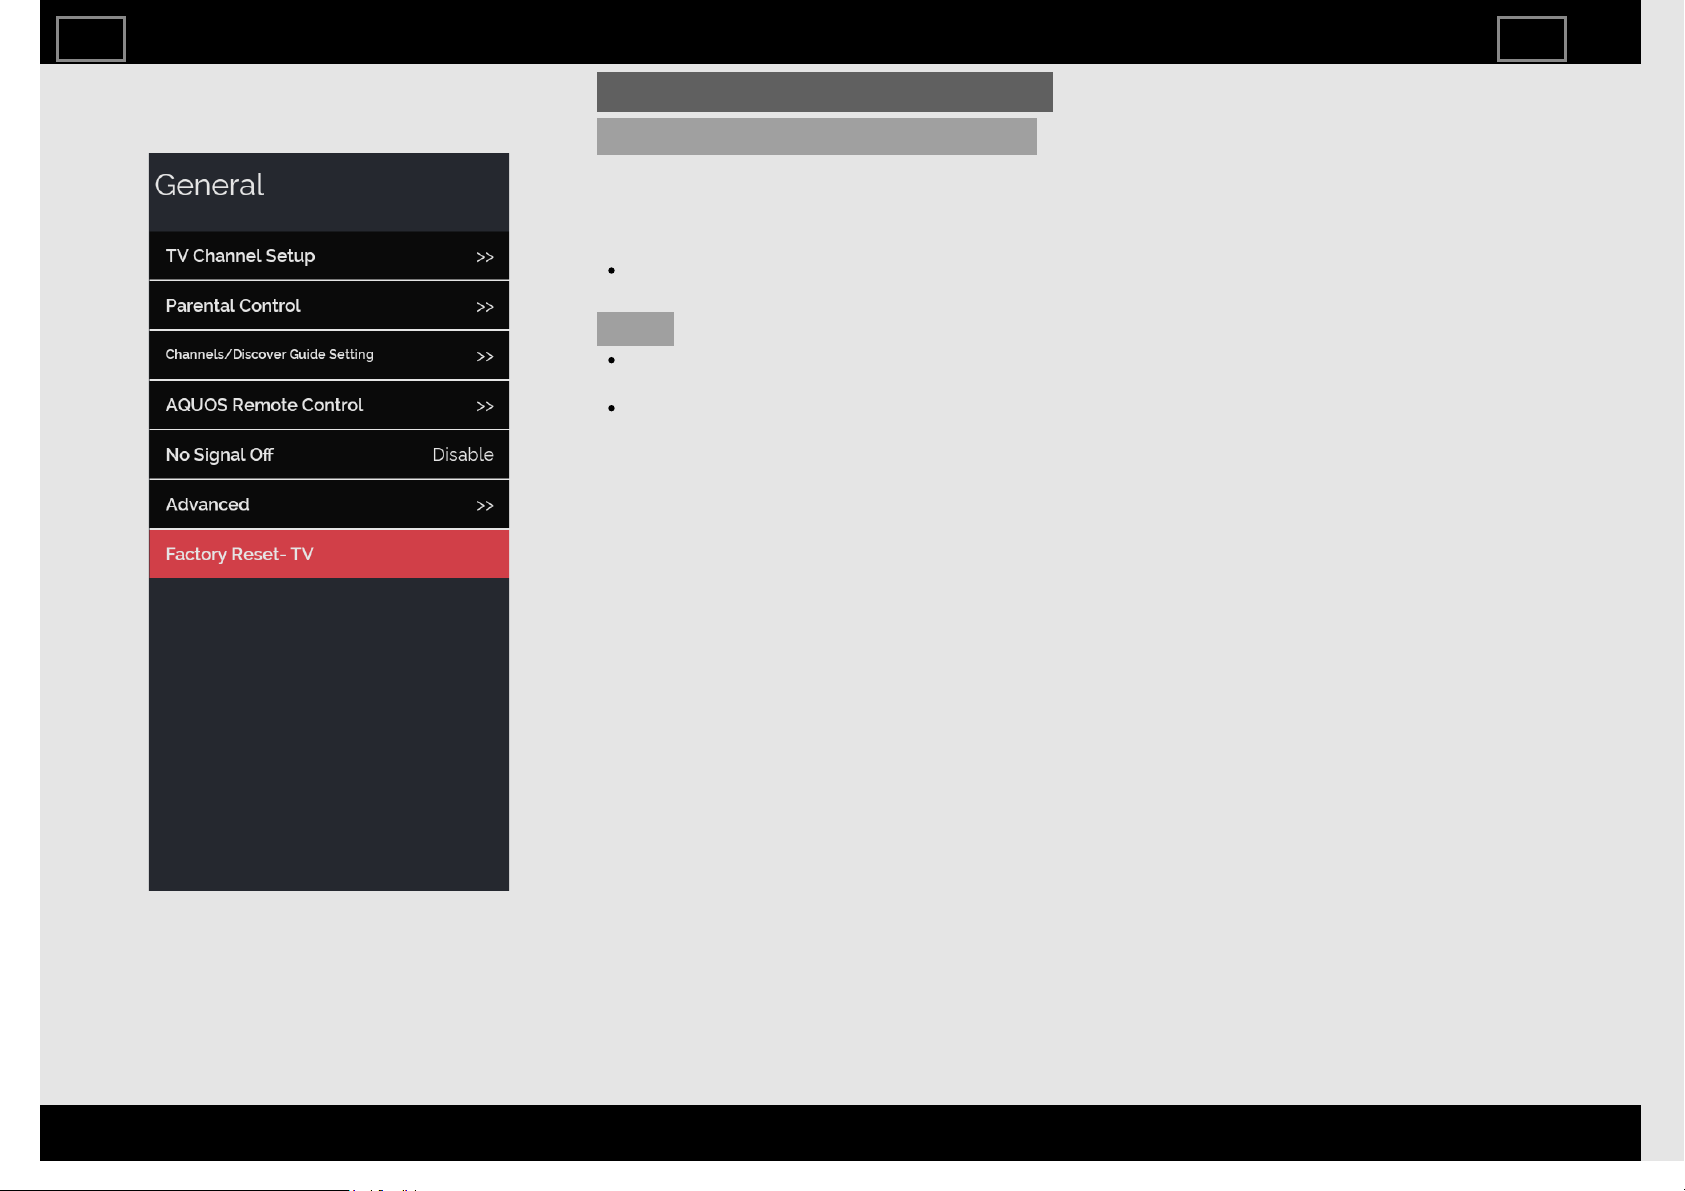
Example
General (Continue)
Factory Reset - TV
If complex adjustments are made and the
settings cannot be restored to normal, you
can reset the settings to the factory preset
values.
If you have already set the Secret No.,
input the 4-digit secret number here.
NOTE
The Language settings will not be
changed.
To reset all data, including Google
Accounts, execute "Storage & Reset"
from Settings on the HOME screen.
TV Setup Operation
ENG345
ENGLISH | FRANÇAIS | ESPAÑOL
>><<

Video In
HDMI Type Selection
Sets the HDMI type for HDMI IN 1, 2, 3 and 4
terminals.
Set to "Full" when an HDMI 4K60P 4:4:4
device is connected, and set to "Limited"
when an HDMI 4:2:0 device is connected.
Devices Operation
ENG41
ENGLISH | FRANÇAIS | ESPAÑOL
>><<
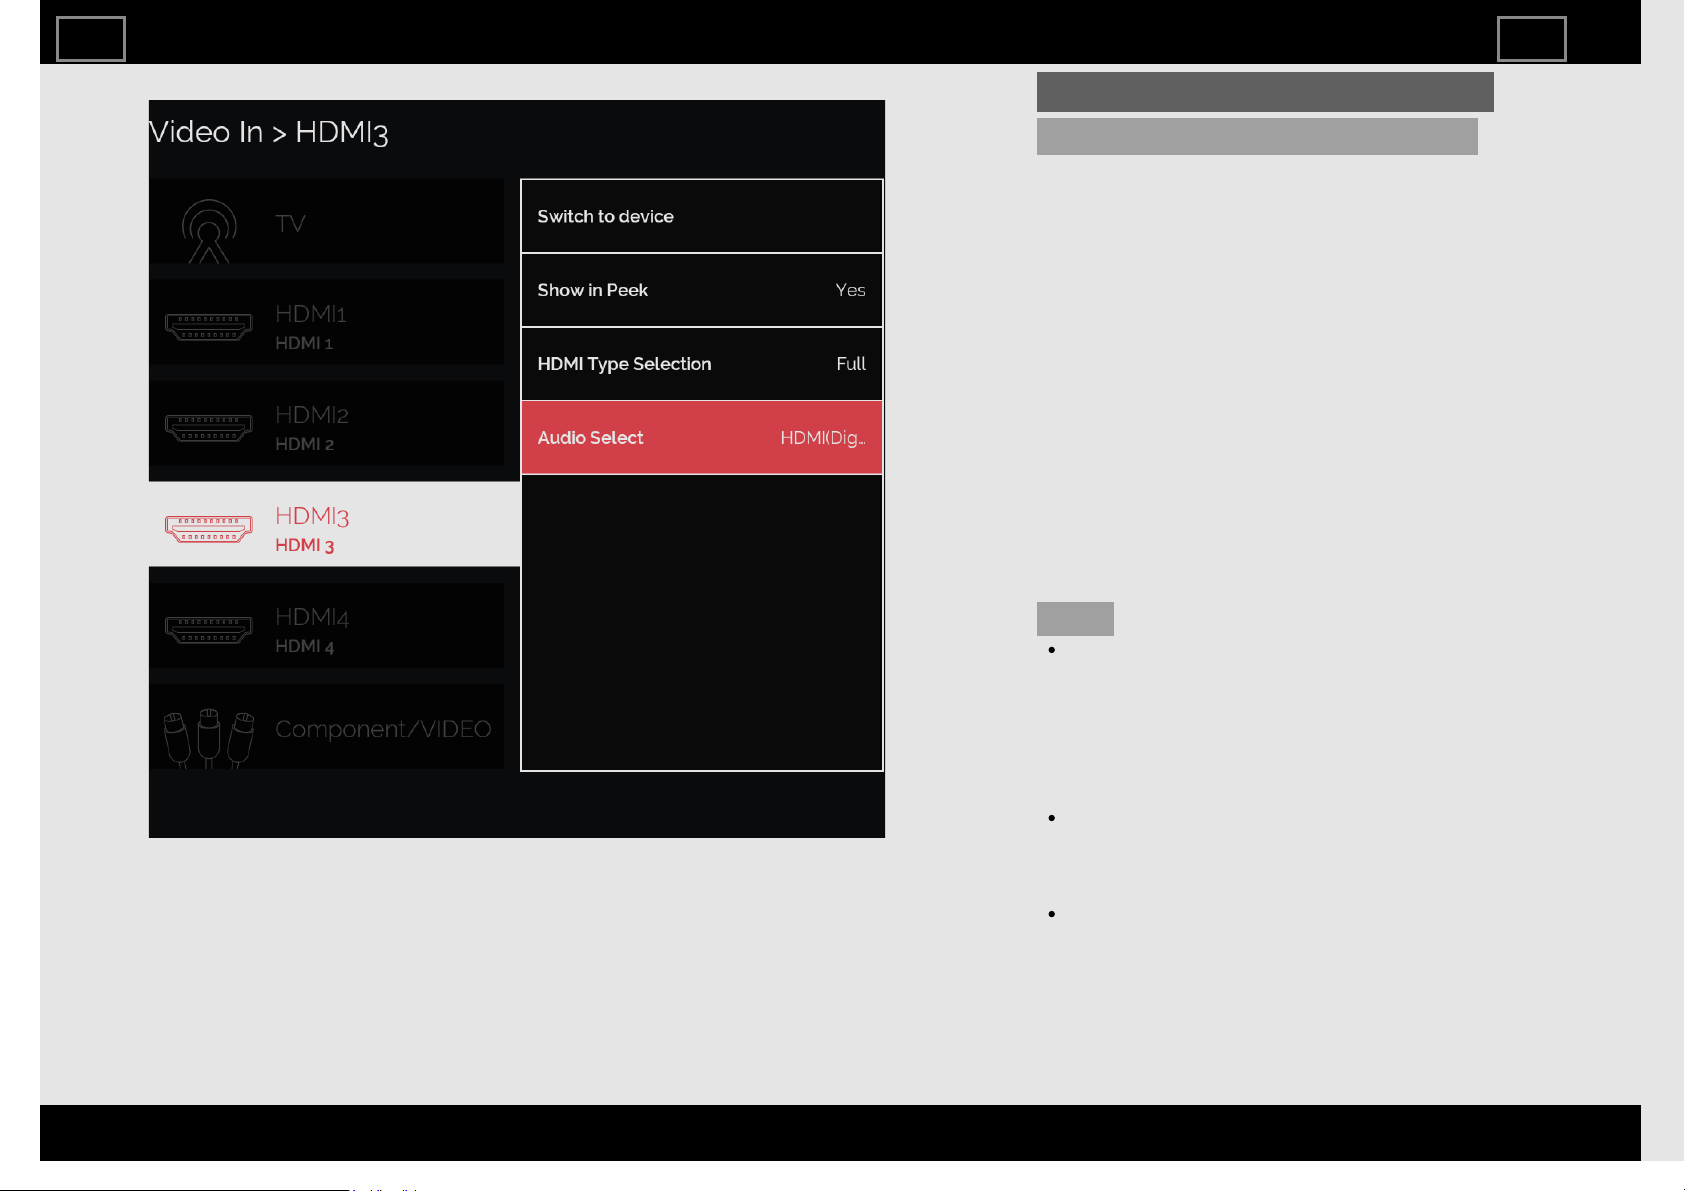
Video In (Continue)
Audio Select
This function sets the terminal to output the
computer audio.
The adjustment items vary depending on
the input source. Select the input source
corresponding to the terminal connected to
the PC and then adjust the desired item.
To perform the operation, refer to "Devices"
> "Video in" > "HDMI 3" > "Audio Select".
HDMI 3
HDMI(Digital): Select this when the TV and
PC are connected using an HDMI-
certified cable and audio is input via the
same cable.
HDMI+Analog: Select this when the TV and
PC are connected using a HDMI-certified
cable and the audio is input via a Ø 3.5
mm stereo minijack.
NOTE
When "Audio Select" is set to
"HDMI+Analog", sound will not be
produced if you use only an HDMI-
certified cable to connect HDMI-
compatible equipment. To produce
sound, you should make an analog audio
connection.
If you want to connect HDMI-compatible
equipment using only an HDMI-certified
cable, set "Audio Select" to
"HDMI(Digital)".
"Audio Select" can only be set for the
HDMI IN 3.
Devices Operation
ENG42
ENGLISH | FRANÇAIS | ESPAÑOL
>><<
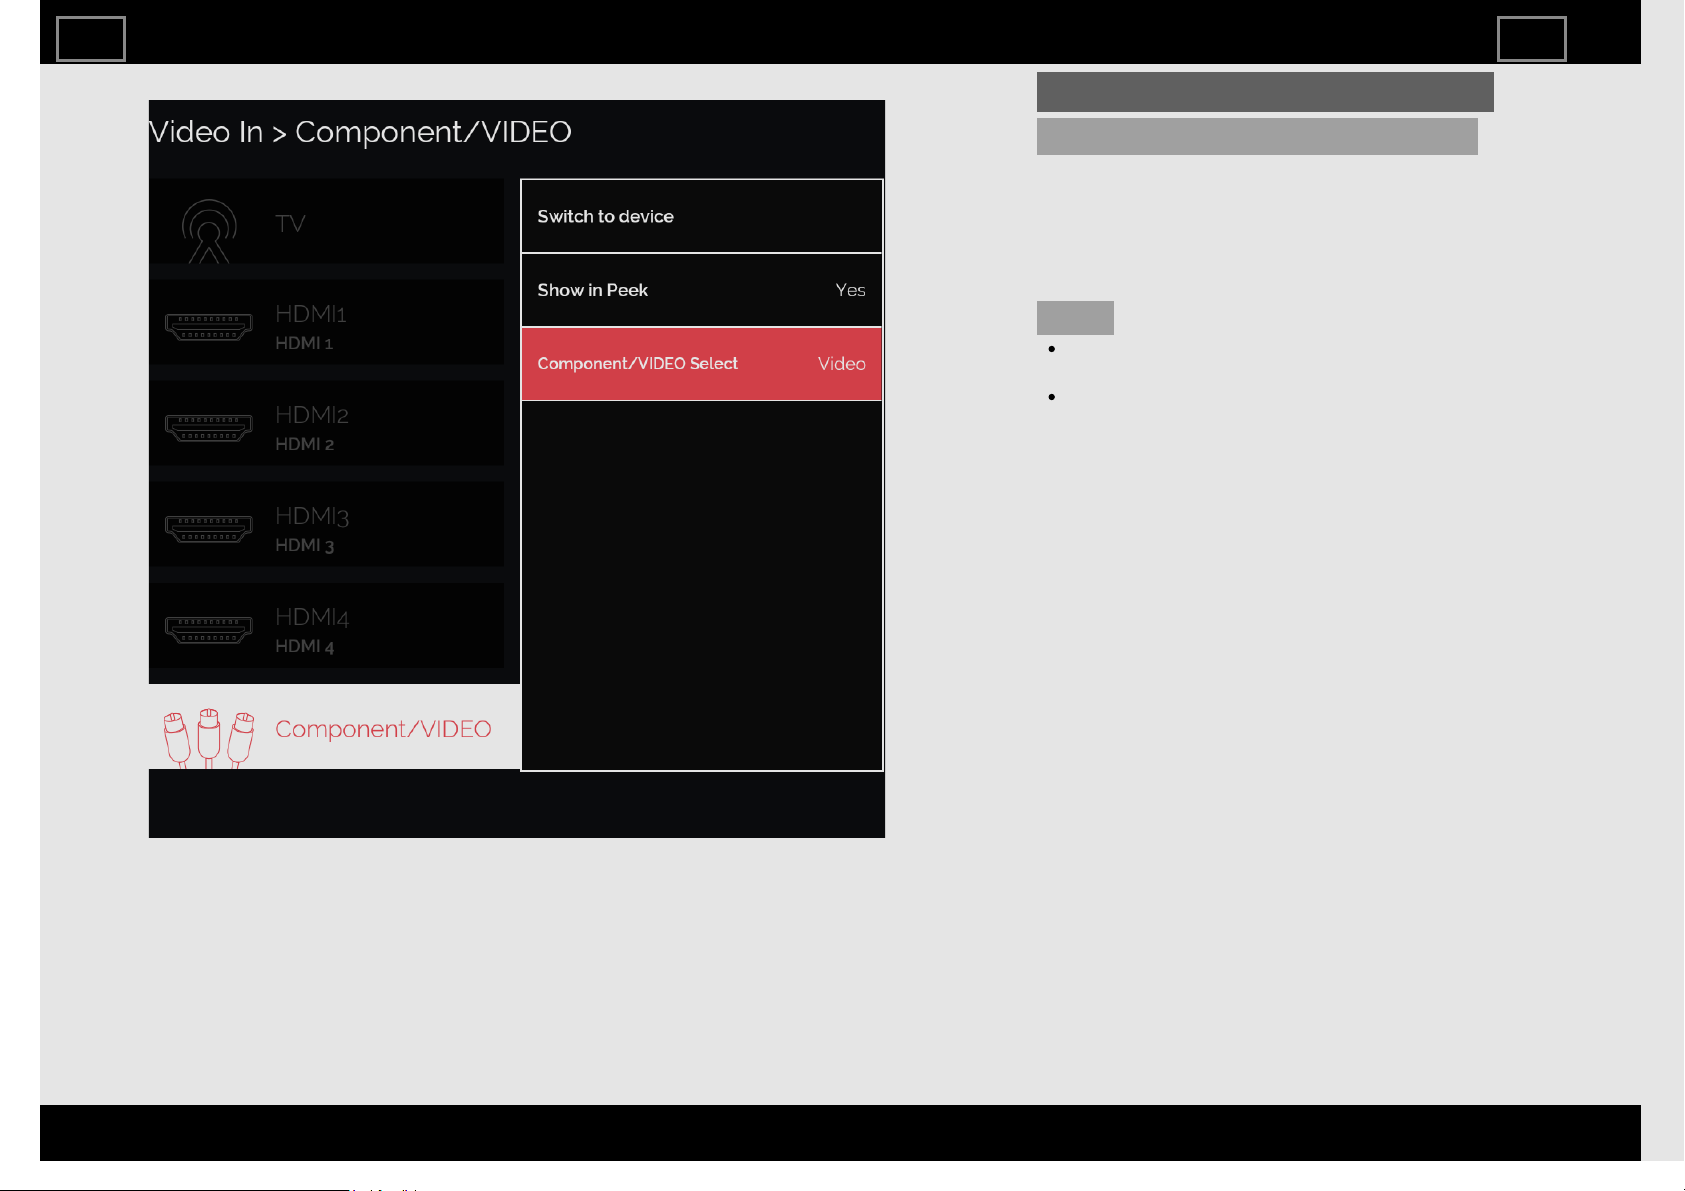
Video In (Continue)
Component/VIDEO Select
For image input applied to the COMPONENT
IN or VIDEO IN terminal, switch to
“Component” or “Video”, respectively.
Component: Select component video.
Video: Select composite video.
NOTE
If no (color) image displays, try changing
to another signal type.
Check the operation manual of the
external equipment for the signal type.
Devices Operation
ENG43
ENGLISH | FRANÇAIS | ESPAÑOL
>><<
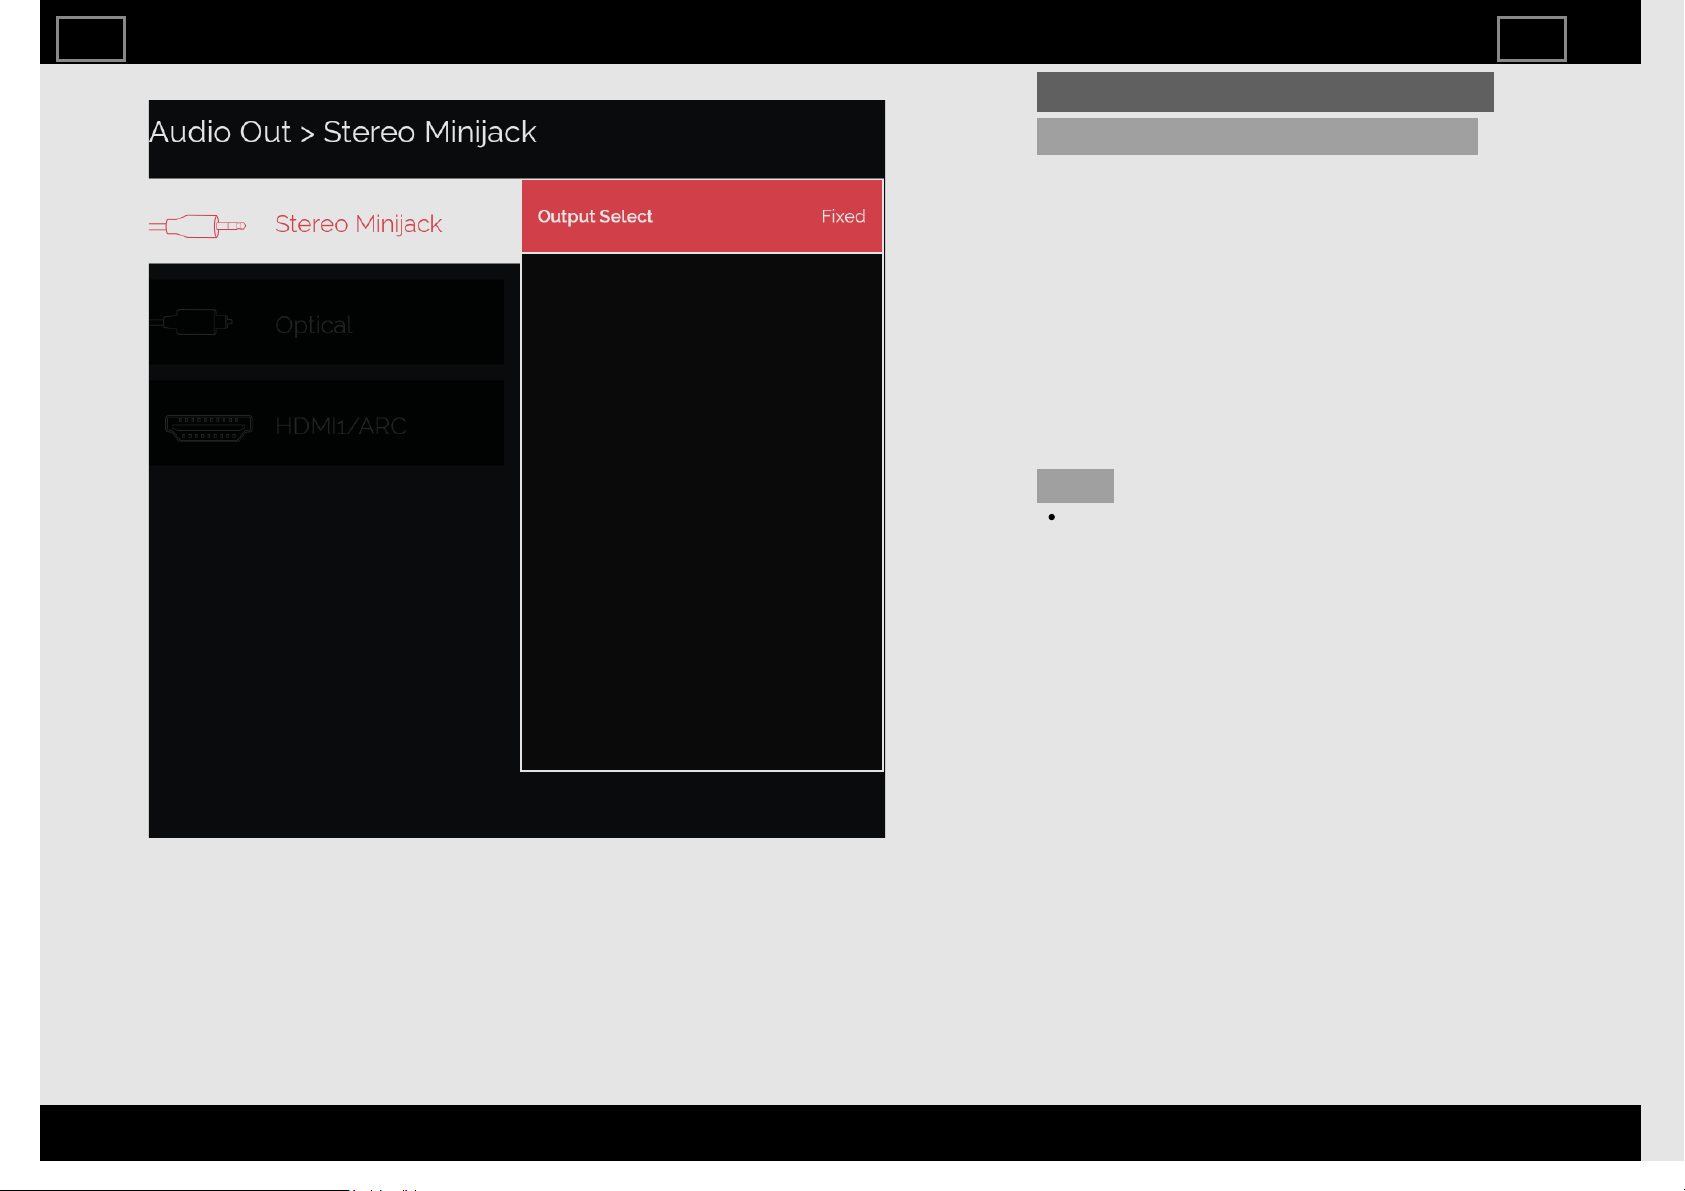
Audio Out
Output Select
Allows you to select what controls the audio
output.
Fixed: Sound via speaker is adjusted with
VOL+/- on the remote control unit or on
the TV.
Sound via the AUDIO OUT terminal is not
adjustable and outputs at a consistent
level.
Variable: Sound via the AUDIO OUT
terminal is adjusted with VOL+/- on the
remote control unit or on the TV.
Sound via speaker is muted.
NOTE
"Output Select" does not operate for
Bluetooth devices.
Devices Operation
ENG44
ENGLISH | FRANÇAIS | ESPAÑOL
>><<
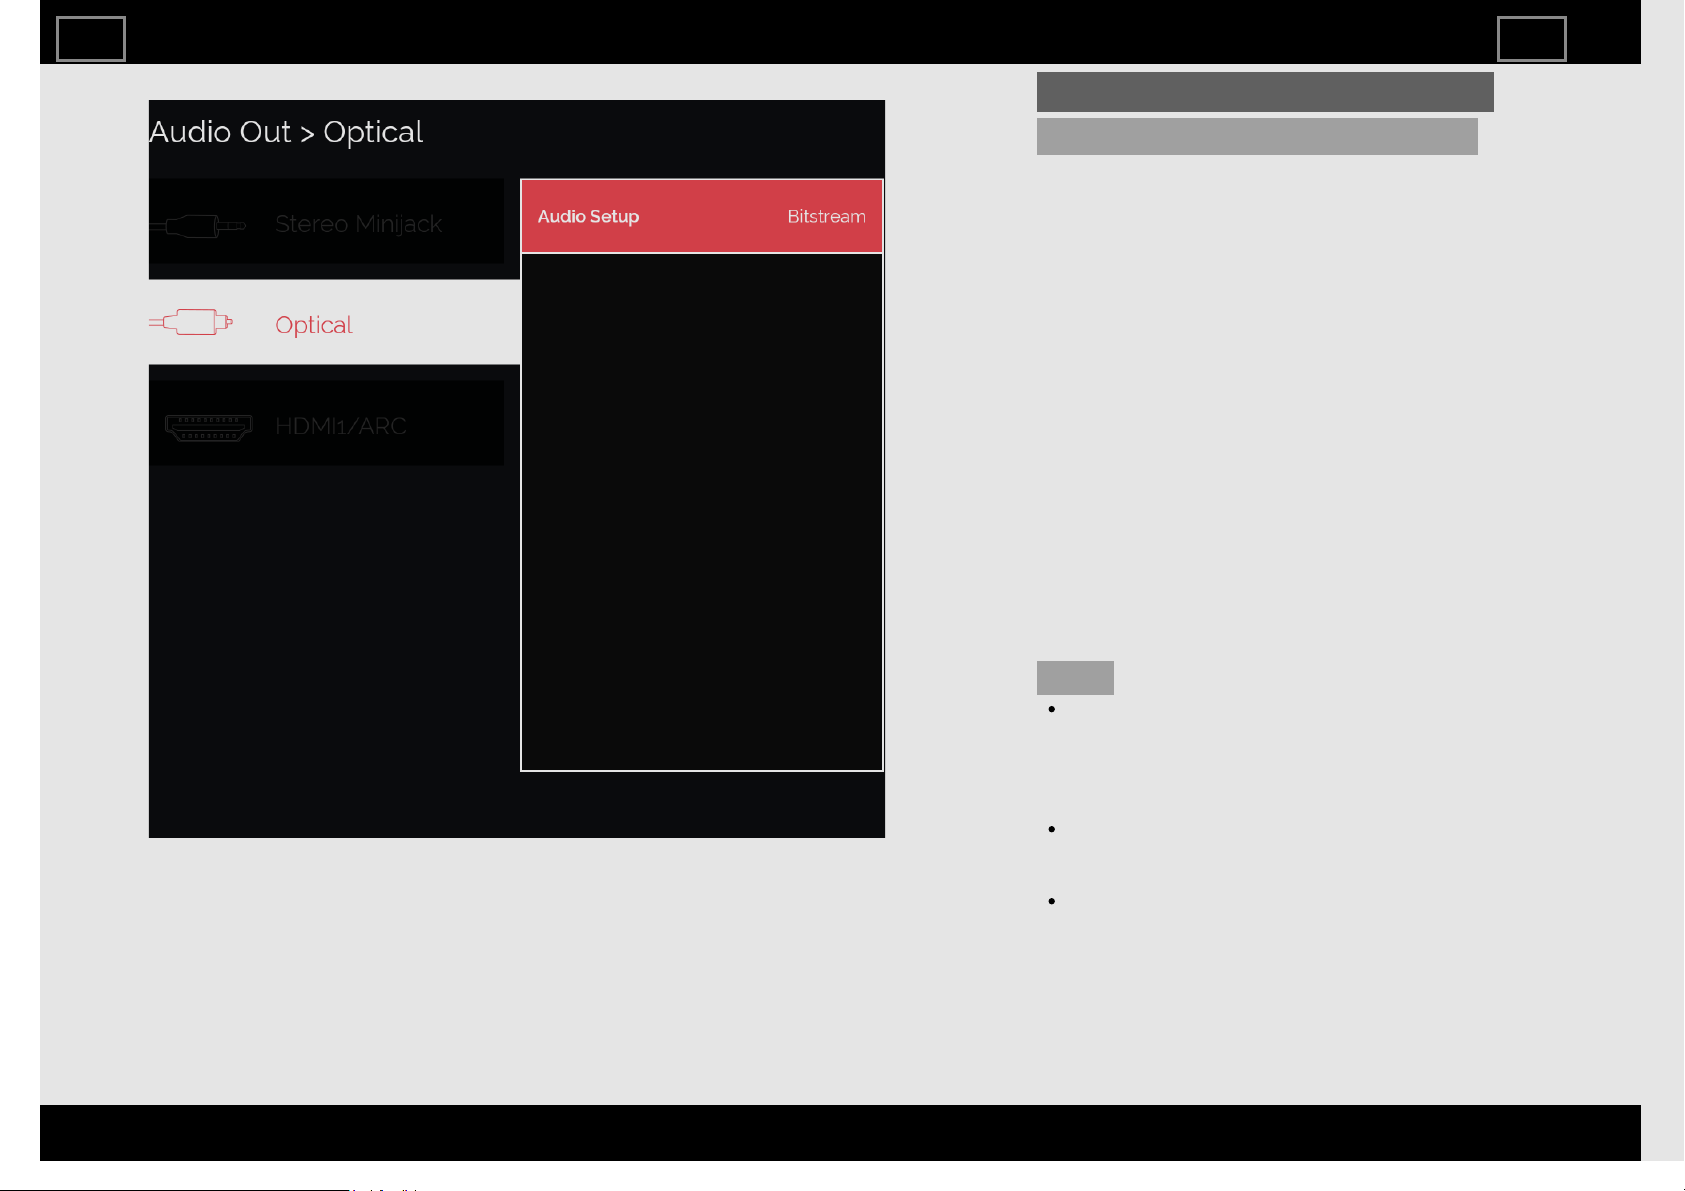
Audio Out (Continue)
Audio Setup
You can output digital audio to an AV
amplifier or similar device whose DIGITAL
AUDIO INPUT terminal is connected to the
DIGITAL AUDIO OUT terminal on the TV.
Please select an audio output format
compatible with the audio format of the
program you are watching and the
equipment connected.
PCM: For connecting to equipment that
does not support Dolby Digital. The same
audio (main, sub, or main/sub) as the
audio of the program being viewed is
output.
2-channel audio with a sampling rate of
48 kHz or less is output as linear PCM
audio.
Bitstream: For connecting to an audio
system that supports Dolby Digital.
Audio is output through both the main
and sub channels.
NOTE
Analog channel audio,
Video/Component input audio, PC input
audio and HDMI-Analog input audio are
output in PCM mode even when
"Bitstream" is selected.
PCM digital input signals are output in
PCM mode even when "Bitstream" is
selected.
"Audio Setup" does not operate for
Bluetooth devices.
Devices Operation
ENG45
ENGLISH | FRANÇAIS | ESPAÑOL
>><<

Audio Out (Continue)
Speaker Select
You can select to listen to the TV sound only
from the LINK-compatible audio system.
Internal Speaker: The sound is output from
the TV speaker.
External Devices: The sound from the TV
speaker is muted and only the sound
from the LINK-compatible audio system
is audible.
You can use VOL+/- and MUTE.
NOTE
"Speaker Select" does not operate for
Bluetooth devices.
Audio Setup
You can output digital audio to an AV
amplifier or similar device whose HDMI
terminal is connected to the HDMI1/ARC
terminal on the TV. Please select an audio
output format compatible with the audio
format of the program you are watching and
the equipment connected.
(See page 4-5.)
Devices Operation
ENG46
ENGLISH | FRANÇAIS | ESPAÑOL
>><<
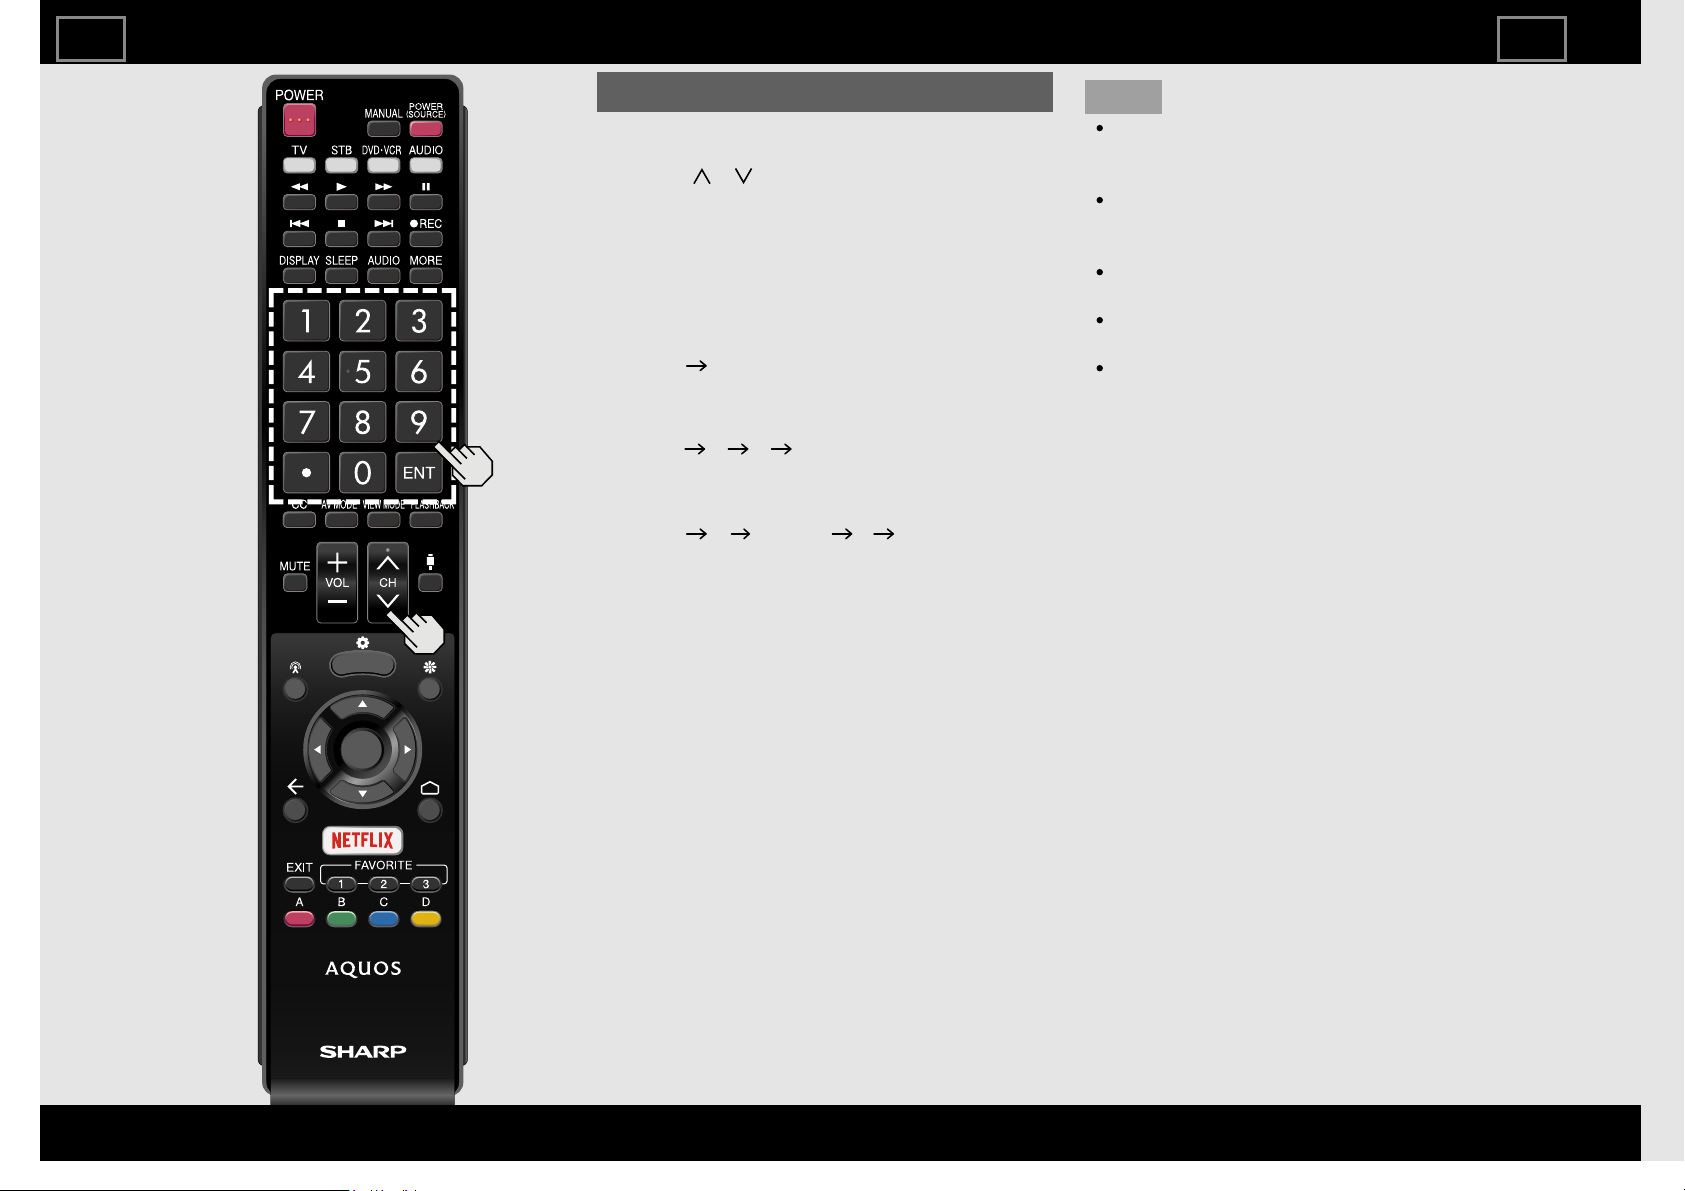
Changing Channels
You can change channels in several ways.
Method 1
Using CH / on the remote control unit
or on the TV.
Method 2
Using remote control buttons 0-9, • (DOT).
Examples:
To select a 1 or 2-digit channel number (e.
g., Channel 5):
Press 5 ENT
To select a 3-digit channel number (e. g.,
Channel 115):
Press 1 1 5 ENT
To select a 4-digit channel number (e. g.,
Channel 22.1):
Press 2 2 • (DOT) 1 ENT
NOTE
When selecting a 1-digit channel
number, it is not necessary to press 0
before the number.
When you enter 0-9 only, channel
selection will be made if there is no
operation within a few seconds.
If you push "0" by itself, nothing will
happen.
Complete the above steps within a few
seconds.
When you enter 0-9 and • (DOT), channel
selection will be made if there is no
operation within a few seconds.
Direct Button Operation
ENG51
ENGLISH | FRANÇAIS | ESPAÑOL
>><<
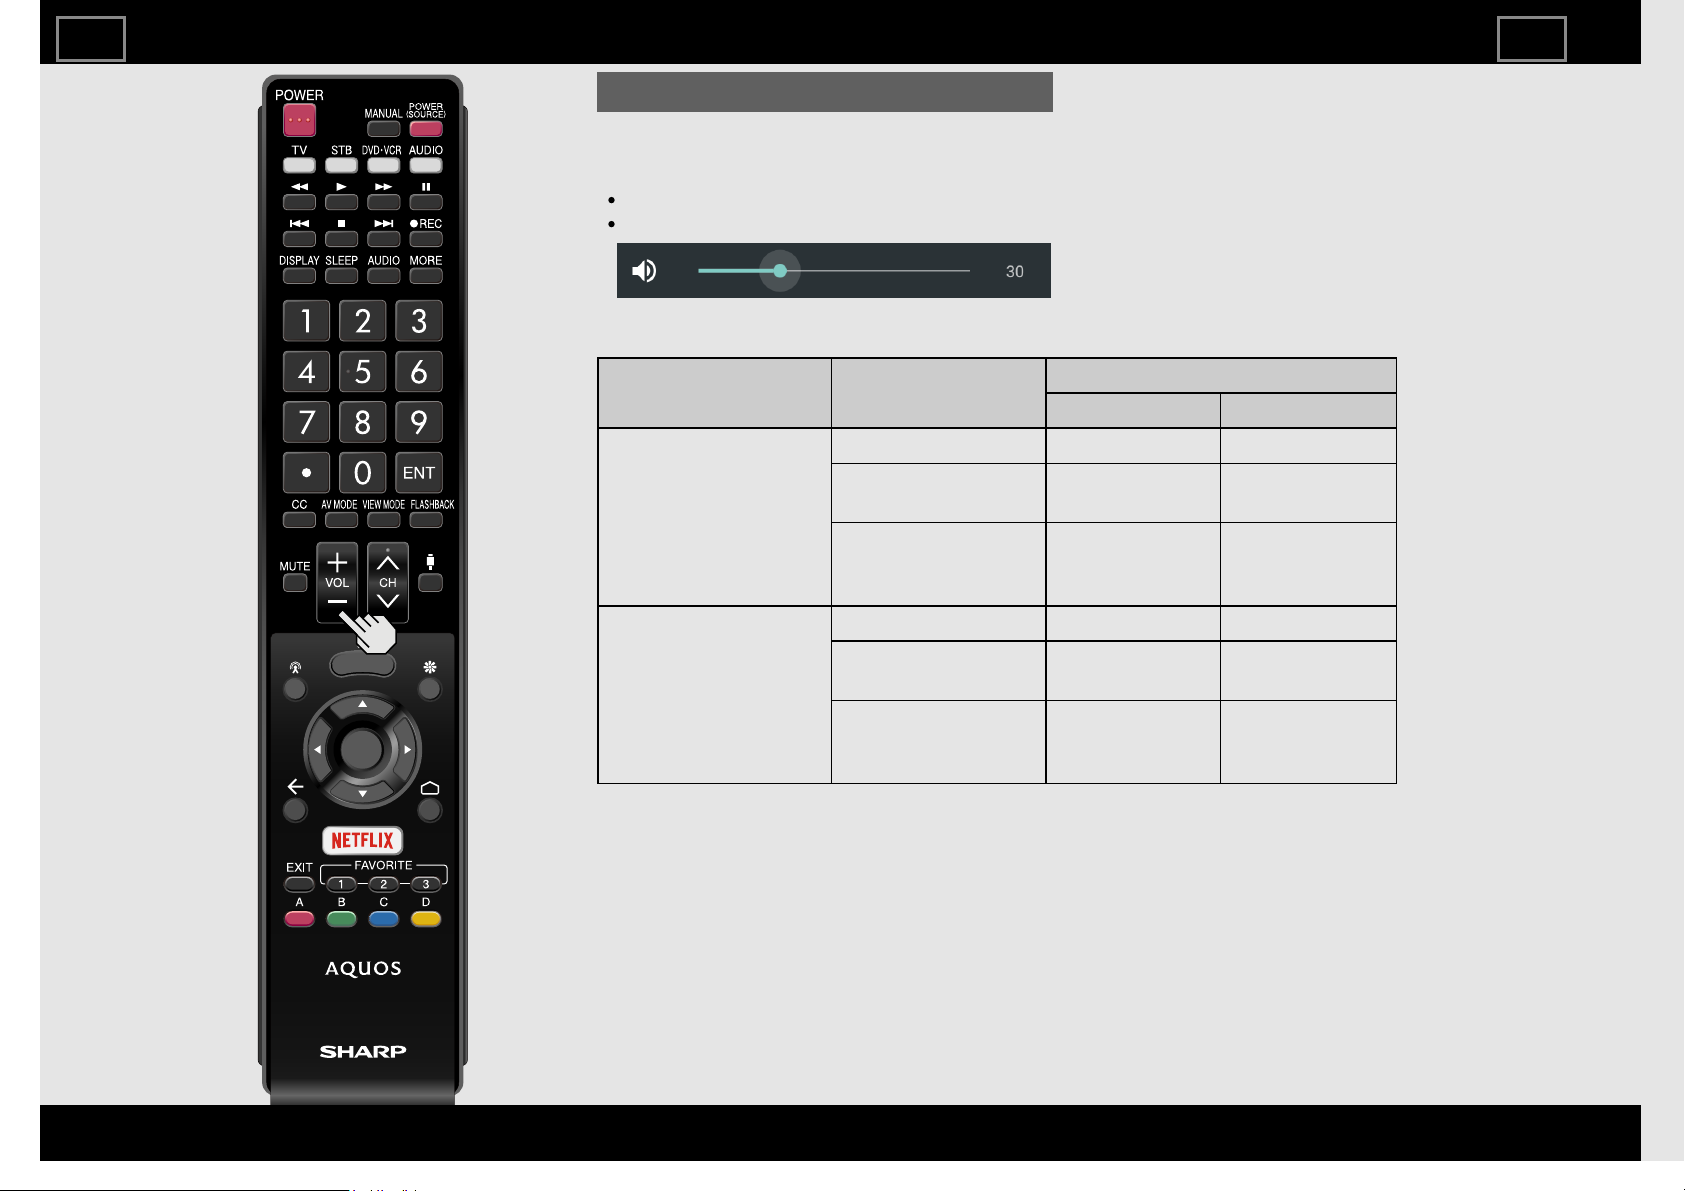
Changing Volume
You can change the volume by pressing
VOL+/- on the TV or on the remote control
unit.
To increase the volume, press VOL +.
To decrease the volume, press VOL -.
Audio status
Contents Output device
Output Select
Fixed Variable
TV,
HDMI,
Component,
Composite,
ContentPlayer,
Vudu
TV Speaker Variable Sound Mute
AUDIO OUT
Fixed Sound
(Volume MAX)
Variable Sound
DIGITAL AUDIO
OUT,
HDMI IN 1 (ARC)
Fixed Sound
(Volume MAX)
Fixed Sound
(Volume MAX)
YouTube,
Netflix,
GooglePlay
[Movies&TV] and
Android APP
TV Speaker Variable Sound Mute
AUDIO OUT
Same volume as
a TV speaker
Variable sound
DIGITAL AUDIO
OUT,
HDMI IN 1 (ARC)
Same volume as
a TV speaker
Same volume as
an AUDIO OUT
Direct Button Operation
ENG52
ENGLISH | FRANÇAIS | ESPAÑOL
>><<
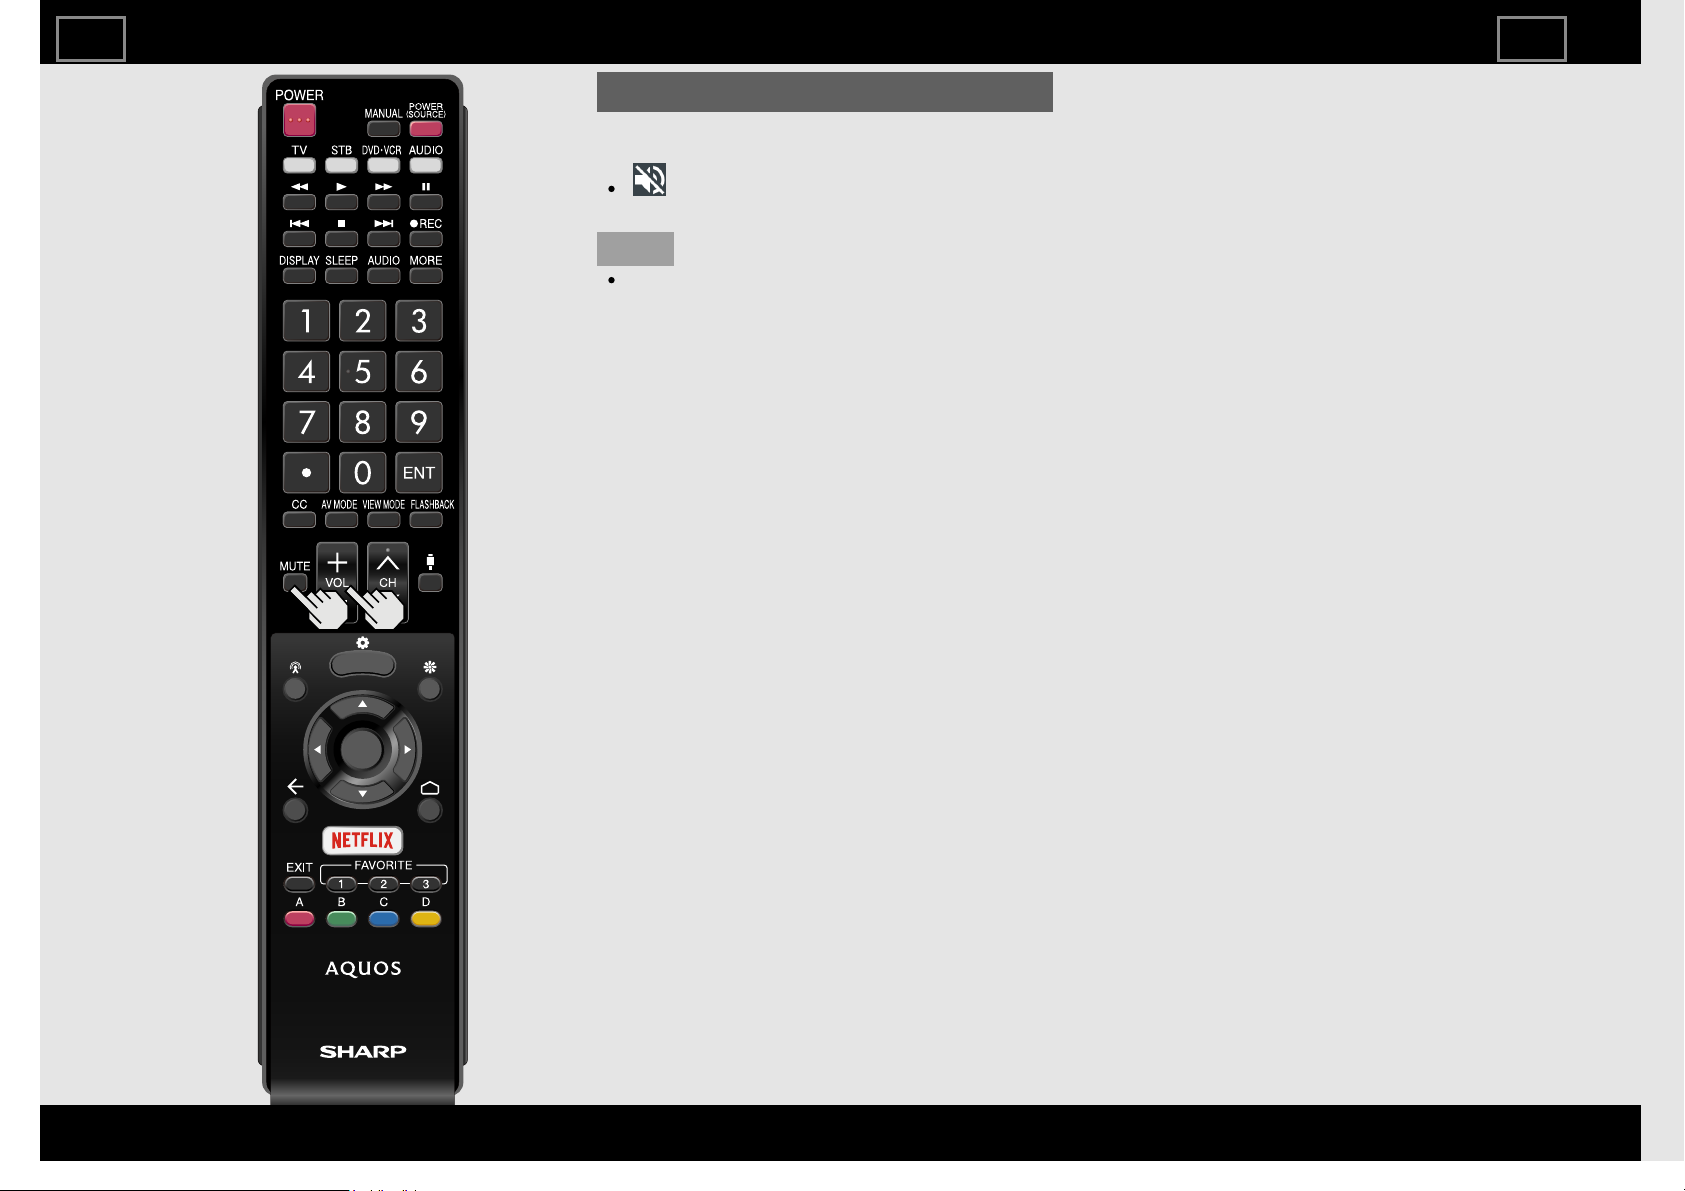
MUTE
Mutes the current sound output.
Press MUTE.
" " will be displayed on the screen for
30 minutes.
NOTE
Mute can be canceled by pressing
VOL+/- or MUTE.
Direct Button Operation
ENG53
ENGLISH | FRANÇAIS | ESPAÑOL
>><<
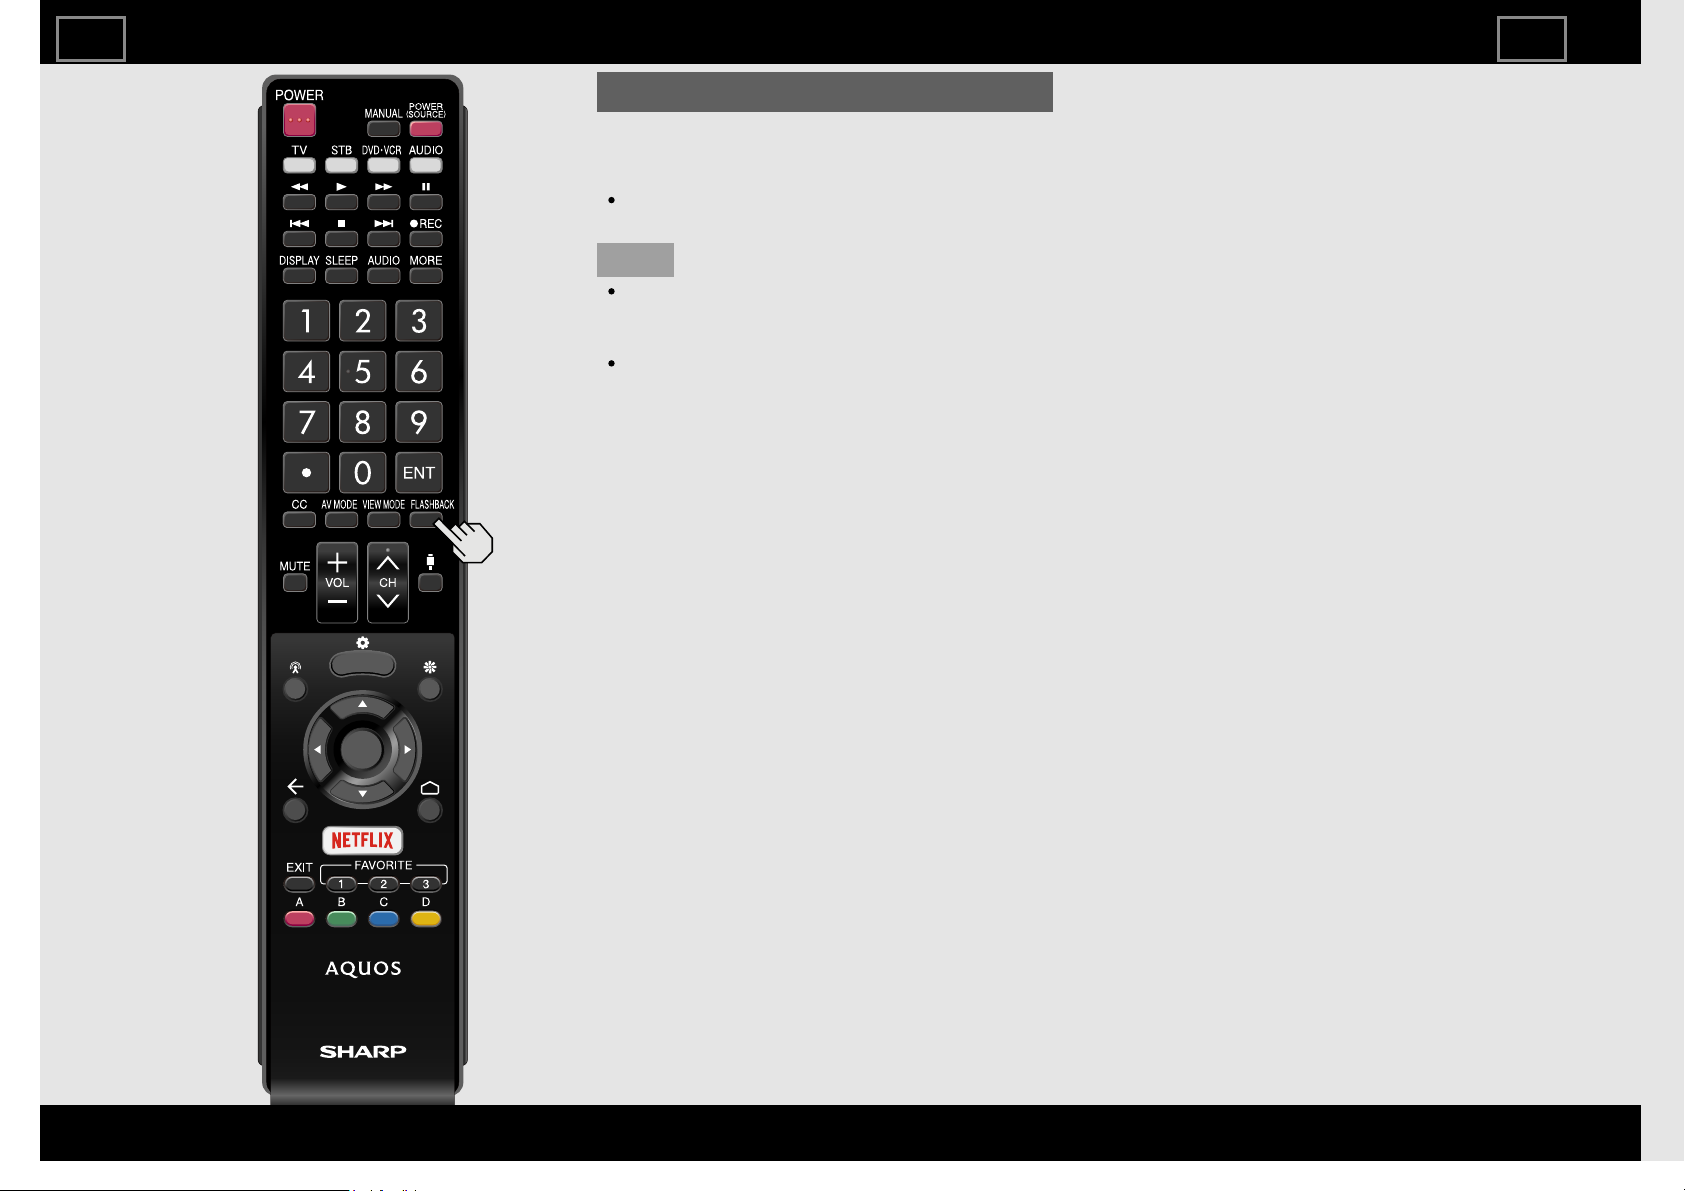
FLASHBACK
Press FLASHBACK to switch to the
previously tuned channel or previous input
mode.
Press FLASHBACK again to switch back
to the currently tuned channel.
NOTE
FLASHBACK will not work if no channel
has been changed after the TV is turned
on.
With FLASHBACK, only input from TV,
HDMI 1 through 4, or Video/Component
will be stored in Memory.
Direct Button Operation
ENG54
ENGLISH | FRANÇAIS | ESPAÑOL
>><<

NETFLIX
Displays the NETFLIX screen.
Press NETFLIX.
NOTE
If you press the NETFLIX button when the
TV is turned off, the TV turns on and the
NETFLIX screen is displayed.
To enjoy Netflix, you need to make:
—a broadband Internet connection
(See page 9-1.)
—settings of Internet Setup
(See page 9-1.)
Direct Button Operation
ENG55
ENGLISH | FRANÇAIS | ESPAÑOL
>><<
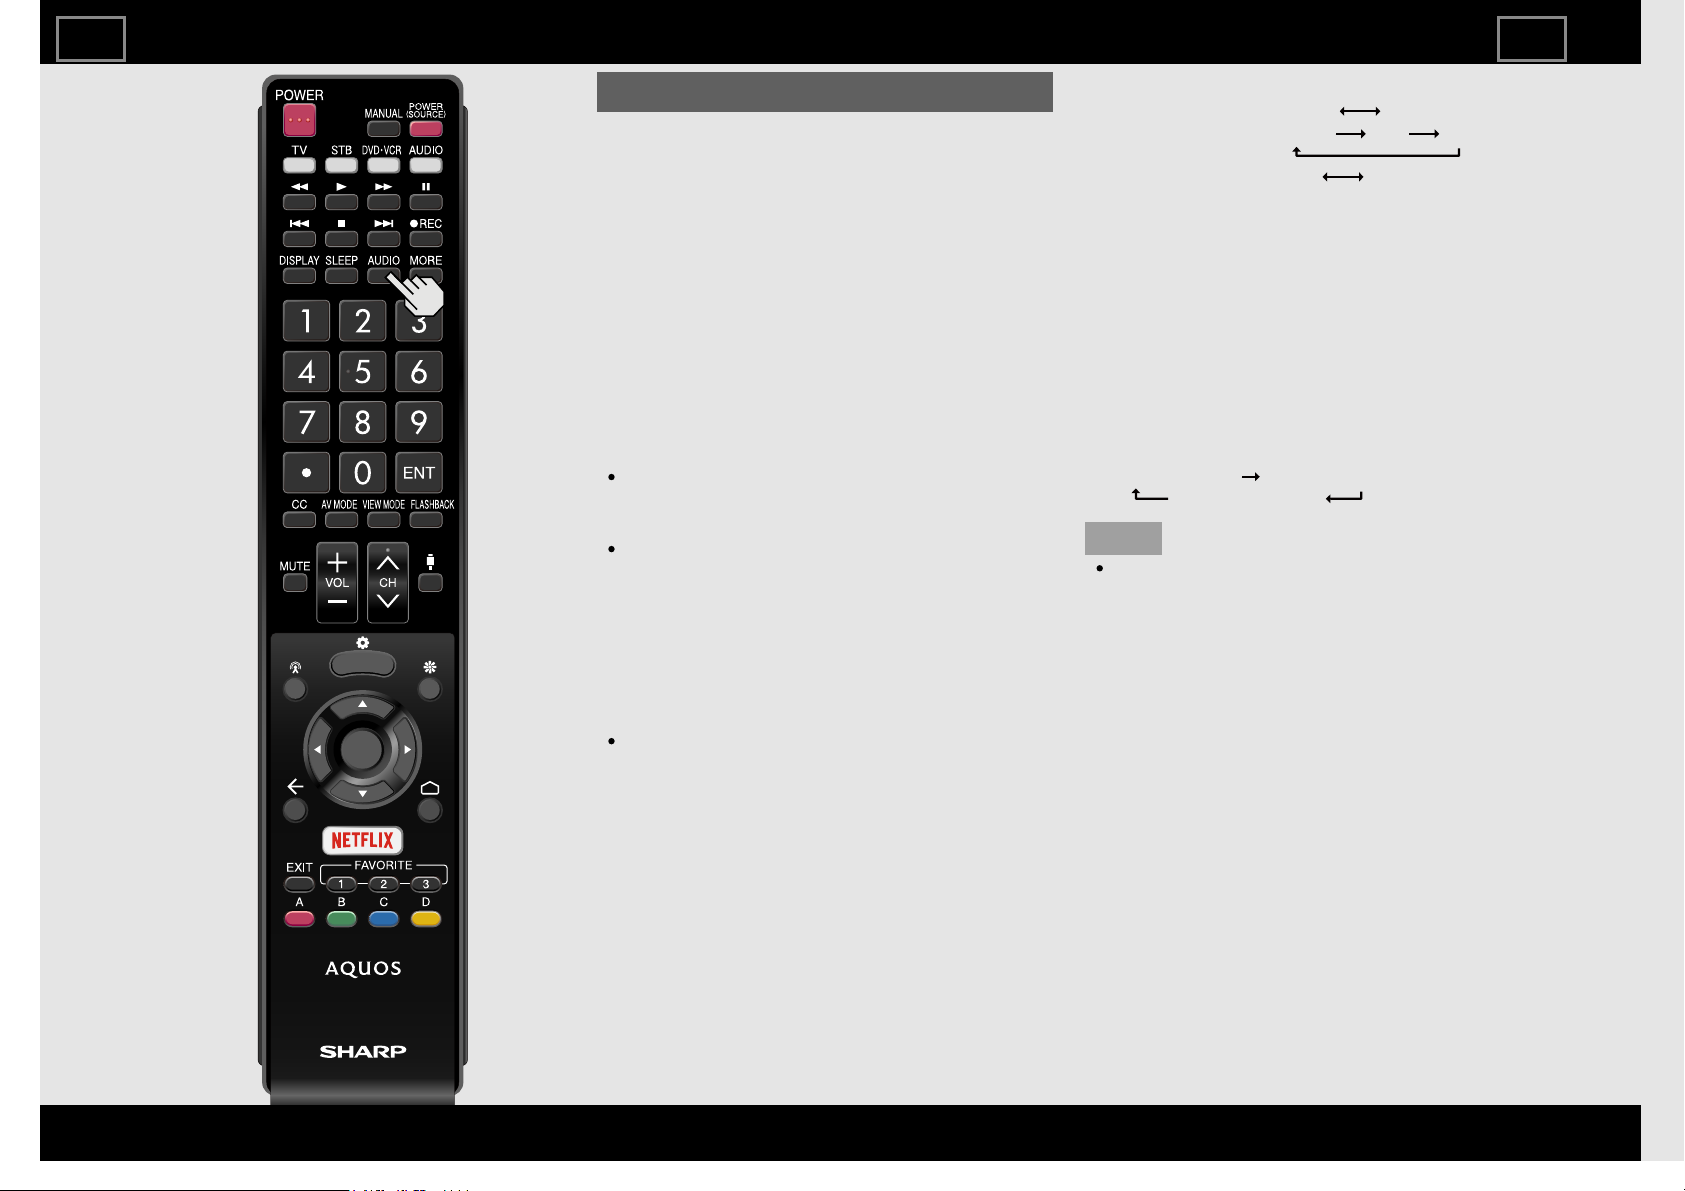
AUDIO
MTS/SAP stereo mode
The TV has a feature that allows reception
of sound other than the main audio for the
program. This feature is called Multi-
channel Television Sound (MTS). The TV
with MTS can receive mono sound, stereo
sound
and Secondary Audio Programs (SAP). The
SAP feature allows a TV station to broadcast
other information, which could be audio in
another language or something completely
different like weather information.
You can enjoy Hi-Fi stereo sound or SAP
broadcasts where available.
Stereo broadcasts: View programs like
live sporting events, shows and concerts
in dynamic stereo sound.
SAP broadcasts: Receive TV broadcasts
in either MAIN or SAP sound.
MAIN sound: The normal program
soundtrack (either in mono or stereo).
SAP sound: Listen to a second language,
supplementary commentary or other
information. (SAP is mono sound.)
If stereo sound is difficult to hear.
Obtain a clearer sound by manually
switching to fixed mono-sound mode.
You can change MTS as shown below to
match the television broadcast signal.
Press to toggle between audio modes.
Examples: when receiving MTS and SAP
STEREO mode:
MONOSTEREO
STEREO + SAP mode:
STEREO MONOSAP
MONO + SAP mode:
MONO SAP
MONO mode: MONO
Digital broadcasting audio mode
The types of audio transmitted in a digital
broadcast include SURROUND as well as
MONO and STEREO. In addition, it is possible
for multiple audio tracks to accompany a
single video track.
Press AUDIO to toggle between audio
modes.
Example: when receiving Digital
broadcasting
STEREO(Audio1)
SURROUND(Audio3)
STEREO(Audio2)
NOTE
MTS only operates while in TV mode.
Direct Button Operation
ENG56
ENGLISH | FRANÇAIS | ESPAÑOL
>><<
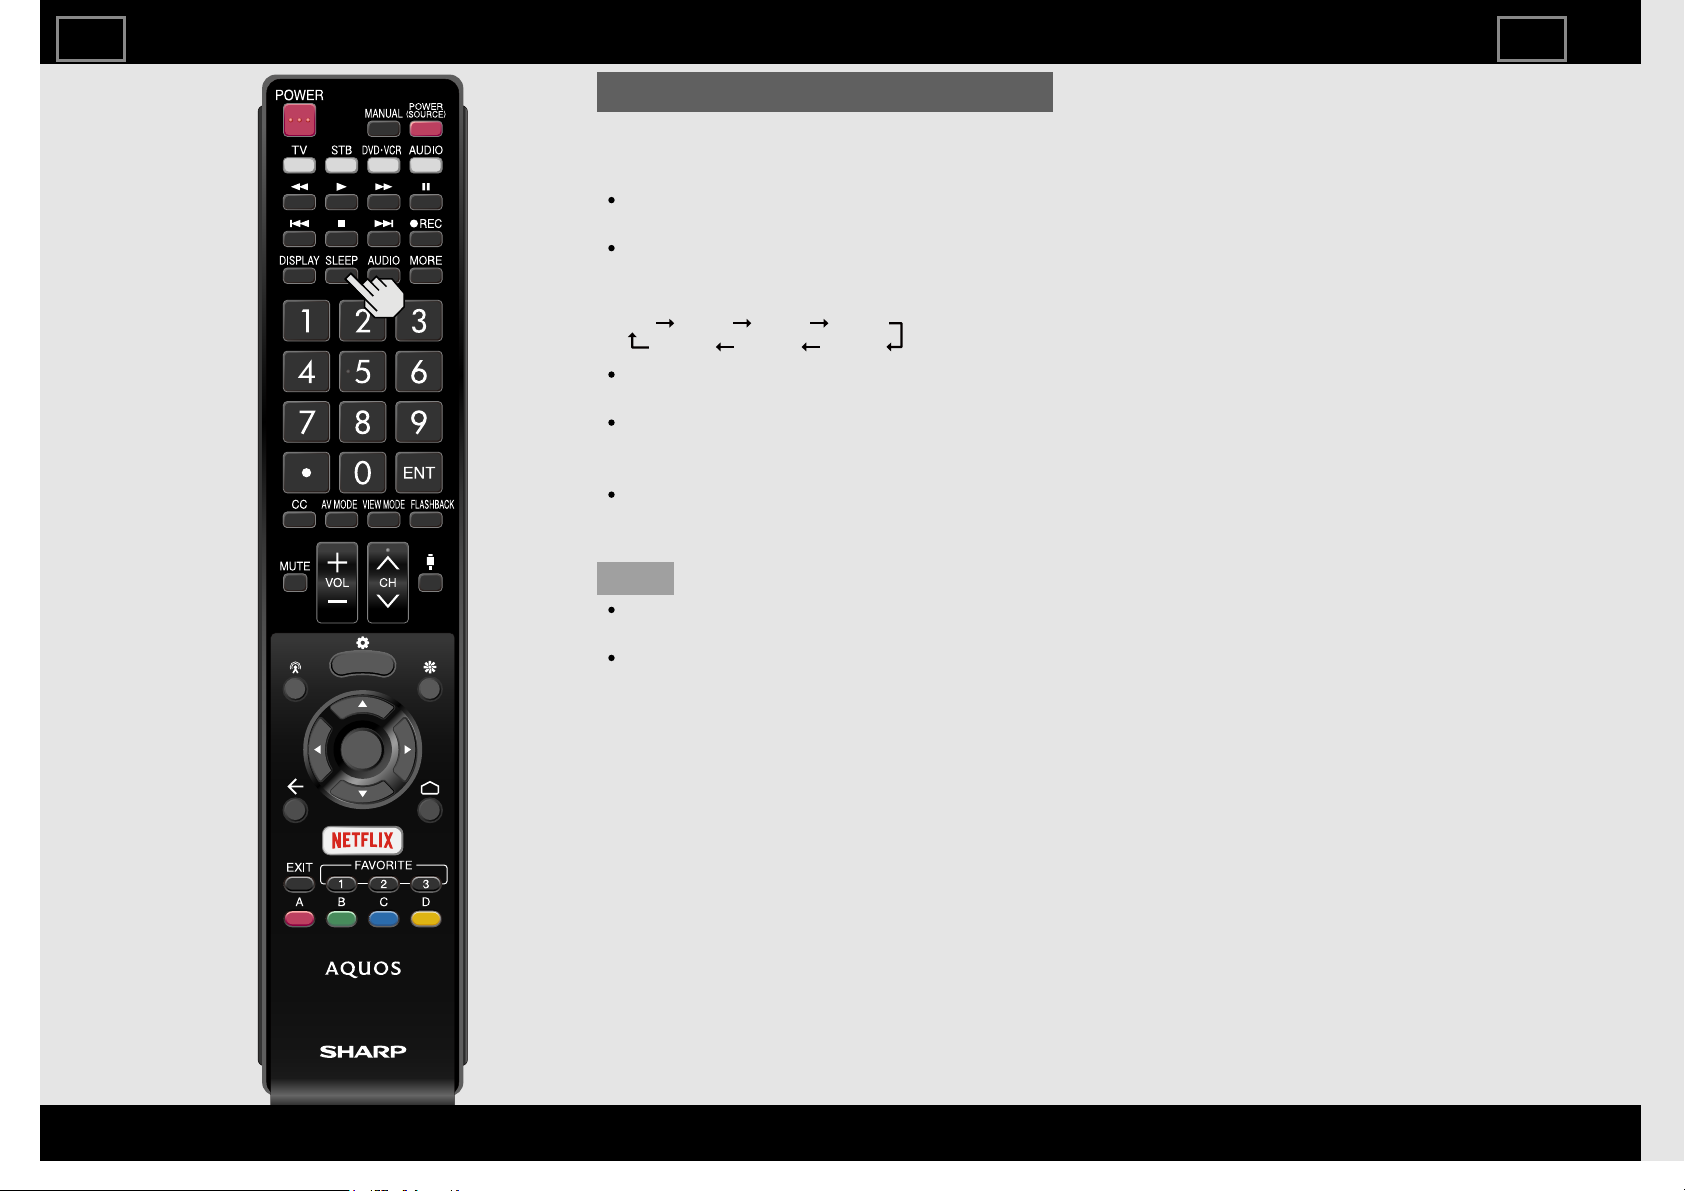
Sleep Timer
Allows you to set a time when the TV
automatically switches to standby.
Press SLEEP.
The remaining time displays when the
sleep timer has been set.
Each time you press SLEEP, the
remaining time switches as shown
below.
OFF 30min 60min 90min
120min
150min
180min
When set, the time automatically starts
counting down.
If you want to adjust the sleep timer, you
can press SLEEP twice then change the
time setting.
When it is 5 minutes before the time
expires, the remaining time will start to
keep appearing every minute.
NOTE
Select "Off" by pressing SLEEP to cancel
the sleep timer.
The TV will enter standby when the
remaining time reaches 0.
Direct Button Operation
ENG57
ENGLISH | FRANÇAIS | ESPAÑOL
>><<
Closed Captions and Digital Closed
Captions (Continue)
Examples:
In a case where there are two closed caption services
provided (for instance, Digital CC(ENG) and CC1), and
Digital CC(ENG) is displayed as your current selection, if
Digital CC(ENG) is not broadcast for the next program, the
other closed caption service, CC1, will be displayed in
parentheses.
A closed caption service appears in parentheses because
the service you selected is not available and a different
service is displayed on your screen. "1/1(CC1)" is
displayed instead of "1/2/ENG".
NOTE
When the program contains no closed caption, "--"
displays in the closed caption information.
If the language code, e.g. "ENG", is not found on Digital
TV programs, "--" will be shown.
Four kinds of closed caption service (CC1, CC2, Text1,
Text2) are potentially available, but a broadcast may
contain none or only some of these services at the
discretion of the program provider.
When a web page is displayed, Closed Captions are
not available.
Direct Button Operation
ENG59
ENGLISH | FRANÇAIS | ESPAÑOL
>><<
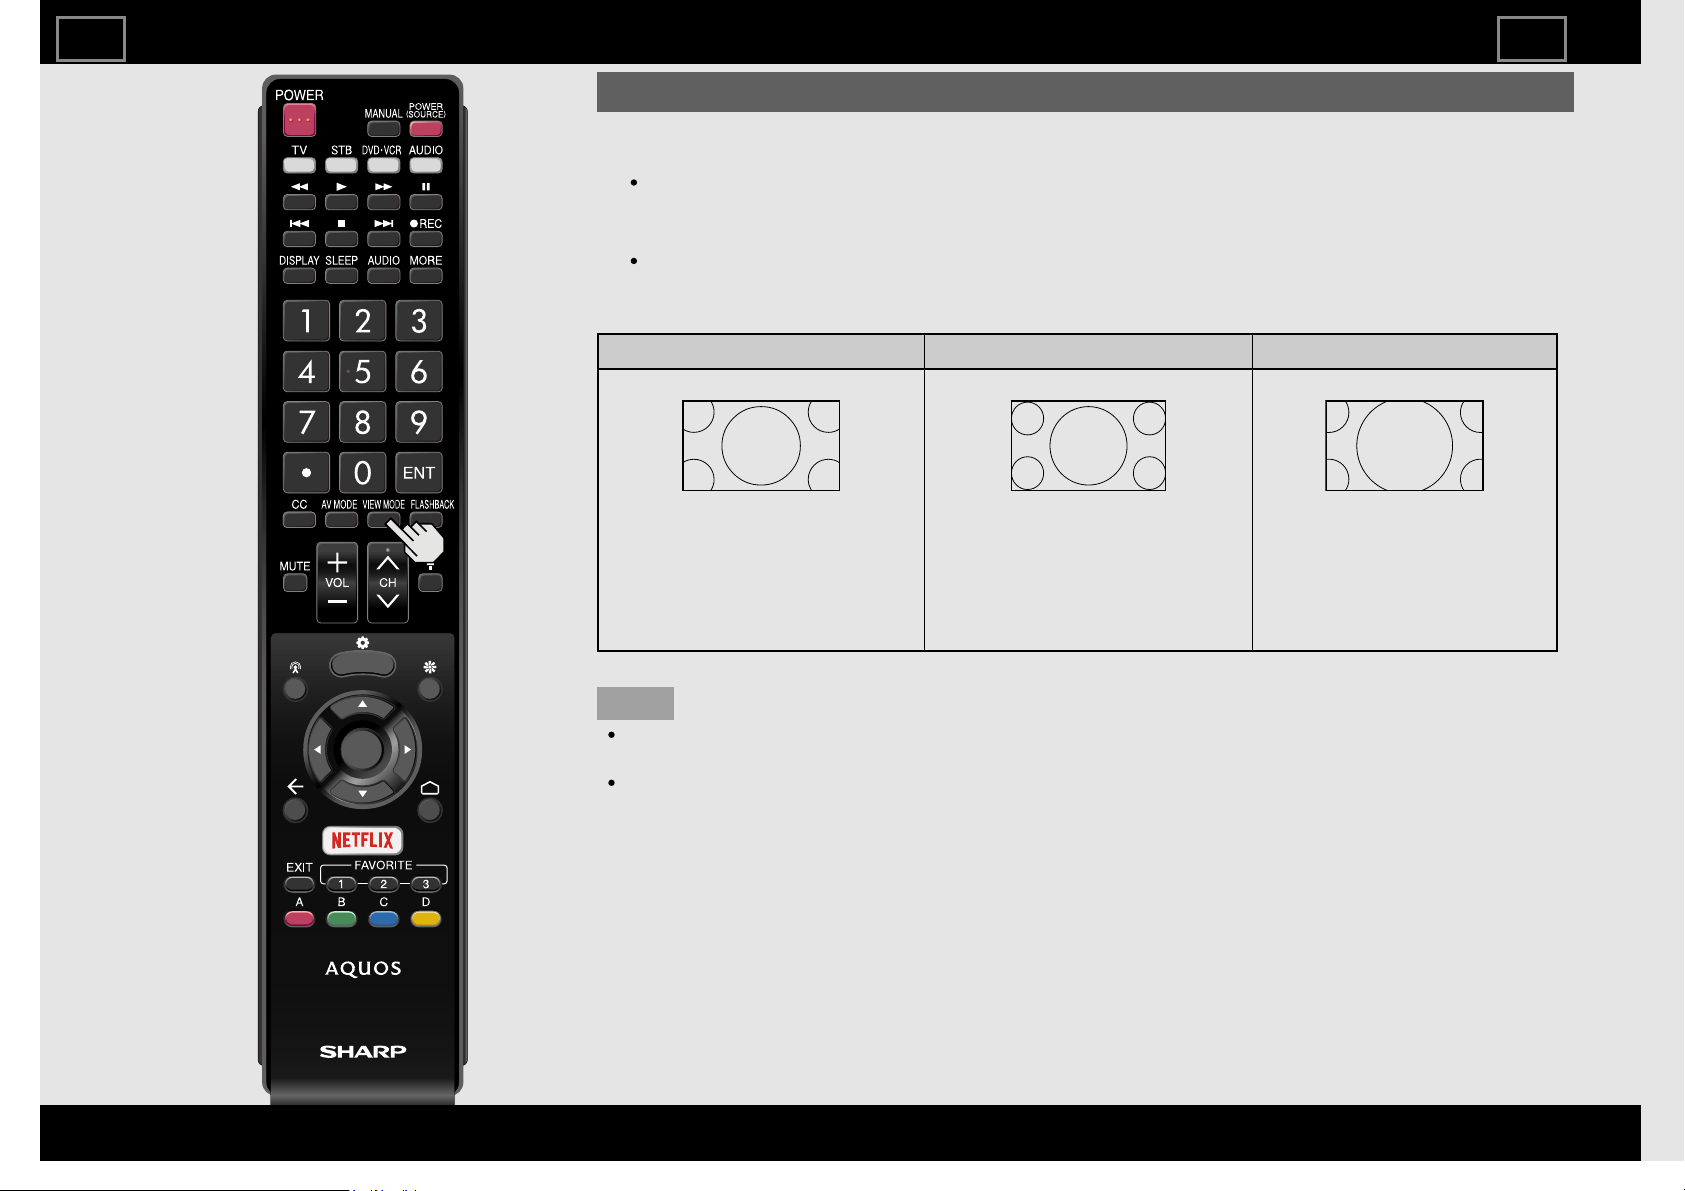
VIEW MODE
You can select the screen size.
1 Press VIEW MODE.
Current View Mode is displayed.
2 Press VIEW MODE while the View Mode indicator is displayed to select a desired item on the
menu.
View Mode will toggle within selectable options for the type of video signal currently being
received when you press VIEW MODE button.
For HD programs
Stretch Dot by Dot (Full Screen) Zoom
Suitable for viewing wide-screen 1.78:1
aspect ratio program, stretch mode will
still show very thin black bands at the top
and bottom of the screen.
"Dot by Dot" when the number of pixels
on the screen and the resolution of the
signal are the same. "Full Screen" when
the number of pixels on the screen and
the resolution of the signal are different.
In either case, the image fully fills the
screen.
Suitable for viewing wide-screen
2.35:1 aspect-ratio programs in full
screen.
NOTE
When using Dot by Dot or Full Screen, it is possible to see noise or bars around different outer
portions of the screen. Please change view mode to correct this.
This feature is available with TV, HDMI IN 1-4, and Video/Component input.
Availability in other input modes varies according to the individual App specifications.
Direct Button Operation
ENG510
ENGLISH | FRANÇAIS | ESPAÑOL
>><<
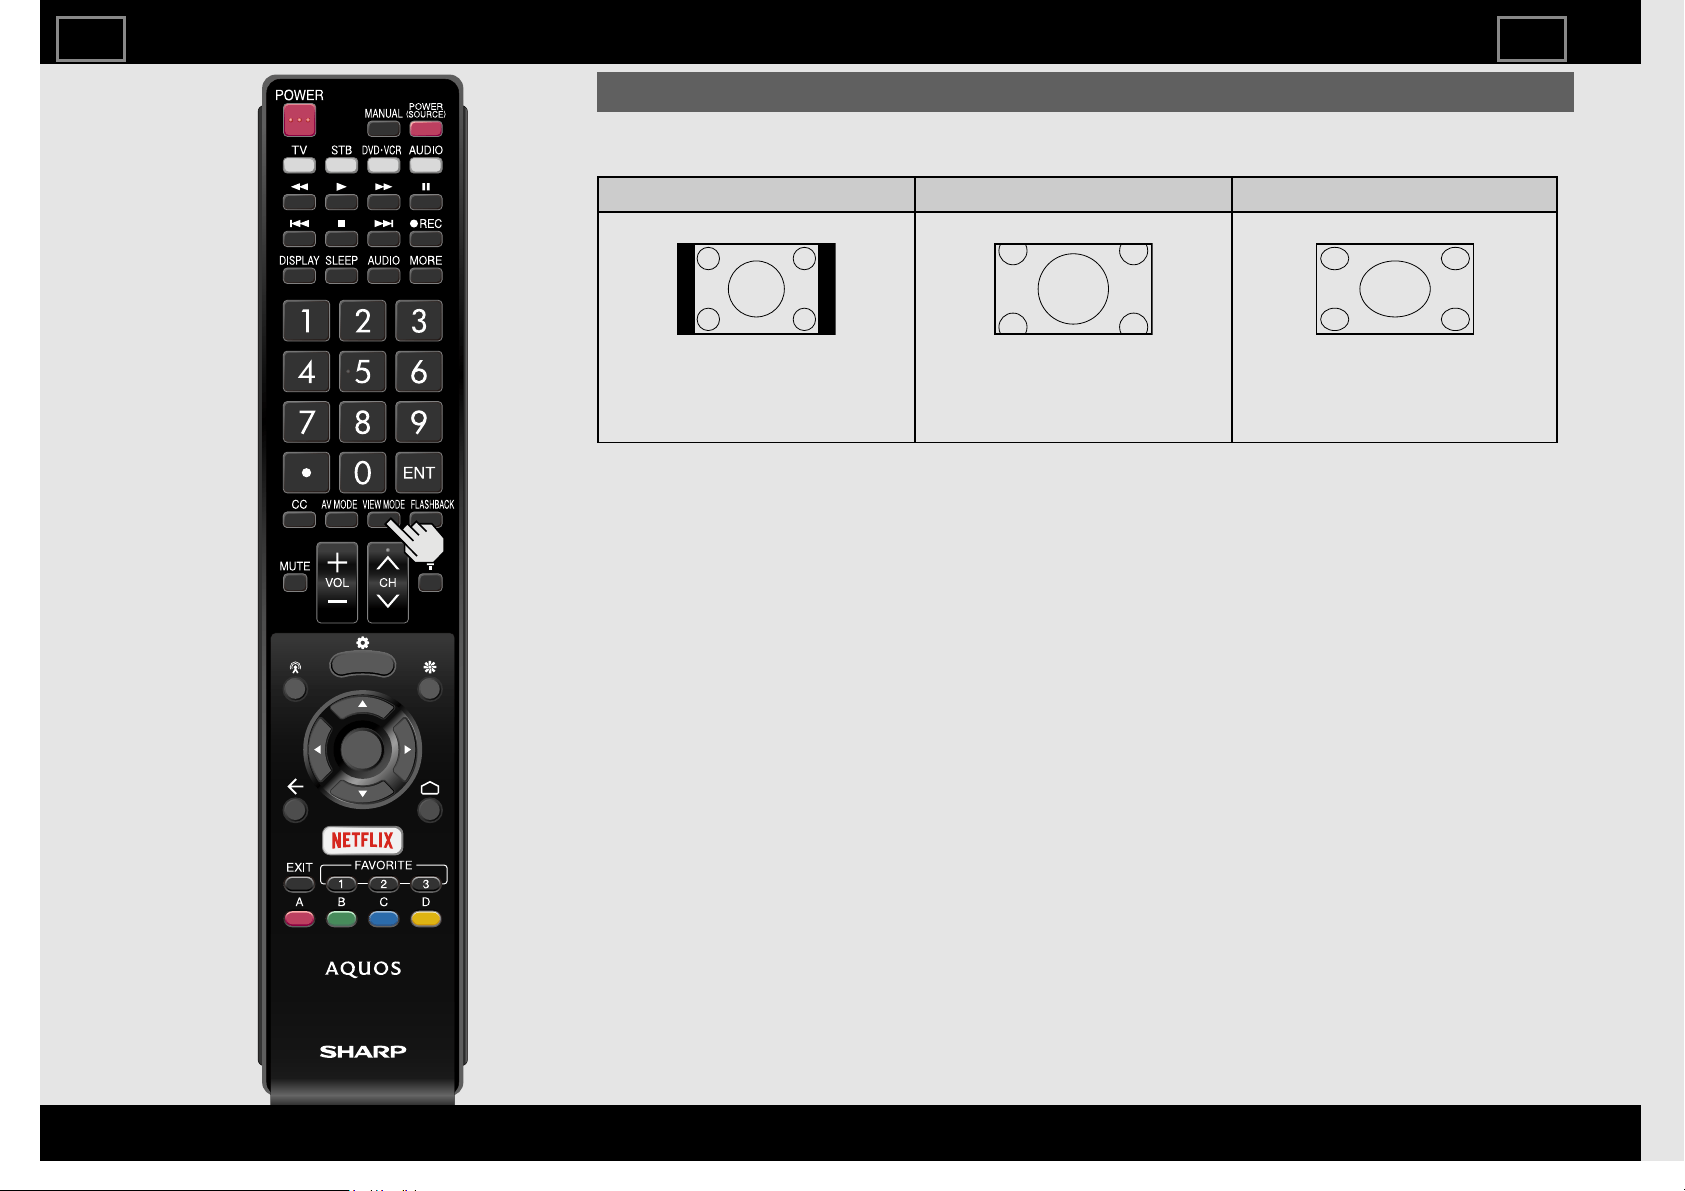
VIEW MODE (Continue)
For 4:3 programs
Example: Screen size images
Side Bar Zoom Stretch
Suitable for viewing conventional 4:3
programs in their normal format.
Suitable for viewing wide-screen 2.35:1
anamorphic DVDs in full screen.
This mode is useful for 1.78:1 DVDs.
When viewing 1.85:1 DVDs, stretch mode
will still show very thin black bands at
the top and bottom of the screen.
Direct Button Operation
ENG511
ENGLISH | FRANÇAIS | ESPAÑOL
>><<
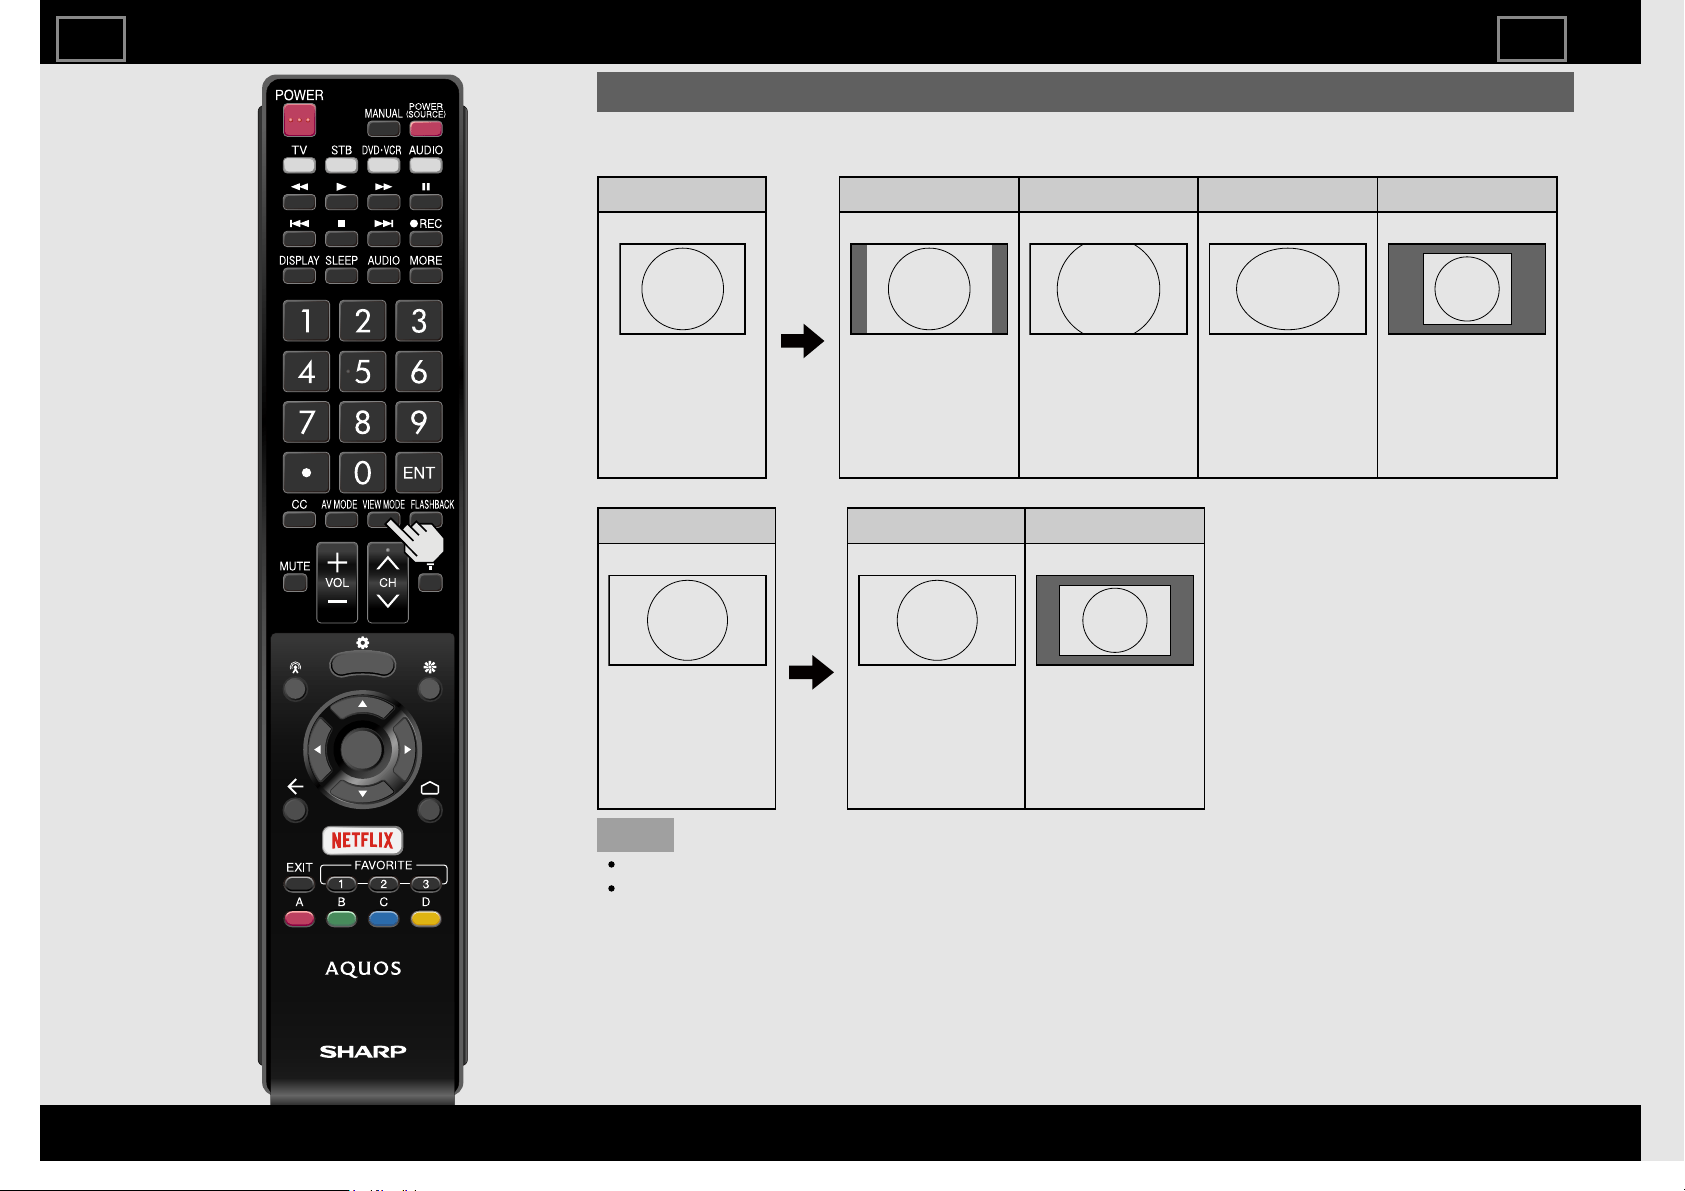
VIEW MODE (Continue)
For PC
Example: Screen size images
Input signal Normal Zoom Stretch Dot by Dot
4:3 Keeps the original
aspect ratio in a full
screen display.
For viewing
widescreen
programs. The top
and bottom of the
image is cropped.
An image fully fills
the screen.
Detects the
resolution of the
signal and displays an
image with the same
number of pixels on
the screen.
Input signal Stretch Dot by Dot
16:9 An image fully fills
the screen.
Detects the
resolution of the
signal and displays an
image with the same
number of pixels on
the screen.
NOTE
Connect the PC before making adjustments. See the Setup Guide.
Selectable screen size may vary with input signal type.
Direct Button Operation
ENG512
ENGLISH | FRANÇAIS | ESPAÑOL
>><<
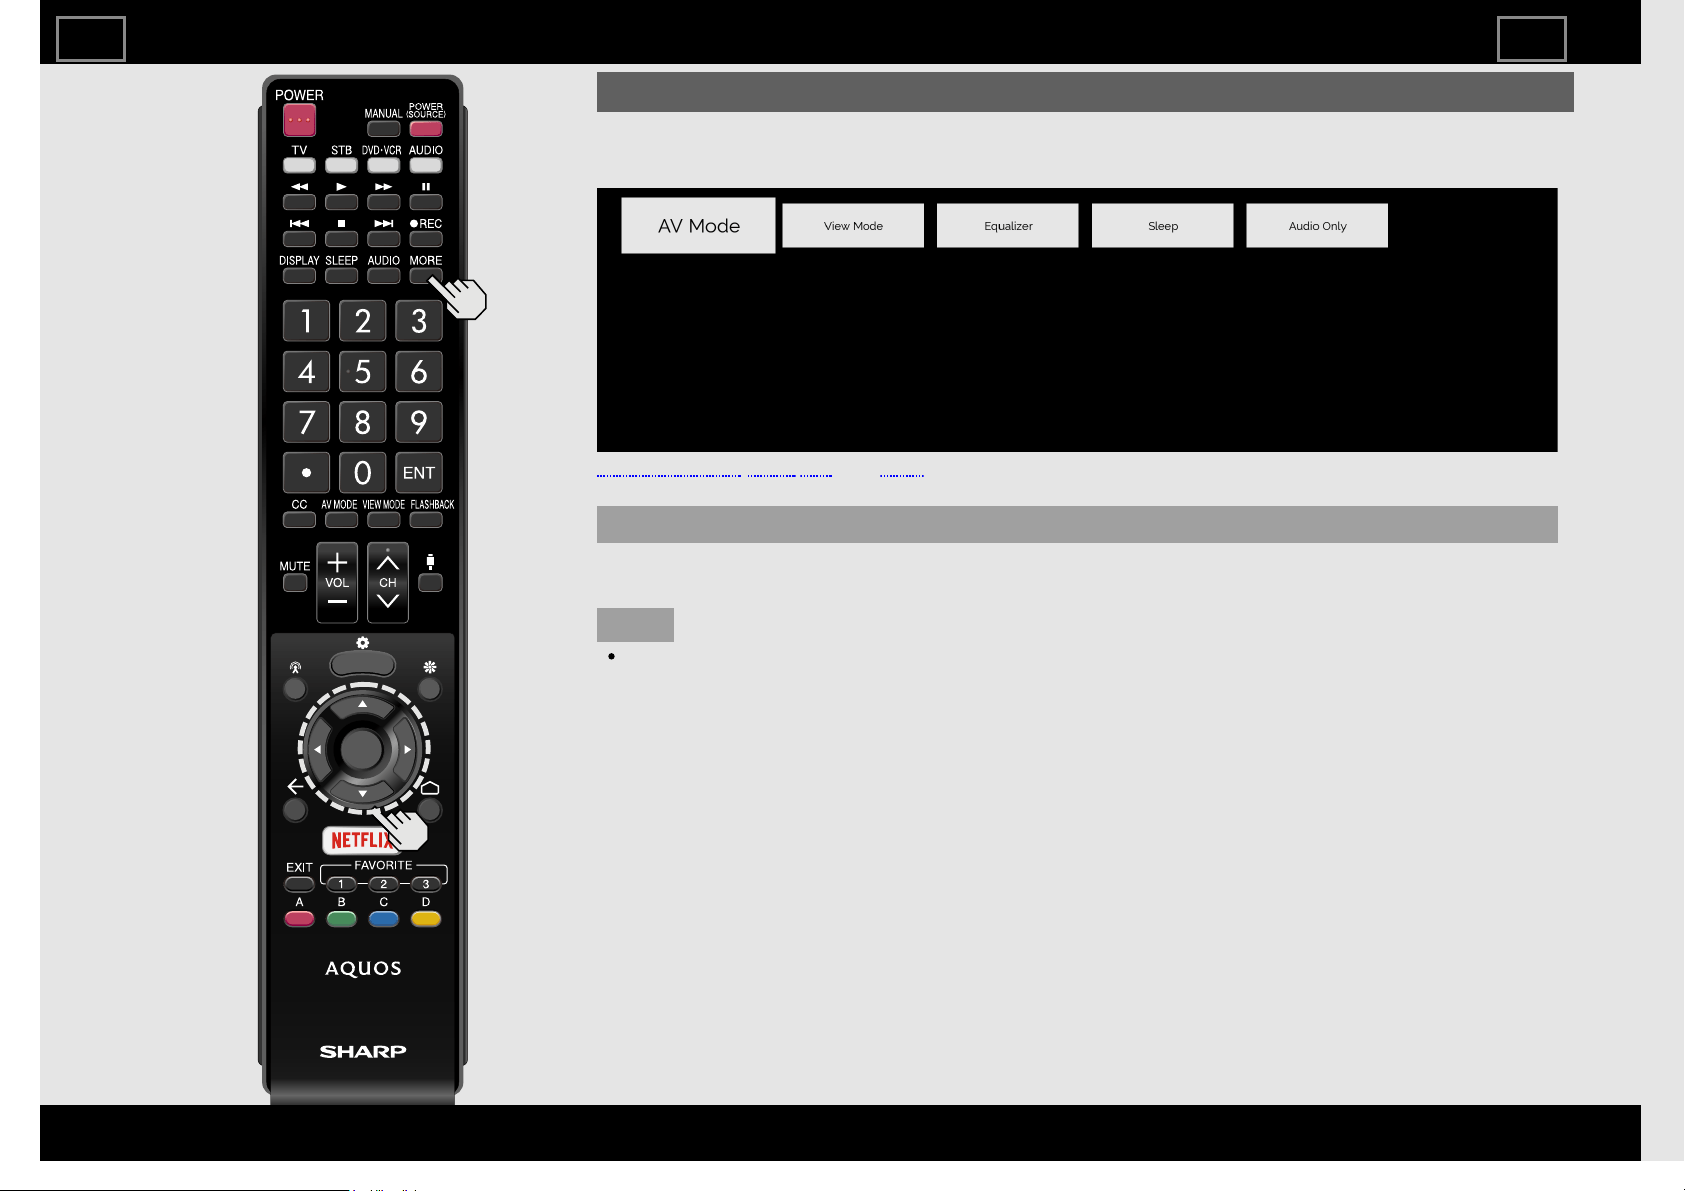
Remote Control Panel
Press MORE to display the Remote Control Panel.
The "AV Mode", "View Mode", "Equalizer", "Sleep" and "Audio Only" menus can be configured.
See pages 3-2, 3-26, 5-7 and 5-10 for details on the settings for "AV Mode", "View Mode",
"Equalizer" and "Sleep" menus.
Audio Only
When listening to music from a music program, you can turn the screen off and enjoy audio only.
NOTE
The screen image will return to normal when a button (except those for audio adjustment,
such as VOL, MUTE) is pressed.
Direct Button Operation
ENG513
ENGLISH | FRANÇAIS | ESPAÑOL
>><<
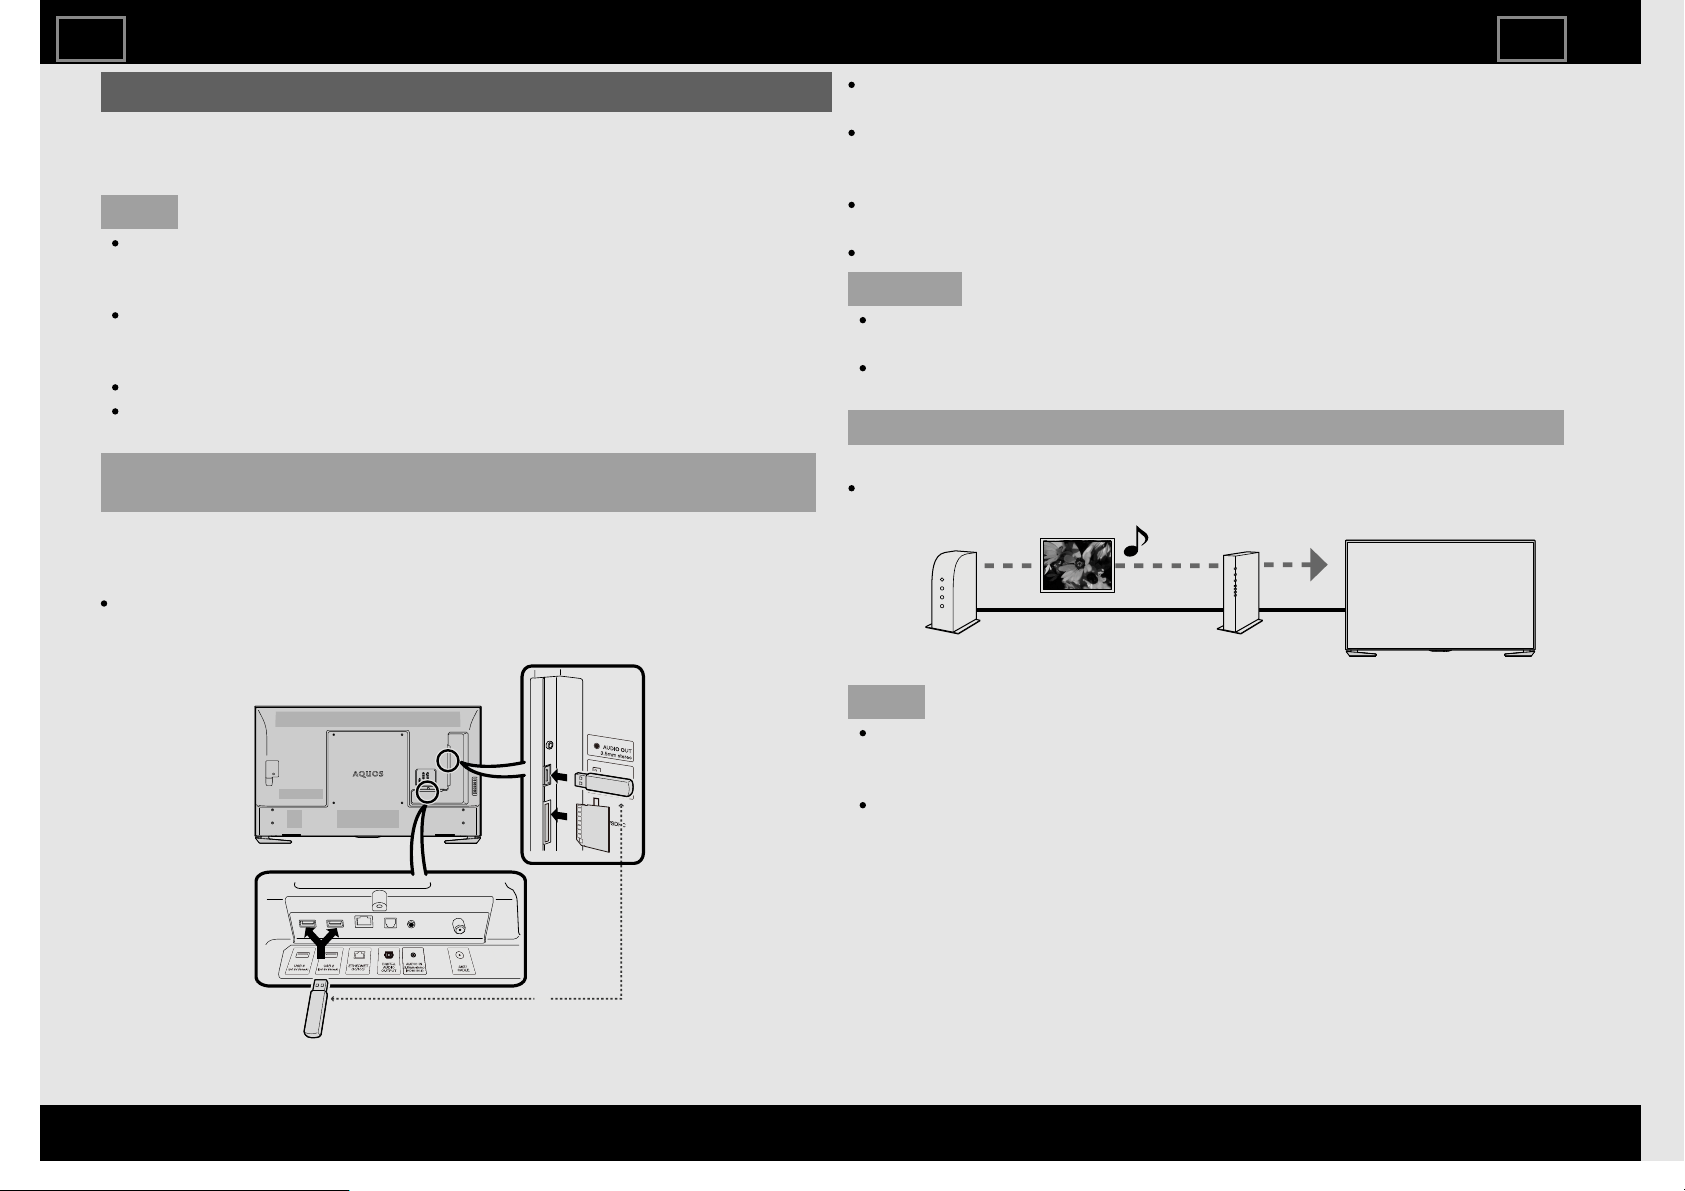
Preparation
You can connect the TV to a USB memory device, USB hard drive, SD
memory card*1, Home Network server, Smartphone or Tablet to enjoy
viewing pictures, listening to music, and watching videos.
NOTE
Depending on the USB memory device/USB hard drive/SD memory
card*1/Home Network server, the TV may not be able to recognize
the recorded data.
It may take time to read the recorded data if the USB memory
device/USB hard drive/SD memory card*1/Home Network server
contains many files or folders.
Use only alphanumeric characters for naming files.
File names over 80 characters (may vary depending on character set)
may not be displayed.
Connecting a USB Memory Device/USB Hard Drive/SD Memory
Card*1
Insert the USB memory device or SD memory card*1 with recorded
photos, music or videos into the USB 1, USB 2 or USB 3 terminal or SD
memory card slot*1 on the TV.
If USB memory devices are inserted into multiple terminals, the USB 1
terminal has priority.
*1
or
When connecting a USB hard drive, be sure to use a hard drive with an
AC adapter.
Do not remove a USB memory device or SD memory card*1 from the
TV while transferring files, using the slide show function, or switching
screens, or before you exit "Content Player".
Do not insert and remove a USB memory device/USB hard drive/SD
memory card*1 to and from the TV repeatedly.
When using a card reader, be sure to insert a USB memory device first.
CAUTION
Do not use a USB extension cable when connecting a USB memory
device to the USB terminal on the TV.
Using a USB extension cable with the USB memory device may
prevent the TV from performing correctly.
Connecting a Home Network Server
Connect the TV to the Home Network server using an ETHERNET cable.
You can also connect a Home Network server by using a wireless LAN.
HomeNetworkserver
ETHERNETcable
Router
NOTE
Do not disconnect a Home Network server from the TV while
transferring files, when a screen is switching to another or before you
exit "Content Player".
Do not connect and disconnect a Home Network server from the TV
repeatedly.
*1 For UH30U model only.
Enjoying Photo/Music/Video Playback
ENG61
ENGLISH | FRANÇAIS | ESPAÑOL
>><<
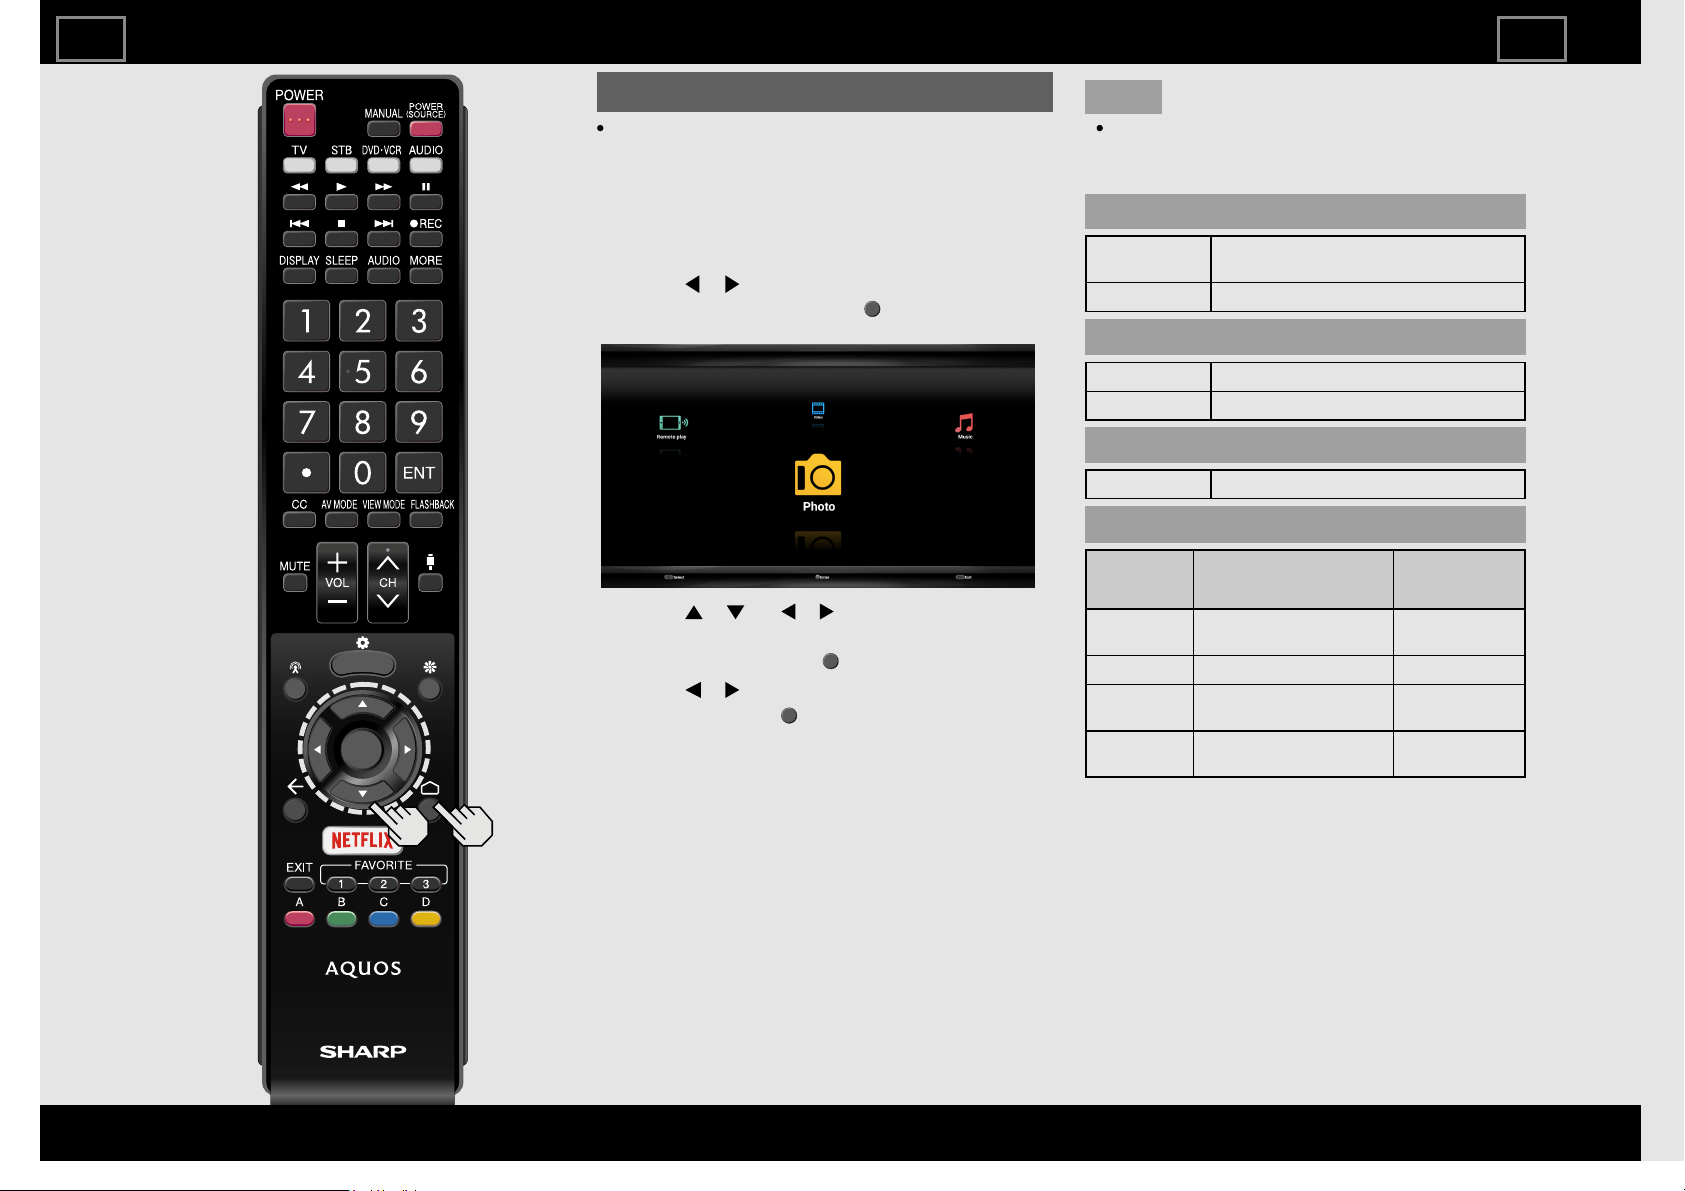
Selecting the Folders to Play Back
To play back data on a USB memory
device or SD memory card*1, insert the
USB memory device on the TV.
1 Select "Content Player" from the Devices
screen, or launch the Content Player app
from HOME screen.
2 Press / to select "Photo", "Music" or
"Video", and then press (ENTER).
Example
3 Press / (or / ) to select the
drive/server where you want to find your
file, and then press (ENTER).
4 Press / to select the desired folder,
and then press (ENTER).
*1 For UH30U model only.
NOTE
If the TV is turned off and then on again,
the number assigned to the USB may
change.
USB Device Compatibility
USB device USB Memory, USB card reader (Mass
Storage class), USB hard drive
File system FAT/FAT32
SD memory card Compatibility
SD card SD/SDHC memory card
File system FAT/FAT32
Photo file format
Format JPEG, PNG, BMP
Music file format
Format Sampling rate
[KHz]
Bitrate
[Kbps]
MP3 8/11.025/12/16/
22.050/24/32/44.1/48
8~320
AAC 32/44.1/48 8~320
WMA 8/11.025/16/22.05/
32/44.1/48/64/88.2/96
8~384
WAV 8/11.025/12/16/
22.050/24/32/44.1/48
8~1024
Enjoying Photo/Music/Video Playback
ENG62
ENGLISH | FRANÇAIS | ESPAÑOL
>><<
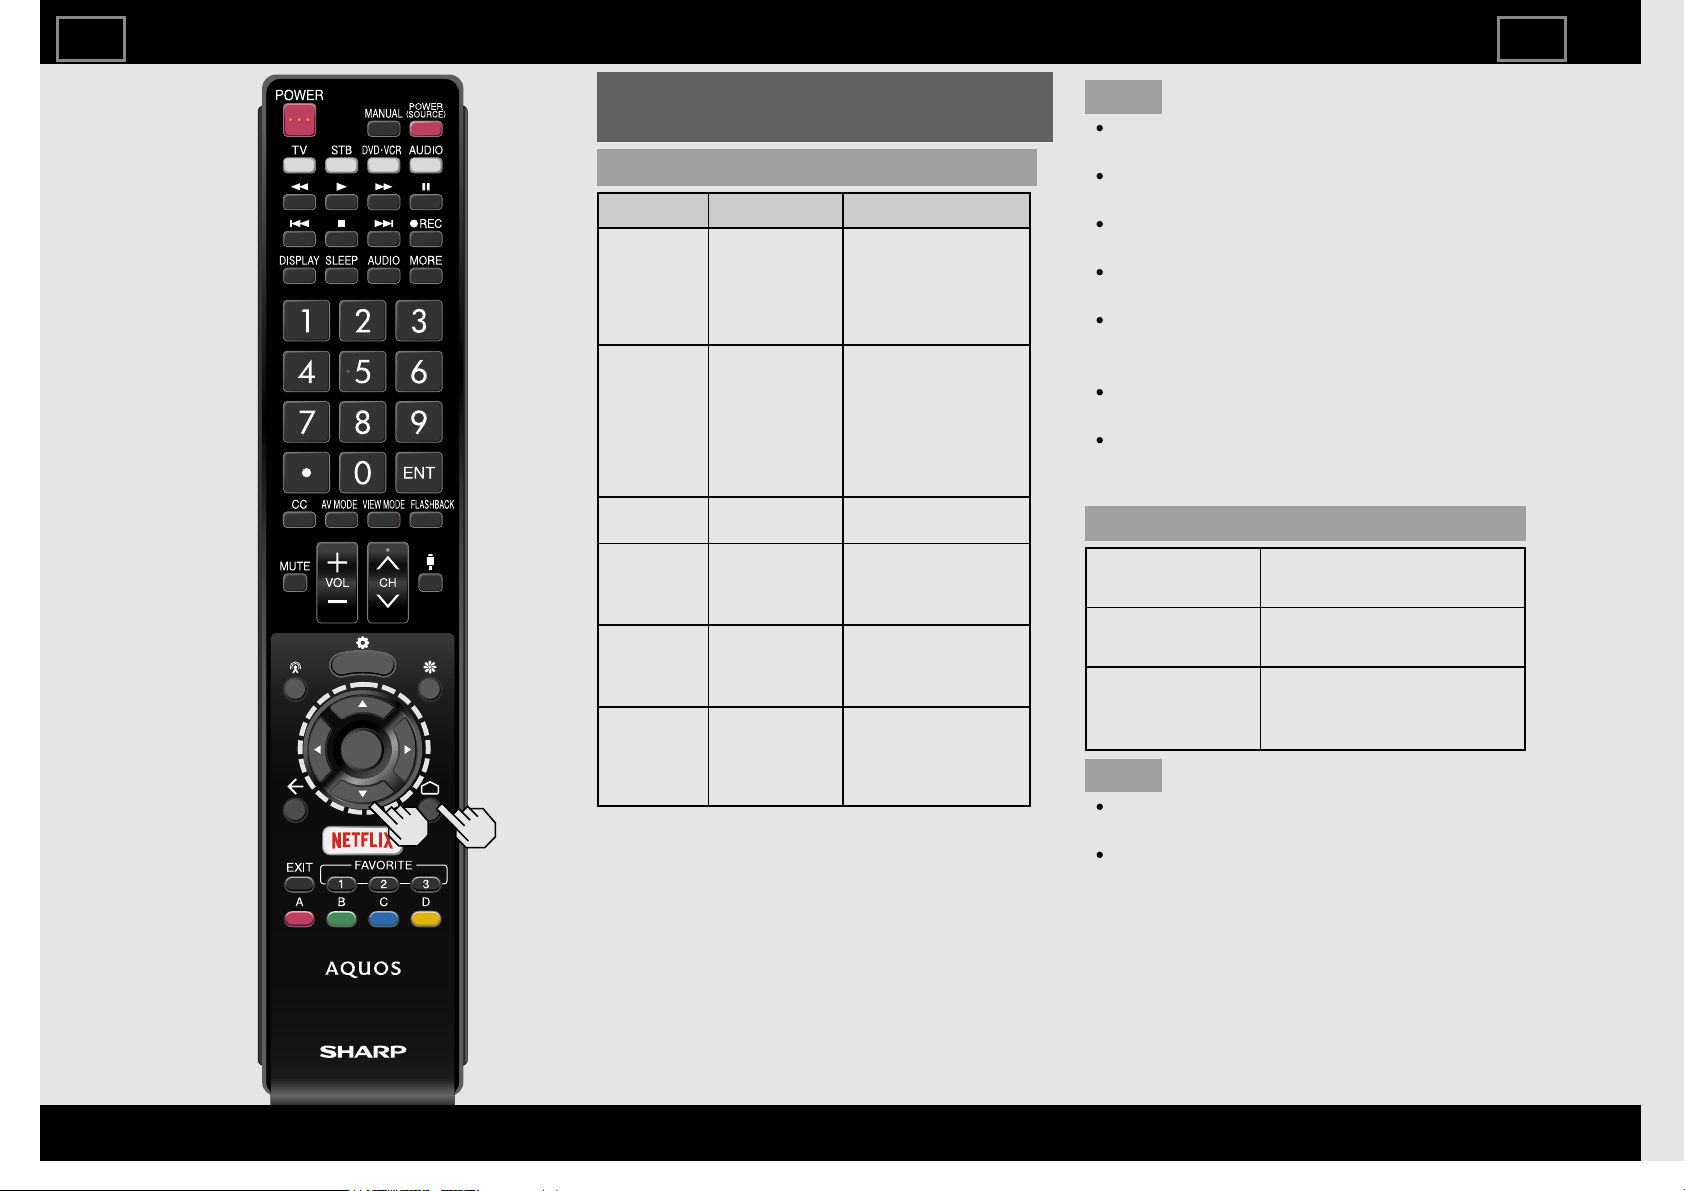
>
Selecting the Folders to Play Back
(Continue)
Video file format
Container Video Audio
AVI
MPEG-1
MPEG-2
MPEG-4
H.264
PCM
MP2: MPEG-1 Layer2
MP3: MPEG-1 Layer3
AAC
AC3
WMA
MKV
MPEG-1
MPEG-2
MPEG-4
H.264
VP8
H.265(HEVC)
PCM
MP2: MPEG-1 Layer2
MP3: MPEG-1 Layer3
AAC
AC3
WMA
VORBIS
DTS
ASF
MPEG-4
VC1(WMV3)
MP3: MPEG-1 Layer3
WMA
PS
MPEG-1
MPEG-2
MP2: MPEG-1 Layer2
MP3: MPEG-1 Layer3
AC3
DTS
TS
MPEG-2
VC1(WMV3)
H.264
H.265(HEVC)
MP2: MPEG-1 Layer2
AAC
AC3
DTS
MP4
MPEG-4
H.264
H.265(HEVC)
VP8
VC1(WMV3)
MP2: MPEG-1 Layer2
MP3: MPEG-1 Layer3
AAC
NOTE
Progressive format jpeg files are not
supported.
USB 1.1 devices may not be played
properly.
Operation using USB hubs is not
guaranteed.
Some video file formats may not be
played depending on the file.
Some images may not be displayed in
the appropriate aspect ratio depending
on the file format.
File extensions are not used to determine
the file format.
If you insert any card other than the
SD/SDHC (class 6 or higher), it will not
work.(For UH30U model)
Home Network Server Compatibility
Photo file
format
JPEG
Music file
format
WAV, MP3
Video file
format
MPEG2-PS, MPEG2-TS,
WMV, ASF, MP4, MOV,
AVI
NOTE
Progressive format jpeg files are not
supported.
Some video file formats may not be
played depending on the file or the
server.
Enjoying Photo/Music/Video Playback
ENG63
ENGLISH | FRANÇAIS | ESPAÑOL
>><<

Playing Back Files on a USB
Memory Device/SD Memory
Card/Home Network Server
Photo Mode
Viewing Thumbnails
Example
Buttons for thumbnail/list operations
Buttons Description
/ Select a desired item.
In Thumbnail mode: Select a desired
item.
In List mode: Return to the previous
process.
In Thumbnail mode: Select a desired
item.
In List mode, when selecting a folder
icon: Enter this directory.
In List mode, when selecting a photo
file: Enlarge the photo.
(ENTER) When selecting a folder icon: Enter this
directory.
When selecting a photo file: Enlarge
the photo.
(Back)
In Thumbnail mode: Return to the
previous process.
In List mode: Exit application.
C (blue) Change Thumbnail/List mode.
D (yellow) Display the Menu screen.
Menu for thumbnail operations
Press / to select an item and make
settings to youre preferences.
Example
Sort
You can change the way in which files are
ordered.
Press / to select "Type", "Date" or
"Name", and then press (ENTER).
Media Type
Switch the media type when the Recursive
Parser display is displayed.
Thumbnail Size
Change the thumbnail size.
Small/Medium/Large
Recursive Parser
Display all files according to the Media Type
settings.
NOTE
You can see the file name, file size and
pixel size of the selected photo in the
upper-left corner of the screen.
When you are viewing the Content Player
app, you cannot configure Picture/Audio
settings.
Enjoying Photo/Music/Video Playback
ENG64
ENGLISH | FRANÇAIS | ESPAÑOL
>><<
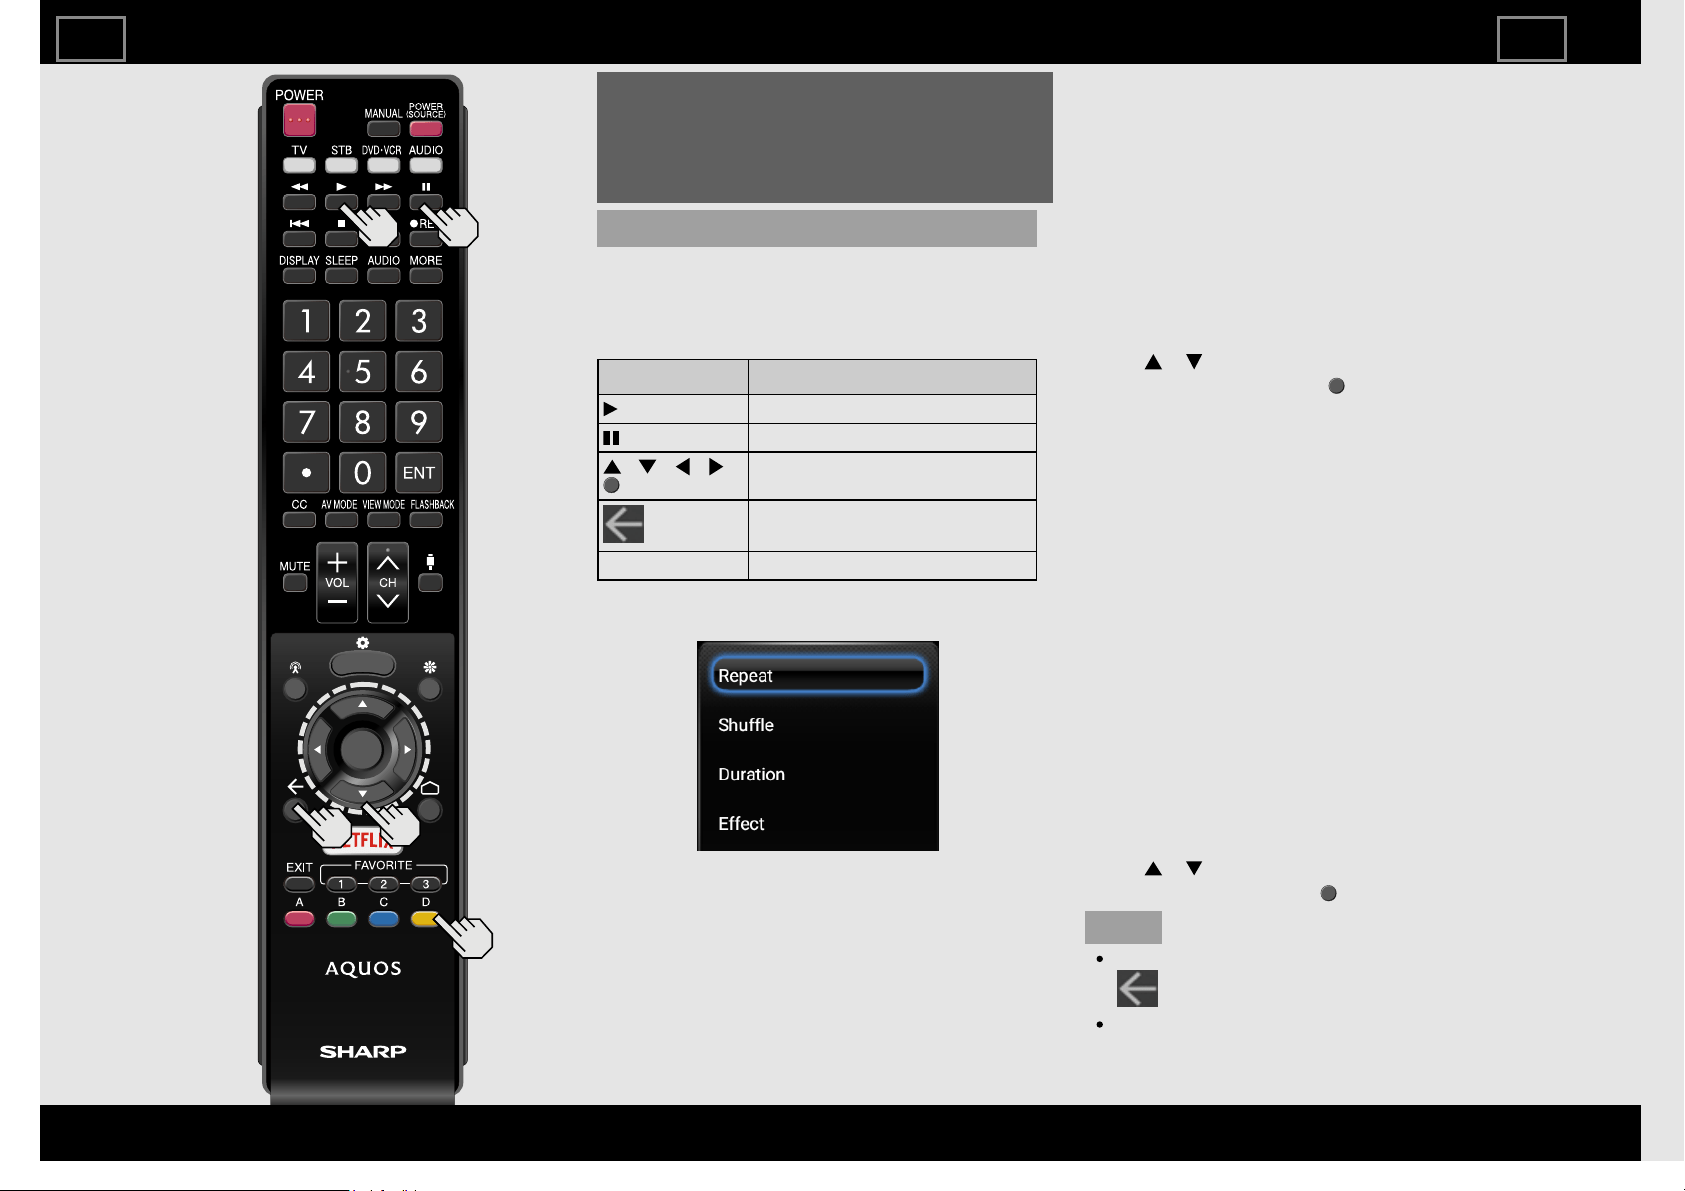
Playing Back Files on a USB
Memory Device/SD Memory
Card/Home Network Server
(Continue)
Slide Show
The photos displayed on the thumbnail
selection screen are displayed as a slide
show.
Buttons for slide show operation
Buttons Description
Play the Slide Show.
Pause the Slide Show.
/ / / ,
(ENTER)
Select the desired item.
(Back)
Return to the thumbnail selection
screen.
D (yellow) Display the USB Menu screen.
Menu for slide show
Example
Repeat
Set whether to show the slide show
repeatedly.
None/Repeat One/Repeat All
Shuffle
Shuffle the image files within the folder and
display as a slide show.
Duration
Specify the length of time before the next
image appears.
Press / to select the desired length of
the time, and then press (ENTER).
Short/Midium/Long
Effect
Specify the effect for transitioning to the
next image.
None/Dissolve/Wipe right/Wipe left/
Wipe up/Wipe down/Box in/Box out/
Random
Rotate*
Rotate the photo by 90 degrees to the right.
* Only displayed when playback is paused.
Zoom*
Zoom in on the image.
Normal/Zoom1/Zoom2
* Only displayed when playback is paused.
Sort
You can change the way in which files are
ordered.
Press / to select "Type", "Date" or
"Name", and then press (ENTER).
NOTE
The slide show continues until you press
(Back).
For setting the slide show speed, select
"Duration" on the Menu screen.
Enjoying Photo/Music/Video Playback
ENG65
ENGLISH | FRANÇAIS | ESPAÑOL
>><<

Playing Back Files on a USB
Memory Device/SD Memory
Card/Home Network Server
(Continue)
Music Mode
Viewing Thumbnails
Example
Buttons for thumbnail/list operations
Buttons Description
/ Select a desired item.
In Thumbnail mode: Select a desired
item.
In List mode: Return to the previous
process.
In Thumbnail mode: Select a desired
item.
In List mode, when selecting a folder
icon: Enter this directory.
In List mode, when selecting a music
file: Play music.
(ENTER) When selecting a folder icon: Enter this
directory.
When selecting a music file: Play
music.
(Back)
In Thumbnail mode: Return to the
previous process.
In List mode: Exit application.
C (blue) Change Thumbnail/List mode.
D (yellow) Display the Menu screen.
NOTE
When you are viewing the Content Player
app, you cannot configure Picture/Audio
settings.
Menu for thumbnail operations
Example
Sort
You can change the way in which files are
ordered.
Press / to select "Date", "Genre", "Artist"
or "Album", and then press (ENTER).
Media Type
Switch the media type when the Recursive
Parser display is displayed.
Thumbnail Size
Change the thumbnail size.
Small/Medium/Large
Recursive Parser
Display all files according to the Media Type
settings.
Enjoying Photo/Music/Video Playback
ENG66
ENGLISH | FRANÇAIS | ESPAÑOL
>><<

Playing Back Files on a USB
Memory Device/SD Memory
Card/Home Network Server
(Continue)
Playing Mode
Buttons for playing mode
Buttons Description
The fast revers speed changes
every time you press .
The fast forward speed changes
every time you press .
Pause the music.
Go to the previous file.
Go to the next file.
/ / / ,
(ENTER)
Select a desired item.
(Back)
Return to the previous process.
D (yellow) Display the Manu screen.
NOTE
The displayed play time may differ
slightly from the actual play time
depending on the files.
Menu for playing mode
Example
Repeat
Configure the repeat playback settings.
None/Repeat One/Repeat All
Shuffle
Shuffle the music within the folder.
Hide Spectrum/Show Spectrum
Show or hide the spectrum.
Lyric
You can change the lyric display type.
This is only available when a lyrics file (".lrc")
is present.
Only UTF-8 character code lyric files
(without BOM) are supported.
Enjoying Photo/Music/Video Playback
ENG67
ENGLISH | FRANÇAIS | ESPAÑOL
>><<
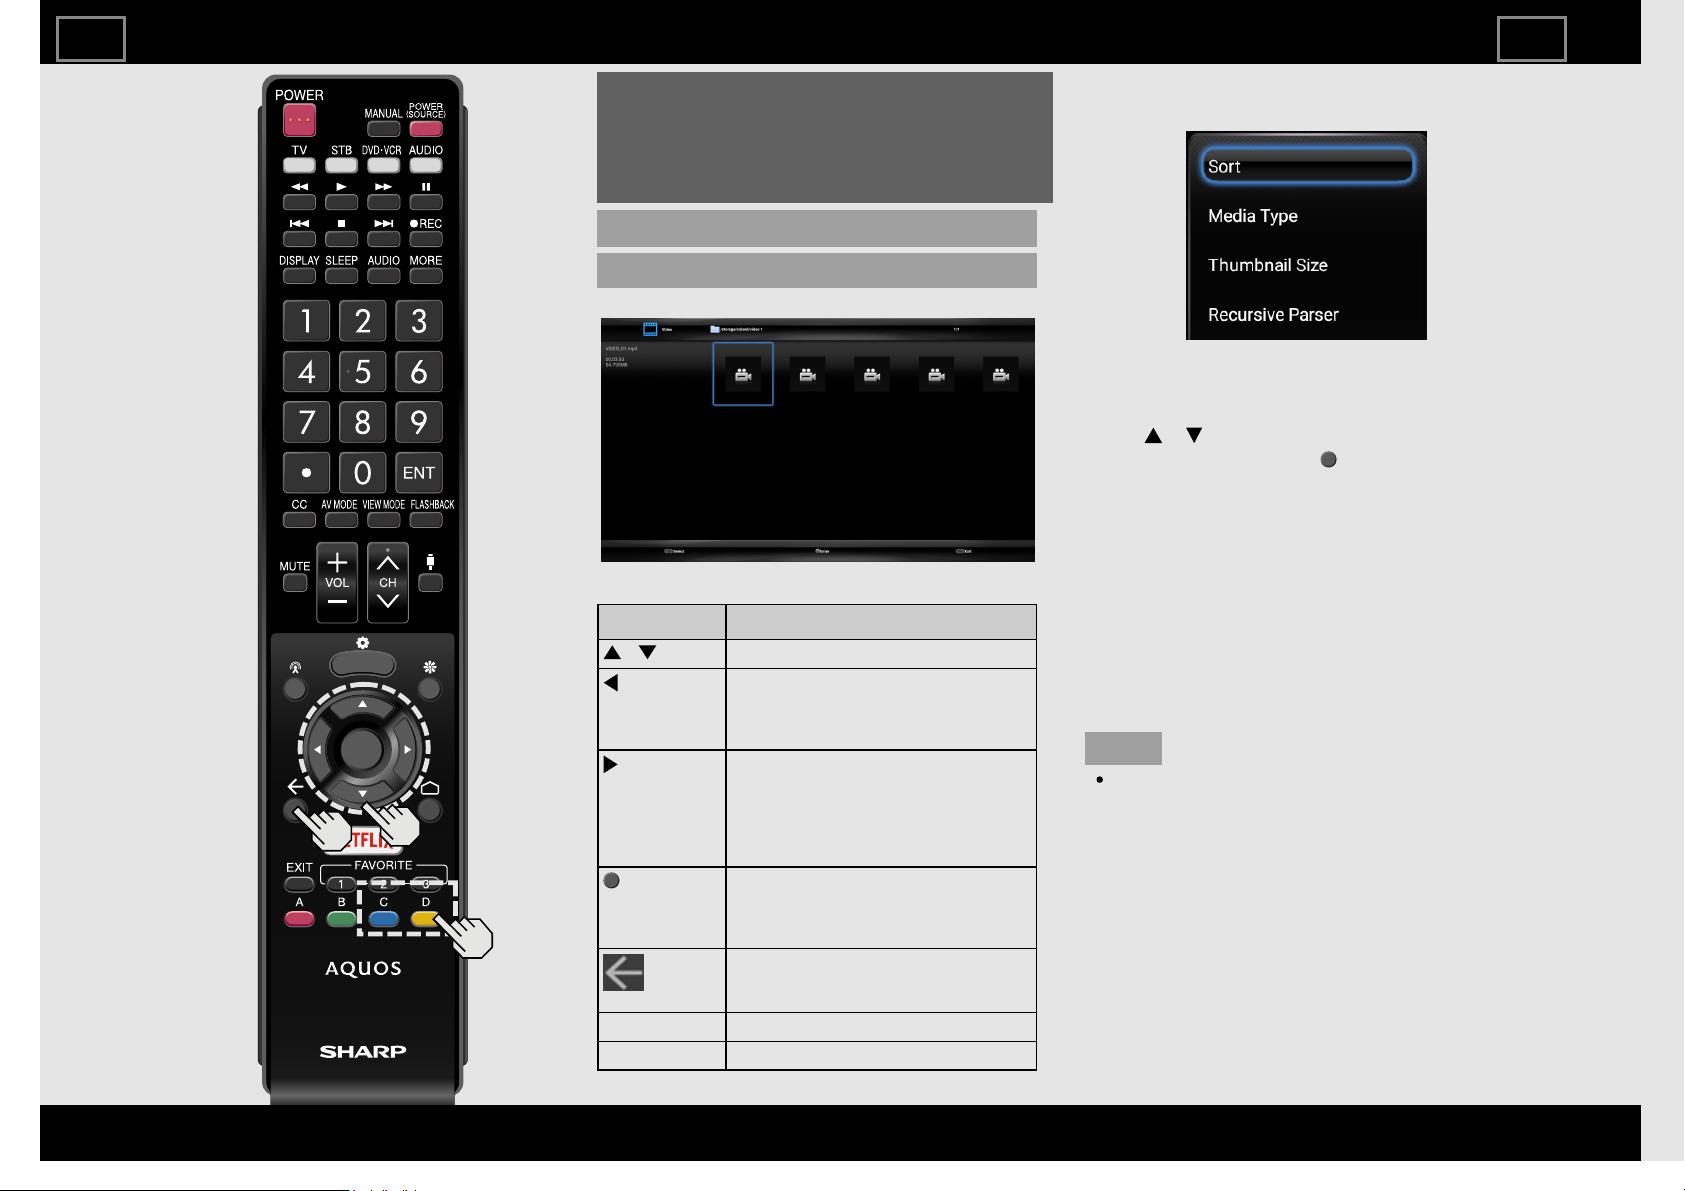
Playing Back Files on a USB
Memory Device/SD Memory
Card/Home Network Server
(Continue)
Video Mode
Viewing Thumbnails
Example
Buttons for thumbnail/list operations
Buttons Description
/ Select a desired item.
In Thumbnail mode: Select a desired
item.
In List mode: Return to the previous
process.
In Thumbnail mode: Select a desired
item.
In List mode, when selecting a folder
icon: Enter this directory.
In List mode, when selecting a video
file: Play the video file.
(ENTER) When selecting a folder icon: Enter this
directory.
When selecting a video file: Play the
video file.
(Back)
In Thumbnail mode: Return to the
previous process.
In List mode: Exit application.
C (blue) Change Thumbnail/List mode.
D (yellow) Display the Menu screen.
Menu for thumbnail operations
Example
Sort
You can change the way in which files are
ordered.
Press / to select "Type", "Date" or
"Name", and then press (ENTER).
Media Type
Switch the media type when the Recursive
Parser display is displayed.
Thumbnail Size
Change the thumbnail size.
Small/Medium/Large
Recursive Parser
Display all files according to the Media Type
settings.
NOTE
When you are viewing the Content Player
app, you cannot configure Picture/Audio
settings.
Enjoying Photo/Music/Video Playback
ENG68
ENGLISH | FRANÇAIS | ESPAÑOL
>><<
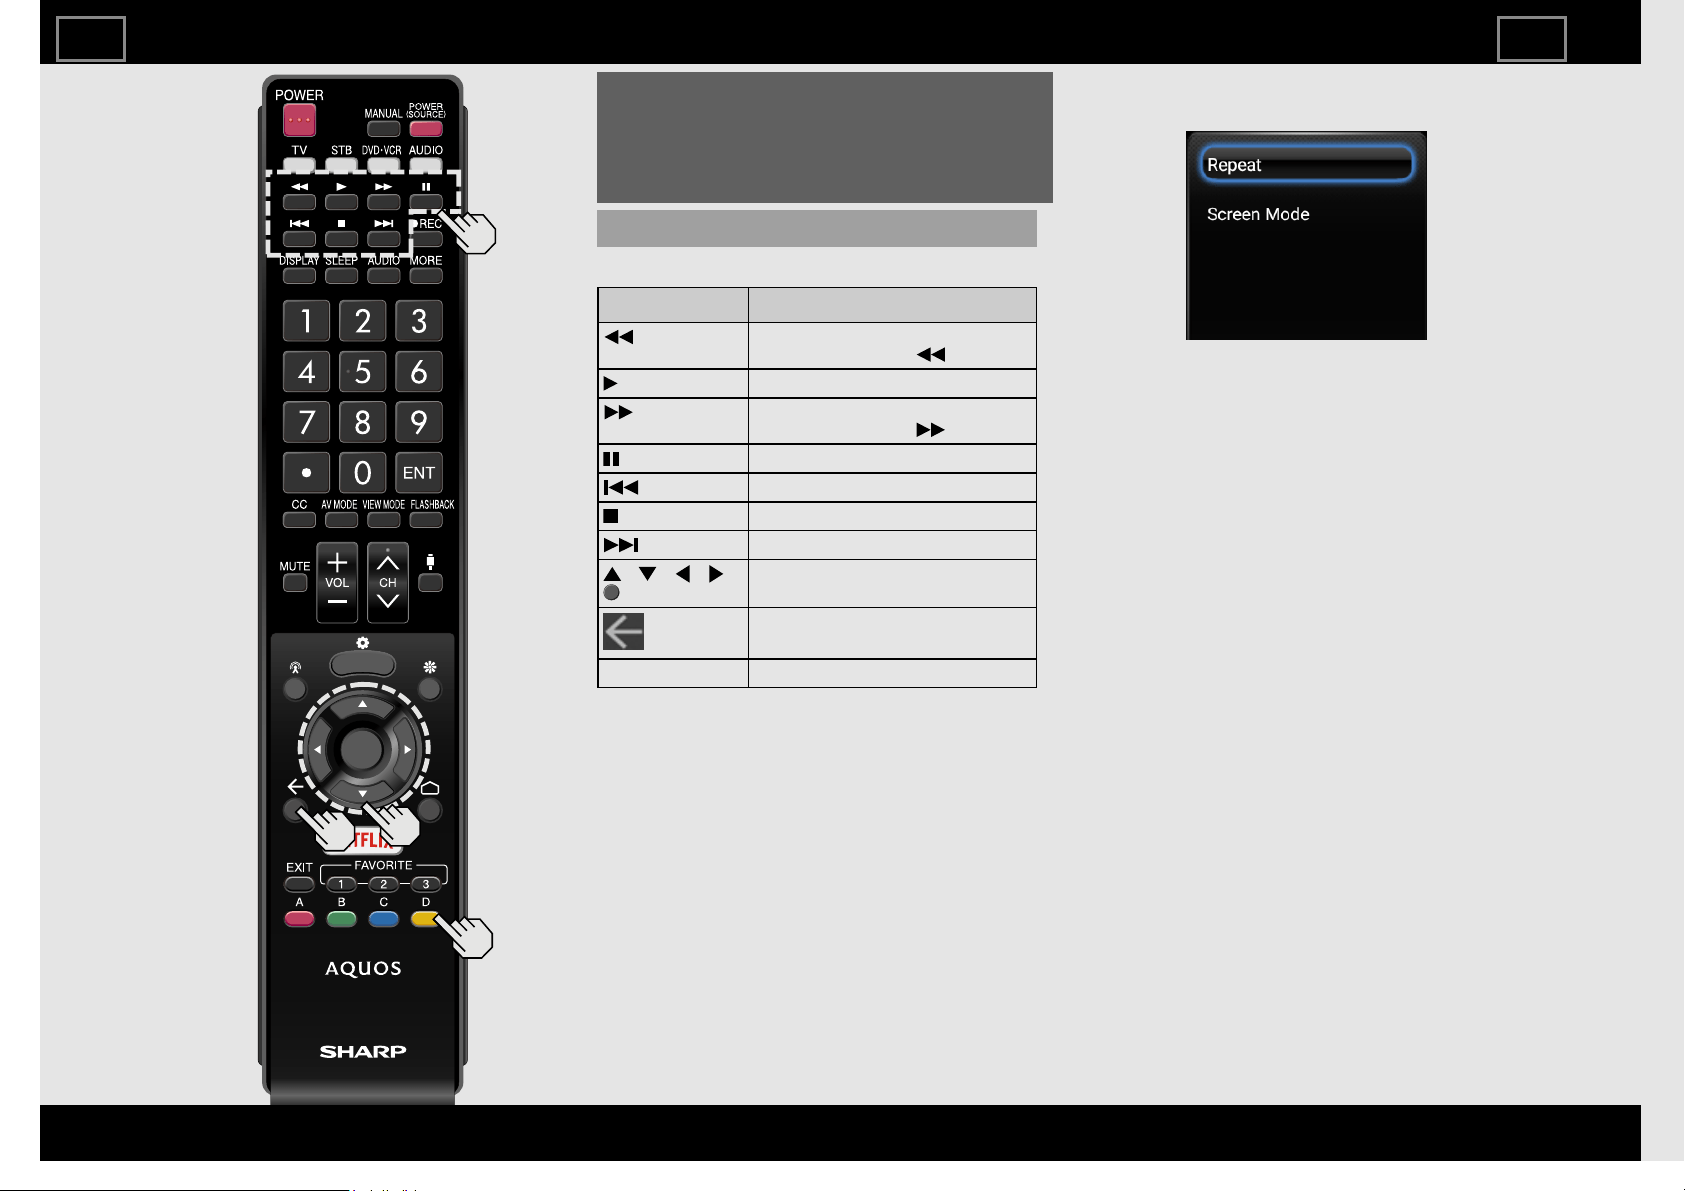
Playing Back Files on a USB
Memory Device/SD Memory
Card/Home Network Server
(Continue)
Playing Mode
Buttons for playing mode
Buttons Description
The fast revers speed changes
every time you press .
Play the video
The fast forward speed changes
every time you press .
Pause the video.
Go to the previous file.
Stop the video.
Go to the next file.
/ / / ,
(ENTER)
Select a desired item.
(Back)
Return to the previous process.
D (yellow) Display the Manu screen.
Menu for playing mode
Example
Repeat
Configure the repeat playback settings.
None/Repeat One/Repeat All
Screen Mode
Set the screen size.
Auto/Original
Enjoying Photo/Music/Video Playback
ENG69
ENGLISH | FRANÇAIS | ESPAÑOL
>><<
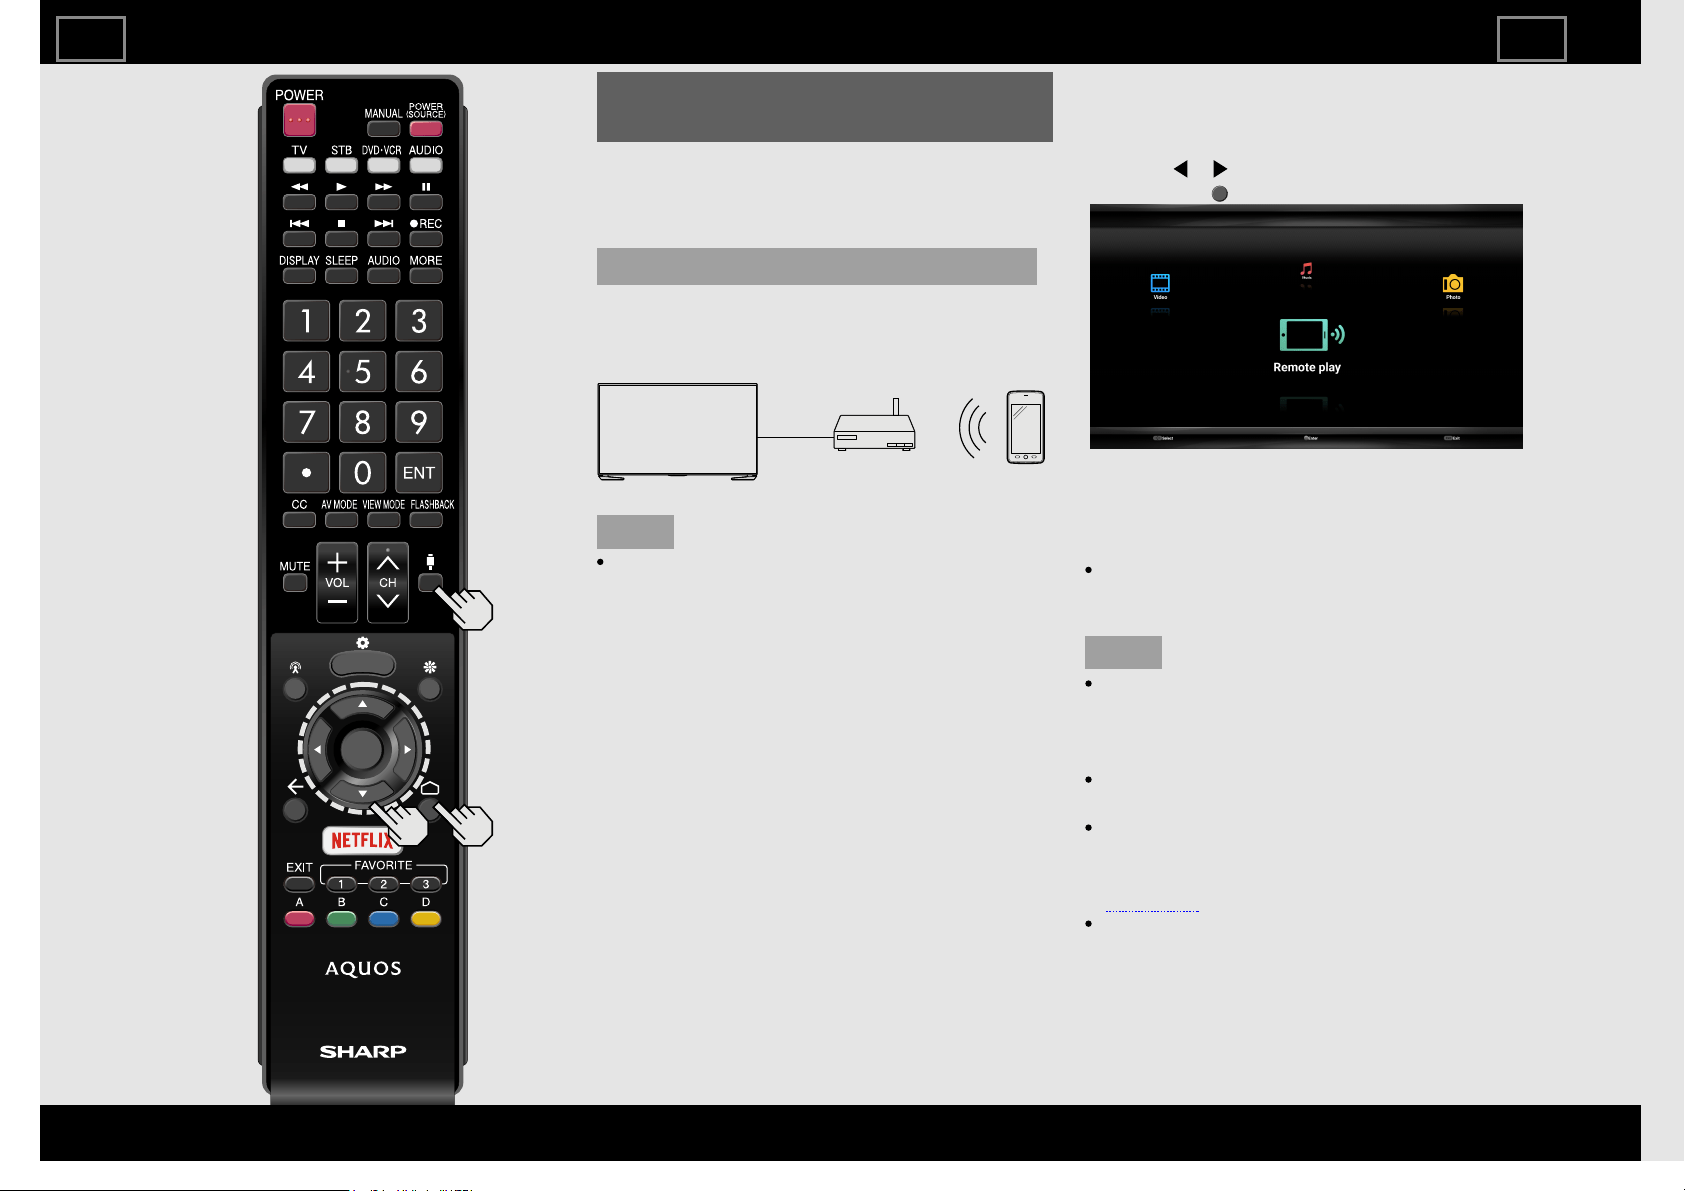
Playing Back Files from a Portable
Device
With the remote playback function, you can
use your portable device to play back
pictures, video, and music on the Home
Network server.
Preparation
Use Wi-Fi to connect the smartphone or
tablet to the TV.
WirelessLANrouter/
Example
accesspoint
NOTE
A wireless access point is required to use
a portable device.
1 Select "Content Player" from the Devices
screen, or launch the Content Player app
from HOME screen.
2 Press / to select "Remote play" icon,
and then (ENTER).
3 While the TV is in standby mode, send
photos/music/video from the
smartphone, tablet, or similar device to
the TV.
To use the remote playback function, your
portable device must be a DLNA Certified
Digital Media Controller.
NOTE
This function will only start when the
standby screen of Remote play is
displayed after you launch the Content
Player app from the HOME screen.
This function may not work while an
Internet application is being used.
For information on the compatible
formats, see "Home Network Server
Compatibility" on
page 6-3.
Some Digital Media Controllers and
Remote play applications are not
supported. In this situation, regardless of
whether the file can be played back, the
message "Playback not possible" may be
displayed, and playback may be stopped.
Enjoying Photo/Music/Video Playback
ENG610
ENGLISH | FRANÇAIS | ESPAÑOL
>><<

Presetting Remote Control
Function
You can operate the connected AV products
(AV receiver, cable box, SAT tuner, DTV,
VCR, BD, DVD, LD) using the presetting
manufacturer function of your remote
control unit.
Presetting manufacturer codes
1 Press an appropriate button (STB,
DVD•VCR or AUDIO) to operate the
connected equipment.
2 Press an appropriate button (STB,
DVD•VCR or AUDIO) and MANUAL at the
same time to enter the code registration
mode.
3 Press 0-9 to enter the manufacturer
code.
Preset mode is finished once the LED
no longer lights up.
4 After registering the code, the LED will
stop blinking then turn off after one
second. (If you perform an incorrect
operation, the LED will blink quickly then
turn off.)
Manufacturer codes
STB BRAND
REMOTE CONTROL
CODE NUMBER
ANVISION 04, 05
CABLE STAR 04, 05
DISH NETWORK 39, 40
DIRECTV 41
EAGLE 05
G.INSTRUMENT 02, 03, 10, 11, 17, 20
GERROLD 17
JERROLD 02, 03, 10, 11, 12, 20, 26-34
MAGNAVOX 04, 05, 08, 12, 15, 16, 18, 19, 22,
23
MOTOROLA 38
OKA SIGMA 07
PANASONIC 14, 21
PHILIPS 04, 05, 08, 13, 15, 16, 18, 19, 22,
23
PIONEER 07
RANDTEK 04, 05
RCA 14, 36*, 37*
S.ATLANTA 01, 09, 24
VIEWSTAR 04, 05, 08, 13, 15, 16, 18, 19, 22,
23
ZENITH 06, 35
NOTE
Numbers marked with * are SAT codes,
all others are STB codes.
Using LINK Operation
ENG71
ENGLISH | FRANÇAIS | ESPAÑOL
>><<
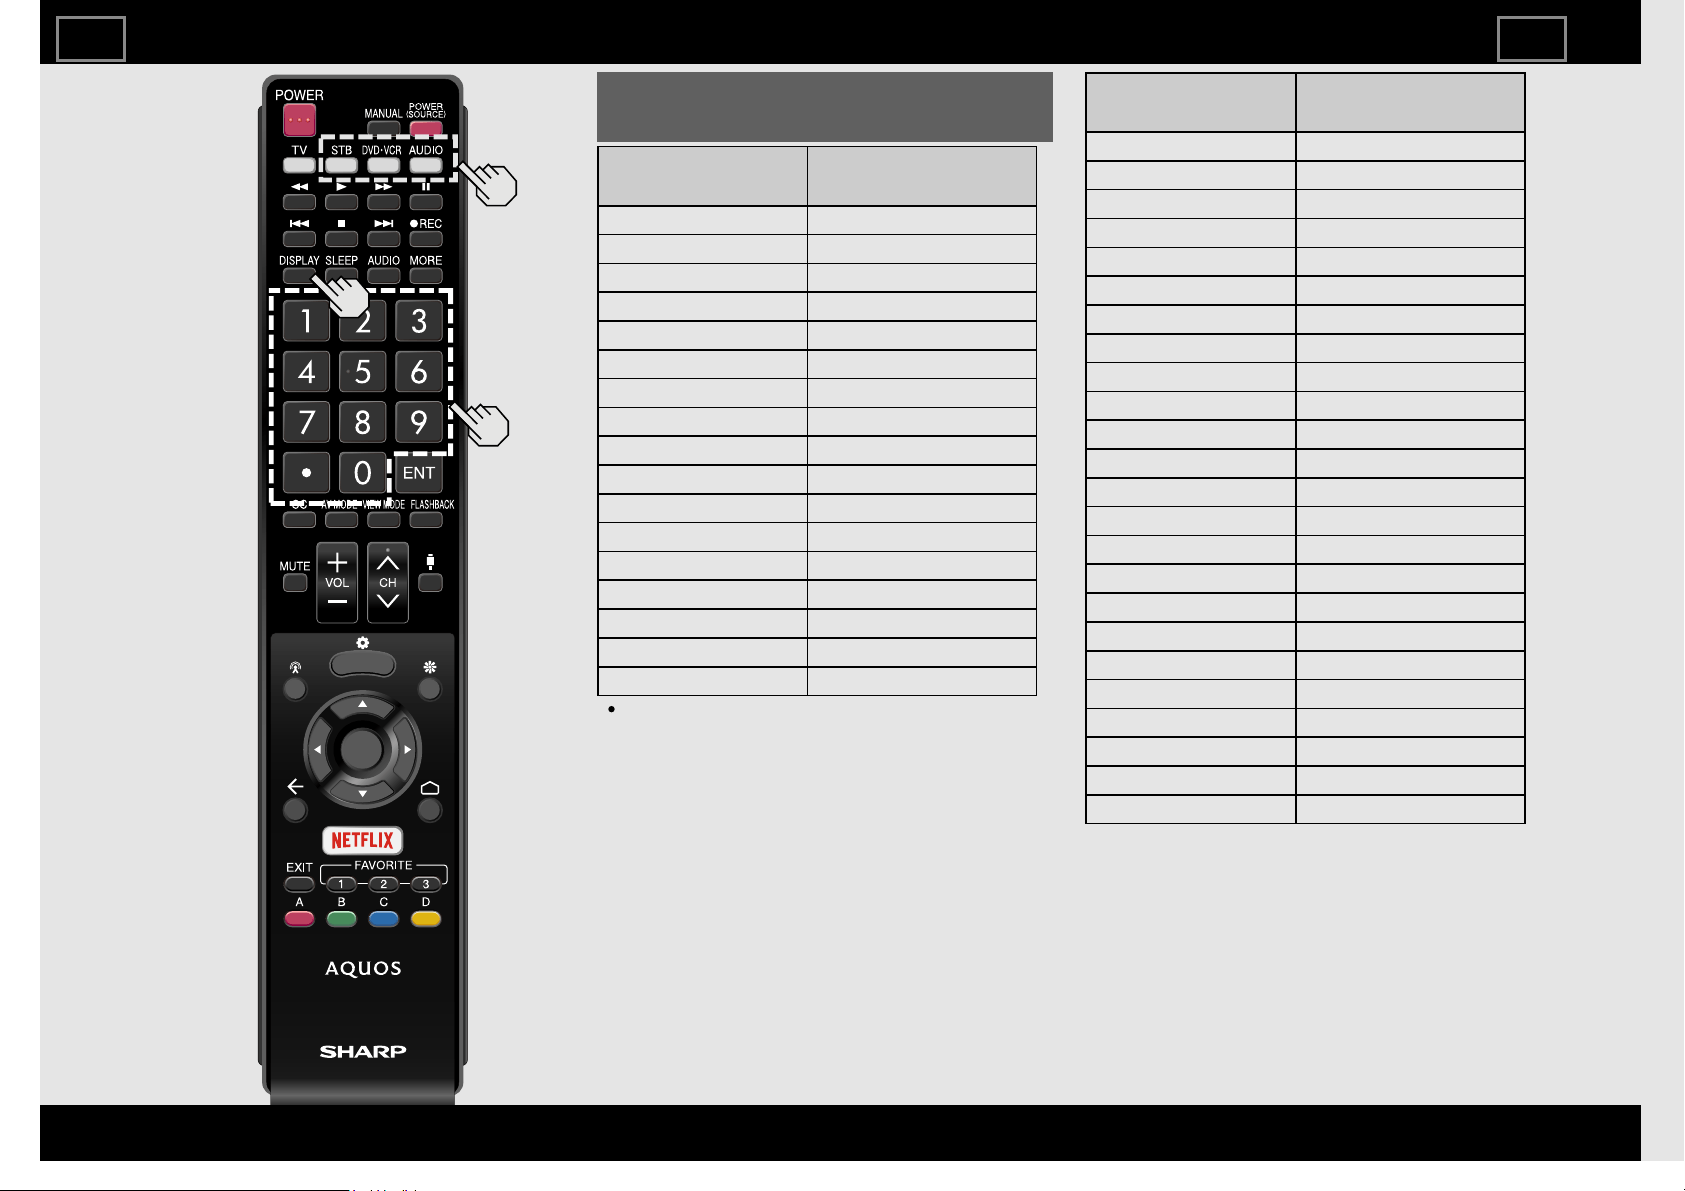
Presetting Remote Control
Function (Continue)
BD/DVD/LD
BRAND
REMOTE CONTROL
CODE NUMBER
DENON 24
JVC 31
KENWOOD 36
MAGNAVOX 26
MARANTZ 26
MITSUBISHI 28
PANASONIC 24, 37
PHILIPS 26, 38
PIONEER 30, 33, 35
PROSCAN 25
RCA 25, 39
SAMSUNG 29, 34
SHARP 23, 32, 41, 42
SONY 27, 40
TOSHIBA 26
YAMAHA 24
ZENITH 26
Depending on the brand, the codes of
some BD players may not be supported.
VCR BRAND
REMOTE CONTROL
CODE NUMBER
AUDIO DYNAMICS 09
BROCKSONIC 13
CANON 04
CRAIG 12
CURTIS MATHIS 04
DBX 09
EMERSON 10, 13, 14
GE 04
INSTANT REOLYA 04
JC PENNEY 04
JVC 09, 16, 17, 22
KENWOOD 09
MAGNAVOX 04, 05, 06
MAGNIN 12
MEMOREX 04
MONTGOMERY WARD 02
NEC 09
PANASONIC 04, 18, 19, 20, 21
PENTAX 05
PHILCO 04, 05
PHILIPS 04, 05, 06
QUASAR 04
REALISTIC 01, 02
SAMSUNG 11, 12
Using LINK Operation
ENG72
ENGLISH | FRANÇAIS | ESPAÑOL
>><<
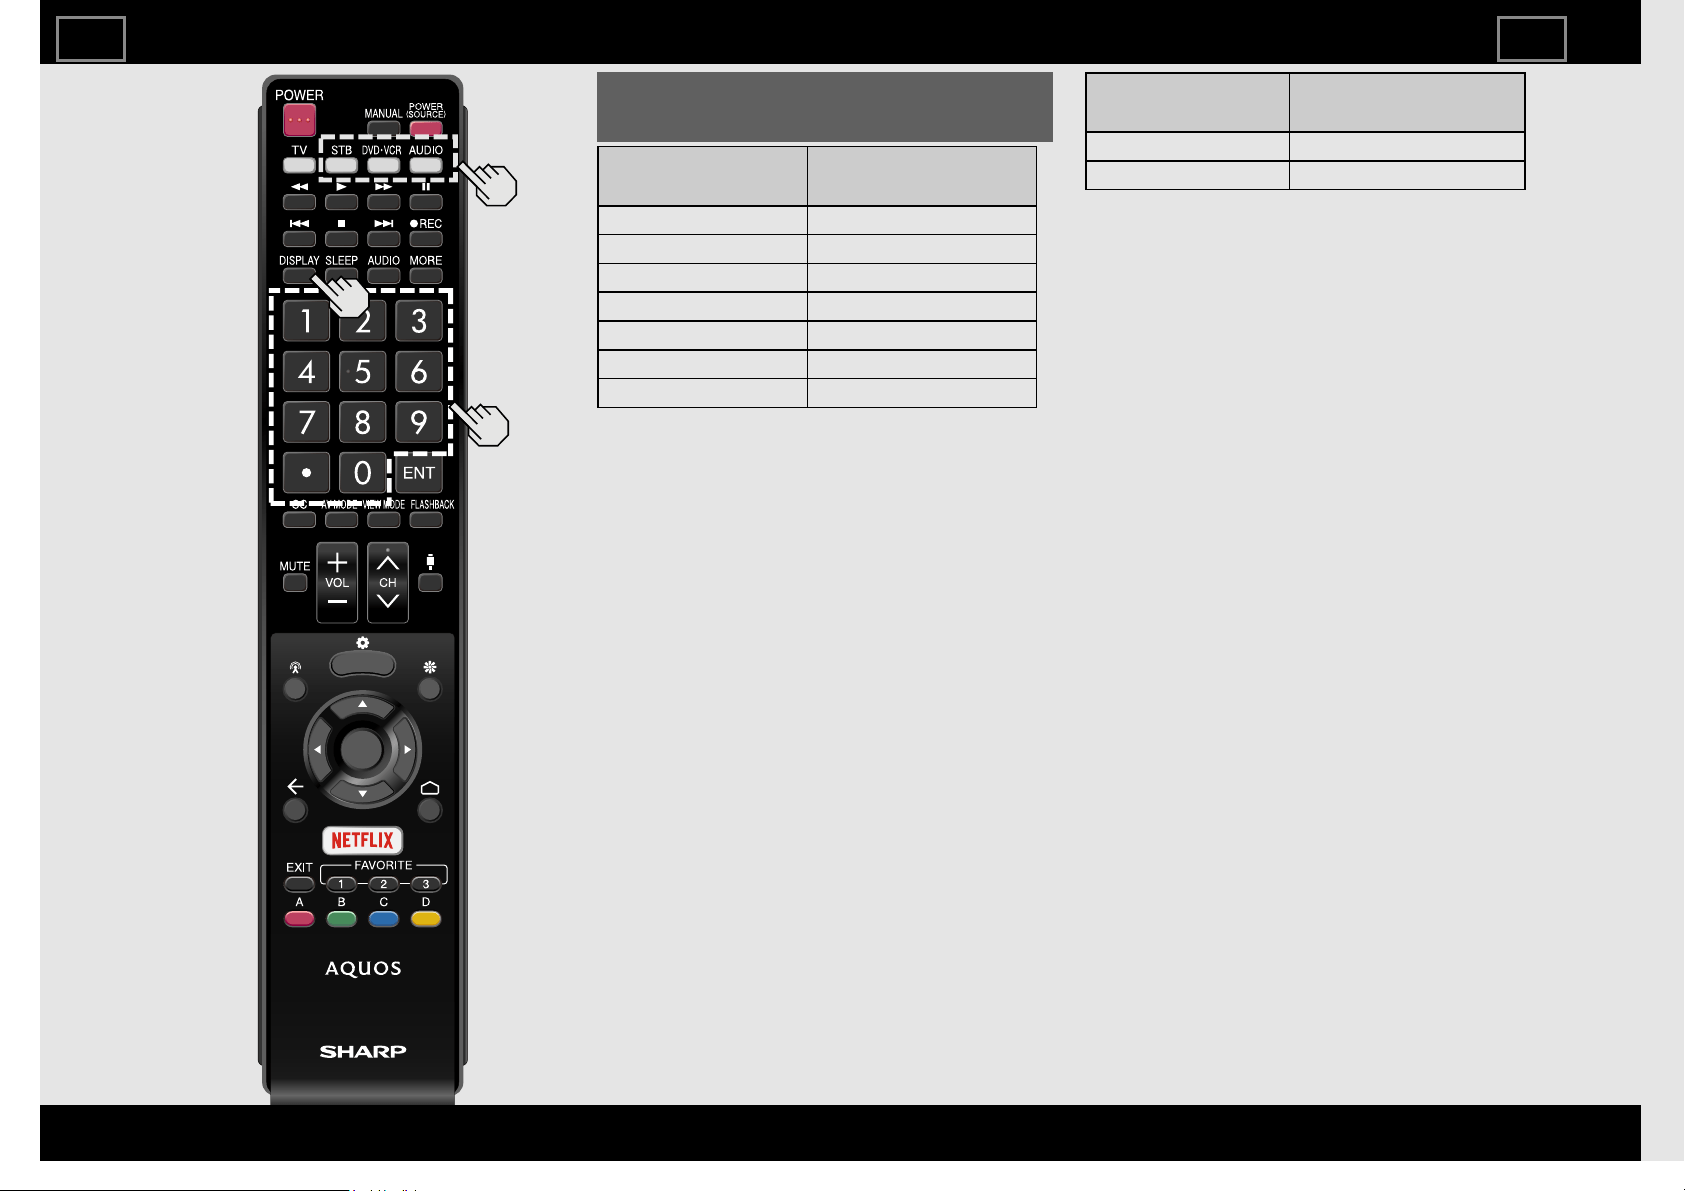
Presetting Remote Control
Function (Continue)
VCR BRAND
REMOTE CONTROL
CODE NUMBER
SHARP 01, 02, 03
SONY 07, 08, 15
SYLVANIA 04, 05, 06
TATUNG 09
TEAC 09
TMK 10
YAMAHA 09
AUDIO BRAND
REMOTE CONTROL
CODE NUMBER
SHARP 01
SHARP (SOUND BAR) 02
Using LINK Operation
ENG73
ENGLISH | FRANÇAIS | ESPAÑOL
>><<
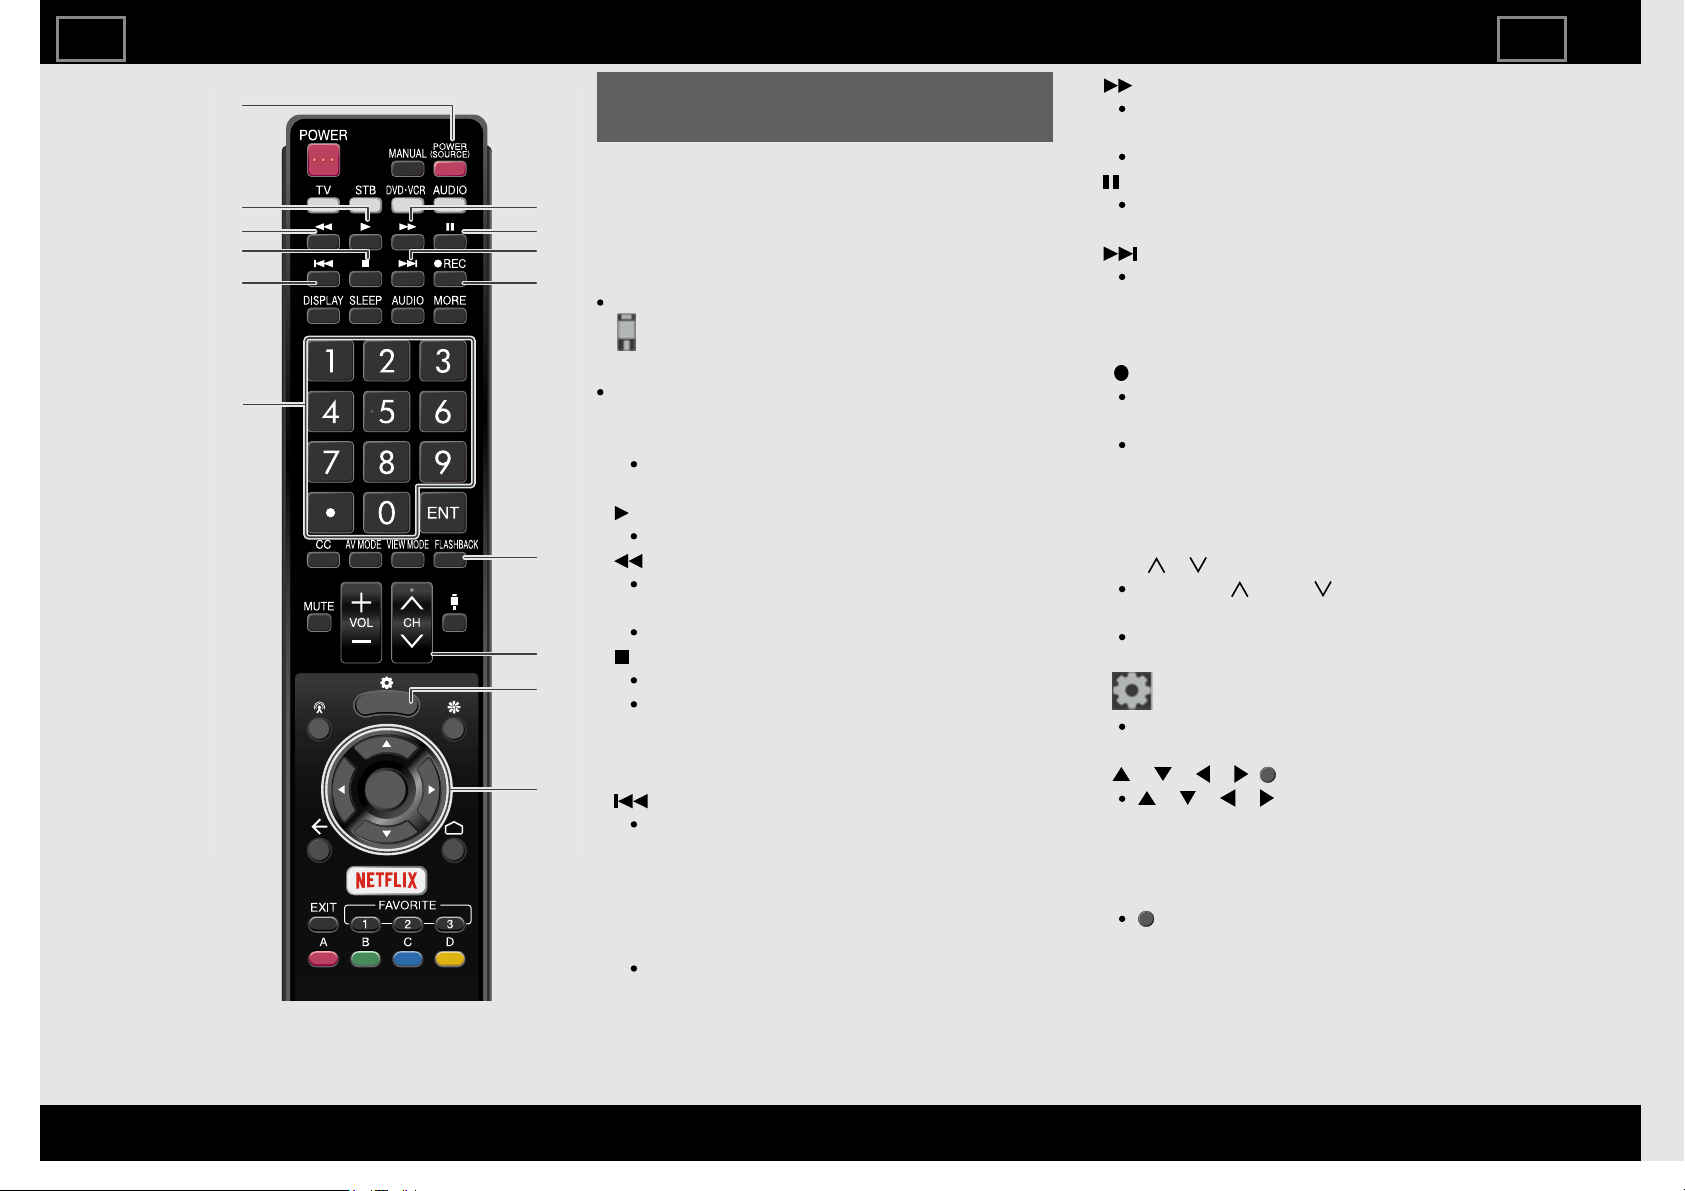
Operating the Connected
Equipment
To operate the connected equipment, press
STB, DVD•VCR or AUDIO to select your
device. (STB
(cable/satellite set-top box), BD, DVD, VCR
or AUDIO.) The remote control unit button
will function as follows.
When you operate VCR, DVD or BD, press
(Devices) to select the terminal
connected to your device.
CABLE and SAT cannot be selected at the
same time.
1 POWER (SOURCE)
Turns the connected equipment power
on and off.
2
Starts playback. (VCR, BD, DVD)
3
Rewinds the tape and allows picture
search. (VCR)
Hold down to go in reverse. (BD, DVD)
4
Stops the tape transport. (VCR)
Playback stops when pressed. With
some Blu-ray disc/DVD players,
pressing the button twice may open
the disc tray. (BD, DVD)
5
Pressing quickly once takes you to the
start of the chapter currently playing.
Each time you press it, you move back
to the start of the previous chapter.
(BD, DVD)
6 0-9, • (DOT)
Press a button (or buttons) that
corresponds to the channel that you
wish to watch.(STB)
7
Rapidly advances the tape and allows
picture search. (VCR)
Hold down to fast forward. (BD, DVD)
8
Sets pauses and still pictures. (VCR,
BD, DVD)
9
Pressing quickly once takes you to the
start of the next chapter. Each time
you press it, you move ahead to the
start of the next chapter. (BD, DVD)
10 REC
Starts recording. (VCR)
11 FLASHBACK
Press to switch between the current
channel and the channel you were
watching immediately before. Some
manufacturers do not preset
FLASHBACK. (STB)
12 CH /
Press CH or CH to tune in to a
higher or lower channel. (STB)
Press to select the channel of the TV
tuner on the VCR. (VCR)
13 (TV Setup)
When this button is pressed, the
BD/DVD menu will display. (BD, DVD)
14 / / / , (ENTER)
/ / / : Press the button to
select items on the STB GUIDE screen
or STB MENU screen. (STB)
Press the button to select items on the
BD/DVD menu screen. (BD, DVD)
(ENTER): Press to activate the
selected function. (STB, BD, DVD)
Using LINK Operation
1
11
2 7
8
9
10
3
4
5
13
12
14
6
ENG74
ENGLISH | FRANÇAIS | ESPAÑOL
>><<

Controlling HDMI Equipment Using LINK Operation
What’s LINK Operation?
Using the HDMI CEC (Consumer Electronics Control) protocol, with
LINK Operation you can interactively operate compatible system
equipment (Blu-ray disc equipment, AV amplifier, DVD).
By connecting LINK-compatible devices with HDMI-certified cables
to the TV, you can control a recorder or AV amplifier using the
remote control of the TV.
LINK Operation allows you to operate the HDMI-connected
equipment with one remote control.
NOTE
HDMI IN 1, 2, 3 and 4 terminals are all capable of receiving 4K60P
4:4:4 signals.
To receive 4K60P 4:4:4 signals, on the Devices menu, set the HDMI
type to "Full". (See page 4-1)
For connecting the TV to LINK-compatible equipment, use
commercially available cables.
Point the remote control toward the TV, not to connected HDMI
equipment.
Video noise may occur depending on the type of HDMI cable used.
Make sure to use an HDMI-certified cable.
Up to 3 pieces of HDMI recording equipment and one AV amplifier
can be connected using this system.
NOTE
If the equipment does not operate, turn on the equipment and select
the appropriate input source using (Devices).
The LINK feature may not operate properly when an HDMI splitter or
AV selector unit is used. These devices may cause interruptions to
the image and/or sound.
Connected LINK-compatible devices can be operated without changing
the settings of the remote control unit.
One Touch Play
While the TV is in standby mode, it automatically turns on and plays
back the image from the HDMI source.
Single remote control
The LINK Operation automatically recognizes the connected HDMI
device and you can control the TV and the devices as if using a universal
remote control.
Control the LINK-compatible audio system
Set the volume of LINK-compatible audio system.
NOTE
The above description is an example of the LINK Operation function.
Refer to this operation manual and the operation manual of the LINK-
compatible device to be used with this TV.
Using LINK Operation
Backpanel
verticalinputs
Backpanel
horizontalinputs
Example
LINKcompatible
audiosystem
AQUOSBDplayer
HDMIcertifiedcable
HDMIcertifiedcable Opticalfibercable
ConnectingAQUOS
BDplayervia
LINKcompatible
audiosystem
ENG75
ENGLISH | FRANÇAIS | ESPAÑOL
>><<
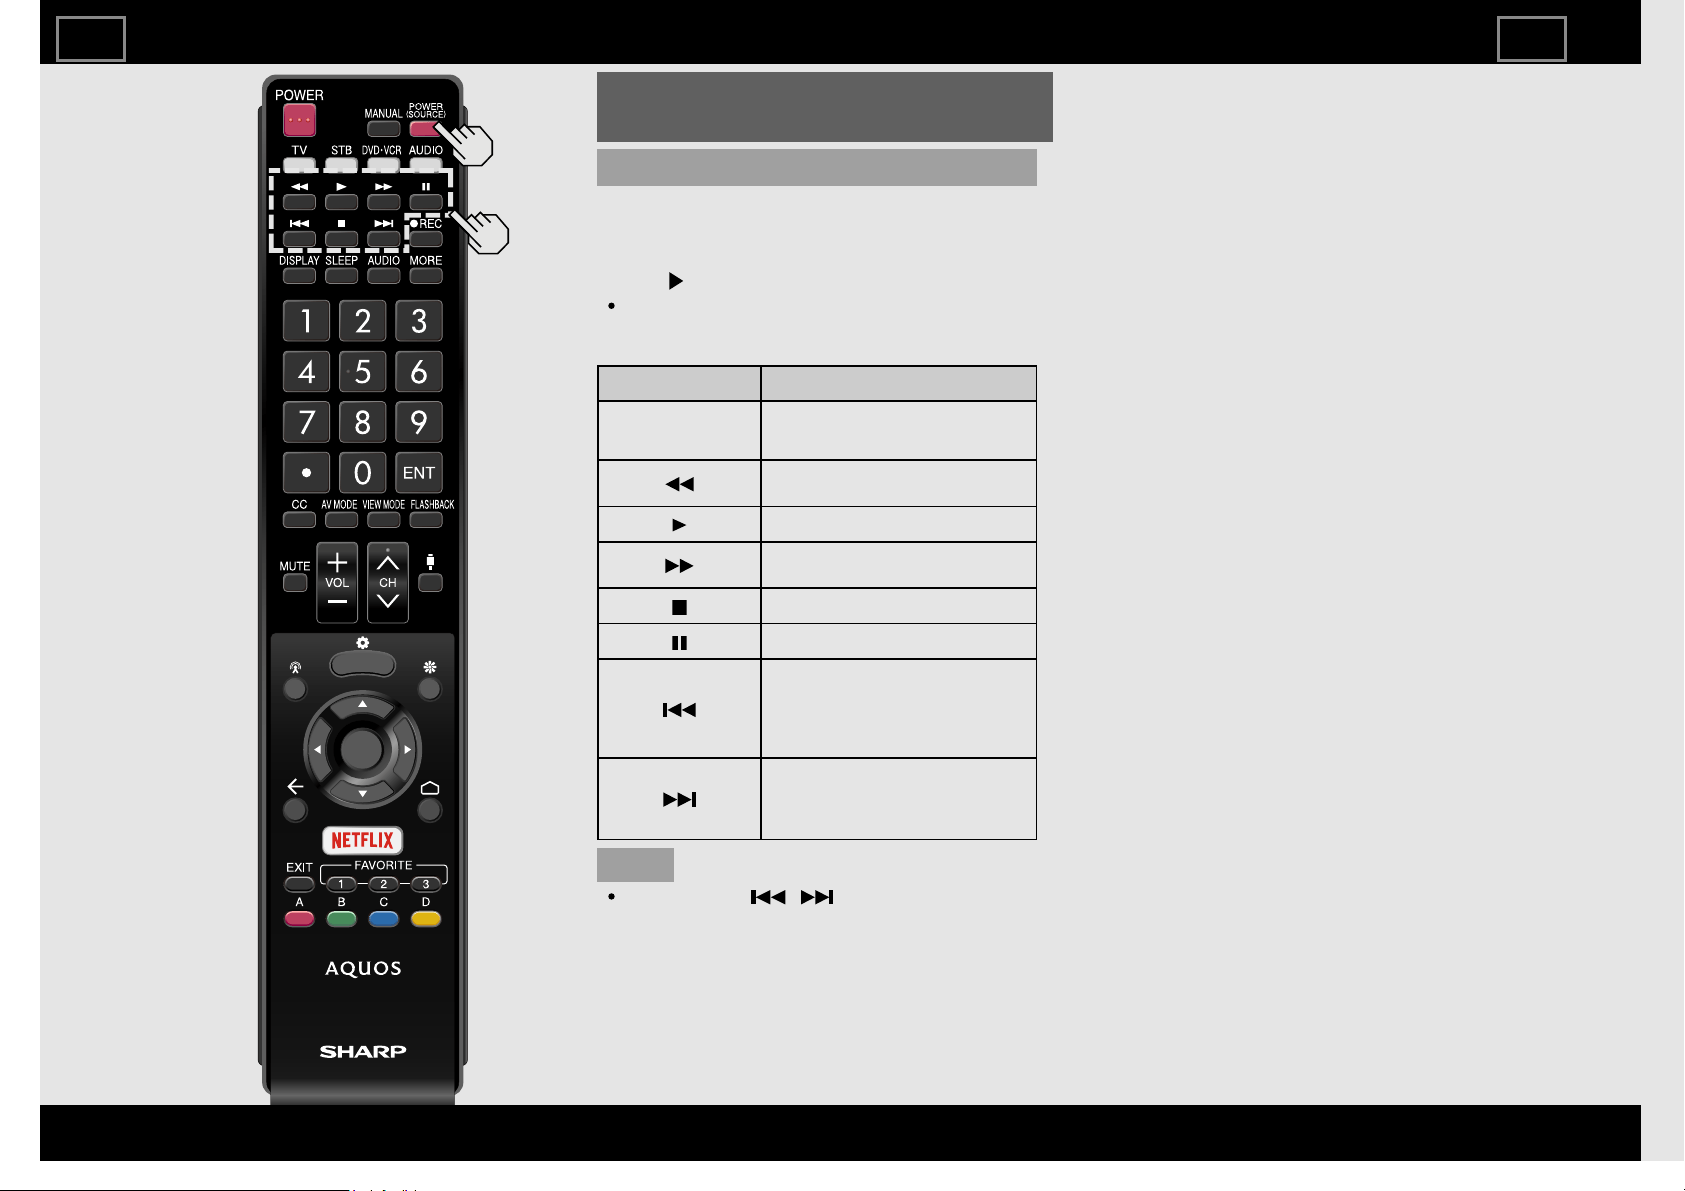
Controlling HDMI Equipment Using
LINK Operation (Continue)
One Touch Playback
LINK Operation allows you to operate the
HDMI-connected equipment with one
remote control.
Press to start playing back a title.
The last played program is played back.
You can use the following buttons during
broadcast viewing.
Buttons Description
POWER
(SOURCE)
Turns the power of the HDMI
connected devices on and off.
Hold down this button to go in
reverse.
Starts playback.
Hold down this button to fast
forward.
Stops playback.
Sets pauses and still pictures.
Pressing quickly once takes you to
the start of the chapter currently
playing. Each time you press it,
you move back to the start of the
previous chapter.
Pressing quickly once takes you to
the start of the next chapter. Each
time you press it, you move ahead
to the start of the next chapter.
NOTE
The buttons / do not function
with the following Blu-ray disc players
currently available.
- BD-HP20U, BD-HP50U
Using LINK Operation
ENG76
ENGLISH | FRANÇAIS | ESPAÑOL
>><<
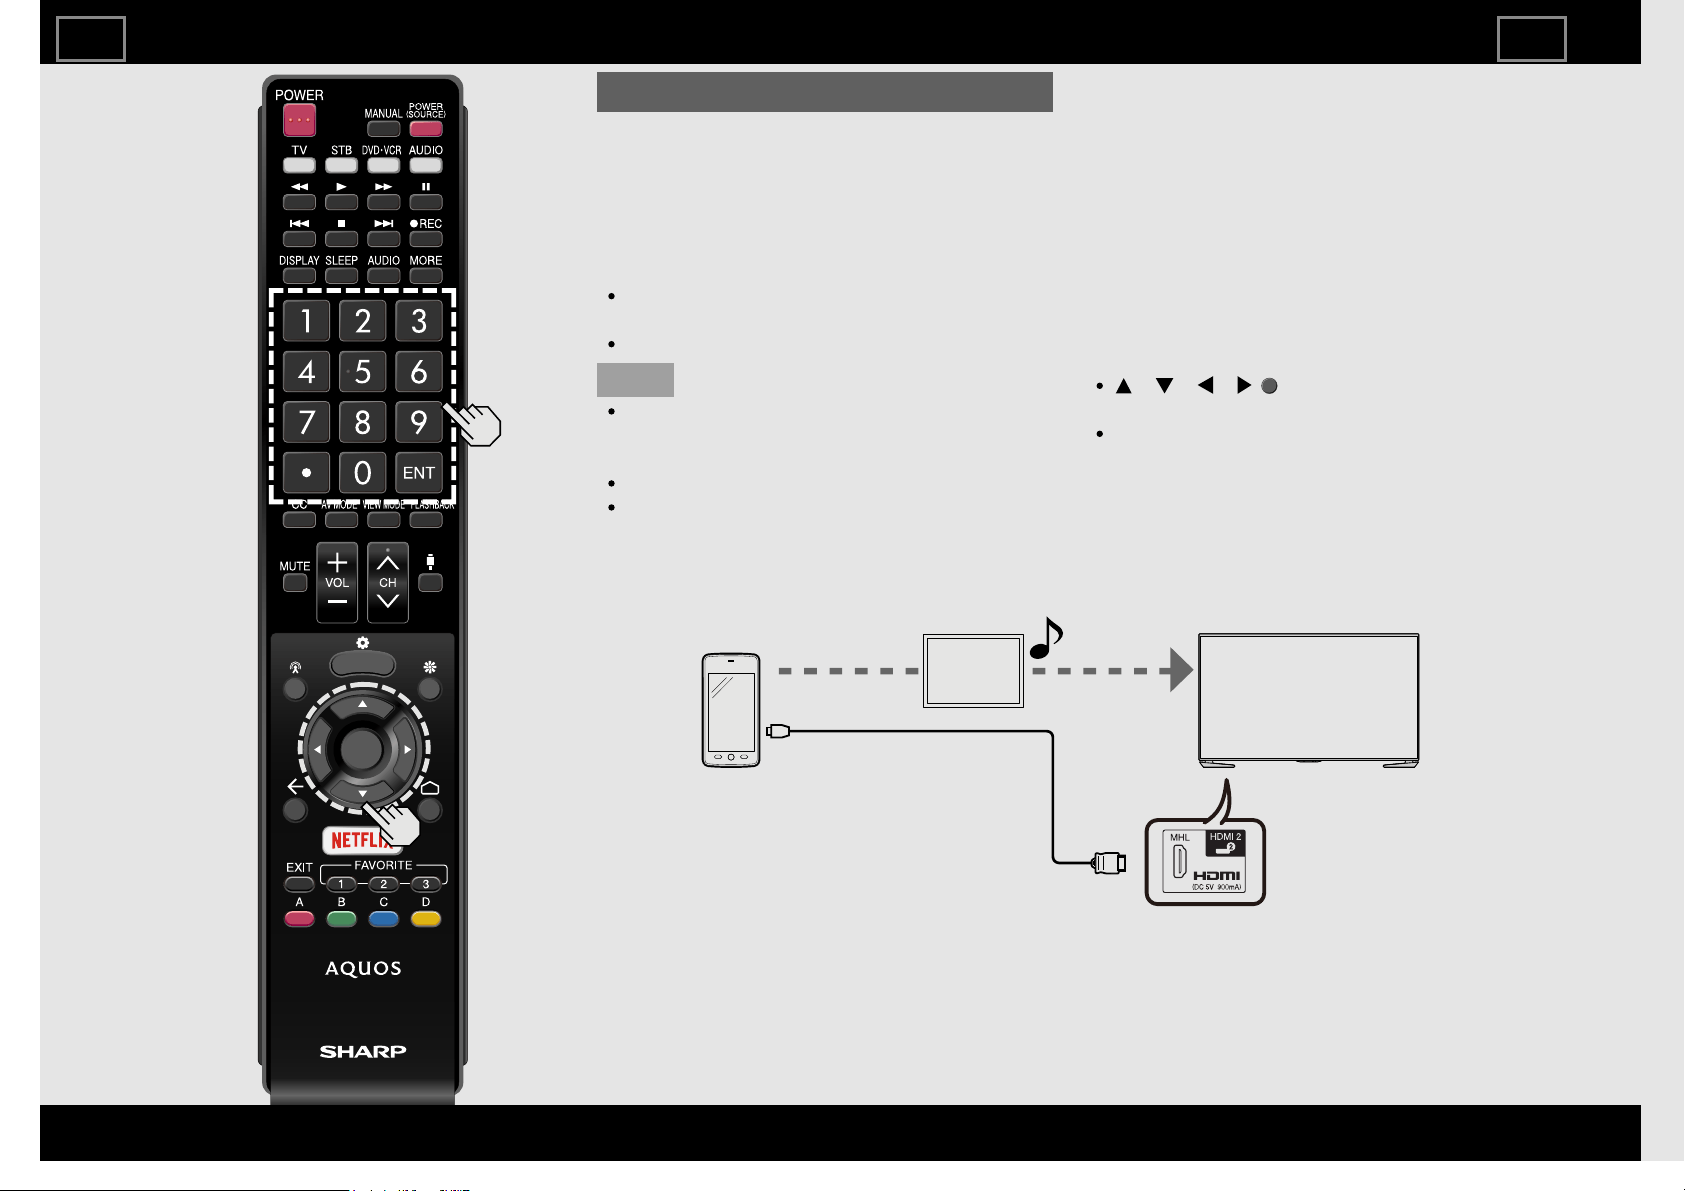
Using a Smartphone with the TV
This function enables you to connect the TV
to a smartphone that supports Mobile High-
Definition Link
(MHL®) using an MHL cable.
To connect the TV to your MHL-compatible
smartphone, be sure to use an MHL cable
(commercially available).
You can view pictures and video on a
large screen.
You can play back music files.
NOTE
An MHL-compatible portable device is
required to use this function. Connect the
device to the HDMI IN 2 terminal.
This product incorporates MHL 1.
To use the MHL function, configure the
settings from "HOME" > "Settings" >
"Device" > "Control".
Auto Power On
When an MHL-compatible device is
connected to the TV, the TV turns on
automatically.
Auto Input Selection
When an MHL-compatible device is
connected while the TV is on, the input
mode is selected automatically.
Operation Using the Remote Control
The remote control of the TV can be used to
operate a portable device.
/ / / , (ENTER), EXIT, 0-9, •
(DOT), ENT, etc.
The operations vary depending on the
connected equipment and content being
viewed.
Using LINK Operation
Backpanel
verticalinputs
MHLcable
ENG77
ENGLISH | FRANÇAIS | ESPAÑOL
>><<

Setting Audio Input
Audio Select HDMI
This function sets the terminal to output the computer audio.
The adjustment items vary depending on the input source. Select the
input source corresponding to the terminal connected to the PC and
then adjust the desired item.
To perform the operation, refer to "Devices" > "Video in" > "HDMI 3" >
"Audio Select".
HDMI 3
HDMI(Digital): Select this when the TV and PC are connected using an
HDMI-certified cable and audio is input via the same cable.
HDMI+Analog: Select this when the TV and PC are connected using a
HDMI-certified cable and the audio is input via a Ø 3.5 mm stereo
minijack.
NOTE
When "Audio Select" is set to "HDMI+Analog", sound will not be
produced if you use only an HDMI-certified cable to connect HDMI-
compatible equipment. To produce sound, you should make an
analog audio connection.
If you want to connect HDMI-compatible equipment using only an
HDMI-certified cable, set "Audio Select" to "HDMI(Digital)".
"Audio Select" can only be set for the HDMI IN 3.
Using a PC
ENG81
ENGLISH | FRANÇAIS | ESPAÑOL
>><<
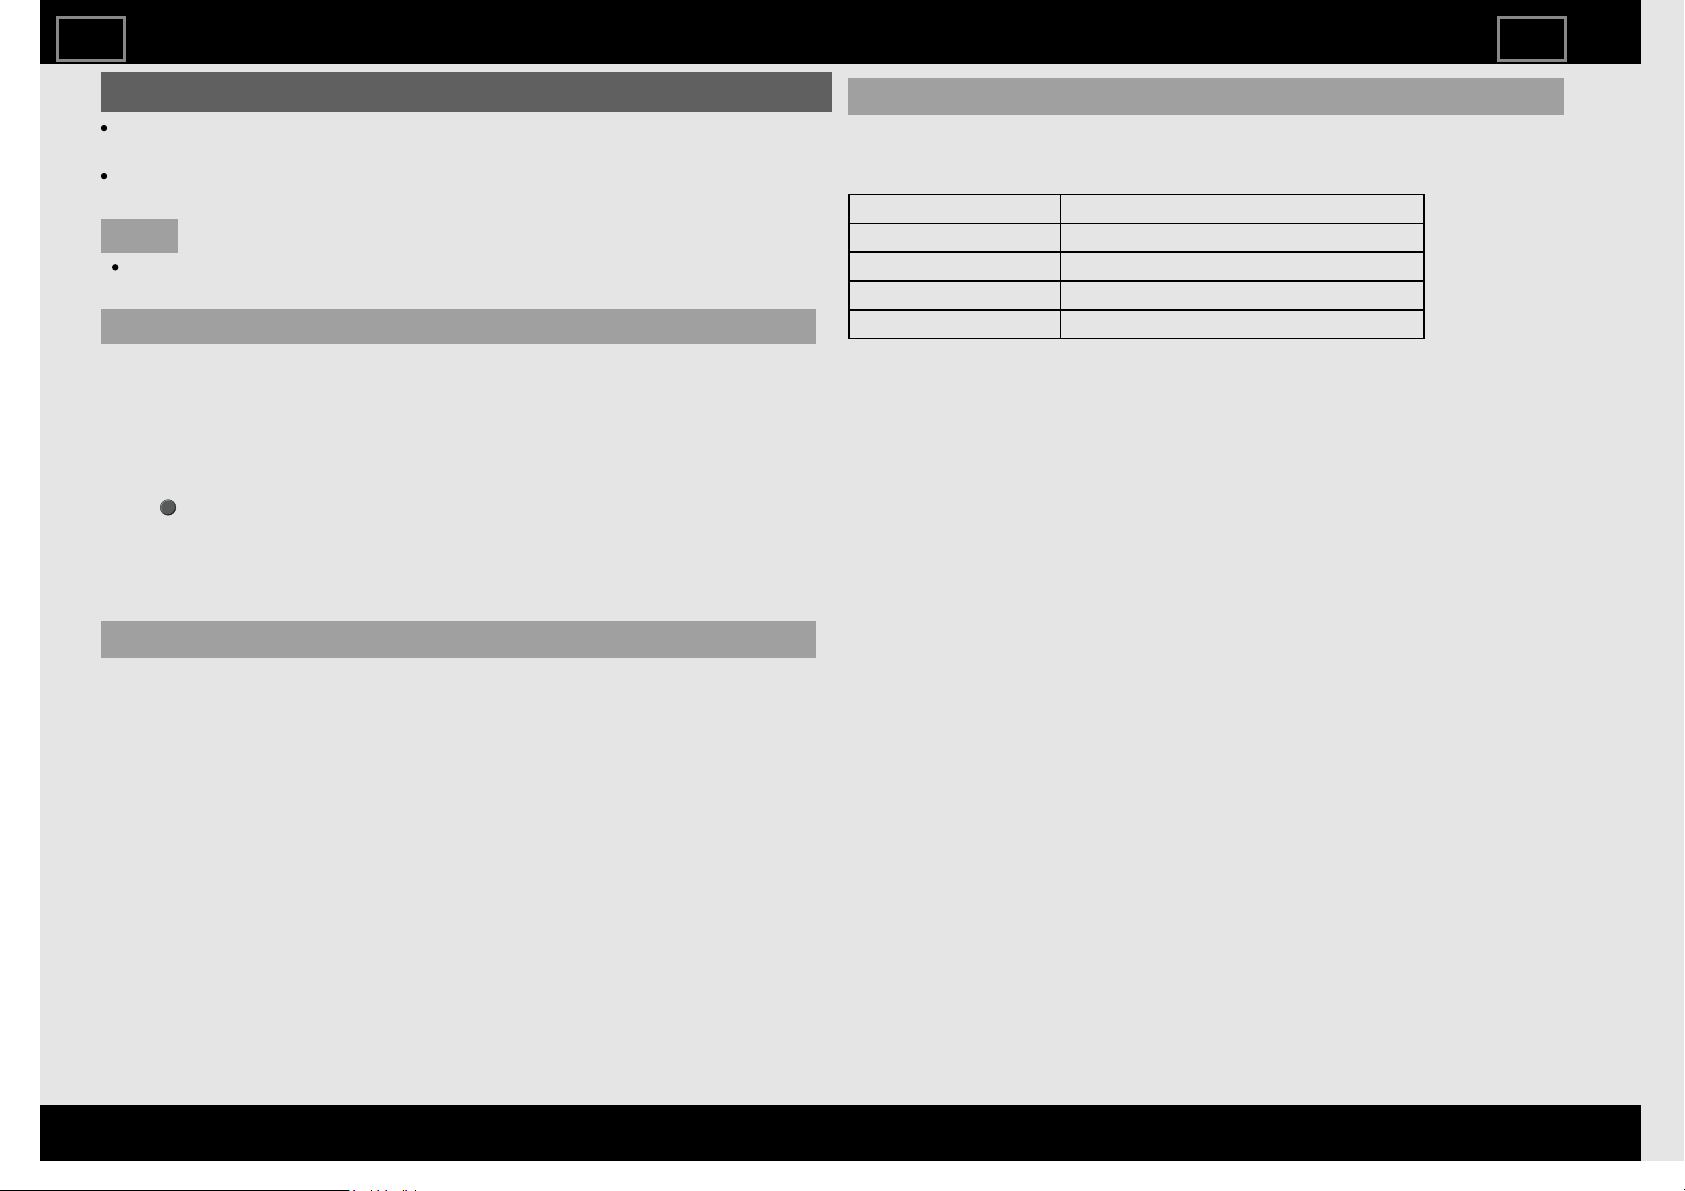
Control of the TV
The TV can be controlled from a PC, control panels and other devices
using the RS-232C.
Use a cross-type RS-232C cable (commercially available) for the
connections.
NOTE
This operation system should be used by a person who is
accustomed to using computers.
AQUOS Remote Control
Set this function when operating the TV from equipment connected by
LAN or wireless LAN. To perform the operation, refer to "TV Setup" >
"General".
Remote Control App
When "Remote Control App" is selected, "Change" will be highlighted.
Press (ENTER).
Detailed Settings
Make the detailed settings (Login ID, Password).
Follow the on-screen instructions to configure the settings.
Device name
Set the name of the TV displayed on other network devices.
Configure the settings from "HOME" > "Settings" > "Device" > "About" >
"Device name".
Communication Conditions for RS-232C
Set the RS-232C communication settings on the PC to match the TV's
communication conditions.
The TV's communication settings are as follows:
Baud rate: 9,600 bps
Data length: 8 bits
Parity bit: None
Stop bit: 1 bit
Flow control: None
Communication procedure
Send the control commands from the PC via the RS-232C.
The TV operates according to the received command and sends a
response message to the PC.
Do not send multiple commands at the same time.
Wait until the PC receives the OK response before sending the next
command.
Using a PC
ENG82
ENGLISH | FRANÇAIS | ESPAÑOL
>><<
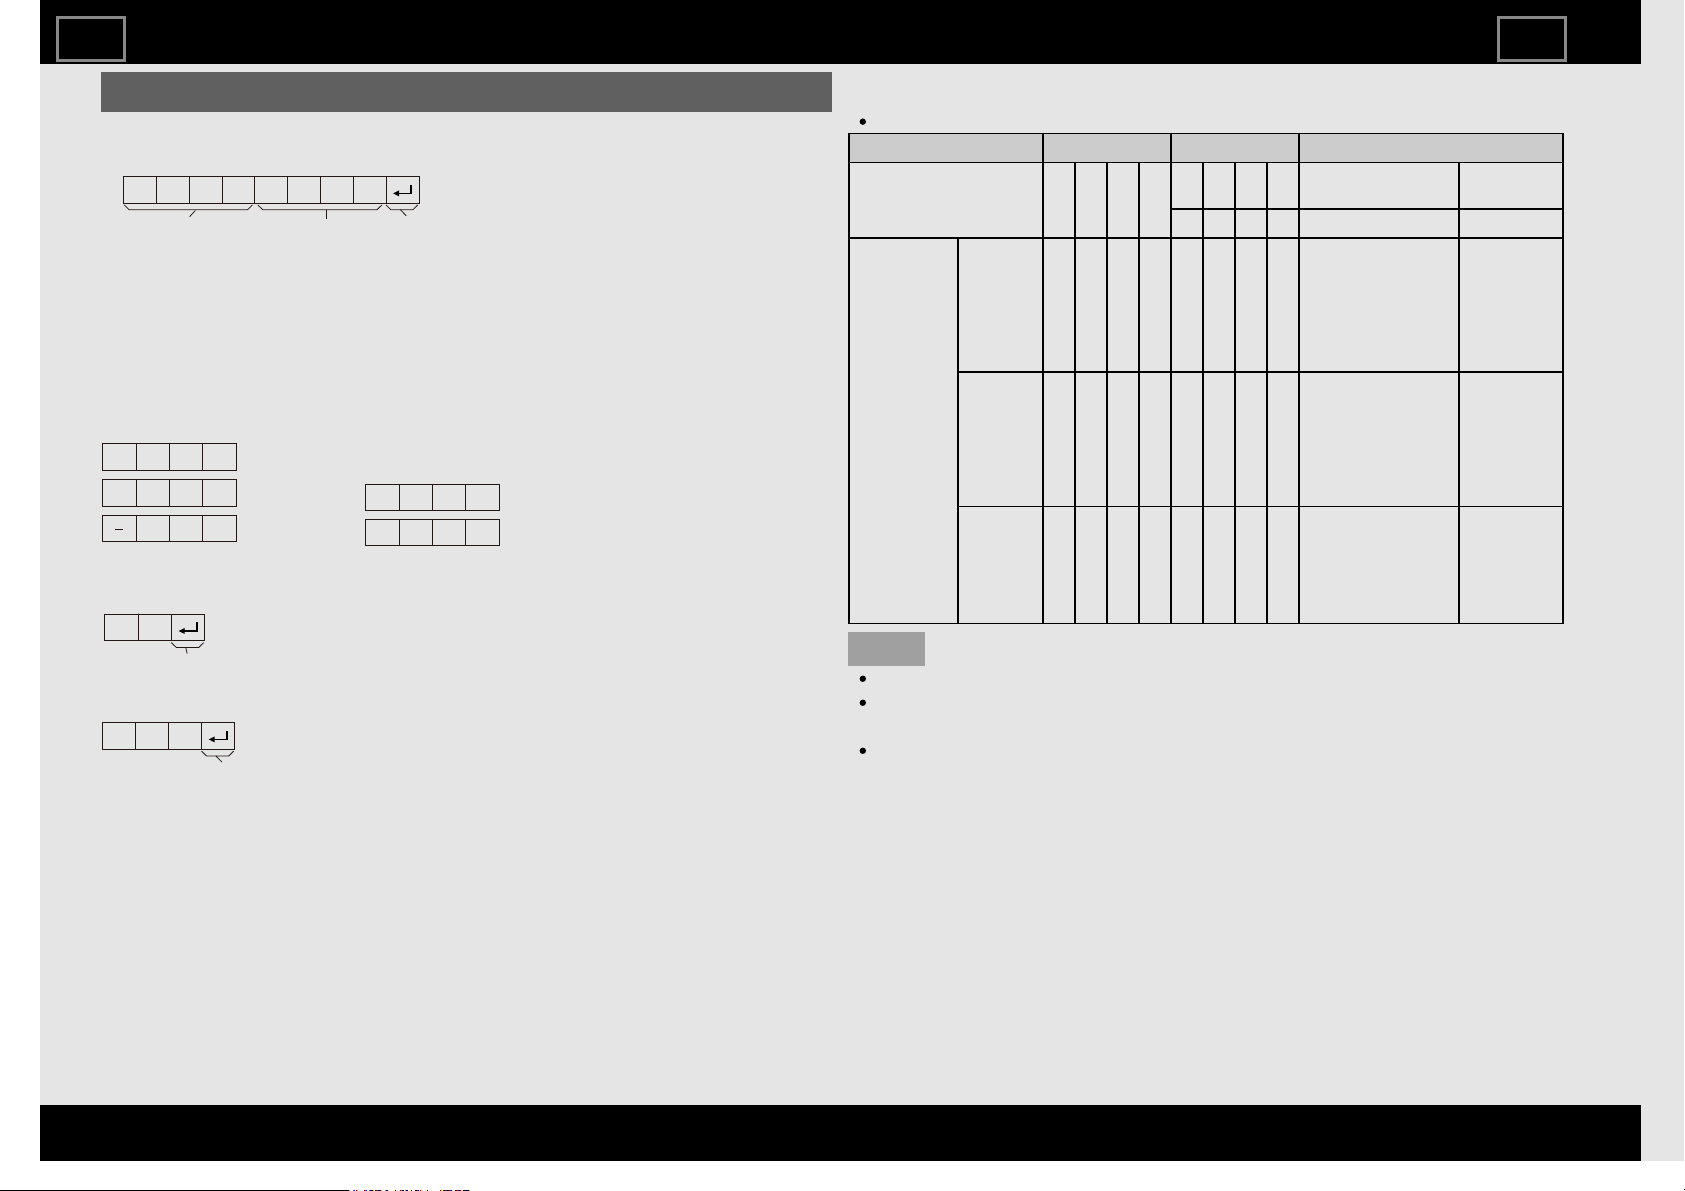
Control of the TV (Continue)
Command format
Eight ASCII codes +CR
C1 C2 C3 C4 P1 P2 P3 P4
Command4digits Parameter4digits Returncode
Command 4-digits: Command. The text of four characters.
Parameter 4-digits: Parameter 0-9, x, blank, ?
Parameter
Input the parameter values, aligning left, and fill with blank(s) for the
remainder. (Be sure that 4 values are input for the parameter.)
When the input parameter is not within an adjustable range, "ERR"
returns. (Refer to "Response code format".)
Any numerical value can replace the "x" on the table.
3 0
0 0 0 9
0
? ? ? ?
?
When"?"isinputforsome
commands,the
presentsetting
valueresponds.
Response code format
Normal response
O K
Returncode(0DH)
Problem response
(communication error or incorrect command)
Returncode(0DH)
E R R
Command table
Commands not indicated here are not guaranteed to operate.
CONTROL ITEM COMMAND PARAMETER CONTROL CONTENTS
POWER SETTING P O W R 0 _ _ _ Power Off It shifts to
standby.
1 _ _ _ Power On Power On
INPUT
SELECTION
TOGGLE I T G D x _ _ _ (Toggle) It input-
switches by
the toggle.
(It is the
same as an
input
change key)
TV I T V D 0 _ _ _ It input-
switches to
TV. (A
channel
remains as
it is. (Last
memory))
1-5 I A V D * _ _ _ 1: HDMI IN 1,
2: HDMI IN 2,
3: HDMI IN 3,
4: HDMI IN 4,
5: COMPONENT/
VIDEO IN
NOTE
If an underbar (_) appears in the parameter column, enter a space.
If an asterisk (*) appears, enter a value in the range indicated in
brackets under CONTROL CONTENTS.
Any numerical value can replace the "x" on the table.
Using a PC
ENG83
ENGLISH | FRANÇAIS | ESPAÑOL
>><<
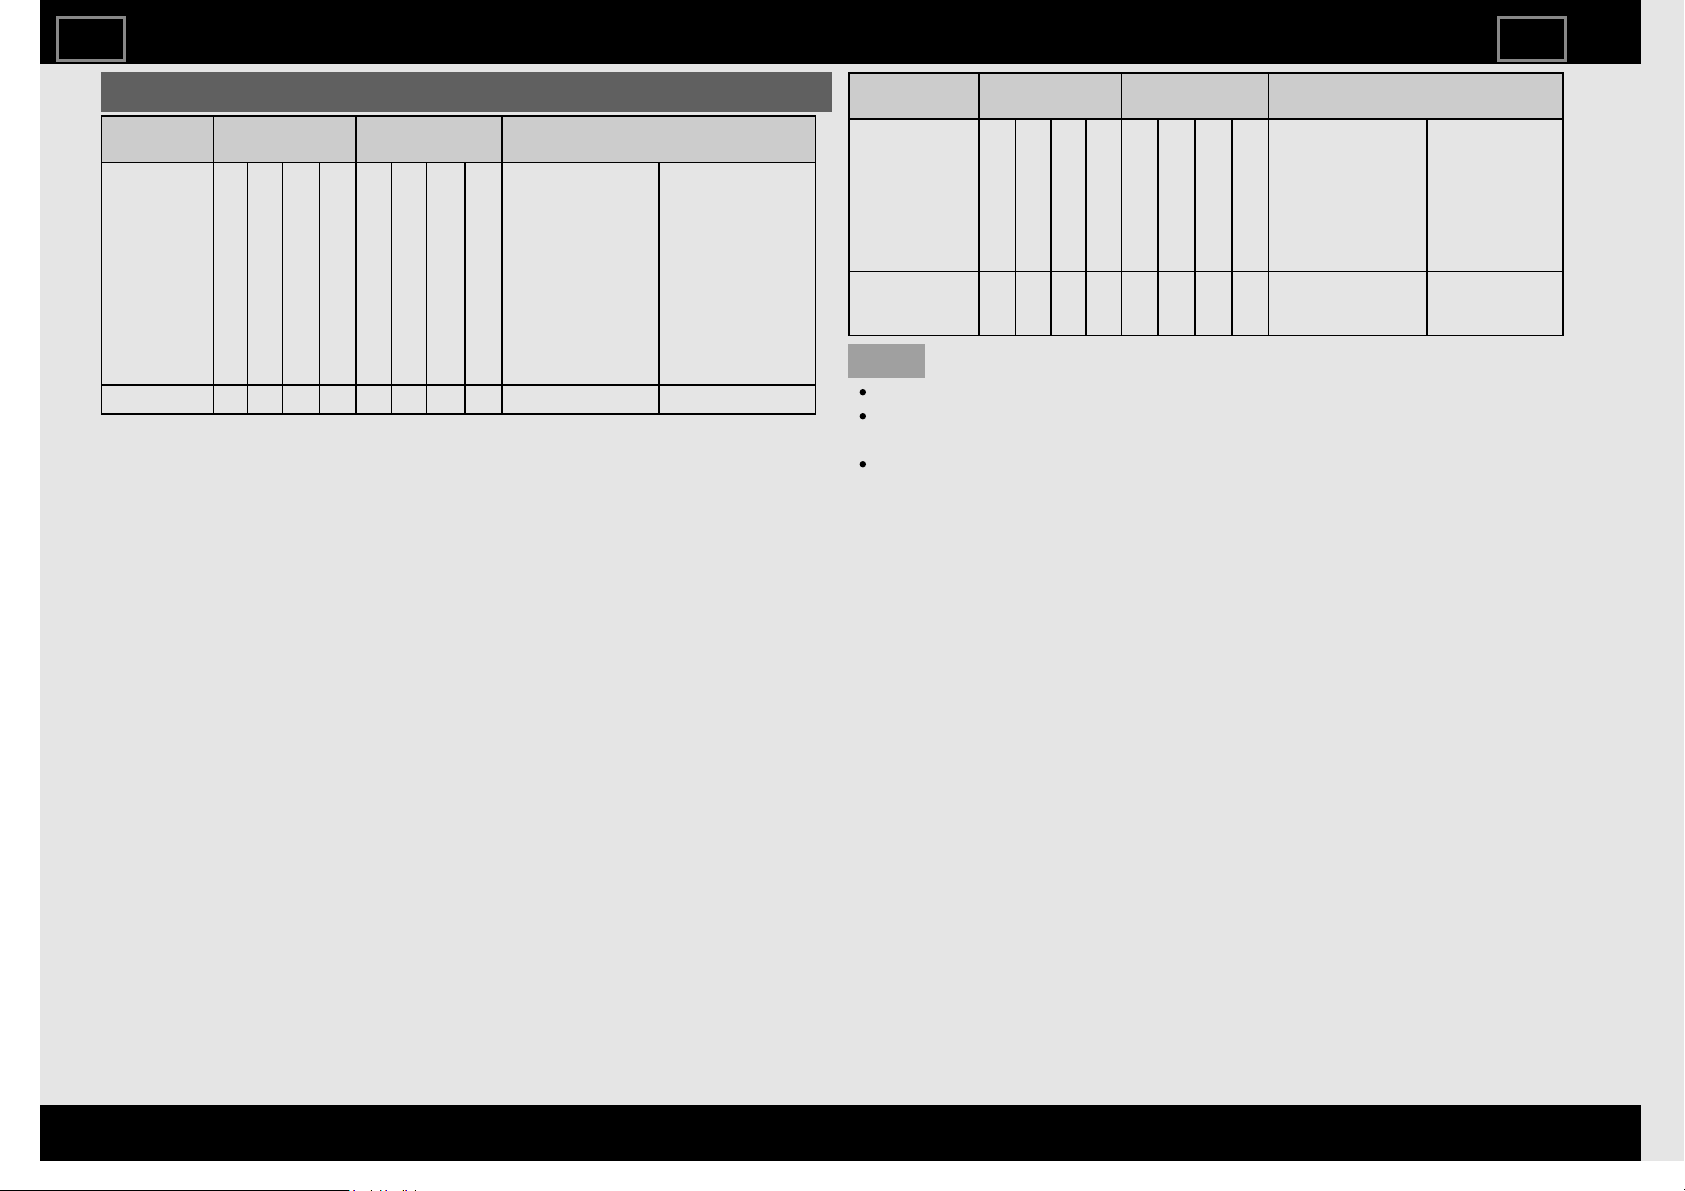
Control of the TV (Continue)
CONTROL
ITEM
COMMAND PARAMETER CONTROL CONTENTS
AV MODE
SELECTION
A V M D * * * _ 0: (Toggle),
1: STANDARD,
2: MOVIE,
3: GAME,
4: USER,
5: DYNAMIC
(Fixed),
6: DYNAMIC,
7: PC,
17: MOVIE THX (For
UH30U model
only.)
Although it can
choose now, it is
toggle operation in
inside.
VOLUME V O L M * * * _ Volume (0-100)
CONTROL
ITEM
COMMAND PARAMETER CONTROL CONTENTS
VIEW MODE W I D E * * _ _ 0: (Toggle),
1: Side Bar,
3: Zoom,
4: Stretch,
8: Dot by Dot,
9: Full Screen,
10: Auto,
11: Original
It is the same as
View Mode key.
MUTE M U T E * _ _ _ 0: (Toggle),
1: On,
2: Off
NOTE
If an underbar (_) appears in the parameter column, enter a space.
If an asterisk (*) appears, enter a value in the range indicated in
brackets under CONTROL CONTENTS.
Any numerical value can replace the "x" on the table.
Using a PC
ENG84
ENGLISH | FRANÇAIS | ESPAÑOL
>><<
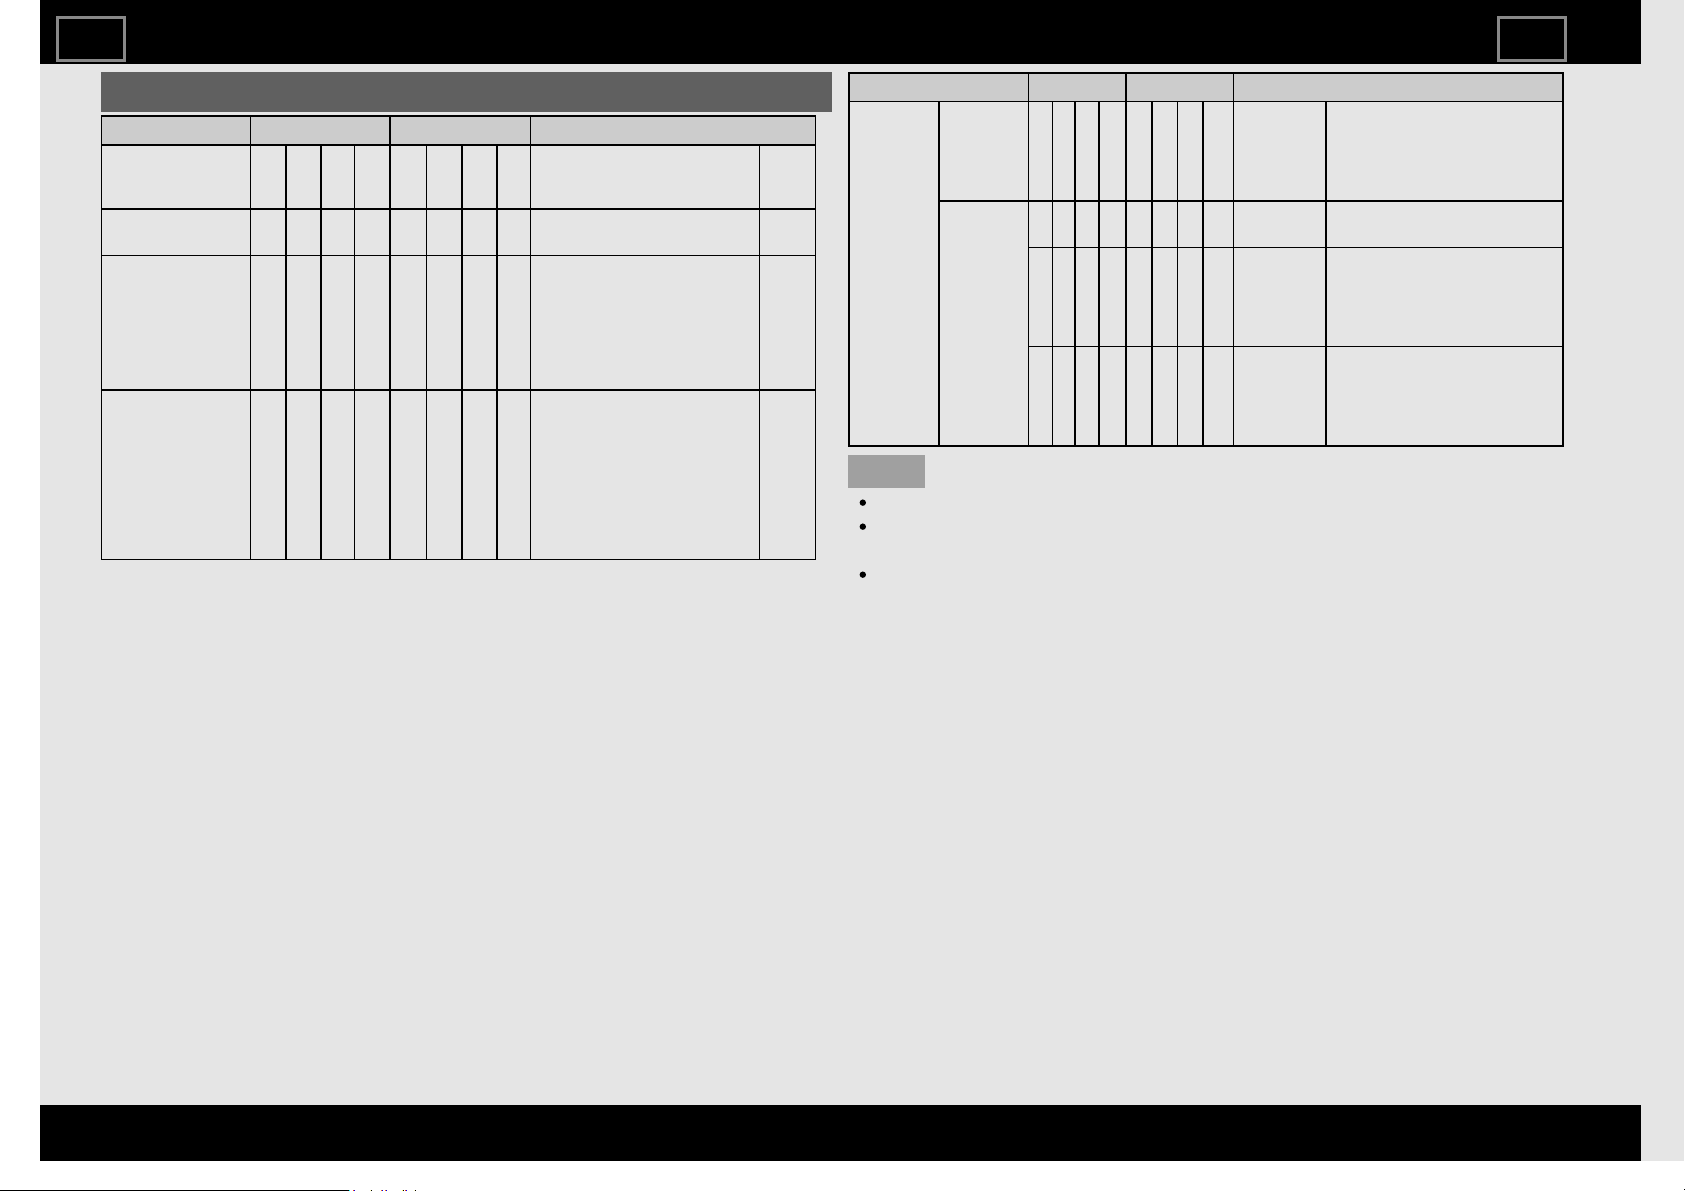
Control of the TV (Continue)
CONTROL ITEM COMMAND PARAMETER CONTROL CONTENTS
SURROUND A C S U * _ _ _ 0: (Toggle),
1: On,
2: Off
AUDIO
SELECTION
A C H A x _ _ _ (Toggle)
SLEEP TIMER O F T M * _ _ _ 0: Off,
1: OFF TIMER - 30 MIN.,
2: OFF TIMER - 60 MIN.,
3: OFF TIMER - 90 MIN.,
4: OFF TIMER - 120 MIN.,
5: OFF TIMER - 150 MIN.,
6: OFF TIMER - 180 MIN.
EQUALIZER E Q L Z * _ _ _ 0: (Toggle),
1: Off,
2: Rock,
3: Pop,
4: Live,
5: Dance,
6: Techno,
7: Classic,
8: Soft
CONTROL ITEM COMMAND PARAMETER CONTROL CONTENTS
CHANNEL DIRECT
CHANNEL
(ANALOG)
D C C H * * * _ The
channel
number of
TV
(1-135)
An input change is included if
it is not TV display.
In Air, 2-69ch is effective.
In Cable, 1-135ch is effective.
DIRECT
CHANNEL
(DIGITAL)
D A 2 P * * * * (0100-
9999)
DIGITAL Air (Two-Part
numbers, 2-digit plus 2-digit)
D C 2 U * * * _ (1-999) DIGITAL Cable (Two-Part
numbers, 3-digit plus 3-digit)
Front half of DIGITAL CABLE
CHANNEL NO. (Designate
major channel)
D C 2 L * * * _ (0-999) DIGITAL Cable (Two-Part
numbers, 3-digit plus 3-digit)
Rear half of DIGITAL CABLE
CHANNEL NO. (Designate
minor channel)
NOTE
If an underbar (_) appears in the parameter column, enter a space.
If an asterisk (*) appears, enter a value in the range indicated in
brackets under CONTROL CONTENTS.
Any numerical value can replace the "x" on the table.
Using a PC
ENG85
ENGLISH | FRANÇAIS | ESPAÑOL
>><<

Control of the TV (Continue)
CONTROL ITEM COMMAND PARAMETER CONTROL CONTENTS
CHANNEL DIRECT
CHANNEL
(DIGITAL)
D C 1 0 * * * * (0-9999) DIGITAL Cable
(One-Part
numbers, 5-
digit, less than
10,000)
D C 1 1 * * * * (0-6383) DIGITAL Cable
(One-Part
numbers, 5-
digit, more
than 10,000)
CH UP C H U P x _ _ _ The channel
number of
TV +1
If it is not TV
display, it will
input-switch to
TV. (same
function as CH
)
CH DOWN C H D W x _ _ _ The channel
number of
TV -1
If it is not TV
display, it will
input-switch to
TV. (same
function as CH
)
CC C L C P x _ _ _ (Toggle) Toggle
operation of a
closed caption.
DEVICE NAME T V N M 1 _ _ _ The device
name set in
"Device Name"
is displayed.
MODEL NAME M N R D 1 _ _ _ The model
name of the TV
CONTROL ITEM COMMAND PARAMETER CONTROL CONTENTS
SOFTWARE
VERSION
S W V N 1 _ _ _ The current
version of the TV
software is
displayed.
IP PROTOCOL
VERSION
I P P V 1 _ _ _ The currently
supported version
of IP protocol is
displayed.
NOTE
If an underbar (_) appears in the parameter column, enter a space.
If an asterisk (*) appears, enter a value in the range indicated in
brackets under CONTROL CONTENTS.
Any numerical value can replace the "x" on the table.
Using a PC
ENG86
ENGLISH | FRANÇAIS | ESPAÑOL
>><<
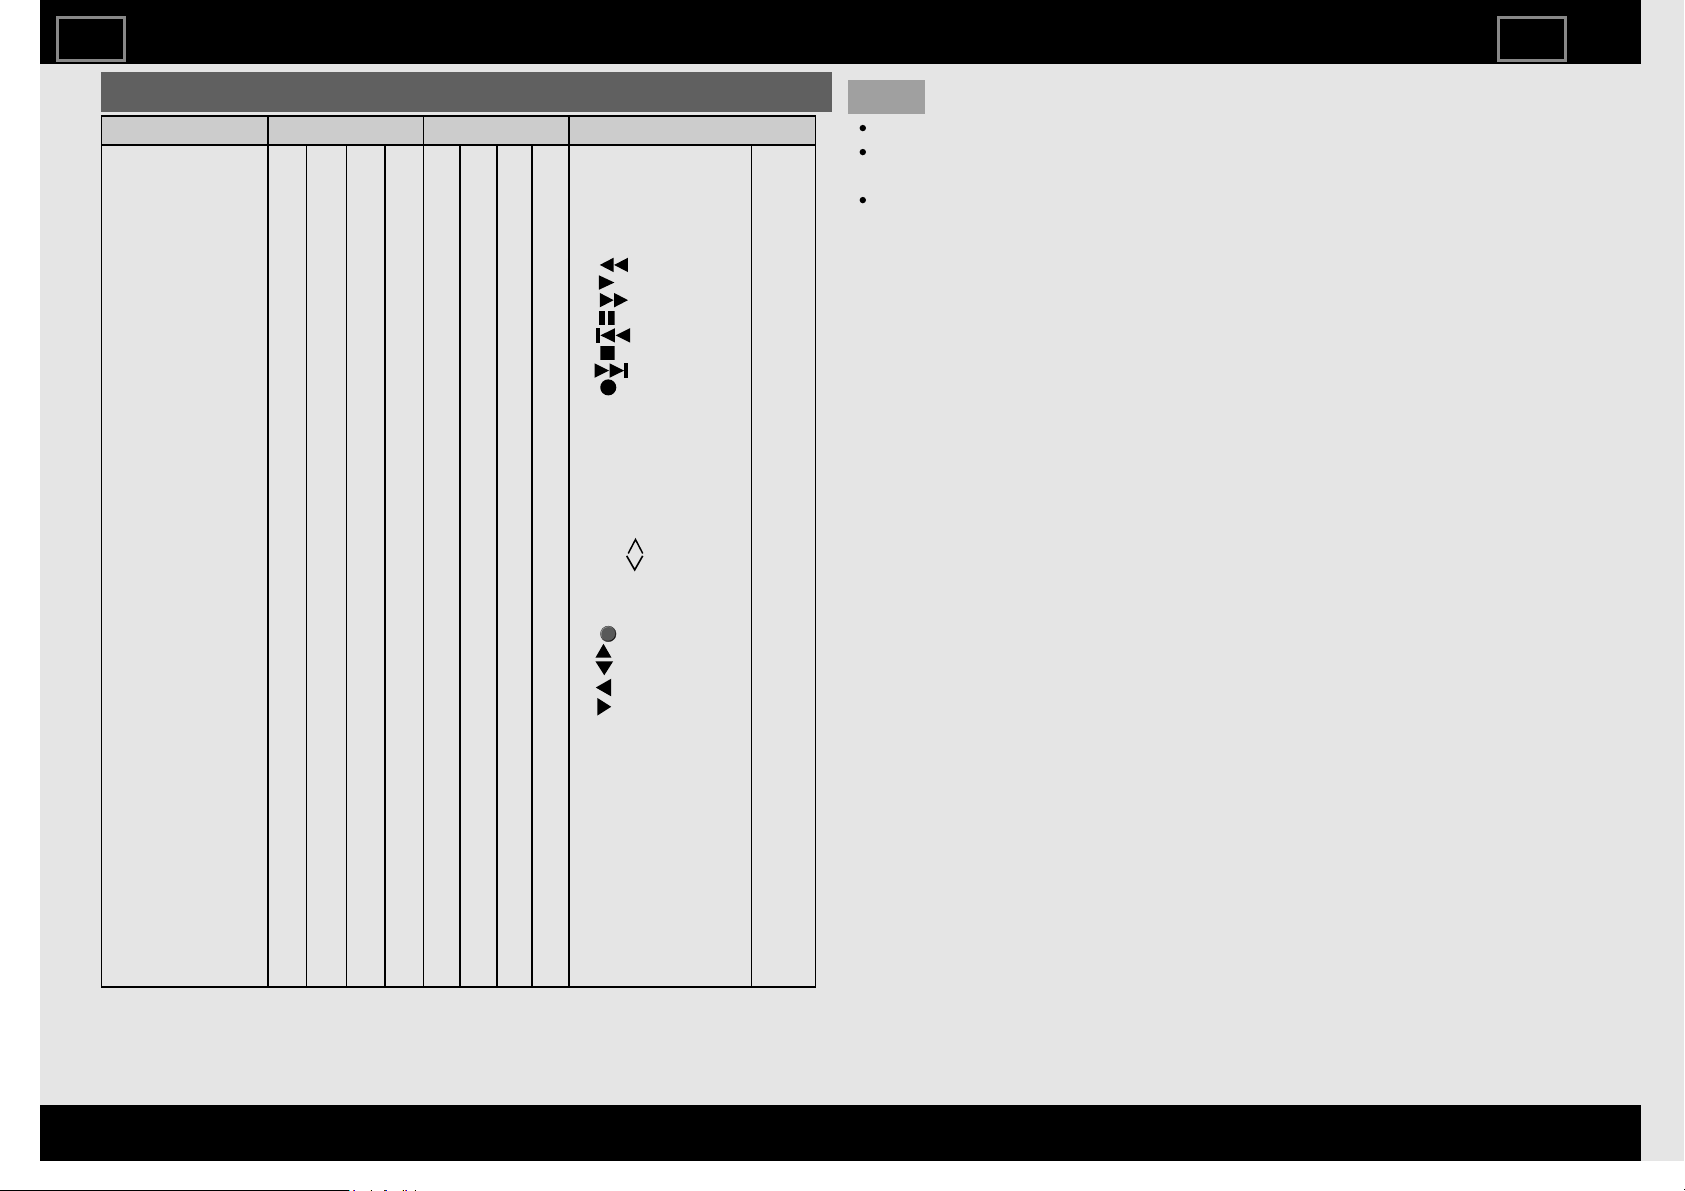
Control of the TV (Continue)
CONTROL ITEM COMMAND PARAMETER CONTROL CONTENTS
REMOTE CONTROL
BUTTONS
R C K Y * * _ _ 0-9: 0-9,
10: DOT,
11: ENT,
12: POWER,
13: DISPLAY,
14: POWER (SOURCE)
15: ,
16: ,
17: ,
18: ,
19: ,
20: ,
21: ,
22: REC,
24: SLEEP,
27: CC,
28: AV MODE,
29: VIEW MODE,
30: FLASHBACK,
31: MUTE,
32: VOL -,
33: VOL +,
34: CH ,
35: CH ,
36: DEVICES,
38: TV SETUP,
39: HOME,
40: (ENTER),
41: ,
42: ,
43: ,
44: ,
45: BACK,
46: EXIT,
47: CHANNELS
49: AUDIO,
50: A (red),
51: B (green),
52: C (blue),
53: D (yellow),
55: FAVORITE 1,
56: FAVORITE 2,
57: FAVORITE 3,
59: NETFLIX,
61: MANUAL,
62: MORE,
63: DISCOVER
NOTE
If an underbar (_) appears in the parameter column, enter a space.
If an asterisk (*) appears, enter a value in the range indicated in
brackets under CONTROL CONTENTS.
Any numerical value can replace the "x" on the table.
Using a PC
ENG87
ENGLISH | FRANÇAIS | ESPAÑOL
>><<
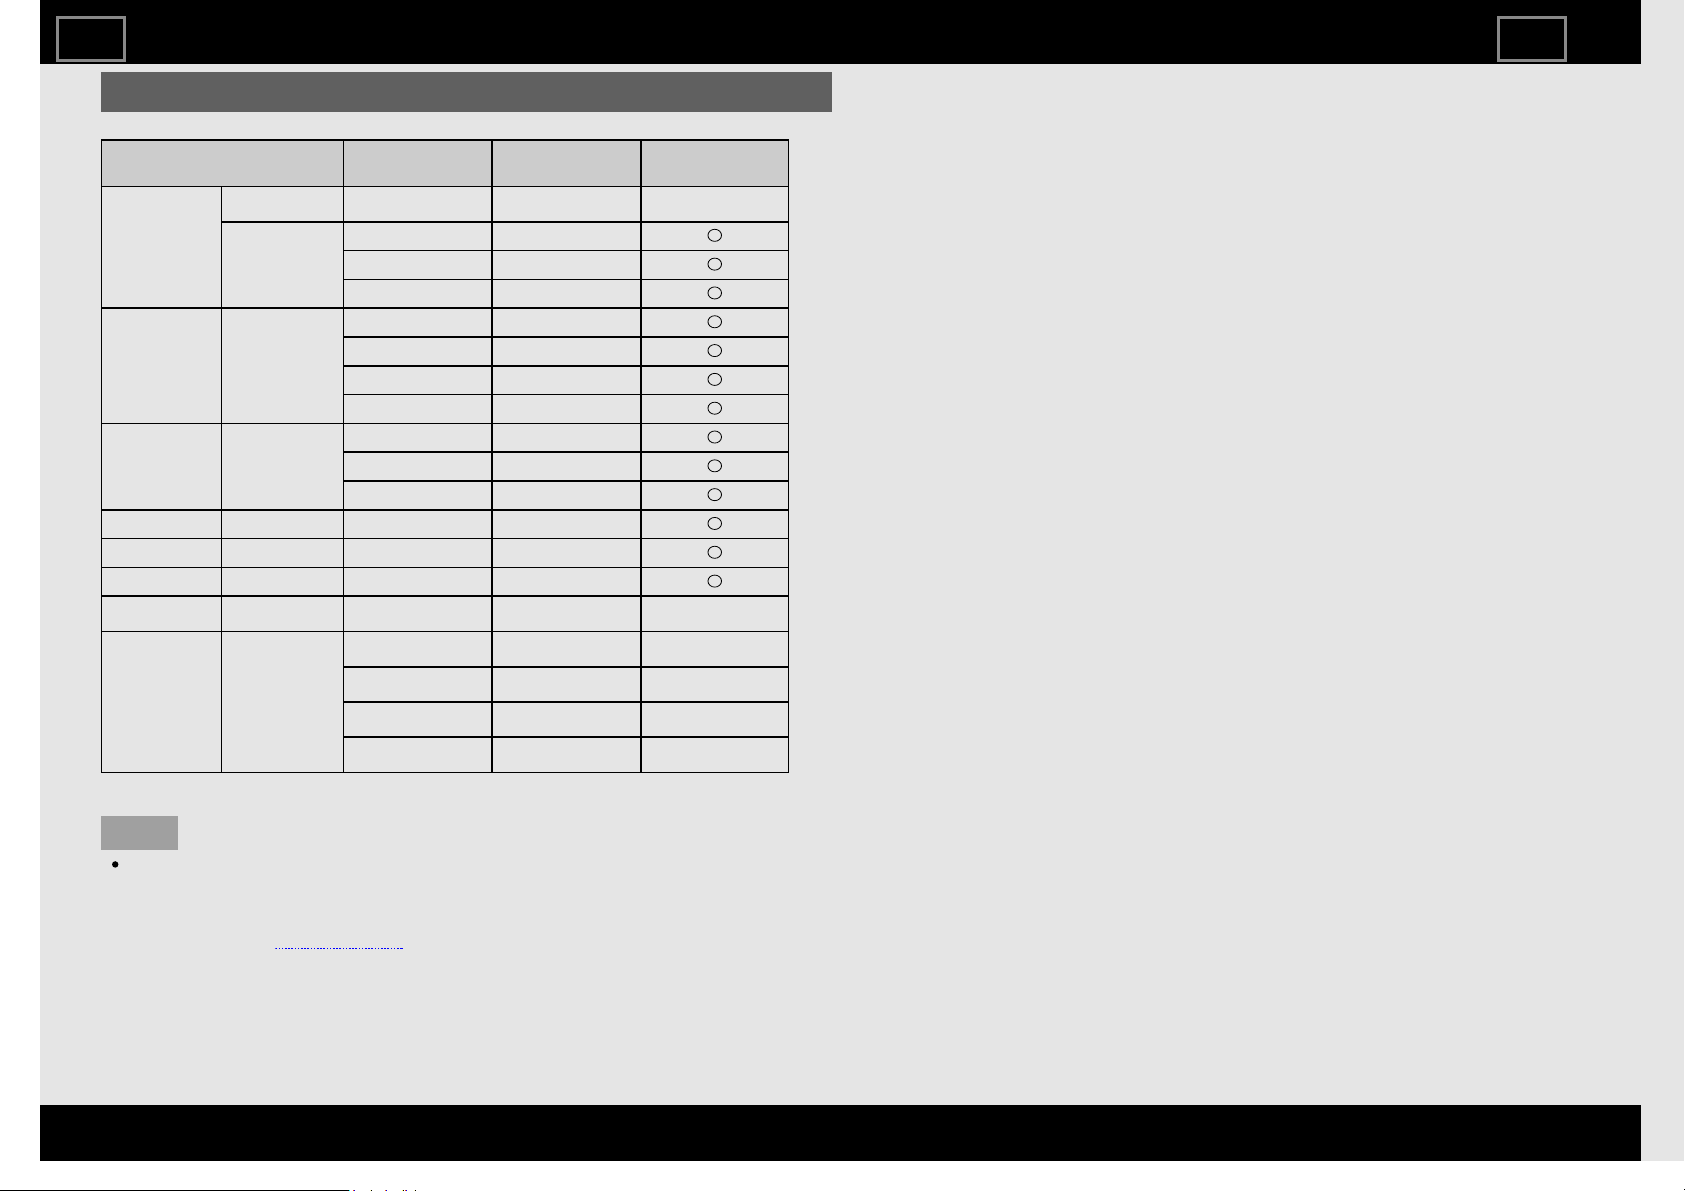
PC Compatibility Chart
It is necessary to set the PC correctly to display XGA and WXGA signal.
Resolution
Horizontal
Frequency
Vertical
Frequency
VESA Standard
VGA
720 x 400 31.5 kHz 70 Hz ―
640 x 480
31.5 kHz 60 Hz
37.9 kHz 72 Hz
37.5 kHz 75 Hz
SVGA 800 x 600
35.1 kHz 56 Hz
37.9 kHz 60 Hz
48.1 kHz 72 Hz
46.9 kHz 75 Hz
XGA 1024 x 768
48.4 kHz 60 Hz
56.5 kHz 70 Hz
60.0 kHz 75 Hz
WXGA 1360 x 768 47.7 kHz 60 Hz
SXGA 1280 x 1024 64.0 kHz 60 Hz
SXGA+ 1400 x 1050 65.3 kHz 60 Hz
1080p 1920 x 1080 67.5 kHz 60 Hz ―
2160p 3840 x 2160
53.95 kHz 24 Hz ― *1
56.25 kHz 25 Hz ― *1
67.5 kHz 30 Hz ― *1
135 kHz 60 Hz ― *1
VGA and XGA are registered trademarks of International Business Machines Corp.
*1: When connecting 4K equipment, use HDMI IN 1, 2, 3 or 4 terminal.
NOTE
HDMI IN 1, 2, 3 and 4 terminals are all capable of receiving 4K60P
4:4:4 signals.
To receive 4K60P 4:4:4 signals, on the Devices menu, set the HDMI
type to "Full". (See page 4-1)
Using a PC
ENG88
ENGLISH | FRANÇAIS | ESPAÑOL
>><<
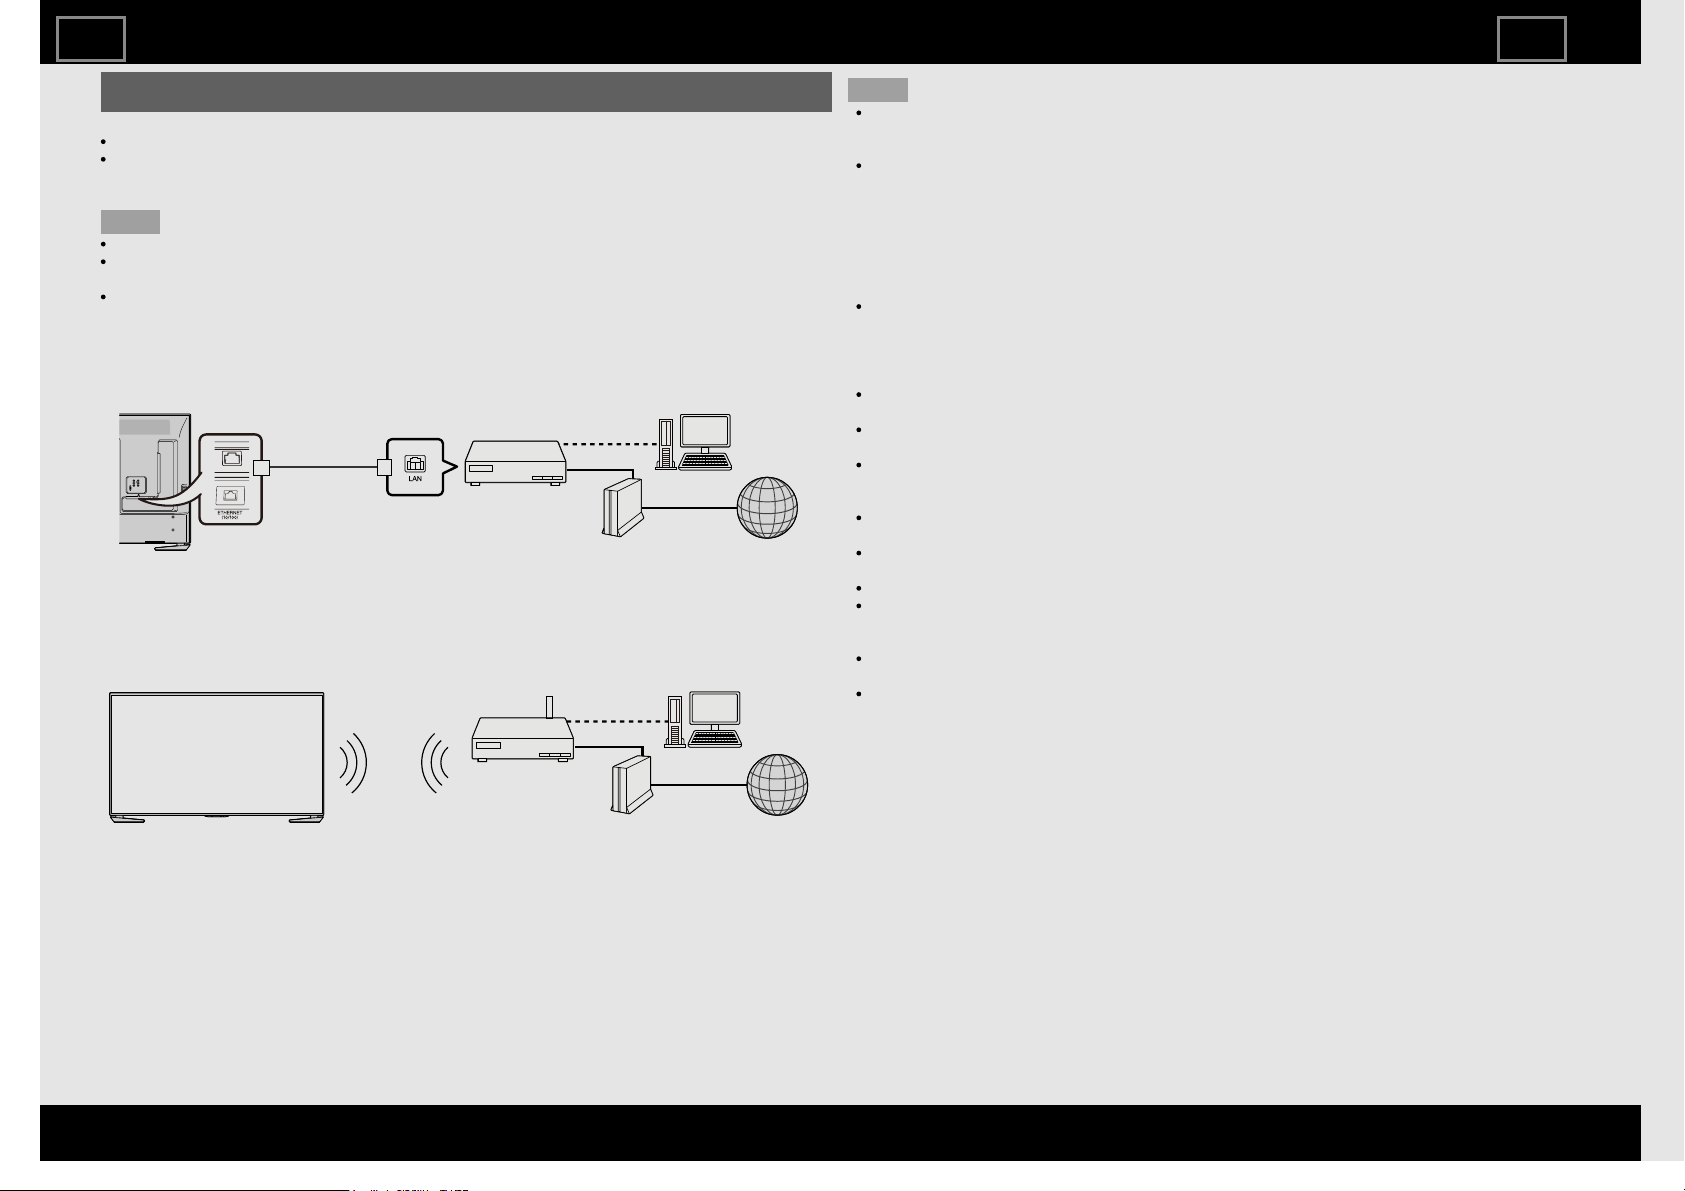
Connecting to the Internet
By connecting your TV to a broadband system, you can access the Internet from the TV.
You can enjoy a variety of streaming content and Internet applications.
It is necessary to configure the network settings in order to enjoy streaming content and
internet applications.
These settings can be configured from "HOME" > "Settings" > "Device" > "Network".
NOTE
To connect your TV to the Internet, you must have a broadband Internet connection.
If you do not have a broadband Internet connection, consult the store where you purchased
your TV or ask your Internet service provider or telephone company.
When an Internet connection is made, an Ethernet and wireless connection cannot be used
at the same time. Use only one of the connection types.
Using an ETHERNET cable
Use an ETHERNET cable (commercially available) to connect the ETHERNET terminal on the
TV to your broadband router (commercially available).
ETHERNET
cable
Internet
Modem
PC
Broadbandrouter
Using the wireless LAN
This TV is equipped with a wireless LAN function.
For a wireless LAN connection, you must use wireless setup to connect the access point and
TV.
WirelessLANrouter/
accesspoint
Internet
Modem
PC
NOTE
This TV has a built-in wireless LAN function. Using a separate wireless USB LAN adapter
may result in radio communications that do not comply with regulations on radio
communications. Therefore, do not use a separate wireless LAN adapter.
A wireless LAN connection and performance cannot be guaranteed for all residential
environments. In the following cases, the wireless LAN signal may be poor or drop, or the
connection speed may become slower.
- When used in buildings made with concrete, reinforced steel, or metal
- When placed near objects that obstruct the signal
- When used with other wireless devices that emit the same frequency
- When used in the vicinity of microwave ovens and other devices that emit a magnetic
field, electrostatic charge, or electromagnetic interference
When there is significant interference in the 2.4-GHz frequency (such as from other
wireless LAN devices, Bluetooth® devices, 2.4-GHz cordless telephones, and microwave
ovens), it is recommended that you use a wireless LAN router/access point that supports
IEEE802.11ac (5 GHz) and set the access point to transmit at 5 GHz. For setup details, see
the operation manual of your access point.
Operations cannot be guaranteed when used with access points that do not have Wi-Fi®
certification.
A wireless LAN router/access point is required to connect the TV to the Internet using a
wireless LAN. See the operation manual of your access point for setup.
If your access point is set to a stealth mode (that prevents detection by other devices), you
may not be able to establish a connection. In this case, disable the stealth mode on the
access point.
A stable connection speed is required to play back streaming content. Use an Ethernet
connection if the wireless LAN speed is unstable.
Before transferring to a third party or disposal, be sure to initialize the wireless LAN
settings.
Please follow the legislation in your country when using the wireless LAN outdoors.
If you have failed to connect to the Internet in the above operation, then an error message
will appear. In this case, press EXIT to exit from the connected TV feature to make changes
to the network settings.
If you still cannot connect to the Internet, please consult your Internet service provider or
telephone company.
You cannot configure the settings from "HOME" > "Settings" > "Device" > "Network" while
using an application. If you must configure your "Network" settings, press the EXIT key to
exit the function.
Using the Internet
ENG91
ENGLISH | FRANÇAIS | ESPAÑOL
>><<

Using Keyboard and Mouse
You can use a keyboard or mouse for
operating the TV when using applications.
When you use the USB devices, connect
the device to the USB terminal on the TV.
When you use the bluetooth device, make
necessary settings with "Bluetooth".
NOTE
The keyboard or mouse may not operate
properly depending on the application
being used.
The bluetooth device may not operate
properly depending on the device being
used.
Using the Internet
ENG92
ENGLISH | FRANÇAIS | ESPAÑOL
>><<

Notes
DISCLAIMERS
This SHARP device facilitates the access to content and services provided by third parties. The content and services accessible via this device
belong to and may be proprietary to third parties. Therefore, any use of such third party content and services must be in accordance with any
authorization or terms of use provided by such content or service provider. SHARP shall not be liable to you or any third party for your failure to
abide by such authorization or terms of use. Unless otherwise specifically authorized by the applicable content or service provider, all third
party content and services provided are for personal and non-commercial use; you may not modify, copy, distribute, transmit, display, perform,
reproduce, upload, publish, license, create derivative works from, transfer or sell in any manner or medium any content or services available via
this device.
SHARP is not responsible, nor liable, for customer service-related issues related to the third party content or services. Any questions, comments
or service-related inquiries relating to the third party content or service should be made directly to the applicable content or service provider.
You may not be able to access content or services from the device for a variety of reasons which may be unrelated to the device itself,
including, but not limited to, power failure, other Internet connection, or failure to configure your device properly. SHARP, its directors, officers,
employees, agents, contractors and affiliates shall not be liable to you or any third party with respect to such failures or maintenance outages,
regardless of cause or whether or not it could have been avoided.
ALL THIRD PARTY CONTENT OR SERVICES ACCESSIBLE VIA THIS DEVICE IS PROVIDED TO YOU ON AN "AS-IS" AND "AS AVAILABLE" BASIS AND
SHARP AND ITS AFFILIATES MAKE NO WARRANTY OR REPRESENTATION OF ANY KIND TO YOU, EITHER EXPRESS OR IMPLIED, INCLUDING,
WITHOUT LIMITATION, ANY WARRANTIES OF MERCHANTABILITY, NON-INFRINGEMENT, FITNESS FOR A PARTICULAR PURPOSE OR ANY
WARRANTIES OF SUITABILITY, AVAILABILITY, ACCURACY, COMPLETENESS, SECURITY, TITLE, USEFULNESS, LACK OF NEGLIGENCE OR
ERROR-FREE OR UNINTERRUPTED OPERATION OR USE OF THE CONTENT OR SERVICES PROVIDED TO YOU OR THAT THE CONTENT OR
SERVICES WILL MEET YOUR REQUIREMENTS OR EXPECTATIONS.
SHARP IS NOT AN AGENT OF AND ASSUMES NO RESPONSIBILITY FOR THE ACTS OR OMISSIONS OF THIRD PARTY CONTENT OR SERVICE
PROVIDERS, NOR ANY ASPECT OF THE CONTENT OR SERVICE RELATED TO SUCH THIRD PARTY PROVIDERS.
IN NO EVENT WILL SHARP AND/OR ITS AFFILIATES BE LIABLE TO YOU OR ANY THIRD PARTY FOR ANY DIRECT, INDIRECT, SPECIAL,
INCIDENTAL, PUNITIVE, CONSEQUENTIAL OR OTHER DAMAGES, WHETHER THE THEORY OF LIABILITY IS BASED ON CONTRACT, TORT,
NEGLIGENCE, BREACH OF WARRANTY, STRICT LIABILITY OR OTHERWISE AND WHETHER OR NOT SHARP AND/OR ITS AFFILIATES HAVE
BEEN ADVISED OF THE POSSIBILITY OF SUCH DAMAGES.
Using the Internet
ENG93
ENGLISH | FRANÇAIS | ESPAÑOL
>><<
Troubleshooting
Problem Possible Solution
No power Check if you pressed POWER on the remote control unit.
Is the AC cord disconnected?
Has the power been turned on?
Unit cannot
be operated.
External influences such as lightning, static electricity, may cause
improper operation. In this case, operate the unit after first turning off the
power of the TV or unplugging the AC cord and replugging it in after 1 or
2 minutes.
Remote
control unit
does not
operate.
Is the equipment to be operated by the remote control unit set correctly?
Press TV to set the remote control unit to the setting for operating the
TV.
Are batteries inserted with polarity (+, -) aligned?
Are batteries worn out? (Replace with new batteries.)
Are you using it under strong or fluorescent lighting?
Is a fluorescent light illuminated near the remote control sensor?
Is "RC Control Lock" selected in "Operation Lock Out"?
Page 3-41
If you are using a touchpad remote control unit, has the pairing operation
finished?
page 2-2
Picture is cut
off/with
sidebar
screen.
Are screen mode adjustments such as picture size made correctly?
Pages 5-10 to 5-12
Strange
color, light
color, or
color
misalignment
Adjust the picture tone.
Pages 3-2 to 3-23
Is the room too bright? The picture may look dark in a room that is too
bright.
Power is
suddenly
turned off.
Is the sleep timer set?
Pages 5-7
Check the power control settings.
Page 2-6
The unit's internal temperature has increased. Remove any objects
blocking vent or clean.
Problem Possible Solution
No picture Is connection to other components correct?
Is the correct input selected?
Pages 2-9
Is "On" selected in "Audio Only"?
Page 5-13
If the PC image is not displayed, check the following:
- When connecting a laptop PC to the TV, check that display output
mode of the PC is set to external monitor.
- Check the resolution setting on the PC. Is a non-compatible signal
being input?
Page 8-8
For 4K60P signals applied to an HDMI input, the external device may
not be outputting signals correctly. Set "HDMI Type Selection" to
"Limited".
page 4-1
Picture quality
of HD programs
is poor.
To enjoy HD images from external equipment, you are required to set
up HDMI connection or component connection.
If the program content is not of HD quality, HD images cannot be
displayed. Check that the program you are viewing provides HD
images.
The HD cable/satellite set-top box may need to be configured to
output HD images via cable/satellite.
The cable/satellite broadcast may not support a signal resolution of
1080p.
The TV
sometimes
makes a
cracking sound.
This is not a malfunction. This happens when the cabinet slightly
expands and contracts according to change in temperature. This does
not affect the TV's performance.
Appendix
ENG101
ENGLISH | FRANÇAIS | ESPAÑOL
>><<
Troubleshooting (Continue)
Problem Possible Solution
No sound Is connection to other components correct?
Is the volume too low?
Page 5-2
Is "Variable" selected in "Output Select"?
Page 4-4
Have you pressed MUTE on the remote control unit?
Page 5-3
Check the audio output of the connected external equipment.
Is the volume too low or muted?
When external equipment is connected via an HDMI cable, you
may need to configure the audio to be output through the
HDMI cable.
When audio is not output from external equipment connected
to the HDMI IN 3 terminal, check the "Audio Select" setting.
Page 8-1
Even when external equipment is connected using an HDMI-
certified cable, an audio cable connection may be required
depending on the type of equipment and the media being
played back. In this case, in addition to connecting an HDMI-
certified cable to the HDMI IN 3 terminal, connect a Ø 3.5 mm
stereo minijack cable to the AUDIO IN terminal and set "Audio
Select" to "HDMI+Analog".
Page 8-1
When connecting a PC via an HDMI-certified cable, check the
following:
- Is the audio output of the PC configured correctly? Check the
audio output settings and output audio format in Sound
Properties on the PC.
The audio formats compatible with this TV are PCM, Dolby
Digital. With other formats, audio cannot be output.
- Depending on the board, only video signals may be output. In
this case, in addition to connecting an HDMI-certified cable to
the HDMI IN 3 terminal, connect a Ø 3.5 mm stereo minijack
cable to the AUDIO IN terminal and set "Audio Select" to
"HDMI+Analog".
Page 8-1
If you have selected "Bluetooth-Audio", you will not be able to
output sound from the TV's internal speakers or to output
optical audio.
Problem Possible Solution
Google Cast image/
audio cannot be output
to the TV.
Check pairing.
Appendix
ENG102
ENGLISH | FRANÇAIS | ESPAÑOL
>><<
Troubleshooting - Error Message
The example of an
error message
displayed on a
screen
Possible Solution
No broadcast now. Check the antenna cable. Check that the antenna is correctly
setup.
Check the broadcast time in the program guide.
An incompatible audio
signal has been
received. Check the
output device settings.
This message is displayed when an audio format other than
PCM, Dolby Digital is input.
- Set the audio output format of connected external HDMI
equipment to PCM, Dolby Digital.
- Refer to the operation manual of the external equipment for
setting details.
Appendix
ENG103
ENGLISH | FRANÇAIS | ESPAÑOL
>><<
Information on the Software License for This Product
Software License
You can read the software licenses in the on-screen display menu. Refer
to "HOME" > "Settings" > "Device" > "About" > "Legal information" > "Open
source licenses" .
Software composition
The software included in this product is comprised of various software
components whose individual copyrights are held by SHARP or by third
parties.
Cautions regarding use in high and low temperature environments
When the unit is used in a low temperature space (e.g. room, office),
the picture may leave trails or appear slightly delayed. This is not a
malfunction, and the unit will recover when the temperature returns
to normal.
Do not leave the unit in a hot or cold location. Also, do not leave the
unit in a location exposed to direct sunlight or near a heater, as this
may cause the cabinet to deform and the front panel to
malfunction.
Storage temperature: -4°F to +140°F (-20°C to +60°C)
Appendix
ENG104
ENGLISH | FRANÇAIS | ESPAÑOL
>><<
Google, Android, Android TV, Google Play, Google Cast, and
YouTube are trademarks of Google Inc.
Dolby, Dolby Audio, and the double-D symbol are trademarks
of Dolby Laboratories.
The terms HDMI and HDMI High-Definition Multimedia
Interface, and the HDMI Logo are trademarks or registered
trademarks of HDMI Licensing, LLC in the United States and
other countries.
The Wi-Fi CERTIFIED Logo is a certification mark of the Wi-Fi
Alliance.
The Wi-Fi Protected Setup Mark is a mark of the Wi-Fi
Alliance.
Netflix and the Netflix logo are the registered trademarks of
Netflix, Inc.
VUDU™ is a trademark of VUDU, Inc.
SDHC Logo is a trademark of SD-3C, LLC.
MHL, the MHL Logo, and Mobile High-Definition Link are
trademarks or registered trademarks of MHL LLC in the
United States and other countries.
MHL®
The Bluetooth® word mark and logos are registered
trademarks owned by Bluetooth SIG, Inc. and any use of such
marks by SHARP Corporation is under license. Other
trademarks and trade names are those of their respective
owners.
THX and the THX logo are trademarks of THX Ltd., registered
in the United States and other jurisdictions. All rights
reserved.
For DTS patents, see http://patents.dts.com. Manufactured
under license from DTS Licensing Limited. DTS, the Symbol, &
DTS and the Symbol together are registered trademarks, and
DTS 2.0+Digital Out is a trademark of DTS, Inc. © DTS, Inc. All
Rights Reserved.
Trademarks
ENG111
ENGLISH | FRANÇAIS | ESPAÑOL
>><<
TV
Item Model: LC-80UH30U
LCD panel
Size 80" Class (80" Diagonal)
Resolution 8,294,400 pixels (3,840 x 2,160)
TV Function
TV-standard (CCIR) American TV Standard ATSC/NTSC System
Receiving Channel
VHF/UHF VHF 2-13ch, UHF 14-69ch
CATV 1-135ch (non-scrambled channel only)
Digital Terrestrial Broadcast (8VSB) 2-69ch
Digital cable*1 (64/256 QAM) 1-135ch (non-scrambled channel only)
Audio multiplex BTSC System
Audio out 10W x 2 + 15W(WF)
Terminals
Side SD card slot SD/SDHC memory card *2
Back panel vertical side
HDMI IN 1 HDMI in with HDCP (HDCP 2.2 supported), ARC
HDMI IN 2 HDMI in with HDCP (HDCP 2.2 supported), MHL
HDMI IN 3 HDMI in with HDCP (HDCP 2.2 supported), Audio in (ø3.5 mm stereo jack)
HDMI IN 4 HDMI in with HDCP (HDCP 2.2 supported)
AUDIO OUT Audio out (ø3.5 mm stereo jack)
USB 1 Photo/Music/Video mode, Software update, USB keyboard/mouse
Back panel surface side
COMPONENT IN/VIDEO IN COMPONENT in/AV in
RS-232C 9-pin D-sub male connector
USB 4 USB connector type B (Not for customers)
Back panel horizontal side
ANT/CABLE 75Ω Unbalace, F Type x 1 for Analog (VHF/UHF/CATV) and Digital (AIR/CABLE)
AUDIO IN Audio in (ø3.5mm stereo jack)
DIGITAL AUDIO OUT Optical Digital audio out x 1 (PCM/Dolby Digital)
ETHERNET Network connector
USB 2 Photo/Music/Video mode, Software update, USB keyboard/mouse
USB 3 Photo/Music/Video mode, Software update, USB keyboard/mouse
OSD language English/French/Spanish
Power Requirement AC 120 V, 60Hz
On Mode Power 223 W
Power Consumption 468 W (0.5 W Standby with AC 120 V)
Weight
TV + Stand 122.4lbs/55.5kg
TV only 113.5lbs/51.5kg
Dimensions (W x H x D)(inch)
TV + Stand 71 1/2 x 43 x 17 59/64
TV only 71 1/2 x 41 35/64 x 4 1/2
Operating temperature +32°F to +104°F (0°C to +40°C)
*1 Emergency alert messages via Cable are unreceivable.
*2 If you insert any card other than the SD/SDHC (class 6 or higher), it will not work.
As part of policy of continuous improvement, SHARP reserves the right to make design and specification changed for product improvement without prior notice.
The performance specification figures indicated are nominal values of production units. There may be some deviations from these vaklues in individual units.
Specifications
ENG121
ENGLISH | FRANÇAIS | ESPAÑOL
>><<

TV (Continue)
Item Model: LC-70UH30U
LCD panel
Size 70" Class (69 1/2" Diagonal)
Resolution 8,294,400 pixels (3,840 x 2,160)
TV Function
TV-standard (CCIR) American TV Standard ATSC/NTSC System
Receiving Channel
VHF/UHF VHF 2-13ch, UHF 14-69ch
CATV 1-135ch (non-scrambled channel only)
Digital Terrestrial Broadcast (8VSB) 2-69ch
Digital cable*1 (64/256 QAM) 1-135ch (non-scrambled channel only)
Audio multiplex BTSC System
Audio out 10W x 2 + 15W(WF)
Terminals
Side SD card slot SD/SDHC memory card *2
Back panel vertical side
HDMI IN 1 HDMI in with HDCP (HDCP 2.2 supported), ARC
HDMI IN 2 HDMI in with HDCP (HDCP 2.2 supported), MHL
HDMI IN 3 HDMI in with HDCP (HDCP 2.2 supported), Audio in (ø3.5 mm stereo jack)
HDMI IN 4 HDMI in with HDCP (HDCP 2.2 supported)
AUDIO OUT Audio out (ø3.5 mm stereo jack)
USB 1 Photo/Music/Video mode, Software update, USB keyboard/mouse
Back panel surface side
COMPONENT IN/VIDEO IN COMPONENT in/AV in
RS-232C 9-pin D-sub male connector
USB 4 USB connector type B (Not for customers)
Back panel horizontal side
ANT/CABLE 75Ω Unbalace, F Type x 1 for Analog (VHF/UHF/CATV) and Digital (AIR/CABLE)
AUDIO IN Audio in (ø3.5mm stereo jack)
DIGITAL AUDIO OUT Optical Digital audio out x 1 (PCM/Dolby Digital)
ETHERNET Network connector
USB 2 Photo/Music/Video mode, Software update, USB keyboard/mouse
USB 3 Photo/Music/Video mode, Software update, USB keyboard/mouse
OSD language English/French/Spanish
Power Requirement AC 120 V, 60Hz
On Mode Power 125 W
Power Consumption 270 W (0.5 W Standby with AC 120 V)
Weight
TV + Stand 86.0lbs/39.0kg
TV only 81.6lbs/37.0kg
Dimensions (W x H x D)(inch)
TV + Stand 61 35/64 x 37 3/32 x 14 39/64
TV only 61 35/64 x 35 3/4 x 3 15/32
Operating temperature +32°F to +104°F (0°C to +40°C)
*1 Emergency alert messages via Cable are unreceivable.
*2 If you insert any card other than the SD/SDHC (class 6 or higher), it will not work.
As part of policy of continuous improvement, SHARP reserves the right to make design and specification changed for product improvement without prior notice.
The performance specification figures indicated are nominal values of production units. There may be some deviations from these vaklues in individual units.
Specifications
ENG122
ENGLISH | FRANÇAIS | ESPAÑOL
>><<

TV (Continue)
Item Model: LC-80UE30U
LCD panel
Size 80" Class (80" Diagonal)
Resolution 8,294,400 pixels (3,840 x 2,160)
TV Function
TV-standard (CCIR) American TV Standard ATSC/NTSC System
Receiving Channel
VHF/UHF VHF 2-13ch, UHF 14-69ch
CATV 1-135ch (non-scrambled channel only)
Digital Terrestrial Broadcast (8VSB) 2-69ch
Digital cable*1 (64/256 QAM) 1-135ch (non-scrambled channel only)
Audio multiplex BTSC System
Audio out 10W x 2
Terminals
Back panel vertical side
HDMI IN 1 HDMI in with HDCP (HDCP 2.2 supported), ARC
HDMI IN 2 HDMI in with HDCP (HDCP 2.2 supported), MHL
HDMI IN 3 HDMI in with HDCP (HDCP 2.2 supported), Audio in (ø3.5 mm stereo jack)
HDMI IN 4 HDMI in with HDCP (HDCP 2.2 supported)
AUDIO OUT Audio out (ø3.5 mm stereo jack)
USB 1 Photo/Music/Video mode, Software update, USB keyboard/mouse
Back panel surface side
COMPONENT IN/VIDEO IN COMPONENT in/AV in
RS-232C 9-pin D-sub male connector
USB 4 USB connector type B (Not for customers)
Back panel horizontal side
ANT/CABLE 75Ω Unbalace, F Type x 1 for Analog (VHF/UHF/CATV) and Digital (AIR/CABLE)
AUDIO IN Audio in (ø3.5mm stereo jack)
DIGITAL AUDIO OUT Optical Digital audio out x 1 (PCM/Dolby Digital)
ETHERNET Network connector
USB 2 Photo/Music/Video mode, Software update, USB keyboard/mouse
USB 3 Photo/Music/Video mode, Software update, USB keyboard/mouse
OSD language English/French/Spanish
Power Requirement AC 120 V, 60Hz
On Mode Power 223 W
Power Consumption 468 W (0.5 W Standby with AC 120 V)
Weight
TV + Stand 121.3lbs/55.0kg
TV only 112.4lbs/51.0kg
Dimensions (W x H x D)(inch)
TV + Stand 71 1/2 x 43 x 17 59/64
TV only 71 1/2 x 41 35/64 x 4 1/2
Operating temperature +32°F to +104°F (0°C to +40°C)
*1 Emergency alert messages via Cable are unreceivable.
As part of policy of continuous improvement, SHARP reserves the right to make design and specification changed for product improvement without prior notice.
The performance specification figures indicated are nominal values of production units. There may be some deviations from these vaklues in individual units.
Specifications
ENG123
ENGLISH | FRANÇAIS | ESPAÑOL
>><<
TV (Continue)
Item Model: LC-70UE30U/LC-70UC30U
LCD panel
Size 70" Class (69 1/2" Diagonal)
Resolution 8,294,400 pixels (3,840 x 2,160)
TV Function
TV-standard (CCIR) American TV Standard ATSC/NTSC System
Receiving Channel
VHF/UHF VHF 2-13ch, UHF 14-69ch
CATV 1-135ch (non-scrambled channel only)
Digital Terrestrial Broadcast (8VSB) 2-69ch
Digital cable*1 (64/256 QAM) 1-135ch (non-scrambled channel only)
Audio multiplex BTSC System
Audio out 10W x 2
Terminals
Back panel vertical side
HDMI IN 1 HDMI in with HDCP (HDCP 2.2 supported), ARC
HDMI IN 2 HDMI in with HDCP (HDCP 2.2 supported), MHL
HDMI IN 3 HDMI in with HDCP (HDCP 2.2 supported), Audio in (ø3.5 mm stereo jack)
HDMI IN 4 HDMI in with HDCP (HDCP 2.2 supported)
AUDIO OUT Audio out (ø3.5 mm stereo jack)
USB 1 Photo/Music/Video mode, Software update, USB keyboard/mouse
Back panel surface side
COMPONENT IN/VIDEO IN COMPONENT in/AV in
RS-232C 9-pin D-sub male connector
USB 4 USB connector type B (Not for customers)
Back panel horizontal side
ANT/CABLE 75Ω Unbalace, F Type x 1 for Analog (VHF/UHF/CATV) and Digital (AIR/CABLE)
AUDIO IN Audio in (ø3.5mm stereo jack)
DIGITAL AUDIO OUT Optical Digital audio out x 1 (PCM/Dolby Digital)
ETHERNET Network connector
USB 2 Photo/Music/Video mode, Software update, USB keyboard/mouse
USB 3 Photo/Music/Video mode, Software update, USB keyboard/mouse
OSD language English/French/Spanish
Power Requirement AC 120 V, 60Hz
On Mode Power 125 W
Power Consumption 270 W (0.5 W Standby with AC 120 V)
Weight
TV + Stand 84.9lbs/38.5kg
TV only 80.5lbs/36.5kg
Dimensions (W x H x D)(inch)
TV + Stand 61 35/64 x 37 3/32 x 14 39/64
TV only 61 35/64 x 35 3/4 x 3 15/32
Operating temperature +32°F to +104°F (0°C to +40°C)
*1 Emergency alert messages via Cable are unreceivable.
As part of policy of continuous improvement, SHARP reserves the right to make design and specification changed for product improvement without prior notice.
The performance specification figures indicated are nominal values of production units. There may be some deviations from these vaklues in individual units.
Specifications
ENG124
ENGLISH | FRANÇAIS | ESPAÑOL
>><<

TV (Continue)
Item Model: LC-60UE30U
LCD panel
Size 60" Class (60 3/32" Diagonal)
Resolution 8,294,400 pixels (3,840 x 2,160)
TV Function
TV-standard (CCIR) American TV Standard ATSC/NTSC System
Receiving Channel
VHF/UHF VHF 2-13ch, UHF 14-69ch
CATV 1-135ch (non-scrambled channel only)
Digital Terrestrial Broadcast (8VSB) 2-69ch
Digital cable*1 (64/256 QAM) 1-135ch (non-scrambled channel only)
Audio multiplex BTSC System
Audio out 10W x 2
Terminals
Back panel vertical side
HDMI IN 1 HDMI in with HDCP (HDCP 2.2 supported), ARC
HDMI IN 2 HDMI in with HDCP (HDCP 2.2 supported), MHL
HDMI IN 3 HDMI in with HDCP (HDCP 2.2 supported), Audio in (ø3.5 mm stereo jack)
HDMI IN 4 HDMI in with HDCP (HDCP 2.2 supported)
AUDIO OUT Audio out (ø3.5 mm stereo jack)
USB 1 Photo/Music/Video mode, Software update, USB keyboard/mouse
Back panel surface side
COMPONENT IN/VIDEO IN COMPONENT in/AV in
RS-232C 9-pin D-sub male connector
USB 4 USB connector type B (Not for customers)
Back panel horizontal side
ANT/CABLE 75Ω Unbalace, F Type x 1 for Analog (VHF/UHF/CATV) and Digital (AIR/CABLE)
AUDIO IN Audio in (ø3.5mm stereo jack)
DIGITAL AUDIO OUT Optical Digital audio out x 1 (PCM/Dolby Digital)
ETHERNET Network connector
USB 2 Photo/Music/Video mode, Software update, USB keyboard/mouse
USB 3 Photo/Music/Video mode, Software update, USB keyboard/mouse
OSD language English/French/Spanish
Power Requirement AC 120 V, 60Hz
On Mode Power 125 W
Power Consumption 235 W (0.5 W Standby with AC 120 V)
Weight
TV + Stand 63.9lbs/29.0kg
TV only 59.5lbs/27.0kg
Dimensions (W x H x D)(inch)
TV + Stand 53 23/64 x 32 29/64 x 14 39/64
TV only 53 23/64 x 31 5/32 x 3 25/64
Operating temperature +32°F to +104°F (0°C to +40°C)
*1 Emergency alert messages via Cable are unreceivable.
As part of policy of continuous improvement, SHARP reserves the right to make design and specification changed for product improvement without prior notice.
The performance specification figures indicated are nominal values of production units. There may be some deviations from these vaklues in individual units.
Specifications
ENG125
ENGLISH | FRANÇAIS | ESPAÑOL
>><<
Wireless LAN
Specification
Standard IEEE 802.11a/b/g/n/ac*
Frequency Band
2412-2484 MHz
5150-5850 MHz
Security
Static WEP (64/128 bit kry index 1 only)
WPA-PSK (TKIP)
WPA2-PSK (AES)
Modulation
IEEE802.11b: DBPSK, DQPSK, CCK / DSSS HRDSSS
IEEE802.11a: BPSK, QPSK, 16QAM, DBPSK, DQPSK, CCK / OFDM
IEEE802.11g: BPSK, QPSK, 16QAM, DBPSK, DQPSK, CCK, PBCC / OFDM
IEEE802.11n: BPSK, QPSK, 16QAM, 64QAM / OFDM
IEEE802.11ac: BPSK, QPSK, 16QAM, 64QAM, 256QAM / OFDM
Throughput
IEEE802.11b: 1, 2.5, 5, 11Mbps
IEEE802.11a: 6, 9, 12, 18, 24, 36, 48, 54Mbps
IEEE802.11g: 6, 9, 12, 18, 24, 36, 48, 54Mbps
IEEE802.11n: ~300Mbps
IEEE802.11ac: ~866.6Mbps
* IEEE 802.11ac is supported.
Specifications
ENG126
ENGLISH | FRANÇAIS | ESPAÑOL
>><<

LC-80UH30U
3
29
/32(99)
4
1
/2 (114)*3
8
9
/32(210)
43(1092)
41
35
/64(1055)
71
1
/2(1816)
71
5
/32 (1807)
22
17
/
32
(572)
8
15
/64
(209)
17
59
/64
(455)
23
5
/8(600)
15
3
/
4
(400)
24
47
/64(628)
2
31
/64(63)*2
70
5
/32
(1781.76)*1
39
15
/32
(1002.24)*1
Dimensional Drawings
Unit: inch (mm)
Unite: pouce (mm)
Unidad: pulgada (mm)
*1 Active area/Area activa/Zone active
*2 Thinnest part/Parte mas delgada/Partie la plus mince
*3 Including projecting parts/Incluyendo partes salientes/Parties saillantes incluses
ENG131
ENGLISH | FRANÇAIS | ESPAÑOL
>><<

LC-70UH30U
2
23
/
32
(69)
3
15
/
32
(88)*3
0
29
/
32
(23)*2
14
39
/
64
(371)
61
35
/
64
(1563)
61
17
/
64
(1556)
8
19
/
32
(218)
8
19
/
32
(218)
15
3
/
4
(400)
23
35
/
64
(598)
17
51
/
64
(452)
18
13
/
64
(462)
19
1
/
2
(495)
727/32(199)
15
3
/
4
(400)
35
3
/
4
(908)
37
3
/
32
(942)
36
31
/
32
(939)
6
25
/
64
(162)
60
19
/
32
(1538.88)
*
1
34
3
/
32
(865.62)
*
1
5
7
/
8
(149)
AN52AG4
5°
7
23
/
32
(196)
8
29
/
32
(226)
35
41
/
64
(905)
1
5
/
16
(33)
Dimensional Drawings
Unit: inch (mm)
Unite: pouce (mm)
Unidad: pulgada (mm)
*1 Active area/Area activa/Zone active
*2 Thinnest part/Parte mas delgada/Partie la plus mince
*3 Including projecting parts/Incluyendo partes salientes/Parties saillantes incluses
ENG132
ENGLISH | FRANÇAIS | ESPAÑOL
>><<

LC-80UE30U
3
29
/32(99)
4
1
/2 (114)*3
8
9
/32(210)
43(1092)
41
35
/64(1055)
71
1
/2(1816)
71
5
/32 (1807)
22
17
/
32
(572)
8
15
/64
(209)
17
59
/64
(455)
23
5
/8(600)
15
3
/
4
(400)
24
47
/64(628)
2
31
/64(63)*2
70
5
/32
(1781.76)*1
39
15
/32
(1002.24)*1
Dimensional Drawings
Unit: inch (mm)
Unite: pouce (mm)
Unidad: pulgada (mm)
*1 Active area/Area activa/Zone active
*2 Thinnest part/Parte mas delgada/Partie la plus mince
*3 Including projecting parts/Incluyendo partes salientes/Parties saillantes incluses
ENG133
ENGLISH | FRANÇAIS | ESPAÑOL
>><<
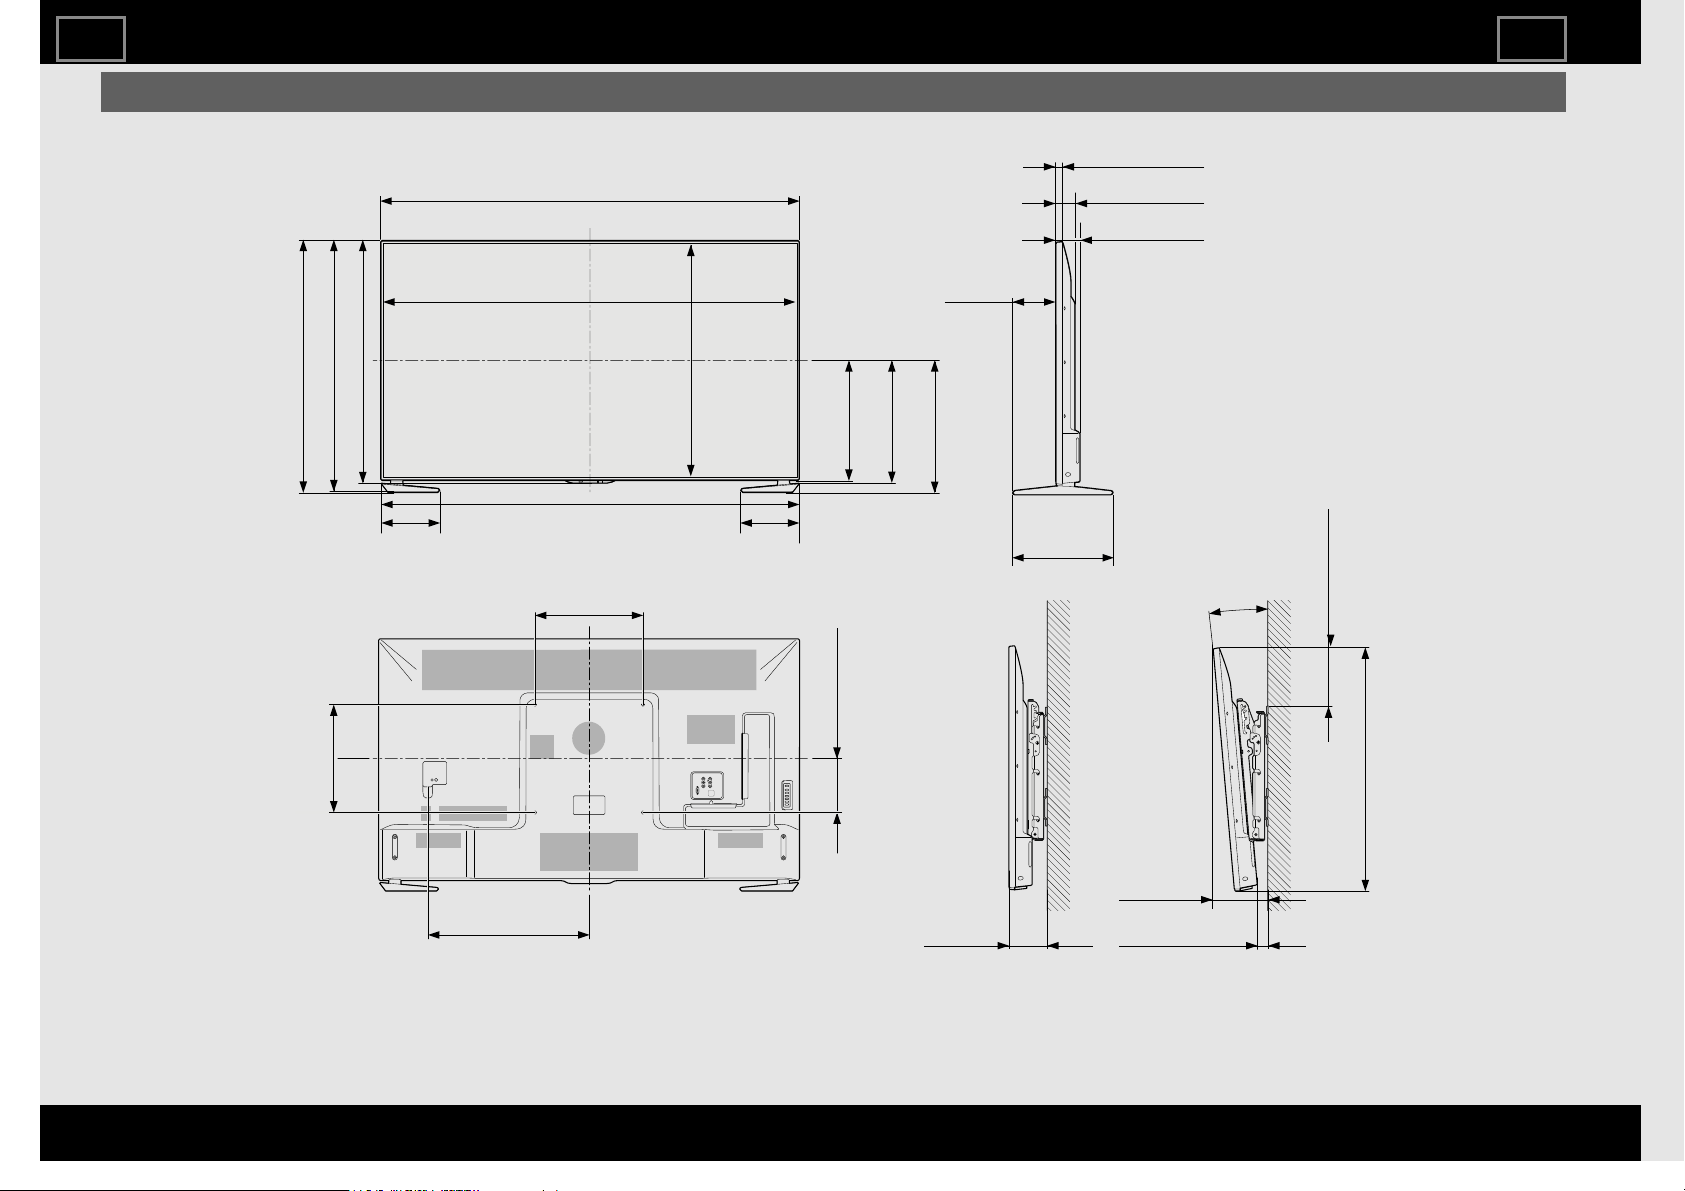
LC-70UE30U / LC-70UC30U
2
23
/
32
(69)
3
15
/
32
(88)*3
0
29
/
32
(23)*2
14
39
/
64
(371)
61
35
/
64
(1563)
61
17
/
64
(1556)
8
19
/
32
(218)
8
19
/
32
(218)
15
3
/
4
(400)
23
35
/
64
(598)
17
51
/
64
(452)
18
13
/
64
(462)
19
1
/
2
(495)
727/32(199)
15
3
/
4
(400)
35
3
/
4
(908)
37
3
/
32
(942)
36
31
/
32
(939)
6
25
/
64
(162)
60
19
/
32
(1538.88)
*
1
34
3
/
32
(865.62)
*
1
5
7
/
8
(149)
AN52AG4
5°
7
23
/
32
(196)
8
29
/
32
(226)
35
41
/
64
(905)
1
5
/
16
(33)
Dimensional Drawings
Unit: inch (mm)
Unite: pouce (mm)
Unidad: pulgada (mm)
*1 Active area/Area activa/Zone active
*2 Thinnest part/Parte mas delgada/Partie la plus mince
*3 Including projecting parts/Incluyendo partes salientes/Parties saillantes incluses
ENG134
ENGLISH | FRANÇAIS | ESPAÑOL
>><<

LC-60UE30U
5°
2
23
/
32
(69)
325/64(86)*3
2
3
/
32
(53)*2
14
39
/
64
(371)
5
21
/
64
(135)
AN52AG4
7
31
/
64
(190)
53
23
/
64
(1355)
53
5
/
64
(1348)
8
19
/
32
(218)
8
19
/
32
(218)
15
3
/
4
(400)
23
5
/
64
(586)
6
5
/
16
(160)
31
1
/
32
(788)
17
11
/
64
(436)
15
31
/
64
(393)
8
23
/
64
(212)
15
3
/
4
(400)
1
47
/
64
(44) 31
5
/
32
(791)
32
29
/
64
(824)
6
25
/
64
(162)
52
25
/
64
(1330.60)
*
1
29
15
/
32
(748.40)
*
1
Dimensional Drawings
Unit: inch (mm)
Unite: pouce (mm)
Unidad: pulgada (mm)
*1 Active area/Area activa/Zone active
*2 Thinnest part/Parte mas delgada/Partie la plus mince
*3 Including projecting parts/Incluyendo partes salientes/Parties saillantes incluses
ENG135
ENGLISH | FRANÇAIS | ESPAÑOL
>><<

ENGLISH | FRANÇAIS | ESPAÑOL
<<