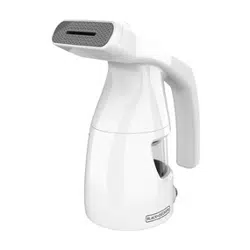
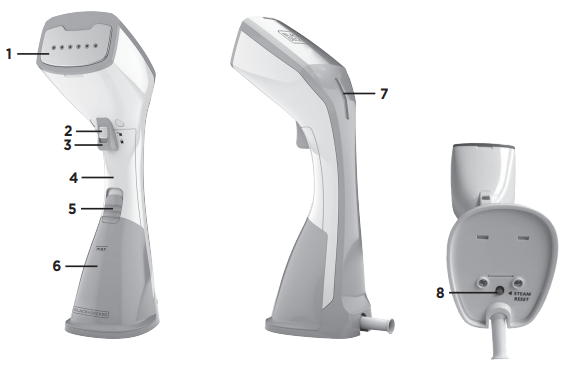
1. Ironing plate 2. Steam trigger 3. Continuous steam switch 4. Handle 5. Tank lock 6. Removable water tank (Part # HGS100-01) 7. Indicator light 8. Steam reset button
HOW TO USE
This product is for household use only.
GETTING STARTED
Remove all labels, tags and stickers attached to the body, or cord of the steamer and the plastic band around the power plug.
Remove and save literature.
Read all the instructions before using your steamer.
IMPORTANT NOTES
Using distilled, purified, or filtered water is highly recommended to maintain optimal performance. Tap water contains minerals that build up over time.
Any water droplets visible inside the tank are from individual quality control tests done to ensure every steamer meets our high standards for product performance.
Do not use perfumes, oils, or other additives.
Always review the garment manufacturer’s care label instructions before steaming, and always test fabrics for colorfastness in inconspicuous areas (such as an inseam). Steamers are not recommended for use on leather, suede, vinyl, plastic, or other steam sensitive fabrics.
The steamer becomes hot during use.
It is normal to feel or hear the water pump in the handle.
The water pump may become louder when the water level in the tank is low. Check and refill tank, as needed.
FILLING THE WATER TANK
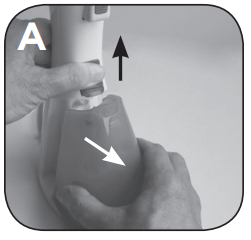
1. Place the steamer on its base on a stable surface.
2. Hold the handle to stabilize while pressing the tank lock upward and pulling away the removable water tank with the other hand. (A)
3. Gently pull out the rubber water tank cover at the top of the tank. (B)
Tip: Using distilled, purified, or filtered water is highly recommended and will reduce mineral buildup. Do not use oils, perfumes, or scented additives.
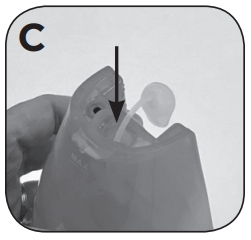
4. Using a clean measuring cup, pour water into opening until water reaches the “MAX” level mark on the top of the tank. (C) Do not overfill. Close the rubber cover securely.
5. Dry off any excess water from the tank. While pressing the tank lock upward, push water tank back into the steamer base until it clicks into place.
6. To refill at any time during use, unplug from outlet, and follow the above procedure.
Tip: After refilling, allow to reheat for 60 seconds until steam forms.
USING THE HANDHELD STEAMER
1. Read the manufacturer's fabric label to make sure the fabrics are suitable for steaming.
• If you see “do not iron” or this icon , do not press the ironing plate against the garment.
• If you see “do not steam” or this icon , do not steam the garment.
2. Place the garment on a hanger.
• Hang against a heat safe surface and use the ironing plate to get crisp results. The ironing plate can also be used in the horizontal position, with a traditional ironing board.
• The steamer may be used by hanging the garment in an area that will not be impacted by the heat and steam, such as on a shower rod.
3. Plug the steamer into an outlet. The indicator light will slowly blink, indicating that the steamer is heating.
4. The Ironing Plate will be fully preheated in 1–3 minutes.
Note: The fixed temperature on the ironing plate is a mid-range heat level , which is suitable for most fabrics. If the garment label says not to iron , or iron at low temperatures , do not press the ironing plate against the garment.
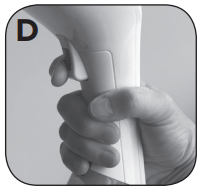
5. To generate steam, press down on the steam trigger with your index finger. (D) As long as the trigger is held down, steam will emit from the steamer. When the trigger is released, the steam will stop.
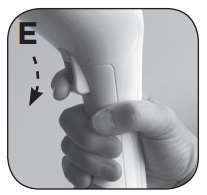
• To generate a constant flow of steam without holding the trigger, press the steam trigger and then slide the continuous steam switch down. (E) This will activate the continuous steam feature. To turn the steam off, press the trigger, push the continuous steam switch up and then release trigger.
Note: It is normal to feel or hear the water pump in the handle. It is normal to feel or hear the water pump in the handle.
6. To iron using the Ironing Plate on a heat safe surface placed vertically, start steaming and then lightly press the metal ironing plate against the garment. (F) While holding the fabric gently taut, drag the ironing plate up and down the fabric, being careful to keep hands away from the steam and never leaving the plate in one section for too long; like how a typical iron is used.
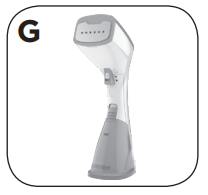
7. Stand steamer on its base and allow it to completely cool off before storing. (G) To avoid mineral buildup, empty the tank after each use.
STEAM CLEANING IN THE HOME
Using steam to clean household items that can tolerate hot, damp steam without damage is non-toxic, and inexpensive. This cleaning method is beneficial to those sensitive to chemical cleaners or trying to reduce chemicals in the home. Steam upholstery, draperies, linens and home textiles to clean and refresh.
CLEANING AND CARE
This product contains no user serviceable parts. Refer to qualified service personnel.
CLEANING STEAMER EXTERIOR
Make sure steamer is unplugged and completely cool.
Wipe the ironing plate and outer surface with soft, damp cloth. Water and small amounts of gentle household soaps, such as dishwashing liquid, can be used on the exterior. Never use heavy-duty cleaner, or abrasive scouring pads that may scratch or discolor the steamer.
After the steamer has been thoroughly dried, turn it back on and lightly steam over an old cloth. This will help remove any reside left in the steam holes.
Unplug, empty tank, and allow time to cool before storing.
STORING THE STEAMER
Check that the steamer is unplugged and completely cool.
Wrap the cord loosely around the base of the steamer.
Always store steamer upright on its base to prevent water leakage.
Tip: Emptying the tank after each use is recommended because standing water can leave a residue over time.
STEAMING TIPS AND TRICKS
This steamer is designed to use distilled, purified, or filtered water. Tap water contains minerals that build up. Using water with perfumes or scented additives is also not recommended.
Always test garments by steaming a small hidden area to make sure the garment takes well to steam.
Always read garment care label instructions. Fabrics suitable for mid to high heat can be pressed with the ironing plate.
Small amounts of dripping might occur during use. If excessive, either the steamer needs time to get back up to full temperature or there could be a build-up of condensation on the ironing plate. Just allow the steamer a minute to reheat, or gently wipe the ironing plate against the ironing pad fabric to remove condensation.
To prevent iron marks on fabric, turn garment inside out before using the ironing plate. Sensitive items (such as items with embellishments) should be steamed inside out as well to avoid damage.
Putting on a garment immediately after ironing or steaming can actually create wrinkles. Always allow clothing to cool for about 5 minutes after ironing or steaming to set the press.
TROUBLESHOOTING
Problem
Possible Cause
Solution
The steamer is plugged in but not heating.
There's a power supply issue.
Check that the plug is properly inserted into the outlet or try plugging the steamer into a different outlet.
Not enough steam or no steam is coming out of the steamer.
The steamer isn’t heated up to full temperature.
Always allow steamer to preheat at least 60 seconds.
There is not enough water in the water tank.
Follow the instructions under the “filling the water tank” section and fill to Max level marker.
The steamer has not been used for several weeks or more and an air pocket is blocking the steam.
Push the "steam reset" button on the bottom of the unit. The steam reset button pushes air through the pump.
Discolored water is coming through the holes and staining the fabric.
Residue has built up in the water tank or on the ironing plate.
Empty the water tank after each use. Only use distilled, filtered, or purified water.
Perfumed or scented additives were used.
Regularly clean steamer and refrain from using perfumed or scented additives.
Starch was used.
Always clean steamer ironing plate after using starch.
Steamer is leaking or spitting.
Steamer is not hot enough.
Allow the steamer to heat for about 45 seconds.
Condensation has built up.
Gently wipe the ironing plate with a soft, damp cloth to remove condensation.
Water tank is running lo
Follow the instructions under the “Filling the Water Tank” section and fill to Max level marker.
If additional assistance is needed, please contact our consumer service team at 1-800-465-6070.
NEED HELP?
For service, repair or any questions regarding your appliance, please call our Customer Service Line at 1-800-465-6070. Please DO NOT return the product to the place of purchase. Also, please DO NOT mail product back to manufacturer, nor bring it to a service center. You may also want to consult the website listed on the cover of this pamphlet.
Warranty Information
(Applies only in the United States and Canada)
What does it cover?
• Any defect in material or workmanship provided; however, Spectrum Brands’ liability will not exceed the purchase price of product
For how long?
• Two years from the date of original purchase with proof of such purchase.
What will we do to help you?
• Provide you with a reasonably similar replacement product that is either new or factory refurbished.
How do you get service?
• Save your receipt as proof of date of sale.
• Visit the online service website at www.prodprotect.com/blackanddecker, or call toll-free 1-800-465-6070, for general warranty service.
• If you need parts or accessories, please call 1-800-738-0245.
What does your warranty not cover?
• Damage from commercial use
• Damage from misuse, abuse or neglect
• Products that have been modified in any way
• Products used or serviced outside the country of purchase
• Glass parts and other accessory items that are packed with the unit
• Shipping and handling costs associated with the replacement of the unit
• Consequential or incidental damages (Please note, however, that some states do not allow the exclusion or limitation of consequential or incidental damages, so this limitation may not apply to you.)
How does state law relate to this warranty?
• This warranty gives you specific legal rights. You may also have other rights that vary from state to state or province to province.

 , do not press the ironing plate against the garment.
  , do not steam the garment.
 , which is suitable for most fabrics. If the garment label says not to iron
  , or iron at low temperatures
  , do not press the ironing plate against the garment.