Loading ...
Page 2 of 2
Rev. 03-15-2012
Limited Warranty – INSTEON warrants to original consumer of this product for a period of 2 years from date of purchase, this product will be free from
defects in material and workmanship and will perform in substantial conformity with its Owner's Manual. Warranty shall not apply to defects caused by
misuse or neglect.
Protected under U.S. and foreign patents (see www.insteon.com) © Copyright 2012
INSTEON, 16542 Millikan Ave., Irvine, CA 92606, 800-762-7845
Quick Start Guide INSTEON I/O Linc Low Voltage/Contact Closure Interface
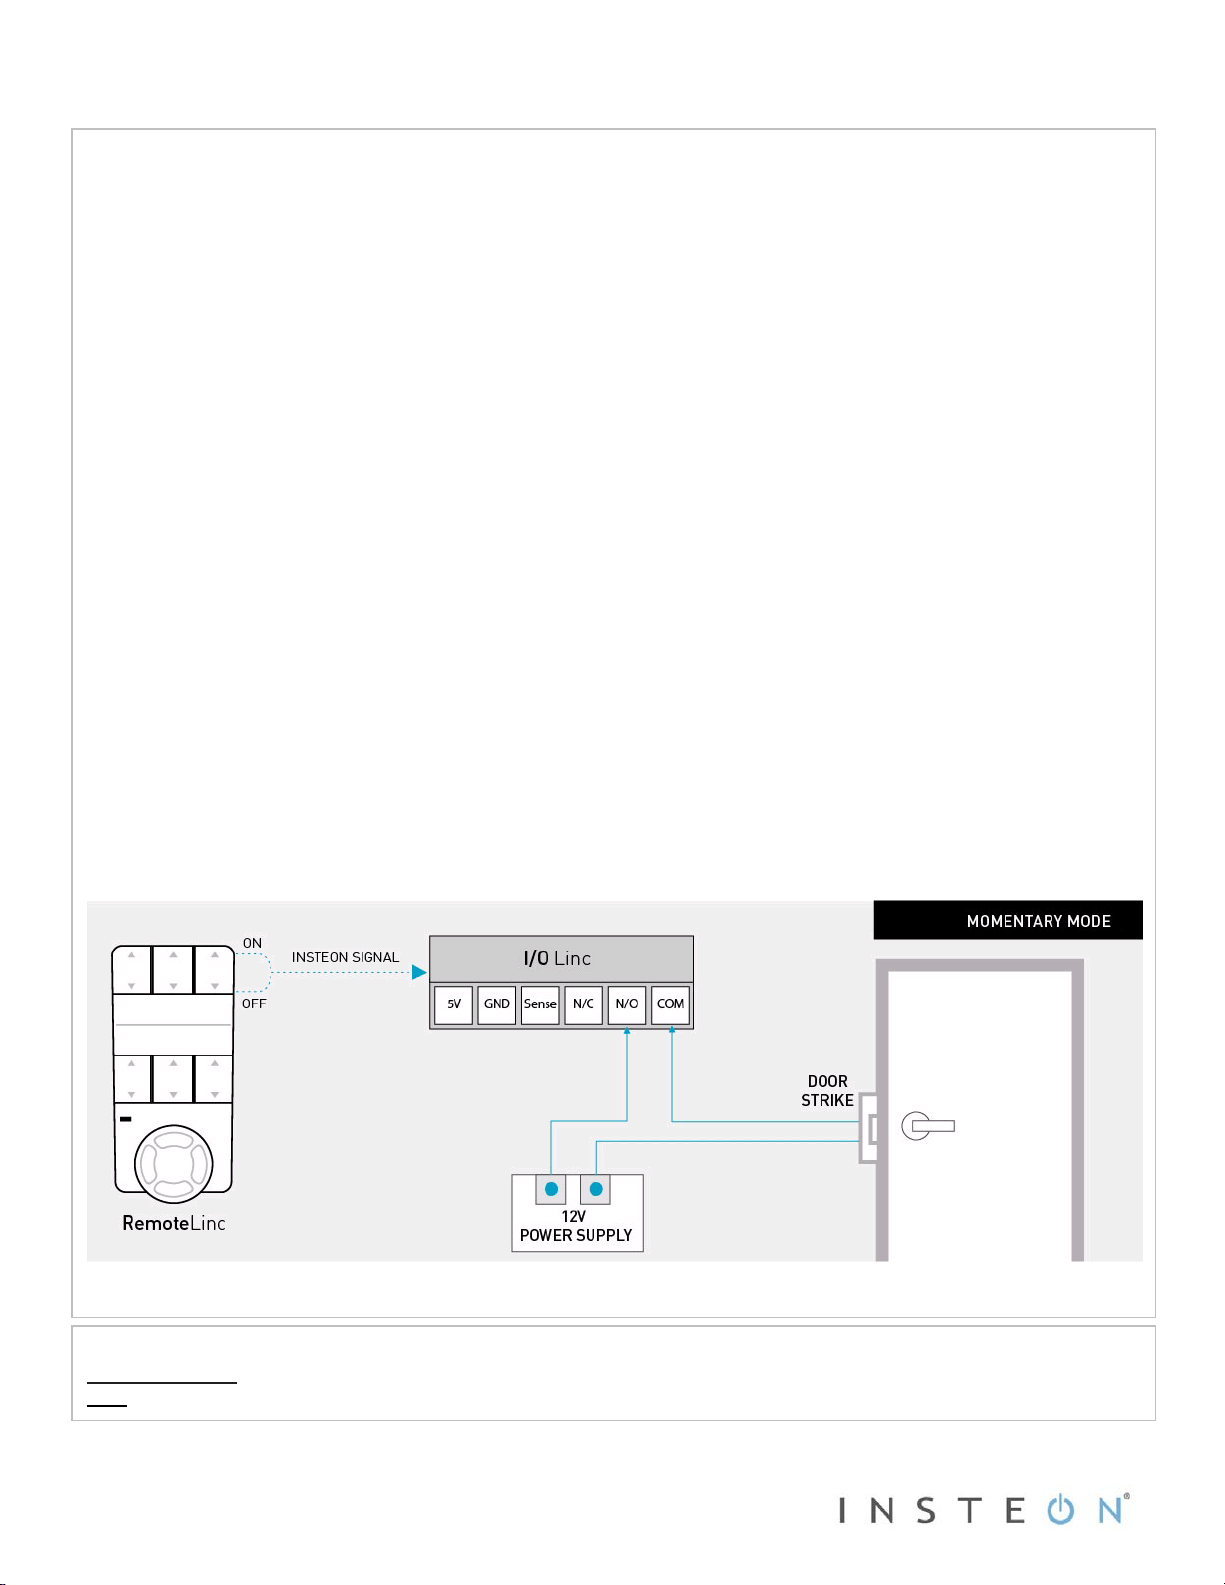
Controlling a Door Strike from an INSTEON Device
This mode is used for controlling a normally open momentary switch or button, such as using an INSTEON controller to
trigger a door strike.
NOTE: These instructions assume your output relay set is set to latching mode (default).*
1) Plug I/O Linc into a convenient unswitched outlet.
The I/O Linc Status LED should turn on.
2) Using the Set button, ensure the relay is closed.
The I/O Linc Status LED should be bright when the relay is closed and dim when open.
Link your INSTEON Controller(s) to I/O Linc
3) Set the controller to Linking Mode.** (For most controllers, press and hold an On or Scene button for 10 seconds or
the Set button for 3 seconds.)
4) Press and hold the Set button on I/O Linc until it beeps (3 seconds).
5) Repeat steps 3 and 4 for each controller you want to use to control I/O Linc.
Set the Output Relay to Momentary Mode A
6) Set I/O Linc to linking mode by pressing and holding the Set button until it beeps (3 seconds).
The I/O Linc Status LED should begin blinking.
7) Set I/O Linc to unlinking mode by pressing and holding the Set button until it beeps again (3 seconds).
The I/O Linc Status LED should continue blinking.
8) Set I/O Linc to output relay programming mode by pressing and holding the Set button until it beeps a third time
(3 seconds).
The I/O Linc Status LED should stop blinking and turn on solid.
9) Connect the door strike and power supply to I/O Linc (see Figure 2).
10) Test by either tapping the I/O Linc Set button or the button you linked to on the controller.
The I/O Linc relay should close and then reopen after a few seconds.
11) For instructions on how to set up the following features, consult the Owner’s Manual.
a) Increase the amount of time the momentary relay is closed (from 2 seconds up to 25 seconds).
b) Trigger your momentary closure with an OFF command only.
c) Trigger your momentary closure with both ON and OFF commands.
d) Use the I/O Linc sensor input to determine whether the I/O Linc output will respond.
*To be sure I/O Linc is in latching mode, tap the Set button and wait a few seconds. If you only hear one click, I/O Linc
is in latching mode. If you hear two clicks, I/O Linc is in a momentary mode; return I/O Linc to latching mode or perform
a factory reset (see Owner’s Manual).
Figure 2
Complete Instructions, Troubleshooting and Tech Support
Owner’s Manual: www.smarthome.com/manuals/2450.pdf
Call:
INSTEON Support Line at 800-762-7845