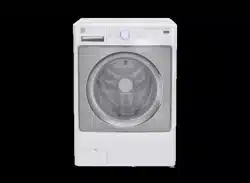
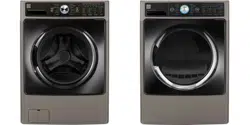
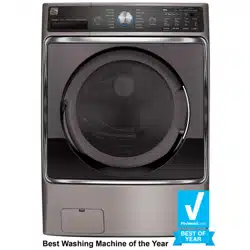
User & Care Guide
FEATURES AND BENEFITS
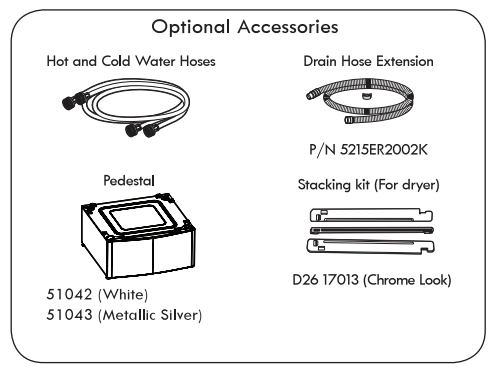
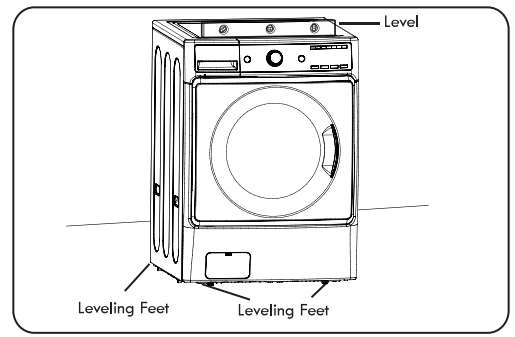
KEY PARTS AND COMPONENTS
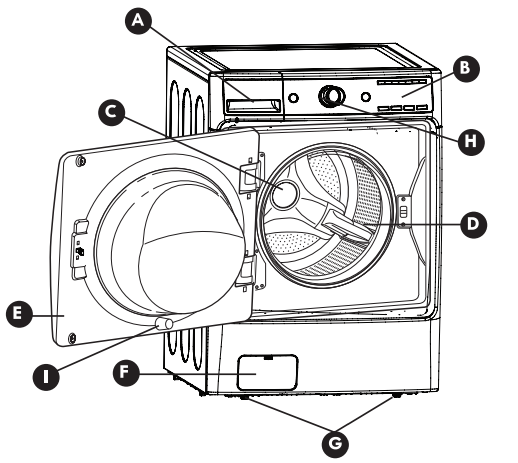
A. DETERGENT DISPENSER
There are four compartments. One each for prewash, main wash, liquid bleach, and liquid fabric softener.
B. CONTROL PANEL WITH LED DISPLAY
The easy-to-read LED display shows cycle options, settings, cycle status, and estimated time remaining during operation.
NOTE: Sensors in the washer automatically detect the size of the wash load to optimize washing time, based on the selected cycle and options.
C. DIRECT-DRIVE MOTOR
The direct-drive motor provides improved performance and reliability while increasing energy efficiency.
(Motor is not visible.)
D. LARGE-CAPACITY STAINLESS STEEL DRUM
The ultra-large stainless steel drum offers extreme durability and is tilted to improve efficiency and allow easier access for large items.
E. EASY-ACCESS LOCKING DOOR
The extra-large door locks during operation. The door will not open until it is safe to do so.
F. FILTER ACCESS PANEL
Provides easy access to the drain pump filter, which allows you to clean the filter or retrieve lost items without a service call.
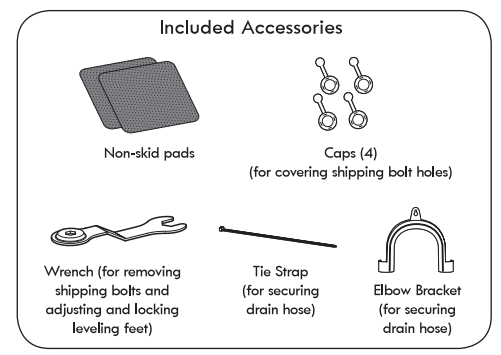
G. LEVELING FEET
Four leveling feet (two in the front and two in the back) adjust to improve washer stability on uneven floors. Feet are adjusted and locked in place using the adjusting wrench included with the washer.
H. HIGH-EFFICIENCY STEAM CYCLES
During high-efficiency steam cycles, hot steam interacts with fabrics to help remove tough stains.
I. DOOR MAGNET
Safely and conveniently keeps the door ajar. There are two door closed positions, fully closed and slightly ajar. In the latter position, the door is only closed to the door magnet to keep the door slightly open when the washer is not in use. This will promote air circulation and allow the interior of the machine to dry. To use this feature, close the door just until it contacts the door magnet.
KEY DIMENSIONS AND SPECIFICATIONS

CHOOSE THE PROPER LOCATION
Power Outlet
- The power outlet must be within 60 in. (1.5 m) of either side of the washer.
- The appliance and outlet must be positioned so that the plug is easily accessible.
- Do not overload the outlet with more than, one appliance.
- The outlet must be grounded in accordance with current wiring electric codes and regulations.
- Time-delay fuse or circuit breaker is recommended.
NOTE: It is the personal responsibility and obligation of the product owner to have a proper outlet installed by a qualified service technician.
FLOORING
- To minimize noise and vibration, the washer MUST be installed on a solidly constructed floor. See the NOTE at right.
- Allowable slope under the entire washer is a maximum 1 in. difference from side to side or from front to back.
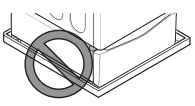
- Installing on carpeting and soft tile surfaces is not recommended.
- Never install the washer on a platform or weakly supported structure.
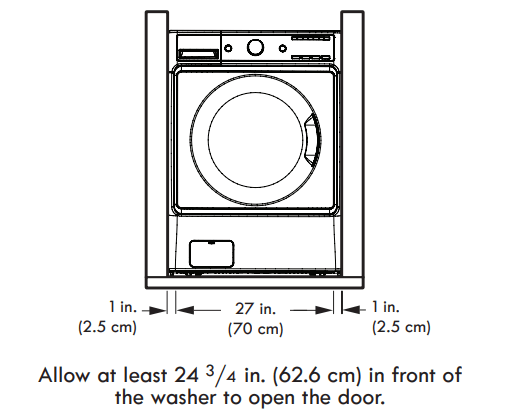
CLEARANCES
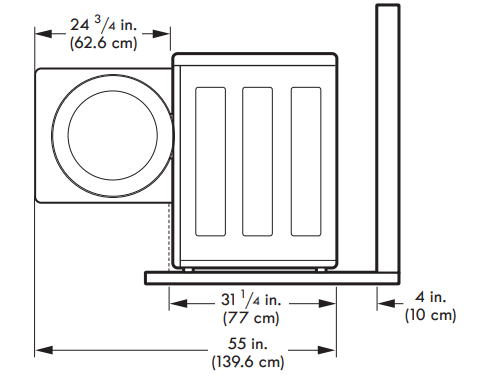
To ensure sufficient clearance for water lines and airflow, allow minimum clearances of at least 1 in. (2.5 cm) at the sides and 4 in. (10 cm) behind the unit. Be sure to allow for wall, door, or floor moldings that may increase the required clearances.
NOTE: The floor must be strong and rigid enough to support the weight of the washer, when fully loaded, without flexing or bouncing. If your floor has too much flex, reinforce it to make it more rigid.
A floor that is adequate for a top-loading washer may not be rigid enough for a front loading washer, due to the difference in the spin speed and direction. If the floor is not solid, your washer may vibrate and you may hear and feel the vibration throughout your house.
UNPACKING AND REMOVING SHIPPING BOLTS
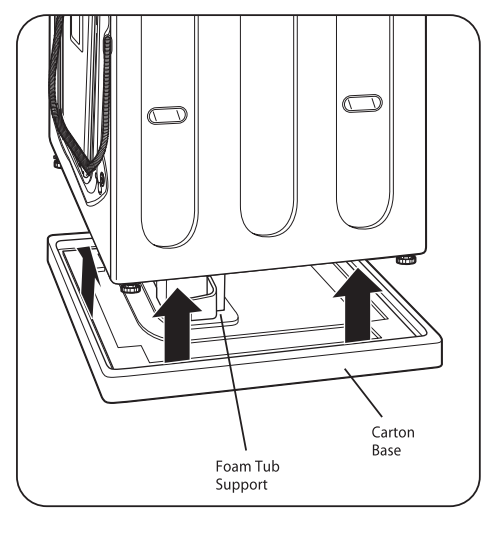
When removing the washer from the carton base, be sure to remove the foam drum support in the middle of the carton base. See drawing below.
If you must lay the washer down to remove the base packaging materials, always protect the side of the washer and lay it carefully on its side. DO NOT lay the washer on its front or back.
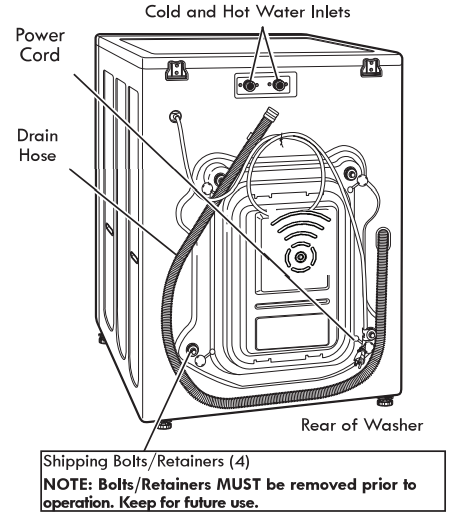
To prevent internal damage during transport, the washer is equipped with four shipping bolts and plastic retainers.
IMPORTANT:
- These shipping bolts and retainers MUST NOT be removed until just before moving the washer into its final position.
- These bolts and retainers MUST be removed before operating the washer.
- Failure to remove shipping bolts and retainers may cause severe vibration and noise, which can lead to permanent damage to the washer.
NOTE: The power cord is secured to the back of the washer with a shipping bolt to help prevent operation with shipping bolts in place
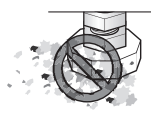
1. Starting with the bottom two shipping bolts, use the wrench (included) to fully loosen all four shipping bolts by turning them counterclockwise.
2. Remove the bolt assemblies by wiggling them slightly while pulling.
3. Locate the four hole caps included in the accessory pack and install them in the shipping bolt holes.
NOTE: Save the bolt assemblies for future use. To prevent damage to internal components, DO NOT transport the washer without reinstalling the shipping bolts.
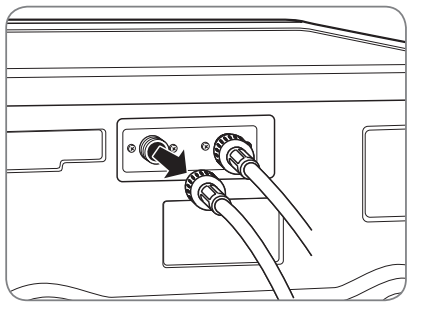
CONNECTING THE WATER LINES
1. Inspect the threaded fitting on each hose and make sure there is a rubber seal in place in both ends.
2. Connect the water supply hoses to the HOT and COLD water faucets tightly by hand and then tighten another % turn with pliers.
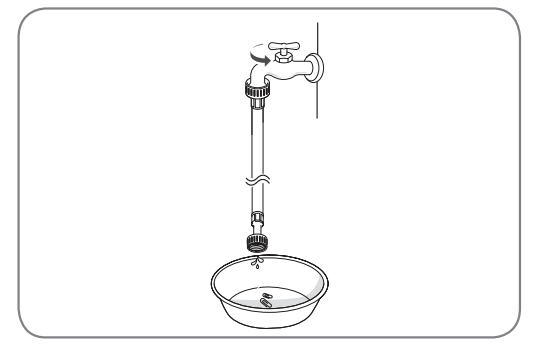
3. Always run a gallon or two of water through each inlet hose to flush dirt, scale and other debris out of the water lines. Doing so will help prevent future problems with clogged filter screens, and will also allow you to verify which hose is hot and which is cold.
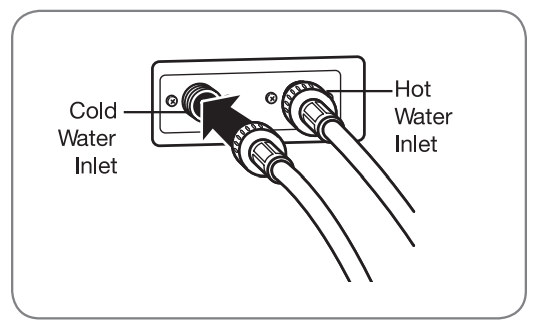
4. Attach the (red) hot water line to the hot water inlet on the back of the washer. Attach the (blue) cold water line to the cold water inlet on the back of the washer.
Tighten the fittings securely.
NOTE: When installing the hoses onto the water inlet valves, be careful not to cross-thread the hose fittings. DO NOT overtighten the hoses; this could cause damage to internal components, the valve or the hose gasket. Overtightening could result in property damage from leaks.
CONNECTING THE DRAIN HOSE
- The drain hose should always be properly secured. Failure to properly secure the drain hose can result in flooding and property damage
- Do not install the end of the drain hose lower than 29 in. (73.7 cm) or higher than 96 in. (243.8 cm) above the bottom of the washer.
- The drain must be installed in accordance with any applicable local codes and regulations.
- Make sure that the drain hose is not stretched, pinched, crushed, or kinked.
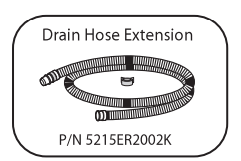
NOTE: A drain hose extension kit is available if the drain hose is not long enough. Do not extend the drain hose more than 6 feet, as this will cause poor draining, which will result in poor wash and spin performance.
Option 1: Standpipe
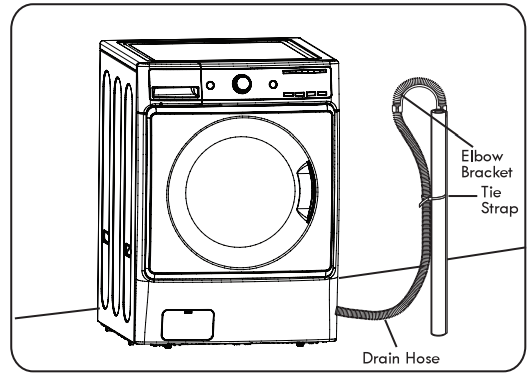
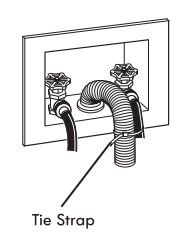
Install the end of the drain hose into the elbow bracket. Do not extend the drain hose more than 4 inches past the end of the elbow bracket. Use a tie strap to secure the drain hose in place.
Option 2: Laundry Tub
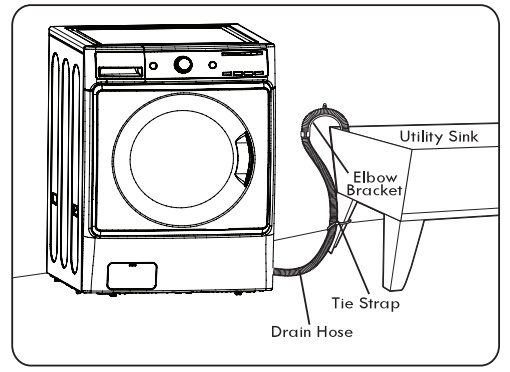
Install the elboe bracket near the end of the drain hose. Hang the end of the drain hose over the side of the utility sink. Use a tie strap to secure the drain hose in place.
Option 3: Floor Drain
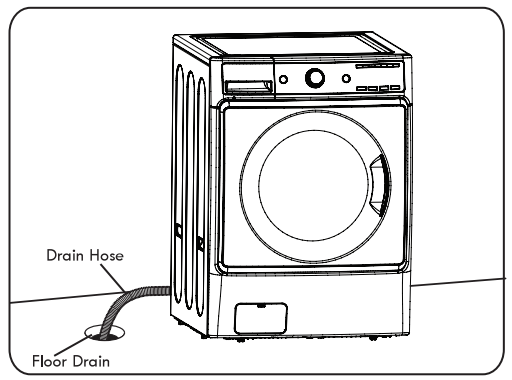
Insert the end of the drain hose into the floor drain. If possible, secure the hose to prevent it from moving or coming out of the drain.
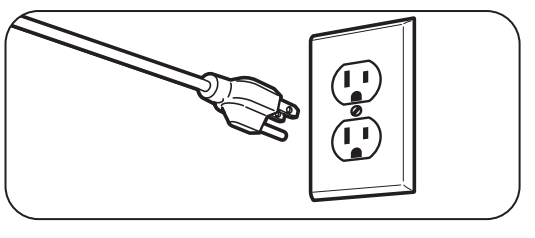
CONNECTING TO THE POWER SUPPLY
Washer should be plugged into a 120-VAC, 60-Hz grounded 3-prong outlet. Plug in the washer.
LEVELING THE WASHER
The drum of your new washer spins at very high speeds. To minimize vibration, noise, and unwanted movement, the floor must be a level, solid surface.
NOTE: Before installing the washer, make sure that the floor is clean, dry and free of dust, dirt, water and oils so the washer feet cannot slide easily. Leveling feet that move or slide on the floor can contribute to excess vibration and noise due to poor contact with the floor. See INSTALLATION OF NON-SKID PADS for more information
NOTE: If a drip pan must be used, make sure to follow the instructions provided with the drip pan and make sure the leveling feet are adjusted for firm and even contact with the pan. Use of drip pans and failure to properly level the machine may result in increased vibration and noise during operation.
All four leveling feet must rest solidly on the floor. Rock the washer from corner to corner to make sure that all four leveling feet are in firm and even contact with the floor.
1. Position the washer in its final location, taking special care not to pinch, strain, or crush the water and drain lines. Place a level across the top of the washer.
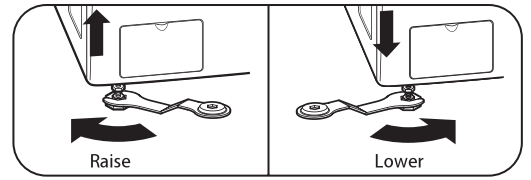
2. Loosen the locknuts on all four leveling feet with the wrench until you can adjust the feet (wrench appearance may vary). Use the wrench to turn the feet clockwise to raise the washer, and counterclockwise to lower the washer. Using a level, adjust the feet until the washer is level from side to side and front to back. Make sure that all four feet are in firm contact with the floor
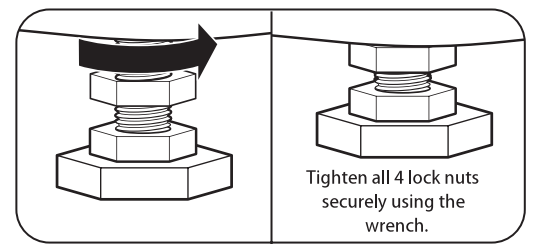
3. Once the washer is level from side to side and front to back, use the adjusting wrench to tighten all four lock nuts securely to prevent the legs from getting out of adjustment during operation. Make sure that all four leveling feet are in firm contact with the floor.
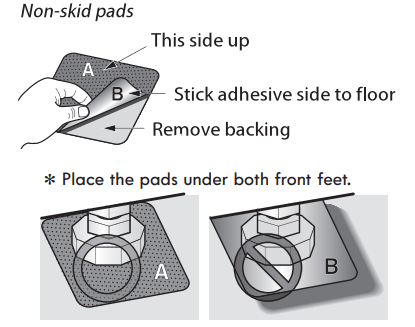
INSTALLATION OF NON-SKID PADS (optional)
Some floor surfaces are too slippery to prevent the washer from moving on the floor during heavily unbalanced loads. While it is normal for an occasional load to be out of balance, excess noise and vibration can result from the washer moving out of position. If these conditions are encountered, follow the instructions below for installation of the non-skid pads. These pads will help prevent the washer from moving during heavy, out of balance conditions, thereby reducing noise and vibration.
HOW TO USE
CONTROL PANEL FEATURES
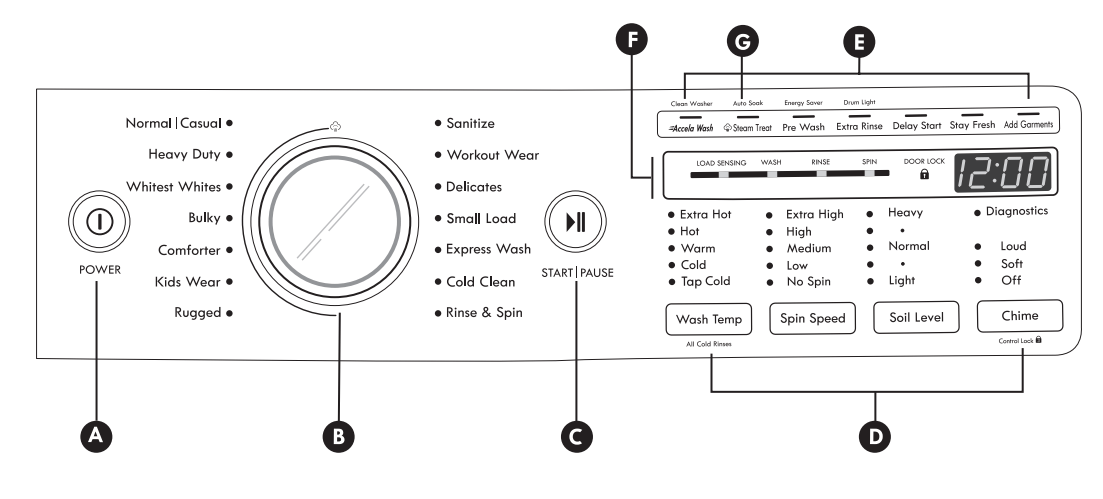
A. POWER (ON/OFF) BUTTON
Press to turn the washer ON or OFF.
NOTE: Pressing the POWER button during a cycle will cancel that cycle and any load settings will be lost. The door will unlock after a brief pause, unless the water level or temperature is too high.
B. CYCLE SELECTOR KNOB
Turn this knob to select the desired cycle. Once the desired cycle has been selected, the standard presets will appear in the display. These settings can be adjusted using the cycle setting buttons any time before starting the cycle.
C. START/PAUSE BUTTON
Press this button to start the selected cycle. If the washer is running, use this button to pause the cycle without losing the current settings.
NOTE: If you do not press the START/PAUSE one hour the washer automatically turns OFF.
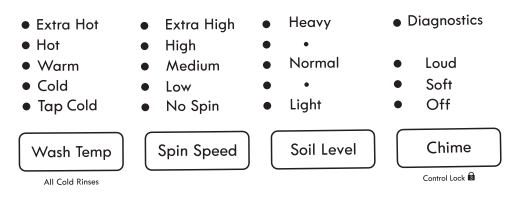
D. CYCLE MODIFIER BUTTONS
Use these buttons to adjust the settings for the selected cycle. The settings light up above the buttons to show the current selection.
E. SPECIAL CYCLE AND OPTION BUTTONS
These buttons are used to activate special cycles or options.
F. TIME AND STATUS DISPLAY
The display shows the cycle status, door lock status and estimated time remaining.
G. STEAM TREAT BUTTON
Select the STEAM TREAT button to add steam to the selected cycle for added cleaning power. NOTE: The steam option is not available on all cycles.
OPERATING THE WASHER
1 SORT LAUNDRY AND LOAD WASHER
Sort laundry by fabric type, soil level, color and load size, as needed. Open the door and load selected items into the washer.

2 TURN ON THE WASHER
Press the POWER button to turn ON the washer. The lights around the cycle selector knob will illuminate and a chime will sound.
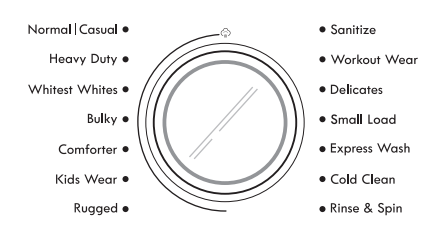
3 SELECT A CYCLE
Turn the cycle selector knob in either direction to select the desired cycle. The preset Wash Temperature, Spin Speed, Soil Level, and Option settings for that cycle will be shown
4 SELECT CYCLE MODIFIERS
Default settings for the selected cycle can now be changed if desired. Use the cycle modifier buttons.
NOTE: To protect your fabrics, not all modifiers are available on all cycles.

5 SELECT CYCLE OPTIONS
Cycle options can be added using the option buttons.
NOTE:To protect your fabrics, not all modifi ers are available on all cycles. Cycle options can also be added by using the option buttons. Not all options are available on all cycles.
A different chime will sound and the LED will not come on if the selection is not allowed.

6 ADD DETERGENT
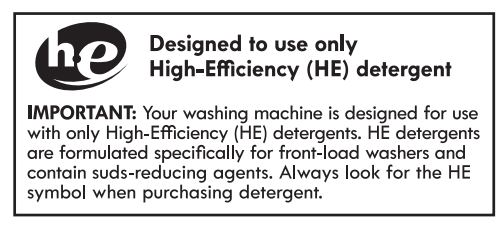
Add High-Efficiency (HE) detergent to the detergent dispenser drawer. For proper wash performance, always measure the detergent using the measuring device provided by the detergent manufacturer.

7 BEGIN CYCLE
Press the START/PAUSE button to begin the cycle. The door will lock, and the washer will briefly tumble the load without Water to measure its weight. Once the weight of the load is measured, the washer will begin the selected wash cycle.
Pressing the START/PAUSE button will pause the cycle and the door will unlock. Press the START/PAUSE button again to resume the wash cycle.
CYCLE GUIDE
The cycle guide below shows the default settings, available options and recommended fabric types for each cycle. Allowable modifier adjustments are shown below the default setting for each cycle.

CERTIFIED BY NSF: NSF International (formerly the National Sanitation Foundation), certifies that this wash cycle reduces 99.9% of bacteria on laundry through high temperature, when used with powdered detergent. Commercial. Family Sized Clothes Washers

NOTE:
- To protect your garments. not every wash temperature. spin speed. soil level. or option is available with every cycle. A chime will sound and the LED will not light if the selection is not allowed.
- The washer automatically adjusts the wash time for the amount of laundry. water pressure. water heating time and other operating conditions.
- These cycles use various wash motions to enhance cleaning and/or fabric care performance. The wash motions may sound different at different stages of the wash cycle. This is normal.
- Do not load more than 22 Ib. (10 kg) in the washer. (1 thick. dry bath towel = 1 Ib.) Do not use the Sanitize cycle with more than 10 Ib. (4.5 kg) of laundry.
- Do not overload the Bulky cycle. If the washer does not function properly. manually redistribute the load or wash one item at a time.
- When the Accela Wash option is selected. the drum spins to rinse the clothes. To use the No Spin option. you must deselect the Accela Wash option.
CYCLE GUIDE (continued)
The cycle guide below shows the default settings, available options and recommended fabric types for each cycle. Allowable modifier adjustments are shown below the default setting for each cycle.

SORTING WASH LOADS
Fabric Care Labels
Many articles of clothing include a fabric care label. Using the chart below. adjust the cycle and option selections to care for your clothing according to the manufacturer's recommendations.
Grouping Similar Items
For the best washing results, and to reduce the possibility of damage to clothing, care should be taken to sort the clothing into loads that are made up of similar items.
Mixing different fabric types and/or soil levels can result in poor wash performance, color transfer or discoloration, fabric damage or linting. Fabrics should be sorted into groups as described below.
Colors
Sort articles by color. Wash dark clothes together in a separate load from light colors or whites. Mixing dark clothes with light clothes can result in dye transfer or discoloration of the lighter clothes.
Soil Level
Wash heavily soiled clothing together. Washing lightly soiled clothing in the same load with heavily soiled clothing could result in poor wash performance for the lightly soiled clothing.
Fabric Type
Delicate articles should not be mixed with heavier or sturdier fabric types. Washing delicates in a load with heavy fabrics can result in damage to the more delicate fabrics. Washing heavier fabrics in a delicate load can result in poor wash performance for the heavier fabrics and possible damage to the delicates.
Lint Type
Some fabrics attract and bind lint to them while others give off lint in the laundry process. Avoid mixing these lint collectors and lint producers in the same load. Mixing these fabrics will result in pilling and linting on the lint collectors. (For example. lint collector — knit sweater; lint producer — terrycloth towels.)
Loading the Washer
- Check all pockets to make sure that they are empty. Items such as clips. matches. pens. coins. and keys can damage both your washer and your clothes.
- Close zippers. hooks. and drawstrings to prevent these items from snagging or tangling on other clothes.
- Pretreat heavily stained areas for best results.
- Combine large and small items in a load. Load large items first.
- Large items should not be more than half of the total wash load.
- The drum should not be tightly packed with items. The door of the washer should close easily.
- To prevent an out-of-balance load. do not wash single items. Add one or two similar items to the load. Large. bulky items. such as a blanket. comforter. or bedspread. should be washed individually.
- Do not wash or spin waterproof items. such as rain coats. sleeping bags. etc.
- When unloading the washer. check under the door seal for small items.
- For best performance, load clothes as shown
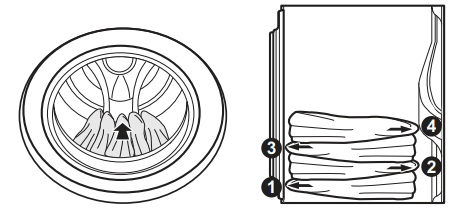
- Load clothes loosely. and do not overfill the drum. Clothes need room to circulate in order to get clean.
- Do not press down on items while stacking them in the drum.
ABOUT THE DISPENSER DRAWER
The automatic dispenser consists of four compartments which hold:
- Liquid chlorine bleach.
- Liquid fabric softener.
- Liquid or powdered detergent for prewash.
- Liquid or powdered detergent and color-safe bleach for main wash.
Pre-Wash Detergent Compartment
Add liquid or powdered detergent to this compartment when using the Pre-Wash option. Always use High
Efficiency (HE) detergent with your washing machine.
The amount of detergent added for the Pre-Wash option should be 1/2 the amount recommended for the main wash cycle. For example, if the main wash cycle requires 1/2 measure of detergent. add 4 measure to the
Pre-Wash compartment.
NOTE: If using liquid detergent for the main wash when using the Pre-Wash option. the liquid detergent cup accessory must be used in the main wash dispenser. This will prevent the main wash liquid detergent from being dispensed immediately.
Main Wash Detergent Compartment
This compartment holds laundry detergent for the main wash cycle. The detergent is added to the load at the beginning of the cycle. Always use High-Efficiency (HE) detergent with your washing machine. Either powdered or liquid detergent may be used.
Never exceed the manufacturer's recommendations when adding detergent. Using too much detergent can result in detergent buildup in clothing and the washer.
NOTE: Liquid or powdered color-safe bleach may be added to the main wash compartment with detergent of the same type. DO NOT add liquid or powdered color-safe bleach to the bleach dispenser. DO NOT mix liquid and powdered cleaning agents within the same compartment.
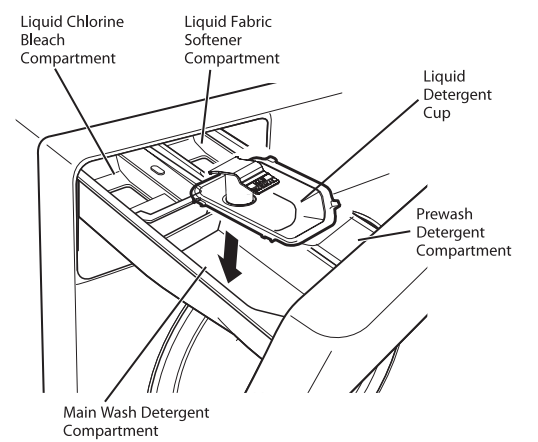
Liquid Bleach Compartment
This compartment holds liquid chlorine bleach. which is dispensed automatically at the proper time during the wash cycle.
- Do not add powdered or liquid color-safe bleach to this compartment. The bleach compartment is designed to dispense liquid chlorine bleach only. Powdered or liquid color-safe bleach will not dispense properly.
- Always follow the manufacturer's recommendations when adding bleach. Do not exceed the maximum fill line since this can cause the bleach to be dispensed immediately. causing damage to fabrics. Using too much bleach can damage fabrics.
- Never pour undiluted liquid chlorine bleach directly onto the load or into the drum. Fabric damage can occur.
Fabric Softener Compartment
This compartment holds liquid fabric softener. which is automatically dispensed during the final rinse cycle.
Never exceed the manufacturer's recommendations when adding softener. Using too much fabric softener can result in buildup in clothing and the washer. Either powdered or liquid fabric softener may be used.
- Always follow the manufacturer's recommendations when adding fabric softener. Do not exceed the maximum fill line. Using too much fabric softener may stain clothes.
- Dilute concentrated fabric softeners with warm water. Do not exceed the maximum fill line.
- Never pour fabric softener directly onto the load or into the drum.
DETERGENT AND DISPENSER USE
A Word About Detergents
High-Efficiency (HE) detergents produce fewer suds. dissolve more efficiently to improve washing and rinsing performance. and help to keep the interior of your washer clean. Using detergent that is not HE may cause oversudsing and unsatisfactory performance which could result in error codes. cycle failure. and machine damage.
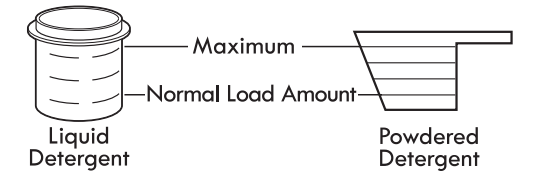
For proper wash performance, always measure the detergent using the measuring device provided by the detergent manufacturer.
The normal amount of HE detergent needed, for average loads, is less than Vi of the recommended maximum.
Use less detergent for soft water, light soil or smaller loads. Never use more than the maximum amount recommended by the detergent manufacturer.
Filling the Dispenser
To add detergent, bleach, and fabric softener to the automatic dispenser:
- Open the dispenser drawer.
- Load the laundry products into the appropriate compartments.
- Close the drawer before starting the cycle.
TIME AND STATUS DISPLAY
The time and status display shows the estimated time remaining, cycle progress, and door lock status.
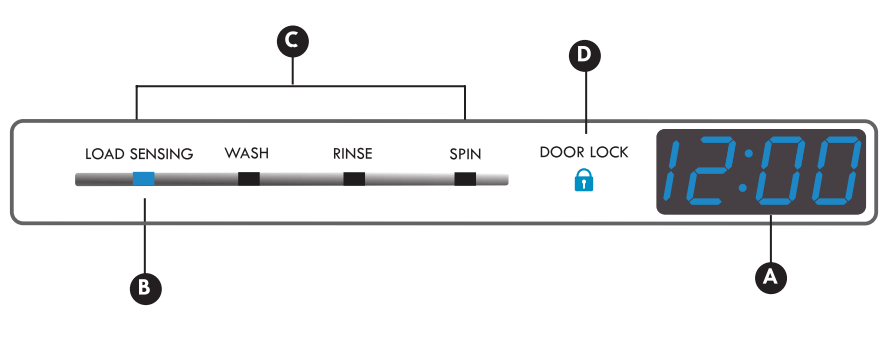
A. ESTIMATED TIME REMAINING
When the START/PAUSE button is pressed, the washer will automatically detect the load size for cycles that use load sensing. The control will then optimize the wash and rinse times, based on the selected cycle, modifiers and options. When the load size has been determined, the display will change from dashes (---) to the estimated time for that cycle. For non-load sensing cycles, the estimated time will display when the cycle is selected.
B. LOAD-SENSING INDICATOR
At the beginning of cycles that use the load sensing feature, the LOAD SENSING light will blink while the load size is being measured. Once the size has been determined, the control adjusts the cycle for optimum performance. Estimated time remaining will not display until the load size has been determined, and may be different for each load.
C. CYCLE STATUS INDICATOR
These status LEDs illuminate to indicate which stage of the cycle is currently running. A blinking light indicates the active stage of the cycle. When that stage is complete, the light will remain steady.
D. DOOR LOCK INDICATOR
Indicates that the door is locked. The washer door will lock while the washer is operating. The door can be unlocked by pressing START/PAUSE to pause the washer.
CYCLE MODIFIER BUTTONS
Each cycle has default settings that are selected automatically. You may also customize these settings using the cycle modifier buttons. Press the button for the desired modifier until the indicator light for the desired value is lit. The washer automatically adjusts the water level for the type and size of wash load for best results and maximum efficiency. Due to the high-efficiency nature of this product, water levels may be much lower than expected. This is normal operation and cleaning/ rinsing performance will not be compromised.
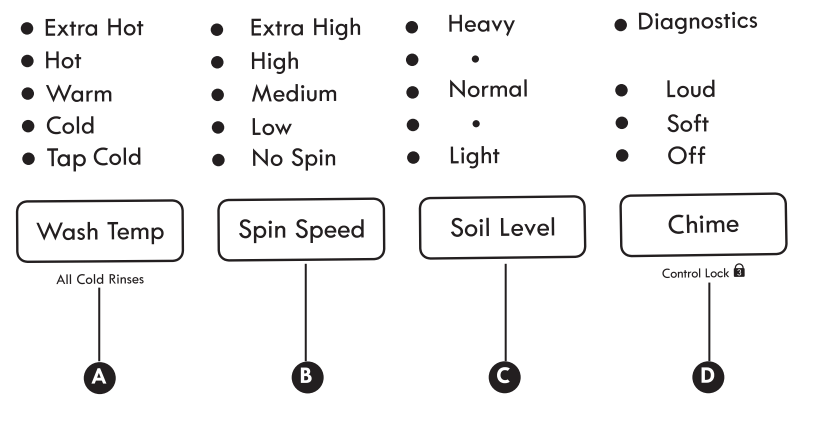
A. WASH TEMP
Wash Temp selects the wash and rinse temperature combination for the selected cycle. Press the Wash Temp button until the indicator light for the desired setting is lit.
- Your washer features a heating element to boost the hot water temperature for Extra Hot settings. This provides improved wash performance at normal water heater settings.
- Select the water temperature suitable for the type of load you are washing. Follow the garment fabric care labels for best results.
- Cold rinses use less energy. The actual rinse temperature depends on the temperature of the cold water at the faucet.
- Cold water is used for all rinse cycles.
B. SPIN SPEED
Higher spin speeds extract more water from clothes, reducing drying time and saving energy.
Press the SPIN SPEED button until the desired speed is selected. Some fabrics, such as delicates, require a slower spin speed. To protect your clothing, not all spin speeds are available for all cycles.
The Drain & Spin cycle:
1. Press the POWER button to turn ON the washer.
2. Press the SPIN SPEED button to select the desired spin speed. For drain only, select the NO SPIN option.
3. Press the START /PAUSE button. The water will drain and the clothes will tumble before
the spin routine begins.
C. SOIL LEVEL
Adjusting the soil level setting will modify the cycle to allow more time for heavily soiled clothes or less time for lightly soiled clothes. Press the SOIL LEVEL button until the desired soil level is selected.
D. CHIME
Press repeatedly to adjust the volume of the chime and keypad tones. You may turn the end-of-cycle chime and keypad tones ON or OFF with the CHIME button.
STEAM CYCLES AND OPTIONS
Your washing machine features several additional cycle options that customize cycles to meet your individual needs
- Turn ON the washer and turn the cycle selector knob to select the desired cycle. If the cycle selection is changed after the options have been selected, all settings will be changed to the default settings for the new cycle.
- Use the cycle modifier buttons to adjust the settings for that cycle.
- Press the cycle option button(s) for the option(s) you would like to add. The button will light when that option is selected. If the selected option is not allowed for the selected cycle, the chime will sound twice to alert you and the LED will not illuminate.
- If the selected option is not allowed for the selected cycle, the chime will sound twice to alert you and the LED will not illuminate.
- Press the START/PAUSE button to start the cycle. After a brief delay, the lid will lock and the cycle will begin.
NOTE:
- To protect your garments, not every option is available with every cycle.
- If the START/PAUSE button is not pressed within four minutes to start the cycle, the control will shut off and all settings will be lost.
STEAM TREAT

Select the STEAM TREAT button to add steam to the selected cycle for added cleaning power. Adding steam to cycles helps provide improved cleaning performance. By creating steam. fab rics get the benefit of a deep clean. The steam option is not available on all cycles.
To add steam to a cycle:
- Turn ON the washer and turn the cycle selector knob to select a cycle that allows the steam option. Refer to the Cycle Guide to see which cycles allow steam.
- Press the STEAM TREAT button. The washer will automatically adjust the cycle settings.
- Set any other desired options.
- Press the START/PAUSE button to start the cycle.
DELAY START

Once you have selected the cycle and other settings. press this button to delay the start of the wash cycle. Each press of the button increases the delay time by one hour. for up to 19 hours. Once the desired delay time is set. press the START/PAUSE button to start the delay time.
EXTRA RINSE

Drum Light This option will add an extra rinse to the selected cycle. Use this option to help ensure the removal of detergent or bleach residue from fabrics.
ACCELA WASH

The Accela Wash option uses a twin spray water and detergent injection which reduces cycle time while maintaining wash performance when added to a cycle.
DRUM LIGHT

The drum is equipped with a blue LED light that illuminates when the washer is turned on. This light automatically turns off when the door is closed and the cycle starts.
To turn on the light during a cycle. press and hold the EXTRA RINSE button for three seconds. The drum light will illuminate and then turn off automatically after four minutes.
NOTE: Clothes may appear to be yellow in the washer while the drum light is on. This effect is caused by the reflection of the light.
STAY FRESH

This feature helps keep wrinkles from setting in clothes and helps keep them fresh if they are not removed from the washer as soon as the cycle is complete. Press the STAY FRESH button to tumble the clothes intermittently and circulate fresh air through the drum for up to eight hours. Press the POWER button or the
START/PAUSE button to remove clothes at any time.
PRE WASH

Energy Saver Select this option to add a 15-minute prewash. rinse and spin cycle to the chosen cycle. This is re Wash} especially useful for heavily soiled items. l
SPECIAL FUNCTIONS
CONTROL LOCK

Use this option to disable the controls. The washer can only be locked during a cycle. This feature can prevent Control Lock children from changing cycles or operating the machine. Once set. the controls remain locked and Control Lock must be turned OFF before the controls can be used again. Once the washer has shut off. the power button will allow the machine to be turned ON. but the controls will still be locked. When the controls are locked. “CL” display alternately with the estimated time remaining.
Press and hold the CHIME button for three seconds to activate or deactivate the controls.
CLEAN WASHER

Detergent residue can build up in the wash drum over time and can lead to a mildewy or musty smell. The CLEAN WASHER cycle is specially designed to remove this buildup using bleach or another cleaner designed specifically for cleaning front load washers. Run the CLEAN WASHER cycle once a month. or more often under heavy use conditions or if odor is present. See complete instructions in the CARE AND
CLEANING section.
- Turn ON the washer and press and hold the ACCELA WASH button for three seconds. Selecting any other cycle after CLEAN WASHER has been selected will cause the CLEAN WASHER cycle to be cancelled.
- Fill the bleach dispenser to the MAX line with liquid chlorine bleach. Do not overfill the bleach dispenser.
- Overfilling will cause the bleach to dispense immediately.
- Press the START/PAUSE button to start the cycle.
- After the cycle has ended. secure the door slightly ajar with the door magnet. This will promote air circulation and allow the interior of the machine to dry. To use this feature. close the door just until it contacts the door magnet.
ADD GARMENTS

Use this function to add garments or remove — foreign objects like coins or keys after the cycle has started.
- Press ADD GARMENTS. The cycle pauses and the door unlocks.
- Open the door. add garments or remove foreign objects. and close the door.
- Press START/PAUSE to restart the cycle. The cycle continues automatically.
NOTE:
- After checking the water level/temperature conditions for safety. the door unlocks once the wash movement has stopped. (Door Lock LED turns off.)
- This may take several seconds depending on the water level. When a lot of water is in the tub. the door unlocks after water drains to a safe level.
- If the temperature in the tub is higher than 113°F (45°C). a short warning chime sounds and ADD GARMENTS is NOT allowed for safety.
- ADD GARMENTS is disabled during the CLEAN WASER cycle for safety.
- To preserve wash performance. wash time may be extended depending on when garments are added to a cycle.
AUTO SOAK

Use the AUTO SOAK option to presoak garments to help remove difficult spots or stains on fabric. This option provides a 30-minute presoak prior to the start of the selected cycle. At the end of the presoak time, the selected cycle will use the same water.
To use the AUTO SOAK feature, press and hold the STEAM TREAT button for three seconds.
ENERGY SAVER

This option saves energy by using cooler water while increasing the wash and rinse times to maintain wash performance. This feature is only available with the NORMAL/CASUAL and HEAVY DUTY cycles as listed below.
To use the Energy Saver option, press and hold the PRE WASH button for three seconds.
- NORMAL — Hot becomes Warm
- NORMAL — Warm becomes Cold
- HEAVY DUTY — Hot becomes War
CARE AND CLEANING
REGULAR CLEANING
Cleaning the Exterior
Proper care of your washer can extend its life. The outside of the machine can be cleaned with warm water and a mild, nonabrasive household detergent. Immediately wipe off any spills with a soft, damp cloth.
IMPORTANT: Do not use solvents, cleaning alcohols, or similar products. Never use steel wool or abrasive cleaners because they can damage the surface.
Care and Cleaning of the Interior
Use a towel or soft cloth to wipe around the washer lid opening and lid glass. Always remove items from the washer as soon as the cycle is complete. Leaving damp items in the washer can cause wrinkling, color transfer, and odor. Run the CLEAN WASH- ER cycle once a month, or more often if needed, to remove detergent buildup and other residue.
Clean Washer
1. Remove any clothing in the drum.
2. Open the dispenser drawer
3. Add liquid chlorine bleach or another drum cleaner designed specifically for cleaning front load washers.
- If using liquid chlorine bleach
Add liquid chlorine bleach to the bleach compartment.
- If using powdered cleaners
Remove the liquid detergent cup and add powder cleaner to the main wash compartment of the dispens- er drawer.
- If using a tablet cleaner
Put the tablet directly into the tub.
NOTE:
- Do not add tablet cleaner to the dispenser drawer.
- Do not add any laundry detergent or fabric softener to the dispenser drawer when using CLEAN WASHER.
4. Turn ON the washer and press and hold the ACCELA WASH button for three seconds, and the LED will blink. Selecting any other cycle after CLEAN WASHER has been selected will cause the CLEAN WASHER cycle to be cancelled.
5. After the cycle ends, open the lid and allow the tub interior to dry completely.
NOTE: Run the clean washer cycle once a month. If a mildewy or musty smell is present, run the clean washer cycle once a week for three consecutive weeks.
Door Seal and Glass Cleaning
Due to the location and nature of the door seal. some detergent and soil residue may build up on the door glass and seal. Periodic cleaning with a bleach solution can help remove buildup and stains. and can help sanitize the seal to prevent odors.
NOTE: Wear rubber gloves and eye protection while performing the following procedure:
1. Dilute 3% cup (177 ml) liquid chlorine bleach in 1 gallon (3.8 L) of warm/hot water.
2. Use this solution to wipe down all surfaces of the gasket and door glass to remove any deposits. Be sure to fold back the lip of the gasket to get under the inner edge where residue can build up.
3. Dry the gasket and glass with a dry cloth.
4. To allow the gasket to dry completely. secure the door slightly ajar with the door magnet. This will promote air circulation and allow the interior of the machine to dry. To use this feature. close the door just until it contacts the door magnet.
Removing Mineral Buildup
If you live in an area with hard water, mineral scale can form on internal components of the washer. Use of a water softener is recommended in areas with hard water.
Use a descaler, such as Washer Magic®, to remove visible mineral buildup. After descaling, always run the CLEAN WASHER cycle before washing clothing.
Storing the Washer
If the washer will not be used for an extended period of time and is in an area that could be exposed to freezing temperatures, perform the following steps to protect the washer from damage.
- Turn OFF the water supply.
- Disconnect hoses from water supply and drain water from hoses.
- Plug the power cord into a properly grounded electrical outlet.
- Add 1 gallon of nontoxic recreational vehicle (RV) an- tifreeze to the empty tub and close the lid. Never use automotive antifreeze.
- Press the POWER button, then press the DRAIN & SPIN button. Press the START/PAUSE button to activate the drain pump. Allow the drain pump to run for one minute, then press the POWER button to shut off the washer. This will expel some of the antifreeze, leaving enough to protect the washer from damage.
- Unplug the power cord, dry the tub interior with a soft cloth, and close the lid.
- Remove the inserts from the dispenser. Drain any water in the compartments and let them dry.
- Store the washer in an upright position.
- To remove the antifreeze from the washer after storage, run a complete express wash cycle using detergent. Do not add laundry to this cycle.
Cleaning the Dispenser
The dispenser should be cleaned periodically to remove buildup of detergent and other laundry products that can cause the dispenser not to dispense the laundry product properly.
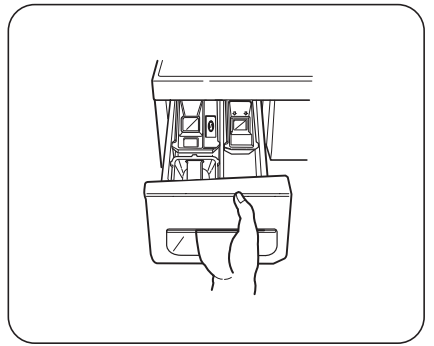
1 Pull the dispenser drawer out until it stops
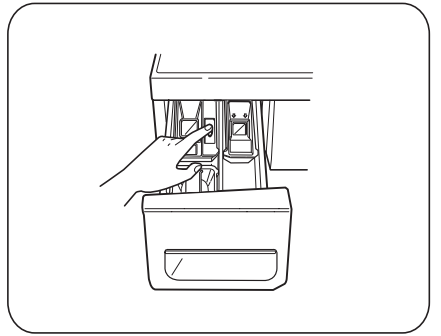
2 Press down the lock tab located between the bleach and softener compartments and slide the drawer out.
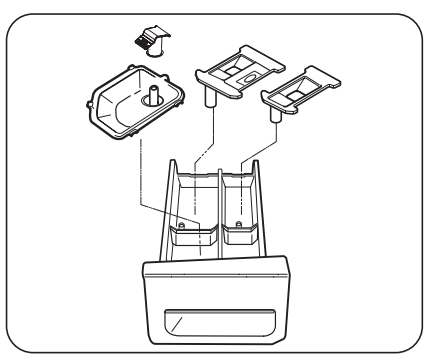
3 Remove the liquid detergent box. softener and bleach inserts from their compartments.
4 Clean the dispenser compartments and insert with warm soapy water.
MAINTENANCE
Cleaning the Water Inlet Filters
If the washer does not fill properly, an error message will show on the display. The inlet valve filter screens could be plugged by hard water scale, sediment in the water supply, or other debris.
NOTE: The inlet screens protect the delicate parts of the inlet valve from being damaged by particles that could enter the valves with the water supply. Operat- ing the washer with these filters removed could cause a valve to stick open resulting in flooding and/or property damage.
1. Turn OFF both water faucets completely. Unscrew the hot and cold water lines from the back of the washer.
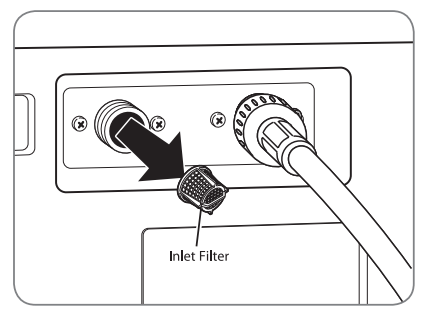
2. Carefully remove the filters from the water valves and soak them in white vinegar or a lime scale re- mover, following the manufacturer’s instructions. Be careful not to damage the filters while cleaning.
3. Rinse thoroughly before reinstalling. Press the filters back into place.
4. Before reattaching the hoses, flush the hoses and water lines by running several gallons of water into a bucket or drain.
Cleaning the Drain Pump Filter
The lint and foreign objects like buttons, keys, and coins from causing damage to the pump. If the washer fails to drain properly, unplug the washer and allow the water to cool, if necessary, before proceeding.
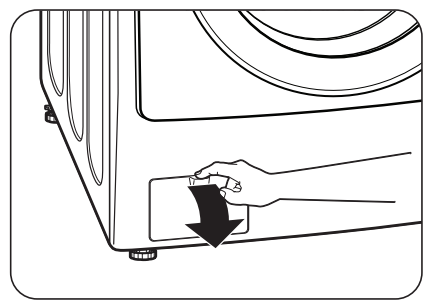
1 Open the drain pump filter access panel.
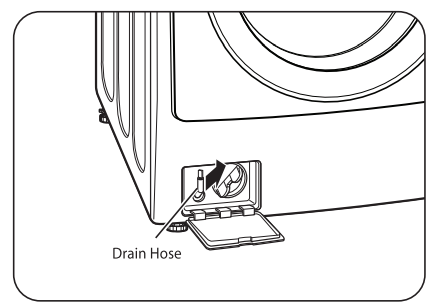
2 Urclip the drain hose and pull it out. Place the end of the drain hose into a shallow pan or a floor drain. Make sure not to pull the hose out too far. or it may not drain properly.

3 Remove the plug from the drain hose. and allow the water to drain completely.
NOTE: If there is a large amount of water in the drum. you may have to empty your container several times.
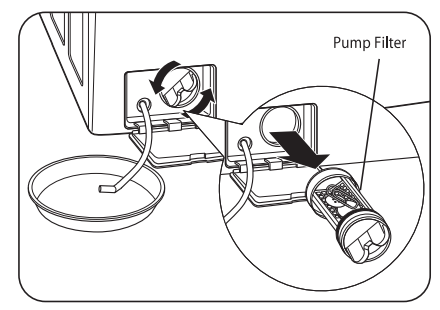
4 Twist the pump filter counterclockwise to remove. Remove any lint and foreign objects from the pump filter. Insert pump filter back into opening and twist clockwise to secure. Be sure to close the drain pump filter access panel.
TROUBLESHOOTING GUIDE
NORMAL SOUNDS YOU MAY HEAR
The following sounds may be heard while the washer is operating. They are normal.
Clicking:
Lid lock relay when the lid locks and unlocks.
Spraying or hissing:
Water spraying or circulating during the cycle
Humming or gurgling:
Drain pump is pumping water from the washer at times during a cycle.
BEFORE CALLING FOR SERVICE
If your washer does not function properly or does not function at all, check the following before you call for service:
| Problem |
Possible Cause |
Solutions |
|
Rattling and clanking noise
|
Foreign objects, such as keys, coins, or safety pins, may be in tub or pump.
|
Stop washer, check tub and drain filter for foreign objects. If noise continues after washer is restarted, call for service.
|
|
Thumping sound
|
Heavy wash loads may produce a thumping sound.
Washer load may be out of balance.
|
This is normal. If sound continues, washer is probably out of balance. Stop and redistribute wash load.
Pause the cycle and redistribute the load after the lid unlocks.
|
|
Vibrating noise
|
Packaging materials were not removed.
Wash load may be unevenly distributed in the tub.
Not all leveling feet are resting firmly and evenly on the floor
Floor not rigid enough.
|
See the Unpacking and Removing Shipping MATE- RIAL section in the installation requirements.
Pause the cycle and redistribute the load after the lid unlocks.
See Leveling the Washer in the Installation Instructions.
Make sure that the floor is solid and does not flex. See Flooring in the Installation Requirements.
|
|
Water leaking around washer
|
Inlet hose connection is loose at faucet or washer.
House drain pipes are clogged.
Drain hose has come out of drain. Drain hose is not inserted far enough.
Door glass is dirty.
|
Check hoses. Check and tighten hose connections.
The washer pumps out water very rapidly. Check for water backing up out of the drain pipe during drain. If water is seen coming out of the drain, check for proper drain hose installation and check for restric- tions in the drain. Contact a plumber to repair drain pipe.
Tie drain hose to inlet hose or standpipe to prevent it from coming out during drain. For smaller drain pipes, insert the drain hose into the pipe as far as the drain hose flange. For larger drain pipes, insert the drain hose into the pipe 1-2 inches past the flange.
Inspect door glass periodically to make sure there is no buildup of residue or other foreign matter. Follow cleaning instructions.
|
|
Excessive sudsing
|
Too much detergent or incorrect detergent.
|
 Only use detergent with the High-Efficiency (HE) logo. For detergent quantities refer to the How to Use section. Only use detergent with the High-Efficiency (HE) logo. For detergent quantities refer to the How to Use section.
|
|
Staining
|
Bleach or softener dispensed too soon.
Bleach or softener was added directly to the wash load in the tub.
Washer was not unloaded promptly.
Clothes were not properly sorted.
|
Dispenser compartment is overfilled causing bleach or softener to dispense immediately. ALWAYS measure bleach to prevent overfilling - one cup maximum.
Dispenser drawer closed too quickly causing softener to dispense immediately
Always use the dispensers to ensure that laundry products are properly dispensed at the right time in the cycle
Always remove items from the washer as soon as possible after the cycle is complete.
Always wash dark colors separately from light colors and whites to prevent discoloration.
Never wash heavily soiled items washed with lightly soiled items.
|
|
Washer will not turn ON
|
Power cord is not properly plugged in
House fuse is blown, circuit breaker has tripped, or power outage has occurred.
House fuse is blown, circuit breaker has tripped, due to multiple appliances on one outlet.
|
Make sure that the plug is plugged securely into a grounded, 3-prong, 120-VAC, 60-Hz outlet.
Reset circuit breaker or replace fuse. Do not increase fuse capacity. If the problem is a circuit overload, have it corrected by a qualified electrician.
Reset circuit breaker or replace fuse. If more than one appliance is connected to the outlet, call an electrician to have an additional circuit installed.
|
| Door will not unlock when cycle is stopped or paused |
Interior temperature of washer is too high. Water level in washer is too high. |
The washer door has a safety feature to prevent personal injury. For example, if the washer is paused during the hot wash stage of a sanitize cycle, the interior temperature of the drum will be very hot, so the door will not unlock. This is normal. Allow the washer to cool until the DOOR LOCK indicator turns OFF on the display.
To drain the water, press POWER, then press the SPIN SPEED button without selecting a cycle. |
|
Wash cycle time is longer than usual
|
The washer automatically adjusts the wash time for the amount of laundry, water pressure and other operating conditions. |
This is normal. The washer adjusts cycle time automatically to provide optimal results for the selected cycle. The time remaining shown in the display is only an estimate. Actual time may vary
|
|
Musty or mildewy odor in washer
|
Incorrect or too much detergent has been used.
Inside of tub was not cleaned properly
|
Use only High-Efficiency (HE) detergent in accordance with the manufacturer’s instructions.
Inside of tub was not cleaned properly
|
|
Wrinkling
|
Washer not unloaded promptly. Washer overloaded.
Hot and cold water inlet hoses are reversed.
|
Always remove items from the washer as soon as the cycle is complete.
When washing large loads, do not overstuff the drum. The washer can be fully loaded, but the drum should not be tightly packed and the door should close easily.
Hot water rinse can set wrinkles in garments. Check the inlet hose connections. |
|
Water in the washer drains slowly or not at all, or the display shows:

|
Drain hose is kinked, pinched, or clogged.
Drain discharge is more than 96 inches above bottom of washer.
|
Make sure the drain hose is free of clogs, kinks, etc., and is not pinched behind or under the washer.
Adjust or repair drain. Maximum drain height is 96 inches (8 ft.)
|
|
Washer fills with wa- ter slowly or not at all, or the display shows:

|
Water supply faucets are not fully open.
Water line hoses are kinked, pinched, or crushed.
Water inlet filters are clogged.
Water supply pressure to faucet or house is too low.
Water supply connected with leaklimiting hoses.
|
Make sure that the water faucets are fully open
Make sure the hoses are not kinked or pinched. Be careful when moving the washer during cleaning and mainte- nance.
Clean the inlet filters. See Mainte- nance in the Care and Cleaning sec- tion.
Check another faucet in the house to make sure that household water pres- sure is adequate and flow is not re- stricted. Disconnect the inlet hose from the washer and run a few gallons of water through the hose to flush the water supply lines. If flow is too low, contact a plumber to have the water lines repaired.
Hoses designed to limit leaks can trip falsely and prevent the washer from filling. The use of leak limiting hoses is not recommended.
|
|
Cycle won’t start, or the display shows:

or

|
The door is not closed properly. |
Make sure that the door is closed properly and press the START/PAUSE button. After starting a cycle, it may take a few moments before the drum begins to turn or spin. The washer will not operate unless the door is locked.
If the door is closed and locked and the open door error message is displayed, call for service |
|
The display shows:

|
Load is too small.
Load is out of balance. |
Add 1 or 2 similar items to help balance the load.
The washer has an imbalance detection and correction system. If individual heavy articles are loaded (bath mat, bath robe, etc.) and the imbalance is too great, the washer will make several attempts to restart the spin cycle. If an imbalance is still detected, the washer will stop and the error code will display. |
The display shows:
 |
Control error |
Unplug the washer and wait 60 seconds. Reconnect power and try again. If the error reappears, call for service |
The display shows:
 |
Water level is too high due to a faulty water valve |
Close the water faucets, unplug the wash- er, and call for service. |
The display shows:
 |
The water level sensor is not working correctly |
Close the water faucets, unplug the wash- er, and call for service.
|
The display shows:
 |
A motor error has occurred |
Allow the washer to stand for 30 minutes and then restart the cycle. If the LE error code persists, call for service.
|
The display shows:
 |
A power failure has occurred. |
If the power to the washer has been interrupted during a cycle, the PF error code will display the next time the washer is turned ON. This will alert you to the fact that the previous cycle may not have been completed. Select any cycle to clear the error code and use the washer |