Loading ...
Loading ...
Loading ...
31
English
5. Set the stitch length control lever.
- Tapes: between "3" and "4"
- Elastics: "4"
6. Adjust the presser adjusting dial 2
- at "0" when sewing with tapes.
- at desirable number for contraction when
sewing with elastics.
NOTE:
Contraction will be increased with larger number.
7. Make trial sewing and adjust thread tensions.
Example of proper sewing seam:
<B>
<A>
<C>
<D>
<A> Surface
<B> Tape
<C> Surface
<D> Elastic
NOTE:
Thread tensions are alike to normal overedging
when sewing with tapes.
It is recommendable to have a stronger tension for
under looper and over looper for beautiful finish.
It is advisable to make trial sewing on each material
/ thread due to different contraction.
Pearl sequence foot
Features
By using the pearl sequence foot, you can bead
on fabric. It is useful for decorated edge of curtain,
table cloth, dress, etc. From 3mm to 5mm
sequential pearl can be sewn with this foot.
LS
Preparation
1. Retract the knife (see CHAPTER 1 "Retracting
knife").
2. Attach the pearl sequence foot (see CHAPTER
1 "Attaching/ Removing presser foot").
3. Set up the machine for 3 thread overlock stitch
with one needle in the left position.
The right needle should be removed.
How to adjust the machine
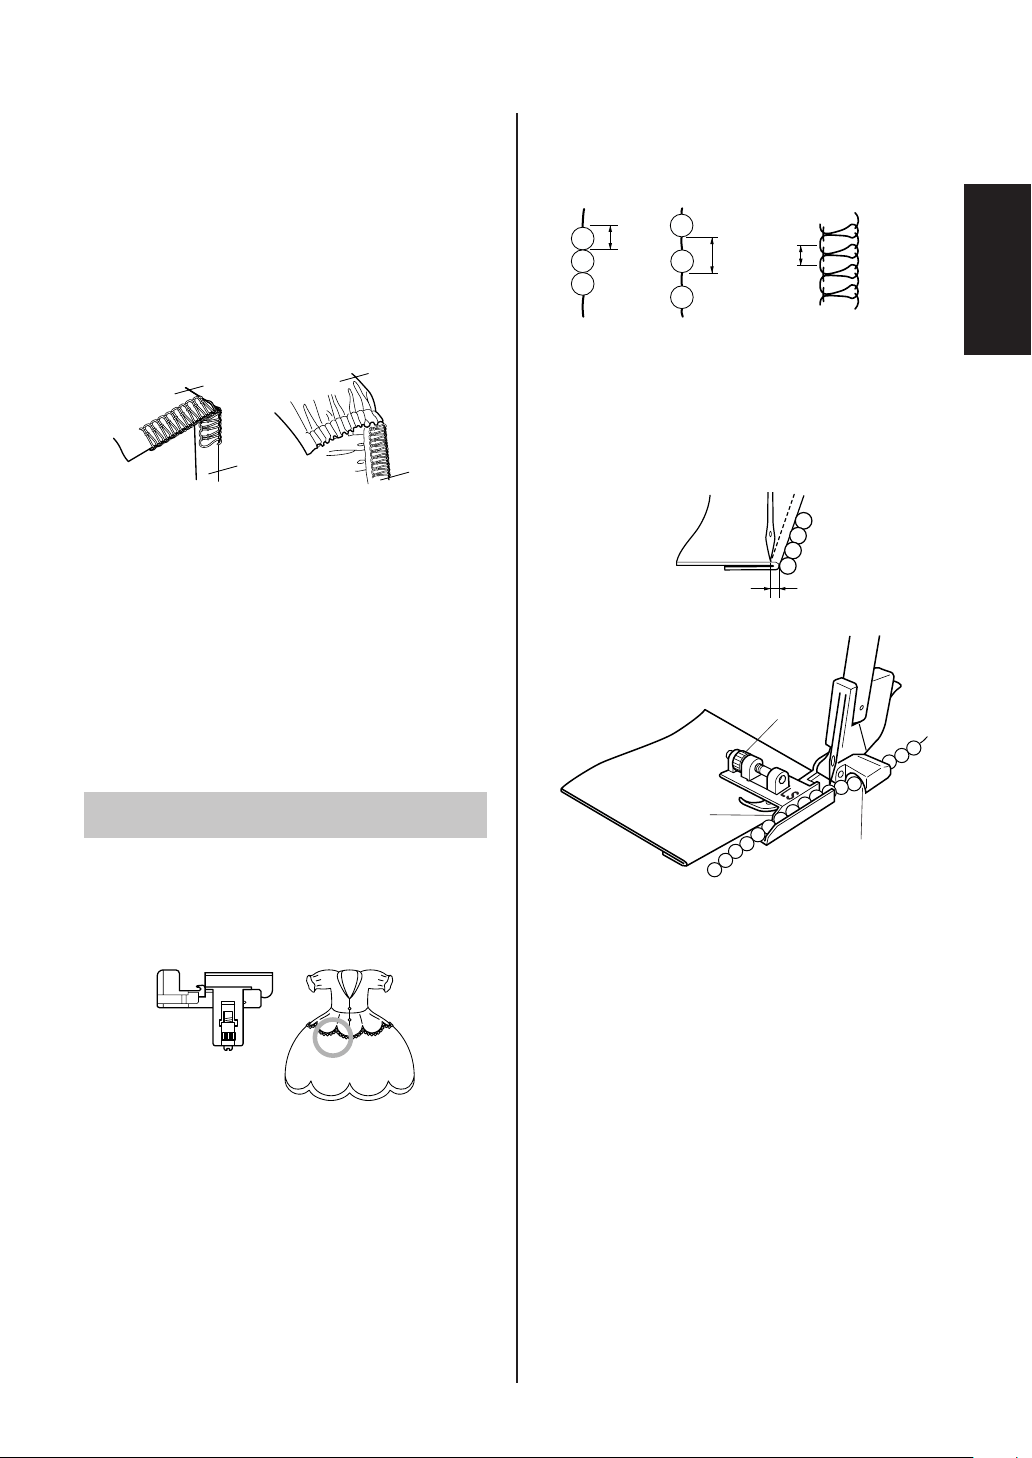
1. Adjust the stitch length according to the length
as <A> or <B>. For example, 4mm stitch
length means 4mm for <A> or <B>.
<A>
<B>
<A>
<B>
2. Adjust stitch width 3 to 5mm.
3. Adjust thread tension as follows:
Needle thread: slightly decrease
Over looper thread: slightly decrease
Under looper thread: slightly increase
How to set fabric and pearl
1 ~ 1.5mm
1
2
3
1. Fold the fabric according to the line for pearl
fitting.
2. Place the fabric at needle dropping point
keeping the folded edge with guide 1.
3. Use the screw 2 and adjust the clearance
between folded edge needle so that it
becomes 1mm to 1.5mm.
4. Place the pearl through the guide just front of
guide tunnel 3.
Test sewing
1. Sew turning hand wheel by hand until the pearl
comes through the tunnel.
2. Sew at slow speed while guiding the pearl and
fabric by hand.
3. Tie both end of thread at the beginnig and end.
NOTE:
Thread tension is easy to loosen especially for small
size pearl. Retract movable stitch tongue for better
stitching.
Loading ...
Loading ...
Loading ...