
IMPORTANT SAFETY
INSTRUCTIONS
When using electrical appliances, especially when children are present, basic
safety precautions should always be followed, including the following:
READ ALL INSTRUCTIONS BEFORE USING.
DANGER
To reduce the risk of electric shock:
■ Do not reach for a trimmer that has fallen into water. Unplug immediately.
■ Do not use while bathing or in a shower.
■ Do not place or store trimmer where it can fall or be pulled into a tub or sink.
Do not place in or drop into water or other liquid.
■ Except when charging, always unplug this trimmer from the electrical outlet
immediately after using.
■ Unplug this trimmer before cleaning.
WARNING
To reduce the risk of burns, fire, electric shock or injury to persons:
■ Do not crush, disassemble, expose to excessive heat or incinerate the appliance.
■ Your trimmer should never be left unattended when plugged in, except when
charging your rechargeable trimmer.
■ Close supervision is necessary when this trimmer is used by, on, or near children
or persons with certain disabilities.
■ Use this trimmer only for its intended use as described in this manual. Do not
use attachments not recommended by the manufacturer.
■ Keep the cord away from heated surfaces.
■ Never operate this trimmer if it has a damaged cord or if it is not working
properly, if it has been dropped or damaged, or dropped into water.
■ Never drop or insert any object into any opening.
■ Do not use outdoors or operate where aerosol (spray) products are being used or
where oxygen is being administered.
■ Do not use this trimmer with a damaged or broken cutting unit, as facial injury
may occur.
■ Always attach plug to trimmer, then adapter to outlet. To disconnect, turn all
controls to OFF, then remove adapter from outlet, then detach power cord from
the trimmer for storage.
■ Always store your trimmer and adapter in a moisture-free area. Make sure the
cord is disconnected from the trimmer.
■ Keep trimmer out of extreme heat and cold. Product must be stored at 0º F to 120º F.
■ Dispose of used batteries properly. Do not incinerate. Batteries may explode if
overheated. Do not wrap in metal or aluminum foil. Wrap in newspaper before
discarding. It is suggested that you contact local town/city officials to determine
proper battery redemption site(s) in your area.
■ For household use only.
SAVE THESE INSTRUCTIONS
KEEP AWAY FROM CHILDREN
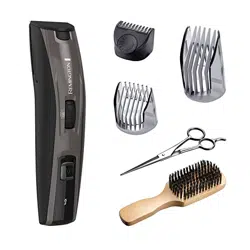
Product Features
Before Using
1. On/Off Switch
2. Adjustable Zoom Wheel
3. Length position indicator
4. Charging indicator
5. Beard brush
6. Scissors
7. Stubble comb (1-5mm)
8. Short length adjustable comb (1.5-
18mm)
9. XL adjustable comb (20-35mm)
10. Adaptor (not shown)
11. Pop-up trimmer
Feature Checklist
Operating Your Trimmer
Operating Your Trimmer
Register Your New Product Today!
By registering your new Remington
®
product, you will receive these important benefits:
Proof of Ownership • Product Protection • Product Registration • Special Offers
Register online at: RemingtonProducts.com
Beard Kit Trimmer
Use and Care Guide
MB4045
8
9
5
6
1
2
4
3
11
7
CHARGING
• Before using your trimmer for the first time, fully charge the unit for 4 hours.
• Ensure the product is switched off.
• Connect the adaptor to the product and then to the power outlet.
CHARGE LEVEL INDICATORS
Charge Level Indicator
Charging Orange LED will show
Fully charged Orange LED will turn off
• Typical charging will take no more than 4 hours.
• Run time from fully charged is up to 120 minutes.
Note: To preserve the life of your batteries, let them run out every 6 months then
fully charge.
WARNING: Do not charge the trimmer in the shower or near water.
Cordless use – when the product is switched on and fully charged it can be used
in cordless mode for up to 120 minutes.
• Switch the product on by sliding up the on/off switch.
• Always comb your beard or moustache with a fine comb or brush before you
start trimming.
• If you wish to trim your beard hair between 1.5–18mm – attach the short
length adjustable comb.
• For maintaining and trimming longer beard length between 20–35mm attach
the XL adjustable comb.
• To attach a comb, first ensure the adjustable zoom wheel is set to 1. Then
slide on the desired comb so that the comb rails align into the slots found at
the top of the trimmer head.
• Select the comb length by rotating the zoom wheel upwards to increase the
length and downwards to decrease the length. Please see the table below for
the different length increments.
Setting Hair Trimming Length with
Short Length Adjustable
Comb Attached
1 1.5mm (Grade 0)
2 2.5mm (Grade 1)
3 4mm
4 5.5mm (Grade 2)
5 7mm
6 9mm (Grade 3)
7 11mm (Grade 4)
8 14mm (Grade 5)
9 18mm (Grade 6)
Setting Hair Trimming Length with XL
Adjustable Comb Attached
1 20mm
2 21mm
3 22mm (Grade 7)
4 23.5mm
5 25.5mm (Grade 8)
6 27.5mm
7 29.5mm
8 32mm
9 35mm
• To remove the comb, with the adjustable zoom wheel set to 1, pull the comb
off the beard trimmer.
• For a more detailed, precision stubble look, attached the adjustable stubble
comb which can trim hair between 1 to 5mm. The cutting lengths increase in
0.5 increments.
Please note that the adjustable zoom wheel does not increase the length settings
on the stubble comb. To adjust these length settings, turn the dial found on
the back of the stubble comb which will then indicate the different trimming
lengths to choose from.
Note: The below instructions are recommended for those with or wanting to trim
beard hair between 1.5 to 18mm in length.
TO THIN AND TAPER THE BEARD/MOUSTACHE
• Turn the unit on.
• Place the flat top of the trimmer comb against the skin.
• Slowly slide the trimmer through the hair. Repeat from different directions as
necessary.
• If hair builds up in the trimmer comb during the trimming process, switch the
unit off, pull off the comb and brush off.
DETAILING
• To create sharp lines around your beard, remove adjustable comb from
trimmer, then press the pop-up trimmer release button.
• Start with the edge of the beard/moustache line and gently lower the trimmer
blade onto your skin. Use motions towards the edge of the beard/moustache line to
trim to the desired locations in the facial area and away from beard in neck area.
TRIMMING AND STYLING LONGER BEARDS
• To take out volume from your beard or if you want to take down the length
significantly, select your desired length setting on the XL comb (please see the table
for trimming length settings). Place the flat top of the trimmer comb against the skin.
Slowly slide through the hair. Repeat from different directions as necessary.
• If hair builds up in the trimmer comb during the trimming process, switch the
unit off, pull off the comb and brush the hair off.
Operating Your Trimmer
Cleaning and Maintenance
Cleaning and Maintaining Your Trimmer
To ensure long lasting performance clean after each use.
• Ensure the appliance is switched off and unplugged from the power outlet.
• Always store the attachment guide comb on the trimmer blade.
• Do not use harsh or corrosive cleaners on the unit or blades.
• To clean the unit, wipe with a damp cloth and dry immediately.
• Wash the removable blade cartridge under a running tap to remove any hair clippings.
• We recommend that you add a couple of drops of oil to the blades every so often.
TROUBLESHOOTING
The trimmer does not work when turned on:
• Trimmer must be charged for a full 4 hours initially.
Trimmer cutters do not move:
• The cutting unit may be dirty and clogged. Clean the unit as directed in
Cleaning and Maintenance section.
Trimmer does not hold charge:
• Fully discharge battery by running trimmer until it stops; then follow
recharging instructions (see section on "Operating Your Trimmer").
WarrantyBattery Disposal Performance Guarantee
HOW TO CREATE A TAPERING EFFECT ON YOUR BEARD
• A taper effect is created when the length of your beard gradually increases
starting shorter at the sideburns and gradually increasing in length as it
reaches your chin.
1. Adjust the comb to your preferred length.
2. Actual cutting lengths as they correspond to the numbers indicated on the
zoom wheel for each attachment comb respectively, can be seen in the
table. You will need to use either the short length adjustable comb or the XL
adjustable comb depending on length you require. If you don’t know, always
start with the longest length and decrease the length as needed to achieve
your desired look.
3. Beard hairs tend to lie down on your face, with the root located above.
Therefore, you will need to use a comb or brush to lift up the hair to help identify
where the hair is actually growing from (the root).
4. When creating a tapered look, start trimming your beard at the top, at about
the middle of your ear, and work your way downward, increasing the length
accordingly as you go. Don’t start trimming too low, or you will be taking away
hairs that support those above them which contribute to your beard’s mass and
help to achieve the tapering effect.
TRIMMING THE NAPE OF YOUR NECK
• You will need a hand mirror for this operation if performing it alone.
• Use your fingers to lift the hair at the base of your head up off the neck. Your
index finger should be covering the roots of the hairs you are lifting to prevent
accidental removal by trimmer.
• Using your other hand, hold the trimmer to the base of your neck with the
cutting unit facing up, and move the trimmer up the length of the neck until it
touches your finger covering the hair roots at the base of your head.
• Be sure to move the unit slowly when performing this operation and to keep
the hair roots at the base of your head out of the way of the trimmer.
Battery Disposal
The MB4045 contains a lithium-ion battery. To ensure proper disposal of the
product, please refer to the battery removal instructions below.
When your rechargeable trimmer reaches the end of the its useful life, the
Lithium-Ion battery must be removed from the product and be recycled or dis-
posed of properly in accordance with your state and local requirements. If this is
not required by law, you may elect to dispose of the product with batteries.
CAUTION! Do not put in the re or mutilate your batteries when disposing as they
may burst and release toxic materials. Do no short circuit as it may cause burns.
Dispose of properly in accordance with your local and state requirements.
To Remove the Rechargeable Battery:
1. Make sure the appliance is unplugged.
2. Remove the blade cartridge from trimmer.
3. Pry the decorative panel off of top housing to expose the 2 top screws.
Start at the bottom and work around the edges until the panel can be
removed.
4. Remove the 2 top screws located toward the head end of the trimmer.
5. Remove the remaining 2 bottom screws from the other side of the trimmer
located toward the bottom end.
6. Pry the two halves of the housing apart from one another to expose the
internals.
7. Remove the 6 visible screws from the internals. There is one on each side of
the zoom wheel and 4 in the top of the circuit board.
8. Pry out the circuit board to expose the battery underneath it.
9. Cut the wires attached to the battery.
10. Remove the battery from the device and dispose of it properly.
U.S. and Canadian residents: To order accessories call 800-392-6544, visit
RemingtonProducts.com, or visit your local retailer.
Limited Two-Year Warranty
Spectrum Brands, Inc. warrants this product against any defects that are due
to faulty material or workmanship for a two-year period from the original date
of consumer purchase. This warranty does not include damage to the product
resulting from accident or misuse.
If the product should become defective within the warranty period, we will
replace it free of charge. Return your product and sales receipt with your name,
address and day time phone number to: Remington Returns Center, 507 Stokely
Dr., P.O. Box 1, Deforest, WI 53532. For more information call 800-736-4648 in the
U.S. and Canada or visit RemingtonProducts.com.
KEEP ORIGINAL SALES RECEIPT AS PROOF OF PURCHASE FOR WARRANTY PURPOSES.
This warranty does not cover products damaged by the following:
■ Accident, misuse, abuse or alteration of the product
■ Servicing by unauthorized persons
■ Use with unauthorized accessories
■ Connecting it to incorrect current and voltage
■ Wrapping cord around appliance causing premature wear and breakage
■ Any other conditions beyond our control
No responsibility, obligations, or liability is assumed for the installation or
maintenance of this product.
SPECTRUM BRANDS, INC. SHALL NOT BE RESPONSIBLE FOR ANY INCIDENTAL,
SPECIAL OR CONSEQUENTIAL DAMAGES RESULTING FROM THE USE OF THIS
PRODUCT. ALL IMPLIED WARRANTIES, INCLUDING BUT NOT LIMITED TO IM PLIED
WARRANTIES OF FITNESS AND MERCHANTABILITY, ARE LIMITED IN DURATION
TO TWO YEARS FROM DATE OF ORIGINAL PURCHASE.
This warranty gives you specific legal rights and you may also have other rights
which vary from state to state or province to province. Some states do not allow
the exclusion or limitation of incidental, special or consequential damages.
Spectrum Brands, Inc. Money-back Offer
If within 30 days after you have purchased your Remington
®
branded product, you
are not satisfied and would like a refund, return it with the sales slip indicating
purchase price and date of purchase to the retailer from whom it was purchased.
Spectrum Brands, Inc. will reimburse all retailers who accept the product within
30 days from the date of purchase. If you have any questions concerning the
money-back guarantee, please call 800-736-4648 in the U.S. and Canada or visit
RemingtonProducts.com.
Remington Guarantees Satisfaction After 30 Days!
Remington 60-Day Money Back Guarantee*
If within 60 days after purchasing any Remington
®
product, you are
not completely satisfied and would like a refund, return it with the original
dated sales receipt directly to Remington and receive a full refund.** For
questions concerning the money-back guarantee, please call 800-736-4648
in the U.S. and Canada.
*Applies to U.S. and Canadian customers’ returns only.
**Terms and conditions apply.
Terms and Conditions
1. Refund will be in the form of a check issued in U.S. Dollars and will be provided
only if all Terms and Conditions are met.
2. The following items must be returned to Remington and postmarked no later
than 60 days after purchase of the Remington
®
branded product:
a. The Remington
®
product;
b. The original sales receipt indicating price and date purchased; and
c. The completed 60-day money back guarantee form located at
RemingtonProducts.com/60day.
3. In addition, Remington, in its discretion, must determine that the returned product
was used in accordance with the instruction booklet (included with the product
at the time of purchase).
4. Returns should be mailed prepaid (no collect returns accepted) to:
Remington 60-Day MBG
507 Stokely Drive, Box 1
DeForest, WI 53532
5. Refund does not include postage costs for the return of the product, but will
include applicable taxes paid by customer, if any.
6. No responsibility will be accepted for late, lost, stolen, misdirected or damaged
product.
7. Please allow 4-6 weeks to receive your refund by check.
Questions or comments: Call 800-736-4648 in the U.S. and Canada
or visit RemingtonProducts.com.
120 VAC 60 Hz
Dist. by: Spectrum Brands, Inc., Middleton, WI 53562
Dist. by: Spectrum Brands Canada Inc.
255 Longside Drive, Unit 101
Mississauga, ON L54 1L8
® Registered Trademark of Spectrum Brands, Inc.
© 2017 Spectrum Brands, Inc. 4/17 17525-00
Made in China.
T22-0003523-B
Contains a
listed adaptor
TIPS FOR BEST RESULTS
• Beard, moustache and sideburn hairs should be dry.
• Always brush your beard before beginning to trim, shape or style it.
• Avoid using lotions before using your trimmer.
• If you are trimming for the first time start with the maximum comb length setting.
ATTACHING AND REMOVING THE BLADE
• To remove the blade press the release button found at the top of the trimmer
where it meets the back of the blade head and push the blade cartridge
upwards and away from the trimmer.
• To attach the blade, snap in place until it clicks.

MESURES DE SÉCURITÉ
IMPORTANTES
Des mesures de sécurité élémentaires, dont les suivantes, s’imposent lors de
l’utilisation d’un appareil électrique, surtout en présence d’enfants :
LISEZ TOUTES LES DIRECTIVES AVANT
D’UTILISER CET APPAREIL.
DANGER
Afin de réduire le risque de choc électrique :
■ Ne tentez pas de repêcher une tondeuse tombée à l’eau. Débranchez-la
immédiatement.
■ N’utilisez pas cet appareil en prenant un bain ou une douche.
■ Évitez de déposer ou de ranger cet appareil près d’une baignoire ou d’un évier
dans lequel il pourrait tomber. Évitez de déposer et d’échapper cet appareil
dans l’eau ou tout autre liquide.
■ Sauf lorsque vous le rechargez, débranchez toujours cet appareil dès que vous
avez fini de l’utiliser.
■ Débranchez cet appareil avant de le nettoyer.
AVERTISSEMENT
Afin de réduire le risque de brûlure, d’incendie, de choc électrique ou de blessure :
■ Veillez à ne pas écraser, démonter, exposer à la chaleur excessive ni incinérer
cet appareil.
■ Ne laissez jamais la tondeuse sans surveillance lorsqu’elle est branchée, sauf
durant la recharge s’il s’agit d’un modèle rechargeable.
■ Surveillez étroitement les enfants ou les personnes ayant certains handicaps
qui sont à proximité de la tondeuse, qui s’en servent ou sur qui l’on s’en sert.
■ N’utilisez cet appareil que pour l’usage prévu dans ce livret. N’utilisez jamais
d’autres accessoires que ceux recommandés par le fabricant.
■ Tenez le cordon loin des surfaces chauffées.
■ N’utilisez jamais cette tondeuse si le cordon ou la fiche est endommagé, si
elle ne fonctionne pas correctement, si elle a été échappée ou endommagée
ou si elle est tombée dans l’eau.
■ Évitez d’échapper ou d’insérer des objets quelconques dans les ouvertures de
l’appareil.
■ N’utilisez pas cet appareil à l’extérieur ni là où l’on utilise des produits
aérosol ou administre de l’oxygène.
■ N’utilisez pas cet appareil si le dispositif de coupe est endommagé ou brisé,
car vous pourriez vous blesser au visage.
■ Fixez toujours d’abord la fiche à la tondeuse, puis l’adaptateur à la prise
de courant. Pour débrancher, placez toutes les commandes en position
ARRÊT, retirez l’adaptateur de la prise de courant puis retirez le cordon
d’alimentation de la tondeuse avant de ranger cette dernière.
■ Rangez toujours la tondeuse et son adaptateur à l’abri de l’humidité. Assurez-
vous que le cordon est débranché de la tondeuse pour le rangement.
■ Tenez la tondeuse à l’abri de la chaleur et du froid extrême. L’appareil doit
être conservé à une température se situant entre 17º et 48 ºC (0º et 120 ºF).
■ Jetez les piles usagées de manière adéquate. Ne les jetez pas au feu. Les
piles peuvent exploser si elles sont surchauffées. Ne les enveloppez pas
dans du métal ou du papier d’aluminium. Enveloppez-les plutôt dans du
papier journal avant de les jeter. On vous suggère de communiquer avec les
autorités locales pour connaître l’emplacement des sites de récupération des
piles de votre région.
■ Cet appareil est destiné à un usage domestique seulement.
Caractéristiques du produit
Avant de commencer
1. Interrupteur de mise en marche/arrêt
2. Molette de réglage de longueur
3. Indicateur de position de longueur
4. Voyant de recharge
5. Brosse à barbe
6. Ciseaux
7. Peigne à repousse (1 à 5 mm)
8. Peigne réglable pour poils courts
(1,5 à 18 mm)
9. Peigne réglable pour poils longs
(20 à 35 mm)
10. Adaptateur (non illustré)
11. Tondeuse escamotable
Liste de caractéristiques
Fonctionnement de la tondeuse
Fonctionnement de la tondeuse
Tondeuse à barde
Guide d’utilisation et
d’entretien
MB4045
8
9
5
6
1
2
4
3
11
7
RECHARGE
• Avant d’utiliser votre tondeuse pour la première fois, rechargez-la complètement
pendant 4 heures.
• Assurez-vous qu’elle est à l’arrêt.
• Branchez le fil de l’adaptateur dans la tondeuse puis l’adaptateur dans une prise
électrique.
INDICATEURS DE NIVEAU DE CHARGE
Niveau de charge Voyant
Pendant la recharge Voyant orange allumé
Recharge terminée Voyant orange éteint
• Une recharge complète normale ne prend pas plus de 4 heures.
• La durée d’autonomie lorsque la pile est entièrement rechargée est de 120 minutes.
Remarque : Pour préserver la durée de la pile, laissez-la se décharger entièrement
tous les six mois puis rechargez-la complètement.
MISE EN GARDE : Ne rechargez pas la tondeuse dans la douche ni près de l’eau.
Utilisation sans fil – Lorsque la tondeuse est complètement rechargée, elle peut
fonctionner sans fil pendant 120 minutes.
• Mettez la tondeuse en marche en faisant glisser l’interrupteur de mise en
marche/arrêt vers le haut.
• Peignez toujours votre barbe ou votre moustache avec un peigne fin ou une
brosse avant d’utiliser la tondeuse.
• Si vous souhaitez vous couper les poils de la barbe à une longueur entre 1,5 et
18 mm, fixez le peigne pour poils courts à la tondeuse.
• Si vous souhaitez garder les poils plus longs, soit entre 20 et 35 mm, fixez le
peigne pour poils longs à la tondeuse.
• Pour fixer un peigne à la tondeuse, assurez-vous d’abord que la molette est
réglée à la position 1. Puis glissez le peigne voulu sur la tondeuse en alignant les
rails latéraux sur le peigne avec les fentes sur la tête de la tondeuse.
• Sélectionnez la longueur du peigne en faisant tourner la molette vers le haut
pour augmenter la longueur ou vers le bas pour la diminuer. Veuillez consulter le
tableau ci-dessous pour connaître les différents réglages de longueur offerts.
Réglage Longueur de coupe avec le
peigne réglable pour poils
courts
1 1,5 mm (longueur 0)
2 2,5 mm (longueur 1)
3 4 mm
4 5,5 mm (longueur 2)
5 7 mm
6 9 mm (longueur 3)
7 11 mm (longueur 4)
8 14 mm (longueur 5)
9 18 mm (longueur 6)
Réglage Longueur de coupe avec le
peigne réglable pour poils
longs
1 20 mm
2 21 mm
3 22 mm (longueur 7)
4 23,5 mm
5 25,5 mm (longueur 8)
6 27,5 mm
7 29,5 mm
8 32 mm
9 35 mm
• Pour retirer un peigne, réglez la molette à la position 1 puis tirez sur le peigne.
• Pour obtenir un effet « repousse » plus précis, utilisez le peigne à repousse
permettant de couper les poils entre 1 et 5 mm. La longueur de coupe
augmente par cran de 0,5 mm.
Veuillez noter que la molette de réglage ne permet pas de modifier la longueur de
coupe du peigne à repousse. Pour modifier la longueur du peigne à repousse,
vous devez tourner le cadran situé à l’arrière du peigne qui indique les
différentes longueurs offertes.
Remarque : Les directives qui suivent s’adressent aux hommes qui souhaitent
avoir une barbe entre 1,5 et 18 mm de long.
POUR AMINCIR ET EFFILER LA BARBE/LA MOUSTACHE
• Mettez la tondeuse en marche.
• Posez le dessus plat du peigne contre la peau.
• Faites glisser lentement la tondeuse dans les cheveux. Répétez de différentes
directions au besoin.
• Si des poils s’accumulent dans le peigne pendant la coupe, arrêtez la tondeuse,
retirez le peigne et brossez-le.
POUR TAILLER AVEC PRÉCISION
• Pour délimiter la barbe avec précision, retirez le peigne réglable de la tondeuse et
appuyez sur le bouton de déverrouillage de la tondeuse escamotable.
• Commencez près du bord de la barbe ou de la moustache et posez doucement la
lame sur la peau. Amenez la tondeuse vers le bord de la barbe ou de la moustache
pour tailler jusqu’à l’endroit voulu dans le visage, et, dans le cou, partez du bord de
la barbe vers l’extérieur.
POUR TAILLER ET DÉCOUPER LES BARBES PLUS LONGUES
• Pour amincir la barbe ou si vous souhaitez la couper beaucoup plus court,
sélectionnez le réglage de longueur voulu sur le peigne pour poils longs (veuillez
consulter le tableau pour connaître les différents réglages offerts). Posez le dessus
plat du peigne contre la peau. Passez lentement le peigne dans la barbe. Répétez de
différentes directions au besoin.
• Si des poils s’accumulent dans le peigne pendant la coupe, arrêtez la tondeuse,
retirez le peigne et brossez-le.
Fonctionnement de la tondeuse
Nettoyage et entretien
Nettoyage et entretien de la tondeuse
Pour assurer le bon fonctionnement prolongé de la tondeuse, nettoyez-la après
chaque utilisation.
• Assurez-vous qu’elle est l’arrêt et débranchée de la prise de courant.
• Rangez-la toujours avec un peigne fixé sur la lame.
• N’utilisez pas de nettoyants forts ou corrosifs sur la tondeuse ni sur les dents de
la lame.
• Utilisez un linge humide pour nettoyer la tondeuse puis essuyez-la
immédiatement.
• Lavez l’assemblage de la lame amovible sous l’eau courante pour enlever tous les
poils coupés.
• Nous recommandons de mettre quelques gouttes d’huile sur la lame de temps à
autre.
DÉPANNAGE
La tondeuse ne fonctionne pas alors qu’elle est en position de marche :
• La tondeuse doit être rechargée pendant au moins 4 heures la première fois.
Les couteaux de la tondeuse ne bougent pas :
• Le dispositif de coupe peut être sale et bouché. Nettoyez la tondeuse tel
qu’indiqué dans la section Nettoyage et entretien.
La tondeuse ne retient pas sa charge :
• Déchargez complètement la pile en faisant fonctionner la tondeuse jusqu’à
ce qu’elle s’arrête; puis suivez les directives de recharge (consultez la section
Fonctionnement de la tondeuse).
GarantieÉlimination de la pile Garantie de rendement
POUR OBTENIR UN EFFET DÉGRADÉ DANS LA BARBE
• On obtient un effet dégradé lorsque la longueur de la barbe augmente
graduellement de courte au niveau des favoris à plus longue au niveau du
menton.
1. Réglez le peigne à la longueur voulue.
2. Consultez le tableau pour savoir à quelles longueurs de coupe les différents
réglages indiqués sur la molette correspondent. Vous devrez utiliser soit le
peigne pour poils courts soit le peigne pour poils longs selon le résultat désiré.
Si vous ne savez pas par quel réglage commencer, utilisez d’abord le réglage le
plus long et diminuez graduellement jusqu’à obtenir la longueur voulue.
3. Les poils de la barbe tendent à se coucher sur le visage, la racine située
au-dessus. Par conséquent, utilisez un peigne ou une brosse pour soulever
les poils que vous souhaitez couper et trouver d’où ils poussent réellement
(autrement dit, la racine).
4. Pour créer un effet dégradé, commencez à tailler à partir du haut, soit vers
le milieu de l’oreille, et descendez graduellement en augmentant la longueur
au fur et à mesure. Ne commencez pas à couper trop bas car vous risqueriez
de couper des poils qui soutiennent ceux qui se trouvent au-dessus et qui
contribuent au volume de la barbe et aident à créer le dégradé.
TAILLE DE LA NUQUE
• Il vous faudra un miroir si vous vous coupez vous-même les poils sur la nuque.
• Soulevez les cheveux à la base du cou avec les doigts. L’index devrait
couvrir la racine des cheveux que vous soulevez pour éviter de les couper
accidentellement.
• Avec l’autre main, tenez la tondeuse à la base du cou, le dispositif de coupe
tourné vers le haut, et glissez la tondeuse le long du cou jusqu’à ce qu’elle
touche le doigt qui couvre la racine des cheveux à la base du cou.
• Déplacez la tondeuse lentement et maintenez bien les cheveux à la base du cou
hors de portée de la tondeuse.
Élimination de la pile
La tondeuse modèle MB4045 contient une pile lithium-ion. Pour éliminer le produit
adéquatement, veuillez consulter les directives pour le retrait de la pile ci-dessous.
Lorsque la tondeuse rechargeable aura atteint la n de sa durée de vie utile, il
faudra en retirer la pile Li ion et recycler cette dernière ou la jeter de manière ap-
propriée, conformément aux exigences provinciales et régionales. Si la loi ne vous
y oblige pas, vous pouvez jeter la tondeuse avec la pile.
ATTENTION! Ne pas incinérer la pile ni l’endommager en la jetant car elle peut
exploser ou libérer des substances toxiques. Ne pas provoquer de court-circuit
sous peine de brûlures. Éliminer la pile de manière appropriée, conformément aux
exigences provinciales et régionales en vigueur.
Marche à suivre pour le retrait de la pile rechargeable :
1. Assurez-vous que la tondeuse est débranchée.
2. Retirez l’assemblage de lame de la tondeuse.
3. Détachez le panneau décoratif de la partie supérieure du boîtier pour exposer
les deux vis du haut. Pour ce faire, commencez par le bas puis remontez par
les côtés jusqu’à ce que le panneau se détache.
4. Retirez les deux vis du haut situées près de la tête de la tondeuse.
5. Retirez les deux vis qui restent et qui sont situées de l’autre côté de la
tondeuse, vers le bas.
6. Séparez les deux moitiés du boîtier pour exposer l’intérieur de la tondeuse.
7. Retirez les six vis visibles à l’intérieur. Il y en a une de chaque côté de la
molette et quatre au haut de la carte de circuits.
8. Sortez la carte de circuits pour exposer la pile en dessous.
9. Coupez les fils qui retiennent la pile.
10. Retirez la pile et éliminez-la de manière appropriée.
Résidents des É.-U. et du Canada: Pour commander des accessoires, composez
le 800-392-6544, visitez le site RemingtonProducts.com ou rendez-vous chez votre
détaillant local.
Garantie limitée de deux ans
Spectrum Brands, Inc. garantit ce produit contre toute défectuosité due à des
vices matériels et de fabrication pour une période de deux ans à compter de la
date d’achat initiale. La garantie ne couvre toutefois pas les dommages résultant
d’un accident ou d’un mauvais usage.
Si ce produit devait faire défaut au cours de la période de garantie, nous le rem-
placerons sans frais. Retournez votre produit accompagné du reçu de caisse avec
vos nom, adresse et numéro de téléphone de jour à : Remington Returns Center,
507 Stokely Dr., P.O. Box 1, DeForest, WI 53532. Pour obtenir de plus amples
renseignements, composez le 800-736-4648 aux É.-U. et du Canada ou visitez
RemingtonProducts.com.
CONSERVEZ LE REÇU DE CAISSE ORIGINAL COMME PREUVE D’ACHAT AUX FINS DE LA
GARANTIE.
Cette garantie ne couvre pas les produits endommagés par ce qui suit :
■ Accident, mésusage, usage abusif ou modification du produit
■ Réparation par des personnes non autorisées
■ Utilisation avec des accessoires non autorisés
■ Branchement de l’appareil dans une prise possédant une tension ou un courant
inadéquat
■ Enroulement du cordon autour de l’appareil entraînant l’usure prématurée et le
bris
■ Toute autre circonstance indépendante de notre volonté
Aucune responsabilité ni obligation n’est assumée pour l’installation et l’entretien
de ce produit.
SPECTRUM BRANDS, INC. DÉCLINE TOUTE RESPONSABILITÉ POUR LES
DOMMAGES INDIRECTS, PARTICULIERS OU CONSÉCUTIFS RÉSULTANT DE
L’UTILISATION DE CE PRODUIT. TOUTES LES GARANTIES IMPLICITES, Y COMPRIS
SANS TOUTEFOIS S’Y LIMITER LES GARANTIES DE QUALITÉ MARCHANDE ET
D’ADÉQUATION À UN USAGE PARTICULIER, SONT LIMITÉES À UNE PÉRIODE DE
DEUX ANS À COMPTER DE LA DATE D’ACHAT INITIALE.
La présente garantie vous confère des droits spécifiques, cependant vous pou-
vez avoir d’autres droits qui varient d’un État ou d’une province à l’autre. Par
exemple, certains États n’autorisent pas l’exclusion ni la limite des dommages
indirects, particuliers et consécutifs.
Garantie de remboursement de Spectrum Brands, Inc.
Si vous n’êtes pas satisfait et désirez obtenir un remboursement au cours des
30 jours qui suivent l’achat de ce produit de marque Remington
®
, retournez le
produit avec son reçu de caisse indiquant le prix et la date d’achat au détaillant
où vous l’avez acheté. Spectrum Brands, Inc. remboursera tous les détaillants qui
acceptent le produit dans les 30 jours suivant la date d’achat. Si vous avez des
questions concernant la présente garantie de remboursement, veuillez composer
le 800-736-4648 aux É.-U. et du Canada ou visitez RemingtonProducts.com.
Remington garantit votre satisfaction après 30 jours!
Garantie de remboursement de 60 jours de Remington*
Si au cours des 60 jours qui suivent l’achat de n’importe quel produit Remington
®
vous n’êtes pas totalement satisfait de votre achat et désirez un remboursement,
retournez le produit avec son reçu de caisse original indiquant la date d’achat
directement à Remington et vous serez remboursé en entier.** Si vous avez des
questions concernant la garantie de remboursement, veuillez téléphoner au
800-736-4648 aux É.-U. et du Canada.
*S’applique aux retours des clients aux É.-U. et au Canada seulement.
**Des conditions s’appliquent.
Modalités et conditions
1. Le remboursement se fera sous forme de chèque émis en dollars U.S. et ne sera
accordé que si toutes les conditions sont remplies.
2. Les articles suivants doivent être retournés à Remington et le colis doit être
daté d’au plus 60 jours après la date d’achat du rasoir ou de la tondeuse pour
homme de marque Remington
®
, le cachet de la poste faisant foi :
a. le produit Remington
®
;
b. le reçu de caisse original indiquant le prix et la date d’achat; et
c. le formulaire de garantie de remboursement de 60 jours
dûment rempli que vous trouverez sur notre site à l’adresse
RemingtonProducts.com/60day.
3. De plus, Remington, à son entière discrétion, doit déterminer que le produit
retourné a été utilisé conformément au guide d’utilisation (compris avec le
produit au moment de l’achat).
4. Les retours doivent être postés port payé (aucun retour port dû ne sera accepté)
à l’adresse suivante :
Remington 60-Day MBG
507 Stokely Drive, Box 1
DeForest, WI 53532
120 V c.a., 60 Hz
Dist. par : Spectrum Brands, Inc., Middleton, WI 53562
Dist. par : Spectrum Brands Canada Inc.
255 Longside Drive, Unit 101
Mississauga, ON L54 1L8
® Marque déposée de Spectrum Brands, Inc.
© 2017 Spectrum Brands, Inc. 4/17 17525-00
Fabriqué en Chine.
T22-0003523-B
Contient un
adaptateur
homologué
CONSEILS POUR DES RÉSULTATS OPTIMAUX
• La barbe, la moustache et les favoris doivent être secs.
• Brossez-vous toujours la barbe avant de commencer à la tailler.
• Évitez d’appliquer une lotion avant d’utiliser la tondeuse.
• Si c’est la première fois que vous utilisez la tondeuse, commencez avec le
réglage de longueur des poils le plus long.
POSE ET RETRAIT DE LA LAME
• Pour retirer la lame, appuyez sur le bouton de dégagement situé au haut de la
tondeuse où elle rencontre l’arrière de la lame et poussez sur l’assemblage de la
lame vers le haut et l’extérieur.
• Pour fixer la lame, appuyez dessus jusqu’à ce que vous entendiez un « clic ».
Enregistrez votre nouveau produit dès aujourd’hui!
En enregistrant votre nouveau produit Remington® vous profiterez des avantages importants que voici:
• Preuve de propriété • Protection du produit • Enregistrement du produit • Offres spéciales
Enregistrez votre produit en ligne à l’adresse : RemingtonProducts.com
CONSERVEZ CES
DIRECTIVES
TENIR HORS DE LA PORTÉE DES ENFANTS
5. Le remboursement ne couvre pas les frais de port pour le retour du produit mais
comprendra les taxes applicables payées par le consommateur, le cas échéant.
6. Aucune responsabilité ne sera assumée pour les produits en retard, perdus,
volés, postés à la mauvaise adresse ou endommagés.
7. Veuillez prévoir de 4 à 6 semaines avant de recevoir votre chèque de
remboursement.
Questions ou commentaires : Composez le 800-736-4648 aux É.-U. et du Canada,
ou encore visitez RemingtonProducts.com.